@dropins/mcp 0.1.0
This diff represents the content of publicly available package versions that have been released to one of the supported registries. The information contained in this diff is provided for informational purposes only and reflects changes between package versions as they appear in their respective public registries.
- package/LICENSE.md +127 -0
- package/README.md +314 -0
- package/dist/common/project-reader.d.ts +55 -0
- package/dist/common/project-reader.js +173 -0
- package/dist/common/registry-loader.d.ts +101 -0
- package/dist/common/registry-loader.js +386 -0
- package/dist/common/response-handling.d.ts +12 -0
- package/dist/common/response-handling.js +21 -0
- package/dist/common/sanitize.d.ts +8 -0
- package/dist/common/sanitize.js +45 -0
- package/dist/common/synonyms.d.ts +9 -0
- package/dist/common/synonyms.js +127 -0
- package/dist/common/telemetry.d.ts +14 -0
- package/dist/common/telemetry.js +54 -0
- package/dist/common/types.d.ts +308 -0
- package/dist/common/types.js +1 -0
- package/dist/common/version.d.ts +2 -0
- package/dist/common/version.js +14 -0
- package/dist/index.d.ts +2 -0
- package/dist/index.js +136 -0
- package/dist/operations/analyze-project.d.ts +13 -0
- package/dist/operations/analyze-project.js +125 -0
- package/dist/operations/check-block-health.d.ts +19 -0
- package/dist/operations/check-block-health.js +1149 -0
- package/dist/operations/check-config.d.ts +13 -0
- package/dist/operations/check-config.js +228 -0
- package/dist/operations/explain-event-flow.d.ts +16 -0
- package/dist/operations/explain-event-flow.js +218 -0
- package/dist/operations/get-upgrade-diff.d.ts +13 -0
- package/dist/operations/get-upgrade-diff.js +144 -0
- package/dist/operations/list-api-functions.d.ts +13 -0
- package/dist/operations/list-api-functions.js +53 -0
- package/dist/operations/list-containers.d.ts +13 -0
- package/dist/operations/list-containers.js +44 -0
- package/dist/operations/list-design-tokens.d.ts +13 -0
- package/dist/operations/list-design-tokens.js +47 -0
- package/dist/operations/list-events.d.ts +16 -0
- package/dist/operations/list-events.js +39 -0
- package/dist/operations/list-graphql-queries.d.ts +19 -0
- package/dist/operations/list-graphql-queries.js +84 -0
- package/dist/operations/list-i18n-keys.d.ts +19 -0
- package/dist/operations/list-i18n-keys.js +105 -0
- package/dist/operations/list-models.d.ts +16 -0
- package/dist/operations/list-models.js +80 -0
- package/dist/operations/list-slots.d.ts +16 -0
- package/dist/operations/list-slots.js +81 -0
- package/dist/operations/scaffold-block.d.ts +31 -0
- package/dist/operations/scaffold-block.js +331 -0
- package/dist/operations/scaffold-extension.d.ts +28 -0
- package/dist/operations/scaffold-extension.js +346 -0
- package/dist/operations/scaffold-slot.d.ts +22 -0
- package/dist/operations/scaffold-slot.js +189 -0
- package/dist/operations/search-commerce-docs.d.ts +16 -0
- package/dist/operations/search-commerce-docs.js +101 -0
- package/dist/operations/search-docs.d.ts +23 -0
- package/dist/operations/search-docs.js +298 -0
- package/dist/operations/suggest-event-handler.d.ts +16 -0
- package/dist/operations/suggest-event-handler.js +175 -0
- package/dist/operations/suggest-slot-implementation.d.ts +19 -0
- package/dist/operations/suggest-slot-implementation.js +183 -0
- package/dist/registry/api-functions.json +3045 -0
- package/dist/registry/block-patterns.json +78 -0
- package/dist/registry/containers.json +2003 -0
- package/dist/registry/design-tokens.json +577 -0
- package/dist/registry/docs/boilerplate.json +55 -0
- package/dist/registry/docs/dropins-all.json +97 -0
- package/dist/registry/docs/dropins-b2b.json +607 -0
- package/dist/registry/docs/dropins-cart.json +163 -0
- package/dist/registry/docs/dropins-checkout.json +193 -0
- package/dist/registry/docs/dropins-order.json +139 -0
- package/dist/registry/docs/dropins-payment-services.json +73 -0
- package/dist/registry/docs/dropins-personalization.json +67 -0
- package/dist/registry/docs/dropins-product-details.json +139 -0
- package/dist/registry/docs/dropins-product-discovery.json +85 -0
- package/dist/registry/docs/dropins-recommendations.json +67 -0
- package/dist/registry/docs/dropins-user-account.json +121 -0
- package/dist/registry/docs/dropins-user-auth.json +103 -0
- package/dist/registry/docs/dropins-wishlist.json +85 -0
- package/dist/registry/docs/get-started.json +85 -0
- package/dist/registry/docs/how-tos.json +19 -0
- package/dist/registry/docs/index.json +139 -0
- package/dist/registry/docs/licensing.json +19 -0
- package/dist/registry/docs/merchants.json +523 -0
- package/dist/registry/docs/resources.json +13 -0
- package/dist/registry/docs/sdk.json +139 -0
- package/dist/registry/docs/setup.json +145 -0
- package/dist/registry/docs/troubleshooting.json +19 -0
- package/dist/registry/events.json +2200 -0
- package/dist/registry/examples/index.json +19 -0
- package/dist/registry/examples/storefront-checkout.json +377 -0
- package/dist/registry/examples/storefront-quote-management.json +49 -0
- package/dist/registry/extensions.json +272 -0
- package/dist/registry/graphql.json +3469 -0
- package/dist/registry/i18n.json +1873 -0
- package/dist/registry/models.json +1001 -0
- package/dist/registry/sdk.json +2357 -0
- package/dist/registry/slots.json +2270 -0
- package/dist/registry/tools-components.json +595 -0
- package/dist/resources/guides.d.ts +7 -0
- package/dist/resources/guides.js +625 -0
- package/dist/resources/handlers.d.ts +31 -0
- package/dist/resources/handlers.js +322 -0
- package/package.json +47 -0
|
@@ -0,0 +1,145 @@
|
|
|
1
|
+
{
|
|
2
|
+
"section": "setup",
|
|
3
|
+
"label": "Storefront Setup",
|
|
4
|
+
"pageCount": 23,
|
|
5
|
+
"pages": [
|
|
6
|
+
{
|
|
7
|
+
"path": "setup",
|
|
8
|
+
"title": "Overview",
|
|
9
|
+
"description": "Learn about Adobe Commerce on Edge Delivery Services project requirements, data validation, drop-in components, and Luma Bridge.",
|
|
10
|
+
"content": "Before starting any Adobe Commerce on Edge Delivery Services project, you must conduct a setup phase to scope the project and ensure that there are no major roadblocks or risks.\n\n## Big picture\n\nIn the [create your storefront](https://experienceleague.adobe.com/developer/commerce/storefront/get-started/) tutorial, you learned how to quickly create a new project based on the . The boilerplate provides a starter storefront that uses a pre-configured Adobe Commerce environment.\n\nThe next step is to plan, build, optimize, and launch a production-ready storefront connected to your own Adobe Commerce instance and storefront services. Here's an overview of the process:\n\n<Diagram caption=\"Storefront project planning and delivery process.\">\n \n</Diagram>\n\n<Callouts>\n\n1. **Discovery**: Understand the requirements and goals of the project.\n1. **Setup**: Configure the project environment and tools.\n1. **Analytics**: Instrument the storefront to collect user interaction events.\n1. **SEO**: Optimize the storefront for search engines and marketing campaigns.\n1. **Drop-in components**: Develop and integrate drop-in components to enhance the storefront experience.\n1. **Launch**: Deploy the storefront to a production environment.\n\n</Callouts>\n\n## Project scope\n\nThe discovery phase is important because Adobe Commerce is a highly customizable platform with a large third-party extension ecosystem. Migrating an Adobe Commerce storefront to Edge Delivery Services is similar to migrating to a headless storefront (like ).\n\n:::note[Important]\nThe key requirement for a headless storefront implementation is that all required data is provided by APIs.\n:::\n\nSuccessfully building a storefront requires a well-defined plan and a phased approach. Here are some key steps to consider:\n\n\n### Phased launch\n\nFast return on investment (ROI) and learnings:\n\n- Break down project scope into small milestones\n- Small milestones result in faster time-to-value (TTV), learnings, and higher quality\n- Define a rollout _and_ rollback strategy for each milestone (for example, split traffic)\n\nAdobe recommends the following launch phases:\n\n- Homepage and content pages with high-acquisition traffic that benefit from SEO improvement\n- Catalog pages (PDP and PLP) with high-conversion traffic that benefit from performance improvements\n- Checkout and account pages with high-retention traffic that benefit from personalization\n\n:::tip\nInstead of launching all features at once, start with a fresh Commerce project, launch with the minimum viable feature set, and add additional features as needed.\n\nAvoid introducing any potentially breaking changes to the existing project. For example, if you uninstall an extension required for an existing storefront when migrating to Edge Delivery Services, this could be a breaking change that prevents you from rolling back to the existing storefront if necessary.\n:::\n\n\n### Metrics\n\nDefine what success should look like in each phase:\n\n- Define measurable business and technical metrics that are impacted by launch\n- Establish a baseline for each metric before launch\n- Create a realistic forecast of what to expect over time\n\n\n### Validation\n\nValidate the impact of changes:\n\n- Validate launch impact using your baseline and forecast\n- Prioritize fixing issues you and your team can resolve quickly\n- Rollback if issues are unclear or if a fix will take too long\n- Improve and test code before the next launch\n\n\nAn iterative approach to launching your storefront will help you quickly identify and resolve issues, and improve the overall quality of your project. The following diagram illustrates the iterative approach:\n\n<Diagram caption=\"Iterative rollout process.\">\n \n</Diagram>\n\n### Use cases and requirements\n\nDocument your use cases and requirements and create a plan for how you will implement them. Adobe offers pre-built components that accelerate development (drop-in components).\n\nDrop-in components are reusable components that define the storefront shopping experience. They are framework agnostic and can be used in any context (Edge Delivery Services, AEM, Luma). However, this documentation focuses on the use of drop-in components in Edge Delivery Services projects using the . The drop-in component development roadmap is synchronized with Adobe Commerce APIs, so new API features are automatically available in drop-in components.\n\n:::note\nSee the [drop-in components overview](https://experienceleague.adobe.com/developer/commerce/storefront/dropins/all/introduction/) for a list of all available drop-in components.\n:::\n\nIf you see gaps in what the drop-in components support, Adobe can help with a plan to achieve your scenarios. For example:\n\n- Identify if drop-in components can solve your use cases and requirements\n- Identify what use cases are already supported, what is a gap, and what needs to be implemented differently from what is available out-of-the-box\n- Reach out to the Adobe team early to share your use cases and get recommendations on how to fulfill them: [commerce-storefront-compatibility@adobe.com](mailto:commerce-storefront-compatibility@adobe.com)\n\nThe Live Search Popover and PLP have two integration paths:\n\n- Using the out-of-the-box hosted option where Adobe hosts the JavaScript file\n\n - Automatic updates for fixes and small features\n - Small upgrades available for major or breaking features\n - Can change some styling\n\n- Using the customized option where Adobe provides a reference implementation for the components\n\n - Full control of customization and look and feel\n - You host the library and own the total cost of ownership\n\n### Extensions\n\nBefore starting the project, use the following list to create an inventory of the Adobe Commerce extensions that are actively being used. This will help you understand which extensions can be replaced by out-of-the-box Adobe Commerce functionality.\n\n- What extensions are currently in use?\n\n- What type of data do the extensions provide (for example, reviews)?\n\n- Is the data required on the frontend?\n- How do the extensions expose the data (for example, GraphQL, REST API)?\n\n- Do the extensions expose an API to access data (for example, a product labels module from )? If not, create an action item to expose the required data through an API. Options include:\n\n - Customize the Adobe Commerce Catalog Service exporter to export additional custom data to Catalog Service\n - Create a custom Adobe Commerce GraphQL query\n - Use \n\n- Are any of the extensions for delivery options (for example, shipping/BOPIS), payments, or tax providers? If you use third-party solutions, clarify if they expose APIs on the frontend and if they provide their own set of drop-in components for the frontend integration.\n\n## Existing storefronts\n\nThere are a couple of options for modernizing your existing storefront with Edge Delivery Services:\n\n- **Progressive implementation**: Rebuild selected parts of the commerce funnel on Edge Delivery Services and reuse the rest from your existing storefront.\n- **Full implementation**: Rebuild your entire storefront on Edge Delivery Services and retire your existing storefront.\n\nA progressive implementation enables you to unlock business value with Edge Delivery Services sooner, minimizing the risks associated with migration. You can start by implementing the home page only and reusing the rest of your existing storefront. The next step could be implementing catalog with product listing, search, and product details and reusing cart, checkout, and account from your existing storefront.\n\nThis approach comes with the cost of maintaining two storefronts in parallel, so before you choose, assess which approach is right for you. These are the key factors to consider:\n\n- **Business metrics to improve**:\n\n - What areas of your existing storefront drive business performance?\n - What are the challenges based on the site analytics that you see?\n\n- **Level of storefront customization**:\n\n - How many experiences are built with custom code on your storefront?\n - Do these experiences rely on custom business logic?\n\n- **Third-party extensions**:\n\n - How many third-party extensions are you using on your existing storefront?\n - Do you need to connect to third-party services?\n\n- **B2B**:\n - Are there any Adobe Commerce B2B modules enabled on your existing storefront?\n\nAdobe recommends the progressive implementation if any of the following are true:\n\n- The main business metrics are brand visibility in search engines, customer acquisition cost, and customer engagement.\n- The existing storefront is heavily customized in the areas of checkout and user account.\n- There are many third-party integrations in the existing storefront that affect transactional flow.\n- The existing storefront supports B2B use cases with Adobe Commerce modules.\n\nThe full implementation is a better option if any of the following are true:\n\n- Your business objectives include improving customer conversion and re-engagement.\n- The current checkout flow only relies on a few third-party integrations (for example, payments, shipping, taxes).\n- No Adobe Commerce B2B modules are enabled on the existing storefront.\n\n| Criteria | Progressive Implementation | Full Implementation |\n| ------------------------------- | ------------------------------------------------------------------------------------------------------------------------- | -------------------------------------------------------------------------------------------------- |\n| **Description** | Rebuild selected parts of the commerce funnel on Edge Delivery Services and reuse the rest from your existing storefront. | Rebuild your entire storefront on Edge Delivery Services and retire your existing storefront. |\n| **Business Metrics to Improve** | Brand visibility in search engines, customer acquisition cost, customer engagement. | Customer conversion, customer re-engagement. |\n| **Level of Customization** | Heavily customized in areas like checkout and user account. | Minimal customization, relies on a few third-party integrations (e.g., payments, shipping, taxes). |\n| **Third-Party Integrations** | Many third-party integrations affecting transactional flow. | Few third-party integrations. |\n| **B2B Modules** | Supports B2B use cases with Adobe Commerce modules. | No Adobe Commerce B2B modules enabled. |\n| **Project Scope** | Identify use cases for new and existing storefronts (e.g., catalog, product detail, cart, checkout, customer account). | Verify use cases are available through Adobe Commerce GraphQL APIs. |\n| **Third-Party Extensions** | Identify necessary extensions and their reliance on third-party services. | Identify necessary extensions and their reliance on third-party services. |\n| **Storefront Bridge Options** | Plan to connect existing storefront with the new one (e.g., using Luma Bridge). | Not applicable. |\n\n### Progressive implementation\n\nFor the progressive implementation, you'll need to look into the following:\n\n- **Project scope**: Identify which use cases the new storefront will handle and which ones the existing storefront will continue to manage, such as catalog, product detail, cart, checkout, and customer account.\n- **Third-party extensions**: Identify the list of extensions you will need on your new storefront and determine if they rely on integrating third-party services.\n- **Storefront bridge options**: Plan to connect the existing storefront with the new one. If you are using Adobe Commerce native storefront with Luma, you can use the Luma Bridge.\n\n### Full implementation\n\nFor the full implementation, the list of considerations is similar to the progressive implementation:\n\n- **Project scope**: Identify which use cases the new storefront will handle and verify that they are available through Adobe Commerce GraphQL APIs.\n- **Third-party extensions**: Identify the list of extensions you will need on your new storefront and determine if they rely on integrating third-party services."
|
|
11
|
+
},
|
|
12
|
+
{
|
|
13
|
+
"path": "setup/analytics/adobe-experience-platform",
|
|
14
|
+
"title": "Adobe Experience Platform",
|
|
15
|
+
"description": "Learn how to integrate your Adobe Commerce on Edge Delivery Services storefront project with Adobe Experience Platform to collect and analyze customer data.",
|
|
16
|
+
"content": "## Overview\n\nAdobe Experience Platform (AEP) is a comprehensive suite of services that enables you to collect, unify, and analyze customer data from multiple touchpoints. By integrating your Adobe Commerce storefront with AEP, you can gain deeper insights into customer behavior and create more personalized experiences.\n\n<Diagram caption=\"Adobe Experience Platform architecture showing data flow from various sources to unified customer profiles.\">\n \n</Diagram>\n\nThis integration allows your storefront to send commerce events (product views, purchases, cart actions) directly to the Experience Platform Edge Network, where they can be processed, stored, and used for real-time personalization and analytics.\n\nFor more information about Adobe Experience Platform capabilities, see the .\n\n## Prerequisites\n\nBefore configuring your integration with Adobe Experience Platform, ensure you have the following:\n\n### Required Identifiers\n\n* **IMS Organization ID**: Your Adobe organization identifier (format: `1234567890ABCDEF7F000101@AdobeOrg`)\n* **Datastream ID**: A configured datastream for routing data (format: `12345678-1234-1234-1234-123456789012`)\n\n### How to Find Your Identifiers\n\n**IMS Organization ID:**\nTo locate your IMS Organization ID, refer to the . You can typically find this in:\n\n- Adobe Admin Console\n- Developer Console\n- Any Adobe Experience Cloud application under Account Settings\n\n**Datastream ID:**\nYour datastream must be configured to route data to Adobe Experience Platform. For detailed instructions on creating and configuring a datastream, see the .\n\n## Configuration\n\nTo enable data flow from your storefront to the Experience Platform Edge Network, you need to add your AEP credentials to your storefront configuration.\n\n### Method 1: Configuration File (Recommended)\n\nAdd your AEP credentials to the `analytics` section of your :\n\n```json title=\"config.json\"\n{\n \"public\": {\n \"default\": {\n \"analytics\": {\n \"aep-ims-org-id\": \"1234567890ABCDEF7F000101@AdobeOrg\",\n \"aep-datastream-id\": \"12345678-1234-1234-1234-123456789012\",\n \"base-currency-code\": \"USD\",\n \"environment\": \"Testing\",\n ...\n }\n }\n }\n}\n```\n\nWhen both `aep-ims-org-id` and `aep-datastream-id` are configured, the storefront automatically:\n- Enables event forwarding to Adobe Experience Platform\n- Configures the AEP context with your credentials\n- Begins sending commerce events to the Experience Platform Edge Network\n\n### Method 2: Direct Script Configuration (Alternative)\n\nAlternatively, you can configure AEP directly in your `scripts/delayed.js` file:\n\n```js\nwindow.adobeDataLayer.push(\n {\n aepContext: {\n imsOrgId: '1234567890ABCDEF7F000101@AdobeOrg',\n datastreamId: '12345678-1234-1234-1234-123456789012'\n }\n },\n {\n eventForwardingContext: {\n aep: true\n }\n }\n);\n```\n\n> **Recommended approach**\n>\nUsing the configuration file (Method 1) is recommended because it:\n- Centralizes all configuration in one place\n- Allows environment-specific settings without code changes\n- Simplifies deployment and configuration management\n\n\n### Configuration Parameters\n\n| Parameter | Description | Required | Example |\n|-----------|-------------|----------|---------|\n| `aep-ims-org-id` | Your Adobe IMS Organization ID | Yes | `\"1234567890ABCDEF7F000101@AdobeOrg\"` |\n| `aep-datastream-id` | Your configured datastream ID for routing data to AEP | Yes | `\"12345678-1234-1234-1234-123456789012\"` |\n\n### What This Configuration Does\n\n- **`aep-ims-org-id`**: Identifies your Adobe organization for routing events to the correct Experience Platform environment\n- **`aep-datastream-id`**: Specifies the datastream configuration that determines how events are processed and where they are sent\n- **Automatic event forwarding**: When both values are present, the storefront automatically enables `eventForwardingContext.aep` and configures the `aepContext`\n\n## Storefront events\n\nOnce configured, your storefront will automatically send the following types of events to Adobe Experience Platform:\n\n- **Shopping events**: Cart updates and views (`addToCart`, `removeFromCart`, `shoppingCartView`), page views (`pageView`, `productPageView`), checkout (`startCheckout`, `completeCheckout`) and more.\n- **Customer profile events**: Customer login (`signIn`), customer logout (`signOut`), create account (`createAccount`), edit account (`editAccount`).\n- **Search events**: Search query (`searchRequestSent`) and search results (`searchResponseReceived`).\n\n> **Search events**\n>\nIf `LiveSearch` is not installed and configured, these search events are not sent.\n\n\nFor a complete list of storefront events, see the .\n\n> **Debugging events**\n>\nTo debug events in your storefront, use the AEP Debugger Events view. See the for instructions.\n\n\nThese events are processed in real-time and can be used for:\n- Customer journey analysis\n- Real-time personalization\n- Audience segmentation\n- Attribution modeling\n\n## Validation\n\n### Testing Your Integration\n\n\n### Check browser console\n\nAfter implementing the configuration, open your browser's developer tools and verify that:\n\n- No JavaScript errors appear\n- Adobe Data Layer events are being fired\n- Network requests to Adobe Experience Platform Edge Network are successful\n\n\n### Monitor data ingestion\n\nUse Adobe Experience Platform's monitoring tools to confirm data is being received:\n\n- Navigate to your AEP workspace\n- Check the **Monitoring** section for incoming data\n- Verify events appear in your configured datasets\n\n\n### Validate event structure\n\nEnsure events contain the expected commerce data fields and customer identifiers.\n\n### Troubleshooting\n\nIf data is not flowing as expected:\n\n- **Verify credentials**: Double-check your IMS Organization ID and Datastream ID\n- **Check datastream configuration**: Ensure your datastream is properly configured to route to Adobe Experience Platform\n- **Review browser network tab**: Look for failed requests to Adobe Experience Platform endpoints\n- **Validate Adobe Data Layer**: Confirm the Adobe Data Layer is properly initialized before your AEP configuration\n\nFor detailed validation procedures, refer to the .\n\n## Next Steps\n\nAfter successful integration:\n\n\n1. **Configure schemas**: Set up XDM schemas in Adobe Experience Platform to structure your commerce data\n1. **Create audiences**: Build customer segments based on commerce behavior\n1. **Set up Real-Time CDP**: Use collected data for personalization and marketing activation\n1. **Monitor performance**: Regularly review data quality and ingestion metrics\n\n\nFor a complete implementation example, see the and ."
|
|
17
|
+
},
|
|
18
|
+
{
|
|
19
|
+
"path": "setup/analytics/instrumentation",
|
|
20
|
+
"title": "Analytics instrumentation",
|
|
21
|
+
"description": "Configure the Adobe Client Data Layer and storefront events so Live Search, Product Recommendations, and related Commerce services receive behavioral data from your Edge Delivery Services storefront.",
|
|
22
|
+
"content": "## Overview\n\nAnalytics instrumentation is the process of wiring your storefront so user interaction data reaches Adobe Commerce services (for example, Live Search and Product Recommendations) in the shape those services expect. This topic covers the Adobe Client Data Layer (ACDL), `config.json` analytics settings, and validation—not Adobe Analytics reporting alone.\n\n### Why event collection matters\n\nUser interaction events collected through your storefront implementation enable:\n\n- **Adobe Sensei features**: Intelligent merchandising and search result optimization in Live Search\n- **Product recommendations**: Personalized product suggestions based on user behavior\n- **Performance analytics**: Detailed dashboards showing search performance, conversion rates, and user engagement\n- **Business intelligence**: Data-driven insights for inventory management and marketing strategies\n\n> **Required for Core Features**\n>\nLive Search and Product Recommendations events are not sent to AEP. For these features to function correctly, you must collect and send user interaction events to Adobe Commerce. Without proper instrumentation, these features will not work as expected.\n\n\n## Adobe Client Data Layer (ACDL)\n\nThe is a standardized JavaScript framework that simplifies data collection on your storefront. It provides a unified approach to capturing, storing, and transmitting user interaction data.\n\n### Key Capabilities\n\nThe ACDL enables your storefront to:\n\n- **Collect interaction data**: Track user behaviors like product views, searches, cart actions, and purchases\n- **Standardize data format**: Ensure consistent data structure across all events\n- **Manage event timing**: Control when and how data is sent to analytics services\n- **Support multiple integrations**: Work seamlessly with Adobe Experience Platform, Analytics, and other tools\n\n### Core API Functions\n\n\n| Function | Description | Use Case |\n|----------|-------------|----------|\n| `push()` | Add data or trigger events | Send product view, cart addition events |\n| `getState()` | Retrieve current data layer state | Access user session or cart information |\n| `addEventListener()` | Register event listeners | React to specific user actions |\n| `getHistory()` | View event history | Debug or audit data collection |\n\n\n> **Built-in Support**\n>\nThe Adobe Commerce boilerplate includes ACDL by default, so you don't need to install it separately. Drop-in components automatically send events to the data layer.\n\n\n## Configuration\n\n### Store Configuration\n\nTo enable proper event collection, you need to configure your store's analytics settings. This configuration tells the instrumentation system about your store's identity and structure. The specific values depend on your Commerce environment type.\n\nRefer to the for complete details on how to configure your store.\n\n### Required Configuration Parameters\n\nThe analytics configuration structure varies based on your Commerce backend type:\n\n\n**Adobe Commerce (PaaS) / ACCS:**\n\n\nFor Adobe Commerce PaaS and Adobe Commerce as a Cloud Service environments, use standard Commerce store and website identifiers from your Commerce environment. You can obtain these values using a `storeConfig` query.\n\n```json title=\"config.json\"\n{\n \"analytics\": {\n \"aep-ims-org-id\": \"{}\",\n \"aep-datastream-id\": \"{}\",\n \"base-currency-code\": \"{}\",\n \"environment\": \"{}\",\n \"environment-id\": \"{}\",\n \"store-code\": \"{}\",\n \"store-id\": {},\n \"store-name\": \"{}\",\n \"store-url\": \"{}\",\n \"store-view-code\": \"{}\",\n \"store-view-id\": {},\n \"store-view-name\": \"{}\",\n \"website-code\": \"{}\",\n \"website-id\": {},\n \"website-name\": \"{}\"\n }\n}\n```\n\n**Configuration Properties:**\n\n\n| Parameter | Description | Example | Required |\n|-----------|-------------|---------|----------|\n| `aep-ims-org-id` | Adobe IMS Organization ID for Experience Platform integration | `\"1234567890ABCDEF7F000101@AdobeOrg\"` | No (required for AEP) |\n| `aep-datastream-id` | Datastream ID for routing data to Adobe Experience Platform | `\"12345678-1234-1234-1234-123456789012\"` | No (required for AEP) |\n| `base-currency-code` | The base currency code for the store | `\"USD\"`, `\"EUR\"` | Yes |\n| `environment` | Environment type | `\"Testing\"`, `\"Production\"` | Yes |\n| `environment-id` | Unique identifier for the Commerce environment | `\"f38a0de0-764b-41fa-bd2c-5bc2f3c7b39a\"` | Yes |\n| `store-code` | Code identifier for the store from your Commerce environment | `\"main_website_store\"` | Yes |\n| `store-id` | Numeric ID for the store | `1`, `2` | Yes |\n| `store-name` | Display name for the store | `\"Main Website Store\"` | Yes |\n| `store-url` | Base URL for the store | `\"https://example.com\"` | Yes |\n| `store-view-code` | Code identifier for the store view | `\"default\"` | Yes |\n| `store-view-id` | Numeric ID for the store view | `1`, `2` | Yes |\n| `store-view-name` | Display name for the store view | `\"Default Store View\"` | Yes |\n| `website-code` | Code identifier for the website from your Commerce environment | `\"base\"` | Yes |\n| `website-id` | Numeric ID for the website | `1`, `2` | Yes |\n| `website-name` | Display name for the website | `\"Main Website\"` | Yes |\n\n\n> **Adobe Experience Platform integration**\n>\nTo enable automatic event forwarding to Adobe Experience Platform, include both `aep-ims-org-id` and `aep-datastream-id` in your analytics configuration. When both values are present, events will automatically be sent to AEP. See the [Adobe Experience Platform integration guide](https://experienceleague.adobe.com/developer/commerce/storefront/setup/analytics/adobe-experience-platform/) for detailed setup instructions.\n\n\n**Adobe Commerce Optimizer (ACO):**\n\n\nFor Adobe Commerce Optimizer environments, use a simplified analytics configuration structure:\n\n```json title=\"config.json\"\n{\n \"analytics\": {\n \"aep-ims-org-id\": \"{}\",\n \"aep-datastream-id\": \"{}\",\n \"base-currency-code\": \"{}\",\n \"environment\": \"{}\",\n \"environment-id\": \"{}\",\n \"locale\": \"{}\",\n \"store-url\": \"{}\",\n \"store-view-currency-code\": \"{}\",\n \"storefront-template\": \"{}\",\n \"view-id\": \"{}\"\n }\n}\n```\n\n**Configuration Properties:**\n\n\n| Parameter | Description | Example | Required |\n|-----------|-------------|---------|----------|\n| `aep-ims-org-id` | Adobe IMS Organization ID for Experience Platform integration | `\"1234567890ABCDEF7F000101@AdobeOrg\"` | No (required for AEP) |\n| `aep-datastream-id` | Datastream ID for routing data to Adobe Experience Platform | `\"12345678-1234-1234-1234-123456789012\"` | No (required for AEP) |\n| `base-currency-code` | The base currency code for the store | `\"USD\"`, `\"EUR\"` | Yes |\n| `environment` | Environment type | `\"Testing\"`, `\"Production\"` | Yes |\n| `environment-id` | The tenant ID for the Adobe Commerce Optimizer instance | `\"8idEEDDiVwjCEJAyB5kjfi\"` | Yes |\n| `locale` | Catalog source locale (language or geography) | `\"en-US\"` | Yes |\n| `store-url` | Base URL for the store | `\"https://example.com\"` | Yes |\n| `store-view-currency-code` | Currency code for the store view | `\"USD\"`, `\"EUR\"` | Yes |\n| `storefront-template` | Storefront template type | `\"Other\"` | No |\n| `view-id` | The unique ID assigned to the catalog view | `\"0d3eebf7-b5fb-4904-9ccf-f35fcc61862b\"` | Yes |\n\n\n> **environment**\n>\nThe `environment` parameter is used to determine the type of environment your store is running in. This is important because it affects how data is collected and processed. In your storefront configuration, set the value to the JSON string `\"Testing\"` while you develop and `\"Production\"` when you deploy.\n\n\n### Data Services Configuration\n\nFor the instrumentation to work with Adobe Commerce's data services, you'll need additional configuration parameters. The easiest way to obtain these is through the `magento/module-data-services-graphql` module, which exposes the necessary GraphQL endpoints.\n\n#### Required for Data Services\n\n- **Catalog Service credentials**: For product data synchronization\n- **SaaS environment ID**: Links your storefront to Adobe Commerce SaaS services\n- **API keys**: Authenticate with Adobe Commerce backend services\n\n## Event Collection and Validation\n\n### Automatic Event Collection\n\nThe Commerce boilerplate includes the , which automatically:\n\n\n1. **Listens for ACDL events**: Monitors the data layer for new events\n1. **Validates event structure**: Ensures events conform to required schemas\n1. **Batches and sends data**: Efficiently transmits events to Adobe Commerce\n1. **Handles errors**: Manages network issues and retry logic\n\n\n### Event Types Collected\n\nYour instrumentation will automatically track:\n\n- **Shopping events**: Cart updates and views (`addToCart`, `removeFromCart`, `shoppingCartView`), page views (`pageView`, `productPageView`), checkout (`startCheckout`, `completeCheckout`) and more.\n- **Customer profile events**: Customer login (`signIn`), customer logout (`signOut`), create account (`createAccount`), edit account (`editAccount`).\n- **Search events**: Search query (`searchRequestSent`) and search results (`searchResponseReceived`).\n\n> **Search events**\n>\nIf `LiveSearch` is not installed and configured, these search events are not sent.\n\n\n> **Debugging events**\n>\nTo debug events in your storefront, use the AEP Debugger Events view. See the for instructions.\n\n\n### Event Schema Compliance\n\nAll events must comply with the schema defined by the . This ensures compatibility with Adobe Commerce services and analytics tools.\n\n## Validation and Testing\n\nThe following sections describe how to validate and test your event implementation.\n\n### Automated Validation\n\nYou can validate your event implementation using the . This tool checks:\n\n- **Event structure**: Verifies required fields are present\n- **Data types**: Ensures values match expected formats\n- **Schema compliance**: Confirms events follow Storefront Event SDK specifications\n\n> **Performance Recommendation**\n>\nFor optimal performance, Adobe recommends writing events directly to ACDL rather than using the Storefront Events SDK wrapper. Drop-in components handle this automatically, but custom implementations should follow this practice.\n\n\n### Manual Testing Steps\n\n\n1. **Open browser developer tools** and navigate to the Console tab\n1. **Check for ACDL**: Verify `window.adobeDataLayer` exists and contains events\n1. **Monitor network requests**: Look for successful data transmission to Adobe services\n1. **Validate event data**: Inspect event payloads for completeness and accuracy\n1. **Confirm that event data is collected**: To confirm that data is being collected from your Commerce store, use the Adobe Experience Platform debugger to examine your Commerce site.\n\n\n> **Debugging events**\n>\nThe AEP Debugger provides an Events view that you can use to examine the events being sent from your Commerce site. See the for instructions.\n\n\n### Common Validation Issues\n\n- **Missing configuration**: Ensure all required analytics parameters are set\n- **Incorrect store IDs**: Verify store and website IDs match your Adobe Commerce setup\n- **Network connectivity**: Check that your storefront can reach Adobe Commerce endpoints\n- **Event timing**: Confirm events fire at the correct moments in the user journey\n\n## Troubleshooting Configuration Issues\n\n**Problem**: Events not being sent\n\n**Solution**:\n\n1. Verify your `config.json` contains all required analytics parameters\n1. Check that store IDs match your Adobe Commerce backend configuration\n1. Ensure the Storefront Events Collector is loading properly\n\n\n**Problem**: Invalid event data\n\n**Solution**:\n\n1. Use the ACDL validator to check event structure\n1. Verify custom events follow the Storefront Event SDK schema\n1. Check for JavaScript errors that might corrupt event data\n\n\n## Troubleshooting Integration Issues\n\n**Problem**: Live Search not receiving data\n\n**Solution**:\n\n1. Confirm your SaaS environment ID is correctly configured\n2. Verify API credentials are valid and have necessary permissions\n3. Check that product catalog is properly synchronized\n\n\nFor additional troubleshooting, refer to the .\n\n## Best Practices\n\n### Implementation Guidelines\n\n- **Test thoroughly**: Validate events in development before deploying to production\n- **Monitor regularly**: Set up alerts for data collection failures\n- **Follow schemas**: Always comply with Storefront Event SDK specifications\n- **Optimize performance**: Batch events when possible to reduce network overhead\n\n### Data Quality\n\n- **Validate user inputs**: Sanitize data before adding to events\n- **Handle edge cases**: Account for scenarios like network failures or missing data\n- **Maintain consistency**: Use standardized naming and formatting across all events\n- **Respect privacy**: Ensure compliance with data protection regulations"
|
|
23
|
+
},
|
|
24
|
+
{
|
|
25
|
+
"path": "setup/configuration",
|
|
26
|
+
"title": "Overview",
|
|
27
|
+
"description": "Learn the differences in implementing Edge Delivery Services projects for Adobe Commerce.",
|
|
28
|
+
"content": "Setting up an Adobe Commerce Storefront project is similar to other Edge Delivery Services projects. The main difference is that you need to connect your storefront to your Adobe Commerce backend.\n\n## Big picture\n\nLaunching a headless Adobe Commerce Storefront on Edge Delivery Services requires some basic setup before you do any custom development. Adobe recommends starting with the to simplify the process. The Commerce boilerplate GitHub repository is a fork of the . It includes additional code specifically for Commerce use cases.\n\n:::note[Note]\nAll implementation guidance in this documentation is based on the Commerce boilerplate.\n:::\n\nThe [Create your storefront tutorial](https://experienceleague.adobe.com/developer/commerce/storefront/get-started/) provides all the information that you need to quickly set up a starter project that uses a pre-configured sample Adobe Commerce backend. After you complete the tutorial, you can [connect](https://experienceleague.adobe.com/developer/commerce/storefront/setup/configuration/commerce-configuration/) your own Adobe Commerce backend to the project.\n\nHere's an overview of the process:\n\n<Diagram caption=\"Project setup process.\">\n \n</Diagram>\n\n<Callouts>\n\n1. **Storefront configuration**: Connect your Edge Delivery Services storefront to your Adobe Commerce backend.\n1. **CDN configuration**: Set up the content delivery network (CDN) to deliver your project.\n1. **Storefront compatibility package**: Install the Storefront Compatibility Package to enable drop-in component functionality.\n\n</Callouts>"
|
|
29
|
+
},
|
|
30
|
+
{
|
|
31
|
+
"path": "setup/configuration/aem-assets-configuration",
|
|
32
|
+
"title": "AEM Assets integration",
|
|
33
|
+
"description": "Learn how to connect your Edge Delivery Services storefront to your AEM Assets integration.",
|
|
34
|
+
"content": "The AEM Assets integration displays product images managed in AEM Assets instead of traditional Commerce-hosted images. The integration delivers enhanced image management capabilities: advanced optimization, cropping, and delivery through Adobe's Content Delivery Network (CDN). Learn more in the .\n\n## Boilerplate update required\n\nOnly one update is required: set `\"commerce-assets-enabled\": true` in your [Storefront configuration](https://experienceleague.adobe.com/developer/commerce/storefront/setup/configuration/commerce-configuration/).\n\n```json title=\"config.json\" ins={'+':4}\n{\n \"public\": {\n \"default\": {\n \"commerce-assets-enabled\": true\n }\n }\n}\n```\n\nThe Commerce drop-ins automatically detect the `commerce-assets-enabled` configuration and adjust image handling accordingly. See the . \n\n## Expected behaviors\n\nThe following table describes what happens in different configuration scenarios. The **Image source** refers to where you store your images: either \"Commerce\" for traditional Commerce-hosted images or \"AEM Assets\" for images managed in AEM Assets. The **`commerce-assets-enabled setting`** column indicates whether this configuration is set to `true` or `false`.\n\n\n## How it works in the boilerplate\n\nThe Commerce drop-ins automatically detect the `commerce-assets-enabled` configuration and adjust image handling accordingly. Here's how the boilerplate integrates this configuration:\n\n<Options label='Integration'>\n\n<Option>\n\n### Import the AEM Assets utility\n\nThe Commerce blocks in the boilerplate import the `tryRenderAemAssetsImage` helper from the drop-ins tools package.\n\n```javascript showLineNumbers=false \n\n```\n\n</Option>\n\n<Option>\n\n### Render images via drop-in slots\n\nThe Commerce blocks use the `tryRenderAemAssetsImage` function inside its drop-in image slots, as shown below.\n\n```javascript showLineNumbers=false {\"Container:\":4-5} {\"Container Image Slot:\":6-8} {\"AEM Assets integration:\":10-17}\n\nexport default async function decorate(block) {\n \n await dropinRenderer.render(DropinComponent, {\n\n slots: {\n DropinImageSlot: (ctx) => {\n const { data, defaultImageProps } = ctx;\n\n tryRenderAemAssetsImage(ctx, {\n imageProps: defaultImageProps,\n params: {\n width: defaultImageProps.width,\n height: defaultImageProps.height,\n },\n });\n },\n },\n })(block);\n}\n```\n</Option>\n\n</Options>\n\n## Real-world examples from the boilerplate\n\nBased on the Commerce blocks in the boilerplate, AEM Assets integration uses the `tryRenderAemAssetsImage` function from `@dropins/tools/lib/aem/assets.js` as follows.\n\n### Product List SearchResults container\n\n```javascript showLineNumbers=false {\"Container:\":2-3} {\"Container Image Slot:\":4-6} {\"AEM Assets integration:\":11-20}\n\nprovider.render(SearchResults, {\n\n slots: {\n ProductImage: (ctx) => {\n const { product, defaultImageProps } = ctx;\n const anchorWrapper = document.createElement('a');\n anchorWrapper.href = rootLink(`/products/$/$`);\n\n\n tryRenderAemAssetsImage(ctx, {\n alias: product.sku,\n imageProps: defaultImageProps,\n wrapper: anchorWrapper,\n params: {\n width: defaultImageProps.width,\n height: defaultImageProps.height,\n },\n });\n },\n },\n});\n```\n\n### Checkout OrderProductList container\n\n```javascript showLineNumbers=false {\"Container:\":2-3} {\"Container Image Slot:\":4-6} {\"AEM Assets integration:\":8-16}\n\nOrderProvider.render(OrderProductList, {\n\n slots: {\n CartSummaryItemImage: (ctx) => {\n const { data, defaultImageProps } = ctx;\n\n tryRenderAemAssetsImage(ctx, {\n alias: data.product.sku,\n imageProps: defaultImageProps,\n params: {\n width: defaultImageProps.width,\n height: defaultImageProps.height,\n },\n });\n },\n ...\n },\n})($orderProductList);\n```\n\n## Using drop-ins outside the boilerplate (optional)\n\nIf you use the boilerplate, AEM Assets works out of the box. Without the boilerplate, you need to implement the minimal config and slot usage below. See the [Commerce drop-ins overview](https://experienceleague.adobe.com/developer/commerce/storefront/dropins/all/introduction/) for how slots and initializers work.\n\nTo enable AEM Assets with standalone drop-ins, you'll need to implement the configuration system that drop-ins expect. See [Storefront configuration](https://experienceleague.adobe.com/developer/commerce/storefront/setup/configuration/commerce-configuration/) for full configuration details.\n\n### Minimal configuration\n\nSet `commerce-assets-enabled: true` in a `public.default` config (JSON or config service). Align endpoints/headers to your environment as needed.\n\n> **Reference implementation**\n>\nSee the for complete examples.\n\n\n### Minimal integration steps\n\n1. Install `@dropins/tools`.\n1. Add the `assets.js` file from the boilerplate to your project.\n1. Import `tryRenderAemAssetsImage` into your drop-in components.\n1. In each image slot, call `tryRenderAemAssetsImage(ctx, { alias: <sku>, imageProps, params: { width, height } })`. Fallback to Commerce-hosted images is automatic from functions in `assets.js`—no extra code is required.\n1. Use the product SKU (or your configured alias) for `alias` so the correct asset is matched in AEM.\n1. When linking images, pass a `wrapper` element (for example, an anchor) in the options.\n1. Set the `width`/`height` params to the slot’s intended render size (e.g., from `defaultImageProps`).\n1. For more details, see [Commerce drop-ins overview](https://experienceleague.adobe.com/developer/commerce/storefront/dropins/all/introduction/).\n\n**Minimal implementation results**: Uses AEM Assets when available; falls back to Commerce; applies correct CDN params automatically.\n\n> **AEM Assets API helpers**\n>\n\nOutside the boilerplate, use these helpers from `@dropins/tools/lib/aem/assets.js` to detect enablement, generate optimized URLs, and render slots:\n - `isAemAssetsEnabled()`\n - `getDefaultAemAssetsOptimizationParams()`\n - `isAemAssetsUrl(url)`\n - `generateAemAssetsOptimizedUrl(assetUrl, alias, params)`\n - `tryGenerateAemAssetsOptimizedUrl(assetUrl, alias, params)`\n - `makeAemAssetsImageSlot(config)`\n - `tryRenderAemAssetsImage(ctx, config)`\n\n\n## Troubleshooting\n\n### Images not displaying\n\nIf product images are not displaying correctly:\n\n1. **Check your configuration:** Ensure `commerce-assets-enabled` is set to `true` if you're using AEM Assets.\n2. **Verify image URLs:** AEM Assets images typically include specific URL patterns that indicate they're served from AEM.\n3. **Check browser console:** Look for 400 errors that might indicate incompatible optimization parameters.\n4. **Test with mixed sources:** Try with both AEM Assets and Commerce-hosted images to isolate the issue.\n5. **Confirm slot integration:** If not using the boilerplate, ensure each drop-in image slot calls `tryRenderAemAssetsImage` with a valid `alias` (SKU).\n6. **Validate size params:** Ensure `params.width`/`params.height` match the slot's intended render size (for example, from `defaultImageProps`).\n\n### Configuration not taking effect\n\n1. **Clear cache:** Ensure your configuration changes are not cached.\n2. **Check config location:** Verify your is properly formatted.\n3. **Validate JSON:** Use a JSON validator to ensure your configuration file is valid."
|
|
35
|
+
},
|
|
36
|
+
{
|
|
37
|
+
"path": "setup/configuration/aem-prerender",
|
|
38
|
+
"title": "AEM Commerce Prerender",
|
|
39
|
+
"description": "Learn how to set up the AEM Commerce Prerender app to serve complete product page HTML to search engines and AI systems before JavaScript runs.",
|
|
40
|
+
"content": "The AEM Commerce Prerender solution lets your Edge Delivery Services (Adobe's hosting and delivery infrastructure that turns authored documents into fast HTML pages served from servers close to the shopper. You push code to GitHub; Edge Delivery Services builds and publishes automatically.) Commerce Storefront serve complete product page HTML to search engines and AI crawlers _before_ JavaScript runs. This can improve SEO rankings and make your product catalog readable by large language models (LLMs) and other AI systems.\n\n## How it works\n\n\n1. Deploy the App Builder (Adobe's serverless platform for building and deploying cloud-native apps. The AEM Commerce Prerender app runs on App Builder — it polls your catalog on a schedule, generates product page HTML, and publishes it to Edge Delivery Services.) app first, because your storefront integration depends on the HTML it generates. The app runs in Adobe's cloud on a schedule, polling your product catalog and generating HTML for each product.\n\n1. The app publishes that HTML to Edge Delivery Services as overlay (A complete HTML file that Edge Delivery Services serves at a specific page URL before any JavaScript runs. The prerender app generates one HTML file per product and registers it with Edge Delivery Services, so crawlers and shoppers receive full page content instantly.) content, where it becomes part of the initial page HTML served to visitors.\n\n1. Your `product-details` block adds interactive features to the prerendered HTML using the product detail page (PDP) drop-in (NPM packages that provide core Commerce storefront features such as cart, checkout, product details, and account flows.).\n\n\n> **Prerequisite: Bring Your Own Markup**\n>\nThe prerender solution uses Edge Delivery Services' API to publish HTML content. The app generates one HTML file per product and publishes it as overlay content, so Edge Delivery Services serves complete product HTML at your product page URLs.\n\n\n## Why use prerender?\n\nBy default, Adobe Commerce on Edge Delivery Services renders product information with client-side JavaScript, which limits discoverability for search engines and AI systems that don't run JavaScript. Edge Delivery Services has no built-in server-side rendering, so the prerender solution is the closest equivalent. Prerendering generates complete HTML — including structured data — and publishes it via the Bring Your Own Markup (BYOM) API before any page is requested. Structured data is machine-readable product information embedded in the HTML, so search engines can read product details without running JavaScript.\n\n- **Enhanced SEO**: Complete HTML for search engines improves indexing and rankings.\n- **AI-readable catalog**: AI systems can read structured markup to understand and recommend your products.\n- **Content appears immediately**: Prerendered product content is visible while interactive drop-ins finish loading.\n- **Faster first load**: Pages start displaying content before JavaScript finishes running.\n- **Automated updates**: Monitors the product catalog and updates markup when products change.\n\n## Implementation roadmap\n\nTo implement the prerender solution, you'll work in two repositories. Follow these steps in order:\n\n<Diagram\n type=\"mermaid\"\n caption=\"Complete implementation workflow showing the step-by-step process for setting up prerendered product pages in your storefront.\"\n code={`%%{init: {'theme':'base', 'themeVariables': {'fontSize':'16px'}}}%%\nflowchart LR\n Start([<strong>Start Implementation]):::start\n\n Step1[\"<strong>1. Check Prerequisites\nVerify access, tools, and storefront requirements\"]:::step\n Step2[\"<strong>2. Understand the Architecture\nLearn how the two repositories work together\"]:::step\n Step3[\"<strong>3. Install & Deploy App Builder App\nRepository: aem-commerce-prerender\nClone, configure, and deploy to App Builder\"]:::repo1\n Step4[\"<strong>4. Integrate with Your Storefront\nRepository: Your Commerce Boilerplate\nModify the product-details block to use prerendered markup\"]:::repo2\n Step5[\"<strong>5. Customize (Optional)\nAdjust templates, schemas, and queries\"]:::optional\n\n End([<strong>✓ Implementation Complete]):::complete\n\n Start --> Step1\n Step1 --> Step2\n Step2 --> Step3\n Step3 --> Step4\n Step4 --> Step5\n Step5 --> End\n\n classDef start fill:#e3f2fd,stroke:#1976d2,stroke-width:3px,color:#000\n classDef step fill:#f5f5f5,stroke:#666,stroke-width:2px,color:#000\n classDef repo1 fill:#fff3e0,stroke:#f57c00,stroke-width:3px,color:#000\n classDef repo2 fill:#e8f5e9,stroke:#388e3c,stroke-width:3px,color:#000\n classDef optional fill:#fce4ec,stroke:#c2185b,stroke-width:2px,color:#000,stroke-dasharray: 5 5\n classDef complete fill:#c8e6c9,stroke:#2e7d32,stroke-width:3px,color:#000\n\n linkStyle default stroke-width:3px,stroke:#666\n`}\n/>\n\n## Prerequisites\n\nBefore implementing the prerender solution, verify you have:\n\n### Required access and permissions\n\n- **Adobe Developer Console access** with \"Developer\" role for your organization\n- **App Builder workspace** (Stage and Production workspaces recommended)\n- **AEM Admin API access** for your Edge Delivery Services project (see documentation)\n- **Adobe Commerce instance** with Catalog Service (Adobe's fast, read-only GraphQL API for product data. Drop-ins call it instead of core Commerce GraphQL for product pages, search results, and category listings — up to ten times faster.) configured and operational\n\n\n### Storefront requirements\n\nYour Edge Delivery Services Commerce Storefront must be:\n\n- Built on the \n- Configured with valid [storefront configuration](https://experienceleague.adobe.com/developer/commerce/storefront/setup/configuration/commerce-configuration/) connecting to your Adobe Commerce backend\n- Using product URLs with consistent format (typically `/products//`)\n\n### Technical requirements\n\n- **Node.js** (current LTS version) installed locally\n- **Adobe I/O CLI** (`@adobe/aio-cli`) installed globally\n- **Git** for cloning the prerender repository\n- Familiarity with JavaScript, Handlebars templates, and GraphQL\n\n## Detailed workflow\n\nThe three steps in \"How it works\" describe the high-level flow. The steps below show how the prerender system carries out that process on a schedule in the background:\n\n1. The store admin manages products in Adobe Commerce.\n2. The prerender system detects product changes.\n3. The prerender system renders pages with semantic markup.\n4. The prerender system publishes the pages via the AEM Admin API.\n5. The prerender system updates the sitemap via the AEM Admin API.\n6. Shoppers access the prerendered product details pages.\n\nThe diagram below shows how data moves through each stage, from the store admin's product update to the shopper's product page.\n\n<Diagram\n type=\"mermaid\"\n caption=\"High-level workflow showing how product data flows from Store Admin through the prerender system to deliver Product Details Pages to Store Customers.\"\n code={`flowchart LR\n A[\"👨💼\nStore Admin\"]:::actor\n B[\"Product\"]:::product\n\n subgraph subGraph0[\"<strong>Prerender system\"]\n direction TB\n C[\"Product changed\"]:::prerender\n D[\"Render page\"]:::prerender\n C --> D\n end\n\n E[\"Store HTML in\nApp Builder blob store\"]:::action\n F[\"AEM Admin API configures\noverlay & updates sitemap\"]:::action\n G[\"Product Details Page\nWith embedded JSON-LD\nMetadata and Semantic Markup\"]:::output\n H[\"🛒\nStore Customer\"]:::actor\n\n A --> B\n B --> subGraph0\n subGraph0 --> E\n E -->|AEM Admin API| F\n F --> G\n G --> H\n\n classDef actor fill:none,stroke:none,color:#000000\n classDef product fill:#e3f2fd,stroke:#1976d2,stroke-width:2px\n classDef prerender fill:#fff3e0,stroke:#f57c00,stroke-width:2px,stroke-dasharray: 5 5\n classDef action fill:#f3e5f5,stroke:#7b1fa2,stroke-width:2px\n classDef output fill:#c8e6c9,stroke:#388e3c,stroke-width:2px\n`}\n/>\n\n### Architecture components\n\nThe solution consists of these components:\n\n- **App Builder Actions**: Handle product fetching, change detection, and markup generation.\n- **Scheduled Triggers**: Invoke actions on a configurable schedule to keep content synchronized.\n- **Catalog Service Integration**: Queries product data from your Adobe Commerce backend.\n- **AEM Admin API**: Publishes generated markup to your Edge Delivery Services project.\n- **Storage Layer**: Maintains product state and generated markup in App Builder storage.\n- **Management UI**: Provides a web interface for monitoring, configuration, and troubleshooting.\n\nThe diagram below shows how these components connect and work together to generate and serve prerendered product pages.\n\n<Diagram\n type=\"mermaid\"\n caption=\"Complete architecture showing App Builder actions, content management, and how prerendered and dynamic content are delivered to consumers.\"\n code={`flowchart TB\n subgraph subGraph0[\"<strong>App Builder Workspace\"]\n direction TB\n A[\"Product Change Detector\n(publishes products upon change)\"]:::appBuilder\n B[\"Product List Scraper\n(fetch and store list)\"]:::appBuilder\n C[\"PDP Renderer\n(generates/stores pages)\"]:::appBuilder\n D[(\"Blob Store\")]:::storage\n A --> D\n B --> D\n C --> D\n end\n\n E[\"AEM Admin API\nconfigures overlay link\nto App Builder blob store\"]:::api\n F[\"Edge Delivery Services\nserves HTML from overlay\nat product URLs\"]:::helix\n\n subgraph subGraph1[\"<strong>Product Page\"]\n direction TB\n G[\"Embedded markup with product data\nand attributes, injected ahead of time\"]:::embedded\n H[\"Description\"]:::prerendered\n I[\"Product image carousel\"]:::prerendered\n J[\"Price\nStock qty\"]:::dynamic\n K[\"More\nCustomer-defined fields\"]:::dynamic\n end\n\n subgraph subGraph2[\"<strong>Consumers\"]\n direction TB\n L[\"SEO / AI systems\"]\n M[\"AI Scrapers\n(read markup, no js)\"]\n N[\"Googlebot\n(reads JSON-LD, Rendered page)\"]\n O[\"Other crawlers\n(read markup, no js)\"]\n end\n\n P[\"Catalog service\n(high frequency data)\"]:::api\n Q[\"API for price retrieval\"]:::api\n\n D -->|HTML stored in blob store| E\n E -->|Overlay configured| F\n F -->|Edge Delivery serves the final page| subGraph1\n subGraph1 --> subGraph2\n G --> H\n G --> I\n H --> subGraph2\n I --> subGraph2\n P -->|Provides data| J\n Q -->|Provides data| J\n P -->|Provides data| K\n\n classDef appBuilder fill:#e3f2fd,stroke:#2962FF,color:#2962FF\n classDef storage fill:#fff3e0,stroke:#f57c00\n classDef helix fill:#e8f5e9,stroke:#388e3c\n classDef embedded fill:#fff9c4,stroke:#f57f17\n classDef prerendered fill:#c8e6c9,stroke:#388e3c\n classDef dynamic fill:#ffcdd2,stroke:#c62828\n classDef api fill:#fce4ec,stroke:#c2185b\n`}\n/>\n\n> **Catalog Size Considerations**\n>\nFor catalogs exceeding 50,000 products, consult the documentation for sitemap splitting strategies and scaling considerations.\n\n\n## Product lifecycle management\n\nThe prerender solution publishes everything Catalog Service returns, without filtering by product status, visibility, or stock level. A product gets prerendered when Catalog Service includes it in search results and it has a valid URL key.\n\n### Draft product preview\n\nThe prerender system does not have a draft mode. It renders every product that Catalog Service returns, regardless of whether that product is enabled, visible, or in stock. Whether a draft or inactive product appears in the prerendered site therefore depends entirely on your Commerce and Catalog Service configuration — not on any filtering in the prerender system.\n\nYou can also preview the product template itself — the BYOM template document that provides the page structure for all product pages. Open it in Document Authoring (DA), Universal Editor (UE), or another supported editor, with a `defaultSku` configured to review the layout and content before any products go live.\n\n### Scheduled publishing\n\nProducts become live on your storefront only when they have been prerendered and published to Edge Delivery Services. The prerender system runs two coordinated polling actions:\n\n- **`fetch-all-products`** — runs every 60 minutes to discover new products in the catalog\n- **`check-product-changes`** — runs every 5 minutes to detect changes, render updated markup, and publish product pages\n\nTo schedule when a product goes live, control when it becomes visible in Catalog Service. When the product appears in Catalog Service search results, the `fetch-all-products` action discovers it within 60 minutes and the `check-product-changes` action publishes it within 5 minutes of discovery.\n\nSee the for details on configuring polling intervals in `app.config.yaml`.\n\n### Offline product removal\n\nWhen a product is removed from Catalog Service — because it was disabled, deleted, or its visibility changed — the `mark-up-clean-up` action removes it from the published storefront. This action runs every 60 minutes and works by comparing the list of currently published product pages against current Catalog Service results: any product in the published index that is no longer returned by Catalog Service is unpublished and deleted.\n\nFor faster, event-driven removal, you can build custom instrumentation that observes product changes in Commerce and calls the Edge Delivery Services unpublish API directly. The accepts a resource path and immediately removes it from your live site.\n\n## Installation and configuration\n\nThe has complete installation instructions. The steps below cover the key configuration values for your deployment.\n\n\n1. **Clone the repository** and install dependencies:\n ```bash\n git clone https://github.com/adobe-rnd/aem-commerce-prerender.git\n cd aem-commerce-prerender\n npm install\n ```\n\n2. **Run the setup wizard** to generate your `.env` configuration:\n ```bash\n npm run setup\n ```\n The wizard prompts for your App Builder workspace selection and Adobe I/O authentication.\n\n3. **Configure environment variables** in the generated `.env` file with your storefront-specific values:\n\n \n\n | Variable | Description | Example |\n |----------|-------------|---------|\n | `ORG` | Your GitHub organization or username | `adobe` |\n | `SITE` | Your AEM site/repository name | `your-storefront` |\n | `CONTENT_URL` | Your AEM content URL (auto-populated by setup wizard) | `https://main--your-storefront--adobe.aem.live` |\n | `STORE_URL` | Your Commerce store URL (auto-populated by setup wizard) | `https://main--your-storefront--adobe.aem.live` |\n | `PRODUCTS_TEMPLATE` | URL for the product template page (auto-populated by setup wizard) | `https://main--your-storefront--adobe.aem.live/products/default` |\n | `PRODUCT_PAGE_URL_FORMAT` | URL pattern for product pages (auto-populated by setup wizard). Supports tokens: ``, ``, `` | `//products/` |\n | `LOCALES` | Comma-separated list of locales (for example, `en-us,en-gb,fr-fr`) or empty for non-localized sites | `en-us,fr-fr` |\n | `AEM_ADMIN_API_AUTH_TOKEN` | Long-lived authentication token for AEM Admin API (valid for 1 year). The setup wizard exchanges your temporary token for this automatically. | `your-admin-token-here` |\n\n \n\n > **Token expiration**\n>\n `AEM_ADMIN_API_AUTH_TOKEN` expires after one year. When it expires, product markup stops updating. Set a calendar reminder to rotate the token before expiration and redeploy with `npm run deploy`. See the Troubleshooting section for how to generate a new token.\n \n\n > **Commerce configuration**\n>\n The prerender app reads Commerce configuration (endpoints, headers, and store context) from your storefront configuration, not from environment variables. Ensure your storefront configuration includes Commerce endpoints and headers as documented in the documentation. For Adobe Commerce Optimizer, configure the appropriate headers (`AC-View-ID`, `AC-Source-Locale`, `AC-Price-Book-ID`) in your storefront configuration.\n \n\n4. **Obtain required credentials**:\n - **AEM Admin API token**: To obtain your token:\n 1. Log in to the (select the link from your preferred Identity Provider, where links suffixed by \"_sa\" let you pick a specific account instead of the one currently logged in)\n 2. Once redirected to the JSON response, open your browser's Developer Tools (F12)\n 3. Go to the Application tab (Chrome) or Storage tab (Firefox)\n 4. Under Cookies, find and copy the value of the `auth_token` cookie\n 5. Paste that token in the setup wizard textarea (the setup wizard exchanges your temporary token for a long-lived token automatically)\n\n > **Keep this token secret**\n>\n `AEM_ADMIN_API_AUTH_TOKEN` is a long-lived credential. Treat it like a password: never commit it to source control, and confirm your `.env` file is listed in `.gitignore` before you deploy.\n \n - **App Builder credentials**: To configure the credentials:\n 1. Go to the \n 2. Open your project and navigate to the workspace you want to use (Stage or Production)\n 3. Click **Download All** in the top-right to download the App Builder configuration file (a `.json` file)\n 4. Run `aio app use <file_name>` in the root directory of your prerender project to activate the credentials\n - **Commerce credentials** (Adobe Commerce as a Cloud Service): Access your Commerce Admin → System → Services → for environment and API configuration\n - **Commerce credentials** (Adobe Commerce Optimizer): Configure your Commerce backend connection according to your deployment type. See the documentation for details on configuring Optimizer headers and endpoints.\n\n5. **Deploy to App Builder**:\n ```bash\n npm run deploy\n ```\n This deploys all actions and schedules to your selected workspace (Stage or Production).\n\n6. **Test the deployment**:\n - Manually invoke actions using the Management UI or via CLI commands:\n ```bash\n # Fetch all products from Catalog Service and store them\n aio rt action invoke aem-commerce-ssg/fetch-all-products\n\n # Check for product changes and generate markup\n aio rt action invoke aem-commerce-ssg/check-product-changes\n\n # Clean up and unpublish deleted products\n aio rt action invoke aem-commerce-ssg/mark-up-clean-up\n ```\n - Verify product markup generation for sample SKUs\n - Check that pages publish successfully to your AEM project\n\n7. **Enable automated synchronization**:\n - Use the to start the change detector\n - Configure polling intervals in the `app.config.yaml` file (default: checks for changes every 5 minutes)\n - Monitor the product index to verify continuous updates\n\n > **app.config.yaml productDependencies**\n>\n If your `app.config.yaml` includes a `productDependencies` array, ensure each entry includes the required `maxVersion` property. The Adobe I/O CLI validates this during `aio app build`. See the Troubleshooting section below for details if you encounter build errors.\n \n\n\n> **App Builder costs**\n>\nThe prerender app runs as a paid App Builder application. Actions, scheduled triggers, and blob storage all consume App Builder quota. For large catalogs or frequent polling intervals, review the documentation before deploying to production.\n\n\n### Management UI\n\nAfter deployment, access the web-based to monitor and control your prerender deployment. Configure the UI with your App Builder workspace credentials before deployment-specific data appears.\n\nThe Management UI provides:\n\n- **Monitoring capabilities** to view published products and track the product index\n- **Change detector controls** to start, stop, and configure scheduled product polling\n- **Markup preview** to view generated HTML for product pages before publication\n- **Logs and activations** for debugging App Builder action executions\n- **Storage management** to trigger manual product operations and manage App Builder file storage\n- **Configuration settings** to review environment variables and deployment parameters\n\nYou configure access and authentication during the initial deployment. See the for details.\n\n## Storefront integration\n\nWith the App Builder app deployed, you've completed the first repository. Now modify your Commerce boilerplate — the second repository — so product pages can read and enhance the prerendered HTML the app publishes.\n\n### The two-repository architecture\n\nThe prerender solution involves two separate codebases that work together:\n\n1. **The aem-commerce-prerender repository** (App Builder app)\n - This is the repository you cloned, configured, and deployed in the previous section\n - Runs as a serverless application in Adobe App Builder\n - Generates prerendered HTML and publishes it to your Edge Delivery Services site\n - Operates independently as a background process\n\n2. **Your storefront repository** (Commerce boilerplate)\n - Your customer-facing website code\n - Built on the \n - Needs code changes to read and use the prerendered HTML\n - You'll make the integration changes in this repository.\n\n#### How they connect\n\nThe prerender app and your storefront meet at each product page URL.\n\nThe prerender app saves generated HTML in App Builder storage. The AEM Admin API tells Edge Delivery Services where to find those files so they can be served as an overlay: ready-made HTML at the same address as your product pages (for example, `/products/acme-widget/sku123`). When a shopper or search crawler opens that URL, Edge Delivery Services returns the prerendered HTML first, so product names, images, and descriptions appear without waiting for JavaScript.\n\nAfter the page loads, your storefront JavaScript runs and replaces that static HTML with the interactive product detail page (PDP) drop-in. Shoppers then see live prices, stock, and add-to-cart. Use lowercase SKUs in your product URLs because the drop-in reads the SKU from the `<meta name=\"sku\">` tag (which preserves the original casing) rather than from the URL. See [URL format and SKU handling](#url-format-and-sku-handling) below.\n\n<Diagram\n type=\"mermaid\"\n caption=\"Two-repository architecture showing how the App Builder prerender app publishes HTML that your storefront code consumes and enhances for visitors.\"\n code={`flowchart LR\n subgraph repo1[\" \"]\n direction TB\n A0[\"<strong>Repository 1\naem-commerce-prerender\n(App Builder Application)\"]\n A1@{ label: \"👨💻\nDeveloper Actions\" }\n A2[\"Clone repo\nConfigure .env\nDeploy to App Builder\"]\n end\n subgraph repo2[\" \"]\n direction TB\n D0[\"<strong>Repository 2\nYour Storefront\n(Commerce Boilerplate)\"]\n D1@{ label: \"👨💻\nDeveloper Actions\" }\n D2[\"Modify product-details block\nto read prerendered HTML\nand enhance with PDP drop-in\"]\n end\n subgraph repos[\"<strong>Developer Repositories\"]\n direction TB\n repo1\n repo2\n end\n subgraph appbuilder[\"<strong>App Builder Workspace\"]\n direction TB\n B0[\"Runs Independently\"]\n B1[\"Detect product changes\"]\n B2[\"Generate prerendered HTML\nwith semantic markup\"]\n B3[\"Store HTML in\nApp Builder blob store\"]\n B4[\"AEM Admin API configures\noverlay link to blob store\"]\n end\n subgraph eds[\"<strong>Edge Delivery Services\"]\n direction TB\n C0[\"Content Delivery Layer\"]\n C1[\"Serves prerendered HTML\nfrom overlay at product URLs\n/products//\"]\n end\n subgraph delivery[\"<strong>Page Delivery Flow\"]\n direction TB\n E1@{ label: \"🤖\nCrawler Request\" }\n E2@{ label: \"👤\nUser Request\" }\n E3[\"Edge Delivery serves\nprerendered HTML\"]\n E4[\"Crawler reads\nstatic HTML\"]\n E5[\"Browser executes\nstorefront JavaScript\"]\n E6[\"PDP drop-in replaces\nHTML with interactive UI\"]\n end\n A0 -.-> A1\n A1 --> A2\n D0 -.-> D1\n D1 --> D2\n B0 L_B0_B1_0@--> B1\n B1 L_B1_B2_0@--> B2\n B2 L_B2_B3_0@--> B3\n B3 L_B3_B4_0@--> B4\n C0 -.-> C1\n E1 --> E3\n E2 --> E3\n E3 --> E4 & E5\n E5 --> E6\n repo1 L_repo1_appbuilder_0@-. <strong>npm run deploy .-> appbuilder\n repo2 == <strong>Deployed to ==> eds\n B4 L_B4_eds_0@-. <strong>Overlay configured .-> eds\n eds L_eds_delivery_0@-. <strong>Serves content .-> delivery\n A1@{ shape: rect}\n D1@{ shape: rect}\n E1@{ shape: rect}\n E2@{ shape: rect}\n A0:::title\n A1:::icon\n A2:::action\n D0:::title\n D1:::icon\n D2:::action\n B0:::note\n B1:::process\n B2:::process\n B3:::process\n B4:::process\n C0:::note\n C1:::storage\n E1:::icon\n E2:::icon\n E3:::delivery\n E4:::crawlerEnd\n E5:::delivery\n E6:::delivery\n classDef title fill:#f5f5f5,stroke:#666,stroke-width:1px,color:#333\n classDef note fill:#fff,stroke:#999,stroke-width:1px,color:#666,font-style:italic\n classDef icon fill:none,stroke:none,color:#000000\n classDef action fill:#fff3e0,stroke:#f57c00,stroke-width:2px\n classDef process fill:#f3e5f5,stroke:#7b1fa2,stroke-width:2px\n classDef storage fill:#e8f5e9,stroke:#388e3c,stroke-width:2px\n classDef delivery fill:#fff9c4,stroke:#f57f17,stroke-width:2px\n classDef crawlerEnd fill:#c8e6c9,stroke:#388e3c,stroke-width:2px\n style repo1 fill:#f3e5f5,stroke:#7b1fa2,stroke-width:1px\n style repo2 fill:#fff3e0,stroke:#f57c00,stroke-width:1px\n style appbuilder fill:#e8f5e9,stroke:#388e3c,stroke-width:2px\n style eds fill:#e3f2fd,stroke:#1976d2,stroke-width:2px\n style delivery fill:#fce4ec,stroke:#c2185b,stroke-width:2px\n style repos fill:#e3f2fd,stroke:#1976d2,stroke-width:2px\n L_B0_B1_0@{ animation: slow }\n L_B1_B2_0@{ animation: slow }\n L_B2_B3_0@{ animation: slow }\n L_B3_B4_0@{ animation: slow }\n L_repo1_appbuilder_0@{ animation: slow }\n L_B4_eds_0@{ animation: slow }\n L_eds_delivery_0@{ animation: slow }\n`}\n/>\n\n### How prerendered HTML reaches your storefront\n\nThe prerendered HTML flows from the App Builder app to your storefront through App Builder storage and Edge Delivery Services overlay configuration:\n\n#### Publishing mechanism\n\n1. The App Builder app generates complete HTML files with prerendered product markup.\n2. The App Builder app saves those HTML files to its own file storage.\n3. The AEM Admin API configures the link to the App Builder file storage as an overlay in your Edge Delivery Services configuration.\n4. The AEM Admin API updates your sitemap to include the new and updated product pages.\n5. Edge Delivery Services serves the prerendered HTML from the overlay when product page URLs are requested.\n\nThe Commerce Prerender app uses App Builder file storage and Edge Delivery Services overlay configuration. It does _not_ use events to trigger updates. Each time the App Builder app detects a product change and generates HTML, it saves the HTML to App Builder storage and configures the overlay link via the AEM Admin API. When the overlay is configured, the prerendered HTML is served at the product URLs automatically. The storefront needs no additional fetching or configuration.\n\n### How the storefront serves prerendered HTML\n\nWhen a visitor requests a product page URL (for example, `/products/acme-widget/sku123`), Edge Delivery Services serves the prerendered HTML as the actual page. The HTML already contains the `product-details` block populated with prerendered content. Your storefront doesn't fetch it separately.\n\n#### The delivery sequence\n\n\n1. **Request arrives** → Edge Delivery Services receives the URL request\n2. **HTML served** → Edge Delivery Services returns the prerendered HTML file (published by the App Builder app)\n3. **Page loads** → The browser displays the page with prerendered content (crawlers stop here)\n4. **JavaScript executes** → Your storefront code runs\n5. **Enhancement** → The `product-details` block's `decorate()` function replaces the static HTML with the interactive PDP drop-in, which fetches live prices, stock, and add-to-cart from Commerce APIs\n\n\nThis process is called progressive enhancement (An approach where a page starts as complete, readable HTML and JavaScript upgrades it to an interactive experience when it runs. Shoppers with JavaScript get live prices, stock, and add-to-cart. Crawlers and shoppers without JavaScript still see all the product information from the prerendered HTML.): the prerendered HTML is the complete page that everyone sees first. The storefront code reads the page's existing HTML, extracts the SKU from the meta tag, and upgrades the page to a fully interactive experience for shoppers with JavaScript. Crawlers and shoppers without JavaScript always see complete product information from the prerendered HTML.\n\n### Modifying your `product-details` block\n\nTo integrate prerendered markup with the PDP drop-in, you'll need to modify the `product-details` block in your .\n\n#### Location\n\nThe lives in your boilerplate at:\n\n```\nblocks/product-details/product-details.js\n```\n\n#### Integration pattern\n\nBy the time `decorate()` runs, Edge Delivery Services has already served the prerendered HTML to the browser, so crawlers have read that content before any JavaScript executes. When `decorate()` runs, it replaces the static block content with the interactive PDP layout.\n\nYour `decorate()` function should:\n\n\n1. **Retrieve the SKU**: Read the product SKU from the `<meta name=\"sku\">` tag. The prerender system stores the original-casing SKU here, so the drop-in gets the correct value even after URL lowercasing.\n2. **Mount the PDP drop-in**: Call `mountImmediately` to initialize the PDP with the retrieved SKU.\n3. **Replace with PDP layout**: Clear the block content and render the interactive PDP containers.\n\n\n> **Simplified code example**\n>\nThis snippet is a minimal teaching version: it reads the SKU, runs `mountImmediately(initialize, { sku })`, clears the block, and mounts `ProductHeader` only. In the Commerce boilerplate, PDP is initialized from `scripts/initializers/pdp.js`, which calls `mountImmediately` with `langDefinitions`, `models`, fetched placeholders, and the other options documented on [Product Details initialization](https://experienceleague.adobe.com/developer/commerce/storefront/dropins/product-details/initialization/). The real `product-details` block builds a layout fragment and renders every region (for example, `ProductGallery`, `ProductHeader`, `ProductPrice`, and `ProductOptions`). For production patterns, see the in the Commerce boilerplate and the [containers overview](https://experienceleague.adobe.com/developer/commerce/storefront/dropins/product-details/containers/).\n\n\n```js\n// File location: blocks/product-details/product-details.js\n// Import paths are relative to blocks/product-details/product-details.js\n\n\nexport default async function decorate(block) {\n // Edge Delivery Services served the prerendered HTML before this function ran.\n // Crawlers have already read that content. decorate() now replaces it with the interactive layout.\n\n // Step 1: Retrieve the SKU from the meta tag (with URL fallback), then initialize PDP\n // getProductSku() reads the SKU from the <meta name=\"sku\"> tag and falls back to URL parsing.\n // In template preview mode (Universal Editor or Document Authoring), it reads a defaultSku value from the block config instead.\n const sku = getProductSku();\n await initializers.mountImmediately(initialize, { sku });\n\n // Step 2: Replace prerendered HTML with interactive composed containers\n // Production code builds a layout fragment and renders every region. This sample mounts ProductHeader only.\n block.innerHTML = '';\n await productRenderer.render(ProductHeader, {})(block);\n // ... other rendering code\n}\n```\n\n#### URL format and SKU handling\n\nThe prerender system generates markup files that match your storefront product URL structure. By default, this uses the format:\n\n```plaintext\n/products//\n```\n\nThe `PRODUCT_PAGE_URL_FORMAT` can be customized in your .\n\n> **SKU lowercase requirement**\n>\nStarting with the October 2025 Adobe Commerce Storefront release, all SKUs in product URLs are automatically converted to lowercase to ensure URL consistency and proper resolution. When the prerendered markup is generated, the actual SKU (with original casing) is stored in a meta tag:\n\n```html\n<meta name=\"sku\" content=\"MY_PRODUCT_123\">\n```\n\nThis allows your PDP drop-in to retrieve the correct SKU regardless of URL transformations, which is why the code example above retrieves the SKU from the meta tag rather than parsing it from the URL.\n\n\nFor complete implementation examples, refer to the in the Commerce boilerplate.\n\n## Customization\n\nThe prerender solution provides these customization options:\n\n\n| Customization | Purpose and Configuration |\n|---------------|---------------------------|\n| **Templates** | Control HTML markup structure and styling. By default, markup is handled on the client side at `/product/default`. If the default template is not available, you can edit the template at |\n| **Structured Data** | Customize JSON-LD schemas in to optimize product rich snippets for search engines |\n| **GraphQL Queries** | Extend product data by modifying GraphQL queries in . The rendering logic that uses these queries is implemented in the `generateProductHtml` method in |\n| **URL Patterns** | Match your storefront URL structure by configuring `PRODUCT_PAGE_URL_FORMAT` in the `.env` file |\n| **Rendering Logic** | Transform product data before markup generation by implementing custom logic in App Builder actions |\n\n\nFor implementation details, see the , particularly the `actions/` directory and repository root for templates and configuration files.\n\n## Troubleshooting\n\nFor troubleshooting during development and operations, consult the .\n\nCommon issues include:\n\n- **Authentication failures**: Verify that your AEM Admin API token is valid (tokens expire after 1 year). To check the token expiration, decode the token using or check your .\n - Generate a new token if expired (see ) and update `AEM_ADMIN_API_AUTH_TOKEN` in your `.env` file\n - Redeploy with `npm run deploy` after updating credentials\n\n- **Product not rendering**: Check that the product exists in Catalog Service and that the SKU matches.\n - Query the Catalog Service directly using its to verify product data\n - Use the Management UI to view the product index and confirm that the SKU is listed\n - Run `aio rt activation list` to check action logs. For more details, see the \n\n- **Markup not updating**: Review the Change Detector logs to ensure scheduled triggers are running.\n - Access the to verify the change detector status (should show \"Running\")\n - Run `aio rt activation list` to check activation logs. For more details, see the \n - Manually trigger the change detector from the Management UI to test functionality\n\n- **Build error: \"Missing or invalid keys in app.config.yaml\"**: This error occurs when `productDependencies` entries are missing the required `maxVersion` property.\n - **Error message**: `must have required property 'maxVersion'` in `/productDependencies/0`\n - **Solution**: Ensure each entry in the `productDependencies` array includes `maxVersion`. Example:\n ```yaml\n productDependencies:\n - code: <PRODUCT_CODE>\n minVersion: <MIN_VERSION>\n maxVersion: <MAX_VERSION> # Required field\n ```\n - Update your `app.config.yaml` file and redeploy with `npm run deploy`\n\n- **Deployment errors**: If you encounter 403 errors when running `npm run deploy`, the `aio` CLI may be authenticated to the wrong organization. Run `aio login --force` to re-authenticate and choose the correct organization.\n\n## Additional resources\n\n- **App Builder Documentation**: \n- **Catalog Service Guide**: \n- **Edge Delivery Services**: \n- **AEM Admin API**: (The prerender app automatically uses this API to publish content; useful for understanding the publishing mechanism and troubleshooting authentication issues)\n\n## Support\n\nFor technical issues or questions during implementation, consult the or contact Adobe Commerce support."
|
|
41
|
+
},
|
|
42
|
+
{
|
|
43
|
+
"path": "setup/configuration/commerce-configuration",
|
|
44
|
+
"title": "Storefront configuration",
|
|
45
|
+
"description": "Learn how to connect your Edge Delivery Services storefront to your Adobe Commerce backend.",
|
|
46
|
+
"content": "In this section, you'll learn how Commerce blocks in your storefront connect to a Commerce backend using values from either the for your site or a config.json file in your code repo.\n\nThe configuration is organized into several key sections:\n- **Endpoints** - GraphQL endpoints for Commerce and Catalog Services\n- **Headers** - HTTP headers required for API authentication and store context\n- **Analytics** - Store and environment metadata for tracking and reporting\n- **Plugins** - Configuration for various Edge Delivery Services plugins and features\n- **Multistore** - Settings for multiple store views and internationalization\n\nWhen implementing your own project, you must update the configuration values with:\n- The Adobe Commerce and Catalog Service GraphQL endpoint that you configured as part of the [content delivery network (CDN) setup](https://experienceleague.adobe.com/developer/commerce/storefront/setup/configuration/content-delivery-network/).\n- The header values specific to your Adobe Commerce Catalog Services environment.\n\nIf you [set up your storefront](https://experienceleague.adobe.com/developer/commerce/storefront/get-started/) using the boilerplate code, refer to the config generator tool to generate a `config.json` file for your Commerce backend. This file will contain the environment values for a Commerce backend including GraphQL endpoints and headers.\n\nIf you set up your site using the , the `config.json` file is created and added to the GitHub repository created for the boilerplate code. You can review and update the default values in the `config.json` file after the process completes.\n\n:::note\n**Need help configuring your Commerce backend?** Use the to automatically generate the appropriate configuration structure for your Adobe Commerce, Adobe Commerce as a Cloud Service, or Adobe Commerce Optimizer backend. The tool will detect your backend type and generate the correct configuration, though you should validate and confirm the results.\n:::\n\nThis page covers your storefront configuration (The JSON configuration object used by storefront code to resolve endpoints, headers, analytics, and plugin behavior.), when to replace sample default values (Starter values in a sample configuration that must be replaced with environment-specific values for your project.), and how helper APIs such as getConfigValue function (Helper function that reads a configuration value by dot-notation path from storefront config data.) and getHeaders function (Helper function that returns a header map for a given storefront scope based on configured header entries.) read resolved values.\n\n## Configuration Caching\n\nThe storefront configuration is cached at multiple levels to optimize performance:\n\n- **CDN Caching**: The configuration file is cached by the EDS CDN with a `max-age=7200` (2 hours) cache control header. This means configuration changes can take up to 2 hours to be reflected on the CDN after deployment.\n\n- **Browser Caching**: When the configuration is loaded in the browser, it is stored in , which persists until the browser session is cleared.\n\n**For developers**: After making configuration changes, it can take up to two hours for the CDN cache to expire. Clear your browser's session storage to see updates. Verify the current cache configuration by accessing `<site.com>/config.json` directly and checking the `last-modified` header.\n\n## Configuration Sections\n\nThe following sections detail each part of your configuration for Adobe Commerce. Each section includes placeholders (marked with `{}`) that you must replace with your specific Commerce environment details.\n\nYou can find your configuration in your code repo at `/config.json`, or in the config service for your site. If you do not have a configuration yet, you can:\n- Copy and customize the demo config for the boilerplate: .\n- Or use the to generate a configuration with your backend values (may contain placeholders to fill in).\n\nBe sure to update all values to match your Commerce backend before deploying.\n\n### Endpoints\n\nThe endpoints properties define the GraphQL API endpoints for your Commerce backend.\n\n```json\n{\n \"commerce-core-endpoint\": \"{}\",\n \"commerce-endpoint\": \"{}\"\n}\n```\n\n**Configuration Properties:**\n\n- **`commerce-core-endpoint`** (read/write) - Core GraphQL endpoint for queries and mutations. This endpoint handles all write operations and some read operations. See for details.\n\n- **`commerce-endpoint`** (read-only) - Services GraphQL endpoint optimized for read-only operations with Catalog Service, Live Search, and Product Recommendations. It is also optimized for performance for product data retrieval. For details, see the following documentation:\n - For Adobe Commerce as a Cloud Service, see the .\n - For Adobe Commerce Optimizer, see the .\n\n### Headers\n\nThe headers section defines HTTP headers required for API authentication and store context. Headers are organized by scope to apply different authentication and context settings for different request types. The specific headers required depend on your Commerce environment type.\n\n\n**Adobe Commerce (PaaS):**\n\n\nAdobe Commerce PaaS environments use standard Adobe Commerce header naming conventions and require API keys for SaaS services.\n\n```json\n{\n \"headers\": {\n \"all\": {\n \"Store\": \"{}\"\n },\n \"cs\": {\n \"Magento-Store-Code\": \"{}\",\n \"Magento-Store-View-Code\": \"{}\",\n \"Magento-Website-Code\": \"{}\",\n \"x-api-key\": \"{}\",\n \"Magento-Environment-Id\": \"{}\"\n }\n }\n}\n```\n\n**Header Scopes:**\n\n- **`all`** - Headers applied to all GraphQL requests\n - **`Store`** - Store view code for Core GraphQL requests. See for details.\n\n- **`cs`** - Headers for Catalog Service requests\n - **`Magento-Store-Code`** - Store to connect to. See for details.\n - **`Magento-Store-View-Code`** - Store view for Catalog Service requests. See for details.\n - **`Magento-Website-Code`** - Website to connect to. See for details.\n - **`x-api-key`** - API key for SaaS services (Catalog Service, Live Search, Product Recommendations). See for details.\n - **`Magento-Environment-Id`** - Connects the storefront to the cloud instance serving it. See for details.\n\n\n**Adobe Commerce as a Cloud Service (ACCS):**\n\n\nAdobe Commerce as a Cloud Service uses standard Adobe Commerce header naming conventions but does not require API keys or environment IDs in the default configuration.\n\n```json\n{\n \"headers\": {\n \"all\": {\n \"Store\": \"{}\"\n },\n \"cs\": {\n \"Magento-Store-Code\": \"{}\",\n \"Magento-Store-View-Code\": \"{}\",\n \"Magento-Website-Code\": \"{}\"\n }\n }\n}\n```\n\n**Header Scopes:**\n\n- **`all`** - Headers applied to all GraphQL requests\n - **`Store`** - Store view code for Core GraphQL requests. See for details.\n\n- **`cs`** - Headers for Catalog Service requests\n - **`Magento-Store-Code`** - Store to connect to. See for details.\n - **`Magento-Store-View-Code`** - Store view for Catalog Service requests. See for details.\n - **`Magento-Website-Code`** - Website to connect to. See for details.\n\n\n**Adobe Commerce Optimizer:**\n\n\nAdobe Commerce Optimizer uses different header naming conventions and requires Commerce Optimizer-specific headers as defined in the .\n\n```json\n{\n \"headers\": {\n \"cs\": {\n \"AC-View-ID\": \"{}\",\n \"AC-Price-Book-ID\": \"{}\",\n \"AC-Policy-{{*}}\": \"{}\"\n }\n }\n}\n```\n\n**Header Scopes:**\n\n- **`cs`** - Headers applied to all GraphQL requests\n - **`AC-View-ID`** - (Required) The unique ID assigned to the catalog view that products will be sold through. You can find this in the .\n - **`AC-Price-Book-ID`** - (Optional) Specifies the Price Book ID to use for pricing. Each catalog view defines a default Price Book. If a customer has an assigned Price Book, it is used when it falls within the allowed Price Books for the catalog view. Otherwise, the default Price Book for the catalog view is used. See for implementation details.\n - **`AC-Policy-{{*}}`** - (Optional) Policy trigger for filtering products by attribute. The header should match the \"name\" of the trigger. For example, `AC-Policy-Brand:Cruz` for brand filtering using \"Cruz\". You can specify multiple policy headers per request.\n\n:::note[Troubleshooting Optimizer Headers]\n**Warning:** There is currently a bug (being resolved) that may require adding the `AC-Environment-ID` header in some Optimizer configurations. If you have all the requisite Optimizer headers configured correctly and are still experiencing problems, you may need to add this header:\n\n```json\n{\n \"headers\": {\n \"cs\": {\n \"AC-Environment-Id\": \"{}\",\n // ... your other Optimizer headers\n }\n }\n}\n```\n:::\n\n\n### Analytics\n\nThe analytics section contains store and environment metadata for tracking and reporting. The specific values depend on your Commerce environment type.\n\n\n**Adobe Commerce (PaaS) / SaaS:**\n\n\nFor Adobe Commerce PaaS and Adobe Commerce as a Cloud Service environments, use standard Commerce store and website identifiers from your Commerce Environment. You can obtain these values using a `storeConfig` query.\n\n```json\n{\n \"analytics\": {\n \"aep-ims-org-id\": \"{}\",\n \"aep-datastream-id\": \"{}\",\n \"base-currency-code\": \"{}\",\n \"environment\": \"{}\",\n \"environment-id\": \"{}\",\n \"store-code\": \"{}\",\n \"store-id\": {},\n \"store-name\": \"{}\",\n \"store-url\": \"{}\",\n \"store-view-code\": \"{}\",\n \"store-view-id\": {},\n \"store-view-name\": \"{}\",\n \"website-code\": \"{}\",\n \"website-id\": {},\n \"website-name\": \"{}\"\n }\n}\n```\n\n**Configuration Properties:**\n\n- **`aep-ims-org-id`** - (Optional) Adobe IMS Organization ID for Experience Platform integration (for example, `\"1234567890ABCDEF7F000101@AdobeOrg\"`)\n- **`aep-datastream-id`** - (Optional) Datastream ID for routing data to Adobe Experience Platform (for example, `\"12345678-1234-1234-1234-123456789012\"`)\n- **`base-currency-code`** - The base currency code for the store (for example, \"USD\", \"EUR\")\n- **`environment`** - Environment type (\"Production\", \"Testing\")\n- **`environment-id`** - Unique identifier for the Commerce environment\n- **`store-url`** - Base URL for the store\n- **`store-code`** - Code identifier for the store from your Commerce environment\n- **`store-id`** - Numeric ID for the store\n- **`store-name`** - Display name for the store\n- **`store-view-code`** - Code identifier for the store view\n- **`store-view-id`** - Numeric ID for the store view\n- **`store-view-name`** - Display name for the store view\n- **`website-code`** - Code identifier for the website from your Commerce environment\n- **`website-id`** - Numeric ID for the website\n- **`website-name`** - Display name for the website\n\n> **Adobe Experience Platform integration**\n>\nTo enable automatic event forwarding to Adobe Experience Platform, include both `aep-ims-org-id` and `aep-datastream-id` in your analytics configuration. When both values are present, events will automatically be sent to AEP. See the [Adobe Experience Platform integration guide](https://experienceleague.adobe.com/developer/commerce/storefront/setup/analytics/adobe-experience-platform/) for detailed setup instructions.\n\n\n**Adobe Commerce Optimizer:**\n\n\nFor Adobe Commerce Optimizer environments, use a simplified analytics configuration structure:\n\n```json\n{\n \"analytics\": {\n \"aep-ims-org-id\": \"{}\",\n \"aep-datastream-id\": \"{}\",\n \"base-currency-code\": \"{}\",\n \"environment\": \"{}\",\n \"environment-id\": \"{}\",\n \"store-url\": \"{}\",\n \"store-view-currency-code\": \"{}\",\n \"storefront-template\": \"{}\",\n \"view-id\": \"{}\"\n }\n}\n```\n\n**Configuration Properties:**\n\n- **`aep-ims-org-id`** - (Optional) Adobe IMS Organization ID for Experience Platform integration (for example, `\"1234567890ABCDEF7F000101@AdobeOrg\"`)\n- **`aep-datastream-id`** - (Optional) Datastream ID for routing data to Adobe Experience Platform (for example, `\"12345678-1234-1234-1234-123456789012\"`)\n- **`base-currency-code`** - The base currency code for the store (for example, \"USD\", \"EUR\")\n- **`environment`** - Environment type (\"Production\", \"Testing\")\n- **`environment-id`** - The tenant ID for the Adobe Commerce Optimizer instance\n- **`store-url`** - Base URL for the store\n- **`store-view-currency-code`** - Currency code for the store view (for example, \"USD\", \"EUR\")\n- **`storefront-template`** - (Optional) Storefront template type (for example, \"Other\")\n- **`view-id`** - The unique ID assigned to the catalog view from the Adobe Commerce Optimizer UI\n\n\n### Plugins\n\nThe plugins section configures various Commerce plugins and features.\n\n```json\n{\n \"plugins\": {\n \"picker\": {\n \"rootCategory\": \"{}\"\n }\n }\n}\n```\n\n**Configuration Properties:**\n\n- **`picker.rootCategory`** - Root category ID for the product picker. This determines which category serves as the starting point when browsing products in the Commerce interface.\n\n### Multistore\n\nThe multistore section manages configurations for multiple store views and internationalization. This allows different configurations for different locales or store views. Each non-\"default\" configuration will be merged with the default at runtime and used for the corresponding locale or store view. For example, the below would serve as a basis for configuration for the site at aemshop.net/fr.\n\n```json\n{\n \"/fr/\": {\n \"headers\": {\n \"all\": {\n \"Store\": \"{}\"\n },\n \"cs\": {\n \"Magento-Store-Code\": \"{}\",\n \"Magento-Website-Code\": \"{}\",\n \"Magento-Store-View-Code\": \"{}\"\n }\n }\n }\n}\n```\n\n**Configuration Properties:**\n\n- **Path-based configuration** - Use URL paths (like `/fr/`, `/de/`, etc.) to define locale-specific or store-specific overrides\n- **Header overrides** - Override default headers for specific store views\n- **Store context** - Define different store, website, and store view codes for each locale\n\n\n### Additional Configuration Options\n\nSome configuration options can be set to enable or disable certain boilerplate features.\n\n```json\n{\n \"commerce-assets-enabled\": boolean,\n \"commerce-b2b-enabled\": boolean,\n \"commerce-companies-enabled\": boolean,\n}\n```\n\n- **`commerce-assets-enabled`** - Boolean flag to enable or disable AEM Assets within the storefront\n- **`commerce-b2b-enabled`** - Boolean flag to enable or disable B2B-related global and shared logic within the storefront. When enabled, this flag is passed to the Auth initializer as `customerPermissionRoles: true` to enable customer role permissions API. This flag controls B2B functionality at the authentication and authorization level, enabling the drop-in to automatically fetch B2B customer role permissions on initialization and re-fetch when authentication state changes. See the [User Auth initialization documentation](https://experienceleague.adobe.com/developer/commerce/storefront/dropins/user-auth/initialization/) for details.\n- **`commerce-companies-enabled`** - Boolean flag to enable or disable Commerce B2B company features within the storefront. This flag controls company-specific features such as company management, company structure, and company-related blocks.\n\n> **B2B Configuration Flags**\n>\n**Understanding the difference:**\n\n- **`commerce-b2b-enabled`** - Controls B2B functionality at the authentication and authorization level. When set to `true`, this flag enables the customer role permissions API in the Auth drop-in (via the `customerPermissionRoles` parameter), which automatically fetches B2B customer role permissions including purchase order and company management capabilities. This is required for B2B features to work properly. See the [User Auth v3.0.0 changelog](https://experienceleague.adobe.com/developer/commerce/storefront/releases/changelog/) for implementation details.\n\n- **`commerce-companies-enabled`** - Controls company-specific features and blocks. This flag enables or disables company management features, company structure, and company-related commerce blocks.\n\n**Relationship:** While these flags serve different purposes, `commerce-b2b-enabled` is typically required for B2B features to function correctly, as it enables the underlying authentication and permission system. `commerce-companies-enabled` can be used independently to control company-specific features, but company features will only work properly when `commerce-b2b-enabled` is also set to `true`.\n\nFor a complete B2B storefront with company features, set both flags to `true`:\n```json\n{\n \"commerce-b2b-enabled\": true,\n \"commerce-companies-enabled\": true\n}\n```\n\n**Implementation:** To use `commerce-b2b-enabled` in your storefront, read it from config in your Auth initializer and pass it to the Auth drop-in:\n\n```javascript title=\"scripts/initializers/user-auth.js\"\n\n\nconst isB2BEnabled = await getConfigValue('commerce-b2b-enabled');\n\nawait initializers.mountImmediately(initialize, {\n customerPermissionRoles: isB2BEnabled,\n // ... other options\n});\n```\n\nThis enables the customer role permissions API when B2B features are enabled in your configuration.\n\n\n## Configuration Examples\n\nThe following examples show real `config.json` files from different Adobe Commerce environments. These examples demonstrate the actual structure and values used in production environments.\n\n\n**Adobe Commerce (PaaS):**\n\n\nThis example shows the configuration for an Adobe Commerce PaaS environment, which includes additional features like multistore support and asset management. This configuration is used on this site: https://www.aemshop.net/\n\n```json title=\"aemshop.net config.json example\" showLineNumbers\n{\n \"public\": {\n \"default\": {\n \"commerce-core-endpoint\": \"https://www.aemshop.net/graphql\",\n \"commerce-endpoint\": \"https://www.aemshop.net/cs-graphql\",\n \"headers\": {\n \"all\": {\n \"Store\": \"default\"\n },\n \"cs\": {\n \"Magento-Store-Code\": \"main_website_store\",\n \"Magento-Store-View-Code\": \"default\",\n \"Magento-Website-Code\": \"base\",\n \"x-api-key\": \"<YOUR_API_KEY>\",\n \"Magento-Environment-Id\": \"<YOUR_ENVIRONMENT_ID>\"\n }\n },\n \"analytics\": {\n \"aep-ims-org-id\": null,\n \"aep-datastream-id\": null,\n \"base-currency-code\": \"USD\",\n \"environment\": \"Production\",\n \"environment-id\": \"f38a0de0-764b-41fa-bd2c-5bc2f3c7b39a\",\n \"store-code\": \"main_website_store\",\n \"store-id\": 1,\n \"store-name\": \"Main Website Store\",\n \"store-url\": \"https://www.aemshop.net\",\n \"store-view-code\": \"default\",\n \"store-view-id\": 1,\n \"store-view-name\": \"Default Store View\",\n \"website-code\": \"base\",\n \"website-id\": 1,\n \"website-name\": \"Main Website\"\n },\n \"plugins\": {\n \"picker\": {\n \"rootCategory\": \"2\"\n }\n },\n \"commerce-assets-enabled\": false\n },\n \"/fr/\": {\n \"headers\": {\n \"all\": {\n \"Store\": \"fr\"\n },\n \"cs\": {\n \"Magento-Store-Code\": \"fr_store\",\n \"Magento-Website-Code\": \"fr_website\",\n \"Magento-Store-View-Code\": \"fr\"\n }\n }\n }\n }\n}\n```\n\n\n**Adobe Commerce as a Cloud Service (ACCS):**\n\n\nThis example shows the configuration for Adobe Commerce as a Cloud Service (ACCS). For ACCS you only need to set **`commerce-endpoint`** to your ACCS GraphQL URL; the same endpoint is used for catalog and core. This configuration is used on this site: https://main--boilerplate-accs--adobe-commerce.aem.live/\n\n```json title=\"ACCS config.json\" showLineNumbers\n{\n \"public\": {\n \"default\": {\n \"commerce-endpoint\": \"https://na1-sandbox.api.commerce.adobe.com/LwndYQs37CvkUQk9WEmNkz/graphql\",\n \"headers\": {\n \"all\": {\n \"Store\": \"default\"\n },\n \"cs\": {\n \"Magento-Store-Code\": \"main_website_store\",\n \"Magento-Store-View-Code\": \"default\",\n \"Magento-Website-Code\": \"base\"\n }\n },\n \"analytics\": {\n \"base-currency-code\": \"USD\",\n \"environment\": \"Testing\",\n \"environment-id\": \"LwndYQs37CvkUQk9WEmNkz\",\n \"store-code\": \"main_website_store\",\n \"store-id\": 1,\n \"store-name\": \"ACCS Store\",\n \"store-url\": \"https://main--boilerplate-accs--adobe-commerce.aem.live\",\n \"store-view-code\": \"default\",\n \"store-view-id\": 1,\n \"store-view-name\": \"Default Store View\",\n \"website-code\": \"base\",\n \"website-id\": 1,\n \"website-name\": \"Main Website\"\n },\n \"plugins\": {\n \"picker\": {\n \"rootCategory\": \"2\"\n }\n }\n }\n }\n}\n```\n\n\n**Adobe Commerce Optimizer (ACO):**\n\n\nThis example shows the configuration for Adobe Commerce Optimizer (ACO), which uses different header naming conventions and includes ACO-specific settings. For ACO, set commerce-endpoint (ACO GraphQL URL for catalog) at a minimum. Set commerce-core-endpoint (your core endpoint—PaaS or your own Adobe Commerce hosted environment) to enable transactional or other core-related functionality. Include \"adobe-commerce-optimizer\": true. This example is from https://main--boilerplate-aco--adobe-commerce.aem.live/ and does not include a core endpoint.\n\n```json title=\"ACO config.json\" showLineNumbers\n{\n \"public\": {\n \"default\": {\n \"adobe-commerce-optimizer\": true,\n \"commerce-endpoint\": \"https://na1-sandbox.api.commerce.adobe.com/8idEEDDiVwjCEJAyB5kjfi/graphql\",\n \"headers\": {\n \"cs\": {\n \"ac-view-id\": \"0d3eebf7-b5fb-4904-9ccf-f35fcc61862b\",\n \"ac-price-book-id\": \"west_coast_inc\"\n }\n },\n \"analytics\": {\n \"base-currency-code\": \"USD\",\n \"environment\": \"Testing\",\n \"environment-id\": \"8idEEDDiVwjCEJAyB5kjfi\",\n \"store-url\": \"https://main--boilerplate-aco--adobe-commerce.aem.live/\",\n \"store-view-currency-code\": \"USD\",\n \"storefront-template\": \"Other\",\n \"view-id\": \"0d3eebf7-b5fb-4904-9ccf-f35fcc61862b\"\n },\n \"plugins\": {\n \"picker\": {\n \"rootCategory\": \"2\"\n }\n }\n }\n }\n}\n```\n\n\n## Local Development\n\nUnderstanding how storefront configuration resolution works is essential for effective local development and branch-based testing. This section explains how the browser retrieves configuration and how to manage it across different environments.\n\n### How Configuration Resolution Works\n\nWhen your storefront loads in the browser, the following sequence occurs:\n\n1. **Browser requests** `https://[site]/config.json`\n2. **EDS CDN checks** if a `config.json` file exists in the code repository root\n3. **If found** - The `config.json` file from the repository is served\n4. **If not found** - The CDN falls back to the `public` config from the EDS site config (Config Service)\n\n:::caution[Do not commit config.json to main]\nA `config.json` file in your repository **always** takes precedence over the Config Service. This means if `config.json` is committed to your `main` branch, your Config Service values will be silently ignored in production.\n\n`config.json` is intended for **local development and branch-based testing only**. For production, use the Config Service and ensure `config.json` is absent from the `main` branch.\n:::\n\n### Getting a starter configuration\n\nTo get a configuration for your Commerce storefront, use one of these approaches:\n\n1. **Config Service (recommended for production)**: Use the Config Service to store and manage your production configuration. See the to get started. Your configuration is stored at `https://admin.hlx.page/config//sites//public.json` and served automatically — no `config.json` in the repository is needed.\n\n2. **Generate a local starter config**: Use the to automatically generate a configuration for your Commerce backend. Use this as the basis for your Config Service upload or for local development. Note that the generated config may contain placeholders that you'll need to replace with actual values.\n\n3. **Copy the demo configuration**: Download and customize the live configuration for the boilerplate from . This provides a working example with all required fields — useful as a reference for local development.\n\n**Important**: Always update the configuration values to match your specific Commerce backend. For production, push your configuration to the Config Service rather than committing `config.json` to your `main` branch.\n\n### Local Development Configuration\n\nTo work with your own Commerce backend locally:\n\n\n1. **Get your configuration from the config generator tool:**\n - Visit the and enter your API url.\n - Copy the configuration to your clipboard and paste it into your `config.json` file in your code repo.\n\n2. **Edit config.json** with your Commerce backend values:\n - Update `commerce-endpoint` (required).\n - Add/update `commerce-core-endpoint` if necessary.\n - Update `headers`.\n - Update `analytics` values for your store.\n - Update any other values as needed, such as `commerce-assets-enabled`, etc.\n\n3. **Add config.json to .gitignore** (optional):\n ```bash\n echo \"config.json\" >> .gitignore\n ```\n This prevents you from accidentally committing your local configuration.\n\n4. **Clear session storage and reload:**\n - Open browser DevTools (F12)\n - Go to **Application** > **Session Storage**\n - Delete the `config` entry\n - Reload the page\n\n5. **Verify the configuration loaded:**\n - Check `http://localhost:3000/config.json` in your browser\n - Or check **Application** > **Session Storage** > `config` entry in DevTools\n\n\n### Branch-Based Configuration\n\nYou can commit `config.json` to any branch to provide branch-specific configuration. Understanding the behavior based on which branch you commit to is crucial:\n\n**Committing to a feature/test branch:**\n- Commit `config.json` to your branch (for example, `feature/new-backend`).\n- When deployed, `https://[branch]--[site]--[org].aem.page/config.json` will serve the configuration for your branch.\n- The `main` branch and other branches are unaffected.\n- Public config is NOT used for this branch.\n\n**Committing to main branch:**\n- If you commit `config.json` to `main`, it will ALWAYS be served.\n- Public config from EDS site config will NEVER be used (unless you delete `config.json` from main).\n- All branches without their own `config.json` will inherit the configuration from main.\n- Use this approach only if you want repository-based configuration for production.\n\n**Using public config (Recommended for production):**\n- Do NOT commit `config.json` to `main`.\n- Configure the `public` property in your EDS site config via the .\n- Access at `https://admin.hlx.page/config//sites//public.json`.\n- Update configuration without code deployments.\n- Any branch with a committed `config.json` will be used (on that branch) instead of this public config.\n\n### Testing Configuration Changes\n\nAfter creating or updating your configuration (either in public config or `config.json`), follow these steps to verify the changes:\n\n\n1. **Deploy or save your changes:**\n - For repository-based: Commit and push `config.json`\n - For public config: Update via the Configuration Service API\n\n2. **Clear session storage:**\n - Open browser DevTools (F12)\n - Navigate to **Application** tab > **Session Storage**\n - Find and delete the `config` entry for your domain\n\n3. **Reload the page:**\n - Hard refresh (Ctrl+Shift+R or Cmd+Shift+R)\n - Or simply reload after clearing session storage\n\n4. **Verify the configuration:**\n - In DevTools, go to **Application** > **Session Storage**\n - Check the `config` entry contains your updated values\n - Or access `https://[your-site]/config.json` directly in the browser\n\n\n:::tip[Quick Verification]\nAlways verify your configuration loaded correctly by checking the session storage `config` entry after reload. This ensures your storefront is using the expected configuration values.\n:::\n\n## Step-by-step\n\nWe'll use a mock PDP / Catalog Service block to demonstrate how to utilize the config utilities and values. This example shows how to access the configuration sections detailed above.\n\n\n### Import the configuration functions.\n\nFirst, import the `getConfigValue` and `getHeaders` functions from the `scripts/configs.js` file in your boilerplate.\n\n```javascript\n\n```\n\n\n### Access endpoint configuration.\n\nUse the `getConfigValue` function to retrieve endpoint URLs from the configuration. This function takes a dot-notation path that matches the keys in your `config.json`.\n\n```javascript\nexport default async function decorate(block) {\n // Get the catalog service endpoint from the endpoints section\n const catalogEndpoint = await getConfigValue('commerce-endpoint');\n const coreEndpoint = await getConfigValue('commerce-core-endpoint');\n\n console.log('Catalog Service endpoint:', catalogEndpoint);\n console.log('Core Commerce endpoint:', coreEndpoint);\n}\n```\n\n\n### Access header configuration.\n\nUse the `getHeaders` function to retrieve headers for specific scopes. This function automatically formats the headers for use in HTTP requests.\n\n```javascript\nexport default async function decorate(block) {\n // Get headers for Catalog Service requests\n const csHeaders = await getHeaders('cs');\n\n // Get headers for all requests\n const allHeaders = await getHeaders('all');\n\n console.log('CS headers:', csHeaders);\n console.log('All headers:', allHeaders);\n}\n```\n\n\n### Access analytics and other configuration.\n\nUse `getConfigValue` to access any configuration value using dot notation, including analytics data and plugin settings.\n\n```javascript\nexport default async function decorate(block) {\n // Get analytics configuration\n const storeUrl = await getConfigValue('analytics.store-url');\n const currency = await getConfigValue('analytics.base-currency-code');\n const environment = await getConfigValue('analytics.environment');\n\n // Get plugin configuration\n const rootCategory = await getConfigValue('plugins.picker.rootCategory');\n\n console.log('Store URL:', storeUrl, 'Currency:', currency, 'Environment:', environment);\n console.log('Root category:', rootCategory);\n}\n```\n\n\n### Make API requests with configuration.\n\nCombine the endpoint and header configuration to make authenticated API requests to your Commerce backend.\n\n```javascript\nexport default async function decorate(block) {\n // Get the catalog service endpoint\n const endpoint = await getConfigValue('commerce-endpoint');\n\n // Get the catalog service required headers\n const headers = await getHeaders('cs');\n\n // Make the API request\n const response = await fetch(endpoint, {\n method: 'POST',\n headers: {\n 'Content-Type': 'application/json',\n ...headers\n },\n body: JSON.stringify({\n query: `query { products { items { name } } }`\n })\n });\n\n const data = await response.json();\n // Process the response data\n}\n```\n\n\n## Summary\n\nThe Commerce configuration provides a structured approach to connecting your storefront to Adobe Commerce backends. By organizing settings into clear sections for endpoints, headers, analytics, plugins, and multistore configurations, you can easily customize your storefront for different Commerce environments. The configuration system supports Adobe Commerce (PaaS), Adobe Commerce as a Cloud Service (SaaS), and Adobe Commerce Optimizer, each with specific header requirements and authentication methods. For local development and testing, you can use a `config.json` file in your repository or the public config from the Configuration Service, with repository files taking precedence. Use the `getConfigValue` and `getHeaders` helper functions to access these settings in your Commerce blocks, ensuring consistent and maintainable integration with your Commerce backend."
|
|
47
|
+
},
|
|
48
|
+
{
|
|
49
|
+
"path": "setup/configuration/content-delivery-network",
|
|
50
|
+
"title": "Content delivery network (CDN)",
|
|
51
|
+
"description": "Learn how to configure a CDN for your Commerce Storefront powered by Edge Delivery Services.",
|
|
52
|
+
"content": "A CDN is a critical component of your Commerce Storefront. It is responsible for delivering content to your customers in the most efficient and secure way possible.\n \n\nCDN features, usage, and provider details vary depending on your backend commerce implementation. By default, Adobe Commerce on Cloud projects use Fastly, while Adobe Commerce as a Cloud Service projects use an Adobe-managed CDN service.\n\nIf necessary, you can configure your own CDN, also known as \"Bring Your Own CDN\" (BYO CDN). See for required settings and vendor-specific setup instructions.\n\n> **Image optimization**\n>\nDrop-in components automatically add image optimization parameters (such as width, height, and quality) to image URLs. CDN-based image optimization services rely on these parameters to optimize images. If you need to use different parameters or URL patterns for your CDN provider, you can override the defaults by using the [`setImageParamKeys`](https://experienceleague.adobe.com/developer/commerce/storefront/sdk/reference/initializer/#setimageparamkeysparams) method in the initializer configuration.\n\n\nFor Adobe Commerce on Cloud projects, Fastly is included with your Adobe Commerce license and is the default CDN provider. The module exposes Fastly service configurations in the Commerce Admin.\n\nThe remaining sections on this page provide instructions and guidance for configuring Adobe Commerce on Cloud projects with the Fastly module. It focuses on routing use cases, configuration, validation, and debugging.\n\n## Routing\n\nThe main difference between the use cases described in this section is whether all paths should be routed by default to Commerce or Edge Delivery Services. If you plan to use Edge Delivery Services only for your homepage, all paths should default to Commerce. However, if you plan to migrate parts of your storefront over time, the Edge Delivery Services origins are more sensible.\n\nDefaulting to Edge Delivery Services is generally ideal because you'll have to log in to the Commerce Admin and understand Fastly VCLs to add the path for routing in the “default to Commerce” scenario when adding a new page in Edge Delivery Services. Therefore, the VCL snippets below focus on the “default to Edge” use case.\n\nThe following table provides a high-level comparison of the three routing options:\n\n| Topic | Full storefront | Luma Bridge | Homepage only |\n|--------------------------------|----------------------------------------------|--------------------------------------------------------|---------------------------------------------------------------|\n| **Routing logic** | Default to Edge Delivery Services | Default to Edge Delivery Services | Default to Commerce |\n| **Paths routed to Commerce** | Product images, GraphQL endpoints | Transactional pages, account page, REST endpoints, etc | All paths except those explicitly |\n| **Paths routed to Edge** | All other paths | Product catalog, content pages | Homepage |\n| **VCL snippets focus** | Default to Edge Delivery Services | Default to Edge Delivery Services | Default to Commerce |\n| **Optimization tips** | Avoid additional TLS handshake for API calls | Same as full storefront | Route resources (JS, CSS) to Edge Delivery Services |\n| **Common patterns** | Use CDN as proxy for Catalog Service | Same as full storefront | Move Edge code to subfolder, such as `aem` |\n\n:::note\nAll paths for the Adobe Commerce Admin should be routed to Commerce.\n:::\n\n### Full storefront\n\nThe entire storefront experience is delivered by Edge Delivery Services. Only some paths (for example, images and API calls) are routed to Commerce.\n\n* By default, paths are routed to Edge Delivery Services\n* Product images must be routed to Commerce\n* Commerce GraphQL endpoint must be routed to Commerce\n* CDN must proxy requests to your Catalog Service API endpoints (https://catalog-service.adobe.io/graphql and https://catalog-service-sandbox.adobe.io/graphql).\n\n :::tip\n These API endpoints impact largest contentful paint (LCP), so we want to avoid an additional TLS handshake.\n :::\n\n### Luma Bridge\n\nThe product catalog and content pages are delivered by Edge Delivery Services. Transactional pages (for example, cart, checkout, and account) are delivered by Commerce.\n\n* [Luma Bridge](https://experienceleague.adobe.com/developer/commerce/storefront/setup/discovery/luma-bridge/) includes the same details as the full storefront option, plus the following:\n * Transactional pages (for example, cart, checkout, and account) are routed to Commerce, depending on the Luma Bridge implementation\n * Any additional endpoints (such as REST endpoints, `/customer/sections/load`) that are required by the Luma Bridge implementation are routed to Commerce\n\n### Homepage only\n\nOnly the homepage is delivered by Edge Delivery Services. All Commerce functionality is delivered by Commerce.\n\n* All paths are routed to Commerce by default\n* The paths that are routed to Edge Delivery Services are explicitly set\n* Resources (for example, JS and CSS) that are required by the Edge Delivery Servicesw pages must be routed to Edge Delivery Services\n\n :::note\n A common pattern is to move all Edge Delivery Services code into a subfolder called `aem`, and then route any path starting with `aem` to Edge Delivery Services.\n :::\n\nFor general information on setting up Fastly for Adobe Commerce and accessing the Adobe Commerce Admin, see .\n\n## Backend configuration\n\nThe first step is to configure a backend for each origin/service that Fastly needs to route to, which includes the following:\n\n* Edge Delivery Services\n* Catalog Service GraphQL API endpoint\n* Default Adobe Commerce backend\n\n:::note\nThe Fastly configuration instructions on this page are based on the module, which exposes Fastly service configurations in the Adobe Commerce Admin.\n:::\n\n\n1. Log in to the Adobe Commerce Admin.\n\n1. Click **Stores** > **Settings** > **Configuration** > **Advanced** > **System** > **Full Page Cache** > **Fastly Configuration** > **Backend Settings** > **Create**.\n\n1. Enter a name for the Edge Delivery Services backend.\n\n For example: `edge delivery`.\n\n1. Enter the address for the Edge Delivery Services backend.\n\n For example: `main--aem-boilerplate-commerce--hlxsites.aem.live`\n\n1. Click **Attach condition**.\n\n1. Click **Create a new request condition**.\n\n1. Enter a name for the condition.\n\n For example: `false`.\n\n1. Enter `false` in the **Apply if** field.\n\n1. Accept the default (`10`) in the **Priority** field\n\n1. Click **Create**.\n\n1. Select your new condition from the **Condition** drop-down list.\n\n 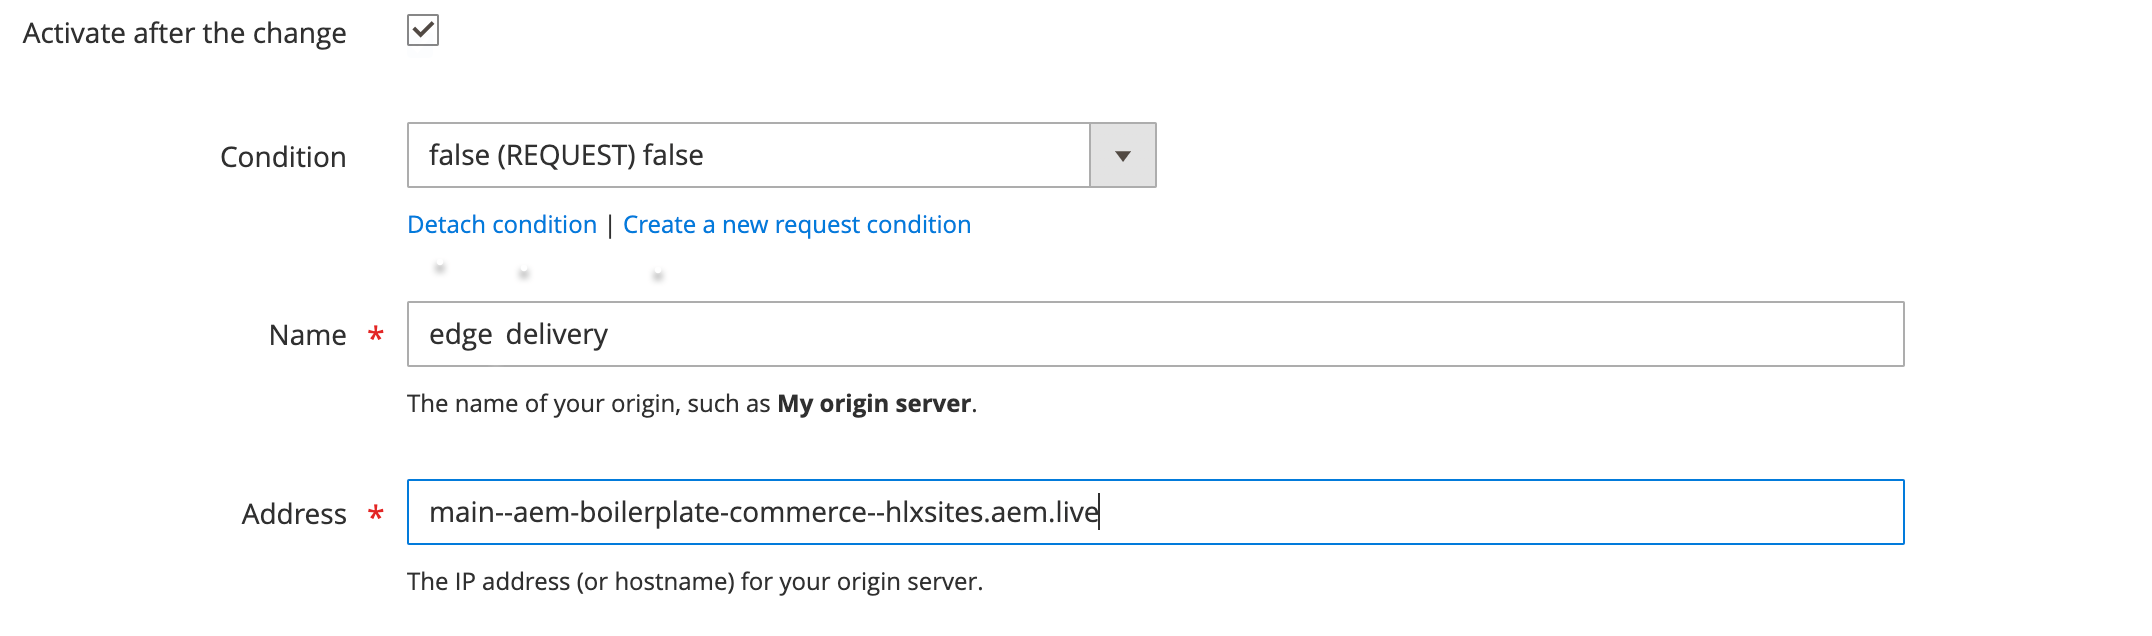\n\n :::caution\n Remember to also set this condition for the default Adobe Commerce backend. Otherwise, this condition can overwrite the changes made by the VCL conditions that you configure in the custom VCL snippets. You could also lose access to the Admin, which may require an Adobe Commerce Support ticket to resolve.\n :::\n\n1. Set Shielding to **(none)**.\n\n If you choose to use shielding, see the [shielding section](#shielding) for additional guidance.\n\n\nRepeat these steps for the Catalog Service GraphQL API endpoints (plus any other backends that you may require):\n\n* `https://catalog-service.adobe.io/graphql`\n* `https://catalog-service-sandbox.adobe.io/graphql`\n\n:::tip\nYou can also rename the Adobe Commerce backend from the generated name to simply `commerce`.\n:::\n\n## VCL configuration\n\nYour routing setup requires the following VCL snippets:\n\n* `recv`\n* `pass`\n* `miss`\n* `fetch`\n* `deliver`\n\nSee in the Fastly documentation for more information.\n\nThe VCL snippets on this page are a starting point that you can alter or extend to fit your use cases. There are also examples of potential extended use cases listed further down the page. The main purposes of the VCL snippets are to:\n\n* Correctly set the backend based on request path\n* Set the recommended priority setting for each snippet to determine the order in which they are executed (lower numbers are executed first)\n* Ensure that the requests do not receive extra caching or headers if they are going to a non-Adobe Commerce backend (achieved by returning early)\n* Improve performance for non-Adobe Commerce backends by rewriting some features, like compression, that would be provided by the default Adobe Commerce VCL\n\n:::tip\nIf you make a change or apply a new VCL snippet, it can take some time to propagate and apply to Fastly's system. It's a best practice to validate the latest change before continuing to other changes, otherwise you may introduce a bug and find it challenging to determine the root cause.\n\nIf you need to rename a snippet, delete it first and then recreate it with the new name to avoid this .\n:::\n\nTo apply these custom VCL snippets to your Adobe Commerce Fastly CDN service, see or use the Admin module.\n\n### recv\n\nThe following `recv` snippet does a simple redirect if `host` does not contain `www`. The snippet adds the string and then redirects to `https` using a . This is done in place of the **Auto-redirect to Base URL** setting in the Commerce Admin. The steps in the [Commerce configuration](#commerce-configuration) section instruct you to set **Auto-redirect to Base URL** to **No** based on this snippet.\n\n**Type**: `recv`\n\n**Priority**: `4`\n\n```txt\nif (req.http.host == \"aemshop.net\") {\n set req.http.host = \"www.aemshop.net\";\n error 801;\n}\n```\n\nThe following `recv` snippet has the following purpose:\n\n* Path-based routing for Edge Delivery Services, Catalog Service, and Adobe Commerce backends\n* Preparing the requests for the respective backends\n* Blocking access to non-production environments (non-production environments should not be indexed by search engines)\n\n**Type**: `recv`\n\n**Priority**: `100`\n\n```txt\nunset req.http.x-commerce;\n\n# Catalog Service\nif (req.url.path ~ \"^/cs-graphql$\") {\n # Disable Commerce WAF as it can interfere with some queries\n set req.http.bypasswaf = \"true\";\n\n # Forward to Catalog Service GraphQL\n set req.backend = F_catalog_service;\n set req.http.host = \"catalog-service.adobe.io\";\n set req.url = regsub(req.url, \"^/cs-graphql\", \"/graphql\");\n\n # Remove cookies\n unset req.http.Cookie;\n}\nelse if (req.url.path ~ \"^/(graphql|rest|oauth|media|checkout|customer|admin|static)($|/)\") {\n # Commerce routes, e.g. for product images, core GQL/Rest, Luma Bridge (any paths which should load Commerce origin)\n set req.backend = F_commerce;\n set req.http.x-commerce = \"true\";\n}\nelse\n{\n # Block access to non-prod configs\n if (req.url ~ \"^/configs-(stage|dev)\\.json$\") {\n error 404 \"Not Found\";\n }\n\n # Everything else is considered Edge Delivery Services\n set req.backend = F_edge_delivery;\n # Restore accepted encoding\n set req.http.Accept-Encoding = req.http.Fastly-Orig-Accept-Encoding;\n if (req.url.path !~ \"/media_[0-9a-f]{40,}[/a-zA-Z0-9_-]*\\.[0-9a-z]+$\"\n && req.url.ext !~ \"(?i)^(gif|png|jpe?g|webp)$\"\n && req.url.ext != \"json\"\n && req.url.path != \"/.auth\") {\n # trim the query string to improve caching\n set req.url = req.url.path;\n # replace some special characters with a dash because Edge doesn't support them\n set req.url = regsuball(req.url, \"[()]\", \"-\");\n\n }\n}\n```\n\n### pass\n\nIn the `pass` snippet, we set the correct host URL to fetch from depending on the backend that was selected in the `recv` snippet.\n\nIf it's not a request to Adobe Commerce, we skip (return `pass` will invoke `fetch`) the rest of the default `pass` VCL.\n\n**Type**: `pass`\n\n**Priority**: `30`\n\n```txt\nif (req.backend == F_edge_delivery) {\n set bereq.http.Host = \"main--aem-boilerplate-commerce--hlxsites.aem.live\";\n set bereq.http.X-BYO-CDN-Type = \"fastly\";\n set bereq.http.X-Push-Invalidation = \"enabled\";\n}\n\nif (!req.http.x-commerce) {\n return(pass);\n}\n```\n\n:::note\nChanges to the host header set here will require a Commerce Fastly cache purge due to .\n:::\n\n### miss\n\nSame as `pass`.\n\n**Type**: `miss`\n\n**Priority**: `30`\n\n```txt\nif (req.backend == F_edge_delivery) {\n set bereq.http.Host = \"main--aem-boilerplate-commerce--hlxsites.aem.live\";\n set bereq.http.X-BYO-CDN-Type = \"fastly\";\n set bereq.http.X-Push-Invalidation = \"enabled\";\n}\n\nif (!req.http.x-commerce) {\n return(fetch);\n}\n```\n\n:::note\nChanges to the Host header set here will require a Commerce Fastly cache purge due to .\n:::\n\n### fetch\n\nIf fetching from a backend other than Adobe Commerce, skip the rest of the because this is only relevant to Adobe Commerce backends.\n\n**Type**: `fetch`\n\n**Priority**: `30`\n\n```txt\nif (!req.http.x-commerce) {\n unset beresp.http.Set-Cookie;\n return(deliver);\n}\n```\n\n### deliver\n\nThis comes from the Edge Delivery Services .\n\n**Type**: `deliver`\n\n**Priority**: `30`\n\n```txt\nif (req.backend == F_edge_delivery) {\n unset resp.http.Age;\n\n if (req.url.path !~ \"\\.plain\\.html$\") {\n unset resp.http.X-Robots-Tag;\n }\n}\n```\n\n## Optional configuration\n\nThe following are optional configurations that can be added to the VCL snippets to handle specific use cases.\n\n### URL rewrites\n\nBe aware that URLs in Edge Delivery Services may only contain a-z, 0-9, and the dash (`-`) character (see ). You may need to create a CDN rule to rewrite/remove these characters.\n\nAs an example, consider one possible case where this applies with login referrer links. Luma may redirect to a page like `/login/referrer/<base64string>`. If the login page is implemented in Edge Delivery Services (with a Luma Bridge) and the base 64 string contains unsupported characters, this page will 404. Since the base64 part is only needed on the Edge Delivery Services client side to handle redirecting after a successful sign-in, this could be stripped for the request to the Edge Delivery Services backend.\n\n:::note\nThe exact cases where this needs to be performed, and the steps required, depend on the implementation of the Luma Bridge as well as customizations of Adobe Commerce.\n:::\n\n### GeoIP\n\nThe following example redirects users to a country-specific path based on their IP address. It uses the `country_to_store` table, which is a built-in Fastly table that maps country codes to store codes. You must install the Fastly CDN or to use this example.\n\nAdd the following to the `recv` snippet:\n\n```txt\n# Enable the GeoIP feature, allowing the VCL to use GeoIP data for various purposes, such as redirecting users based on their geographic location.\n\npragma optional_param geoip_opt_in true;\n\n# Snippet GeoIpRedirect\n declare local var.countryCode STRING;\n\n# Only apply redirection if the URL has no country-specific path\n\n# This snippet performs a GeoIP-based redirection. It checks if the request is made to the\n# \"example.com\" domain and if the URL path is either the root (\"/\") or empty. If these conditions are met, it\n# retrieves the user's country code based on their IP address using the `client.geo.country_code` variable.\n# It then looks up the corresponding store code from the `country_to_store` table. The user is redirected\n# to the appropriate country-specific URL.\n\nif ((req.http.host ~ \"example.com\") && ((req.url.path == \"/\") || (req.url.path == \"\"))) {\n # Retrieve the user's country based on IP address\n set var.countryCode = table.lookup(country_to_store, client.geo.country_code,\"us\");\n set req.http.X-Redirect-Url = \"https://\" + req.http.host + \"/\" + var.countryCode;\n if (req.url.qs != \"\") {\n set req.http.X-Redirect-Url = req.http.X-Redirect-Url + \"?\" + req.url.qs;\n }\n error 701;\n }\n# End of Snippet GeoIpRedirect\n\n# This table maps country codes to store codes. It is used in the GeoIP redirect logic to determine\n# the appropriate store URL based on the user's geographic location.\n\ntable country_to_store {\n \"FR\": \"fr\",\n \"AU\": \"au\",\n \"NZ\": \"nz\",\n \"CA\": \"ca\",\n ...\n}\n```\n\n### Proxy RUM through the origin to avoid a TLS handshake\n\nAdd a new backend called `hlx_rum` that points to `rum.hlx.page`. Also, change the implementation in `aem.js` to use a relative path to the origin instead of `rum.hlx.page`.\n\nAdd the following to the `recv` snippet:\n\n```txt\nif (req.url.path ~ \"^/\\.rum/\") {\n # AEM Real User Monitoring\n set req.backend = F_hlx_rum;\n unset req.http.Cookie;\n}\n```\n\n### Shielding\n\nIf you enable shielding in a backend, then conditions like `req.backend == F_commerce` may not work. For this reason, the snippets above use a header like `http.x-commerce` that is set/unset, which is then used instead of the direct backend variable.\n\n### Compression\n\nIn `fetch`, you can add compression for non-Adobe Commerce resources by adding this snippet to the `fetch` VCL:\n\n```txt\nif (!req.http.x-commerce) {\n unset beresp.http.Set-Cookie;\n if (beresp.http.content-type ~ \"(text/|/json|/javascript)\") {\n if (!beresp.http.Vary ~ \"Accept-Encoding\") {\n set beresp.http.Vary:Accept-Encoding = \"\";\n }\n if (req.http.Accept-Encoding == \"br\") {\n set beresp.brotli = true;\n } else if (req.http.Accept-Encoding == \"gzip\") {\n set beresp.gzip = true;\n }\n }\n return(deliver);\n}\n```\n\nSince the `deliver` VCL skips all the subsequent steps, the default compression settings are skipped. The snippet above is the same as in the default VCL, but copied again to be applied to responses that are not going to the Adobe Commerce backend.\n\n### Failover\n\nWe can support automatic failover from Edge Delivery Services to Adobe Commerce Luma pages on a 404 in Edge Delivery Services. To do this, add the following in your custom `fetch` snippet:\n\n```txt\nif (req.backend == F_edge && http_status_matches(beresp.status, \"404\")) {\n # See <https://www.fastly.com/documentation/solutions/examples/failover-to-a-secondary-backend/>\n set beresp.http.Vary:restarts = \"\"; # Add restart to vary key\n set beresp.cacheable = true; # Errors are not cacheable by default, so enable them\n set beresp.ttl = 5s; # Set a short ttl so the unfindable object expires quickly\n set beresp.http.do_failover = \"yes\";\n }\n```\n\nThen, in your custom `recv` snippet:\n\n```txt\nif (req.http.try-alt-origin) {\n set req.backend = F_commerce;\n set req.http.x-commerce = \"true\";\n set req.http.restarts = req.restarts; # Use restart value for vary key\n set req.http.Fastly-Force-Shield = \"1\";\n}\n```\n\nFactly-Force-Shield may be required to turn on clustering (not related to shielding despite the name).\n\nFlow of EDS request: In `recv`, hits Edge Delivery Services case, then goes to `miss`, then goes to `fetch`, `fetch` returns 404 and sets retry (as snippet above), and `deliver` calls `restart`.\n\nIf we are using Fastly shielding, we need to have `fastly.ff.visits_this_service == 0` in the `deliver` snippet, before `restart`, otherwise it can be that ESI doesn't work.\n\n```txt\nif (fastly.ff.visits_this_service == 0 && !req.http.try-alt-origin && resp.http.do_failover == \"yes\") {\n set req.http.try-alt-origin = \"1\";\n set req.url = req.http.Magento-Original-URL;\n return (restart);\n}\n```\n\nIt is not recommended to handle all paths that need to be routed to Luma like this, but still hardcode those that are known, in order to reduce load of 404s on Edge Delivery Services.\n\n### API Mesh\n\nAPI Mesh has a header size limit. You must remove third-party cookies if you're using API mesh. Add this in the graphql section of `recv` snippet:\n\n```txt\nif (req.http.Cookie) {\n # Remove all 3rd-party cookies\n # API Mesh has a header size limit\n set req.http.Cookie = \";\" + req.http.Cookie;\n set req.http.Cookie = regsuball(req.http.Cookie, \"; +\", \";\");\n set req.http.Cookie = regsuball(req.http.Cookie, \";(PHPSESSID|X-Magento-Vary|form_key|private_content_version|mage-messages|persistent_shopping_cart|fastly_geo_store)=\", \"; \\\\1=\");\n set req.http.Cookie = regsuball(req.http.Cookie, \";[^ ][^;]*\", \"\");\n set req.http.Cookie = regsuball(req.http.Cookie, \"^[; ]+|[; ]+$\", \"\");\n if (req.http.cookie ~ \"^\\\\s*$\") {\n unset req.http.cookie;\n }\n }\n```\n\n### Branch names on staging\n\nYou can enable the use of Edge Delivery Services branches on a staging URL (for example, `branch1.my-staging.com`). Use regex to get the domain name with this addition to the `miss` snippet:\n\n```txt\nif (req.backend == F_edge) {\n if (req.http.Host ~ \"^([^.]+)\\\\.([^.]+)\\\\.example\\\\.com$\") {\n set bereq.http.Host = re.group.1 + \"--your-eds-url.aem.page\";\n } else {\n set bereq.http.Host = \"your-eds-url.aem.live\";\n }\n set bereq.http.X-BYO-CDN-Type = \"fastly\";\n set bereq.http.X-Push-Invalidation = \"enabled\";\n}\n```\n\nIn the domains configuration, you must use a wildcard. Since the Commerce Admin doesn't let you do this, you must do it using the Fastly CLI (which also shows the wildcard URL in the Admin).\n\n### Maintenance page workaround\n\nThe maintenance page can block requests to API Mesh/GraphQL. The solution is to create a VCL snippet with low priority that comes before the maintenance check in VCL and allows GraphQL requests through.\n\n### Multiple set-cookie headers workaround\n\nThere's a known issue with multiple `set-cookie` headers in API Mesh. See the following snippet for a workaround\n\n```txt\nif (req.http.x-mesh == \"true\") {\n # There's a bug in API MESH that combines multiple set-cookie headers\n # Let's remove these cookies from the response\n declare local var.ignored BOOL;\n set var.ignored = setcookie.delete_by_name(beresp, \"private_content_version\");\n set var.ignored = setcookie.delete_by_name(beresp, \"form_key\");\n set var.ignored = setcookie.delete_by_name(beresp, \"authentication_flag\");\n set var.ignored = setcookie.delete_by_name(beresp, \"dataservices_customer_id\");\n set var.ignored = setcookie.delete_by_name(beresp, \"dataservices_customer_group\");\n set var.ignored = setcookie.delete_by_name(beresp, \"dataservices_cart_id\");\n return (pass);\n}\n```\n\n:::note\n`x-mesh` header is just an example. It would be added in API Mesh to use as determination in routing of VCL (for example, `x-commerce-bypass-fastly-cache`).\n:::\n\n## Commerce configuration\n\nIf you are using the VCL to do the APEX redirect (`aemshop.net` → `www.aemshop.net` with 801 error), you should do two things in the Adobe Commerce backend:\n\n1. Disable `auto-redirect`.\n1. Set the `base_url` and `secure_base_url` settings to your domain, including `www`.\n\nFollow these steps:\n\n\n1. Log in to the Adobe Commerce Admin.\n\n1. Click **Stores** > _Settings_ > **Configuration** > **General** > **Web**.\n\n1. Expand the **URL options** section.\n\n1. Set **Auto-redirect to Base URL** to **No**.\n\n1. Expand the **Base URLs** section.\n\n1. Set the **Base URL** and **Secure Base URL** to your domain, including `www`.\n\n For example: `https://www.aemshop.net/`\n\n1. Expand the **Base URLs (Secure)** section.\n\n1. Set the **Secure Base URL** to your domain, including `www`.\n\n For example: `https://www.aemshop.net/`\n\n1. Click **Save Config**.\n\n\n## Edge Delivery Service configuration\n\nTo obtain a purge API token for Fastly, you must contact Adobe Commerce Customer Support.\n\nThen, follow the instructions in . The remaining configuration described on this page is already taken care of by applying the VCL snippets above.\n\n## Validation\n\nTo validate your CDN setup, use `curl` requests to check expected responses from the paths you have configured.\n\n### Content encoding, surrogate key, and cache\n\nValidate that surrogate key, cache hits, and content encoding are working as expected by requesting an Edge Delivery Services-served asset from your Commerce domain. Ensure you are checking a warm cache by making the request at least twice. The following examples are to a warmed cache.\n\nHere is an example of validation against an Adobe staging environment:\n\n```bash\ncurl -sI -H 'Fastly-Debug: 1' https://www.aemshop.net/scripts/aem.js | grep 'x-cache\\|surrogate-key\\|cache-control'\n```\n\n```txt\ncontent-encoding: gzip\nsurrogate-key: develop--aem-boilerplate-commerce--hlxsites develop--aem-boilerplate-commerce--hlxsites_code E3hjdgev7F5OyPUD\nx-cache: MISS, HIT, HIT, HIT\nx-cache-hits: 0, 37, 1, 0\n```\n\n* `content-encoding`: Should be `gzip` or `br` for things like JS assets and HTML files, which should be encoded from origin.\n* `surrogate-key`: Should not be `text`. If the value is `text`, make sure you have correctly configured the `fetch` VCL snippet to return `deliver` for Edge Delivery Servicespaths.\n\n The reason for this validation step is that the sets this. This overwrites the Edge Delivery Services surrogate key, which is required for cache invalidation to work correctly when a page is re-published.\n\n* `x-cache`: Should contain `HIT` entries. The last entry should be `HIT` (`MISS`, `HIT`, `MISS`, `HIT`) is ok.\n\nAlso, make sure that you validate `gzip` encoding is applied to HTML pages:\n\n```bash\ncurl -sI -H 'accept-encoding: gzip, deflate, br, zstd' https://www.aemshop.net | grep content-encoding\n```\n\n```txt\ncontent-encoding: gzip\n```\n\n```bash\ncurl -sI -H 'accept-encoding: gzip, deflate, br, zstd' https://www.aemshop.net/index.plain.html | grep content-encoding\n```\n\n```txt\ncontent-encoding: gzip\n```\n\nValidate the CDN configuration with the BYOCDN . Additionally, preview and publish a document and validate that the changes are correctly reflected.\n\n```bash\ncurl -Is --http2 https://www.aemshop.net | grep 'HTTP/2'\n```\n\n```txt\nHTTP/2 200\n```\n\nValidate that all requests are using `HTTP/2` or `HTTP/3` connections.\n\n```bash\ncurl -Is -L https://aemshop.net | grep location\n```\n\n```txt\nlocation: https://www.aemshop.net/\n```\n\nTo validate the APEX redirect, observe the location header returned by a request to the domain without `www`.\n\n### Image optimization\n\nValidate that images are encoded with the expected format. If you get back `image/jpeg` this indicates an issue, probably Commerce Fastly is rewriting the content type header. You'll need to validate the VCL snippets.\n\nTo validate Edge Delivery Services, ensure you check some content expected to be served from the Edge Delivery Services origin (such as the hero banner).\n\n```bash\ncurl -sI -H \"Accept: image/webp\" 'https://www.aemshop.net/media_1b6ab8fa5166c1d9ab57a109f4f97b8e950a3ed84.png?width=2000&format=webply&optimize=medium' | grep 'content-type'\n```\n\n```txt\ncontent-type: image/webp\n```\n\nTo validate Commerce, ensure you check some content expected to be served from the Adobe Commerce origin (such as a product image).\n\n```bash\ncurl -sI -H \"Accept: image/webp\" 'https://www.aemshop.net/media/catalog/product/adobestoredata/ADB150.jpg?auto=webp&quality=80&crop=false&fit=cover&width=960&height=1191' | grep 'content-type'\n```\n\n```txt\ncontent-type: image/webp\n```\n\n### Commerce cache\n\nEnsure that GraphQL `GET` requests result in cache HITs.\n\n```bash\ncurl -sI 'https://www.aemshop.net/graphql?query=query+STORE_CONFIG_QUERY+%7B+storeConfig+%7B+minicart_display%7D+%7D' | grep x-cache\n```\n\n```txt\nx-cache: HIT\nx-cache-hits: 1\n```\n\n### Commerce base URL\n\nEnsure that the base URL change is propagated to Catalog Service. You can do this with a query against your Catalog Service API to verify that the URLs for product images contain the APEX domain, including `www`. This is to prevent a redirect and subsequent load for images not including the APEX domain.\n\n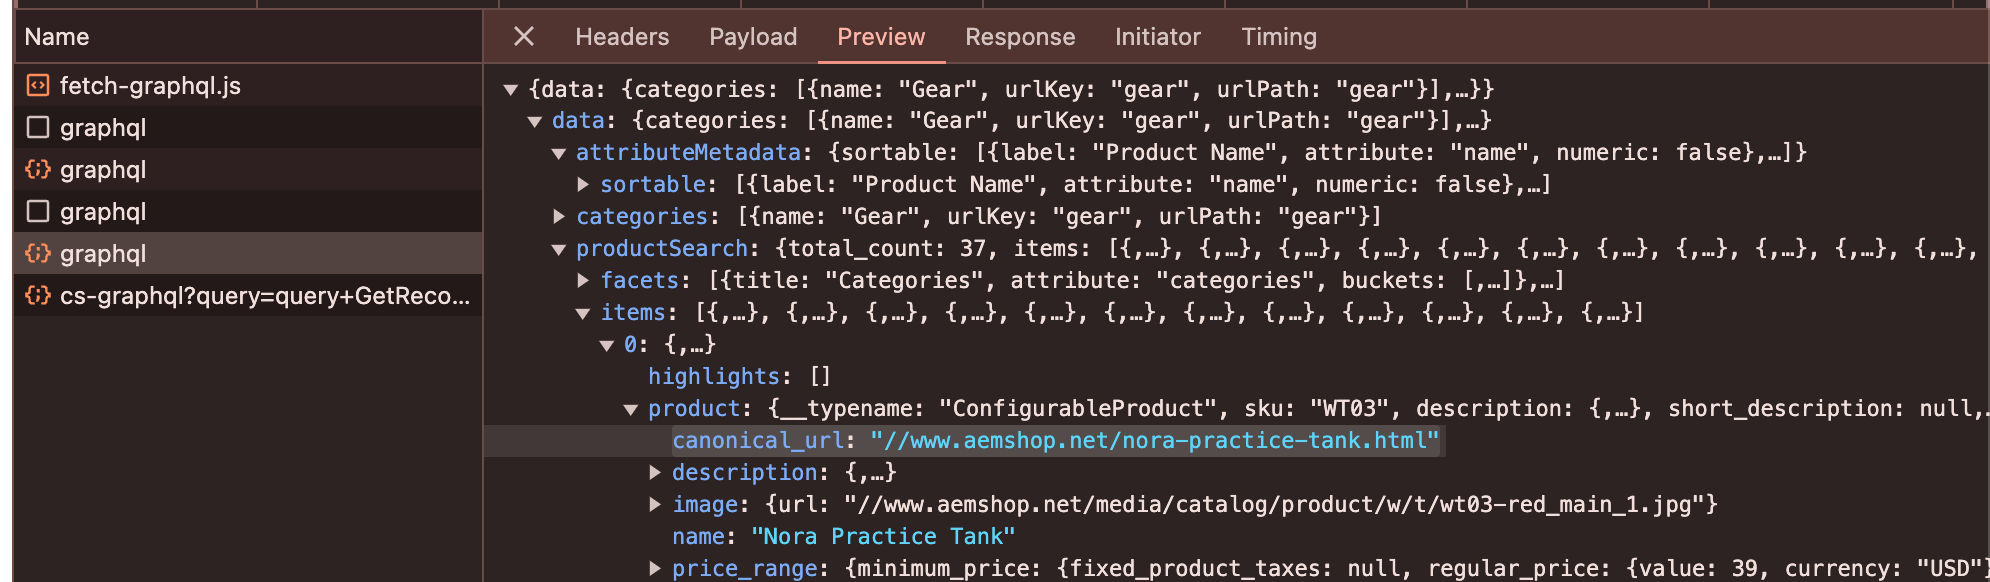\n\n## Troubleshooting\n\n> **It's confusing - we get it**\n>\nFastly VCL and CDN configuration can be a bit overwhelming at first. Here's a collection of troubleshooting steps that might help you if you have problems.\n\n\n### Fastly API quick reference\n\nWith your Fastly API Token you can make requests against the Fastly API for information or data that may be otherwise inaccessible. You can find your API Token in your Commerce Admin view under **Stores** > **Settings** > **Configuration** > **Advanced** > **System** > **Full Page Cache** > **Fastly Configuration**.\n\nHere's a quick reference of things you can do with your API Token. See for more details.\n\n```bash\n# retrieve active version\ncurl -H \"Fastly-Key: API_TOKEN\" \"https://api.fastly.com/service/SERVICE_ID/version\"\n\n# retrieve full, generated VCL\ncurl -H \"Fastly-Key: API_TOKEN\" \"https://api.fastly.com/service/SERVICE_ID/version/VERSION/generated_vcl\"\n\n# retrieve all snippets\ncurl -H \"Fastly-Key: API_TOKEN\" \"https://api.fastly.com/service/SERVICE_ID/version/VERSION/snippet\"\n```\n\n### Missing snippets\n\nFastly maintains a \"version\" of your snippets remotely on their servers. These versions are never pulled \"down\" to your Commerce environment, but can be \"pushed\" from your environment to Fastly. Unintentional local changes can cause things to become out of sync.\n\nFor example, renaming a snippet actually creates a new snippet with the new name, and does not delete the old one. You should not rename snippets unless you must. See for more information.\n\nYour environment stores custom VCL snippets in the `var/vcl_snippets_custom/` directory. If you delete that directory or its contents, you will not be able to view, edit, or modify the snippets, even though they remain active in Fastly.\"\n\nTo resolve this, you should use the Fastly API to \"pull\" all snippets and then place them back in that folder (with permission **775**). The following table details how to construct the file correctly:\n\n| `var` directory filename | Admin Panel Field | Fastly Fields |\n|--------------------------------|----------------------------------------------|--------------------------------------------------------|\n| _recv_100_snippetrecv.vcl_ | Type: _recv_ \n Priority: _100_ \n Name: _snippetrecv_ | Type: _recv_ \n Priority: _100_ \n Name: _magentomodule_snippetrecv_ |"
|
|
53
|
+
},
|
|
54
|
+
{
|
|
55
|
+
"path": "setup/configuration/cors-setup",
|
|
56
|
+
"title": "CORS Setup",
|
|
57
|
+
"description": "Quick guide to configuring CORS headers for Adobe Commerce GraphQL endpoints.",
|
|
58
|
+
"content": "Cross-Origin Resource Sharing (CORS) is a browser security feature that restricts web pages from making requests to a different domain than the one serving the page. CORS is required when your storefront runs on a different domain or port than your Adobe Commerce backend.\n\n \n\n> **Production recommendation**\n>\nCORS should be a last resort for production. Prefer same-origin delivery of the storefront and API (for example, via Fastly VCL) to avoid CORS entirely.\n\nBut during development, it's a common scenario for storefronts to run on a different domain or port than the Adobe Commerce backend, so CORS is required. Without CORS, browsers will block cross-origin requests and you'll see errors like the following in the browser console:\n\n```txt\nAccess to fetch at 'https://commerce.example.com/graphql' from origin 'http://localhost:3000' has been blocked by CORS policy: No 'Access-Control-Allow-Origin' header is present\n```\n\n\n## Quick test: Is CORS working?\n\nAdobe Commerce uses `/graphql` as the GraphQL endpoint, and this is the primary endpoint that requires CORS configuration. If you already have CORS configured, test it by replacing `YOUR_STOREFRONT_URL` with your actual frontend URL:\n\n```bash\ncurl -I -X OPTIONS https://your-commerce-backend.com/graphql \\\n -H \"Origin: YOUR_STOREFRONT_URL\" \\\n -H \"Access-Control-Request-Method: POST\"\n```\n\nLook for these headers in the response:\n- `Access-Control-Allow-Origin: YOUR_STOREFRONT_URL` (or `*` if using a wildcard)\n- `Access-Control-Allow-Methods: GET, POST, OPTIONS`\n\nIf you see these headers with your storefront URL, CORS is configured correctly. If not, follow the setup steps below.\n\n## Quick steps\n\n\n### Add CORS support\n\nTo add CORS headers to your Adobe Commerce GraphQL endpoints, you have several options:\n\n- **Server configuration**: Configure CORS headers at the web server level (, )\n- **Third-party module**: Use a community module such as \n- **Custom module**: Implement a custom Adobe Commerce module to add CORS headers\n\n> **Support scope**\n>\nThird-party modules and custom module implementations are outside the scope of Adobe Commerce support. For production environments, Adobe recommends server-level configuration or same-origin delivery to avoid CORS requirements entirely.\n\n\nRefer to your chosen implementation's documentation for specific configuration steps.\n\n\n### Configure CORS settings\n\nConfigure your CORS implementation to allow requests from your storefront domain(s) to your Adobe Commerce GraphQL endpoint.\n\nAt minimum, you'll need to configure:\n- **Allowed origins**: Your storefront domain(s) (for example, `http://localhost:3000`, `https://your-storefront.com`)\n- **Allowed methods**: `GET`, `POST`, `OPTIONS`\n- **Allowed headers**: `Content-Type`, `Authorization`, `X-Requested-With`\n\nRefer to your chosen implementation's documentation for specific configuration steps.\n\n\n### Test your CORS configuration\n\nOpen your storefront in a browser and check the Network tab in DevTools:\n- Look for preflight `OPTIONS` requests to your GraphQL endpoint\n- Verify the response includes headers like:\n - `Access-Control-Allow-Origin: <your-storefront-url>` (or `*` if using a wildcard)\n - `Access-Control-Allow-Methods: GET, POST, OPTIONS`\n - `Access-Control-Allow-Headers: Content-Type, Authorization`\n\nIf configured correctly, your GraphQL requests should succeed without CORS errors.\n\n\n## Common pitfalls\n\n> **Avoid these common mistakes**\n>\n\n**Forgetting to clear cache:** After changing CORS settings, always run `bin/magento cache:flush`. A stale cache is the primary cause of \"it's not working\" reports.\n\n**Using `*` with credentials:** You cannot use a wildcard `*` origin when `Allow Credentials` is enabled. Browsers will block the request.\n\n**Missing the `OPTIONS` method:** All CORS requests start with an OPTIONS preflight request. If you forget to include `OPTIONS` in **Allowed Methods**, all CORS requests will fail.\n\n\n## Next steps\n\nIf you encounter issues or need detailed configuration guidance, see [CORS Troubleshooting](https://experienceleague.adobe.com/developer/commerce/storefront/setup/configuration/cors-troubleshooting/)\n\n## References\n\n- - MDN Web Docs on Cross-Origin Resource Sharing\n- - MDN documentation on common CORS error messages"
|
|
59
|
+
},
|
|
60
|
+
{
|
|
61
|
+
"path": "setup/configuration/cors-troubleshooting",
|
|
62
|
+
"title": "CORS Troubleshooting",
|
|
63
|
+
"description": "Diagnose and resolve CORS issues with Adobe Commerce GraphQL endpoints, including common errors, debugging techniques, and browser network inspection.",
|
|
64
|
+
"content": "This guide helps you diagnose and resolve CORS issues with Adobe Commerce GraphQL endpoints.\n\n\n## Common CORS errors\n\nThe following are standard CORS errors enforced by browser security policies. These error messages appear in the browser console (DevTools).\n\n<Options label=\"Error\" numbered=>\n\n<Option>\n\n### No 'Access-Control-Allow-Origin' header\n\n```txt\nAccess to fetch at 'https://commerce.example.com/graphql' from origin 'http://localhost:3000' \nhas been blocked by CORS policy: No 'Access-Control-Allow-Origin' header is present on the \nrequested resource.\n```\n\n#### Cause\n\nCORS headers are not being sent by your Commerce backend. This could mean:\n- CORS support is not configured\n- The origin is not in the allowed list\n- The configuration cache needs to be cleared\n\n#### Solution\n\n- Verify CORS is configured. See [CORS Setup](https://experienceleague.adobe.com/developer/commerce/storefront/setup/configuration/cors-setup/) if not configured yet.\n- Add your storefront origin to the allowed origins list\n- Clear the cache: `bin/magento cache:flush`\n\n</Option>\n\n<Option>\n\n### Origin not allowed\n\n```txt\nAccess to fetch at 'https://commerce.example.com/graphql' from origin 'http://localhost:3000' \nhas been blocked by CORS policy: The 'Access-Control-Allow-Origin' header has a value \n'https://storefront.example.com' that is not equal to the supplied origin.\n```\n\n#### Cause\n\nThe requesting origin is not in the allowed origins list.\n\n#### Solution\n\nAdd the exact origin (including protocol and port) to the Allowed Origins configuration.\n\n</Option>\n\n<Option>\n\n### Credentials flag issue\n\n```txt\nAccess to fetch at 'https://commerce.example.com/graphql' from origin 'http://localhost:3000' \nhas been blocked by CORS policy: The value of the 'Access-Control-Allow-Origin' header in the \nresponse must not be the wildcard '*' when the request's credentials mode is 'include'.\n```\n\n#### Cause\n\nYou have `Allow Credentials` enabled but are using `*` for allowed origins.\n\n#### Solution\n\nReplace `*` with specific origins when credentials are required.\n\n</Option>\n\n</Options>\n\n### Common issues\n\nIf you encounter CORS errors after installing `adobe-commerce/storefront-compatibility`, verify that your CORS implementation is compatible with Adobe Commerce Storefronts. If using the graycore module, ensure v2.x or later is installed.\n\n## Debug checklist\n\n<Options label=\"Item\" numbered=>\n\n<Option>\n\n### Verify CORS is configured\n\nIf using a CORS module, check that it's installed and enabled:\n\n```bash\n# List all enabled modules\nbin/magento module:status | grep -i cors\n```\n\nIf using a custom CORS implementation, verify your code is deployed and active.\n\n</Option>\n\n<Option>\n\n### Verify CORS configuration\n\nCheck your CORS configuration and confirm:\n- Your storefront origin is in the Allowed Origins list\n- Origins match exactly (including protocol and port)\n- No trailing slashes in origins\n- Allowed Methods includes `OPTIONS`\n- Allowed Headers includes all headers your storefront sends\n\nSee [CORS Setup](https://experienceleague.adobe.com/developer/commerce/storefront/setup/configuration/cors-setup/) for configuration details.\n\n</Option>\n\n<Option>\n\n### Inspect browser network traffic\n\nOpen DevTools > Network tab and look for:\n\n#### Preflight OPTIONS request\n\n```txt\nRequest URL: https://commerce.example.com/graphql\nRequest Method: OPTIONS\n```\n\nExpected response headers:\n```txt\nAccess-Control-Allow-Origin: http://localhost:3000\nAccess-Control-Allow-Methods: GET, POST, OPTIONS\nAccess-Control-Allow-Headers: Content-Type, Authorization\nAccess-Control-Max-Age: 86400\n```\n\n#### Actual GraphQL POST request\n\n```txt\nRequest URL: https://commerce.example.com/graphql\nRequest Method: POST\n```\n\nExpected response headers:\n```txt\nAccess-Control-Allow-Origin: http://localhost:3000\nAccess-Control-Allow-Credentials: true\n```\n\n</Option>\n\n<Option>\n\n### Check server logs\n\nIf CORS headers are present but requests still fail:\n\n```bash\ntail -f var/log/system.log\ntail -f var/log/exception.log\n```\n\nLook for PHP errors, GraphQL exceptions, or module conflicts.\n\n</Option>\n\n<Option>\n\n### Clear all caches\n\nAfter any configuration changes:\n\n```bash\nbin/magento cache:flush\nbin/magento cache:clean\n```\n\nSome CORS configurations may also be cached in Varnish/Fastly if applicable.\n\n</Option>\n\n</Options>\n\n## Distinguishing CORS errors from server-side errors\n\nWhen debugging, it's important to distinguish CORS policy failures from server-side GraphQL exceptions. Here's an example of a server-side error that might be mistaken for a CORS issue: \n\n```txt\n{\n \"message\": \"Internal server error\",\n \"extensions\": {\n \"debugMessage\": \"Magento\\\\InventoryConfiguration\\\\Model\\\\IsSourceItemManagementAllowedForProductType\\\\Interceptor::execute(): Argument #1 ($productType) must be of type string, null given\"\n }\n}\n```\n\nThis indicates a PHP/GraphQL issue (inventory configuration or compatibility) and not a missing Access-Control-Allow-Origin header.\n\n## Edge cases and special scenarios\n\n### Docker and containerized environments\n\nWhen running Commerce in Docker, you may need to add multiple origin variations:\n\n```txt\nhttp://localhost:3000\nhttp://127.0.0.1:3000\nhttp://host.docker.internal:3000\n```\n\n> **Docker hostname variations**\n>\nDocker networking can cause your browser to use different hostnames for the same service, so you need to add all variations.\n\n\n### Multiple storefronts\n\nFor multiple storefronts accessing the same Commerce backend, add each origin separately:\n\n```txt\nhttps://storefront-us.example.com\nhttps://storefront-eu.example.com\nhttps://storefront-asia.example.com\n```\n\nEach storefront is treated as a separate origin and must be explicitly allowed.\n\n## Production best practices\n\nThe recommended production approach is to avoid CORS entirely by serving both the storefront and the backend from the same domain using a CDN proxy.\n\n### Same-origin architecture (recommended)\n\nServe both your storefront and Commerce backend from the same domain:\n\n- Storefront: `https://example.com` → CDN serves static assets\n- GraphQL API: `https://example.com/graphql` → CDN proxies to Commerce backend\n\nThis requires configuring your CDN to proxy `/graphql` requests to your Commerce backend.\n\n**Benefits:**\n- No CORS complexity\n- Better performance (fewer preflight requests)\n- Simpler security model\n- Better caching control\n\n**Implementation approaches:**\n\n\n1. **Fastly VCL routing:**\n Configure Fastly to route GraphQL requests to your Commerce backend using VCL (Varnish Configuration Language). The VCL detects requests to `/graphql` and proxies them to your backend origin while serving other requests from your storefront origin.\n\n2. **Cloudflare Workers / CDN Edge Functions:**\n Use edge functions to route API requests to your backend dynamically.\n\n3. **Reverse proxy (Nginx/Apache):**\n Configure your web server to proxy `/graphql` requests to the backend.\n\n\n**Note:** This approach requires CDN/infrastructure expertise. If you don't have these resources, use CORS configuration instead.\n\n### CORS configuration\n\nIf you must use different domains (for example, `storefront.example.com` → `commerce.example.com`), use CORS configuration. Use specific allowed origins for single production domains, or a wildcard `*` when you have multiple dynamic preview URLs (such as Edge Delivery Services branch previews).\n\n## References\n\n### CORS standards and specifications\n\n- - MDN Web Docs on Cross-Origin Resource Sharing\n- - MDN documentation on common CORS error messages\n- - Complete list of CORS-related HTTP headers\n- - How browsers use OPTIONS requests for CORS\n\n### Adobe Commerce\n\n- - Official documentation for Magento CLI commands used in this guide\n- - GraphQL API documentation\n\n### Additional tools and platforms\n\n- - PHP dependency manager used for module installation\n- - Understanding Docker hostname resolution for CORS origins\n- - For implementing same-origin architecture with Fastly CDN routing"
|
|
65
|
+
},
|
|
66
|
+
{
|
|
67
|
+
"path": "setup/configuration/gated-content",
|
|
68
|
+
"title": "Gated content",
|
|
69
|
+
"description": "Learn how to implement gated content for assets that are not managed by Adobe Commerce.",
|
|
70
|
+
"content": "If your site is not managed by Adobe Commerce, you might want to restrict access to certain content, such as videos, images, or pages on your site. This content resides on the edge and cannot be controlled using customer segments or other Commerce functionality. You can restrict access to these non-Commerce assets using gated content.\n\n## Big picture\n\nThere are several things to know to implement this feature.\n\n* Gated content is displayed only if the customer is logged in and their authentication token is valid. Anonymous users cannot access gated content.\n\n* You must define the gated content. In most cases, you define the path to the gated content in the `header` document. This file contains a list of URLs that are gated and defines a key/value pair for your custom code to evaluate. (You can also hardcode URLs in your custom code, but this information is easier to maintain in the spreadsheet.) The spreadsheet contains three columns:\n\n * `url` - The path to the gated content. Wildcards are supported.\n * `key` - Any key that you want to use to evaluate whether the content is gated.\n * `value` - `True` or other value to be evaluated.\n\n* You must create custom code that evaluates whether access to the content is gated. CDNs typically do not provide the ability to evaluate whether a user is authenticated. As a result, you must implement an auxiliary service, such as Fastly Compute, Amazon Lambda, or Cloudflare workers to perform the evaluation. This code must be able to send an authentication request to Adobe Commerce and process the result. The request is typically a simple GraphQL query, such as the `customer` query, but you can use any query or mutation that checks if the customer is authenticated.\n\n## Workflow\n\nThe following diagram illustrates the workflow when gated content is enabled.\n\n<Diagram caption=\"Gated content workflow\">\n\n</Diagram>\n\nThe shopper requests a page on the storefront. The request is sent to the CDN (Fastly in this case), which then routes it to Edge Delivery Services. Edge Delivery Services returns the requested document with headers defined in the `header` document. Fastly Compute checks whether the requested page is considered gated content based on the headers returned by Edge Delivery Services or by comparing it with a hardcoded list of gated content. If the header defined in the `header` document is not present, or if the requested URL is not in the hardcoded gated content list, the request is processed normally.\n\nIf the requested page is gated, the Fastly Compute code uses the customer token to construct an authorization request to Adobe Commerce. If the customer is authenticated, the request is allowed to pass through. If the customer is not authenticated, the request is redirected to a fallback page, such as a login page.\n\n## Example implementation\n\nYou can [download a sample solution](https://experienceleague.adobe.com/developer/commerce/storefront/samples/fastly-compute-sample.zip) that provides an outline of how to implement gated content using Fastly Compute. This sample is based on Fastly's .\n\n> **Important**\n>\n Adobe does not support this example implementation. It is provided as a reference only.\n\n\nThe README provides an overview of the solution and how to install the starter kit. The `index.js` file contains a Fastly Compute@Edge script that handles incoming HTTP requests and performs user authentication for specific protected URLs."
|
|
71
|
+
},
|
|
72
|
+
{
|
|
73
|
+
"path": "setup/configuration/multistore-setup",
|
|
74
|
+
"title": "Multistore setup",
|
|
75
|
+
"description": "Learn how to set up a multistore configuration for multiple languages, regions, or brands from a single codebase.",
|
|
76
|
+
"content": "**Multistore** enables you to run multiple storefronts from a single codebase and content repository. Each storefront can serve different languages, currencies, regions, or brands while sharing core code and maintaining unified content delivery.\n\n## What is multistore?\n\nMultistore is useful for:\n\n- **Localization**: Serving different languages and currencies (for example, English/US, French/Canada) from the same site, with localized content and Commerce data.\n- **Multiple Brands or Regions**: Operating several brands or regional storefronts, each with their own configuration, but sharing core code and content.\n\nThere are two main approaches to multistore:\n\n1. **Multiple Domains**: Each domain points to a different commerce backend or configuration, but shares the same code and content.\n2. **Subfolders (Root Folders)**: A single domain with subfolders (such as `/en/`, `/fr/`) for each locale or store. Each subfolder can have its own localized content and Commerce configuration.\n\n**Key features:**\n- **Editorial and Commerce Localization**: Editorial content (pages, blocks) and commerce data (products, prices, currencies) are both localized.\n- **Automated Translation Tools**: Tools are provided to automate translation of content and manage updates across languages.\n- **Configurable Headers**: Storefronts can send different headers to the commerce backend to select the correct store, language, and currency.\n- **Store Switcher**: Out-of-the-box UI enables users to switch between stores and locales.\n- **Automatic Link Management**: Links are automatically updated to point to the correct localized version as users navigate.\n\n## How it works\n\nAdobe Commerce uses a to manage multiple stores within a single instance. This structure consists of three levels: websites, stores, and store views. Localization is managed at the store view level, allowing merchants to present the store in different languages and apply the proper currency.\n\nEach store or locale is defined in configuration files, specifying which headers to send to the commerce backend, which content folders to use, and how to structure localized content. The content hierarchy follows best practices, emphasizing a single-tier structure.\n\n### Content organization\n\nContent is organized primarily by language. US English files should be placed in the `en` directory of the project root. All other language- and region-specific files should be placed in a directory that is named in the format `language-code-region-code` (using hyphens). For example, the `/en/` directory contains data for the US market, while the `/en-ca/` directory contains data for Canada. French content should be placed in directories with names like `fr-fr` for France and `fr-ca` for Canada.\n\n\n- **/en/** _-- English store (Default root language)_\n - placeholders/ _-- Stores JSON files for text and UI components for the English US store._\n - index _-- The home page of the English US store._\n - store-switcher _-- Manages the list of stores and their URL for the English US store._\n- **/en-ca/** _-- English Canadian Store_\n - placeholders/ _-- Defines JSON files for text and UI components for the Canadian store._\n - index _-- The home page of the English Canadian store._\n - store-switcher _-- Manages the list of stores and their URL for the Canadian store._\n\n\n### Store-specific files\n\nEach store view requires specific files to define the customer experience:\n\n**Store switcher**: Each store view has its own `store-switcher` document file (called a fragment). This fragment provides the list of stores to select from by language. The store-switcher component renders a button in the footer that opens a modal containing the stores listed in this document.\n\n**Content files**: The content files provide the structure of the pages served to your shoppers. They are located in the store view directories and contain the content for each store view. These files are documents hosted on da.live (Document Authoring environment), SharePoint, or Google Docs that are used to generate the store view pages.\n\n**Placeholders**: JSON files that define reusable variables for text and UI components. Each drop-in component has its own placeholder file—`cart.json`, `checkout.json`, `pdp.json`. These files replace variables in your content files with text values.\n\n**Merchant guidance:** For translating placeholder files, see [Commerce localization tasks](https://experienceleague.adobe.com/developer/commerce/storefront/merchants/quick-start/content-localization-commerce-tasks/).\n\n**Developer guidance:** For technical implementation details, see [Labeling and Localizing Drop-In Components](https://experienceleague.adobe.com/developer/commerce/storefront/dropins/all/labeling/).\n\n## Prerequisites\n\nBefore implementing multistore functionality, ensure you have:\n\n- Your storefront repository linked to Document Authoring environment (da.live) via Edge Delivery Services\n- Access to Adobe Commerce Admin for \n- Your [Storefront Configuration](https://experienceleague.adobe.com/developer/commerce/storefront/setup/configuration/commerce-configuration/) set up and pointing to the Adobe Commerce instance\n- Familiarity with \n- Understanding of [Storefront Configuration](https://experienceleague.adobe.com/developer/commerce/storefront/setup/configuration/commerce-configuration)\n- Knowledge of \n\n---\n\n## Implementation walkthrough\n\nThis walkthrough demonstrates the complete process from initial planning to final validation, using a real-world scenario where the Acme brand expands from the United States to the Canadian market with two new locales: Canadian English (`en-ca`) and Canadian French (`fr-ca`).\n\n\n### Verify environment setup\n\nBefore implementing multistore functionality, confirm your environment is properly configured.\n\n\n1. **Verify the code sync bot** is installed on your repository. This automatically configures your site's content pointer to the Document Authoring environment at da.live.\n\n2. **Verify the `config.json` file** (or Configuration Service) is connected to your Adobe Commerce instance to enable content preview, publishing, and editing.\n\n\n> **Environment setup**\n>\nThis verification step is crucial as it ensures you can properly preview and publish content for your new store views.\n\n\n### Create the content folder structure\n\nSet up the folder structure in your Document Authoring environment to support the new store views.\n\n\n1. **Navigate to the connected content folder** in da.live.\n\n2. **Create the Canadian English folder**:\n - Select \"New folder\"\n - Name it `en-ca`\n\n3. **Create the Canadian French folder**:\n - Select \"New folder\"\n - Name it `fr-ca`\n\n4. **Copy content from the default root folder** into each new store view folder:\n - Select all content from the `/en/` folder\n - Copy the content\n - Navigate to the `en-ca` folder and paste\n - Repeat for the `fr-ca` folder\n\n\n> **Folder naming**\n>\n\n**Standard format:** Use hyphens for locale folders (`en-ca`, `fr-ca`) following the `language-code-region-code` pattern. This aligns with:\n- ISO 639-1 (language codes) and ISO 3166-1 (country codes)\n- Web URL conventions\n- Adobe/AEM.live best practices\n\nEnsure folder names match exactly with Adobe Commerce store view codes and can be used in web addresses.\n\n\n### Configure Adobe Commerce store views\n\nCreate the corresponding store views in Adobe Commerce Admin to match your content folder structure.\n\n\n1. **Access Adobe Commerce Admin** and navigate to Stores → Settings → All Stores.\n\n2. **Create the Canadian English store view**:\n - Follow the store view creation process\n - Configure as: one website, one store, one store view\n - Set the store view code to match your folder name (`en-ca`)\n\n3. **Create the Canadian French store view**:\n - Repeat the process for the French locale\n - Set the store view code to match your folder name (`fr-ca`)\n\n\n> **Store view codes**\n>\nThe store view codes in Adobe Commerce Admin must exactly match the folder names created in da.live for proper integration.\n\n\n### Update folder mapping\n\nProduct Detail Pages (PDP) are mapped to a single document at `products/default`. When adding a new store view, you must add a corresponding folder mapping for the new URLs using the **Config Service API**.\n\n:::note\n**fstab.yaml is bootstrap-only.** After the AEM Code Sync bot initially provisions your site, changes to `fstab.yaml` in the code repository have no effect. Folder mapping must be managed through the Config Service API described below.\n:::\n\n#### Step 1: Authenticate\n\nGo to `https://admin.hlx.page/login`, then go to your selected IDP login URL, and sign in. Retrieve the auth token from your browser's cookie storage (available in Developer Tools → Application → Cookies). Use that token to authenticate Admin API requests, with the headers and request format described in the and the .\n\n#### Step 2: Get the current folder configuration\n\n```http\nGET https://admin.hlx.page/config//sites//folders.json\nAuthorization: token \n```\n\nThe response is a JSON object mapping URL path prefixes to template document paths, for example:\n\n```json\n{\n \"/products/\": \"/products/default\"\n}\n```\n\nIf you don't receive a response, you may not have folder mapping yet. In that case, move on to step 3 and create the JSON object manually.\n\n#### Step 3: Modify and POST the updated configuration\n\nAdd your new store view mappings and POST the complete object back to the same endpoint:\n\n```http\nPOST https://admin.hlx.page/config//sites//folders.json\nAuthorization: token \nContent-Type: application/json\n```\n\n```json\n{\n \"/en/products/\": \"/en/products/default\",\n \"/en-ca/products/\": \"/en-ca/products/default\",\n \"/fr-ca/products/\": \"/fr-ca/products/default\"\n}\n```\n\n:::caution\nThe POST **replaces** the entire `folders.json` object. Always start from the current GET response and include all existing mappings alongside your new ones.\n:::\n\nFor full details, see the and the .\n\n\n### Update site configuration\n\nYou must update your [storefront config](https://experienceleague.adobe.com/developer/commerce/storefront/setup/configuration/commerce-configuration/) to include configuration overrides for the new store view. In this file, you'll define store-view specific settings, such as service headers and analytics values.\n\nThe `key` of each overridden object must match the root folder path of the corresponding store view. These values will be merged into the default configuration.\n\n```json\n{\n \"public\": {\n \"default\": {\n // default configuration\n },\n \"/en/\": {}, // inherits the default\n \"/en-ca/\": {\n \"headers\": {\n \"all\": {\n \"Store\": \"en-ca\"\n },\n \"cs\": {\n \"Magento-Store-Code\": \"ca-store\",\n \"Magento-Website-Code\": \"base\",\n \"Magento-Store-View-Code\": \"en-ca\"\n }\n },\n \"analytics\": {\n // overrides values from the default analytics configuration\n }\n },\n \"/fr-ca/\": {\n \"headers\": {\n \"all\": {\n \"Store\": \"fr-ca\"\n },\n \"cs\": {\n \"Magento-Store-Code\": \"ca-store\",\n \"Magento-Website-Code\": \"base\",\n \"Magento-Store-View-Code\": \"fr-ca\"\n }\n }\n }\n }\n}\n```\n\n**Headers configuration details:**\n- **`Magento-Store-Code`**: Must match the store code from the Commerce Admin\n- **`Magento-Website-Code`**: Typically \"base\" for single-website setups\n- **`Magento-Store-View-Code`**: Must match the store view code from the Admin\n\nThe `analytics` section contains the Adobe Commerce environment variables for the store view. These variables are used by the Analytics API. For more details, see [Analytics](https://experienceleague.adobe.com/developer/commerce/storefront/setup/analytics/instrumentation).\n\n> **Configuration Service**\n>\nIf you are using the Config Service, read the to learn how to publish your updates to the Config Service for your site.\n\n\n### Configure store switcher\n\nCreate a `store-switcher` file in each store view root folder containing a bulleted list. Each line must define the display name of your store with an active link to the store.\n\n```text\n**Select a store:**\n\n- Canada (CAD)\n - [Canada (EN)](https://main--aem-boilerplate-commerce--hlxsites.aem.page/en-ca/#nolocal)\n - [Canada (FR)](https://main--aem-boilerplate-commerce--hlxsites.aem.page/fr-ca/#nolocal)\n- United States (USD)\n - [United States (USD)](https://main--aem-boilerplate-commerce--hlxsites.aem.page/en/#nolocal)\n```\n\n**Important:** The boilerplate automatically localizes internal links to keep users within their current locale (see [Localizing links](https://experienceleague.adobe.com/developer/commerce/storefront/dropins/all/linking/) for technical details). For links that should always point to a specific locale (such as store switcher links), add the hash `#nolocal` to prevent automatic localization:\n\n```markdown\n[United States (USD)](https://yoursite.com/en/#nolocal)\n```\n\n**Best practice:** Prioritize the current store view in the display order for better user experience. For example, in the `en-ca` folder's store switcher, list \"Canada (EN)\" first.\n\n\n### Preview and validate content\n\nTest your new store views to ensure proper functionality before publishing.\n\n\n1. **Push configuration changes** to your storefront repository.\n\n2. **Return to the content files** in both `en-ca` and `fr-ca` folders in da.live.\n\n3. **Preview content files**:\n - Navigate to the `en-ca` folder\n - Open the `index` file\n - Click \"Preview\" to test the store view\n\n4. **Verify configuration in browser**:\n - Check that the URL structure includes the store view path\n - Open browser Developer Tools\n - Navigate to Application → Session Storage\n - Look for the `config` key and expand the JSON object\n - Navigate to `public` → `[your store path]` → `headers` → `cs`\n - Verify the correct header values:\n - `Magento-Store-Code`\n - `Magento-Website-Code`\n - `Magento-Store-View-Code`\n\n5. **Test the store switcher**:\n - Verify the store switcher correctly shows the current store view\n - Confirm customers can see and select other available stores\n - Check that switching stores navigates to the correct URLs\n\n\n> **Session storage verification**\n>\nUse session storage to verify configuration loads properly and identifies the correct store view.\n\n\n### Localize and translate content\n\nAfter setting up infrastructure, prepare content for each locale.\n\n\n1. **Translate content files** in the `/en-ca/` and `/fr-ca/` folders using your chosen authoring tool:\n - **Document Authoring**: Follow the [Localization (Document Authoring Tool)](https://experienceleague.adobe.com/developer/commerce/storefront/merchants/quick-start/content-localization/) workflow\n - **Universal Editor**: Follow the [Localization (Universal Editor)](https://experienceleague.adobe.com/developer/commerce/storefront/merchants/quick-start/content-localization-universal-editor/) workflow\n\n2. **Complete Commerce-specific tasks**: Follow the [Commerce localization tasks](https://experienceleague.adobe.com/developer/commerce/storefront/merchants/quick-start/content-localization-commerce-tasks/) guide to:\n - Translate drop-in placeholder files (`cart.json`, `checkout.json`, `pdp.json`)\n - Verify store view configuration aligns with folder structure\n - Test Commerce functionality across all locales\n\n\n### Final validation and publishing\n\nComplete the implementation with thorough testing and team coordination.\n\n\n1. **Test all store views** to ensure:\n - Proper URL structure\n - Correct content loading\n - Functional store switcher\n - Accurate header configuration\n - Proper currency and pricing display\n\n2. **Preview all files** in the updated folders (`/en-ca/`, `/fr-ca/`) with .\n\n3. **Validate the storefront experience** by accessing each new language/region and testing the rendering, navigation, and data accuracy.\n\n4. **Publish the store views**:\n - Publish the updated folders using AEM Sidekick when ready\n - Update all `store-switcher` content documents to include links to the new store views\n\n5. **Prepare for marketing handoff**:\n - Inform the marketing team that content folders are ready\n - Provide directory structure documentation\n - Share access to content folders for ongoing management\n\n\n> **Success!**\n>\nYour multistore infrastructure is now ready to support multiple locales with proper content management and customer experience.\n\n\n## Best practices\n\n### Folder structure\n- Use clear, consistent naming conventions (`en-ca`, `fr-ca`)\n- Ensure that folder names can be used in web URLs\n- Match folder names exactly with the Adobe Commerce store view codes\n- Maintain the same content structure across all store views\n\n### Configuration management\n- Keep header values synchronized between `config.json` and Adobe Commerce Admin\n- Document all store view codes and their corresponding folders\n- Test configuration changes in preview before publishing\n- Use version control for all configuration files\n\n### Content management\n- Maintain separate content folders for each locale\n- Use automated translation tools where possible\n- Keep placeholder files synchronized across store views\n- Test all localized content before publishing\n\n## Troubleshooting\n\n### Common Issues\n\n#### Store View Not Loading\n- **Check the folder mapping**: Verify that the folder mapping is correct by querying the Config Service: `GET https://admin.hlx.page/config//sites//folders.json`. Note that editing `fstab.yaml` has no effect after initial site setup — all folder mapping changes must go through the Config Service API.\n- **Verify the headers**: Ensure that the headers in `config.json` or Configuration Service match the store view codes in Adobe Commerce Admin\n- **Check the session storage**: Use browser developer tools to verify that the correct headers are being sent\n\n#### Content Not Displaying\n- **Verify the content structure**: Ensure that all required files (index, store-switcher, placeholders) exist in the store view folder\n- **Check the file permissions**: Verify that content files are properly published in da.live\n- **Validate the JSON syntax**: Check that placeholder JSON files have valid syntax\n\n#### Store Switcher Issues\n- **Check the links**: Ensure that all store switcher links use the correct URLs and include `#nolocal` for absolute links\n- **Verify the file structure**: Confirm that each store view has its own store-switcher file\n- **Test the navigation**: Verify that switching between stores works correctly\n\n### Debugging Steps\n\n1. **Check the browser console** for JavaScript errors\n2. **Verify the network requests** in browser developer tools\n3. **Check the session storage** for configuration values\n4. **Validate the configuration files** for syntax errors\n5. **Test in different browsers** to rule out browser-specific issues\n\n### Performance considerations\n- Monitor site performance across all store views\n- Optimize images and assets for each locale\n- Consider CDN configuration for different regions\n- Test loading times from the target markets\n\n## Related resources\n\n- [Content localization](https://experienceleague.adobe.com/developer/commerce/storefront/merchants/quick-start/content-localization/) - Automated translation using da.live\n- [Storefront Configuration](https://experienceleague.adobe.com/developer/commerce/storefront/setup/configuration/commerce-configuration) - Complete config.json reference\n- [Analytics](https://experienceleague.adobe.com/developer/commerce/storefront/setup/analytics/instrumentation) — Analytics configuration for store views\n- - Adobe Commerce Admin guide\n- - Edge Delivery Services documentation\n- - Configuration Service documentation"
|
|
77
|
+
},
|
|
78
|
+
{
|
|
79
|
+
"path": "setup/configuration/price-book-setup",
|
|
80
|
+
"title": "Price Book ID setup",
|
|
81
|
+
"description": "Enable Adobe Commerce Optimizer Price Book ID functionality in your storefront.",
|
|
82
|
+
"content": "This guide shows you how to enable Adobe Commerce Optimizer Price Book ID functionality in the Adobe Commerce boilerplate. Price Books in Adobe Commerce Optimizer allow you to deliver personalized pricing based on customer segments, contracts, or other business rules. Each and may restrict which Price Books are allowed for that view. Customers can have their own assigned Price Books, which are used if they fall within the allowed Price Books for the catalog view.\n\n> **Adobe Commerce Optimizer only**\n>\nThis guide is specifically for **Adobe Commerce Optimizer** implementations. If you are using Adobe Commerce as a Cloud Service or Adobe Commerce PaaS without Optimizer, this feature does not apply to your setup. Adobe Commerce as a Cloud Service uses customer groups and shared catalogs for pricing instead of Price Book IDs. See the documentation for configuration options for your Commerce environment.\n\n\n## Prerequisites\n\nBefore you begin, ensure you have:\n\n- An active Adobe Commerce Optimizer subscription.\n- The storefront is .\n- Access to your code.\n- The installed and configured in your storefront.\n\n## Enable Price Book ID\n\n\n1. **Enable Adobe Commerce Optimizer in the Auth drop-in initializer**\n\n Open the file at `scripts/initializers/auth.js` and add the `adobeCommerceOptimizer: true` option:\n\n ```javascript\n // Initialize auth\n return initializers.mountImmediately(initialize, {\n langDefinitions,\n adobeCommerceOptimizer: true // Enable ACO\n });\n ```\n\n1. **Replace the customer group header function**\n\n Open the main initializers file at `scripts/initializers/index.js` and replace the `setCustomerGroupHeader` function with the `setAdobeCommerceOptimizerHeader` function:\n\n ```javascript\n const setAdobeCommerceOptimizerHeader = (adobeCommerceOptimizer) => {\n if (adobeCommerceOptimizer?.priceBookId) {\n CS_FETCH_GRAPHQL.setFetchGraphQlHeader('AC-Price-Book-ID', adobeCommerceOptimizer.priceBookId);\n } else {\n CS_FETCH_GRAPHQL.removeFetchGraphQlHeader('AC-Price-Book-ID');\n }\n };\n ```\n\n1. **Update the event listener**\n\n In the same `scripts/initializers/index.js` file, replace the `auth/group-uid` event listener with the `auth/adobe-commerce-optimizer` :\n\n ```javascript\n events.on('auth/adobe-commerce-optimizer', setAdobeCommerceOptimizerHeader, { eager: true });\n ```\n \n The `{ eager: true }` option ensures the event handler executes immediately if the event has already been emitted. See for more details.\n\n1. **Test the implementation**\n\n After making these changes, verify that the Price Book ID header is being sent with GraphQL requests:\n\n - Log in to your storefront as a customer.\n - Open your browser's developer tools and navigate to the Network tab.\n - Look for GraphQL requests and verify the `AC-Price-Book-ID` header is present in the request headers.\n\n\n## Troubleshooting\n\n### Price Book ID header is not being sent\n\nIf the `AC-Price-Book-ID` header is not appearing in your GraphQL requests:\n\n- Verify that `adobeCommerceOptimizer: true` is set in the Auth drop-in initializer.\n- Confirm that the catalog view has a default Price Book configured in Adobe Commerce Optimizer.\n- Verify that the customer has a valid Price Book assigned (or that the default Price Book for the catalog view is configured).\n- Check the browser console for any JavaScript errors that might prevent the event from firing.\n\n### Pricing is not changing\n\nIf the header is being sent but pricing remains unchanged:\n\n- Verify that the default Price Book for the catalog view is correctly configured in Adobe Commerce Optimizer.\n- If the customer has an assigned Price Book, confirm it is within the allowed Price Books for the catalog view.\n- Confirm that your Adobe Commerce backend is configured to recognize and process the `AC-Price-Book-ID` .\n- Check that the Price Book has active pricing rules.\n\n## How it works\n\nWhen Adobe Commerce Optimizer is enabled:\n\n\n1. Each catalog view in Commerce Optimizer defines a default Price Book and may restrict which Price Books are allowed for that view.\n1. The emits the `auth/adobe-commerce-optimizer` event when a customer logs in.\n1. The event includes the Price Book ID for the authenticated customer (if the customer has an assigned Price Book).\n1. Adobe Commerce Optimizer validates that the Price Book for the customer is within the allowed Price Books for the catalog view. If valid, the Price Book for the customer is used. Otherwise, the default Price Book for the catalog view is used.\n1. The `setAdobeCommerceOptimizerHeader` function adds the `AC-Price-Book-ID` header to all GraphQL requests.\n1. Adobe Commerce uses this header to return pricing specific to the determined Price Book.\n\n\n> **Tip**\n>\nThe `eager: true` option ensures the event handler is registered before any authentication occurs, preventing race conditions. Learn more about .\n\n\n> **Note**\n>\nEach catalog view in Commerce Optimizer and may restrict which Price Books are allowed. Customers can have their own assigned Price Books. The `commerceOptimizer` GraphQL query returns the appropriate Price Book ID for the authenticated customer, ensuring it falls within the allowed Price Books for the catalog view. For more information about Commerce Optimizer setup, see the documentation.\n\n\n## Additional resources\n\n- \n- [Storefront configuration](https://experienceleague.adobe.com/developer/commerce/storefront/setup/configuration/commerce-configuration/)\n- [Auth drop-in documentation](https://experienceleague.adobe.com/developer/commerce/storefront/dropins/user-auth/quick-start/)"
|
|
83
|
+
},
|
|
84
|
+
{
|
|
85
|
+
"path": "setup/configuration/storefront-compatibility-b2b",
|
|
86
|
+
"title": "Storefront Compatibility B2B Package",
|
|
87
|
+
"description": "Learn about the contents of Storefront Compatibility B2B Package, which can be used with Adobe Commerce as a Cloud Service.",
|
|
88
|
+
"content": "The Storefront Compatibility B2B Package contains changes to the Adobe Commerce B2B codebase that enable drop-in component functionality. On , it is installed and updated automatically.\n\nMost of these changes enhance the Adobe Commerce B2B GraphQL schema. However, miscellaneous bug fixes are also included. The drop-in components require this package along with the Storefront Compatibility Package.\n\n## Major features\n\nThe Storefront Compatibility B2B Package defines the following queries and mutations:\n\n- - Retrieves a list of negotiable quote templates along with their details, including expiration dates.\n\n- - Converts a negotiable quote into an order and returns comprehensive order details along with an errors array for consistent response handling.\n\n- - Allows negotiable quote templates to include an expiration date using setQuoteTemplateExpirationDate.\n\n## Release information\n\nTo see release notes for each version of the Storefront Compatibility B2B Package, go to the [changelog](https://experienceleague.adobe.com/developer/commerce/storefront/releases/changelog/)."
|
|
89
|
+
},
|
|
90
|
+
{
|
|
91
|
+
"path": "setup/configuration/storefront-compatibility/install",
|
|
92
|
+
"title": "Storefront Compatibility Package Installation",
|
|
93
|
+
"description": "Learn how to install the Storefront Compatibility Package.",
|
|
94
|
+
"content": "The Storefront Compatibility Package contains changes to the Adobe Commerce codebase that enable drop-in component functionality. On , it is installed and updated automatically.\n\n\n## Installation\n\n:::note[Note]\nYou must have Adobe Commerce 2.4.7 or 2.4.8 installed. Magento Open Source is not supported.\n:::\n\n\n **Cloud infrastructure:**\n\n\nUse this method to install the Storefront Compatibility Package using the Cloud infrastructure.\n\n 1. On your local workstation, change to the project directory for your Adobe Commerce on cloud infrastructure project.\n\n 1. Check out the environment branch to update using the Adobe Commerce Cloud CLI.\n\n ```bash\n magento-cloud environment:checkout <environment-id>\n ```\n\n 1. Add the Storefront Compatibility module.\n\n Use the appropriate package version based on your Adobe Commerce version:\n\n For Adobe Commerce 2.4.7, run:\n\n ```bash\n composer require adobe-commerce/storefront-compatibility:4.7.10\n ```\n\n For Adobe Commerce 2.4.8, run:\n\n ```bash\n composer require adobe-commerce/storefront-compatibility:4.8.8\n ```\n\n To check the latest version of the Storefront Compatibility Package, go to the [changelog](https://experienceleague.adobe.com/developer/commerce/storefront/releases/changelog/).\n\n 1. Update package dependencies.\n\n ```bash\n composer update \"adobe-commerce/storefront-compatibility\"\n ```\n\n 1. Commit and push code changes for the `composer.json` and `composer.lock` files.\n\n 1. Add, commit, and push the code changes for the `composer.json` and `composer.lock` files to the cloud environment\n\n ```bash\n git add -A\n git commit -m \"Add module\"\n git push origin <branch-name>\n ```\n\n Pushing the updates to the cloud environment initiates the to apply the changes. Check the deployment status from the .\n\n \n \n **On premises:**\n\n\nUse this method to install the Storefront Compatibility Package for an on-premises instance.\n\n1. Use Composer to add the package module to your project:\n\n Use the appropriate package version based on your Adobe Commerce version:\n\n For Adobe Commerce 2.4.7, run:\n\n ```bash\n composer require adobe-commerce/storefront-compatibility:4.7.10\n ```\n\n For Adobe Commerce 2.4.8, run:\n\n ```bash\n composer require adobe-commerce/storefront-compatibility:4.8.8\n ```\n\n To check the latest version of the Storefront Compatibility Package, go to the [changelog](https://experienceleague.adobe.com/developer/commerce/storefront/releases/changelog/).\n\n1. Upgrade Adobe Commerce:\n\n ```bash\n bin/magento setup:upgrade\n ```\n\n \n\n\n## Update the package\n\nUse the following procedure to update patch versions of the Storefront Compatibility Package.\n\n1. Run the following command to update the package:\n\n ```bash\n composer update adobe-commerce/storefront-compatibility\n ```\n\n1. Run the following commands to upgrade Adobe Commerce and clear the cache.\n\n ```bash\n bin/magento setup:upgrade && bin/magento cache:clean\n ```"
|
|
95
|
+
},
|
|
96
|
+
{
|
|
97
|
+
"path": "setup/configuration/storefront-compatibility/v247",
|
|
98
|
+
"title": "Storefront Compatibility Package for Adobe Commerce 2.4.7",
|
|
99
|
+
"description": "Learn about the contents of Storefront Compatibility Package, which can be used with Adobe Commerce 2.4.7.",
|
|
100
|
+
"content": "The Storefront Compatibility Package contains changes to the Adobe Commerce 2.4.7 codebase that enable drop-in component functionality.\n\nMost of these changes enhance the Adobe Commerce GraphQL schema. However, miscellaneous bugfixes are also included. The drop-in components require this package.\n\n:::note[Note]\nThis Storefront Compatibility Package can be installed on Adobe Commerce 2.4.7 only. Fixes in this package are already included in Adobe Commerce 2.4.8. Lower versions of Adobe Commerce are not supported. Magento Open Source is not supported.\n:::\n\n## Major features\n\nThe Storefront Compatibility Package defines the following queries and mutations:\n\n- mutation - Allows all items to be removed from a wishlist in a single action.\n\n- mutation - Cancels the specified order for a guest.\n\n- mutation - Confirms a guest or customer return request.\n\n- query - Retrieves information about specified customer group.\n\n- query - Retrieves information about specified customer segment.\n\n- mutation - Authenticates users using an integration token and returns both the customer token and associated customer data.\n\n- mutation - Estimates totals for cart based on the address.\n\n- mutation - Creates a new customer token.\n\n- - Retrieves information about a guest order using an order number, email, and billing last name as input.\n\n- - Retrieves information about a guest order based on an order token.\n\n- query - Returns information about the reCaptcha configuration for the specified form type.\n\n- mutation - Cancels the specified guest order.\n\n- mutation - Requests a return for a specified order on behalf of a guest.\n\n- mutation - Resends a confirmation email to the specified customer upon request.\n\n## Release information\n\nTo see release notes for each version of the Storefront Compatibility Package, go to the [changelog](https://experienceleague.adobe.com/developer/commerce/storefront/releases/changelog/)."
|
|
101
|
+
},
|
|
102
|
+
{
|
|
103
|
+
"path": "setup/configuration/storefront-compatibility/v248",
|
|
104
|
+
"title": "Storefront Compatibility Package for Adobe Commerce 2.4.8",
|
|
105
|
+
"description": "Learn about the contents of Storefront Compatibility Package, which can be used with Adobe Commerce 2.4.8.",
|
|
106
|
+
"content": "The Storefront Compatibility Package contains changes to the Adobe Commerce 2.4.8 codebase that enable drop-in component functionality.\n\nMost of these changes enhance the Adobe Commerce GraphQL schema. However, miscellaneous bugfixes are also included. The drop-in components require this package.\n\n:::note[Note]\nThis Storefront Compatibility Package can be installed on Adobe Commerce 2.4.8 only. Fixes in this package will be included automatically in Adobe Commerce 2.4.9. Lower versions of Adobe Commerce are not supported. Magento Open Source is not supported.\n:::\n\n## Major features\n\nThe Storefront Compatibility Package defines the following queries and mutations:\n\n- mutation - Allows all items to be removed from a wishlist in a single action.\n\n- query - Retrieves information about specified customer group.\n\n- query - Retrieves information about specified customer segment.\n\n- `deleteCustomerAddressV2` mutation - Deletes a billing or shipping address of a customer using customer UID as input.\n\n- mutation - Authenticates users via an integration token and returns both the customer token and associated customer data.\n\n- `updateCustomerAddressV2` mutation - Updates a billing or shipping address of a customer using customer UID as input.\n\n## Release information\n\nTo see release notes for each version of the Storefront Compatibility Package, go to the [changelog](https://experienceleague.adobe.com/developer/commerce/storefront/releases/changelog/)."
|
|
107
|
+
},
|
|
108
|
+
{
|
|
109
|
+
"path": "setup/discovery/data-export-validation",
|
|
110
|
+
"title": "Data export validation",
|
|
111
|
+
"description": "Learn how to validate data exports from your Adobe Commerce backend to your storefront.",
|
|
112
|
+
"content": "Data export synchronizes data between an Adobe Commerce instance and connected [Commerce services](https://experienceleague.adobe.com/developer/commerce/storefront/get-started/architecture/commerce-services-and-backends/#commerce-services). Those services are required for drop-in components to work correctly.\n\nValidating the data export is crucial to ensure that the data is correctly synchronized and available for the storefront. You can use the to monitor the data sync progress for each service.\n\n:::tip[Self-service data export validation]\nSee the for details and troubleshooting.\n:::\n\nUse GraphQL to validate that all products were synchronized and product lookup and search are working. See and for queries.\n\nFor more complex catalogs, reach out to the Adobe team on to validate that the exported data is correct. This might require you to provide a database dump or direct access. Please also reach out to the Adobe team if you encounter any currently unsupported use cases, so that they can be enabled in the future."
|
|
113
|
+
},
|
|
114
|
+
{
|
|
115
|
+
"path": "setup/discovery/luma-bridge",
|
|
116
|
+
"title": "Luma Bridge",
|
|
117
|
+
"description": "Learn how to implement the Luma Bridge for your Adobe Commerce on Edge Delivery Services project.",
|
|
118
|
+
"content": "This section provides guidance on how to implement the Luma Bridge for your Adobe Commerce on Edge Delivery Services project.\n\n\n> **Supported Configuration**\n>\nLuma Bridge is intended for Adobe Commerce Platform as a Service (PaaS) instances with complex cart, checkout, and account page implementations that need to be migrated progressively to Edge Delivery Services. It is only supported for the following configuration: **Edge Delivery Services (EDS) + Adobe Commerce Optimizer (ACO) + PaaS**.\n\nIf you need access to the Luma Bridge package, please reach out to us at `commerce-storefront-luma-bridge@adobe.com`.\n\n\n## What is Luma Bridge?\n\nLuma Bridge is a session management mechanism between two storefronts:\n\n- The main storefront (headless storefront) that is built using the on Edge Delivery Services\n- The default, theme-based PHP storefront that is built using Adobe Commerce (Luma theme or another base theme)\n\nIt allows you to reuse complex parts of your storefront (for example, cart, checkout, and account pages). This approach provides a path for Adobe customers currently using default, theme-based storefronts to migrate to a highly performant shopping experience in a phased manner. Using Luma Bridge, you can progressively migrate your theme-based storefront to Edge Delivery Services.\n\n:::note\nIf you already have a headless storefront implementation (for example, or ), Luma Bridge is not a suitable solution to share session and other context between Edge Delivery Services and your storefront.\n:::\n\n## Demo site\n\nThe following demo site was built with Luma Bridge. You can access the full demo site at https://mcprod.eds.ecg.magento.com/.\n\n[](https://mcprod.eds.ecg.magento.com/)\n\n## Requirements for implementation\n\nYou must meet the following requirements to implement Luma Bridge:\n\n- Both the Edge Delivery Services storefront and the theme-based Adobe Commerce storefront must operate on the same top-level domain.\n- You must use the user authentication and cart drop-in components to manage your storefront authentication and cart context. This ensures that Luma Bridge works with the correct set of cookies.\n\n## How does session management work?\n\nLuma Bridge relies on cookies generated by the [user authentication](https://experienceleague.adobe.com/developer/commerce/storefront/dropins/user-auth/) and [cart](https://experienceleague.adobe.com/developer/commerce/storefront/dropins/cart/) drop-in components. These components are part of your Commerce boilerplate template-based storefront on Edge Delivery Services.\n\nLuma Bridge is a PHP module installed in Adobe Commerce, as noted above. When you enable the Luma Bridge module, Adobe Commerce can recognize and create the same cookies that your storefront drop-in components generate. This enables both applications to share the same session cookies, whether the user has a guest session or a logged-in session.\n\nThe cookies include:\n\n- A JWT token that represents the customer session when the user is logged in, generated as a response to the `generateCustomerToken` GraphQL mutation.\n- A cart ID that represents a masked quote ID, generated as a response to the `createGuestCart` GraphQL mutation.\n\nNo changes are required on your Edge Delivery Services storefront when you use the user authentication and cart drop-in components.\n\n## Implementation considerations\n\nBefore starting an implementation, clarify the following information:\n\n- Architecture of cart, checkout, and account pages\n- Complexity of implementation\n- Customization requirements\n\nThis information will help you decide whether to use Luma Bridge or a headless implementation for the cart, checkout, and account pages.\n\n:::tip\nWhen implementing Luma Bridge, ensure that you have engineers on the project with backend PHP knowledge on Adobe Commerce.\n:::\n\n## Installation\n\nTo install the Luma Bridge, use the following steps:\n\n\n1. Fetch the package via Composer:\n\n ```bash\n composer require adobe-commerce/luma-bridge\n ```\n\n1. Enable the module and complete the standard CLI procedure:\n\n ```bash\n bin/magento module:enable Magento_LumaBridge\n bin/magento setup:upgrade\n bin/magento setup:di:compile\n bin/magento cache:flush\n ```\n\n\nAfter completing the installation, Luma Bridge will automatically recognize and share session cookies between your Edge Delivery Services storefront and Adobe Commerce. Test that user authentication and cart state persist correctly as customers navigate between both storefronts."
|
|
119
|
+
},
|
|
120
|
+
{
|
|
121
|
+
"path": "setup/launch",
|
|
122
|
+
"title": "Launch checklist",
|
|
123
|
+
"description": "Verify that you have completed all recommended steps before launching your Adobe Commerce on Edge Delivery Services storefront project.",
|
|
124
|
+
"content": "Adobe’s launch resources are designed to help you achieve a seamless and successful rollout of your Adobe Commerce storefront powered by Edge Delivery Services.\n\nAdobe Commerce projects usually require much more than a simple content delivery network (CDN) switch to launch. You must ensure that the launch activities are well defined and planned. You should also prepare a rollback plan in case you encounter any issues during the launch.\n\n## Launch checklist\n\nCompleting all pre-work and tasks required to launch a new storefront can be overwhelming. This checklist helps ensure that you complete and track all necessary work before going live.\n\nAs you develop, carefully track all changes made in development or staging environments to ensure that they can be applied and deployed when you migrate to production.\n\n<Checklist checklistKey=\"seo\">\n### SEO and indexing\n\n* [ ] Add document title metadata for key pages (especially PDPs and PLPs). See the [SEO metadata](https://experienceleague.adobe.com/developer/commerce/storefront/setup/seo/metadata/) documentation for details.\n* [ ] Ensure that your PDPs have [metadata and structured data](https://experienceleague.adobe.com/developer/commerce/storefront/setup/seo/metadata/) (for example, JSON-LD is configured).\n* [ ] Standardize URL formats for products (example: `domain/product-name`).\n* [ ] Redirect all vanity URLs to canonical URLs.\n* [ ] Add a `robots.txt` file to your project, which allows your site to be indexed by search\n engines. Ensure that your sitemaps are referenced and that you add rules to block indexing\n of any content that you do not want to be indexed (for example, the `/drafts` folder).\n* [ ] Add one or multiple files to ensure that\n URLs that were changed as part of the migration still work (for example, when you remove the\n `.html` file extension).\n* [ ] Generate a sitemap for your site and catalog. To speed up the indexing process, Adobe\n recommends adding the sitemap to Google Search Console.\n</Checklist>\n\n<Checklist checklistKey=\"prerendering\">\n### Enable pre-rendering\n\n* [ ] Add pre-rendering for key pages. See the [pre-rendering documentation](https://experienceleague.adobe.com/developer/commerce/storefront/setup/configuration/aem-prerender/) for details.\n* [ ] Verify that all URLs are lowercase to support pre-rendering without breaking any links.\n* [ ] Validate HTML source for metadata and enriched body content (to ensure pre-rendering is working).\n* [ ] Check availability of page translations for locales with different languages.\n</Checklist>\n\n<Checklist checklistKey=\"performance\">\n### Performance and monitoring\n\n* [ ] Ensure you have followed all [Performance best practices](https://experienceleague.adobe.com/developer/commerce/storefront/get-started/performance/).\n* [ ] (Optional) Configure Google Analytics and Google Tag Manager.\n* [ ] Validate your \n implementation and ensure that data is displayed in your Live Search and Product\n Recommendation dashboards in the Adobe Commerce Admin.\n* [ ] Ensure that the `environment` analytics config parameter is set appropriately in your [Commerce configuration](https://experienceleague.adobe.com/developer/commerce/storefront/setup/configuration/commerce-configuration). Use the JSON strings `\"Testing\"` (development) and `\"Production\"` (production) in your storefront configuration. See [Analytics](https://experienceleague.adobe.com/developer/commerce/storefront/setup/analytics/instrumentation/).\n* [ ] Ensure that the site's Lighthouse score is green; targeting `100` on every page (taking into\n account previous considerations mentioned in this document).\n</Checklist>\n\n<Checklist checklistKey=\"security\">\n### Security and access\n\n* [ ] Verify that you have configured permissions for DA content and EDS sites. See and .\n* [ ] Ensure that the product visuals integration has been provisioned. See .\n* [ ] Verify/update password reset links. Match the Edge Delivery Services implementation in the Adobe Commerce Admin. See the [FAQ](https://experienceleague.adobe.com/developer/commerce/storefront/troubleshooting/faq#what-should-i-do-if-my-email-template-links-are-broken-after-migrating-to-edge-delivery-services-or-helix) for details.\n* [ ] Provide and configure production keys for integrations and payment providers.\n* [ ] Verify that the new domains/subdomains are `allowlisted` and potential backend webhooks are working.\n</Checklist>\n\n<Checklist checklistKey=\"cdn\">\n### CDN and caching\n\n* [ ] Update your CDN configuration with your production GraphQL endpoint (`yourproject.com/graphql`). Use that endpoint for all Sidekick extensions and scripts (for example, sitemap generation and the image importer).\n* [ ] Request a new CDN purge token for your Adobe Commerce production environment when using Adobe Commerce Fastly. Then update your by adding the authToken and serviceId values.\n* [ ] Validate your [CDN configuration](https://experienceleague.adobe.com/developer/commerce/storefront/setup/configuration/content-delivery-network/) and ensure that caching\n and cache invalidation work as expected.\n* [ ] Add a store-specific cache buster to the Catalog Service and Live Search requests for [multi-store setups](https://experienceleague.adobe.com/developer/commerce/storefront/setup/seo/indexing/#multi-store-setups) (for example, a query parameter or proxy through your CDN configuration).\n</Checklist>\n\n<Checklist checklistKey=\"catalog\">\n### Catalog service\n\n* [ ] Switch to the Catalog Service production endpoint (`https://catalog-service.adobe.io/graphql`).\n* [ ] Ensure a production environment is configured in the Service Connector (will result in a new `environmentId`).\n* [ ] Sync the production catalog to the new production environment.\n* [ ] Create a new Commerce production API key-pair and use the public key as the `x-api-key` value.\n* [ ] Verify category IDs and ensure all category pages reference the correct category.\n* [ ] Update `environmentId` and `x-api-key` values in the `config.json` code file.\n* [ ] Notify the Catalog Service team about the new production environment and launch date.\n</Checklist>\n\n<Checklist checklistKey=\"management\">\n### Project management and updates\n\n* [ ] Notify Adobe early about your planned launch date to ensure that the Adobe Commerce team is\n available to support you during the launch.\n* [ ] Check for the latest boilerplate changes and update your project accordingly.\n</Checklist>\n\n## Documentation\n\nFor complete documentation on launching your storefront, visit the on the Adobe Experience Manager site or select the direct links below. You should also review the Commerce-specific [launch checklist](#launch-checklist).\n\n\n| Topic | Description |\n| ----- | ----------- |\n| | Summary of best practices to consider when launching a website. |\n| | Automatically purge content on your production CDN whenever an author publishes content changes. |\n| | Configure Cloudflare to deliver content. |\n| | Use the Akamai Property Manager to configure a property to deliver content. |\n| | Configure Fastly to deliver content. |\n| | Set up Amazon Web Services CloudFront to deliver your AEM site with push invalidation. |\n| | Custom domain without having to set up a content delivery network. |\n| | Manage redirects as a spreadsheet from the `redirects` document in the root of your project folder. |"
|
|
125
|
+
},
|
|
126
|
+
{
|
|
127
|
+
"path": "setup/seo",
|
|
128
|
+
"title": "SEO overview",
|
|
129
|
+
"description": "Learn how Edge Delivery Services SEO fits Adobe Commerce indexing and metadata, how to align platform and catalog layers in practice, and where to read next in this documentation.",
|
|
130
|
+
"content": "Search optimization on this storefront depends on two coordinated layers: how Edge Delivery Services serves HTML to crawlers, and how your Commerce catalog URLs and metadata stay consistent across stores.\n\n## Two layers to coordinate\n\n### Edge Delivery Services (platform)\n\nEdge Delivery Services (EDS) shapes the first HTML response: document-based pages (for example, marketing or editorial pages) usually ship most of their text there, while many catalog product detail pages (PDPs) load product details after that response for performance unless you publish server-side metadata or use prerender. Search engines and large language model (LLM) crawlers still rely heavily on that first payload, so Adobe publishes shared SEO and GEO guidance on . GEO sits alongside SEO on that page. For example, some bots do not fully render every page, so they lean on the initial HTML.\n\n\n### Adobe Commerce storefront (catalog)\n\nYour Commerce layer adds URL patterns, folder mapping, canonical choices, structured metadata, and multi-store rules on top of those EDS defaults. Document-based routes and catalog routes behave differently, so search crawlers and social previews can treat thin or duplicate first HTML as low-value unless [SEO indexing](https://experienceleague.adobe.com/developer/commerce/storefront/setup/seo/indexing/) and [SEO metadata](https://experienceleague.adobe.com/developer/commerce/storefront/setup/seo/metadata/) stay aligned. SKUs, configurable products, and store-specific URLs all influence which URL should win and what appears in that first response.\n\nThe [SEO indexing](https://experienceleague.adobe.com/developer/commerce/storefront/setup/seo/indexing/) and [SEO metadata](https://experienceleague.adobe.com/developer/commerce/storefront/setup/seo/metadata/) pages spell out storefront-specific checks. They extend the platform baseline on .\n\n### Keep both layers aligned\n\nUse the same story in the platform response and the catalog: one clear URL per indexable product context, metadata that matches that URL, and enough useful text in the first HTML when a bot stops after the first response.\n\n- Match Edge Delivery Services expectations for sitemaps, robots, performance, and primary content in the first HTML. Treat as the baseline for your mix of document-based and catalog routes.\n- Implement URL rules, folder mapping, canonicals, hreflang, and store-specific crawling behavior from [SEO indexing](https://experienceleague.adobe.com/developer/commerce/storefront/setup/seo/indexing/) so the URLs you publish are the URLs you want indexed.\n- Publish titles, descriptions, and structured data for catalog pages from [SEO metadata](https://experienceleague.adobe.com/developer/commerce/storefront/setup/seo/metadata/) so those fields line up with the URLs above.\n- Before go-live, verify with [Launch checklist — SEO and indexing](https://experienceleague.adobe.com/developer/commerce/storefront/setup/launch/#seo-and-indexing). If validators or feeds still see thin PDP HTML, use [AEM Commerce prerender](https://experienceleague.adobe.com/developer/commerce/storefront/setup/configuration/aem-prerender/).\n\n## Related links in this documentation\n\nUse these pages when you implement indexing, metadata, launch checks, or prerender for your storefront:\n\n- [SEO indexing](https://experienceleague.adobe.com/developer/commerce/storefront/setup/seo/indexing/) — canonical URLs, folder mapping, sitemaps, hreflang, and multi-store considerations.\n- [SEO metadata](https://experienceleague.adobe.com/developer/commerce/storefront/setup/seo/metadata/) — titles, descriptions, structured data, and PDP metadata workflows.\n- [Launch checklist — SEO and indexing](https://experienceleague.adobe.com/developer/commerce/storefront/setup/launch/#seo-and-indexing) — tasks to verify before go-live.\n- [AEM Commerce prerender](https://experienceleague.adobe.com/developer/commerce/storefront/setup/configuration/aem-prerender/) — server-rendered HTML when catalog pages rely heavily on client-side data.\n\n> **If validators show empty PDP HTML**\n>\nStart with [SEO metadata](https://experienceleague.adobe.com/developer/commerce/storefront/setup/seo/metadata/) and [folder mapping](https://experienceleague.adobe.com/developer/commerce/storefront/setup/seo/indexing/#folder-mapping). If you still need full product markup in the initial HTML for crawlers, configure [AEM Commerce prerender](https://experienceleague.adobe.com/developer/commerce/storefront/setup/configuration/aem-prerender/)."
|
|
131
|
+
},
|
|
132
|
+
{
|
|
133
|
+
"path": "setup/seo/indexing",
|
|
134
|
+
"title": "SEO indexing",
|
|
135
|
+
"description": "Guidelines for canonical URLs, folder mapping, redirects, sitemaps, and multi-store crawling on Adobe Commerce storefronts with Edge Delivery Services.",
|
|
136
|
+
"content": "This page covers URL and crawling concerns so search engines index the right Adobe Commerce storefront pages on Edge Delivery Services. For how indexing fits with platform SEO and metadata on first-load HTML, start with [SEO overview](https://experienceleague.adobe.com/developer/commerce/storefront/setup/seo/).\n\nThese recommendations come from customer and partner storefront projects on Edge Delivery Services. Use them to keep URLs, canonical signals, and crawlers aligned.\n\n### Canonical URLs\n\n- When product detail pages (PDPs) have multiple URLs, set a consistent canonical URL for each product.\n- Make sure that canonical URLs do not point to redirects (301).\n\n### Configurable products\n\nFor configurable products, ensure that the canonical URL is set to the parent product URL. This is important because Google might index the child product URLs, which can lead to duplicate content issues.\n\n### Folder mapping\n\nWhen using for Commerce pages (PDP, PLP), ensure that the server-side rendered response contains metadata that allows Google to differentiate pages.\n\nFolder-mapped pages (without using ) all look the same and Google might classify them as duplicate and not index them, despite different canonical URLs as Google considers canonical URLs a hint and not an absolute value.\n\n#### URL format of catalog pages\n\nBy default, the boilerplate uses for product detail pages (PDP) and dedicated pages for product list pages (PLP). If your catalog has a large amount of PLPs, it might make sense to also use folder mapping for PLPs. A low number of PDPs or PLPs could justify creating dedicated pages for each.\n\nThe URL format for folder-mapped PDPs looks like this:\n\n```plaintext\n/products//\n```\n\nThis is to include the SEO relevant `urlKey` parameter and the `SKU` which is needed to perform Catalog Service queries. Feel free to customize the format as needed. You might need to do advanced customization on the CDN.\n\n> **Lowercase SKUs in URLs**\n>\nThe Commerce boilerplate enforces lowercase SKUs in all product URLs to ensure canonical consistency and comply with Edge Delivery Services ; SKUs must contain only `a-z`, `0-9`, `-`, and `.` (whitespace and other characters are not supported).\n\n- All product URLs now use lowercase SKUs by default\n- A centralized `getProductLink(urlKey, sku)` function ensures consistent URL generation\n- Sites with uppercase SKUs must either publish metadata or modify the URL generation function\n- See the [SEO metadata](https://experienceleague.adobe.com/developer/commerce/storefront/setup/seo/metadata/) documentation for implementation details\n\n\n### Multi-store setups\n\nFor [multi-store setups](https://experienceleague.adobe.com/developer/commerce/storefront/setup/configuration/multistore-setup/) or stores supporting multiple locales:\n\n- Verify a . You can validate using the .\n\n- Verify that the `Magento-Store-Code` header value defined in your [storefront configuration](https://experienceleague.adobe.com/developer/commerce/storefront/setup/configuration/commerce-configuration/) is part of the URL for every Catalog Service or Live Search request.\n\n > **Store code in URLs**\n>\n This is required because Google caches responses without considering headers. Not adding the store code to the URL might lead to Google indexing the wrong data. You can ensure this by adding a cache-busting query parameter.\n \n\n### Cache-busting Query Parameter\n\nThe includes a built-in way to prevent stale data from being served. It does this by adding a dynamic cache-busting parameter to Catalog Service requests.\n\nWhen your configuration headers change, the browser fetches fresh data instead of using cached responses. This helps keep your storefront content up to date.\n\nHere's how the boilerplate handles it:\n\n1. It collects headers from your [storefront configuration](https://experienceleague.adobe.com/developer/commerce/storefront/setup/configuration/commerce-configuration/)—`public.headers.all.*` and `public.headers.cs.*`\n1. It creates a short hash (5 characters by default) based on those headers.\n1. It adds the hash to the Catalog Service URL using the format `?cb=<hash>`.\n1. When the headers change, it generates a new hash automatically.\n\nThis ensures that any change—like a new store code or view code—triggers a fresh fetch and bypasses CDN-cached GET requests to the Catalog Service.\n\nYou don't need to enable or configure anything. The Commerce boilerplate handles everything automatically when:\n\n- The PDP drop-in component initializes.\n- Any component sends a request to the Catalog Service.\n- Your configuration headers update.\n\nThe boilerplate always manages the `cb` parameter for you.\n\n### Redirects\n\nEnsure proper redirects are set up using the redirects sheet or through your [CDN](https://experienceleague.adobe.com/developer/commerce/storefront/setup/configuration/content-delivery-network/).\n\n- Fallbacks for any potential URL changes (for example, product URLs or missing .html suffixes)\n- Redirects that are set up in Adobe Commerce\n\n### Sitemaps\n\n- Submit new sitemaps through Google Search Console (Google takes a while to detect new sitemaps).\n- If your site is using more than one sitemap, reference all sitemaps in your site's `robots.txt` file.\n- Validate sitemap XML (structure and URLs) with a dedicated sitemap or XML validator before you rely on it for discovery—not the hreflang tester, which checks language alternates only.\n\n> **Generate sitemaps on Edge Delivery Services**\n>\nSee in the Edge Delivery Services documentation for more information on how to generate sitemaps.\n\n\n### Other\n\n- You can validate indexing using Google Search Console by inspecting the markup of the crawl to see if all important information was tracked.\n- Transactional pages (for example, cart, checkout, and account) should not be indexed.\n- Staging or any non-production environments must not be indexed. Once indexed, URLs from a staging environment can reduce traffic to the production environment. It might take a significant amount of time to remove staging URLs from the Google index."
|
|
137
|
+
},
|
|
138
|
+
{
|
|
139
|
+
"path": "setup/seo/metadata",
|
|
140
|
+
"title": "SEO metadata",
|
|
141
|
+
"description": "Learn how to optimize metadata for Adobe Commerce storefronts on Edge Delivery Services.",
|
|
142
|
+
"content": "Adobe recommends uploading product metadata into Edge Delivery Services so that it can be rendered server-side on product detail pages. This is important so that Google Merchant Center can reliably verify entries from your product sheet. Also, social media sites, which don't usually parse JavaScript, can leverage this metadata to display rich previews of your product page links.\n\nFor how metadata fits with Edge Delivery Services crawling behavior and URLs, read [SEO overview](https://experienceleague.adobe.com/developer/commerce/storefront/setup/seo/) and [SEO indexing](https://experienceleague.adobe.com/developer/commerce/storefront/setup/seo/indexing/).\n\n> **Breaking Change**\n>\nFor consistency and canonicalization, mixed-case URLs are not supported. The boilerplate automatically lowercases SKUs in product URLs to comply with Edge Delivery Services, which requires lowercase paths.\n\nExtra attention should be given to sites that use uppercase SKUs. See below for more information.\n\n\nVerify that all pages, especially catalog pages (PDP and PLP), contain the following metadata:\n\n\n| Type | Properties |\n| ------------------------- | ----------------------------------------------------------------------------------------------------------------------------------------------------------------------- |\n| Document title | `title` |\n| Meta tags | `description`, `keywords`, `og:type`, `og:title`, `og:description`, `og:url`, `og:image`, `og:image:secure_url`, `og:product:price:amount`, `og:product:price:currency` |\n| Schema.org data (JSON-LD) | `WebSite`, `Product`, `AggregateRating`, `Rating`, `BreadcrumbList` |\n\n\n> **SKU in metadata**\n>\nMetadata should contain a `SKU` field for each product.\n\n\n> **Non-empty metadata fields**\n>\nWhen importing pages, ensure that when a metadata block is present on a page, it does not contain any empty fields. This might lead to pages with missing titles, which Google penalizes.\n\n\n## Schema.org data (JSON-LD)\n\nJavaScript Object Notation for Linked Data (JSON-LD) is a structured data format that helps search engines understand the content of your web pages more explicitly. It is typically added as a script tag in the `<head>` of your HTML document.\n\nAdobe Commerce storefronts on Edge Delivery Services should include annotations to expose product data to search engines. This data should be included on all Commerce pages, especially PDPs and PLPs.\n\nYou should compare the data available on the site before migrating to Edge Delivery Services to ensure that SKUs for all product variants are included. Use the to validate the schema.org annotations. The PDP drop-in component in the boilerplate contains an example for JSON-LD data.\n\n> **Google Shopping and JSON-LD**\n>\nIf you are using Google Shopping features (for example, products available on `shopping.google.com`), consider schema.org annotations with critical priority. If a single JSON-LD annotation on the page is invalid, Google considers all annotations invalid.\n\n\n## Generate metadata\n\nYou can use the tool to automate the process of generating all recommended metadata. The tool fetches product data from the Catalog Service, processes it, and generates a metadata spreadsheet in `.xlsx` format. The spreadsheet can be used for the feature in Edge Delivery Services.\n\n> **Prerequisites**\n>\n - Node.js installed on your machine\n - Access to the Catalog Service with the necessary API keys and configuration\n - Commerce boilerplate repository cloned to your local machine\n\n\nTo generate metadata using the PDP Metadata Generator tool:\n\n\n1. Navigate to the `tools/pdp-metadata/` directory in your local project.\n1. Install dependencies.\n\n ```bash\n npm install\n ```\n\n > **Configure Catalog Service access**\n>\n Before running the tool, you must ensure that the `configFile` variable in the `pdp-metadata.js` file points to the correct configuration JSON file URL. This file contains the required parameters to access the Catalog Service API and should have been set up as part of your [project onboarding](https://experienceleague.adobe.com/developer/commerce/storefront/setup/configuration/commerce-configuration/).\n \n\n1. Run the tool and generate metadata files in the project directory.\n\n ```bash\n npm start\n ```\n\n\nThe resulting `metadata.xlsx` and `metadata.json` files contain all recommended metadata for all of your products based on your site's [commerce configuration](https://experienceleague.adobe.com/developer/commerce/storefront/setup/configuration/commerce-configuration/).\n\nSee the documentation for instructions on how to upload the generated metadata file to Edge Delivery Services.\n\n## SKU Casing\n\nDue to a requirement in Edge Delivery Services, all product URLs must use lowercase SKUs. The boilerplate will enforce this by default.\n\n#### Product link generation\n\nA centralized `getProductLink(urlKey, sku)` function has been implemented to ensure consistent URL generation across all commerce components. This function is used to generate product page links at runtime in the correct casing.\n\n#### Metadata generation\n\nMetadata applied through only applies metadata for lowercase URLs. The PDP Metadata Generation tool has been updated to produce output in the correct format.\n\n### Implementation Requirements\n\nFor sites with SKUs containing uppercase letters, you have two options:\n\n#### Option A: Publish Metadata (Recommended)\n\nUpload a `metadata.json` file to Edge Delivery Services that maps your product paths to the correct metadata. This approach ensures optimal SEO performance. See for more information.\n\n#### Option B: Remove Lowercase Enforcement\n\nIf you prefer to maintain uppercase SKUs in URLs, you can modify the `getProductLink` function in your boilerplate to remove the `.toLowerCase()` call, but metadata will not be applied.\n\n```javascript\n// In scripts/commerce.js\nexport function getProductLink(urlKey, sku) {\n return `/products/$/$`; // Remove .toLowerCase()\n}\n```\n\n> **SEO Impact**\n>\nRemoving lowercase enforcement may impact SEO performance. Adobe recommends using Option A for optimal results.\n\n\n### Migration Guide\n\nIf you're upgrading from a previous version of the boilerplate:\n\n\n1. Review your SKUs and identify any products with uppercase SKUs.\n1. Choose an implementation strategy between metadata publishing or removing lowercase enforcement.\n1. Update product links so all commerce components use the centralized `getProductLink` function.\n1. Test thoroughly: validate metadata generation and URL consistency.\n1. Monitor performance: track SEO metrics and page load times.\n\n\n> **Best Practice**\n>\nFor new implementations, always use lowercase SKUs from the start to avoid migration complexity and ensure optimal SEO performance."
|
|
143
|
+
}
|
|
144
|
+
]
|
|
145
|
+
}
|