@tencent-rtc/mcp 1.3.1 → 1.3.2
This diff represents the content of publicly available package versions that have been released to one of the supported registries. The information contained in this diff is provided for informational purposes only and reflects changes between package versions as they appear in their respective public registries.
- package/index.js +4 -0
- package/index.js.map +1 -1
- package/package.json +1 -1
- package/resource/doc/chatuikit/faq/web_sdk/faq.md +125 -0
- package/resource/doc/chatuikit/flutter/faq.md +17 -114
- package/resource/doc/chatuikit/flutter/integrate_tuikit_Flutter.md +86 -722
- package/resource/doc/roomkit/vue/features/call-user-to-room.md +256 -0
- package/resource/doc/roomkit/vue/features/device-detection.md +388 -0
- package/resource/doc/roomkit/vue/features/device-state.md +480 -0
- package/resource/doc/roomkit/vue/features/free-beauty-panel.md +238 -0
- package/resource/doc/roomkit/vue/features/room-chat.md +427 -0
- package/resource/doc/roomkit/vue/features/room-participant-state.md +407 -0
- package/resource/doc/roomkit/vue/features/room-state.md +291 -0
- package/resource/doc/roomkit/vue/features/room-view.md +338 -0
- package/resource/doc/roomkit/vue/features/schedule-room.md +349 -0
- package/resource/doc/roomkit/vue/features/screen-share.md +333 -0
- package/resource/doc/roomkit/vue/features/virtual-background.md +287 -0
- package/resource/doc/roomkit/vue/features/workflow.md +553 -0
- package/resource/doc/roomkit/vue/integration.md +479 -0
- package/resource/doc/roomkit/vue/workflow.md +487 -0
- package/resource/doc/tuicallkit/react/api.md +21 -0
- package/resource/doc/tuicallkit/vue/api.md +21 -0
- package/tools/definitions/get_web_room_feature_detail_def.js +95 -0
- package/tools/definitions/get_web_room_feature_detail_def.js.map +1 -0
- package/tools/definitions/get_web_room_uikit_integration_def.js +44 -0
- package/tools/definitions/get_web_room_uikit_integration_def.js.map +1 -0
- package/tools/index.js +4 -2
- package/tools/index.js.map +1 -1
- package/tools/room/get-web-room-feature-detail.js +68 -0
- package/tools/room/get-web-room-feature-detail.js.map +1 -0
- package/tools/room/get-web-room-integration.js +43 -0
- package/tools/room/get-web-room-integration.js.map +1 -0
- package/utils/report-cls-client.js +1 -1
- package/utils/report-es-client.js +1 -1
- package/resource/doc/chatuikit/flutter/integrate_only_tuichat_Flutter.md +0 -333
- package/resource/doc/chatuikit/flutter/quick_start_Flutter.md +0 -217
- package/resource/doc/roomkit/vue/states/device-state.md +0 -369
- package/resource/doc/roomkit/vue/states/login-state.md +0 -59
- package/resource/doc/roomkit/vue/states/room-list-state.md +0 -355
- package/resource/doc/roomkit/vue/states/room-participant-state.md +0 -388
- package/tools/room/get-web-room-state-detail.js +0 -31
- package/tools/room/get-web-room-state-detail.js.map +0 -1
|
@@ -1,217 +0,0 @@
|
|
|
1
|
-
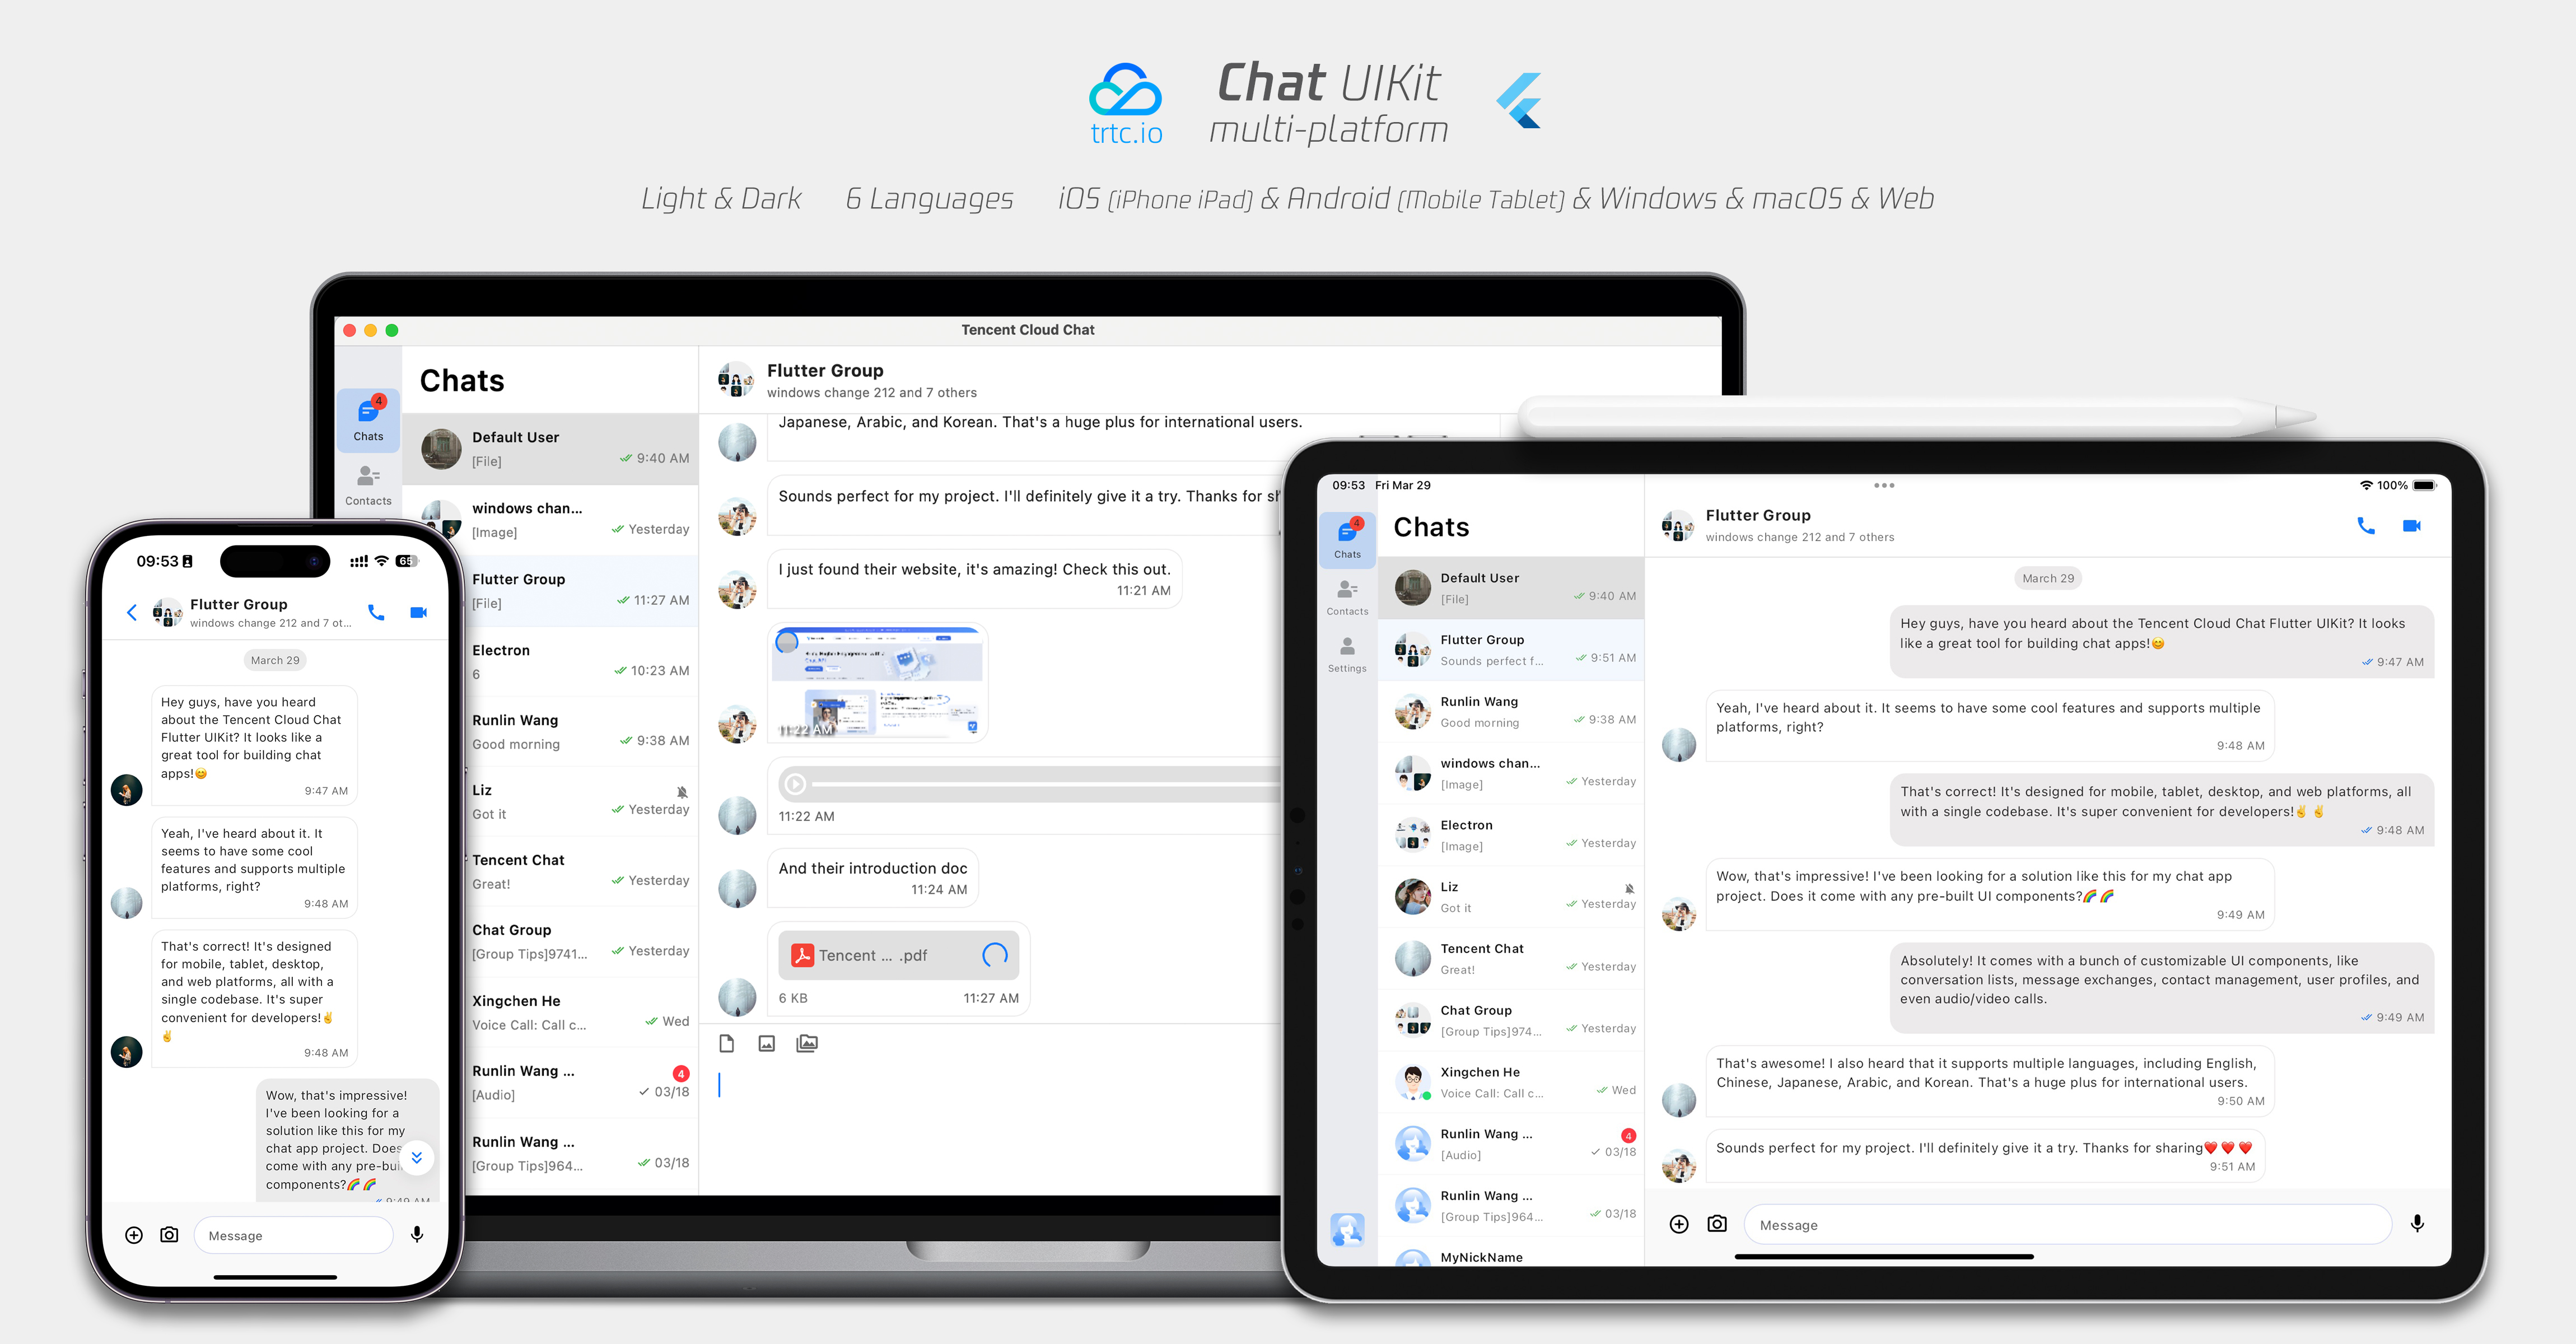
Flutter Chat UIKit is designed to provide developers with a comprehensive set of tools to create feature-rich chat applications with ease.
|
|
2
|
-
|
|
3
|
-
It is built with a modular approach, allowing you to pick and choose the components you need while keeping your application lightweight and efficient.
|
|
4
|
-
|
|
5
|
-
The UIKit includes a wide range of capabilities, such as Conversation list, Message handling,
|
|
6
|
-
|
|
7
|
-
Contact lists, Message Translation, Speech-to-Text, and more.
|
|
8
|
-
|
|
9
|
-
|
|
10
|
-
|
|
11
|
-
|
|
12
|
-
## Features
|
|
13
|
-
1. **Personalized Appearance** : With built-in **Dark and Light **modes, the UIKit offers a variety of **theme and appearance customization** options to meet your business needs.
|
|
14
|
-
|
|
15
|
-
2. **Multi-Platform Compatibility** : The adaptable single codebase ensures compatibility across various platforms, including **Mobile **devices (iOS/Android), **Tablet **(iPad and Android tablets), **Web **browsers, and **Desktop **environments (Windows/macOS).
|
|
16
|
-
|
|
17
|
-
3. **Localization Support** : Developed with native English and additional language options, including Arabic, Japanese, Korean, Simplified Chinese, and Traditional Chinese. The internationalization features ensure a localized interface language and support custom and **supplementary language** , with Arabic support for **RTL** UI.
|
|
18
|
-
|
|
19
|
-
4. **Enhanced Performance** : The UIKit delivers improved message list **performance** , **memory usage** , and precise message positioning capabilities, catering to scenarios with large message volumes and navigation to older messages.
|
|
20
|
-
|
|
21
|
-
5. **Advanced Features** : Boasting numerous advanced capabilities, the UIKit includes continuous voice message playback, enhanced multimedia and file message experiences, and intuitive left-right swiping for multimedia message previews.
|
|
22
|
-
|
|
23
|
-
6. **Refined User Experience** : Detail optimizations such as rich **animations** , **haptic feedback** , and **a polished interface** contribute to an improved user experience. New features like grid-style avatars, redesigned forwarding panels, group member selectors, and revamped long-press message menus further enrich the experience.
|
|
24
|
-
|
|
25
|
-
7. **Modular Design** : Components are organized into modular packages, allowing for selective importing and reducing unnecessary bloat. Each package supports **built-in navigation transitions** , streamlining development and integration by automatically handling transitions, such as between Conversation and Message.
|
|
26
|
-
|
|
27
|
-
8. **Developer-Friendly Approach** : A more unified, standardized component parameter design, clearer code naming conventions, and detailed comments, combined with the flexibility to choose **global or instance-level configuration ** management, make development easier and more efficient.
|
|
28
|
-
|
|
29
|
-
|
|
30
|
-
## Getting Started
|
|
31
|
-
|
|
32
|
-
### Requirements
|
|
33
|
-
- Flutter version: 3.19 or above
|
|
34
|
-
|
|
35
|
-
- Dart version: 3.0 or above
|
|
36
|
-
|
|
37
|
-
|
|
38
|
-
### Setting Up Application in the Console
|
|
39
|
-
|
|
40
|
-
#### **Step1:Create an Account**
|
|
41
|
-
|
|
42
|
-
Visit the [Console](https://trtc.io/login?source=flutter_article_blog_1&utm_campaign=social) of trtc.io and create an account by following the prompts.
|
|
43
|
-
|
|
44
|
-
#### **Step2:Start a Free Trial**
|
|
45
|
-
|
|
46
|
-
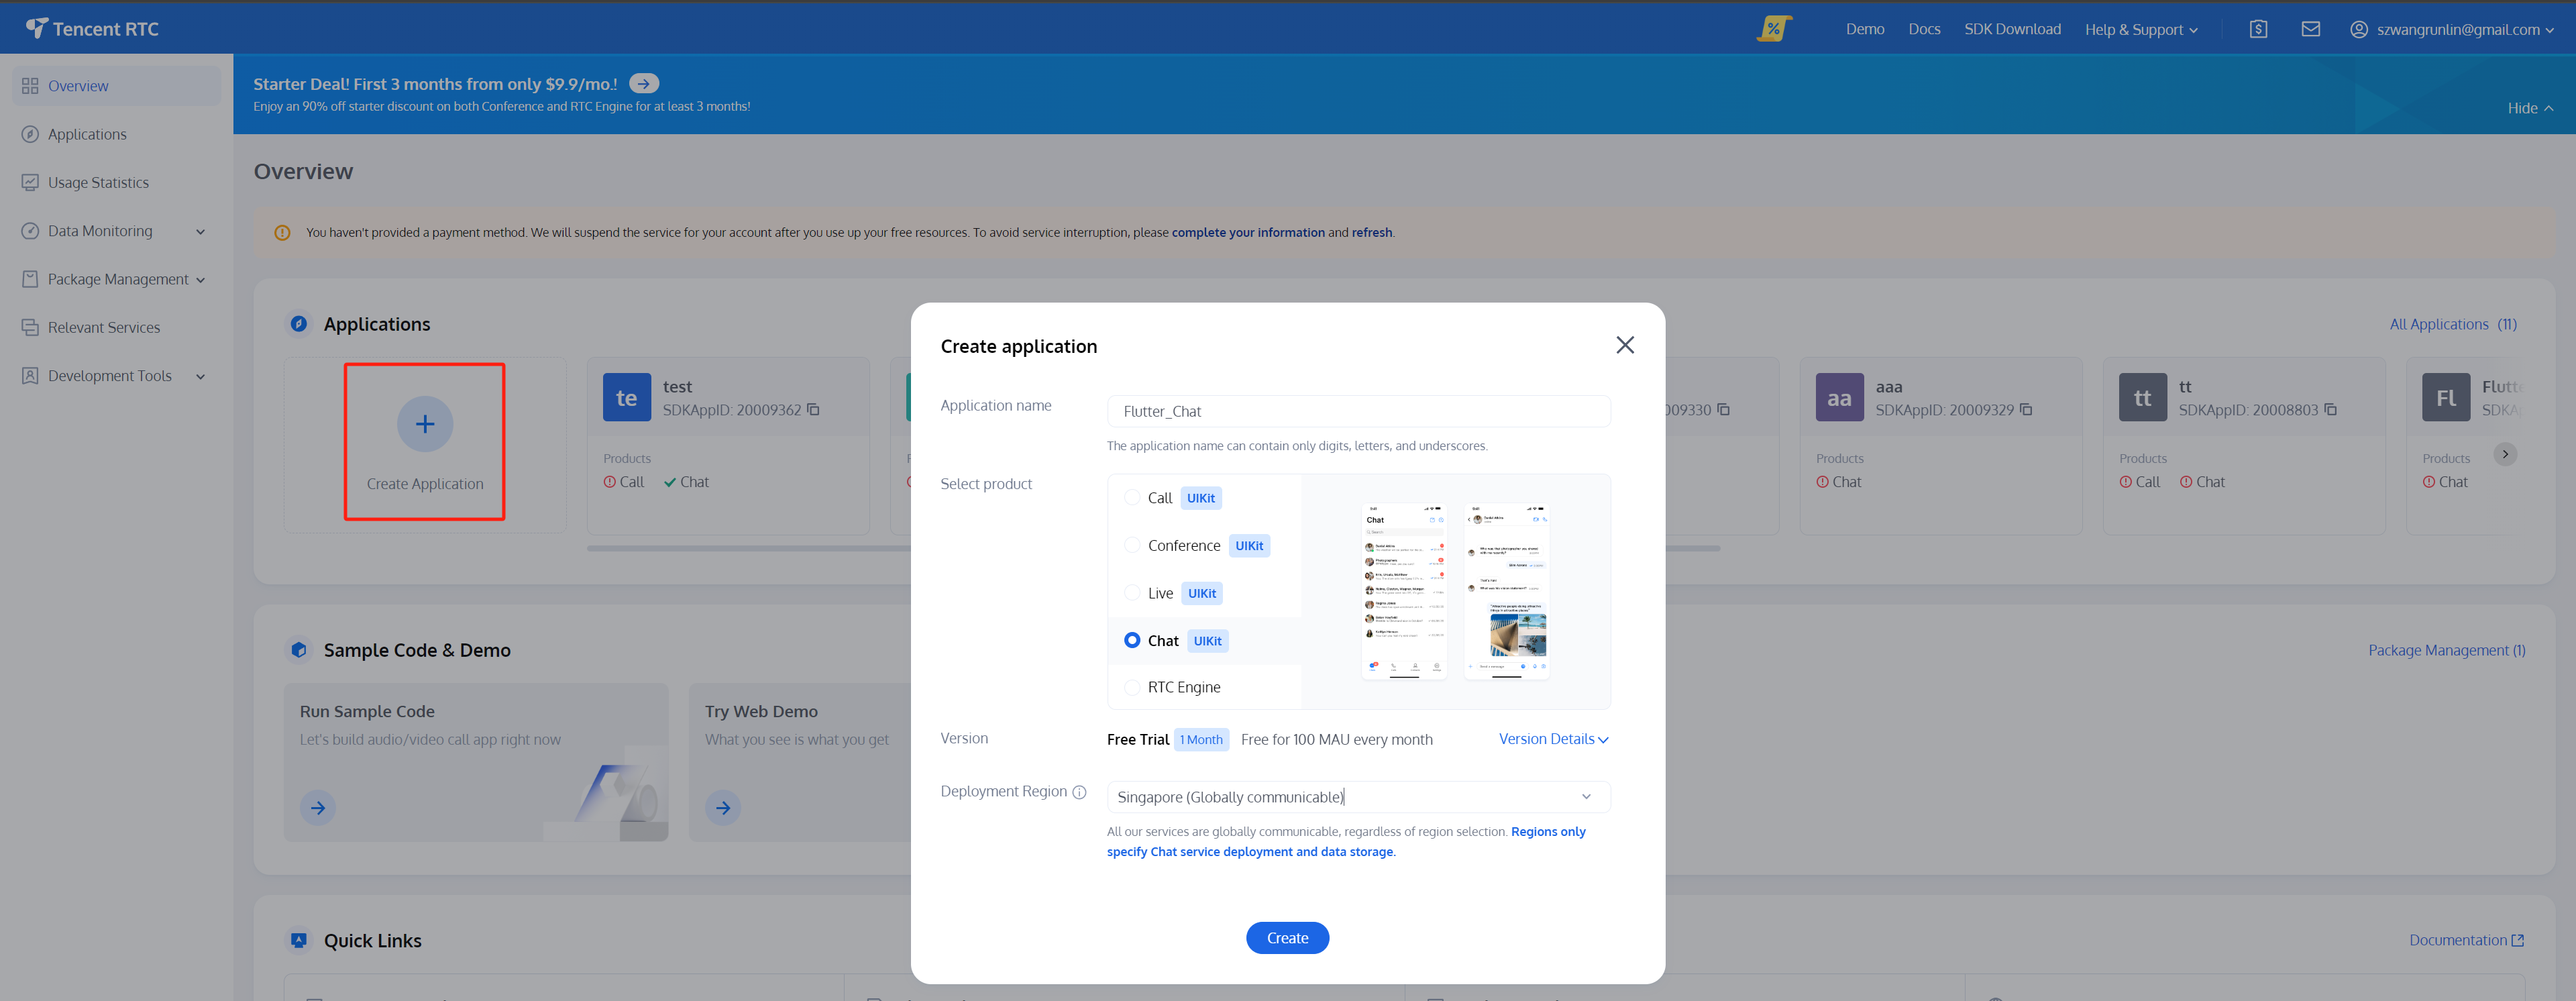
Create an application on the homepage and start your free trial.
|
|
47
|
-
|
|
48
|
-
|
|
49
|
-
|
|
50
|
-
|
|
51
|
-
#### **Step3:Generate Test Users**
|
|
52
|
-
|
|
53
|
-
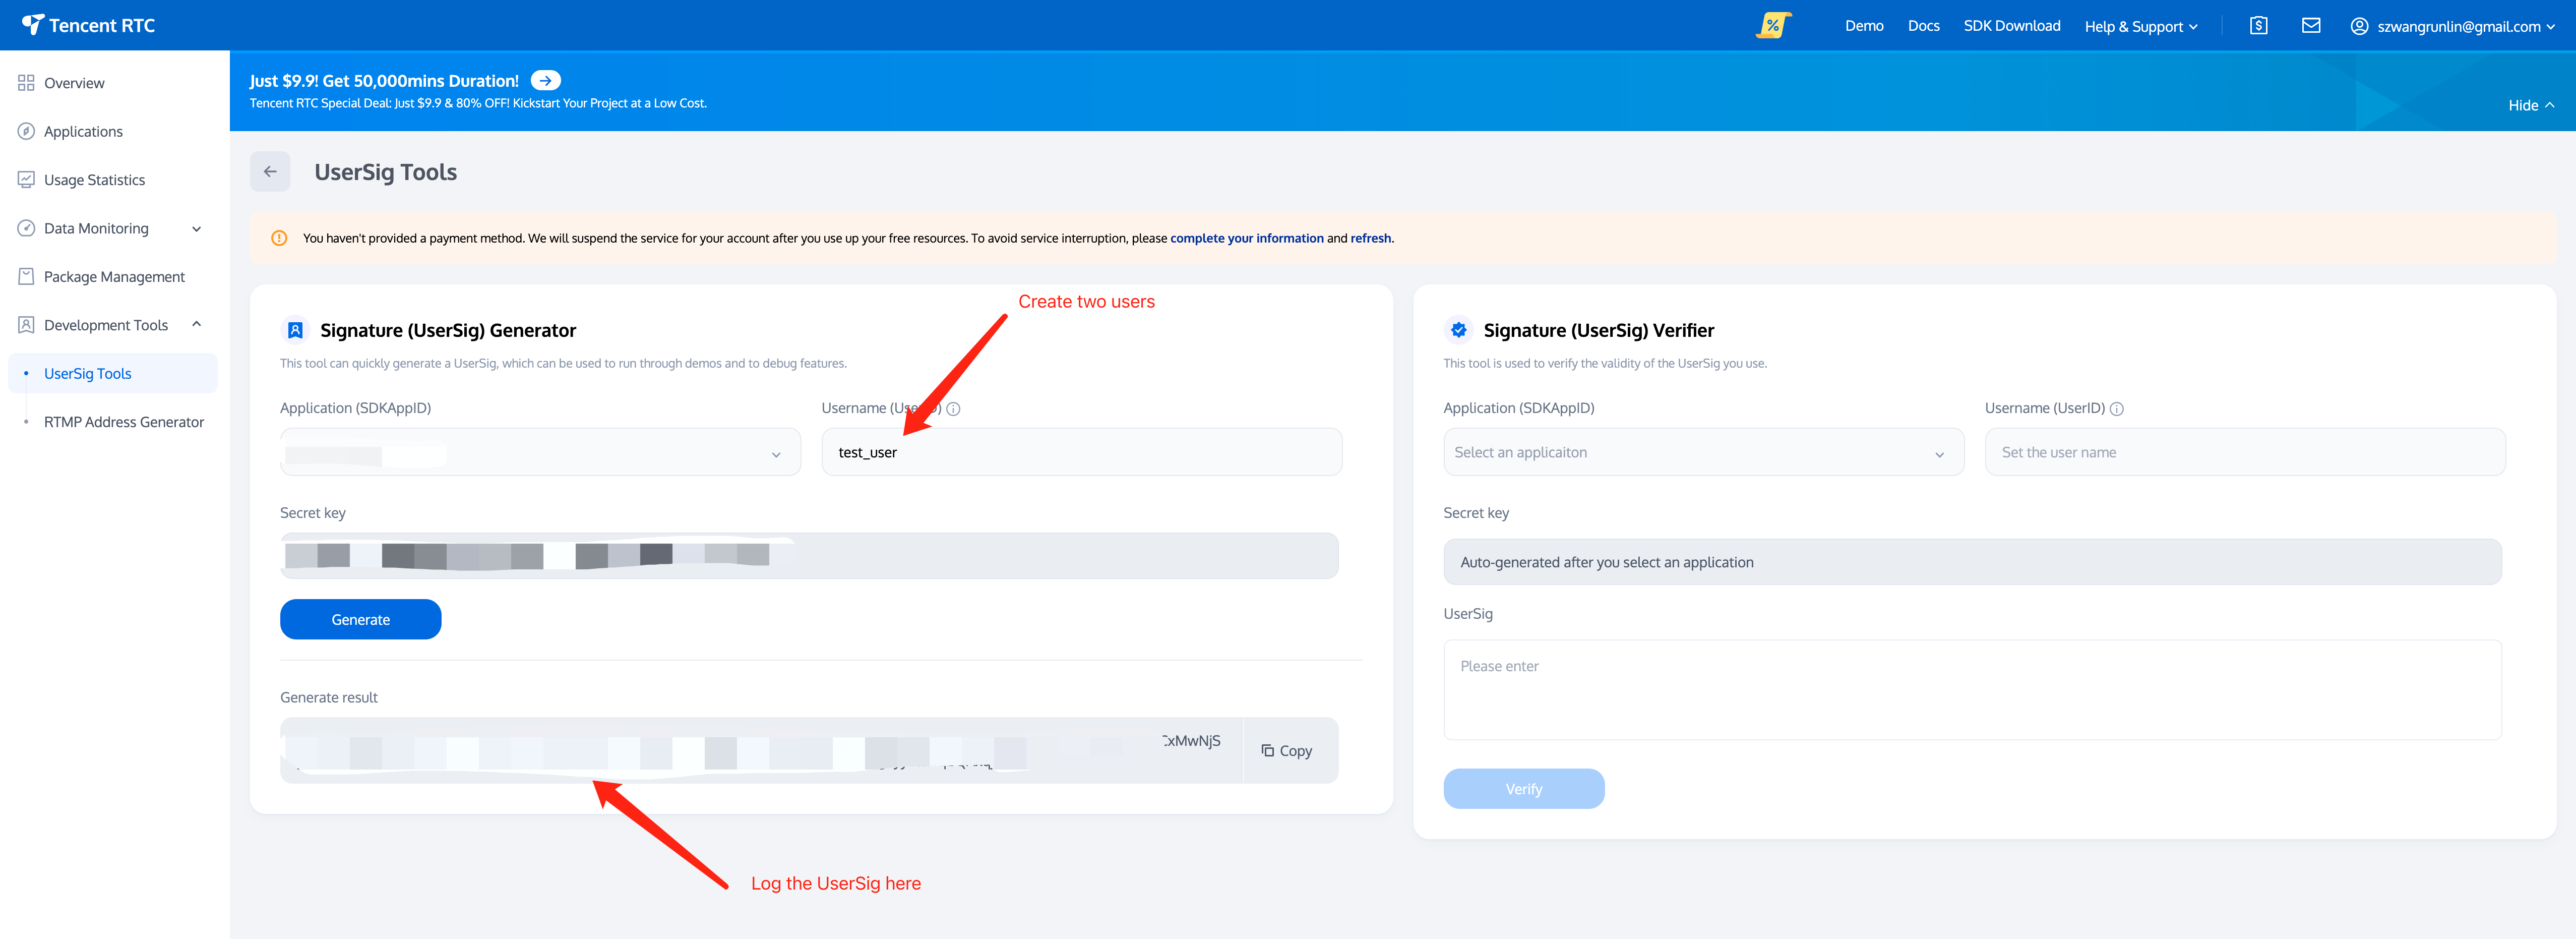
Create two users (test accounts) on [Account Management](https://console.trtc.io/chat/account-management). Following by use the [UserSig Tools](https://console.trtc.io/usersig) to create the corresponding UserSigs for them, note down the UserSigs for later use.
|
|
54
|
-
|
|
55
|
-
|
|
56
|
-
|
|
57
|
-
|
|
58
|
-
#### **Step4:Retrieve Your SDKAppID**
|
|
59
|
-
|
|
60
|
-
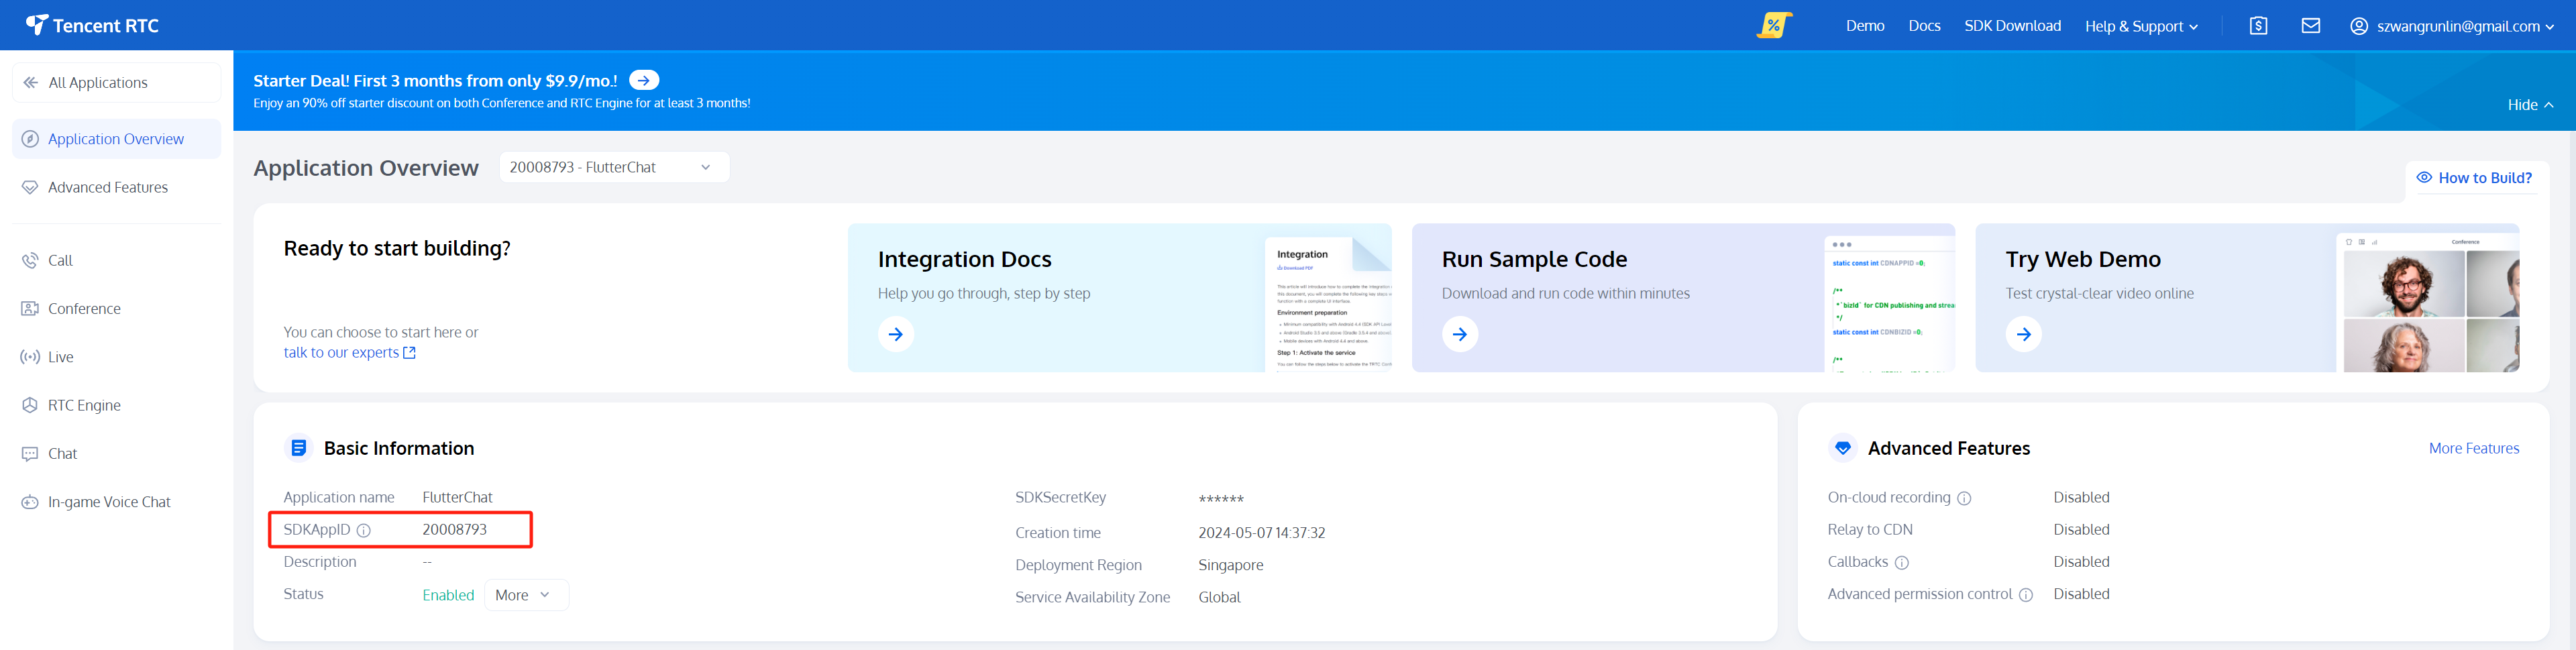
Go to [Applications](https://console.trtc.io/app), select your newly created application, and navigate to the corresponding [Application Overview](https://console.trtc.io/overview) to find your SDKAppID.
|
|
61
|
-
|
|
62
|
-
|
|
63
|
-
|
|
64
|
-
|
|
65
|
-
At this point, the Console setup is complete. Make sure to note down the `SDKAppID `and the two sets of `UserID `and `UserSig`.
|
|
66
|
-
|
|
67
|
-
### Coding
|
|
68
|
-
|
|
69
|
-
> **Note:**
|
|
70
|
-
>
|
|
71
|
-
|
|
72
|
-
> The guide provide a** Simplified Overview** of integrating with Flutter Chat UIKit only.
|
|
73
|
-
>
|
|
74
|
-
|
|
75
|
-
> For a detailed integration process, please refer to this guide: [Detailed Integration Guide](https://trtc.io/document/58585?platform=flutter&product=chat&menulabel=uikit).
|
|
76
|
-
>
|
|
77
|
-
|
|
78
|
-
|
|
79
|
-
To begin, it's best to have a Flutter project ready or create a new one to fully experience this tutorial. We recommend following the steps to [create a new Flutter project](https://docs.flutter.dev/get-started/codelab).
|
|
80
|
-
|
|
81
|
-
If you're interested in exploring a fully-fledged app with an extensive range of features, advanced capabilities, and customization options, please check out [This Repo](https://github.com/TencentCloud/chat-demo-flutter/tree/v2).
|
|
82
|
-
|
|
83
|
-
#### Step 1. Import the Packages
|
|
84
|
-
|
|
85
|
-
To get started, import the base package, tencent_cloud_chat_common.
|
|
86
|
-
``` bash
|
|
87
|
-
flutter pub add tencent_cloud_chat_common
|
|
88
|
-
```
|
|
89
|
-
|
|
90
|
-
Next, import the UI component packages that suit your needs:
|
|
91
|
-
``` bash
|
|
92
|
-
flutter pub add tencent_cloud_chat_message
|
|
93
|
-
flutter pub add tencent_cloud_chat_conversation
|
|
94
|
-
flutter pub add tencent_cloud_chat_contact
|
|
95
|
-
flutter pub add tencent_cloud_chat_sticker
|
|
96
|
-
flutter pub add tencent_cloud_chat_message_reaction
|
|
97
|
-
flutter pub add tencent_cloud_chat_text_translate
|
|
98
|
-
```
|
|
99
|
-
|
|
100
|
-
For demonstration purposes, we suggest importing all of them. However, in real-world projects, you can import packages based on your specific requirements.
|
|
101
|
-
|
|
102
|
-
The architecture of Flutter Chat UIKit is shown below:
|
|
103
|
-
|
|
104
|
-
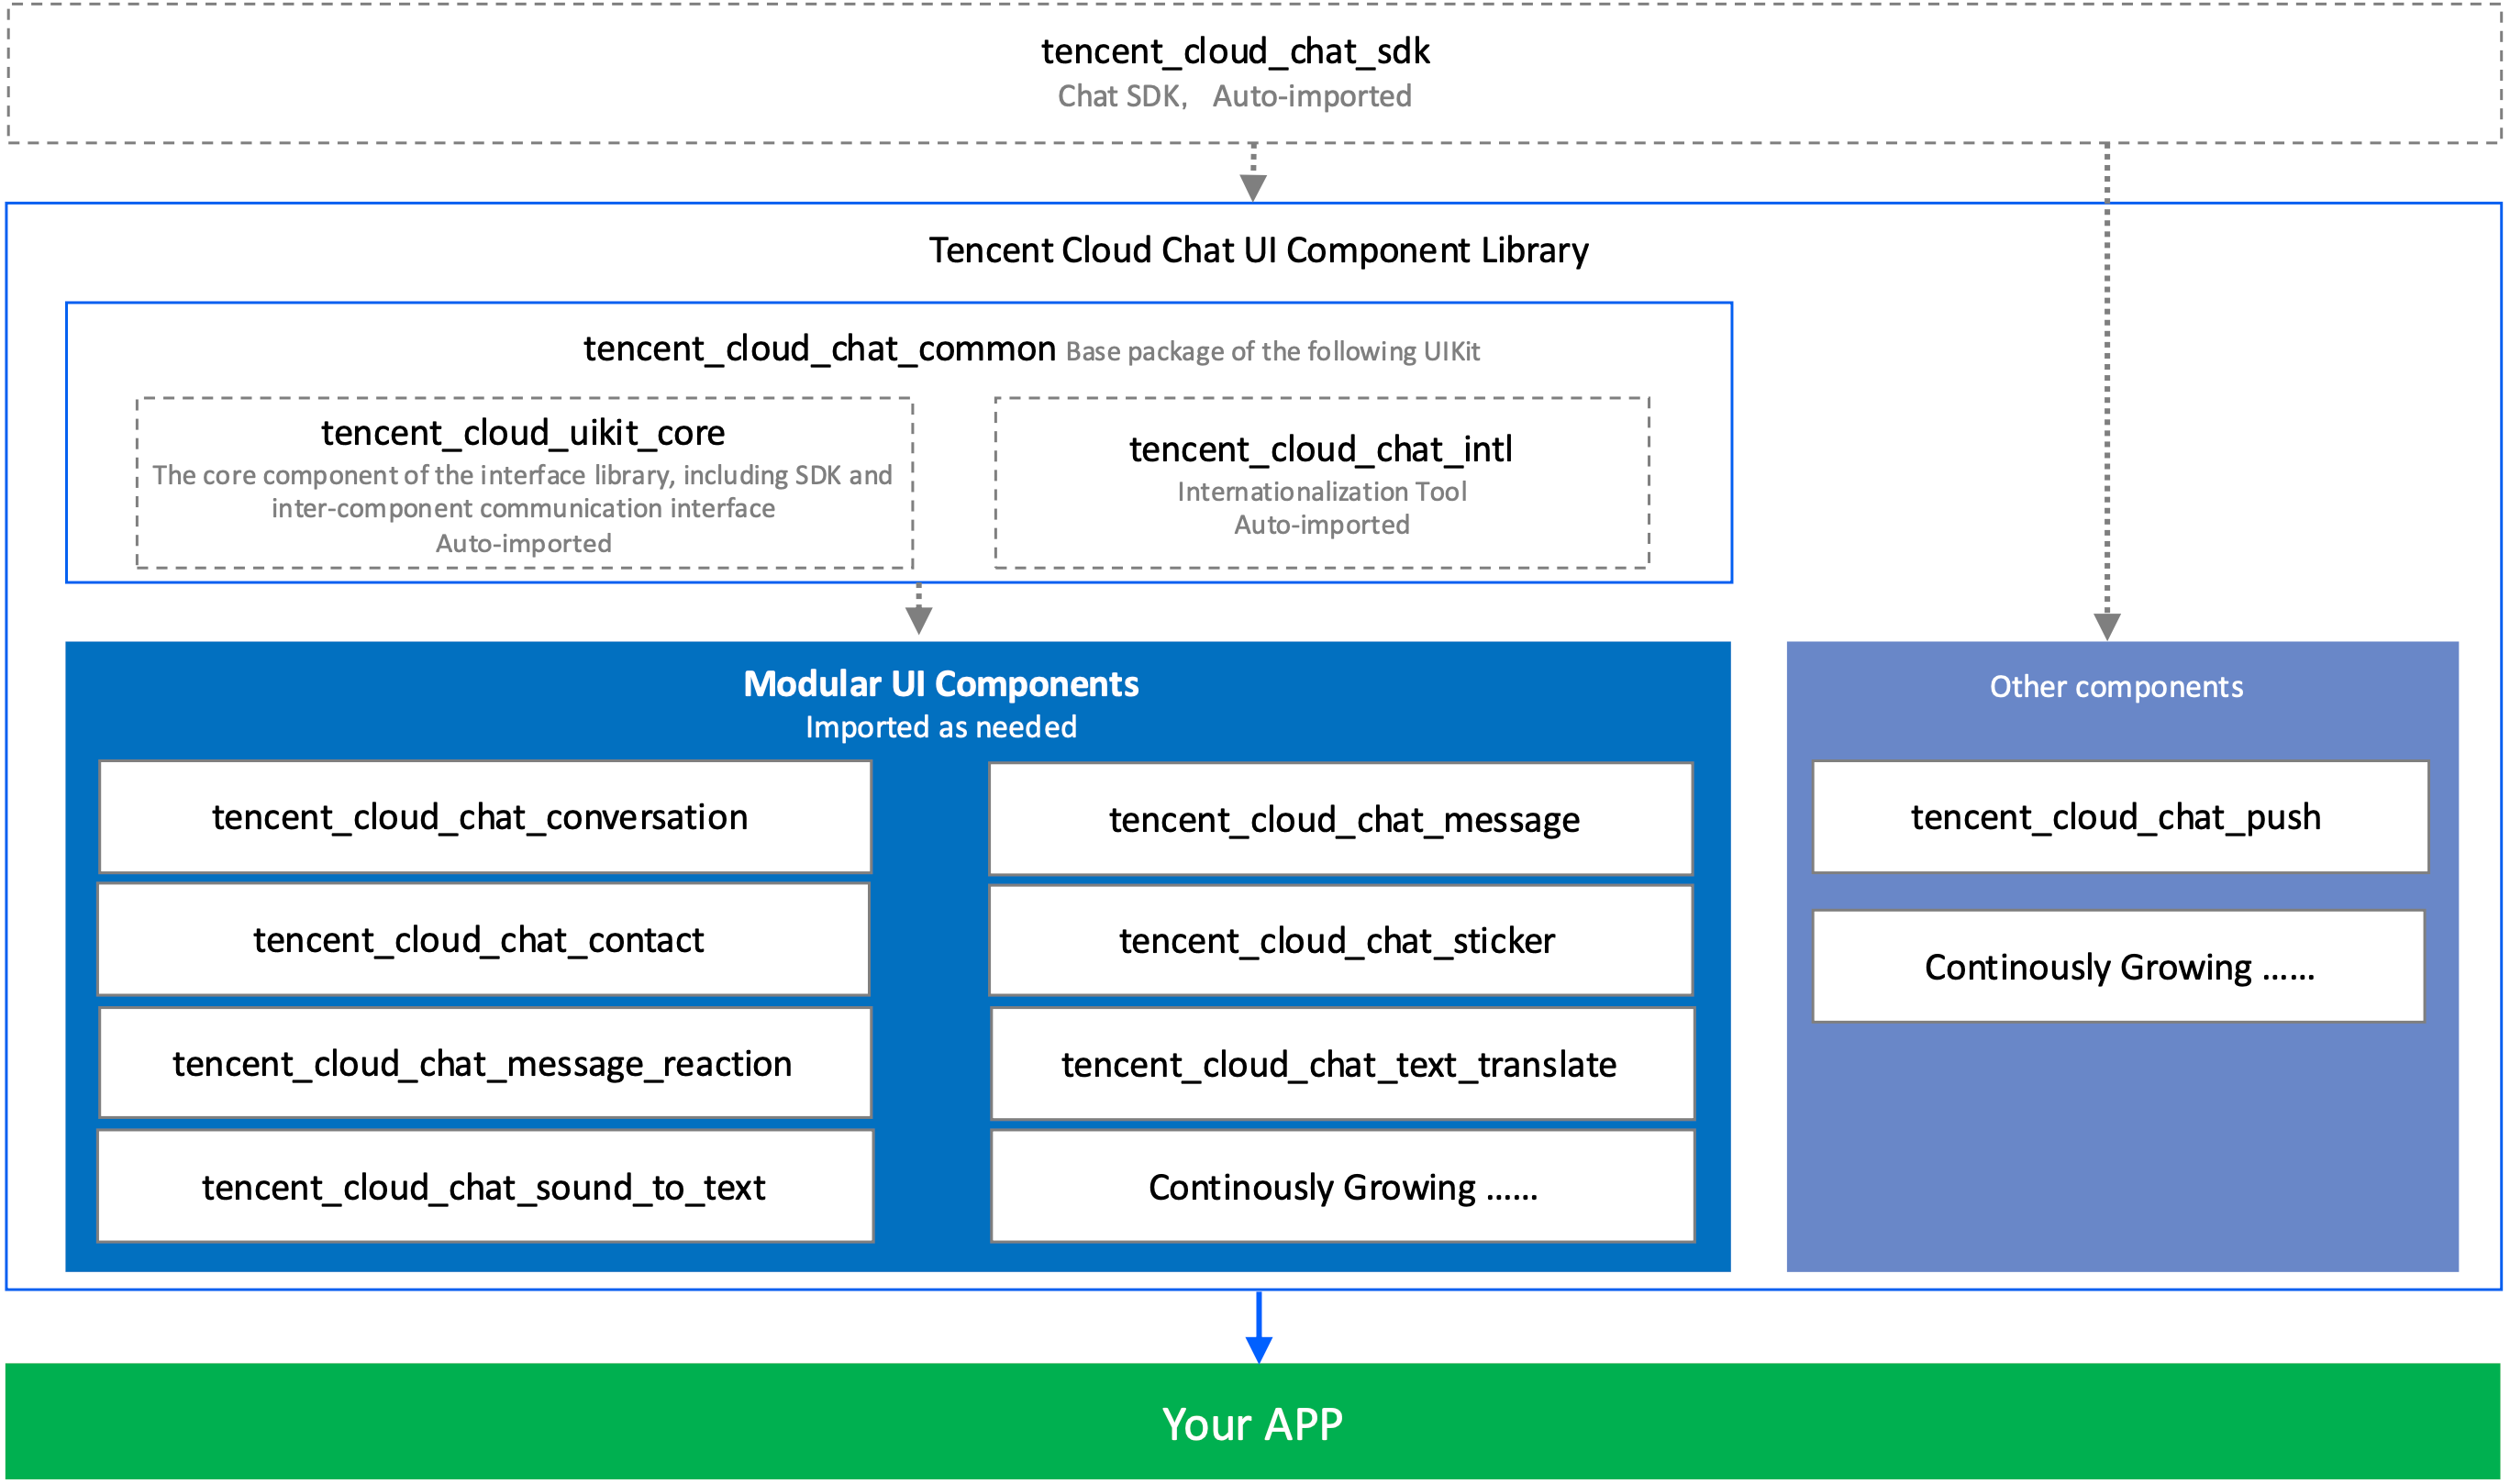
|
|
105
|
-
|
|
106
|
-
|
|
107
|
-
#### Step 2. Initial Setup for UIKit
|
|
108
|
-
|
|
109
|
-
Before you start using each Modular Package UI component, follow these initial setup steps:
|
|
110
|
-
|
|
111
|
-
**Global Configuration**
|
|
112
|
-
|
|
113
|
-
Replace your project's `MaterialApp` by `TencentCloudChatMaterialApp`.
|
|
114
|
-
|
|
115
|
-
This enables automatic management and configuration of language, theme (with material3), theme mode, and other settings. If you prefer manual configuration, refer to [Implement the global configuration for UIKit manually](https://trtc.io/document/58585?platform=flutter&product=chat&menulabel=uikit#ab6bd508-218a-4002-9b76-0ee081e8929a).
|
|
116
|
-
|
|
117
|
-
**Initialization and Login**
|
|
118
|
-
|
|
119
|
-
Call `TencentCloudChat.controller.initUIKit` to initialize and log in.
|
|
120
|
-
|
|
121
|
-
Pass in the **SDKAppID**, **userID**, and **userSig **of your Tencent Cloud Chat application created in the previous step. Also, declare the register of each sub Modular UI Package in the `usedComponentsRegister` list.
|
|
122
|
-
``` java
|
|
123
|
-
TencentCloudChat.controller.initUIKit(
|
|
124
|
-
options: const TencentCloudChatInitOptions(
|
|
125
|
-
sdkAppID: , /// [Required]: The SDKAppID of your Tencent Cloud Chat application
|
|
126
|
-
userID: , /// [Required]: The userID of the logged-in user
|
|
127
|
-
userSig: , /// [Required]: The userSig of the logged-in user
|
|
128
|
-
),
|
|
129
|
-
components: const TencentCloudChatInitComponentsRelated( /// [Required]: The modular UI components related settings, taking effects on a global scale.
|
|
130
|
-
usedComponentsRegister: [
|
|
131
|
-
/// [Required]: List of registration functions for the components used in the Chat UIKit.
|
|
132
|
-
TencentCloudChatConversationManager.register,
|
|
133
|
-
TencentCloudChatMessageManager.register,
|
|
134
|
-
TencentCloudChatContactManager.register,
|
|
135
|
-
],
|
|
136
|
-
),
|
|
137
|
-
);
|
|
138
|
-
```
|
|
139
|
-
|
|
140
|
-
Perfect! With the global configuration complete, we're now ready to dive into the usage of our Modular UI Components. Let's explore how they can enhance your chat application experience.
|
|
141
|
-
|
|
142
|
-
#### Step3. Integrating Modular UI Components
|
|
143
|
-
|
|
144
|
-
In most use cases, you'll need to manually instantiate and add the `TencentCloudChatConversation` and `TencentCloudChatContact `components to a widget, if necessary.
|
|
145
|
-
|
|
146
|
-
Other components are automatically navigated based on user actions.
|
|
147
|
-
|
|
148
|
-
In this tutorial, we'll use the `bottomNavigationBar` to manage the pages and switch between the `TencentCloudChatConversation` and `TencentCloudChatContact `components.
|
|
149
|
-
|
|
150
|
-
First, declare a `currentIndex` variable and a `List<Widget> pages` array to indicate the currently selected component and store the component instances.
|
|
151
|
-
``` java
|
|
152
|
-
List<Widget> pages = [];
|
|
153
|
-
int currentIndex = 0;
|
|
154
|
-
```
|
|
155
|
-
|
|
156
|
-
Store the instances in the `pages` array.
|
|
157
|
-
``` java
|
|
158
|
-
pages = [
|
|
159
|
-
const TencentCloudChatConversation(),
|
|
160
|
-
const TencentCloudChatContact(),
|
|
161
|
-
];
|
|
162
|
-
```
|
|
163
|
-
|
|
164
|
-
Finally, modify the `build` method as follows:
|
|
165
|
-
``` java
|
|
166
|
-
@override
|
|
167
|
-
Widget build(BuildContext context) {
|
|
168
|
-
return Scaffold(
|
|
169
|
-
bottomNavigationBar: BottomNavigationBar(
|
|
170
|
-
type: BottomNavigationBarType.fixed,
|
|
171
|
-
currentIndex: currentIndex,
|
|
172
|
-
onTap: (index) async {
|
|
173
|
-
if (index != currentIndex) {
|
|
174
|
-
setState(
|
|
175
|
-
() {
|
|
176
|
-
currentIndex = index;
|
|
177
|
-
},
|
|
178
|
-
);
|
|
179
|
-
}
|
|
180
|
-
},
|
|
181
|
-
items: const [
|
|
182
|
-
BottomNavigationBarItem(
|
|
183
|
-
icon: Icon(Icons.chat_bubble_outline), label: "Chats"),
|
|
184
|
-
BottomNavigationBarItem(
|
|
185
|
-
icon: Icon(Icons.contacts), label: "Contacts"),
|
|
186
|
-
],
|
|
187
|
-
),
|
|
188
|
-
body: pages[currentIndex],
|
|
189
|
-
);
|
|
190
|
-
}
|
|
191
|
-
```
|
|
192
|
-
|
|
193
|
-
And that's it! You've successfully integrated the components.
|
|
194
|
-
|
|
195
|
-
#### Step 4. Experience the Flutter Chat UIKit in Action
|
|
196
|
-
|
|
197
|
-
Now, let's run the project and experience the Flutter Chat UIKit.
|
|
198
|
-
|
|
199
|
-
Log in with the first test account created in the `initUIKit` method and launch the app.
|
|
200
|
-
|
|
201
|
-
Start by running `flutter run`.
|
|
202
|
-
|
|
203
|
-
Once you've successfully entered the app, you'll see the Conversation and Contact pages, with the ability to switch between them at the bottom.
|
|
204
|
-
|
|
205
|
-
However, there are no conversations to test yet.
|
|
206
|
-
|
|
207
|
-
Don't worry! Switch to the Contacts page, click 'Add Contact' in the top-right corner, and add the other test account as a contact. You'll now see the other account in the Contacts list.
|
|
208
|
-
|
|
209
|
-
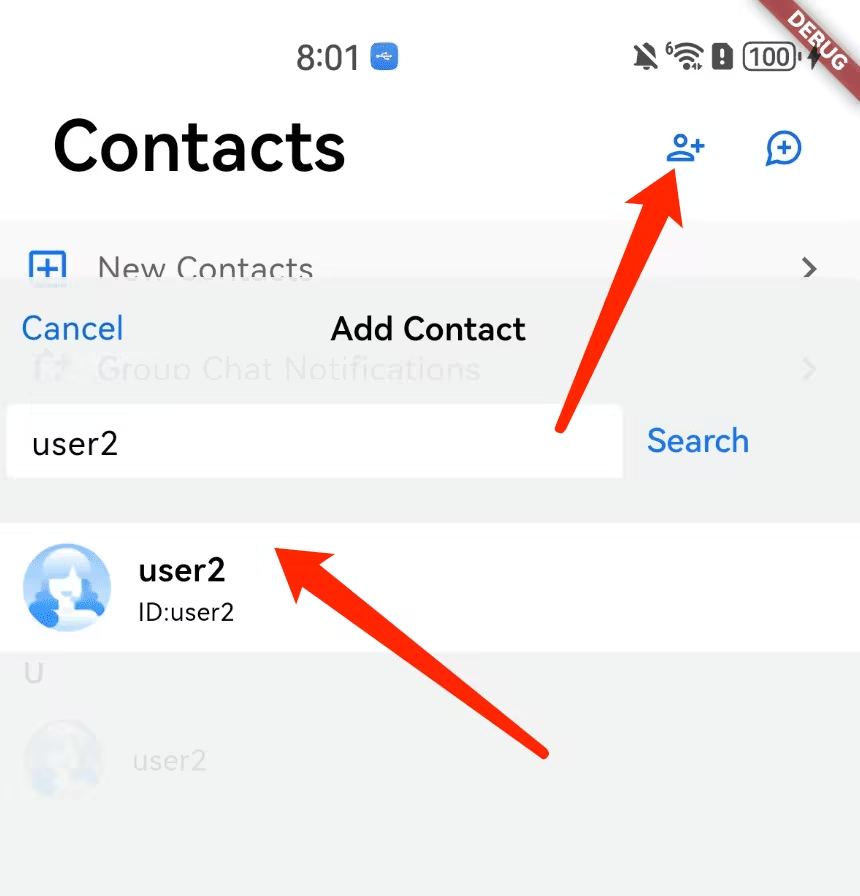
|
|
210
|
-
|
|
211
|
-
|
|
212
|
-
Click on the contact to start chatting. You can also rerun the app, log in with the other user's UserID, and experience sending messages to each other.
|
|
213
|
-
|
|
214
|
-
In conclusion, we've now completed the entire simplified integration process. Thank you for experiencing the power of Tencent Cloud Flutter Chat UIKit.
|
|
215
|
-
|
|
216
|
-
For more information on detailed integration, configuration, and advanced usage, please refer to this guide: [Detailed Integration Guide](https://www.tencentcloud.com/document/product/1047/58585).
|
|
217
|
-
|
|
@@ -1,369 +0,0 @@
|
|
|
1
|
-
# Device State Documentation
|
|
2
|
-
|
|
3
|
-
|
|
4
|
-
## Install dependency
|
|
5
|
-
|
|
6
|
-
|
|
7
|
-
You can choose any method below for dependency installation:
|
|
8
|
-
[npm]
|
|
9
|
-
``` bash
|
|
10
|
-
npm install tuikit-atomicx-vue3@latest --save
|
|
11
|
-
```
|
|
12
|
-
[pnpm]
|
|
13
|
-
``` bash
|
|
14
|
-
pnpm add tuikit-atomicx-vue3@latest
|
|
15
|
-
```
|
|
16
|
-
[yarn]
|
|
17
|
-
``` bash
|
|
18
|
-
yarn add tuikit-atomicx-vue3@latest
|
|
19
|
-
```
|
|
20
|
-
|
|
21
|
-
|
|
22
|
-
## Enums
|
|
23
|
-
|
|
24
|
-
|
|
25
|
-
### DeviceError
|
|
26
|
-
Device error enumeration
|
|
27
|
-
|
|
28
|
-
|
|
29
|
-
```typescript
|
|
30
|
-
export enum DeviceError {
|
|
31
|
-
NoError = 0, // No error
|
|
32
|
-
NoDeviceDetected = 1, // No device detected
|
|
33
|
-
NoSystemPermission = 2, // No system permission
|
|
34
|
-
NotSupportCapture = 3, // Capture not supported
|
|
35
|
-
OccupiedError = 4, // Device occupied
|
|
36
|
-
UnknownError = 5, // Unknown error
|
|
37
|
-
}
|
|
38
|
-
```
|
|
39
|
-
|
|
40
|
-
|
|
41
|
-
### AudioRoute
|
|
42
|
-
Audio route enumeration
|
|
43
|
-
|
|
44
|
-
|
|
45
|
-
```typescript
|
|
46
|
-
export enum AudioRoute {
|
|
47
|
-
Speakerphone = 0, // Speaker
|
|
48
|
-
Earpiece = 1, // Earpiece
|
|
49
|
-
}
|
|
50
|
-
```
|
|
51
|
-
|
|
52
|
-
|
|
53
|
-
### MirrorType
|
|
54
|
-
Image Type Enumeration
|
|
55
|
-
|
|
56
|
-
|
|
57
|
-
```typescript
|
|
58
|
-
export enum MirrorType {
|
|
59
|
-
Auto = 0, // Automatic
|
|
60
|
-
Enable = 1, // Enable
|
|
61
|
-
Disable = 2, // Disable
|
|
62
|
-
}
|
|
63
|
-
```
|
|
64
|
-
|
|
65
|
-
|
|
66
|
-
### DeviceType
|
|
67
|
-
Device Type enumeration
|
|
68
|
-
|
|
69
|
-
|
|
70
|
-
```typescript
|
|
71
|
-
export enum DeviceType {
|
|
72
|
-
Microphone = 'Microphone', // Microphone
|
|
73
|
-
Camera = 'Camera', // Camera
|
|
74
|
-
ScreenShare = 'ScreenShare', // Screen sharing
|
|
75
|
-
}
|
|
76
|
-
```
|
|
77
|
-
|
|
78
|
-
|
|
79
|
-
### VideoQuality
|
|
80
|
-
Video quality enumeration
|
|
81
|
-
|
|
82
|
-
|
|
83
|
-
```typescript
|
|
84
|
-
export enum VideoQuality {
|
|
85
|
-
Quality360P = 1, // 360P resolution
|
|
86
|
-
Quality540P = 2, // 540P resolution
|
|
87
|
-
Quality720P = 3, // 720P resolution
|
|
88
|
-
Quality1080P = 4, // 1080P resolution
|
|
89
|
-
}
|
|
90
|
-
```
|
|
91
|
-
|
|
92
|
-
|
|
93
|
-
### DevicePermission
|
|
94
|
-
Device permission enumeration
|
|
95
|
-
|
|
96
|
-
|
|
97
|
-
```typescript
|
|
98
|
-
export enum DevicePermission {
|
|
99
|
-
PublishAudio = 'PublishAudio', // Publish audio permission
|
|
100
|
-
PublishVideo = 'PublishVideo', // Publish video permission
|
|
101
|
-
ScreenShare = 'ScreenShare', // Screen sharing permission
|
|
102
|
-
}
|
|
103
|
-
```
|
|
104
|
-
|
|
105
|
-
|
|
106
|
-
### MediaSettingDisplayMode
|
|
107
|
-
Media settings display mode enumerate
|
|
108
|
-
|
|
109
|
-
|
|
110
|
-
```typescript
|
|
111
|
-
export enum MediaSettingDisplayMode {
|
|
112
|
-
Icon = 'Icon', // Icon mode only
|
|
113
|
-
IconWithPanel = 'IconWithPanel', // Icon with panel mode
|
|
114
|
-
Panel = 'Panel', // Panel mode only
|
|
115
|
-
}
|
|
116
|
-
```
|
|
117
|
-
|
|
118
|
-
|
|
119
|
-
### DeviceStatus
|
|
120
|
-
Device status enumeration
|
|
121
|
-
|
|
122
|
-
|
|
123
|
-
```typescript
|
|
124
|
-
export enum DeviceStatus {
|
|
125
|
-
Off = 0, // Off
|
|
126
|
-
On = 1, // On
|
|
127
|
-
}
|
|
128
|
-
```
|
|
129
|
-
|
|
130
|
-
|
|
131
|
-
### NetworkQuality
|
|
132
|
-
Network quality enumeration
|
|
133
|
-
|
|
134
|
-
|
|
135
|
-
```typescript
|
|
136
|
-
export enum NetworkQuality {
|
|
137
|
-
Unknown = 0, // Unknown
|
|
138
|
-
Excellent = 1, // Excellent
|
|
139
|
-
Good = 2, // Good
|
|
140
|
-
Poor = 3, // Poor
|
|
141
|
-
Bad = 4, // Bad
|
|
142
|
-
VeryBad = 5, // Poor
|
|
143
|
-
Down = 6, // Disconnected
|
|
144
|
-
}
|
|
145
|
-
```
|
|
146
|
-
|
|
147
|
-
|
|
148
|
-
## Interfaces
|
|
149
|
-
|
|
150
|
-
|
|
151
|
-
### VideoSettingProps
|
|
152
|
-
Video settings property API
|
|
153
|
-
|
|
154
|
-
|
|
155
|
-
```typescript
|
|
156
|
-
export interface VideoSettingProps {
|
|
157
|
-
displayMode: MediaSettingDisplayMode; // Display mode (required)
|
|
158
|
-
supportSwitchCamera?: boolean; // Whether switching camera is supported (optional)
|
|
159
|
-
supportSwitchResolution?: boolean; // Whether switching resolution is supported (optional)
|
|
160
|
-
supportVideoPreview?: boolean; // Whether video preview is supported (optional)
|
|
161
|
-
supportSwitchMirror?: boolean; // Whether switching mirror is supported (optional)
|
|
162
|
-
}
|
|
163
|
-
```
|
|
164
|
-
|
|
165
|
-
|
|
166
|
-
Attribute description
|
|
167
|
-
|
|
168
|
-
|
|
169
|
-
-**displayMode**: Set the display mode to determine the UI presentation form
|
|
170
|
-
- **supportSwitchCamera**: Whether to allow user access to switch between front and rear cameras
|
|
171
|
-
- **supportSwitchResolution**: Whether to allow user access to switch video resolution
|
|
172
|
-
- **supportVideoPreview**: Whether to display video preview
|
|
173
|
-
- **supportSwitchMirror**: Whether to allow user access to toggle the video mirror effect
|
|
174
|
-
|
|
175
|
-
|
|
176
|
-
### AudioSettingProps
|
|
177
|
-
Audio settings property API
|
|
178
|
-
|
|
179
|
-
|
|
180
|
-
```typescript
|
|
181
|
-
export interface AudioSettingProps {
|
|
182
|
-
displayMode: MediaSettingDisplayMode; // Display mode (required)
|
|
183
|
-
supportSwitchMicrophone?: boolean; // Whether switching microphone is supported (optional)
|
|
184
|
-
supportSwitchSpeaker?: boolean; // Whether switching speaker is supported (optional)
|
|
185
|
-
supportAudioLevel?: boolean; // Whether audio level display is supported (optional)
|
|
186
|
-
}
|
|
187
|
-
```
|
|
188
|
-
|
|
189
|
-
|
|
190
|
-
Attribute description
|
|
191
|
-
|
|
192
|
-
|
|
193
|
-
-**displayMode**: Set the display mode to determine the UI presentation form
|
|
194
|
-
- **supportSwitchMicrophone**: Whether to allow user access to switch microphone device
|
|
195
|
-
- **supportSwitchSpeaker**: Whether to allow user access to switch speaker device
|
|
196
|
-
- **supportAudioLevel**: Whether to display the audio level indicator
|
|
197
|
-
|
|
198
|
-
|
|
199
|
-
### NetworkInfo
|
|
200
|
-
Network information API
|
|
201
|
-
|
|
202
|
-
|
|
203
|
-
```typescript
|
|
204
|
-
export interface NetworkInfo {
|
|
205
|
-
quality: NetworkQuality; // Network quality level
|
|
206
|
-
upLoss: number; // Upstream packet loss rate (percentage)
|
|
207
|
-
downLoss: number; // Downstream packet loss rate (percentage)
|
|
208
|
-
delay: number; // Network delay (ms)
|
|
209
|
-
}
|
|
210
|
-
```
|
|
211
|
-
|
|
212
|
-
|
|
213
|
-
Attribute description
|
|
214
|
-
|
|
215
|
-
|
|
216
|
-
-**quality**: Network quality level, for quick network condition judgment
|
|
217
|
-
- **upLoss**: Uplink packet loss rate, typically ranging from 0-100
|
|
218
|
-
- **downLoss**: Downlink packet loss rate, typically ranging from 0-100
|
|
219
|
-
- **delay**: Network round-trip delay time (milliseconds)
|
|
220
|
-
|
|
221
|
-
|
|
222
|
-
## Example
|
|
223
|
-
|
|
224
|
-
|
|
225
|
-
Video Settings Configuration Example
|
|
226
|
-
|
|
227
|
-
|
|
228
|
-
```typescript
|
|
229
|
-
const videoSettings: VideoSettingProps = {
|
|
230
|
-
displayMode: MediaSettingDisplayMode.IconWithPanel,
|
|
231
|
-
supportSwitchCamera: true,
|
|
232
|
-
supportSwitchResolution: true,
|
|
233
|
-
supportVideoPreview: true,
|
|
234
|
-
supportSwitchMirror: false
|
|
235
|
-
};
|
|
236
|
-
```
|
|
237
|
-
|
|
238
|
-
|
|
239
|
-
Audio Settings Configuration Example
|
|
240
|
-
|
|
241
|
-
|
|
242
|
-
```typescript
|
|
243
|
-
const audioSettings: AudioSettingProps = {
|
|
244
|
-
displayMode: MediaSettingDisplayMode.Panel,
|
|
245
|
-
supportSwitchMicrophone: true,
|
|
246
|
-
supportSwitchSpeaker: true,
|
|
247
|
-
supportAudioLevel: true
|
|
248
|
-
};
|
|
249
|
-
```
|
|
250
|
-
|
|
251
|
-
|
|
252
|
-
Network information usage example
|
|
253
|
-
|
|
254
|
-
|
|
255
|
-
```typescript
|
|
256
|
-
const networkInfo: NetworkInfo = {
|
|
257
|
-
quality: NetworkQuality.Good,
|
|
258
|
-
upLoss: 2.5,
|
|
259
|
-
downLoss: 1.8,
|
|
260
|
-
delay: 45
|
|
261
|
-
};
|
|
262
|
-
|
|
263
|
-
|
|
264
|
-
// Display notification based on network quality
|
|
265
|
-
function getNetworkStatusText(info: NetworkInfo): string {
|
|
266
|
-
switch (info.quality) {
|
|
267
|
-
case NetworkQuality.Excellent:
|
|
268
|
-
return "Network condition is excellent";
|
|
269
|
-
case NetworkQuality.Good:
|
|
270
|
-
return "Network condition is good";
|
|
271
|
-
case NetworkQuality.Poor:
|
|
272
|
-
return "Network condition is poor";
|
|
273
|
-
default:
|
|
274
|
-
return "Network condition is unknown";
|
|
275
|
-
}
|
|
276
|
-
}
|
|
277
|
-
```
|
|
278
|
-
|
|
279
|
-
|
|
280
|
-
## Must-Knows
|
|
281
|
-
|
|
282
|
-
|
|
283
|
-
1. **Device permission**: Ensure you obtain appropriate system permission before using the camera and microphone.
|
|
284
|
-
2. **Error handling**: It is recommended to provide corresponding user notifications based on the `DeviceError` enumeration value.
|
|
285
|
-
3. **Network monitoring**: Perform periodic checks on `NetworkInfo` to optimize user experience.
|
|
286
|
-
4. **Device compatibility**: Video quality and features may vary by device.
|
|
287
|
-
|
|
288
|
-
|
|
289
|
-
## API and event usage example
|
|
290
|
-
```typescript
|
|
291
|
-
import { useDeviceState } from 'tuikit-atomicx-vue3';
|
|
292
|
-
const {
|
|
293
|
-
Microphone data
|
|
294
|
-
microphoneStatus,
|
|
295
|
-
microphoneList,
|
|
296
|
-
currentMicrophone,
|
|
297
|
-
microphoneLastError,
|
|
298
|
-
isMicrophoneTesting,
|
|
299
|
-
currentMicVolume,
|
|
300
|
-
captureVolume,
|
|
301
|
-
testingMicVolume,
|
|
302
|
-
|
|
303
|
-
|
|
304
|
-
camera data
|
|
305
|
-
cameraStatus,
|
|
306
|
-
cameraList,
|
|
307
|
-
currentCamera,
|
|
308
|
-
cameraLastError,
|
|
309
|
-
isCameraTesting,
|
|
310
|
-
isCameraTestLoading,
|
|
311
|
-
isFrontCamera,
|
|
312
|
-
localMirrorType,
|
|
313
|
-
localVideoQuality,
|
|
314
|
-
|
|
315
|
-
|
|
316
|
-
speaker data
|
|
317
|
-
speakerList,
|
|
318
|
-
currentSpeaker,
|
|
319
|
-
outputVolume,
|
|
320
|
-
currentAudioRoute,
|
|
321
|
-
isSpeakerTesting,
|
|
322
|
-
|
|
323
|
-
|
|
324
|
-
screen sharing data
|
|
325
|
-
screenStatus,
|
|
326
|
-
|
|
327
|
-
|
|
328
|
-
Local network data
|
|
329
|
-
networkInfo,
|
|
330
|
-
|
|
331
|
-
|
|
332
|
-
// Microphone operation
|
|
333
|
-
openLocalMicrophone,
|
|
334
|
-
closeLocalMicrophone,
|
|
335
|
-
muteLocalAudio,
|
|
336
|
-
unmuteLocalAudio,
|
|
337
|
-
getMicrophoneList,
|
|
338
|
-
setCurrentMicrophone,
|
|
339
|
-
startMicrophoneTest,
|
|
340
|
-
stopMicrophoneTest,
|
|
341
|
-
setCaptureVolume,
|
|
342
|
-
|
|
343
|
-
|
|
344
|
-
// Speaker operation
|
|
345
|
-
getSpeakerList,
|
|
346
|
-
setCurrentSpeaker,
|
|
347
|
-
setAudioRoute,
|
|
348
|
-
startSpeakerTest,
|
|
349
|
-
stopSpeakerTest,
|
|
350
|
-
setOutputVolume,
|
|
351
|
-
|
|
352
|
-
|
|
353
|
-
camera operation
|
|
354
|
-
openLocalCamera,
|
|
355
|
-
closeLocalCamera,
|
|
356
|
-
getCameraList,
|
|
357
|
-
setCurrentCamera,
|
|
358
|
-
switchCamera,
|
|
359
|
-
switchMirror,
|
|
360
|
-
updateVideoQuality,
|
|
361
|
-
startCameraDeviceTest,
|
|
362
|
-
stopCameraDeviceTest,
|
|
363
|
-
|
|
364
|
-
|
|
365
|
-
Screen Sharing
|
|
366
|
-
startScreenShare,
|
|
367
|
-
stopScreenShare,
|
|
368
|
-
} = useDeviceState();
|
|
369
|
-
```
|
|
@@ -1,59 +0,0 @@
|
|
|
1
|
-
# Room LoginState Documentation
|
|
2
|
-
|
|
3
|
-
|
|
4
|
-
Room component login API document.
|
|
5
|
-
|
|
6
|
-
## Install dependency
|
|
7
|
-
|
|
8
|
-
|
|
9
|
-
you can choose any method below for dependency installation:
|
|
10
|
-
[npm]
|
|
11
|
-
``` bash
|
|
12
|
-
npm install tuikit-atomicx-vue3@latest --save
|
|
13
|
-
```
|
|
14
|
-
[pnpm]
|
|
15
|
-
``` bash
|
|
16
|
-
pnpm add tuikit-atomicx-vue3@latest
|
|
17
|
-
```
|
|
18
|
-
[yarn]
|
|
19
|
-
``` bash
|
|
20
|
-
yarn add tuikit-atomicx-vue3@latest
|
|
21
|
-
```
|
|
22
|
-
|
|
23
|
-
|
|
24
|
-
## API usage example
|
|
25
|
-
|
|
26
|
-
|
|
27
|
-
```typescript
|
|
28
|
-
import { useLoginState } from 'tuikit-atomicx-vue3';
|
|
29
|
-
const {
|
|
30
|
-
loginUserInfo,
|
|
31
|
-
login,
|
|
32
|
-
logout,
|
|
33
|
-
setSelfInfo,
|
|
34
|
-
} = useLoginState();
|
|
35
|
-
|
|
36
|
-
|
|
37
|
-
// Log in.
|
|
38
|
-
login({
|
|
39
|
-
userId: 'xxx';
|
|
40
|
-
userSig: 'xxx';
|
|
41
|
-
sdkAppId: 0;
|
|
42
|
-
}).then(() => {
|
|
43
|
-
// Get logged-in user info after successful login
|
|
44
|
-
const { userId, userName, avatarUrl, customInfo } = loginUserInfo;
|
|
45
|
-
})
|
|
46
|
-
|
|
47
|
-
|
|
48
|
-
// Log out
|
|
49
|
-
logout();
|
|
50
|
-
|
|
51
|
-
|
|
52
|
-
// Set user information
|
|
53
|
-
setSelfInfo({
|
|
54
|
-
userName: 'xxx',
|
|
55
|
-
avatarUrl: 'xxx',
|
|
56
|
-
});
|
|
57
|
-
|
|
58
|
-
|
|
59
|
-
```
|