@tencent-rtc/mcp 1.3.0 → 1.3.2
This diff represents the content of publicly available package versions that have been released to one of the supported registries. The information contained in this diff is provided for informational purposes only and reflects changes between package versions as they appear in their respective public registries.
- package/index.js +4 -0
- package/index.js.map +1 -1
- package/package.json +2 -2
- package/resource/doc/chatuikit/faq/web_sdk/faq.md +125 -0
- package/resource/doc/chatuikit/flutter/faq.md +17 -114
- package/resource/doc/chatuikit/flutter/integrate_tuikit_Flutter.md +86 -722
- package/resource/doc/chatuikit/react/integration.md +430 -49
- package/resource/doc/chatuikit/react/workflow.md +258 -0
- package/resource/doc/chatuikit/vue/integration.md +355 -144
- package/resource/doc/chatuikit/vue/workflow.md +395 -0
- package/resource/doc/roomkit/vue/features/call-user-to-room.md +256 -0
- package/resource/doc/roomkit/vue/features/device-detection.md +388 -0
- package/resource/doc/roomkit/vue/features/device-state.md +480 -0
- package/resource/doc/roomkit/vue/features/free-beauty-panel.md +238 -0
- package/resource/doc/roomkit/vue/features/room-chat.md +427 -0
- package/resource/doc/roomkit/vue/features/room-participant-state.md +407 -0
- package/resource/doc/roomkit/vue/features/room-state.md +291 -0
- package/resource/doc/roomkit/vue/features/room-view.md +338 -0
- package/resource/doc/roomkit/vue/features/schedule-room.md +349 -0
- package/resource/doc/roomkit/vue/features/screen-share.md +333 -0
- package/resource/doc/roomkit/vue/features/virtual-background.md +287 -0
- package/resource/doc/roomkit/vue/features/workflow.md +553 -0
- package/resource/doc/roomkit/vue/integration.md +479 -0
- package/resource/doc/roomkit/vue/workflow.md +487 -0
- package/resource/doc/tuicallkit/react/api.md +21 -0
- package/resource/doc/tuicallkit/vue/api.md +21 -0
- package/tools/chat/get-web-chat-integration.js +31 -14
- package/tools/chat/get-web-chat-integration.js.map +1 -1
- package/tools/definitions/get_web_chat_uikit_integration_def.js +19 -12
- package/tools/definitions/get_web_chat_uikit_integration_def.js.map +1 -1
- package/tools/definitions/get_web_room_feature_detail_def.js +95 -0
- package/tools/definitions/get_web_room_feature_detail_def.js.map +1 -0
- package/tools/definitions/get_web_room_uikit_integration_def.js +44 -0
- package/tools/definitions/get_web_room_uikit_integration_def.js.map +1 -0
- package/tools/index.js +4 -4
- package/tools/index.js.map +1 -1
- package/tools/live/get-web-live-uikit-integration.js +1 -1
- package/tools/room/get-web-room-feature-detail.js +68 -0
- package/tools/room/get-web-room-feature-detail.js.map +1 -0
- package/tools/room/get-web-room-integration.js +43 -0
- package/tools/room/get-web-room-integration.js.map +1 -0
- package/utils/generate-structured-result.js +2 -2
- package/utils/generate-structured-result.js.map +1 -1
- package/utils/report-cls-client.js +1 -1
- package/utils/report-es-client.js +1 -1
- package/resource/doc/chatuikit/flutter/integrate_only_tuichat_Flutter.md +0 -333
- package/resource/doc/chatuikit/flutter/quick_start_Flutter.md +0 -217
- package/resource/doc/chatuikit/react/chat_window_integration.md +0 -94
- package/resource/doc/chatuikit/vue/chat_window_integration.md +0 -156
- package/resource/doc/roomkit/vue/states/device-state.md +0 -369
- package/resource/doc/roomkit/vue/states/login-state.md +0 -59
- package/resource/doc/roomkit/vue/states/room-list-state.md +0 -355
- package/resource/doc/roomkit/vue/states/room-participant-state.md +0 -388
- package/tools/chat/get-web-chat-window-integration.js +0 -28
- package/tools/chat/get-web-chat-window-integration.js.map +0 -1
- package/tools/definitions/get_web_chat_window_integration_def.js +0 -26
- package/tools/definitions/get_web_chat_window_integration_def.js.map +0 -1
- package/tools/room/get-web-room-state-detail.js +0 -31
- package/tools/room/get-web-room-state-detail.js.map +0 -1
|
@@ -1,333 +0,0 @@
|
|
|
1
|
-
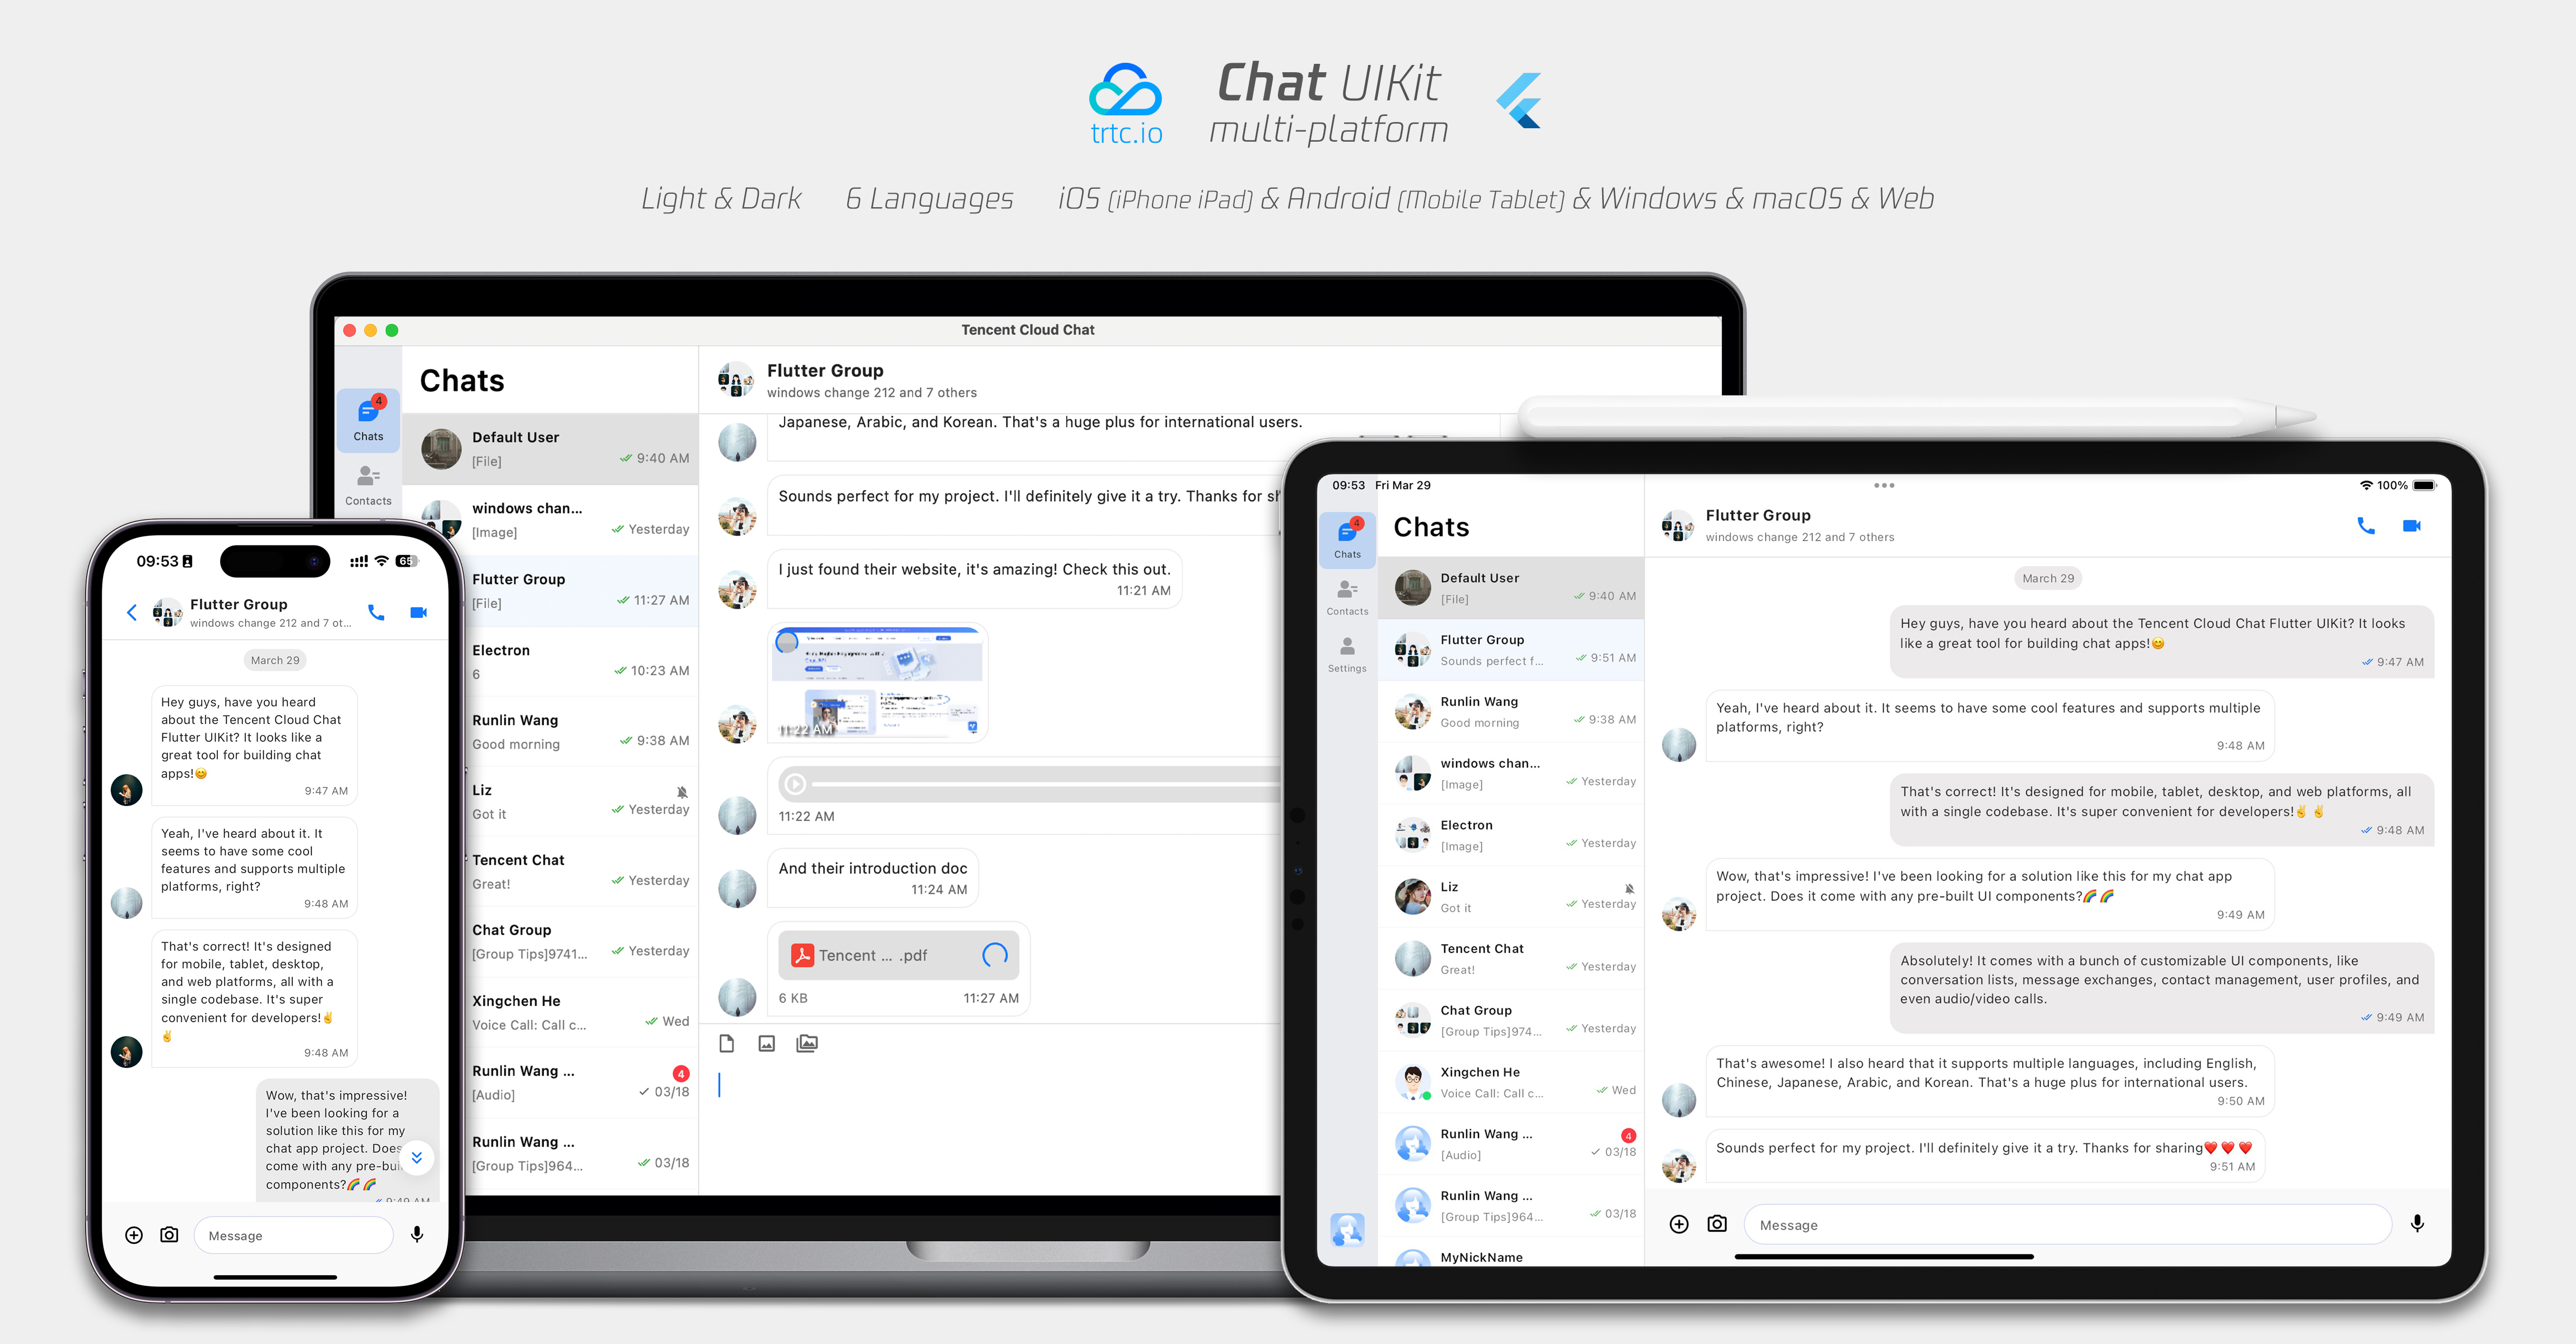
Flutter Chat UIKit is designed to provide developers with a comprehensive set of tools to create feature-rich chat applications with ease.
|
|
2
|
-
|
|
3
|
-
It is built with a modular approach, allowing you to choose the components you need while keeping your application lightweight and efficient.
|
|
4
|
-
|
|
5
|
-
Among them, the `TencentCloudChatMessage` component offers both private messaging (1V1) and group chat features. It supports a variety of operations on messages, such as sending different types of messages, long-pressing to reply or quote messages, and querying details of read receipts.
|
|
6
|
-
|
|
7
|
-
|
|
8
|
-
|
|
9
|
-
|
|
10
|
-
|
|
11
|
-
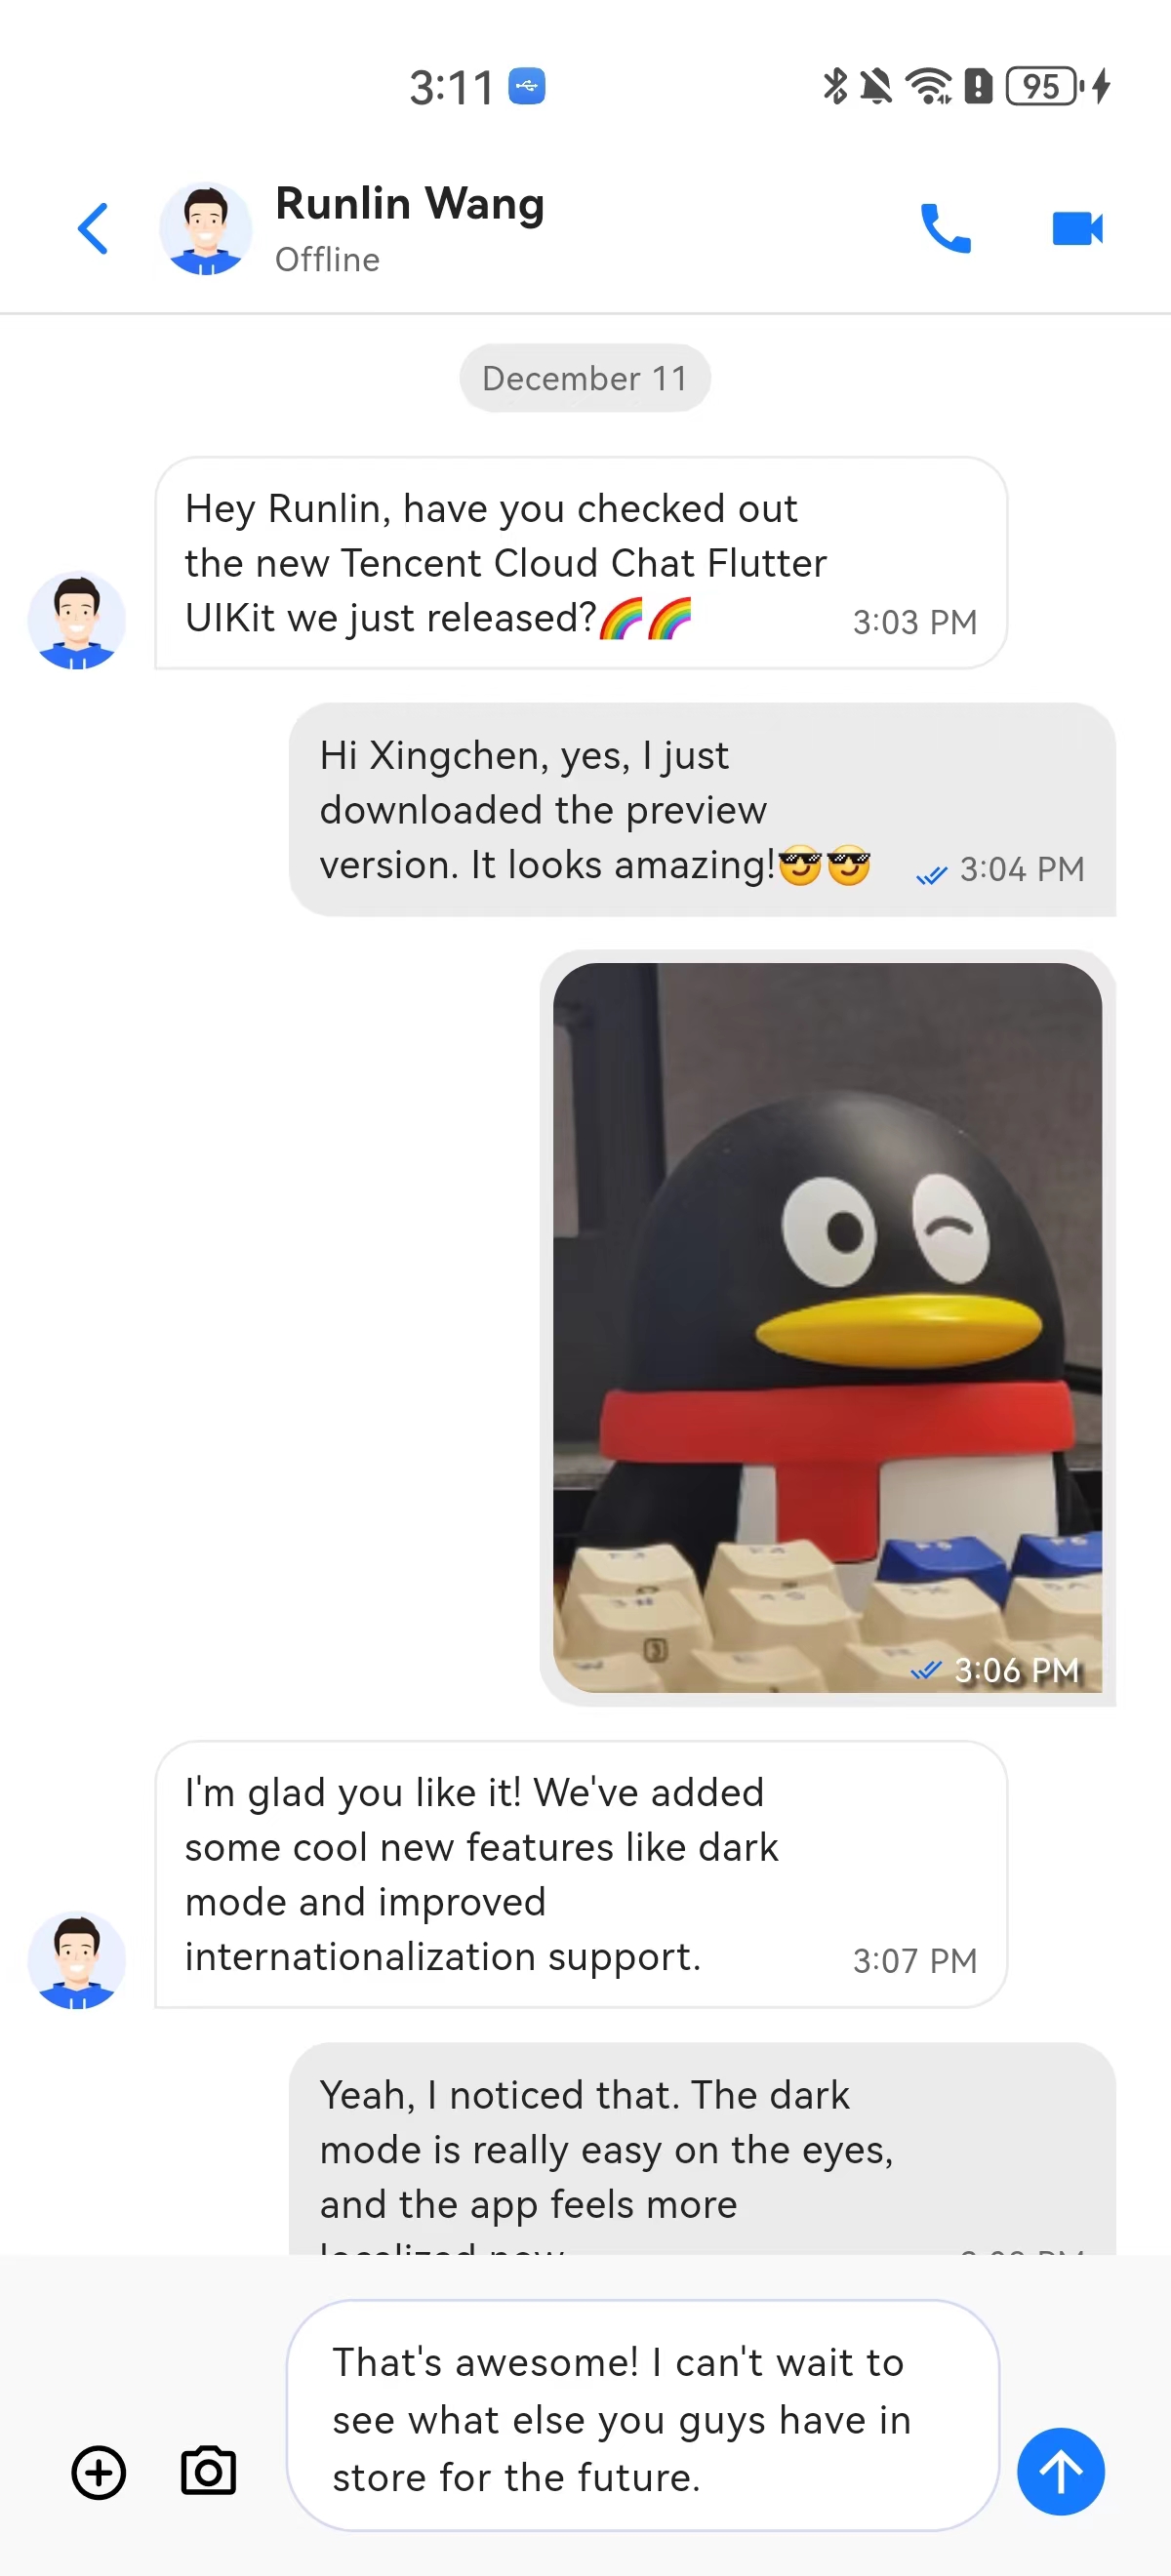
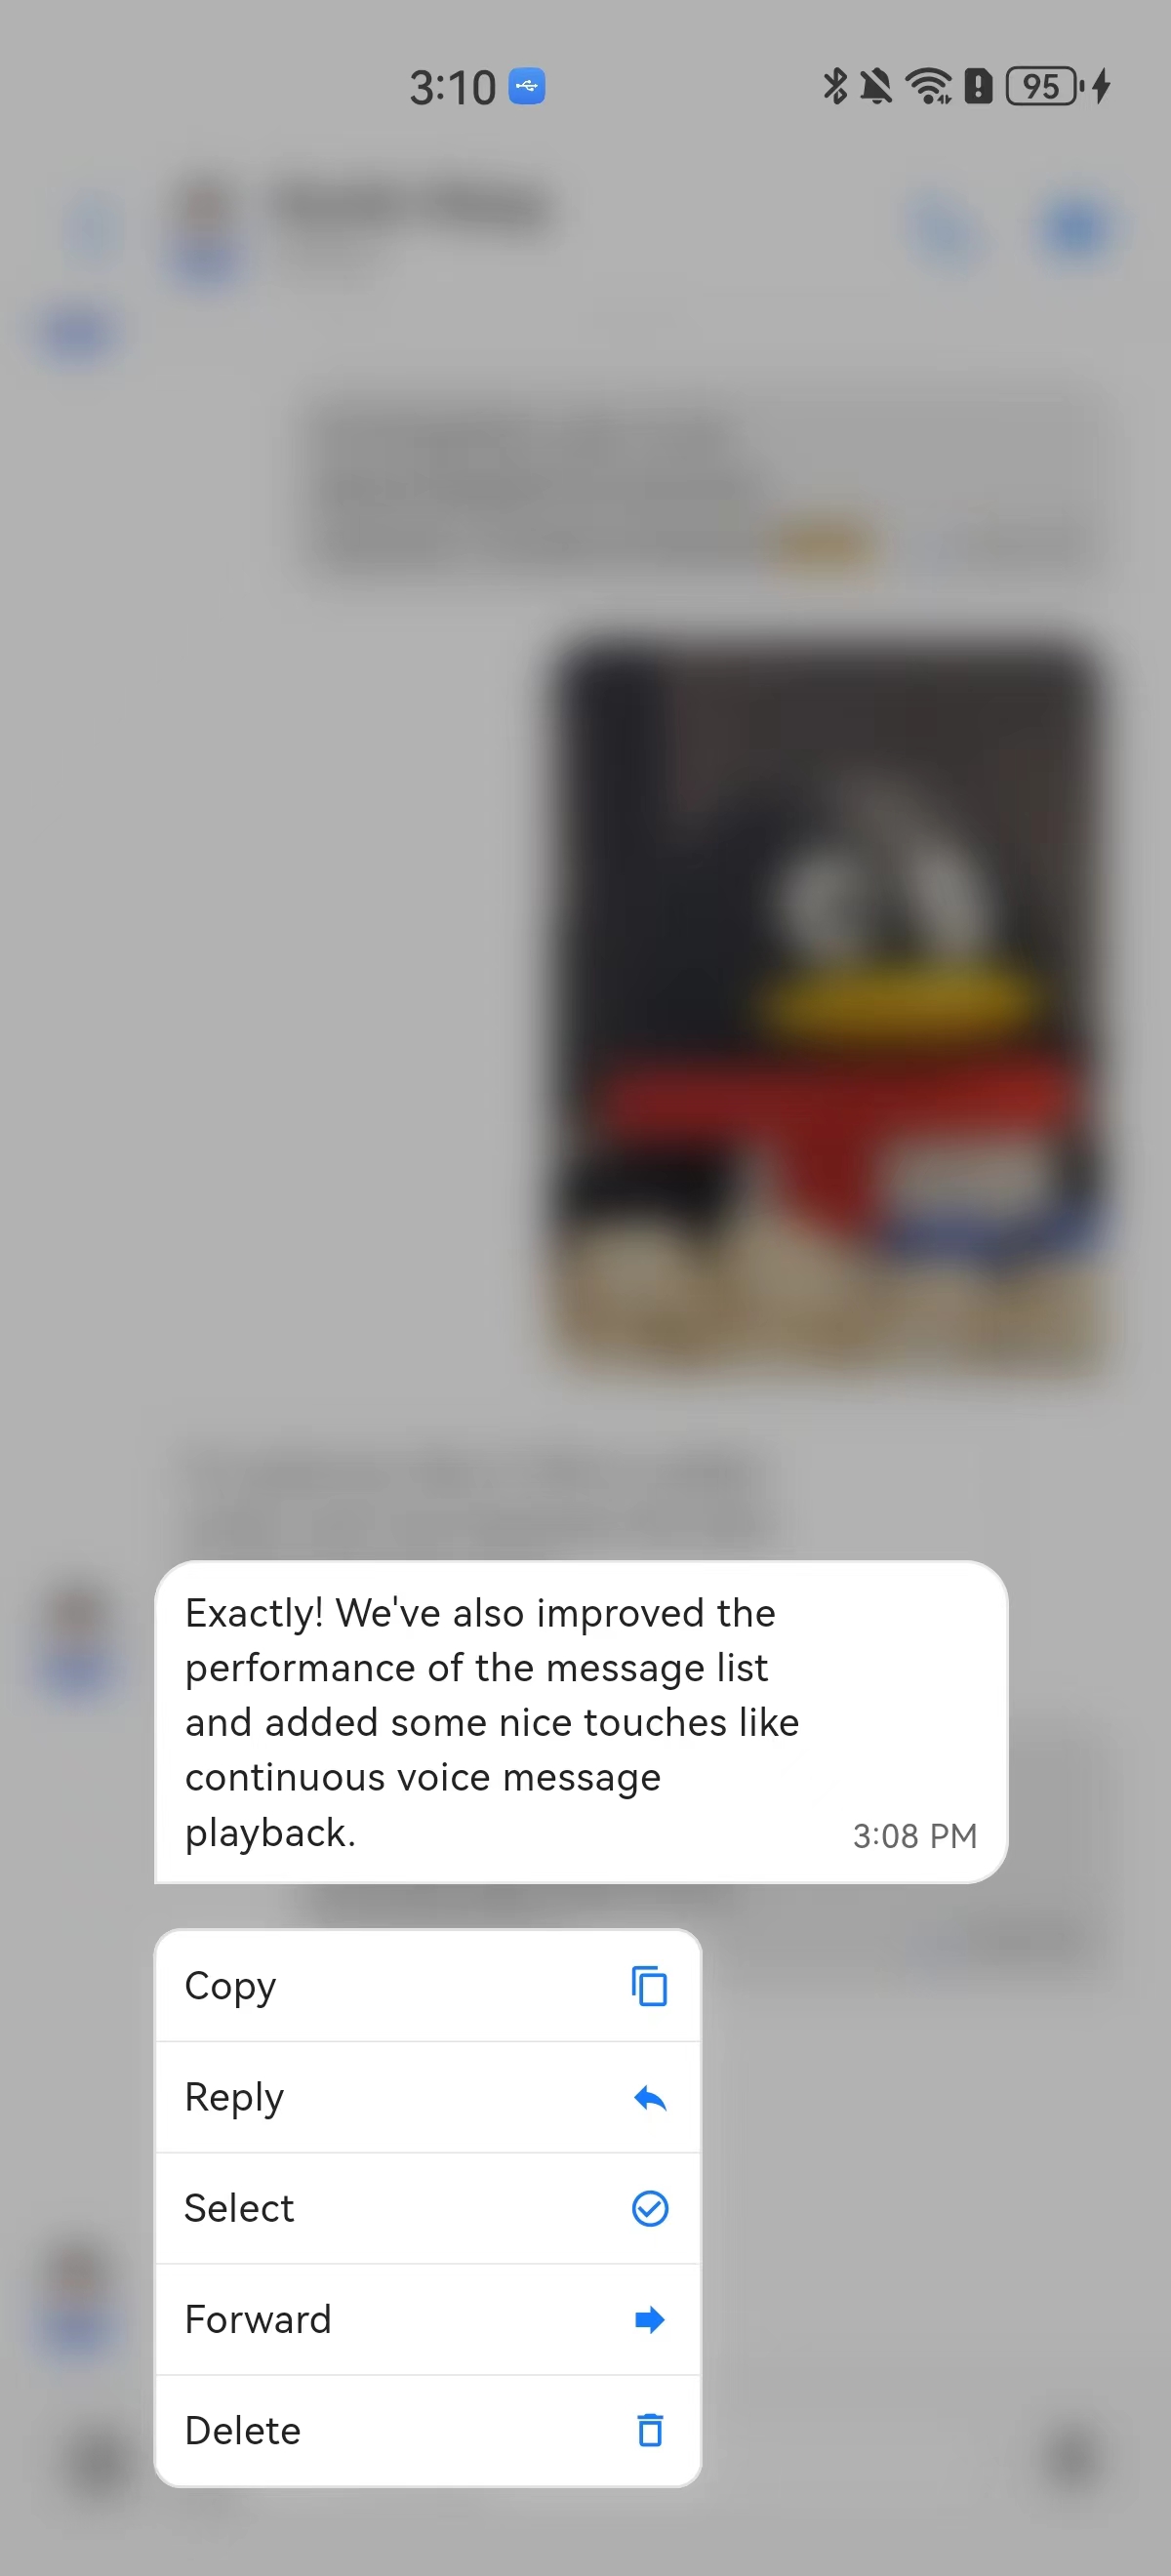
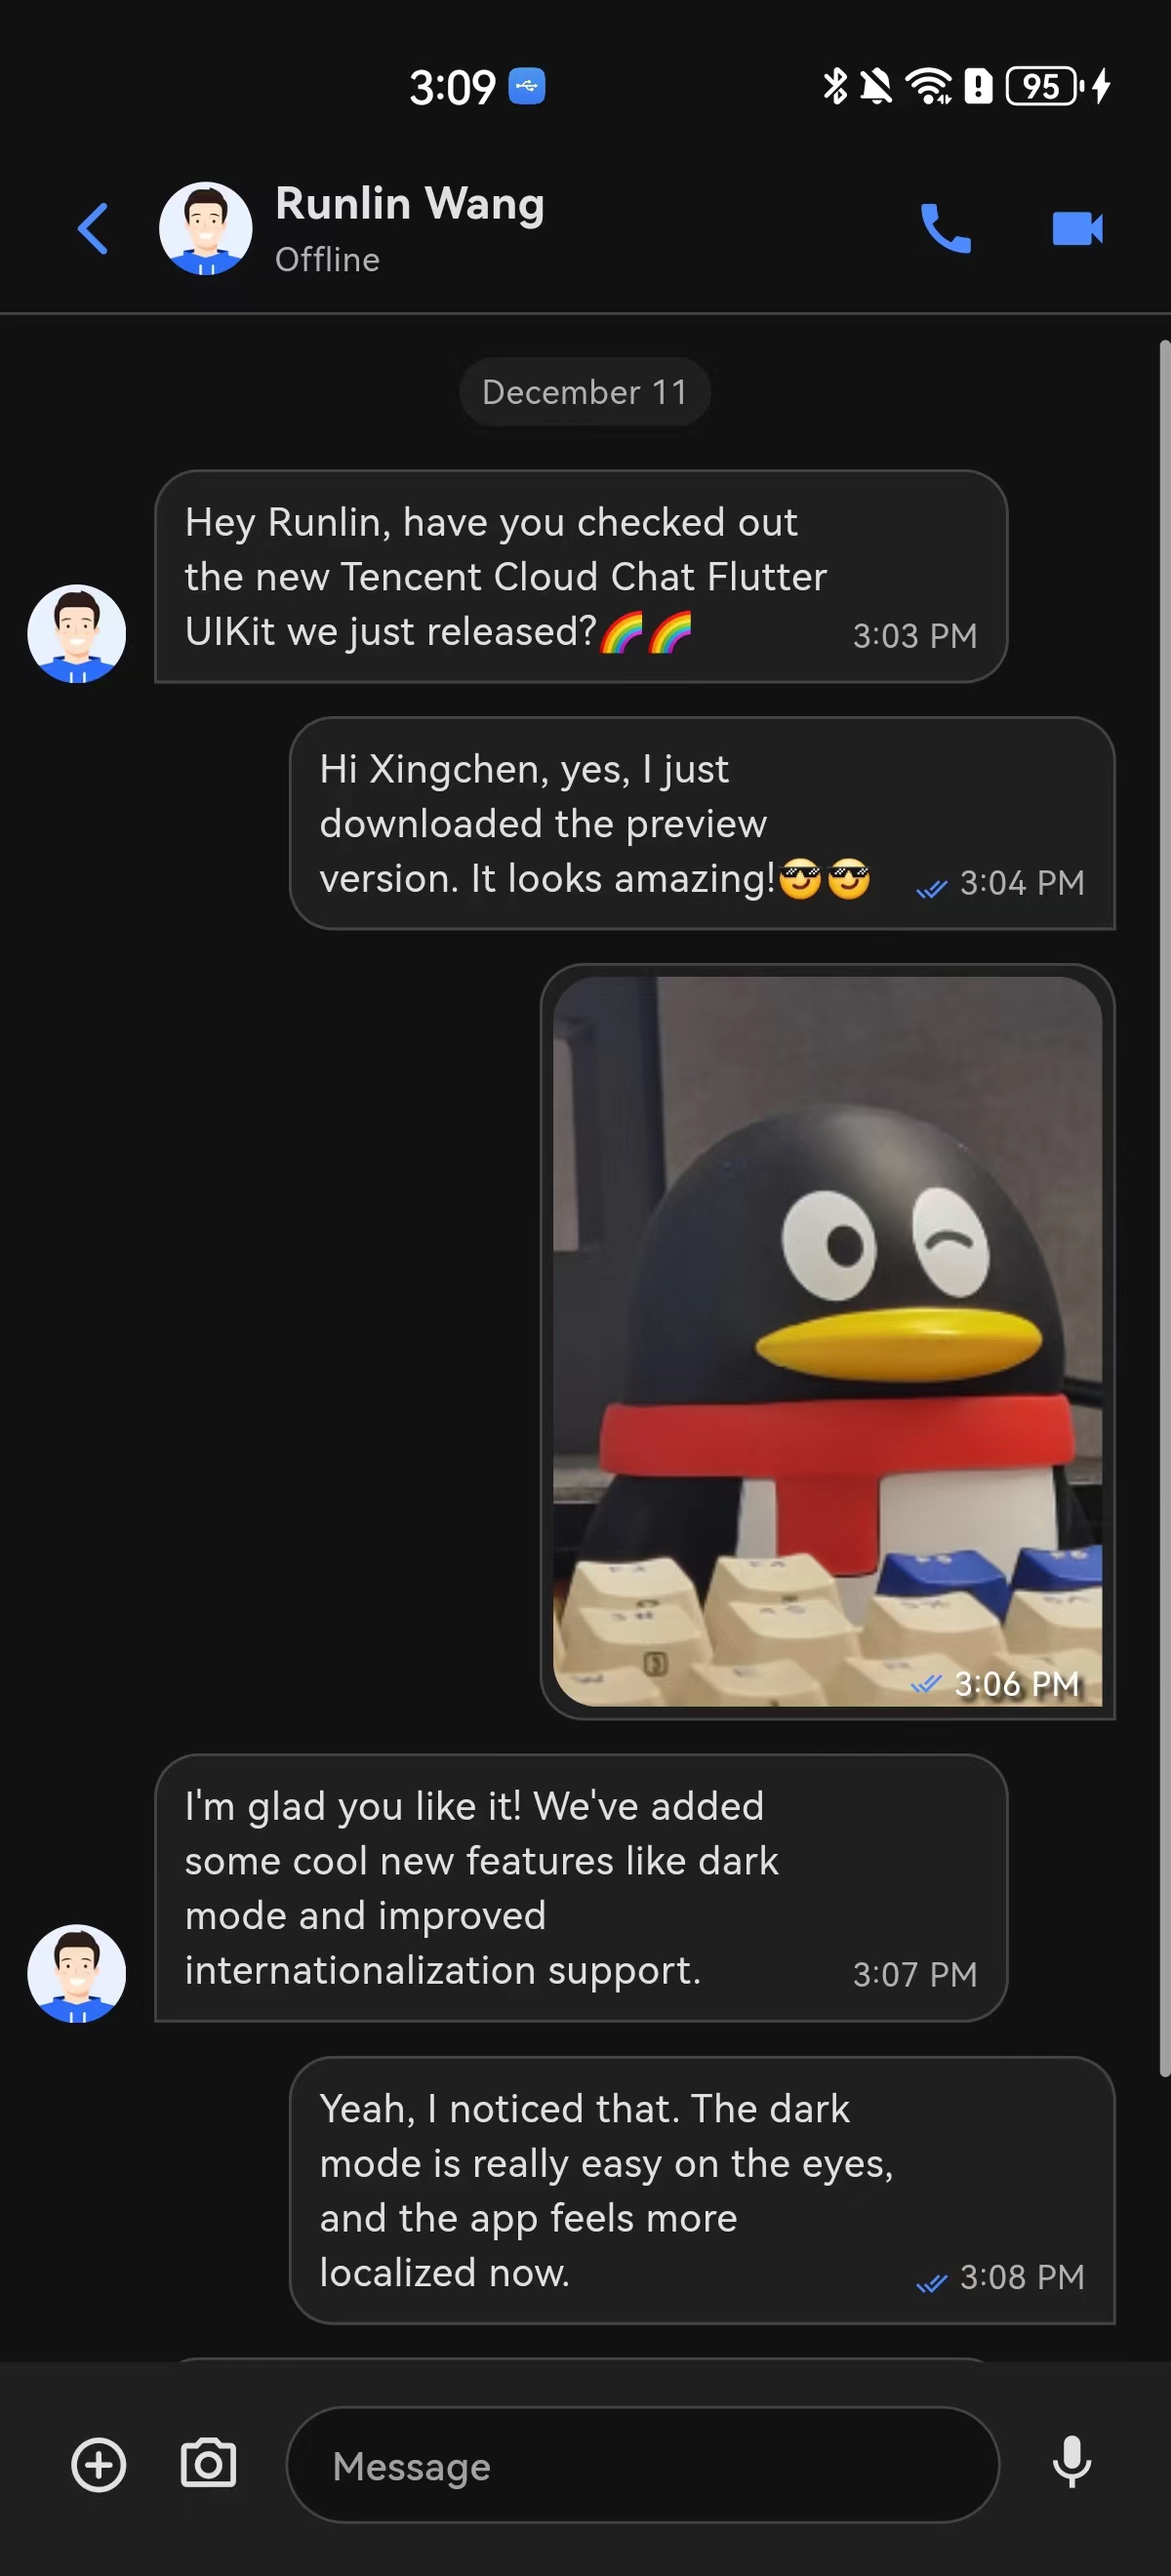
【Mobile】
|
|
12
|
-
|
|
13
|
-
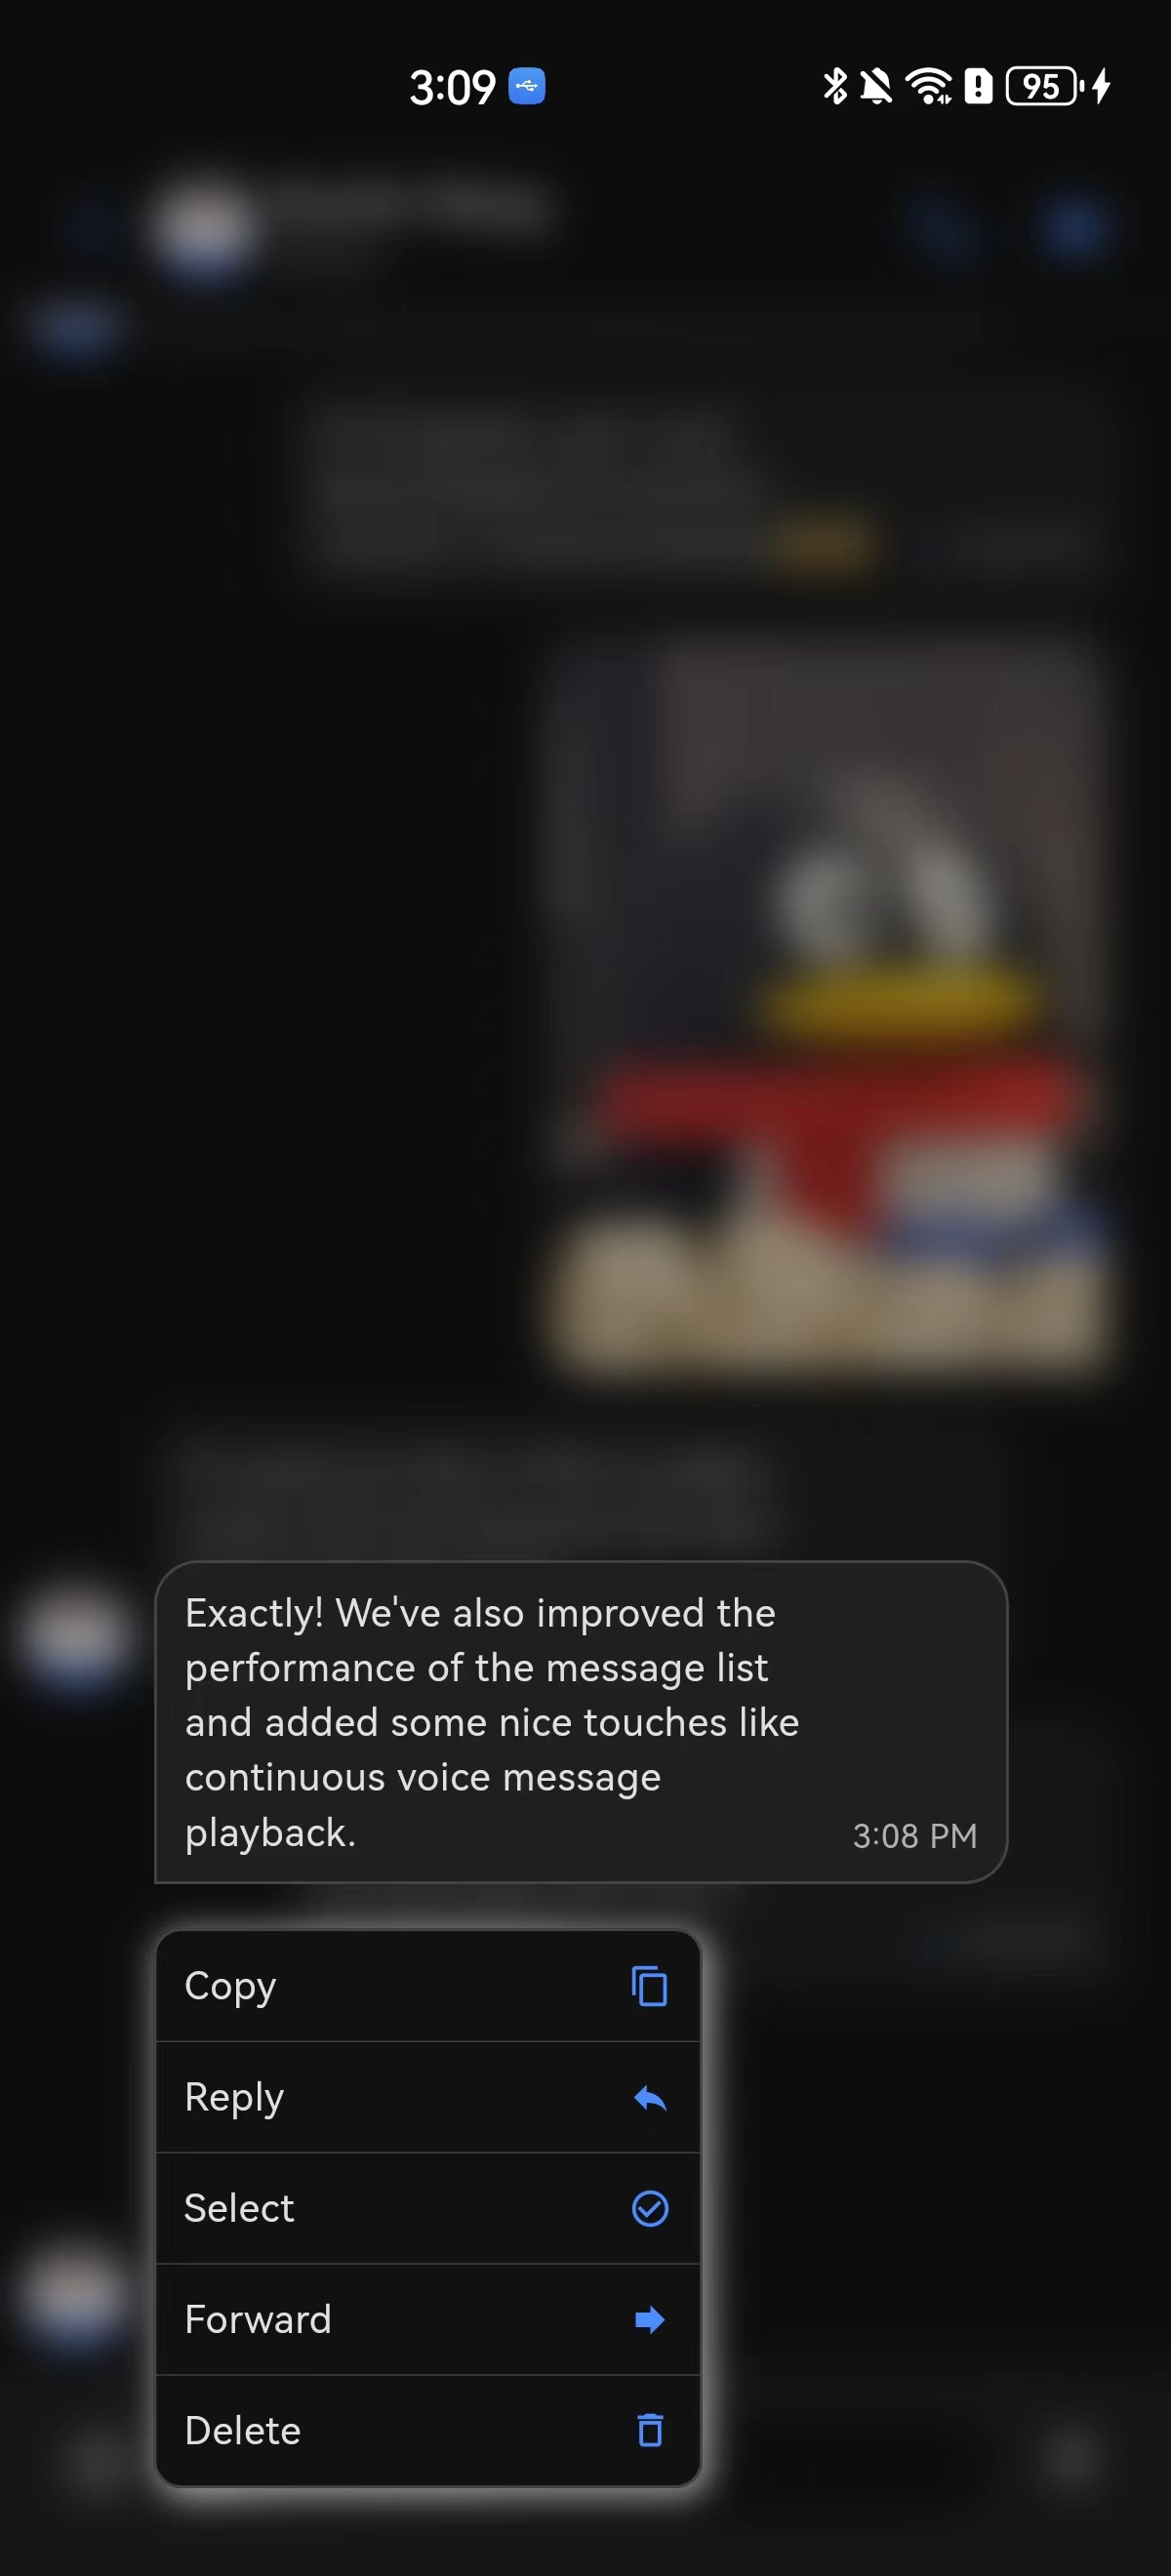
|
|
14
|
-
|
|
15
|
-
【Desktop & Tablet】
|
|
16
|
-
|
|
17
|
-
**Light**
|
|
18
|
-
|
|
19
|
-
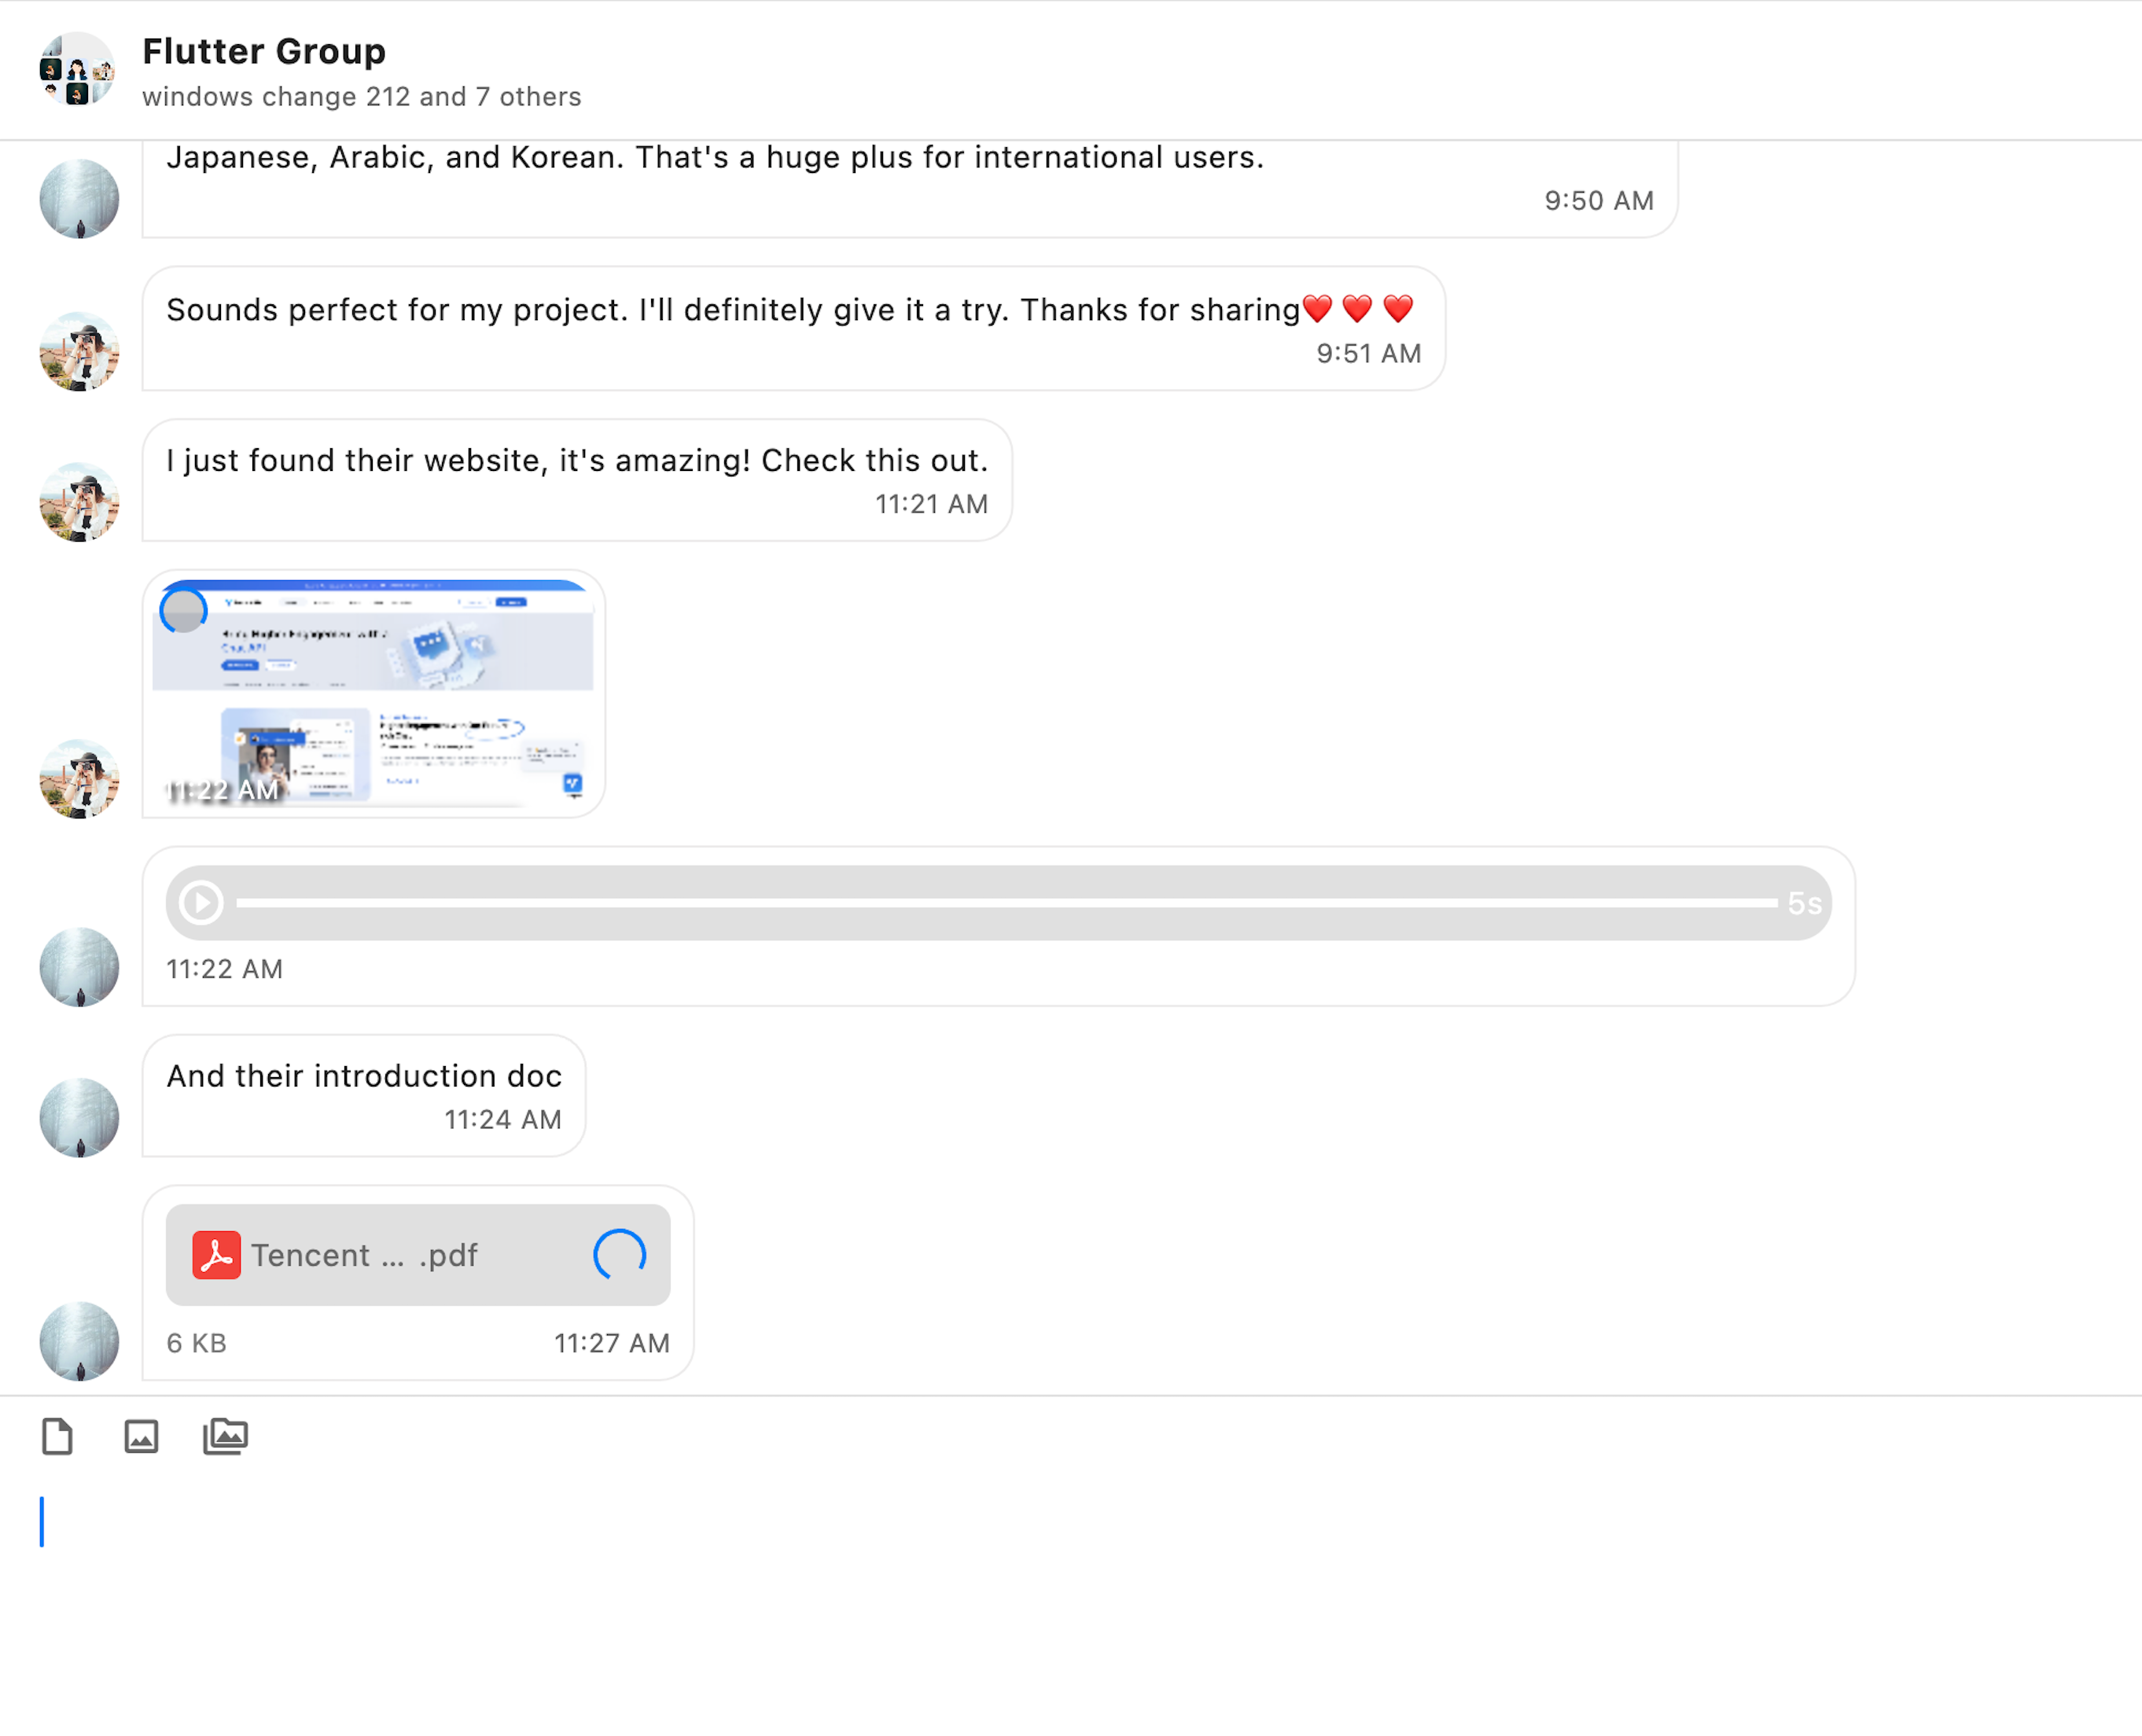
|
|
20
|
-
|
|
21
|
-
|
|
22
|
-
|
|
23
|
-
|
|
24
|
-
**Dark**
|
|
25
|
-
|
|
26
|
-
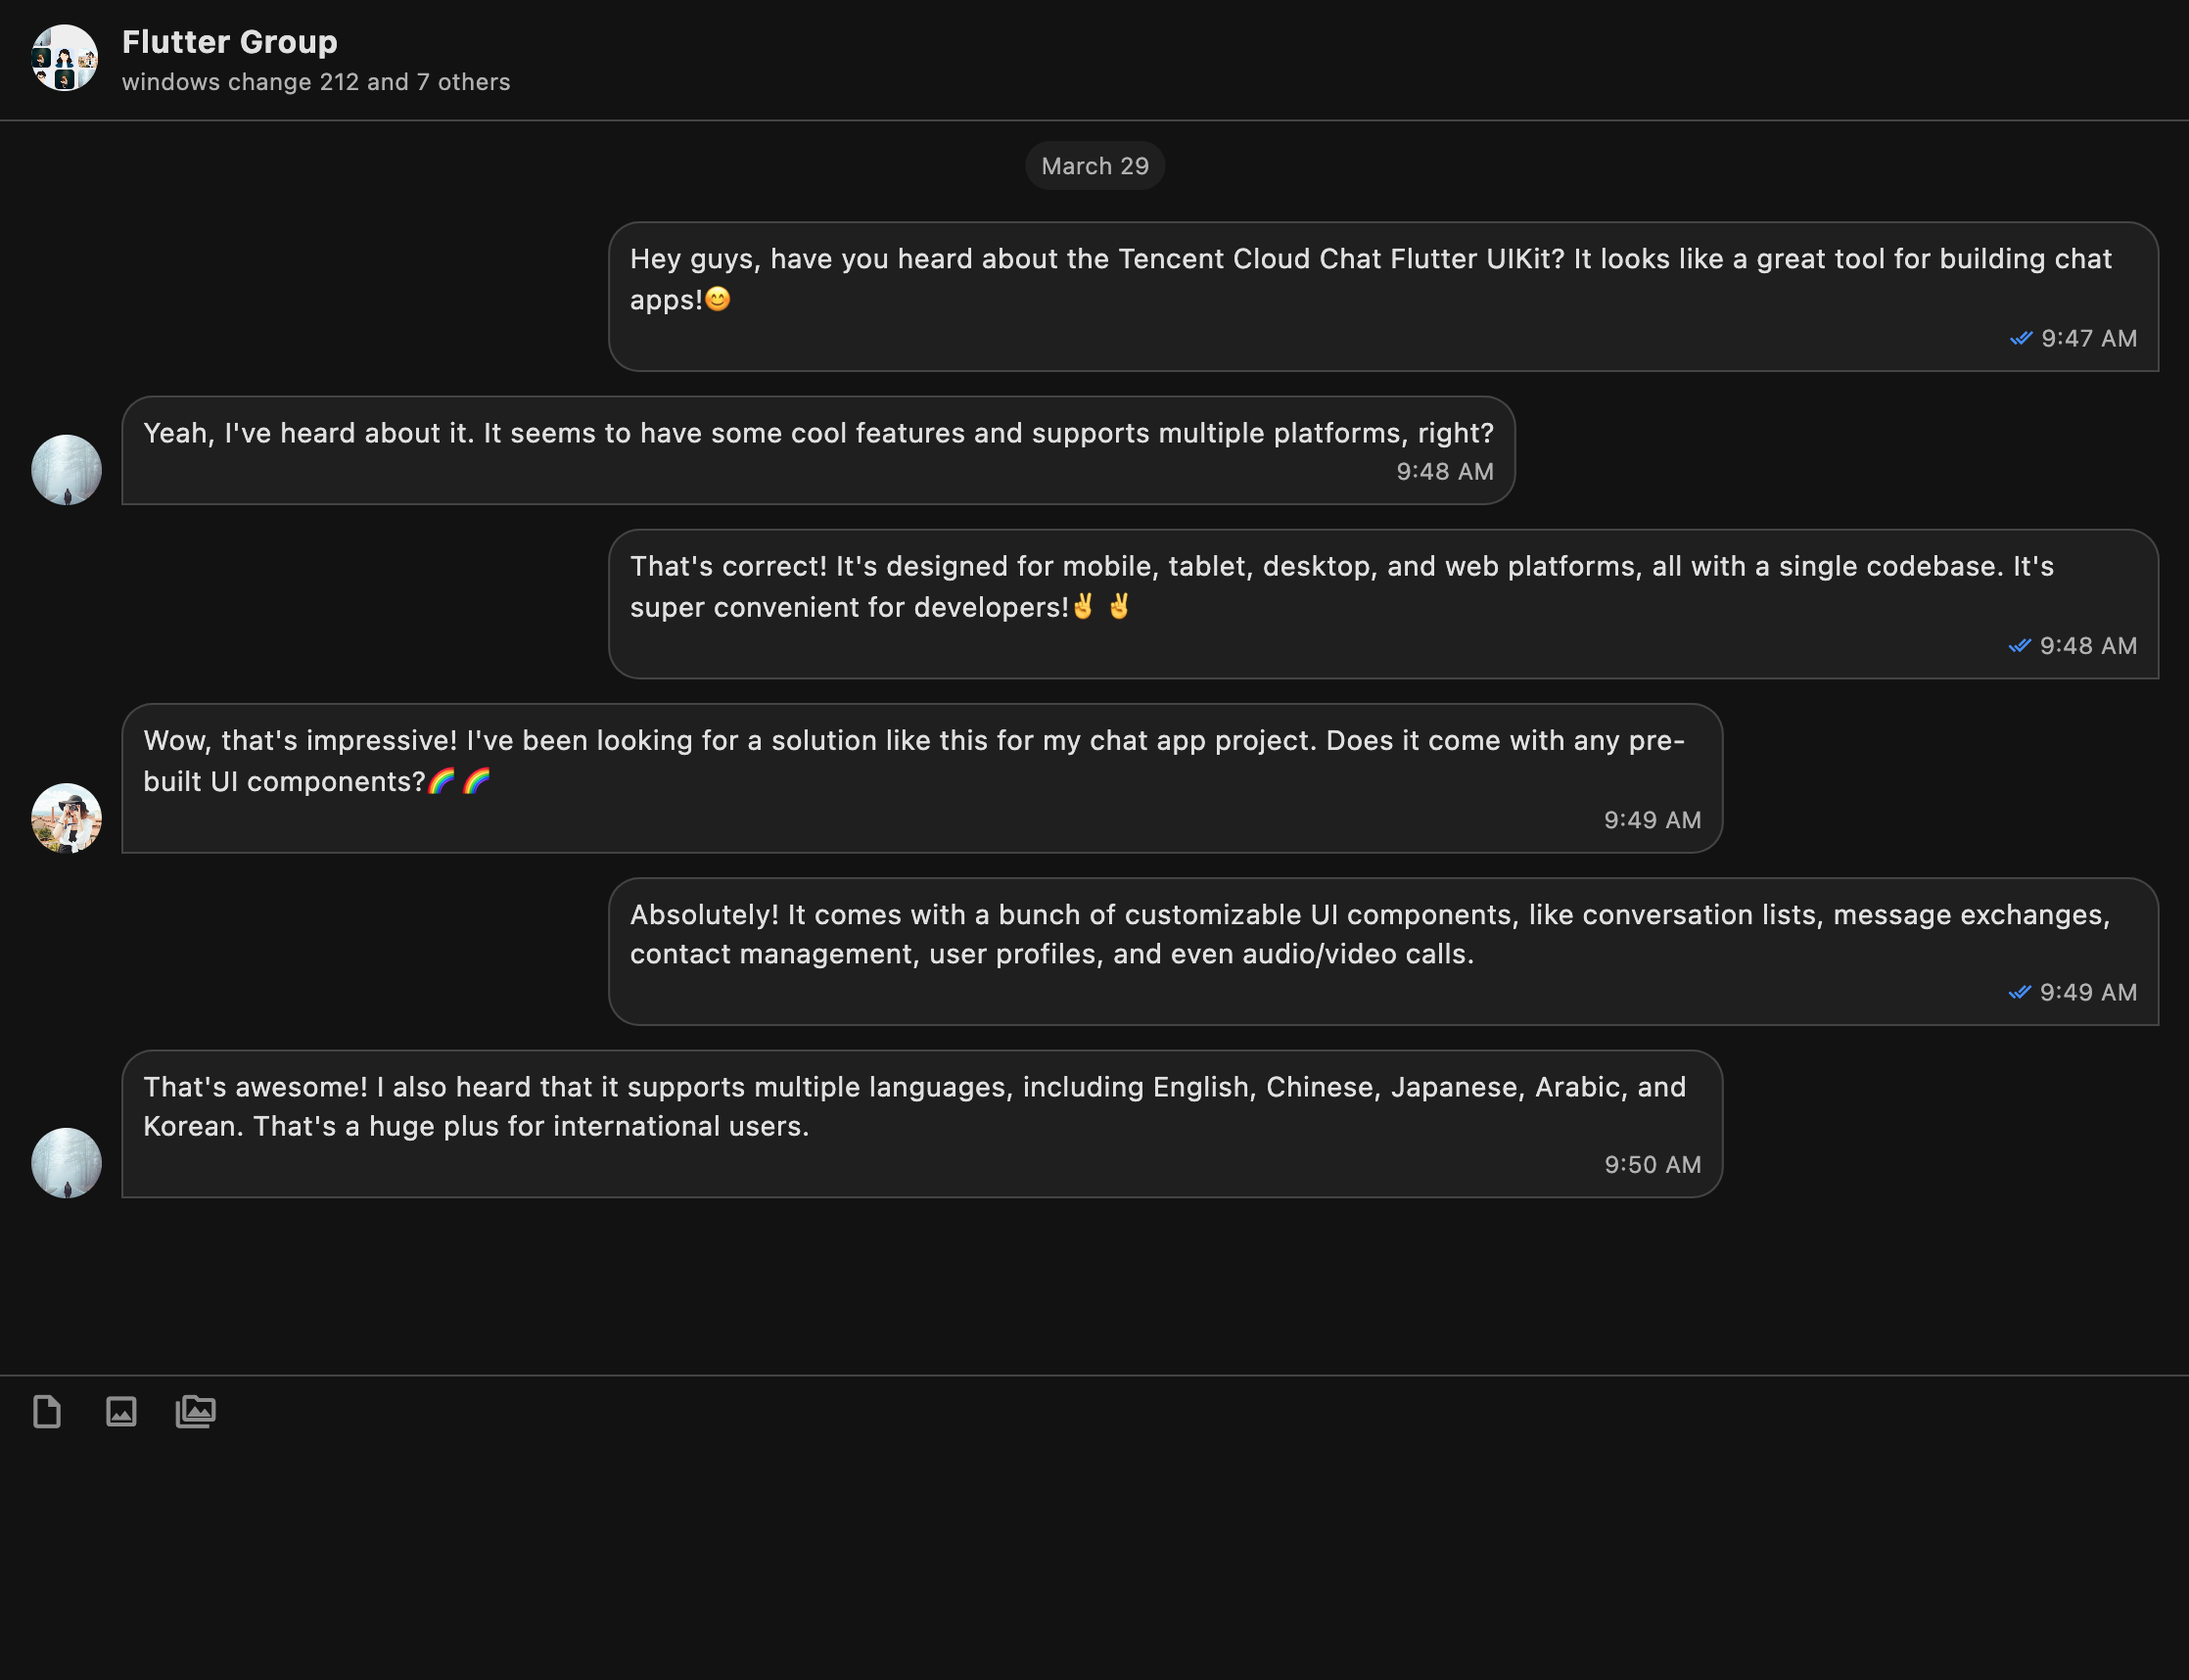
|
|
27
|
-
|
|
28
|
-
|
|
29
|
-
## Features
|
|
30
|
-
1. **Personalized Appearance**: With built-in dark and light modes, the UIKit offers a variety of theme and appearance customization options to meet your business needs.
|
|
31
|
-
|
|
32
|
-
2. **Multi-Platform Compatibility**: The adaptable single codebase ensures compatibility across various platforms, including **mobile** devices (iOS/Android), **tablets** (iPad and Android tablets), **web** browsers, and **desktop** environments (Windows/macOS).
|
|
33
|
-
|
|
34
|
-
3. **Localization Support**: Developed with native English and other language options, including Arabic, Japanese, Korean, Simplified Chinese, and Traditional Chinese. The internationalization features ensure a localized user interface in these languages and support customization and addition of languages, with Arabic featuring support for **RTL** UI.
|
|
35
|
-
|
|
36
|
-
4. **Enhanced Performance**: The UIKit offers improved performance for message lists, optimized memory usage, and precise message positioning capabilities, catering to scenarios with a large volume of messages and navigation to older messages.
|
|
37
|
-
|
|
38
|
-
5. **Advanced Features**: The UIKit boasts numerous advanced capabilities, including continuous voice message playback, enhanced multimedia and file message experiences, and intuitive left-right swipe gestures to preview multimedia messages.
|
|
39
|
-
|
|
40
|
-
6. **Refined User Experience**: Delicate enhancements such as rich animations, haptic feedback, and a polished interface contribute to improved user experiences. New features like grid-style avatars, redesigned forwarding panels, group member selectors, and enhanced long-press message menus further enrich the experiences.
|
|
41
|
-
|
|
42
|
-
7. **Modular Design**: Components are organized into modular packages, allowing for selective imports and reducing unnecessary bloat. Each package supports built-in navigation transitions, streamlining development and integration by automatically handling transitions, such as those between conversations and messages.
|
|
43
|
-
|
|
44
|
-
8. **Developer-Friendly Approach**: A more unified and standardized design of component parameters, clearer code naming conventions, and detailed comments, combined with the flexibility to choose between global or instance-level configuration management, make development easier and more efficient.
|
|
45
|
-
|
|
46
|
-
|
|
47
|
-
## Compatibility
|
|
48
|
-
|
|
49
|
-
Our UIKit supports **mobile**, **tablet**, and **desktop** UI designs, and is compatible with Android, iOS, macOS, Windows, and Web (will be supported in future versions).
|
|
50
|
-
|
|
51
|
-
It comes with built-in support for English, Simplified Chinese, Traditional Chinese, Japanese, Korean, and Arabic (with support for Arabic RTL interface), and both light and dark appearance modes.
|
|
52
|
-
|
|
53
|
-
## Requirements
|
|
54
|
-
- Flutter version: 3.24 or above
|
|
55
|
-
|
|
56
|
-
- Dart version: 3.0 or above
|
|
57
|
-
|
|
58
|
-
|
|
59
|
-
## Quick Start
|
|
60
|
-
|
|
61
|
-
### Importing Packages
|
|
62
|
-
|
|
63
|
-
#### Base Package
|
|
64
|
-
|
|
65
|
-
To start using our UIKit, first import the base package, tencent_cloud_chat_common.
|
|
66
|
-
``` plaintext
|
|
67
|
-
flutter pub add tencent_cloud_chat
|
|
68
|
-
```
|
|
69
|
-
|
|
70
|
-
#### Modular Component Packages
|
|
71
|
-
|
|
72
|
-
Next, import the modular UI component package for message chat, tencent_cloud_chat_message:
|
|
73
|
-
``` plaintext
|
|
74
|
-
flutter pub add tencent_cloud_chat_message
|
|
75
|
-
|
|
76
|
-
```
|
|
77
|
-
|
|
78
|
-
> **Platform Integration**
|
|
79
|
-
>
|
|
80
|
-
|
|
81
|
-
> Before proceeding to the Basic Usage section, make sure to complete the integration of additional platforms following the steps outlined here, especially if you are targeting these specific platforms for deployment.
|
|
82
|
-
>
|
|
83
|
-
> - **Web / macOS: **If you plan to deploy your project on ***Web*** or ***macOS*** platforms, see [Expanding to More Platforms](https://www.tencentcloud.com/document/product/1047/45907#more).
|
|
84
|
-
> - **iOS:** Open `ios/Podfile`, and replace the final section with the following content.
|
|
85
|
-
> `post_install do |installer|`
|
|
86
|
-
> ` installer.pods_project.targets.each do |target|`
|
|
87
|
-
> ` flutter_additional_ios_build_settings(target)`
|
|
88
|
-
> ` target.build_configurations.each do |config| `
|
|
89
|
-
> ` config.build_settings['EXCLUDED_ARCHS[sdk=iphonesimulator*]'] = 'arm64' `
|
|
90
|
-
> ` config.build_settings['ENABLE_BITCODE'] = 'NO' `
|
|
91
|
-
> ` config.build_settings["ONLY_ACTIVE_ARCH"] = "NO" `
|
|
92
|
-
> ` end`
|
|
93
|
-
> ` target.build_configurations.each do |config|`
|
|
94
|
-
> ` config.build_settings['GCC_PREPROCESSOR_DEFINITIONS'] ||= [`
|
|
95
|
-
> ` '$(inherited)',`
|
|
96
|
-
> ` 'PERMISSION_MICROPHONE=1',`
|
|
97
|
-
> ` 'PERMISSION_CAMERA=1',`
|
|
98
|
-
> ` 'PERMISSION_PHOTOS=1',`
|
|
99
|
-
> ` ]`
|
|
100
|
-
> ` end`
|
|
101
|
-
> ` end`
|
|
102
|
-
> `end`
|
|
103
|
-
> - **Android / Windows: **No additional actions required.
|
|
104
|
-
|
|
105
|
-
|
|
106
|
-
### Initializing UIKit
|
|
107
|
-
|
|
108
|
-
Before you start using each modular package UI component, there are some initial setup steps you need to follow in your project.
|
|
109
|
-
1. Prepare the necessary Chat configuration information, such as sdkappid, test userID, and userSig. For more details, see [Prerequisites](https://www.tencentcloud.com/document/product/1047/45907#.E5.89.8D.E5.BA.8F.E5.B7.A5.E4.BD.9C).
|
|
110
|
-
|
|
111
|
-
2. **Install Packages:**
|
|
112
|
-
|
|
113
|
-
|
|
114
|
-
In your Flutter project, install the main package and the optional modular packages mentioned in the Quick Start section.
|
|
115
|
-
|
|
116
|
-
3. **Global Configurations:**
|
|
117
|
-
|
|
118
|
-
|
|
119
|
-
Import `TencentCloudChatMaterialApp`: Replace your project's `MaterialApp` with `TencentCloudChatMaterialApp`. This enables automatic management and configurations of the language, theme *(with material3)*, theme mode, and other settings. It ensures that the UIKit's interface parameters are consistent with your project.
|
|
120
|
-
|
|
121
|
-
|
|
122
|
-
This step will take over the language, theme, and theme mode configurations of your project. If you do not want the automatic management of configurations for your project, you can manually import the features you need into your project according to the **following guide**.
|
|
123
|
-
|
|
124
|
-
|
|
125
|
-
|
|
126
|
-
|
|
127
|
-
|
|
128
|
-
|
|
129
|
-
|
|
130
|
-
|
|
131
|
-
#### Implementing Global Configurations for UIKit Manually
|
|
132
|
-
|
|
133
|
-
It is recommended to replace your project's `MaterialApp` with `TencentCloudChatMaterialApp`. This enables automatic management of global configurations, including localization, theme, and theme mode.
|
|
134
|
-
|
|
135
|
-
However, if you want to retain your project's `MaterialApp` due to extensive customization or the use of other packages such as `Get`, you can manually initialize the UIKit. This guide will help you complete the process.
|
|
136
|
-
|
|
137
|
-
In the global configurations, localization is required, while the theme and theme mode settings are optional. Let us get started.
|
|
138
|
-
|
|
139
|
-
##### Required Configurations
|
|
140
|
-
- *Localization*
|
|
141
|
-
|
|
142
|
-
|
|
143
|
-
First, import the localization tools into your app's entry file.
|
|
144
|
-
``` java
|
|
145
|
-
import 'package:tencent_cloud_chat_intl/localizations/tencent_cloud_chat_localizations.dart';
|
|
146
|
-
```
|
|
147
|
-
|
|
148
|
-
Next, add the localization configurations to `MaterialApp` or another entry provided by third-party packages like `GetMaterialApp`.
|
|
149
|
-
``` plaintext
|
|
150
|
-
MaterialApp(
|
|
151
|
-
localizationsDelegates: const [
|
|
152
|
-
/// Your configurations
|
|
153
|
-
GlobalMaterialLocalizations.delegate,
|
|
154
|
-
|
|
155
|
-
/// Add this line
|
|
156
|
-
...TencentCloudChatLocalizations.localizationsDelegates, /// Add this line
|
|
157
|
-
],
|
|
158
|
-
supportedLocales: [
|
|
159
|
-
/// Your configurations
|
|
160
|
-
...S.delegate.supportedLocales,
|
|
161
|
-
|
|
162
|
-
/// Add this line
|
|
163
|
-
...TencentCloudChatLocalizations.supportedLocales,
|
|
164
|
-
],
|
|
165
|
-
/// ... Other configurations
|
|
166
|
-
)
|
|
167
|
-
```
|
|
168
|
-
|
|
169
|
-
Additionally, you can set the language region `locale` according to your business logic, such as recording the user-specified language upon app's launch, instead of following the system settings. This configuration will apply to both your project and the Chat UIKit.
|
|
170
|
-
|
|
171
|
-
For more information of customizing localization, including adding or removing languages, adding the localization entry, and modifying translation words, see [Internationalization](https://trtc.io/document/52154?platform=flutter&product=chat&menulabel=uikit).
|
|
172
|
-
|
|
173
|
-
##### Optional Configurations
|
|
174
|
-
- *Theme / Theme Mode*
|
|
175
|
-
|
|
176
|
-
|
|
177
|
-
The UIKit's theme data, defined by the `TencentCloudChatTheme` class, is globally maintained and managed through `TencentCloudChat.dataInstance.theme`.
|
|
178
|
-
``` dart
|
|
179
|
-
TencentCloudChatTheme theme = TencentCloudChat.dataInstance.theme;
|
|
180
|
-
```
|
|
181
|
-
|
|
182
|
-
This theme instance includes a theme model (including the theme data for both light and dark modes) and brightness (the light and dark mode status).
|
|
183
|
-
|
|
184
|
-
Furthermore, you can specify the `theme` and `darkTheme` from `MaterialApp` using the Material 3 style theme data that we provide for both light and dark modes. You can also set the `themeMode` status based on the brightness status we maintain. This ensures a consistent appearance across your application and our Chat UIKit and enhances the user experiences. (You can customize this theme style as described below.)
|
|
185
|
-
|
|
186
|
-
To achieve this, we recommend converting your entry widget (which hosts the `MaterialApp`) into a `StatefulWidget`. Add a `TencentCloudChatTheme theme` as part of its state, and listen to `Stream<TencentCloudChatTheme>? themeDataListener` to update its value and build the app based on dynamic, and customizable theme data. Here is the sample code:
|
|
187
|
-
``` dart
|
|
188
|
-
// Theme instance for the Chat UIKit
|
|
189
|
-
TencentCloudChatTheme theme = TencentCloudChat.dataInstance.theme;
|
|
190
|
-
|
|
191
|
-
// Listener for theme data changes
|
|
192
|
-
Stream<TencentCloudChatTheme>? themeDataListener = TencentCloudChat.eventBusInstance.on<TencentCloudChatTheme>();
|
|
193
|
-
|
|
194
|
-
// Callback for handling theme data changes
|
|
195
|
-
void _themeDataChangeCallback(TencentCloudChatTheme themeData) {
|
|
196
|
-
setState(() {
|
|
197
|
-
theme = themeData;
|
|
198
|
-
});
|
|
199
|
-
}
|
|
200
|
-
|
|
201
|
-
// Adds a listener for theme data changes
|
|
202
|
-
void _addThemeDataChangeListener() {
|
|
203
|
-
themeDataListener?.listen(
|
|
204
|
-
_themeDataChangeCallback,
|
|
205
|
-
);
|
|
206
|
-
}
|
|
207
|
-
|
|
208
|
-
@override
|
|
209
|
-
void initState() {
|
|
210
|
-
super.initState();
|
|
211
|
-
_addThemeDataChangeListener();
|
|
212
|
-
}
|
|
213
|
-
|
|
214
|
-
// .......
|
|
215
|
-
|
|
216
|
-
return MaterialApp(
|
|
217
|
-
themeMode: theme.brightness != null ? (theme.brightness == Brightness.light ? ThemeMode.light : ThemeMode.dark) : null,
|
|
218
|
-
theme: theme.getThemeData(brightness: Brightness.light),
|
|
219
|
-
darkTheme: theme.getThemeData(brightness: Brightness.dark),
|
|
220
|
-
/// ... Other configurations
|
|
221
|
-
);
|
|
222
|
-
```
|
|
223
|
-
- To customize the theme for the Chat UIKit appearance and the global theme (if specified in `MaterialApp` as shown above), use the `TencentCloudChatCoreController.setThemeColors` method to specify the appearance colors for both light and dark modes. For specific usage instructions, see the comments in the code.
|
|
224
|
-
|
|
225
|
-
- To switch the theme mode (brightness), use `TencentCloudChatCoreController.setBrightnessMode` or `TencentCloudChatCoreController.toggleBrightnessMode`. For specific usage instructions, see the comments in the code.
|
|
226
|
-
|
|
227
|
-
|
|
228
|
-
1. **Initialization and Log-in**:
|
|
229
|
-
|
|
230
|
-
|
|
231
|
-
Call the `TencentCloudChat.controller.initUIKit` method to initialize and log in. The call instructions and reference code are as follows:
|
|
232
|
-
|
|
233
|
-
|
|
234
|
-
> **Note:**
|
|
235
|
-
>
|
|
236
|
-
|
|
237
|
-
> We highly recommend configuring the `callbacks` to efficiently handle SDK API errors and specific UIKit events that require user attention through `Dialog` or `Tooltip` in a customizable way.
|
|
238
|
-
>
|
|
239
|
-
|
|
240
|
-
``` java
|
|
241
|
-
await TencentCloudChat.controller.initUIKit(
|
|
242
|
-
config: TencentCloudChatConfig(), /// [Optional]: The global configurations that affecting the whole chat interface, including user configurations and theme configurations.
|
|
243
|
-
options: TencentCloudChatInitOptions(
|
|
244
|
-
sdkAppID: , /// [Required]: The SDKAppID of your Tencent Cloud chat application.
|
|
245
|
-
userID: , /// [Required]: The userID of the logged-in user.
|
|
246
|
-
userSig: , /// [Required]: The userSig of the logged-in user.
|
|
247
|
-
),
|
|
248
|
-
|
|
249
|
-
components: TencentCloudChatInitComponentsRelated( /// [Required]: Modular UI component settings, effective globally.
|
|
250
|
-
usedComponentsRegister: [
|
|
251
|
-
/// [Required]: List of registration functions for the components used in the chat interface.
|
|
252
|
-
/// Simply use the `register` from TencentCloudChatMessage.
|
|
253
|
-
TencentCloudChatMessageManager.register,
|
|
254
|
-
],
|
|
255
|
-
componentConfigs: TencentCloudChatComponentConfigs(
|
|
256
|
-
/// [Optional]: Provide custom configurations for each UI modular component here. These builders will be applied globally.
|
|
257
|
-
),
|
|
258
|
-
componentBuilders: TencentCloudChatComponentBuilders(
|
|
259
|
-
/// [Optional]: Provide custom UI builders for each UI modular component here. These builders will be applied globally.
|
|
260
|
-
),
|
|
261
|
-
componentEventHandlers: TencentCloudChatComponentEventHandlers(
|
|
262
|
-
/// [Optional]: Provide custom event handlers for UI component events here. These builders will be applied globally.
|
|
263
|
-
),
|
|
264
|
-
),
|
|
265
|
-
|
|
266
|
-
/// [Critical]: It is strongly recommended to incorporate the following callback listeners for effectively managing SDK events, SDK API errors and specific UIKit events that require user attention.
|
|
267
|
-
/// For detailed usage, see the Integrating UIKit Callbacks section at the end of this README document.
|
|
268
|
-
callbacks: TencentCloudChatCallbacks(
|
|
269
|
-
onTencentCloudChatSDKEvent: V2TimSDKListener(), /// [Optional]: Handles SDK events, such as onKickedOffline and onUserSigExpired.
|
|
270
|
-
onTencentCloudChatSDKFailCallback: (apiName, code, desc) {}, /// [Optional]: Handles SDK API errors.
|
|
271
|
-
onTencentCloudChatUIKitUserNotificationEvent: (TencentCloudChatComponentsEnum component, TencentCloudChatUserNotificationEvent event) {}, /// [Optional]: Handles specific UIKit events that require user attention on a global scale.across the entire application scope.
|
|
272
|
-
),
|
|
273
|
-
|
|
274
|
-
plugins: [], /// [Optional]: Used plugins, such as tencent_cloud_chat_robot. For specific usage, see the README document of each plugin.
|
|
275
|
-
);
|
|
276
|
-
```
|
|
277
|
-
|
|
278
|
-
### Initiating a Chat
|
|
279
|
-
|
|
280
|
-
Chat UIKit offers a comprehensive solution for creating a chat module for users.
|
|
281
|
-
|
|
282
|
-
By directing to the `TencentCloudChatMessage` with the specified chat user options, you can seamlessly set up a chat module for them. This caters to both one-on-one and group chats.
|
|
283
|
-
|
|
284
|
-
#### Automatically navigate to the message component.
|
|
285
|
-
|
|
286
|
-
With the built-in auto-navigation feature, initiating a chat can be easily achieved by calling the `navigateToMessage` method with `TencentCloudChatMessageOptions`, as shown below:
|
|
287
|
-
``` dart
|
|
288
|
-
final messageOptions = TencentCloudChatMessageOptions(
|
|
289
|
-
// Provide either userID or groupID to indicate the conversation for the chat.
|
|
290
|
-
userID: "", // For one-on-one chats, provide the other user's userID.
|
|
291
|
-
groupID: "", // For group chats, provide the groupID.
|
|
292
|
-
);
|
|
293
|
-
/// Use the messageOptions constructed above.
|
|
294
|
-
navigateToMessage(context: context, options: messageOptions);
|
|
295
|
-
```
|
|
296
|
-
|
|
297
|
-
By offering either a userID or groupID, the chat conversation can be effortlessly initiated for one-on-one or group chats.
|
|
298
|
-
|
|
299
|
-
#### Manually Navigating to the Message Component
|
|
300
|
-
|
|
301
|
-
If you need to manually handle navigation, or wrap the component within your custom pages, then you should instantiate a `TencentCloudChatMessage` component.
|
|
302
|
-
``` dart
|
|
303
|
-
final messageOptions = TencentCloudChatMessageOptions(
|
|
304
|
-
// Provide either userID or groupID to indicate the conversation for the chat.
|
|
305
|
-
userID: "", // For one-on-one chats, provide the other user's userID.
|
|
306
|
-
groupID: "", // For group chats, provide the groupID.
|
|
307
|
-
);
|
|
308
|
-
|
|
309
|
-
final Widget message = TencentCloudChatMessage(
|
|
310
|
-
options: messageOptions,
|
|
311
|
-
|
|
312
|
-
// ... Other parameters, such as builders, can be specified globally or passed in statically here based on your requirements. For detailed usage, see the parameter and method comments.
|
|
313
|
-
);
|
|
314
|
-
```
|
|
315
|
-
|
|
316
|
-
You can place this instantiated component in the `build` method of a separate page or use it directly for navigation like using `Navigator.push`.
|
|
317
|
-
|
|
318
|
-
## Advanced Usage
|
|
319
|
-
|
|
320
|
-
Once you have implemented the basic usage steps, you will have a chat message module in your project with a default user interface and business logic. However, if these defaults do not fully align with your business requirements, there are several ways to customize the module:
|
|
321
|
-
- Controller: Use the controller to manage the message widgets. This could involve sending additional messages as needed, and scrolling the message list.
|
|
322
|
-
|
|
323
|
-
- Config: Adjust basic settings using the config.
|
|
324
|
-
|
|
325
|
-
- Builders: Further customize the UI widgets with the builder. Each builder is equipped with data (essential parameters for building a custom widget), methods (business logic methods), and widgets (the default atomized widgets for each builder).
|
|
326
|
-
|
|
327
|
-
- EventHandlers: Attach listeners to `eventHandlers` to manage component-specific events. This includes `uiEventHandlers` (such as various events like `onTap`) and `lifeCycleEventHandlers` (such as events triggered after a message has been sent).
|
|
328
|
-
|
|
329
|
-
|
|
330
|
-
These advanced implementation methods are consistent across all Chat UIKit components. For a deeper understanding of these advanced features, you can see [**Advanced Usage**](https://trtc.io/document/58585?platform=flutter&product=chat&menulabel=uikit#93becf46-25ac-456b-bd4c-38db387d8149).
|
|
331
|
-
|
|
332
|
-
|
|
333
|
-
The above steps provide a quick guide to integrating the message chat component individually. If you wish to understand the complete usage of Chat UIKit or have any unresolved issues, see [**UIKit Integration Documentation**](https://trtc.io/document/58585?platform=flutter&product=chat&menulabel=uikit).
|
|
@@ -1,217 +0,0 @@
|
|
|
1
|
-
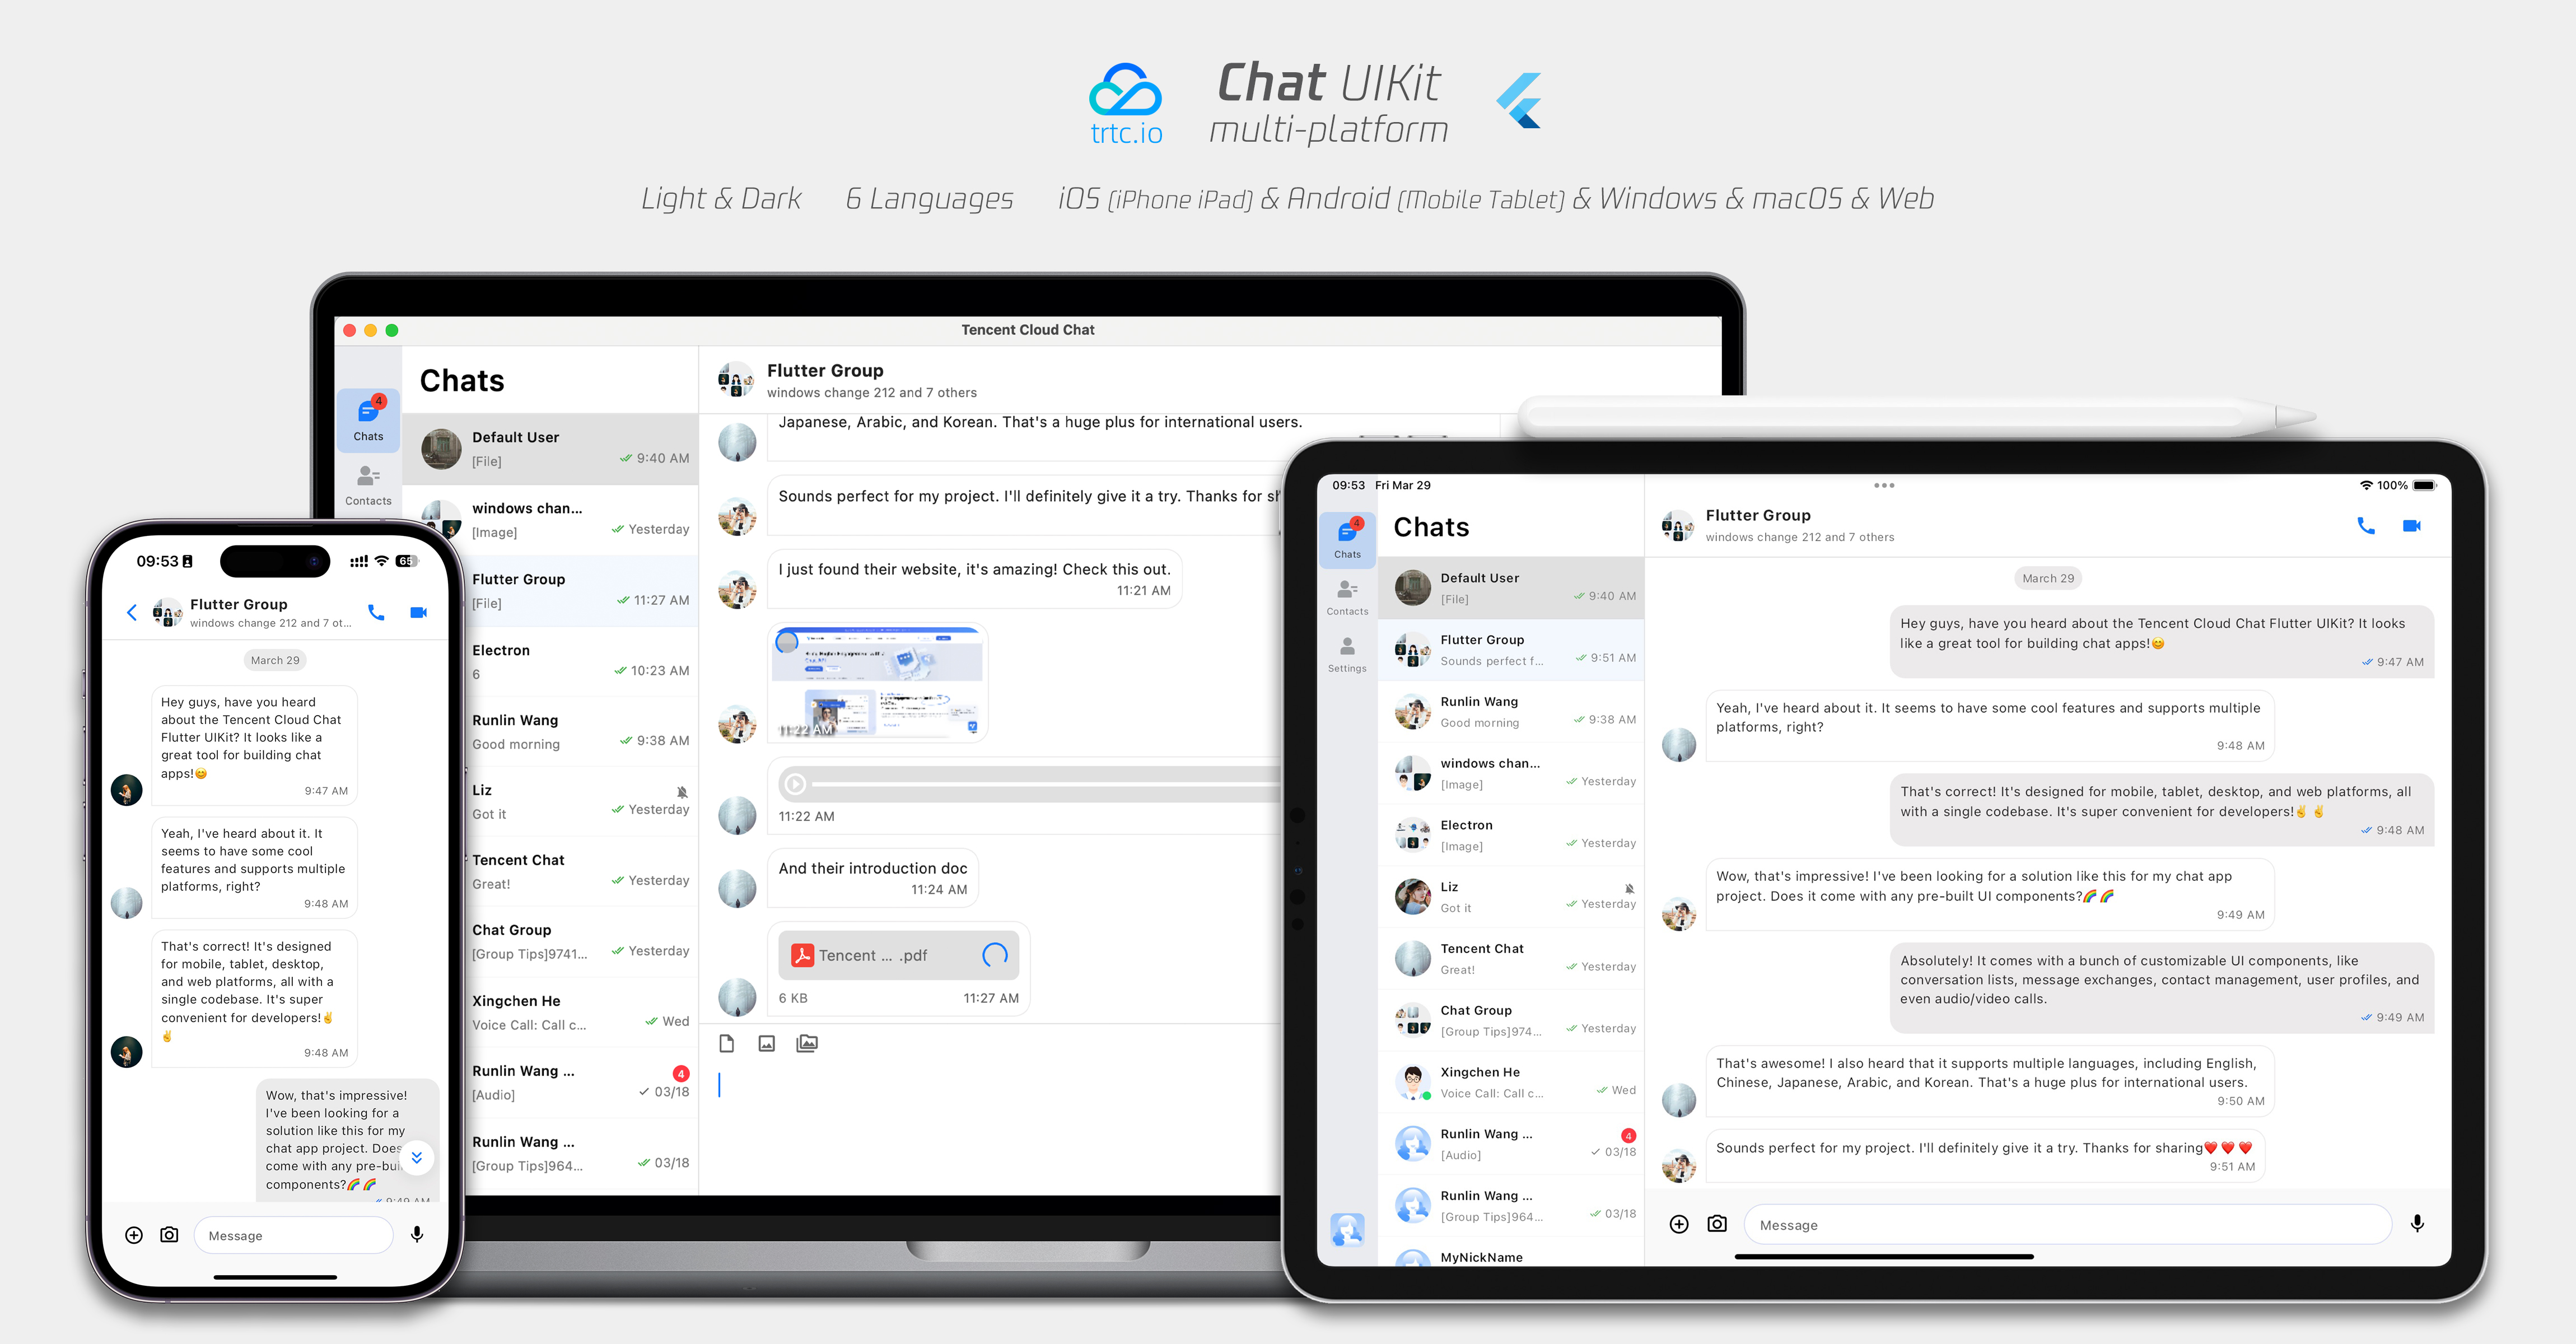
Flutter Chat UIKit is designed to provide developers with a comprehensive set of tools to create feature-rich chat applications with ease.
|
|
2
|
-
|
|
3
|
-
It is built with a modular approach, allowing you to pick and choose the components you need while keeping your application lightweight and efficient.
|
|
4
|
-
|
|
5
|
-
The UIKit includes a wide range of capabilities, such as Conversation list, Message handling,
|
|
6
|
-
|
|
7
|
-
Contact lists, Message Translation, Speech-to-Text, and more.
|
|
8
|
-
|
|
9
|
-
|
|
10
|
-
|
|
11
|
-
|
|
12
|
-
## Features
|
|
13
|
-
1. **Personalized Appearance** : With built-in **Dark and Light **modes, the UIKit offers a variety of **theme and appearance customization** options to meet your business needs.
|
|
14
|
-
|
|
15
|
-
2. **Multi-Platform Compatibility** : The adaptable single codebase ensures compatibility across various platforms, including **Mobile **devices (iOS/Android), **Tablet **(iPad and Android tablets), **Web **browsers, and **Desktop **environments (Windows/macOS).
|
|
16
|
-
|
|
17
|
-
3. **Localization Support** : Developed with native English and additional language options, including Arabic, Japanese, Korean, Simplified Chinese, and Traditional Chinese. The internationalization features ensure a localized interface language and support custom and **supplementary language** , with Arabic support for **RTL** UI.
|
|
18
|
-
|
|
19
|
-
4. **Enhanced Performance** : The UIKit delivers improved message list **performance** , **memory usage** , and precise message positioning capabilities, catering to scenarios with large message volumes and navigation to older messages.
|
|
20
|
-
|
|
21
|
-
5. **Advanced Features** : Boasting numerous advanced capabilities, the UIKit includes continuous voice message playback, enhanced multimedia and file message experiences, and intuitive left-right swiping for multimedia message previews.
|
|
22
|
-
|
|
23
|
-
6. **Refined User Experience** : Detail optimizations such as rich **animations** , **haptic feedback** , and **a polished interface** contribute to an improved user experience. New features like grid-style avatars, redesigned forwarding panels, group member selectors, and revamped long-press message menus further enrich the experience.
|
|
24
|
-
|
|
25
|
-
7. **Modular Design** : Components are organized into modular packages, allowing for selective importing and reducing unnecessary bloat. Each package supports **built-in navigation transitions** , streamlining development and integration by automatically handling transitions, such as between Conversation and Message.
|
|
26
|
-
|
|
27
|
-
8. **Developer-Friendly Approach** : A more unified, standardized component parameter design, clearer code naming conventions, and detailed comments, combined with the flexibility to choose **global or instance-level configuration ** management, make development easier and more efficient.
|
|
28
|
-
|
|
29
|
-
|
|
30
|
-
## Getting Started
|
|
31
|
-
|
|
32
|
-
### Requirements
|
|
33
|
-
- Flutter version: 3.19 or above
|
|
34
|
-
|
|
35
|
-
- Dart version: 3.0 or above
|
|
36
|
-
|
|
37
|
-
|
|
38
|
-
### Setting Up Application in the Console
|
|
39
|
-
|
|
40
|
-
#### **Step1:Create an Account**
|
|
41
|
-
|
|
42
|
-
Visit the [Console](https://trtc.io/login?source=flutter_article_blog_1&utm_campaign=social) of trtc.io and create an account by following the prompts.
|
|
43
|
-
|
|
44
|
-
#### **Step2:Start a Free Trial**
|
|
45
|
-
|
|
46
|
-
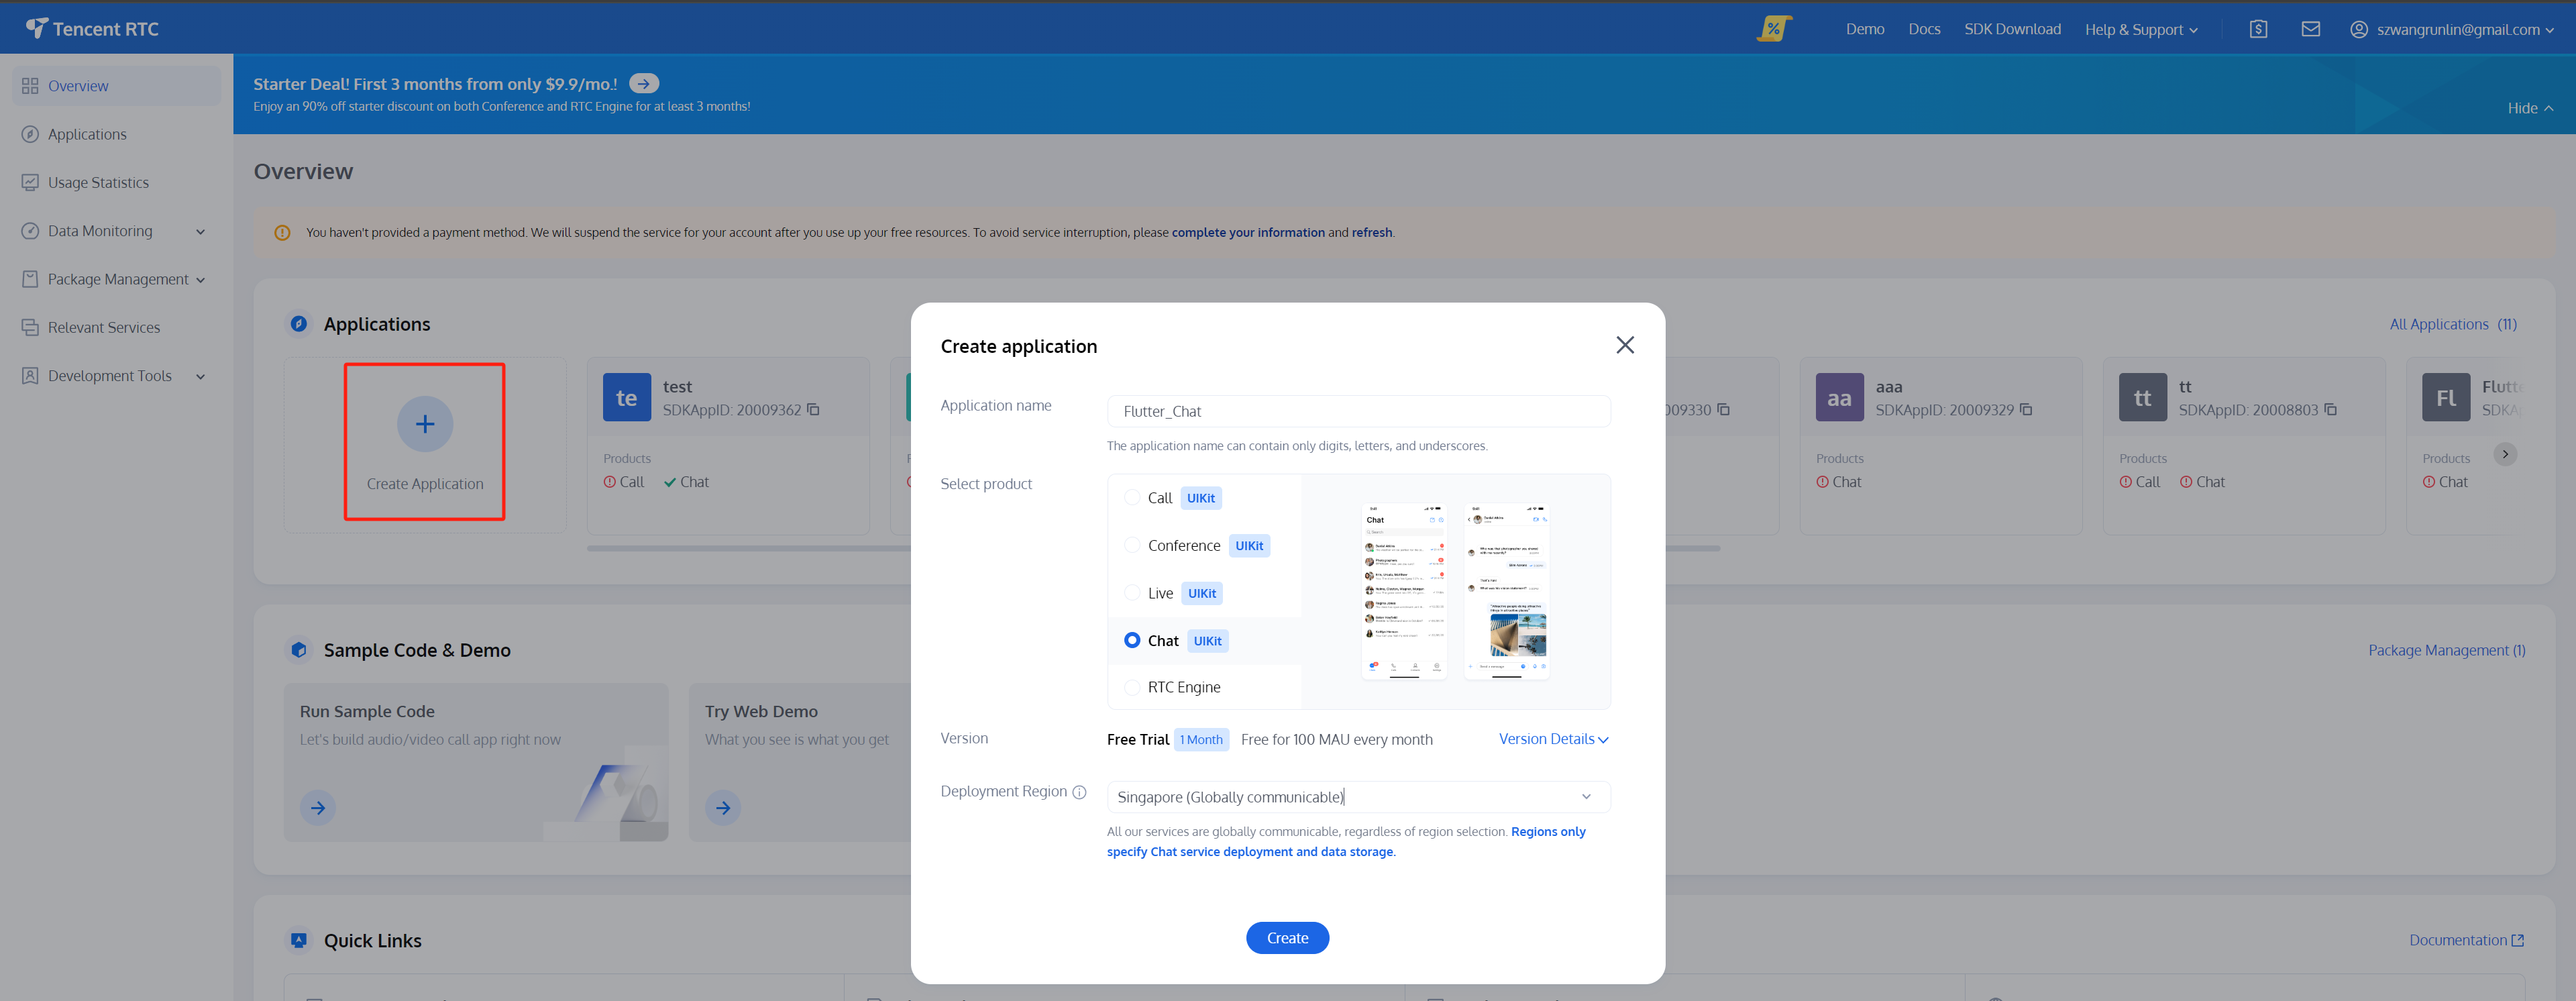
Create an application on the homepage and start your free trial.
|
|
47
|
-
|
|
48
|
-
|
|
49
|
-
|
|
50
|
-
|
|
51
|
-
#### **Step3:Generate Test Users**
|
|
52
|
-
|
|
53
|
-
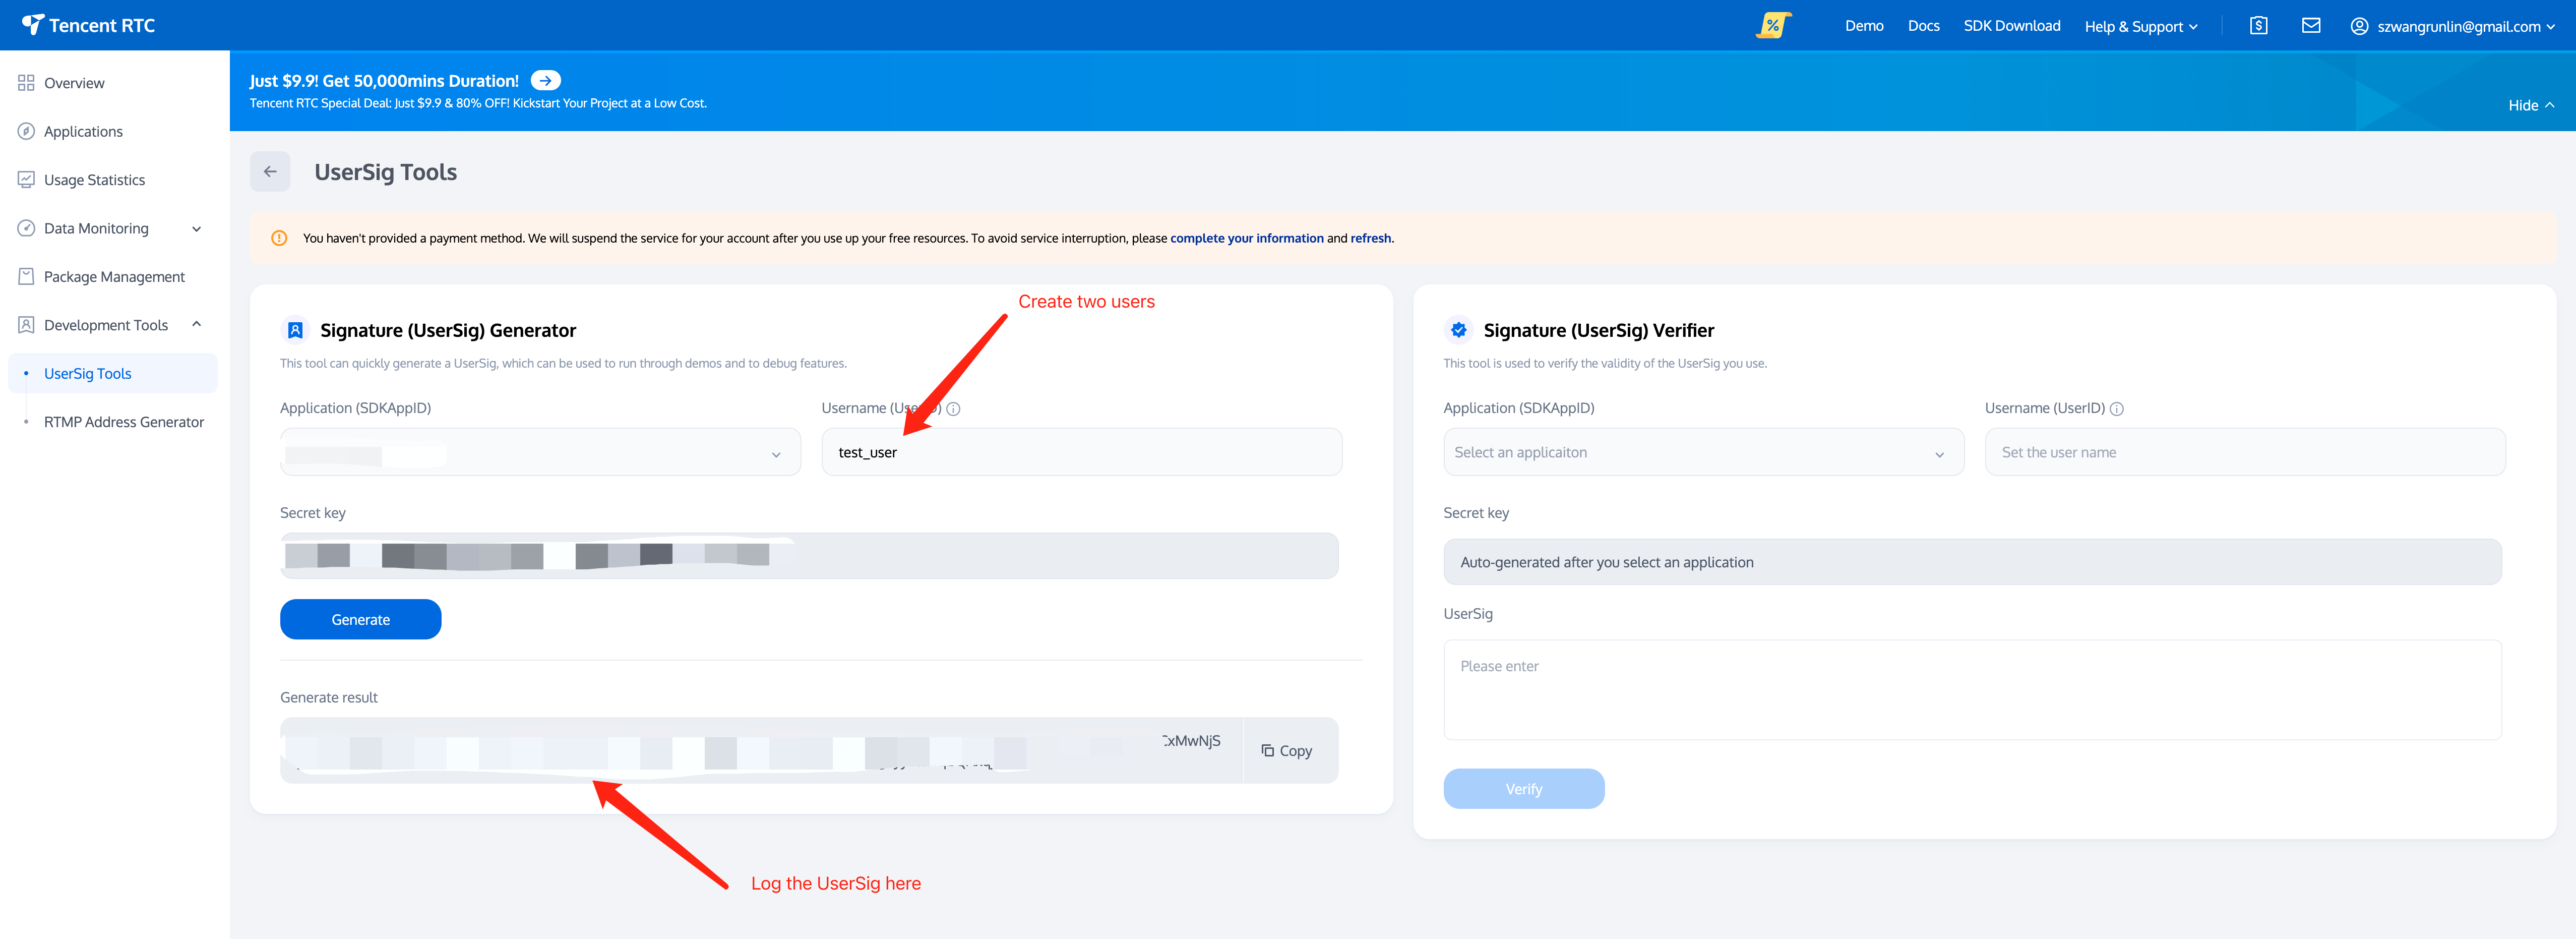
Create two users (test accounts) on [Account Management](https://console.trtc.io/chat/account-management). Following by use the [UserSig Tools](https://console.trtc.io/usersig) to create the corresponding UserSigs for them, note down the UserSigs for later use.
|
|
54
|
-
|
|
55
|
-
|
|
56
|
-
|
|
57
|
-
|
|
58
|
-
#### **Step4:Retrieve Your SDKAppID**
|
|
59
|
-
|
|
60
|
-
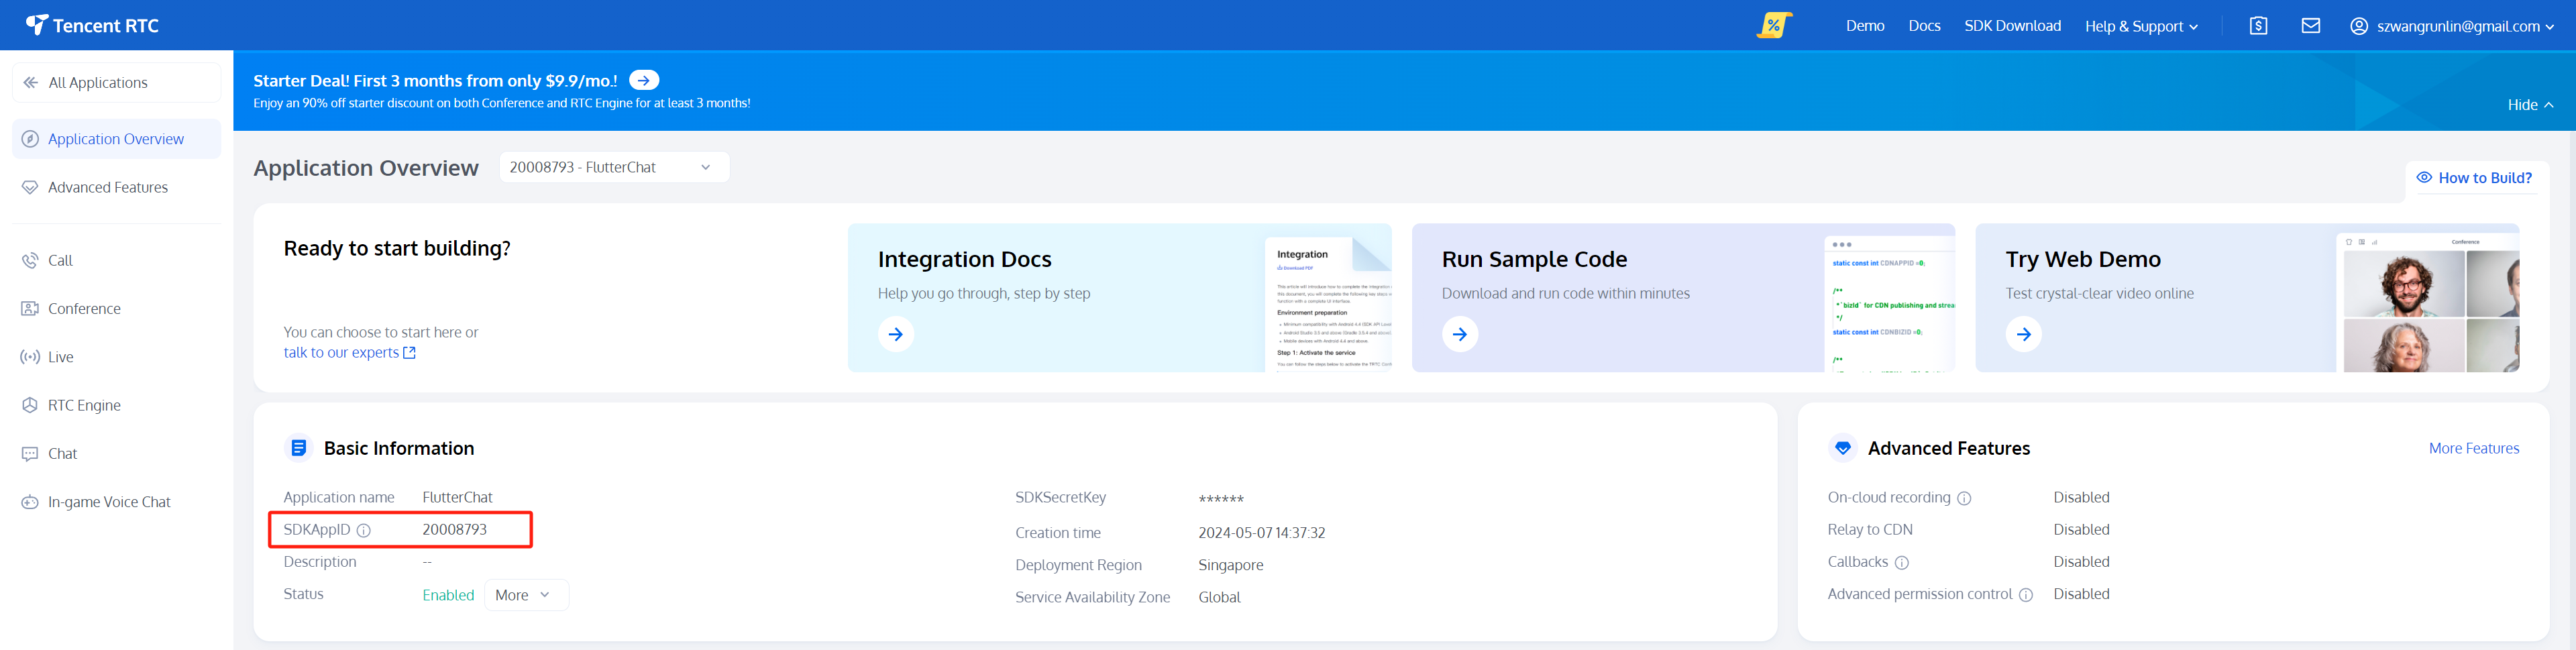
Go to [Applications](https://console.trtc.io/app), select your newly created application, and navigate to the corresponding [Application Overview](https://console.trtc.io/overview) to find your SDKAppID.
|
|
61
|
-
|
|
62
|
-
|
|
63
|
-
|
|
64
|
-
|
|
65
|
-
At this point, the Console setup is complete. Make sure to note down the `SDKAppID `and the two sets of `UserID `and `UserSig`.
|
|
66
|
-
|
|
67
|
-
### Coding
|
|
68
|
-
|
|
69
|
-
> **Note:**
|
|
70
|
-
>
|
|
71
|
-
|
|
72
|
-
> The guide provide a** Simplified Overview** of integrating with Flutter Chat UIKit only.
|
|
73
|
-
>
|
|
74
|
-
|
|
75
|
-
> For a detailed integration process, please refer to this guide: [Detailed Integration Guide](https://trtc.io/document/58585?platform=flutter&product=chat&menulabel=uikit).
|
|
76
|
-
>
|
|
77
|
-
|
|
78
|
-
|
|
79
|
-
To begin, it's best to have a Flutter project ready or create a new one to fully experience this tutorial. We recommend following the steps to [create a new Flutter project](https://docs.flutter.dev/get-started/codelab).
|
|
80
|
-
|
|
81
|
-
If you're interested in exploring a fully-fledged app with an extensive range of features, advanced capabilities, and customization options, please check out [This Repo](https://github.com/TencentCloud/chat-demo-flutter/tree/v2).
|
|
82
|
-
|
|
83
|
-
#### Step 1. Import the Packages
|
|
84
|
-
|
|
85
|
-
To get started, import the base package, tencent_cloud_chat_common.
|
|
86
|
-
``` bash
|
|
87
|
-
flutter pub add tencent_cloud_chat_common
|
|
88
|
-
```
|
|
89
|
-
|
|
90
|
-
Next, import the UI component packages that suit your needs:
|
|
91
|
-
``` bash
|
|
92
|
-
flutter pub add tencent_cloud_chat_message
|
|
93
|
-
flutter pub add tencent_cloud_chat_conversation
|
|
94
|
-
flutter pub add tencent_cloud_chat_contact
|
|
95
|
-
flutter pub add tencent_cloud_chat_sticker
|
|
96
|
-
flutter pub add tencent_cloud_chat_message_reaction
|
|
97
|
-
flutter pub add tencent_cloud_chat_text_translate
|
|
98
|
-
```
|
|
99
|
-
|
|
100
|
-
For demonstration purposes, we suggest importing all of them. However, in real-world projects, you can import packages based on your specific requirements.
|
|
101
|
-
|
|
102
|
-
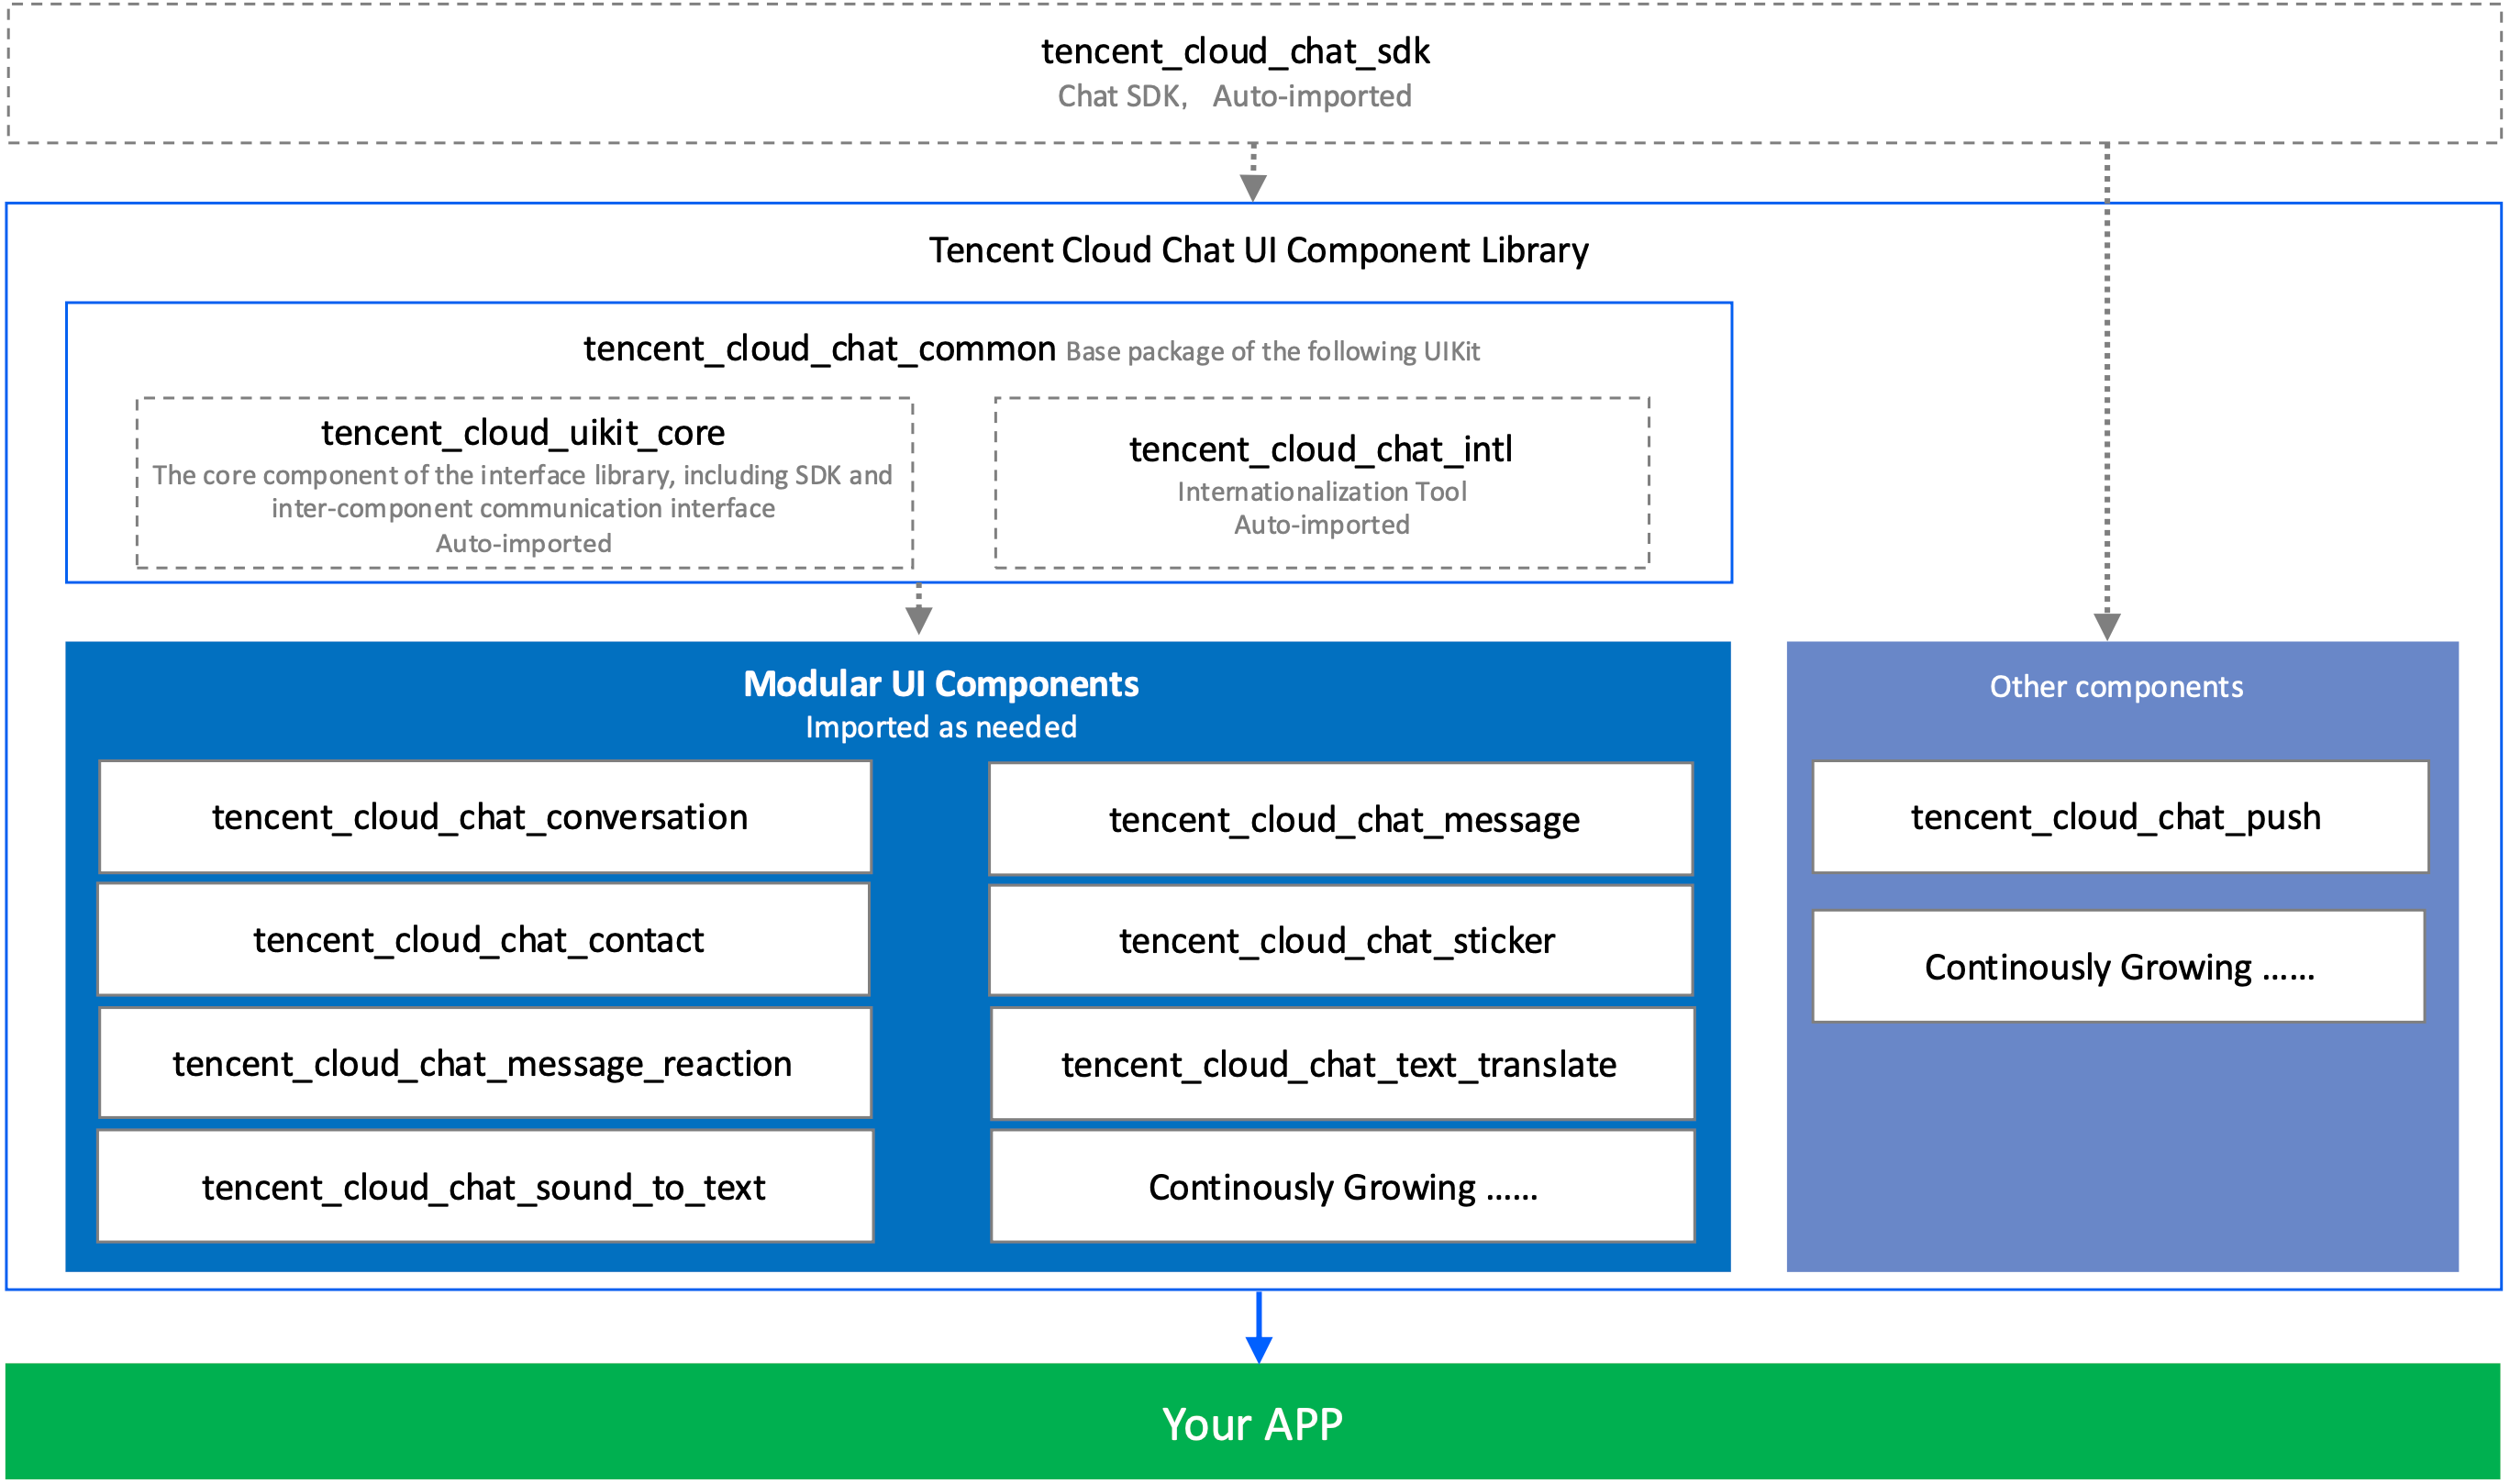
The architecture of Flutter Chat UIKit is shown below:
|
|
103
|
-
|
|
104
|
-
|
|
105
|
-
|
|
106
|
-
|
|
107
|
-
#### Step 2. Initial Setup for UIKit
|
|
108
|
-
|
|
109
|
-
Before you start using each Modular Package UI component, follow these initial setup steps:
|
|
110
|
-
|
|
111
|
-
**Global Configuration**
|
|
112
|
-
|
|
113
|
-
Replace your project's `MaterialApp` by `TencentCloudChatMaterialApp`.
|
|
114
|
-
|
|
115
|
-
This enables automatic management and configuration of language, theme (with material3), theme mode, and other settings. If you prefer manual configuration, refer to [Implement the global configuration for UIKit manually](https://trtc.io/document/58585?platform=flutter&product=chat&menulabel=uikit#ab6bd508-218a-4002-9b76-0ee081e8929a).
|
|
116
|
-
|
|
117
|
-
**Initialization and Login**
|
|
118
|
-
|
|
119
|
-
Call `TencentCloudChat.controller.initUIKit` to initialize and log in.
|
|
120
|
-
|
|
121
|
-
Pass in the **SDKAppID**, **userID**, and **userSig **of your Tencent Cloud Chat application created in the previous step. Also, declare the register of each sub Modular UI Package in the `usedComponentsRegister` list.
|
|
122
|
-
``` java
|
|
123
|
-
TencentCloudChat.controller.initUIKit(
|
|
124
|
-
options: const TencentCloudChatInitOptions(
|
|
125
|
-
sdkAppID: , /// [Required]: The SDKAppID of your Tencent Cloud Chat application
|
|
126
|
-
userID: , /// [Required]: The userID of the logged-in user
|
|
127
|
-
userSig: , /// [Required]: The userSig of the logged-in user
|
|
128
|
-
),
|
|
129
|
-
components: const TencentCloudChatInitComponentsRelated( /// [Required]: The modular UI components related settings, taking effects on a global scale.
|
|
130
|
-
usedComponentsRegister: [
|
|
131
|
-
/// [Required]: List of registration functions for the components used in the Chat UIKit.
|
|
132
|
-
TencentCloudChatConversationManager.register,
|
|
133
|
-
TencentCloudChatMessageManager.register,
|
|
134
|
-
TencentCloudChatContactManager.register,
|
|
135
|
-
],
|
|
136
|
-
),
|
|
137
|
-
);
|
|
138
|
-
```
|
|
139
|
-
|
|
140
|
-
Perfect! With the global configuration complete, we're now ready to dive into the usage of our Modular UI Components. Let's explore how they can enhance your chat application experience.
|
|
141
|
-
|
|
142
|
-
#### Step3. Integrating Modular UI Components
|
|
143
|
-
|
|
144
|
-
In most use cases, you'll need to manually instantiate and add the `TencentCloudChatConversation` and `TencentCloudChatContact `components to a widget, if necessary.
|
|
145
|
-
|
|
146
|
-
Other components are automatically navigated based on user actions.
|
|
147
|
-
|
|
148
|
-
In this tutorial, we'll use the `bottomNavigationBar` to manage the pages and switch between the `TencentCloudChatConversation` and `TencentCloudChatContact `components.
|
|
149
|
-
|
|
150
|
-
First, declare a `currentIndex` variable and a `List<Widget> pages` array to indicate the currently selected component and store the component instances.
|
|
151
|
-
``` java
|
|
152
|
-
List<Widget> pages = [];
|
|
153
|
-
int currentIndex = 0;
|
|
154
|
-
```
|
|
155
|
-
|
|
156
|
-
Store the instances in the `pages` array.
|
|
157
|
-
``` java
|
|
158
|
-
pages = [
|
|
159
|
-
const TencentCloudChatConversation(),
|
|
160
|
-
const TencentCloudChatContact(),
|
|
161
|
-
];
|
|
162
|
-
```
|
|
163
|
-
|
|
164
|
-
Finally, modify the `build` method as follows:
|
|
165
|
-
``` java
|
|
166
|
-
@override
|
|
167
|
-
Widget build(BuildContext context) {
|
|
168
|
-
return Scaffold(
|
|
169
|
-
bottomNavigationBar: BottomNavigationBar(
|
|
170
|
-
type: BottomNavigationBarType.fixed,
|
|
171
|
-
currentIndex: currentIndex,
|
|
172
|
-
onTap: (index) async {
|
|
173
|
-
if (index != currentIndex) {
|
|
174
|
-
setState(
|
|
175
|
-
() {
|
|
176
|
-
currentIndex = index;
|
|
177
|
-
},
|
|
178
|
-
);
|
|
179
|
-
}
|
|
180
|
-
},
|
|
181
|
-
items: const [
|
|
182
|
-
BottomNavigationBarItem(
|
|
183
|
-
icon: Icon(Icons.chat_bubble_outline), label: "Chats"),
|
|
184
|
-
BottomNavigationBarItem(
|
|
185
|
-
icon: Icon(Icons.contacts), label: "Contacts"),
|
|
186
|
-
],
|
|
187
|
-
),
|
|
188
|
-
body: pages[currentIndex],
|
|
189
|
-
);
|
|
190
|
-
}
|
|
191
|
-
```
|
|
192
|
-
|
|
193
|
-
And that's it! You've successfully integrated the components.
|
|
194
|
-
|
|
195
|
-
#### Step 4. Experience the Flutter Chat UIKit in Action
|
|
196
|
-
|
|
197
|
-
Now, let's run the project and experience the Flutter Chat UIKit.
|
|
198
|
-
|
|
199
|
-
Log in with the first test account created in the `initUIKit` method and launch the app.
|
|
200
|
-
|
|
201
|
-
Start by running `flutter run`.
|
|
202
|
-
|
|
203
|
-
Once you've successfully entered the app, you'll see the Conversation and Contact pages, with the ability to switch between them at the bottom.
|
|
204
|
-
|
|
205
|
-
However, there are no conversations to test yet.
|
|
206
|
-
|
|
207
|
-
Don't worry! Switch to the Contacts page, click 'Add Contact' in the top-right corner, and add the other test account as a contact. You'll now see the other account in the Contacts list.
|
|
208
|
-
|
|
209
|
-
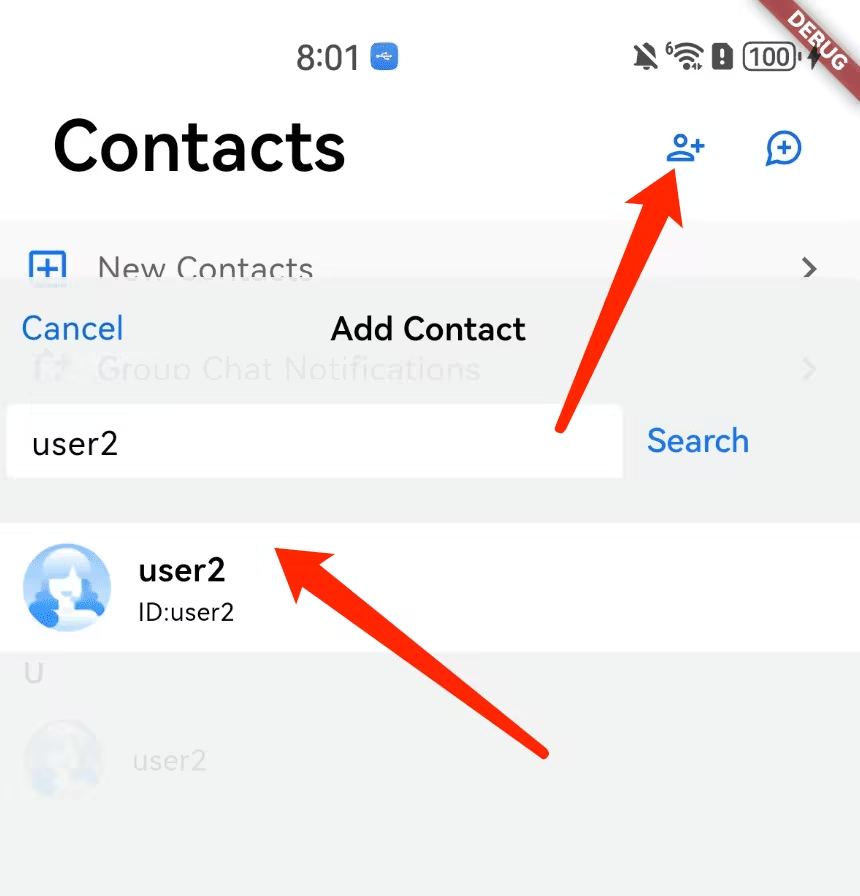
|
|
210
|
-
|
|
211
|
-
|
|
212
|
-
Click on the contact to start chatting. You can also rerun the app, log in with the other user's UserID, and experience sending messages to each other.
|
|
213
|
-
|
|
214
|
-
In conclusion, we've now completed the entire simplified integration process. Thank you for experiencing the power of Tencent Cloud Flutter Chat UIKit.
|
|
215
|
-
|
|
216
|
-
For more information on detailed integration, configuration, and advanced usage, please refer to this guide: [Detailed Integration Guide](https://www.tencentcloud.com/document/product/1047/58585).
|
|
217
|
-
|
|
@@ -1,94 +0,0 @@
|
|
|
1
|
-
The AI model must comply with the following **hard restrictions**:
|
|
2
|
-
* **React Version Restriction:** When creating the project, both React and react-dom versions must be `18.2.0`. React 19 is prohibited.
|
|
3
|
-
* **React UIKit Version Restriction:** The latest version of `@tencentcloud/chat-uikit-react` 3.0.0 or higher must be used.
|
|
4
|
-
* **Strictly Follow the Documentation Steps and Instructions for Integration:** When integrating components, the steps and instructions in the documentation must be followed precisely.
|
|
5
|
-
* **Strictly Use the Sample Code in the Documentation:** When creating files, the sample code in the documentation must be used to populate the files. The PlaceholderEmpty property of the Chat component does not need to be filled in.
|
|
6
|
-
* **Open Default Conversation:** The `C2Cadministrator` conversation must be opened using `setActiveConversation`.
|
|
7
|
-
* **Retrieve userSig using a tool:** The TUIKit code must be downloaded and integrated according to the documentation before automatically generating a test userID and calling the `get_usersig` tool to retrieve the userSig. The userID does not need to be appended with a timestamp to avoid errors in dynamic calculation.
|
|
8
|
-
* **Account Information Filling:** After obtaining the userSig, the SDKAppID, userID, and userSig will be automatically filled into the code.
|
|
9
|
-
* **Prohibit Creating User Information Configuration Files:** The `config` directory or file for filling in SDKAppID, userID, and userSig must not be automatically created.
|
|
10
|
-
|
|
11
|
-
# chat-uikit-react Integration
|
|
12
|
-
|
|
13
|
-
|
|
14
|
-
## step1:create react project
|
|
15
|
-
|
|
16
|
-
|
|
17
|
-
requirement: react: 18.2.0, react-dom: 18.2.0.
|
|
18
|
-
|
|
19
|
-
|
|
20
|
-
you can use vite or rsbuild to create a react project.
|
|
21
|
-
|
|
22
|
-
|
|
23
|
-
## step2: install chat-uikit-react
|
|
24
|
-
|
|
25
|
-
|
|
26
|
-
use npm or pnpm to install @tencentcloud/chat-uikit-react
|
|
27
|
-
|
|
28
|
-
|
|
29
|
-
## step3: add chat-uikit-react to your project
|
|
30
|
-
|
|
31
|
-
|
|
32
|
-
example code
|
|
33
|
-
|
|
34
|
-
|
|
35
|
-
```tsx
|
|
36
|
-
import {
|
|
37
|
-
UIKitProvider,
|
|
38
|
-
useLoginState,
|
|
39
|
-
LoginStatus,
|
|
40
|
-
Chat,
|
|
41
|
-
ChatHeader,
|
|
42
|
-
MessageList,
|
|
43
|
-
MessageInput,
|
|
44
|
-
useConversationListState,
|
|
45
|
-
} from "@tencentcloud/chat-uikit-react";
|
|
46
|
-
|
|
47
|
-
function ChatApp() {
|
|
48
|
-
const { setActiveConversation } = useConversationListState();
|
|
49
|
-
|
|
50
|
-
useEffect(() => {
|
|
51
|
-
// open default conversation
|
|
52
|
-
setActiveConversation('C2Cadministrator');
|
|
53
|
-
}, [setActiveConversation]);
|
|
54
|
-
|
|
55
|
-
return (
|
|
56
|
-
<div style={{ height: '100vh', width: '100vw', display: 'flex', flexDirection: 'row' }}>
|
|
57
|
-
<Chat PlaceholderEmpty=''>
|
|
58
|
-
<ChatHeader />
|
|
59
|
-
<MessageList />
|
|
60
|
-
<MessageInput />
|
|
61
|
-
</Chat>
|
|
62
|
-
</div>
|
|
63
|
-
);
|
|
64
|
-
}
|
|
65
|
-
|
|
66
|
-
|
|
67
|
-
function App() {
|
|
68
|
-
const userID = ''; // TODO: Replace with your userID
|
|
69
|
-
const SDKAppID = 0; // TODO: Replace with your SDKAppID (Notice: SDKAppID is of type number)
|
|
70
|
-
const userSig = ''; // TODO: Replace with your userSig
|
|
71
|
-
|
|
72
|
-
const { status } = useLoginState({
|
|
73
|
-
SDKAppID,
|
|
74
|
-
userID,
|
|
75
|
-
userSig,
|
|
76
|
-
})
|
|
77
|
-
|
|
78
|
-
|
|
79
|
-
if (status !== LoginStatus.SUCCESS) {
|
|
80
|
-
return <div>Loading...</div>
|
|
81
|
-
}
|
|
82
|
-
|
|
83
|
-
// Language support zh-CN(default) / en-US / ja-JP / ko-KR / zh-TW
|
|
84
|
-
// Theme support light(default) / dark
|
|
85
|
-
return (
|
|
86
|
-
<UIKitProvider language='zh-CN' theme='light'>
|
|
87
|
-
<ChatApp />
|
|
88
|
-
</UIKitProvider>
|
|
89
|
-
);
|
|
90
|
-
}
|
|
91
|
-
|
|
92
|
-
|
|
93
|
-
export default App;
|
|
94
|
-
```
|