@tencentcloud/sdk-mcp 1.3.8 → 1.3.9
This diff represents the content of publicly available package versions that have been released to one of the supported registries. The information contained in this diff is provided for informational purposes only and reflects changes between package versions as they appear in their respective public registries.
- package/package.json +1 -1
- package/resource/doc/chatuikit/android/integration.md +466 -484
- package/resource/doc/chatuikit/android/workflow.md +713 -0
- package/resource/doc/livekit/live/flutter/live-integration.md +208 -167
- package/resource/doc/livekit/voice/android/voice-audience-list.md +335 -0
- package/resource/doc/livekit/voice/android/voice-audio-effect.md +384 -0
- package/resource/doc/livekit/voice/android/voice-barrage.md +569 -0
- package/resource/doc/livekit/voice/android/voice-co-guest-interaction.md +748 -0
- package/resource/doc/livekit/voice/android/voice-gift.md +833 -0
- package/resource/doc/livekit/voice/android/voice-host-interaction.md +728 -0
- package/resource/doc/livekit/voice/android/voice-integration.md +886 -0
- package/resource/doc/livekit/voice/android/voice-room-list.md +493 -0
- package/resource/doc/livekit/voice/android/workflow.md +333 -0
- package/resource/doc/livekit/voice/flutter/voice-audience-list.md +337 -0
- package/resource/doc/livekit/voice/flutter/voice-audio-effect.md +739 -0
- package/resource/doc/livekit/voice/flutter/voice-barrage.md +578 -0
- package/resource/doc/livekit/voice/flutter/voice-co-guest-interaction.md +673 -0
- package/resource/doc/livekit/voice/flutter/voice-gift.md +812 -0
- package/resource/doc/livekit/voice/flutter/voice-integration.md +925 -0
- package/resource/doc/livekit/voice/flutter/voice-room-list.md +842 -0
- package/resource/doc/livekit/voice/flutter/workflow.md +359 -0
- package/resource/doc/livekit/voice/ios/voice-audience-list.md +335 -0
- package/resource/doc/livekit/voice/ios/voice-audio-effect.md +373 -0
- package/resource/doc/livekit/voice/ios/voice-barrage.md +529 -0
- package/resource/doc/livekit/voice/ios/voice-co-guest-interaction.md +701 -0
- package/resource/doc/livekit/voice/ios/voice-gift.md +785 -0
- package/resource/doc/livekit/voice/ios/voice-host-interaction.md +820 -0
- package/resource/doc/livekit/voice/ios/voice-integration.md +853 -0
- package/resource/doc/livekit/voice/ios/voice-room-list.md +467 -0
- package/resource/doc/livekit/voice/ios/workflow.md +358 -0
- package/resource/doc/livekit/voice/uni-app/voice-audience-list.md +264 -0
- package/resource/doc/livekit/voice/uni-app/voice-audio-effect.md +332 -0
- package/resource/doc/livekit/voice/uni-app/voice-barrage.md +482 -0
- package/resource/doc/livekit/voice/uni-app/voice-co-guest-interaction.md +944 -0
- package/resource/doc/livekit/voice/uni-app/voice-gift.md +716 -0
- package/resource/doc/livekit/voice/uni-app/voice-integration.md +613 -0
- package/resource/doc/livekit/voice/uni-app/voice-room-list.md +562 -0
- package/resource/doc/livekit/voice/uni-app/workflow.md +369 -0
- package/resource/doc/roomkit/vue/integration.md +119 -224
- package/resource/doc/roomkit/vue/workflow.md +472 -226
- package/resource/doc/tuicallkit/android/integration.md +675 -90
- package/resource/doc/tuicallkit/android/workflow.md +432 -0
- package/tools/common/present-scenario-choice.js +16 -0
- package/tools/common/present-scenario-choice.js.map +1 -0
- package/tools/definitions/get_native_call_uikit_integration_def.js +18 -2
- package/tools/definitions/get_native_call_uikit_integration_def.js.map +1 -1
- package/tools/definitions/get_native_chat_uikit_integration_def.js +29 -7
- package/tools/definitions/get_native_chat_uikit_integration_def.js.map +1 -1
- package/tools/definitions/get_native_live_uikit_integration_def.js +65 -40
- package/tools/definitions/get_native_live_uikit_integration_def.js.map +1 -1
- package/tools/definitions/get_native_live_uikit_interaction_def.js +42 -94
- package/tools/definitions/get_native_live_uikit_interaction_def.js.map +1 -1
- package/tools/definitions/get_web_room_feature_detail_def.js +29 -32
- package/tools/definitions/get_web_room_feature_detail_def.js.map +1 -1
- package/tools/definitions/get_web_room_uikit_integration_def.js +25 -9
- package/tools/definitions/get_web_room_uikit_integration_def.js.map +1 -1
- package/tools/definitions/present_scenario_choice_def.js +53 -0
- package/tools/definitions/present_scenario_choice_def.js.map +1 -0
- package/tools/definitions/record_prompt_def.js +6 -1
- package/tools/definitions/record_prompt_def.js.map +1 -1
- package/tools/definitions/record_result_def.js +20 -4
- package/tools/definitions/record_result_def.js.map +1 -1
- package/tools/index.js +2 -0
- package/tools/index.js.map +1 -1
- package/tools/live/get-native-live-uikit-integration.js +110 -34
- package/tools/live/get-native-live-uikit-integration.js.map +1 -1
- package/tools/live/get_native_live_uikit_interaction.js +128 -35
- package/tools/live/get_native_live_uikit_interaction.js.map +1 -1
- package/utils/report-cls-client.js +1 -1
- package/utils/report-es-client.js +1 -1
|
@@ -138,62 +138,29 @@ void main() async {
|
|
|
138
138
|
|
|
139
139
|
## 搭建基础直播间
|
|
140
140
|
|
|
141
|
-
### 步骤1
|
|
141
|
+
### 步骤1:实现主播开播
|
|
142
142
|
|
|
143
|
-
|
|
143
|
+
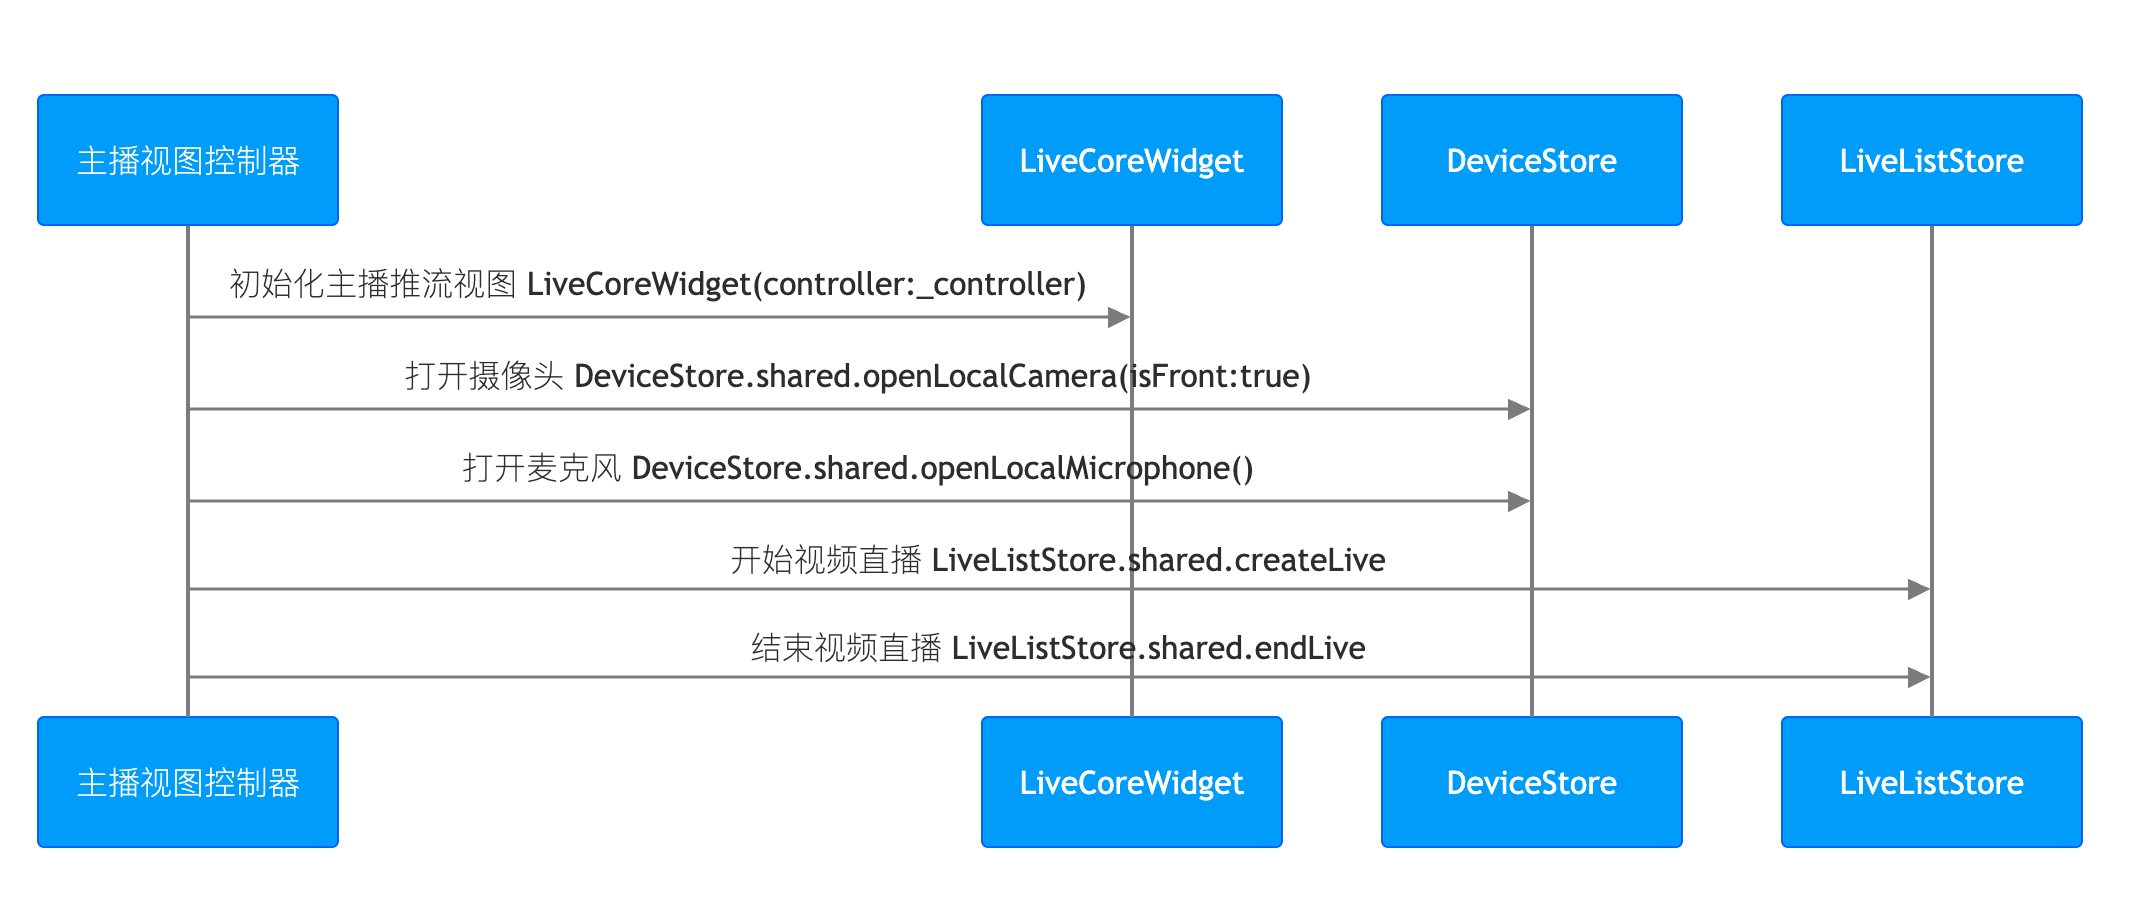
主播开播涉及“预览”和“直播”两个阶段。由于底层视频渲染机制不同,我们需要构建一个状态机来管理视图切换,从而避免预览时出现黑屏。
|
|
144
|
+
1. **核心逻辑与状态定义**
|
|
144
145
|
|
|
145
|
-
|
|
146
146
|
|
|
147
|
-
|
|
148
|
-
> **提示:**
|
|
149
|
-
>
|
|
150
|
-
|
|
151
|
-
> 主播开播推流的业务代码,您也可以参考 TUILiveKit 开源项目中的 [live_room_anchor_widget.dart](https://github.com/Tencent-RTC/TUIKit_Flutter/blob/main/live/livekit/lib/live_stream/features/live_room_anchor_widget.dart) 文件来了解完整的实现逻辑。
|
|
152
|
-
>
|
|
153
|
-
|
|
154
|
-
1. **初始化主播推流视图**
|
|
155
|
-
|
|
156
|
-
|
|
157
|
-
在您的主播页面中,创建一个 `LiveCoreWidget` 实例,并通过 `LiveCoreController` 控制直播行为。
|
|
147
|
+
首先,在您的 State 类中定义核心控制器,并增加一个 _isLiveStarted 标记,用于区分当前是“预览态”还是“直播态”。
|
|
158
148
|
|
|
159
149
|
``` java
|
|
160
|
-
import 'package:flutter/material.dart';
|
|
161
|
-
import 'package:atomic_x_core/atomicxcore.dart';
|
|
162
|
-
|
|
163
|
-
/// YourAnchorPage 代表您的主播开播页面
|
|
164
|
-
class YourAnchorPage extends StatefulWidget {
|
|
165
|
-
final String liveId;
|
|
166
|
-
|
|
167
|
-
const YourAnchorPage({super.key, required this.liveId});
|
|
168
|
-
|
|
169
|
-
@override
|
|
170
|
-
State<YourAnchorPage> createState() => _YourAnchorPageState();
|
|
171
|
-
}
|
|
172
|
-
|
|
173
150
|
class _YourAnchorPageState extends State<YourAnchorPage> {
|
|
174
|
-
//
|
|
151
|
+
// 核心控制器
|
|
175
152
|
late final LiveCoreController _controller;
|
|
153
|
+
// 状态标记:false = 预览中; true = 直播中
|
|
154
|
+
bool _isLiveStarted = false;
|
|
176
155
|
|
|
177
156
|
@override
|
|
178
157
|
void initState() {
|
|
179
158
|
super.initState();
|
|
180
|
-
|
|
181
|
-
_controller = LiveCoreController.create();
|
|
182
|
-
// 3. 设置直播 ID
|
|
159
|
+
_controller = LiveCoreController.create(CoreViewType.pushView);
|
|
183
160
|
_controller.setLiveID(widget.liveId);
|
|
184
|
-
|
|
185
|
-
|
|
186
|
-
|
|
187
|
-
Widget build(BuildContext context) {
|
|
188
|
-
return Scaffold(
|
|
189
|
-
body: Stack(
|
|
190
|
-
children: [
|
|
191
|
-
// 4. 将主播推流页面加载到您的视图上
|
|
192
|
-
LiveCoreWidget(controller: _controller),
|
|
193
|
-
// 您的其他 UI 组件
|
|
194
|
-
],
|
|
195
|
-
),
|
|
196
|
-
);
|
|
161
|
+
|
|
162
|
+
// 初始化时直接打开设备(详见下一步)
|
|
163
|
+
_openDevices();
|
|
197
164
|
}
|
|
198
165
|
}
|
|
199
166
|
```
|
|
@@ -201,134 +168,109 @@ void main() async {
|
|
|
201
168
|
|
|
202
169
|
|
|
203
170
|
通过调用 **DeviceStore** 的 `openLocalCamera`、`openLocalMicrophone` 接口打开摄像头和麦克风,**您无需做额外操作,LiveCoreWidget 会自动预览当前摄像头的视频流**,示例代码如下:
|
|
171
|
+
|
|
172
|
+
|
|
173
|
+
> **注意:**
|
|
174
|
+
>
|
|
175
|
+
|
|
176
|
+
> 此步骤对于预览至关重要。只有打开设备,后续的 VideoView 才有画面可渲染。
|
|
177
|
+
>
|
|
204
178
|
|
|
205
179
|
``` java
|
|
206
|
-
|
|
207
|
-
|
|
208
|
-
|
|
209
|
-
/// YourAnchorPage 代表您的主播开播页面
|
|
210
|
-
class YourAnchorPage extends StatefulWidget {
|
|
211
|
-
final String liveId;
|
|
212
|
-
|
|
213
|
-
const YourAnchorPage({super.key, required this.liveId});
|
|
214
|
-
|
|
215
|
-
@override
|
|
216
|
-
State<YourAnchorPage> createState() => _YourAnchorPageState();
|
|
217
|
-
}
|
|
218
|
-
|
|
219
|
-
class _YourAnchorPageState extends State<YourAnchorPage> {
|
|
220
|
-
late final LiveCoreController _controller;
|
|
221
|
-
|
|
222
|
-
@override
|
|
223
|
-
void initState() {
|
|
224
|
-
super.initState();
|
|
225
|
-
_controller = LiveCoreController.create();
|
|
226
|
-
_controller.setLiveID(widget.liveId);
|
|
227
|
-
// 打开设备
|
|
228
|
-
_openDevices();
|
|
229
|
-
}
|
|
230
|
-
|
|
231
|
-
void _openDevices() {
|
|
232
|
-
// 1. 打开前置摄像头
|
|
180
|
+
void _openDevices() {
|
|
181
|
+
// 1. 打开前置摄像头 (true 表示前置)
|
|
233
182
|
DeviceStore.shared.openLocalCamera(true);
|
|
234
183
|
// 2. 打开麦克风
|
|
235
184
|
DeviceStore.shared.openLocalMicrophone();
|
|
236
185
|
}
|
|
186
|
+
```
|
|
187
|
+
3. **构建预览视图**
|
|
188
|
+
|
|
189
|
+
|
|
190
|
+
这是最关键的一步。我们需要根据 `_isLiveStarted` 的状态选择不同的组件:
|
|
191
|
+
|
|
192
|
+
- **预览态:**使用 `VideoView` + `setLocalVideoView`(直接渲染本地采集数据)。
|
|
193
|
+
|
|
194
|
+
- **直播态:**使用 `LiveCoreWidget`(渲染直播间流数据)。
|
|
195
|
+
|
|
196
|
+
``` java
|
|
197
|
+
// 3.1 封装预览视图组件
|
|
198
|
+
Widget _buildLocalPreview() {
|
|
199
|
+
return Container(
|
|
200
|
+
color: Colors.black,
|
|
201
|
+
child: VideoView(
|
|
202
|
+
onViewCreated: (viewId) {
|
|
203
|
+
// 关键:将本地摄像头画面绑定到预览 View
|
|
204
|
+
TUIRoomEngine.sharedInstance().setLocalVideoView(viewId);
|
|
205
|
+
},
|
|
206
|
+
onViewDisposed: (viewId) {
|
|
207
|
+
// 销毁时解绑
|
|
208
|
+
TUIRoomEngine.sharedInstance().setLocalVideoView(0);
|
|
209
|
+
},
|
|
210
|
+
),
|
|
211
|
+
);
|
|
212
|
+
}
|
|
237
213
|
|
|
214
|
+
// 3.2 组合主视图
|
|
238
215
|
@override
|
|
239
216
|
Widget build(BuildContext context) {
|
|
240
217
|
return Scaffold(
|
|
241
218
|
body: Stack(
|
|
242
219
|
children: [
|
|
243
|
-
|
|
220
|
+
// 视图层:根据状态自动切换
|
|
221
|
+
Positioned.fill(
|
|
222
|
+
child: _isLiveStarted
|
|
223
|
+
? LiveCoreWidget(controller: _controller) // 直播中:用核心组件
|
|
224
|
+
: _buildLocalPreview(), // 预览中:用 VideoView
|
|
225
|
+
),
|
|
226
|
+
|
|
227
|
+
// UI 层:开播按钮(仅在预览时显示)
|
|
228
|
+
if (!_isLiveStarted)
|
|
229
|
+
Positioned(
|
|
230
|
+
bottom: 50, left: 0, right: 0,
|
|
231
|
+
child: Center(
|
|
232
|
+
child: ElevatedButton(
|
|
233
|
+
onPressed: _startLive, // 下一步实现此方法
|
|
234
|
+
child: const Text('开始直播'),
|
|
235
|
+
),
|
|
236
|
+
),
|
|
237
|
+
),
|
|
244
238
|
],
|
|
245
239
|
),
|
|
246
240
|
);
|
|
247
241
|
}
|
|
248
|
-
}
|
|
249
242
|
```
|
|
250
|
-
|
|
243
|
+
4. **实现开播与关播逻辑**
|
|
251
244
|
|
|
252
245
|
|
|
253
|
-
通过调用 **LiveListStore** 的 `createLive`
|
|
246
|
+
通过调用 **LiveListStore** 的 `createLive` 接口开始视频直播,示例代码如下:
|
|
254
247
|
|
|
255
248
|
``` java
|
|
256
|
-
|
|
257
|
-
|
|
258
|
-
|
|
259
|
-
/// YourAnchorPage 代表您的主播开播页面
|
|
260
|
-
class YourAnchorPage extends StatefulWidget {
|
|
261
|
-
final String liveId;
|
|
262
|
-
|
|
263
|
-
const YourAnchorPage({super.key, required this.liveId});
|
|
264
|
-
|
|
265
|
-
@override
|
|
266
|
-
State<YourAnchorPage> createState() => _YourAnchorPageState();
|
|
267
|
-
}
|
|
268
|
-
|
|
269
|
-
class _YourAnchorPageState extends State<YourAnchorPage> {
|
|
270
|
-
late final LiveCoreController _controller;
|
|
271
|
-
|
|
272
|
-
@override
|
|
273
|
-
void initState() {
|
|
274
|
-
super.initState();
|
|
275
|
-
_controller = LiveCoreController.create();
|
|
276
|
-
_controller.setLiveID(widget.liveId);
|
|
277
|
-
_openDevices();
|
|
278
|
-
}
|
|
279
|
-
|
|
280
|
-
void _openDevices() {
|
|
281
|
-
DeviceStore.shared.openLocalCamera(true);
|
|
282
|
-
DeviceStore.shared.openLocalMicrophone();
|
|
283
|
-
}
|
|
284
|
-
|
|
285
|
-
// 调用开播接口开始直播
|
|
286
|
-
Future<void> _startLive() async {
|
|
287
|
-
// 1. 准备 LiveInfo 对象
|
|
249
|
+
Future<void> _startLive() async {
|
|
250
|
+
// 1. 配置直播间参数
|
|
288
251
|
final liveInfo = LiveInfo(
|
|
289
|
-
//
|
|
290
|
-
|
|
291
|
-
//
|
|
292
|
-
|
|
293
|
-
// 配置布局模板,默认:600 动态宫格布局
|
|
294
|
-
seatLayoutTemplateID: 600,
|
|
295
|
-
// 配置主播始终在麦位上
|
|
296
|
-
keepOwnerOnSeat: true,
|
|
252
|
+
liveID: widget.liveId, // 房间唯一标识
|
|
253
|
+
liveName: "Atomic Live Demo", // 房间标题
|
|
254
|
+
seatLayoutTemplateID: 600, // 布局模式:600 代表默认动态宫格
|
|
255
|
+
keepOwnerOnSeat: true, // 房主是否始终占有一个麦位
|
|
297
256
|
);
|
|
298
257
|
|
|
299
|
-
// 2.
|
|
258
|
+
// 2. 发起开播请求
|
|
300
259
|
final result = await LiveListStore.shared.createLive(liveInfo);
|
|
301
260
|
|
|
302
261
|
if (result.isSuccess) {
|
|
303
|
-
debugPrint("
|
|
262
|
+
debugPrint("开播成功");
|
|
263
|
+
// 3. 关键步骤:更新状态
|
|
264
|
+
// 将 _isLiveStarted 置为 true,触发 build 方法重新构建,
|
|
265
|
+
// 从而将 UI 从 VideoView(预览)切换为 LiveCoreWidget(直播)。
|
|
266
|
+
setState(() {
|
|
267
|
+
_isLiveStarted = true;
|
|
268
|
+
});
|
|
304
269
|
} else {
|
|
305
|
-
debugPrint("
|
|
270
|
+
debugPrint("开播失败: ${result.errorMessage}");
|
|
271
|
+
// 可以在此处添加 Toast 提示用户
|
|
306
272
|
}
|
|
307
273
|
}
|
|
308
|
-
|
|
309
|
-
@override
|
|
310
|
-
Widget build(BuildContext context) {
|
|
311
|
-
return Scaffold(
|
|
312
|
-
body: Stack(
|
|
313
|
-
children: [
|
|
314
|
-
LiveCoreWidget(controller: _controller),
|
|
315
|
-
// 开播按钮
|
|
316
|
-
Positioned(
|
|
317
|
-
bottom: 50,
|
|
318
|
-
left: 0,
|
|
319
|
-
right: 0,
|
|
320
|
-
child: Center(
|
|
321
|
-
child: ElevatedButton(
|
|
322
|
-
onPressed: _startLive,
|
|
323
|
-
child: const Text('开始直播'),
|
|
324
|
-
),
|
|
325
|
-
),
|
|
326
|
-
),
|
|
327
|
-
],
|
|
328
|
-
),
|
|
329
|
-
);
|
|
330
|
-
}
|
|
331
|
-
}
|
|
332
274
|
```
|
|
333
275
|
|
|
334
276
|
**LiveInfo 参数说明:**
|
|
@@ -495,19 +437,40 @@ void main() async {
|
|
|
495
437
|
</tr>
|
|
496
438
|
</table>
|
|
497
439
|
|
|
498
|
-
|
|
440
|
+
5. **结束直播**
|
|
499
441
|
|
|
500
442
|
|
|
501
443
|
直播结束后,主播可以调用 **LiveListStore** 的 `endLive` 接口结束直播。SDK 会处理停止推流和销毁房间的逻辑。
|
|
502
444
|
|
|
445
|
+
``` java
|
|
446
|
+
Future<void> _stopLive() async {
|
|
447
|
+
// 1. 调用接口结束直播
|
|
448
|
+
// SDK 内部会自动停止推流、销毁房间并清理媒体资源
|
|
449
|
+
final result = await LiveListStore.shared.endLive();
|
|
450
|
+
|
|
451
|
+
if (result.isSuccess) {
|
|
452
|
+
debugPrint("关播成功");
|
|
453
|
+
// 2. 退出当前页面
|
|
454
|
+
if (mounted) {
|
|
455
|
+
Navigator.of(context).pop();
|
|
456
|
+
}
|
|
457
|
+
} else {
|
|
458
|
+
debugPrint("关播失败: ${result.errorMessage}");
|
|
459
|
+
}
|
|
460
|
+
}
|
|
461
|
+
```
|
|
462
|
+
6. **完整代码参考**
|
|
463
|
+
|
|
464
|
+
|
|
465
|
+
为了方便您快速集成,我们将上述步骤整合为完整的 `YourAnchorPage` 文件。您可以直接复制以下代码:
|
|
466
|
+
|
|
503
467
|
``` java
|
|
504
468
|
import 'package:flutter/material.dart';
|
|
505
469
|
import 'package:atomic_x_core/atomicxcore.dart';
|
|
470
|
+
import 'package:rtc_room_engine/rtc_room_engine.dart'; // 引入 RTC 引擎
|
|
506
471
|
|
|
507
|
-
/// YourAnchorPage 代表您的主播开播页面
|
|
508
472
|
class YourAnchorPage extends StatefulWidget {
|
|
509
473
|
final String liveId;
|
|
510
|
-
|
|
511
474
|
const YourAnchorPage({super.key, required this.liveId});
|
|
512
475
|
|
|
513
476
|
@override
|
|
@@ -515,20 +478,73 @@ void main() async {
|
|
|
515
478
|
}
|
|
516
479
|
|
|
517
480
|
class _YourAnchorPageState extends State<YourAnchorPage> {
|
|
518
|
-
|
|
481
|
+
late final LiveCoreController _controller;
|
|
482
|
+
bool _isLiveStarted = false; // 直播状态标记
|
|
519
483
|
|
|
520
|
-
|
|
521
|
-
|
|
522
|
-
|
|
484
|
+
@override
|
|
485
|
+
void initState() {
|
|
486
|
+
super.initState();
|
|
487
|
+
_controller = LiveCoreController.create(CoreViewType.pushView);
|
|
488
|
+
_controller.setLiveID(widget.liveId);
|
|
489
|
+
_openDevices(); // 步骤2:打开设备
|
|
490
|
+
}
|
|
491
|
+
|
|
492
|
+
void _openDevices() {
|
|
493
|
+
DeviceStore.shared.openLocalCamera(true);
|
|
494
|
+
DeviceStore.shared.openLocalMicrophone();
|
|
495
|
+
}
|
|
496
|
+
|
|
497
|
+
// 步骤3:构建预览
|
|
498
|
+
Widget _buildLocalPreview() {
|
|
499
|
+
return Container(
|
|
500
|
+
color: Colors.black,
|
|
501
|
+
child: VideoView(
|
|
502
|
+
onViewCreated: (viewId) => TUIRoomEngine.sharedInstance().setLocalVideoView(viewId),
|
|
503
|
+
onViewDisposed: (viewId) => TUIRoomEngine.sharedInstance().setLocalVideoView(0),
|
|
504
|
+
),
|
|
505
|
+
);
|
|
506
|
+
}
|
|
523
507
|
|
|
508
|
+
// 步骤4:开播逻辑
|
|
509
|
+
Future<void> _startLive() async {
|
|
510
|
+
final liveInfo = LiveInfo(
|
|
511
|
+
liveID: widget.liveId,
|
|
512
|
+
liveName: "Test Live",
|
|
513
|
+
seatLayoutTemplateID: 600,
|
|
514
|
+
keepOwnerOnSeat: true,
|
|
515
|
+
);
|
|
516
|
+
|
|
517
|
+
final result = await LiveListStore.shared.createLive(liveInfo);
|
|
524
518
|
if (result.isSuccess) {
|
|
525
|
-
|
|
526
|
-
|
|
527
|
-
|
|
519
|
+
setState(() {
|
|
520
|
+
_isLiveStarted = true; // 切换 UI 状态
|
|
521
|
+
});
|
|
528
522
|
}
|
|
529
523
|
}
|
|
530
524
|
|
|
531
|
-
|
|
525
|
+
@override
|
|
526
|
+
Widget build(BuildContext context) {
|
|
527
|
+
return Scaffold(
|
|
528
|
+
body: Stack(
|
|
529
|
+
children: [
|
|
530
|
+
// 视图自动切换
|
|
531
|
+
Positioned.fill(
|
|
532
|
+
child: _isLiveStarted
|
|
533
|
+
? LiveCoreWidget(controller: _controller)
|
|
534
|
+
: _buildLocalPreview(),
|
|
535
|
+
),
|
|
536
|
+
// 开播按钮
|
|
537
|
+
if (!_isLiveStarted)
|
|
538
|
+
Positioned(
|
|
539
|
+
bottom: 50, left: 0, right: 0,
|
|
540
|
+
child: Center(
|
|
541
|
+
child: ElevatedButton(onPressed: _startLive, child: const Text('开始直播')),
|
|
542
|
+
),
|
|
543
|
+
),
|
|
544
|
+
],
|
|
545
|
+
),
|
|
546
|
+
);
|
|
547
|
+
}
|
|
532
548
|
}
|
|
533
549
|
```
|
|
534
550
|
|
|
@@ -549,32 +565,46 @@ void main() async {
|
|
|
549
565
|
|
|
550
566
|
|
|
551
567
|
在您的观众页面中,创建 `LiveCoreWidget` 实例,并通过 `LiveCoreController` 控制直播行为。
|
|
568
|
+
|
|
569
|
+
|
|
570
|
+
> **注意:**
|
|
571
|
+
>
|
|
572
|
+
|
|
573
|
+
> **必须确保 LiveCoreWidget 在调用 joinLive() 之前已经完成初始化并处于渲染树中。**
|
|
574
|
+
>
|
|
575
|
+
|
|
576
|
+
> **原理分析:**`LiveCoreWidget` 在 `initState` 中会执行 `controller.init() `以注册对 `currentLive` 信息的监听。如果先调用` joinLive()` 导致房间信息更新,而此时 `Widget` 尚未渲染(监听器未注册),则无法触发内部的自动拉流逻辑,导致画面黑屏。
|
|
577
|
+
>
|
|
552
578
|
|
|
553
579
|
``` java
|
|
554
580
|
import 'package:flutter/material.dart';
|
|
555
581
|
import 'package:atomic_x_core/atomicxcore.dart';
|
|
556
582
|
|
|
557
583
|
/// YourAudiencePage 代表您的观众观看页面
|
|
558
|
-
class YourAudiencePage extends StatefulWidget {
|
|
559
|
-
final String liveId;
|
|
560
|
-
|
|
561
|
-
const YourAudiencePage({super.key, required this.liveId});
|
|
562
|
-
|
|
563
|
-
@override
|
|
564
|
-
State<YourAudiencePage> createState() => _YourAudiencePageState();
|
|
565
|
-
}
|
|
566
|
-
|
|
567
584
|
class _YourAudiencePageState extends State<YourAudiencePage> {
|
|
568
|
-
// 1. 创建 LiveCoreController 实例
|
|
569
585
|
late final LiveCoreController _controller;
|
|
586
|
+
bool _isJoining = true;
|
|
570
587
|
|
|
571
588
|
@override
|
|
572
589
|
void initState() {
|
|
573
590
|
super.initState();
|
|
574
|
-
|
|
575
|
-
_controller = LiveCoreController.create();
|
|
576
|
-
// 3. 绑定直播 id
|
|
591
|
+
_controller = LiveCoreController.create(CoreViewType.playView);
|
|
577
592
|
_controller.setLiveID(widget.liveId);
|
|
593
|
+
|
|
594
|
+
// 修正:在第一帧渲染完成后再进房,确保 LiveCoreWidget 已完成 init()
|
|
595
|
+
WidgetsBinding.instance.addPostFrameCallback((_) {
|
|
596
|
+
_joinLive();
|
|
597
|
+
});
|
|
598
|
+
}
|
|
599
|
+
|
|
600
|
+
Future<void> _joinLive() async {
|
|
601
|
+
final result = await LiveListStore.shared.joinLive(widget.liveId);
|
|
602
|
+
if (result.isSuccess) {
|
|
603
|
+
debugPrint("joinLive success");
|
|
604
|
+
if (mounted) setState(() => _isJoining = false);
|
|
605
|
+
} else {
|
|
606
|
+
debugPrint("joinLive error: ${result.errorMessage}");
|
|
607
|
+
}
|
|
578
608
|
}
|
|
579
609
|
|
|
580
610
|
@override
|
|
@@ -582,8 +612,11 @@ void main() async {
|
|
|
582
612
|
return Scaffold(
|
|
583
613
|
body: Stack(
|
|
584
614
|
children: [
|
|
585
|
-
//
|
|
615
|
+
// 必须始终渲染,不可根据 _isJoining 状态移除,否则会导致监听失效
|
|
586
616
|
LiveCoreWidget(controller: _controller),
|
|
617
|
+
|
|
618
|
+
if (_isJoining)
|
|
619
|
+
const Center(child: CircularProgressIndicator(color: Colors.white)),
|
|
587
620
|
],
|
|
588
621
|
),
|
|
589
622
|
);
|
|
@@ -1002,6 +1035,14 @@ class _YourAudiencePageState extends State<YourAudiencePage> {
|
|
|
1002
1035
|
- **检查网络**:请检查设备网络连接是否正常。
|
|
1003
1036
|
|
|
1004
1037
|
|
|
1038
|
+
### 观众端调用了 joinLive 且返回 Success,但依然没有视频画面?
|
|
1039
|
+
- **时序问题:**是否在 LiveCoreWidget 挂载前就执行了 joinLive?请参考上文使用 addPostFrameCallback。
|
|
1040
|
+
|
|
1041
|
+
- **Controller 类型:**创建时是否正确传入了 CoreViewType.playView?
|
|
1042
|
+
|
|
1043
|
+
- **Widget 持久性:**在进房过程中,LiveCoreWidget 是否因为 setState 被意外销毁或重新创建?请确保其在 Widget 树中的稳定性。
|
|
1044
|
+
|
|
1045
|
+
|
|
1005
1046
|
### Flutter 项目如何请求权限?
|
|
1006
1047
|
|
|
1007
1048
|
您可以使用 `permission_handler` 插件来请求摄像头和麦克风权限:
|