@aigne/doc-smith 0.8.10-beta → 0.8.10-beta.2
This diff represents the content of publicly available package versions that have been released to one of the supported registries. The information contained in this diff is provided for informational purposes only and reflects changes between package versions as they appear in their respective public registries.
- package/.aigne/doc-smith/config.yaml +3 -1
- package/.aigne/doc-smith/preferences.yml +4 -4
- package/.aigne/doc-smith/upload-cache.yaml +180 -0
- package/.release-please-manifest.json +1 -1
- package/CHANGELOG.md +22 -0
- package/README.md +2 -2
- package/RELEASE.md +3 -3
- package/agents/generate/check-need-generate-structure.mjs +40 -18
- package/agents/generate/index.yaml +7 -0
- package/agents/generate/user-review-document-structure.mjs +173 -0
- package/agents/init/index.mjs +5 -11
- package/agents/update/generate-and-translate-document.yaml +3 -3
- package/agents/utils/check-feedback-refiner.mjs +2 -0
- package/agents/utils/save-docs.mjs +16 -22
- package/aigne.yaml +1 -0
- package/docs/advanced-how-it-works.md +26 -24
- package/docs/advanced-how-it-works.zh.md +32 -30
- package/docs/advanced-quality-assurance.md +6 -9
- package/docs/advanced-quality-assurance.zh.md +19 -22
- package/docs/cli-reference.md +35 -76
- package/docs/cli-reference.zh.md +48 -89
- package/docs/configuration-interactive-setup.md +18 -18
- package/docs/configuration-interactive-setup.zh.md +33 -33
- package/docs/configuration-language-support.md +12 -12
- package/docs/configuration-language-support.zh.md +20 -20
- package/docs/configuration-llm-setup.md +14 -13
- package/docs/configuration-llm-setup.zh.md +16 -15
- package/docs/configuration-preferences.md +22 -27
- package/docs/configuration-preferences.zh.md +35 -40
- package/docs/configuration.md +31 -45
- package/docs/configuration.zh.md +48 -62
- package/docs/features-generate-documentation.md +6 -7
- package/docs/features-generate-documentation.zh.md +21 -22
- package/docs/features-publish-your-docs.md +38 -30
- package/docs/features-publish-your-docs.zh.md +45 -37
- package/docs/features-translate-documentation.md +14 -74
- package/docs/features-translate-documentation.zh.md +19 -79
- package/docs/features-update-and-refine.md +19 -18
- package/docs/features-update-and-refine.zh.md +33 -32
- package/docs-mcp/get-docs-structure.mjs +1 -1
- package/package.json +9 -9
- package/prompts/detail/custom/custom-components.md +113 -18
- package/prompts/detail/detail-example.md +58 -65
- package/prompts/detail/document-rules.md +2 -1
- package/prompts/structure/check-document-structure.md +11 -15
- package/prompts/translate/translate-document.md +20 -9
- package/tests/agents/generate/check-need-generate-structure.test.mjs +21 -24
- package/tests/agents/generate/user-review-document-structure.test.mjs +294 -0
- package/tests/agents/init/init.test.mjs +2 -8
- package/utils/auth-utils.mjs +2 -2
|
@@ -1,12 +1,10 @@
|
|
|
1
1
|
# 生成文档
|
|
2
2
|
|
|
3
|
-
`aigne doc generate`
|
|
4
|
-
|
|
5
|
-
该过程会分析您的代码库,规划逻辑文档结构,然后为每个部分生成内容。这是从零开始创建文档的主要方式。
|
|
3
|
+
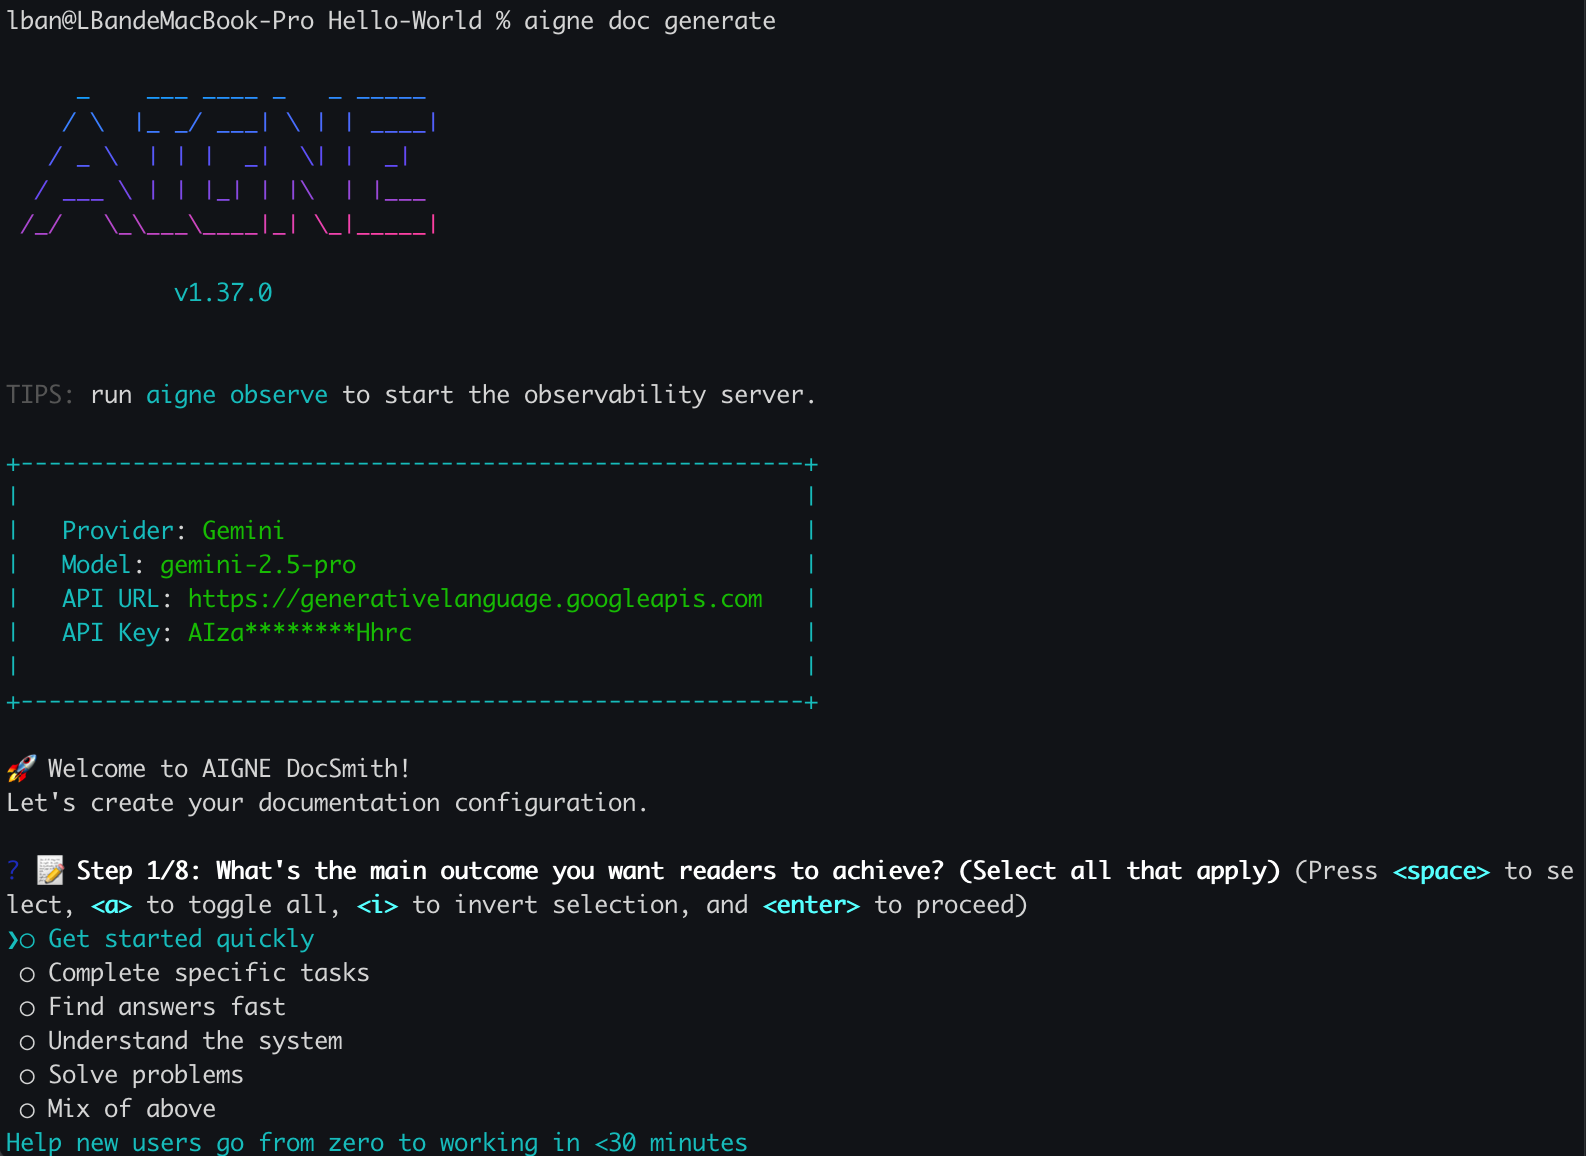
`aigne doc generate` 命令是从源代码创建完整文档集的核心功能。该过程会分析你的代码库,规划逻辑化的文档结构,然后为每个部分生成内容。这是从零开始创建文档的主要方式。
|
|
6
4
|
|
|
7
5
|
## 首次生成
|
|
8
6
|
|
|
9
|
-
|
|
7
|
+
首先,请导航到项目的根目录并运行以下命令:
|
|
10
8
|
|
|
11
9
|
```bash
|
|
12
10
|
aigne doc generate
|
|
@@ -14,29 +12,30 @@ aigne doc generate
|
|
|
14
12
|
|
|
15
13
|
### 自动配置
|
|
16
14
|
|
|
17
|
-
|
|
15
|
+
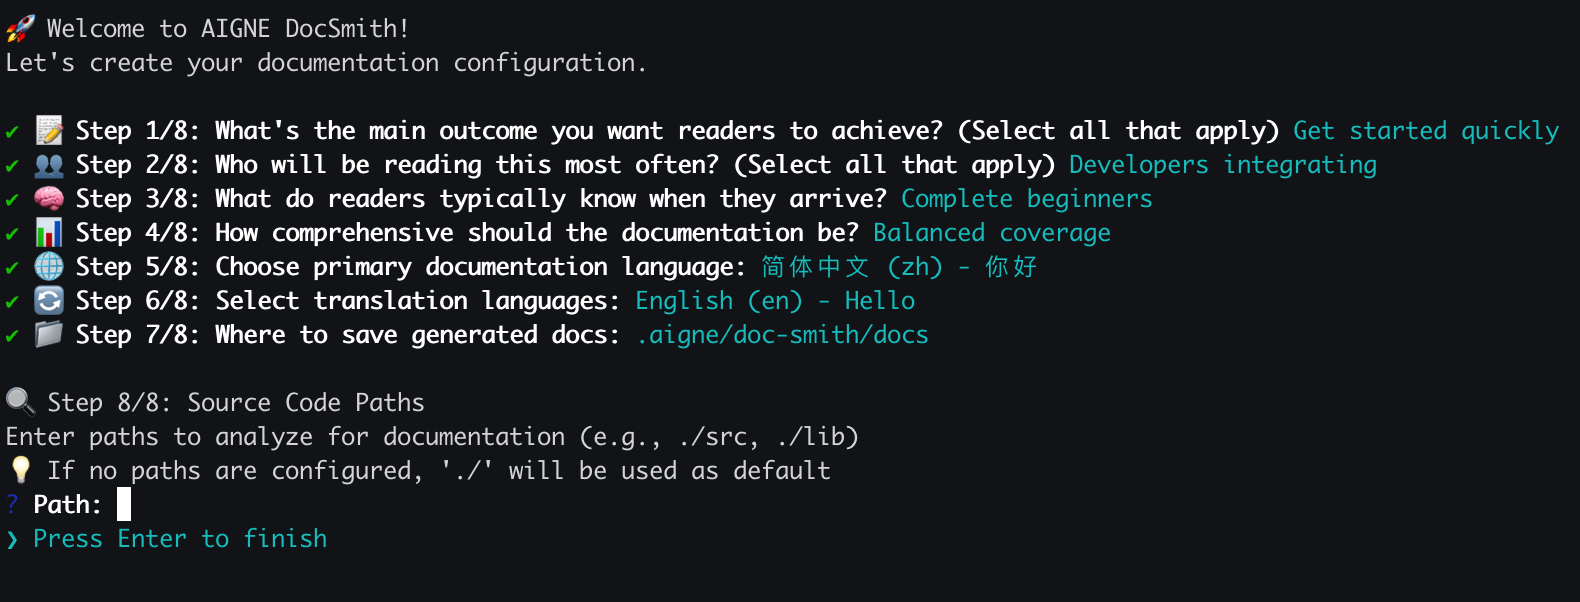
如果这是你首次在项目中运行此命令,DocSmith 会检测到尚无配置。接着,它将启动一个交互式设置向导,引导你完成初始设置。这能确保在生成开始前,你拥有一个正确配置的环境。
|
|
18
16
|
|
|
19
17
|
|
|
20
18
|
|
|
21
|
-
|
|
19
|
+
系统将询问你一系列问题,以定义:
|
|
20
|
+
|
|
22
21
|
- 文档生成规则和风格
|
|
23
22
|
- 目标受众
|
|
24
23
|
- 主要语言和翻译语言
|
|
25
24
|
- 源代码和输出路径
|
|
26
25
|
|
|
27
|
-
|
|
28
27
|
|
|
29
|
-
配置完成后,DocSmith
|
|
28
|
+
配置完成后,DocSmith 将继续进行文档生成。
|
|
30
29
|
|
|
31
|
-
|
|
32
31
|
|
|
33
|
-
|
|
32
|
+
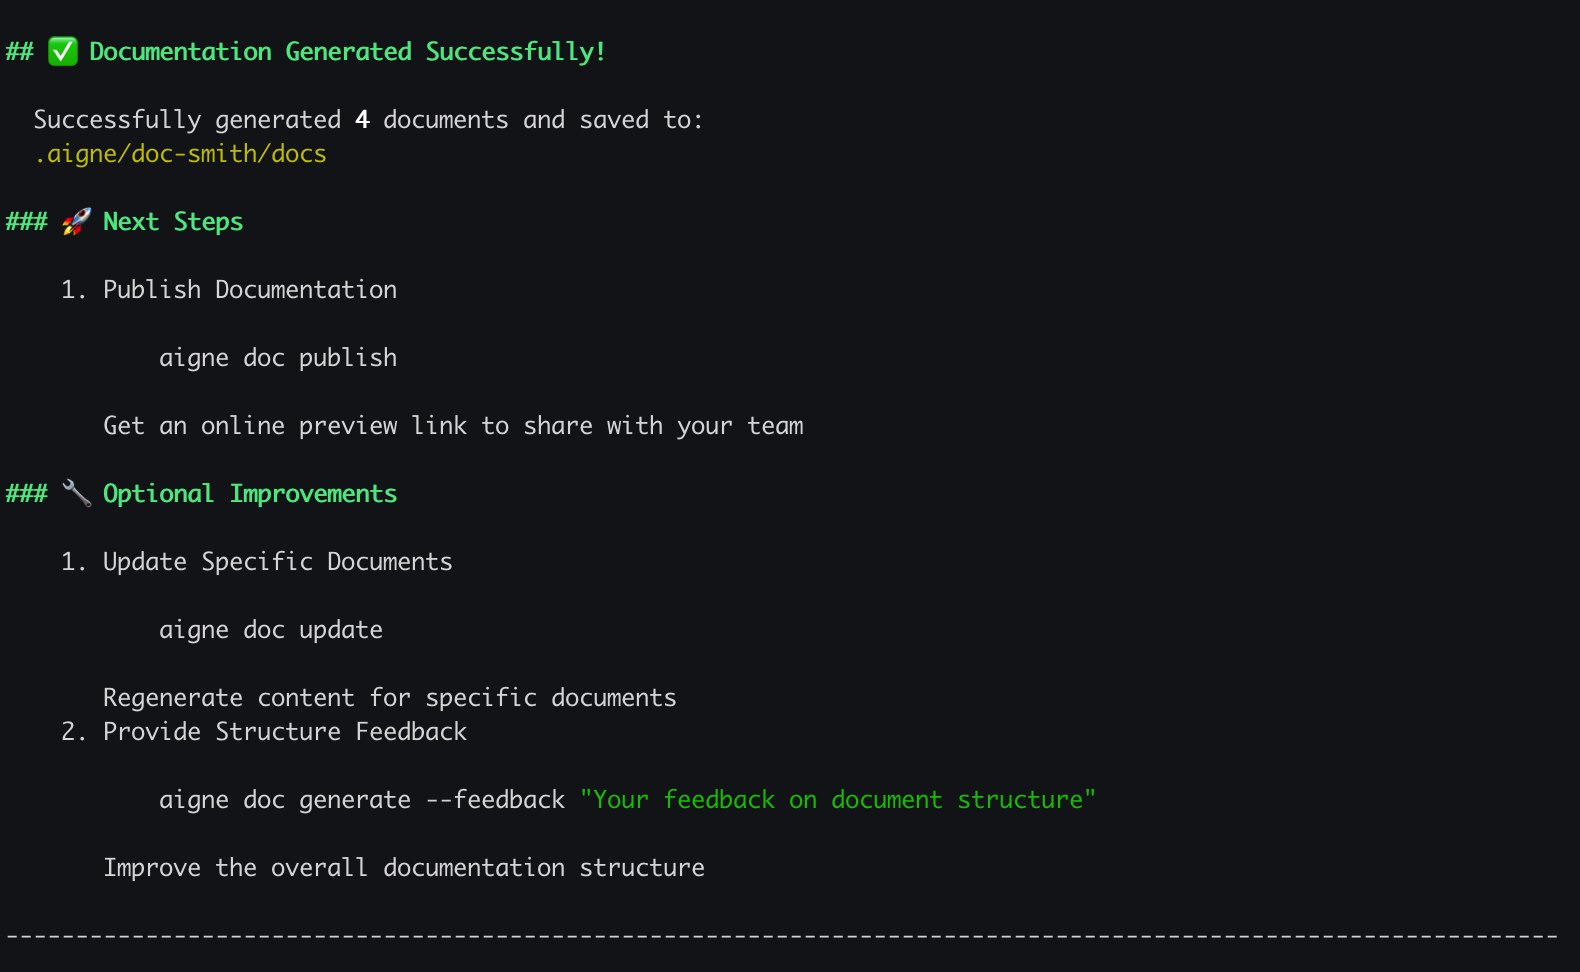
成功完成后,新创建的文档将位于你指定的输出目录中。
|
|
34
33
|
|
|
35
|
-
|
|
36
35
|
|
|
37
36
|
## 生成过程
|
|
38
37
|
|
|
39
|
-
`generate`
|
|
38
|
+
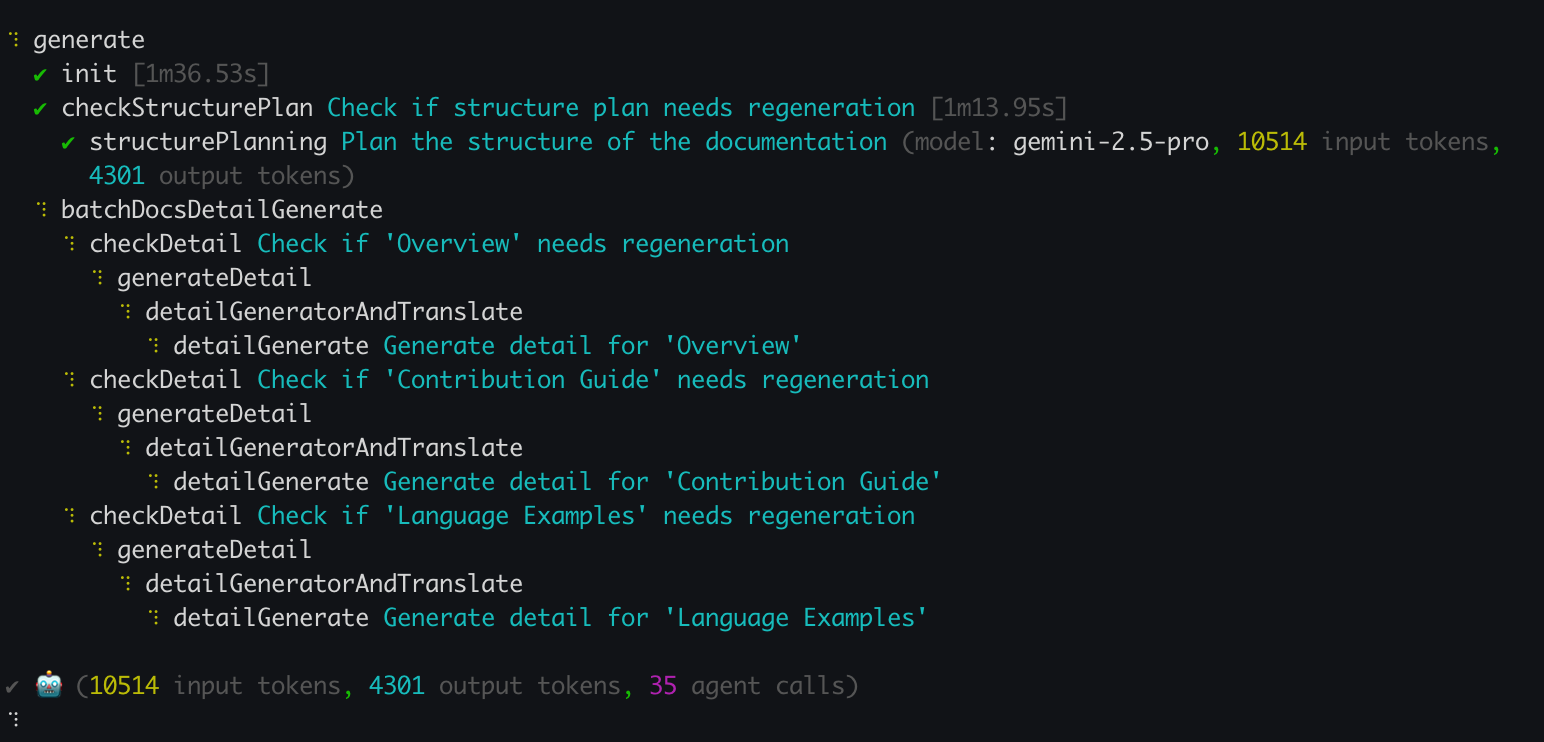
`generate` 命令遵循一个自动化的工作流程。该过程可直观地表示如下:
|
|
40
39
|
|
|
41
40
|
```d2
|
|
42
41
|
direction: down
|
|
@@ -57,7 +56,7 @@ interactive_setup: "启动交互式设置向导" {
|
|
|
57
56
|
shape: rectangle
|
|
58
57
|
}
|
|
59
58
|
|
|
60
|
-
plan_structure: "1.
|
|
59
|
+
plan_structure: "1. 分析代码并规划结构" {
|
|
61
60
|
shape: rectangle
|
|
62
61
|
}
|
|
63
62
|
|
|
@@ -85,18 +84,18 @@ save_docs -> end
|
|
|
85
84
|
|
|
86
85
|
## 命令选项
|
|
87
86
|
|
|
88
|
-
虽然默认的 `generate`
|
|
87
|
+
虽然默认的 `generate` 命令足以满足大多数使用场景,但你可以使用几个选项来控制生成过程。这些选项在重新生成内容或优化文档结构时非常有用。
|
|
89
88
|
|
|
90
|
-
| 选项 | 描述
|
|
91
|
-
|
|
92
|
-
| `--forceRegenerate` | 删除所有现有文档并从头开始重新生成。在对源代码或配置进行重大更改后使用此选项。
|
|
93
|
-
| `--feedback` |
|
|
94
|
-
| `--model` | 指定 AIGNE Hub
|
|
89
|
+
| 选项 | 描述 | 示例 |
|
|
90
|
+
|---------------------|----------------------------------------------------------------------------------------------------------------------------------|----------------------------------------------------------------------|
|
|
91
|
+
| `--forceRegenerate` | 删除所有现有文档并从头开始重新生成。在对源代码或配置进行重大更改后使用此选项。 | `aigne doc generate --forceRegenerate` |
|
|
92
|
+
| `--feedback` | 提供高层反馈以优化整体文档结构,例如添加、删除或重组章节。 | `aigne doc generate --feedback "Add an API Reference section"` |
|
|
93
|
+
| `--model` | 指定 AIGNE Hub 中的特定大型语言模型用于内容生成,允许你切换模型。 | `aigne doc generate --model claude:claude-3-5-sonnet` |
|
|
95
94
|
|
|
96
|
-
##
|
|
95
|
+
## 接下来做什么?
|
|
97
96
|
|
|
98
|
-
|
|
97
|
+
既然你已经生成了初始文档,你的项目将继续演进。为使文档与代码保持同步,你需要更新它们。请继续阅读下一部分,了解如何进行有针对性的更改和重新生成特定文件。
|
|
99
98
|
|
|
100
99
|
<x-card data-title="更新和优化" data-icon="lucide:file-edit" data-href="/features/update-and-refine">
|
|
101
|
-
|
|
100
|
+
了解当代码变更时如何更新文档,或使用反馈进行特定改进。
|
|
102
101
|
</x-card>
|
|
@@ -1,14 +1,12 @@
|
|
|
1
1
|
# Publish Your Docs
|
|
2
2
|
|
|
3
|
-
|
|
4
|
-
|
|
5
|
-
This guide covers how to publish your documentation, whether you are using the official platform or your own website.
|
|
3
|
+
After generating your documentation, the `aigne doc publish` command uploads your content to a Discuss Kit platform, making it accessible online. This guide explains how to publish your documentation to either the official platform or your own self-hosted website.
|
|
6
4
|
|
|
7
5
|
## The Publishing Process
|
|
8
6
|
|
|
9
|
-
The `aigne doc publish` command initiates an interactive process
|
|
7
|
+
The `aigne doc publish` command initiates an interactive process. The first time you publish to a new destination, it will guide you through authentication. Subsequent publishes will use saved credentials.
|
|
10
8
|
|
|
11
|
-
```d2
|
|
9
|
+
```d2 The Publishing Flow icon=lucide:upload-cloud
|
|
12
10
|
direction: down
|
|
13
11
|
shape: sequence_diagram
|
|
14
12
|
|
|
@@ -32,47 +30,49 @@ alt: "First-time publish or missing config" {
|
|
|
32
30
|
CLI -> Platform: "Uploads docs & media files"
|
|
33
31
|
Platform -> CLI: "Success response"
|
|
34
32
|
CLI -> User: "✅ Published Successfully!"
|
|
33
|
+
|
|
35
34
|
```
|
|
36
35
|
|
|
37
36
|
## Publishing Options
|
|
38
37
|
|
|
39
|
-
You have two
|
|
40
|
-
|
|
41
|
-
### Official Platform
|
|
42
|
-
|
|
43
|
-
Publish to [docsmith.aigne.io](https://docsmith.aigne.io), the official hosting platform. This option is free, makes your documentation publicly accessible, and is recommended for open-source projects.
|
|
44
|
-
|
|
45
|
-
### Your Own Website
|
|
38
|
+
You have two main options for hosting your documentation:
|
|
46
39
|
|
|
47
|
-
|
|
40
|
+
<x-cards data-columns="2">
|
|
41
|
+
<x-card data-title="Official Platform" data-icon="lucide:globe">
|
|
42
|
+
Publish to [docsmith.aigne.io](https://docsmith.aigne.io/app/), a free, public hosting platform provided by AIGNE. This is a good option for open-source projects or to quickly share your docs.
|
|
43
|
+
</x-card>
|
|
44
|
+
<x-card data-title="Your Own Website" data-icon="lucide:server">
|
|
45
|
+
Publish to your own Discuss Kit instance for full control over access and branding. This is suitable for internal or private documentation. You can get a Discuss Kit instance from the [Blocklet Store](https://store.blocklet.dev/blocklets/z8ia1WEiBZ7hxURf6LwH21Wpg99vophFwSJdu).
|
|
46
|
+
</x-card>
|
|
47
|
+
</x-cards>
|
|
48
48
|
|
|
49
49
|
## Step-by-Step Guide
|
|
50
50
|
|
|
51
|
-
|
|
51
|
+
Follow these steps to publish your documentation for the first time.
|
|
52
52
|
|
|
53
53
|
### 1. Run the Publish Command
|
|
54
54
|
|
|
55
|
-
|
|
55
|
+
In your project's root directory, run the following command:
|
|
56
56
|
|
|
57
|
-
```bash
|
|
57
|
+
```bash Terminal icon=lucide:terminal
|
|
58
58
|
aigne doc publish
|
|
59
59
|
```
|
|
60
60
|
|
|
61
61
|
### 2. Choose Your Platform
|
|
62
62
|
|
|
63
|
-
If
|
|
63
|
+
If this is your first time publishing, you will be prompted to select a destination. Choose the option that fits your needs.
|
|
64
64
|
|
|
65
65
|

|
|
66
66
|
|
|
67
|
-
If you select your own website, you will be asked to enter
|
|
67
|
+
If you select your own website, you will be asked to enter its URL.
|
|
68
68
|
|
|
69
69
|
### 3. Authenticate Your Account
|
|
70
70
|
|
|
71
|
-
For the first connection to a new platform,
|
|
71
|
+
For the first connection to a new platform, a browser window will open for you to log in and authorize the CLI. This is a one-time step per platform; your access token is saved locally in `~/.aigne/doc-smith-connected.yaml` for future use.
|
|
72
72
|
|
|
73
73
|
### 4. Confirmation
|
|
74
74
|
|
|
75
|
-
Once the upload is complete,
|
|
75
|
+
Once the upload is complete, a success message will appear in your terminal.
|
|
76
76
|
|
|
77
77
|
```
|
|
78
78
|
✅ Documentation Published Successfully!
|
|
@@ -80,20 +80,28 @@ Once the upload is complete, you will see a success message in your terminal, an
|
|
|
80
80
|
|
|
81
81
|
## Publishing in CI/CD Environments
|
|
82
82
|
|
|
83
|
-
For automated workflows, you can
|
|
83
|
+
For automated workflows, you can provide arguments and environment variables to bypass the interactive prompts.
|
|
84
84
|
|
|
85
|
-
| Method
|
|
86
|
-
|
|
87
|
-
| **Argument** | `--appUrl`
|
|
88
|
-
| **Env Var**
|
|
89
|
-
|
|
85
|
+
| Method | Name | Description |
|
|
86
|
+
|---|---|---|
|
|
87
|
+
| **Argument** | `--appUrl` | Specifies the URL of your Discuss Kit instance directly. |
|
|
88
|
+
| **Env Var** | `DOC_DISCUSS_KIT_ACCESS_TOKEN` | Provides the access token, skipping the interactive login. |
|
|
89
|
+
|
|
90
|
+
Here is an example of a non-interactive publish command suitable for a CI/CD pipeline:
|
|
91
|
+
|
|
92
|
+
```bash CI/CD Example icon=lucide:workflow
|
|
93
|
+
export DOC_DISCUSS_KIT_ACCESS_TOKEN="your_access_token_here"
|
|
94
|
+
aigne doc publish --appUrl https://docs.mycompany.com
|
|
95
|
+
```
|
|
90
96
|
|
|
91
97
|
## Troubleshooting
|
|
92
98
|
|
|
93
|
-
If you encounter
|
|
99
|
+
If you encounter an issue during publishing, check for these common problems:
|
|
100
|
+
|
|
101
|
+
- **Connection Error**: The provided URL for your self-hosted instance might be incorrect, or the server may be unreachable. Verify the URL and your network connection.
|
|
102
|
+
|
|
103
|
+
- **Invalid Website URL**: The URL must point to a valid website built on the ArcBlock platform. The CLI will show an error like `The provided URL is not a valid website on ArcBlock platform`. To host your documentation, you can start by getting a [Discuss Kit instance from the store](https://store.blocklet.dev/blocklets/z8ia1WEiBZ7hxURf6LwH21Wpg99vophFwSJdu).
|
|
94
104
|
|
|
95
|
-
-
|
|
96
|
-
- **Invalid Website URL**: The provided URL is not a valid website on the ArcBlock platform. To host your documentation, you need a website running on this platform. You can start by visiting the [Discuss Kit Store](https://www.arcblock.io/store/z8iZhf67n368m2k5a9fXvCL778jAnf3e5n2b).
|
|
97
|
-
- **Missing Required Components**: The destination website must have the Discuss Kit component installed to host the documentation. If it is missing, the CLI will return an error with guidance on how to add the component. You can find instructions in the [Discuss Kit documentation](https://www.arcblock.io/docs/web3-kit/en/discuss-kit).
|
|
105
|
+
- **Missing Required Components**: The destination website must have the Discuss Kit component installed. If it is missing, the CLI will return an error like `This website does not have required components for publishing`. Please refer to the [Discuss Kit documentation](https://www.arcblock.io/docs/web3-kit/en/discuss-kit) to add the necessary component.
|
|
98
106
|
|
|
99
107
|
For a complete list of commands and options, refer to the [CLI Command Reference](./cli-reference.md).
|
|
@@ -1,30 +1,28 @@
|
|
|
1
1
|
# 发布你的文档
|
|
2
2
|
|
|
3
|
-
|
|
3
|
+
生成文档后,`aigne doc publish` 命令会将你的内容上传到 Discuss Kit 平台,使其可以在线访问。本指南将说明如何将文档发布到官方平台或你自己的自托管网站。
|
|
4
4
|
|
|
5
|
-
|
|
5
|
+
## 发布过程
|
|
6
6
|
|
|
7
|
-
|
|
7
|
+
`aigne doc publish` 命令会启动一个交互式过程。当你首次发布到新目标时,它将引导你完成身份验证。后续的发布将使用已保存的凭据。
|
|
8
8
|
|
|
9
|
-
|
|
10
|
-
|
|
11
|
-
```d2
|
|
9
|
+
```d2 发布流程 icon=lucide:upload-cloud
|
|
12
10
|
direction: down
|
|
13
11
|
shape: sequence_diagram
|
|
14
12
|
|
|
15
13
|
User: { shape: c4-person }
|
|
16
14
|
CLI: { label: "AIGNE CLI" }
|
|
17
|
-
Browser: { label: "
|
|
18
|
-
Platform: { label: "Discuss Kit
|
|
15
|
+
Browser: { label: "浏览器" }
|
|
16
|
+
Platform: { label: "Discuss Kit 平台" }
|
|
19
17
|
|
|
20
18
|
User -> CLI: "aigne doc publish"
|
|
21
19
|
|
|
22
20
|
alt: "首次发布或缺少配置" {
|
|
23
|
-
CLI -> User: "选择平台\n
|
|
21
|
+
CLI -> User: "选择平台\n(官方 / 自托管)"
|
|
24
22
|
User -> CLI: "提供选择"
|
|
25
23
|
CLI -> Browser: "打开认证 URL"
|
|
26
24
|
User -> Browser: "登录并授权"
|
|
27
|
-
Browser -> Platform: "
|
|
25
|
+
Browser -> Platform: "发送凭据"
|
|
28
26
|
Platform -> CLI: "返回访问令牌"
|
|
29
27
|
CLI -> CLI: "保存令牌以备将来使用"
|
|
30
28
|
}
|
|
@@ -32,47 +30,49 @@ alt: "首次发布或缺少配置" {
|
|
|
32
30
|
CLI -> Platform: "上传文档和媒体文件"
|
|
33
31
|
Platform -> CLI: "成功响应"
|
|
34
32
|
CLI -> User: "✅ 发布成功!"
|
|
33
|
+
|
|
35
34
|
```
|
|
36
35
|
|
|
37
36
|
## 发布选项
|
|
38
37
|
|
|
39
|
-
|
|
40
|
-
|
|
41
|
-
### 官方平台
|
|
42
|
-
|
|
43
|
-
发布到官方托管平台 [docsmith.aigne.io](https://docsmith.aigne.io)。此选项免费,可使你的文档公开访问,推荐用于开源项目。
|
|
44
|
-
|
|
45
|
-
### 你自己的网站
|
|
38
|
+
你有两种主要选项来托管你的文档:
|
|
46
39
|
|
|
47
|
-
|
|
40
|
+
<x-cards data-columns="2">
|
|
41
|
+
<x-card data-title="官方平台" data-icon="lucide:globe">
|
|
42
|
+
发布到 [docsmith.aigne.io](https://docsmith.aigne.io/app/),这是 AIGNE 提供的一个免费的公共托管平台。对于开源项目或希望快速分享文档的用户来说,这是一个不错的选择。
|
|
43
|
+
</x-card>
|
|
44
|
+
<x-card data-title="你自己的网站" data-icon="lucide:server">
|
|
45
|
+
发布到你自己的 Discuss Kit 实例,以完全控制访问和品牌。这适用于内部或私有文档。你可以从 [Blocklet 商店](https://store.blocklet.dev/blocklets/z8ia1WEiBZ7hxURf6LwH21Wpg99vophFwSJdu) 获取 Discuss Kit 实例。
|
|
46
|
+
</x-card>
|
|
47
|
+
</x-cards>
|
|
48
48
|
|
|
49
49
|
## 分步指南
|
|
50
50
|
|
|
51
|
-
|
|
51
|
+
按照以下步骤首次发布你的文档。
|
|
52
52
|
|
|
53
53
|
### 1. 运行发布命令
|
|
54
54
|
|
|
55
|
-
|
|
55
|
+
在你的项目根目录中,运行以下命令:
|
|
56
56
|
|
|
57
|
-
```bash
|
|
57
|
+
```bash Terminal icon=lucide:terminal
|
|
58
58
|
aigne doc publish
|
|
59
59
|
```
|
|
60
60
|
|
|
61
61
|
### 2. 选择你的平台
|
|
62
62
|
|
|
63
|
-
|
|
63
|
+
如果这是你第一次发布,系统将提示你选择一个目标。选择适合你需求的选项。
|
|
64
64
|
|
|
65
65
|

|
|
66
66
|
|
|
67
|
-
|
|
67
|
+
如果你选择自己的网站,系统将要求你输入其 URL。
|
|
68
68
|
|
|
69
|
-
### 3.
|
|
69
|
+
### 3. 验证你的账户
|
|
70
70
|
|
|
71
|
-
|
|
71
|
+
首次连接到新平台时,浏览器窗口将打开,以便你登录并授权 CLI。每个平台只需执行此步骤一次;你的访问令牌会保存在本地的 `~/.aigne/doc-smith-connected.yaml` 文件中,以供将来使用。
|
|
72
72
|
|
|
73
73
|
### 4. 确认
|
|
74
74
|
|
|
75
|
-
|
|
75
|
+
上传完成后,你的终端将显示一条成功消息。
|
|
76
76
|
|
|
77
77
|
```
|
|
78
78
|
✅ 文档发布成功!
|
|
@@ -80,20 +80,28 @@ aigne doc publish
|
|
|
80
80
|
|
|
81
81
|
## 在 CI/CD 环境中发布
|
|
82
82
|
|
|
83
|
-
|
|
83
|
+
对于自动化工作流,你可以提供参数和环境变量来绕过交互式提示。
|
|
84
84
|
|
|
85
|
-
|
|
|
86
|
-
|
|
87
|
-
|
|
|
88
|
-
|
|
|
89
|
-
|
|
85
|
+
| 方法 | 名称 | 描述 |
|
|
86
|
+
|---|---|---|
|
|
87
|
+
| **参数** | `--appUrl` | 直接指定你的 Discuss Kit 实例的 URL。 |
|
|
88
|
+
| **环境变量** | `DOC_DISCUSS_KIT_ACCESS_TOKEN` | 提供访问令牌,跳过交互式登录。 |
|
|
89
|
+
|
|
90
|
+
以下是一个适用于 CI/CD 流程的非交互式发布命令示例:
|
|
91
|
+
|
|
92
|
+
```bash CI/CD Example icon=lucide:workflow
|
|
93
|
+
export DOC_DISCUSS_KIT_ACCESS_TOKEN="your_access_token_here"
|
|
94
|
+
aigne doc publish --appUrl https://docs.mycompany.com
|
|
95
|
+
```
|
|
90
96
|
|
|
91
97
|
## 故障排除
|
|
92
98
|
|
|
93
|
-
|
|
99
|
+
如果你在发布过程中遇到问题,请检查以下常见问题:
|
|
100
|
+
|
|
101
|
+
- **连接错误**:提供的自托管实例 URL 可能不正确,或者服务器可能无法访问。请验证 URL 和你的网络连接。
|
|
102
|
+
|
|
103
|
+
- **无效的网站 URL**:该 URL 必须指向一个基于 ArcBlock 平台构建的有效网站。CLI 将显示类似 `The provided URL is not a valid website on ArcBlock platform` 的错误。要托管你的文档,你可以先从[商店获取一个 Discuss Kit 实例](https://store.blocklet.dev/blocklets/z8ia1WEiBZ7hxURf6LwH21Wpg99vophFwSJdu)。
|
|
94
104
|
|
|
95
|
-
-
|
|
96
|
-
- **无效的网站 URL**:提供的 URL 不是 ArcBlock 平台上的有效网站。要托管你的文档,你需要一个在该平台上运行的网站。你可以从访问 [Discuss Kit 商店](https://www.arcblock.io/store/z8iZhf67n368m2k5a9fXvCL778jAnf3e5n2b) 开始。
|
|
97
|
-
- **缺少必需组件**:目标网站必须安装 Discuss Kit 组件才能托管文档。如果缺少该组件,CLI 将返回错误并提供有关如何添加该组件的指导。你可以在 [Discuss Kit 文档](https://www.arcblock.io/docs/web3-kit/en/discuss-kit) 中找到相关说明。
|
|
105
|
+
- **缺少必需组件**:目标网站必须安装 Discuss Kit 组件。如果缺少该组件,CLI 将返回类似 `This website does not have required components for publishing` 的错误。请参阅 [Discuss Kit 文档](https://www.arcblock.io/docs/web3-kit/en/discuss-kit) 以添加必要的组件。
|
|
98
106
|
|
|
99
|
-
|
|
107
|
+
有关命令和选项的完整列表,请参阅 [CLI 命令参考](./cli-reference.md)。
|
|
@@ -1,76 +1,16 @@
|
|
|
1
1
|
# Translate Documentation
|
|
2
2
|
|
|
3
|
-
AIGNE DocSmith
|
|
4
|
-
|
|
5
|
-
### Translation Workflow
|
|
6
|
-
|
|
7
|
-
The `aigne doc translate` command offers two primary modes of operation: interactive for a guided setup and command-line for automation.
|
|
8
|
-
|
|
9
|
-
```d2
|
|
10
|
-
direction: down
|
|
11
|
-
|
|
12
|
-
start: {
|
|
13
|
-
label: "Run 'aigne doc translate'"
|
|
14
|
-
shape: rectangle
|
|
15
|
-
}
|
|
16
|
-
|
|
17
|
-
interactive_vs_cli: {
|
|
18
|
-
label: "With or without\narguments?"
|
|
19
|
-
shape: diamond
|
|
20
|
-
}
|
|
21
|
-
|
|
22
|
-
interactive_path: {
|
|
23
|
-
label: "Interactive Mode"
|
|
24
|
-
shape: rectangle
|
|
25
|
-
|
|
26
|
-
select_docs: {
|
|
27
|
-
label: "1. Select Documents"
|
|
28
|
-
shape: rectangle
|
|
29
|
-
}
|
|
30
|
-
select_langs: {
|
|
31
|
-
label: "2. Choose Languages"
|
|
32
|
-
shape: rectangle
|
|
33
|
-
}
|
|
34
|
-
select_docs -> select_langs
|
|
35
|
-
}
|
|
36
|
-
|
|
37
|
-
cli_path: {
|
|
38
|
-
label: "CLI Mode"
|
|
39
|
-
shape: rectangle
|
|
40
|
-
|
|
41
|
-
flags: {
|
|
42
|
-
label: "Provide arguments\n--docs, --langs, etc."
|
|
43
|
-
shape: rectangle
|
|
44
|
-
}
|
|
45
|
-
}
|
|
46
|
-
|
|
47
|
-
ai_translation: {
|
|
48
|
-
label: "AI-Powered Translation"
|
|
49
|
-
shape: rectangle
|
|
50
|
-
}
|
|
51
|
-
|
|
52
|
-
end: {
|
|
53
|
-
label: "Translated Documents\nSaved"
|
|
54
|
-
shape: rectangle
|
|
55
|
-
}
|
|
56
|
-
|
|
57
|
-
start -> interactive_vs_cli
|
|
58
|
-
interactive_vs_cli -> interactive_path: "Without args"
|
|
59
|
-
interactive_vs_cli -> cli_path: "With args"
|
|
60
|
-
interactive_path -> ai_translation
|
|
61
|
-
cli_path -> ai_translation
|
|
62
|
-
ai_translation -> end
|
|
63
|
-
```
|
|
3
|
+
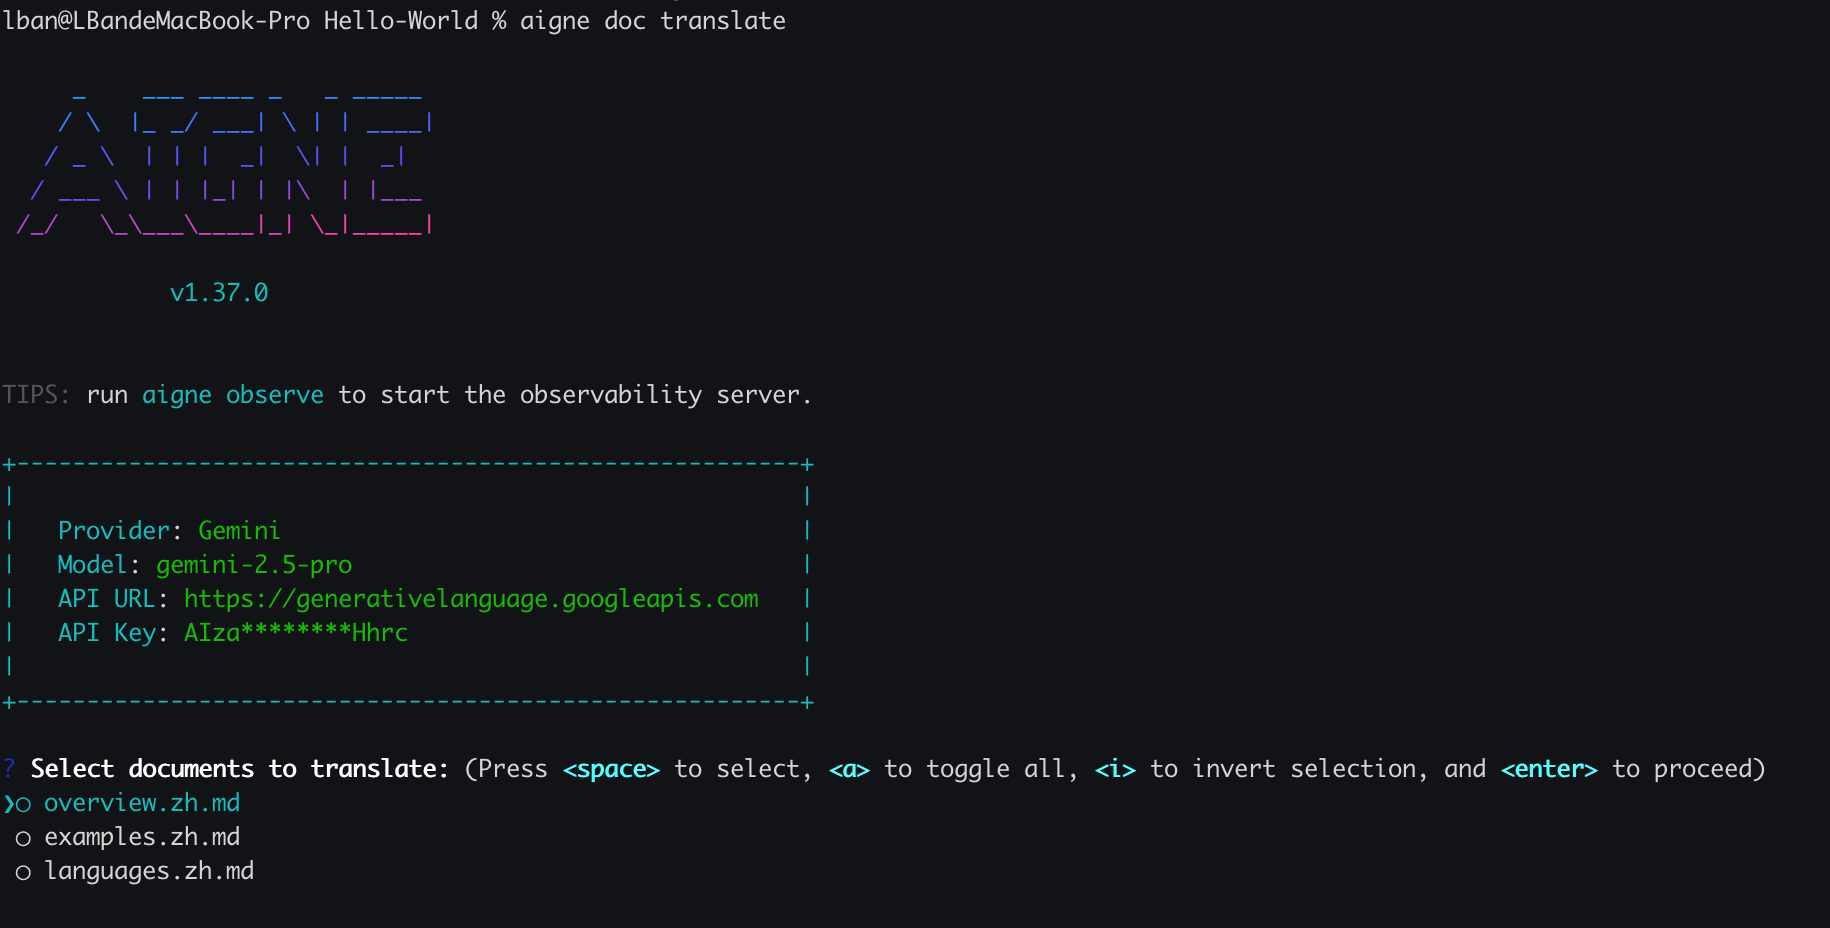
AIGNE DocSmith can translate your documentation into 12 different languages, making your project accessible to a global audience. The tool provides two ways to manage translations: an interactive mode for a guided setup and command-line arguments for precise control and automation.
|
|
64
4
|
|
|
65
5
|
## Interactive Translation
|
|
66
6
|
|
|
67
|
-
For a guided experience, run the `translate` command without any arguments
|
|
7
|
+
For a guided experience, run the `translate` command without any arguments. This is ideal for users who prefer a step-by-step process.
|
|
68
8
|
|
|
69
9
|
```bash
|
|
70
10
|
aigne doc translate
|
|
71
11
|
```
|
|
72
12
|
|
|
73
|
-
This launches an interactive wizard that guides you through the process:
|
|
13
|
+
This command launches an interactive wizard that guides you through the process:
|
|
74
14
|
|
|
75
15
|
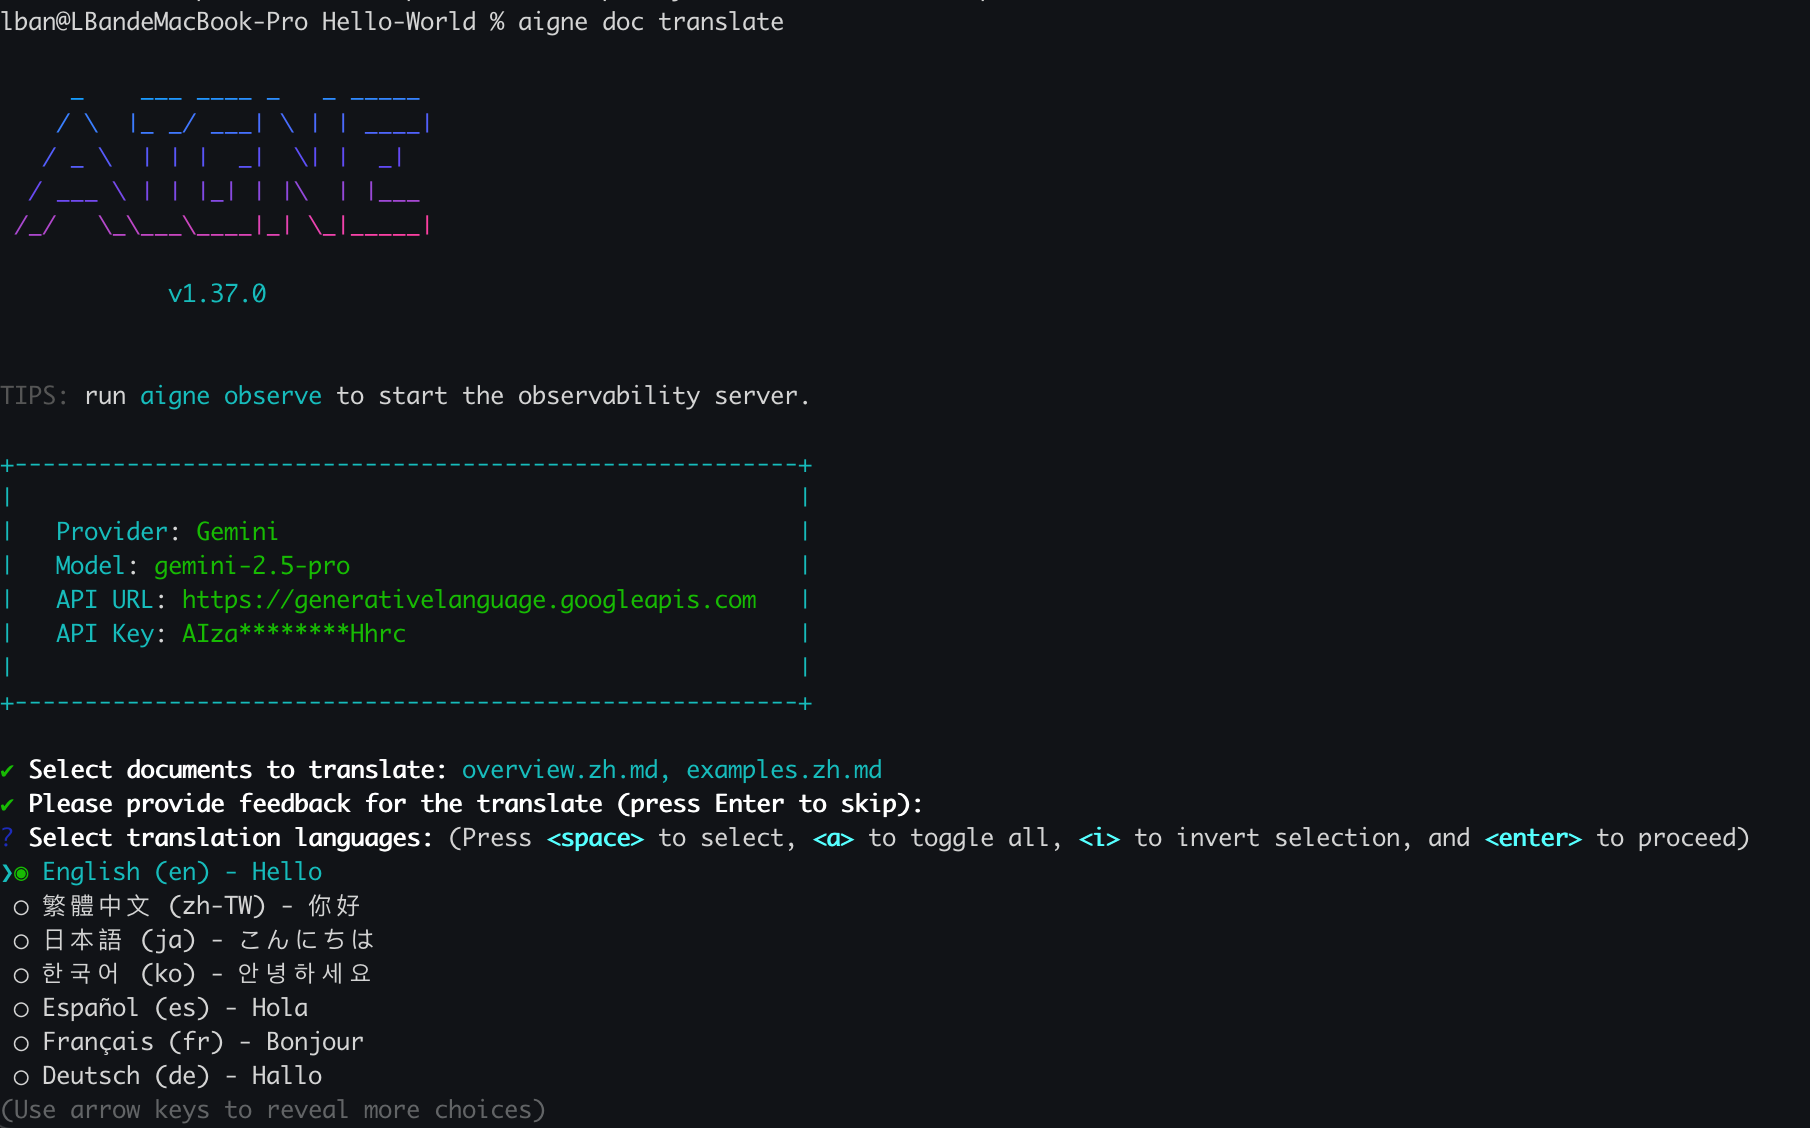
1. **Select Documents to Translate:** You will be presented with a list of your existing documents. Use the spacebar to select the ones you want to translate.
|
|
76
16
|
|
|
@@ -84,18 +24,18 @@ This launches an interactive wizard that guides you through the process:
|
|
|
84
24
|
|
|
85
25
|
## Command-Line Translation
|
|
86
26
|
|
|
87
|
-
For automation or
|
|
27
|
+
For automation in scripts or CI/CD pipelines, use command-line flags to control the translation process. This method is suitable for developers and advanced users.
|
|
88
28
|
|
|
89
|
-
|
|
29
|
+
### Command Parameters
|
|
90
30
|
|
|
91
|
-
|
|
92
|
-
|
|
93
|
-
|
|
94
|
-
|
|
95
|
-
|
|
96
|
-
|
|
31
|
+
<x-field data-name="--langs" data-type="string" data-required="false" data-desc="Specify one target language. This flag can be used multiple times to include several languages (e.g., --langs zh --langs ja)."></x-field>
|
|
32
|
+
<x-field data-name="--docs" data-type="string" data-required="false" data-desc="Specify the path of a document to translate. This can also be used multiple times for batch translation."></x-field>
|
|
33
|
+
<x-field data-name="--feedback" data-type="string" data-required="false" data-desc="Provide suggestions to the AI to guide the translation quality (e.g., --feedback "Use a formal tone")."></x-field>
|
|
34
|
+
<x-field data-name="--glossary" data-type="string" data-required="false" data-desc="Use a glossary file in Markdown format to ensure consistent terminology for specific terms (e.g., --glossary @path/to/glossary.md)."></x-field>
|
|
35
|
+
|
|
36
|
+
### Examples
|
|
97
37
|
|
|
98
|
-
|
|
38
|
+
#### Translating Specific Documents
|
|
99
39
|
|
|
100
40
|
To translate `overview.md` and `examples.md` into Chinese and Japanese, run:
|
|
101
41
|
|
|
@@ -103,7 +43,7 @@ To translate `overview.md` and `examples.md` into Chinese and Japanese, run:
|
|
|
103
43
|
aigne doc translate --langs zh --langs ja --docs overview.md --docs examples.md
|
|
104
44
|
```
|
|
105
45
|
|
|
106
|
-
|
|
46
|
+
#### Using a Glossary and Feedback
|
|
107
47
|
|
|
108
48
|
To ensure brand names and technical terms are translated correctly, you can provide a glossary file. You can also give feedback to refine the translation style.
|
|
109
49
|
|
|
@@ -135,5 +75,5 @@ DocSmith supports automatic translation for the following languages:
|
|
|
135
75
|
Once your documentation is translated, you are ready to share it with the world.
|
|
136
76
|
|
|
137
77
|
<x-card data-title="Next: Publish Your Docs" data-icon="lucide:upload-cloud" data-href="/features/publish-your-docs" data-cta="Read More">
|
|
138
|
-
A guide on how to
|
|
78
|
+
A guide on how to publish your documentation to a public platform or your own private website.
|
|
139
79
|
</x-card>
|
|
@@ -1,78 +1,18 @@
|
|
|
1
1
|
# 翻译文档
|
|
2
2
|
|
|
3
|
-
AIGNE DocSmith
|
|
4
|
-
|
|
5
|
-
### 翻译工作流
|
|
6
|
-
|
|
7
|
-
`aigne doc translate` 命令提供两种主要操作模式:用于引导设置的交互模式和用于自动化的命令行模式。
|
|
8
|
-
|
|
9
|
-
```d2
|
|
10
|
-
direction: down
|
|
11
|
-
|
|
12
|
-
start: {
|
|
13
|
-
label: "运行 'aigne doc translate'"
|
|
14
|
-
shape: rectangle
|
|
15
|
-
}
|
|
16
|
-
|
|
17
|
-
interactive_vs_cli: {
|
|
18
|
-
label: "是否带有\n参数?"
|
|
19
|
-
shape: diamond
|
|
20
|
-
}
|
|
21
|
-
|
|
22
|
-
interactive_path: {
|
|
23
|
-
label: "交互模式"
|
|
24
|
-
shape: rectangle
|
|
25
|
-
|
|
26
|
-
select_docs: {
|
|
27
|
-
label: "1. 选择文档"
|
|
28
|
-
shape: rectangle
|
|
29
|
-
}
|
|
30
|
-
select_langs: {
|
|
31
|
-
label: "2. 选择语言"
|
|
32
|
-
shape: rectangle
|
|
33
|
-
}
|
|
34
|
-
select_docs -> select_langs
|
|
35
|
-
}
|
|
36
|
-
|
|
37
|
-
cli_path: {
|
|
38
|
-
label: "CLI 模式"
|
|
39
|
-
shape: rectangle
|
|
40
|
-
|
|
41
|
-
flags: {
|
|
42
|
-
label: "提供参数\n--docs, --langs 等"
|
|
43
|
-
shape: rectangle
|
|
44
|
-
}
|
|
45
|
-
}
|
|
46
|
-
|
|
47
|
-
ai_translation: {
|
|
48
|
-
label: "AI 翻译"
|
|
49
|
-
shape: rectangle
|
|
50
|
-
}
|
|
51
|
-
|
|
52
|
-
end: {
|
|
53
|
-
label: "已翻译文档\n已保存"
|
|
54
|
-
shape: rectangle
|
|
55
|
-
}
|
|
56
|
-
|
|
57
|
-
start -> interactive_vs_cli
|
|
58
|
-
interactive_vs_cli -> interactive_path: "无参数"
|
|
59
|
-
interactive_vs_cli -> cli_path: "有参数"
|
|
60
|
-
interactive_path -> ai_translation
|
|
61
|
-
cli_path -> ai_translation
|
|
62
|
-
ai_translation -> end
|
|
63
|
-
```
|
|
3
|
+
AIGNE DocSmith 可以将你的文档翻译成 12 种不同的语言,让你的项目面向全球受众。该工具提供两种管理翻译的方式:用于引导式设置的交互模式和用于精确控制与自动化的命令行参数。
|
|
64
4
|
|
|
65
5
|
## 交互式翻译
|
|
66
6
|
|
|
67
|
-
如需引导式体验,请运行不带任何参数的 `translate`
|
|
7
|
+
如需引导式体验,请运行不带任何参数的 `translate` 命令。这非常适合喜欢分步操作的用户。
|
|
68
8
|
|
|
69
9
|
```bash
|
|
70
10
|
aigne doc translate
|
|
71
11
|
```
|
|
72
12
|
|
|
73
|
-
|
|
13
|
+
该命令会启动一个交互式向导,引导你完成整个过程:
|
|
74
14
|
|
|
75
|
-
1. **选择要翻译的文档:**
|
|
15
|
+
1. **选择要翻译的文档:** 系统将显示你现有文档的列表。使用空格键选择要翻译的文档。
|
|
76
16
|
|
|
77
17
|
|
|
78
18
|
|
|
@@ -80,22 +20,22 @@ aigne doc translate
|
|
|
80
20
|
|
|
81
21
|
|
|
82
22
|
|
|
83
|
-
3. **确认并运行:** DocSmith
|
|
23
|
+
3. **确认并运行:** DocSmith 随后将处理翻译,为每个选定的语言生成所选文件的新版本。
|
|
84
24
|
|
|
85
25
|
## 命令行翻译
|
|
86
26
|
|
|
87
|
-
|
|
27
|
+
对于脚本或 CI/CD 流水线中的自动化,请使用命令行标志来控制翻译过程。此方法适合开发者和高级用户。
|
|
88
28
|
|
|
89
|
-
|
|
29
|
+
### 命令参数
|
|
90
30
|
|
|
91
|
-
|
|
92
|
-
|
|
93
|
-
|
|
94
|
-
|
|
95
|
-
|
|
96
|
-
|
|
31
|
+
<x-field data-name="--langs" data-type="string" data-required="false" data-desc="指定一种目标语言。此标志可多次使用以包含多种语言(例如,--langs zh --langs ja)。"></x-field>
|
|
32
|
+
<x-field data-name="--docs" data-type="string" data-required="false" data-desc="指定要翻译的文档路径。此标志也可多次使用以进行批量翻译。"></x-field>
|
|
33
|
+
<x-field data-name="--feedback" data-type="string" data-required="false" data-desc="向 AI 提供建议以指导翻译质量(例如,--feedback "使用正式语调")。"></x-field>
|
|
34
|
+
<x-field data-name="--glossary" data-type="string" data-required="false" data-desc="使用 Markdown 格式的术语表文件,以确保特定术语的一致性(例如,--glossary @path/to/glossary.md)。"></x-field>
|
|
35
|
+
|
|
36
|
+
### 示例
|
|
97
37
|
|
|
98
|
-
|
|
38
|
+
#### 翻译特定文档
|
|
99
39
|
|
|
100
40
|
要将 `overview.md` 和 `examples.md` 翻译成中文和日文,请运行:
|
|
101
41
|
|
|
@@ -103,9 +43,9 @@ aigne doc translate
|
|
|
103
43
|
aigne doc translate --langs zh --langs ja --docs overview.md --docs examples.md
|
|
104
44
|
```
|
|
105
45
|
|
|
106
|
-
|
|
46
|
+
#### 使用术语表和反馈
|
|
107
47
|
|
|
108
|
-
|
|
48
|
+
为确保品牌名称和技术术语翻译正确,你可以提供一个术语表文件。你也可以提供反馈来优化翻译风格。
|
|
109
49
|
|
|
110
50
|
```bash
|
|
111
51
|
aigne doc translate --glossary @glossary.md --feedback "Use technical terminology consistently" --docs overview.md --langs de
|
|
@@ -132,8 +72,8 @@ DocSmith 支持以下语言的自动翻译:
|
|
|
132
72
|
|
|
133
73
|
---
|
|
134
74
|
|
|
135
|
-
|
|
75
|
+
文档翻译完成后,你就可以与世界分享了。
|
|
136
76
|
|
|
137
|
-
<x-card data-title="
|
|
138
|
-
|
|
77
|
+
<x-card data-title="下一步:发布你的文档" data-icon="lucide:upload-cloud" data-href="/features/publish-your-docs" data-cta="阅读更多">
|
|
78
|
+
关于如何将文档发布到公共平台或你自己的私人网站的指南。
|
|
139
79
|
</x-card>
|