@tencentcloud/sdk-mcp 1.3.1 → 1.3.2
This diff represents the content of publicly available package versions that have been released to one of the supported registries. The information contained in this diff is provided for informational purposes only and reflects changes between package versions as they appear in their respective public registries.
- package/index.js +5 -1
- package/index.js.map +1 -1
- package/package.json +1 -1
- package/resource/doc/chatuikit/faq/web_sdk/faq.md +117 -0
- package/resource/doc/chatuikit/flutter/client_api_Flutter.md +100 -179
- package/resource/doc/chatuikit/flutter/faq.md +17 -112
- package/resource/doc/chatuikit/flutter/integrate_tuikit_Flutter.md +272 -1281
- package/resource/doc/roomkit/vue/features/call-user-to-room.md +256 -0
- package/resource/doc/roomkit/vue/features/device-detection.md +388 -0
- package/resource/doc/roomkit/vue/features/device-state.md +480 -0
- package/resource/doc/roomkit/vue/features/free-beauty-panel.md +238 -0
- package/resource/doc/roomkit/vue/features/room-chat.md +427 -0
- package/resource/doc/roomkit/vue/features/room-participant-state.md +407 -0
- package/resource/doc/roomkit/vue/features/room-state.md +291 -0
- package/resource/doc/roomkit/vue/features/room-view.md +338 -0
- package/resource/doc/roomkit/vue/features/schedule-room.md +349 -0
- package/resource/doc/roomkit/vue/features/screen-share.md +333 -0
- package/resource/doc/roomkit/vue/features/virtual-background.md +281 -0
- package/resource/doc/roomkit/vue/features/workflow.md +553 -0
- package/resource/doc/roomkit/vue/integration.md +479 -0
- package/resource/doc/roomkit/vue/workflow.md +487 -0
- package/resource/doc/tuicallkit/react/api.md +16 -0
- package/resource/doc/tuicallkit/vue/api.md +16 -0
- package/tools/definitions/get_web_live_uikit_integration_def.js +1 -1
- package/tools/definitions/get_web_room_feature_detail_def.js +95 -0
- package/tools/definitions/get_web_room_feature_detail_def.js.map +1 -0
- package/tools/definitions/get_web_room_uikit_integration_def.js +44 -0
- package/tools/definitions/get_web_room_uikit_integration_def.js.map +1 -0
- package/tools/index.js +4 -2
- package/tools/index.js.map +1 -1
- package/tools/room/get-web-room-feature-detail.js +68 -0
- package/tools/room/get-web-room-feature-detail.js.map +1 -0
- package/tools/room/get-web-room-integration.js +43 -0
- package/tools/room/get-web-room-integration.js.map +1 -0
- package/utils/report-cls-client.js +1 -1
- package/utils/report-es-client.js +1 -1
- package/resource/doc/roomkit/vue/states/device-state.md +0 -316
- package/resource/doc/roomkit/vue/states/login-state.md +0 -51
- package/resource/doc/roomkit/vue/states/room-list-state.md +0 -287
- package/resource/doc/roomkit/vue/states/room-participant-state.md +0 -307
- package/tools/definitions/get_web_room_state_detail_def.js +0 -19
- package/tools/definitions/get_web_room_state_detail_def.js.map +0 -1
- package/tools/room/get-web-room-state-detail.js +0 -31
- package/tools/room/get-web-room-state-detail.js.map +0 -1
|
@@ -0,0 +1,333 @@
|
|
|
1
|
+
本文档指导您如何使用 Atomicx 实现屏幕分享能力,并根据屏幕分享状态处理房间内交互。
|
|
2
|
+
|
|
3
|
+
## 前提条件
|
|
4
|
+
- 用户已经通过 [useLoginState](https://web.sdk.qcloud.com/trtc/live/web/doc/zh/index.html#module-LoginState) 完成登录鉴权,请参考 [接入概览](https://write.woa.com/document/197379797539790848)。
|
|
5
|
+
|
|
6
|
+
- 用户已经通过 [useRoomState](https://web.sdk.qcloud.com/trtc/live/web/doc/zh/index.html#module-RoomState) 进入房间,请参考 [房间管理](https://write.woa.com/document/197379861957083136)。
|
|
7
|
+
|
|
8
|
+
- 若在 `iframe` 中集成,需在标签中声明权限。
|
|
9
|
+
|
|
10
|
+
``` typescript
|
|
11
|
+
<iframe allow="display-capture; fullscreen;"></iframe>
|
|
12
|
+
```
|
|
13
|
+
|
|
14
|
+
## 实现屏幕分享功能
|
|
15
|
+
|
|
16
|
+
### 步骤1:开始屏幕分享
|
|
17
|
+
|
|
18
|
+
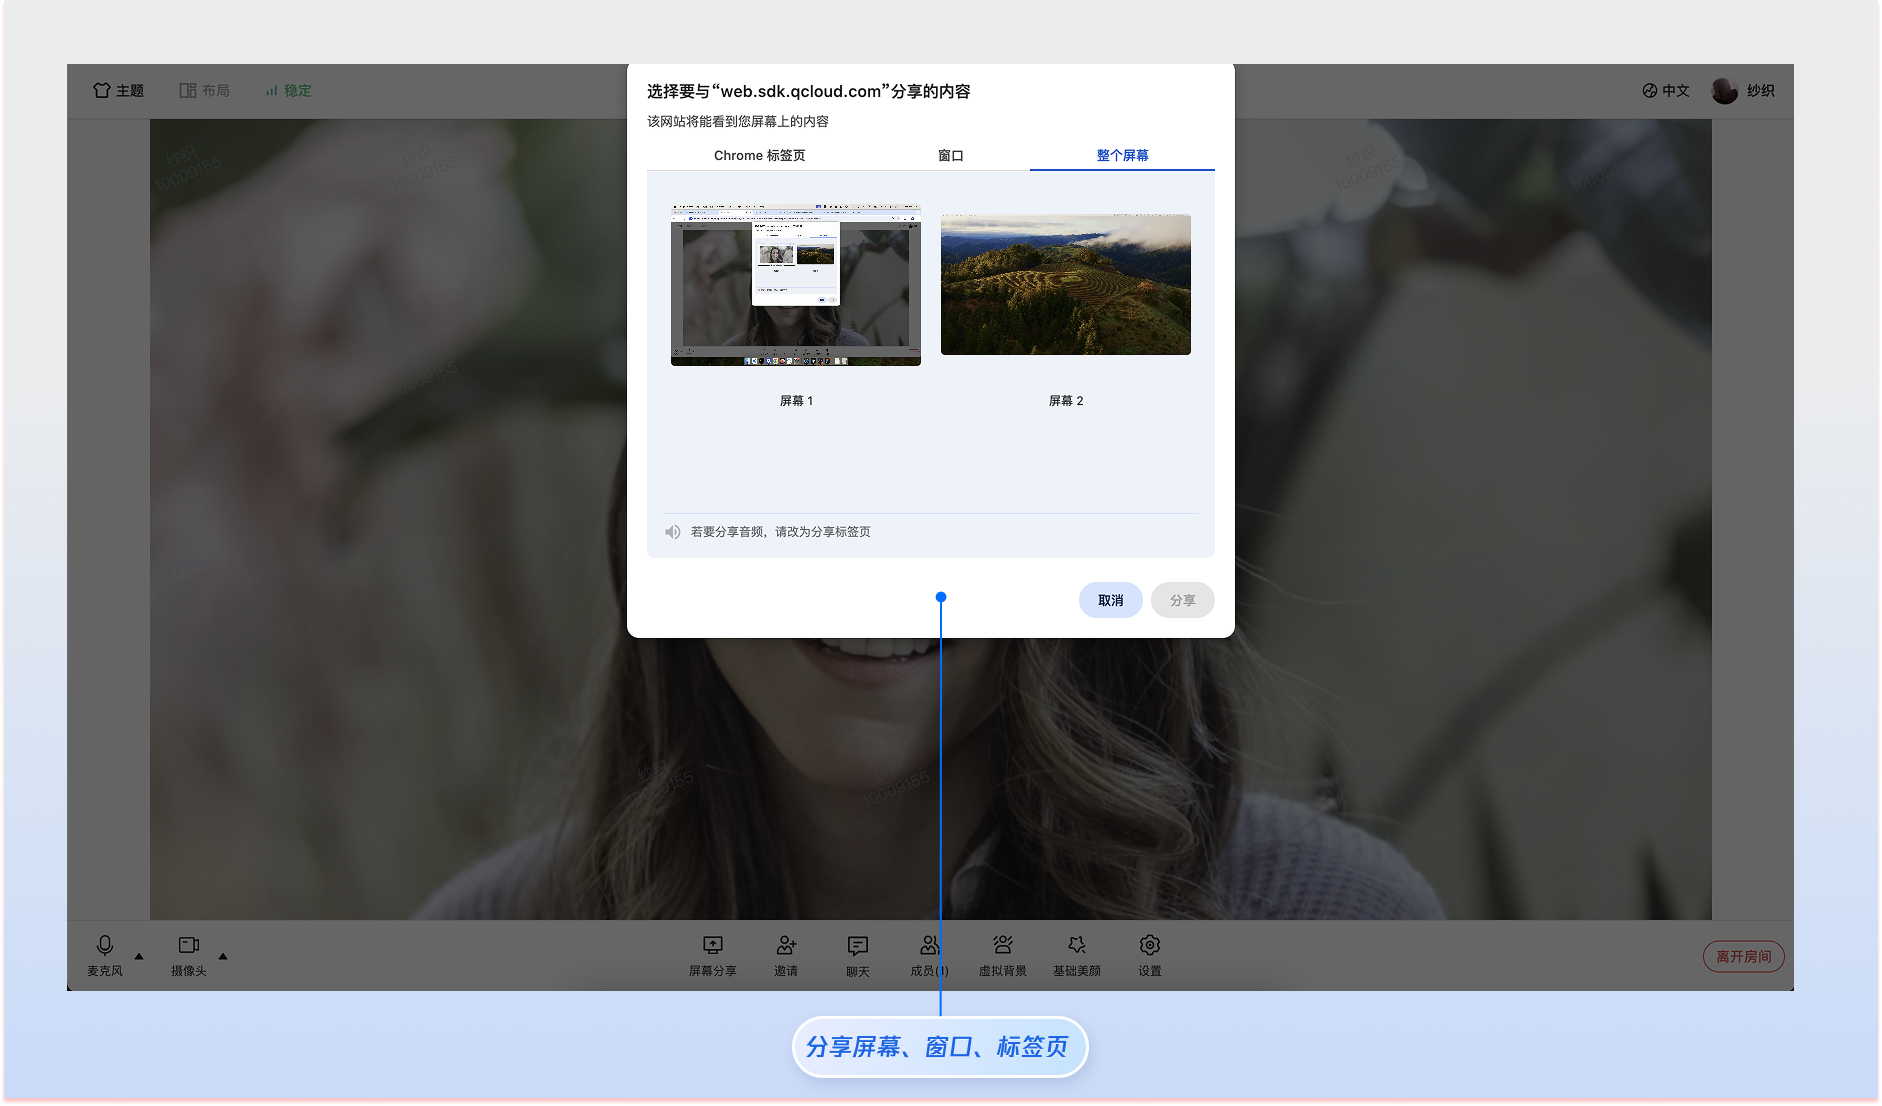
使用 [startScreenShare](https://web.sdk.qcloud.com/trtc/live/web/doc/zh/index.html#startScreenShare) 方法开始屏幕分享。在 Web 环境下,您将看到浏览器的屏幕选择器,可以选择分享整个屏幕、应用窗口或浏览器标签页。
|
|
19
|
+
|
|
20
|
+
|
|
21
|
+
|
|
22
|
+
``` typescript
|
|
23
|
+
import { useDeviceState } from 'tuikit-atomicx-vue3/room';
|
|
24
|
+
const { startScreenShare } = useDeviceState();
|
|
25
|
+
|
|
26
|
+
// 尝试开始屏幕分享,并尝试分享系统音频
|
|
27
|
+
const handleStartShare = async () => {
|
|
28
|
+
try {
|
|
29
|
+
await startScreenShare({ screenAudio: true });
|
|
30
|
+
} catch (error) {
|
|
31
|
+
// 处理用户拒绝或浏览器不支持等错误
|
|
32
|
+
console.error('开始屏幕分享失败:', error);
|
|
33
|
+
}
|
|
34
|
+
};
|
|
35
|
+
```
|
|
36
|
+
|
|
37
|
+
### 步骤2:分享系统音频
|
|
38
|
+
|
|
39
|
+
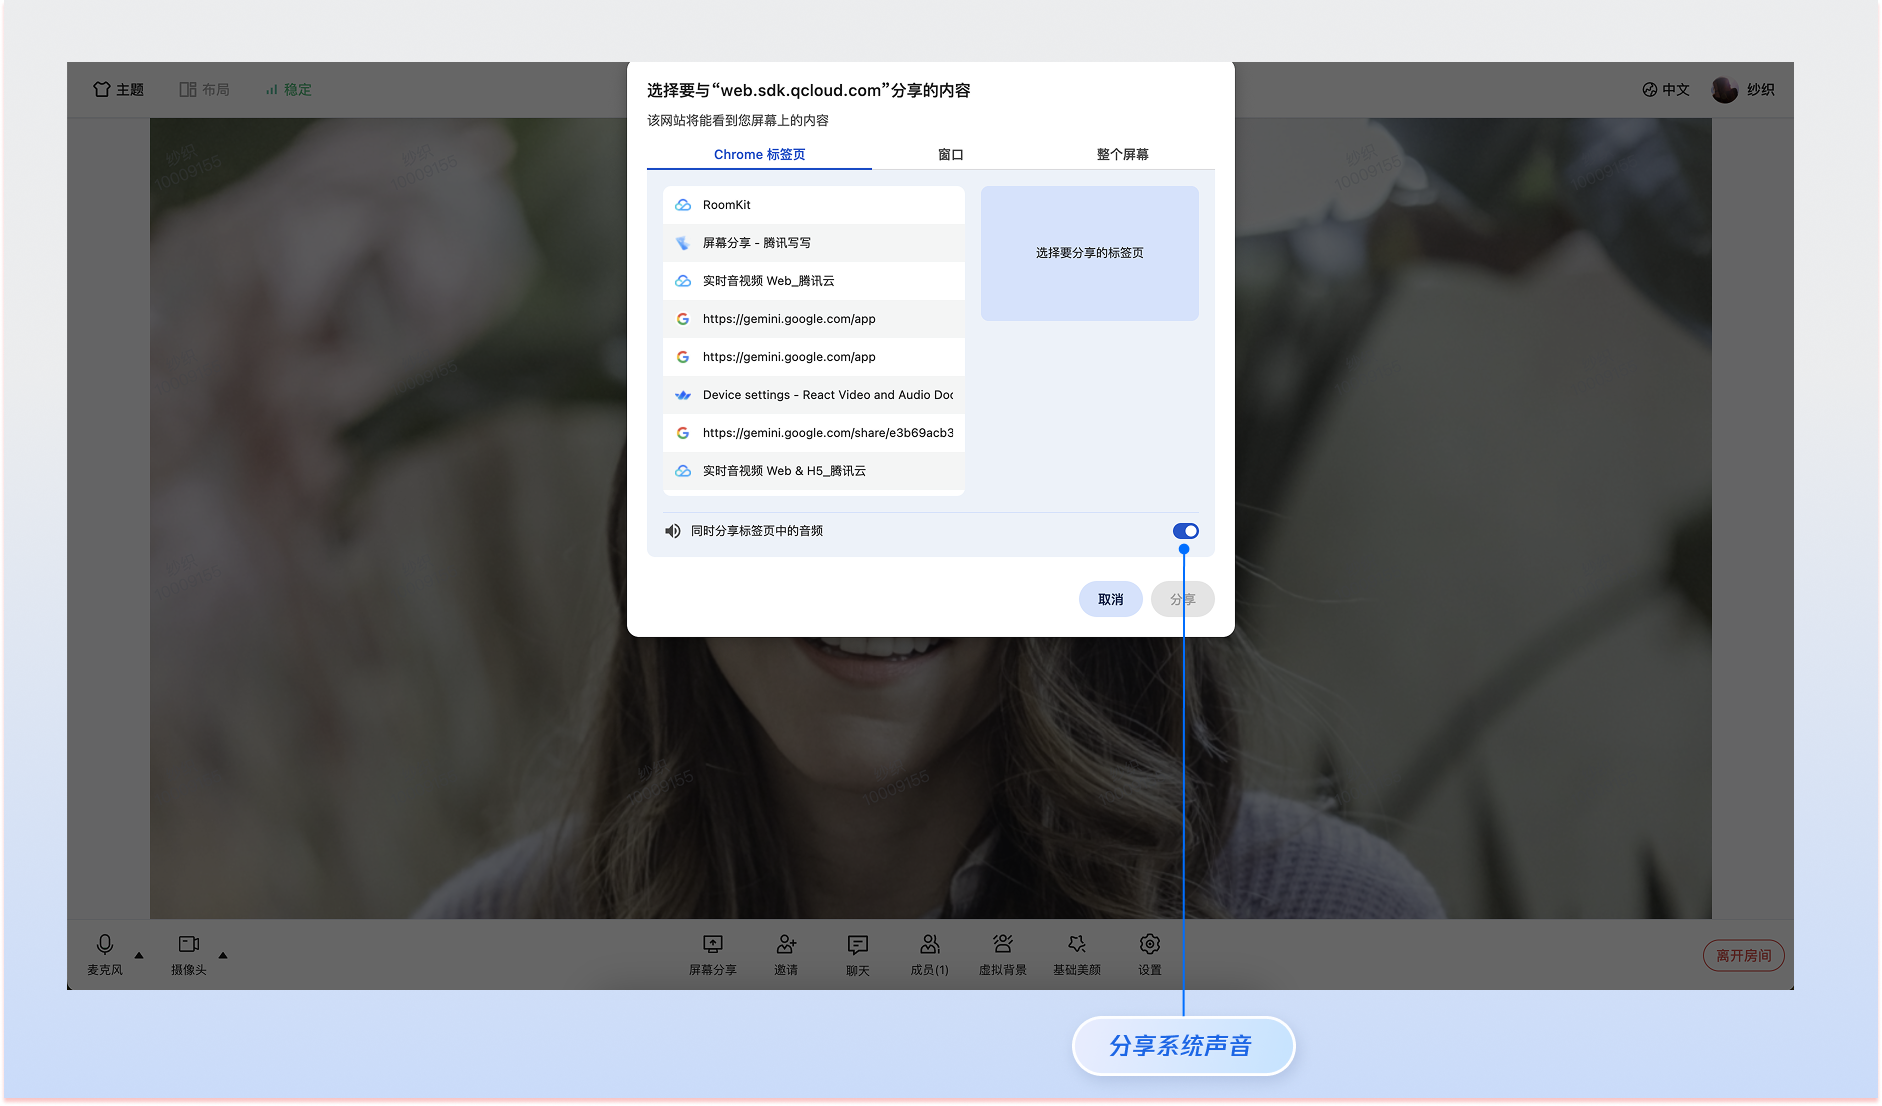
通过设置 `screenAudio: true` 参数,可以在屏幕分享时同时分享系统音频。这在分享视频、演示、音乐等包含音频内容时非常有用。
|
|
40
|
+
|
|
41
|
+
|
|
42
|
+
|
|
43
|
+
``` typescript
|
|
44
|
+
import { useDeviceState } from 'tuikit-atomicx-vue3/room';
|
|
45
|
+
const { startScreenShare } = useDeviceState();
|
|
46
|
+
|
|
47
|
+
// 开始屏幕分享并分享系统音频
|
|
48
|
+
const handleStartScreenShareWithAudio = async () => {
|
|
49
|
+
try {
|
|
50
|
+
await startScreenShare({ screenAudio: true });
|
|
51
|
+
console.log('屏幕分享(含音频)已开始');
|
|
52
|
+
} catch (error) {
|
|
53
|
+
console.error('开始屏幕分享失败:', error);
|
|
54
|
+
}
|
|
55
|
+
};
|
|
56
|
+
```
|
|
57
|
+
|
|
58
|
+
**浏览器兼容性说明:**
|
|
59
|
+
<table>
|
|
60
|
+
<tr>
|
|
61
|
+
<td rowspan="1" colSpan="1" >浏览器</td>
|
|
62
|
+
|
|
63
|
+
<td rowspan="1" colSpan="1" >系统音频分享支持</td>
|
|
64
|
+
|
|
65
|
+
<td rowspan="1" colSpan="1" >备注</td>
|
|
66
|
+
</tr>
|
|
67
|
+
|
|
68
|
+
<tr>
|
|
69
|
+
<td rowspan="1" colSpan="1" >Chrome 74+</td>
|
|
70
|
+
|
|
71
|
+
<td rowspan="1" colSpan="1" >支持</td>
|
|
72
|
+
|
|
73
|
+
<td rowspan="1" colSpan="1" >需要在选择器中勾选**分享音频**</td>
|
|
74
|
+
</tr>
|
|
75
|
+
|
|
76
|
+
<tr>
|
|
77
|
+
<td rowspan="1" colSpan="1" >Edge 79+</td>
|
|
78
|
+
|
|
79
|
+
<td rowspan="1" colSpan="1" >支持</td>
|
|
80
|
+
|
|
81
|
+
<td rowspan="1" colSpan="1" >基于 Chromium,体验同 Chrome</td>
|
|
82
|
+
</tr>
|
|
83
|
+
|
|
84
|
+
<tr>
|
|
85
|
+
<td rowspan="1" colSpan="1" >Firefox</td>
|
|
86
|
+
|
|
87
|
+
<td rowspan="1" colSpan="1" >不支持</td>
|
|
88
|
+
|
|
89
|
+
<td rowspan="1" colSpan="1" >暂不支持系统音频分享</td>
|
|
90
|
+
</tr>
|
|
91
|
+
|
|
92
|
+
<tr>
|
|
93
|
+
<td rowspan="1" colSpan="1" >Safari</td>
|
|
94
|
+
|
|
95
|
+
<td rowspan="1" colSpan="1" >不支持</td>
|
|
96
|
+
|
|
97
|
+
<td rowspan="1" colSpan="1" >暂不支持系统音频分享</td>
|
|
98
|
+
</tr>
|
|
99
|
+
</table>
|
|
100
|
+
|
|
101
|
+
|
|
102
|
+
> **注意:**
|
|
103
|
+
>
|
|
104
|
+
|
|
105
|
+
> 系统音频分享需要浏览器支持,且用户在屏幕选择器中勾选**分享音频**选项。如果浏览器不支持系统音频分享,`screenAudio` 参数会被忽略,但屏幕画面分享功能不受影响,可以正常使用。
|
|
106
|
+
>
|
|
107
|
+
|
|
108
|
+
|
|
109
|
+
### 步骤3:停止屏幕分享
|
|
110
|
+
|
|
111
|
+
用户可以通过以下几种方式停止屏幕分享:
|
|
112
|
+
1. **调用 **[**stopScreenShare()**](https://web.sdk.qcloud.com/trtc/live/web/doc/zh/index.html#stopScreenShare)** 接口**
|
|
113
|
+
|
|
114
|
+
``` typescript
|
|
115
|
+
import { useDeviceState, DeviceStatus } from 'tuikit-atomicx-vue3/room';
|
|
116
|
+
const { screenStatus, stopScreenShare } = useDeviceState();
|
|
117
|
+
|
|
118
|
+
// 停止屏幕分享
|
|
119
|
+
const handleStopScreenShare = async () => {
|
|
120
|
+
try {
|
|
121
|
+
await stopScreenShare();
|
|
122
|
+
console.log('屏幕分享已停止');
|
|
123
|
+
} catch (error) {
|
|
124
|
+
console.error('停止屏幕分享失败:', error);
|
|
125
|
+
}
|
|
126
|
+
};
|
|
127
|
+
```
|
|
128
|
+
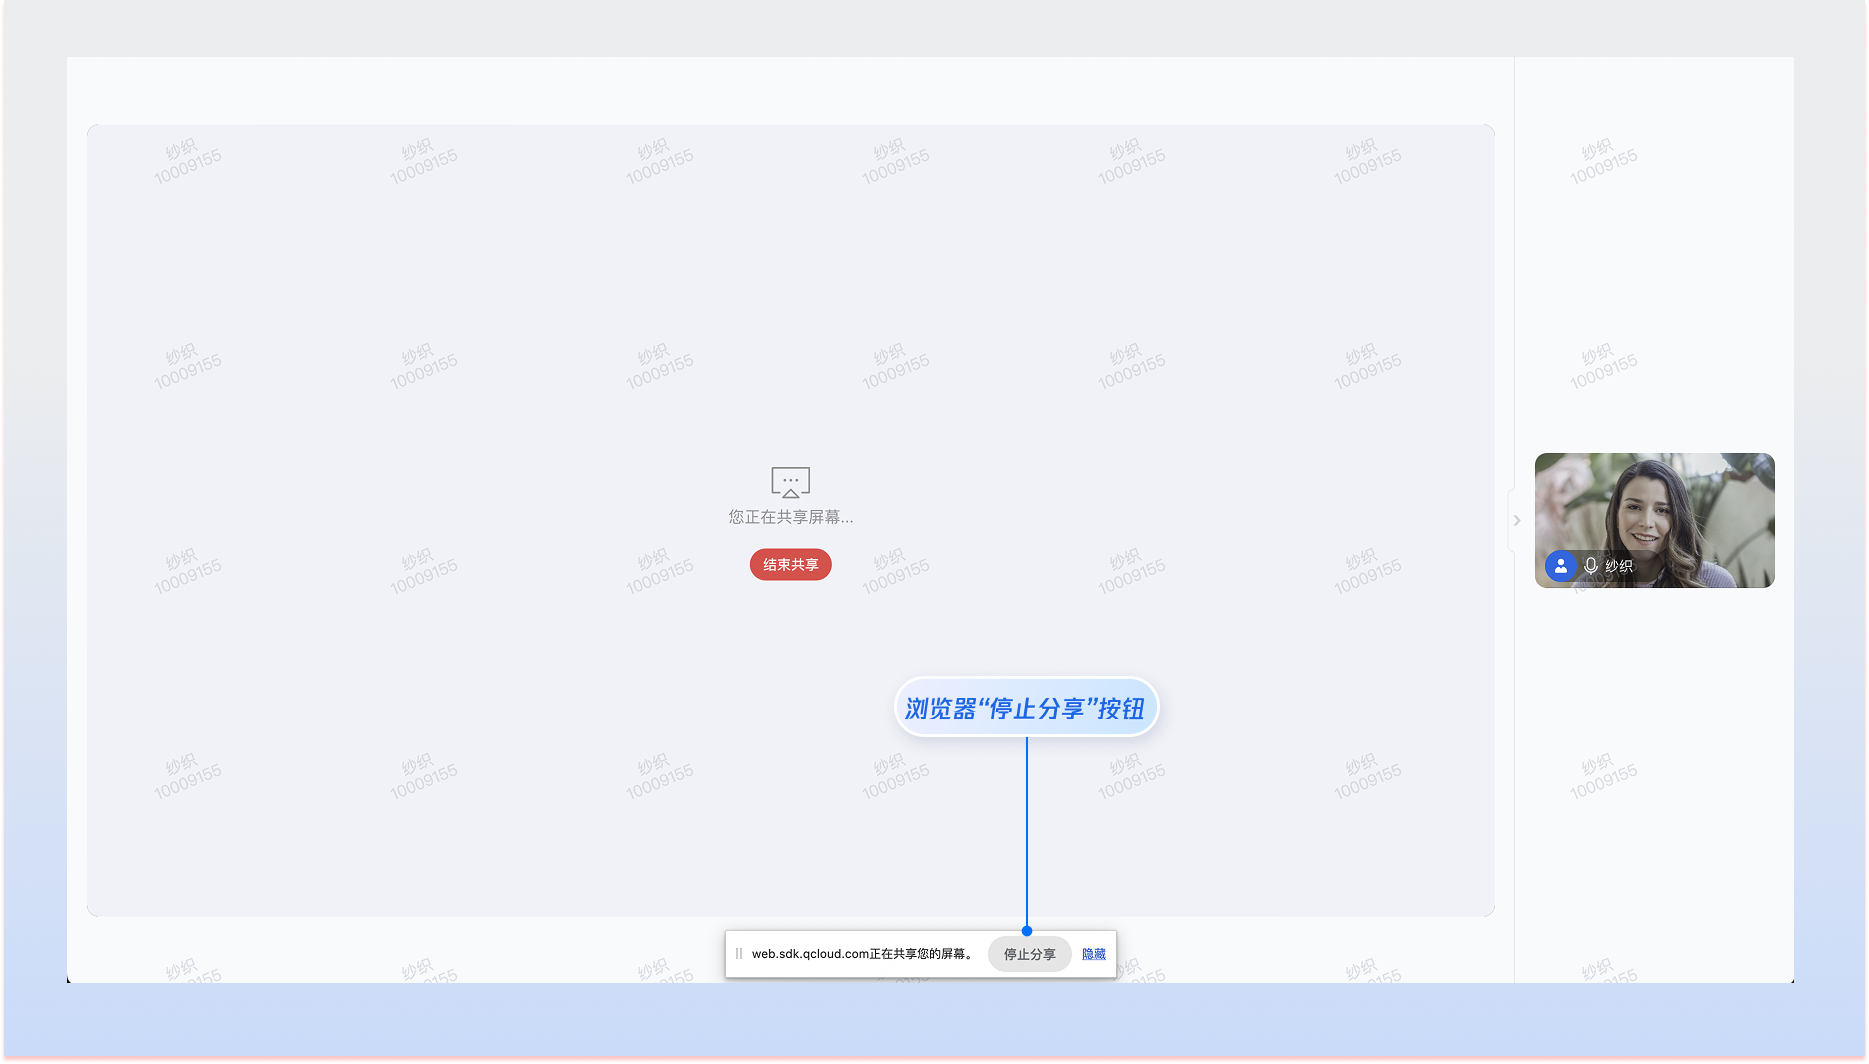
2. **点击浏览器原生的"停止分享"按钮**
|
|
129
|
+
|
|
130
|
+
|
|
131
|
+
|
|
132
|
+
3. **关闭被分享的窗口或标签页**
|
|
133
|
+
|
|
134
|
+
|
|
135
|
+
> **说明:**
|
|
136
|
+
>
|
|
137
|
+
|
|
138
|
+
> 用户使用任意一种方式停止屏幕分享时,Atomicx 都会自动更新 [screenStatus](https://web.sdk.qcloud.com/trtc/live/web/doc/zh/index.html#screenStatus) 的状态。
|
|
139
|
+
>
|
|
140
|
+
|
|
141
|
+
|
|
142
|
+
### 步骤4:权限控制与状态监听
|
|
143
|
+
|
|
144
|
+
#### **设置屏幕分享权限**
|
|
145
|
+
|
|
146
|
+
您可以通过 [useRoomParticipantState](https://web.sdk.qcloud.com/trtc/live/web/doc/zh/index.html#module-RoomParticipantState) 提供的成员管理接口控制房间内的屏幕管理权限。
|
|
147
|
+
``` typescript
|
|
148
|
+
import { useRoomParticipantState, DeviceType } from 'tuikit-atomicx-vue3/room';
|
|
149
|
+
const { disableAllDevices } = useRoomParticipantState();
|
|
150
|
+
|
|
151
|
+
// 限制仅房主/管理员可以发起屏幕分享
|
|
152
|
+
async function handleDisableAllScreen() {
|
|
153
|
+
await disableAllDevices({
|
|
154
|
+
deviceType: DeviceType.Screen,
|
|
155
|
+
disable: true,
|
|
156
|
+
});
|
|
157
|
+
}
|
|
158
|
+
|
|
159
|
+
// 允许房间内所有用户发起屏幕分享
|
|
160
|
+
async function handleEnableAllScreen() {
|
|
161
|
+
await disableAllDevices({
|
|
162
|
+
deviceType: DeviceType.Screen,
|
|
163
|
+
disable: false,
|
|
164
|
+
});
|
|
165
|
+
}
|
|
166
|
+
```
|
|
167
|
+
|
|
168
|
+
#### **自动布局切换**
|
|
169
|
+
|
|
170
|
+
当检测到房间中有用户开始屏幕分享时,建议切换到侧边栏布局(`RoomLayoutTemplate.SidebarLayout`),将分享画面放大显示,其他参会者画面显示在侧边栏。
|
|
171
|
+
``` typescript
|
|
172
|
+
<template>
|
|
173
|
+
<div class="room-container">
|
|
174
|
+
<RoomView :layout-template="layoutTemplate">
|
|
175
|
+
<template #participantViewUI="{ participant, streamType }">
|
|
176
|
+
<ParticipantViewUI
|
|
177
|
+
:participant="participant"
|
|
178
|
+
:stream-type="streamType"
|
|
179
|
+
/>
|
|
180
|
+
</template>
|
|
181
|
+
</RoomView>
|
|
182
|
+
</div>
|
|
183
|
+
</template>
|
|
184
|
+
|
|
185
|
+
<script setup lang="ts">
|
|
186
|
+
import { ref, watch } from 'vue';
|
|
187
|
+
import {
|
|
188
|
+
RoomView,
|
|
189
|
+
RoomLayoutTemplate,
|
|
190
|
+
useRoomParticipantState
|
|
191
|
+
} from 'tuikit-atomicx-vue3/room';
|
|
192
|
+
|
|
193
|
+
const layoutTemplate = ref(RoomLayoutTemplate.GridLayout);
|
|
194
|
+
const { participantWithScreen } = useRoomParticipantState();
|
|
195
|
+
|
|
196
|
+
// 监听屏幕分享状态,自动切换布局
|
|
197
|
+
watch(participantWithScreen, (participant) => {
|
|
198
|
+
if (participant) {
|
|
199
|
+
// 有人分享屏幕,切换到侧边栏布局
|
|
200
|
+
layoutTemplate.value = RoomLayoutTemplate.SidebarLayout;
|
|
201
|
+
} else {
|
|
202
|
+
// 没有人分享屏幕,切换回网格布局
|
|
203
|
+
layoutTemplate.value = RoomLayoutTemplate.GridLayout;
|
|
204
|
+
}
|
|
205
|
+
});
|
|
206
|
+
</script>
|
|
207
|
+
```
|
|
208
|
+
|
|
209
|
+
#### **限制仅一人屏幕分享**
|
|
210
|
+
|
|
211
|
+
在房间中应该只允许一个人分享屏幕,当有人正在分享时,禁用其他人的分享按钮:
|
|
212
|
+
``` typescript
|
|
213
|
+
<script setup>
|
|
214
|
+
import { computed } from 'vue';
|
|
215
|
+
import { useRoomParticipantState } from 'tuikit-atomicx-vue3/room';
|
|
216
|
+
|
|
217
|
+
const { participantWithScreen, localParticipant } = useRoomParticipantState();
|
|
218
|
+
|
|
219
|
+
const isOtherSharing = computed(() => {
|
|
220
|
+
const sharer = participantWithScreen.value;
|
|
221
|
+
if (!sharer) return false;
|
|
222
|
+
return sharer.userId !== localParticipant.value?.userId;
|
|
223
|
+
});
|
|
224
|
+
|
|
225
|
+
const canStartScreenShare = computed(() => {
|
|
226
|
+
return !isOtherSharing.value;
|
|
227
|
+
});
|
|
228
|
+
</script>
|
|
229
|
+
|
|
230
|
+
// 在模板中使用
|
|
231
|
+
<template>
|
|
232
|
+
<button :disabled="!canStartScreenShare" @click="handleStartShare">
|
|
233
|
+
开始屏幕分享
|
|
234
|
+
</button>
|
|
235
|
+
<template>
|
|
236
|
+
```
|
|
237
|
+
|
|
238
|
+
### 步骤5:处理屏幕分享错误
|
|
239
|
+
|
|
240
|
+
当屏幕分享发生错误时,根据错误信息提示用户做出相应的操作。
|
|
241
|
+
|
|
242
|
+
**代码示例:**
|
|
243
|
+
``` typescript
|
|
244
|
+
import { useDeviceState, DeviceError } from 'tuikit-atomicx-vue3/room';
|
|
245
|
+
import { TUIToast } from '@tencentcloud/uikit-base-component-vue3';
|
|
246
|
+
|
|
247
|
+
const { startScreenShare } = useDeviceState();
|
|
248
|
+
|
|
249
|
+
try {
|
|
250
|
+
await startScreenShare();
|
|
251
|
+
} catch (error: any) {
|
|
252
|
+
let message = '';
|
|
253
|
+
switch (error.name) {
|
|
254
|
+
case 'NotReadableError':
|
|
255
|
+
message = '系统禁止当前浏览器访问屏幕内容,请启用屏幕分享权限。';
|
|
256
|
+
break;
|
|
257
|
+
case 'NotAllowedError':
|
|
258
|
+
if (error.message.includes('Permission denied by system')) {
|
|
259
|
+
message = '系统禁止当前浏览器访问屏幕内容,请启用屏幕分享权限。';
|
|
260
|
+
} else {
|
|
261
|
+
message = '用户取消屏幕分享';
|
|
262
|
+
}
|
|
263
|
+
break;
|
|
264
|
+
default:
|
|
265
|
+
message = '屏幕分享过程中发生未知错误,请重试。';
|
|
266
|
+
break;
|
|
267
|
+
}
|
|
268
|
+
TUIToast.warning({
|
|
269
|
+
message,
|
|
270
|
+
});
|
|
271
|
+
}
|
|
272
|
+
```
|
|
273
|
+
|
|
274
|
+
## API 文档
|
|
275
|
+
<table>
|
|
276
|
+
<tr>
|
|
277
|
+
<td rowspan="1" colSpan="1" >**State/Component**</td>
|
|
278
|
+
|
|
279
|
+
<td rowspan="1" colSpan="1" >**功能描述**</td>
|
|
280
|
+
|
|
281
|
+
<td rowspan="1" colSpan="1" >**API 文档**</td>
|
|
282
|
+
</tr>
|
|
283
|
+
|
|
284
|
+
<tr>
|
|
285
|
+
<td rowspan="1" colSpan="1" >**useDeviceState**</td>
|
|
286
|
+
|
|
287
|
+
<td rowspan="1" colSpan="1" >包含音视频设备状态,音视频设备列表及操作接口。</td>
|
|
288
|
+
|
|
289
|
+
<td rowspan="1" colSpan="1" >[API 文档](https://web.sdk.qcloud.com/trtc/live/web/doc/zh/index.html#module-DeviceState)</td>
|
|
290
|
+
</tr>
|
|
291
|
+
|
|
292
|
+
<tr>
|
|
293
|
+
<td rowspan="1" colSpan="1" >**useRoomParticipantState**</td>
|
|
294
|
+
|
|
295
|
+
<td rowspan="1" colSpan="1" >包含房间内用户数据,用户管理接口。</td>
|
|
296
|
+
|
|
297
|
+
<td rowspan="1" colSpan="1" >[API 文档](https://web.sdk.qcloud.com/trtc/live/web/doc/zh/index.html#module-RoomParticipantState)</td>
|
|
298
|
+
</tr>
|
|
299
|
+
</table>
|
|
300
|
+
|
|
301
|
+
|
|
302
|
+
## 常见问题
|
|
303
|
+
|
|
304
|
+
### 为什么系统音频分享不生效?
|
|
305
|
+
- **平台限制:**音频分享目前仅在 Chrome、Edge 等现代浏览器上支持。
|
|
306
|
+
|
|
307
|
+
- **操作细节:**用户必须在浏览器弹出的屏幕选择器中,手动选择**分享音频**。
|
|
308
|
+
|
|
309
|
+
- **系统限制:**部分操作系统不支持分享特定**应用窗口**的音频,建议优先选择**整个屏幕**或**浏览器标签页**。
|
|
310
|
+
|
|
311
|
+
|
|
312
|
+
### 如何感知用户通过点击浏览器的“停止分享”按钮后结束屏幕分享?
|
|
313
|
+
|
|
314
|
+
Atomicx 会自动监听浏览器的停止分享事件,并更新 `screenStatus` 状态。您只需要监听 `screenStatus` 的变化即可:
|
|
315
|
+
``` typescript
|
|
316
|
+
watch(screenStatus, (newStatus, oldStatus) => {
|
|
317
|
+
if (oldStatus === DeviceStatus.On && newStatus === DeviceStatus.Off) {
|
|
318
|
+
console.log('用户已停止屏幕分享。');
|
|
319
|
+
}
|
|
320
|
+
});
|
|
321
|
+
```
|
|
322
|
+
|
|
323
|
+
### 移动端浏览器是否支持屏幕分享?
|
|
324
|
+
|
|
325
|
+
仅桌面端浏览器支持屏幕分享,移动端浏览器不支持屏幕分享能力。
|
|
326
|
+
|
|
327
|
+
### 为什么用户开启屏幕分享音频后,其他参会者看到该用户的麦克风状态显示为“开启”?
|
|
328
|
+
|
|
329
|
+
这是符合预期的系统行为,原因如下:
|
|
330
|
+
|
|
331
|
+
**技术原理:**`microphoneStatus`表示当前设备是否正在对外传输音频信号。当开启屏幕分享并**勾选采集系统音频**时,Atomicx SDK 会启动一条音频传输通道。由于远端接收到的是连续的音频数据流,系统无法区分音频来源是物理麦克风还是系统播放声音,因此会将音频采集状态统一标识为 `DeviceStatus.On`。
|
|
332
|
+
|
|
333
|
+
**隐私说明:**请放心,这并不代表您的麦克风已经在采集说话声音。 麦克风声音是否在推送仅和麦克风控制接口( `openLocalMicrophone` 和 `unmuteLocalMicrophone` )有关,与屏幕分享音频采集是独立的两个通道。即使屏幕分享音频正在传输,只要未调用麦克风相关接口,您的麦克风声音不会被采集和推送。
|
|
@@ -0,0 +1,281 @@
|
|
|
1
|
+
虚拟背景功能允许用户在视频通话或直播中,将真实背景替换为自定义图片或进行模糊处理。通过该功能,用户可以有效保护隐私,隐藏杂乱的背景,或者通过特定背景展示企业形象。
|
|
2
|
+
|
|
3
|
+
## 适用场景
|
|
4
|
+
- **远程办公/会议:** 在家中或公共场所参会时,使用背景虚化或虚拟背景隐藏真实环境,保护个人隐私。
|
|
5
|
+
|
|
6
|
+
- **在线教育:** 教师使用统一的教学背景,营造专业的课堂氛围。
|
|
7
|
+
|
|
8
|
+
- **品牌展示:** 企业员工在对外会议中使用带有公司 Logo 的背景图,提升品牌形象。
|
|
9
|
+
|
|
10
|
+
- **趣味互动:** 社交场景下,用户更换有趣的背景图片,增加互动乐趣。
|
|
11
|
+
|
|
12
|
+
|
|
13
|
+
## 前提条件
|
|
14
|
+
- **用户状态:** 用户已经通过 useLoginState 完成登录鉴权,参考 [接入概览](https://write.woa.com/document/197379797539790848),处于**已登录**状态。
|
|
15
|
+
|
|
16
|
+
- **环境依赖:** 项目已引入 `tuikit-atomicx-vue3`。
|
|
17
|
+
|
|
18
|
+
- **设备要求:** 需要有可用的摄像头设备,并且用户已授权摄像头访问权限。如果用户拒绝授权,虚拟背景功能将无法使用。
|
|
19
|
+
|
|
20
|
+
- **资源依赖:** 虚拟背景功能依赖 AI 模型文件,为保证浏览器可以正常加载和运行这些文件,您需要完成以下步骤。
|
|
21
|
+
|
|
22
|
+
- 将 `node_modules/trtc-sdk-v5/assets` 目录发布至 CDN 或者静态资源服务器中,详情可见 [SDK 文档](https://web.sdk.qcloud.com/trtc/webrtc/doc/zh-cn/tutorial-36-advanced-virtual-background.html)。
|
|
23
|
+
|
|
24
|
+
- 若选择 [方案一:使用 UI 组件快速集成](https://write.woa.com/#1362aad9-2836-4931-b947-2f0f7836d284),在使用 [VirtualBackgroundPanel](https://github.com/Tencent-RTC/TUIKit_Vue3/tree/main/packages/tuikit-atomicx-vue3/src/components/VirtualBackgroundPanel) 组件时,需要通过 props 传入 `assetsPath` 静态资源地址。
|
|
25
|
+
|
|
26
|
+
- 若选择 [方案二:使用底层 API 自定义集成](https://write.woa.com/#b941dd3e-0f43-48af-8aa4-8818ab74a80e),在使用 [initVirtualBackground](https://web.sdk.qcloud.com/trtc/live/web/doc/zh/index.html#initVirtualBackground) 接口时,需要传入 `assetsPath` 静态资源地址。
|
|
27
|
+
|
|
28
|
+
|
|
29
|
+
## 实现虚拟背景功能
|
|
30
|
+
|
|
31
|
+
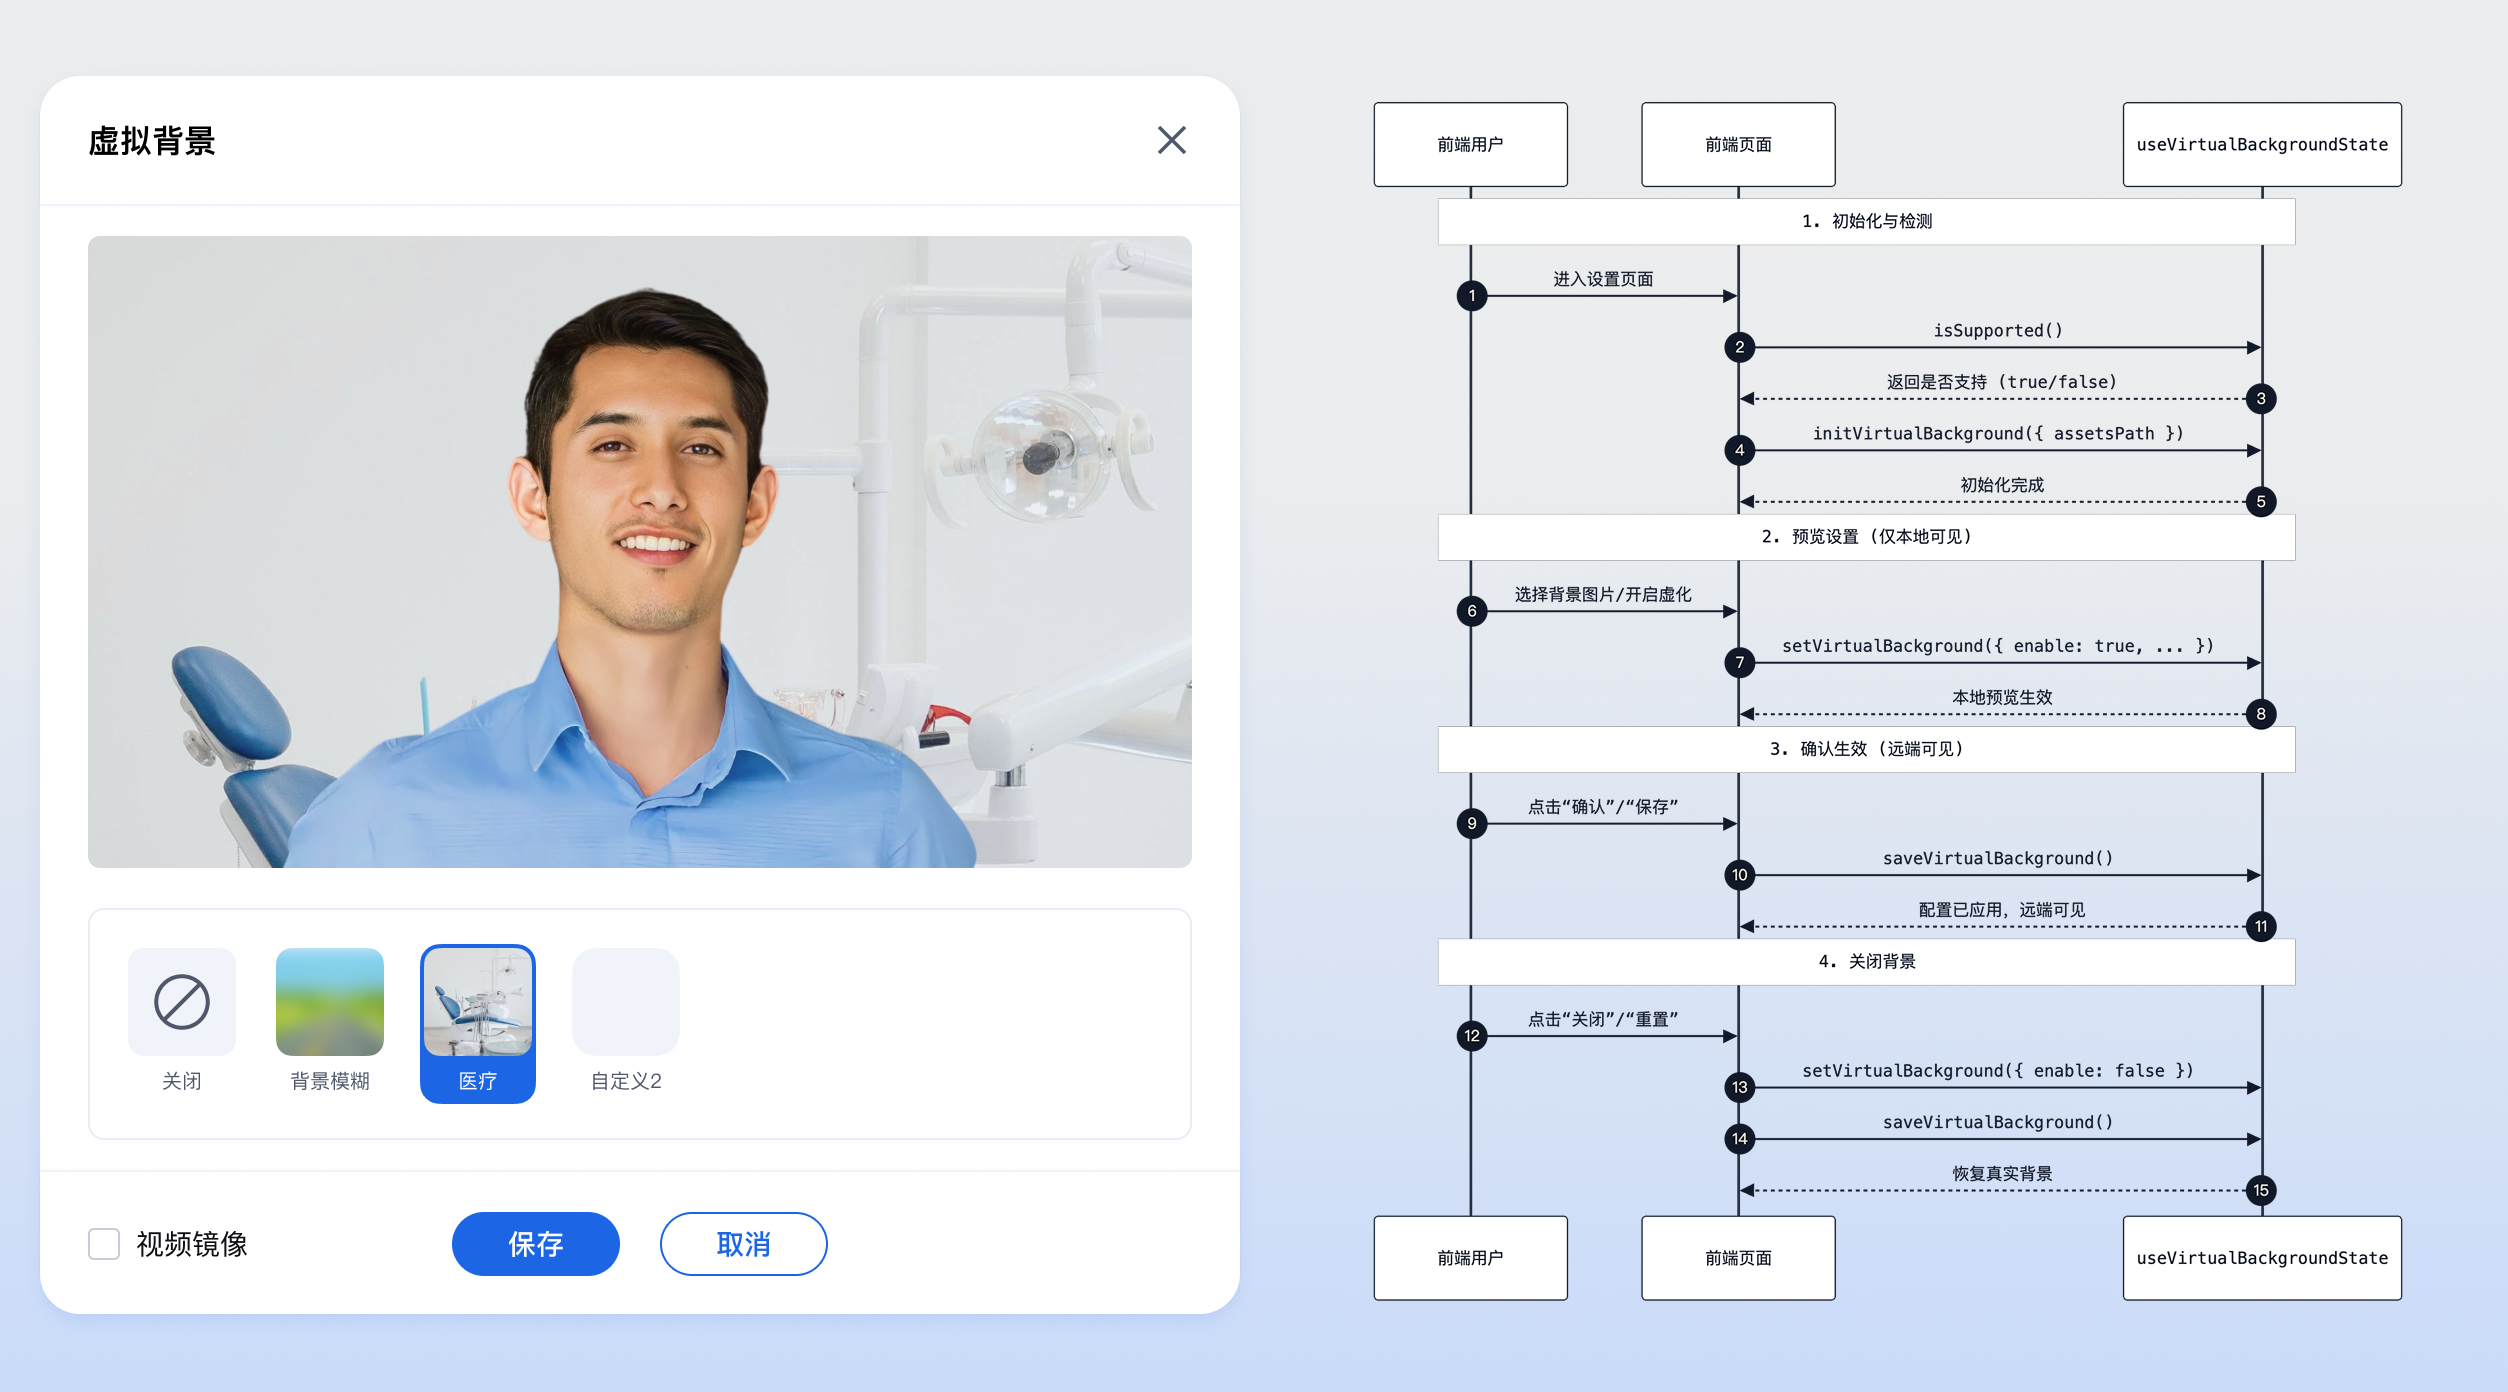
本功能提供两种集成方案,您可以根据业务需求选择最适合的一种:
|
|
32
|
+
- **方案一(推荐):** 使用 UI 组件快速集成。直接引入 `tuikit-atomicx-vue3` 提供的虚拟背景面板组件([VirtualBackgroundPanel](https://github.com/Tencent-RTC/TUIKit_Vue3/tree/main/packages/tuikit-atomicx-vue3/src/components/VirtualBackgroundPanel)),将其嵌入到您的应用弹窗或侧边栏中,开发成本最低。
|
|
33
|
+
|
|
34
|
+
- **方案二(高级):** 使用底层 API 自定义集成。基于 atomicx-core SDK API [useVirtualBackgroundState](https://web.sdk.qcloud.com/trtc/live/web/doc/zh/index.html#module-VirtualBackgroundState) 状态钩子自行实现 UI 和交互逻辑,灵活度最高。
|
|
35
|
+
|
|
36
|
+
|
|
37
|
+
|
|
38
|
+
虚拟背景
|
|
39
|
+
|
|
40
|
+
|
|
41
|
+
## 方案一:使用 UI 组件快速集成
|
|
42
|
+
|
|
43
|
+
`tuikit-atomicx-vue3` 提供了核心设置面板组件:
|
|
44
|
+
- [**VirtualBackgroundPanel**](https://github.com/Tencent-RTC/TUIKit_Vue3/tree/main/packages/tuikit-atomicx-vue3/src/components/VirtualBackgroundPanel)**:** 虚拟背景的配置面板,包含背景虚化、图片选择和预览功能。
|
|
45
|
+
|
|
46
|
+
|
|
47
|
+
### 步骤1:引入组件
|
|
48
|
+
``` typescript
|
|
49
|
+
import { VirtualBackgroundPanel } from 'tuikit-atomicx-vue3/room';
|
|
50
|
+
```
|
|
51
|
+
|
|
52
|
+
### 步骤2:使用组件
|
|
53
|
+
|
|
54
|
+
通常建议将 [VirtualBackgroundPanel](https://github.com/Tencent-RTC/TUIKit_Vue3/tree/main/packages/tuikit-atomicx-vue3/src/components/VirtualBackgroundPanel) 放置在一个弹窗(Dialog)或模态框(Modal)中,通过按钮点击触发显示。
|
|
55
|
+
|
|
56
|
+
**以下示例展示了如何实现一个点击按钮弹出虚拟背景设置的完整交互:**
|
|
57
|
+
|
|
58
|
+
> **注意:**
|
|
59
|
+
>
|
|
60
|
+
> - 将 `node_modules/trtc-sdk-v5/assets` 目录发布至 CDN 或者静态资源服务器中,详情可见 [SDK 文档](https://web.sdk.qcloud.com/trtc/webrtc/doc/zh-cn/tutorial-36-advanced-virtual-background.html)。
|
|
61
|
+
> - 在使用 [VirtualBackgroundPanel](https://github.com/Tencent-RTC/TUIKit_Vue3/tree/main/packages/tuikit-atomicx-vue3/src/components/VirtualBackgroundPanel) 组件时,通过 props 传入 `assetsPath` 静态资源地址。
|
|
62
|
+
> - 所有 TUIKit 组件必须包裹在 [UIKitProvider](https://write.woa.com/document/197379797539790848) 内部,否则将无法获取上下文依赖,导致样式异常。
|
|
63
|
+
|
|
64
|
+
``` typescript
|
|
65
|
+
<template>
|
|
66
|
+
<UIKitProvider theme="light" language="zh-CN">
|
|
67
|
+
<div class="toolbar-container">
|
|
68
|
+
<!-- 1. 触发按钮 -->
|
|
69
|
+
<button @click="openSettings">设置虚拟背景</button>
|
|
70
|
+
|
|
71
|
+
<!-- 2. 设置弹窗 -->
|
|
72
|
+
<div v-if="showSettings" class="modal-mask">
|
|
73
|
+
<div class="modal-content">
|
|
74
|
+
<div class="modal-header">
|
|
75
|
+
<span>虚拟背景</span>
|
|
76
|
+
<button @click="showSettings = false">关闭</button>
|
|
77
|
+
</div>
|
|
78
|
+
|
|
79
|
+
<div class="modal-body">
|
|
80
|
+
<!-- 3. 引入面板组件 -->
|
|
81
|
+
<!-- @close 事件:当用户点击面板内的关闭按钮(如有)时触发 -->
|
|
82
|
+
<VirtualBackgroundPanel assetsPath='https://xxxx/assets' @close="showSettings = false" />
|
|
83
|
+
</div>
|
|
84
|
+
</div>
|
|
85
|
+
</div>
|
|
86
|
+
</div>
|
|
87
|
+
</UIKitProvider>
|
|
88
|
+
</template>
|
|
89
|
+
|
|
90
|
+
<script setup lang="ts">
|
|
91
|
+
import { ref } from 'vue';
|
|
92
|
+
import { UIKitProvider } from '@tencentcloud/uikit-base-component-vue3';
|
|
93
|
+
import { VirtualBackgroundPanel, useVirtualBackgroundState, useDeviceState } from 'tuikit-atomicx-vue3/room';
|
|
94
|
+
|
|
95
|
+
const showSettings = ref(false);
|
|
96
|
+
const { isSupported } = useVirtualBackgroundState();
|
|
97
|
+
const { cameraList } = useDeviceState();
|
|
98
|
+
|
|
99
|
+
const openSettings = () => {
|
|
100
|
+
// 1. 检查浏览器是否支持虚拟背景
|
|
101
|
+
if (!isSupported()) {
|
|
102
|
+
alert('当前浏览器不支持虚拟背景');
|
|
103
|
+
return;
|
|
104
|
+
}
|
|
105
|
+
|
|
106
|
+
// 2. 检查是否有可用摄像头
|
|
107
|
+
if (cameraList.value.length === 0) {
|
|
108
|
+
alert('未检测到摄像头,无法设置虚拟背景');
|
|
109
|
+
return;
|
|
110
|
+
}
|
|
111
|
+
|
|
112
|
+
// 3. 打开设置面板
|
|
113
|
+
showSettings.value = true;
|
|
114
|
+
};
|
|
115
|
+
</script>
|
|
116
|
+
|
|
117
|
+
<style scoped>
|
|
118
|
+
.modal-mask{position:fixed;top:0;left:0;width:100%;height:100%;background:rgba(0,0,0,0.5);display:flex;justify-content:center;align-items:center;z-index:1000}.modal-content{background:white;width:600px;border-radius:8px;overflow:hidden}.modal-header{padding:16px;display:flex;justify-content:space-between;border-bottom:1px solid #eee}
|
|
119
|
+
</style>
|
|
120
|
+
```
|
|
121
|
+
|
|
122
|
+
## 方案二:使用底层 API 自定义集成
|
|
123
|
+
|
|
124
|
+
本节主要介绍如何通过 atomicx-core SDK API [**useVirtualBackgroundState**](https://web.sdk.qcloud.com/trtc/live/web/doc/zh/index.html#module-VirtualBackgroundState) 接口来实现虚拟背景。
|
|
125
|
+
|
|
126
|
+
### 步骤1:初始化与检测
|
|
127
|
+
|
|
128
|
+
在调用虚拟背景功能前,必须先检查浏览器是否支持,并初始化资源路径。
|
|
129
|
+
|
|
130
|
+
> **注意:**
|
|
131
|
+
>
|
|
132
|
+
> - 将 node_modules/trtc-sdk-v5/assets 目录发布至 CDN 或者静态资源服务器中,详情可见 [SDK 文档](https://web.sdk.qcloud.com/trtc/webrtc/doc/zh-cn/tutorial-36-advanced-virtual-background.html)。
|
|
133
|
+
> - 在使用 [initVirtualBackground](https://web.sdk.qcloud.com/trtc/live/web/doc/zh/index.html#initVirtualBackground) 接口时,传入 assetsPath 静态资源地址。
|
|
134
|
+
> - 虚拟背景功能依赖摄像头设备。可使用 [useDeviceState](https://web.sdk.qcloud.com/trtc/live/web/doc/zh/index.html#module-DeviceState) 检查设备状态。
|
|
135
|
+
> - [cameraList](https://web.sdk.qcloud.com/trtc/live/web/doc/zh/index.html#cameraList):当前可用的摄像头设备列表,如果列表为空,说明未检测到摄像头或摄像头权限被禁止。
|
|
136
|
+
|
|
137
|
+
``` typescript
|
|
138
|
+
import { onMounted } from 'vue';
|
|
139
|
+
import { useVirtualBackgroundState } from 'tuikit-atomicx-vue3/room';
|
|
140
|
+
|
|
141
|
+
const { isSupported, initVirtualBackground } = useVirtualBackgroundState();
|
|
142
|
+
|
|
143
|
+
onMounted(async () => {
|
|
144
|
+
// 1. 检查浏览器兼容性
|
|
145
|
+
if (!isSupported()) {
|
|
146
|
+
console.warn('当前浏览器不支持虚拟背景');
|
|
147
|
+
return;
|
|
148
|
+
}
|
|
149
|
+
|
|
150
|
+
// 2. 初始化资源
|
|
151
|
+
try {
|
|
152
|
+
await initVirtualBackground({ assetsPath: './assets' });
|
|
153
|
+
console.log('虚拟背景初始化完成');
|
|
154
|
+
} catch (error) {
|
|
155
|
+
console.error('初始化失败', error);
|
|
156
|
+
}
|
|
157
|
+
});
|
|
158
|
+
```
|
|
159
|
+
|
|
160
|
+
### 步骤2:设置预览
|
|
161
|
+
|
|
162
|
+
在用户确认应用背景前,通常需要先预览效果。使用 [setVirtualBackground](https://web.sdk.qcloud.com/trtc/live/web/doc/zh/index.html#setVirtualBackground) 方法可以设置预览效果,此时不会应用到远端可见的视频流中。
|
|
163
|
+
|
|
164
|
+
> **说明:**
|
|
165
|
+
>
|
|
166
|
+
|
|
167
|
+
> 调用 `setVirtualBackground` 仅在本地预览画面生效,远端用户不会看到虚拟背景效果,需调用 `saveVirtualBackground` 后才会同步到远端视频流。
|
|
168
|
+
>
|
|
169
|
+
|
|
170
|
+
``` typescript
|
|
171
|
+
import { useVirtualBackgroundState } from 'tuikit-atomicx-vue3/room';
|
|
172
|
+
|
|
173
|
+
const { setVirtualBackground } = useVirtualBackgroundState();
|
|
174
|
+
|
|
175
|
+
// 开启背景虚化预览
|
|
176
|
+
const previewBlur = async () => {
|
|
177
|
+
await setVirtualBackground({
|
|
178
|
+
enable: true,
|
|
179
|
+
type: 'blur',
|
|
180
|
+
level: 0.5 // 虚化程度,可选
|
|
181
|
+
});
|
|
182
|
+
};
|
|
183
|
+
|
|
184
|
+
// 开启背景图片预览
|
|
185
|
+
const previewImage = async (imageUrl: string) => {
|
|
186
|
+
await setVirtualBackground({
|
|
187
|
+
enable: true,
|
|
188
|
+
type: 'image',
|
|
189
|
+
source: imageUrl // 图片 URL,支持本地或网络路径
|
|
190
|
+
});
|
|
191
|
+
};
|
|
192
|
+
```
|
|
193
|
+
|
|
194
|
+
### 步骤3:保存并生效
|
|
195
|
+
|
|
196
|
+
用户确认预览效果满意后,调用 [saveVirtualBackground](https://web.sdk.qcloud.com/trtc/live/web/doc/zh/index.html#saveVirtualBackground) 将配置真正应用到当前的视频流中,此时远端用户将看到效果。
|
|
197
|
+
``` typescript
|
|
198
|
+
import { useVirtualBackgroundState } from 'tuikit-atomicx-vue3/room';
|
|
199
|
+
|
|
200
|
+
const { saveVirtualBackground } = useVirtualBackgroundState();
|
|
201
|
+
|
|
202
|
+
const confirmSettings = async () => {
|
|
203
|
+
try {
|
|
204
|
+
await saveVirtualBackground();
|
|
205
|
+
console.log('虚拟背景已生效');
|
|
206
|
+
} catch (error) {
|
|
207
|
+
console.error('保存失败', error);
|
|
208
|
+
}
|
|
209
|
+
};
|
|
210
|
+
```
|
|
211
|
+
|
|
212
|
+
### 步骤4:关闭虚拟背景
|
|
213
|
+
|
|
214
|
+
如果需要关闭虚拟背景,恢复真实背景,可以将其 `enable` 属性设为 `false` 并保存。
|
|
215
|
+
``` typescript
|
|
216
|
+
import { useVirtualBackgroundState } from 'tuikit-atomicx-vue3/room';
|
|
217
|
+
|
|
218
|
+
const { setVirtualBackground, saveVirtualBackground } = useVirtualBackgroundState();
|
|
219
|
+
|
|
220
|
+
const disableVirtualBackground = async () => {
|
|
221
|
+
// 1. 设置为关闭状态
|
|
222
|
+
await setVirtualBackground({ enable: false });
|
|
223
|
+
// 2. 保存生效
|
|
224
|
+
await saveVirtualBackground();
|
|
225
|
+
};
|
|
226
|
+
```
|
|
227
|
+
|
|
228
|
+
## 开发注意事项
|
|
229
|
+
- **资源文件路径:**`initVirtualBackground` 中的 `assetsPath` 必须正确指向 AI 模型文件的目录。如果路径错误,会导致虚拟背景无法启动。请查阅 [SDK 文档](https://web.sdk.qcloud.com/trtc/webrtc/doc/zh-cn/tutorial-36-advanced-virtual-background.html) 获取资源文件包。
|
|
230
|
+
|
|
231
|
+
- **性能消耗:** 开启虚拟背景会占用较高的 CPU 和 GPU 资源。在低端设备上可能会导致视频掉帧或发热,建议在检测到设备性能不足时提示用户关闭。
|
|
232
|
+
|
|
233
|
+
- **浏览器兼容性:** 并非所有浏览器都支持虚拟背景(依赖 WebAssembly 和 SIMD 等特性)。务必在 UI 渲染前调用 `isSupported()` 进行检查。
|
|
234
|
+
|
|
235
|
+
- **图片格式:** 自定义背景图片建议使用 `jpg` 或 `png` 格式,且分辨率不宜过大(建议 1920x1080 以内),以免影响加载速度和内存占用。
|
|
236
|
+
|
|
237
|
+
|
|
238
|
+
## 常见问题
|
|
239
|
+
|
|
240
|
+
### **在 Chrome 中运行 Demo 发现画面颠倒且卡顿?**
|
|
241
|
+
|
|
242
|
+
虚拟背景插件使用 GPU 进行加速,您需要在浏览器设置中找到使用硬件加速模式并启用。可以将 `chrome://settings/system` 复制到浏览器地址栏,并且打开硬件加速模式。
|
|
243
|
+
|
|
244
|
+
### **为什么开启虚拟背景后,电脑发热严重或风扇高速运转?**
|
|
245
|
+
|
|
246
|
+
虚拟背景功能需要实时识别人物轮廓并进行图像处理,对 CPU 和 GPU 算力有一定要求。建议在无需使用时关闭该功能,或在低端设备上避免开启。
|
|
247
|
+
|
|
248
|
+
### **初始化失败,报错 "assets load failed" 怎么办?**
|
|
249
|
+
|
|
250
|
+
请检查 `initVirtualBackground` 中传入的 `assetsPath` 是否正确。确保该路径下包含必要的 AI 模型文件,且能够通过浏览器直接访问。如果是跨域资源,需要配置 CORS 策略。
|
|
251
|
+
|
|
252
|
+
### **虚拟背景支持移动端浏览器吗?**
|
|
253
|
+
|
|
254
|
+
由于移动端浏览器的性能限制和 WebAssembly 支持情况差异较大,体验可能不如桌面端稳定。建议优先在桌面端 Chrome(推荐 94+)、Edge 等主流浏览器中使用,并做好兼容性判断 `isSupported()`。
|
|
255
|
+
|
|
256
|
+
### **本地开发时无法使用虚拟背景?**
|
|
257
|
+
|
|
258
|
+
WebRTC 相关功能通常要求在 HTTPS 环境下运行,或者是 `localhost` / `127.0.0.1`。请确保您的开发环境满足安全上下文要求。
|
|
259
|
+
|
|
260
|
+
## **示例项目**
|
|
261
|
+
|
|
262
|
+
腾讯云在 GitHub 上提供了示例项目 [atomicx-vite-vue3-ts](https://github.com/Tencent-RTC/TUIRoomKit/tree/main/Web/example/atomicx-vite-vue3-ts) ,您可以参考以实现完整的 RoomKit 功能。
|
|
263
|
+
|
|
264
|
+
## API 文档
|
|
265
|
+
<table>
|
|
266
|
+
<tr>
|
|
267
|
+
<td rowspan="1" colSpan="1" >**State/Component**</td>
|
|
268
|
+
|
|
269
|
+
<td rowspan="1" colSpan="1" >**功能描述**</td>
|
|
270
|
+
|
|
271
|
+
<td rowspan="1" colSpan="1" >**API 文档**</td>
|
|
272
|
+
</tr>
|
|
273
|
+
|
|
274
|
+
<tr>
|
|
275
|
+
<td rowspan="1" colSpan="1" >**useVirtualBackgroundState**</td>
|
|
276
|
+
|
|
277
|
+
<td rowspan="1" colSpan="1" >虚拟背景管理</td>
|
|
278
|
+
|
|
279
|
+
<td rowspan="1" colSpan="1" >[API 文档](https://web.sdk.qcloud.com/trtc/live/web/doc/zh/index.html#module-VirtualBackgroundState)</td>
|
|
280
|
+
</tr>
|
|
281
|
+
</table>
|