@tencentcloud/sdk-mcp 1.0.2 → 1.0.4
This diff represents the content of publicly available package versions that have been released to one of the supported registries. The information contained in this diff is provided for informational purposes only and reflects changes between package versions as they appear in their respective public registries.
- package/@tencent/aegis-node-sdk/lib/packages/core/src/constant/config.d.ts +14 -14
- package/@tencent/aegis-node-sdk/lib/packages/core/src/constant/global.d.ts +1 -1
- package/@tencent/aegis-node-sdk/lib/packages/core/src/constant/index.d.ts +9 -9
- package/@tencent/aegis-node-sdk/lib/packages/core/src/constant/report-ignore.d.ts +2 -2
- package/@tencent/aegis-node-sdk/lib/packages/core/src/core.d.ts +85 -85
- package/@tencent/aegis-node-sdk/lib/packages/core/src/hooks/afterRequestHooks.d.ts +3 -3
- package/@tencent/aegis-node-sdk/lib/packages/core/src/hooks/beforeRequestHooks.d.ts +9 -9
- package/@tencent/aegis-node-sdk/lib/packages/core/src/hooks/modifyRequestHooks.d.ts +3 -3
- package/@tencent/aegis-node-sdk/lib/packages/core/src/index.d.ts +9 -9
- package/@tencent/aegis-node-sdk/lib/packages/core/src/interface/config.d.ts +62 -62
- package/@tencent/aegis-node-sdk/lib/packages/core/src/interface/env.d.ts +11 -11
- package/@tencent/aegis-node-sdk/lib/packages/core/src/interface/index.d.ts +4 -4
- package/@tencent/aegis-node-sdk/lib/packages/core/src/interface/log.d.ts +130 -130
- package/@tencent/aegis-node-sdk/lib/packages/core/src/interface/send.d.ts +34 -34
- package/@tencent/aegis-node-sdk/lib/packages/core/src/pipes/format.d.ts +2 -2
- package/@tencent/aegis-node-sdk/lib/packages/core/src/pipes/index.d.ts +18 -18
- package/@tencent/aegis-node-sdk/lib/packages/core/src/pipes/length-limit.d.ts +8 -8
- package/@tencent/aegis-node-sdk/lib/packages/core/src/pipes/pv.d.ts +8 -8
- package/@tencent/aegis-node-sdk/lib/packages/core/src/pipes/remove-payload.d.ts +2 -2
- package/@tencent/aegis-node-sdk/lib/packages/core/src/pipes/repeat-limit.d.ts +4 -4
- package/@tencent/aegis-node-sdk/lib/packages/core/src/pipes/report.d.ts +10 -10
- package/@tencent/aegis-node-sdk/lib/packages/core/src/pipes/sample.d.ts +3 -3
- package/@tencent/aegis-node-sdk/lib/packages/core/src/pipes/throttle.d.ts +3 -3
- package/@tencent/aegis-node-sdk/lib/packages/core/src/pipes/trace/index.d.ts +34 -34
- package/@tencent/aegis-node-sdk/lib/packages/core/src/pipes/trace/jwt.d.ts +12 -12
- package/@tencent/aegis-node-sdk/lib/packages/core/src/pipes/trace/ot-js.d.ts +14 -14
- package/@tencent/aegis-node-sdk/lib/packages/core/src/pipes/trace/uuid.d.ts +2 -2
- package/@tencent/aegis-node-sdk/lib/packages/core/src/pipes/whitelist.d.ts +12 -12
- package/@tencent/aegis-node-sdk/lib/packages/core/src/pipes/write-before.d.ts +3 -3
- package/@tencent/aegis-node-sdk/lib/packages/core/src/plugin.d.ts +33 -33
- package/@tencent/aegis-node-sdk/lib/packages/core/src/util/destroy.d.ts +2 -2
- package/@tencent/aegis-node-sdk/lib/packages/core/src/util/event-emitter.d.ts +18 -18
- package/@tencent/aegis-node-sdk/lib/packages/core/src/util/index.d.ts +60 -60
- package/@tencent/aegis-node-sdk/lib/packages/node-sdk/src/index.d.ts +15 -15
- package/@tencent/aegis-node-sdk/lib/packages/node-sdk/src/interface/selector.d.ts +5 -5
- package/@tencent/aegis-node-sdk/lib/packages/node-sdk/src/pipes/batch-report-pipe.d.ts +6 -6
- package/@tencent/aegis-node-sdk/lib/packages/node-sdk/src/protocol/protocol_base.d.ts +18 -18
- package/@tencent/aegis-node-sdk/lib/packages/node-sdk/src/protocol/protocol_http.d.ts +12 -12
- package/@tencent/aegis-node-sdk/lib/packages/node-sdk/src/selector/ip_selector.d.ts +10 -10
- package/@tencent/aegis-node-sdk/lib/packages/node-sdk/src/selector/polaris_selector.d.ts +20 -20
- package/@tencent/aegis-node-sdk/lib/packages/node-sdk/src/selector/selector_base.d.ts +27 -27
- package/@tencent/aegis-node-sdk/lib/packages/node-sdk/src/util/eval_require.d.ts +2 -2
- package/mcp-server-prompt.png +0 -0
- package/mcp.json +9 -9
- package/package.json +1 -1
- package/resource/doc/chatuikit/android/client_api_android.md +1377 -0
- package/resource/doc/chatuikit/android/integrate_tuichat_only_android.md +382 -0
- package/resource/doc/chatuikit/android/integrate_tuikit_android.md +612 -0
- package/resource/doc/chatuikit/android/ui_api_android.md +418 -0
- package/resource/doc/chatuikit/faq/freq_qa.md +86 -0
- package/resource/doc/chatuikit/faq/sdk_qa.md +117 -0
- package/resource/doc/chatuikit/faq/vue_qa.md +344 -0
- package/resource/doc/chatuikit/faq/web_qa.md +118 -0
- package/resource/doc/chatuikit/flutter/client_api_Flutter.md +939 -0
- package/resource/doc/chatuikit/flutter/integrate_tuikit_Flutter.md +1432 -0
- package/resource/doc/chatuikit/iOS/client_api_iOS.md +1371 -0
- package/resource/doc/chatuikit/iOS/integrate_tuichat_only_iOS.md +993 -0
- package/resource/doc/chatuikit/iOS/integrate_tuikit_iOS.md +1427 -0
- package/resource/doc/chatuikit/iOS/ui_api_iOS.md +526 -0
- package/resource/doc/chatuikit/react/integrate_tuichat_only_react.md +185 -0
- package/resource/doc/chatuikit/react/integrate_tuichat_react.md +212 -0
- package/resource/doc/chatuikit/vue/integrate_tuichat_only_vue.md +149 -0
- package/resource/doc/chatuikit/vue/integrate_tuichat_vue.md +248 -0
- package/server.js +57 -33
- package/server.js.map +1 -1
- package/@tencent/polaris/node_modules/axios/CHANGELOG.md +0 -891
- package/@tencent/polaris/node_modules/axios/LICENSE +0 -19
- package/@tencent/polaris/node_modules/axios/README.md +0 -908
- package/@tencent/polaris/node_modules/axios/SECURITY.md +0 -5
- package/@tencent/polaris/node_modules/axios/UPGRADE_GUIDE.md +0 -168
- package/@tencent/polaris/node_modules/axios/dist/axios.js +0 -2277
- package/@tencent/polaris/node_modules/axios/dist/axios.map +0 -1
- package/@tencent/polaris/node_modules/axios/dist/axios.min.js +0 -4
- package/@tencent/polaris/node_modules/axios/dist/axios.min.map +0 -1
- package/@tencent/polaris/node_modules/axios/index.d.ts +0 -221
- package/@tencent/polaris/node_modules/axios/index.js +0 -1
- package/@tencent/polaris/node_modules/axios/lib/adapters/README.md +0 -37
- package/@tencent/polaris/node_modules/axios/lib/adapters/http.js +0 -388
- package/@tencent/polaris/node_modules/axios/lib/adapters/xhr.js +0 -212
- package/@tencent/polaris/node_modules/axios/lib/axios.js +0 -57
- package/@tencent/polaris/node_modules/axios/lib/cancel/Cancel.js +0 -19
- package/@tencent/polaris/node_modules/axios/lib/cancel/CancelToken.js +0 -119
- package/@tencent/polaris/node_modules/axios/lib/cancel/isCancel.js +0 -5
- package/@tencent/polaris/node_modules/axios/lib/core/Axios.js +0 -155
- package/@tencent/polaris/node_modules/axios/lib/core/InterceptorManager.js +0 -54
- package/@tencent/polaris/node_modules/axios/lib/core/README.md +0 -8
- package/@tencent/polaris/node_modules/axios/lib/core/buildFullPath.js +0 -20
- package/@tencent/polaris/node_modules/axios/lib/core/createError.js +0 -18
- package/@tencent/polaris/node_modules/axios/lib/core/dispatchRequest.js +0 -87
- package/@tencent/polaris/node_modules/axios/lib/core/enhanceError.js +0 -43
- package/@tencent/polaris/node_modules/axios/lib/core/mergeConfig.js +0 -99
- package/@tencent/polaris/node_modules/axios/lib/core/settle.js +0 -25
- package/@tencent/polaris/node_modules/axios/lib/core/transformData.js +0 -22
- package/@tencent/polaris/node_modules/axios/lib/defaults.js +0 -134
- package/@tencent/polaris/node_modules/axios/lib/env/README.md +0 -3
- package/@tencent/polaris/node_modules/axios/lib/env/data.js +0 -3
- package/@tencent/polaris/node_modules/axios/lib/helpers/README.md +0 -7
- package/@tencent/polaris/node_modules/axios/lib/helpers/bind.js +0 -11
- package/@tencent/polaris/node_modules/axios/lib/helpers/buildURL.js +0 -70
- package/@tencent/polaris/node_modules/axios/lib/helpers/combineURLs.js +0 -14
- package/@tencent/polaris/node_modules/axios/lib/helpers/cookies.js +0 -53
- package/@tencent/polaris/node_modules/axios/lib/helpers/deprecatedMethod.js +0 -24
- package/@tencent/polaris/node_modules/axios/lib/helpers/isAbsoluteURL.js +0 -14
- package/@tencent/polaris/node_modules/axios/lib/helpers/isAxiosError.js +0 -13
- package/@tencent/polaris/node_modules/axios/lib/helpers/isURLSameOrigin.js +0 -68
- package/@tencent/polaris/node_modules/axios/lib/helpers/normalizeHeaderName.js +0 -12
- package/@tencent/polaris/node_modules/axios/lib/helpers/parseHeaders.js +0 -53
- package/@tencent/polaris/node_modules/axios/lib/helpers/spread.js +0 -27
- package/@tencent/polaris/node_modules/axios/lib/helpers/toFormData.js +0 -55
- package/@tencent/polaris/node_modules/axios/lib/helpers/validator.js +0 -82
- package/@tencent/polaris/node_modules/axios/lib/utils.js +0 -349
- package/@tencent/polaris/node_modules/axios/package.json +0 -86
- package/@tencent/polaris/node_modules/axios/tsconfig.json +0 -14
- package/@tencent/polaris/node_modules/axios/tslint.json +0 -6
- package/resource/doc/tuicallkit/vue/api_TUICallObserver.md +0 -926
|
@@ -0,0 +1,185 @@
|
|
|
1
|
+
## 适用场景
|
|
2
|
+
|
|
3
|
+
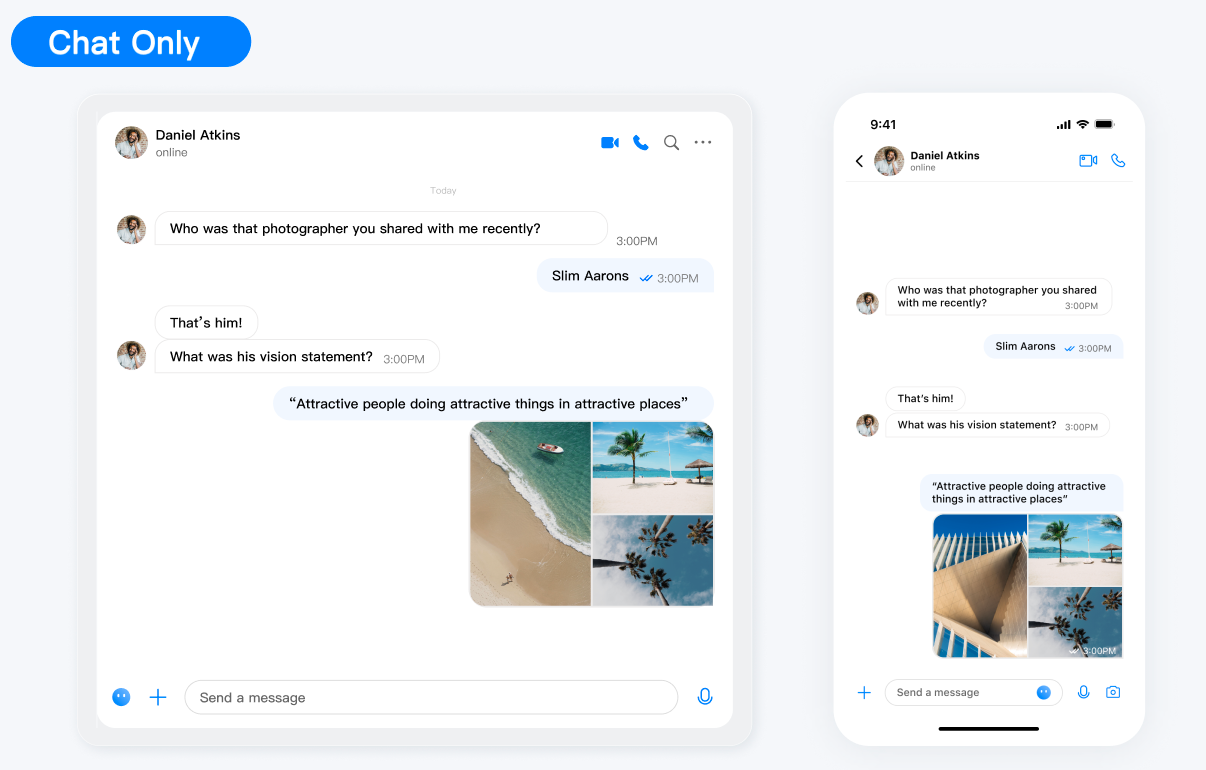
Web & H5 平台,独立集成私信聊天(1V1)或者群聊(Group),例如房产中介咨询、电商在线客服、保险远程定损等。
|
|
4
|
+
|
|
5
|
+
|
|
6
|
+
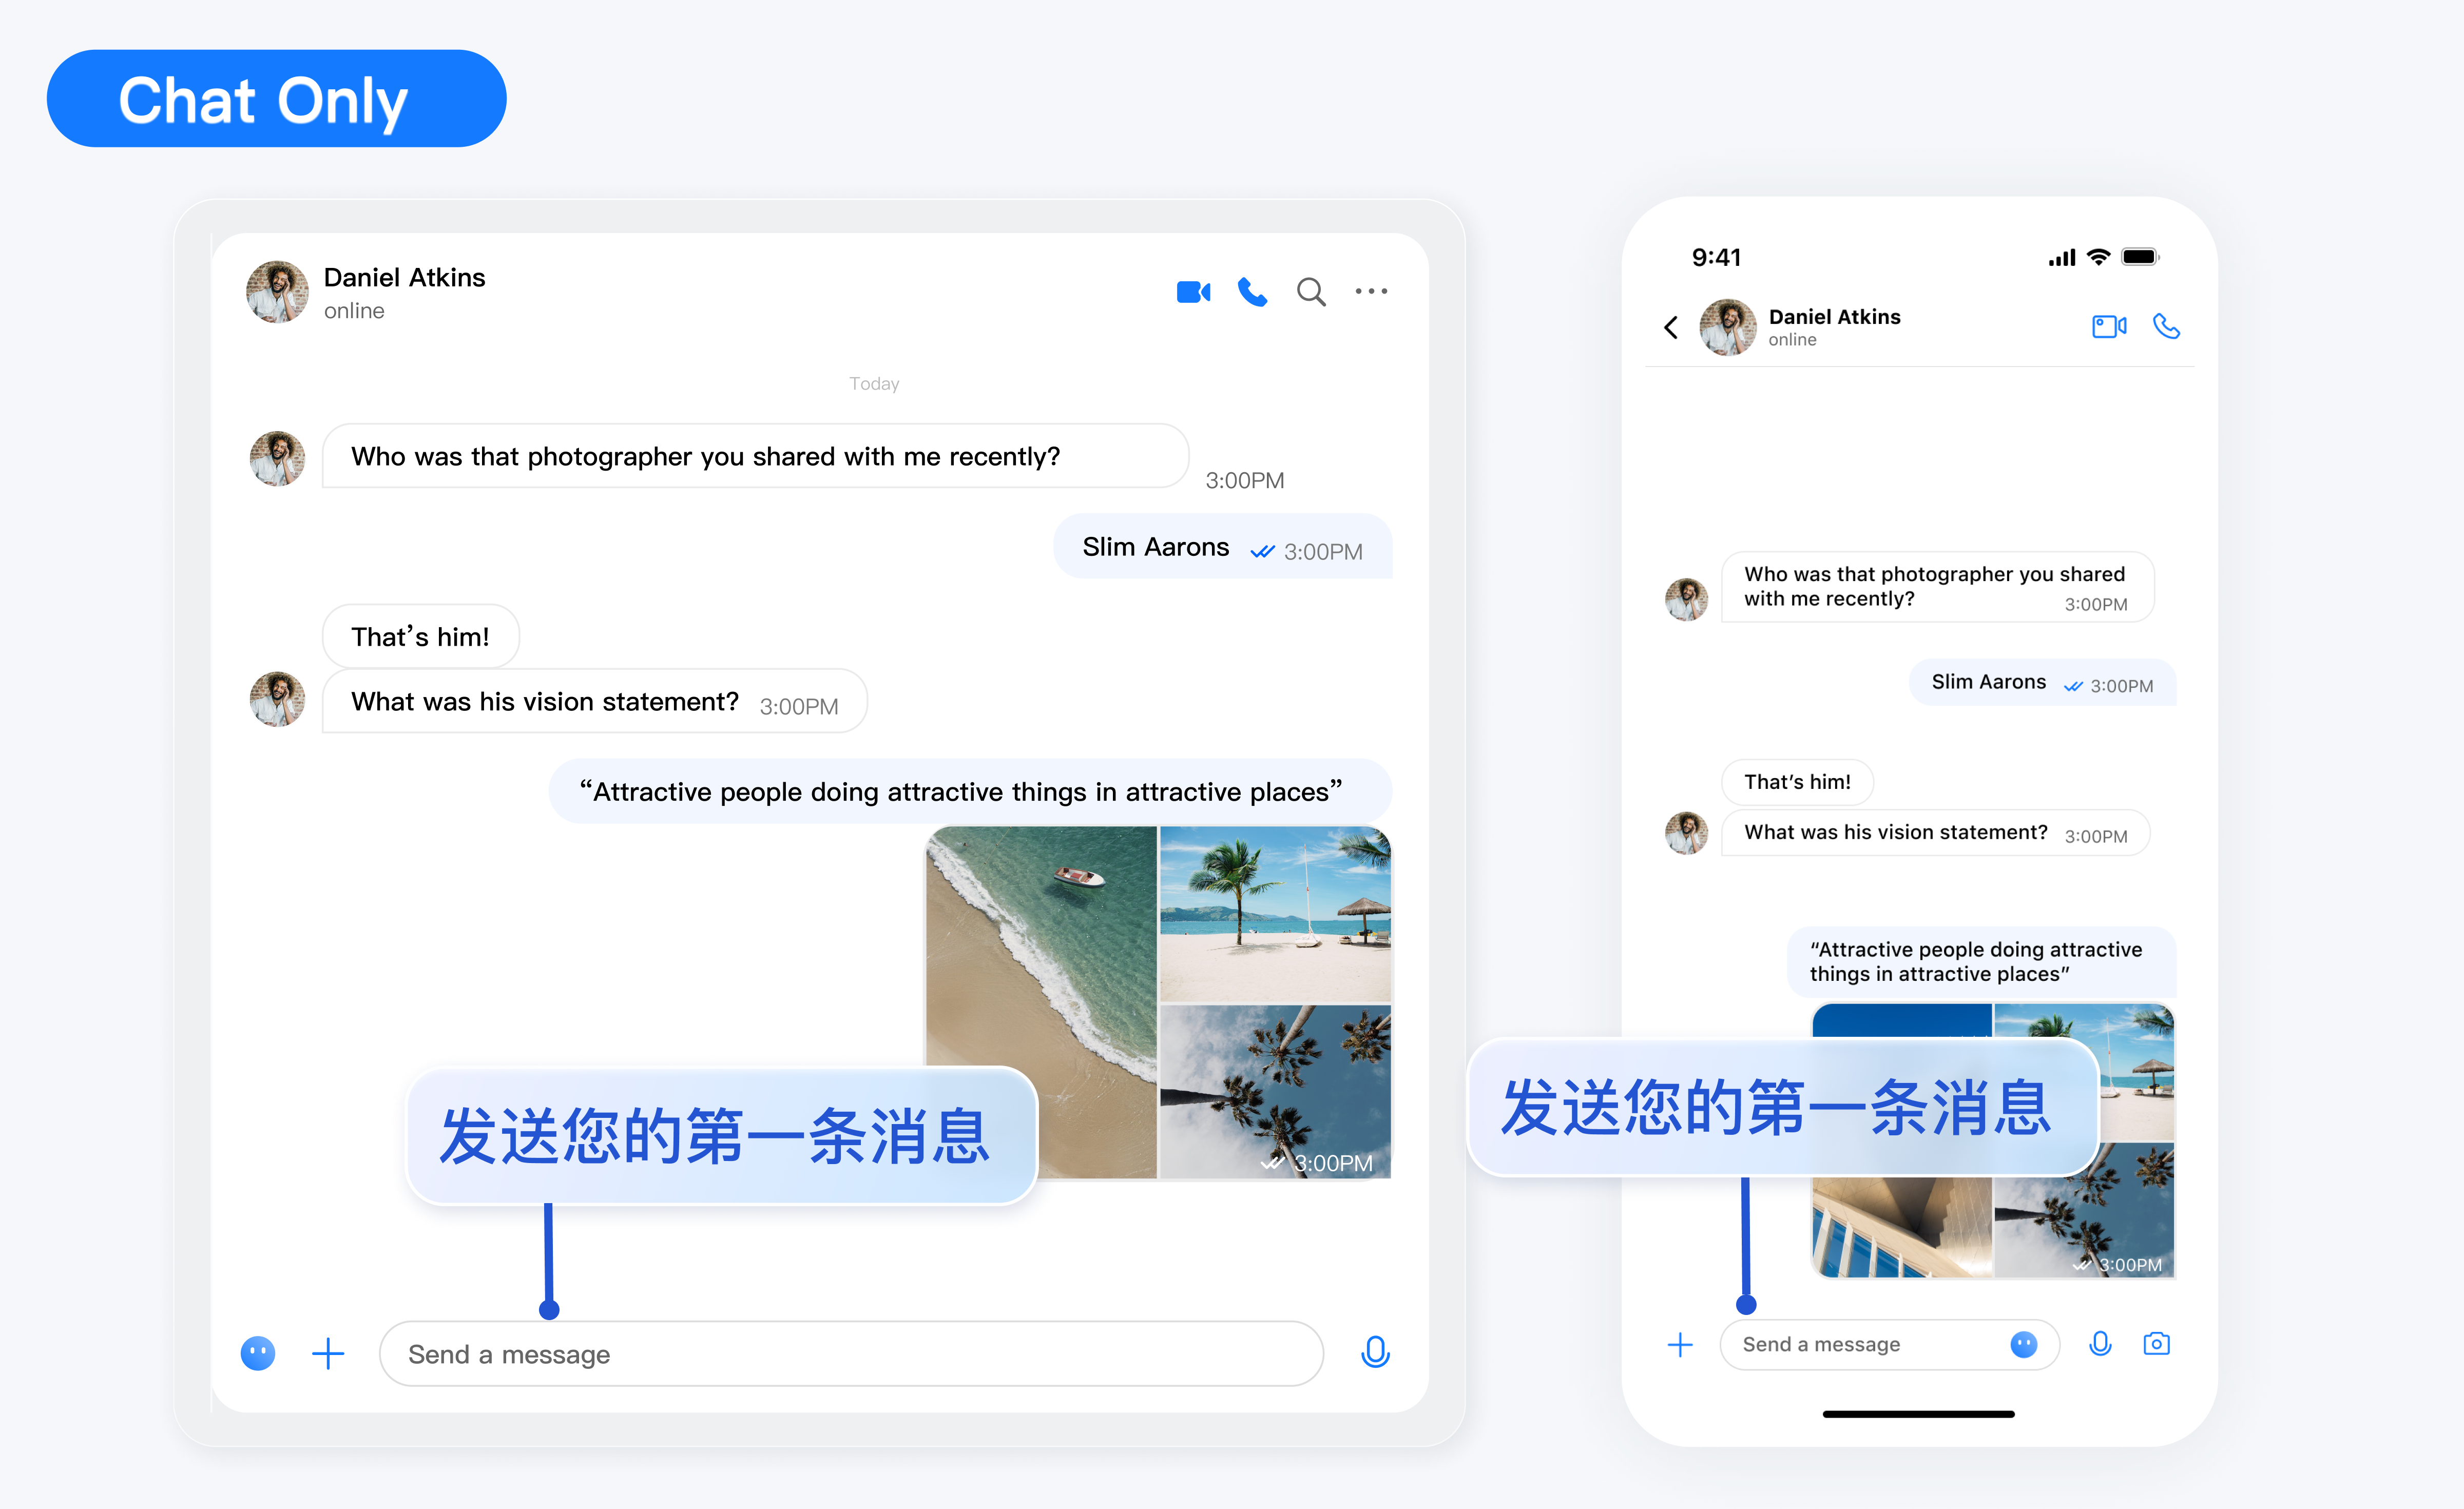
|
|
7
|
+
|
|
8
|
+
## 开发环境要求
|
|
9
|
+
- React ≥ v18.0 (17.x 版本不支持)
|
|
10
|
+
|
|
11
|
+
- TypeScript
|
|
12
|
+
|
|
13
|
+
- node(node.js ≥ 16.0.0)
|
|
14
|
+
|
|
15
|
+
- npm(版本请与 node 版本匹配)
|
|
16
|
+
|
|
17
|
+
|
|
18
|
+
## chat-uikit-react 集成
|
|
19
|
+
|
|
20
|
+
### 步骤1:创建项目
|
|
21
|
+
1. 创建一个新的 React 项目,您可自行选择是否需要使用 ts 模板。
|
|
22
|
+
|
|
23
|
+
|
|
24
|
+
|
|
25
|
+
【shell】
|
|
26
|
+
``` bash
|
|
27
|
+
npx create-react-app sample-chat --template typescript
|
|
28
|
+
```
|
|
29
|
+
2. 创建项目完成后,切换到项目所在目录。
|
|
30
|
+
|
|
31
|
+
|
|
32
|
+
|
|
33
|
+
【shell】
|
|
34
|
+
``` bash
|
|
35
|
+
cd sample-chat
|
|
36
|
+
```
|
|
37
|
+
|
|
38
|
+
### 步骤2:下载 chat-uikit-react 组件
|
|
39
|
+
|
|
40
|
+
通过 npm 方式下载 [chat-uikit-react](https://www.npmjs.com/package/@tencentcloud/chat-uikit-react) 并在项目中使用。
|
|
41
|
+
|
|
42
|
+
|
|
43
|
+
【shell】
|
|
44
|
+
``` bash
|
|
45
|
+
npm i @tencentcloud/chat-uikit-react @tencentcloud/uikit-base-component-react
|
|
46
|
+
```
|
|
47
|
+
|
|
48
|
+
### 步骤3:引入 chat-uikit-react 组件,创建并打开会话进行聊天
|
|
49
|
+
|
|
50
|
+
> **注意:**
|
|
51
|
+
>
|
|
52
|
+
|
|
53
|
+
> 以下代码中未填入 `SDKAppID`、`userID` 和 `userSig`,需在 [步骤4](https://write.woa.com/#step4) 中获取相关信息后进行替换。
|
|
54
|
+
>
|
|
55
|
+
|
|
56
|
+
|
|
57
|
+
> **说明:**
|
|
58
|
+
>
|
|
59
|
+
> - 关于群聊:
|
|
60
|
+
> - 可以通过调用 API [createC2CConversation](https://write.woa.com/document/157860942511771648) 来创建单聊。
|
|
61
|
+
> - 可以通过调用 API [createGroupConversation](https://write.woa.com/document/157860942511771648) 来创建群聊。
|
|
62
|
+
> - 进入聊天的方式:
|
|
63
|
+
> - 通过调用 API [setActiveConversation](https://write.woa.com/document/157860942511771648),传入 conversationID 进入聊天页面。
|
|
64
|
+
|
|
65
|
+
|
|
66
|
+
替换 App.tsx 中的内容,或者您可以新建一个组件引入。
|
|
67
|
+
``` javascript
|
|
68
|
+
import React from 'react';
|
|
69
|
+
import {
|
|
70
|
+
Chat,
|
|
71
|
+
ChatHeader,
|
|
72
|
+
MessageList,
|
|
73
|
+
MessageInput,
|
|
74
|
+
ChatSetting,
|
|
75
|
+
Search,
|
|
76
|
+
VariantType,
|
|
77
|
+
useUIOpenControlState,
|
|
78
|
+
useLoginState,
|
|
79
|
+
useConversationListState,
|
|
80
|
+
} from '@tencentcloud/chat-uikit-react';
|
|
81
|
+
import { UIKitProvider } from '@tencentcloud/uikit-base-component-react';
|
|
82
|
+
|
|
83
|
+
const config = {
|
|
84
|
+
SDKAppID: 0, // 您的 SDKAppID, 参考步骤4
|
|
85
|
+
userID: 'test-user1', // 您登录的 UserID, 参考步骤4
|
|
86
|
+
userSig: '', // 您的 userSig, 参考步骤4
|
|
87
|
+
}
|
|
88
|
+
|
|
89
|
+
export default function App() {
|
|
90
|
+
// 语言支持 en-US(default) / zh-CN / ja-JP / ko-KR / zh-TW
|
|
91
|
+
// 主题支持 light(default) / dark
|
|
92
|
+
const { isChatSettingOpen, isChatSearchOpen } = useUIOpenControlState();
|
|
93
|
+
const { setActiveConversation, createC2CConversation } = useConversationListState();
|
|
94
|
+
const { login } = useLoginState();
|
|
95
|
+
login(config).then(() => {
|
|
96
|
+
const userID = 'test-user2'; // userID: 消息接收方的 userID
|
|
97
|
+
createC2CConversation(userID).then((conversation) => {
|
|
98
|
+
setActiveConversation(conversation.conversationID);
|
|
99
|
+
})
|
|
100
|
+
}).catch(() => {});
|
|
101
|
+
return (
|
|
102
|
+
<div style={{display: 'flex', height: '100vh'}}>
|
|
103
|
+
<UIKitProvider language='en-US' theme='light'>
|
|
104
|
+
<Chat>
|
|
105
|
+
<ChatHeader />
|
|
106
|
+
<MessageList />
|
|
107
|
+
<MessageInput />
|
|
108
|
+
</Chat>
|
|
109
|
+
{isChatSettingOpen && <ChatSetting />}
|
|
110
|
+
{isChatSearchOpen && <Search style={{ minWidth: '300px'}} variant={VariantType.EMBEDDED} />}
|
|
111
|
+
</UIKitProvider>
|
|
112
|
+
</div>
|
|
113
|
+
);
|
|
114
|
+
}
|
|
115
|
+
```
|
|
116
|
+
|
|
117
|
+
### 步骤4:获取 SDKAppID、userID 和 userSig
|
|
118
|
+
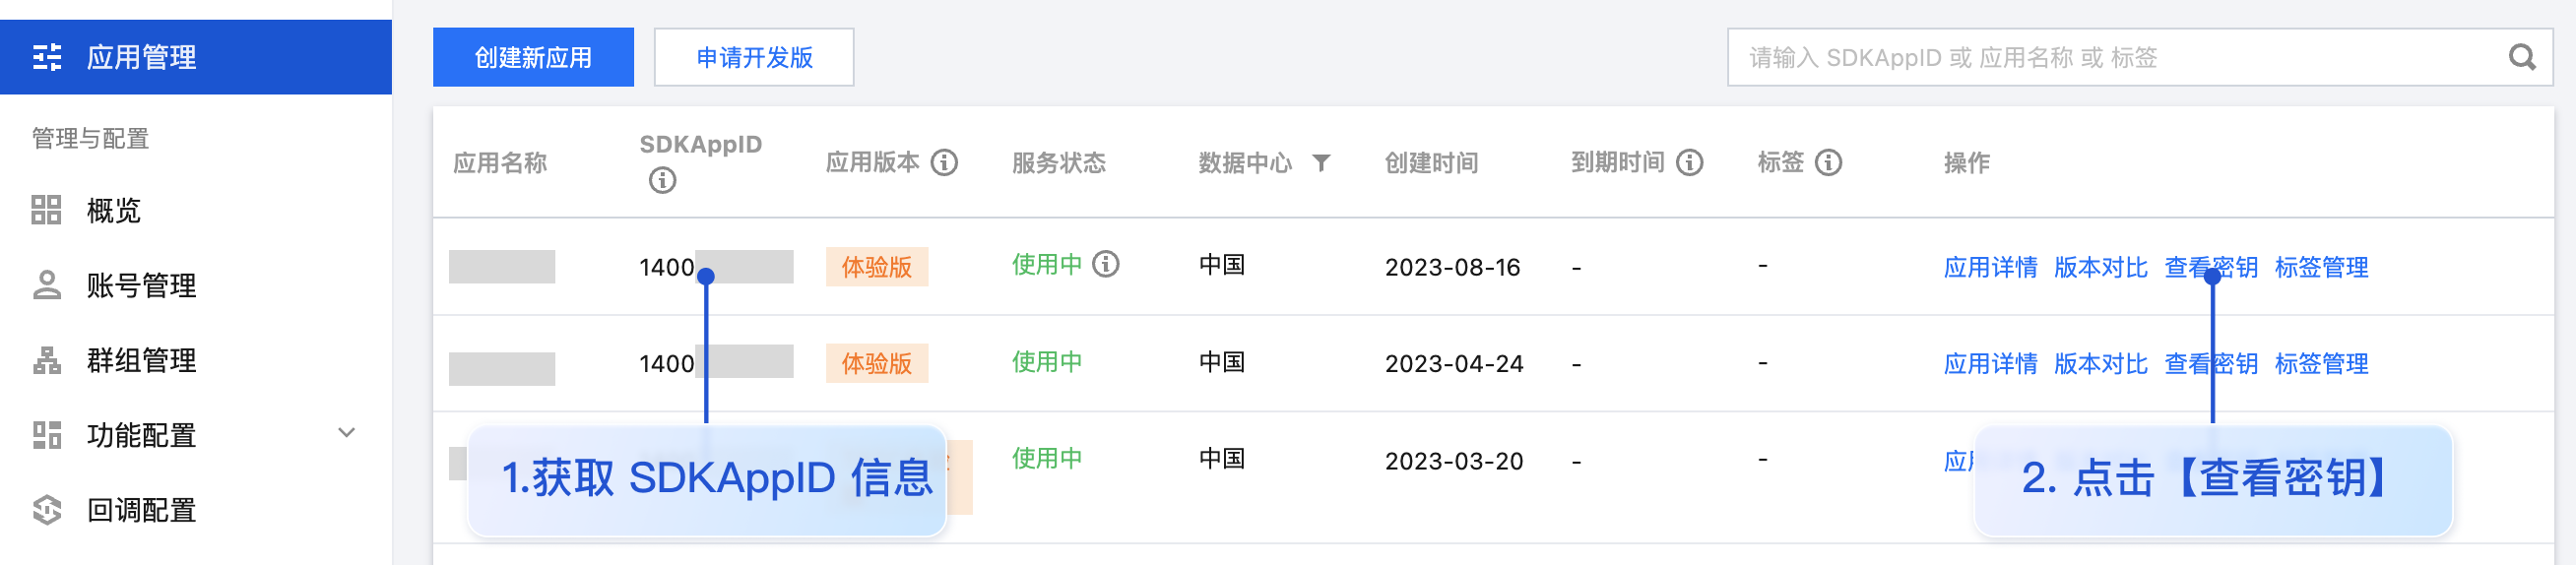
- SDKAppID:SDKAppID 是腾讯云 IM 服务区分客户账号的唯一标识。我们建议每一个独立的 App 都申请一个新的 SDKAppID。不同 SDKAppID 之间的消息是天然隔离的,不能互通。
|
|
119
|
+
|
|
120
|
+
|
|
121
|
+
您可以在 [即时通信 IM 控制台](https://console.cloud.tencent.com/im) 查看所有的 SDKAppID,单击**创建新应用**,可以创建新的 SDKAppID。
|
|
122
|
+
|
|
123
|
+
|
|
124
|
+
|
|
125
|
+
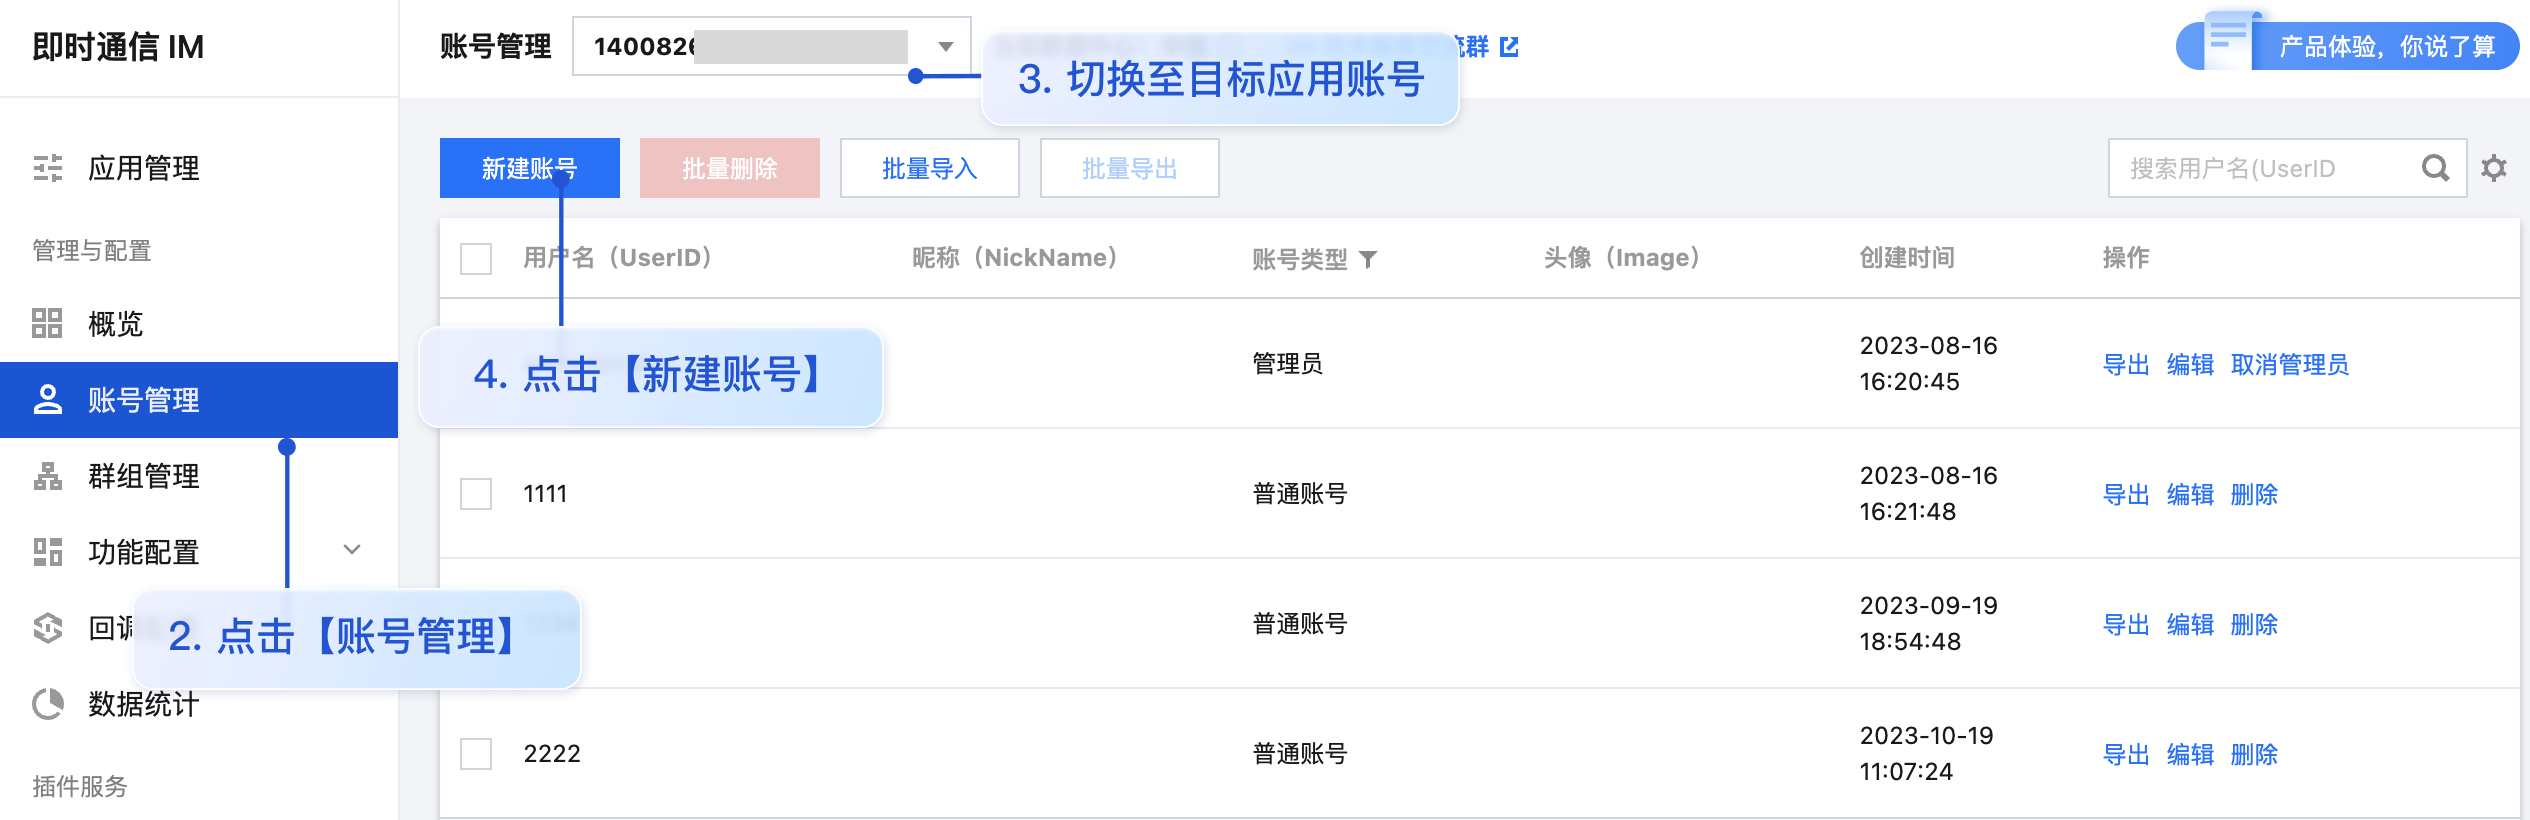
- userID:可通过单击 [即时通信 IM 控制台 > 账号管理](https://console.cloud.tencent.com/im/account-management),切换至目标应用所在账号,即可创建账号并获取 userID。**您可以创建两个或多个 userID 便于体验聊天。**
|
|
126
|
+
|
|
127
|
+
|
|
128
|
+
**例如:创建 test-user1、test-user2 两个账号**
|
|
129
|
+
|
|
130
|
+
|
|
131
|
+
|
|
132
|
+
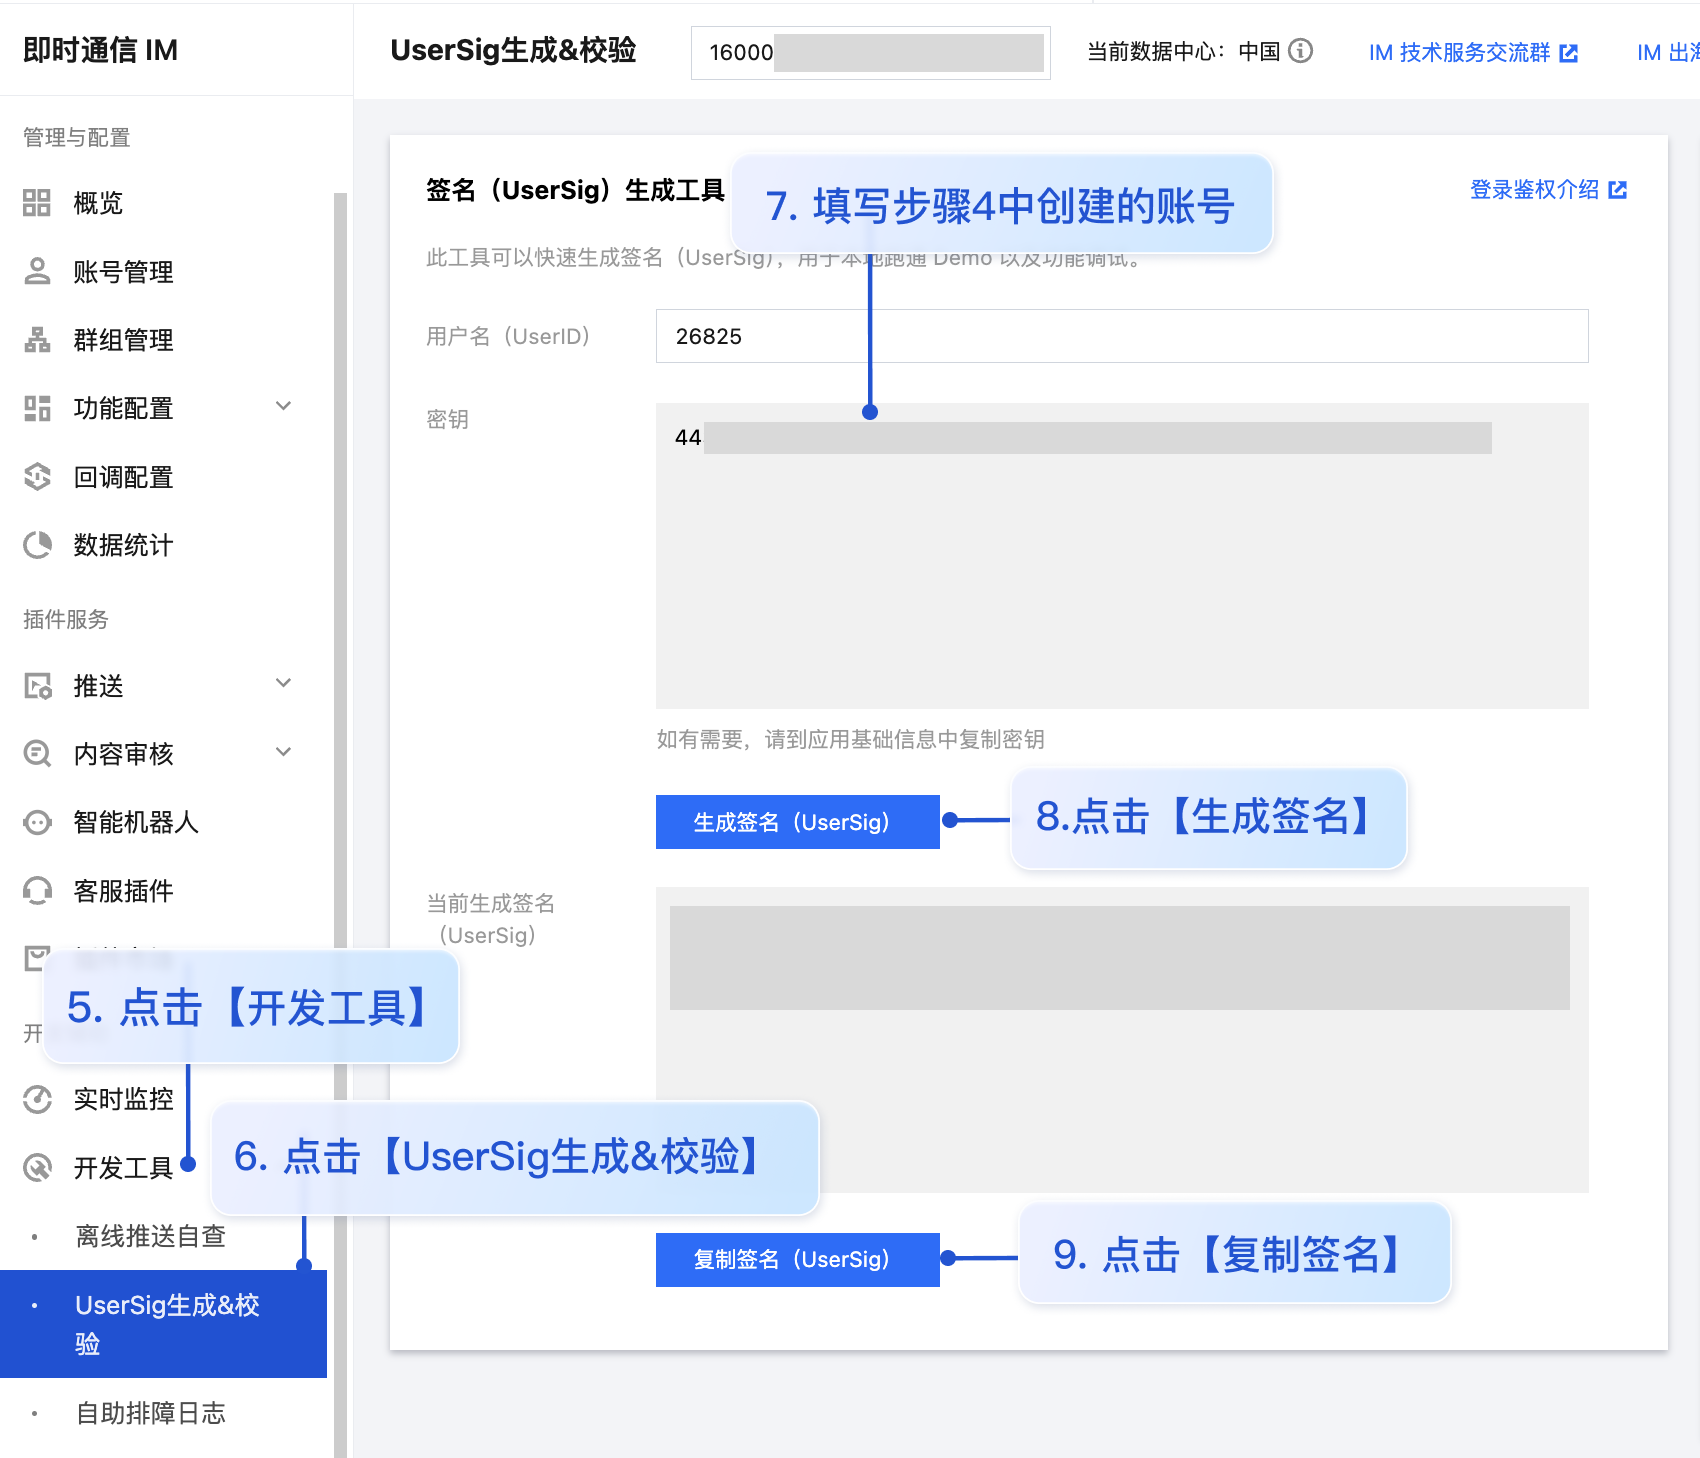
- userSig:可单击 [即时通信 IM 控制台 > 开发工具 > UserSig生成&校验](https://console.cloud.tencent.com/im/tool-usersig),填写创建的 UserID,即可生成 UserSig。
|
|
133
|
+
|
|
134
|
+
|
|
135
|
+
|
|
136
|
+
|
|
137
|
+
### 步骤5:启动项目
|
|
138
|
+
|
|
139
|
+
|
|
140
|
+
【shell】
|
|
141
|
+
``` bash
|
|
142
|
+
npm run start
|
|
143
|
+
```
|
|
144
|
+
|
|
145
|
+
> **注意:**
|
|
146
|
+
>
|
|
147
|
+
> 1. 请确保 [步骤3](https://write.woa.com/#step3) 代码中 SDKAppID、userID 和 userSig 均已成功替换,如未替换将会导致项目表现异常。
|
|
148
|
+
> 2. userID 和 userSig 为一一对应关系,具体参见 [生成 UserSig](https://console.cloud.tencent.com/im/tool-usersig)。
|
|
149
|
+
> 3. 如遇到项目启动失败,请检查 开发环境要求 是否满足。
|
|
150
|
+
|
|
151
|
+
|
|
152
|
+
### 步骤6:发送您的第一条消息
|
|
153
|
+
|
|
154
|
+
在输入框输入消息,按下 **enter **键发送。
|
|
155
|
+
|
|
156
|
+
|
|
157
|
+
|
|
158
|
+
|
|
159
|
+
## 常见问题
|
|
160
|
+
|
|
161
|
+
#### 什么是 UserSig?
|
|
162
|
+
|
|
163
|
+
UserSig 是用户登录即时通信 IM 的密码,其本质是对 UserID 等信息加密后得到的密文。
|
|
164
|
+
|
|
165
|
+
#### 如何生成 UserSig?
|
|
166
|
+
|
|
167
|
+
UserSig 签发方式是将 UserSig 的计算代码集成到您的服务端,并提供面向项目的接口,在需要 UserSig 时由您的项目向业务服务器发起请求获取动态 UserSig。更多详情请参见 [服务端生成 UserSig](https://cloud.tencent.com/document/product/269/32688)。
|
|
168
|
+
|
|
169
|
+
> **注意:**
|
|
170
|
+
>
|
|
171
|
+
|
|
172
|
+
> 本文示例代码采用的获取 UserSig 的方案是在客户端代码中配置 SECRETKEY,该方法中 SECRETKEY 很容易被反编译逆向破解,一旦您的密钥泄露,攻击者就可以盗用您的腾讯云流量,因此**该方法仅适合本地跑通功能调试**。 正确的 UserSig 签发方式请参见上文。
|
|
173
|
+
>
|
|
174
|
+
|
|
175
|
+
|
|
176
|
+
#### 是否支持 react 17.x 版本?
|
|
177
|
+
|
|
178
|
+
目前不支持 17.x 版本,仅支持 React ≥ v18.0。
|
|
179
|
+
|
|
180
|
+
## 参考文档
|
|
181
|
+
- [chat-uikit-react npm](https://www.npmjs.com/package/@tencentcloud/chat-uikit-react)
|
|
182
|
+
|
|
183
|
+
- [Demo源码及跑通示例](https://github.com/TencentCloud/chat-uikit-react)
|
|
184
|
+
|
|
185
|
+
|
|
@@ -0,0 +1,212 @@
|
|
|
1
|
+
## chat-uikit-react 介绍
|
|
2
|
+
|
|
3
|
+
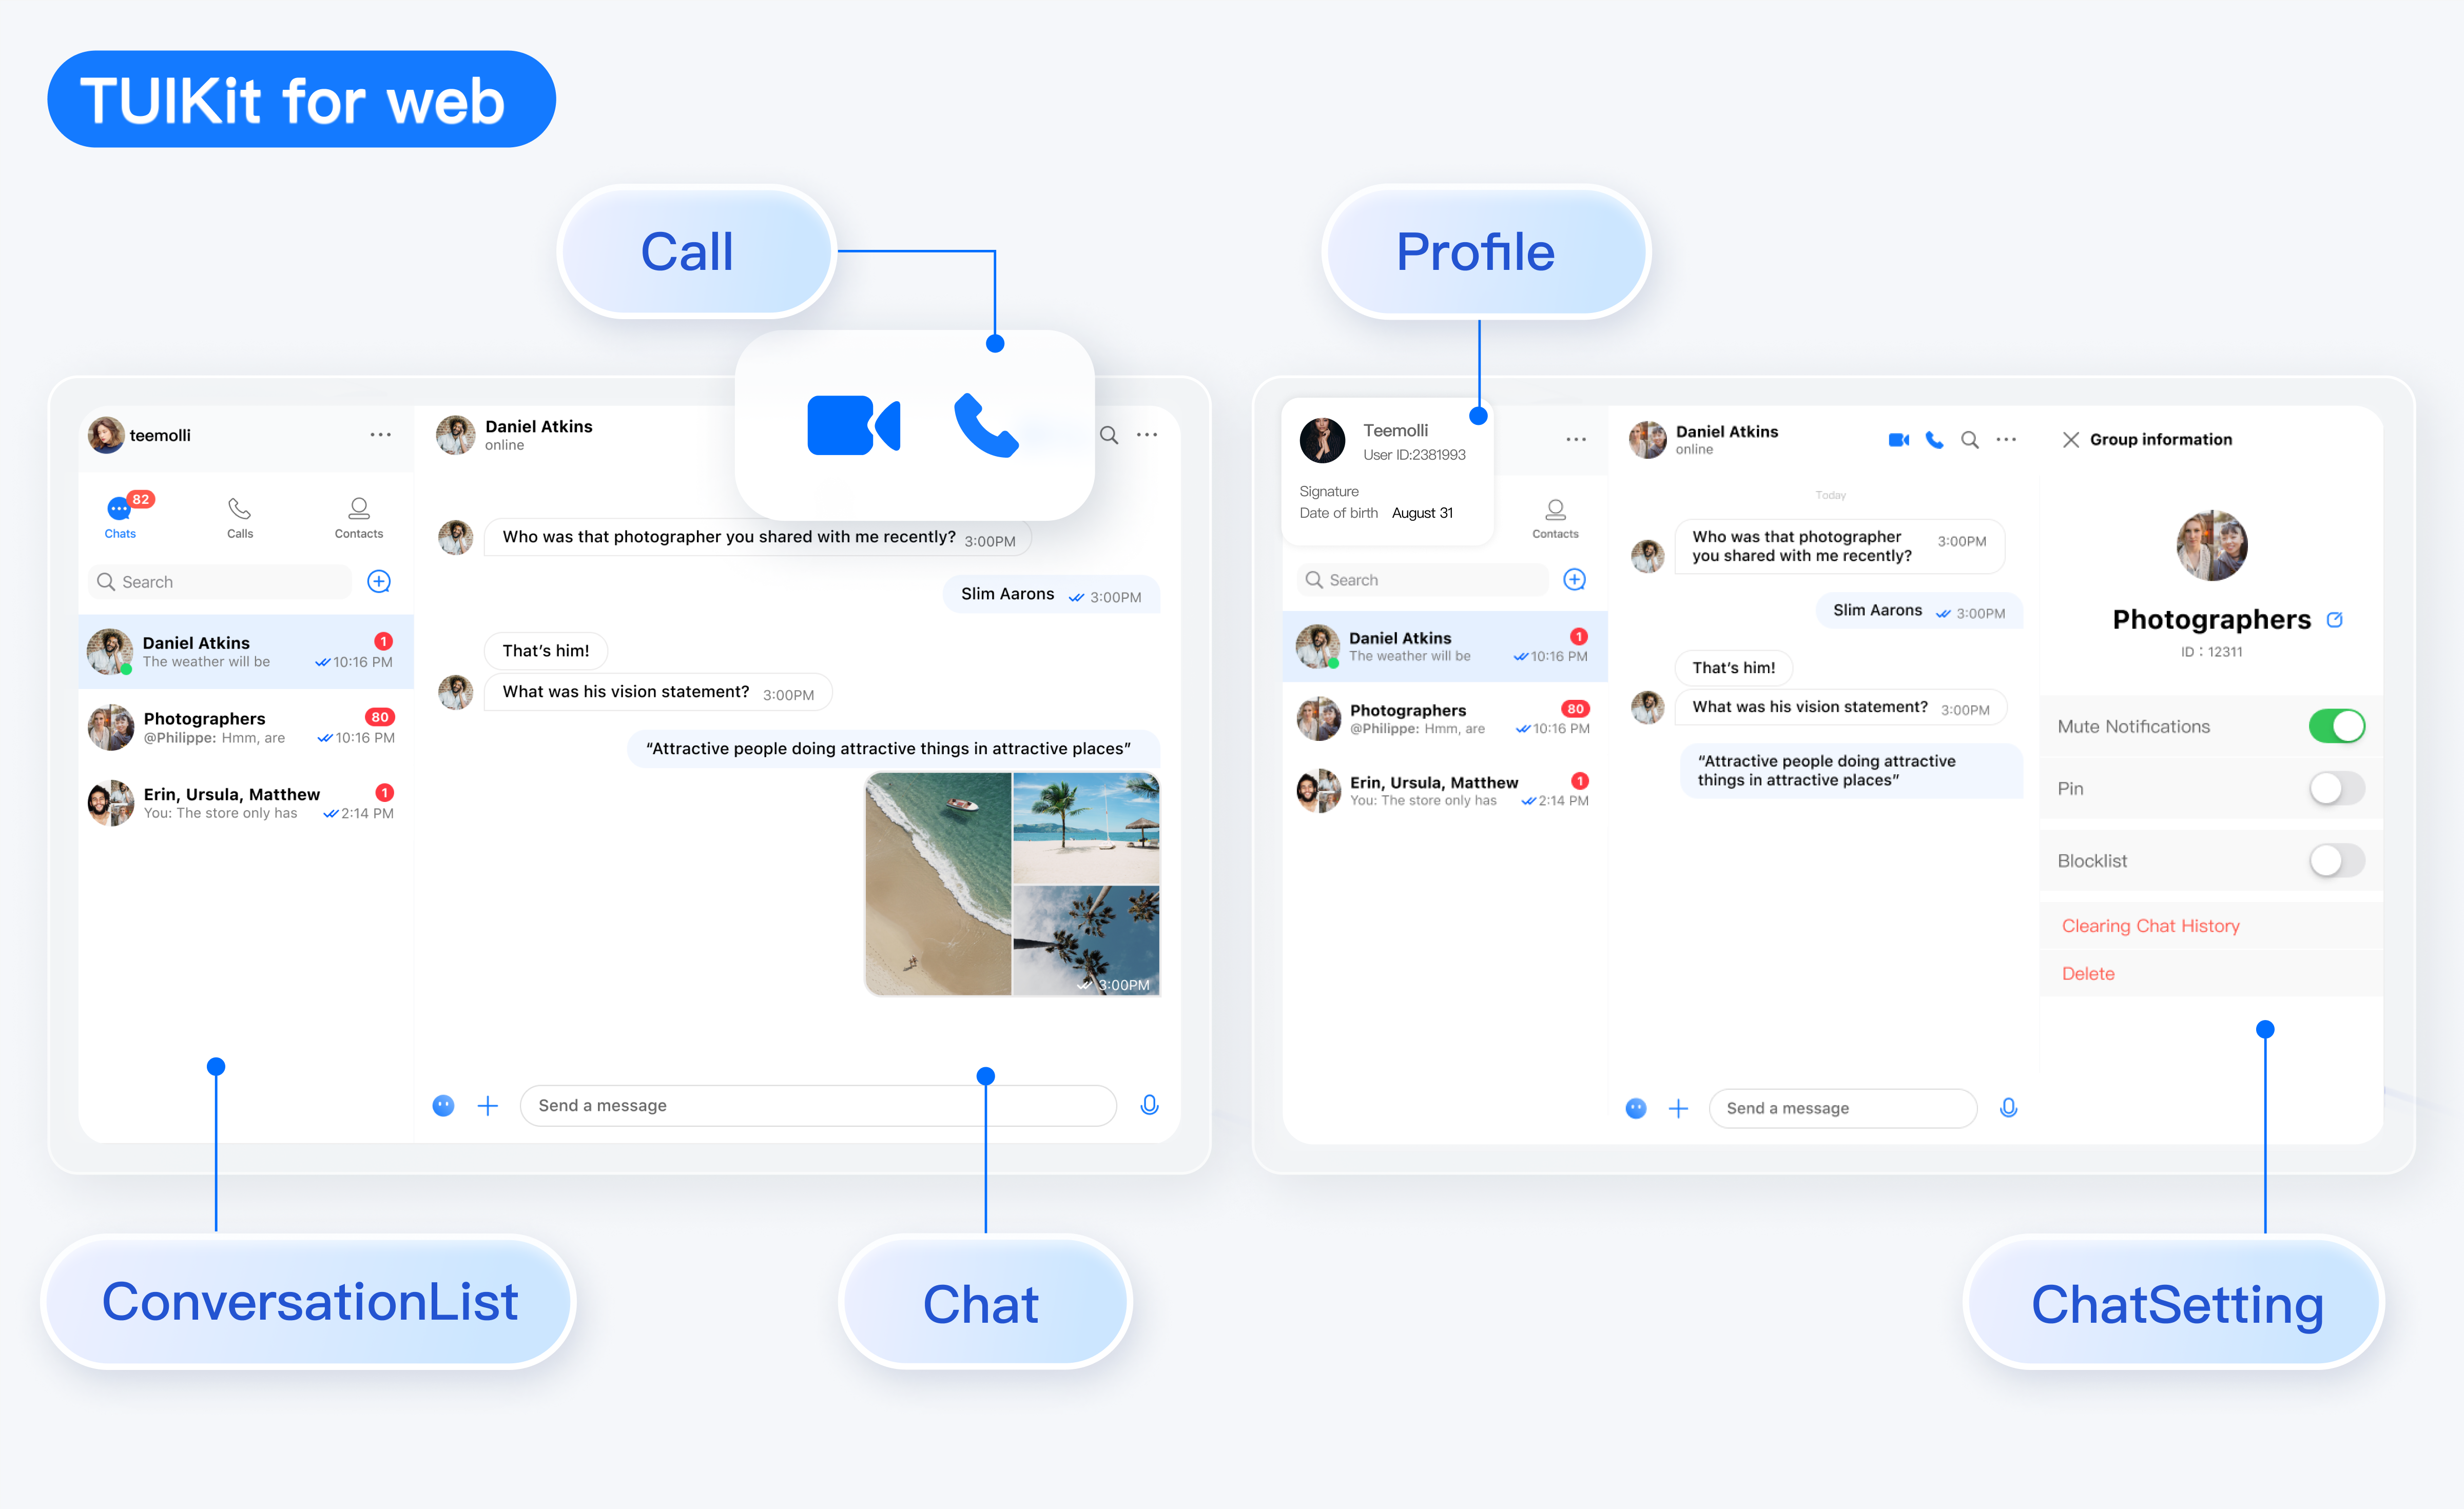
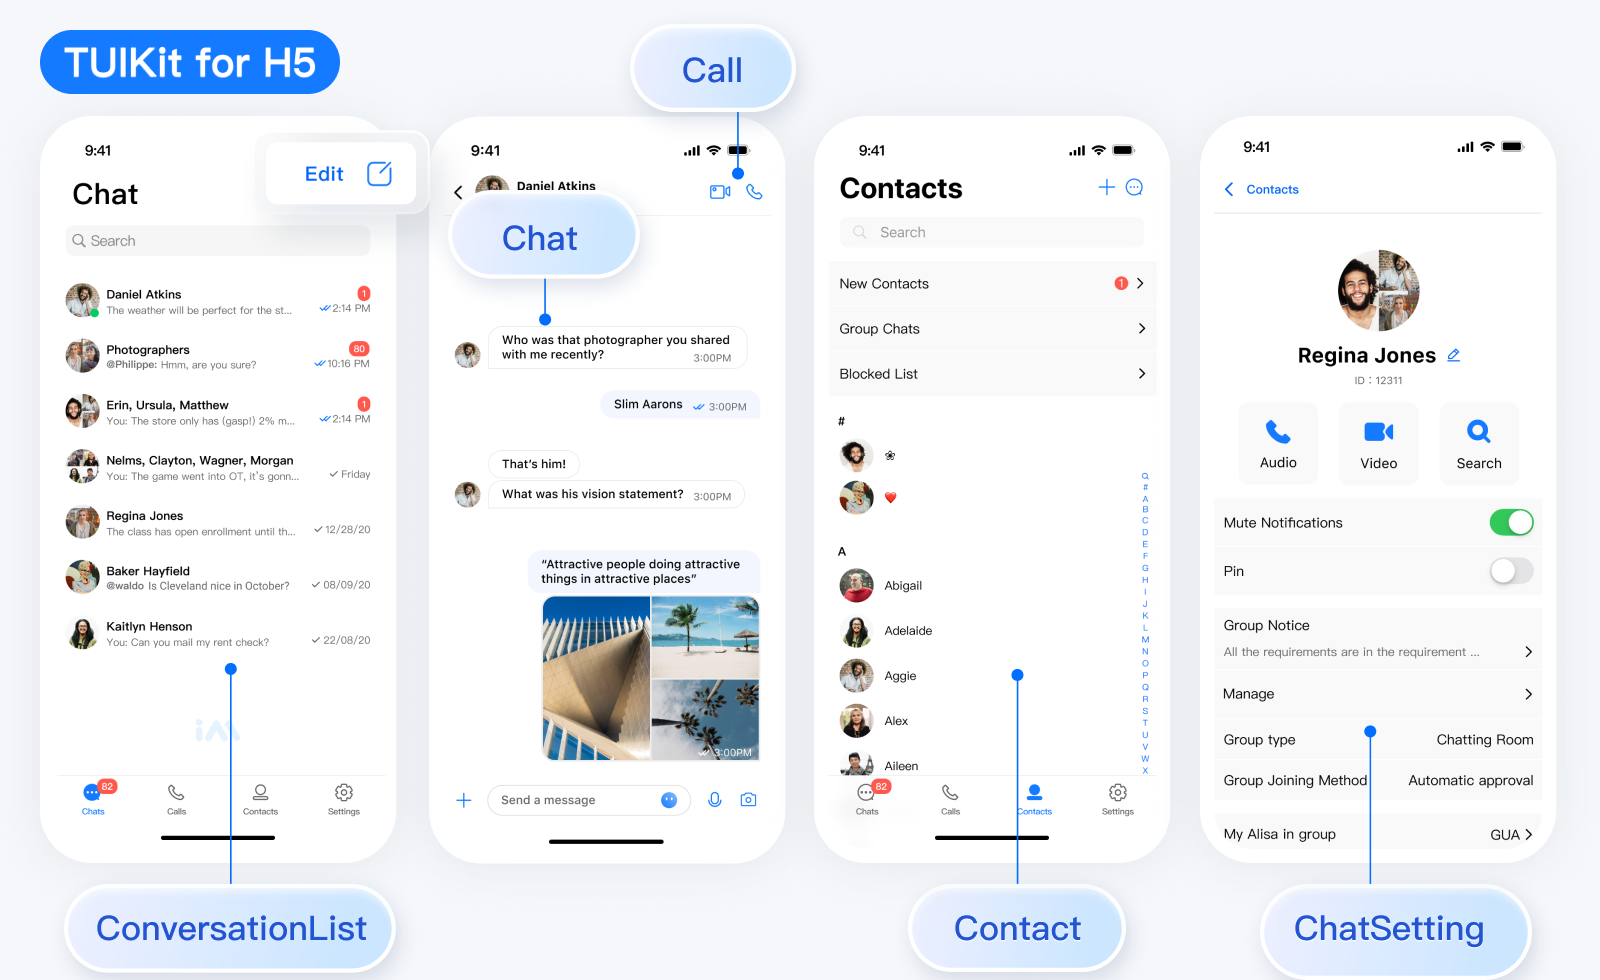
chat-uikit-react 是基于腾讯云 Chat SDK 的一款 react UI 组件库,它提供了一些通用的 UI 组件,包含会话、聊天、群组等功能。基于这些精心设计的 UI 组件,您可以快速构建优雅的、可靠的、可扩展的 Chat 应用。 chat-uikit-react 界面效果如下图所示:
|
|
4
|
+
|
|
5
|
+
您可以在线体验:
|
|
6
|
+
- [Web Demo](https://web.sdk.qcloud.com/im/demo/react/index.html?scene=social)
|
|
7
|
+
|
|
8
|
+
- [H5 Demo](https://trtc.io/demo/homepage/#/detail?scene=messenger)
|
|
9
|
+
|
|
10
|
+
|
|
11
|
+
**TUIKit Web 端**界面效果如下图所示:
|
|
12
|
+
|
|
13
|
+
|
|
14
|
+
|
|
15
|
+
|
|
16
|
+
**TUIKit H5 端**界面效果如下图所示:
|
|
17
|
+
|
|
18
|
+
|
|
19
|
+
|
|
20
|
+
|
|
21
|
+
## 开发环境要求
|
|
22
|
+
- React v18
|
|
23
|
+
|
|
24
|
+
- TypeScript
|
|
25
|
+
|
|
26
|
+
- Node.js ≥ v18
|
|
27
|
+
|
|
28
|
+
- npm(版本请与 node 版本匹配)
|
|
29
|
+
|
|
30
|
+
|
|
31
|
+
## chat-uikit-react 集成
|
|
32
|
+
|
|
33
|
+
### 步骤1:创建项目
|
|
34
|
+
|
|
35
|
+
创建一个新的名为 **chat-app** 的 React 项目(创建项目时选择 React 18,并且建议使用 TypeScript 模板),并按照提示跑通脚手架初始项目。
|
|
36
|
+
|
|
37
|
+
|
|
38
|
+
【shell】
|
|
39
|
+
``` bash
|
|
40
|
+
npm create rsbuild@latest
|
|
41
|
+
```
|
|
42
|
+
|
|
43
|
+
### 步骤2:下载 chat-uikit-react 组件
|
|
44
|
+
|
|
45
|
+
通过 npm 方式下载 [chat-uikit-react](https://www.npmjs.com/package/@tencentcloud/chat-uikit-react) 并在项目中使用。
|
|
46
|
+
|
|
47
|
+
|
|
48
|
+
【shell】
|
|
49
|
+
``` bash
|
|
50
|
+
npm i @tencentcloud/chat-uikit-react
|
|
51
|
+
```
|
|
52
|
+
|
|
53
|
+
### 步骤3:引入 chat-uikit-react 组件
|
|
54
|
+
|
|
55
|
+
> **注意:**
|
|
56
|
+
>
|
|
57
|
+
> - 以下代码中未填入 `SDKAppID`、`userID` 和 `userSig`,需在 [步骤4](https://write.woa.com/#step4) 中获取相关信息后进行替换。
|
|
58
|
+
> - 为了尊重表情符号设计的版权,Demo/UIKit 项目不包括大型表情元素的剪切图。请在正式商业发布之前,用您自己设计或拥有版权的表情包替换它们。默认的小黄脸表情包由腾讯云拥有版权,并可以收费授权。如果您希望获得授权,请提交工单与我们联系。
|
|
59
|
+
|
|
60
|
+
|
|
61
|
+
替换 App.tsx 中的内容,或者您可以新建一个组件引入。
|
|
62
|
+
``` typescript
|
|
63
|
+
import {
|
|
64
|
+
UIKitProvider,
|
|
65
|
+
useLoginState,
|
|
66
|
+
LoginStatus,
|
|
67
|
+
ConversationList,
|
|
68
|
+
Chat,
|
|
69
|
+
ChatHeader,
|
|
70
|
+
MessageList,
|
|
71
|
+
MessageInput,
|
|
72
|
+
useUIOpenControlState,
|
|
73
|
+
ChatSetting,
|
|
74
|
+
Search,
|
|
75
|
+
VariantType,
|
|
76
|
+
ContactList,
|
|
77
|
+
ContactInfo,
|
|
78
|
+
} from "@tencentcloud/chat-uikit-react";
|
|
79
|
+
import { useState } from "react";
|
|
80
|
+
|
|
81
|
+
function App() {
|
|
82
|
+
const { isChatSettingOpen, isChatSearchOpen } = useUIOpenControlState();
|
|
83
|
+
const [activeTab, setActiveTab] = useState('chats');
|
|
84
|
+
|
|
85
|
+
const { status } = useLoginState({
|
|
86
|
+
SDKAppID: 0, // 参考步骤 4
|
|
87
|
+
userID: '', // 参考步骤 4
|
|
88
|
+
userSig: '', // 参考步骤 4
|
|
89
|
+
})
|
|
90
|
+
|
|
91
|
+
if (status !== LoginStatus.SUCCESS) {
|
|
92
|
+
return <div>Loading...</div>
|
|
93
|
+
}
|
|
94
|
+
|
|
95
|
+
// 语言支持 en-US(default) / zh-CN / ja-JP / ko-KR / zh-TW
|
|
96
|
+
// 主题支持 light(default) / dark
|
|
97
|
+
return (
|
|
98
|
+
<UIKitProvider>
|
|
99
|
+
<div style={{ height: '100vh', width: '100vw', display: 'flex', flexDirection: 'row' }}>
|
|
100
|
+
<ul>
|
|
101
|
+
<li onClick={() => {setActiveTab('chats')}}>chats</li>
|
|
102
|
+
<li onClick={() => {setActiveTab('contacts')}}>contact</li>
|
|
103
|
+
</ul>
|
|
104
|
+
{
|
|
105
|
+
activeTab === 'chats' && (
|
|
106
|
+
<>
|
|
107
|
+
<ConversationList style={{ minWidth: '300px', maxWidth: '350px' }}/>
|
|
108
|
+
<Chat PlaceholderEmpty="No messages yet">
|
|
109
|
+
<ChatHeader />
|
|
110
|
+
<MessageList />
|
|
111
|
+
<MessageInput />
|
|
112
|
+
</Chat>
|
|
113
|
+
{isChatSettingOpen && <ChatSetting />}
|
|
114
|
+
{isChatSearchOpen && <Search style={{ minWidth: '300px'}} variant={VariantType.EMBEDDED} />}
|
|
115
|
+
</>
|
|
116
|
+
)
|
|
117
|
+
}
|
|
118
|
+
{
|
|
119
|
+
activeTab === 'contacts' && (
|
|
120
|
+
<>
|
|
121
|
+
<ContactList style={{ minWidth: '300px', maxWidth: '350px' }}/>
|
|
122
|
+
<ContactInfo
|
|
123
|
+
PlaceholderEmpty="No contact yet"
|
|
124
|
+
onSendMessage={() => {setActiveTab('chats')}}
|
|
125
|
+
onEnterGroup={() => {setActiveTab('chats')}}
|
|
126
|
+
/>
|
|
127
|
+
</>
|
|
128
|
+
)
|
|
129
|
+
}
|
|
130
|
+
</div>
|
|
131
|
+
</UIKitProvider>
|
|
132
|
+
);
|
|
133
|
+
}
|
|
134
|
+
|
|
135
|
+
export default App;
|
|
136
|
+
```
|
|
137
|
+
|
|
138
|
+
### 步骤4:获取 SDKAppID、userID 和 userSig
|
|
139
|
+
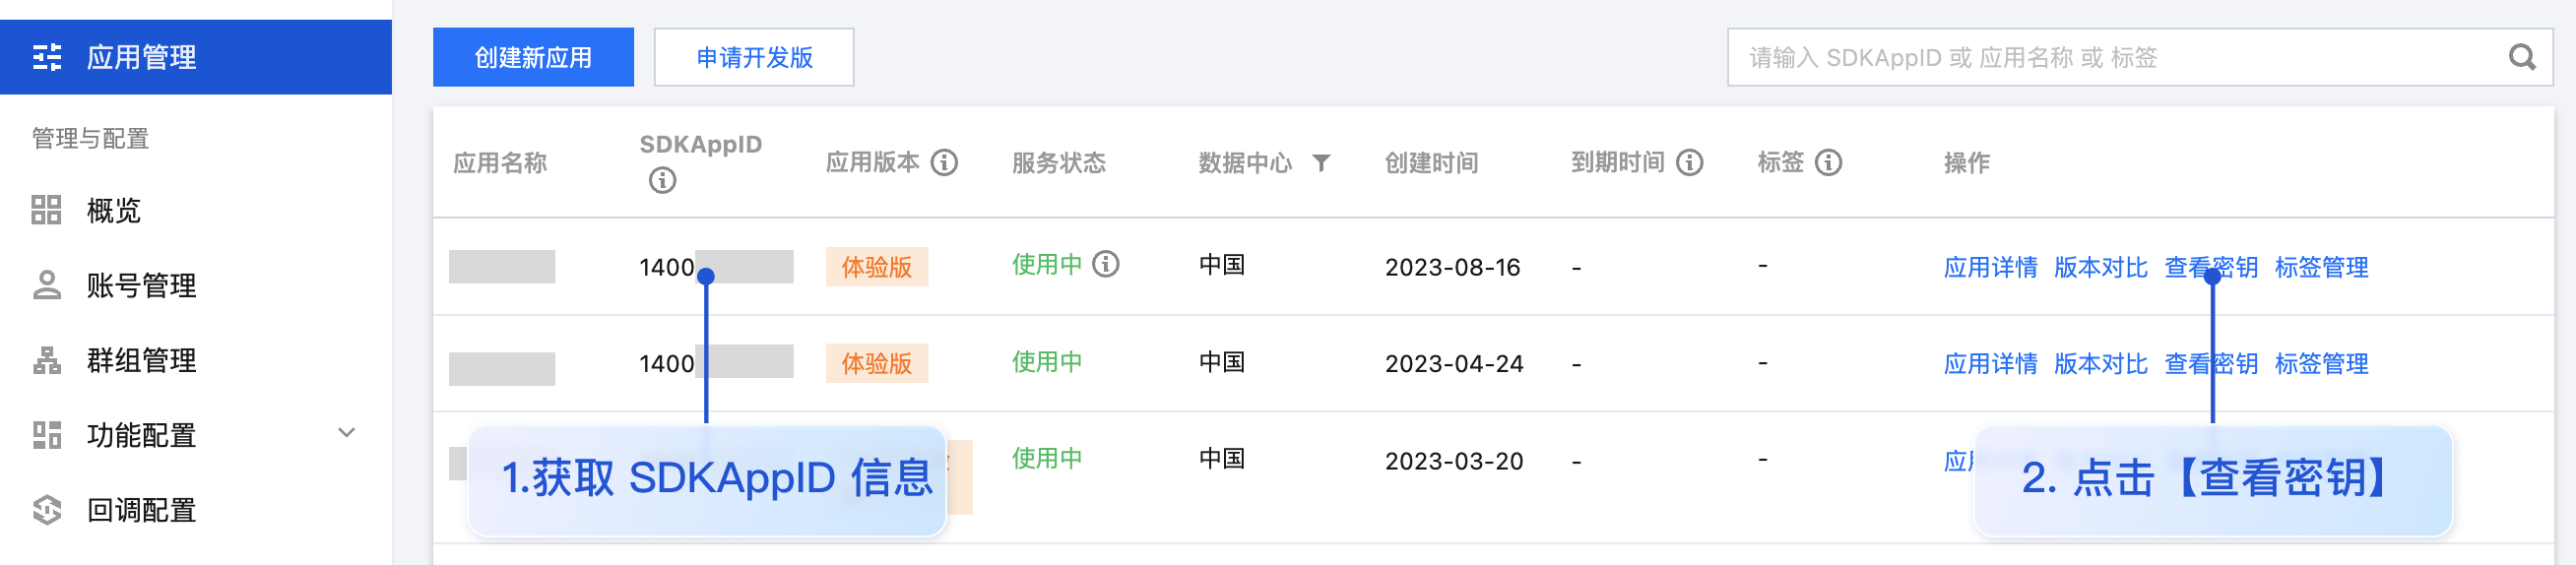
- SDKAppID:SDKAppID 是腾讯云 IM 服务区分客户账号的唯一标识。我们建议每一个独立的 App 都申请一个新的 SDKAppID。不同 SDKAppID 之间的消息是天然隔离的,不能互通。
|
|
140
|
+
|
|
141
|
+
|
|
142
|
+
您可以在 [即时通信 IM 控制台](https://console.cloud.tencent.com/im) 查看所有的 SDKAppID,单击**创建新应用**,可以创建新的 SDKAppID。
|
|
143
|
+
|
|
144
|
+
|
|
145
|
+
|
|
146
|
+
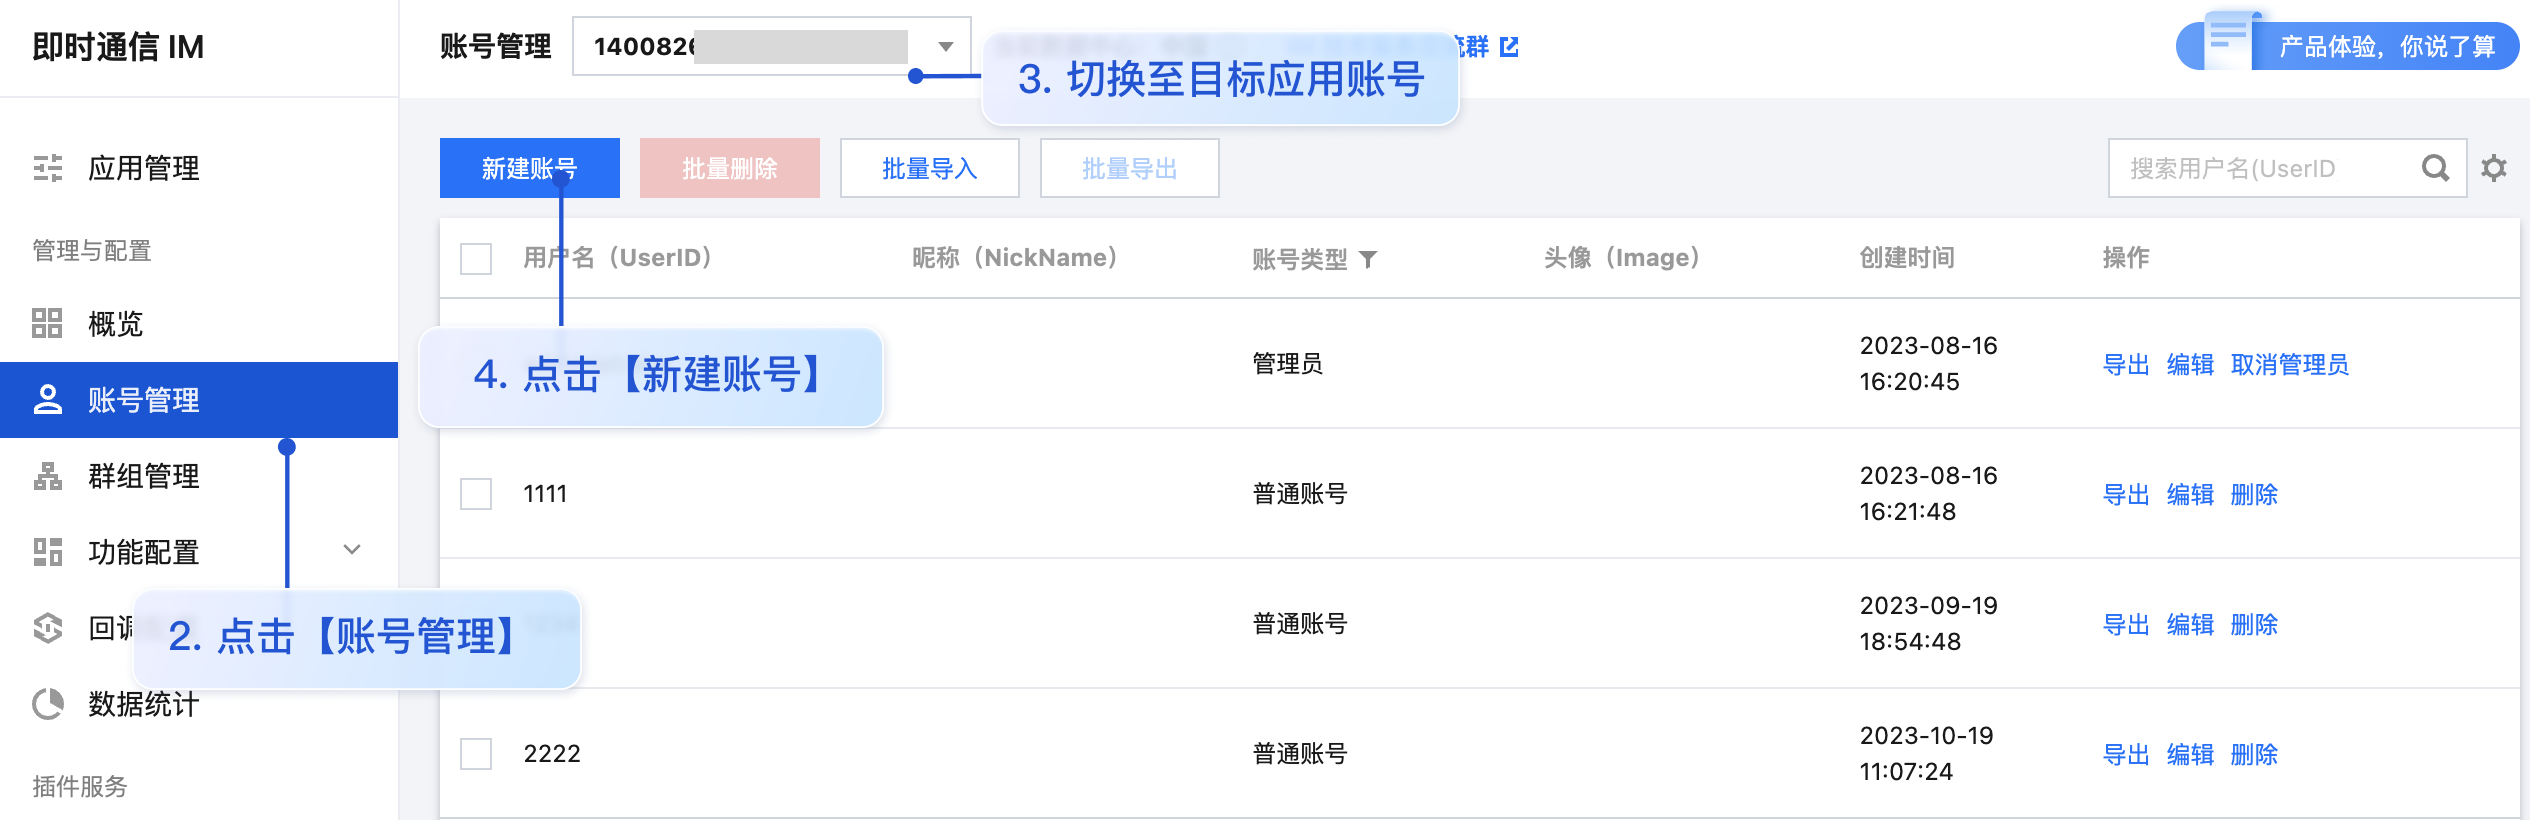
- userID:可通过单击 [ 即时通信 IM 控制台 -【账号管理】](https://console.cloud.tencent.com/im/account-management),切换至目标应用所在账号,即可创建账号并获取 userID。
|
|
147
|
+
|
|
148
|
+
|
|
149
|
+
|
|
150
|
+
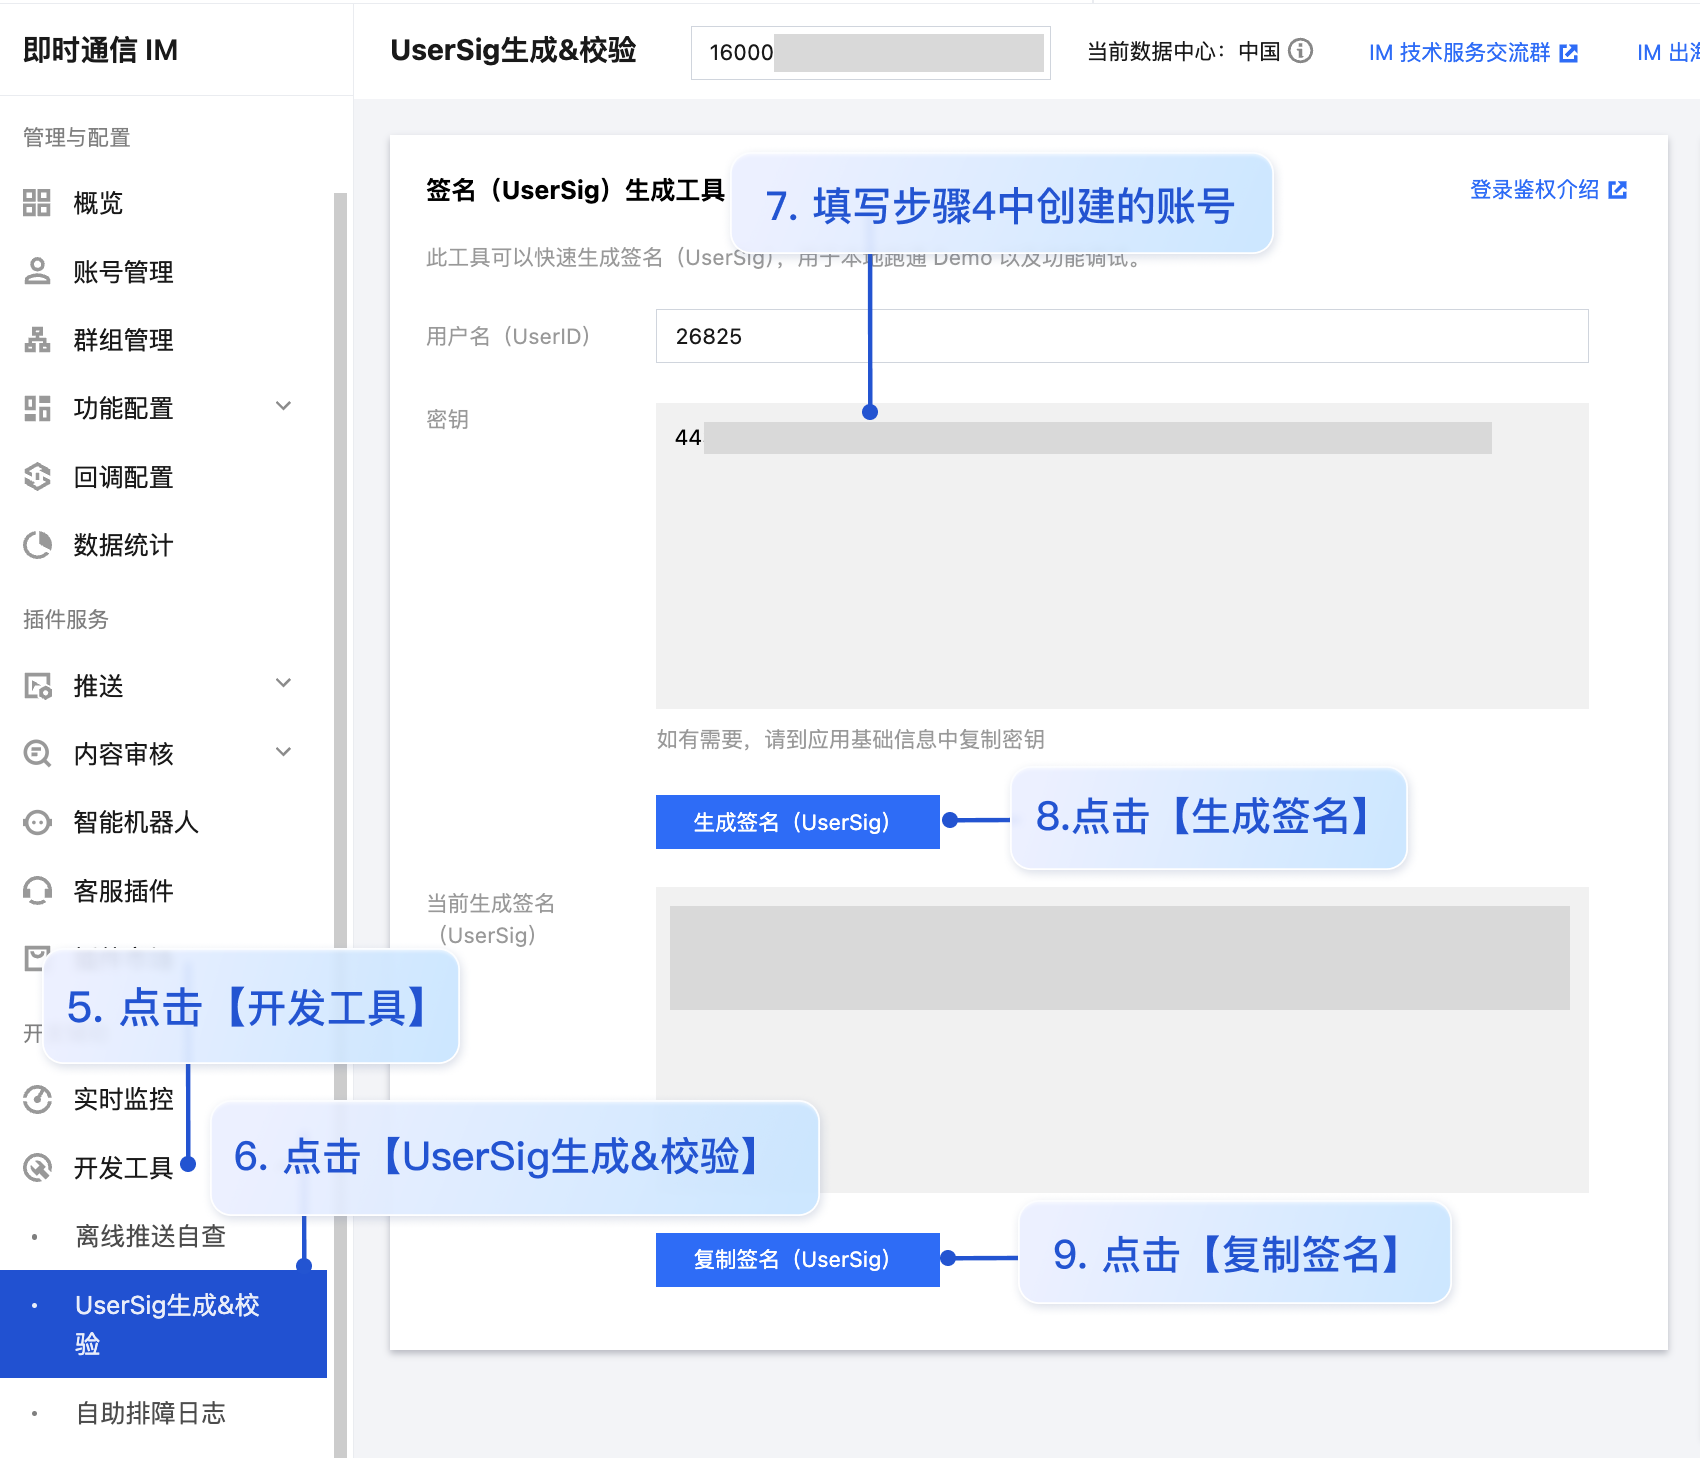
- userSig:可单击 [ 即时通信 IM 控制台 > 开发工具 > UserSig生成&校验](https://console.cloud.tencent.com/im/tool-usersig),填写创建的 userID,即可生成 userSig。
|
|
151
|
+
|
|
152
|
+
|
|
153
|
+
|
|
154
|
+
|
|
155
|
+
### 步骤5:启动项目
|
|
156
|
+
|
|
157
|
+
|
|
158
|
+
【shell】
|
|
159
|
+
``` bash
|
|
160
|
+
npm run dev
|
|
161
|
+
```
|
|
162
|
+
|
|
163
|
+
> **注意:**
|
|
164
|
+
>
|
|
165
|
+
> 1. 请确保 [步骤3](https://write.woa.com/#step3) 代码中 SDKAppID、userID 和 userSig 均已成功替换,如未替换将会导致项目表现异常。
|
|
166
|
+
> 2. userID 和 userSig 为一一对应关系,具体参见 [生成 UserSig(用户鉴权)](https://write.woa.com/document/107052240244191232)。
|
|
167
|
+
> 3. 如遇到项目启动失败,请检查 开发环境要求 是否满足。
|
|
168
|
+
|
|
169
|
+
|
|
170
|
+
### 步骤6:发送您的第一条消息
|
|
171
|
+
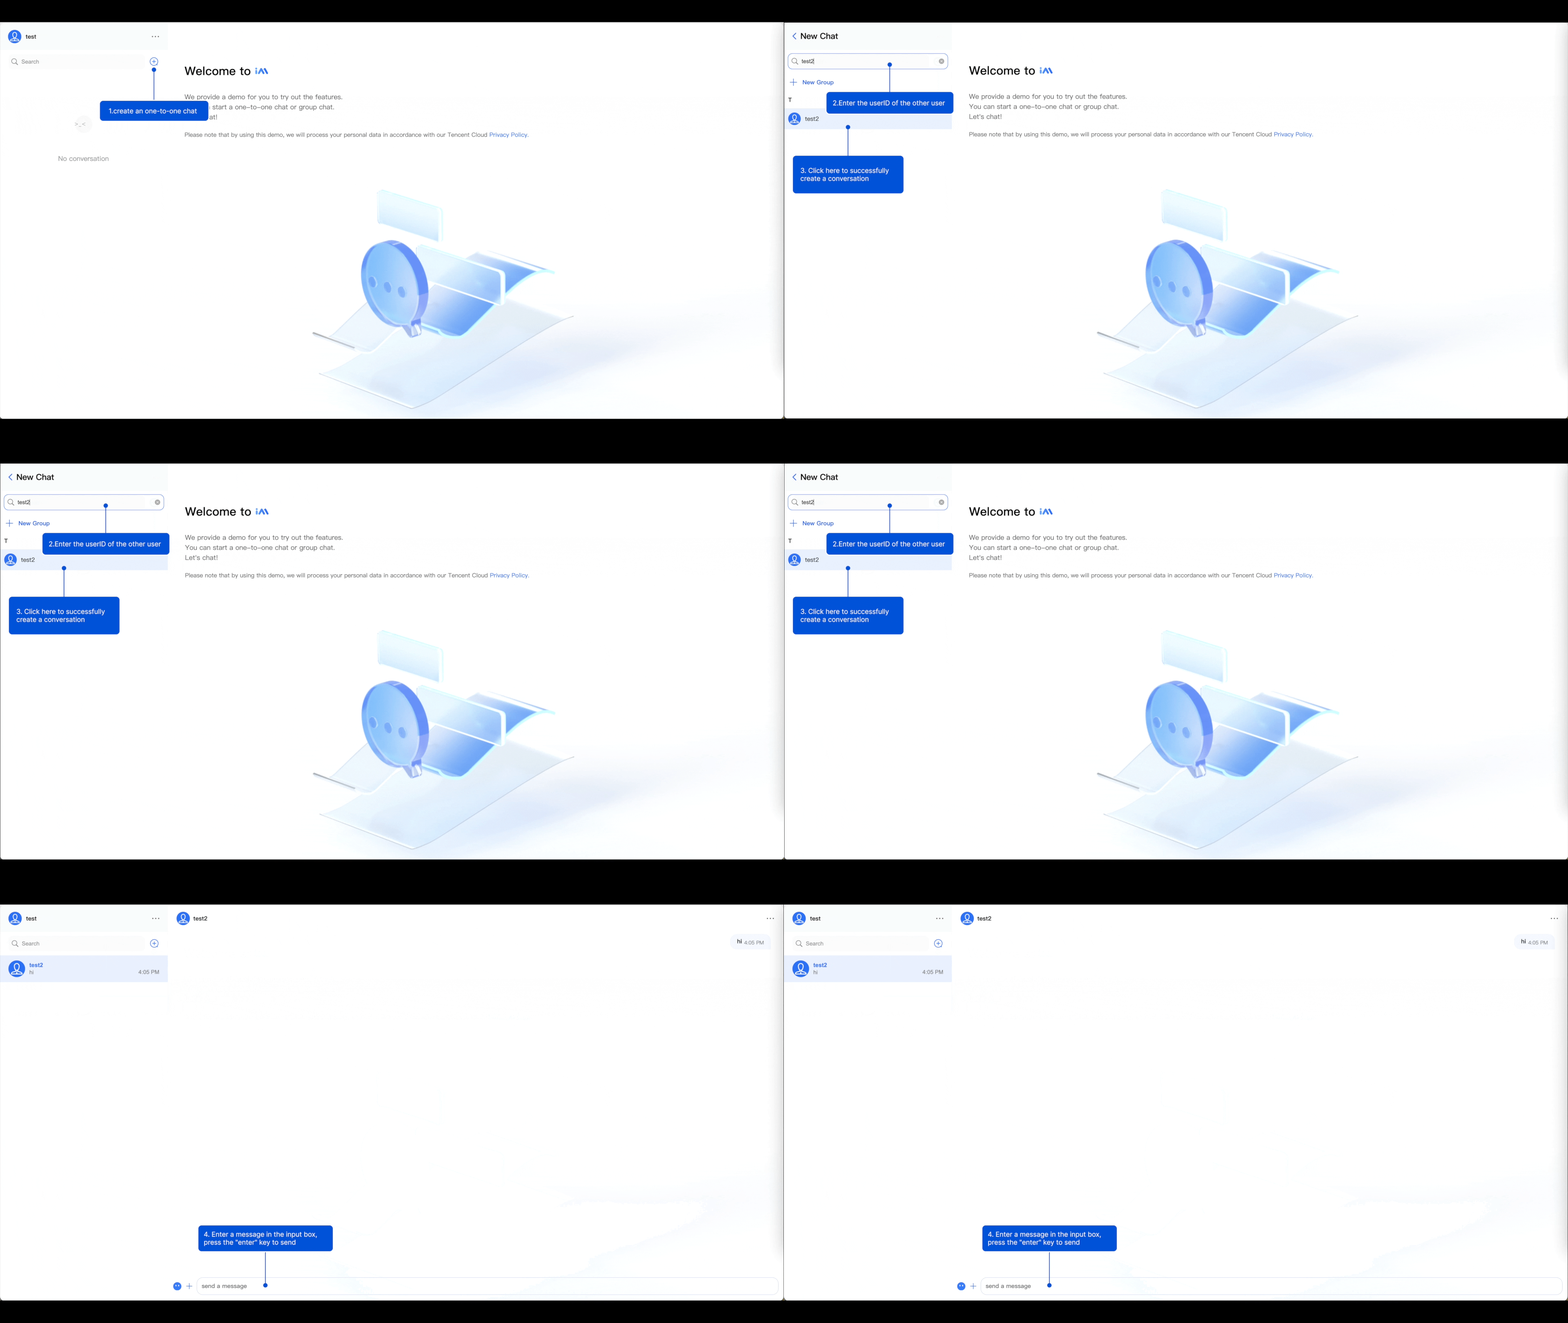
1. 项目启动成功后,单击 **+ **图标,创建会话。
|
|
172
|
+
|
|
173
|
+
2. 在输入框中搜索另一个用户的 userID(参考:[步骤4 -> 创建账号并获取 userID](https://write.woa.com/#step4))。
|
|
174
|
+
|
|
175
|
+
3. 单击用户头像发起会话。
|
|
176
|
+
|
|
177
|
+
4. 在输入框输入消息,按下 **Enter **键发送。
|
|
178
|
+
|
|
179
|
+
|
|
180
|
+
|
|
181
|
+
|
|
182
|
+
## 常见问题
|
|
183
|
+
|
|
184
|
+
#### 什么是 UserSig?
|
|
185
|
+
|
|
186
|
+
UserSig 是用户登录即时通信 IM 的密码,其本质是对 UserID 等信息加密后得到的密文。
|
|
187
|
+
|
|
188
|
+
#### 如何生成 UserSig?
|
|
189
|
+
|
|
190
|
+
UserSig 签发方式是将 UserSig 的计算代码集成到您的服务端,并提供面向项目的接口,在需要 UserSig 时由您的项目向业务服务器发起请求获取动态 UserSig。更多详情请参见 [服务端生成 UserSig](https://cloud.tencent.com/document/product/269/32688)。
|
|
191
|
+
|
|
192
|
+
> **注意:**
|
|
193
|
+
>
|
|
194
|
+
|
|
195
|
+
> 本文示例代码采用的获取 UserSig 的方案是在客户端代码中配置 SECRETKEY,该方法中 SECRETKEY 很容易被反编译逆向破解,一旦您的密钥泄露,攻击者就可以盗用您的腾讯云流量,因此**该方法仅适合本地跑通功能调试**。 正确的 UserSig 签发方式请参见上文。
|
|
196
|
+
>
|
|
197
|
+
|
|
198
|
+
|
|
199
|
+
#### 是否支持 react 17.x 版本?
|
|
200
|
+
|
|
201
|
+
目前不支持 17.x 版本,仅支持 React v18。
|
|
202
|
+
|
|
203
|
+
## 相关文档
|
|
204
|
+
|
|
205
|
+
## 参考文档
|
|
206
|
+
|
|
207
|
+
#### UIKit 相关:
|
|
208
|
+
- [chat-uikit-react npm](https://www.npmjs.com/package/@tencentcloud/chat-uikit-react)
|
|
209
|
+
|
|
210
|
+
- [Demo 跑通示例](https://github.com/TencentCloud/chat-uikit-react)
|
|
211
|
+
|
|
212
|
+
|
|
@@ -0,0 +1,149 @@
|
|
|
1
|
+
## 适用场景
|
|
2
|
+
|
|
3
|
+
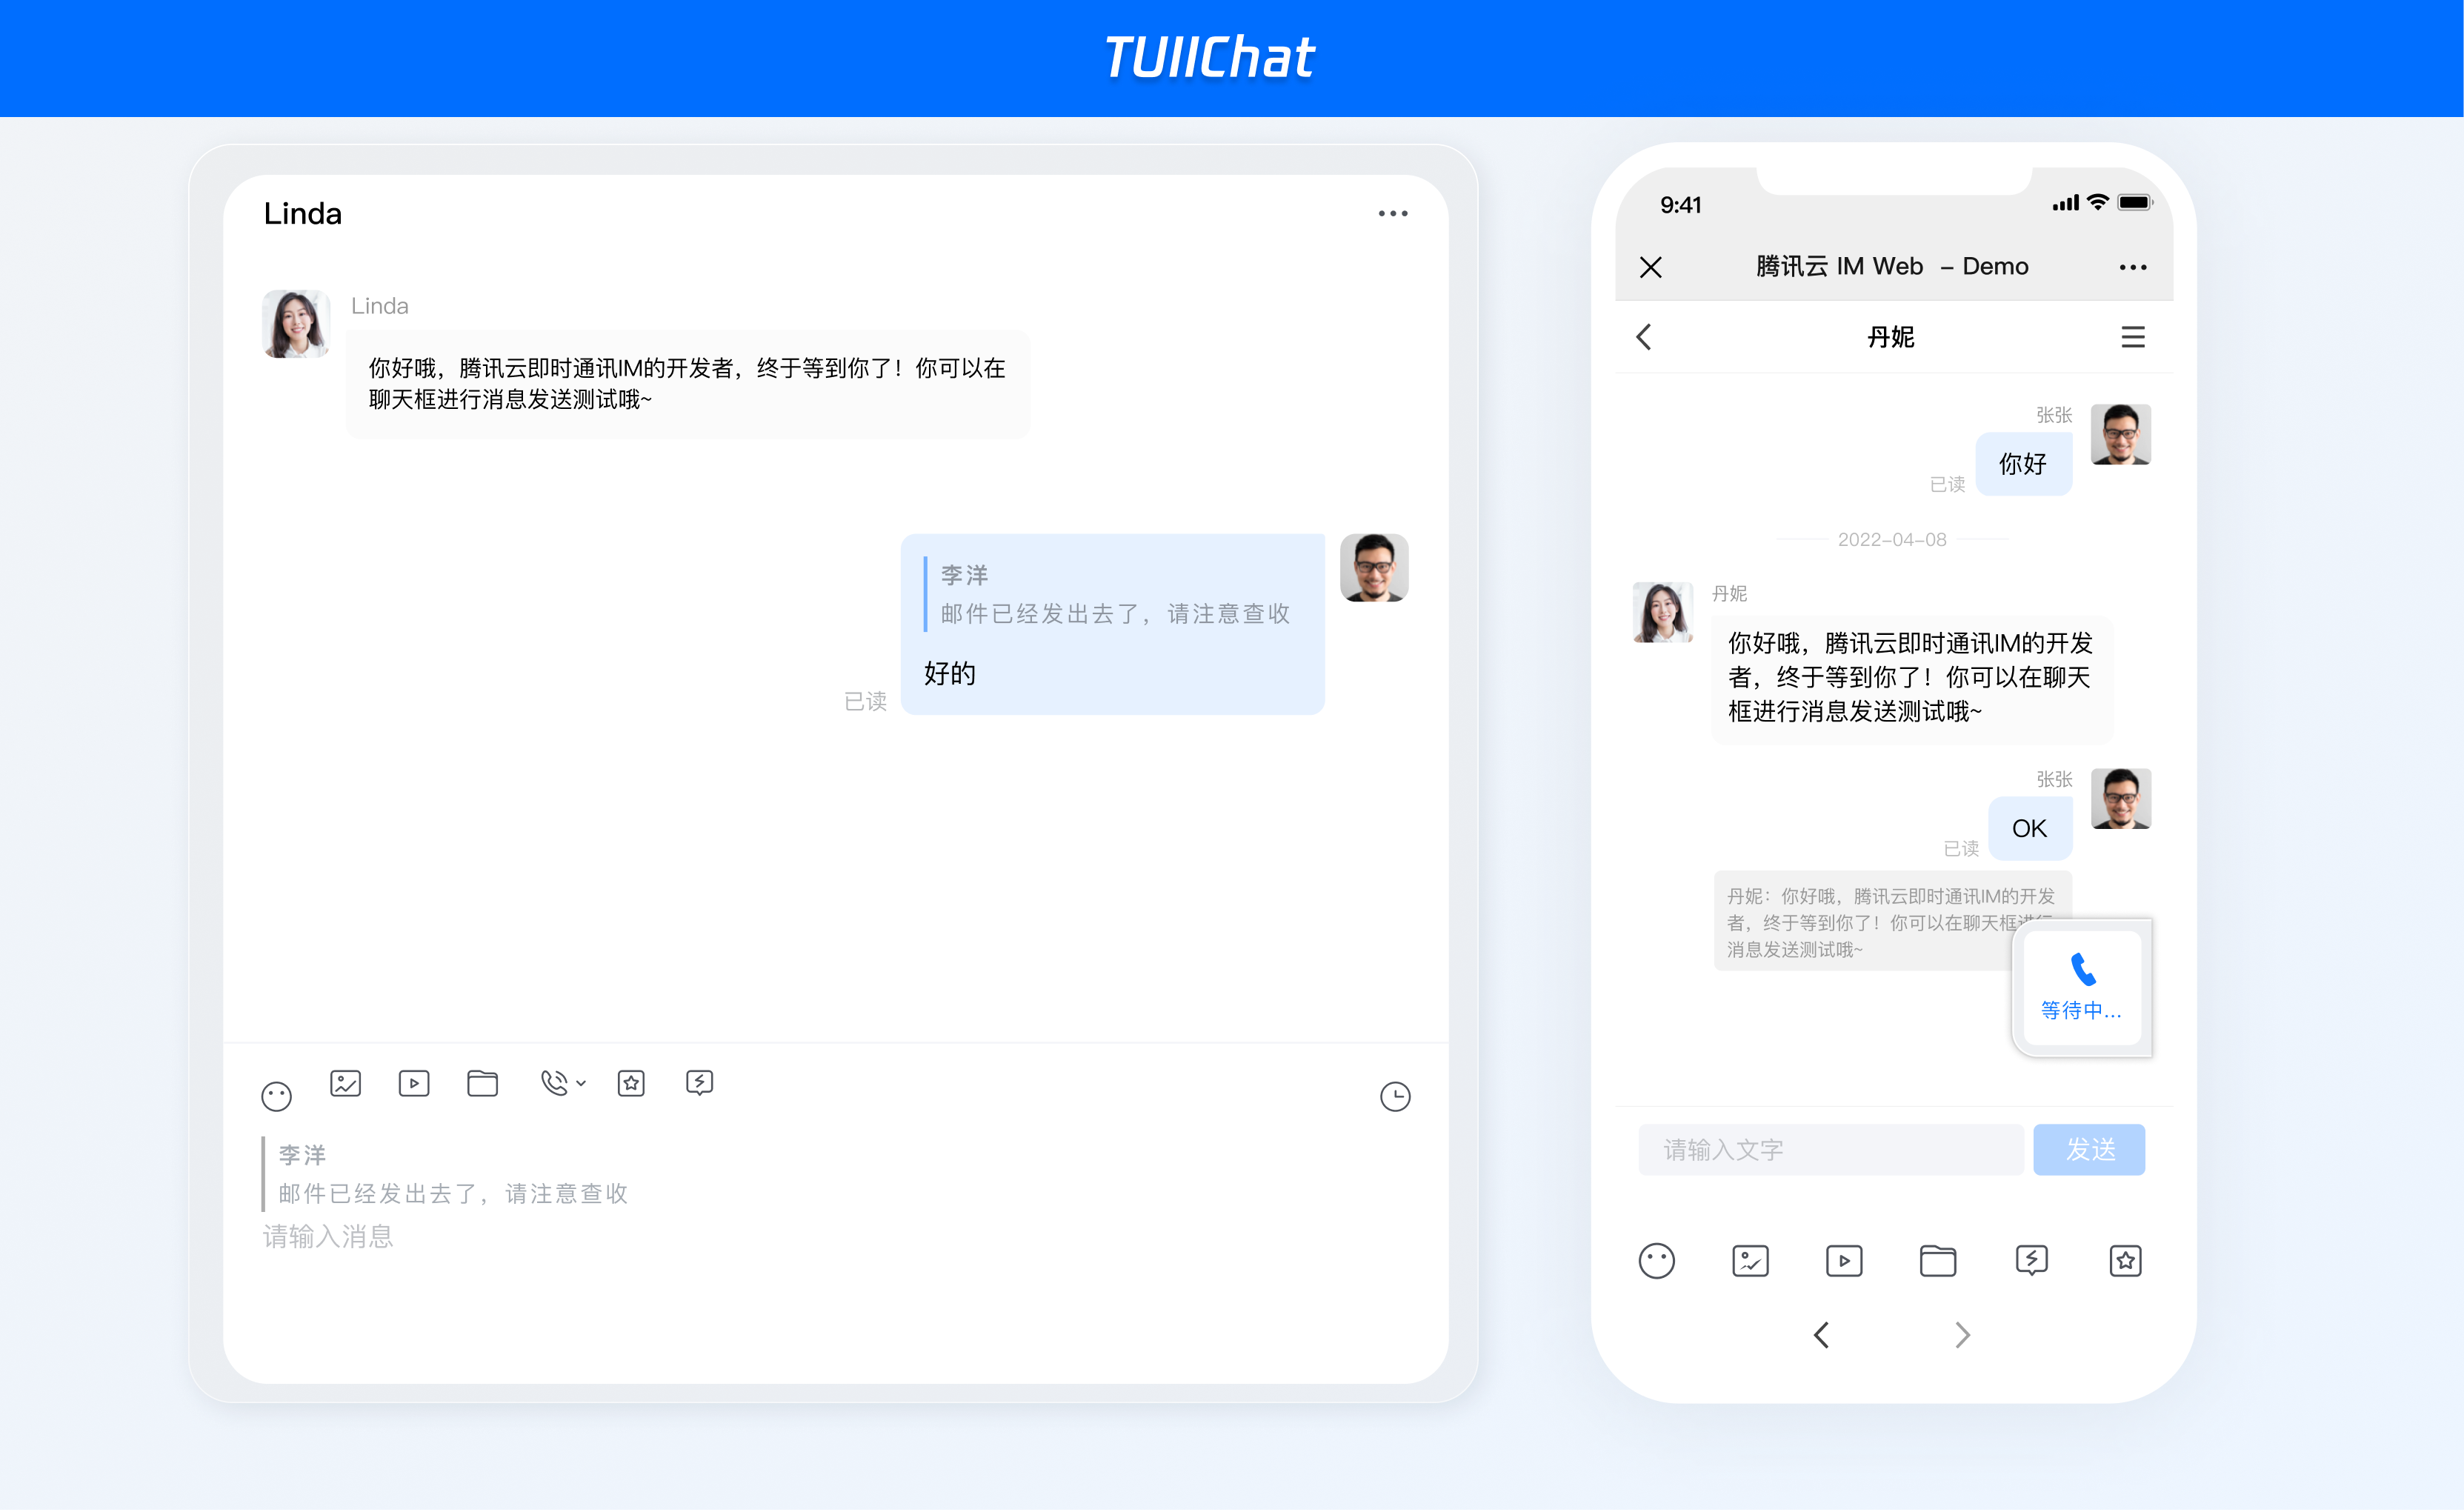
Web & H5 平台,独立集成私信聊天(1V1)或者群聊(Group),例如房产中介咨询、电商在线客服、保险远程定损等。
|
|
4
|
+
|
|
5
|
+
|
|
6
|
+
|
|
7
|
+
|
|
8
|
+
## 开发环境要求
|
|
9
|
+
- vue3
|
|
10
|
+
|
|
11
|
+
- TypeScript
|
|
12
|
+
|
|
13
|
+
- node(node.js ≥ 16.0.0)
|
|
14
|
+
|
|
15
|
+
- npm(版本请与 node 版本匹配)
|
|
16
|
+
|
|
17
|
+
|
|
18
|
+
## 集成指引
|
|
19
|
+
|
|
20
|
+
### 步骤1:创建项目
|
|
21
|
+
1. 创建一个新的名称为 **chat-example** 的 Vue3 项目,您可自行选择是否需要使用 ts 模板。
|
|
22
|
+
|
|
23
|
+
|
|
24
|
+
|
|
25
|
+
【shell】
|
|
26
|
+
``` bash
|
|
27
|
+
npm create vite@latest
|
|
28
|
+
```
|
|
29
|
+
2. 创建项目完成后,切换到项目所在目录。
|
|
30
|
+
|
|
31
|
+
|
|
32
|
+
|
|
33
|
+
【shell】
|
|
34
|
+
``` bash
|
|
35
|
+
cd chat-example
|
|
36
|
+
npm install
|
|
37
|
+
```
|
|
38
|
+
|
|
39
|
+
### 步骤2:下载 chat-uikit-vue3 组件
|
|
40
|
+
|
|
41
|
+
|
|
42
|
+
【shell】
|
|
43
|
+
``` bash
|
|
44
|
+
npm i @tencentcloud/chat-uikit-vue3
|
|
45
|
+
```
|
|
46
|
+
|
|
47
|
+
### 步骤3:仅引入 Chat 相关组件
|
|
48
|
+
|
|
49
|
+
##### 在 App.vue 页面中实现以下代码,即可快速搭建聊天界面并开启指定会话:
|
|
50
|
+
|
|
51
|
+
> **说明:**
|
|
52
|
+
>
|
|
53
|
+
|
|
54
|
+
> conversationID:会话 ID。会话ID组成方式如下:
|
|
55
|
+
>
|
|
56
|
+
> - C2C${userID}(单聊),例如 `C2C123456`
|
|
57
|
+
> - GROUP${groupID}(群聊),例如 `GROUP123456`
|
|
58
|
+
|
|
59
|
+
``` javascript
|
|
60
|
+
<template>
|
|
61
|
+
<div class="app">
|
|
62
|
+
<UIKitProvider>
|
|
63
|
+
<Chat style="flex: 1;">
|
|
64
|
+
<ChatHeader />
|
|
65
|
+
<MessageList />
|
|
66
|
+
<MessageInput />
|
|
67
|
+
</Chat>
|
|
68
|
+
</UIKitProvider>
|
|
69
|
+
</div>
|
|
70
|
+
</template>
|
|
71
|
+
<script lang="ts" setup>
|
|
72
|
+
import {
|
|
73
|
+
Chat,
|
|
74
|
+
MessageList,
|
|
75
|
+
MessageInput,
|
|
76
|
+
ChatHeader,
|
|
77
|
+
UIKitProvider,
|
|
78
|
+
useLoginState,
|
|
79
|
+
useConversationListState,
|
|
80
|
+
} from '@tencentcloud/chat-uikit-vue3';
|
|
81
|
+
const config = {
|
|
82
|
+
sdkAppId : 0, // SDKAppID, 可以参考步骤 4 获取
|
|
83
|
+
userId: 'xxx', // UserID, 可以参考步骤 4 获取
|
|
84
|
+
userSig: 'xxx', // userSig, 可以参考步骤 4 获取
|
|
85
|
+
}
|
|
86
|
+
|
|
87
|
+
const { login } = useLoginState();
|
|
88
|
+
const { setActiveConversation } = useConversationListState();
|
|
89
|
+
const conversationID="YOUR_CONVERSATIONID"; // 参考说明设置您需要的会话 ID。
|
|
90
|
+
|
|
91
|
+
login({
|
|
92
|
+
...config,
|
|
93
|
+
useUploadPlugin: true
|
|
94
|
+
})
|
|
95
|
+
.then(() => {
|
|
96
|
+
setActiveConversation(conversationID)
|
|
97
|
+
})
|
|
98
|
+
.catch(() => {});
|
|
99
|
+
</script>
|
|
100
|
+
<style lang="scss">
|
|
101
|
+
.app {
|
|
102
|
+
width: 100vw;
|
|
103
|
+
height: 100vh;
|
|
104
|
+
display: flex;
|
|
105
|
+
}
|
|
106
|
+
</style>
|
|
107
|
+
```
|
|
108
|
+
|
|
109
|
+
### 步骤4:获取 SDKAppID、userID 和 userSig
|
|
110
|
+
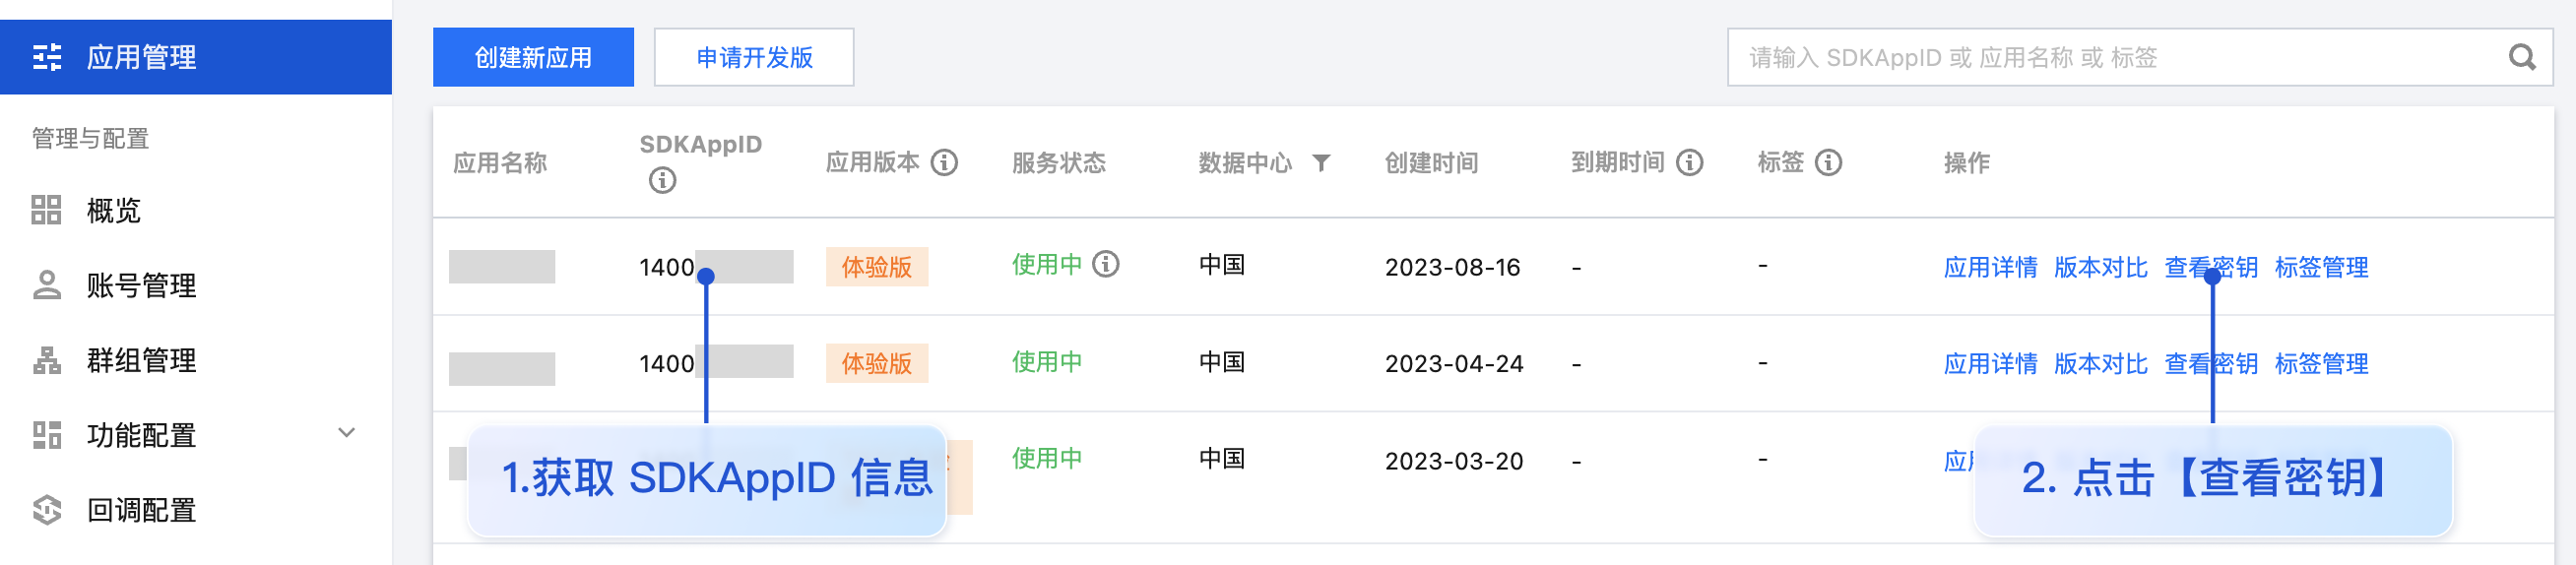
- SDKAppID:SDKAppID 是腾讯云 IM 服务区分客户账号的唯一标识。我们建议每一个独立的 App 都申请一个新的 SDKAppID。不同 SDKAppID 之间的消息是天然隔离的,不能互通。
|
|
111
|
+
|
|
112
|
+
|
|
113
|
+
您可以在 [即时通信 IM 控制台](https://console.cloud.tencent.com/im) 查看所有的 SDKAppID,单击**创建新应用**,可以创建新的 SDKAppID。
|
|
114
|
+
|
|
115
|
+
|
|
116
|
+
|
|
117
|
+
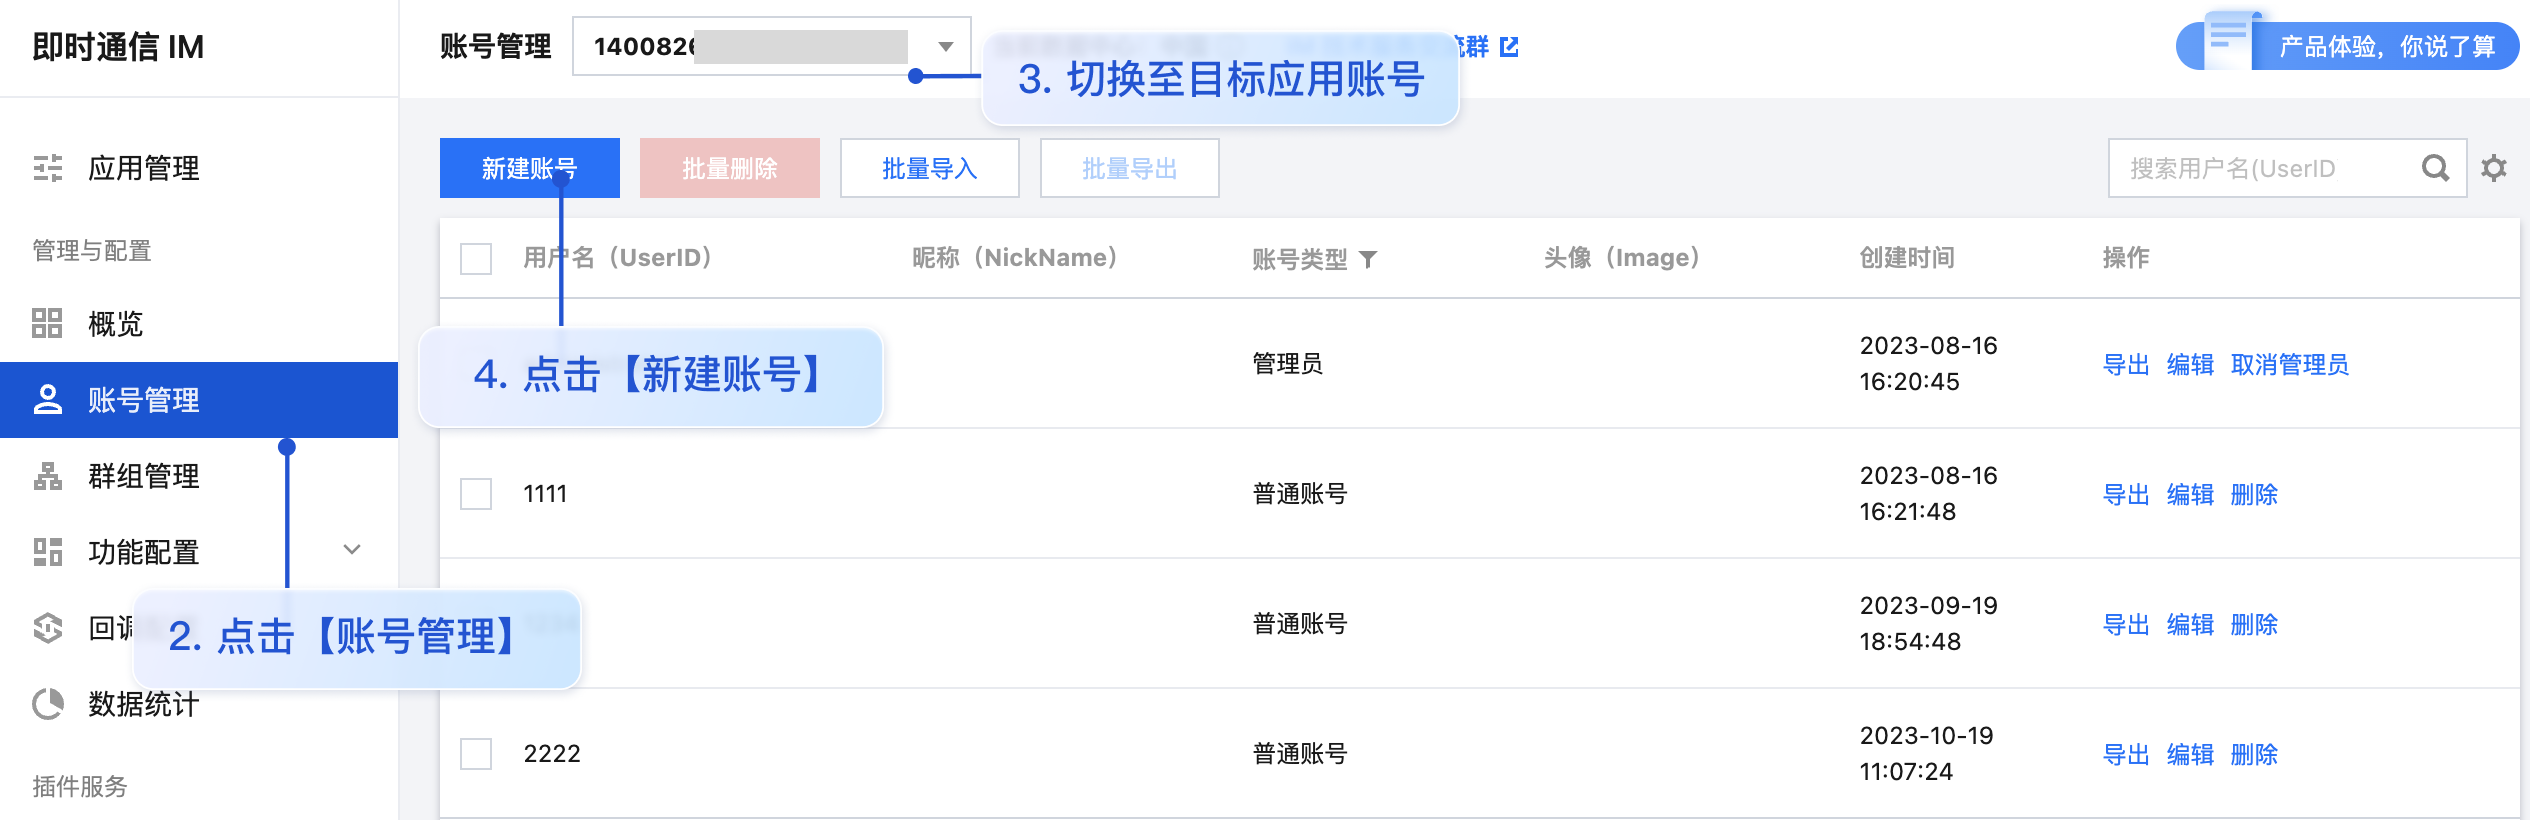
- userID:可通过单击 [ 即时通信 IM 控制台 -【账号管理】](https://console.cloud.tencent.com/im/account-management),切换至目标应用所在账号,即可创建账号并获取 userID。
|
|
118
|
+
|
|
119
|
+
|
|
120
|
+
|
|
121
|
+
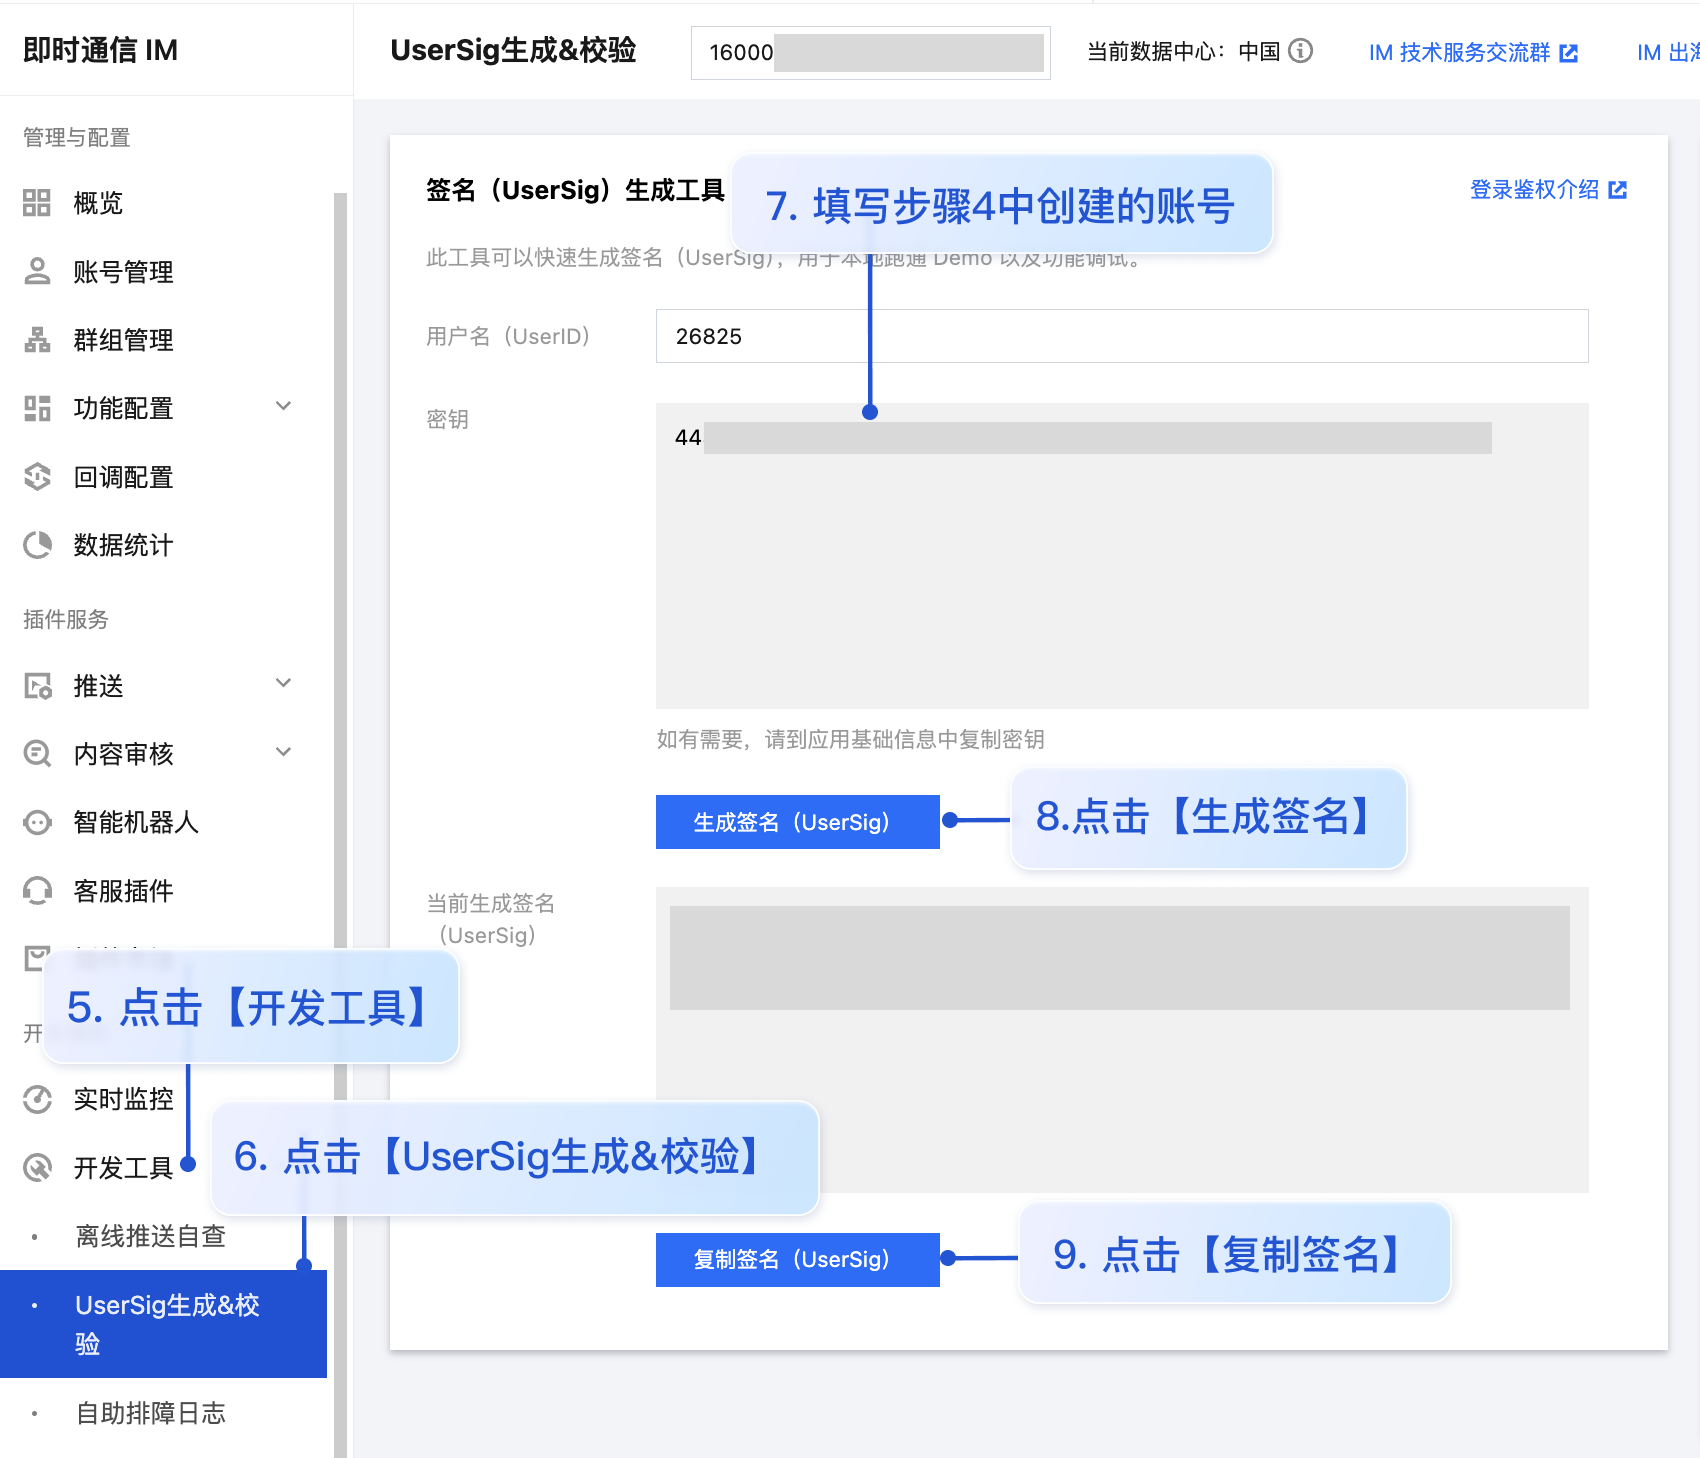
- userSig:可单击 [ 即时通信 IM 控制台 > 开发工具 > UserSig生成&校验](https://console.cloud.tencent.com/im/tool-usersig),填写创建的 userID,即可生成 userSig。
|
|
122
|
+
|
|
123
|
+
|
|
124
|
+
|
|
125
|
+
|
|
126
|
+
### 步骤5:启动项目
|
|
127
|
+
|
|
128
|
+
|
|
129
|
+
【shell】
|
|
130
|
+
``` bash
|
|
131
|
+
npm run dev
|
|
132
|
+
```
|
|
133
|
+
|
|
134
|
+
> **注意:**
|
|
135
|
+
>
|
|
136
|
+
> 1. 请确保 [步骤3](https://write.woa.com/#step3) 代码中 SDKAppID、userID 和 userSig 均已成功替换,如未替换将会导致项目表现异常。
|
|
137
|
+
> 2. userID 和 userSig 为一一对应关系,具体参见 生成 UserSig。
|
|
138
|
+
> 3. 如遇到项目启动失败,请检查 开发环境要求 是否满足。
|
|
139
|
+
|
|
140
|
+
|
|
141
|
+
## 相关文档
|
|
142
|
+
- [chat-uikit-vue3 npm](https://www.npmjs.com/package/@tencentcloud/chat-uikit-vue3)
|
|
143
|
+
|
|
144
|
+
- [github Demo](https://github.com/Tencent-RTC/TUIKit_Vue3/tree/main/demos/rtcube-vite-vue3)
|
|
145
|
+
|
|
146
|
+
|
|
147
|
+
## 交流与反馈
|
|
148
|
+
|
|
149
|
+
如遇任何问题,可联系 [官网售后](https://cloud.tencent.com/act/event/connect-service#/) 反馈,享有专业工程师的支持,解决您的难题。
|