@tencentcloud/sdk-mcp 0.1.0
This diff represents the content of publicly available package versions that have been released to one of the supported registries. The information contained in this diff is provided for informational purposes only and reflects changes between package versions as they appear in their respective public registries.
- package/README.md +20 -0
- package/index.js +16 -0
- package/index.js.map +1 -0
- package/package.json +37 -0
- package/resource/doc/tuicallkit/android/.gitkeep +0 -0
- package/resource/doc/tuicallkit/android/api_TUICallKit.md +663 -0
- package/resource/doc/tuicallkit/android/api_TUICallObserver.md +786 -0
- package/resource/doc/tuicallkit/android/how_to_integrated_android_callkit.md +302 -0
- package/resource/doc/tuicallkit/faq/faq.md +1068 -0
- package/resource/doc/tuicallkit/flutter/api_TUICallDefine.md +932 -0
- package/resource/doc/tuicallkit/flutter/api_TUICallKit.md +452 -0
- package/resource/doc/tuicallkit/flutter/api_TUICallObserver.md +926 -0
- package/resource/doc/tuicallkit/flutter/how_to_integrated_flutter_callkit.md +226 -0
- package/resource/doc/tuicallkit/flutter/how_to_run_flutter_callkit_demo.md +101 -0
- package/resource/doc/tuicallkit/iOS/api_TUICallKit.md +635 -0
- package/resource/doc/tuicallkit/iOS/api_TUICallObserver.md +779 -0
- package/resource/doc/tuicallkit/iOS/how_to_integrated_iOS_callkit.md +269 -0
- package/resource/doc/tuicallkit/iOS/how_to_run_iOS_callkit_demo.md +98 -0
- package/resource/doc/tuicallkit/react/.gitkeep +0 -0
- package/resource/doc/tuicallkit/react/api_TUICallKit.md +1909 -0
- package/resource/doc/tuicallkit/react/how_to_integrated_react_callkit.md +195 -0
- package/resource/doc/tuicallkit/react/how_to_run_react_callkit_demo.md +93 -0
- package/resource/doc/tuicallkit/vue/.gitkeep +0 -0
- package/resource/doc/tuicallkit/vue/api_TUICallKit.md +1909 -0
- package/resource/doc/tuicallkit/vue/api_TUICallObserver.md +926 -0
- package/resource/doc/tuicallkit/vue/how_to_integrated_vue_callkit.md +415 -0
- package/resource/doc/tuicallkit/vue/how_to_run_vue_callkit_demo.md +93 -0
- package/server.js +124 -0
- package/server.js.map +1 -0
- package/streamableHttp.js +74 -0
- package/streamableHttp.js.map +1 -0
|
@@ -0,0 +1,195 @@
|
|
|
1
|
+
本文将介绍如何快速完成 TUICallKit 组件的接入,您将在10分钟内完成以下几个关键步骤,并最终得到一个包含完备 UI 界面的视频通话功能。
|
|
2
|
+
|
|
3
|
+

|
|
4
|
+
|
|
5
|
+
## 环境准备
|
|
6
|
+
- React version 18+。
|
|
7
|
+
|
|
8
|
+
- [Node.js](https://nodejs.org/en/) version 16+。
|
|
9
|
+
|
|
10
|
+
- Modern browser, supporting WebRTC APIs。
|
|
11
|
+
|
|
12
|
+
|
|
13
|
+
## 步骤一:开通服务
|
|
14
|
+
|
|
15
|
+
请参见 [开通服务](https://write.woa.com/document/139743928960860160),获取 `SDKAppID、SecretKey`,它们将在 [初始化 TUICallKit 组件](https://write.woa.com/document/130513425899630592) 作为**必填参数**使用。
|
|
16
|
+
|
|
17
|
+
## 步骤二:下载 TUICallKit 组件
|
|
18
|
+
1. 下载 [@tencentcloud/call-uikit-react](https://www.npmjs.com/package/@tencentcloud/call-uikit-react) 组件。
|
|
19
|
+
|
|
20
|
+
|
|
21
|
+
|
|
22
|
+
【shell】
|
|
23
|
+
``` bash
|
|
24
|
+
npm install @tencentcloud/call-uikit-react
|
|
25
|
+
```
|
|
26
|
+
2. 将`debug`目录复制到您的项目目录`src/debug`,本地生成 userSig 时需要使用。
|
|
27
|
+
|
|
28
|
+
|
|
29
|
+
|
|
30
|
+
|
|
31
|
+
|
|
32
|
+
【MacOS】
|
|
33
|
+
``` bash
|
|
34
|
+
cp -r node_modules/@tencentcloud/call-uikit-react/debug ./src
|
|
35
|
+
```
|
|
36
|
+
|
|
37
|
+
|
|
38
|
+
【Windows】
|
|
39
|
+
``` bash
|
|
40
|
+
xcopy node_modules\@tencentcloud\call-uikit-react\debug .\src\debug /i /e
|
|
41
|
+
```
|
|
42
|
+
|
|
43
|
+
|
|
44
|
+
## 步骤三:初始化 TUICallKit 组件
|
|
45
|
+
|
|
46
|
+
您可以选择在 `/src/App.tsx` 文件引入示例代码。
|
|
47
|
+
1. 引入 call-uikit 相关 API 对象。
|
|
48
|
+
|
|
49
|
+
``` tsx
|
|
50
|
+
import { useState } from 'react';
|
|
51
|
+
import { TUICallKit, TUICallKitServer, TUICallType } from "@tencentcloud/call-uikit-react";
|
|
52
|
+
import * as GenerateTestUserSig from "./debug/GenerateTestUserSig-es"; // Refer to Step 3
|
|
53
|
+
```
|
|
54
|
+
2. 引入[<TUICallKit />](https://cloud.tencent.com/document/product/647/81015#tuicallkit),该组件包含通话时的完整 UI 交互。
|
|
55
|
+
|
|
56
|
+
``` javascript
|
|
57
|
+
return (
|
|
58
|
+
<>
|
|
59
|
+
<span> caller's ID: </span>
|
|
60
|
+
<input type="text" placeholder='input caller userID' value={callerUserID} onChange={(event) => setCallerUserID(event.target.value)} />
|
|
61
|
+
<button onClick={init}> step1. init </button> <br />
|
|
62
|
+
<span> callee's ID: </span>
|
|
63
|
+
<input type="text" placeholder='input callee userID' value={calleeUserID} onChange={(event) => setCalleeUserID(event.target.value)} />
|
|
64
|
+
<button onClick={call}> step2. call </button>
|
|
65
|
+
|
|
66
|
+
{/* 【1】Import the TUICallKit component: Call interface UI */}
|
|
67
|
+
<TUICallKit />
|
|
68
|
+
</>
|
|
69
|
+
);
|
|
70
|
+
```
|
|
71
|
+
3. 调用 [TUICallKitServer.init](https://cloud.tencent.com/document/product/647/81015#init) API 登录组件,需要在代码中**填写 **`SDKAppID、SecretKey`** 两个参数。**
|
|
72
|
+
|
|
73
|
+
``` javascript
|
|
74
|
+
const SDKAppID = 0; // TODO: Replace with your SDKAppID (Notice: SDKAppID is of type number)
|
|
75
|
+
const SDKSecretKey = ''; // TODO: Replace with your SDKSecretKey
|
|
76
|
+
|
|
77
|
+
const [callerUserID, setCallerUserID] = useState('');
|
|
78
|
+
const [calleeUserID, setCalleeUserID] = useState('');
|
|
79
|
+
|
|
80
|
+
//【2】Initialize the TUICallKit component
|
|
81
|
+
const init = async () => {
|
|
82
|
+
const { userSig } = GenerateTestUserSig.genTestUserSig({
|
|
83
|
+
userID: callerUserID,
|
|
84
|
+
SDKAppID,
|
|
85
|
+
SecretKey: SDKSecretKey,
|
|
86
|
+
});
|
|
87
|
+
await TUICallKitServer.init({
|
|
88
|
+
userID: callerUserID,
|
|
89
|
+
userSig,
|
|
90
|
+
SDKAppID,
|
|
91
|
+
});
|
|
92
|
+
alert('TUICallKit init succeed');
|
|
93
|
+
}
|
|
94
|
+
```
|
|
95
|
+
<table>
|
|
96
|
+
<tr>
|
|
97
|
+
<td rowspan="1" colSpan="1" >**参数**</td>
|
|
98
|
+
|
|
99
|
+
<td rowspan="1" colSpan="1" >**类型**</td>
|
|
100
|
+
|
|
101
|
+
<td rowspan="1" colSpan="1" >**说明**</td>
|
|
102
|
+
</tr>
|
|
103
|
+
|
|
104
|
+
<tr>
|
|
105
|
+
<td rowspan="1" colSpan="1" >userID</td>
|
|
106
|
+
|
|
107
|
+
<td rowspan="1" colSpan="1" >String</td>
|
|
108
|
+
|
|
109
|
+
<td rowspan="1" colSpan="1" >**用户的唯一标识符**,由您定义,只允许包含大小写英文字母(a-z A-Z)、数字(0-9)及下划线和连词符。</td>
|
|
110
|
+
</tr>
|
|
111
|
+
|
|
112
|
+
<tr>
|
|
113
|
+
<td rowspan="1" colSpan="1" >SDKAppID</td>
|
|
114
|
+
|
|
115
|
+
<td rowspan="1" colSpan="1" >Number</td>
|
|
116
|
+
|
|
117
|
+
<td rowspan="1" colSpan="1" >在 [Tencent RTC 控制台](https://console.cloud.tencent.com/trtc) 创建的音视频应用的唯一标识。</td>
|
|
118
|
+
</tr>
|
|
119
|
+
|
|
120
|
+
<tr>
|
|
121
|
+
<td rowspan="1" colSpan="1" >SDKSecretKey</td>
|
|
122
|
+
|
|
123
|
+
<td rowspan="1" colSpan="1" >String</td>
|
|
124
|
+
|
|
125
|
+
<td rowspan="1" colSpan="1" >在 [Tencent RTC 控制台](https://console.cloud.tencent.com/trtc) 创建的音视频应用的 SecretKey。</td>
|
|
126
|
+
</tr>
|
|
127
|
+
|
|
128
|
+
<tr>
|
|
129
|
+
<td rowspan="1" colSpan="1" >userSig</td>
|
|
130
|
+
|
|
131
|
+
<td rowspan="1" colSpan="1" >String</td>
|
|
132
|
+
|
|
133
|
+
<td rowspan="1" colSpan="1" >一种安全保护签名,用于对用户进行登录鉴权认证,确认用户是否真实,阻止恶意攻击者盗用您的云服务使用权。</td>
|
|
134
|
+
</tr>
|
|
135
|
+
</table>
|
|
136
|
+
|
|
137
|
+
|
|
138
|
+
> **userSig 说明:**
|
|
139
|
+
>
|
|
140
|
+
> - **开发环境**:如果您正在本地跑通 Demo、开发调试,可以采用 `debug` 文件中的 `genTestUserSig`(参考步骤3.2)函数生成 userSig。该方法中 SDKSecretKey 很容易被反编译逆向破解,一旦您的密钥泄露,攻击者就可以盗用您的腾讯云流量。
|
|
141
|
+
> - **生产环境**:如果您的项目要发布上线,请采用 [服务端生成 UserSig](https://trtc.io/document/35166) 的方式。
|
|
142
|
+
|
|
143
|
+
|
|
144
|
+
## 步骤四:拨打您的第一通电话
|
|
145
|
+
1. 调用 [TUICallKitServer.calls API](https://cloud.tencent.com/document/product/647/81015#calls) 拨打通话。
|
|
146
|
+
|
|
147
|
+
``` javascript
|
|
148
|
+
//【3】Make a 1v1 video call
|
|
149
|
+
const call = async () => {
|
|
150
|
+
await TUICallKitServer.calls({
|
|
151
|
+
userIDList: [calleeUserID],
|
|
152
|
+
type: TUICallType.VIDEO_CALL,
|
|
153
|
+
});
|
|
154
|
+
};
|
|
155
|
+
```
|
|
156
|
+
2. 运行项目。
|
|
157
|
+
|
|
158
|
+
|
|
159
|
+
> **警告:**
|
|
160
|
+
>
|
|
161
|
+
|
|
162
|
+
> **本地环境请在 localhost 协议下访问,公网体验请在 HTTPS 协议下访问,具体参见 **[网络访问协议说明](https://web.sdk.qcloud.com/trtc/webrtc/doc/zh-cn/tutorial-05-info-browser.html#h2-3)**。**
|
|
163
|
+
>
|
|
164
|
+
|
|
165
|
+
3. 打开两个浏览器页面,输入不同的 userID(由您定义) 单击`step1. init`登录(主叫方和被叫方)。
|
|
166
|
+
|
|
167
|
+
|
|
168
|
+
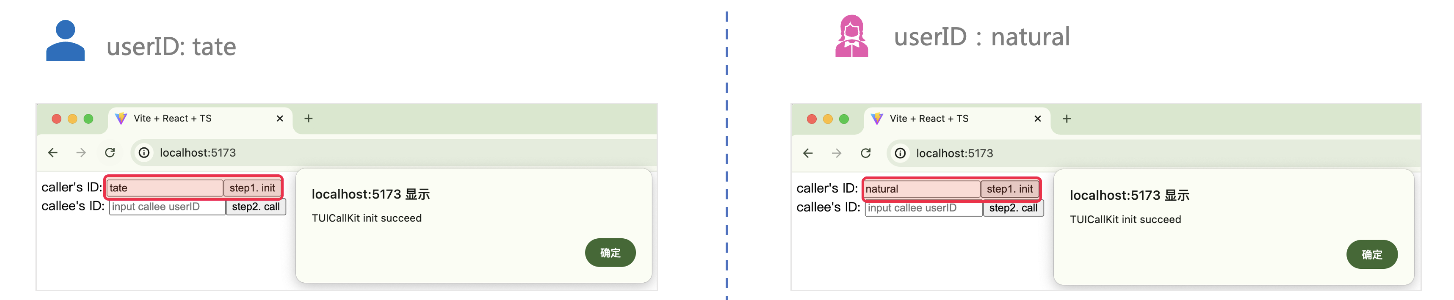
|
|
169
|
+
|
|
170
|
+
4. 两个 userID 都登录成功后,单击`step2. call `拨打通话,如果您有通话问题,参见 [常见问题](https://cloud.tencent.com/document/product/647/78769)。
|
|
171
|
+
|
|
172
|
+
|
|
173
|
+
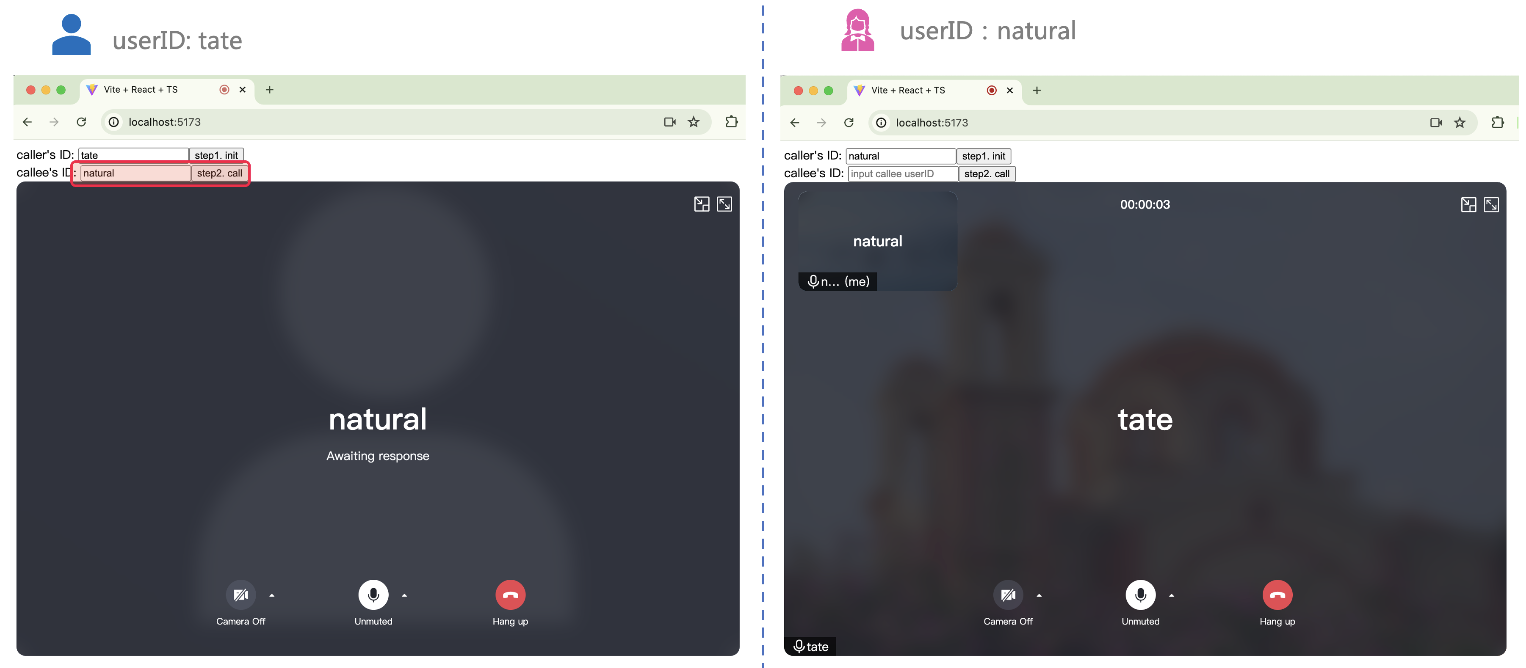
|
|
174
|
+
|
|
175
|
+
|
|
176
|
+
## 更多特性
|
|
177
|
+
- [设置昵称、头像](https://write.woa.com/document/140283367112228864)
|
|
178
|
+
|
|
179
|
+
- [群组通话](https://write.woa.com/document/139754159113613312)
|
|
180
|
+
|
|
181
|
+
- [悬浮窗](https://write.woa.com/document/139754324095582208)
|
|
182
|
+
|
|
183
|
+
- [自定义铃声](https://write.woa.com/document/139754575448756224)
|
|
184
|
+
|
|
185
|
+
- [监听通话状态、组件回调事件](https://write.woa.com/document/139754708026372096)
|
|
186
|
+
|
|
187
|
+
- [设置分辨率、填充模式](https://write.woa.com/document/140283358174851072)
|
|
188
|
+
|
|
189
|
+
- [界面定制](https://write.woa.com/document/90292932030300160)
|
|
190
|
+
|
|
191
|
+
|
|
192
|
+
## 常见问题
|
|
193
|
+
- 如果您的接入和使用中遇到问题,请参见 [常见问题](https://cloud.tencent.com/document/product/647/78769)。
|
|
194
|
+
|
|
195
|
+
- 了解更多详情您可 [腾讯云通信官方社群](https://zhiliao.qq.com/) 进行咨询和反馈。
|
|
@@ -0,0 +1,93 @@
|
|
|
1
|
+
本文将介绍如何快速实现音视频通话演示。您将在10分钟内完成以下关键步骤,并最终获得一个具有全面用户界面的视频通话功能。
|
|
2
|
+
|
|
3
|
+

|
|
4
|
+
|
|
5
|
+
## 环境准备
|
|
6
|
+
- Node.js, 如果没有,[请点击下载。](https://nodejs.org/en)
|
|
7
|
+
|
|
8
|
+
- Modern browser, supporting WebRTC API.
|
|
9
|
+
|
|
10
|
+
|
|
11
|
+
## 步骤一:下载 Demo
|
|
12
|
+
1. 打开终端,克隆仓库。
|
|
13
|
+
|
|
14
|
+
``` bash
|
|
15
|
+
git clone
|
|
16
|
+
```
|
|
17
|
+
2. 安装依赖。
|
|
18
|
+
|
|
19
|
+
|
|
20
|
+
|
|
21
|
+
|
|
22
|
+
|
|
23
|
+
【React】
|
|
24
|
+
``` bash
|
|
25
|
+
cd ./TUICallKit/Web/basic-react
|
|
26
|
+
```
|
|
27
|
+
|
|
28
|
+
|
|
29
|
+
【Vue3】
|
|
30
|
+
``` bash
|
|
31
|
+
cd ./TUICallKit/Web/basic-vue3
|
|
32
|
+
```
|
|
33
|
+
|
|
34
|
+
``` bash
|
|
35
|
+
npm install
|
|
36
|
+
```
|
|
37
|
+
|
|
38
|
+
## 步骤二:配置 Demo
|
|
39
|
+
1. [点击进入开通服务页面](https://trtc.io/document/59832?platform=android&product=call),获取`SDKAppID、SecretKey`**。**
|
|
40
|
+
|
|
41
|
+
2. 填写 `SDKAPPID、SecretKey`。
|
|
42
|
+
|
|
43
|
+
|
|
44
|
+
|
|
45
|
+
|
|
46
|
+
【React】
|
|
47
|
+
|
|
48
|
+
文件路径:`TUICallKit/Web/basic-react/src/debug/GenerateTestUserSig-es.js`
|
|
49
|
+
|
|
50
|
+
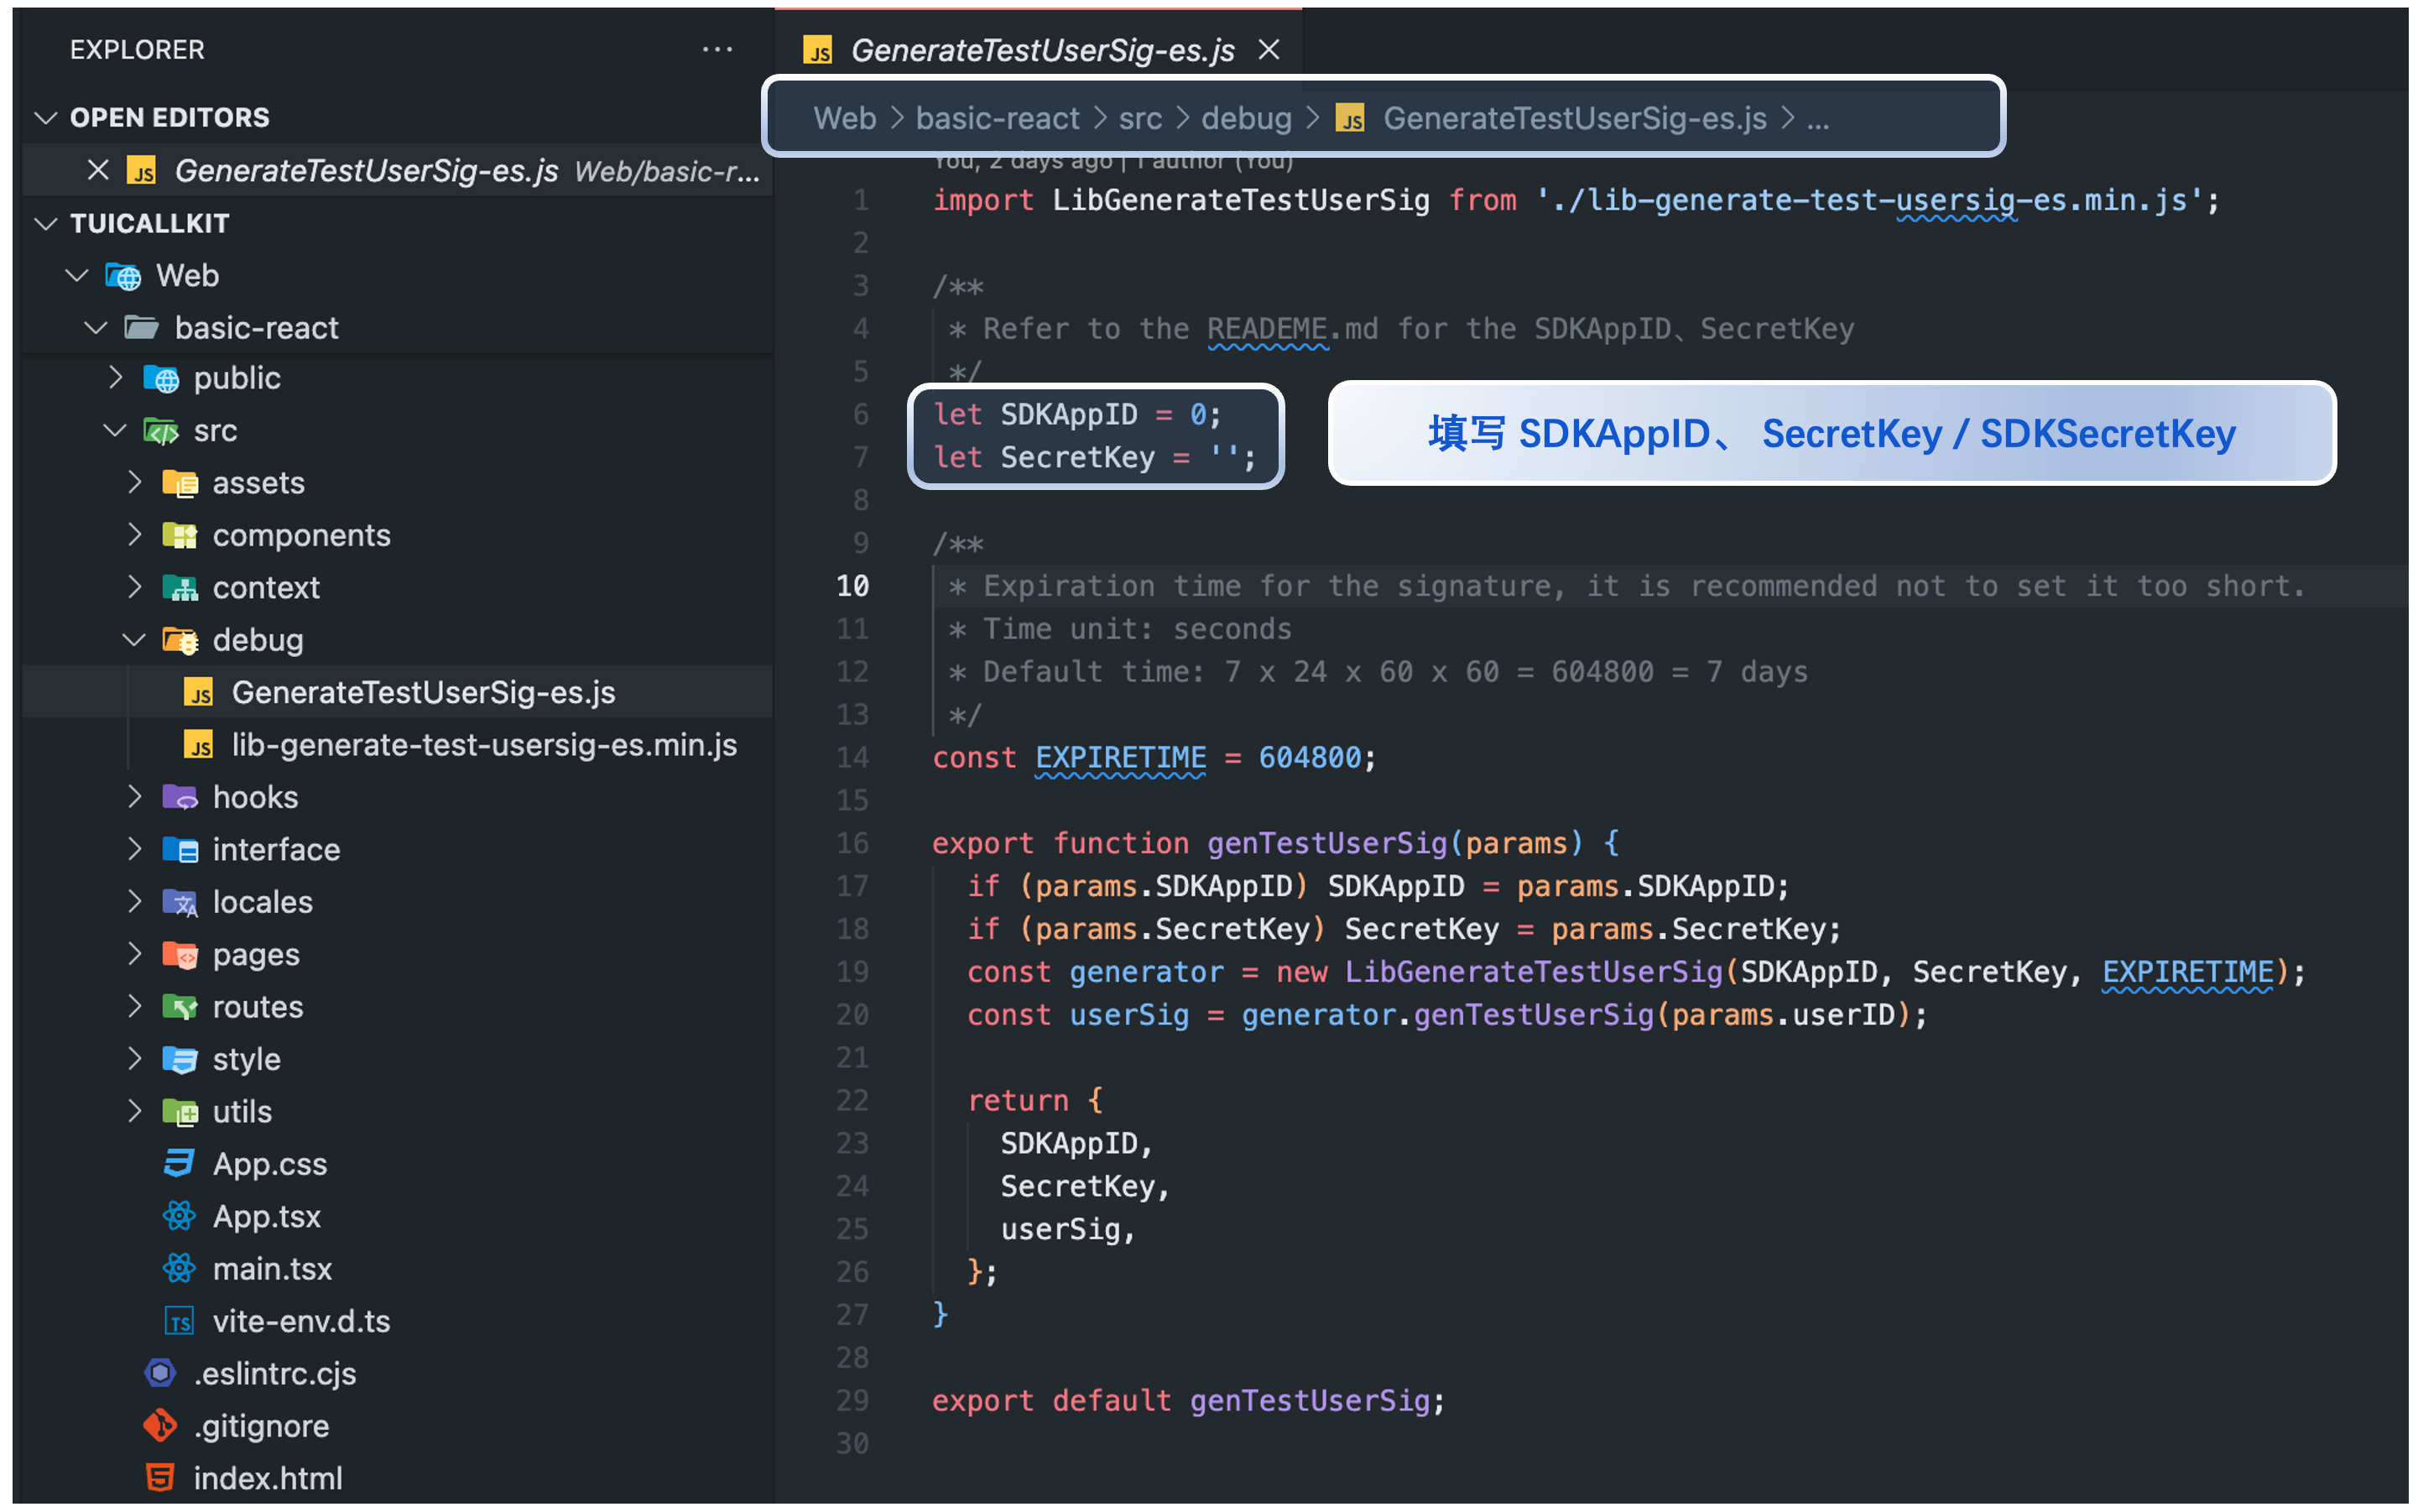
|
|
51
|
+
|
|
52
|
+
【Vue3】
|
|
53
|
+
|
|
54
|
+
文件路径:`TUICallKit/Web/basic-vue3/src/debug/GenerateTestUserSig-es.js`
|
|
55
|
+
|
|
56
|
+
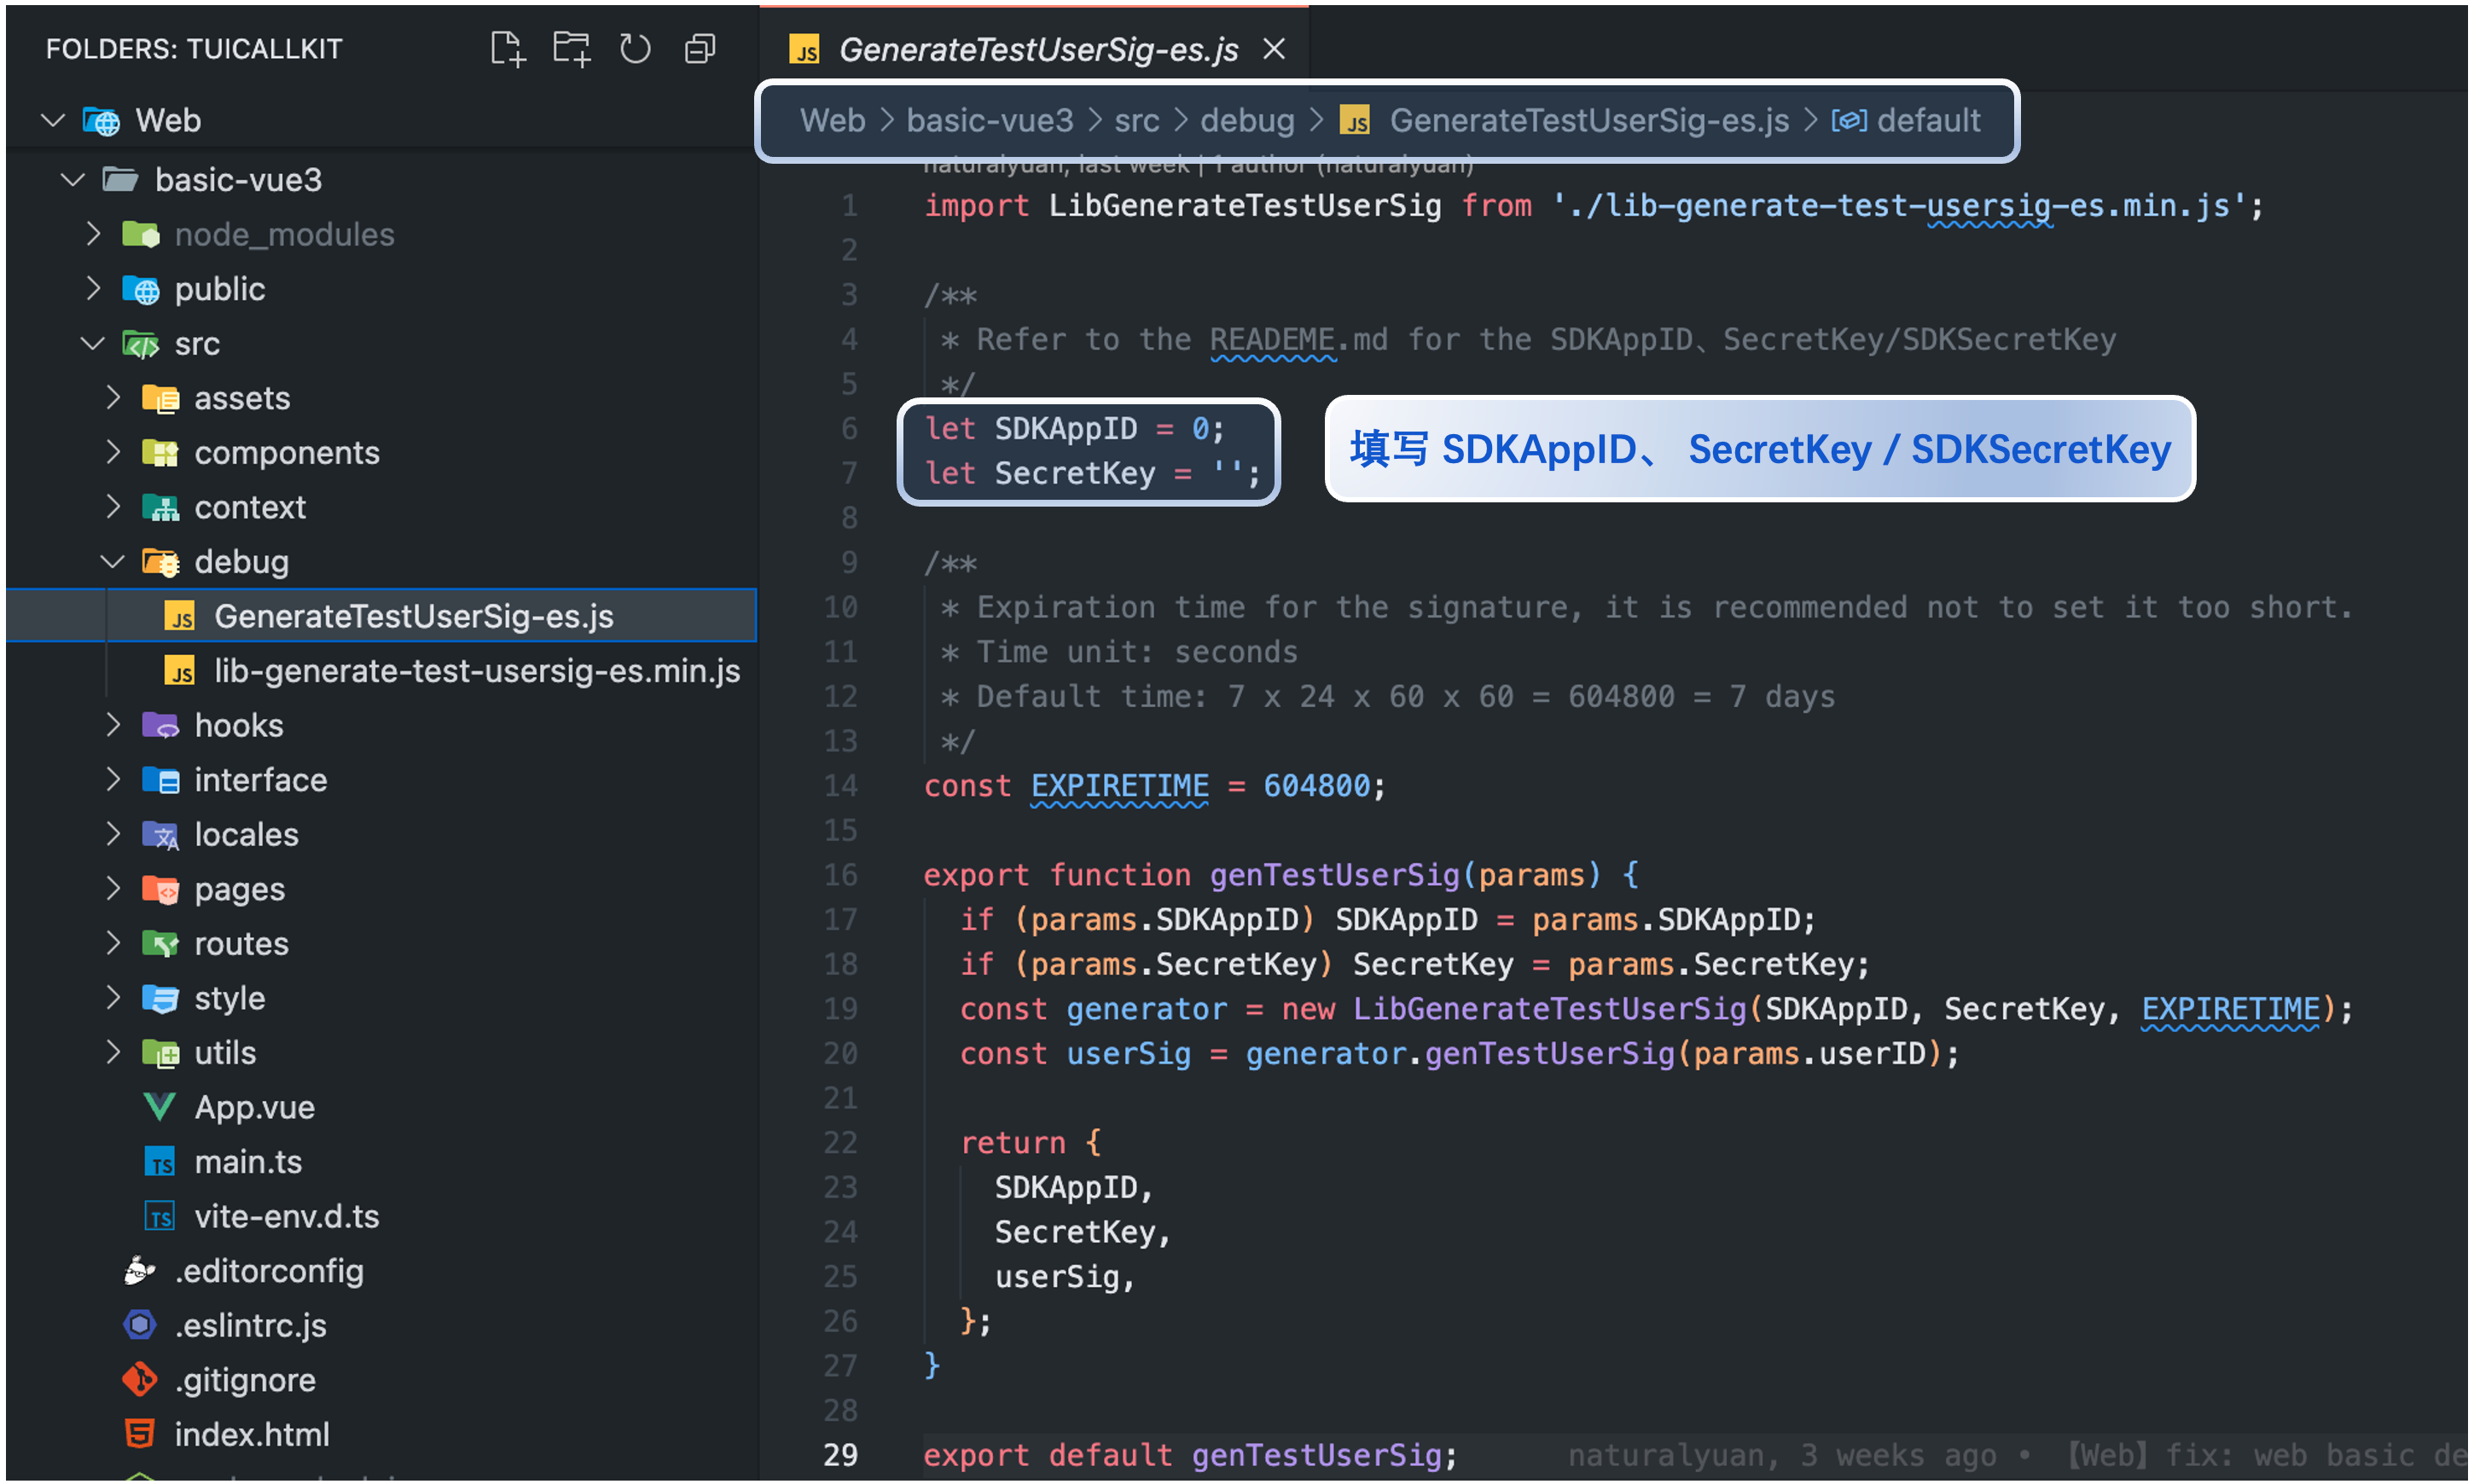
|
|
57
|
+
|
|
58
|
+
|
|
59
|
+
## 步骤三:运行 Demo
|
|
60
|
+
|
|
61
|
+
打开终端,复制示例命令运行 Demo。
|
|
62
|
+
|
|
63
|
+
|
|
64
|
+
|
|
65
|
+
|
|
66
|
+
【TUICallKit/Web/basic-react】
|
|
67
|
+
``` bash
|
|
68
|
+
npm run dev
|
|
69
|
+
```
|
|
70
|
+
|
|
71
|
+
|
|
72
|
+
【TUICallKit/Web/basic-vue3】
|
|
73
|
+
``` bash
|
|
74
|
+
npm run dev
|
|
75
|
+
```
|
|
76
|
+
|
|
77
|
+
> **警告:**
|
|
78
|
+
>
|
|
79
|
+
|
|
80
|
+
> **本地环境请在 localhost 协议下访问,公网体验请在 HTTPS 协议下访问,具体参见 **[网络访问协议说明](https://web.sdk.qcloud.com/trtc/webrtc/doc/en/tutorial-05-info-browser.html#h2-3)**。**
|
|
81
|
+
>
|
|
82
|
+
|
|
83
|
+
|
|
84
|
+
## 步骤四:拨打您的第一通电话
|
|
85
|
+
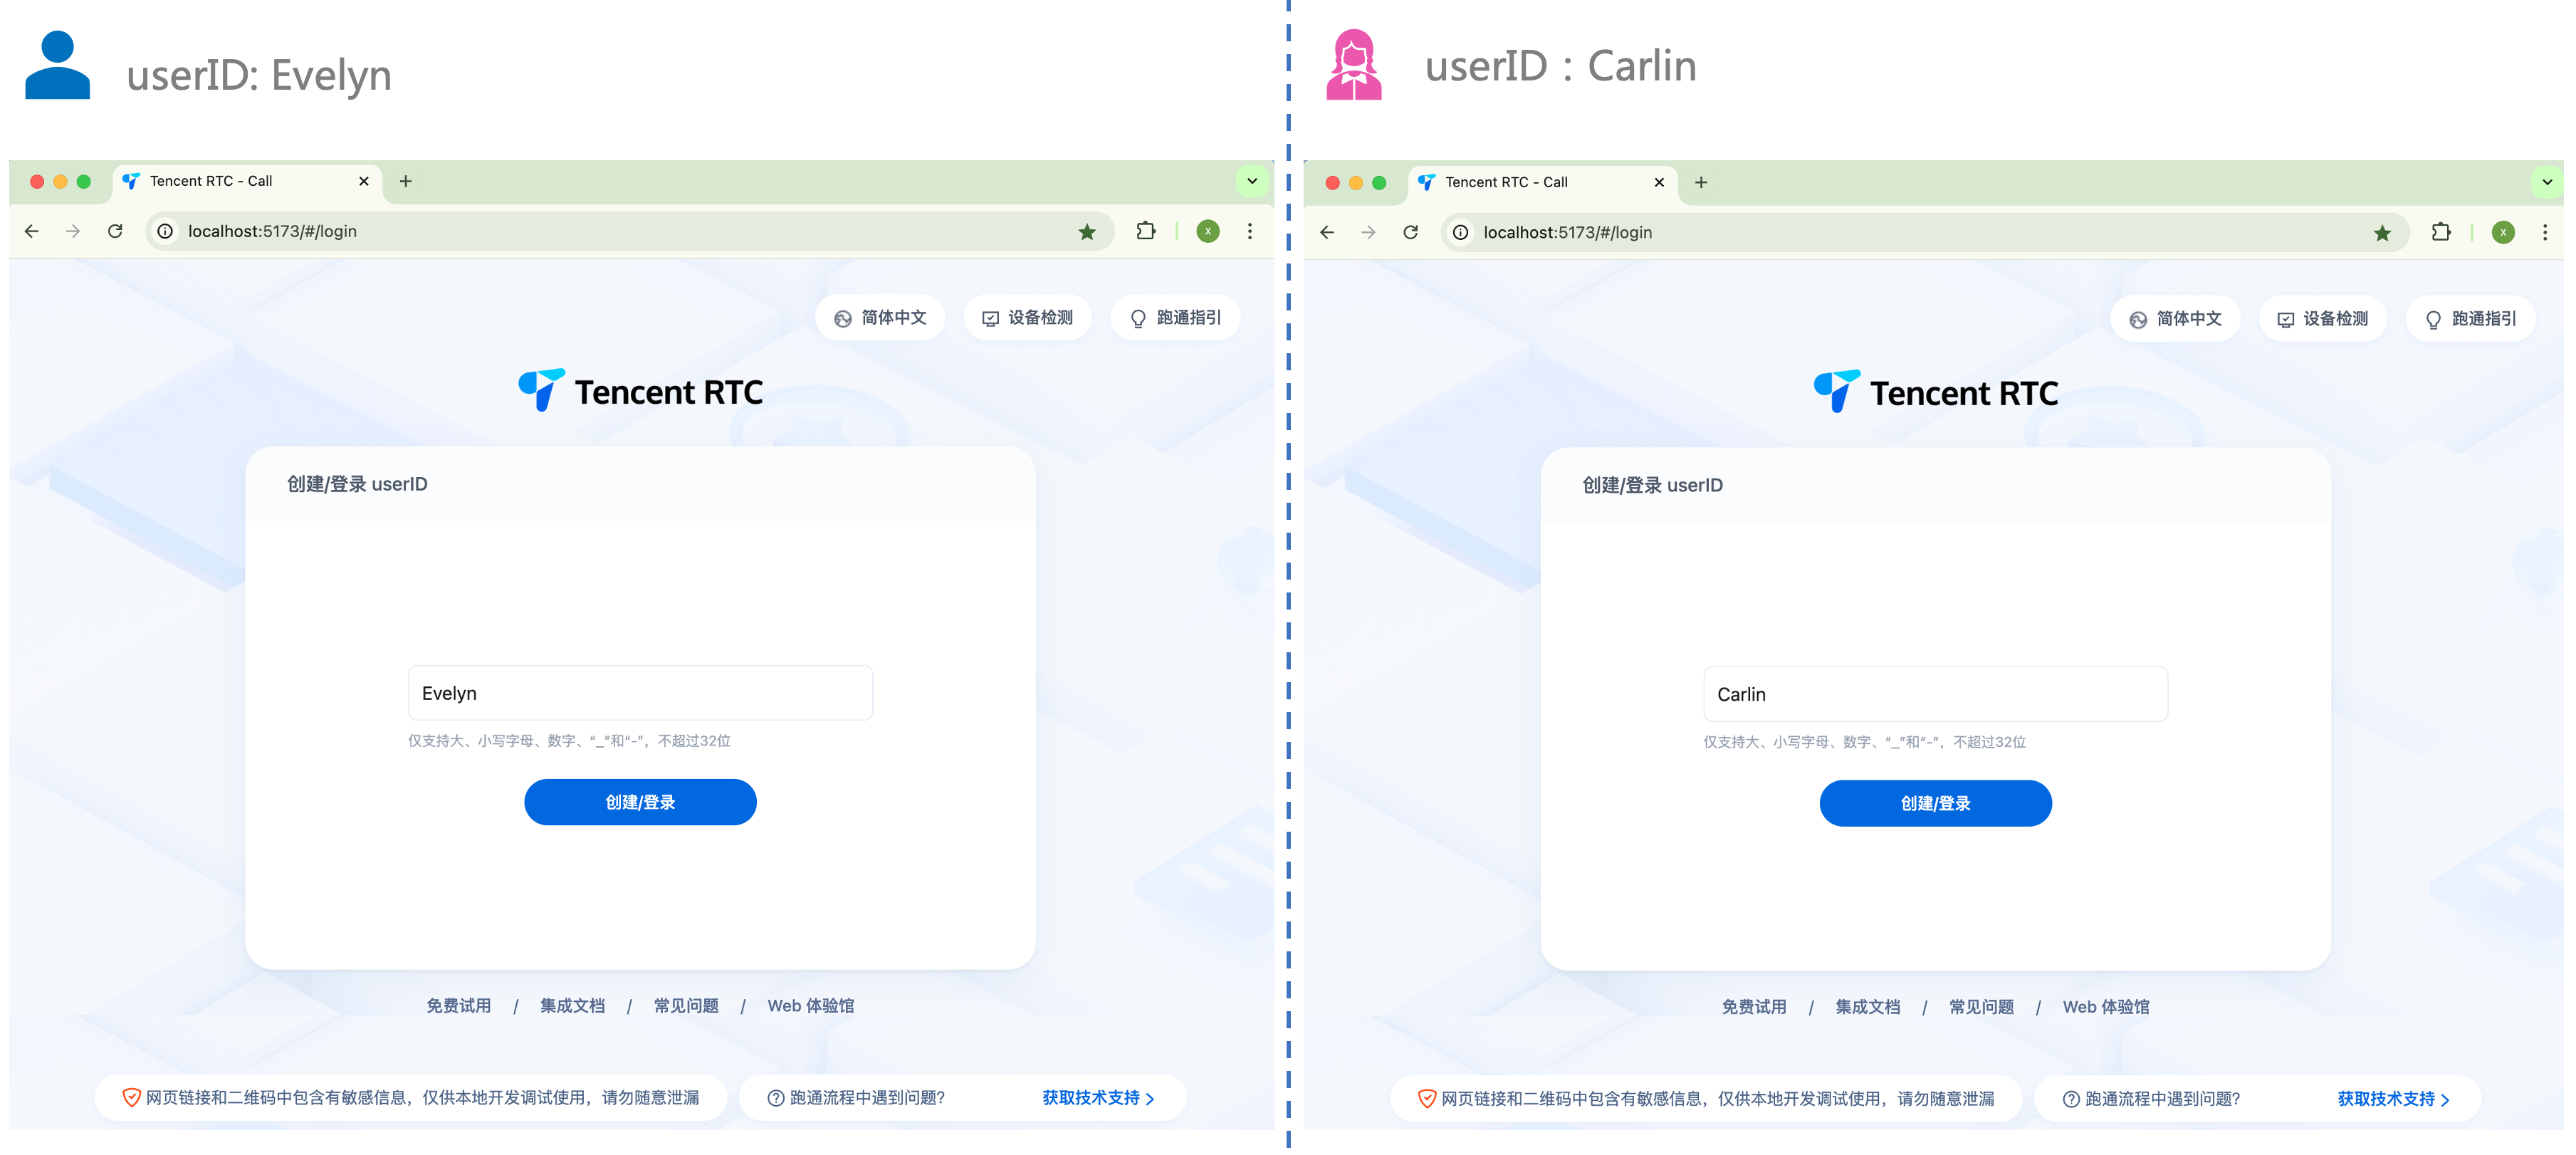
1. 打开浏览器页面,输入项目运行地址,登录 userID(由您定义)。
|
|
86
|
+
|
|
87
|
+
|
|
88
|
+
|
|
89
|
+
|
|
90
|
+
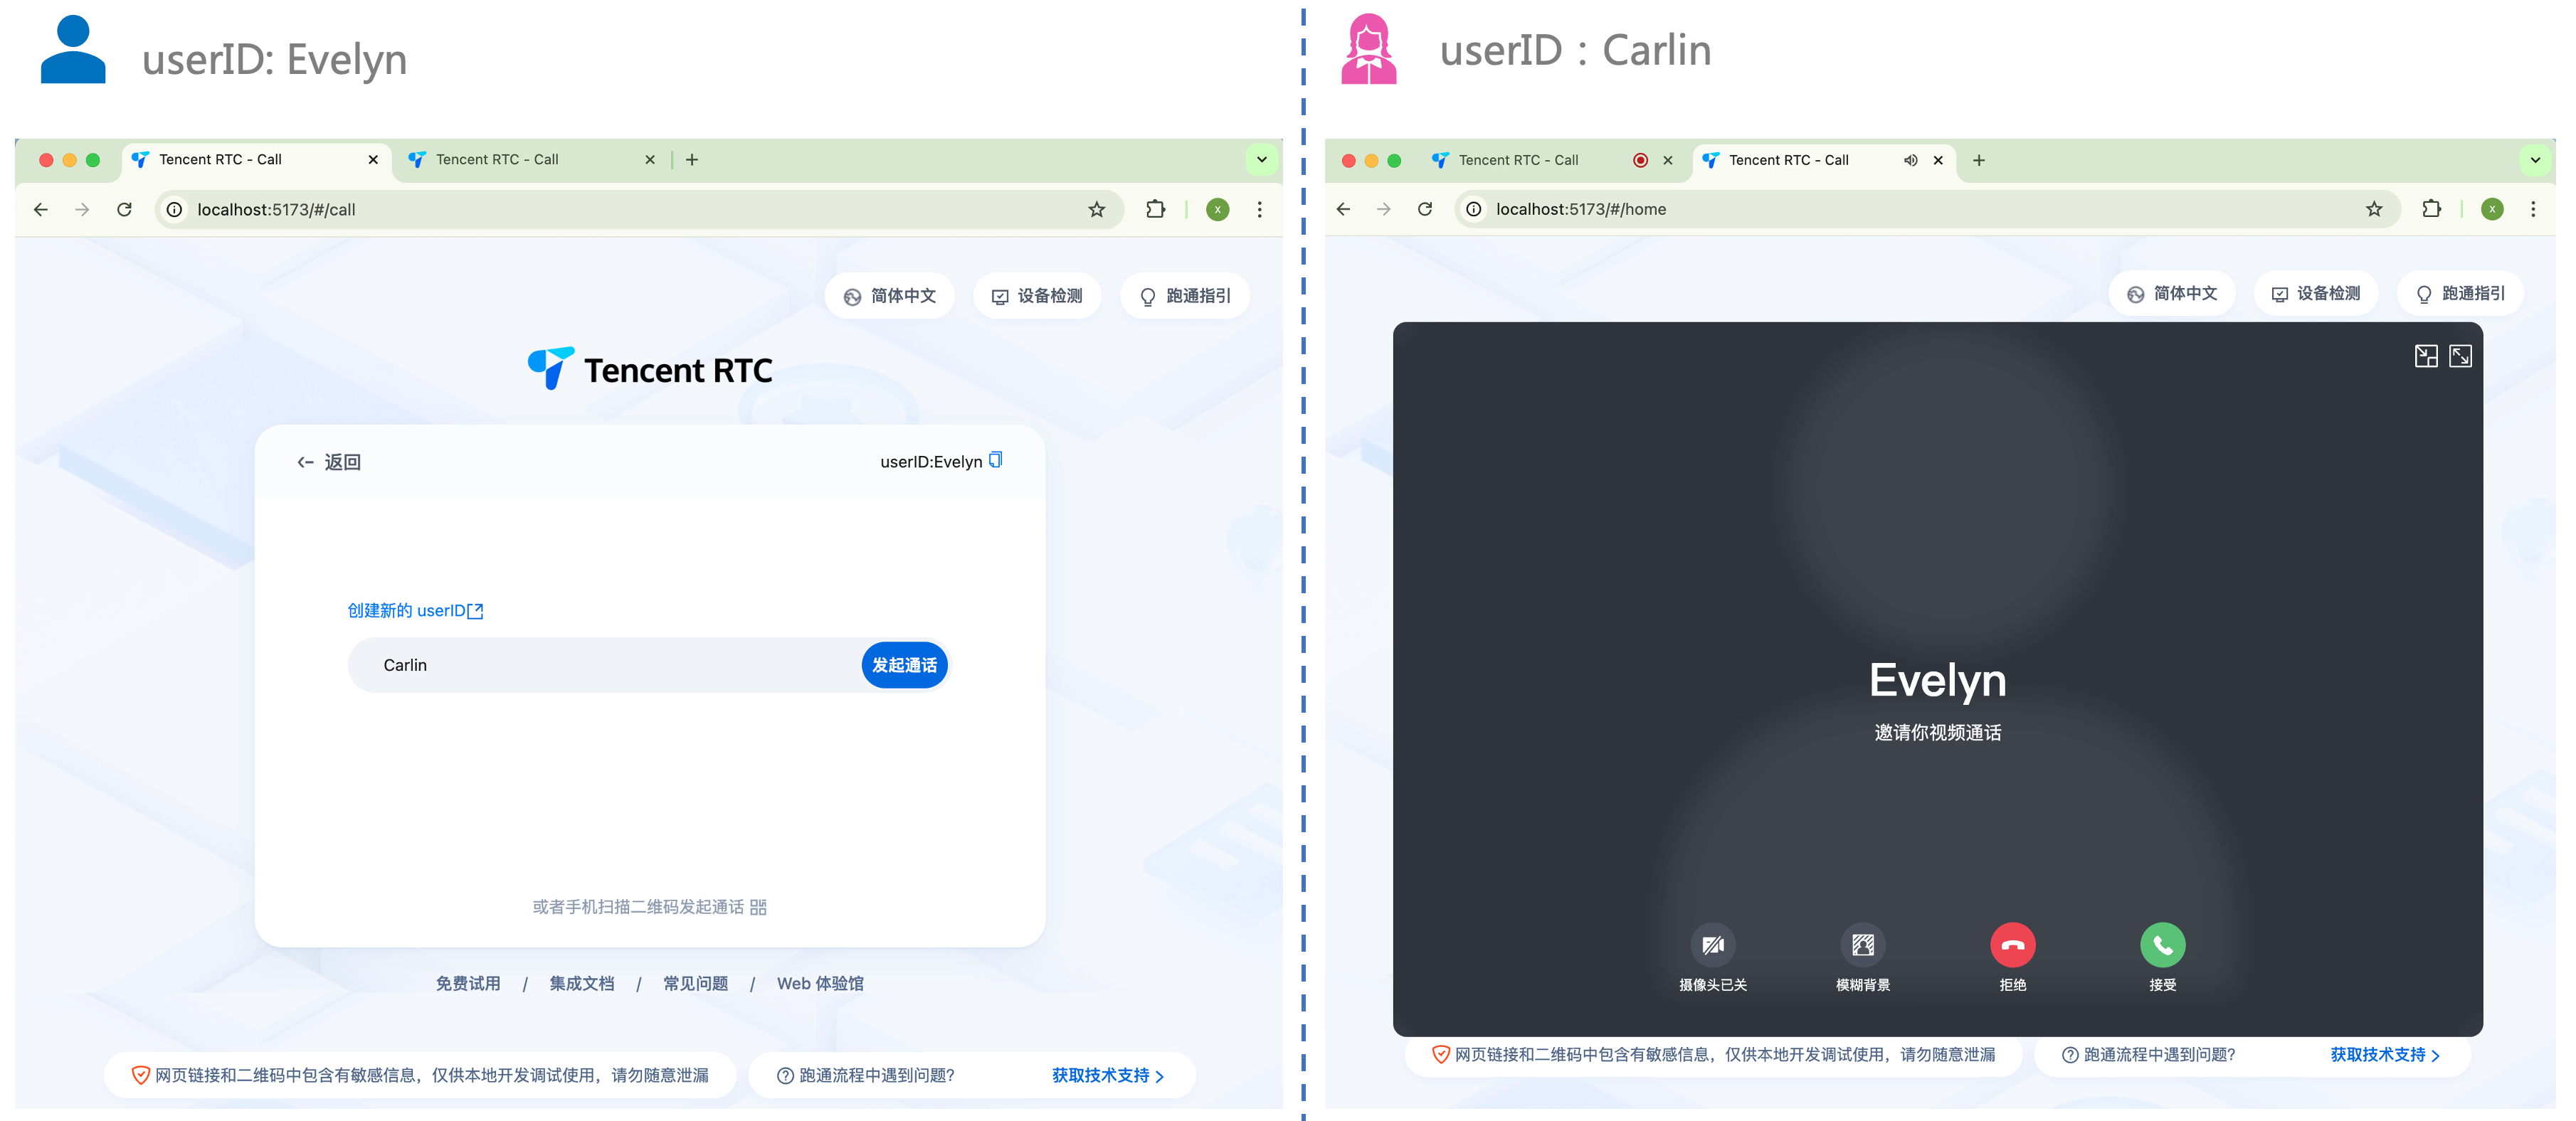
2. 输入被叫方的 userID,单击 `发起通话` 体验您的第一通话。
|
|
91
|
+
|
|
92
|
+
|
|
93
|
+
|
|
File without changes
|