@tencent-rtc/mcp 1.0.1 → 1.0.2
This diff represents the content of publicly available package versions that have been released to one of the supported registries. The information contained in this diff is provided for informational purposes only and reflects changes between package versions as they appear in their respective public registries.
- package/README.md +38 -37
- package/package.json +1 -1
- package/resource/doc/chatuikit/android/client_api_Android.md +1373 -0
- package/resource/doc/chatuikit/android/generate_UserSig.md +306 -0
- package/resource/doc/chatuikit/android/integrarte_only_tuichat_Android.md +290 -0
- package/resource/doc/chatuikit/android/integrate_tuikit_Android.md +287 -0
- package/resource/doc/chatuikit/android/quick_start_Android.md +138 -0
- package/resource/doc/chatuikit/android/show_typing_Android.md +43 -0
- package/resource/doc/chatuikit/faq/faq_sdk.md +120 -0
- package/resource/doc/chatuikit/faq/generate_UserSig.md +306 -0
- package/resource/doc/chatuikit/flutter/client_api_Flutter.md +932 -0
- package/resource/doc/chatuikit/flutter/generate_UserSig.md +306 -0
- package/resource/doc/chatuikit/flutter/integrate_only_tuichat_Flutter.md +333 -0
- package/resource/doc/chatuikit/flutter/integrate_tuikit_Flutter.md +769 -0
- package/resource/doc/chatuikit/flutter/quick_start_Flutter.md +217 -0
- package/resource/doc/chatuikit/iOS/client_api_iOS.md +1121 -0
- package/resource/doc/chatuikit/iOS/generate_UserSig.md +306 -0
- package/resource/doc/chatuikit/iOS/integrate_only_tuichat_iOS.md +748 -0
- package/resource/doc/chatuikit/iOS/integrate_tuikit_iOS.md +852 -0
- package/resource/doc/chatuikit/iOS/quick_start_iOS.md +163 -0
- package/resource/doc/chatuikit/iOS/show_typing_iOS.md +52 -0
- package/resource/doc/chatuikit/react/generate_UserSig.md +306 -0
- package/resource/doc/chatuikit/react/integrate_tuichat_only_react.md +202 -0
- package/resource/doc/chatuikit/react/integrate_tuichat_react.md +279 -0
- package/resource/doc/chatuikit/vue/generate_UserSig.md +306 -0
- package/resource/doc/chatuikit/vue/integrate_only_tuichat_Vue_web.md +124 -0
- package/resource/doc/chatuikit/vue/integrate_tuikit_Vue_web.md +552 -0
- package/server.js +51 -27
- package/server.js.map +1 -1
|
@@ -0,0 +1,287 @@
|
|
|
1
|
+
This article introduces how to integrate `TUIKit` components.
|
|
2
|
+
|
|
3
|
+
> **Note:**
|
|
4
|
+
>
|
|
5
|
+
> - Starting from version 5.7.1435, TUIKit supports modular integration and the classic UI. You can integrate the necessary modules according to your needs.
|
|
6
|
+
> - Starting from version 6.9.3557, TUIKit introduces a brand new minimalist UI.
|
|
7
|
+
|
|
8
|
+
|
|
9
|
+
You can freely choose between the classic or minimalist UI components according to your needs. If you are not familiar with the effects of the interface libraries, you can refer to the document [TUIKit Overview](https://www.tencentcloud.com/document/product/1047/50062).
|
|
10
|
+
|
|
11
|
+
## Environment Requirements
|
|
12
|
+
- Android Studio-Giraffe
|
|
13
|
+
|
|
14
|
+
- Gradle-7.2
|
|
15
|
+
|
|
16
|
+
- Android Gradle Plugin Version-7.0.0
|
|
17
|
+
|
|
18
|
+
- kotlin-gradle-plugin-1.5.31
|
|
19
|
+
|
|
20
|
+
|
|
21
|
+
## Integrate Module Source Code
|
|
22
|
+
1. Download the TUIKit source code from [GitHub](https://github.com/TencentCloud/chat-uikit-android). Ensure that the TUIKit folder is at the same level as your project folder, for example:
|
|
23
|
+
|
|
24
|
+
|
|
25
|
+
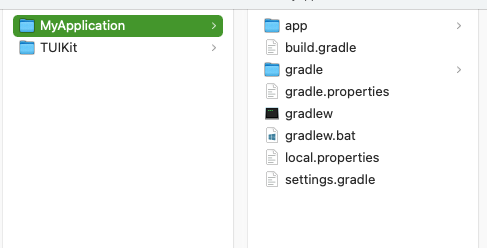
|
|
26
|
+
|
|
27
|
+
2. Add the corresponding TUIKit components to settings.gradle according to your business requirements. TUIKit components are independent of each other, and adding or removing them does not affect project compilation.
|
|
28
|
+
|
|
29
|
+
``` java
|
|
30
|
+
// Include the upper-layer app module
|
|
31
|
+
include ':app'
|
|
32
|
+
|
|
33
|
+
// Include the internal communication module (required module)
|
|
34
|
+
include ':tuicore'
|
|
35
|
+
project(':tuicore').projectDir = new File(settingsDir, '../TUIKit/TUICore/tuicore')
|
|
36
|
+
|
|
37
|
+
// Include the common module of IM component (required module)
|
|
38
|
+
include ':timcommon'
|
|
39
|
+
project(':timcommon').projectDir = new File(settingsDir, '../TUIKit/TIMCommon/timcommon')
|
|
40
|
+
|
|
41
|
+
// Include the chat feature module (basic feature module)
|
|
42
|
+
include ':tuichat'
|
|
43
|
+
project(':tuichat').projectDir = new File(settingsDir, '../TUIKit/TUIChat/tuichat')
|
|
44
|
+
|
|
45
|
+
// Include the relationship chain feature module (basic feature module)
|
|
46
|
+
include ':tuicontact'
|
|
47
|
+
project(':tuicontact').projectDir = new File(settingsDir, '../TUIKit/TUIContact/tuicontact')
|
|
48
|
+
|
|
49
|
+
// Include the conversation list feature module (basic feature module)
|
|
50
|
+
include ':tuiconversation'
|
|
51
|
+
project(':tuiconversation').projectDir = new File(settingsDir, '../TUIKit/TUIConversation/tuiconversation')
|
|
52
|
+
|
|
53
|
+
// Include the search feature module (To use this module, you need to purchase the Pro edition、Pro Plus edition or Enterprise edition)
|
|
54
|
+
include ':tuisearch'
|
|
55
|
+
project(':tuisearch').projectDir = new File(settingsDir, '../TUIKit/TUISearch/tuisearch')
|
|
56
|
+
|
|
57
|
+
// Include the community topic feature module (To use this module, you need to purchase the Pro edition、Pro Plus edition or Enterprise edition)
|
|
58
|
+
include ':tuicommunity'
|
|
59
|
+
project(':tuicommunity').projectDir = new File(settingsDir, '../TUIKit/TUICommunity/tuicommunity')
|
|
60
|
+
|
|
61
|
+
// Include the audio/video call feature module
|
|
62
|
+
include ':tuicallkit-kt'
|
|
63
|
+
project(':tuicallkit-kt').projectDir = new File(settingsDir, '../TUIKit/TUICallKit/tuicallkit-kt')
|
|
64
|
+
|
|
65
|
+
// Include the video conference module
|
|
66
|
+
include ':tuiroomkit'
|
|
67
|
+
project(':tuiroomkit').projectDir = new File(settingsDir, '../TUIKit/TUIRoomKit/tuiroomkit')
|
|
68
|
+
|
|
69
|
+
// Include speech-to-text plugin, supported from version 7.5
|
|
70
|
+
include ':tuivoicetotextplugin'
|
|
71
|
+
project(':tuivoicetotextplugin').projectDir = new File(settingsDir, '../TUIKit/TUIVoiceToTextPlugin/tuivoicetotextplugin')
|
|
72
|
+
|
|
73
|
+
// Include chat message translation plugin, supported from version 7.2 (Value-added feature activation is required. Please contact Tencent Cloud sales)
|
|
74
|
+
include ':tuitranslationplugin'
|
|
75
|
+
project(':tuitranslationplugin').projectDir = new File(settingsDir, '../TUIKit/TUITranslationPlugin/tuitranslationplugin')
|
|
76
|
+
|
|
77
|
+
// Include emoji reaction plugin, supported from version 7.8 (To use this module, you need to purchase the Pro Edition、Pro Plus edition or Enterprise edition)
|
|
78
|
+
include ':tuiemojiplugin'
|
|
79
|
+
project(':tuiemojiplugin').projectDir = new File(settingsDir, '../TUIKit/TUIEmojiPlugin/tuiemojiplugin')
|
|
80
|
+
```
|
|
81
|
+
3. Add the following to `build.gradle` in App:
|
|
82
|
+
|
|
83
|
+
``` java
|
|
84
|
+
dependencies {
|
|
85
|
+
api project(':tuiconversation')
|
|
86
|
+
api project(':tuicontact')
|
|
87
|
+
api project(':tuichat')
|
|
88
|
+
api project(':tuisearch')
|
|
89
|
+
api project(':tuicommunity')
|
|
90
|
+
api project(':tuicallkit-kt')
|
|
91
|
+
api project(':tuiroomkit')
|
|
92
|
+
// Integrate speech-to-text plugin, supported from version 7.5
|
|
93
|
+
api project(':tuivoicetotextplugin')
|
|
94
|
+
// Integrate translation plugin, supported from version 7.2 (Value-added feature activation is required. Please contact Tencent Cloud sales)
|
|
95
|
+
api project(':tuitranslationplugin')
|
|
96
|
+
// Integrate emoji reaction plugin, supported from version 7.8 (To use this module, you need to purchase the Premium Edition)
|
|
97
|
+
api project(':tuiemojiplugin')
|
|
98
|
+
// Integrate group chain plugin, supported from version 7.1
|
|
99
|
+
api 'com.tencent.imsdk:tuigroupnote-plugin:8.4.6667'
|
|
100
|
+
// Integrate group voting plugin, supported from version 7.1
|
|
101
|
+
api 'com.tencent.imsdk:tuipoll-plugin:8.4.6667'
|
|
102
|
+
// Integrate session grouping plugin, supported from version 7.3
|
|
103
|
+
api 'com.tencent.imsdk:tuiconversationgroup-plugin:8.4.6667'
|
|
104
|
+
// Integrate session tagging plugin, supported from version 7.3
|
|
105
|
+
api 'com.tencent.imsdk:tuiconversationmark-plugin:8.4.6667'
|
|
106
|
+
// Integrate message push plugin, supported from version 7.6
|
|
107
|
+
api 'com.tencent.timpush:timpush:8.4.6667'
|
|
108
|
+
// Integrate the corresponding manufacturer's push package as needed
|
|
109
|
+
api 'com.tencent.timpush:fcm:8.4.6667'
|
|
110
|
+
api 'com.tencent.timpush:xiaomi:8.4.6667'
|
|
111
|
+
api 'com.tencent.timpush:meizu:8.4.6667'
|
|
112
|
+
api 'com.tencent.timpush:oppo:8.4.6667'
|
|
113
|
+
api 'com.tencent.timpush:vivo:8.4.6667'
|
|
114
|
+
api 'com.tencent.timpush:huawei:8.4.6667'
|
|
115
|
+
api 'com.tencent.timpush:honor:8.4.6667'
|
|
116
|
+
}
|
|
117
|
+
```
|
|
118
|
+
4. Add the following to the `gradle.properties` file to automatically convert third-party libraries to use AndroidX:
|
|
119
|
+
|
|
120
|
+
``` java
|
|
121
|
+
android.enableJetifier=true
|
|
122
|
+
```
|
|
123
|
+
5.
|
|
124
|
+
|
|
125
|
+
Add the following to the `build.gradle` file (in the same level as `settings.gradle`) of the root project to add the Maven repository and
|
|
126
|
+
|
|
127
|
+
|
|
128
|
+
|
|
129
|
+
|
|
130
|
+
Kotlin support:
|
|
131
|
+
|
|
132
|
+
``` java
|
|
133
|
+
buildscript {
|
|
134
|
+
repositories {
|
|
135
|
+
mavenCentral()
|
|
136
|
+
maven { url "https://mirrors.tencent.com/nexus/repository/maven-public/" }
|
|
137
|
+
}
|
|
138
|
+
dependencies {
|
|
139
|
+
classpath 'com.android.tools.build:gradle:7.0.0'
|
|
140
|
+
classpath "org.jetbrains.kotlin:kotlin-gradle-plugin:1.5.31"
|
|
141
|
+
}
|
|
142
|
+
}
|
|
143
|
+
```
|
|
144
|
+
|
|
145
|
+
If you use Gradle 8.x, you need to add the following code.
|
|
146
|
+
|
|
147
|
+
``` java
|
|
148
|
+
buildscript {
|
|
149
|
+
repositories {
|
|
150
|
+
mavenCentral()
|
|
151
|
+
maven { url "https://mirrors.tencent.com/nexus/repository/maven-public/" }
|
|
152
|
+
}
|
|
153
|
+
dependencies {
|
|
154
|
+
classpath 'com.android.tools.build:gradle:8.0.2'
|
|
155
|
+
classpath "org.jetbrains.kotlin:kotlin-gradle-plugin:1.9.0"
|
|
156
|
+
}
|
|
157
|
+
}
|
|
158
|
+
```
|
|
159
|
+
|
|
160
|
+
> **Note:**
|
|
161
|
+
>
|
|
162
|
+
> - The compatibility between Kotlin, Gradle, and AGP versions can be [viewed here](https://kotlinlang.org/docs/gradle-configure-project.html#apply-the-plugin).
|
|
163
|
+
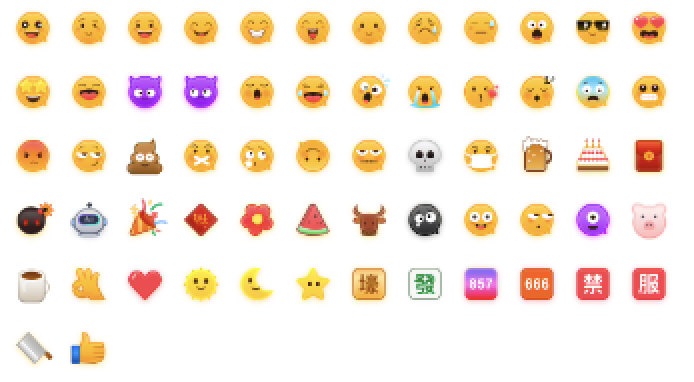
> - To respect the copyright of emoji designs, the Chat Demo/TUIKit project does not include cutouts of large emoji elements. Please replace them with your own designs or other emoji packs for which you hold the copyright before officially launching for commercial use. **The default smiley face emoji pack shown below is copyrighted by Tencent RTC** and is available for licensed use for a fee. If you need to obtain a license, please [contact us](https://trtc.io/contact).
|
|
164
|
+
|
|
165
|
+
> 
|
|
166
|
+
>
|
|
167
|
+
|
|
168
|
+
6. Sync the project, and compile and run it. The expected project structure is shown in the following figure:
|
|
169
|
+
|
|
170
|
+
|
|
171
|
+
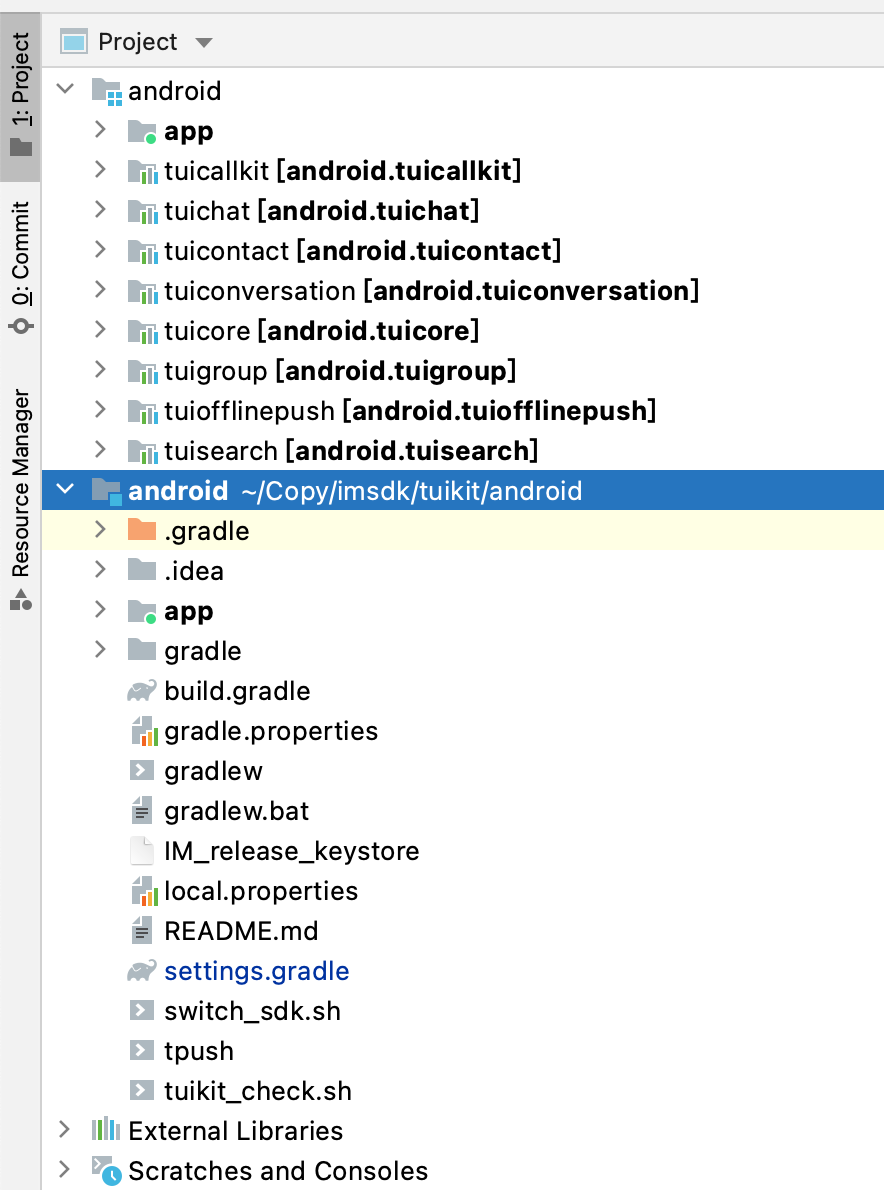
|
|
172
|
+
|
|
173
|
+
7. **[Optional] **Delete unnecessary UI files
|
|
174
|
+
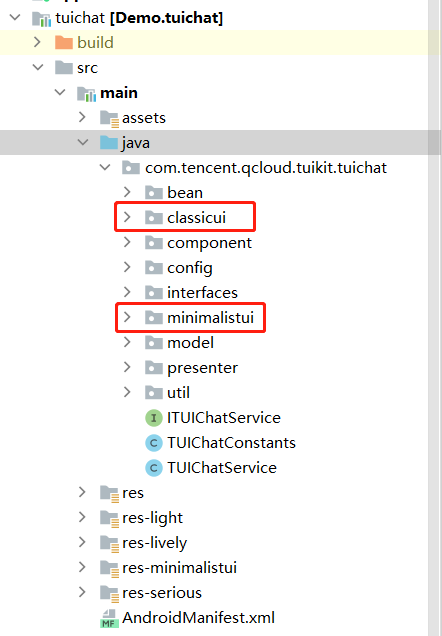
The classic and minimalist UI do not affect each other, and they can run independently. Their files are in separate folders. Take TUIChat as an example:
|
|
175
|
+
|
|
176
|
+
|
|
177
|
+
|
|
178
|
+
|
|
179
|
+
|
|
180
|
+
The `classicui` folder stores the classic version UI files, while the `minimalistui` folder stores the minimalist version UI files. If you are to integrate the minimalist UI, just delete the classicui folder, Activity and Service in the AndroidManifest.xml file.
|
|
181
|
+
|
|
182
|
+
|
|
183
|
+
> **Note:**
|
|
184
|
+
>
|
|
185
|
+
|
|
186
|
+
> The Classic and Minimalist UI cannot be mixed. When integrating multiple components, you must choose classic UI or minimalist UI at the same time. For instance, the Classic TUIChat component must be used with the Classic versions of the TUIConversation, TUIContact, and TUIGroup. Similarly, the Minimalist version of the TUIChat component must be paired with the Minimalist versions of the TUIConversation, TUIContact, and TUIGroup.
|
|
187
|
+
>
|
|
188
|
+
|
|
189
|
+
|
|
190
|
+
## Build Basic Interfaces
|
|
191
|
+
|
|
192
|
+
After integrating TUIKit, if you want to continue building basic interfaces for chat, conversation list, etc., please refer to the document: [Build Chat](https://www.tencentcloud.com/document/product/1047/61214), [Build Conversation List.](https://www.tencentcloud.com/document/product/1047/61216)
|
|
193
|
+
|
|
194
|
+
## FAQs
|
|
195
|
+
- **How to handle error "Manifest merger failed : Attribute application@allowBackup value=(true) from AndroidManifest.xml"?**
|
|
196
|
+
|
|
197
|
+
|
|
198
|
+
In the Chat SDK, the value of `allowBackup` is `false` by default, indicating that the backup and restore feature of the app is disabled.
|
|
199
|
+
You can delete the `allowBackup` property from the `AndroidManifest.xml` file to disable the backup and restore feature. You can also add `tools:replace="android:allowBackup"` to the `application` node of the `AndroidManifest.xml` file to overwrite the Chat SDK configuration with your own configuration.
|
|
200
|
+
|
|
201
|
+
|
|
202
|
+
For example:
|
|
203
|
+
|
|
204
|
+
``` css
|
|
205
|
+
<manifest xmlns:android="http://schemas.android.com/apk/res/android"
|
|
206
|
+
xmlns:tools="http://schemas.android.com/tools"
|
|
207
|
+
package="com.tencent.qcloud.tuikit.myapplication">
|
|
208
|
+
|
|
209
|
+
<application
|
|
210
|
+
android:allowBackup="true"
|
|
211
|
+
android:name=".MApplication"
|
|
212
|
+
android:icon="@mipmap/ic_launcher"
|
|
213
|
+
android:label="@string/app_name"
|
|
214
|
+
android:roundIcon="@mipmap/ic_launcher_round"
|
|
215
|
+
android:supportsRtl="true"
|
|
216
|
+
android:theme="@style/Theme.MyApplication"
|
|
217
|
+
tools:replace="android:allowBackup">
|
|
218
|
+
<activity android:name=".MainActivity">
|
|
219
|
+
<intent-filter>
|
|
220
|
+
<action android:name="android.intent.action.MAIN" />
|
|
221
|
+
<category android:name="android.intent.category.LAUNCHER" />
|
|
222
|
+
</intent-filter>
|
|
223
|
+
</activity>
|
|
224
|
+
</application>
|
|
225
|
+
|
|
226
|
+
</manifest>
|
|
227
|
+
```
|
|
228
|
+
- **How to handle error "NDK at /Users/***/Library/Android/sdk/ndk-bundle did not have a source.properties file"?**
|
|
229
|
+
|
|
230
|
+
|
|
231
|
+
You only need to add you NDK path to the `local.properties` file. For example: `ndk.dir=/Users/***/Library/Android/sdk/ndk/16.1.4479499`
|
|
232
|
+
|
|
233
|
+
- **How to handle error "Cannot fit requested classes in a single dex file"?**
|
|
234
|
+
|
|
235
|
+
|
|
236
|
+
The possible cause is that your API level is lower than expected. You need to enable `MultiDex` support in the `build.gradle` file in App and add `multiDexEnabled true` and the corresponding dependencies:
|
|
237
|
+
|
|
238
|
+
``` groovy
|
|
239
|
+
android {
|
|
240
|
+
defaultConfig {
|
|
241
|
+
...
|
|
242
|
+
minSdkVersion 19
|
|
243
|
+
targetSdkVersion 30
|
|
244
|
+
multiDexEnabled true
|
|
245
|
+
}
|
|
246
|
+
...
|
|
247
|
+
}
|
|
248
|
+
dependencies {
|
|
249
|
+
implementation "androidx.multidex:multidex:2.0.1"
|
|
250
|
+
}
|
|
251
|
+
```
|
|
252
|
+
|
|
253
|
+
In addition, add the following code to the Application file:
|
|
254
|
+
|
|
255
|
+
``` java
|
|
256
|
+
public class MyApplication extends SomeOtherApplication {
|
|
257
|
+
@Override
|
|
258
|
+
protected void attachBaseContext(Context base) {
|
|
259
|
+
super.attachBaseContext(base);
|
|
260
|
+
MultiDex.install(this);
|
|
261
|
+
}
|
|
262
|
+
}
|
|
263
|
+
```
|
|
264
|
+
- **How to handle error "Plugin with id 'kotlin-android' not found."?**
|
|
265
|
+
|
|
266
|
+
|
|
267
|
+
Because TUIChat uses Kotlin code, you need to add the Kotlin build plug-in. For details, see [Step 5](https://write.woa.com/document/108053209726623744) above.
|
|
268
|
+
|
|
269
|
+
- **Why the App function of the Debug version is normal and the App function of the Release version is abnormal?**
|
|
270
|
+
|
|
271
|
+
|
|
272
|
+
This issue is very likely caused by ProGuard. Please try to avoid ProGuarding TUIKit. You can add the following rule:
|
|
273
|
+
|
|
274
|
+
``` typescript
|
|
275
|
+
# Avoid deleting code logic
|
|
276
|
+
-dontshrink
|
|
277
|
+
-dontoptimize
|
|
278
|
+
# Avoid aliasing TUIKit
|
|
279
|
+
-keep class com.tencent.qcloud.** { *; }
|
|
280
|
+
```
|
|
281
|
+
|
|
282
|
+
## Contact Us
|
|
283
|
+
|
|
284
|
+
If you have any questions about this article, feel free to join the [Telegram Technical Group](https://t.me/+EPk6TMZEZMM5OGY1), where you will receive reliable technical support.
|
|
285
|
+
|
|
286
|
+
|
|
287
|
+
|
|
@@ -0,0 +1,138 @@
|
|
|
1
|
+
This document will guide you through integrating TUIKit and successfully sending your first message.
|
|
2
|
+
|
|
3
|
+
## Environment Requirements
|
|
4
|
+
- Android Studio-Giraffe
|
|
5
|
+
|
|
6
|
+
- Gradle-7.2
|
|
7
|
+
|
|
8
|
+
- Android Gradle Plugin Version-7.0.0
|
|
9
|
+
|
|
10
|
+
- kotlin-gradle-plugin-1.5.31
|
|
11
|
+
|
|
12
|
+
|
|
13
|
+
## Create an Application
|
|
14
|
+
|
|
15
|
+
Before integrating TUIKit, you need to create a Chat application in the console. The steps are as follows:
|
|
16
|
+
1. Register a console account.
|
|
17
|
+
|
|
18
|
+
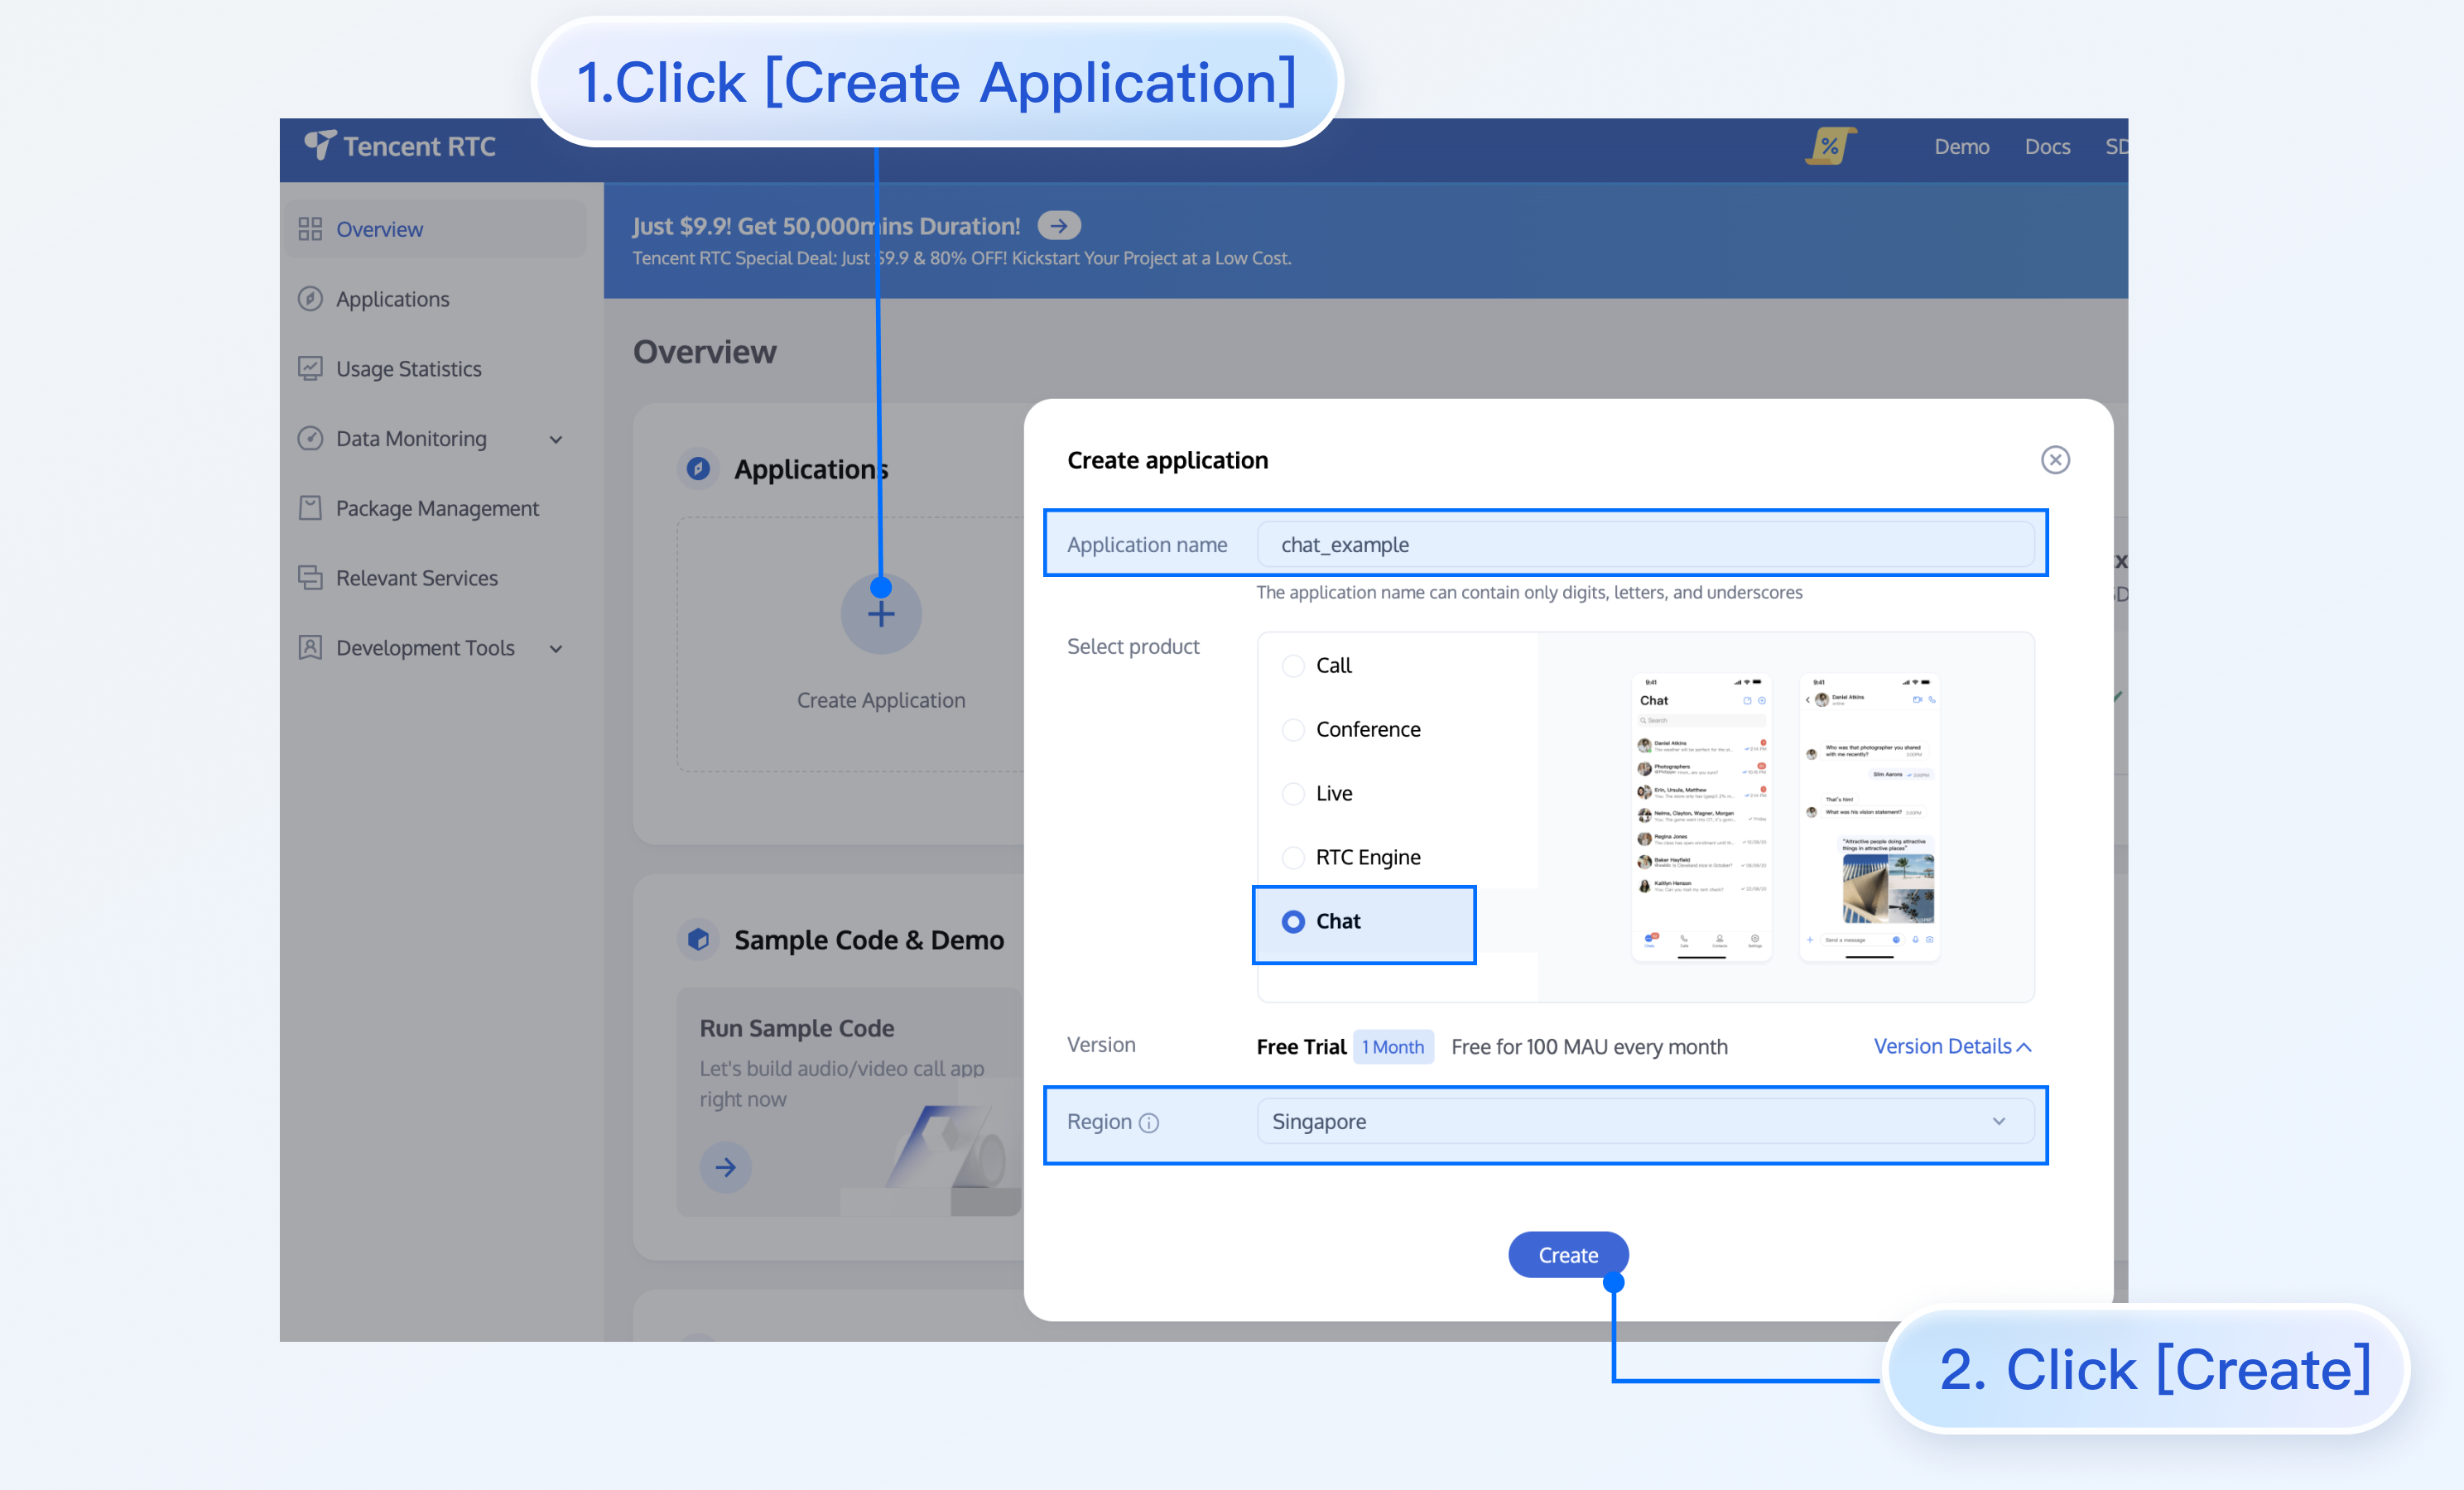
2. Go to `Applications`, click `Create Application`, and an application information input box will pop up.
|
|
19
|
+
|
|
20
|
+
3. Fill in the application name, select the product as Chat, and choose an appropriate region.
|
|
21
|
+
|
|
22
|
+
|
|
23
|
+
After the operation is complete, you will see the application you just created in the `My Applications` list.
|
|
24
|
+
|
|
25
|
+
|
|
26
|
+
> **Note:**
|
|
27
|
+
>
|
|
28
|
+
|
|
29
|
+
> Note down the SDKAppID of this application, as it will be used in subsequent steps. Also, keep the SDKSecretKey strictly confidential and do not disclose it to irrelevant personnel.
|
|
30
|
+
>
|
|
31
|
+
|
|
32
|
+
|
|
33
|
+
The steps are illustrated as follows:
|
|
34
|
+
|
|
35
|
+
|
|
36
|
+
|
|
37
|
+
|
|
38
|
+
## Create User Accounts
|
|
39
|
+
|
|
40
|
+
Creating an application only ensures you can initialize the SDK normally. To successfully send messages, you also need to create a user account in the application. There are many ways to create an account, such as directly creating it in the console or registering via API on the client. You may choose any method that suits you best.
|
|
41
|
+
|
|
42
|
+
> **Note:**
|
|
43
|
+
>
|
|
44
|
+
|
|
45
|
+
> Sending messages involves at least two users, so at this step, you need to create at least two accounts. Note down the userID of these two accounts for subsequent steps.
|
|
46
|
+
>
|
|
47
|
+
|
|
48
|
+
|
|
49
|
+
If you need to create an account in the console, follow these steps:
|
|
50
|
+
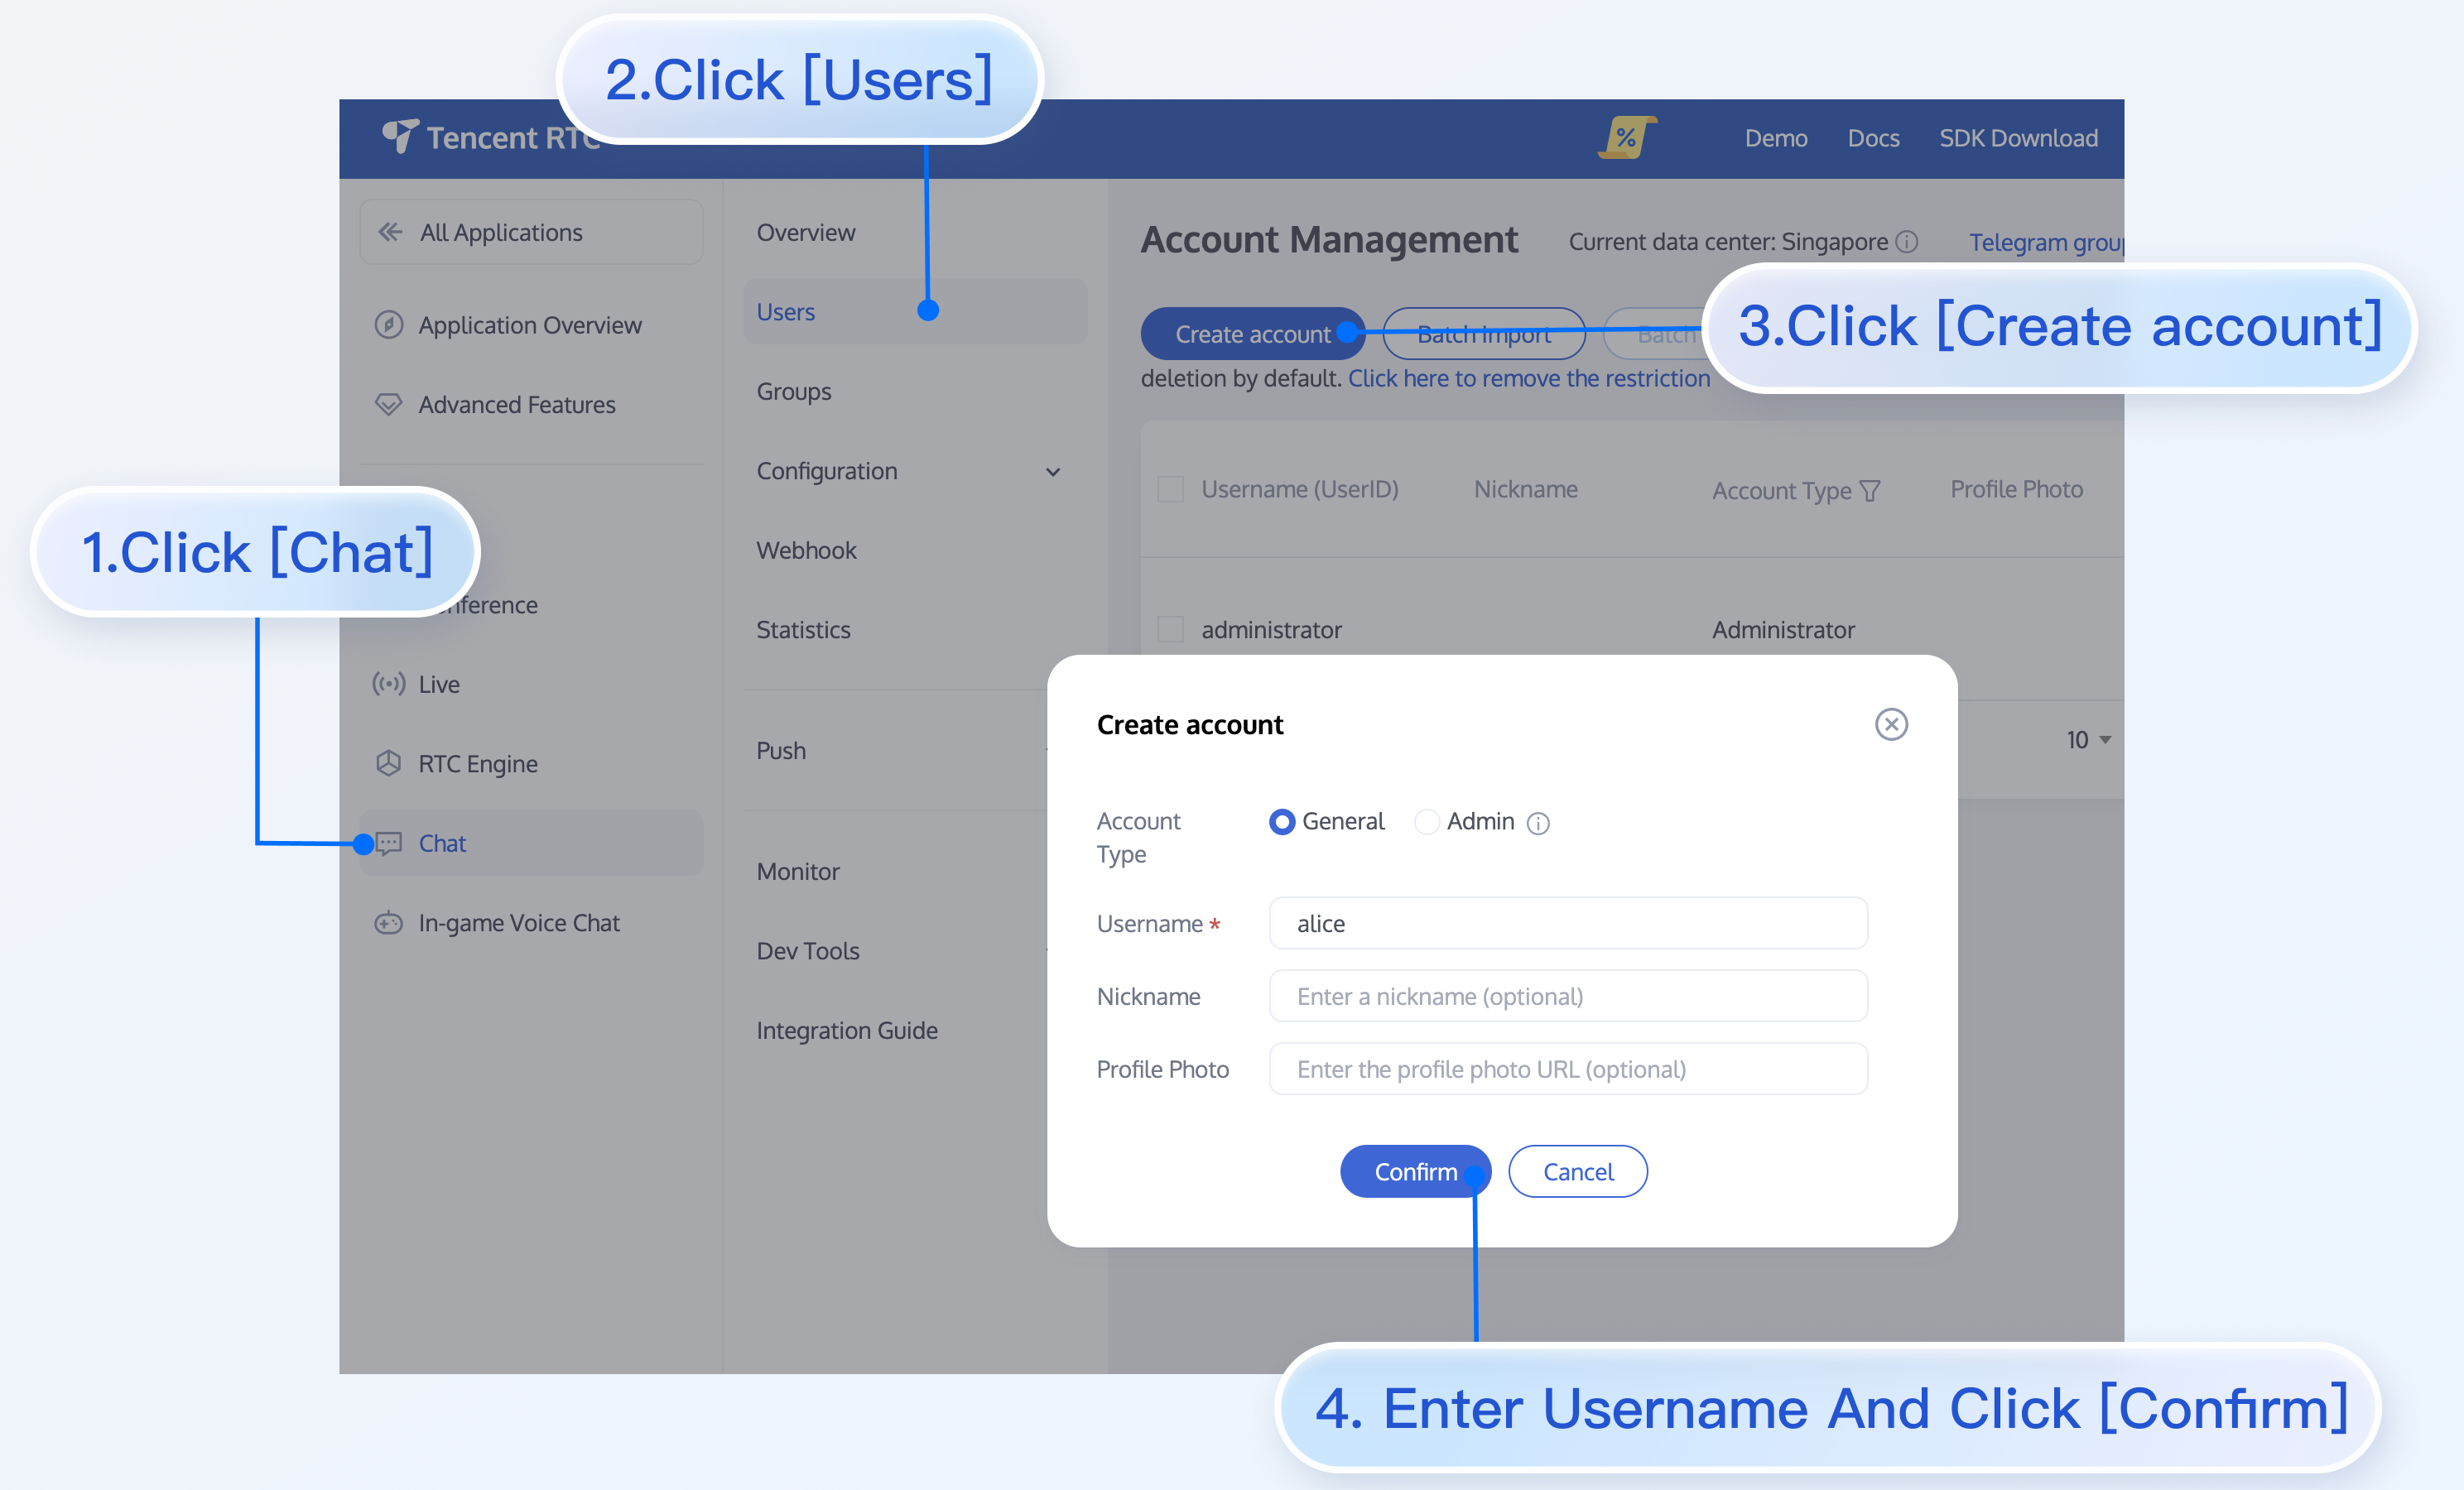
1. Click to enter the application you created above, and you will see the Chat on the left sidebar. Click to enter.
|
|
51
|
+
|
|
52
|
+
2. On the Chat submenu, click `Users` to go to the Account Management page.
|
|
53
|
+
|
|
54
|
+
3. Click `Create account`, and an account creation dialog box will pop up. It is recommended to select `General` for a regular member. Although `Nickname` is not required, we still recommend setting it. If `userID` is not displayed on the UI, you can identify different users through `Nickname`.
|
|
55
|
+
|
|
56
|
+
|
|
57
|
+
The details are as follows:
|
|
58
|
+
|
|
59
|
+
|
|
60
|
+
|
|
61
|
+
|
|
62
|
+
If you need to register through the client, no additional operations are needed. You just need to input a new `userID` in the section "Log In to TUIKit" below, and TUIKit will automatically register that `userID` for you.
|
|
63
|
+
|
|
64
|
+
|
|
65
|
+
## Install TUIKit
|
|
66
|
+
|
|
67
|
+
The feature of sending messages in chat interactions is implemented by `TUIChat`. You need to integrate at least `TUIChat` to properly send and receive messages. Other components, such as `TUIConversation`, `TUIContact`, and `TUIGroup`, can be integrated as needed.
|
|
68
|
+
- If you need multiple UI components, you can integrate TUIKit. For details, see [Install TUIKit](https://www.tencentcloud.com/document/product/1047/50057?lang=en&pg=).
|
|
69
|
+
|
|
70
|
+
- If you only need to integrate TUIChat, see [Install TUIChat Only](https://www.tencentcloud.com/document/product/1047/60168?lang=en&pg=).
|
|
71
|
+
|
|
72
|
+
|
|
73
|
+
## Log In to TUIKit
|
|
74
|
+
|
|
75
|
+
TUILogin provides an API to log in to TUIKit, as follows:
|
|
76
|
+
``` java
|
|
77
|
+
// API location: TUICore/TUILogin.java
|
|
78
|
+
// Called when login is clicked on the user UI
|
|
79
|
+
TUILogin.login(context, sdkAppID, userID, userSig, new TUICallback() {
|
|
80
|
+
@Override
|
|
81
|
+
public void onSuccess() {
|
|
82
|
+
}
|
|
83
|
+
|
|
84
|
+
@Override
|
|
85
|
+
public void onError(final int code, final String desc) {
|
|
86
|
+
}
|
|
87
|
+
});
|
|
88
|
+
```
|
|
89
|
+
|
|
90
|
+
This API requires three parameters:
|
|
91
|
+
- sdkAppID, the new application's SDKAppID, which was obtained in the previous steps.
|
|
92
|
+
|
|
93
|
+
- userID, user1's userID, which was obtained in the previous steps. Note that it is not the user's nickname.
|
|
94
|
+
|
|
95
|
+
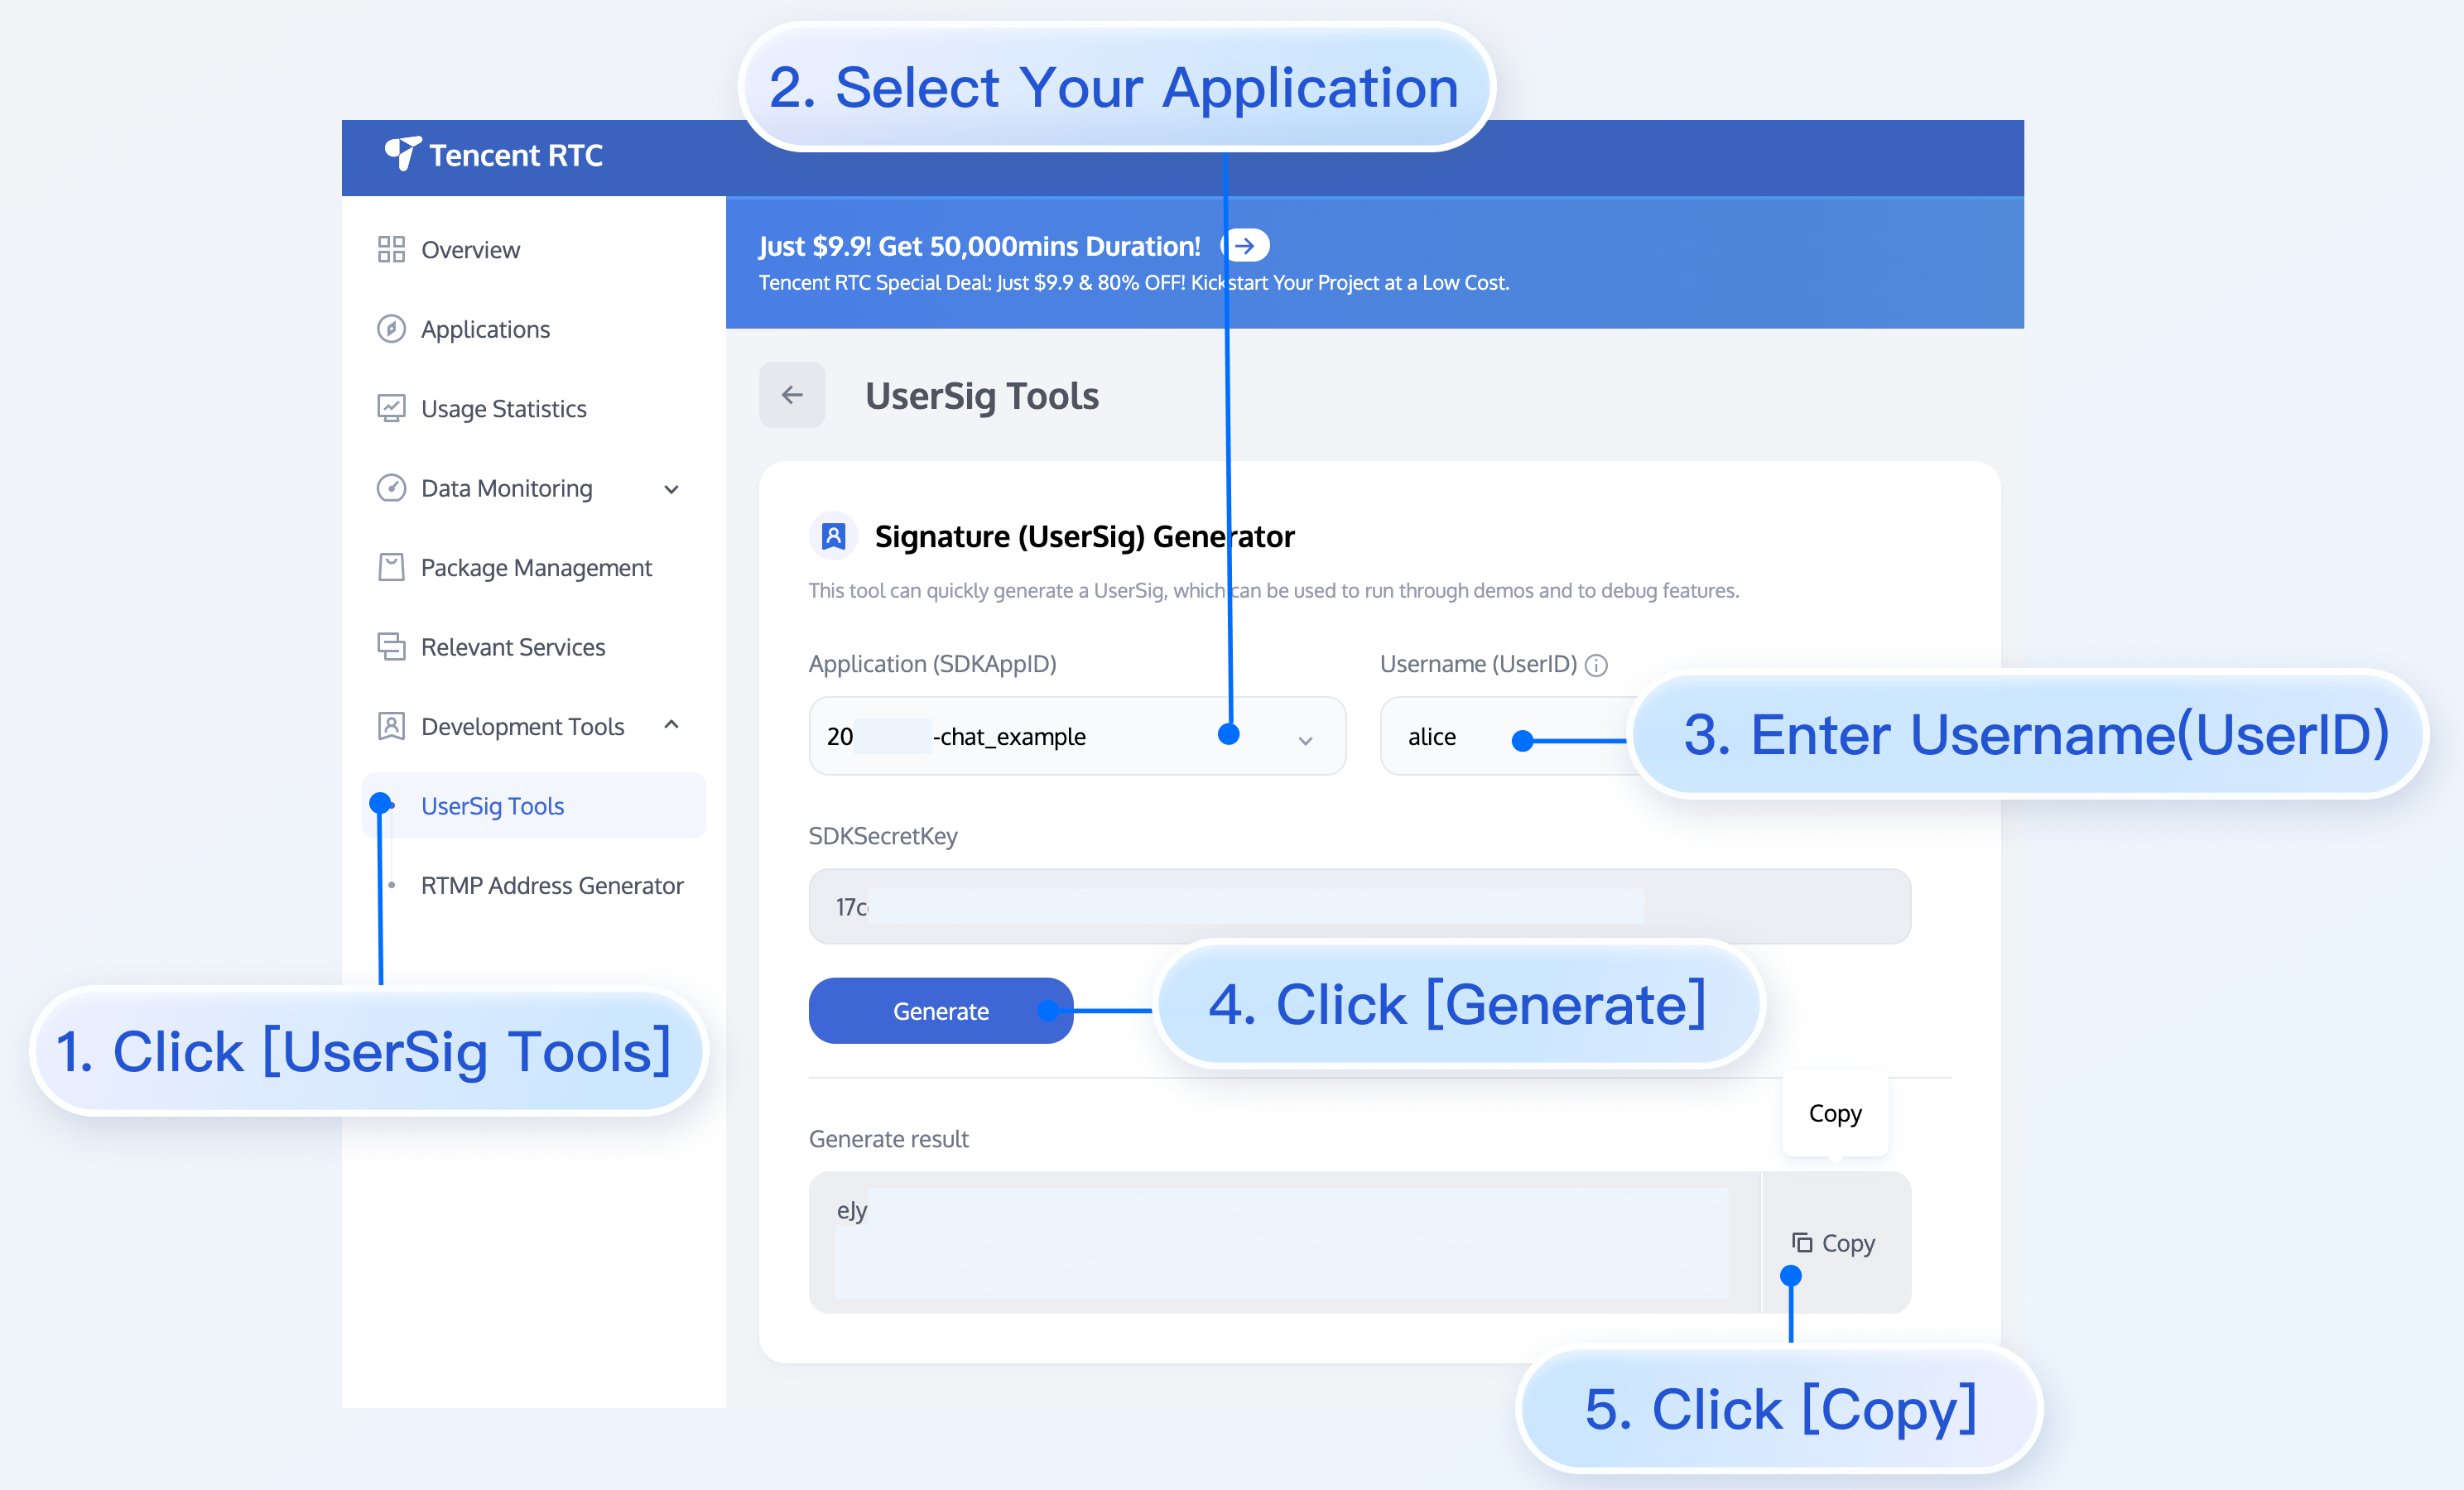
- userSig, user1's userSig, which can be generated in real time using the development tools provided by the console. The path is: Homepage > Development Tools > UserSig Tools > Signature (UserSig) Generator, as shown below:
|
|
96
|
+
|
|
97
|
+
|
|
98
|
+
|
|
99
|
+
|
|
100
|
+
## Navigate to Chat Interface
|
|
101
|
+
|
|
102
|
+
To send messages, the next step is:
|
|
103
|
+
1. Use one of the previously registered accounts (hereinafter referred to as user1) to log in to TUIKit, and then user1 is online.
|
|
104
|
+
|
|
105
|
+
2. User1 sends a message to another account (hereinafter referred to as user2). User2 does not need to log in and does not need to have any friend relationship with user1.
|
|
106
|
+
|
|
107
|
+
|
|
108
|
+
> **Note:**
|
|
109
|
+
>
|
|
110
|
+
|
|
111
|
+
> The following steps explain how to send a message to user2 after logging in as user1. If you wish for user1 and user2 to interact via chat, you need to use the same steps to log in as user2 and enter the chat interface with user1.
|
|
112
|
+
>
|
|
113
|
+
|
|
114
|
+
|
|
115
|
+
You can jump to the chat interface in the callback of user1's successful login, and then you can send a message to user2.
|
|
116
|
+
|
|
117
|
+
|
|
118
|
+
The sample code is as follows, where chatID needs to be user2's id.
|
|
119
|
+
|
|
120
|
+
``` java
|
|
121
|
+
Intent intent = new Intent(context, TUIC2CChatMinimalistActivity.class);
|
|
122
|
+
intent.putExtra(TUIConstants.TUIChat.CHAT_ID, "chatID");
|
|
123
|
+
intent.putExtra(TUIConstants.TUIChat.CHAT_TYPE, V2TIMConversation.V2TIM_C2C);
|
|
124
|
+
intent.addFlags(Intent.FLAG_ACTIVITY_NEW_TASK);
|
|
125
|
+
context.startActivity(intent);
|
|
126
|
+
```
|
|
127
|
+
|
|
128
|
+
## Send Your First Message
|
|
129
|
+
|
|
130
|
+
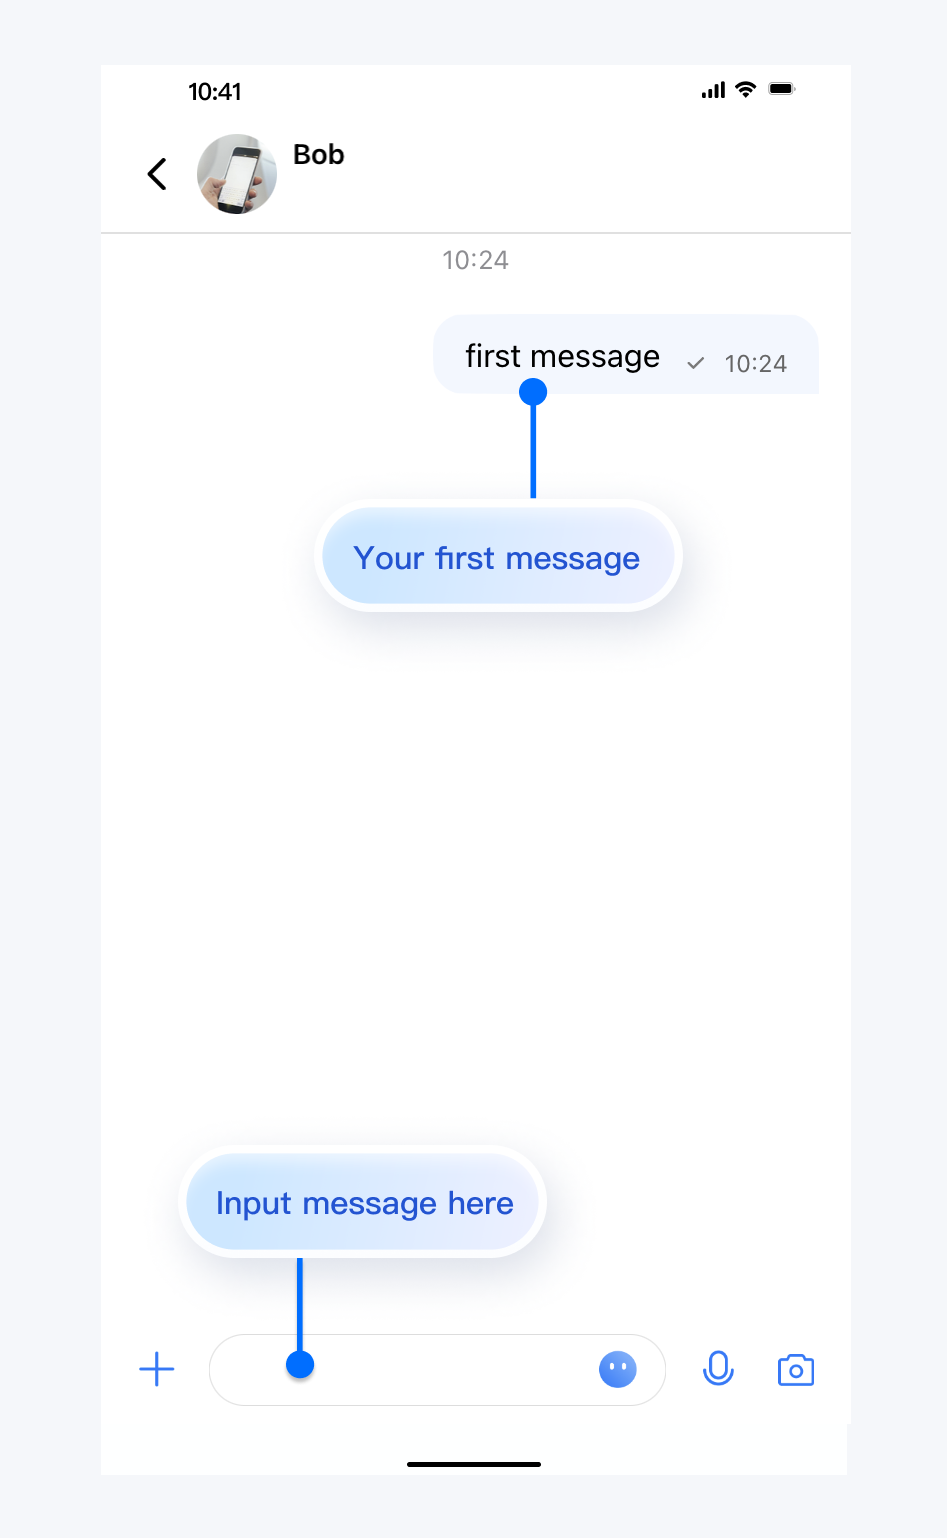
After completing the previous steps, you can jump to the following chat interface. Click the input box to send your first message:
|
|
131
|
+
|
|
132
|
+
|
|
133
|
+
|
|
134
|
+
|
|
135
|
+
## Contact Us
|
|
136
|
+
|
|
137
|
+
If you have any questions about this article, feel free to join the [Telegram Technical Group](https://t.me/+EPk6TMZEZMM5OGY1), where you will receive reliable technical support.
|
|
138
|
+
|
|
@@ -0,0 +1,43 @@
|
|
|
1
|
+
## Description
|
|
2
|
+
|
|
3
|
+
TUIKit supports showing "Typing..." in a one-to-one chat in the classic UI starting from version [6.5.2803](https://www.tencentcloud.com/zh/document/product/1047/34282#6.5.2803-.402022.07.15---.E5.A2.9E.E5.BC.BA.E7.89.88).
|
|
4
|
+
|
|
5
|
+
This feature is implemented using the [Online Message](https://www.tencentcloud.com/zh/document/product/1047/48019) capability of IMSDK.
|
|
6
|
+
<table>
|
|
7
|
+
<tr>
|
|
8
|
+
<td rowspan="1" colSpan="1" >Enabling "Typing..."</td>
|
|
9
|
+
|
|
10
|
+
<td rowspan="1" colSpan="1" >Disabling "Typing..."</td>
|
|
11
|
+
</tr>
|
|
12
|
+
|
|
13
|
+
<tr>
|
|
14
|
+
<td rowspan="1" colSpan="1" >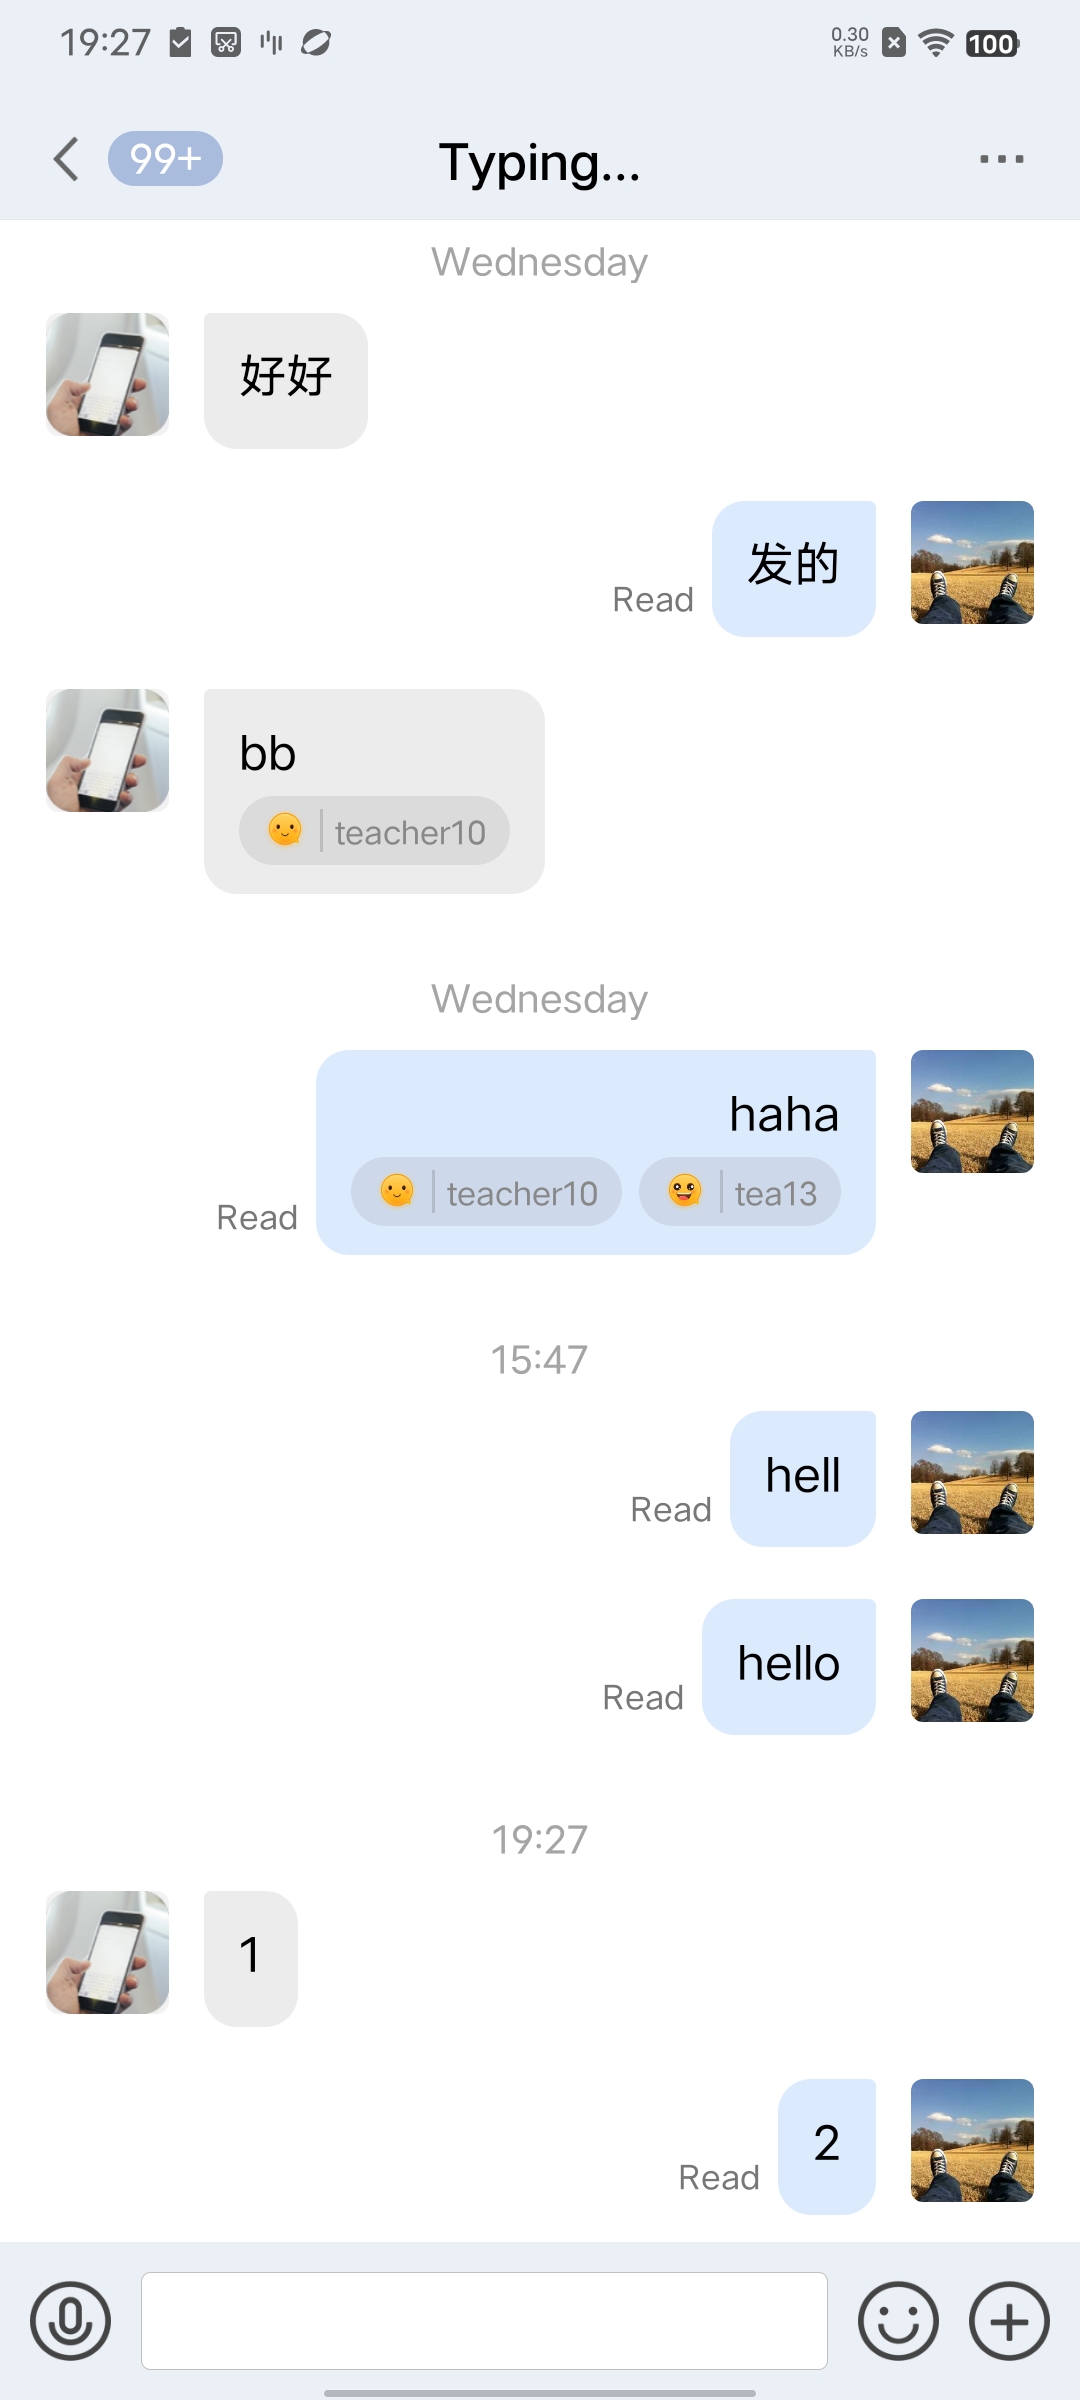</td>
|
|
15
|
+
|
|
16
|
+
<td rowspan="1" colSpan="1" >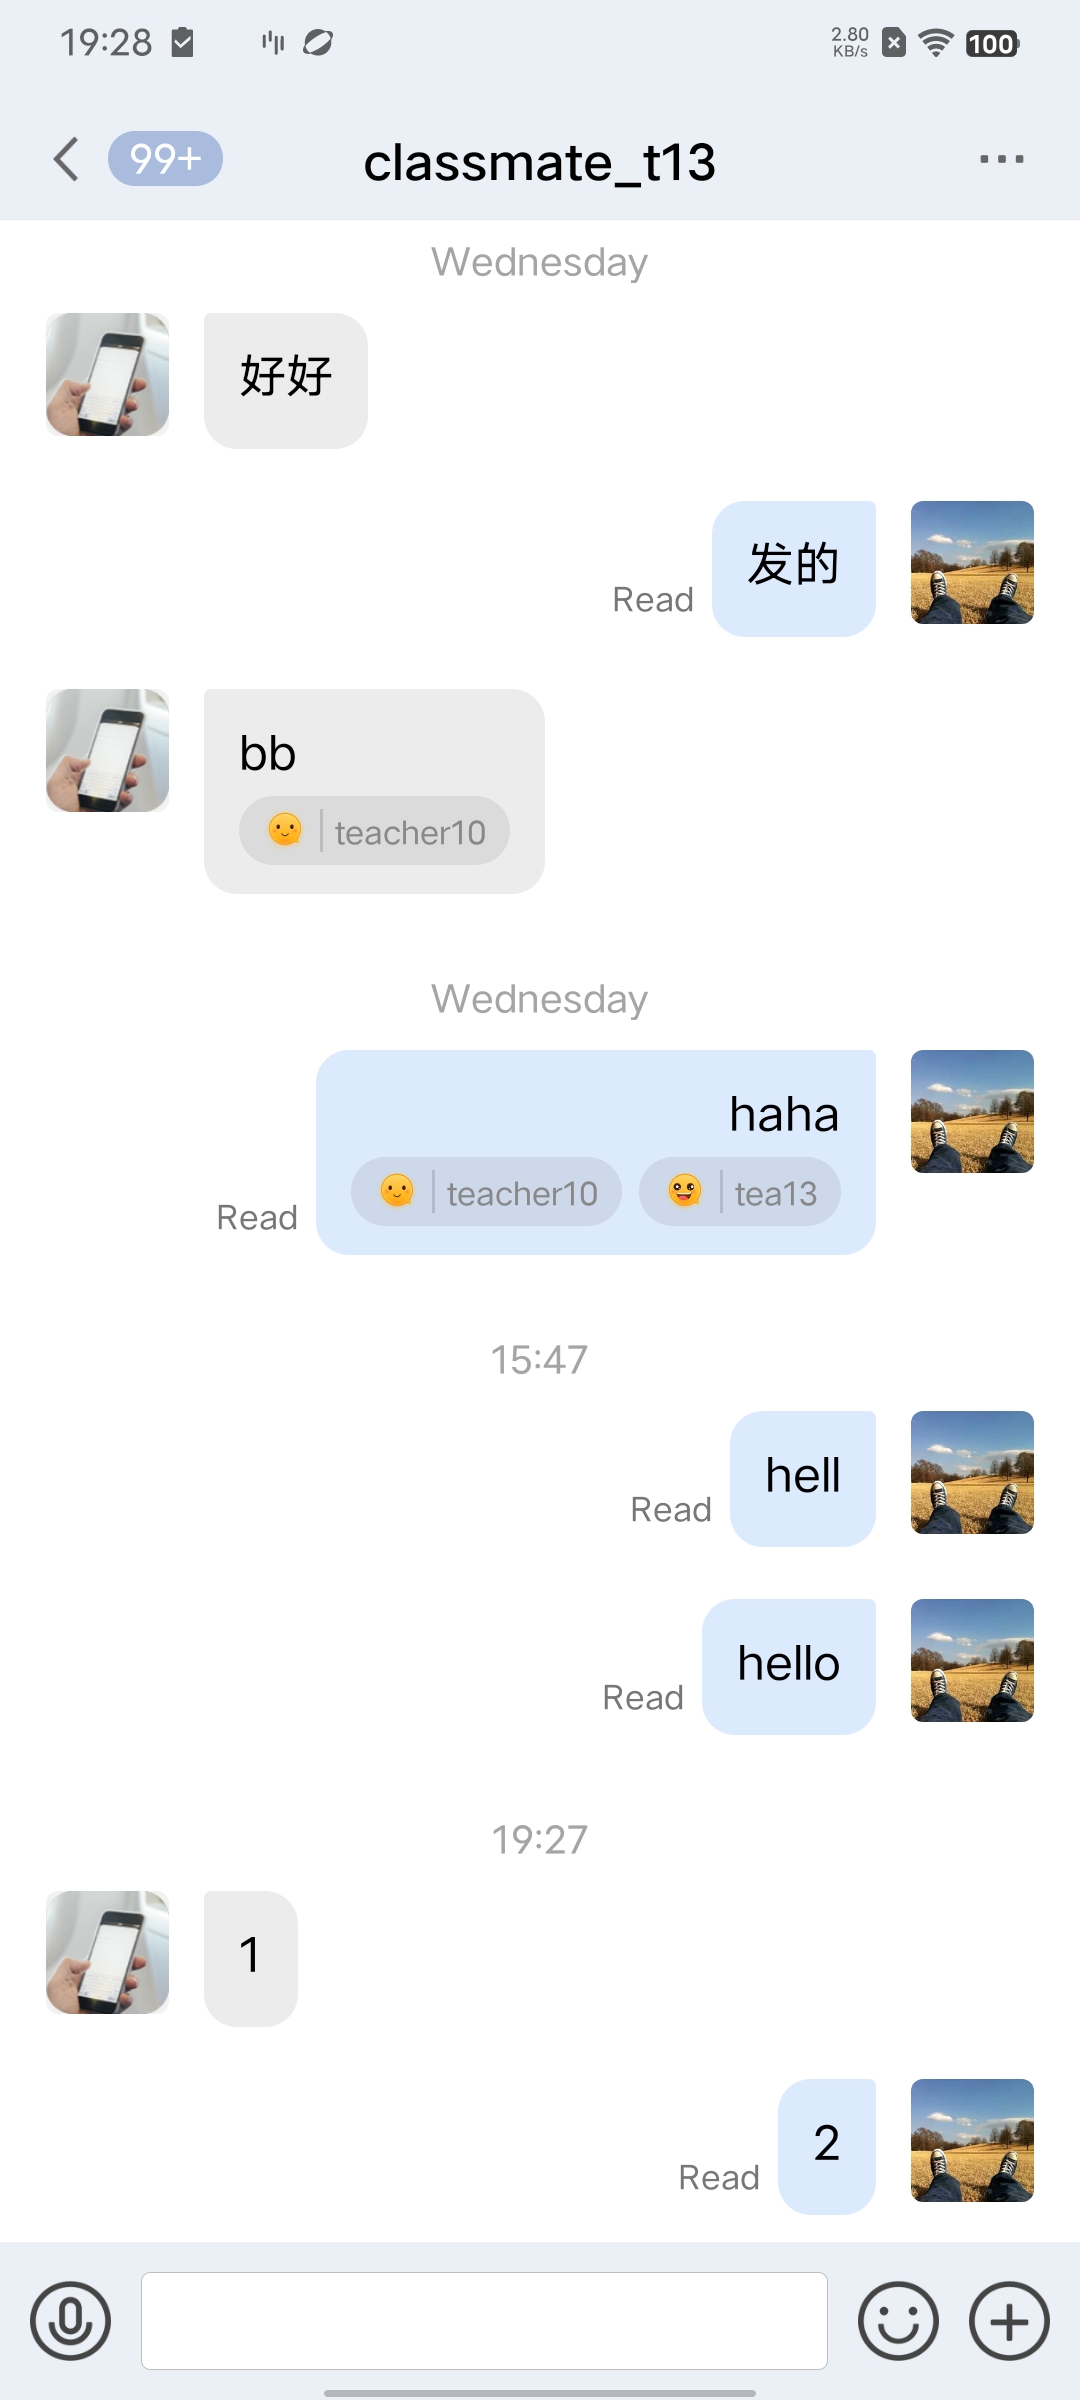</td>
|
|
17
|
+
</tr>
|
|
18
|
+
</table>
|
|
19
|
+
|
|
20
|
+
|
|
21
|
+
## Disabling "Typing..."
|
|
22
|
+
|
|
23
|
+
In the `TUIChat` component, within the [GeneralConfig.java](https://github.com/TencentCloud/chat-uikit-android/blob/main/TUIKit/TUIChat/tuichat/src/main/java/com/tencent/qcloud/tuikit/tuichat/config/GeneralConfig.java) file, a switch for the "Typing..." feature, named **enableTypingStatus**, is provided. Its type is boolean, with a default value of `true`.
|
|
24
|
+
``` java
|
|
25
|
+
public class GeneralConfig {
|
|
26
|
+
private boolean enableTypingStatus = true;
|
|
27
|
+
}
|
|
28
|
+
```
|
|
29
|
+
|
|
30
|
+
To disable the typing indicator feature, simply change the default value of **enableTypingStatus** to `false`, or call the following method before initializing the chat page.
|
|
31
|
+
``` java
|
|
32
|
+
TUIChatConfigs.getConfigs().getGeneralConfig().setEnableTypingStatus(false);
|
|
33
|
+
```
|
|
34
|
+
|
|
35
|
+
## FAQs
|
|
36
|
+
|
|
37
|
+
### Why is there no prompt for typing after the switch is turned on?
|
|
38
|
+
|
|
39
|
+
The rule for showing "Typing..." in a one-to-one chat is: the other party has sent you a message within the last 30 seconds and is currently typing.
|
|
40
|
+
|
|
41
|
+
## Exchange and Feedback
|
|
42
|
+
|
|
43
|
+
Join the [Telegram technical exchange group](https://t.me/+1doS9AUBmndhNGNl) or [WhatsApp discussion group](https://chat.whatsapp.com/Gfbxk7rQBqc8Rz4pzzP27A), benefit from the support of professional engineers, and solve your toughest challenges.
|
|
@@ -0,0 +1,120 @@
|
|
|
1
|
+
### Does TUIKit source code support Androidx?
|
|
2
|
+
|
|
3
|
+
Yes.
|
|
4
|
+
|
|
5
|
+
### Why do I encounter a 6012 error or "TLSSDK exchange ticket fail" upon login?
|
|
6
|
+
- The initialization API and the login API must be called separately and cannot be called successively because there are asynchronous operations in the initialization method.
|
|
7
|
+
|
|
8
|
+
- If you are using Chat Free edition and upgrade to Chat Pro Edition, after the upgrade, you can configure your SDKAppID in the console to ensure proper login. For pricing details, see [Pricing](https://intl.cloud.tencent.com/document/product/1047/34350).
|
|
9
|
+
|
|
10
|
+
|
|
11
|
+
### Why do I encounter a 6013 "SDK Not Initialized" error?
|
|
12
|
+
|
|
13
|
+
If the 6013 "SDK Not Initialized" error occurs, try the following troubleshooting methods:
|
|
14
|
+
1. Check whether you performed other operations such as receiving and sending messages before logging in successfully.
|
|
15
|
+
|
|
16
|
+
2. Check whether you were forced offline when logging in by an account already logged in on another device. By default, the Chat SDK allows one account to log in on one device at a time. For more information, see [Multi-Device Login](https://intl.cloud.tencent.com/document/product/1047/33518).
|
|
17
|
+
|
|
18
|
+
3. For Android, verify that all library files have been loaded or repossessed by the system during use.
|
|
19
|
+
|
|
20
|
+
|
|
21
|
+
### Why do I encounter "code: 6205 desc: QALSERVICE not ready" error?
|
|
22
|
+
|
|
23
|
+
This error is caused by calling `stopQALService` after initialization. To fix it, refer to the [configuration method](https://blog.csdn.net/qq_16131393/article/details/54895733) shared by one of our customers.
|
|
24
|
+
|
|
25
|
+
### Why do not emojis appear or appear as gibberish in messages?
|
|
26
|
+
|
|
27
|
+
Chat does not provide emoji packs. You must align the actual parsing by yourself.
|
|
28
|
+
|
|
29
|
+
There are two ways to use emojis:
|
|
30
|
+
- Use index in TIMFaceElem to identify the index of the emojis. For example, an Android device and an iOS device have the same set of emojis and index 2 represents the smile emoji. When index=2, both devices send and receive the same indexed emoji.
|
|
31
|
+
|
|
32
|
+
- Use data in TIMFaceElem. For example, the names of emoji images are string-type. Use the word "smile" to represent the smile emoji, and store "smile" in data. Then, both iOS and Android devices use data as the key to retrieve and display the corresponding emoji.
|
|
33
|
+
|
|
34
|
+
|
|
35
|
+
You can also use the two fields at the same time. For example, use data to specify the emoji set and index to indicate the specific index in this emoji set. This way, you can implement many different emoji effects as in QQ. It is possible to store more complex data structures in data as long as the devices follow the same parsing rules.
|
|
36
|
+
|
|
37
|
+
|
|
38
|
+
### Why do I encounter error 10002 during operations?
|
|
39
|
+
|
|
40
|
+
This status code is returned when a network exception, timeout, or ticket switching failure occurs during server-side authentication. If you see this status code, wait a moment and try again.
|
|
41
|
+
|
|
42
|
+
### Why do I encounter error 6200 or 6201 when receiving or sending messages?
|
|
43
|
+
|
|
44
|
+
This status code is returned when the client is offline, times out, or is disconnected. Error 6200 is defined as no network connection during request sending, whereas error 6201 is defined as no network connection during response sending. When you encounter this status code, check the network condition or wait for the network to restore and try again.
|
|
45
|
+
|
|
46
|
+
### Why do I encounter error 20003 when receiving and sending messages?
|
|
47
|
+
|
|
48
|
+
This error code is returned when UserID is invalid or UserID has not been imported to Chat. To fix it, check whether UserID has been imported to Tencent Cloud.
|
|
49
|
+
|
|
50
|
+
### Why do I encounter error 6010 when playing audio messages?
|
|
51
|
+
|
|
52
|
+
This error code is returned when audio messages that are no longer retained by the roaming server are requested. To fix it, you can [increase the message roaming duration](https://intl.cloud.tencent.com/document/product/1047/34419) or download audio files to local storage and play them. However, expired files cannot be restored. Different SDK versions allow you to increase the retention duration for different message types. For more information, see [Message Storage](https://intl.cloud.tencent.com/document/product/1047/33524).
|
|
53
|
+
|
|
54
|
+
### Why do I encounter errors 70001, 70003, 70009, and 70013 during account authentication?
|
|
55
|
+
|
|
56
|
+
These errors occur because UserID and UserSig do not match. To fix it, check the validity of UserID and UserSig. Among them, error 70001 means UserSig has expired, error 70003 means a verification failure due to a truncated UserSig, error 70009 means UserSig verification failed (possibly due to mixing the keys or private keys of other SDKAppIDs when generating UserSig), and error 70013 means UserID does not match.
|
|
57
|
+
|
|
58
|
+
### Why do I encounter the error code -2 or -5 when the web client app is using the Chat SDK?
|
|
59
|
+
- -2: Indicates that a web app request to the server failed, usually due to network problems. Web apps send requests to the server by using the HTTP Long Polling method, and this status code is returned when a network problem occurs. To fix it, check your network or try again.
|
|
60
|
+
|
|
61
|
+
- -5: When the login attempt is not completed and the SDK has not received the a2key and tinyID returned by the server, directly calling other APIs returns the "tinyid or a2 is empty" error message and -5 error code.
|
|
62
|
+
|
|
63
|
+
|
|
64
|
+
### What should I do when the SDK on the armeabi platform reports "java.lang.UnsatisfiedLinkError: No implementation found for"?
|
|
65
|
+
|
|
66
|
+
Copy jni/armeabi-v7a/libImSDK.so in the Chat SDK’s aar file to the src/main/jniLibs/armeabi directory in your source code project and load it in build.gradle.
|
|
67
|
+
|
|
68
|
+
### How can I resolve x86_64 and i386 architecture errors when the app has been launched in App Store?
|
|
69
|
+
|
|
70
|
+
This error occurs because App Store does not support the x86_64 and i386 architecture. The solution is as follows:
|
|
71
|
+
1. Clear the project compilation cache:
|
|
72
|
+
Select **Product** > **clean**, press Alt until "clean build Folder..." appears and wait for the operation to complete.
|
|
73
|
+
|
|
74
|
+
2. Remove the x86_64 and i386 architecture not supported by App Store:
|
|
75
|
+
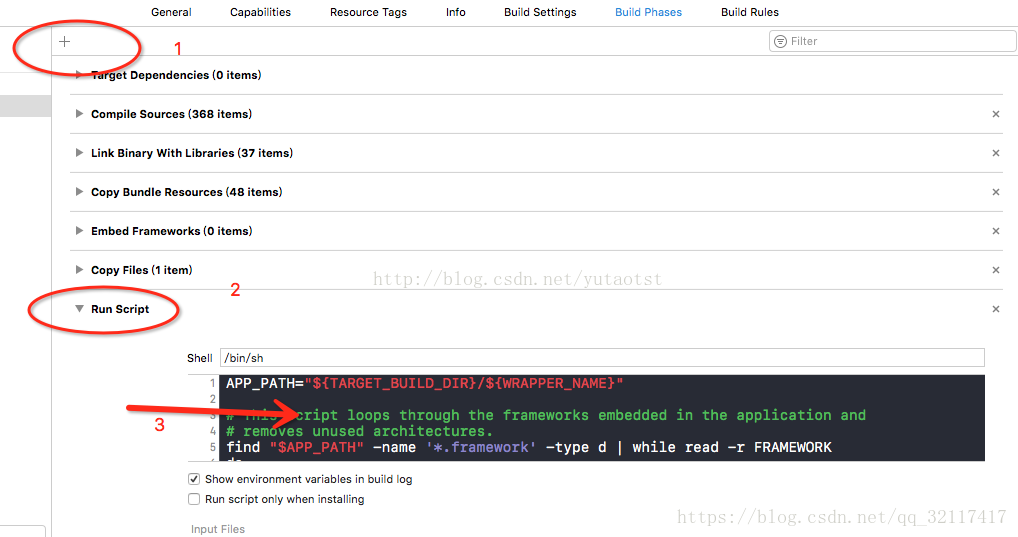
a. Select **TARGETS** > **Build Phases**.
|
|
76
|
+
b. Click the plus sign and select **New Run Script Phase**.
|
|
77
|
+
c. Add the following code:
|
|
78
|
+
|
|
79
|
+
``` bash
|
|
80
|
+
APP_PATH="${TARGET_BUILD_DIR}/${WRAPPER_NAME}"
|
|
81
|
+
|
|
82
|
+
# This script loops through the frameworks embedded in the application and
|
|
83
|
+
|
|
84
|
+
# removes unused architectures.
|
|
85
|
+
|
|
86
|
+
find "$APP_PATH" -name '*.framework' -type d | while read -r FRAMEWORK
|
|
87
|
+
do
|
|
88
|
+
FRAMEWORK_EXECUTABLE_NAME=$(defaults read "$FRAMEWORK/Info.plist" CFBundleExecutable)
|
|
89
|
+
FRAMEWORK_EXECUTABLE_PATH="$FRAMEWORK/$FRAMEWORK_EXECUTABLE_NAME"
|
|
90
|
+
echo "Executable is $FRAMEWORK_EXECUTABLE_PATH"
|
|
91
|
+
|
|
92
|
+
EXTRACTED_ARCHS=()
|
|
93
|
+
|
|
94
|
+
for ARCH in $ARCHS
|
|
95
|
+
do
|
|
96
|
+
echo "Extracting $ARCH from $FRAMEWORK_EXECUTABLE_NAME"
|
|
97
|
+
lipo -extract "$ARCH" "$FRAMEWORK_EXECUTABLE_PATH" -o "$FRAMEWORK_EXECUTABLE_PATH-$ARCH"
|
|
98
|
+
EXTRACTED_ARCHS+=("$FRAMEWORK_EXECUTABLE_PATH-$ARCH")
|
|
99
|
+
done
|
|
100
|
+
|
|
101
|
+
echo "Merging extracted architectures: ${ARCHS}"
|
|
102
|
+
lipo -o "$FRAMEWORK_EXECUTABLE_PATH-merged" -create "${EXTRACTED_ARCHS[@]}"
|
|
103
|
+
rm "${EXTRACTED_ARCHS[@]}"
|
|
104
|
+
|
|
105
|
+
echo "Replacing original executable with thinned version"
|
|
106
|
+
rm "$FRAMEWORK_EXECUTABLE_PATH"
|
|
107
|
+
mv "$FRAMEWORK_EXECUTABLE_PATH-merged" "$FRAMEWORK_EXECUTABLE_PATH"
|
|
108
|
+
|
|
109
|
+
done
|
|
110
|
+
```
|
|
111
|
+
|
|
112
|
+
|
|
113
|
+
3. Package the app and upload it again.
|
|
114
|
+
|
|
115
|
+
|
|
116
|
+
### Can developers directly utilize the emoticon packs demonstrated in the Chat various client demos/TUIKit projects?
|
|
117
|
+
|
|
118
|
+
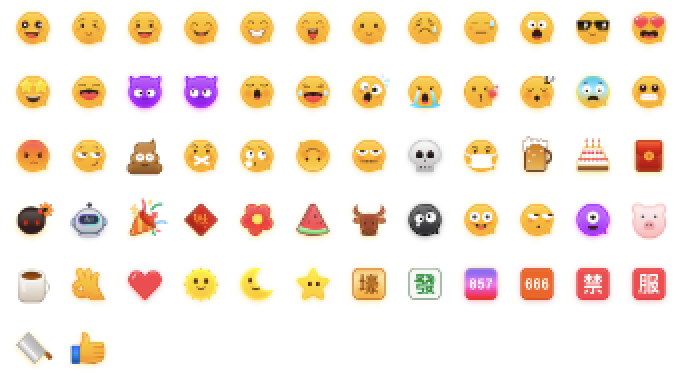
To respect the copyright of emoji designs, the Chat Demo/TUIKit project does not include cutouts of large emoji elements. Please replace them with your own designs or other emoji packs for which you hold the copyright before officially launching for commercial use. **The default smiley face emoji pack shown below is copyrighted by Tencent RTC** and is available for licensed use for a fee. If you need to obtain a license, please [contact us](https://trtc.io/contact).
|
|
119
|
+
|
|
120
|
+
|