@tencent-rtc/mcp 1.0.1 → 1.0.2
This diff represents the content of publicly available package versions that have been released to one of the supported registries. The information contained in this diff is provided for informational purposes only and reflects changes between package versions as they appear in their respective public registries.
- package/README.md +38 -37
- package/package.json +1 -1
- package/resource/doc/chatuikit/android/client_api_Android.md +1373 -0
- package/resource/doc/chatuikit/android/generate_UserSig.md +306 -0
- package/resource/doc/chatuikit/android/integrarte_only_tuichat_Android.md +290 -0
- package/resource/doc/chatuikit/android/integrate_tuikit_Android.md +287 -0
- package/resource/doc/chatuikit/android/quick_start_Android.md +138 -0
- package/resource/doc/chatuikit/android/show_typing_Android.md +43 -0
- package/resource/doc/chatuikit/faq/faq_sdk.md +120 -0
- package/resource/doc/chatuikit/faq/generate_UserSig.md +306 -0
- package/resource/doc/chatuikit/flutter/client_api_Flutter.md +932 -0
- package/resource/doc/chatuikit/flutter/generate_UserSig.md +306 -0
- package/resource/doc/chatuikit/flutter/integrate_only_tuichat_Flutter.md +333 -0
- package/resource/doc/chatuikit/flutter/integrate_tuikit_Flutter.md +769 -0
- package/resource/doc/chatuikit/flutter/quick_start_Flutter.md +217 -0
- package/resource/doc/chatuikit/iOS/client_api_iOS.md +1121 -0
- package/resource/doc/chatuikit/iOS/generate_UserSig.md +306 -0
- package/resource/doc/chatuikit/iOS/integrate_only_tuichat_iOS.md +748 -0
- package/resource/doc/chatuikit/iOS/integrate_tuikit_iOS.md +852 -0
- package/resource/doc/chatuikit/iOS/quick_start_iOS.md +163 -0
- package/resource/doc/chatuikit/iOS/show_typing_iOS.md +52 -0
- package/resource/doc/chatuikit/react/generate_UserSig.md +306 -0
- package/resource/doc/chatuikit/react/integrate_tuichat_only_react.md +202 -0
- package/resource/doc/chatuikit/react/integrate_tuichat_react.md +279 -0
- package/resource/doc/chatuikit/vue/generate_UserSig.md +306 -0
- package/resource/doc/chatuikit/vue/integrate_only_tuichat_Vue_web.md +124 -0
- package/resource/doc/chatuikit/vue/integrate_tuikit_Vue_web.md +552 -0
- package/server.js +51 -27
- package/server.js.map +1 -1
|
@@ -0,0 +1,163 @@
|
|
|
1
|
+
This document will guide you through integrating TUIKit and successfully sending your first message.
|
|
2
|
+
|
|
3
|
+
## Environment Requirements
|
|
4
|
+
- Xcode 10 or later
|
|
5
|
+
|
|
6
|
+
- iOS 9.0 or later
|
|
7
|
+
|
|
8
|
+
|
|
9
|
+
## Create an Application
|
|
10
|
+
|
|
11
|
+
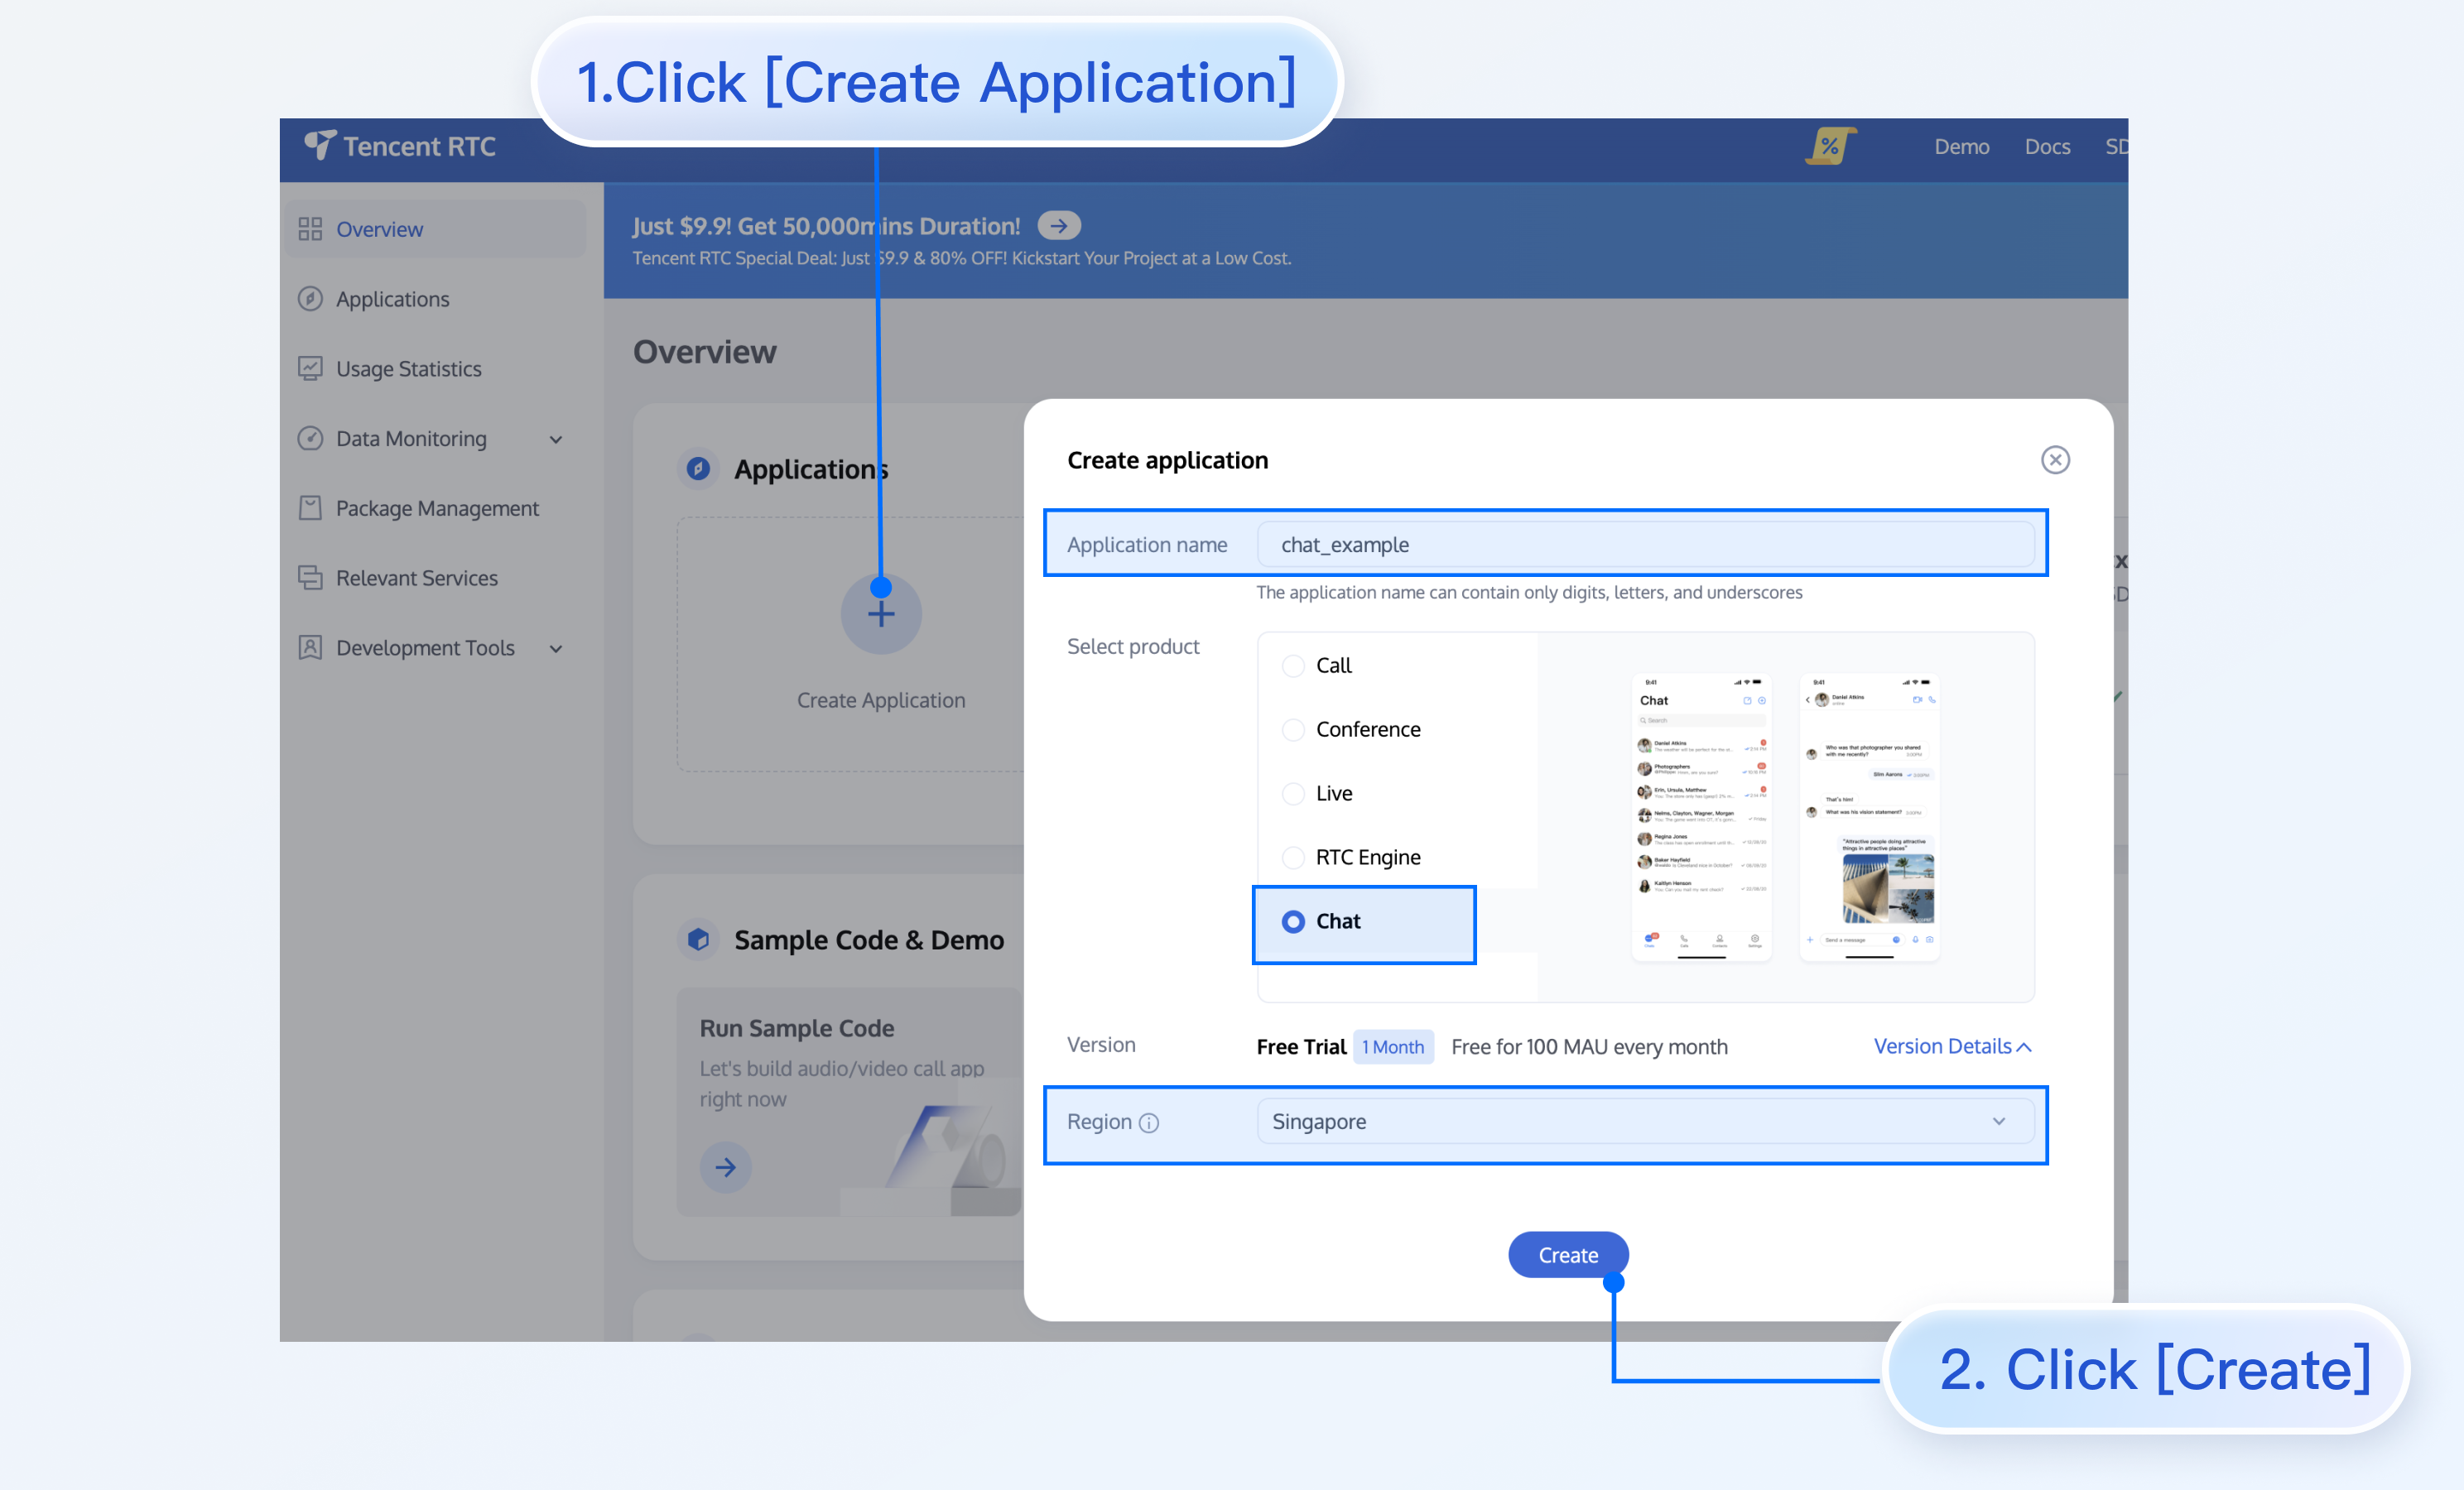
Before integrating TUIKit, you need to create a Chat application in the console. The steps are as follows:
|
|
12
|
+
1. Register a console account.
|
|
13
|
+
|
|
14
|
+
2. Go to `Applications`, click `Create Application`, and an application information input box will pop up.
|
|
15
|
+
|
|
16
|
+
3. Fill in the application name, select the product as Chat, and choose an appropriate region.
|
|
17
|
+
|
|
18
|
+
|
|
19
|
+
After the operation is complete, you will see the application you just created in the `My Applications` list.
|
|
20
|
+
|
|
21
|
+
|
|
22
|
+
> **Note:**
|
|
23
|
+
>
|
|
24
|
+
|
|
25
|
+
> Note down the SDKAppID of this application, as it will be used in subsequent steps. Also, keep the SDKSecretKey strictly confidential and do not disclose it to irrelevant personnel.
|
|
26
|
+
>
|
|
27
|
+
|
|
28
|
+
|
|
29
|
+
The steps are illustrated as follows:
|
|
30
|
+
|
|
31
|
+
|
|
32
|
+
|
|
33
|
+
|
|
34
|
+
## Create User Accounts
|
|
35
|
+
|
|
36
|
+
Creating an application only ensures you can initialize the SDK normally. To successfully send messages, you also need to create a user account in the application. There are many ways to create an account, such as directly creating it in the console or registering via API on the client. You may choose any method that suits you best.
|
|
37
|
+
|
|
38
|
+
> **Note:**
|
|
39
|
+
>
|
|
40
|
+
|
|
41
|
+
> Sending messages involves at least two users, so at this step, you need to create at least two accounts. Note down the userID of these two accounts for subsequent steps.
|
|
42
|
+
>
|
|
43
|
+
|
|
44
|
+
|
|
45
|
+
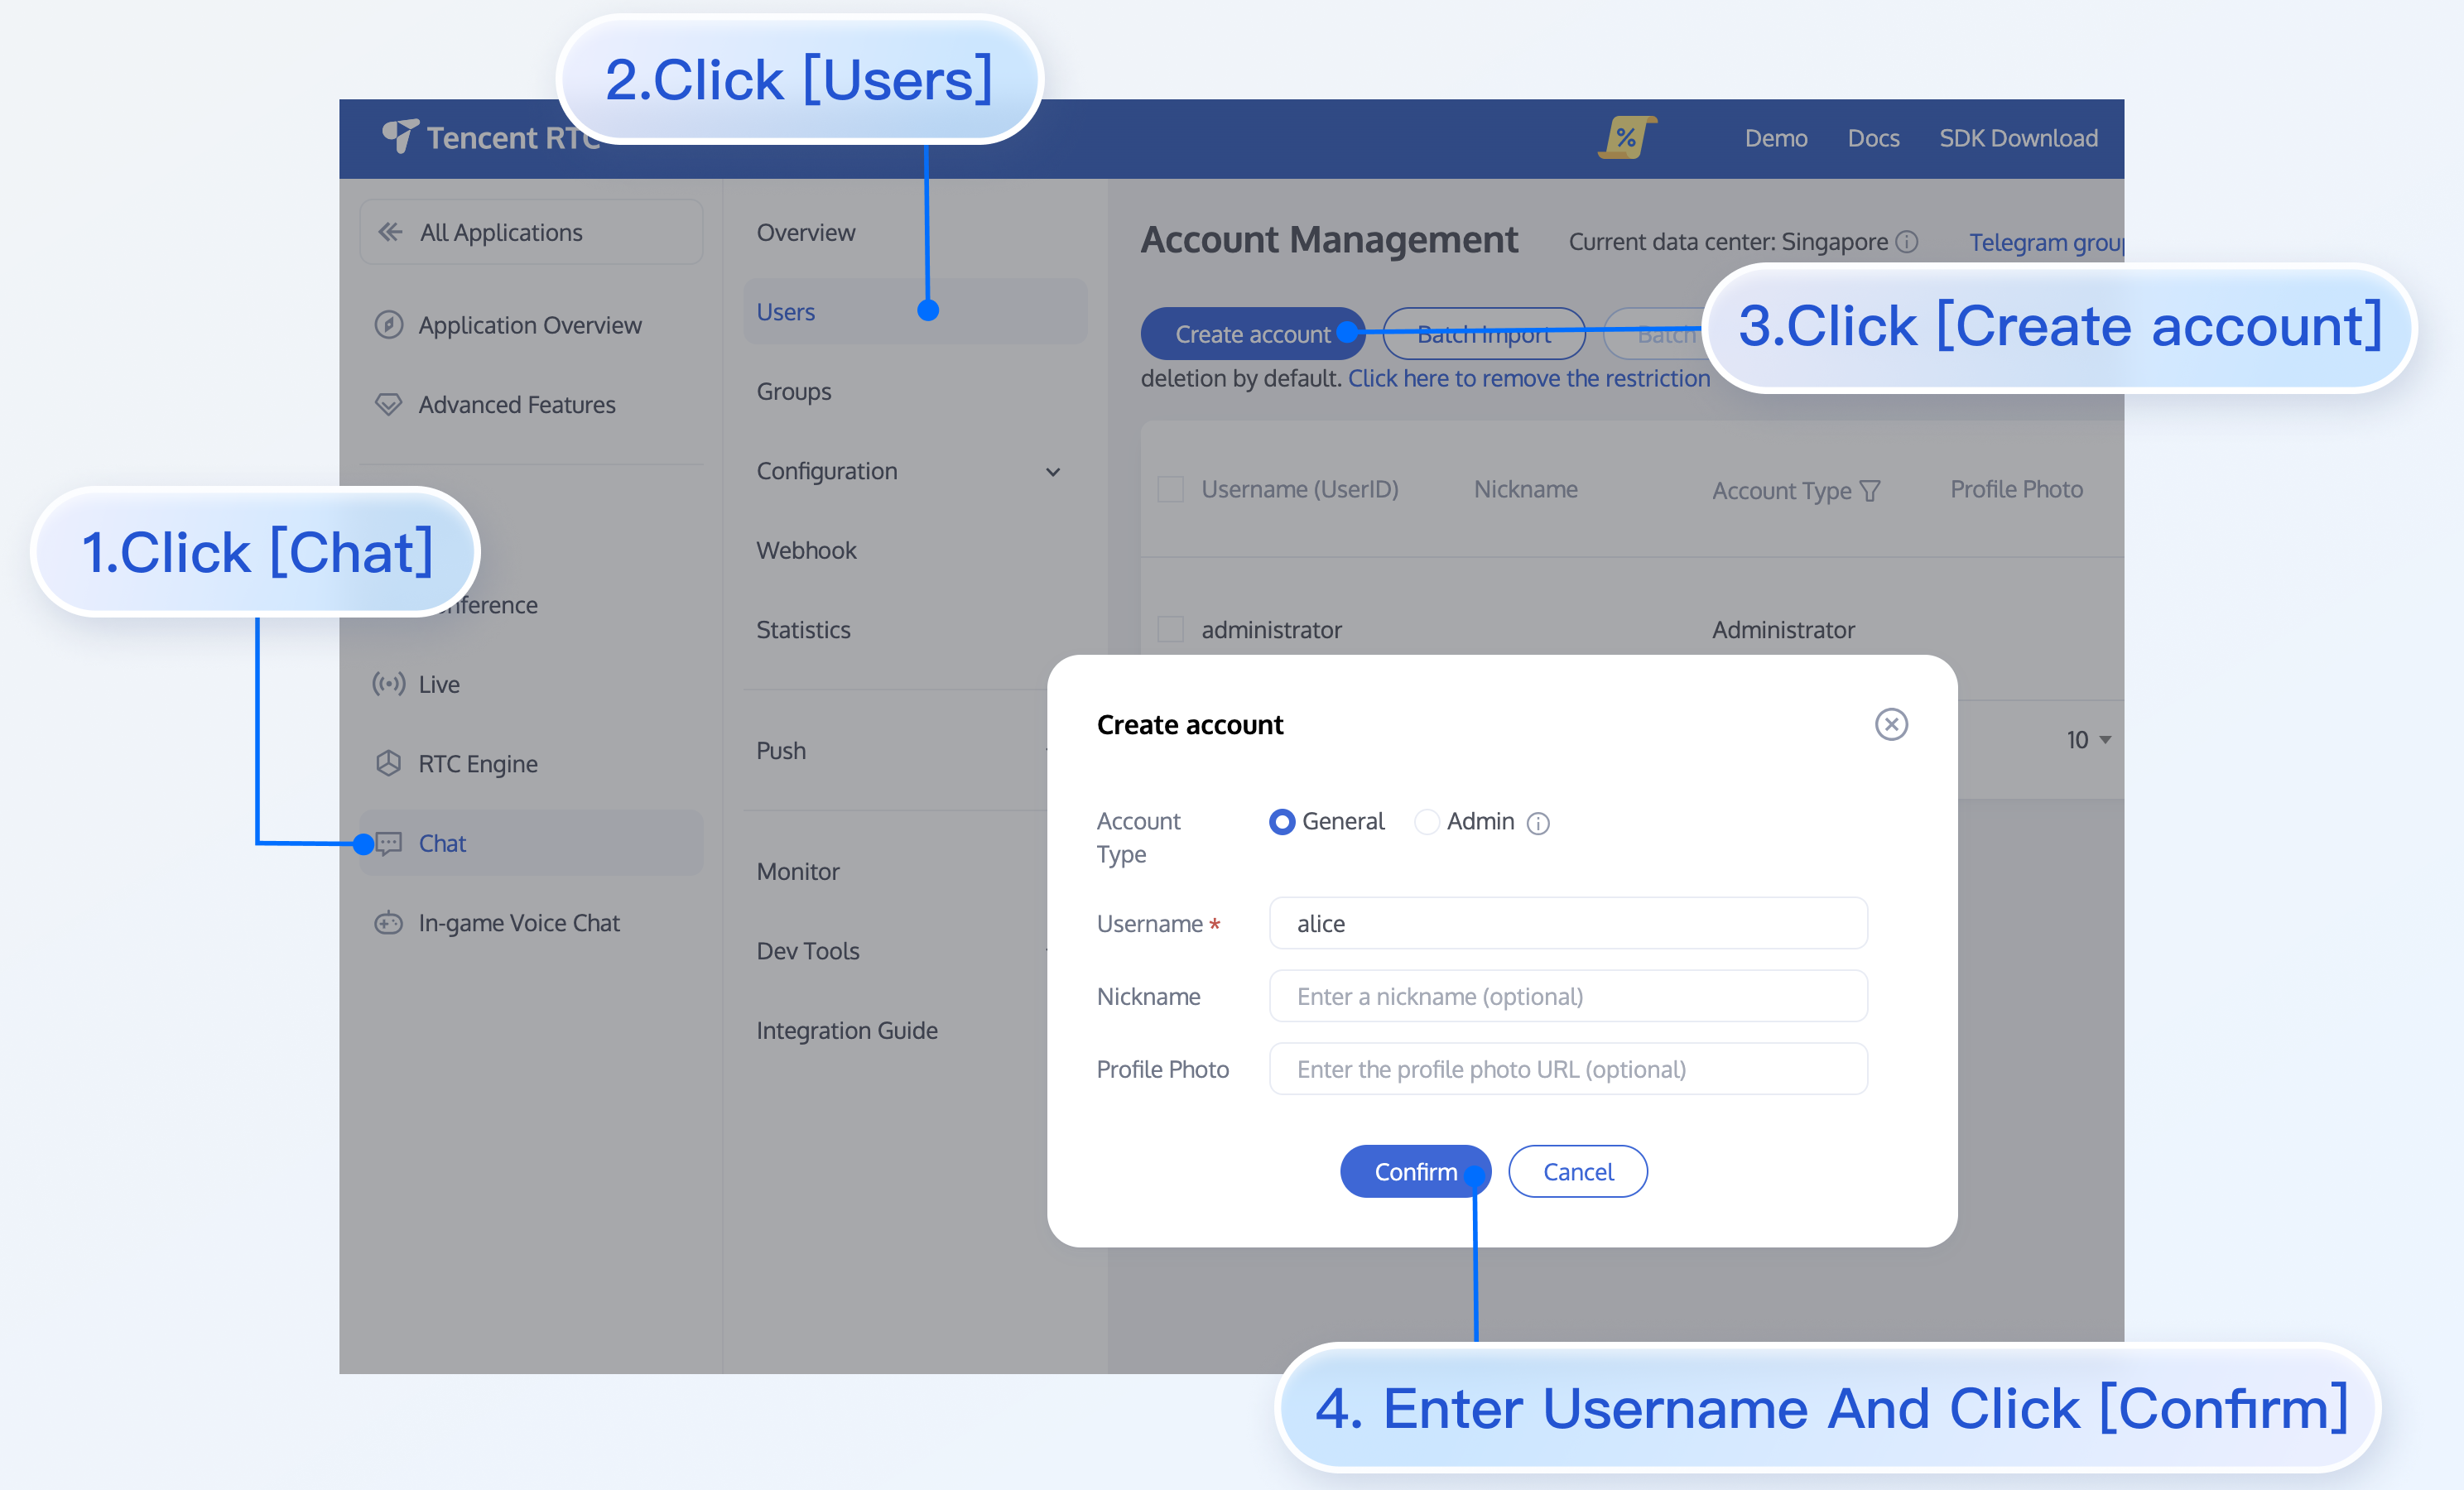
If you need to create an account in the console, follow these steps:
|
|
46
|
+
1. Click to enter the application you created above, and you will see the Chat on the left sidebar. Click to enter.
|
|
47
|
+
|
|
48
|
+
2. On the Chat submenu, click `Users` to go to the Account Management page.
|
|
49
|
+
|
|
50
|
+
3. Click `Create account`, and an account creation dialog box will pop up. It is recommended to select `General` for a regular member. Although `Nickname` is not required, we still recommend setting it. If `userID` is not displayed on the UI, you can identify different users through `Nickname`.
|
|
51
|
+
|
|
52
|
+
|
|
53
|
+
The details are as follows:
|
|
54
|
+
|
|
55
|
+
|
|
56
|
+
|
|
57
|
+
|
|
58
|
+
If you need to register through the client, no additional operations are needed. You just need to input a new `userID` in the section "Log In to TUIKit" below, and TUIKit will automatically register that `userID` for you.
|
|
59
|
+
|
|
60
|
+
|
|
61
|
+
## Install TUIKit
|
|
62
|
+
|
|
63
|
+
The feature of sending messages in chat interactions is implemented by `TUIChat`. You need to integrate at least `TUIChat` to properly send and receive messages. Other components, such as `TUIConversation`, `TUIContact`, and `TUIGroup`, can be integrated as needed.
|
|
64
|
+
- If you need multiple UI components, you can integrate TUIKit. For details, see [Install TUIKit](https://www.tencentcloud.com/document/product/1047/50056#cocoapods-.E9.9B.86.E6.88.90).
|
|
65
|
+
|
|
66
|
+
- If you only need to integrate TUIChat, see [Install TUIChat Only](https://www.tencentcloud.com/document/product/1047/60169#beaaa1f6-5555-42ca-b353-32ad98a620da).
|
|
67
|
+
|
|
68
|
+
|
|
69
|
+
## Log In to TUIKit
|
|
70
|
+
|
|
71
|
+
TUILogin provides an API to log in to TUIKit, as follows:
|
|
72
|
+
``` objectivec
|
|
73
|
+
// API location: TUICore/TUILogin.h
|
|
74
|
+
+ (void)login:(int)sdkAppID userID:(NSString *)userID userSig:(NSString *)userSig succ:(__nullable TSucc)succ fail:(__nullable TFail)fail;
|
|
75
|
+
```
|
|
76
|
+
|
|
77
|
+
This API requires three parameters:
|
|
78
|
+
- sdkAppID, the new application's SDKAppID, which was obtained in the previous steps.
|
|
79
|
+
|
|
80
|
+
- userID, user1's userID, which was obtained in the previous steps. Note that it is not the user's nickname.
|
|
81
|
+
|
|
82
|
+
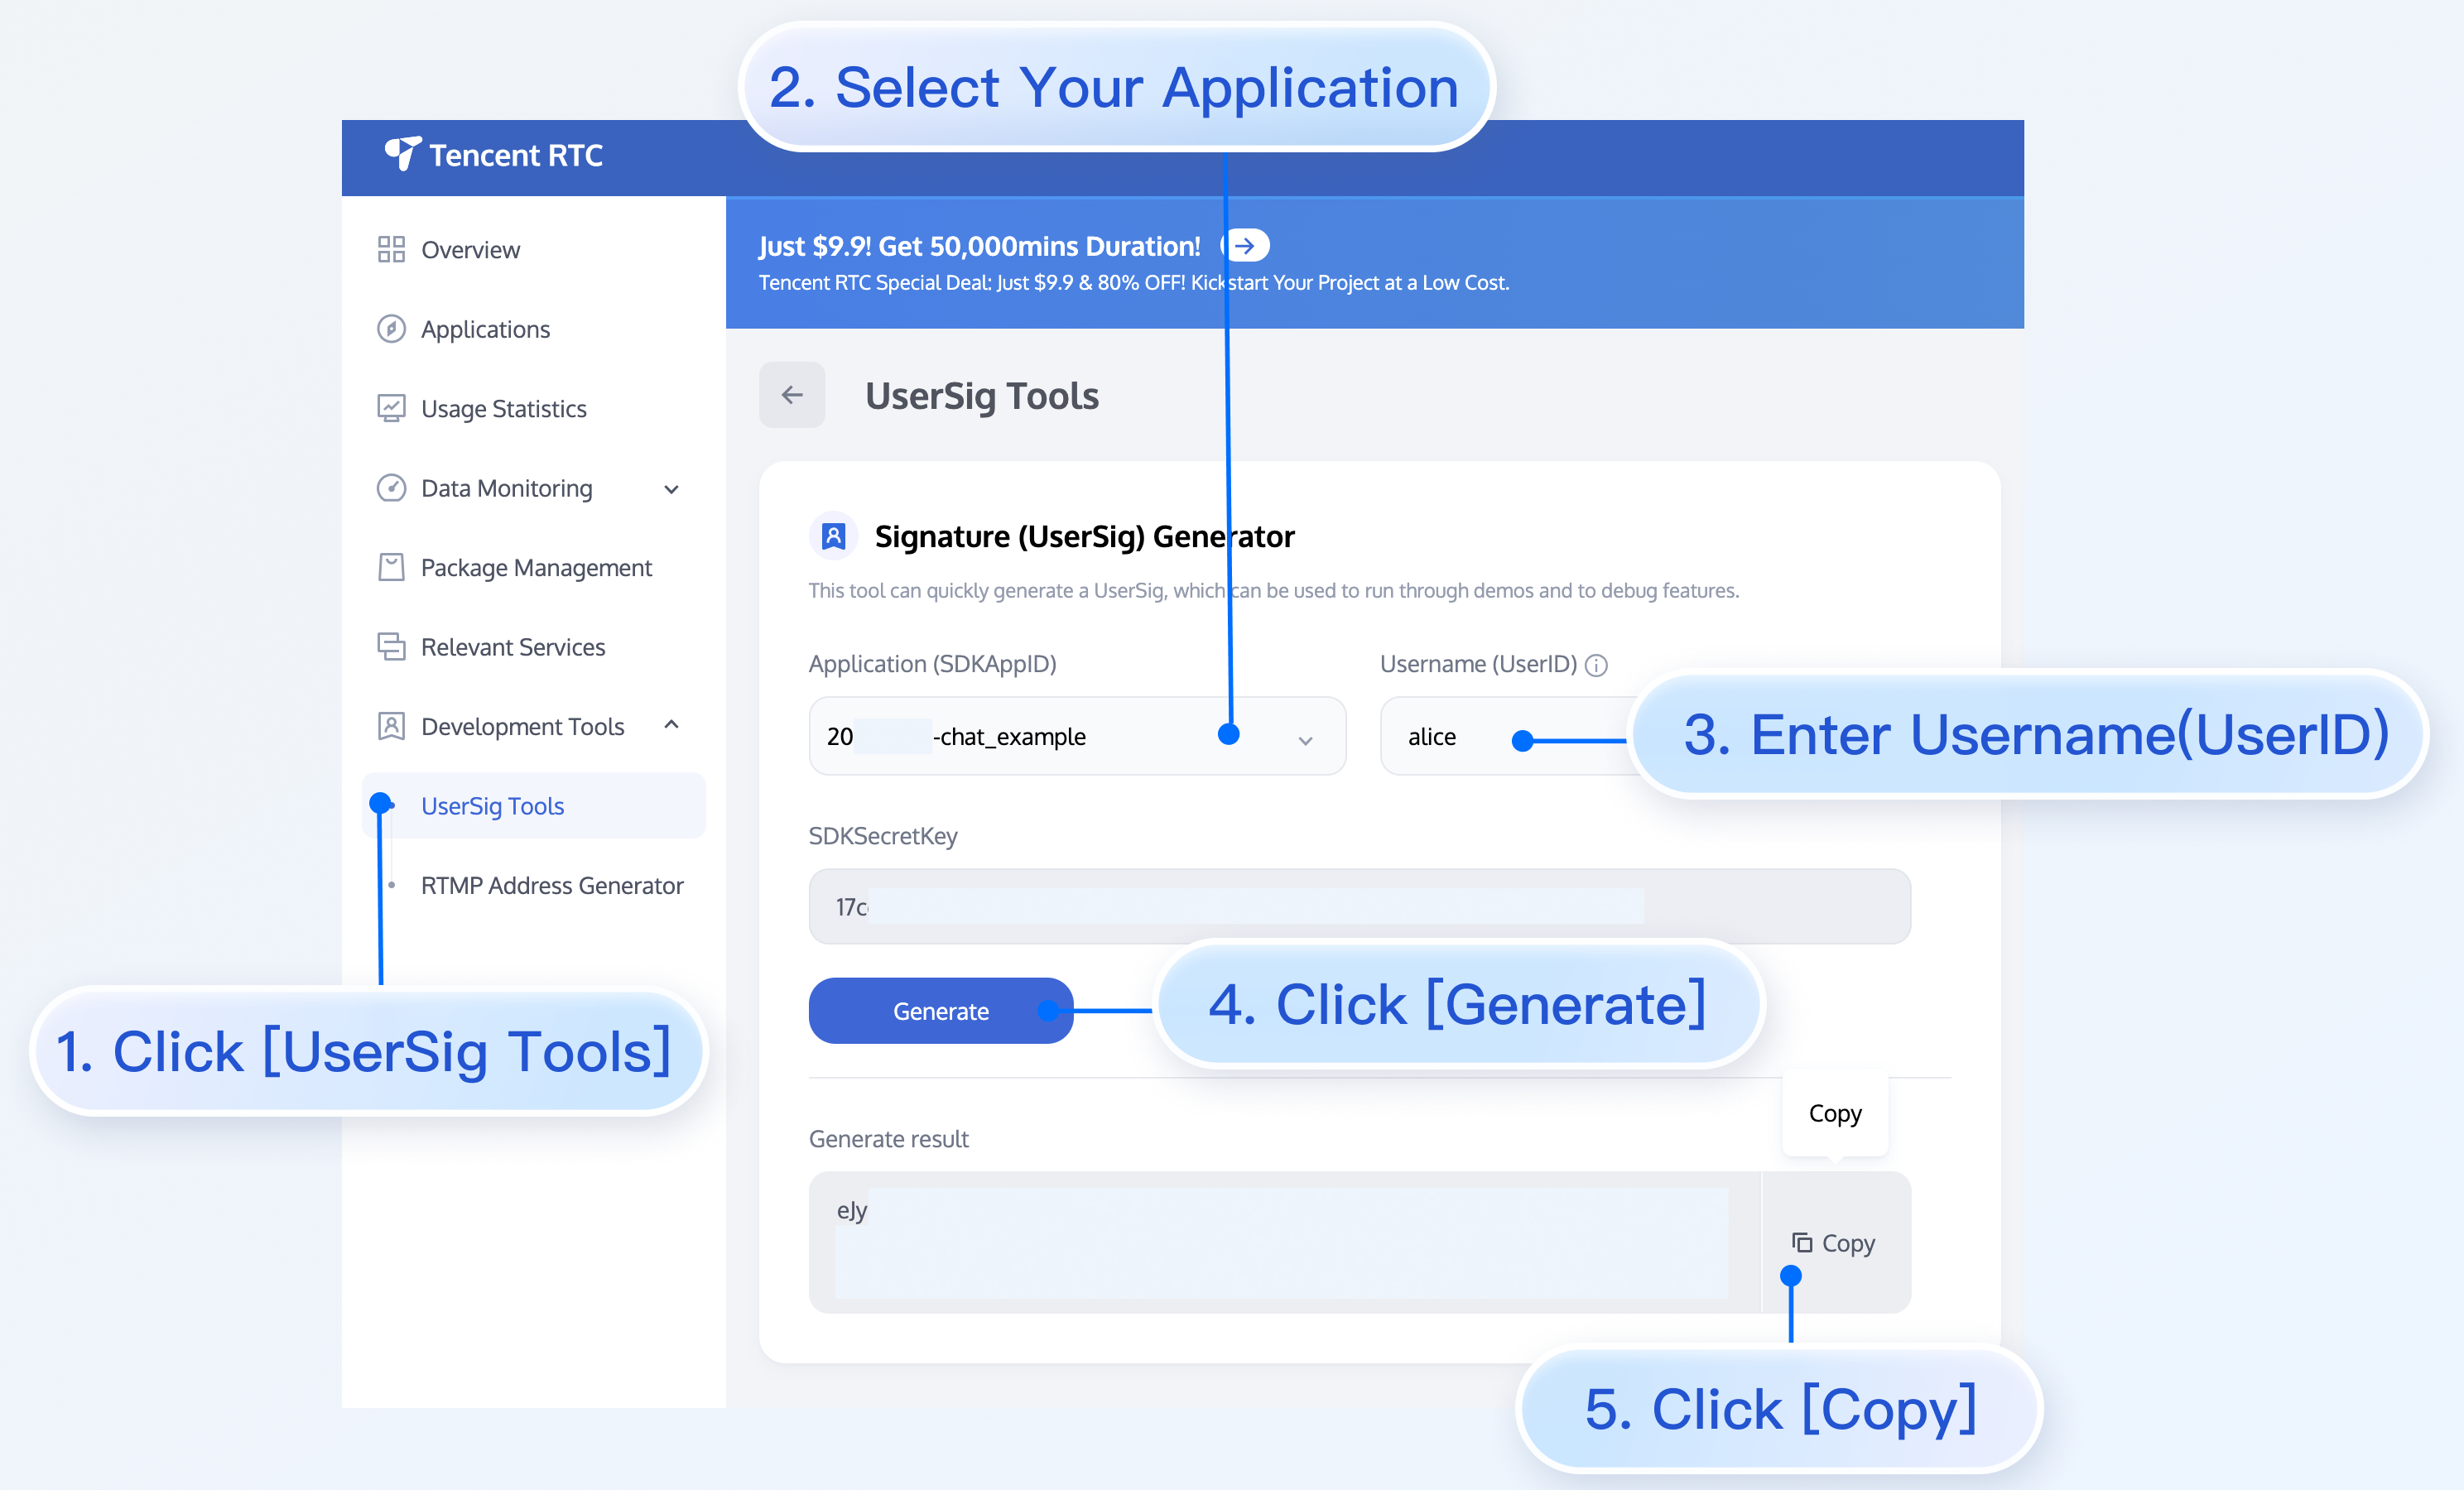
- userSig, user1's userSig, which can be generated in real time using the development tools provided by the console. The path is: Homepage > Development Tools > UserSig Tools > Signature (UserSig) Generator, as shown below:
|
|
83
|
+
|
|
84
|
+
|
|
85
|
+
|
|
86
|
+
|
|
87
|
+
## Navigate to Chat Interface
|
|
88
|
+
|
|
89
|
+
To send messages, the next step is:
|
|
90
|
+
1. Use one of the previously registered accounts (hereinafter referred to as user1) to log in to TUIKit, and then user1 is online.
|
|
91
|
+
|
|
92
|
+
2. User1 sends a message to another account (hereinafter referred to as user2). User2 does not need to log in and does not need to have any friend relationship with user1.
|
|
93
|
+
|
|
94
|
+
|
|
95
|
+
> **Note:**
|
|
96
|
+
>
|
|
97
|
+
|
|
98
|
+
> The following steps explain how to send a message to user2 after logging in as user1. If you wish for user1 and user2 to interact via chat, you need to use the same steps to log in as user2 and enter the chat interface with user1.
|
|
99
|
+
>
|
|
100
|
+
|
|
101
|
+
|
|
102
|
+
You can jump to the chat interface in the callback of user1's successful login, and then you can send a message to user2.
|
|
103
|
+
|
|
104
|
+
|
|
105
|
+
The sample code is as follows, where userID needs to be user2's id.
|
|
106
|
+
|
|
107
|
+
|
|
108
|
+
|
|
109
|
+
|
|
110
|
+
|
|
111
|
+
【Swift】
|
|
112
|
+
``` swift
|
|
113
|
+
// Pass userID for 1v1 conversation.
|
|
114
|
+
func pushToChatViewController(groupID: String?, userID: String?) {
|
|
115
|
+
// Create conversationData.
|
|
116
|
+
let conversationData = TUIChatConversationModel()
|
|
117
|
+
conversationData.userID = userID
|
|
118
|
+
|
|
119
|
+
// Create c2c chatVC.
|
|
120
|
+
let chatVC = TUIC2CChatViewController_Minimalist()
|
|
121
|
+
chatVC.conversationData = conversationData
|
|
122
|
+
|
|
123
|
+
// Option 1: navigate to chatVC.
|
|
124
|
+
navigationController?.pushViewController(chatVC, animated: true)
|
|
125
|
+
// Option 2: add chatVC as a childVC to your parent VC.
|
|
126
|
+
// addChild(chatVC)
|
|
127
|
+
// view.addSubview(chatVC.view)
|
|
128
|
+
}
|
|
129
|
+
```
|
|
130
|
+
|
|
131
|
+
|
|
132
|
+
【Objective-C】
|
|
133
|
+
``` objectivec
|
|
134
|
+
// Pass userID for 1v1 conversation.
|
|
135
|
+
- (void)pushToChatViewController:(NSString *)groupID userID:(NSString *)userID {
|
|
136
|
+
// Create conversationData.
|
|
137
|
+
TUIChatConversationModel *conversationData = [[TUIChatConversationModel alloc] init];
|
|
138
|
+
conversationData.userID = userID;
|
|
139
|
+
|
|
140
|
+
// Create c2c chatVC.
|
|
141
|
+
TUIBaseChatViewController_Minimalist *chatVC = [[TUIC2CChatViewController_Minimalist alloc] init];
|
|
142
|
+
chatVC.conversationData = conversationData;
|
|
143
|
+
|
|
144
|
+
// Option 1: navigate to chatVC.
|
|
145
|
+
[self.navigationController pushViewController:chatVC animated:YES];
|
|
146
|
+
// Option 2: add chatVC as a childVC to your parent VC.
|
|
147
|
+
// [self addChildViewController:vc];
|
|
148
|
+
// [self.view addSubview:vc.view];
|
|
149
|
+
}
|
|
150
|
+
```
|
|
151
|
+
|
|
152
|
+
|
|
153
|
+
## Send Your First Message
|
|
154
|
+
|
|
155
|
+
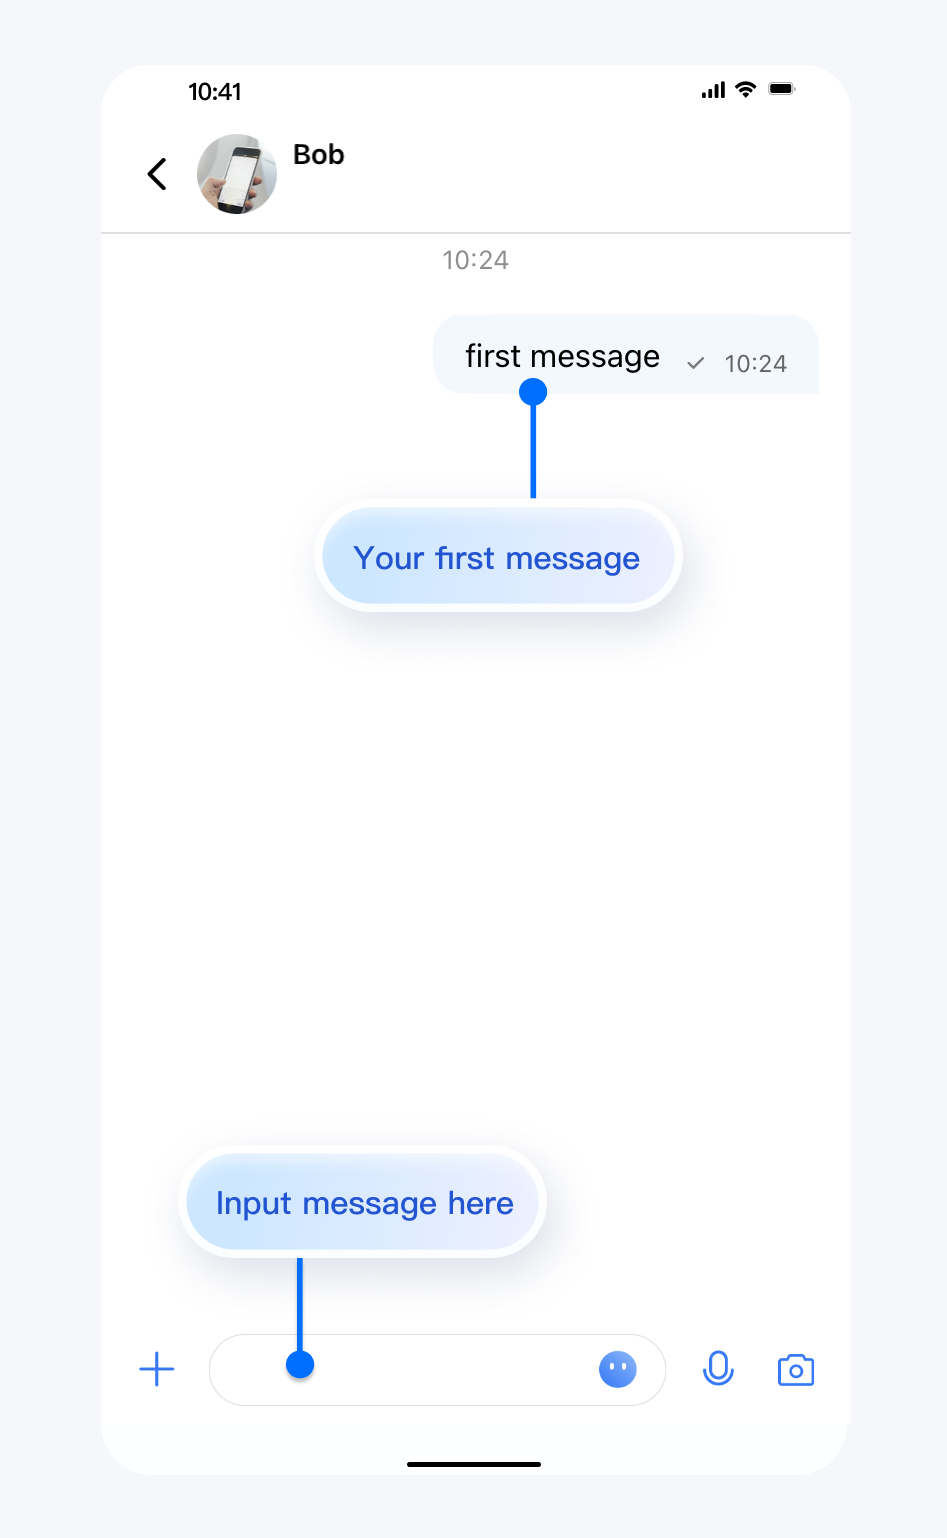
After completing the previous steps, you can jump to the following chat interface. Click the input box to send your first message:
|
|
156
|
+
|
|
157
|
+
|
|
158
|
+
|
|
159
|
+
|
|
160
|
+
## Contact Us
|
|
161
|
+
|
|
162
|
+
If you have any questions about this article, feel free to join the [Telegram Technical Group](https://t.me/+EPk6TMZEZMM5OGY1), where you will receive reliable technical support.
|
|
163
|
+
|
|
@@ -0,0 +1,52 @@
|
|
|
1
|
+
## Description
|
|
2
|
+
|
|
3
|
+
TUIKit supports showing "Typing..." in a one-to-one chat in the classic UI starting from version [6.5.2803](https://www.tencentcloud.com/zh/document/product/1047/34282#6.5.2803-.402022.07.15---.E5.A2.9E.E5.BC.BA.E7.89.88).
|
|
4
|
+
|
|
5
|
+
This feature is implemented using the [Online Message](https://www.tencentcloud.com/zh/document/product/1047/48019) capability of Chat SDK.
|
|
6
|
+
<table>
|
|
7
|
+
<tr>
|
|
8
|
+
<td rowspan="1" colSpan="1" >Enabling "Typing..."</td>
|
|
9
|
+
|
|
10
|
+
<td rowspan="1" colSpan="1" >Disabling "Typing..."</td>
|
|
11
|
+
</tr>
|
|
12
|
+
|
|
13
|
+
<tr>
|
|
14
|
+
<td rowspan="1" colSpan="1" >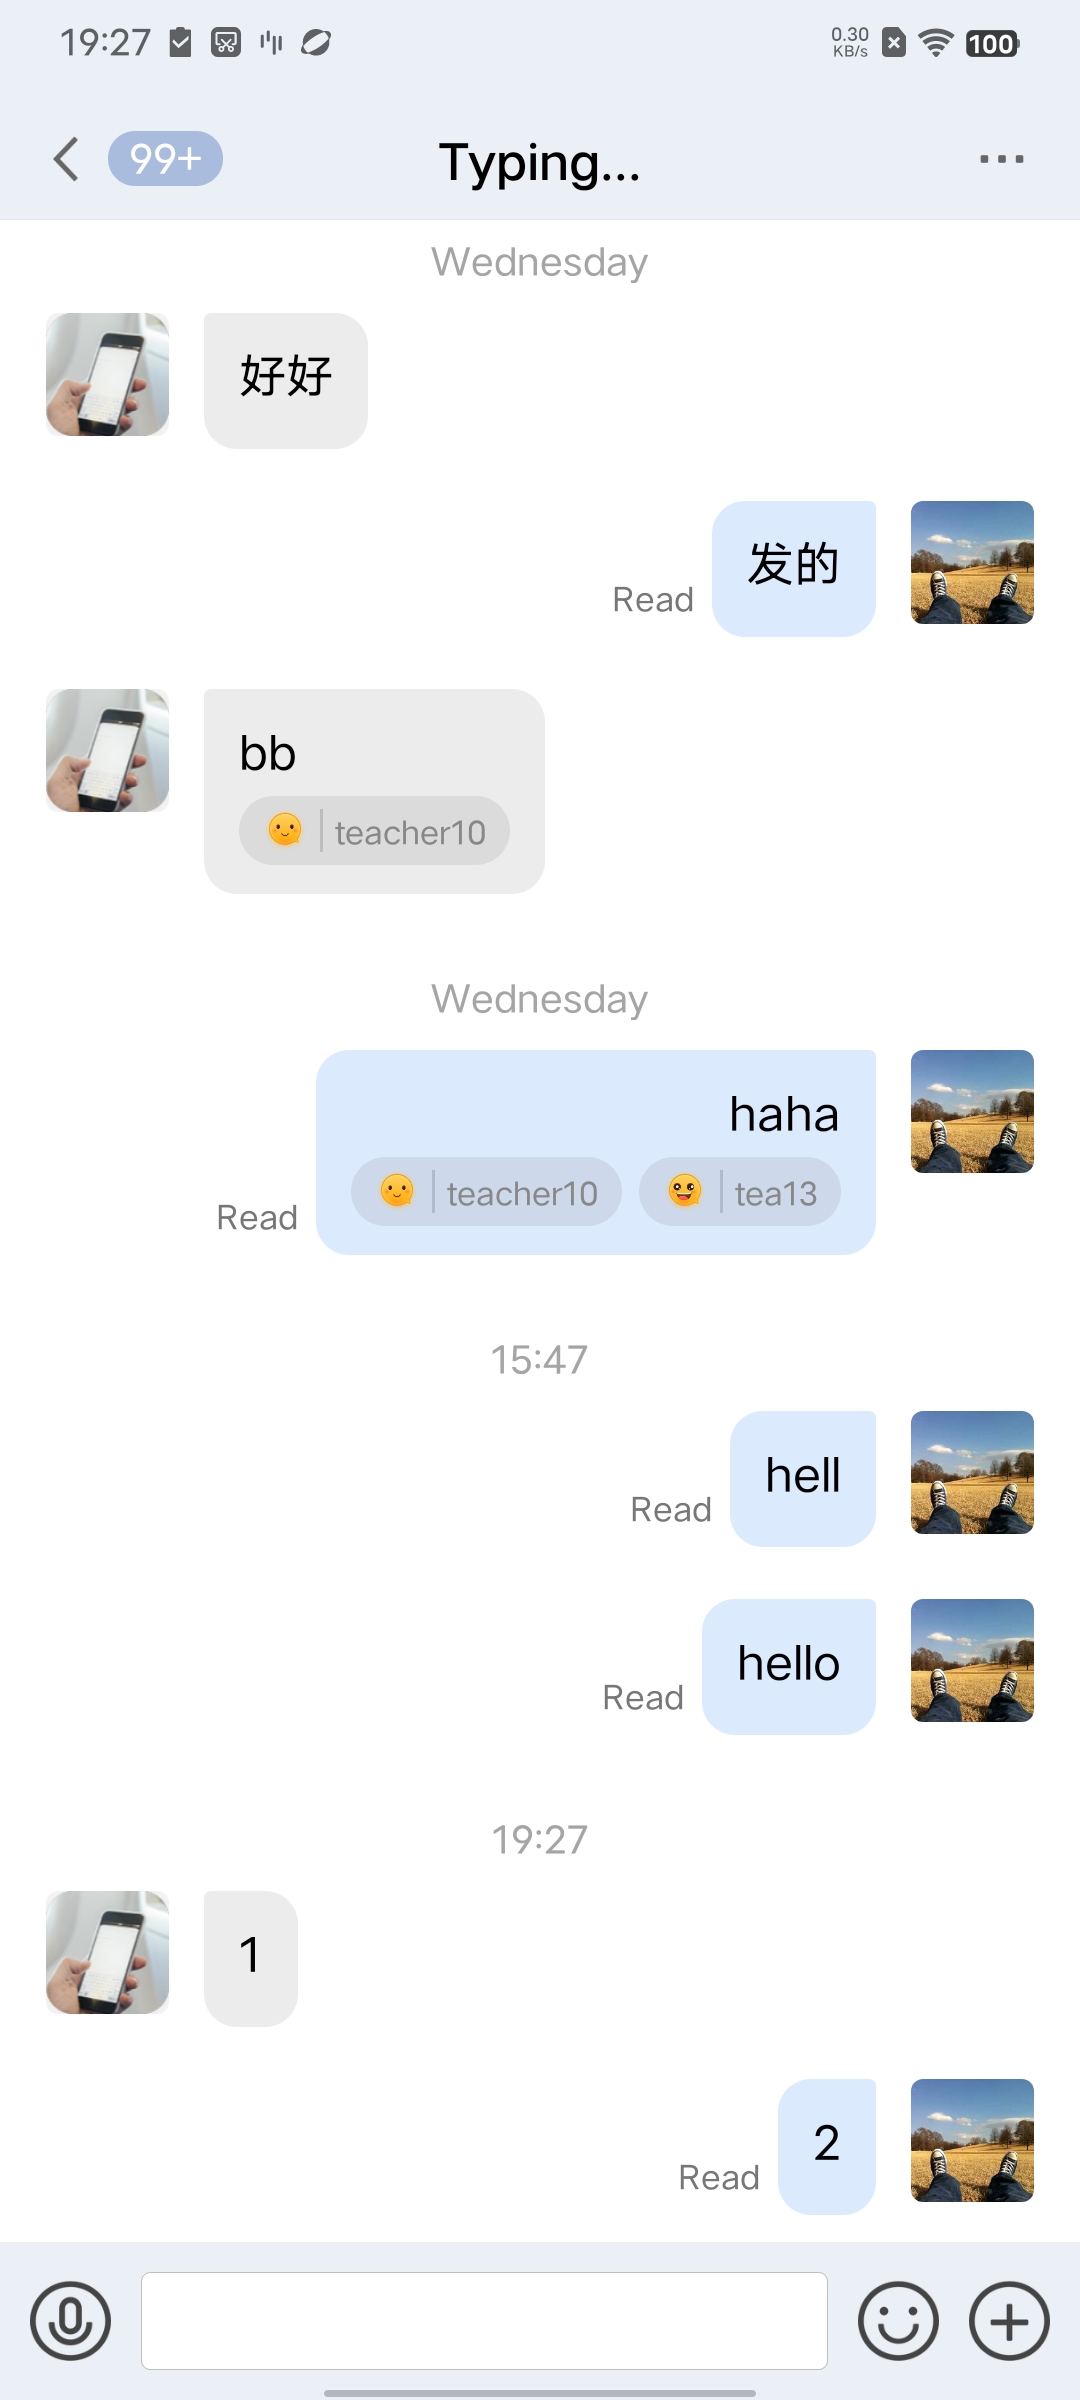</td>
|
|
15
|
+
|
|
16
|
+
<td rowspan="1" colSpan="1" >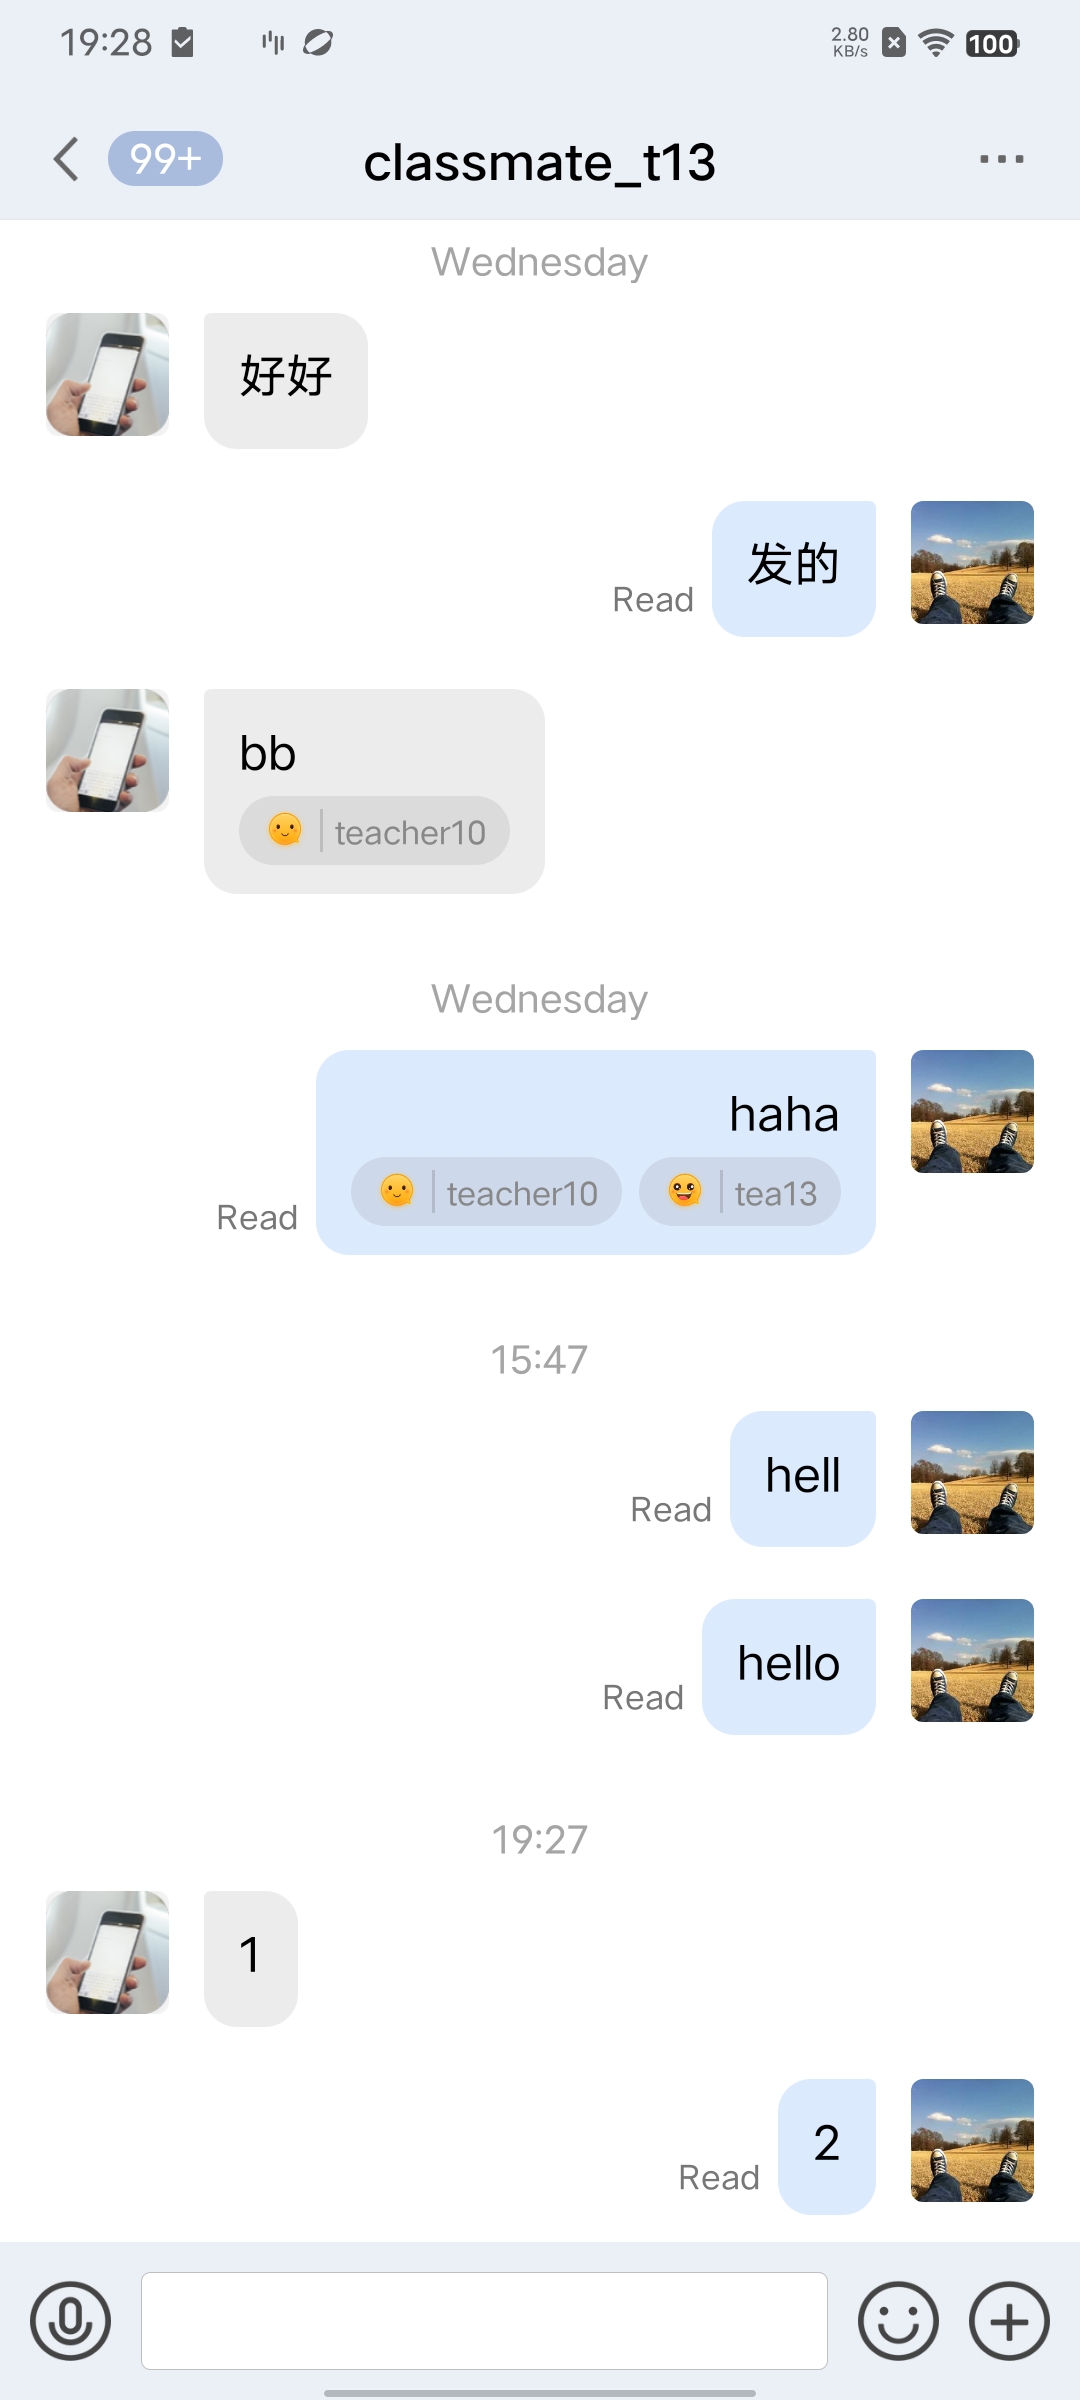</td>
|
|
17
|
+
</tr>
|
|
18
|
+
</table>
|
|
19
|
+
|
|
20
|
+
|
|
21
|
+
## Disabling "Typing..."
|
|
22
|
+
|
|
23
|
+
In the `TUIChat` component, within the `TUIChatConfig` file, a switch for the "Typing" feature, named `enableTypingStatus`, is provided. Its type is BOOL, with a default value of `YES`.
|
|
24
|
+
|
|
25
|
+
To disable the typing indicator feature, simply change the default value of `enableTypingStatus` to `NO`, or call the following method before initializing the chat page.
|
|
26
|
+
|
|
27
|
+
|
|
28
|
+
|
|
29
|
+
|
|
30
|
+
【Swift】
|
|
31
|
+
``` swift
|
|
32
|
+
TUIChatConfig.shared.enableTypingStatus = true
|
|
33
|
+
```
|
|
34
|
+
|
|
35
|
+
|
|
36
|
+
【Objective-C】
|
|
37
|
+
``` objectivec
|
|
38
|
+
TUIChatConfig.defaultConfig.enableTypingStatus = NO;
|
|
39
|
+
```
|
|
40
|
+
|
|
41
|
+
## FAQs
|
|
42
|
+
|
|
43
|
+
### Why is there no prompt for typing after the switch is turned on?
|
|
44
|
+
|
|
45
|
+
The rule for showing "Typing..." in a one-to-one chat is: the other party has sent you a message within the last 30 seconds and is currently typing.
|
|
46
|
+
|
|
47
|
+
## Exchange and Feedback
|
|
48
|
+
|
|
49
|
+
Join the [Telegram technical exchange group](https://t.me/+1doS9AUBmndhNGNl) or [WhatsApp discussion group](https://chat.whatsapp.com/Gfbxk7rQBqc8Rz4pzzP27A), benefit from the support of professional engineers, and solve your toughest challenges.
|
|
50
|
+
|
|
51
|
+
|
|
52
|
+
|
|
@@ -0,0 +1,306 @@
|
|
|
1
|
+
This document outlines two authentication methods for Chat services, with a focus on UserSig, a security signature by Tencent Cloud to safeguard against unauthorized access. For basic cloud service usage, provide SDKAppID, UserID, and UserSig during SDK initialization or login.
|
|
2
|
+
- SDKAppID is used to identify your application.
|
|
3
|
+
|
|
4
|
+
- UserID is used to identify your user.
|
|
5
|
+
|
|
6
|
+
- UserSig is a security signature calculated based on the first two using the HMAC SHA256 encryption algorithm. As long as attackers cannot forge the UserSig, they cannot steal your cloud service traffic.
|
|
7
|
+
|
|
8
|
+
|
|
9
|
+
## Obtaining a Key
|
|
10
|
+
1. Log in to the [Chat console](https://console.trtc.io/chat).
|
|
11
|
+
|
|
12
|
+
|
|
13
|
+
> **Note: **
|
|
14
|
+
>
|
|
15
|
+
|
|
16
|
+
> If you do not have any app, [create an app](https://intl.cloud.tencent.com/document/product/1047/45914) and then perform [step 2](https://write.woa.com/#step2).
|
|
17
|
+
>
|
|
18
|
+
|
|
19
|
+
2. Click the target app card to go to its basic configuration page.
|
|
20
|
+
|
|
21
|
+
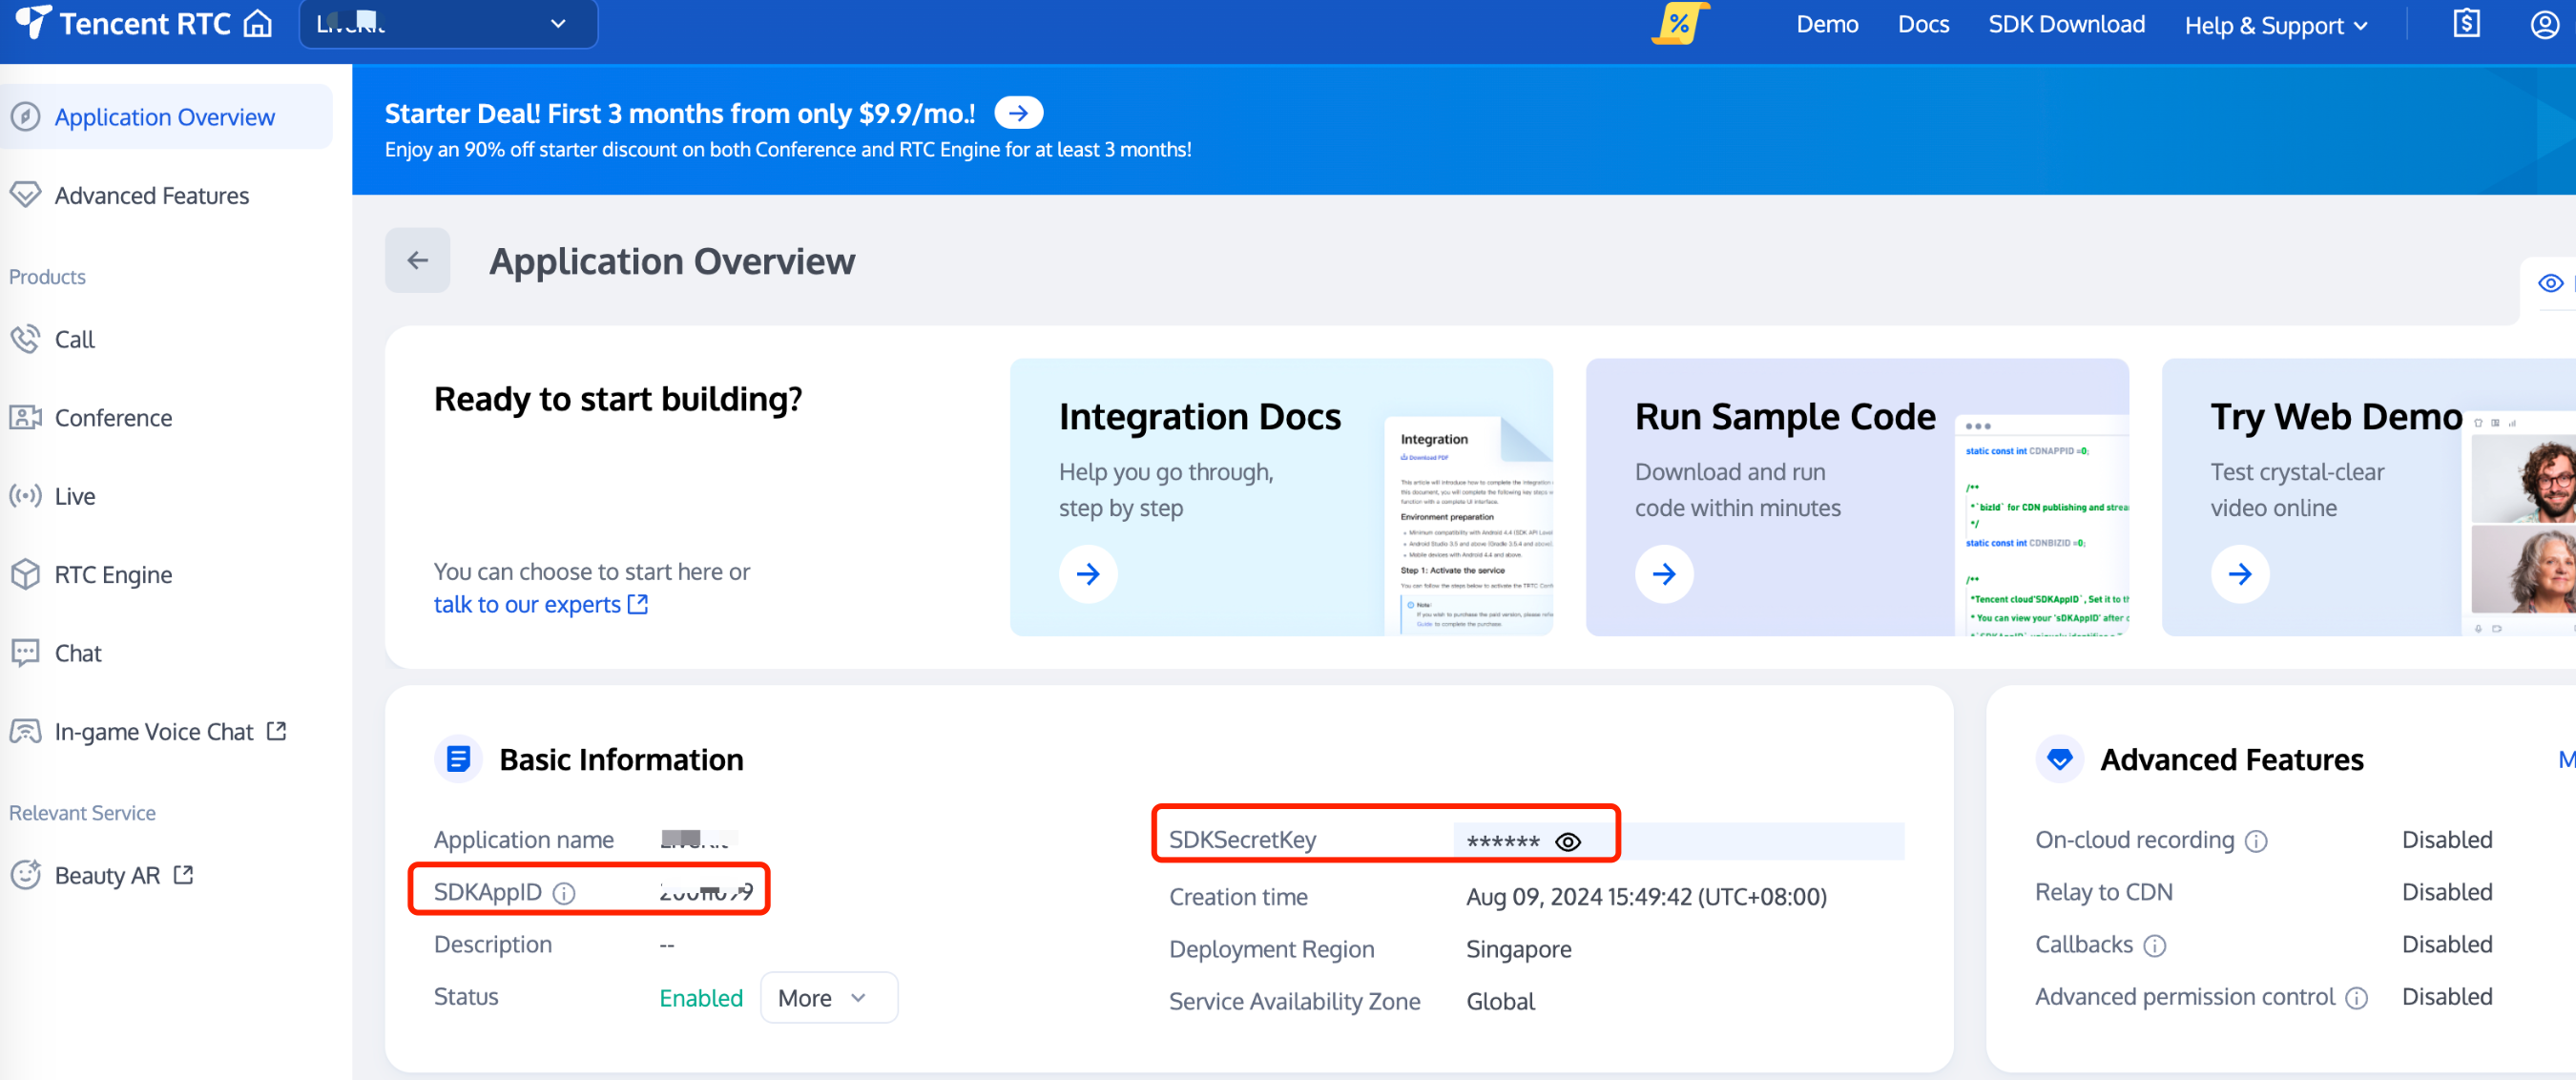
3. In the **Basic Information** section, click **Display key** to the right of **Key**.
|
|
22
|
+
|
|
23
|
+
|
|
24
|
+
|
|
25
|
+
4. Click **Copy** to copy and save the key information.
|
|
26
|
+
|
|
27
|
+
|
|
28
|
+
> **Note: **
|
|
29
|
+
>
|
|
30
|
+
|
|
31
|
+
> Store the key information properly to prevent disclosure.
|
|
32
|
+
>
|
|
33
|
+
|
|
34
|
+
|
|
35
|
+
## Calculating UserSig on the Client
|
|
36
|
+
|
|
37
|
+
The `GenerateTestUserSig` open-source module provided in the sample code of the Chat SDK can help you quickly generate a UserSig. You only need to configure three member variables, including SDKAPPID (SDKAppID of the app), EXPIRETIME (UserSig expiration time), and SECRETKEY (key information), and then call the genTestUserSig() function to quickly obtain a UserSig.
|
|
38
|
+
|
|
39
|
+
To simplify this process, we provide the source code for computing a UserSig for the following languages and platforms. You can directly download and integrate the source code into your client.
|
|
40
|
+
<table>
|
|
41
|
+
<tr>
|
|
42
|
+
<td rowspan="1" colSpan="1" >Programing Language</td>
|
|
43
|
+
|
|
44
|
+
<td rowspan="1" colSpan="1" >Platform</td>
|
|
45
|
+
|
|
46
|
+
<td rowspan="1" colSpan="1" >GenerateTestUserSig Source Code</td>
|
|
47
|
+
</tr>
|
|
48
|
+
|
|
49
|
+
<tr>
|
|
50
|
+
<td rowspan="1" colSpan="1" >Java</td>
|
|
51
|
+
|
|
52
|
+
<td rowspan="1" colSpan="1" >Android</td>
|
|
53
|
+
|
|
54
|
+
<td rowspan="1" colSpan="1" >[GenerateTestUserSig.java](https://github.com/tencentyun/TIMSDK/blob/master/Android/Demo/app/src/main/java/com/tencent/qcloud/tim/demo/signature/GenerateTestUserSig.java)</td>
|
|
55
|
+
</tr>
|
|
56
|
+
|
|
57
|
+
<tr>
|
|
58
|
+
<td rowspan="1" colSpan="1" >Objective-C</td>
|
|
59
|
+
|
|
60
|
+
<td rowspan="1" colSpan="1" >iOS</td>
|
|
61
|
+
|
|
62
|
+
<td rowspan="1" colSpan="1" >[GenerateTestUserSig.h](https://github.com/tencentyun/TIMSDK/blob/master/iOS/Demo/TUIKitDemo/Private/GenerateTestUserSig.h)</td>
|
|
63
|
+
</tr>
|
|
64
|
+
|
|
65
|
+
<tr>
|
|
66
|
+
<td rowspan="1" colSpan="1" >Objective-C</td>
|
|
67
|
+
|
|
68
|
+
<td rowspan="1" colSpan="1" >Mac</td>
|
|
69
|
+
|
|
70
|
+
<td rowspan="1" colSpan="1" >[GenerateTestUserSig.h](https://github.com/tencentyun/TIMSDK/blob/master/Mac/Demo/TUIKitDemo/Debug/GenerateTestUserSig.h)</td>
|
|
71
|
+
</tr>
|
|
72
|
+
|
|
73
|
+
<tr>
|
|
74
|
+
<td rowspan="1" colSpan="1" >C++</td>
|
|
75
|
+
|
|
76
|
+
<td rowspan="1" colSpan="1" >Windows</td>
|
|
77
|
+
|
|
78
|
+
<td rowspan="1" colSpan="1" >[GenerateTestUserSig.h](https://github.com/tencentyun/TIMSDK/blob/master/Windows/Demo/IMApp/GenerateTestUserSig.h)</td>
|
|
79
|
+
</tr>
|
|
80
|
+
|
|
81
|
+
<tr>
|
|
82
|
+
<td rowspan="1" colSpan="1" >Javascript</td>
|
|
83
|
+
|
|
84
|
+
<td rowspan="1" colSpan="1" >Web</td>
|
|
85
|
+
|
|
86
|
+
<td rowspan="1" colSpan="1" >[GenerateTestUserSig.js](https://github.com/TencentCloud/chat-uikit-uniapp/blob/main/TUIKit/debug/GenerateTestUserSig.js)</td>
|
|
87
|
+
</tr>
|
|
88
|
+
|
|
89
|
+
<tr>
|
|
90
|
+
<td rowspan="1" colSpan="1" >Dart</td>
|
|
91
|
+
|
|
92
|
+
<td rowspan="1" colSpan="1" >Flutter</td>
|
|
93
|
+
|
|
94
|
+
<td rowspan="1" colSpan="1" >[GenerateTestUserSig.dart](https://github.com/TencentCloud/chat-demo-flutter/blob/main/lib/utils/GenerateTestUserSig.dart )</td>
|
|
95
|
+
</tr>
|
|
96
|
+
</table>
|
|
97
|
+
|
|
98
|
+
|
|
99
|
+
> **Note: **
|
|
100
|
+
>
|
|
101
|
+
|
|
102
|
+
> In this method, the `SECRETKEY` is vulnerable to decompilation and reverse engineering. Once your `SECRETKEY` is disclosed, attackers can steal your Tencent Cloud traffic. Therefore, **this method is only suitable for locally running a demo project and feature debugging**.
|
|
103
|
+
The correct way to issue a UserSig is to integrate the UserSig computing code into your server and provide app-oriented APIs. When UserSig is needed, your app will send a request to the business server to obtain a dynamic UserSig. For more information, see [How to Calculate UserSig](https://write.woa.com/#GeneratingdynamicUserSig).
|
|
104
|
+
>
|
|
105
|
+
|
|
106
|
+
|
|
107
|
+
## Calculating UserSig on the Server
|
|
108
|
+
|
|
109
|
+
Generating a UserSig on the server provides maximum protection against the disclosure of the key used for calculating the UserSig. You only need to deploy the code for calculating the UserSig on your server and provide an app-oriented API. When a UserSig is needed, your app will send a request to the business server to obtain a dynamic UserSig.
|
|
110
|
+
To simplify this process, we provide the source code for calculating a UserSig for the following languages and platforms. You can directly download and integrate the source code into your server.
|
|
111
|
+
<table>
|
|
112
|
+
<tr>
|
|
113
|
+
<td rowspan="1" colSpan="1" >Programming Language</td>
|
|
114
|
+
|
|
115
|
+
<td rowspan="1" colSpan="1" >Key Function</td>
|
|
116
|
+
|
|
117
|
+
<td rowspan="1" colSpan="1" >Download URL</td>
|
|
118
|
+
</tr>
|
|
119
|
+
|
|
120
|
+
<tr>
|
|
121
|
+
<td rowspan="1" colSpan="1" >Java</td>
|
|
122
|
+
|
|
123
|
+
<td rowspan="1" colSpan="1" >HMAC-SHA256</td>
|
|
124
|
+
|
|
125
|
+
<td rowspan="1" colSpan="1" >[genSig](https://github.com/Tencent-RTC/tls-sig-api-v2-java/blob/main/src/main/java/com/tencentcloud/TLSSigAPIv2.java)</td>
|
|
126
|
+
</tr>
|
|
127
|
+
|
|
128
|
+
<tr>
|
|
129
|
+
<td rowspan="1" colSpan="1" >GO</td>
|
|
130
|
+
|
|
131
|
+
<td rowspan="1" colSpan="1" >HMAC-SHA256</td>
|
|
132
|
+
|
|
133
|
+
<td rowspan="1" colSpan="1" >[GenSig](https://github.com/Tencent-RTC/tls-sig-api-v2-golang/blob/main/tencentyun/TLSSigAPI.go)</td>
|
|
134
|
+
</tr>
|
|
135
|
+
|
|
136
|
+
<tr>
|
|
137
|
+
<td rowspan="1" colSpan="1" >PHP</td>
|
|
138
|
+
|
|
139
|
+
<td rowspan="1" colSpan="1" >HMAC-SHA256</td>
|
|
140
|
+
|
|
141
|
+
<td rowspan="1" colSpan="1" >[genSig](https://github.com/Tencent-RTC/tls-sig-api-v2-php/blob/main/src/TLSSigAPIv2.php)</td>
|
|
142
|
+
</tr>
|
|
143
|
+
|
|
144
|
+
<tr>
|
|
145
|
+
<td rowspan="1" colSpan="1" >Nodejs</td>
|
|
146
|
+
|
|
147
|
+
<td rowspan="1" colSpan="1" >HMAC-SHA256</td>
|
|
148
|
+
|
|
149
|
+
<td rowspan="1" colSpan="1" >[genSig](https://github.com/Tencent-RTC/tls-sig-api-v2-node/blob/main/TLSSigAPIv2.js)</td>
|
|
150
|
+
</tr>
|
|
151
|
+
|
|
152
|
+
<tr>
|
|
153
|
+
<td rowspan="1" colSpan="1" >Python</td>
|
|
154
|
+
|
|
155
|
+
<td rowspan="1" colSpan="1" >HMAC-SHA256</td>
|
|
156
|
+
|
|
157
|
+
<td rowspan="1" colSpan="1" >[gen_sig](https://github.com/Tencent-RTC/tls-sig-api-v2-python/blob/main/TLSSigAPIv2.py)</td>
|
|
158
|
+
</tr>
|
|
159
|
+
|
|
160
|
+
<tr>
|
|
161
|
+
<td rowspan="1" colSpan="1" >C#</td>
|
|
162
|
+
|
|
163
|
+
<td rowspan="1" colSpan="1" >HMAC-SHA256</td>
|
|
164
|
+
|
|
165
|
+
<td rowspan="1" colSpan="1" >[GenSig](https://github.com/Tencent-RTC/tls-sig-api-v2-cs/blob/main/tls-sig-api-v2-cs/TLSSigAPIv2.cs)</td>
|
|
166
|
+
</tr>
|
|
167
|
+
|
|
168
|
+
<tr>
|
|
169
|
+
<td rowspan="1" colSpan="1" >C++</td>
|
|
170
|
+
|
|
171
|
+
<td rowspan="1" colSpan="1" >HMAC-SHA256</td>
|
|
172
|
+
|
|
173
|
+
<td rowspan="1" colSpan="1" >[gen_sig](https://github.com/Tencent-RTC/tls-sig-api-v2-cpp)</td>
|
|
174
|
+
</tr>
|
|
175
|
+
</table>
|
|
176
|
+
|
|
177
|
+
|
|
178
|
+
Key fields in a UserSig calculation function include the SDKAppID, UserID, and UserSig validity period, as described in the following table.
|
|
179
|
+
|
|
180
|
+
> **Note: **
|
|
181
|
+
>
|
|
182
|
+
|
|
183
|
+
> The following table uses the field names in the Java source code as an example. The field names may be different in other languages.
|
|
184
|
+
>
|
|
185
|
+
|
|
186
|
+
<table>
|
|
187
|
+
<tr>
|
|
188
|
+
<td rowspan="1" colSpan="1" >Field Name (Example)</td>
|
|
189
|
+
|
|
190
|
+
<td rowspan="1" colSpan="1" >Description</td>
|
|
191
|
+
</tr>
|
|
192
|
+
|
|
193
|
+
<tr>
|
|
194
|
+
<td rowspan="1" colSpan="1" >sdkappid</td>
|
|
195
|
+
|
|
196
|
+
<td rowspan="1" colSpan="1" >SDKAppID of the app. You can obtain the SDKAppID on the app card in the [Chat console](https://console.trtc.io/chat).</td>
|
|
197
|
+
</tr>
|
|
198
|
+
|
|
199
|
+
<tr>
|
|
200
|
+
<td rowspan="1" colSpan="1" >userId</td>
|
|
201
|
+
|
|
202
|
+
<td rowspan="1" colSpan="1" >User ID (former name: `Identifier`).</td>
|
|
203
|
+
</tr>
|
|
204
|
+
|
|
205
|
+
<tr>
|
|
206
|
+
<td rowspan="1" colSpan="1" >expire</td>
|
|
207
|
+
|
|
208
|
+
<td rowspan="1" colSpan="1" >UserSig validity period, in seconds.</td>
|
|
209
|
+
</tr>
|
|
210
|
+
|
|
211
|
+
<tr>
|
|
212
|
+
<td rowspan="1" colSpan="1" >userbuf</td>
|
|
213
|
+
|
|
214
|
+
<td rowspan="1" colSpan="1" >This field is set to `null` by default because APIs without UserBuf are used in Chat by default.APIs with UserBuf may be required in some TRTC use cases, for example, when entering a room. For more information, see [Enabling Advanced Permission Control](https://intl.cloud.tencent.com/document/product/647/35157).</td>
|
|
215
|
+
</tr>
|
|
216
|
+
|
|
217
|
+
<tr>
|
|
218
|
+
<td rowspan="1" colSpan="1" >key</td>
|
|
219
|
+
|
|
220
|
+
<td rowspan="1" colSpan="1" >Key. You can obtain a key on the app details page in the [Chat console](https://console.trtc.io/chat). For more information, see [Obtaining a Key](https://write.woa.com/#getkey).</td>
|
|
221
|
+
</tr>
|
|
222
|
+
</table>
|
|
223
|
+
|
|
224
|
+
|
|
225
|
+
## Old Version of Algorithm
|
|
226
|
+
|
|
227
|
+
To simplify signature computing so that customers can conveniently and quickly use Tencent Cloud services, the signature algorithm of the Chat service has been upgraded from ECDSA-SHA256 to HMAC-SHA256 since July 19, 2019. This means that all SDKAppIDs created after July 19, 2019 will use the new HMAC-SHA256 algorithm.
|
|
228
|
+
|
|
229
|
+
If your SDKAppID was created before July 19, 2019, we recommend that you upgrade the signature algorithm to [HMAC-SHA256](https://write.woa.com/#GeneratingdynamicUserSig). The upgrade will not affect your business. Alternatively, you can still use the signature algorithm of an earlier version. The URLs for downloading the source code for the ECDSA-SHA256 algorithm are as follows:
|
|
230
|
+
<table>
|
|
231
|
+
<tr>
|
|
232
|
+
<td rowspan="1" colSpan="1" >Programming Language</td>
|
|
233
|
+
|
|
234
|
+
<td rowspan="1" colSpan="1" >Signature Algorithm</td>
|
|
235
|
+
|
|
236
|
+
<td rowspan="1" colSpan="1" >Download Link</td>
|
|
237
|
+
</tr>
|
|
238
|
+
|
|
239
|
+
<tr>
|
|
240
|
+
<td rowspan="1" colSpan="1" >Java</td>
|
|
241
|
+
|
|
242
|
+
<td rowspan="1" colSpan="1" >ECDSA-SHA256</td>
|
|
243
|
+
|
|
244
|
+
<td rowspan="1" colSpan="1" >[GitHub](https://github.com/tencentyun/tls-sig-api-java)</td>
|
|
245
|
+
</tr>
|
|
246
|
+
|
|
247
|
+
<tr>
|
|
248
|
+
<td rowspan="1" colSpan="1" >GO</td>
|
|
249
|
+
|
|
250
|
+
<td rowspan="1" colSpan="1" >ECDSA-SHA256</td>
|
|
251
|
+
|
|
252
|
+
<td rowspan="1" colSpan="1" >[GitHub](https://github.com/tencentyun/tls-sig-api-golang)</td>
|
|
253
|
+
</tr>
|
|
254
|
+
|
|
255
|
+
<tr>
|
|
256
|
+
<td rowspan="1" colSpan="1" >PHP</td>
|
|
257
|
+
|
|
258
|
+
<td rowspan="1" colSpan="1" >ECDSA-SHA256</td>
|
|
259
|
+
|
|
260
|
+
<td rowspan="1" colSpan="1" >[GitHub](https://github.com/tencentyun/tls-sig-api-php)</td>
|
|
261
|
+
</tr>
|
|
262
|
+
|
|
263
|
+
<tr>
|
|
264
|
+
<td rowspan="1" colSpan="1" >Nodejs</td>
|
|
265
|
+
|
|
266
|
+
<td rowspan="1" colSpan="1" >ECDSA-SHA256</td>
|
|
267
|
+
|
|
268
|
+
<td rowspan="1" colSpan="1" >[GitHub](https://github.com/tencentyun/tls-sig-api-node)</td>
|
|
269
|
+
</tr>
|
|
270
|
+
|
|
271
|
+
<tr>
|
|
272
|
+
<td rowspan="1" colSpan="1" >Python</td>
|
|
273
|
+
|
|
274
|
+
<td rowspan="1" colSpan="1" >ECDSA-SHA256</td>
|
|
275
|
+
|
|
276
|
+
<td rowspan="1" colSpan="1" >[GitHub](https://github.com/tencentyun/tls-sig-api-python)</td>
|
|
277
|
+
</tr>
|
|
278
|
+
|
|
279
|
+
<tr>
|
|
280
|
+
<td rowspan="1" colSpan="1" >C#</td>
|
|
281
|
+
|
|
282
|
+
<td rowspan="1" colSpan="1" >ECDSA-SHA256</td>
|
|
283
|
+
|
|
284
|
+
<td rowspan="1" colSpan="1" >[GitHub](https://github.com/tencentyun/tls-sig-api-cs)</td>
|
|
285
|
+
</tr>
|
|
286
|
+
|
|
287
|
+
<tr>
|
|
288
|
+
<td rowspan="1" colSpan="1" >C++</td>
|
|
289
|
+
|
|
290
|
+
<td rowspan="1" colSpan="1" >ECDSA-SHA256</td>
|
|
291
|
+
|
|
292
|
+
<td rowspan="1" colSpan="1" >[GitHub](https://github.com/tencentyun/tls-sig-api)</td>
|
|
293
|
+
</tr>
|
|
294
|
+
</table>
|
|
295
|
+
|
|
296
|
+
|
|
297
|
+
## Get UserSig from the console
|
|
298
|
+
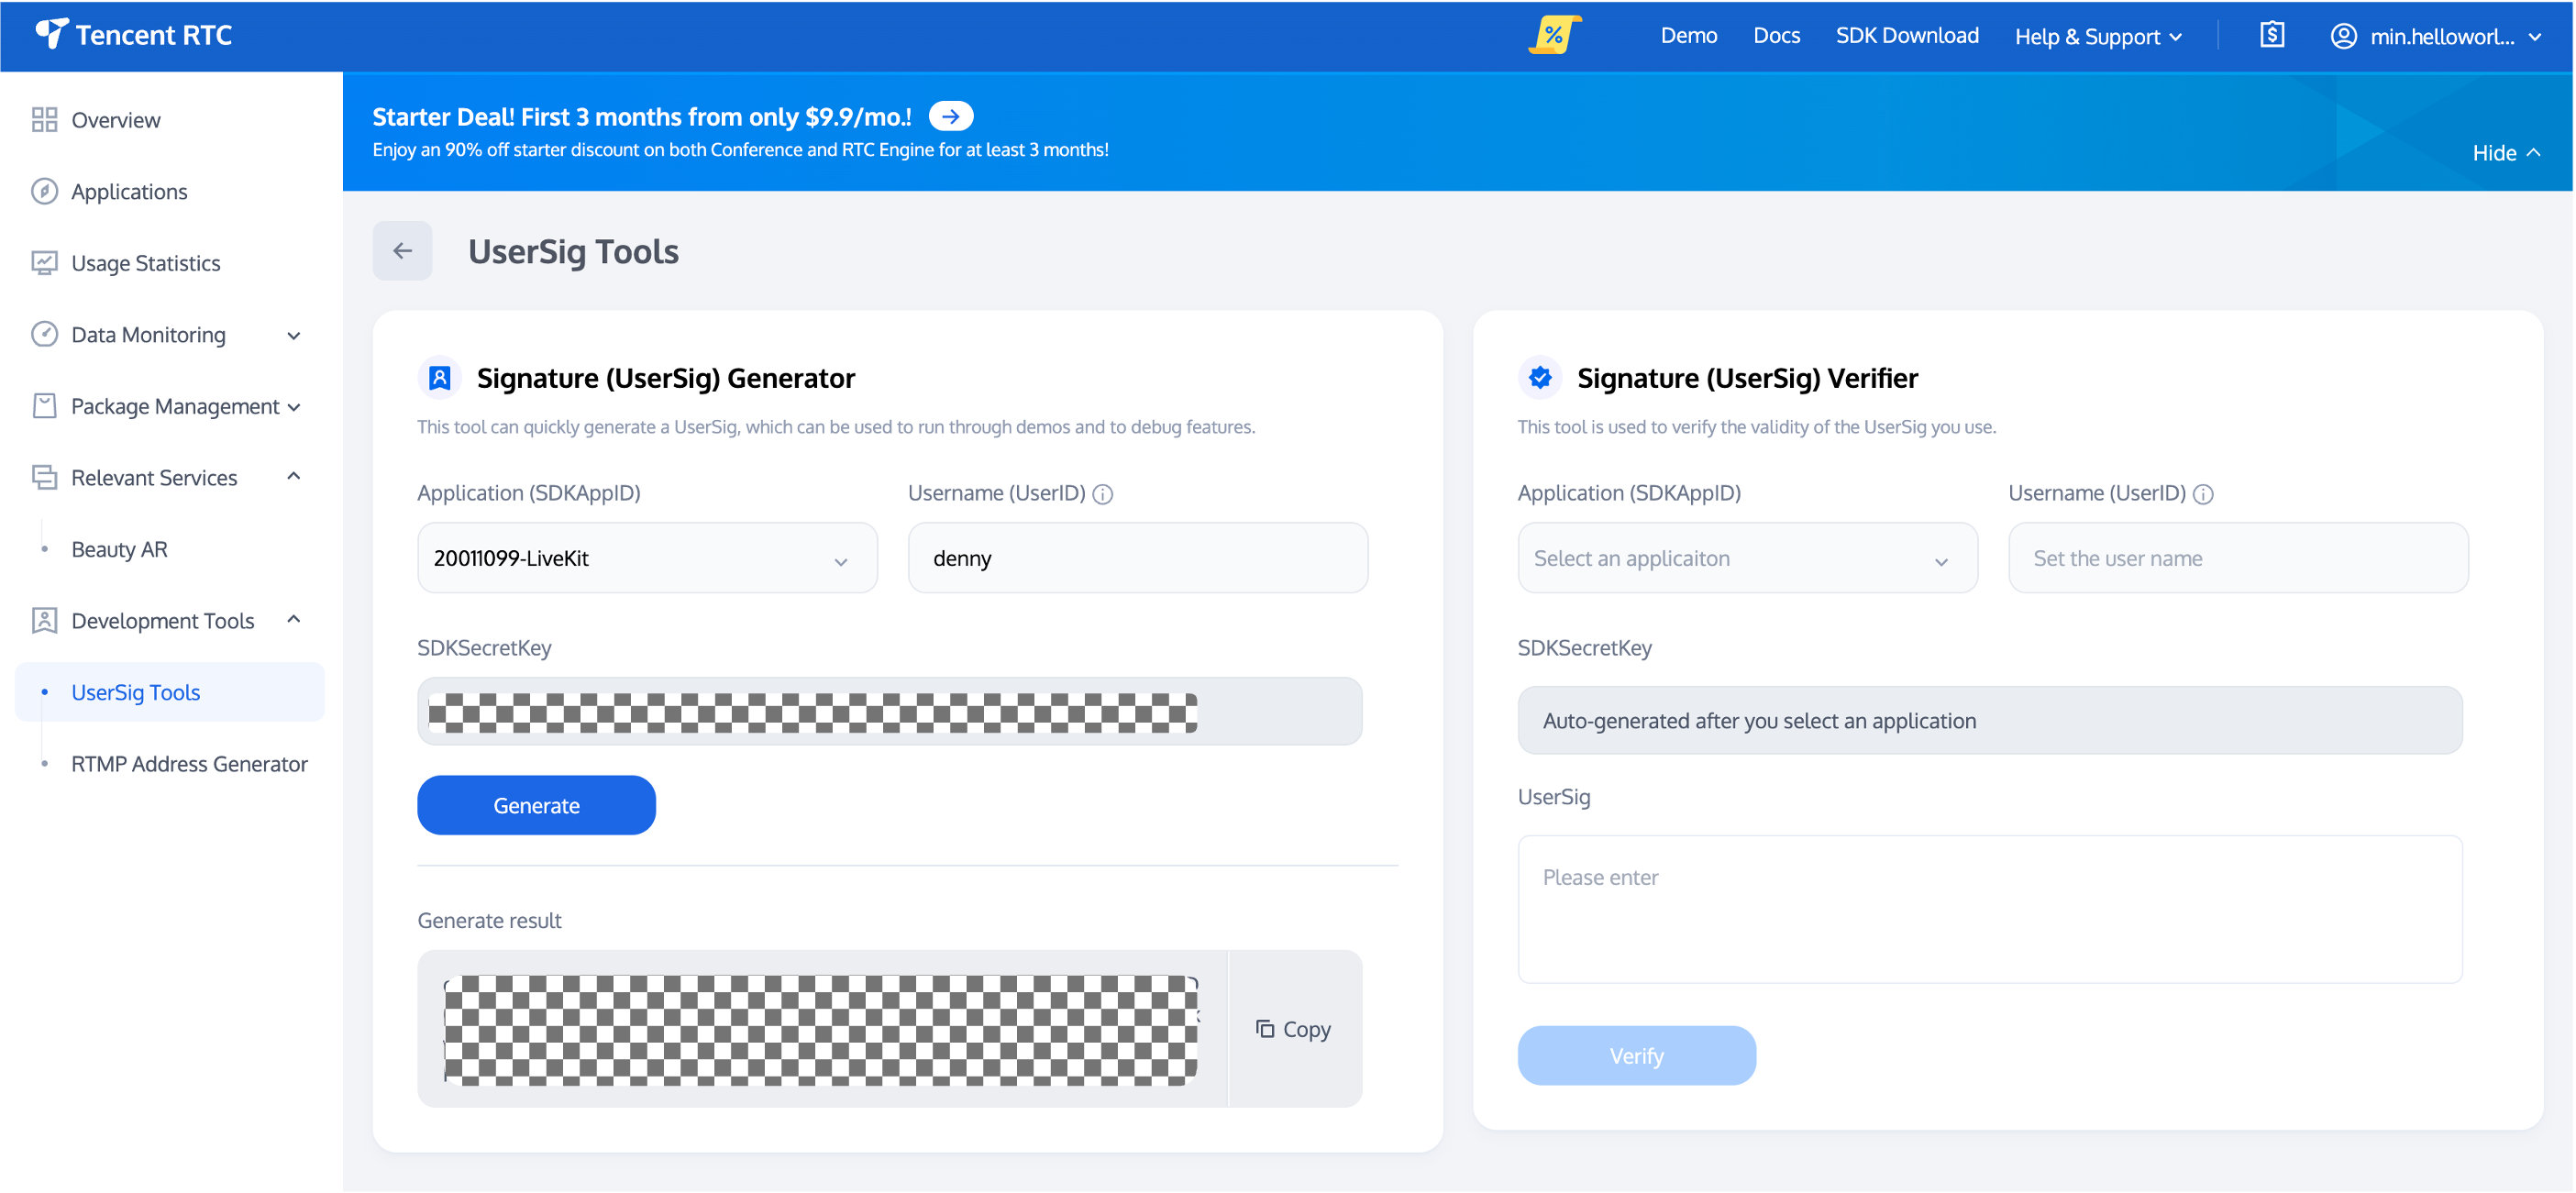
- Log in to Tencent-RTC Console, navigate to Development Tools > [UserSig Tools](https://console.trtc.io/usersig).
|
|
299
|
+
|
|
300
|
+
- Under the UserSig Generation Tool, select the corresponding SDKAppID and UserID.
|
|
301
|
+
|
|
302
|
+
- Click the Generate button to compute the corresponding UserSig.
|
|
303
|
+
|
|
304
|
+
|
|
305
|
+
|
|
306
|
+
|