@serverless-devs/s 2.0.92 → 2.0.93-beta.4
This diff represents the content of publicly available package versions that have been released to one of the supported registries. The information contained in this diff is provided for informational purposes only and reflects changes between package versions as they appear in their respective public registries.
- package/CONTRIBUTORS.md +2 -0
- package/bin/s-component +2 -0
- package/bin/s-set-workspace +2 -0
- package/docs/readme.md +94 -0
- package/docs/zh/awesome.md +296 -0
- package/docs/zh/cicd.md +200 -0
- package/docs/zh/cli_design.md +100 -0
- package/docs/zh/command/clean.md +63 -0
- package/docs/zh/command/cli.md +92 -0
- package/docs/zh/command/component.md +76 -0
- package/docs/zh/command/config.md +278 -0
- package/docs/zh/command/custom.md +73 -0
- package/docs/zh/command/init.md +148 -0
- package/docs/zh/command/readme.md +76 -0
- package/docs/zh/command/set.md +195 -0
- package/docs/zh/default_provider_config/alibabacloud.md +82 -0
- package/docs/zh/default_provider_config/aws.md +12 -0
- package/docs/zh/default_provider_config/azure.md +9 -0
- package/docs/zh/default_provider_config/baiducloud.md +8 -0
- package/docs/zh/default_provider_config/gcp.md +21 -0
- package/docs/zh/default_provider_config/huaweicloud.md +52 -0
- package/docs/zh/default_provider_config/readme.md +9 -0
- package/docs/zh/default_provider_config/tencentcloud.md +41 -0
- package/docs/zh/install.md +52 -0
- package/docs/zh/package_dev.md +142 -0
- package/docs/zh/quick_start.md +297 -0
- package/docs/zh/readme.md +90 -0
- package/docs/zh/tool.md +80 -0
- package/docs/zh/yaml.md +203 -0
- package/docs/zh/yaml_and_cli.md +67 -0
- package/lib/clean/index.js +43 -35
- package/lib/cli/cli-manager.js +33 -22
- package/lib/cli/index.js +60 -62
- package/lib/component/index.d.ts +1 -0
- package/lib/component/index.js +161 -0
- package/lib/config/add/index.js +39 -39
- package/lib/config/delete/index.js +49 -59
- package/lib/config/get/index.d.ts +0 -1
- package/lib/config/get/index.js +46 -51
- package/lib/config/index.js +36 -35
- package/lib/constants/index.d.ts +0 -1
- package/lib/constants/index.js +1 -5
- package/lib/core/command/command-manager.js +36 -43
- package/lib/core/component/index.d.ts +14 -7
- package/lib/core/component/index.js +78 -52
- package/lib/core/plugin/index.js +4 -3
- package/lib/daemon/template.js +2 -4
- package/lib/error/human-error.d.ts +12 -2
- package/lib/error/human-error.js +63 -28
- package/lib/error/human-warning.d.ts +8 -0
- package/lib/error/human-warning.js +19 -0
- package/lib/error/index.d.ts +10 -1
- package/lib/error/index.js +74 -27
- package/lib/index.js +89 -94
- package/lib/init/index.js +76 -79
- package/lib/init/init-config.js +3 -5
- package/lib/init/init-manager.js +3 -4
- package/lib/init/update-template.js +3 -5
- package/lib/onboarding/index.js +5 -5
- package/lib/set/analysis/index.js +41 -37
- package/lib/set/index.js +34 -33
- package/lib/set/locale/index.js +54 -53
- package/lib/set/registry/index.js +52 -52
- package/lib/set/workspace/index.d.ts +1 -0
- package/lib/set/workspace/index.js +61 -0
- package/lib/specification/parse.js +9 -6
- package/lib/update-notifier/index.js +10 -10
- package/lib/utils/command-util.d.ts +0 -2
- package/lib/utils/command-util.js +2 -42
- package/lib/utils/common.d.ts +1 -0
- package/lib/utils/common.js +100 -20
- package/lib/utils/core.js +3 -3
- package/lib/utils/handler-set-config.d.ts +1 -1
- package/lib/utils/handler-set-config.js +6 -7
- package/lib/utils/i18n/en.js +4 -4
- package/lib/utils/i18n/index.js +3 -3
- package/lib/utils/i18n/zh.js +3 -3
- package/lib/utils/storage.js +3 -4
- package/package.json +2 -2
- package/readme.md +64 -38
- package/shell/postbuild.sh +2 -0
- package/spec/readme.md +59 -0
- package/spec/zh/0.0.1/readme.md +47 -0
- package/spec/zh/0.0.1/serverless_pacakge_model/1.purpose_and_goals.md +3 -0
- package/spec/zh/0.0.1/serverless_pacakge_model/2.overview_and_terminology.md +14 -0
- package/spec/zh/0.0.1/serverless_pacakge_model/3.package_model.md +434 -0
- package/spec/zh/0.0.1/serverless_pacakge_model/4.application_scopes.md +3 -0
- package/spec/zh/0.0.1/serverless_pacakge_model/5.design_principles.md +3 -0
- package/spec/zh/0.0.1/serverless_pacakge_model/readme.md +12 -0
- package/spec/zh/0.0.1/serverless_registry_model/1.purpose_and_goals.md +18 -0
- package/spec/zh/0.0.1/serverless_registry_model/2.overview_and_terminology.md +18 -0
- package/spec/zh/0.0.1/serverless_registry_model/3.registry_model.md +61 -0
- package/spec/zh/0.0.1/serverless_registry_model/4.application_scopes.md +6 -0
- package/spec/zh/0.0.1/serverless_registry_model/5.design_principles.md +3 -0
- package/spec/zh/0.0.1/serverless_registry_model/readme.md +12 -0
- package/spec/zh/0.0.1/serverless_user_model/1.purpose_and_goals.md +3 -0
- package/spec/zh/0.0.1/serverless_user_model/2.overview_and_terminology.md +16 -0
- package/spec/zh/0.0.1/serverless_user_model/3.user_model.md +218 -0
- package/spec/zh/0.0.1/serverless_user_model/4.application_scopes.md +4 -0
- package/spec/zh/0.0.1/serverless_user_model/5.design_principles.md +3 -0
- package/spec/zh/0.0.1/serverless_user_model/readme.md +12 -0
- package/bin/s-set-locale +0 -2
- package/readme_zh.md +0 -72
|
@@ -0,0 +1,52 @@
|
|
|
1
|
+
# 工具安装与升级
|
|
2
|
+
|
|
3
|
+
- [工具安装](#工具安装)
|
|
4
|
+
- [通过命令行工具安装](#通过命令行工具安装)
|
|
5
|
+
- [通过脚本安装](#通过脚本安装)
|
|
6
|
+
- [工具升级](#工具升级)
|
|
7
|
+
|
|
8
|
+
|
|
9
|
+
## 工具安装
|
|
10
|
+
### 通过命令行工具安装
|
|
11
|
+
|
|
12
|
+
通过 [npm](https://www.npmjs.com/) 包管理安装:适用于已经预装了 npm 的 Windows、Mac、Linux 平台。在 Windows、Mac、Linux 平台执行以下命令安装 Serverless Devs Tool工具。
|
|
13
|
+
|
|
14
|
+
```shell script
|
|
15
|
+
$ npm install @serverless-devs/s -g
|
|
16
|
+
```
|
|
17
|
+
或者 通过 [yarn](https://yarnpkg.com/) 进行安装
|
|
18
|
+
|
|
19
|
+
```shell script
|
|
20
|
+
$ yarn global add @serverless-devs/s
|
|
21
|
+
```
|
|
22
|
+
|
|
23
|
+
> **说明**:
|
|
24
|
+
> - 如果在 Linux 或 MacOS 下执行该命令报错且报错信息为 `未找到命令`,请执行命令 `ln -s serverless-devs安装位置 /usr/bin`,serverless-devs安装位置可以通过`find / -name s` 查找。
|
|
25
|
+
> - 如果在 Linxu 下执行该命令报错且报错信息为 `Error: EACCES: permission denied`,请执行命令 `sudo npm install @serverless-devs/s -g`。
|
|
26
|
+
> - 如果安装过程较慢,可以考虑使用淘宝 npm 源,安装命令为 `npm --registry=https://registry.npm.taobao.org install @serverless-devs/s -g`。
|
|
27
|
+
|
|
28
|
+
|
|
29
|
+
### 通过脚本安装
|
|
30
|
+
|
|
31
|
+
针对 Mac/Linux 用户
|
|
32
|
+
|
|
33
|
+
```shell script
|
|
34
|
+
$ curl -o- -L http://cli.so/install.sh | bash
|
|
35
|
+
```
|
|
36
|
+
|
|
37
|
+
## 工具升级
|
|
38
|
+
|
|
39
|
+
Serverless Devs 开发者工具会不定期的进行更新升级。开发者在使用 Serverless Devs 开发者工具时,可以根据系统提醒进行进行最新版本的感知。
|
|
40
|
+
|
|
41
|
+
当客户端感知到系统升级之后,开发者可以通过命令`npm i -g @serverless-devs/s`进行更新操作,也可以通过 [Release](https://github.com/Serverless-Devs/Serverless-Devs/releases) 信息查看升级的具体内容,以决定是否进行本次升级。
|
|
42
|
+
|
|
43
|
+
> 例如:我当前的 Serverless Devs 的版本是`2.0.89`,当系统升级之后,我再使用Serverless Devs开发者工具,工具将会给出相对应的提醒:
|
|
44
|
+
> ```shell script
|
|
45
|
+
> ╭───────────────────────────────────────────────╮
|
|
46
|
+
> │ │
|
|
47
|
+
> │ Update available 2.0.89 → 2.0.90 │
|
|
48
|
+
> │ Run npm i -g @serverless-devs/s to update │
|
|
49
|
+
> │ │
|
|
50
|
+
> ╰───────────────────────────────────────────────╯
|
|
51
|
+
> ```
|
|
52
|
+
> 此时,只需要按照提醒进行工具更新升级即可。
|
|
@@ -0,0 +1,142 @@
|
|
|
1
|
+
# Package开发文档
|
|
2
|
+
|
|
3
|
+
|
|
4
|
+
- [组件开发说明](#组件开发说明)
|
|
5
|
+
- [应用开发说明](#应用开发说明)
|
|
6
|
+
|
|
7
|
+
> 注意:
|
|
8
|
+
> - Serverless Devs的组件开发和应用开发模版都已经被默认的集成到了Serverless Devs的开发者工具中,Package开发者可以直接使用;
|
|
9
|
+
> - Package的开发,需要遵循[Serverless Package Model](../../spec/zh/0.0.1/serverless_registry_model/readme.md)以及相关规范,只有这样Serverless Registry和Serverless Devs开发者工具才能正确识别和使用;
|
|
10
|
+
> - 关于应用和组件开发的最佳实践可以参考[社区讨论 #62](https://github.com/Serverless-Devs/Serverless-Devs/discussions/62);
|
|
11
|
+
|
|
12
|
+
|
|
13
|
+
## 组件开发说明
|
|
14
|
+
|
|
15
|
+
> Serverless Devs 组件开发需要严格遵守 [Serverless Package Model](../../spec/zh/0.0.1/serverless_registry_model/readme.md) 中的 [组件模型规范](../../spec/zh/0.0.1/serverless_registry_model/3.registry_model.md#组件模型规范)。在[组件模型规范](../../spec/zh/0.0.1/serverless_registry_model/3.registry_model.md#组件模型规范)中有关于[组件模型元数据](../../spec/zh/0.0.1/serverless_registry_model/3.registry_model.md#组件模型元数据)和[组件模型代码规范](../../spec/zh/0.0.1/serverless_registry_model/3.registry_model.md#组件模型代码规范)的说明。
|
|
16
|
+
|
|
17
|
+
> 🐵 温馨提示,在进行 Serverless Devs 的组件开发时,可能会遇到很多相对来说更为通用的能力,包括不限于:
|
|
18
|
+
> - 获取用户的密钥信息
|
|
19
|
+
> - 进行更规范的格式化输出
|
|
20
|
+
> - 对用户的输入参数进行解析
|
|
21
|
+
> ......
|
|
22
|
+
> 这些内容都可以通过 Serverless Devs 所提供的 [Core包](https://github.com/Serverless-Devs/core) 进行提供,更多 [Core包](https://github.com/Serverless-Devs/core) 信息,可以参考 [Core包的开发文档](https://github.com/Serverless-Devs/core)
|
|
23
|
+
|
|
24
|
+
Serverless Devs的组件开发案例已经被集成到Serverless Devs命令行工具中,通过对Serverless Devs的命令行工具,可以进行空白组件项目的初始化,开发者只需要执行`s init`即可看到:
|
|
25
|
+
|
|
26
|
+
```shell script
|
|
27
|
+
|
|
28
|
+
🚀 Serverless Awesome: https://github.com/Serverless-Devs/package-awesome
|
|
29
|
+
|
|
30
|
+
? Hello Serverless for Cloud Vendors (Use arrow keys or type to search)
|
|
31
|
+
❯ Alibaba Cloud Serverless
|
|
32
|
+
AWS Cloud Serverless
|
|
33
|
+
Tencent Cloud Serverless
|
|
34
|
+
Baidu Cloud Serverless
|
|
35
|
+
Dev Template for Serverless Devs
|
|
36
|
+
```
|
|
37
|
+
|
|
38
|
+
此时,选择最后的`Dev Template for Serverless Devs`,并按回车:
|
|
39
|
+
|
|
40
|
+
```shell script
|
|
41
|
+
$ s init
|
|
42
|
+
|
|
43
|
+
🚀 Serverless Awesome: https://github.com/Serverless-Devs/package-awesome
|
|
44
|
+
|
|
45
|
+
? Hello Serverless for Cloud Vendors Dev Template for Serverless Devs
|
|
46
|
+
? Please select an Serverless-Devs Application (Use arrow keys or type to search)
|
|
47
|
+
❯ Application Scaffolding
|
|
48
|
+
Component Scaffolding
|
|
49
|
+
```
|
|
50
|
+
|
|
51
|
+
此时,选择`Component Scaffolding`,并按回车,即可完成一个完整的Serverless Devs的Component项目的初始化,可以通过命令查看文件树:
|
|
52
|
+
|
|
53
|
+
```shell script
|
|
54
|
+
$ find . -print | sed -e 's;[^/]*/;|____;g;s;____|; |;g'
|
|
55
|
+
.
|
|
56
|
+
|____LICENSE
|
|
57
|
+
|____.signore
|
|
58
|
+
|____example
|
|
59
|
+
| |____s.yaml
|
|
60
|
+
|____readme.md
|
|
61
|
+
|____publish.yaml
|
|
62
|
+
|____.gitignore
|
|
63
|
+
|____package.json
|
|
64
|
+
|____tsconfig.json
|
|
65
|
+
|____src
|
|
66
|
+
| |____common
|
|
67
|
+
| | |____entity.ts
|
|
68
|
+
| | |____logger.ts
|
|
69
|
+
| |____index.ts
|
|
70
|
+
```
|
|
71
|
+
|
|
72
|
+
这其中:
|
|
73
|
+
|
|
74
|
+
| 目录 | 含义 |
|
|
75
|
+
| --- | --- |
|
|
76
|
+
| LICENSE | 项目默认的LICENSE,默认的LICENSE是遵循MIT开源协议的(推荐) |
|
|
77
|
+
| .signore | 项目发布时,可以选择的忽略文件,类似于npm发布是的`.npmignore`文件 |
|
|
78
|
+
| example | 该组件对应的测试应用 |
|
|
79
|
+
| publish.yaml | 项目所必须的文件,Serverless Devs Package的开发识别文档 |
|
|
80
|
+
| .gitignore| 推送到Github的忽略文件 |
|
|
81
|
+
| package.json| Node.js的package.json,需要描述清楚组件的入口文件位置 |
|
|
82
|
+
| tsconfig.json| Typescript的tsconfig.json,用来对TS项目进行描述等 |
|
|
83
|
+
| src| 用户的代码目录 |
|
|
84
|
+
| readme.md| 版本的描述,例如当前版本的更新内容等 |
|
|
85
|
+
|
|
86
|
+
此时,开发者可以在src下完成业务代码的开发,由于默认的初始化项目是Typescript,所以开发完成业务代码还需要编译成Javascript(可以通过`npm run build`进行编译),在完成项目编译之后,还需要对项目进行`publish.yaml`文件的编写。完成之后,即可将项目发不到不同的源,以Github Registry为例,可以在Github创建一个`Public`的仓库,并将编译后的代码放到仓库,并发布一个版本。此时,就可以通过客户端获取到该应用。
|
|
87
|
+
|
|
88
|
+
## 应用开发说明
|
|
89
|
+
|
|
90
|
+
> Serverless Devs 应用开发需要严格遵守 [Serverless Package Model](../../spec/zh/0.0.1/serverless_registry_model/readme.md) 中的 [应用模型规范](../../spec/zh/0.0.1/serverless_registry_model/3.registry_model.md#应用模型规范)。在[应用模型规范](../../spec/zh/0.0.1/serverless_registry_model/3.registry_model.md#应用模型规范)中有关于[应用模型元数据](../../spec/zh/0.0.1/serverless_registry_model/3.registry_model.md#应用模型元数据)的说明。
|
|
91
|
+
|
|
92
|
+
Serverless Devs的组件开发案例已经被集成到Serverless Devs命令行工具中,通过对Serverless Devs的命令行工具,可以进行空白组件项目的初始化,开发者只需要执行`s init`即可看到:
|
|
93
|
+
|
|
94
|
+
```shell script
|
|
95
|
+
|
|
96
|
+
🚀 Serverless Awesome: https://github.com/Serverless-Devs/package-awesome
|
|
97
|
+
|
|
98
|
+
? Hello Serverless for Cloud Vendors (Use arrow keys or type to search)
|
|
99
|
+
❯ Alibaba Cloud Serverless
|
|
100
|
+
AWS Cloud Serverless
|
|
101
|
+
Tencent Cloud Serverless
|
|
102
|
+
Baidu Cloud Serverless
|
|
103
|
+
Dev Template for Serverless Devs
|
|
104
|
+
```
|
|
105
|
+
|
|
106
|
+
此时,选择最后的`Dev Template for Serverless Devs`,并按回车:
|
|
107
|
+
|
|
108
|
+
```shell script
|
|
109
|
+
$ s init
|
|
110
|
+
|
|
111
|
+
🚀 Serverless Awesome: https://github.com/Serverless-Devs/package-awesome
|
|
112
|
+
|
|
113
|
+
? Hello Serverless for Cloud Vendors Dev Template for Serverless Devs
|
|
114
|
+
? Please select an Serverless-Devs Application (Use arrow keys or type to search)
|
|
115
|
+
❯ Application Scaffolding
|
|
116
|
+
Component Scaffolding
|
|
117
|
+
```
|
|
118
|
+
|
|
119
|
+
此时,选择`Component Scaffolding`,并按回车,即可完成一个完整的Serverless Devs的Component项目的初始化,可以通过命令查看文件树:
|
|
120
|
+
|
|
121
|
+
```shell script
|
|
122
|
+
$ find . -print | sed -e 's;[^/]*/;|____;g;s;____|; |;g'
|
|
123
|
+
.
|
|
124
|
+
|____readme.md
|
|
125
|
+
|____version.md
|
|
126
|
+
|____publish.yaml
|
|
127
|
+
|____src
|
|
128
|
+
| |____s.yaml
|
|
129
|
+
| |____index.js
|
|
130
|
+
```
|
|
131
|
+
|
|
132
|
+
这其中:
|
|
133
|
+
|
|
134
|
+
| 目录 | 含义 |
|
|
135
|
+
| --- | --- |
|
|
136
|
+
| readme.md | 对该组件的描述,或帮助文档信息 |
|
|
137
|
+
| version.md | 版本的描述,例如当前版本的更新内容等 |
|
|
138
|
+
| publish.yaml | 项目所必须的文件,Serverless Devs Package的开发识别文档 |
|
|
139
|
+
| src | 应用所在目录,需要包括`s.yaml`和相关的应用代码等 |
|
|
140
|
+
|
|
141
|
+
|
|
142
|
+
此时,开发者可以在src下完成应用的开发,并对项目进行`publish.yaml`文件的编写。完成之后,即可将项目发不到不同的源,以Github Registry为例,可以在Github创建一个`Public`的仓库,并将编译后的代码放到仓库,并发布一个版本。此时,就可以通过客户端获取到该应用。
|
|
@@ -0,0 +1,297 @@
|
|
|
1
|
+
# 快速上手
|
|
2
|
+
|
|
3
|
+
本快速上手案例以 [阿里云函数计算](https://www.aliyun.com/product/fc) 为例(当然,Serverless Devs 还支持 [AWS Lambda](../../components/lambda/readme.md),[百度智能云函数计算](../../components/cfc/readme.md),[华为云函数工作流](../../components/fg/readme.md),[腾讯云云函数](../../components/scf/readme.md)等多个云厂商的 FaaS 平台,具体可以参考[默认FaaS产品支持](../../components/readme_zh.md)),快速上手 Serverless Devs
|
|
4
|
+
|
|
5
|
+
- [工具安装](#工具安装)
|
|
6
|
+
- [密钥配置](#密钥配置)
|
|
7
|
+
- [上手体验](#上手体验)
|
|
8
|
+
- [Serverless:Hello World](#serverlesshello-world)
|
|
9
|
+
- [人工智能:目标检测](#人工智能目标检测)
|
|
10
|
+
- [传统框架:基于Django的博客项目](#传统框架基于django的博客项目)
|
|
11
|
+
|
|
12
|
+
## 工具安装
|
|
13
|
+
- 第一步:安装 Node.js(>=10.8.0) 与 NPM 包管理工具;
|
|
14
|
+
- 第二步:安装 Serverless Devs 开发者工具;
|
|
15
|
+
```shell script
|
|
16
|
+
$ npm install @serverless-devs/s -g
|
|
17
|
+
```
|
|
18
|
+
- 第三步:可以通过`s -v`判断工具是否安装成功,如果安装成功可以看到相对应的版本信息,例如:
|
|
19
|
+
```shell script
|
|
20
|
+
@serverless-devs/s: 2.0.89, @serverless-devs/core: 0.1.7, darwin-x64, node-v12.15.0
|
|
21
|
+
```
|
|
22
|
+
|
|
23
|
+
## 密钥配置
|
|
24
|
+
|
|
25
|
+
> 由于本快速上手文档,将会以 [阿里云函数计算](https://www.aliyun.com/product/fc) 为例,所以此处的密钥配置也是以阿里云密钥配置为例:
|
|
26
|
+
> - AccountId获取页面:https://account.console.aliyun.com/#/secure
|
|
27
|
+
> - 获取密钥页面:https://usercenter.console.aliyun.com/#/manage/ak
|
|
28
|
+
|
|
29
|
+
- 打开 [AccountId获取页面](https://account.console.aliyun.com/#/secure) 获取AccountId :
|
|
30
|
+

|
|
31
|
+
|
|
32
|
+
- 打开 [获取密钥页面](https://usercenter.console.aliyun.com/#/manage/ak) 获取密钥信息 :
|
|
33
|
+
|
|
34
|
+
|
|
35
|
+
- 执行`s config add`,并选择`Alibaba Cloud (alibaba)`:
|
|
36
|
+
```shell script
|
|
37
|
+
$ s config add
|
|
38
|
+
? Please select a template: Alibaba Cloud (alibaba)
|
|
39
|
+
🧭 Refer to the document for alibaba key: http://config.devsapp.net/account/alibaba
|
|
40
|
+
? AccountID ()
|
|
41
|
+
```
|
|
42
|
+
- 此时,可以按照引导,进行密钥的配置:
|
|
43
|
+
```shell script
|
|
44
|
+
? Please select a template: Alibaba Cloud (alibaba)
|
|
45
|
+
🧭 Refer to the document for alibaba key: http://config.devsapp.net/account/alibaba
|
|
46
|
+
? AccountID 此处填写AccountID
|
|
47
|
+
? AccessKeyID 此处填写AccessKeyID
|
|
48
|
+
? AccessKeySecret 此处填写AccessKeySecret
|
|
49
|
+
? Please create alias for key pair. If not, please enter to skip alibaba-access
|
|
50
|
+
|
|
51
|
+
Alias: alibaba-access
|
|
52
|
+
AccountID: 此处填写AccountID
|
|
53
|
+
AccessKeyID: 此处填写AccessKeyID
|
|
54
|
+
AccessKeySecret: 此处填写AccessKeySecret
|
|
55
|
+
|
|
56
|
+
Configuration successful
|
|
57
|
+
```
|
|
58
|
+
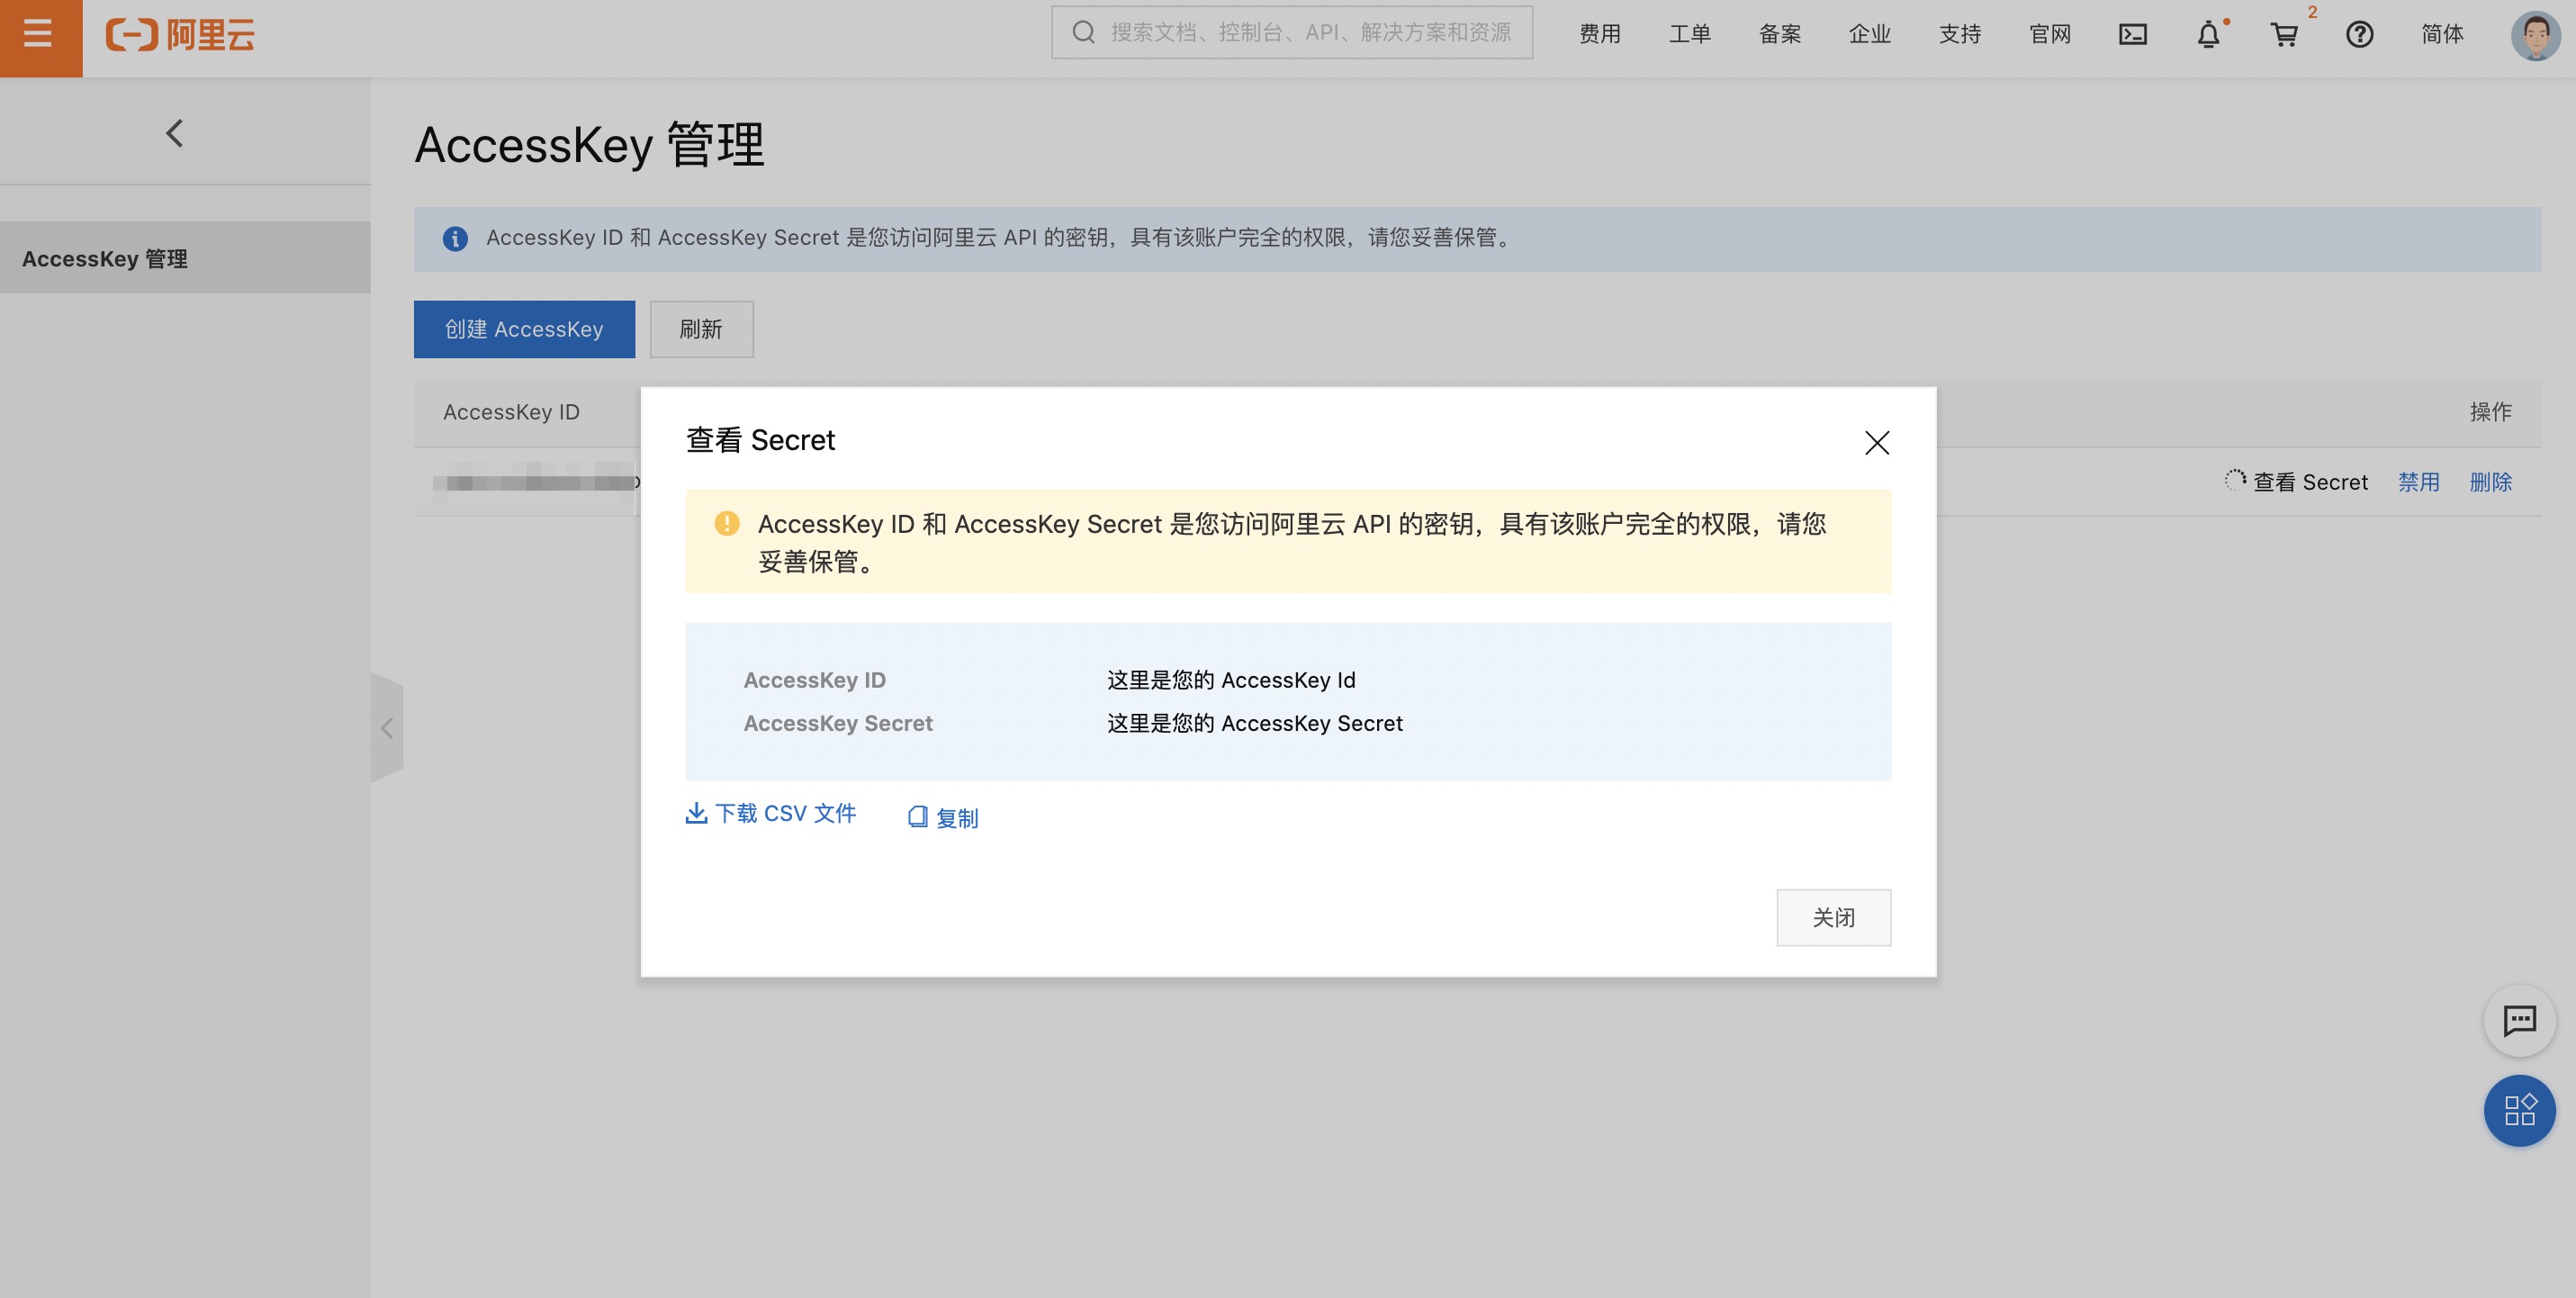
- 为了验证密钥是否正确配置,可以通过`s config get -a alibaba-access`进行指定密钥的查看:
|
|
59
|
+
```shell script
|
|
60
|
+
$ s config get -a alibaba-access
|
|
61
|
+
[2021-10-27T17:39:39.881] [INFO ] [S-CLI] -
|
|
62
|
+
|
|
63
|
+
alibaba-access:
|
|
64
|
+
AccountID: 此处填*******tID
|
|
65
|
+
AccessKeyID: 此处填*********yID
|
|
66
|
+
AccessKeySecret: 此处填*************ret
|
|
67
|
+
```
|
|
68
|
+
|
|
69
|
+
|
|
70
|
+
> 云账号 AccessKey 是您访问阿里云 API 的密钥,具有该账户完全的权限,请您务必妥善保管!不要通过任何方式(e.g. Github)将 AccessKey 公开到外部渠道,以避免被他人利用而造成 [安全威胁](https://help.aliyun.com/knowledge_detail/54059.html?spm=5176.2020520153.0.0.57f1336a8PQ1KR) 。
|
|
71
|
+
> 强烈建议您遵循 [阿里云安全最佳实践](https://help.aliyun.com/document_detail/102600.html?spm=5176.2020520153.0.0.57f1336a8PQ1KR) ,使用 RAM 子用户 AccessKey 来进行 API 调用。
|
|
72
|
+
|
|
73
|
+
|
|
74
|
+
## 上手体验
|
|
75
|
+
|
|
76
|
+
### Serverless:Hello World
|
|
77
|
+
|
|
78
|
+
- 执行`s`命令:
|
|
79
|
+
```shell script
|
|
80
|
+
$ s
|
|
81
|
+
? Serverless Devs project is not detected. Do you want to create a new project? (Y/n)
|
|
82
|
+
```
|
|
83
|
+
- 填写`y`,并按回车,可以进入到创建引导部分:
|
|
84
|
+
```shell script
|
|
85
|
+
🚀 Serverless Awesome: https://github.com/Serverless-Devs/package-awesome
|
|
86
|
+
|
|
87
|
+
? Hello Serverless for Cloud Vendors (Use arrow keys or type to search)
|
|
88
|
+
❯ Alibaba Cloud Serverless
|
|
89
|
+
AWS Cloud Serverless
|
|
90
|
+
Baidu Cloud Serverless
|
|
91
|
+
Huawei Cloud Serverless
|
|
92
|
+
Tencent Cloud Serverless
|
|
93
|
+
Dev Template for Serverless Devs
|
|
94
|
+
```
|
|
95
|
+
|
|
96
|
+
- 此时只需要选择对应的选项,按照引导进行操作,即可。例如选择`Alibaba Cloud Serverless`,就可以看到阿里云Serverless产品下的应用模板分类:
|
|
97
|
+
|
|
98
|
+
```shell script
|
|
99
|
+
? Please select an Serverless-Devs Application (Use arrow keys or type to search)
|
|
100
|
+
❯ fc-runtime-starter - 快速部署一个 FC 函数
|
|
101
|
+
fc-custom-container-stater - 快速部署一个 custom-container 应用
|
|
102
|
+
web-framework-stater - 快速部署一个 Web 框架
|
|
103
|
+
static-website-stater - 快速部署一个静态网站
|
|
104
|
+
serverless-best-practice - 快速体验 Serverless 最佳实践
|
|
105
|
+
```
|
|
106
|
+
|
|
107
|
+
- 此时可以继续选择某分类下的具体应用进行初始化,例如选择`fc-runtime-starter`之后,可以看到该分类下的具体模板应用:
|
|
108
|
+
|
|
109
|
+
```shell script
|
|
110
|
+
? Please select an templete (Use arrow keys or type to search)
|
|
111
|
+
❯ fc-http-nodejs - 快速部署一个 nodejs12 http函数
|
|
112
|
+
fc-http-python - 快速部署一个 python3 http函数
|
|
113
|
+
fc-http-php - 快速部署一个 php http函数
|
|
114
|
+
fc-http-java - 快速部署一个 java8 http函数
|
|
115
|
+
fc-event-nodejs - 快速部署一个 nodejs12 event函数
|
|
116
|
+
fc-event-python - 快速部署一个 python3 event函数
|
|
117
|
+
fc-event-php - 快速部署一个 php event函数
|
|
118
|
+
```
|
|
119
|
+
|
|
120
|
+
选择`fc-http-nodejs`即可完成创建,在引导的过程中,可能会出现填写项目名称以及选择密钥的过程:
|
|
121
|
+
- 项目名称可以是:`start-fc-http-nodejs12`
|
|
122
|
+
- 密钥可以选择我们上文中创建过的:`alibaba-access`
|
|
123
|
+
|
|
124
|
+
例如:
|
|
125
|
+
```shell script
|
|
126
|
+
🚀 Serverless Awesome: https://github.com/Serverless-Devs/package-awesome
|
|
127
|
+
|
|
128
|
+
? Hello Serverless for Cloud Vendors Alibaba Cloud Serverless
|
|
129
|
+
? Please select an Serverless-Devs Application fc-runtime-starter - 快速部署一个 FC 函数
|
|
130
|
+
? Please select an templete fc-http-nodejs - 快速部署一个 nodejs12 http函数
|
|
131
|
+
|
|
132
|
+
😋 Create application command: [s init devsapp/start-fc-http-nodejs12]
|
|
133
|
+
|
|
134
|
+
? Please input your project name (init dir) start-fc-http-nodejs12
|
|
135
|
+
✔ file decompression completed
|
|
136
|
+
? please select credential alias alibaba-access
|
|
137
|
+
|
|
138
|
+
... ...
|
|
139
|
+
|
|
140
|
+
🏄 Thanks for using Serverless-Devs
|
|
141
|
+
👉 You could [cd /Users/jiangyu/start-application/start-fc-http-nodejs12] and enjoy your serverless journey!
|
|
142
|
+
🧭️ If you need help for this example, you can use [s -h] after you enter folder.
|
|
143
|
+
💞 Document ❤ Star:https://github.com/Serverless-Devs/Serverless-Devs
|
|
144
|
+
|
|
145
|
+
? 是否立即部署该项目? (Y/n)
|
|
146
|
+
```
|
|
147
|
+
- 可以看到,系统在最后有一个提醒,是否要部署该项目,此时可以输入`y`,直接进行项目的部署,稍等片刻,可以看到部署结果:
|
|
148
|
+
```shell script
|
|
149
|
+
fc-deploy-test:
|
|
150
|
+
region: cn-hangzhou
|
|
151
|
+
service:
|
|
152
|
+
name: fc-deploy-service
|
|
153
|
+
function:
|
|
154
|
+
name: http-trigger-nodejs12
|
|
155
|
+
runtime: nodejs12
|
|
156
|
+
handler: index.handler
|
|
157
|
+
memorySize: 128
|
|
158
|
+
timeout: 60
|
|
159
|
+
url:
|
|
160
|
+
system_url: https://1583208943291465.cn-hangzhou.fc.aliyuncs.com/2016-08-15/proxy/fc-deploy-service/http-trigger-nodejs12/
|
|
161
|
+
custom_domain:
|
|
162
|
+
-
|
|
163
|
+
domain: http://http-trigger-nodejs12.fc-deploy-service.1583208943291465.cn-hangzhou.fc.devsapp.net
|
|
164
|
+
triggers:
|
|
165
|
+
-
|
|
166
|
+
type: http
|
|
167
|
+
name: httpTrigger
|
|
168
|
+
```
|
|
169
|
+
此时可以打开`domain`返回给我们的域名,进行测试。
|
|
170
|
+
|
|
171
|
+
### 人工智能:目标检测
|
|
172
|
+
|
|
173
|
+
- 初始化一个已有的人工智能目标检测项目:`s init devsapp/image-prediction-app`,初始化过程中可能会出现填写项目名称以及选择密钥的过程:
|
|
174
|
+
- 项目名称可以是:`image-prediction-app`
|
|
175
|
+
- 密钥可以选择我们上文中创建过的:`alibaba-access`
|
|
176
|
+
|
|
177
|
+
例如:
|
|
178
|
+
```shell script
|
|
179
|
+
$ s init devsapp/image-prediction-app
|
|
180
|
+
|
|
181
|
+
🚀 Serverless Awesome: https://github.com/Serverless-Devs/package-awesome
|
|
182
|
+
|
|
183
|
+
? Please input your project name (init dir) image-prediction-app
|
|
184
|
+
✔ file decompression completed
|
|
185
|
+
? please select credential alias alibaba-access
|
|
186
|
+
|
|
187
|
+
___ __ __ _______ _______ _______
|
|
188
|
+
| | | |_| || _ || || |
|
|
189
|
+
| | | || |_| || ___|| ___|
|
|
190
|
+
| | | || || | __ | |___
|
|
191
|
+
| | | || || || || ___|
|
|
192
|
+
| | | ||_|| || _ || |_| || |___
|
|
193
|
+
|___| |_| |_||__| |__||_______||_______|
|
|
194
|
+
|
|
195
|
+
|
|
196
|
+
Welcome to the image-prediction-app application
|
|
197
|
+
This application requires to open these services:
|
|
198
|
+
FC : https://fc.console.aliyun.com/
|
|
199
|
+
This application can help you quickly deploy the image-prediction-app project.
|
|
200
|
+
The application uses FC component:https://github.com/devsapp/fc
|
|
201
|
+
The application homepage: https://github.com/devsapp/image-prediction-app
|
|
202
|
+
|
|
203
|
+
|
|
204
|
+
🏄 Thanks for using Serverless-Devs
|
|
205
|
+
👉 You could [cd /Users/jiangyu/start-application/image-prediction-app] and enjoy your serverless journey!
|
|
206
|
+
🧭️ If you need help for this example, you can use [s -h] after you enter folder.
|
|
207
|
+
💞 Document ❤ Star:https://github.com/Serverless-Devs/Serverless-Devs
|
|
208
|
+
```
|
|
209
|
+
- 进入项目目录:`cd image-prediction-app`
|
|
210
|
+
- 通过`deploy`命令进行项目的部署:
|
|
211
|
+
```shell script
|
|
212
|
+
Tips for next step
|
|
213
|
+
======================
|
|
214
|
+
* Display information of the deployed resource: s info
|
|
215
|
+
* Display metrics: s metrics
|
|
216
|
+
* Display logs: s logs
|
|
217
|
+
* Invoke remote function: s invoke
|
|
218
|
+
* Remove Service: s remove service
|
|
219
|
+
* Remove Function: s remove function
|
|
220
|
+
* Remove Trigger: s remove trigger
|
|
221
|
+
* Remove CustomDomain: s remove domain
|
|
222
|
+
|
|
223
|
+
|
|
224
|
+
|
|
225
|
+
imageAi:
|
|
226
|
+
region: cn-hangzhou
|
|
227
|
+
url:
|
|
228
|
+
custom_domain:
|
|
229
|
+
-
|
|
230
|
+
domain: http://server.ai-cv-image-prediction.1583208943291465.cn-hangzhou.fc.devsapp.net
|
|
231
|
+
```
|
|
232
|
+
- 此时可以打开系统分配的测试域名,并上传一张图片进行测试:
|
|
233
|
+

|
|
234
|
+
|
|
235
|
+
### 传统框架:基于Django的博客项目
|
|
236
|
+
|
|
237
|
+
- 初始化一个已有的基于Django的博客项目:`s init django-blog`,初始化过程中可能会出现填写项目名称以及选择密钥的过程:
|
|
238
|
+
- 项目名称可以是:`django-blog`
|
|
239
|
+
- 密钥可以选择我们上文中创建过的:`alibaba-access`
|
|
240
|
+
|
|
241
|
+
例如:
|
|
242
|
+
```shell script
|
|
243
|
+
$ s init django-blog
|
|
244
|
+
|
|
245
|
+
🚀 Serverless Awesome: https://github.com/Serverless-Devs/package-awesome
|
|
246
|
+
|
|
247
|
+
? Please input your project name (init dir) django-blog
|
|
248
|
+
✔ file decompression completed
|
|
249
|
+
? please select credential alias alibaba-access
|
|
250
|
+
|
|
251
|
+
______ ___ _______ __ _ _______ _______ _______ ___ _______ _______
|
|
252
|
+
| | | || _ || | | || || || _ || | | || |
|
|
253
|
+
| _ | | || |_| || |_| || ___|| _ || |_| || | | _ || ___|
|
|
254
|
+
| | | | | || || || | __ | | | || || | | | | || | __
|
|
255
|
+
| |_| | ___| || || _ || || || |_| || _ | | |___ | |_| || || |
|
|
256
|
+
| || || _ || | | || |_| || || |_| || || || |_| |
|
|
257
|
+
|______| |_______||__| |__||_| |__||_______||_______||_______||_______||_______||_______|
|
|
258
|
+
|
|
259
|
+
|
|
260
|
+
Welcome to the django-blog application
|
|
261
|
+
This application requires to open these services:
|
|
262
|
+
FC : https://fc.console.aliyun.com/
|
|
263
|
+
This application can help you quickly deploy the django-blog project.
|
|
264
|
+
The application uses Django component:https://github.com/devsapp/django
|
|
265
|
+
The application homepage: https://github.com/devsapp/django-blog
|
|
266
|
+
|
|
267
|
+
* Python 3.7 is recommended;
|
|
268
|
+
* If the version is greater than Python 3.7:
|
|
269
|
+
* Operation error: ImportError: cannot import name 'metadata' from 'importlib', you can refer to: https://stackoverflow.com/questions/59216175/importerror-cannot-import-name-metadata-from-importlib
|
|
270
|
+
* Default information:
|
|
271
|
+
* Admin:/admin
|
|
272
|
+
* Default Admin Username: blog
|
|
273
|
+
* Default Admin Password: myblog12345!
|
|
274
|
+
|
|
275
|
+
|
|
276
|
+
|
|
277
|
+
🏄 Thanks for using Serverless-Devs
|
|
278
|
+
👉 You could [cd /Users/jiangyu/django-blog] and enjoy your serverless journey!
|
|
279
|
+
🧭️ If you need help for this example, you can use [s -h] after you enter folder.
|
|
280
|
+
💞 Document ❤ Star:https://github.com/Serverless-Devs/Serverless-Devs
|
|
281
|
+
```
|
|
282
|
+
- 进入项目目录:`cd django-blog`
|
|
283
|
+
- 通过`deploy`命令进行项目的部署:
|
|
284
|
+
```shell script
|
|
285
|
+
Tips for next step
|
|
286
|
+
======================
|
|
287
|
+
* Invoke remote function: s invoke
|
|
288
|
+
✔ Try container acceleration
|
|
289
|
+
djangoBlog:
|
|
290
|
+
region: cn-shenzhen
|
|
291
|
+
serviceName: serverless-devs-django
|
|
292
|
+
functionName: django
|
|
293
|
+
customDomains:
|
|
294
|
+
- http://django.serverless-devs-django.1583208943291465.cn-shenzhen.fc.devsapp.net
|
|
295
|
+
```
|
|
296
|
+
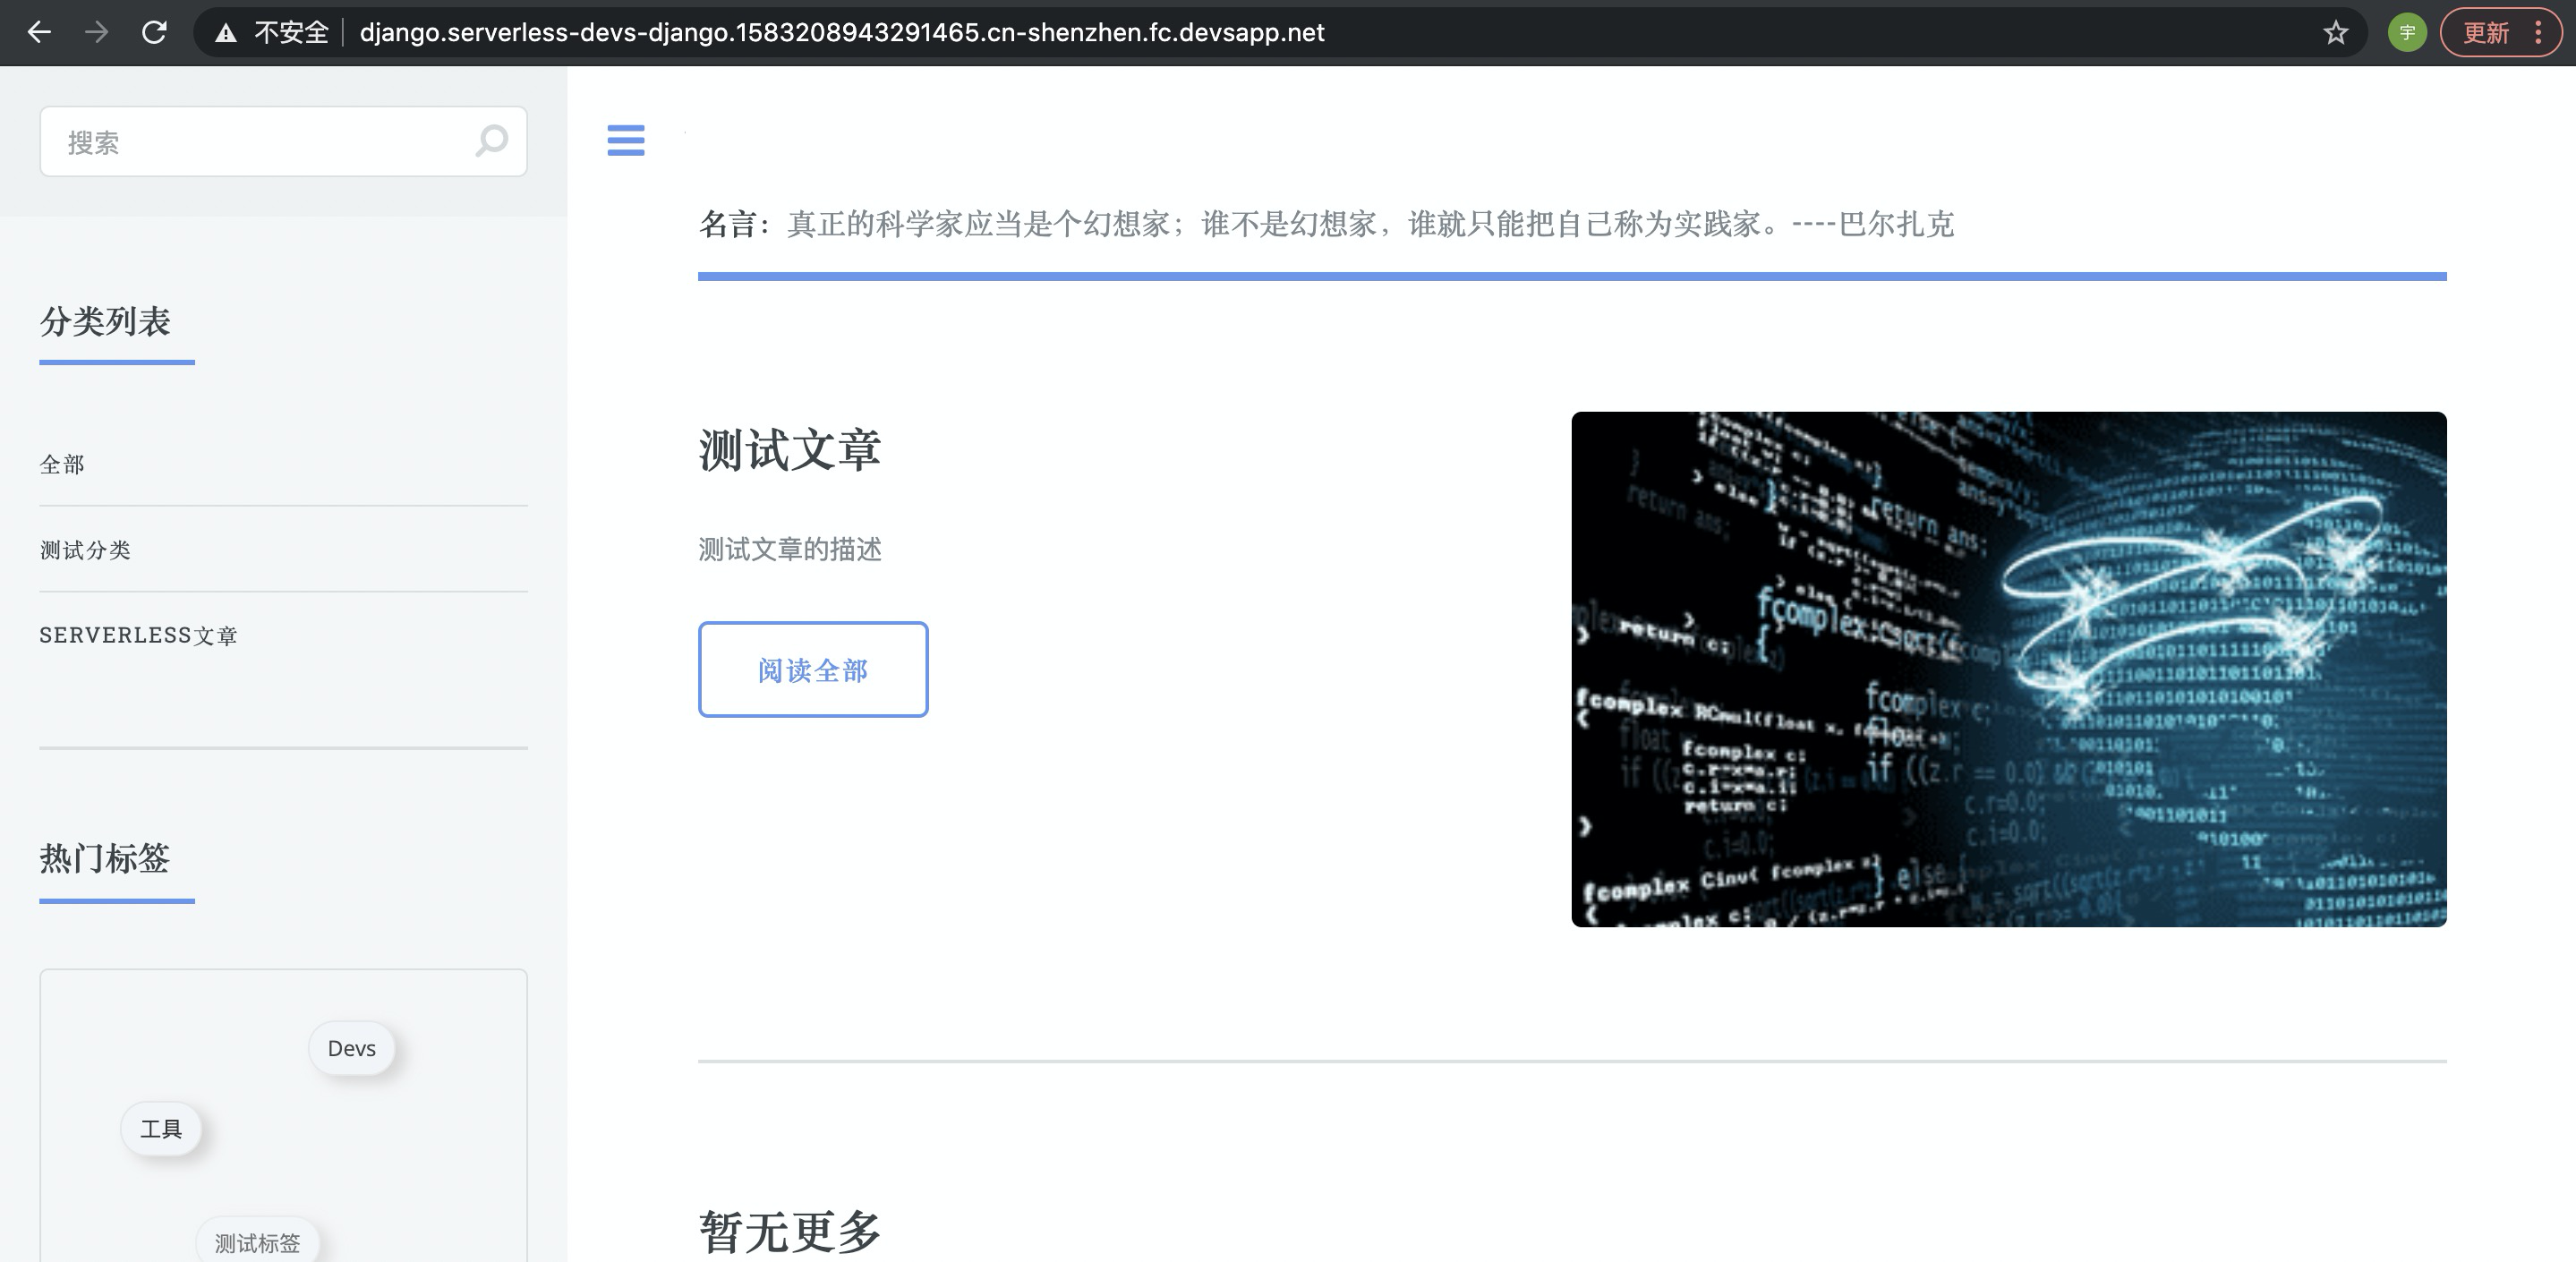
- 此时可以打开系统分配的测试域名,并上传一张图片进行测试:
|
|
297
|
+
|
|
@@ -0,0 +1,90 @@
|
|
|
1
|
+
# Serverless Devs 项目介绍
|
|
2
|
+
|
|
3
|
+

|
|
4
|
+
|
|
5
|
+
|
|
6
|
+
<p align="center">
|
|
7
|
+
<a href="./install.md">安装文档</a> | <a href="./command/readme.md">命令行操作</a> | <a href="./yaml.md">Yaml规范</a> | <a href="./cicd.md">CI/CD平台集成</a> | <a href="./package_dev.md">Package开发文档</a>
|
|
8
|
+
</p>
|
|
9
|
+
|
|
10
|
+
|
|
11
|
+
|
|
12
|
+
**Serverless Devs** 是一个开源开放的 Serverless 开发者平台,致力于为开发者提供强大的工具链体系。通过该平台,开发者不仅可以一键体验多云 Serverless 产品,极速部署 Serverless 项目,还可以在 Serverless 应用全生命周期进行项目的管理,并且非常简单快速的将 Serverless Devs 与其他工具/平台进行结合,进一步提升研发、运维效能。
|
|
13
|
+
|
|
14
|
+
|
|
15
|
+
- [6大优势](#6大优势)
|
|
16
|
+
- [设计哲学](#设计哲学)
|
|
17
|
+
- [成长历史](#成长历史)
|
|
18
|
+
- [未来展望](#未来展望)
|
|
19
|
+
- [交流社群](#交流社群)
|
|
20
|
+
|
|
21
|
+
## 6大优势
|
|
22
|
+
|
|
23
|
+

|
|
24
|
+
|
|
25
|
+
- **无厂商锁定**:得益于功能的可插拔特性,可以非常简单的支持不同云厂商的项目部署,或者一键部署到不同云平台。目前 Serverless Devs 已经支持了[阿里云函数计算](https://github.com/devsapp/fc) 、[AWS Lambda](https://github.com/devscomp/lambda) 、[百度智能云函数计算](https://github.com/xinwuyun/cfc) 、[华为云函数工作流](https://github.com/xinwuyun/fg) 、[腾讯云云函数](https://github.com/devscomp/scf) 等多云的 FaaS 产品;
|
|
26
|
+
- **开源形式建设**:项目通过开源代码,开放生态进行建设的,开发者可以随时查看和参与 Serverless Devs 开发者工具的贡献,也可以随时随地进行相关组件和应用的贡献。当然,除了这种开源开放的形态,我们也鼓励一些企业级团队,通过 [Serverless Registry Model](./../../spec/zh/0.0.1/serverless_registry_model/readme.md) 建设自己的私有 Registry 以定制化某些不便公开的自定义组件;
|
|
27
|
+
- **功能灵活可插拔**:Serverless Devs 开发者工具本身,不具备任何业务能力,所有的业务能力均是通过组件化的形式,进行可插拔式使用,并且每个组件可以根据需要,自定义相对应的命令和功能;开发者可以在一个应用中,选择不同的组件完成对应的业务能力,以满足对不同模块的诉求;
|
|
28
|
+
- **简单快速上手**:通过开放 Serverless Registry 的模型/规范,该项目可以通过应用的模式,为开发者提供多种形式,多种领域以及[多种场景的上手案例](./awesome.md),帮助开发者快速了解、学习、深入、上手 Serverless 架构,例如[新手引导](./quick_start.md)中的[**Serverless:Hello World**](./quick_start.md#serverlesshello-world)、[**人工智能:目标检测**](./quick_start.md#人工智能目标检测)、[**传统框架:基于Django的博客项目**](./quick_start.md#传统框架基于django的博客项目)等项目;
|
|
29
|
+
- **应用全生命周期管理**:通过组件化的支持,Serverless Devs 可以在应用的全生命周期发挥重要的作用,以 [阿里云函数计算的FC组件](https://github.com/devsapp/fc) 为例,开发者可以在项目创建、项目的开发、调试、可观测性等多个层面进行项目的建设和管理;
|
|
30
|
+
- **良好的集成与被集成性**:项目具有非常好的集成性与被集成性,可以通过组件化的支持,非常简单的与传统的生态进行有机结合。同时,Serverless Devs 开发者工具也可以非常简单的被集成到海量的自动化流程中,例如 [CI/CD文档](./cicd.md) 中,就举例了[**与 Github Action 的集成**](./cicd.md#与-github-action-的集成)、[**与 Gitee Go 的集成**](./cicd.md#与-gitee-go-的集成)[**与 Jenkins 的集成**](./cicd.md#与-jenkins-的集成) 等平台集成的案例;
|
|
31
|
+
|
|
32
|
+
## 设计哲学
|
|
33
|
+
|
|
34
|
+
Serverless Devs 是一个开源开发的 Serverless 领域的工具链项目,他不仅仅表示单纯的某个命令行工具,在一定程度上指的是一个完整的工具链体系。
|
|
35
|
+
|
|
36
|
+
|
|
37
|
+
|
|
38
|
+
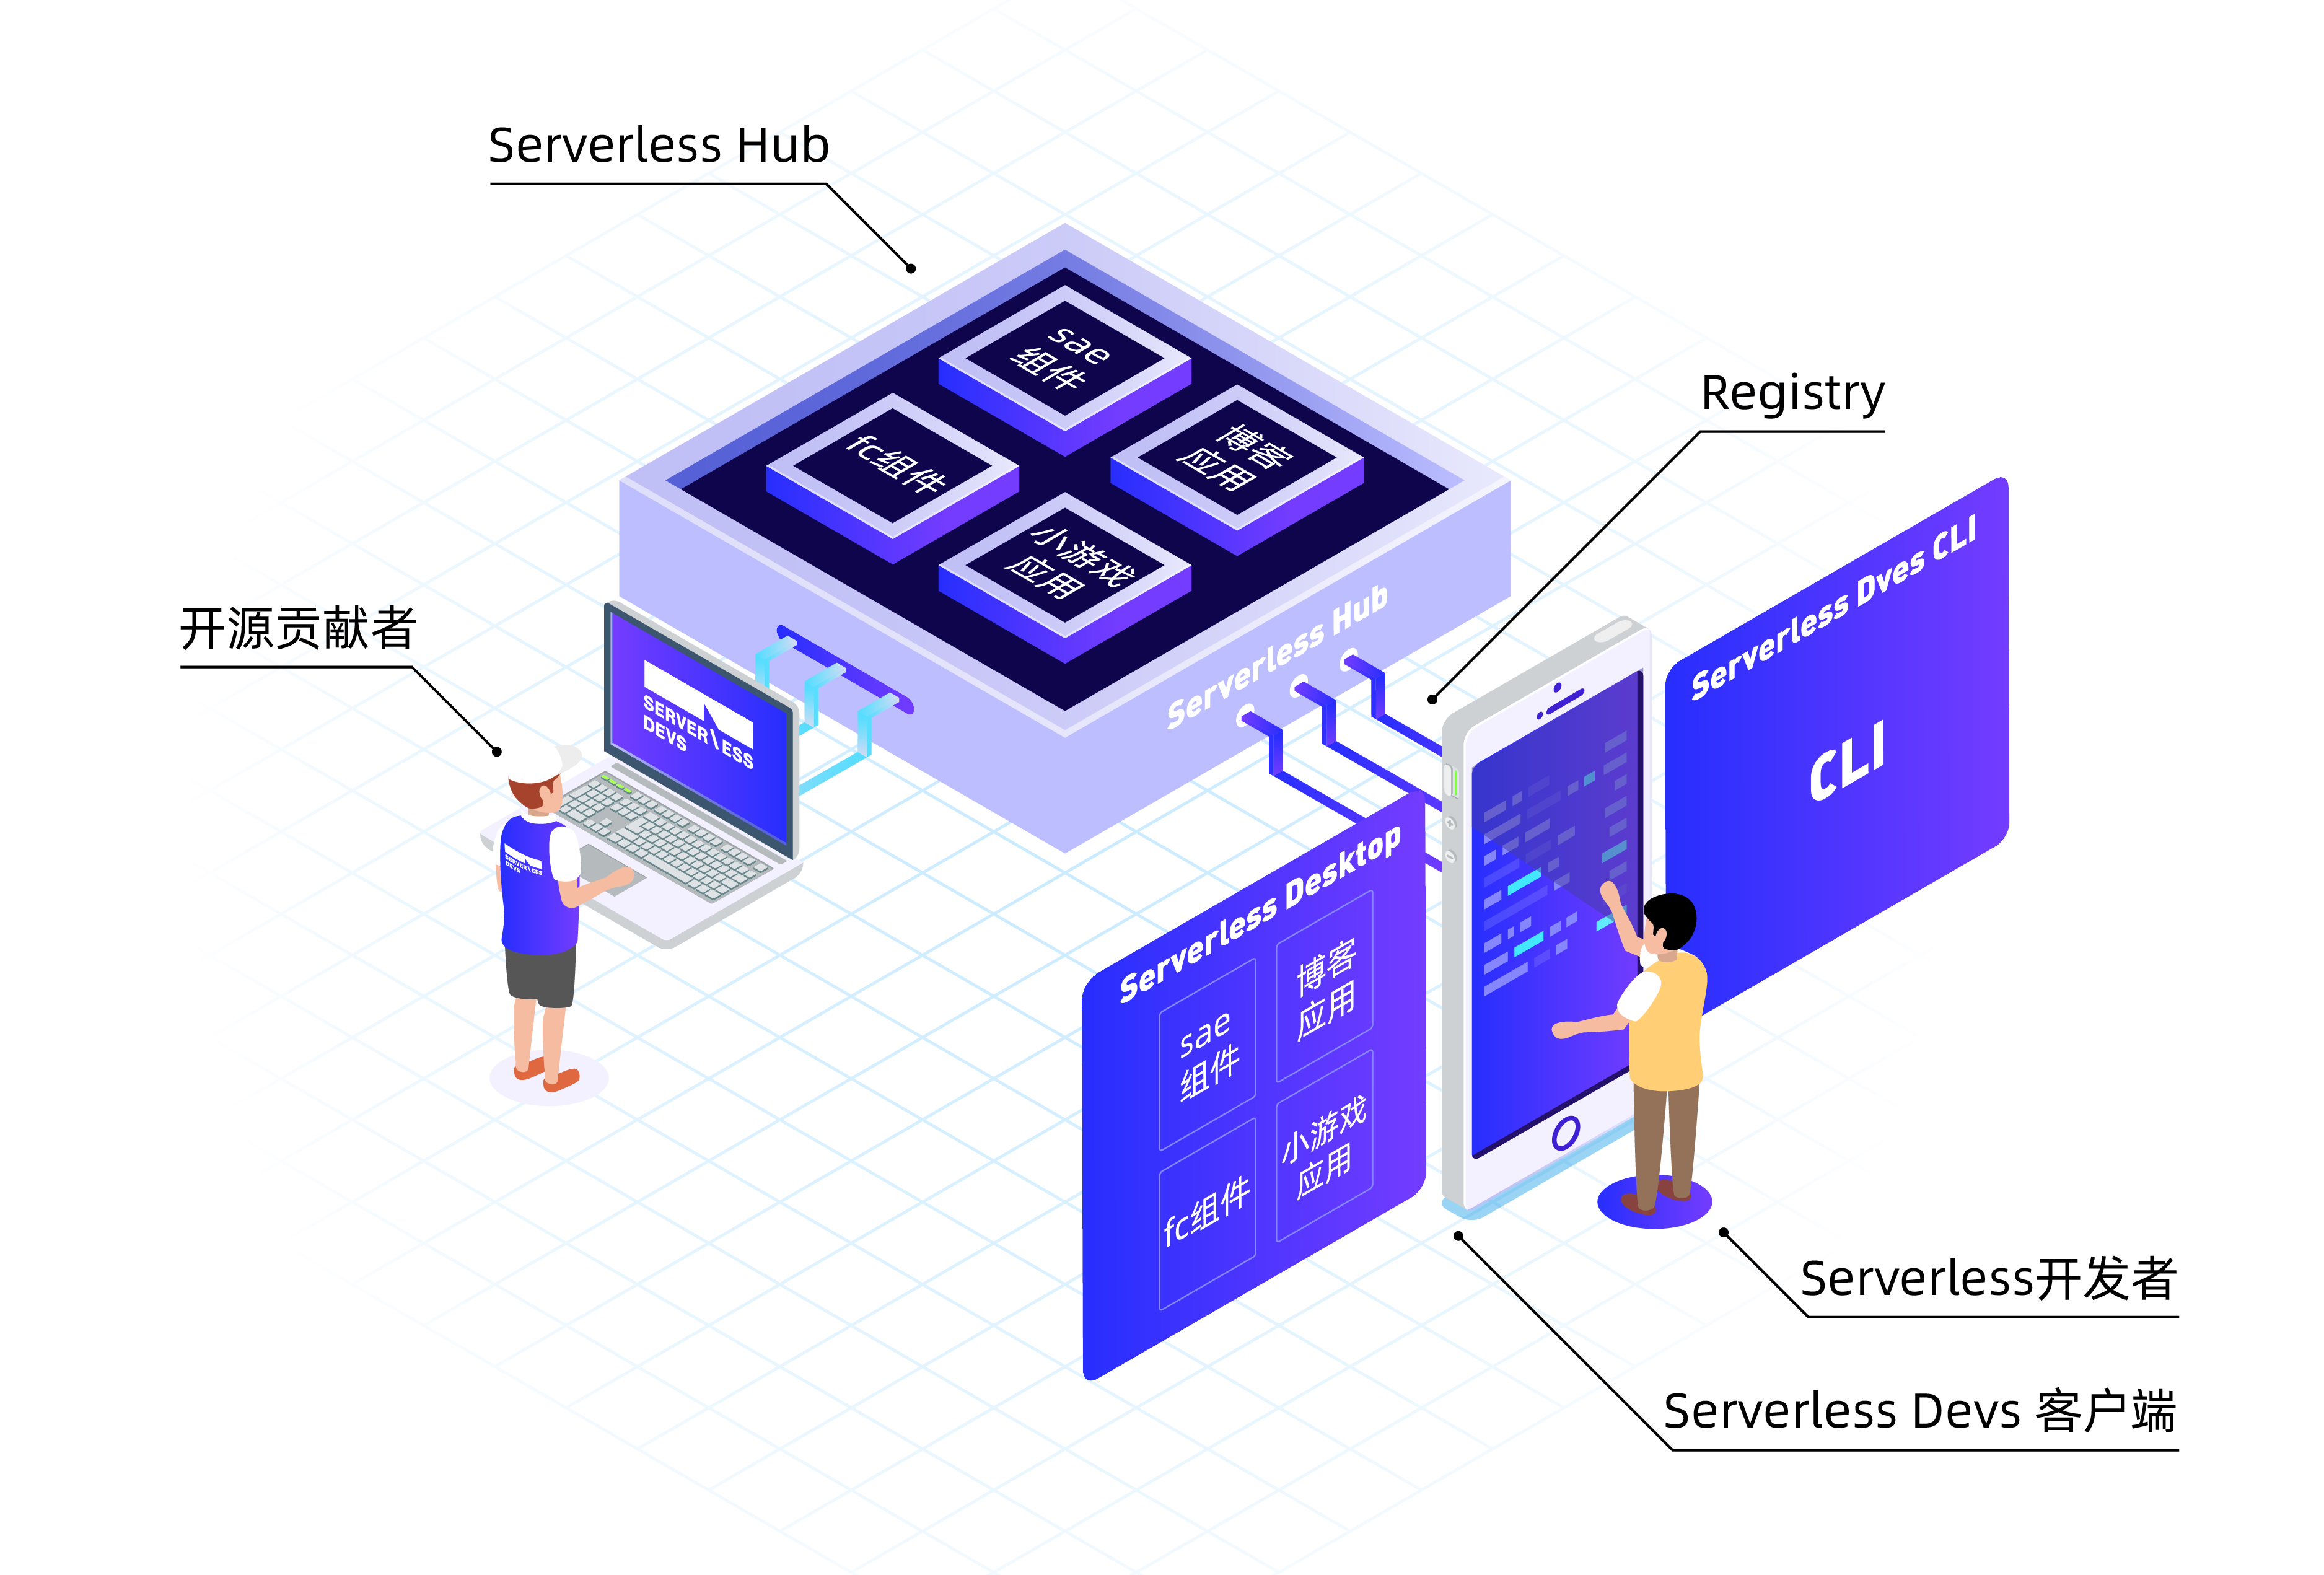
在 Serverless Devs 中,拥有两个角色:
|
|
39
|
+
|
|
40
|
+
- **开源贡献者**:开源贡献者将按照 [Serverless Package Model](./../../spec/zh/0.0.1/serverless_pacakge_model/readme.md) 进行[组件/应用的开发](./package_dev.md) ,并将内容发布到Serverless Hub中,既可以被更多人所使用;
|
|
41
|
+
- **Serverless开发者**:通过开发者工具(包括[命令行工具](./install.md)以及桌面端等工具),进行[应用的初始化](./quick_start.md),以及组件的使用;通过开发者工具,将业务按照预期部署到线上;
|
|
42
|
+
|
|
43
|
+
在这样一个 Serverless Devs 的应用框架上,我们不难发现可以和其他任何一种模式/生态,具有相似的命名以及模块:
|
|
44
|
+
|
|
45
|
+
- **Serverless Hub**:类似于一种组件、应用、案例中心;类似于 Docker Hub 等;
|
|
46
|
+
- **Serverless Registry**:类似于一种组件、应用的管理工具或者规范模型;类似于 Python 生态中的 Pypi,类似于 Node.js 生态中的 NPM;
|
|
47
|
+
|
|
48
|
+
当然,细心的你应该已经发现了,在 Serverless Hub 中,有两种形态的 Package(组件和应用):
|
|
49
|
+
|
|
50
|
+
同时通过上图也可以看到两个比较明显的词汇:Component和Application:
|
|
51
|
+
- **Component**:指的是组件;是由 Package developer 开发并发布的符合 Serverless Package Model 规范的一段代码,通常这段代码会在应用中被引用,并在 Serverless Devs 开发者工具 中被加载,并按照预定的规则进行执行某些动作。例如,将用户的代码部署到 Serverless 平台;将 Serverless 应用进行构建和打包;对 Serverless 应用进行调试等;
|
|
52
|
+
- **Application**:指的是应用;可以由 Package developer 公开发布到 Registry,以供更多人学习和使用,例如某位贡献者贡献了一个猫狗识别的案例到Registry;也可以由 Serverless developer 开发,例如某人开发了一个 人脸识别的应用;通常情况下一个应用可以引用一个或者多个组件,并通过 Serverless Devs 开发者工具 工具部署到 Serverless 平台,例如我开发了一个猫狗识别的应用,在这个应用中引用了 Lambda 组件帮助我将部分业务逻辑部署到 FaaS 平台,同时我也引用了 Website 组件帮助我把前端业务代码部署到对象存储中;
|
|
53
|
+
|
|
54
|
+
Serverless Devs 的模型设计原则,是希望可以通过更加简单、科学、规范的 Serverless 工具链体系,让开发者更专注于业务逻辑,提升 Serverless 应用开发、部署、运维效率,通过该模型,开发者可以通过一种更灵活、更通用的方法使用不同云厂商以及开源的 Serverless 产品,进而更高效、更简洁、更便利的实现 Serverless 应用管理。
|
|
55
|
+
|
|
56
|
+
## 成长历史
|
|
57
|
+
|
|
58
|
+

|
|
59
|
+
|
|
60
|
+
如果说 Serverless 提升了传统应用的开发效能,那么 Serverless Devs 开发者工具就是提升了 Serverless 应用开发的效能。随着时间的发展,Serverless Devs 也从 1.0 版本 到了 2.0 版本,更是从简单的单纯的效能提升,变成了更加规范、更加科学的效能提升。我们真切希望可以通过 Serverless Devs 的工具链模式和思路,为应用的开发,传统项目上 Serverless 架构提供巨大的便利和更科学的管理。
|
|
61
|
+
|
|
62
|
+
- 2020年 10月23日,Serverless 开发者平台 Serverless Devs 正式开源
|
|
63
|
+
- 2020 年11月,Serverless Devs 被 CNCF Landsacpe 收录, 成为国内首个进驻的 Serverless 工具
|
|
64
|
+
- 2020 年11月,Serverless Developer Meetup 首召开,成 Serverless 开发者技术新渠道
|
|
65
|
+
- 2020 年 11月,入围 InfoQ 评选 2020 年度十大开源新锐项目
|
|
66
|
+
- 2020 年12月,Serverless Devs 下载次数突破 5000,组件&应用累计使用次数突破 10000
|
|
67
|
+
- 2021年4月,Serverless Developer Meetup 在上海召开,并正式发布 Serverless Devs 2.0
|
|
68
|
+
- 2021年6月,Serverless Devs 下载次数突破 10000
|
|
69
|
+
- 2021年7月,Serverless Developer Meetup 在杭州召开,阿里云函数计算团队在会上正式发布端云联调、桌面客户端等功能
|
|
70
|
+
- 2021年8月,Serverless Devs 下载次数突破 20000
|
|
71
|
+
- 2021年10月,在***2021 OpenInfra Days China***会议上,Serverless Devs 带来了《Serverless Devs:Serverless全生命周期的工具链建设》的主题演讲
|
|
72
|
+
|
|
73
|
+
## 未来展望
|
|
74
|
+
|
|
75
|
+
Serverless Devs 将会在未来支持:
|
|
76
|
+
- 支持更多的云厂商,云产品;
|
|
77
|
+
- 将会开发和上线 Serverless Devs IDE Plugin;
|
|
78
|
+
- 将会持续推动 Serverless 生态尤其是 Serverless 工具链生态的前进;
|
|
79
|
+
|
|
80
|
+
关于我们的 Roadmap,可以参考 [Github Projects](#https://github.com/Serverless-Devs/Serverless-Devs/projects) 。
|
|
81
|
+
|
|
82
|
+
## 交流社群
|
|
83
|
+
|
|
84
|
+
<p align="center">
|
|
85
|
+
|
|
86
|
+
| <img src="https://serverless-article-picture.oss-cn-hangzhou.aliyuncs.com/1635407298906_20211028074819117230.png" width="200px" > | <img src="https://serverless-article-picture.oss-cn-hangzhou.aliyuncs.com/1635407044136_20211028074404326599.png" width="200px" > | <img src="https://serverless-article-picture.oss-cn-hangzhou.aliyuncs.com/1635407252200_20211028074732517533.png" width="200px" > |
|
|
87
|
+
|--- | --- | --- |
|
|
88
|
+
| <center>关注微信公众号:`serverless`</center> | <center>联系微信小助手:`xiaojiangwh`</center> | <center>加入钉钉交流群:`33947367`</center> |
|
|
89
|
+
|
|
90
|
+
</p>
|
package/docs/zh/tool.md
ADDED
|
@@ -0,0 +1,80 @@
|
|
|
1
|
+
# 开发者工具设计文档
|
|
2
|
+
|
|
3
|
+
- [Exit Code 定义](#exit-code-定义)
|
|
4
|
+
- [命令行设计规范](#命令行设计规范)
|
|
5
|
+
- [优先级定义](#优先级定义)
|
|
6
|
+
- [Yaml 文件优先级规范](#yaml-文件优先级规范)
|
|
7
|
+
- [应用内服务部署顺序](#应用内服务部署顺序)
|
|
8
|
+
- [密钥使用顺序与规范](#密钥使用顺序与规范)
|
|
9
|
+
|
|
10
|
+
## Exit Code 定义
|
|
11
|
+
|
|
12
|
+
| code | 含义 |
|
|
13
|
+
| --- | --- |
|
|
14
|
+
| 0 | 正常退出 |
|
|
15
|
+
| 100 | Serverless Devs 工具本身错误退出 |
|
|
16
|
+
| 101 | Serverless Devs 工具组件执行时,组件错误引起的退出 |
|
|
17
|
+
|
|
18
|
+
## 命令行设计规范
|
|
19
|
+
|
|
20
|
+
Serverless Devs 作为 Serverless 领域的开发者工具,其输出的标准化和规范化会在一定程度上对用户体验有比较明显的影响。
|
|
21
|
+
|
|
22
|
+
关于 Serverless Devs 命令行设计规范,可以参考 [cli_design.md](./cli_design.md)
|
|
23
|
+
|
|
24
|
+
## 优先级定义
|
|
25
|
+
|
|
26
|
+
在使用 Serverless Devs 开发者工具时,会遇到一些带有默认值的参数/变量,这一部分将会针对这些参数/变量,进行优先级划分,在每个类别下面的列表中,上面的情况优先级高于下面的情况,例如`Yaml 文件优先级规范`为案例,描述为:
|
|
27
|
+
|
|
28
|
+
- 通过`-t/--template`参数指定的 Yaml 文件
|
|
29
|
+
- 默认的 Yaml 文件(`s.yaml`/`s.yml`,且`s.yaml`的优先级大于`s.yml`)
|
|
30
|
+
|
|
31
|
+
则 Serverless Devs 开发者工具在进行资源描述文件使用时,会优先选择`通过 -t/--template 参数指定的 Yaml 文件`,其次才会采用`默认的 Yaml 文件( s.yaml/s.yml,且 s.yaml 的优先级大于 s.yml )`
|
|
32
|
+
|
|
33
|
+
|
|
34
|
+
### Yaml 文件优先级规范
|
|
35
|
+
|
|
36
|
+
- 通过`-t/--template`参数指定的 Yaml 文件
|
|
37
|
+
- 默认的 Yaml 文件(`s.yaml`/`s.yml`,且`s.yaml`的优先级大于`s.yml`)
|
|
38
|
+
|
|
39
|
+
### 应用内服务部署顺序
|
|
40
|
+
|
|
41
|
+
- 被依赖的 `service` 优先部署;
|
|
42
|
+
- 从上到下的顺序,按顺序进行部署;
|
|
43
|
+
|
|
44
|
+
> 例如,某资源描述 Yaml 可以缩写成:
|
|
45
|
+
> ```yaml
|
|
46
|
+
> edition: 1.0.0 # 命令行YAML规范版本,遵循语义化版本(Semantic Versioning)规范
|
|
47
|
+
> name: FullStack # 项目名称
|
|
48
|
+
> access: xxx-account1 # 秘钥别名
|
|
49
|
+
>
|
|
50
|
+
> services:
|
|
51
|
+
> nextjs-portal: # 服务名称
|
|
52
|
+
> component: vue-component # 组件名称
|
|
53
|
+
> props: # 组件的属性值
|
|
54
|
+
> src: ./frontend_src
|
|
55
|
+
> url: url
|
|
56
|
+
>
|
|
57
|
+
> assets:
|
|
58
|
+
> component: static
|
|
59
|
+
> props:
|
|
60
|
+
> www: "./public"
|
|
61
|
+
>
|
|
62
|
+
> gateway:
|
|
63
|
+
> component: serverless-gateway # 路由组件:HTTP URL和服务之间的映射规则
|
|
64
|
+
> props:
|
|
65
|
+
> routes:
|
|
66
|
+
> - url: ${assets.output.url}
|
|
67
|
+
> ```
|
|
68
|
+
> 此时,可先进性依赖关系分析,服务`nextjs-portal`、`assets`没有额外依赖,服务`gateway`通过魔法变量`${assets.output.url}`依赖了`assets`服务;此时部署顺序则为:`gateway`优先部署,然后`nextjs-portal`、`assets`按照上下顺序部署,即:`gateway`->`nextjs-portal`->`assets`
|
|
69
|
+
|
|
70
|
+
|
|
71
|
+
### 密钥使用顺序与规范
|
|
72
|
+
|
|
73
|
+
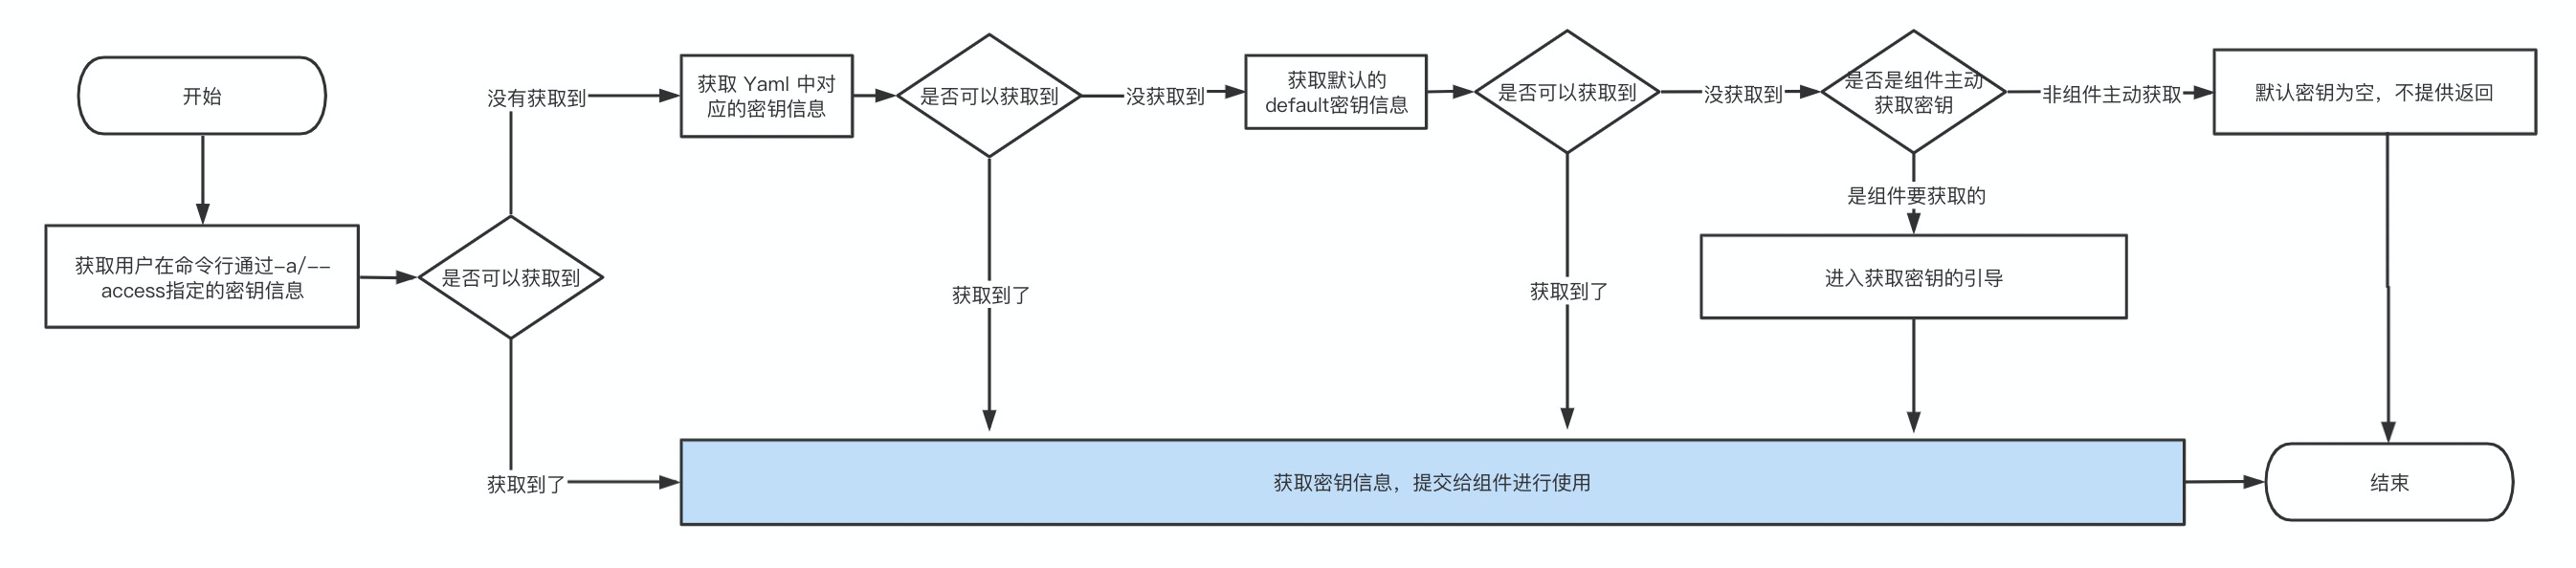
- 通过`-a/--access`参数指定的密钥信息
|
|
74
|
+
- 默认使用`default`密钥信息
|
|
75
|
+
- 不实用密钥信息 / 进入密钥信息配置引导
|
|
76
|
+
|
|
77
|
+
具体的流程图为:
|
|
78
|
+
|
|
79
|
+
|
|
80
|
+
|