@serverless-devs/s 2.0.92 → 2.0.93-beta.4
This diff represents the content of publicly available package versions that have been released to one of the supported registries. The information contained in this diff is provided for informational purposes only and reflects changes between package versions as they appear in their respective public registries.
- package/CONTRIBUTORS.md +2 -0
- package/bin/s-component +2 -0
- package/bin/s-set-workspace +2 -0
- package/docs/readme.md +94 -0
- package/docs/zh/awesome.md +296 -0
- package/docs/zh/cicd.md +200 -0
- package/docs/zh/cli_design.md +100 -0
- package/docs/zh/command/clean.md +63 -0
- package/docs/zh/command/cli.md +92 -0
- package/docs/zh/command/component.md +76 -0
- package/docs/zh/command/config.md +278 -0
- package/docs/zh/command/custom.md +73 -0
- package/docs/zh/command/init.md +148 -0
- package/docs/zh/command/readme.md +76 -0
- package/docs/zh/command/set.md +195 -0
- package/docs/zh/default_provider_config/alibabacloud.md +82 -0
- package/docs/zh/default_provider_config/aws.md +12 -0
- package/docs/zh/default_provider_config/azure.md +9 -0
- package/docs/zh/default_provider_config/baiducloud.md +8 -0
- package/docs/zh/default_provider_config/gcp.md +21 -0
- package/docs/zh/default_provider_config/huaweicloud.md +52 -0
- package/docs/zh/default_provider_config/readme.md +9 -0
- package/docs/zh/default_provider_config/tencentcloud.md +41 -0
- package/docs/zh/install.md +52 -0
- package/docs/zh/package_dev.md +142 -0
- package/docs/zh/quick_start.md +297 -0
- package/docs/zh/readme.md +90 -0
- package/docs/zh/tool.md +80 -0
- package/docs/zh/yaml.md +203 -0
- package/docs/zh/yaml_and_cli.md +67 -0
- package/lib/clean/index.js +43 -35
- package/lib/cli/cli-manager.js +33 -22
- package/lib/cli/index.js +60 -62
- package/lib/component/index.d.ts +1 -0
- package/lib/component/index.js +161 -0
- package/lib/config/add/index.js +39 -39
- package/lib/config/delete/index.js +49 -59
- package/lib/config/get/index.d.ts +0 -1
- package/lib/config/get/index.js +46 -51
- package/lib/config/index.js +36 -35
- package/lib/constants/index.d.ts +0 -1
- package/lib/constants/index.js +1 -5
- package/lib/core/command/command-manager.js +36 -43
- package/lib/core/component/index.d.ts +14 -7
- package/lib/core/component/index.js +78 -52
- package/lib/core/plugin/index.js +4 -3
- package/lib/daemon/template.js +2 -4
- package/lib/error/human-error.d.ts +12 -2
- package/lib/error/human-error.js +63 -28
- package/lib/error/human-warning.d.ts +8 -0
- package/lib/error/human-warning.js +19 -0
- package/lib/error/index.d.ts +10 -1
- package/lib/error/index.js +74 -27
- package/lib/index.js +89 -94
- package/lib/init/index.js +76 -79
- package/lib/init/init-config.js +3 -5
- package/lib/init/init-manager.js +3 -4
- package/lib/init/update-template.js +3 -5
- package/lib/onboarding/index.js +5 -5
- package/lib/set/analysis/index.js +41 -37
- package/lib/set/index.js +34 -33
- package/lib/set/locale/index.js +54 -53
- package/lib/set/registry/index.js +52 -52
- package/lib/set/workspace/index.d.ts +1 -0
- package/lib/set/workspace/index.js +61 -0
- package/lib/specification/parse.js +9 -6
- package/lib/update-notifier/index.js +10 -10
- package/lib/utils/command-util.d.ts +0 -2
- package/lib/utils/command-util.js +2 -42
- package/lib/utils/common.d.ts +1 -0
- package/lib/utils/common.js +100 -20
- package/lib/utils/core.js +3 -3
- package/lib/utils/handler-set-config.d.ts +1 -1
- package/lib/utils/handler-set-config.js +6 -7
- package/lib/utils/i18n/en.js +4 -4
- package/lib/utils/i18n/index.js +3 -3
- package/lib/utils/i18n/zh.js +3 -3
- package/lib/utils/storage.js +3 -4
- package/package.json +2 -2
- package/readme.md +64 -38
- package/shell/postbuild.sh +2 -0
- package/spec/readme.md +59 -0
- package/spec/zh/0.0.1/readme.md +47 -0
- package/spec/zh/0.0.1/serverless_pacakge_model/1.purpose_and_goals.md +3 -0
- package/spec/zh/0.0.1/serverless_pacakge_model/2.overview_and_terminology.md +14 -0
- package/spec/zh/0.0.1/serverless_pacakge_model/3.package_model.md +434 -0
- package/spec/zh/0.0.1/serverless_pacakge_model/4.application_scopes.md +3 -0
- package/spec/zh/0.0.1/serverless_pacakge_model/5.design_principles.md +3 -0
- package/spec/zh/0.0.1/serverless_pacakge_model/readme.md +12 -0
- package/spec/zh/0.0.1/serverless_registry_model/1.purpose_and_goals.md +18 -0
- package/spec/zh/0.0.1/serverless_registry_model/2.overview_and_terminology.md +18 -0
- package/spec/zh/0.0.1/serverless_registry_model/3.registry_model.md +61 -0
- package/spec/zh/0.0.1/serverless_registry_model/4.application_scopes.md +6 -0
- package/spec/zh/0.0.1/serverless_registry_model/5.design_principles.md +3 -0
- package/spec/zh/0.0.1/serverless_registry_model/readme.md +12 -0
- package/spec/zh/0.0.1/serverless_user_model/1.purpose_and_goals.md +3 -0
- package/spec/zh/0.0.1/serverless_user_model/2.overview_and_terminology.md +16 -0
- package/spec/zh/0.0.1/serverless_user_model/3.user_model.md +218 -0
- package/spec/zh/0.0.1/serverless_user_model/4.application_scopes.md +4 -0
- package/spec/zh/0.0.1/serverless_user_model/5.design_principles.md +3 -0
- package/spec/zh/0.0.1/serverless_user_model/readme.md +12 -0
- package/bin/s-set-locale +0 -2
- package/readme_zh.md +0 -72
|
@@ -0,0 +1,148 @@
|
|
|
1
|
+
# Init 命令
|
|
2
|
+
|
|
3
|
+
`init`命令是初始化Serverless项目的脚手架。
|
|
4
|
+
|
|
5
|
+
- [前言](#前言)
|
|
6
|
+
- [命令解析](#命令解析)
|
|
7
|
+
- [参数解析](#参数解析)
|
|
8
|
+
- [初始化项目](#初始化项目)
|
|
9
|
+
- [引导式初始化](#引导式初始化)
|
|
10
|
+
- [直接初始化](#直接初始化)
|
|
11
|
+
- [初始化Registry应用](#初始化Registry应用)
|
|
12
|
+
- [初始化仓库应用](#初始化仓库应用)
|
|
13
|
+
|
|
14
|
+
## 命令解析
|
|
15
|
+
|
|
16
|
+
当执行`s init -h`之后,可以进行相关帮助信息的查看:
|
|
17
|
+
|
|
18
|
+
```shell script
|
|
19
|
+
$ s init -h
|
|
20
|
+
Usage: s init [options] [name | url]
|
|
21
|
+
|
|
22
|
+
Initialize a new project based on a template. You can initialize the application that conforms to the serverless devs project specification through GitHub, or you can initialize the application provided by the source by configuring the source.
|
|
23
|
+
|
|
24
|
+
Example:
|
|
25
|
+
$ s init
|
|
26
|
+
$ s init project
|
|
27
|
+
$ s init project -d my_dir
|
|
28
|
+
$ s init git@github.com:foo/bar.git
|
|
29
|
+
$ s init https://github.com/foo/bar.git
|
|
30
|
+
|
|
31
|
+
🚀 More Application: https://github.com/Serverless-Devs/Serverless-Devs/blob/master/docs/zh/awesome.md
|
|
32
|
+
|
|
33
|
+
Options:
|
|
34
|
+
-d, --dir [dir] Where to output the initialized app into (default: ./<ProjectName> )
|
|
35
|
+
-r, --registry [url] Use specify registry
|
|
36
|
+
-h, --help Display help for command
|
|
37
|
+
```
|
|
38
|
+
|
|
39
|
+
### 参数解析
|
|
40
|
+
|
|
41
|
+
| 参数全称 | 参数缩写 | 默认取值 | 参数含义 |
|
|
42
|
+
|-----|-----|-----|-----|
|
|
43
|
+
| dir | d | `./<ProjectName>` | 项目初始化的路径/目录 |
|
|
44
|
+
| registry | -r | http://registry.devsapp.cn/simple | 源配置地址,类似于Python中指定pip源,或者Node.js中指定NPM源 |
|
|
45
|
+
|
|
46
|
+
### 初始化项目
|
|
47
|
+
|
|
48
|
+
#### 引导式初始化
|
|
49
|
+
|
|
50
|
+
通过`s init`可以直接进入项目初始化的引导模块:
|
|
51
|
+
|
|
52
|
+
```shell script
|
|
53
|
+
$ s init
|
|
54
|
+
|
|
55
|
+
🚀 Serverless Awesome: https://github.com/Serverless-Devs/package-awesome
|
|
56
|
+
|
|
57
|
+
? Hello Serverless for Cloud Vendors (Use arrow keys or type to search)
|
|
58
|
+
❯ Alibaba Cloud Serverless
|
|
59
|
+
AWS Cloud Serverless
|
|
60
|
+
Baidu Cloud Serverless
|
|
61
|
+
Huawei Cloud Serverless
|
|
62
|
+
Tencent Cloud Serverless
|
|
63
|
+
Dev Template for Serverless Devs
|
|
64
|
+
```
|
|
65
|
+
|
|
66
|
+
此时只需要选择对应的选项,按照引导进行操作,即可。例如选择`Alibaba Cloud Serverless`,就可以看到阿里云Serverless产品下的应用模板分类:
|
|
67
|
+
|
|
68
|
+
```shell script
|
|
69
|
+
? Please select an Serverless-Devs Application (Use arrow keys or type to search)
|
|
70
|
+
❯ fc-runtime-starter - 快速部署一个 FC 函数
|
|
71
|
+
fc-custom-container-stater - 快速部署一个 custom-container 应用
|
|
72
|
+
web-framework-stater - 快速部署一个 Web 框架
|
|
73
|
+
static-website-stater - 快速部署一个静态网站
|
|
74
|
+
serverless-best-practice - 快速体验 Serverless 最佳实践
|
|
75
|
+
```
|
|
76
|
+
|
|
77
|
+
此时可以继续选择某分类下的具体应用进行初始化,例如选择`fc-runtime-starter`之后,可以看到该分类下的具体模板应用:
|
|
78
|
+
|
|
79
|
+
```shell script
|
|
80
|
+
? Please select an templete (Use arrow keys or type to search)
|
|
81
|
+
❯ fc-http-nodejs - 快速部署一个 nodejs12 http函数
|
|
82
|
+
fc-http-python - 快速部署一个 python3 http函数
|
|
83
|
+
fc-http-php - 快速部署一个 php http函数
|
|
84
|
+
fc-http-java - 快速部署一个 java8 http函数
|
|
85
|
+
fc-event-nodejs - 快速部署一个 nodejs12 event函数
|
|
86
|
+
fc-event-python - 快速部署一个 python3 event函数
|
|
87
|
+
fc-event-php - 快速部署一个 php event函数
|
|
88
|
+
```
|
|
89
|
+
|
|
90
|
+
选择`fc-http-nodejs`即可完成创建:
|
|
91
|
+
|
|
92
|
+
```shell script
|
|
93
|
+
jiangyu@ServerlessSecurity demo % s init
|
|
94
|
+
|
|
95
|
+
🚀 Serverless Awesome: https://github.com/Serverless-Devs/package-awesome
|
|
96
|
+
|
|
97
|
+
? Hello Serverless for Cloud Vendors Alibaba Cloud Serverless
|
|
98
|
+
? Please select an Serverless-Devs Application fc-runtime-starter - 快速部署一个 FC 函数
|
|
99
|
+
? Please select an templete fc-http-nodejs - 快速部署一个 nodejs12 http函数
|
|
100
|
+
|
|
101
|
+
......
|
|
102
|
+
|
|
103
|
+
💞 Document ❤ Star:https://github.com/Serverless-Devs/Serverless-Devs
|
|
104
|
+
```
|
|
105
|
+
|
|
106
|
+
更多关于默认源对应的应用信息,可以参考[Package Awesome](https://github.com/Serverless-Devs/package-awesome)
|
|
107
|
+
|
|
108
|
+
#### 直接初始化
|
|
109
|
+
|
|
110
|
+
通过`s init [name | url]`,可以从配置的`Registry`或者指定的仓库`Url`获取模板项目。
|
|
111
|
+
|
|
112
|
+
##### 初始化Registry应用
|
|
113
|
+
|
|
114
|
+
以默认的`Registry`为例,可以初始化相对应的案例项目:`start-fc-http-nodejs12`,可以通过`s init start-fc-http-nodejs12`命令来进行:
|
|
115
|
+
|
|
116
|
+
```shell script
|
|
117
|
+
$ s init start-fc-http-nodejs12
|
|
118
|
+
|
|
119
|
+
🚀 Serverless Awesome: https://github.com/Serverless-Devs/package-awesome
|
|
120
|
+
|
|
121
|
+
? Please input your project name (init dir) start-fc-http-nodejs12
|
|
122
|
+
✔ file decompression completed
|
|
123
|
+
|
|
124
|
+
......
|
|
125
|
+
|
|
126
|
+
💞 Document ❤ Star:https://github.com/Serverless-Devs/Serverless-Devs
|
|
127
|
+
```
|
|
128
|
+
|
|
129
|
+
##### 初始化仓库应用
|
|
130
|
+
|
|
131
|
+
以Github仓库 `https://github.com/devsapp/puppeteer-app` 为例,可以通过`s init git@github.com:devsapp/puppeteer-app.git`命令初始化该案例项目:
|
|
132
|
+
|
|
133
|
+
```shell script
|
|
134
|
+
$ s init git@github.com:devsapp/puppeteer-app.git
|
|
135
|
+
|
|
136
|
+
🚀 Serverless Awesome: https://github.com/Serverless-Devs/package-awesome
|
|
137
|
+
|
|
138
|
+
Cloning into 'puppeteer-app'...
|
|
139
|
+
remote: Enumerating objects: 35, done.
|
|
140
|
+
remote: Counting objects: 100% (35/35), done.
|
|
141
|
+
remote: Compressing objects: 100% (23/23), done.
|
|
142
|
+
remote: Total 35 (delta 10), reused 30 (delta 6), pack-reused 0
|
|
143
|
+
Receiving objects: 100% (35/35), 6.59 KiB | 3.30 MiB/s, done.
|
|
144
|
+
Resolving deltas: 100% (10/10), done.
|
|
145
|
+
```
|
|
146
|
+
|
|
147
|
+
|
|
148
|
+
|
|
@@ -0,0 +1,76 @@
|
|
|
1
|
+
# 命令操作文档
|
|
2
|
+
|
|
3
|
+
- [前言](#前言)
|
|
4
|
+
- [全局参数](#全局参数)
|
|
5
|
+
- [命令详情](#命令详情)
|
|
6
|
+
- [config: 密钥配置](./config.md)
|
|
7
|
+
- [init: 项目初始化](./init.md)
|
|
8
|
+
- [cli: 纯命令行模式](./cli.md)
|
|
9
|
+
- [clean: 工具清理](./clean.md)
|
|
10
|
+
- [component: 组件信息](./component.md)
|
|
11
|
+
- [set: 工具配置](./set.md)
|
|
12
|
+
- [custom: 自定义命令](./custom.md)
|
|
13
|
+
|
|
14
|
+
## 前言
|
|
15
|
+
|
|
16
|
+
Serverless Devs 可以通过`-h`唤起对应命令的帮助文档,例如查看 `s` 命令的帮助信息可以是:`s -h`
|
|
17
|
+
|
|
18
|
+
当使用者使用命令行工具时,可以通过`s`命令,查看整体帮助信息:
|
|
19
|
+
|
|
20
|
+
```shell script
|
|
21
|
+
$ s
|
|
22
|
+
Usage: s [options] [command]
|
|
23
|
+
|
|
24
|
+
_________ .__
|
|
25
|
+
/ _____/ ______________ __ ___________| | ____ ______ ______
|
|
26
|
+
\_____ \_/ __ \_ __ \ \/ // __ \_ __ \ | _/ __ \ / ___// ___/
|
|
27
|
+
/ \ ___/| | \/\ /\ ___/| | \/ |_\ ___/ \___ \ \___ \
|
|
28
|
+
/_________/\_____>__| \_/ \_____>__| |____/\_____>______>______>
|
|
29
|
+
|
|
30
|
+
Welcome to the Serverless Devs.
|
|
31
|
+
|
|
32
|
+
More:
|
|
33
|
+
📘 Documents: https://github.com/Serverless-Devs/Serverless-Devs/tree/master/docs
|
|
34
|
+
🙌 Discussions: https://github.com/Serverless-Devs/Serverless-Devs/discussions
|
|
35
|
+
📦 Applications: https://github.com/Serverless-Devs/Serverless-Devs/blob/master/docs/zh/awesome.md
|
|
36
|
+
|
|
37
|
+
Quick start:
|
|
38
|
+
🍻 Can perform [s init] fast experience
|
|
39
|
+
|
|
40
|
+
Options:
|
|
41
|
+
-t, --template [templatePath] Specify the template file
|
|
42
|
+
-a, --access [aliasName] Specify the access alias name
|
|
43
|
+
--skip-actions Skip the extends section
|
|
44
|
+
--debug Open debug model
|
|
45
|
+
-v, --version Output the version number
|
|
46
|
+
-h, --help Display help for command
|
|
47
|
+
|
|
48
|
+
Commands:
|
|
49
|
+
config 👤 Configure venders account.
|
|
50
|
+
init 💞 Initializing a serverless project.
|
|
51
|
+
cli 🐚 Command line operation without yaml mode.
|
|
52
|
+
set 🔧 Settings for the tool.
|
|
53
|
+
clean 💥 Clean up the environment.
|
|
54
|
+
component 🔌 Installed component information.
|
|
55
|
+
```
|
|
56
|
+
|
|
57
|
+
## 全局参数
|
|
58
|
+
|
|
59
|
+
| 参数全称 | 参数缩写 | 默认取值 | 参数含义 | 备注 |
|
|
60
|
+
|-----|-----|-----|-----|-----|
|
|
61
|
+
| template | t | `s.yaml`/`s.yml` | 指定资源描述文件 | 可选`yaml`和`JSON`两种格式 |
|
|
62
|
+
| access | a | `yaml`中所指定的`access`信息/`default` | 指定本次部署时的密钥信息 | 可以使用通过[config命令](./command/config.md#config-add-命令)配置的密钥信息,以及[配置到环境变量的密钥信息](./command/config.md#通过环境变量配置密钥信息) |
|
|
63
|
+
| skip-actions | - | - | 跳过`yaml`所设置的`actions`模块 | - |
|
|
64
|
+
| debug | - | - | 开启`Debug`模式 | 开启`Debug`模式后可以查看到更多的工具执行过程信息 |
|
|
65
|
+
| version | v | - | 查看版本信息 | - |
|
|
66
|
+
| help | h | - | 查看帮助信息 | - |
|
|
67
|
+
|
|
68
|
+
## 命令详情
|
|
69
|
+
|
|
70
|
+
- [config: 密钥配置](./config.md)
|
|
71
|
+
- [init: 项目初始化](./init.md)
|
|
72
|
+
- [cli: 纯命令行模式](./cli.md)
|
|
73
|
+
- [clean: 工具清理](./clean.md)
|
|
74
|
+
- [set: 工具配置](./set.md)
|
|
75
|
+
- [component: 组件信息](./component.md)
|
|
76
|
+
- [custom: 自定义命令](./custom.md)
|
|
@@ -0,0 +1,195 @@
|
|
|
1
|
+
# Set 命令
|
|
2
|
+
|
|
3
|
+
`set`命令是对工具进行相关配置的命令。
|
|
4
|
+
|
|
5
|
+
- [命令解析](#命令解析)
|
|
6
|
+
- [set registry 命令](#set-registry-命令)
|
|
7
|
+
- [set locale 命令](#set-locale-命令)
|
|
8
|
+
- [[FEATURE] set analysis 命令](#feature-set-analysis-命令)
|
|
9
|
+
- [[FEATURE] set workspace 命令](#feature-set-workspace-命令)
|
|
10
|
+
|
|
11
|
+
## 命令解析
|
|
12
|
+
|
|
13
|
+
当执行`s set -h`之后,可以进行相关帮助信息的查看:
|
|
14
|
+
|
|
15
|
+
```shell script
|
|
16
|
+
$ s set -h
|
|
17
|
+
Usage: s set [commands] [options]
|
|
18
|
+
|
|
19
|
+
You can make some default settings for the tool here.
|
|
20
|
+
|
|
21
|
+
📖 Document: https://github.com/Serverless-Devs/Serverless-Devs/tree/master/docs/zh/command/set.md
|
|
22
|
+
|
|
23
|
+
Options:
|
|
24
|
+
-h, --help Display help for command
|
|
25
|
+
|
|
26
|
+
Commands:
|
|
27
|
+
registry 👀 Set up a custom registry
|
|
28
|
+
locale 🔧 Set up current language
|
|
29
|
+
analysis 👉 Set to enable or disable analysis
|
|
30
|
+
```
|
|
31
|
+
|
|
32
|
+
在该命令中,包括了三个子命令:
|
|
33
|
+
- [registry:配置 Serverless Devs 所使用的 registry](#set-registry-命令)
|
|
34
|
+
- [locale:配置 Serverless Devs 所默认的语言](#set-locale-命令)
|
|
35
|
+
- [analysis:配置 Serverless Devs 所进行的数据分析行为](#set-analysis-命令)
|
|
36
|
+
|
|
37
|
+
|
|
38
|
+
## set registry 命令
|
|
39
|
+
|
|
40
|
+
通过该命令,可以对 Serverless Devs 开发者工具进行 Registry 配置。
|
|
41
|
+
|
|
42
|
+
执行`s set registry -h`命令,可以看到帮助文档
|
|
43
|
+
|
|
44
|
+
```shell script
|
|
45
|
+
$ s set registry -h
|
|
46
|
+
|
|
47
|
+
Usage: s set registry [options]
|
|
48
|
+
|
|
49
|
+
Set registry information.
|
|
50
|
+
|
|
51
|
+
Example:
|
|
52
|
+
$ s set registry
|
|
53
|
+
$ s set registry http://registry.devsapp.cn/simple
|
|
54
|
+
|
|
55
|
+
Options:
|
|
56
|
+
-h, --help Display help for command
|
|
57
|
+
```
|
|
58
|
+
|
|
59
|
+
切换 Registry 的方法有两种:
|
|
60
|
+
1. 直接提供 Registry 信息,例如:`s set registry http://registry.devsapp.cn/simple`
|
|
61
|
+
2. 通过交互式方法,进行 Registry 信息的切换:
|
|
62
|
+
```shell script
|
|
63
|
+
$ s set registry
|
|
64
|
+
|
|
65
|
+
🔎 Current registry: http://registry.devsapp.cn/simple
|
|
66
|
+
|
|
67
|
+
? Choose a registry? (Use arrow keys)
|
|
68
|
+
❯ serverless registry [http://registry.devsapp.cn/simple]
|
|
69
|
+
github registry [https://api.github.com/repos]
|
|
70
|
+
gitee registry [http://gitee.registry.devsapp.cn/simple]
|
|
71
|
+
custom registry
|
|
72
|
+
```
|
|
73
|
+
此时,只需要选择对应的选项,就可以引导式的进行操作。
|
|
74
|
+
|
|
75
|
+
> 额外需要说明的是,虽然社区目前拥有Github Resitry, Gitee Registry, Serverless Registry等三个源,但是实际上这三个源也有着一定的逻辑关系:
|
|
76
|
+
> - Github Resitry:终极默认源,即无论用户配置了其他任何一个源,如果没有找到对应的内容,都会默认到该源进行查找;
|
|
77
|
+
> - Gitee Registry:针对中国用户,与Gitee合作的国内源;
|
|
78
|
+
> - Serverless Registry:Serverless Devs社区的默认源,也将作为被默认配置的源;
|
|
79
|
+
> 在Serverless Devs的开发者工具中,默认的加载逻辑:
|
|
80
|
+
> 
|
|
81
|
+
|
|
82
|
+
> 🙊 注:系统默认的 Registry 是:`serverless devs offical registry [http://registry.devsapp.cn/simple] `
|
|
83
|
+
|
|
84
|
+
## set locale 命令
|
|
85
|
+
|
|
86
|
+
通过该命令,可以对 Serverless Devs 开发者工具的语言进行配置。
|
|
87
|
+
|
|
88
|
+
执行`s set locale -h`命令,可以看到帮助文档
|
|
89
|
+
|
|
90
|
+
```shell script
|
|
91
|
+
$ s set locale -h
|
|
92
|
+
|
|
93
|
+
Usage: s set locale [options]
|
|
94
|
+
|
|
95
|
+
Set language information.
|
|
96
|
+
|
|
97
|
+
Example:
|
|
98
|
+
$ s set locale
|
|
99
|
+
$ s set locale zh
|
|
100
|
+
|
|
101
|
+
Options:
|
|
102
|
+
-h, --help Display help for command
|
|
103
|
+
```
|
|
104
|
+
|
|
105
|
+
设置 locale 的方法有两种:
|
|
106
|
+
1. 直接提供语言缩写,例如:`s set locale zh`
|
|
107
|
+
2. 通过交互式方法,进行语言信息的切换:
|
|
108
|
+
```shell script
|
|
109
|
+
$ s set locale
|
|
110
|
+
|
|
111
|
+
💬 Current language: 中文(zh)
|
|
112
|
+
|
|
113
|
+
? Choose a language? (Use arrow keys)
|
|
114
|
+
❯ 中文(zh)
|
|
115
|
+
English(en)
|
|
116
|
+
```
|
|
117
|
+
此时,只需要选择对应的选项,就可以引导式的进行操作。
|
|
118
|
+
|
|
119
|
+
> 🙊 注:系统默认的 locale 是:`zh`
|
|
120
|
+
|
|
121
|
+
## [FEATURE] set analysis 命令
|
|
122
|
+
|
|
123
|
+
通过该命令,可以对 Serverless Devs 开发者工具的数据分析能力进行配置。
|
|
124
|
+
|
|
125
|
+
执行`s set analysis -h`命令,可以看到帮助文档
|
|
126
|
+
|
|
127
|
+
```shell script
|
|
128
|
+
$ s set analysis -h
|
|
129
|
+
|
|
130
|
+
Usage: s set analysis [options]
|
|
131
|
+
|
|
132
|
+
Set analysis action.
|
|
133
|
+
|
|
134
|
+
Example:
|
|
135
|
+
$ s set analysis
|
|
136
|
+
$ s set analysis disable
|
|
137
|
+
|
|
138
|
+
Options:
|
|
139
|
+
-h, --help Display help for command
|
|
140
|
+
```
|
|
141
|
+
|
|
142
|
+
设置 analysis 的方法有两种:
|
|
143
|
+
1. 直接进行配置,例如:`s set analysis disable`
|
|
144
|
+
2. 通过交互式方法,进行配置:
|
|
145
|
+
```shell script
|
|
146
|
+
$ s set analysis
|
|
147
|
+
|
|
148
|
+
📝 Current analysis action: enable
|
|
149
|
+
|
|
150
|
+
? Choose a action? (Use arrow keys)
|
|
151
|
+
❯ enable
|
|
152
|
+
disable
|
|
153
|
+
```
|
|
154
|
+
此时,只需要选择对应的选项,就可以引导式的进行操作。
|
|
155
|
+
|
|
156
|
+
> 🙊 注:系统默认的 analysis 是:`enable`
|
|
157
|
+
|
|
158
|
+
## [FEATURE] set workspace 命令
|
|
159
|
+
|
|
160
|
+
通过该命令,可以对 Serverless Devs 开发者工具的默认路径进行配置。
|
|
161
|
+
|
|
162
|
+
执行`s set workspace -h`命令,可以看到帮助文档
|
|
163
|
+
|
|
164
|
+
```shell script
|
|
165
|
+
$ s set workspace -h
|
|
166
|
+
|
|
167
|
+
Usage: s set workspace [options]
|
|
168
|
+
|
|
169
|
+
Set workspace path. Switching workspaces may make previously cached components and configured key information unavailable.
|
|
170
|
+
|
|
171
|
+
Example:
|
|
172
|
+
$ s set workspace
|
|
173
|
+
$ s set workspace ~/.s
|
|
174
|
+
|
|
175
|
+
Options:
|
|
176
|
+
-h, --help Display help for command
|
|
177
|
+
```
|
|
178
|
+
|
|
179
|
+
设置 workspace 的方法有两种:
|
|
180
|
+
1. 直接进行配置,例如:`s set workspace ~/.s`
|
|
181
|
+
2. 通过交互式方法,进行配置:
|
|
182
|
+
```shell script
|
|
183
|
+
$ s set workspace
|
|
184
|
+
|
|
185
|
+
📝 Current workspace path: ~/.s
|
|
186
|
+
|
|
187
|
+
🙊 Switching workspaces may make previously cached components and configured key information unavailable.
|
|
188
|
+
|
|
189
|
+
? Please input an absolute path:
|
|
190
|
+
```
|
|
191
|
+
此时,只需要选择对应的选项,就可以引导式的进行操作。
|
|
192
|
+
|
|
193
|
+
|
|
194
|
+
|
|
195
|
+
> 🙊 注:系统默认的 workspace 是:`~/.s`
|
|
@@ -0,0 +1,82 @@
|
|
|
1
|
+
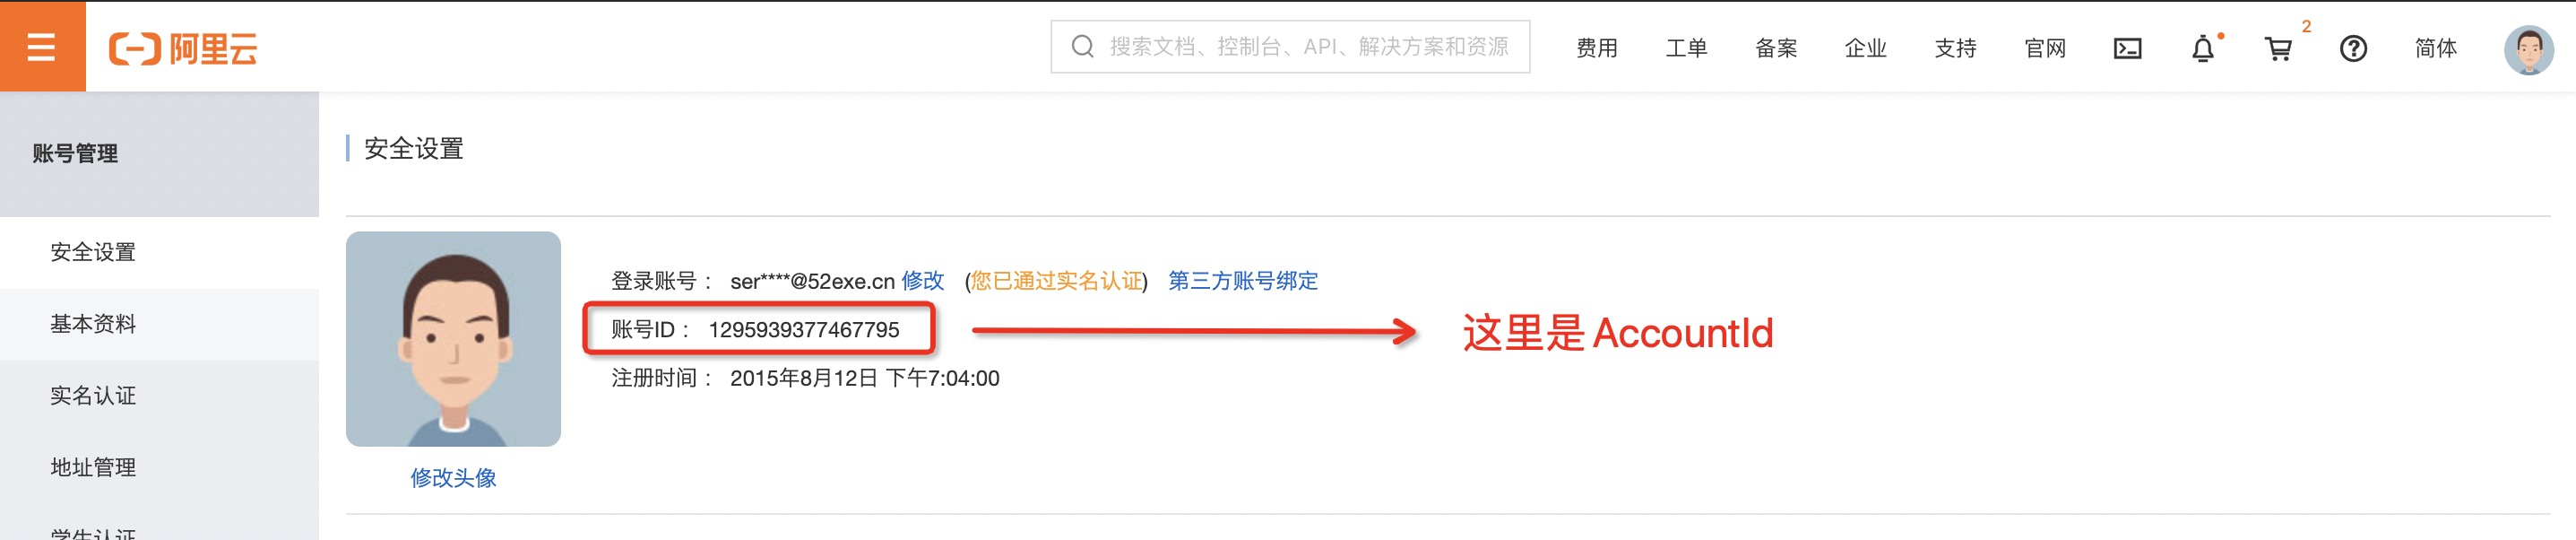
# 阿里云密钥获取
|
|
2
|
+
|
|
3
|
+
阿里云官网:https://www.aliyun.com
|
|
4
|
+
AccountId获取页面:https://account.console.aliyun.com/#/secure
|
|
5
|
+
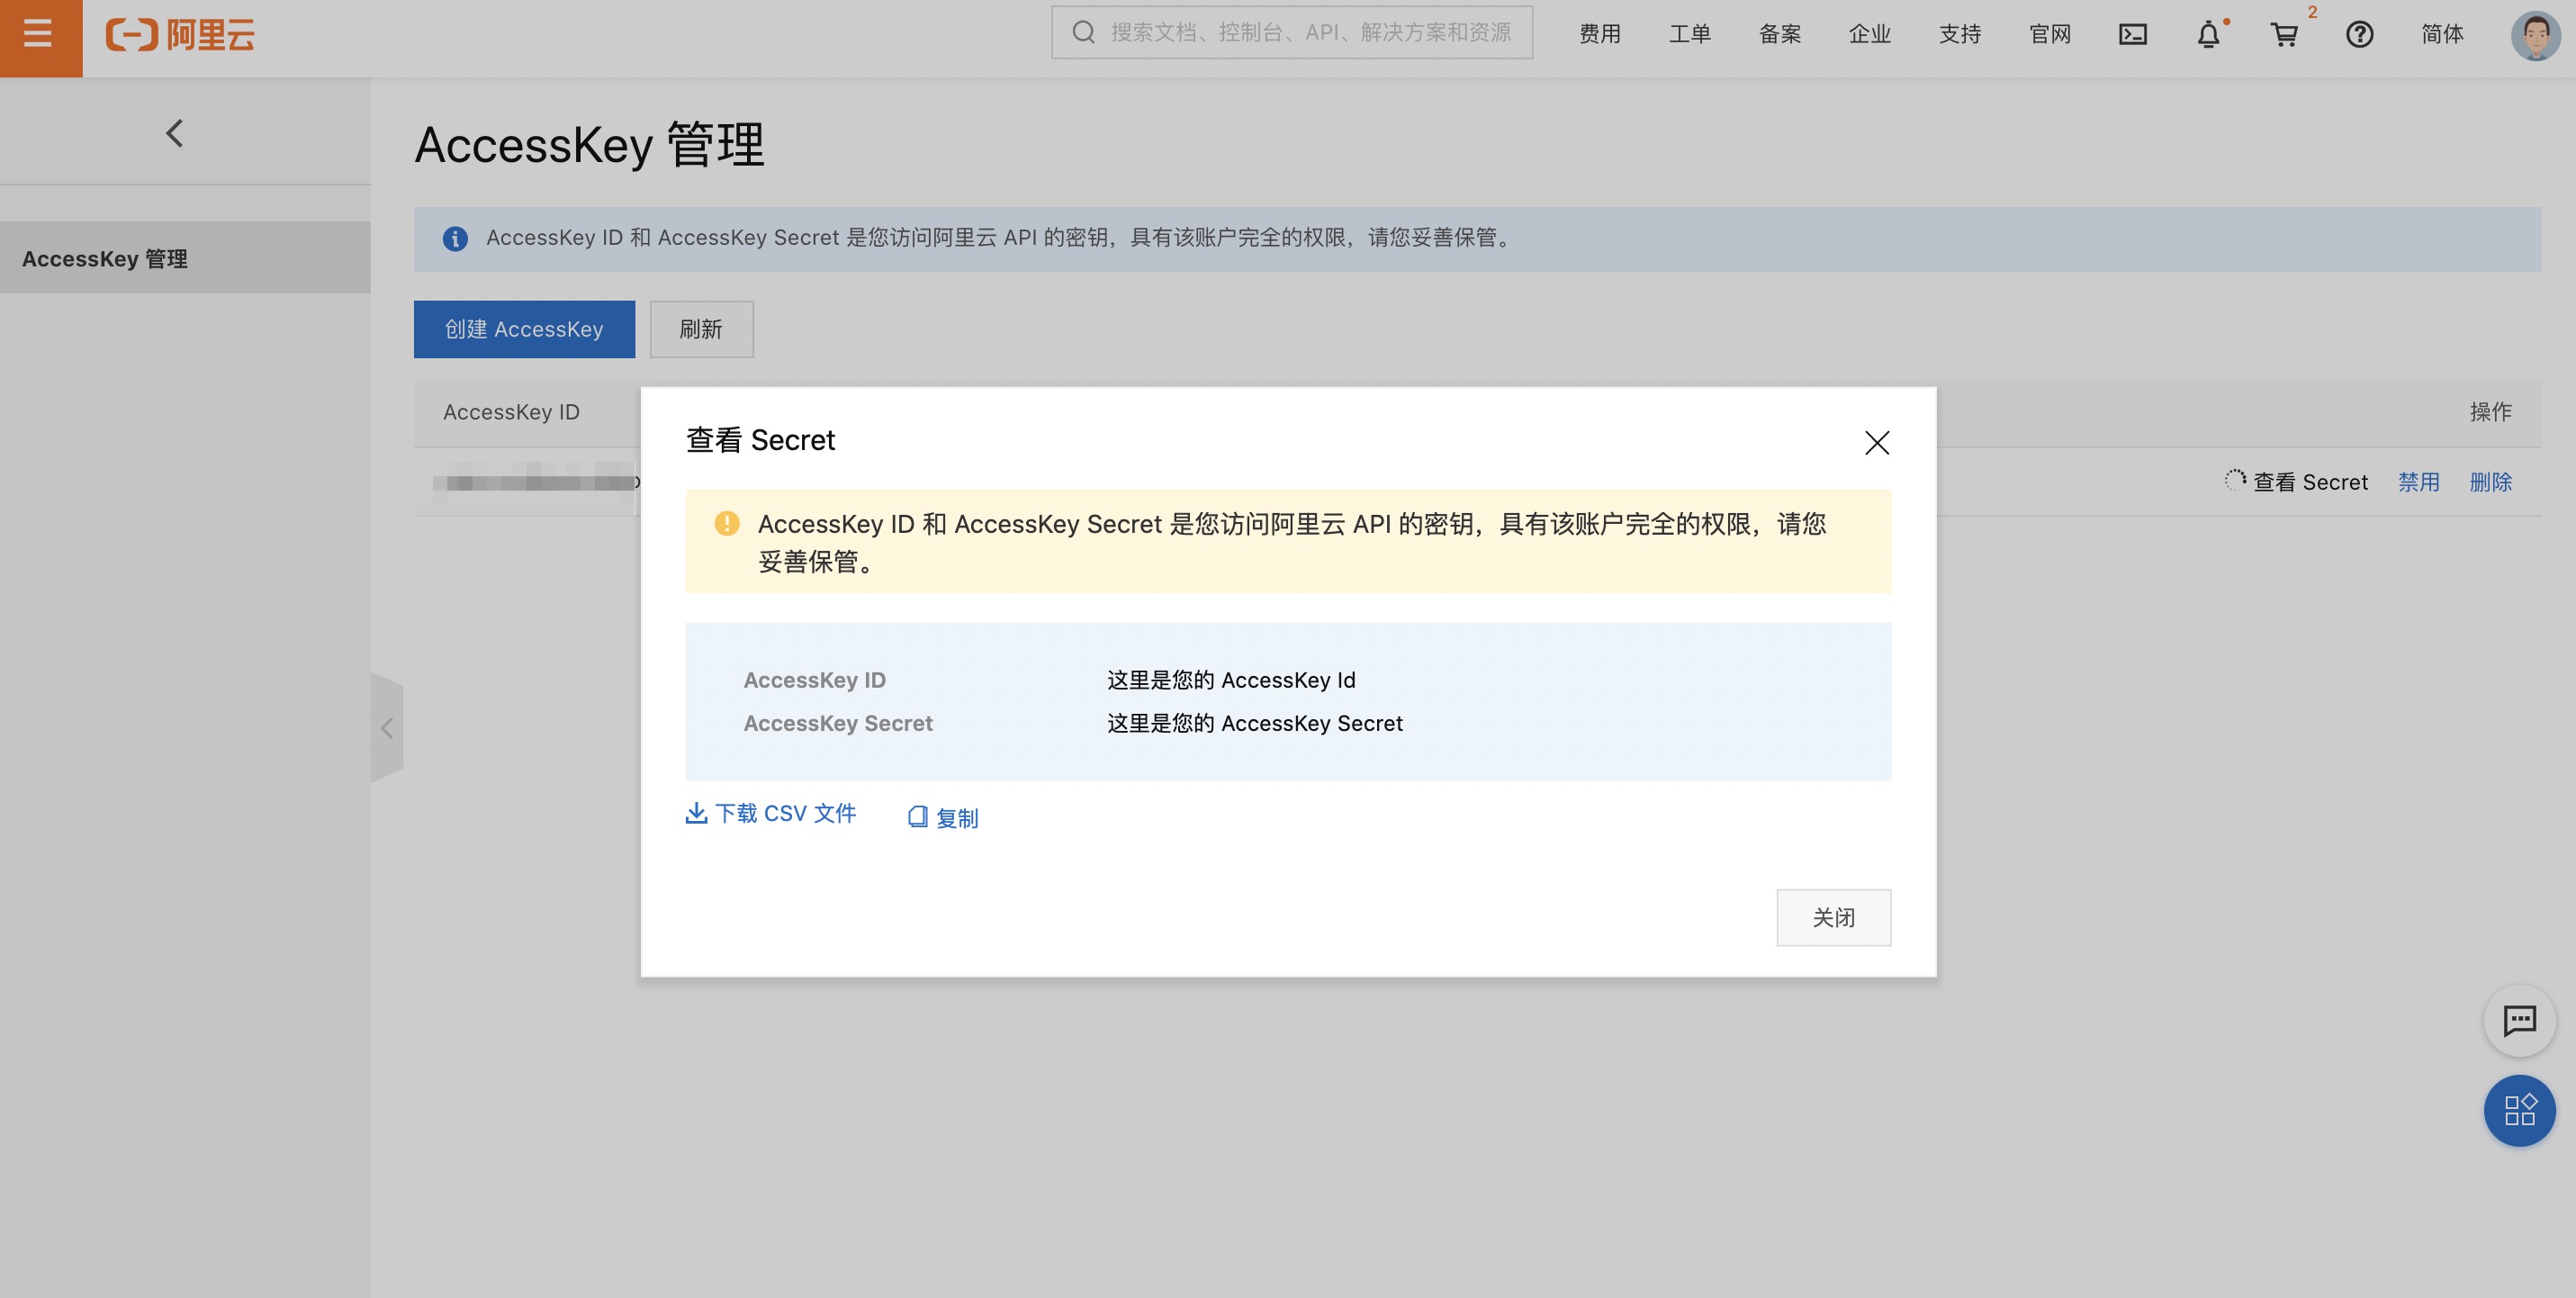
获取密钥页面:https://usercenter.console.aliyun.com/#/manage/ak
|
|
6
|
+
|
|
7
|
+
- 打开 [AccountId获取页面](https://account.console.aliyun.com/#/secure) 获取AccountId :
|
|
8
|
+
|
|
9
|
+
|
|
10
|
+
- 打开 [获取密钥页面](https://usercenter.console.aliyun.com/#/manage/ak) 获取密钥信息 :
|
|
11
|
+
|
|
12
|
+
|
|
13
|
+
|
|
14
|
+
> 云账号 AccessKey 是您访问阿里云 API 的密钥,具有该账户完全的权限,请您务必妥善保管!不要通过任何方式(e.g. Github)将 AccessKey 公开到外部渠道,以避免被他人利用而造成 [安全威胁](https://help.aliyun.com/knowledge_detail/54059.html?spm=5176.2020520153.0.0.57f1336a8PQ1KR) 。
|
|
15
|
+
> 强烈建议您遵循 [阿里云安全最佳实践](https://help.aliyun.com/document_detail/102600.html?spm=5176.2020520153.0.0.57f1336a8PQ1KR) ,使用 RAM 子用户 AccessKey 来进行 API 调用。
|
|
16
|
+
|
|
17
|
+
----
|
|
18
|
+
|
|
19
|
+
## 安全建议
|
|
20
|
+
|
|
21
|
+
- 创建独立的RAM用户
|
|
22
|
+
企业只需使用一个云账号。通过RAM为名下的不同操作员创建独立的RAM用户,进行分权管理,不使用云账号进行日常运维管理。
|
|
23
|
+
|
|
24
|
+
详情请参见[创建RAM用户](https://help.aliyun.com/document_detail/93720.html?spm=a2c4g.11186623.2.15.c79a1723Vwyvig#task-187540) 。
|
|
25
|
+
|
|
26
|
+
- 将控制台用户与API用户分离
|
|
27
|
+
不建议给一个RAM用户同时创建用于控制台操作的登录密码和用于API操作的访问密钥。
|
|
28
|
+
|
|
29
|
+
应用程序账号:只需要通过OpenAPI访问云资源,创建访问密钥即可。
|
|
30
|
+
员工账号:只需要通过控制台操作云资源,设置登录密码即可。
|
|
31
|
+
详情请参见[创建RAM用户](https://help.aliyun.com/document_detail/93720.html?spm=a2c4g.11186623.2.16.c79a1723Vwyvig#task-187540) 。
|
|
32
|
+
|
|
33
|
+
- 创建用户并进行分组
|
|
34
|
+
当云账号下有多个RAM用户时,可以通过创建用户组对职责相同的RAM用户进行分类并授权。
|
|
35
|
+
|
|
36
|
+
详情请参见[创建用户组](https://help.aliyun.com/document_detail/93724.html?spm=a2c4g.11186623.2.17.c79a1723Vwyvig#task-187540) 。
|
|
37
|
+
|
|
38
|
+
- 给不同用户组分配最小权限
|
|
39
|
+
您可以使用系统策略为用户或用户组绑定合理的权限策略,如果您需要更精细粒度的权限策略,也可以选择使用自定义策略。通过为用户或用户组授予最小权限,可以更好的限制用户对资源的操作权限。
|
|
40
|
+
|
|
41
|
+
详情请参见[创建自定义策略](https://help.aliyun.com/document_detail/93733.html?spm=a2c4g.11186623.2.18.c79a1723Vwyvig#task-glf-vwf-xdb) 。
|
|
42
|
+
|
|
43
|
+
- 为用户登录配置强密码策略
|
|
44
|
+
您可以通过RAM控制台设置密码策略,如密码长度、密码中必须包含元素、密码有效期等。如果允许RAM用户更改登录密码,那么应该要求RAM用户创建强密码并且定期轮换登录密码或访问密钥。
|
|
45
|
+
|
|
46
|
+
详情请参见[设置RAM用户安全策略](https://help.aliyun.com/document_detail/116414.html?spm=a2c4g.11186623.2.19.c79a1723Vwyvig#task-188786) 。
|
|
47
|
+
|
|
48
|
+
- 为云账号开启多因素认证
|
|
49
|
+
开启多因素认证(Multi-factor authentication,MFA)可以提高账号的安全性,在用户名和密码之外再增加一层安全保护。启用MFA后,用户登录阿里云时,系统将要求输入两层安全要素:
|
|
50
|
+
|
|
51
|
+
第一安全要素:用户名和密码
|
|
52
|
+
第二安全要素:多因素认证设备生成的验证码
|
|
53
|
+
详情请参见[为云账号设置多因素认证](https://help.aliyun.com/document_detail/28635.html?spm=a2c4g.11186623.2.20.c79a1723Vwyvig#task-u2b-ww2-xdb) 。
|
|
54
|
+
|
|
55
|
+
- 为用户开启SSO单点登录功能
|
|
56
|
+
开启SSO单点登录后,企业内部账号进行统一的身份认证,实现使用企业本地账号登录阿里云才能访问相应资源。
|
|
57
|
+
|
|
58
|
+
详情请参见[SSO概览](https://help.aliyun.com/document_detail/93684.html?spm=a2c4g.11186623.2.21.c79a1723Vwyvig#concept-etn-fjc-mfb) 。
|
|
59
|
+
|
|
60
|
+
- 不要为云账号创建访问密钥
|
|
61
|
+
由于云账号对名下资源有完全控制权限,AccessKey与登录密码具有同样的权力,AccessKey用于程序访问,登录密码用于控制台登录。为了避免因访问密钥泄露带来的信息泄露,不建议您创建云账号访问密钥并使用该密钥进行日常工作。
|
|
62
|
+
|
|
63
|
+
您可以通过为RAM用户创建访问密钥,使用RAM用户进行日常工作。
|
|
64
|
+
|
|
65
|
+
详情请参见[为RAM用户创建访问密钥](https://help.aliyun.com/document_detail/116401.html?spm=a2c4g.11186623.2.22.c79a1723Vwyvig#task-188766) 。
|
|
66
|
+
|
|
67
|
+
- 使用策略限制条件来增强安全性
|
|
68
|
+
要求用户必须使用安全信道(例如:SSL)、在指定时间范围或在指定源IP条件下才能操作指定的云资源。
|
|
69
|
+
|
|
70
|
+
详情请参见[权限策略基本元素](https://help.aliyun.com/document_detail/93738.html?spm=a2c4g.11186623.2.23.c79a1723Vwyvig#concept-xg5-51g-xdb) 。
|
|
71
|
+
|
|
72
|
+
- 集中控制云资源
|
|
73
|
+
阿里云默认云账号是资源的拥有者,掌握完全控制权。RAM用户对资源只有使用权,没有所有权。这一特性可以方便您对用户创建的实例或数据进行集中控制。
|
|
74
|
+
|
|
75
|
+
当用户离开组织:只需要将对应的账号移除,即可撤销所有权限。
|
|
76
|
+
当用户加入组织:只需创建新的账号,设置登录密码或访问密钥并为RAM用户授权。
|
|
77
|
+
详情请参见为[RAM用户授权](https://help.aliyun.com/document_detail/116146.html?spm=a2c4g.11186623.2.24.c79a1723Vwyvig#task-187800) 。
|
|
78
|
+
|
|
79
|
+
- 使用STS给用户授权临时权限
|
|
80
|
+
STS (Security Token Service)是RAM的一个扩展授权服务,使用STS访问令牌可以给用户授予临时权限,您可以根据需要来定义访问令牌的权限和自动过期时间,可以让授权更加可控。
|
|
81
|
+
|
|
82
|
+
详情请参见[什么是STS](https://help.aliyun.com/document_detail/28756.html?spm=a2c4g.11186623.2.25.c79a1723Vwyvig#concept-ong-5nv-xdb) 。
|
|
@@ -0,0 +1,12 @@
|
|
|
1
|
+
# AWS密钥获取
|
|
2
|
+
|
|
3
|
+
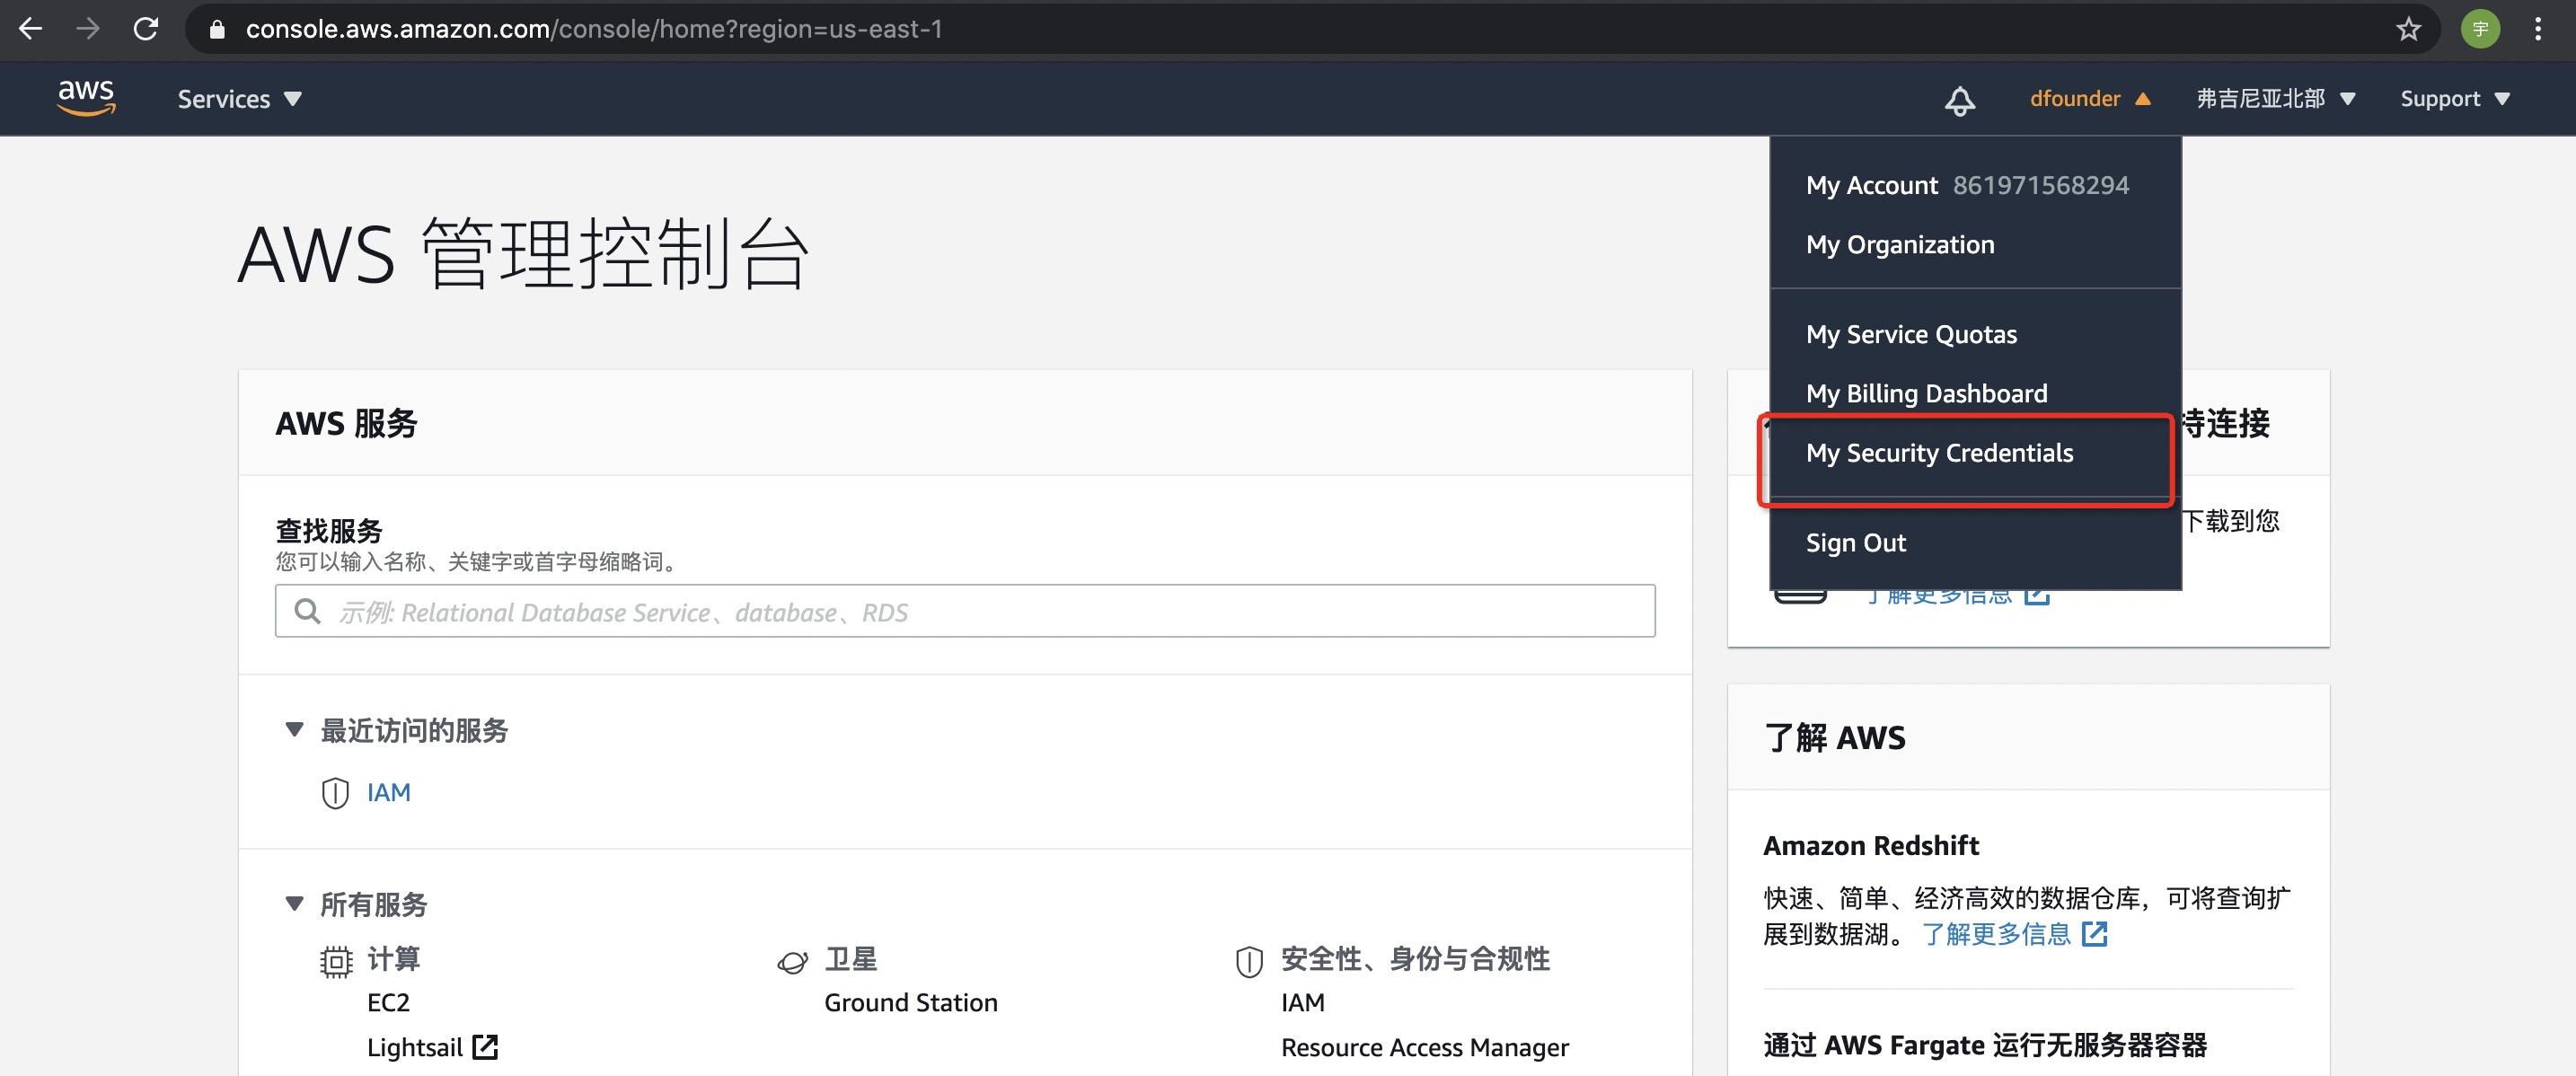
AWS官网:https://www.AWS.com
|
|
4
|
+
|
|
5
|
+
- 打开 [AWS官网](https://www.AWS.com) 进行登录,登录后选择右上角【我的凭证】:
|
|
6
|
+
|
|
7
|
+
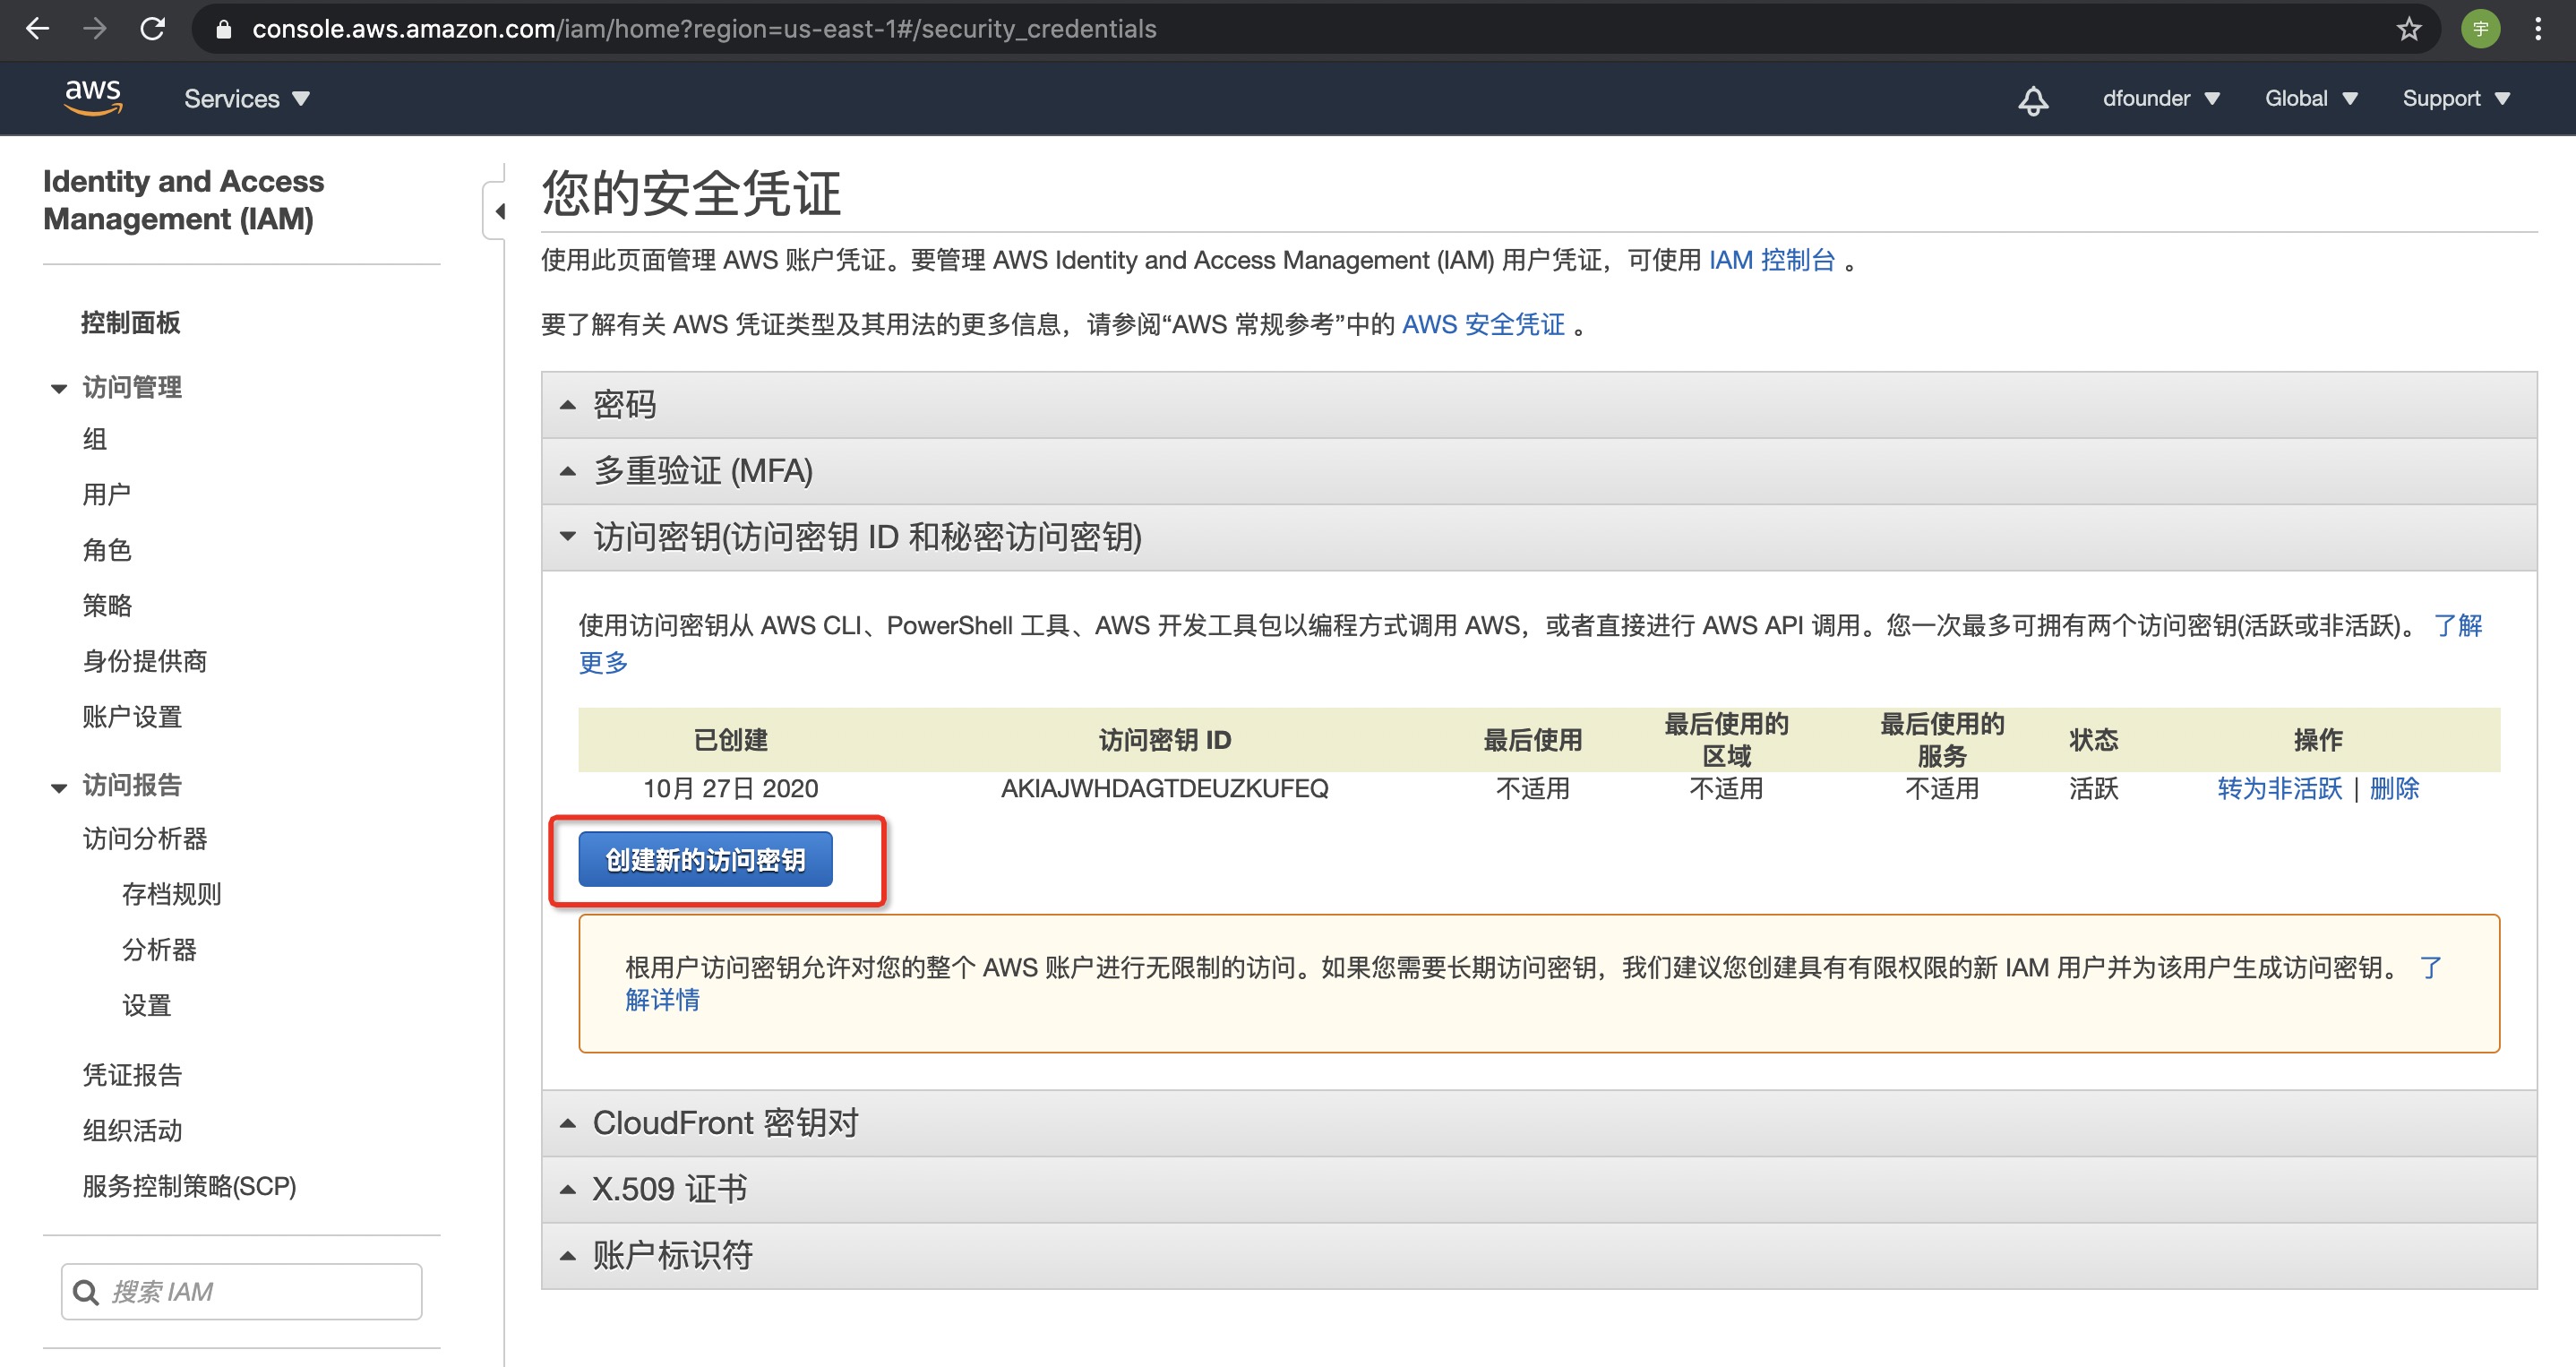
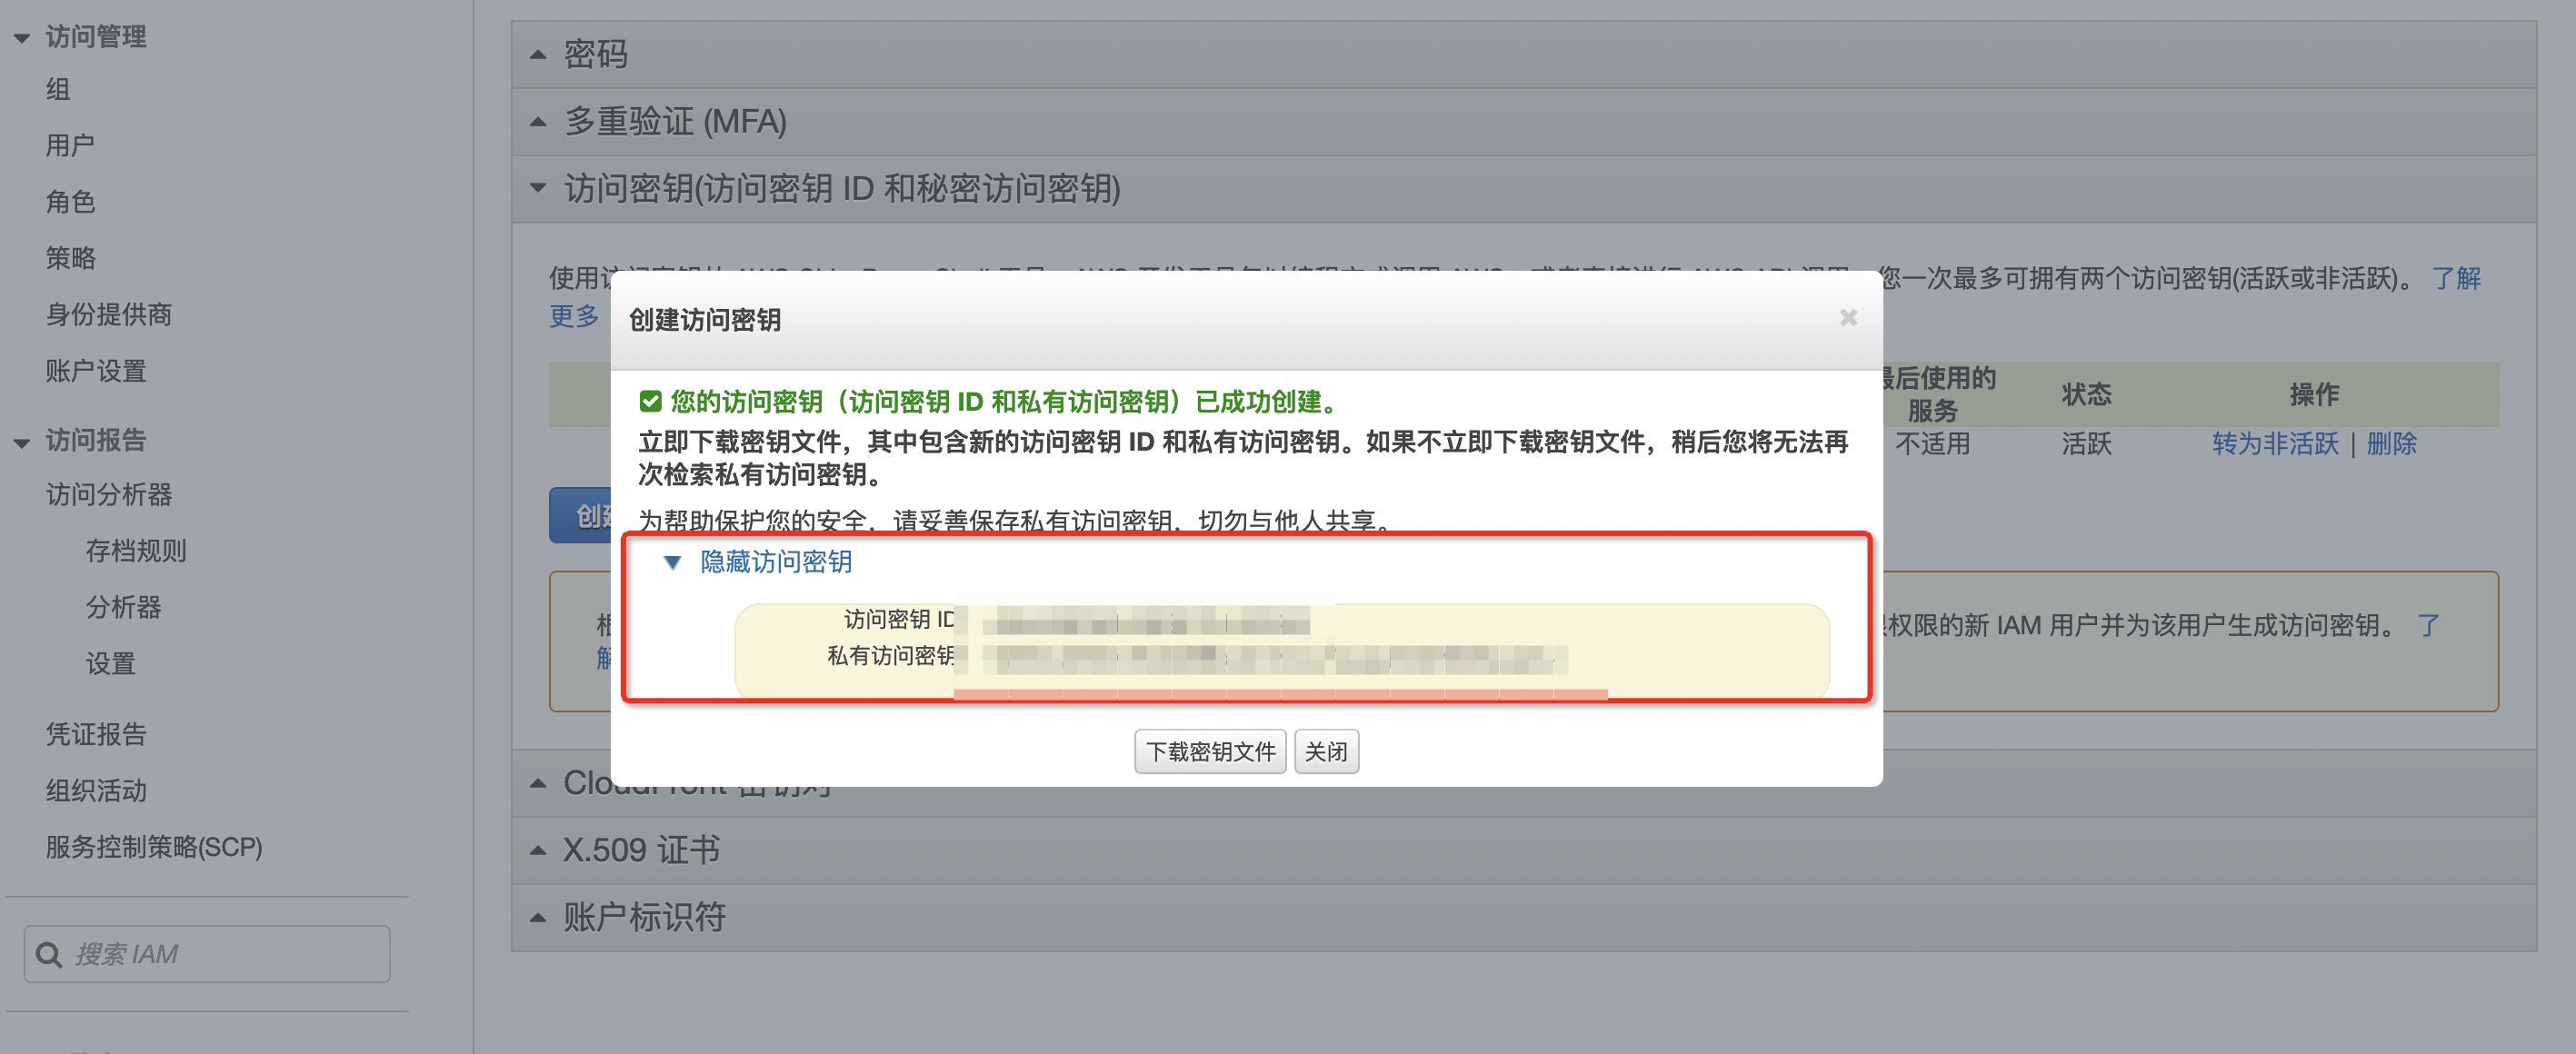
- 点击【访问密钥】,并且【创建新的访问密钥】:
|
|
8
|
+
|
|
9
|
+
- 完成之后即可看到密钥详情:
|
|
10
|
+
|
|
11
|
+
|
|
12
|
+
> 为帮助保护您的安全,请妥善保存私有访问密钥,切勿与他人共享。
|
|
@@ -0,0 +1,9 @@
|
|
|
1
|
+
# Azure密钥获取
|
|
2
|
+
|
|
3
|
+
Azure官网:https://www.azure.com
|
|
4
|
+
|
|
5
|
+
- 通过 [Azure网](https://portal.azure.com/) 进入所创建的Azure Web App的管理界面之后进入Identity管理界面
|
|
6
|
+
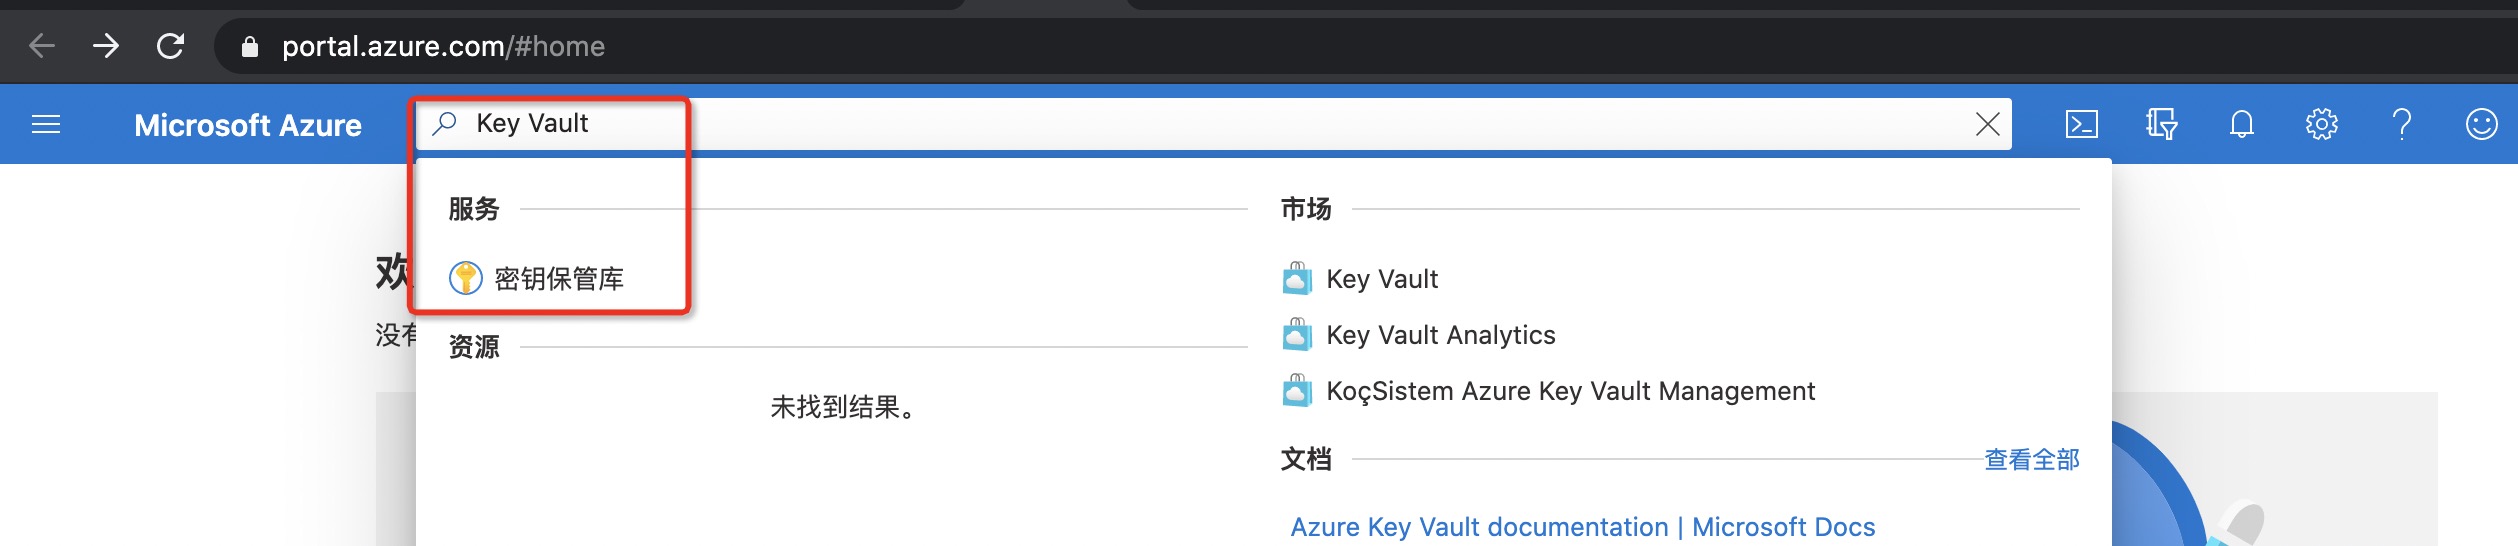
- 在Azure网站最上方的搜索栏里搜索Key Vault关键字并进入Key Vault管理总界面
|
|
7
|
+
|
|
8
|
+
- 点击进入创建好的Azure Key Vault实例之后进入Access Policies管理界面
|
|
9
|
+
- 击添加访问策略按钮,为需要授权的principal添加权限后点击保存按钮即可
|
|
@@ -0,0 +1,8 @@
|
|
|
1
|
+
# 百度云密钥获取
|
|
2
|
+
|
|
3
|
+
百度云官网:https://cloud.baidu.com/
|
|
4
|
+
|
|
5
|
+
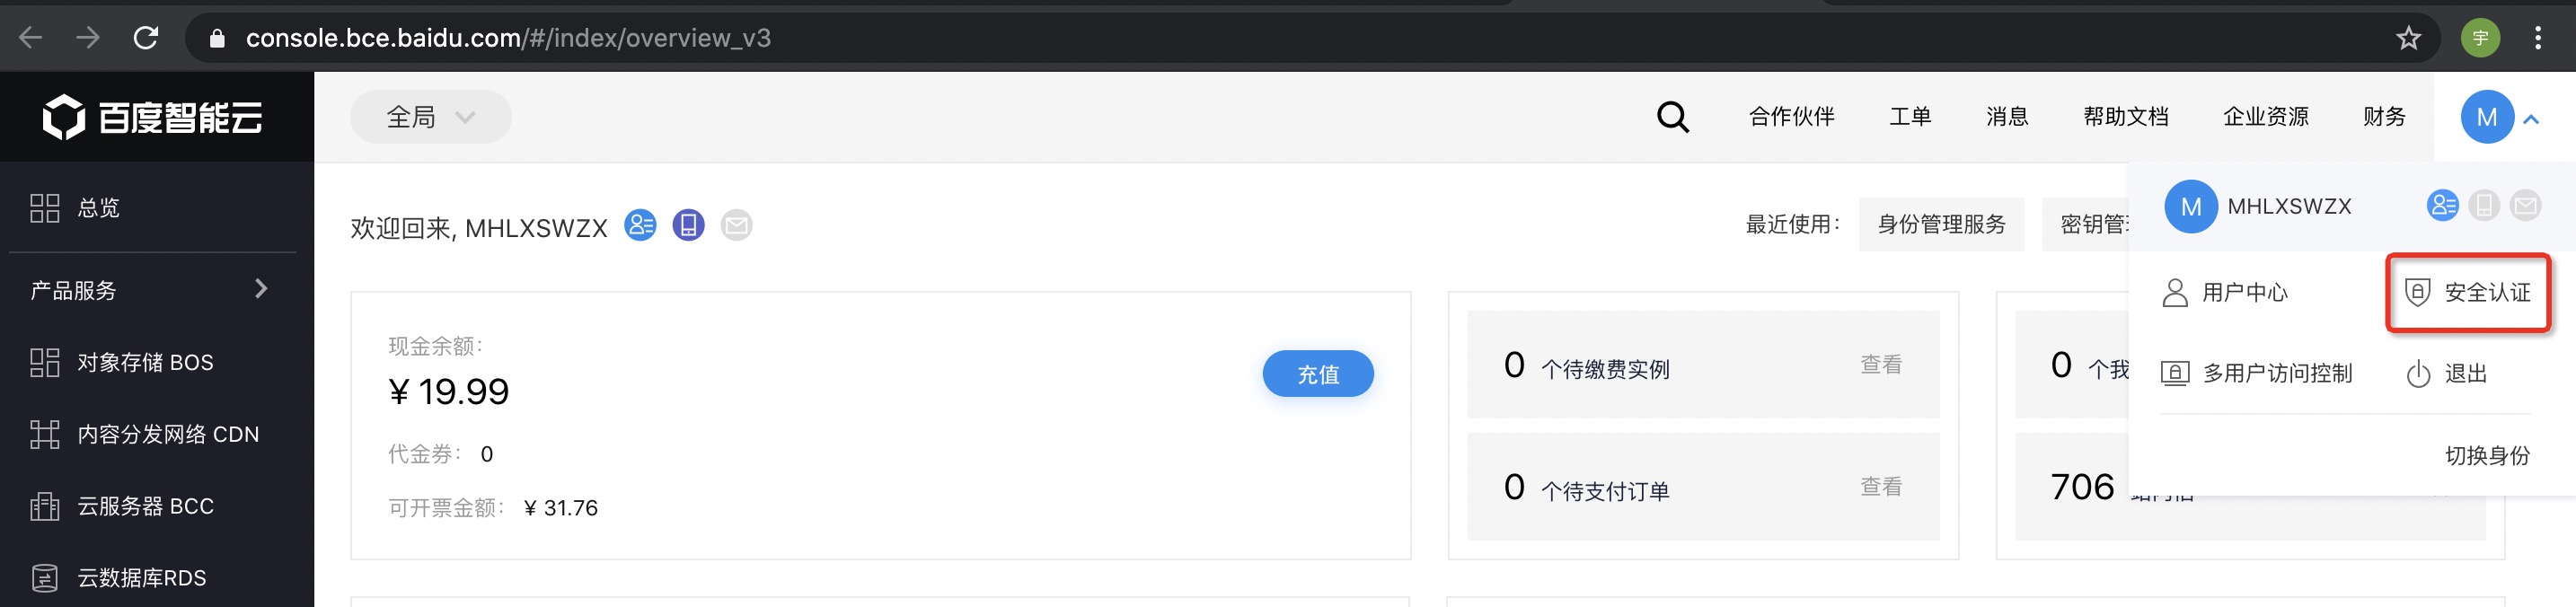
- 打开 [百度云官网](https://cloud.baidu.com/) 进行登录,登录后选择右上角安全认证 :
|
|
6
|
+
|
|
7
|
+
- 点击Access Key ID右侧的“显示”,可查看其对应的Secret Access Key,点击“隐藏”可隐藏对应的Secret Access Key:
|
|
8
|
+

|
|
@@ -0,0 +1,21 @@
|
|
|
1
|
+
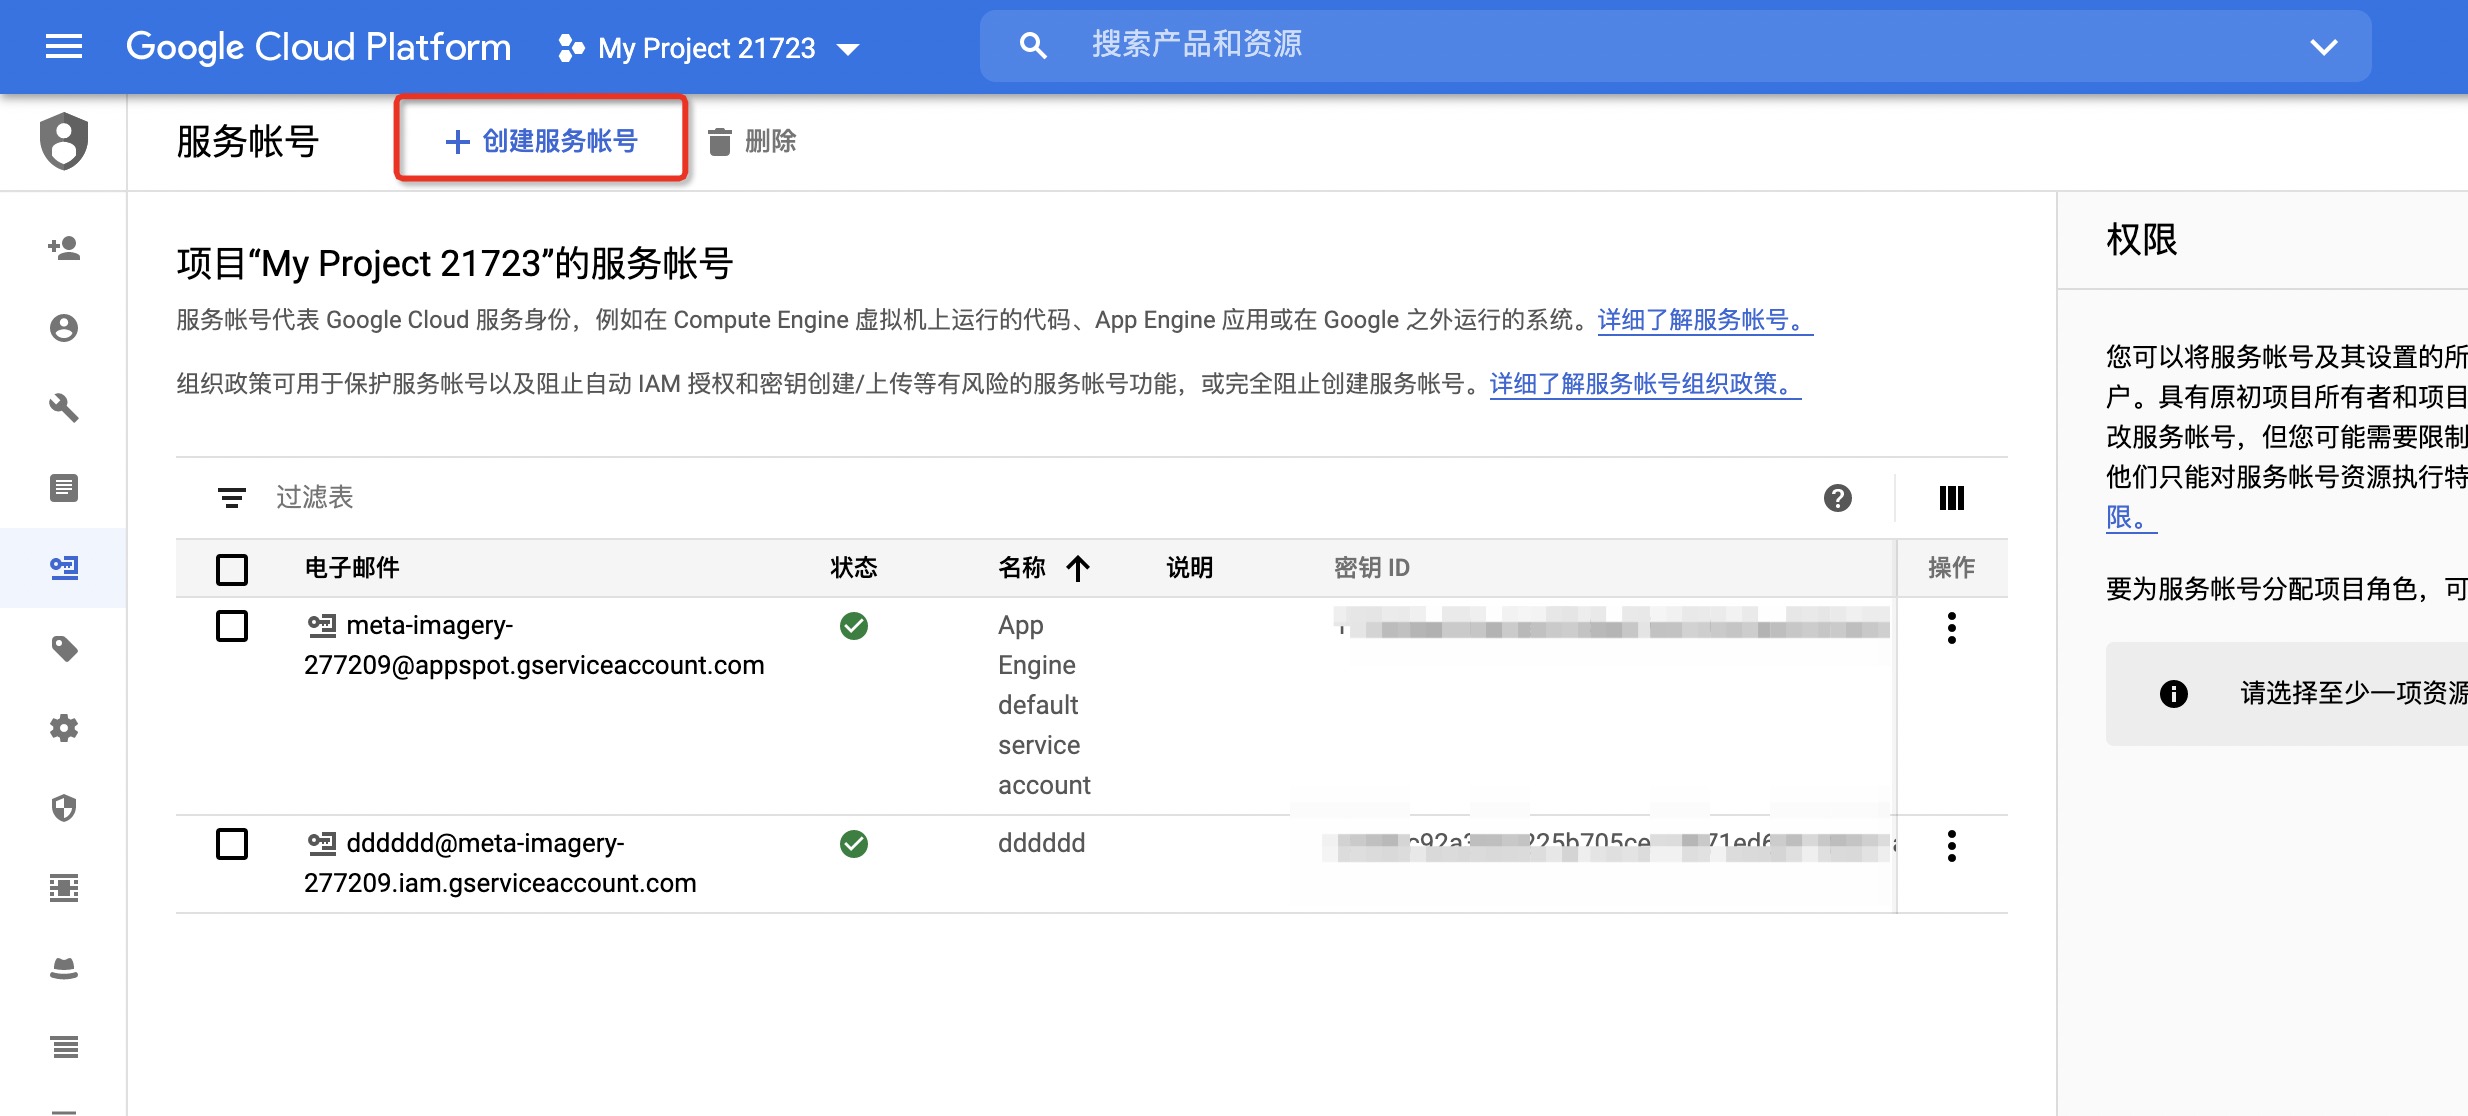
# Google Cloud密钥获取
|
|
2
|
+
|
|
3
|
+
Google Cloud官网:https://cloud.google.com
|
|
4
|
+
|
|
5
|
+
- 打开 [Google Cloud官网](https://cloud.google.com) 进行登录,选择对应项目,进入到项目中:
|
|
6
|
+

|
|
7
|
+
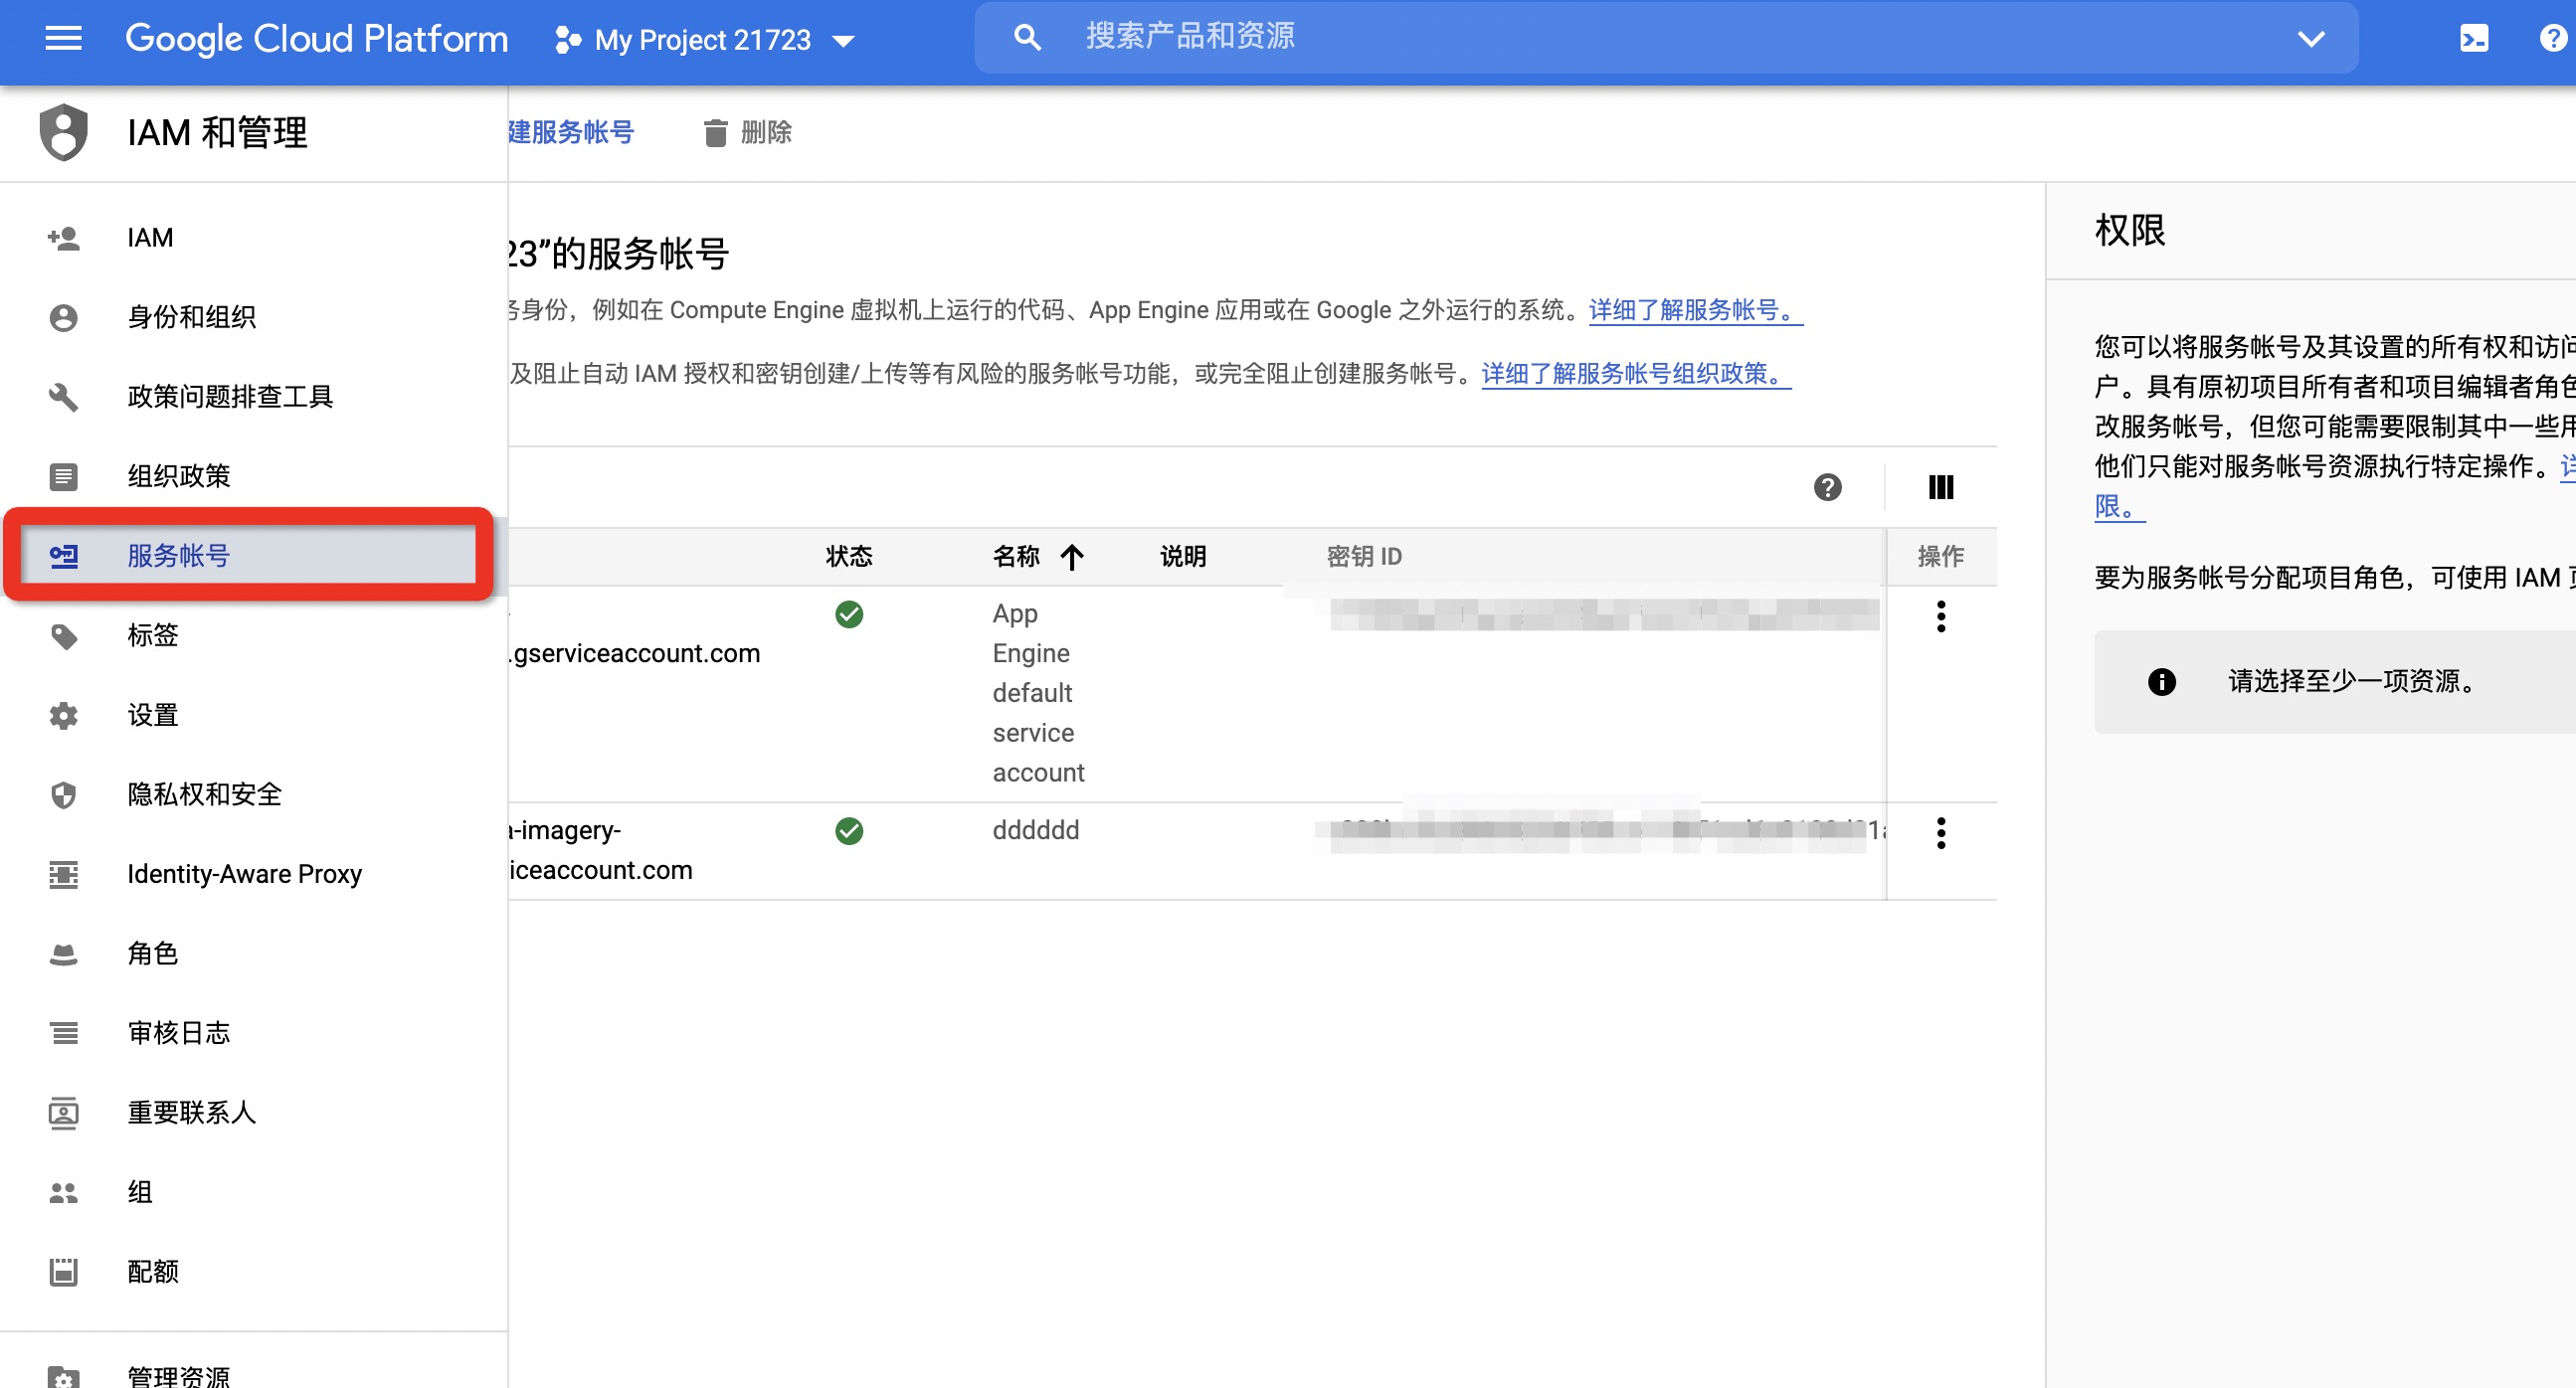
- 点击左侧的【服务账号】:
|
|
8
|
+
|
|
9
|
+
- 再点击上面的【创建服务账号】:
|
|
10
|
+
|
|
11
|
+
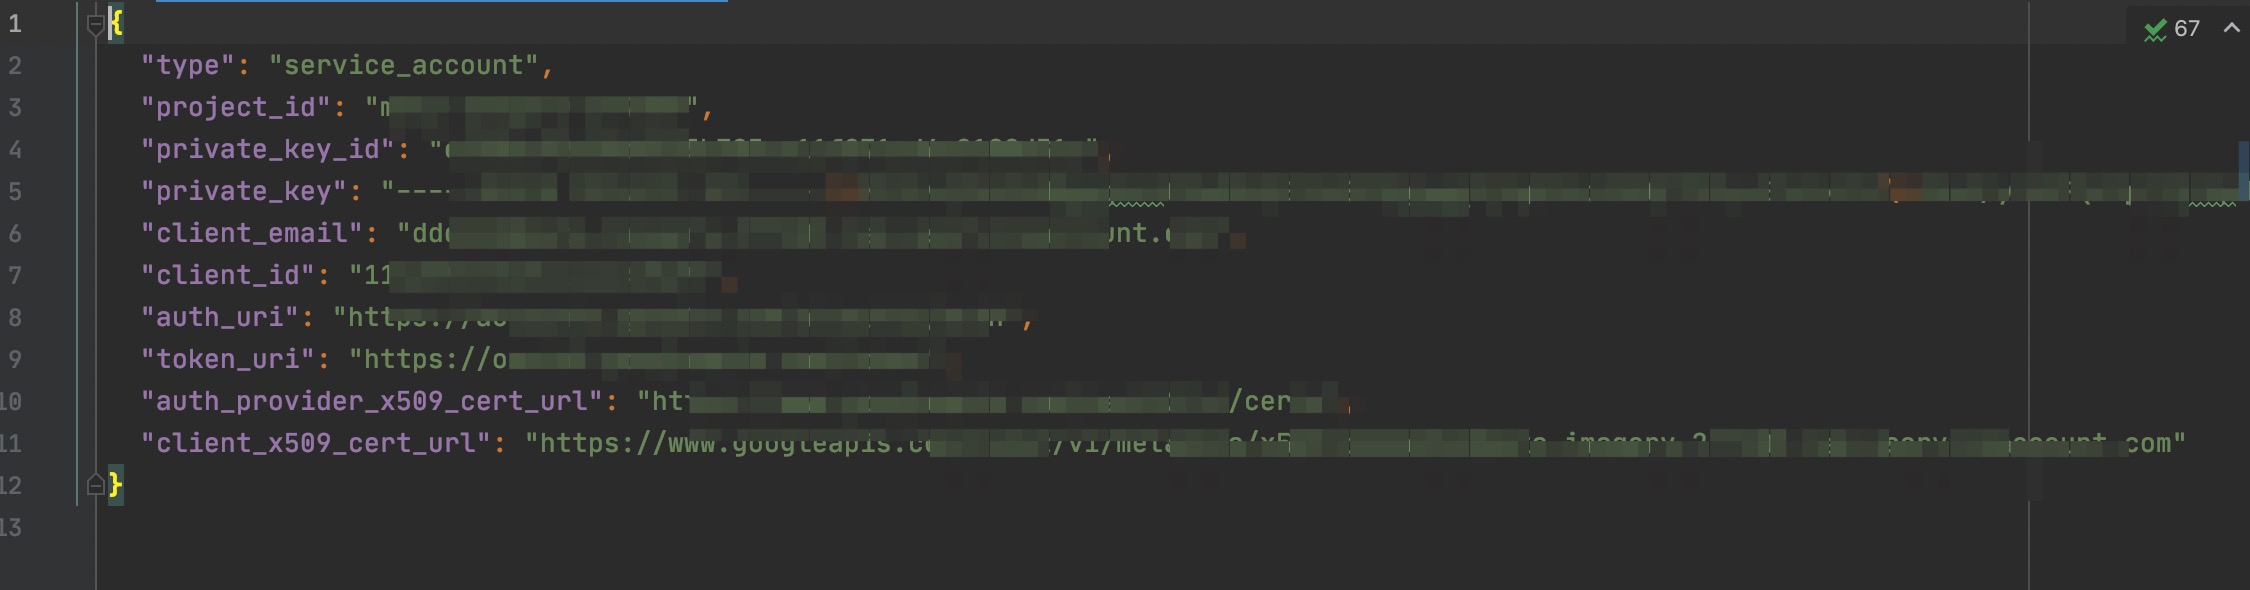
- 创建完成会下载对应文件】:
|
|
12
|
+
|
|
13
|
+
- 将该文件存储到本地,并将存储的绝对路径配置到`s`工具所需的`PrivateKeyData`中
|
|
14
|
+
|
|
15
|
+
> 当您在应用中使用 API 密钥时,请确保其在存储和传输期间均安全无虞。公开泄露凭据可能会导致您的帐号遭盗用,这可能会使您的帐号产生预料之外的费用。为帮助确保 API 密钥的安全,请遵循以下最佳做法:
|
|
16
|
+
> - 不要直接在代码中嵌入 API 密钥。嵌入代码中的 API 密钥可能会被意外泄露给公众。例如,您可能忘记从共享的代码中移除密钥。您可以将 API 密钥存储在环境变量或应用的源代码树之外的文件中,而不是将 API 密钥嵌入应用中。
|
|
17
|
+
> - 不要将 API 密钥存储在应用的源代码树内的文件中。如果将 API 密钥存储在文件中,请将文件保留在应用的源代码树之外,这有助于确保密钥最终不会进入源代码控制系统。 如果您使用公共源代码管理系统(如 GitHub),这种做法尤为重要。
|
|
18
|
+
> - 设置应用和 [API 密钥限制](https://cloud.google.com/docs/authentication/api-keys#api_key_restrictions) 。 通过添加限制,您可以降低 API 密钥被盗用时造成的影响。
|
|
19
|
+
> - 删除不需要的 API 密钥以最大限度地减少遭到攻击的风险。
|
|
20
|
+
> - 定期重新生成 API 密钥。您可以在[“凭据”页面](https://console.cloud.google.com/apis/credentials?_ga=2.119850376.1642904664.1603769673-1032325965.1594091682) 中,针对每个密钥点击重新生成密钥,从而重新生成 API 密钥。然后,更新您的应用以使用新生成的密钥。生成替换密钥后,旧密钥将在 24 小时后失效。
|
|
21
|
+
> - 公开发布代码前,先检查您的代码,确保您的代码不包含 API 密钥或任何其他私密信息,然后再公开代码。
|
|
@@ -0,0 +1,52 @@
|
|
|
1
|
+
# 华为云密钥获取
|
|
2
|
+
|
|
3
|
+
华为云官网:https://www.huaweicloud.com/
|
|
4
|
+
|
|
5
|
+
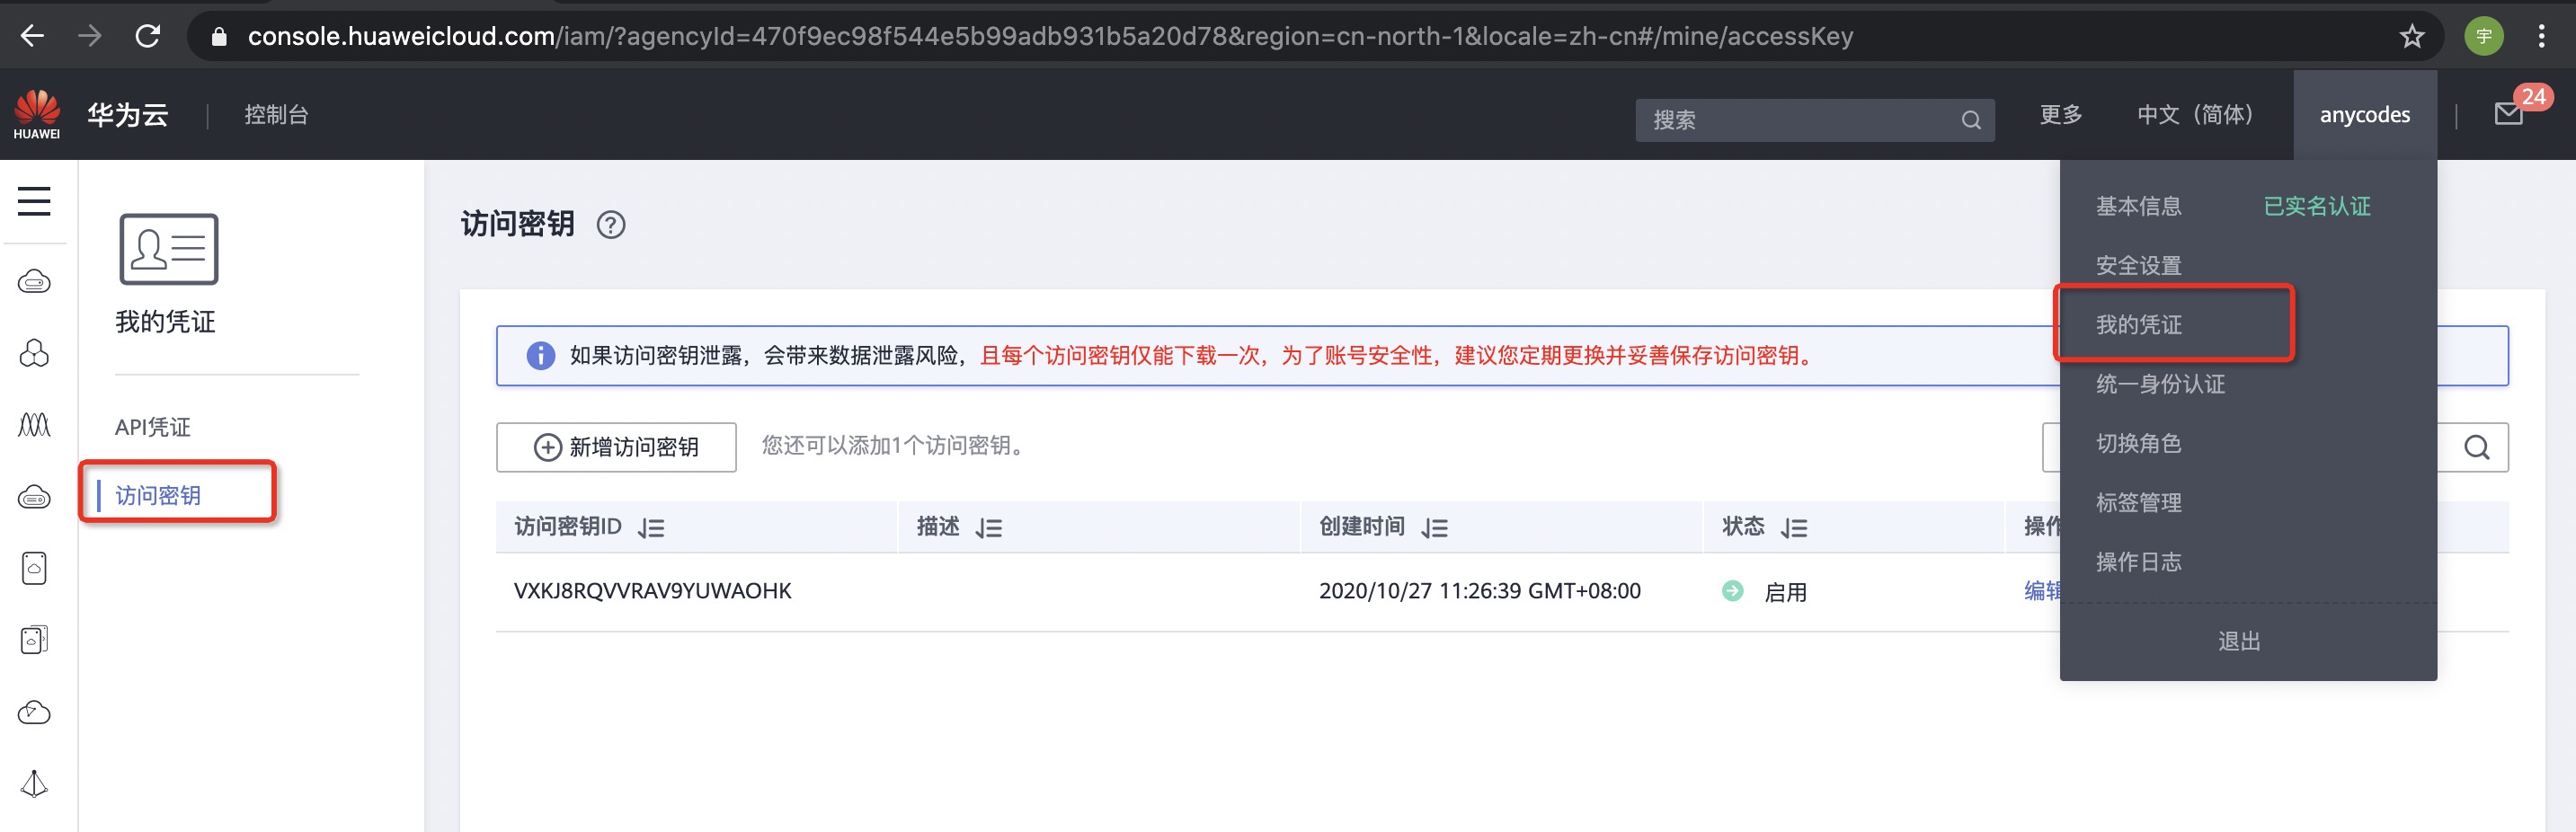
- 打开 [华为云官网](https://www.huaweicloud.com/) 进行登录,登录后选择右上角【我的凭证】再选择左侧的 【访问密钥】:
|
|
6
|
+
|
|
7
|
+
- 点击新增访问密钥,会弹出提示框进行相关安全验证,通过之后可以看到:
|
|
8
|
+
|
|
9
|
+
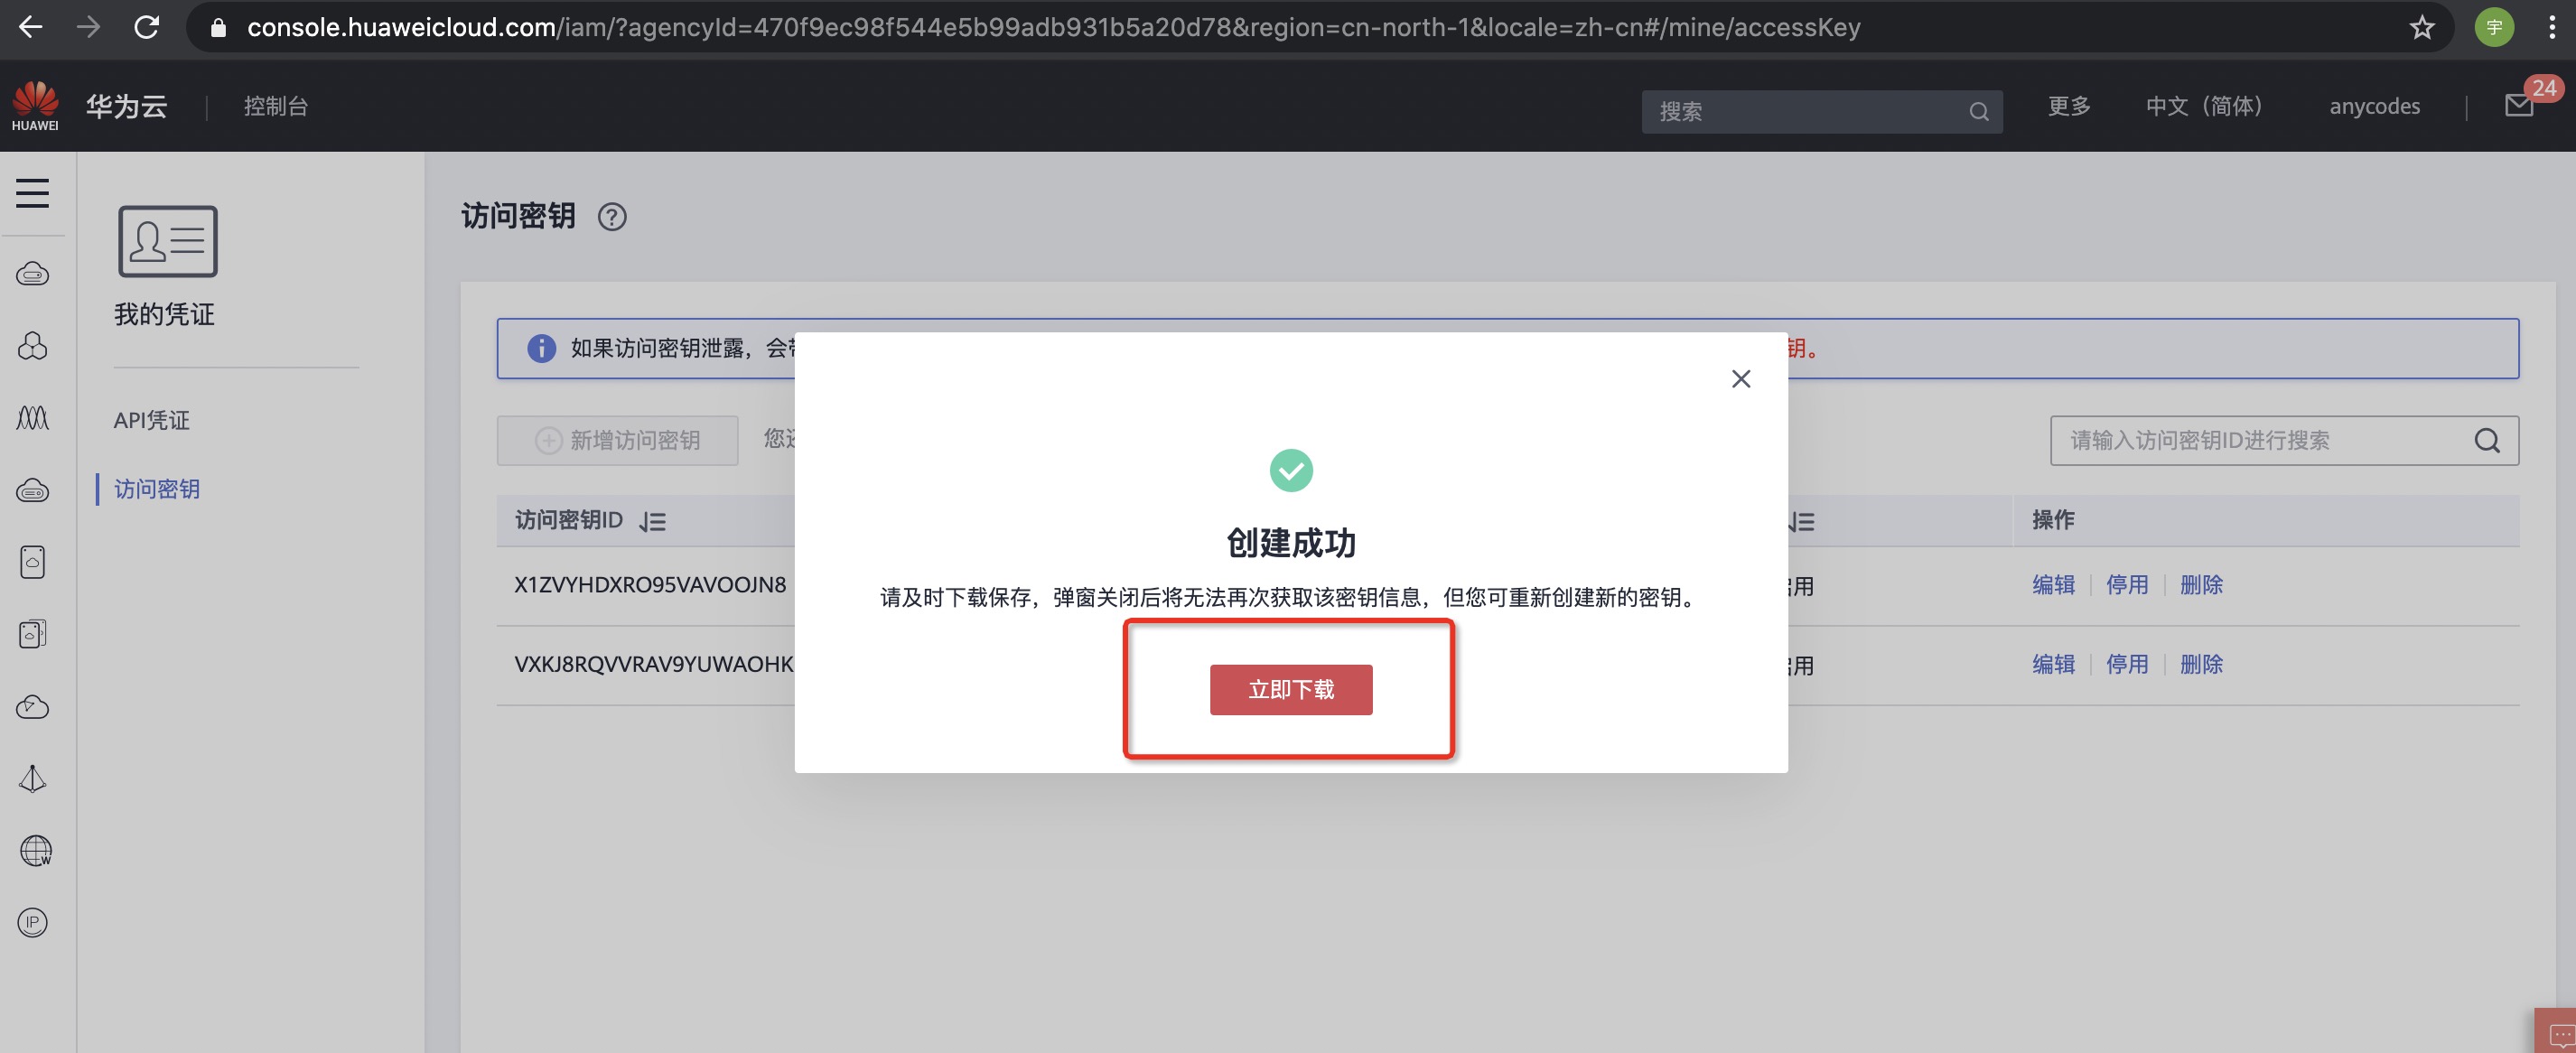
- 下载之后可以看到自己的密钥信息:
|
|
10
|
+
|
|
11
|
+
|
|
12
|
+
> 如果访问密钥泄露,会带来数据泄露风险,且每个访问密钥仅能下载一次,为了账号安全性,建议您定期更换并妥善保存访问密钥。
|
|
13
|
+
|
|
14
|
+
------
|
|
15
|
+
|
|
16
|
+
## 安全建议
|
|
17
|
+
|
|
18
|
+
- 不给华为云账号创建访问密钥
|
|
19
|
+
华为云账号是您华为云资源归属、资源使用计费的主体,对其所拥有的资源及云服务具有完全的访问权限。密码与访问密钥(AK/SK)都是账号的身份凭证,具有同等效力,密码用于登录界面控制台,是您必须具备的身份凭证,访问密钥用于使用开发工具进行编程调用,是第二个身份凭证,为辅助性质,非必须具备。为了提高账号安全性,建议您仅使用密码登录控制台即可,不要给账号创建第二个身份凭证(访问密钥),避免因访问密钥泄露带来的信息安全风险。
|
|
20
|
+
|
|
21
|
+
- 不将访问密钥嵌入到代码中
|
|
22
|
+
当您使用API、CLI、SDK等开发工具来访问云服务时,请勿直接将访问密钥嵌入到代码中,减少访问密钥被泄露的风险。
|
|
23
|
+
|
|
24
|
+
- 创建单独的IAM用户
|
|
25
|
+
如果有任何人需要访问您华为云账号中的资源,请不要将账号的密码共享给他们,而是在您的账号中给他们创建单独的IAM用户并分配相应的权限,同时,作为华为云账号主体,建议您不使用账号访问华为云,而是为自己创建一个IAM用户,并授予该用户管理权限,以使用该IAM用户代替账号进行日常管理工作,保护账号的安全。
|
|
26
|
+
|
|
27
|
+
- 授予最小权限
|
|
28
|
+
最小权限原则是标准的安全建议,您可以使用IAM提供的系统权限,或者自己创建自定义策略,给账号中的用户仅授予刚好能完成工作所需的权限,通过最小权限原则,可以帮助您安全地控制用户对华为云资源的访问。
|
|
29
|
+
|
|
30
|
+
同时,建议为使用API、CLI、SDK等开发工具访问云服务的IAM用户,授予自定义策略,通过精细的权限控制,减小因访问密钥泄露对您的账号造成的影响。
|
|
31
|
+
|
|
32
|
+
- 开启虚拟MFA功能
|
|
33
|
+
Multi-Factor Authentication (简称MFA) 是一种非常简单的安全实践方法,建议您给华为云账号以及您账号中具备较高权限的用户开启MFA功能,它能够在用户名和密码之外再额外增加一层保护。启用MFA后,用户登录控制台时,系统将要求用户输入用户名和密码(第一安全要素),以及来自其MFA设备的验证码(第二安全要素)。这些多重要素结合起来将为您的账户和资源提供更高的安全保护。
|
|
34
|
+
|
|
35
|
+
MFA设备可以基于硬件也可以基于软件,系统目前仅支持基于软件的虚拟MFA,虚拟MFA是能产生6位数字认证码的应用程序,此类应用程序可在移动硬件设备(包括智能手机)上运行,非常方便。
|
|
36
|
+
|
|
37
|
+
- 设置强密码策略
|
|
38
|
+
在IAM控制台设置强密码策略,例如密码最小长度、密码中同一字符连续出现的最大次数、密码不能与历史密码相同,保证用户使用复杂程度高的强密码。
|
|
39
|
+
|
|
40
|
+
- 设置敏感操作
|
|
41
|
+
设置敏感操作后,如果您或者您账号中的用户进行敏感操作时,例如删除资源、生成访问密钥等,需要输入密码和验证码进行验证,避免误操作带来的风险和损失。
|
|
42
|
+
|
|
43
|
+
- 定期修改身份凭证
|
|
44
|
+
如果您不知道自己的密码或访问密钥已泄露,定期进行修改可以将不小心泄露的风险降至最低。
|
|
45
|
+
|
|
46
|
+
定期轮换密码可以通过设置密码有效期策略进行,您以及您账号中的用户在设置的时间内必须修改密码,否则密码将会失效,IAM会在密码到期前15天开始提示用户修改密码。
|
|
47
|
+
轮换访问密钥可以通过创建两个访问密钥进行,将两个访问密钥作为一主一备,一开始先使用主访问密钥一,一段时间后,使用备访问密钥二,然后在控制台删除主访问密钥一,并重新生成一个访问密钥,在您的应用程序中定期轮换使用。
|
|
48
|
+
|
|
49
|
+
- 删除不需要的身份凭证
|
|
50
|
+
对于仅需要登录控制台的IAM用户,不需要使用访问密钥,请不要给他们创建,或者及时删除访问密钥。您还可以通过账号中IAM用户的“最近一次登录时间”,来判断该用户的凭证是否已经属于不需要的范畴,对于长期未登录的用户,请及时修改他们的身份凭证,包括修改密码和删除访问密钥,您还可以设置“账号停用策略”来控制长期未使用的账号到期自动停用。
|
|
51
|
+
|
|
52
|
+
|
|
@@ -0,0 +1,41 @@
|
|
|
1
|
+
# 腾讯云密钥获取
|
|
2
|
+
|
|
3
|
+
腾讯云官网:https://cloud.tencent.com/
|
|
4
|
+
获取密钥页面:https://console.cloud.tencent.com/cam/capi
|
|
5
|
+
|
|
6
|
+
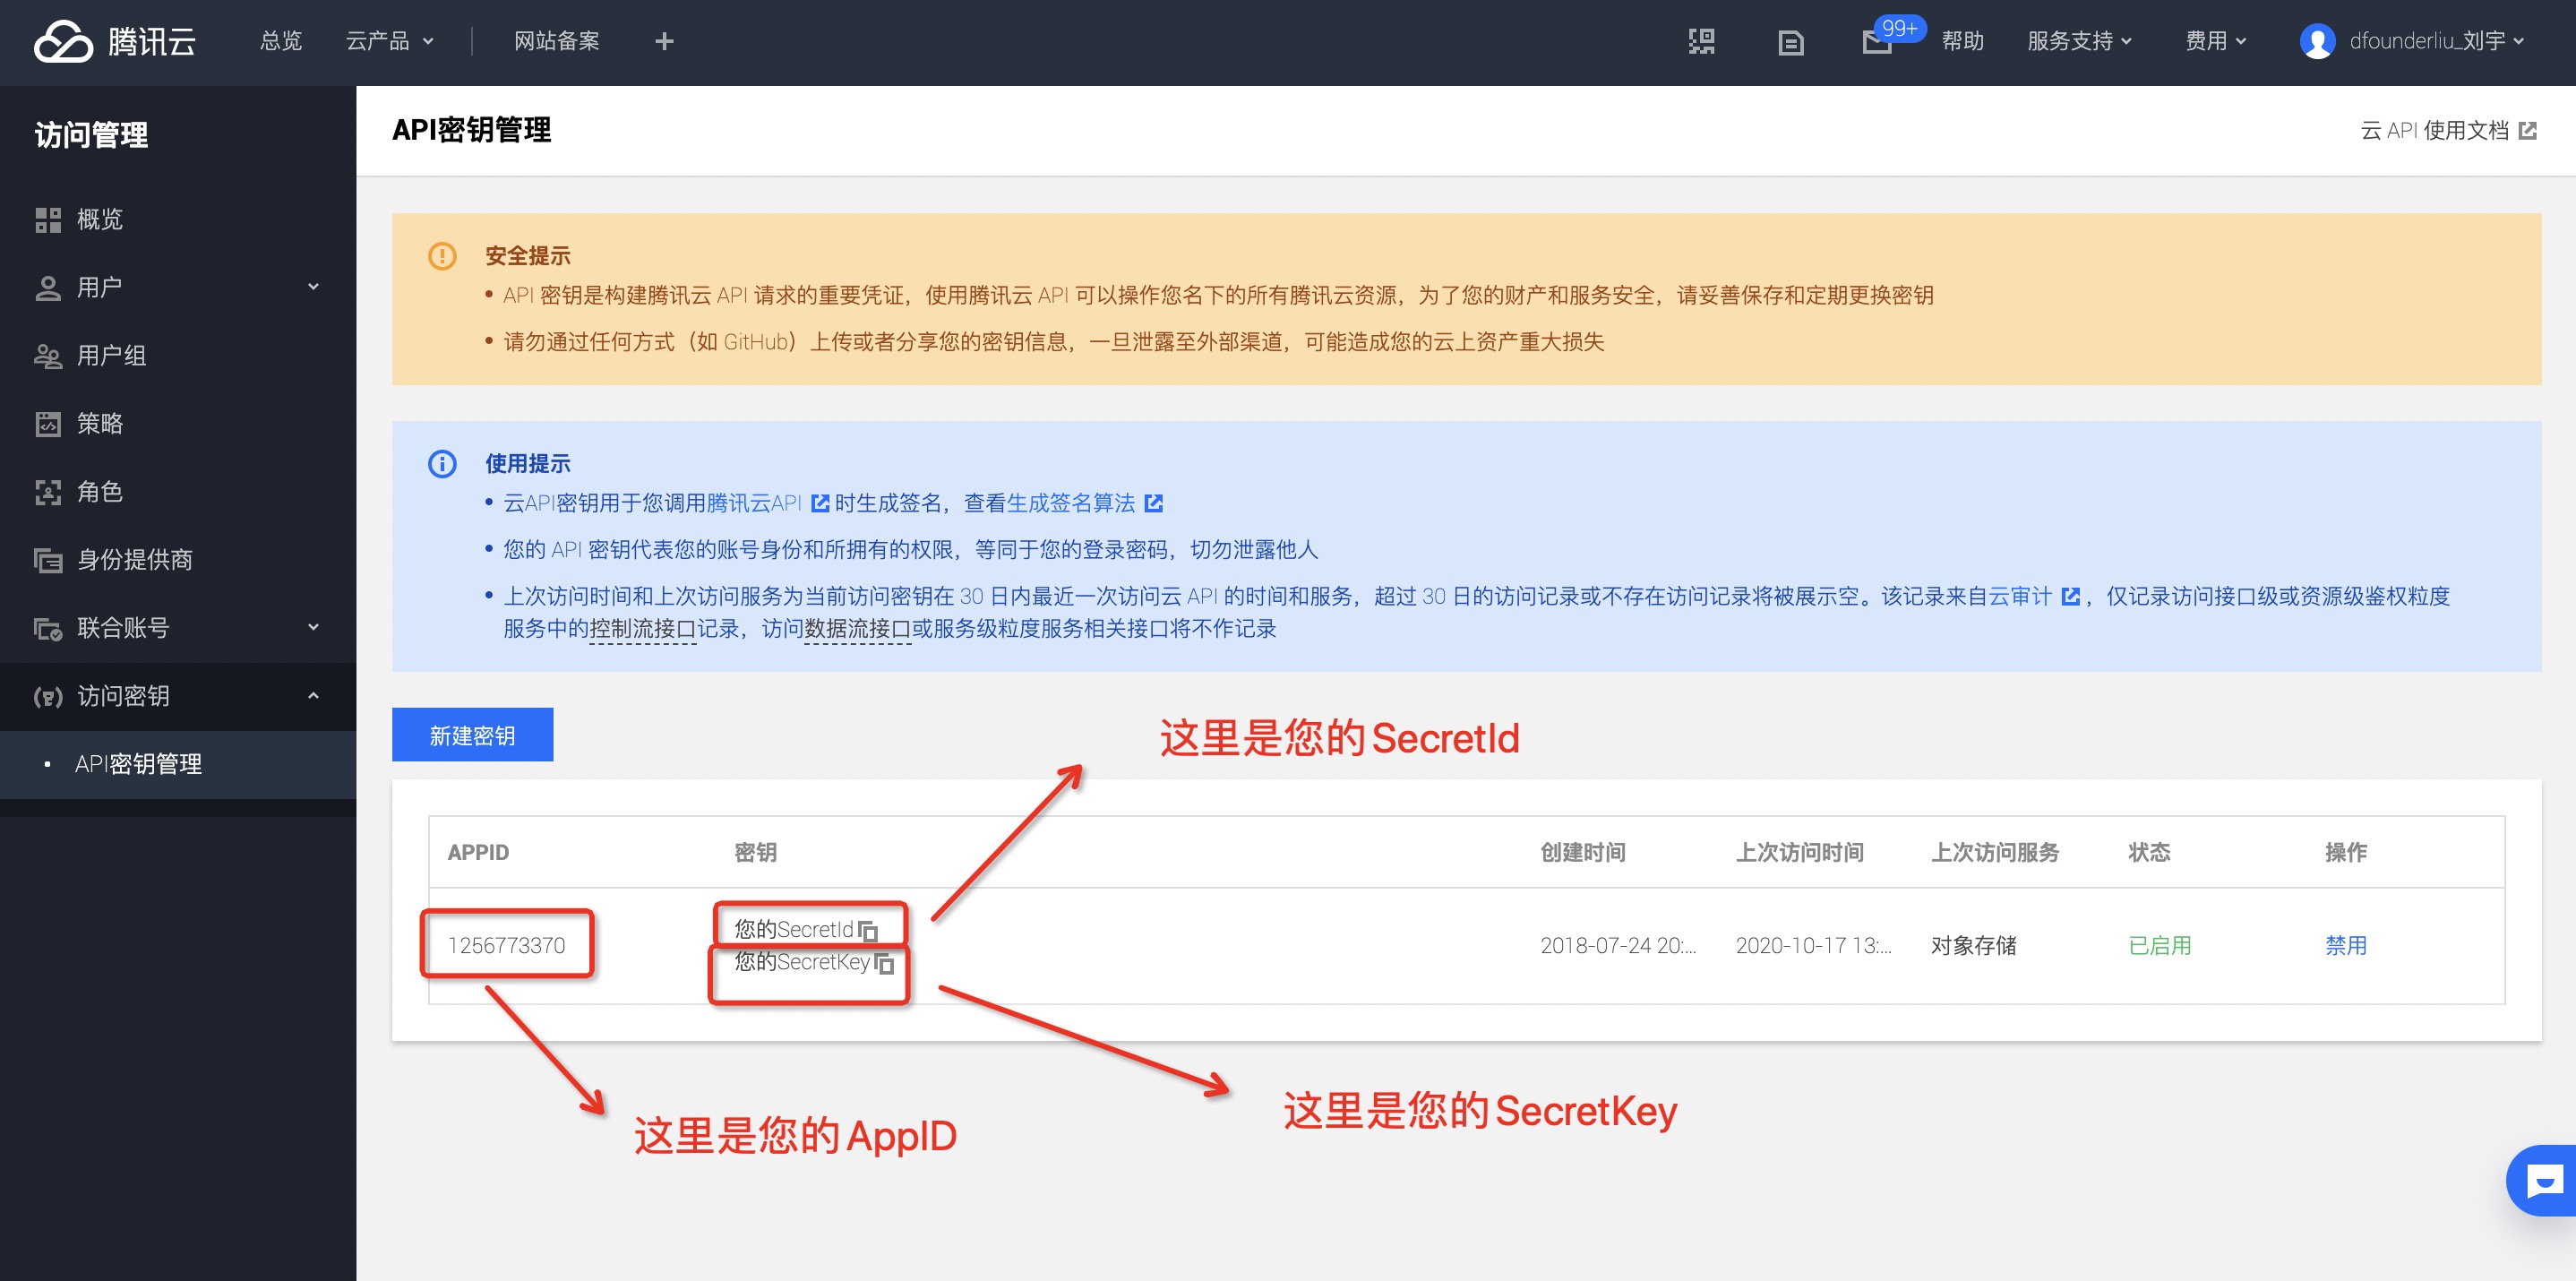
- 打开 [获取密钥页面](https://console.cloud.tencent.com/cam/capi) 获取密钥 :
|
|
7
|
+
|
|
8
|
+
|
|
9
|
+
|
|
10
|
+
> 使用主账号密钥可以无限制地访问您的腾讯云资源,主账号密钥泄露可能造成您的云上资产损失!强烈建议您参照 [最佳实践](https://cloud.tencent.com/document/product/598/10592) 停止使用主账号登录控制台或者使用主账号密钥访问云API,请使用子账号进行相关资源操作。 [如何创建子用户](https://cloud.tencent.com/document/product/598/13674)
|
|
11
|
+
|
|
12
|
+
------
|
|
13
|
+
|
|
14
|
+
## 安全建议
|
|
15
|
+
|
|
16
|
+
- 开启 MFA 保护
|
|
17
|
+
为增强账号安全性,建议您为所有账号绑定 MFA;为主账号及子账号都开启登录保护和敏感操作保护。对于支持邮箱登录或者微信登录的强烈推荐进行 MFA 二次验证。开启 MFA 后,账号登录及敏感操作需进行二次校验。相关设置请参考:[为协作者设置安全保护](https://cloud.tencent.com/document/product/598/36626) 、[为子用户设置安全保护](https://cloud.tencent.com/document/product/598/36383) 。
|
|
18
|
+
|
|
19
|
+
- 使用子账号访问腾讯云
|
|
20
|
+
请尽量不要使用主账号的身份凭证访问腾讯云,更不要将身份凭证共享给他人。一般情况下,应该为所有访问腾讯云的用户创建子账号,同时授权该子账号相应的管理权限。相关设置请参考:[用户类型](https://cloud.tencent.com/document/product/598/13665) 。
|
|
21
|
+
|
|
22
|
+
- 使用组给子账号分配权限
|
|
23
|
+
按照工作职责定义好组,并给组分配相应的管理权限。然后把用户分配到对应的组里。这样,当您修改组的权限时,组里相关用户的权限随即发生变更。另外,当组织架构发生调整时,只需要更新用户和组的关系即可。相关设置请参考:[用户组](https://cloud.tencent.com/document/product/598/14985) 。
|
|
24
|
+
|
|
25
|
+
- 最小权限原则
|
|
26
|
+
最小权限原则是一项标准的安全原则。即仅授予执行任务所需的最小权限,不要授予更多无关权限。例如,一个用户仅是 CDN 服务的使用者,那么不需要将其他服务的资源访问权限(如 COS 读写权限)授予给该用户。
|
|
27
|
+
|
|
28
|
+
- 分子账号管理用户、权限和资源
|
|
29
|
+
建议同一个子账号不同时管理用户、权限和资源。应该让部分子账户管理用户,部分子账号管理权限,部分子账号管理其他云资源。
|
|
30
|
+
|
|
31
|
+
- 定期轮转身份凭证
|
|
32
|
+
建议您或 CAM 用户要定期轮换登录密码或云 API 密钥。这样可以让身份凭证泄漏情况下的影响时间受限。
|
|
33
|
+
主账号密码设置请参考:[账号密码](https://cloud.tencent.com/document/product/378/14623) 。
|
|
34
|
+
子用户密码设置请参考:[子用户重置密码](https://cloud.tencent.com/document/product/598/36260) 。
|
|
35
|
+
|
|
36
|
+
- 删除不需要的证书和权限
|
|
37
|
+
删除用户不需要的证书以及用户不再需要的权限。尽量减少访问凭证泄漏后带来的安全风险。
|
|
38
|
+
|
|
39
|
+
- 使用策略条件来增强安全性
|
|
40
|
+
尽可能的为策略定义更精细化的条件,约束策略生效的场景,强化安全性。如约束用户必须在指定的时间,指定的服务器上执行某些操作等。
|
|
41
|
+
相关设置请参考:[元素参考 condition](https://cloud.tencent.com/document/product/598/10603#6.-.E7.94.9F.E6.95.88.E6.9D.A1.E4.BB.B6.EF.BC.88condition.EF.BC.89) 。
|