@nataliapc/mcp-openmsx 1.1.15 → 1.2.3
This diff represents the content of publicly available package versions that have been released to one of the supported registries. The information contained in this diff is provided for informational purposes only and reflects changes between package versions as they appear in their respective public registries.
- package/README.md +84 -37
- package/dist/server.js +101 -40
- package/dist/utils.js +42 -2
- package/dist/vectordb.js +61 -0
- package/package.json +8 -3
- package/resources/audio/msx-midi.md +872 -0
- package/resources/audio/psg_registers.md +281 -0
- package/resources/audio/sound_cartridge_scc.md +123 -0
- package/resources/audio/sound_cartridge_scci.md +250 -0
- package/resources/audio/toc.json +8 -4
- package/resources/book--msx2-technical-handbook/toc.json +1 -1
- package/resources/msx-dos/MSX-DOS_2_Environment_Variables.md +1368 -0
- package/resources/msx-dos/MSX-DOS_File_extensions.md +154 -0
- package/resources/msx-dos/toc.json +13 -0
- package/resources/msx-unapi/toc.json +2 -2
- package/resources/others/keyboard_matrices.md +243 -0
- package/resources/others/toc.json +6 -0
- package/resources/programming/asm_callbios.md +79 -0
- package/resources/programming/asm_docopy.md +115 -0
- package/resources/programming/asm_fast_loops.md +200 -0
- package/resources/programming/asm_getslot.md +143 -0
- package/resources/programming/asm_interrupts.md +202 -0
- package/resources/programming/asm_load_screen.md +240 -0
- package/resources/programming/asm_mult_div_shifts.md +487 -0
- package/resources/programming/asm_raminpage1.md +56 -0
- package/resources/programming/asm_vdp_detection.md +78 -0
- package/resources/programming/asm_vdp_routines.md +343 -0
- package/resources/programming/asm_z80_routines_collection.md +810 -0
- package/resources/programming/basic_wiki/ABS().md +36 -0
- package/resources/programming/basic_wiki/AND.md +71 -0
- package/resources/programming/basic_wiki/ASC().md +38 -0
- package/resources/programming/basic_wiki/ATN().md +36 -0
- package/resources/programming/basic_wiki/AUTO.md +39 -0
- package/resources/programming/basic_wiki/BASE().md +147 -0
- package/resources/programming/basic_wiki/BEEP.md +27 -0
- package/resources/programming/basic_wiki/BIN$().md +36 -0
- package/resources/programming/basic_wiki/BLOAD.md +63 -0
- package/resources/programming/basic_wiki/BSAVE.md +61 -0
- package/resources/programming/basic_wiki/CALL.md +391 -0
- package/resources/programming/basic_wiki/CALL_ADJUST.md +40 -0
- package/resources/programming/basic_wiki/CALL_IMPOSE.md +28 -0
- package/resources/programming/basic_wiki/CALL_OPTIONS.md +26 -0
- package/resources/programming/basic_wiki/CALL_PAUSE.md +119 -0
- package/resources/programming/basic_wiki/CALL_PCMPLAY.md +60 -0
- package/resources/programming/basic_wiki/CALL_PCMREC.md +70 -0
- package/resources/programming/basic_wiki/CDBL().md +36 -0
- package/resources/programming/basic_wiki/CHR$().md +51 -0
- package/resources/programming/basic_wiki/CINT().md +36 -0
- package/resources/programming/basic_wiki/CIRCLE.md +51 -0
- package/resources/programming/basic_wiki/CLEAR.md +39 -0
- package/resources/programming/basic_wiki/CLOAD.md +27 -0
- package/resources/programming/basic_wiki/CLOAD?.md +31 -0
- package/resources/programming/basic_wiki/CLOSE.md +44 -0
- package/resources/programming/basic_wiki/CLS.md +51 -0
- package/resources/programming/basic_wiki/COLOR.md +143 -0
- package/resources/programming/basic_wiki/COLOR=.md +93 -0
- package/resources/programming/basic_wiki/COLOR_SPRITE$().md +83 -0
- package/resources/programming/basic_wiki/COLOR_SPRITE().md +85 -0
- package/resources/programming/basic_wiki/CONT.md +23 -0
- package/resources/programming/basic_wiki/COPY.md +215 -0
- package/resources/programming/basic_wiki/COPY_SCREEN.md +61 -0
- package/resources/programming/basic_wiki/COS().md +37 -0
- package/resources/programming/basic_wiki/CSAVE.md +35 -0
- package/resources/programming/basic_wiki/CSNG().md +36 -0
- package/resources/programming/basic_wiki/CSRLIN.md +33 -0
- package/resources/programming/basic_wiki/DATA.md +47 -0
- package/resources/programming/basic_wiki/DEFDBL.md +40 -0
- package/resources/programming/basic_wiki/DEFINT.md +40 -0
- package/resources/programming/basic_wiki/DEFSNG.md +40 -0
- package/resources/programming/basic_wiki/DEFSTR.md +40 -0
- package/resources/programming/basic_wiki/DEF_FN.md +49 -0
- package/resources/programming/basic_wiki/DEF_USR.md +33 -0
- package/resources/programming/basic_wiki/DELETE.md +49 -0
- package/resources/programming/basic_wiki/DIM.md +59 -0
- package/resources/programming/basic_wiki/DRAW.md +77 -0
- package/resources/programming/basic_wiki/ELSE.md +45 -0
- package/resources/programming/basic_wiki/END.md +32 -0
- package/resources/programming/basic_wiki/EOF().md +36 -0
- package/resources/programming/basic_wiki/EQV.md +76 -0
- package/resources/programming/basic_wiki/ERASE.md +35 -0
- package/resources/programming/basic_wiki/ERL.md +34 -0
- package/resources/programming/basic_wiki/ERR.md +143 -0
- package/resources/programming/basic_wiki/ERROR.md +145 -0
- package/resources/programming/basic_wiki/EXP().md +38 -0
- package/resources/programming/basic_wiki/FIELD.md +48 -0
- package/resources/programming/basic_wiki/FIX().md +44 -0
- package/resources/programming/basic_wiki/FN.md +61 -0
- package/resources/programming/basic_wiki/FOR...NEXT.md +80 -0
- package/resources/programming/basic_wiki/FRE().md +66 -0
- package/resources/programming/basic_wiki/GET_DATE.md +60 -0
- package/resources/programming/basic_wiki/GET_TIME.md +34 -0
- package/resources/programming/basic_wiki/GOSUB.md +41 -0
- package/resources/programming/basic_wiki/GOTO.md +41 -0
- package/resources/programming/basic_wiki/HEX$().md +36 -0
- package/resources/programming/basic_wiki/IF...GOTO...ELSE.md +55 -0
- package/resources/programming/basic_wiki/IF...THEN...ELSE.md +50 -0
- package/resources/programming/basic_wiki/IMP.md +83 -0
- package/resources/programming/basic_wiki/INKEY$.md +65 -0
- package/resources/programming/basic_wiki/INP().md +33 -0
- package/resources/programming/basic_wiki/INPUT$().md +51 -0
- package/resources/programming/basic_wiki/INPUT.md +93 -0
- package/resources/programming/basic_wiki/INSTR().md +44 -0
- package/resources/programming/basic_wiki/INT().md +44 -0
- package/resources/programming/basic_wiki/INTERVAL.md +57 -0
- package/resources/programming/basic_wiki/KEY().md +51 -0
- package/resources/programming/basic_wiki/KEY.md +254 -0
- package/resources/programming/basic_wiki/LEFT$().md +39 -0
- package/resources/programming/basic_wiki/LEN().md +36 -0
- package/resources/programming/basic_wiki/LET.md +68 -0
- package/resources/programming/basic_wiki/LINE.md +74 -0
- package/resources/programming/basic_wiki/LINE_INPUT.md +79 -0
- package/resources/programming/basic_wiki/LIST.md +58 -0
- package/resources/programming/basic_wiki/LLIST.md +43 -0
- package/resources/programming/basic_wiki/LOAD.md +56 -0
- package/resources/programming/basic_wiki/LOCATE.md +67 -0
- package/resources/programming/basic_wiki/LOG().md +36 -0
- package/resources/programming/basic_wiki/LPOS().md +31 -0
- package/resources/programming/basic_wiki/LPRINT.md +46 -0
- package/resources/programming/basic_wiki/MAXFILES.md +39 -0
- package/resources/programming/basic_wiki/MERGE.md +54 -0
- package/resources/programming/basic_wiki/MID$().md +72 -0
- package/resources/programming/basic_wiki/MOD.md +39 -0
- package/resources/programming/basic_wiki/MOTOR.md +46 -0
- package/resources/programming/basic_wiki/NEW.md +27 -0
- package/resources/programming/basic_wiki/NOT.md +61 -0
- package/resources/programming/basic_wiki/OCT$().md +36 -0
- package/resources/programming/basic_wiki/ON...GOSUB.md +45 -0
- package/resources/programming/basic_wiki/ON...GOTO.md +42 -0
- package/resources/programming/basic_wiki/ON_ERROR_GOTO.md +61 -0
- package/resources/programming/basic_wiki/ON_INTERVAL_GOSUB.md +54 -0
- package/resources/programming/basic_wiki/ON_KEY_GOSUB.md +56 -0
- package/resources/programming/basic_wiki/ON_SPRITE_GOSUB.md +41 -0
- package/resources/programming/basic_wiki/ON_STOP_GOSUB.md +56 -0
- package/resources/programming/basic_wiki/ON_STRIG_GOSUB.md +70 -0
- package/resources/programming/basic_wiki/OPEN.md +103 -0
- package/resources/programming/basic_wiki/OR.md +75 -0
- package/resources/programming/basic_wiki/OUT.md +35 -0
- package/resources/programming/basic_wiki/PAD().md +110 -0
- package/resources/programming/basic_wiki/PAINT.md +66 -0
- package/resources/programming/basic_wiki/PDL().md +53 -0
- package/resources/programming/basic_wiki/PEEK().md +44 -0
- package/resources/programming/basic_wiki/PLAY().md +58 -0
- package/resources/programming/basic_wiki/PLAY.md +196 -0
- package/resources/programming/basic_wiki/POINT.md +52 -0
- package/resources/programming/basic_wiki/POKE.md +51 -0
- package/resources/programming/basic_wiki/POS().md +36 -0
- package/resources/programming/basic_wiki/PRESET.md +61 -0
- package/resources/programming/basic_wiki/PRINT.md +179 -0
- package/resources/programming/basic_wiki/PSET.md +82 -0
- package/resources/programming/basic_wiki/PUT_KANJI.md +93 -0
- package/resources/programming/basic_wiki/PUT_SPRITE.md +143 -0
- package/resources/programming/basic_wiki/READ.md +45 -0
- package/resources/programming/basic_wiki/REM.md +42 -0
- package/resources/programming/basic_wiki/RENUM.md +78 -0
- package/resources/programming/basic_wiki/RESTORE.md +52 -0
- package/resources/programming/basic_wiki/RESUME.md +45 -0
- package/resources/programming/basic_wiki/RETURN.md +47 -0
- package/resources/programming/basic_wiki/RIGHT$().md +39 -0
- package/resources/programming/basic_wiki/RND().md +51 -0
- package/resources/programming/basic_wiki/RUN.md +56 -0
- package/resources/programming/basic_wiki/SAVE.md +65 -0
- package/resources/programming/basic_wiki/SCREEN.md +164 -0
- package/resources/programming/basic_wiki/SET_ADJUST.md +66 -0
- package/resources/programming/basic_wiki/SET_BEEP.md +76 -0
- package/resources/programming/basic_wiki/SET_DATE.md +103 -0
- package/resources/programming/basic_wiki/SET_PAGE.md +52 -0
- package/resources/programming/basic_wiki/SET_PASSWORD.md +75 -0
- package/resources/programming/basic_wiki/SET_PROMPT.md +61 -0
- package/resources/programming/basic_wiki/SET_SCREEN.md +100 -0
- package/resources/programming/basic_wiki/SET_SCROLL.md +55 -0
- package/resources/programming/basic_wiki/SET_TIME.md +83 -0
- package/resources/programming/basic_wiki/SET_TITLE.md +87 -0
- package/resources/programming/basic_wiki/SET_VIDEO.md +49 -0
- package/resources/programming/basic_wiki/SGN().md +38 -0
- package/resources/programming/basic_wiki/SIN().md +36 -0
- package/resources/programming/basic_wiki/SOUND.md +188 -0
- package/resources/programming/basic_wiki/SPACE$().md +38 -0
- package/resources/programming/basic_wiki/SPC().md +34 -0
- package/resources/programming/basic_wiki/SPRITE$().md +50 -0
- package/resources/programming/basic_wiki/SPRITE.md +31 -0
- package/resources/programming/basic_wiki/SQR().md +32 -0
- package/resources/programming/basic_wiki/STICK().md +70 -0
- package/resources/programming/basic_wiki/STOP.md +70 -0
- package/resources/programming/basic_wiki/STR$().md +37 -0
- package/resources/programming/basic_wiki/STRIG().md +82 -0
- package/resources/programming/basic_wiki/STRING$().md +42 -0
- package/resources/programming/basic_wiki/SWAP.md +62 -0
- package/resources/programming/basic_wiki/TAB().md +38 -0
- package/resources/programming/basic_wiki/TAN().md +36 -0
- package/resources/programming/basic_wiki/TIME.md +59 -0
- package/resources/programming/basic_wiki/TROFF.md +21 -0
- package/resources/programming/basic_wiki/TRON.md +39 -0
- package/resources/programming/basic_wiki/USR().md +66 -0
- package/resources/programming/basic_wiki/VAL().md +36 -0
- package/resources/programming/basic_wiki/VARPTR().md +50 -0
- package/resources/programming/basic_wiki/VDP().md +103 -0
- package/resources/programming/basic_wiki/VPEEK().md +46 -0
- package/resources/programming/basic_wiki/VPOKE.md +48 -0
- package/resources/programming/basic_wiki/WAIT.md +38 -0
- package/resources/programming/basic_wiki/WIDTH.md +76 -0
- package/resources/programming/basic_wiki/XOR.md +72 -0
- package/resources/programming/basic_wiki/_toc.json +871 -0
- package/resources/programming/dos_error_handling.md +85 -0
- package/resources/programming/toc.json +51 -36
- package/resources/programming/vdp_commands_speed.md +147 -0
- package/resources/programming/vdp_programming_faq.md +55 -0
- package/resources/programming/vdp_programming_tutorial.md +390 -0
- package/resources/programming/vdp_screensplit_programming_guide.md +166 -0
- package/resources/programming/vdp_scrolling_on_msx.md +124 -0
- package/resources/programming/vdp_the_yjk_screen_modes.md +227 -0
- package/resources/programming/vdp_v9938_vram_timings.md +539 -0
- package/resources/programming/vdp_v9938_vram_timings_part_2.md +281 -0
- package/resources/sdcc/toc.json +1 -1
- package/vector-db/index.json +1 -0
- /package/resources/msx-unapi/{Ethernet_UNAPI_specification_1.1.md → Ethernet_UNAPI_specification_1_1.md} +0 -0
- /package/resources/msx-unapi/{MSX_UNAPI_specification_1.1.md → MSX_UNAPI_specification_1_1.md} +0 -0
|
@@ -0,0 +1,124 @@
|
|
|
1
|
+
# A guide to scrolling game engines on MSX
|
|
2
|
+
|
|
3
|
+
Scrolling is a feature that is an essential part of many games, however due to hardware limitations it is not a trivial thing to do on MSX. Even for experienced programmers, it may grow into quite a complex problem.
|
|
4
|
+
|
|
5
|
+
This article describes different scenarios, problems that you may encounter and possible solutions. It addresses scenarios on the Texas Instruments TMS9918 (MSX1 VDP), the Yamaha v9938 (MSX2 VDP), the Yamaha v9958 (MSX2+/TurboR VDP) and the Yamaha v9990 (Sunrise Graphics9000).
|
|
6
|
+
|
|
7
|
+
- [An introduction to tiles](#an-introduction-to-tiles)
|
|
8
|
+
- [Hardware scrolling capabilities](#hardware-scrolling-capabilities)
|
|
9
|
+
- [TMS9918 - MSX2](#tms9918---msx1)
|
|
10
|
+
- [v9938 - MSX2](#v9938---msx2)
|
|
11
|
+
- [v9958 - MSX2+ / turboR](#v9958---msx2--turbor)
|
|
12
|
+
- [v9990 - Graphics9000](#v9990--graphics9000)
|
|
13
|
+
- [Software scrolling](#software-scrolling)
|
|
14
|
+
- [Optimising software scrolling](#optimising-software-scrolling)
|
|
15
|
+
- [Combining software and hardware scrolling](#combining-software-and-hardware-scrolling)
|
|
16
|
+
- [Closing thoughts](#closing-thoughts)
|
|
17
|
+
|
|
18
|
+
## An introduction to tiles
|
|
19
|
+
|
|
20
|
+
|
|
21
|
+
|
|
22
|
+
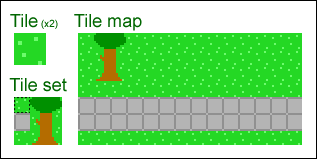
Illustrating tiles conceptYou will usually want to scroll through multiple screens worth of images. Storing all that data as bitmaps uses a lot of memory, and in practice you will want to use tiles instead. In essence, tiles are a compression technique to reduce the amount of data that has to be stored.
|
|
23
|
+
|
|
24
|
+
Tiles, also known as patterns, are rectangular building blocks for a display area we’ll call field. They are taken from a tile set (pattern generator table) which is a collection of all tiles used in the field. The position of the tiles in the field is described in a tile map (pattern name table).
|
|
25
|
+
|
|
26
|
+
Common sizes for such tiles are 8×8 and 16×16, and tilesets usually contain 256 of them so that a tile number fits in one byte. A tile map can be relatively small, such as 768 bytes covering an area or 32×24 tiles; with 8×8 tiles that is 256×192 pixels, the size of screen mode 2. A bigger tile map of for example 16 kB would let you store a field of 128×128 tiles (1024×1024 pixels) or 32×512 tiles (256×4096 pixels).
|
|
27
|
+
|
|
28
|
+
The v9938’s screen 1, 2, 3 and 4, and the v9990’s P1 and P2 modes are 8×8 tile/pattern-based screenmodes. Using these simplifies working with tiles. But even when you are not using those modes, you will often still want to use tiles.
|
|
29
|
+
|
|
30
|
+
## Hardware scrolling capabilities
|
|
31
|
+
|
|
32
|
+
The available scrolling methods can be divided into two categories: ‘hardware scrolling’ and ‘software scrolling’, and a combination of them is also possible. Hardware scrolling means that you use scroll-registers provided by the hardware to move the contents of the screen around. Software scrolling means that you manually copy the contents of the screen.
|
|
33
|
+
|
|
34
|
+
Usually, hardware scrolling is the best solution for scrolling because it’s very fast, and gives good-looking results. However, there are limitations as well. Each MSX VDP has different capabilities, and hardware scrolling is also always full-screen. This can be worked around by means of screensplits, or overlapping part of the screen with sprites or a secondary layer, but sometimes software scrolling may be the right solution even on the v9990.
|
|
35
|
+
|
|
36
|
+
Let’s go over the scrolling capabilities of the different hardware:
|
|
37
|
+
|
|
38
|
+
### TMS9918 - MSX1
|
|
39
|
+
|
|
40
|
+
The MSX1 VDP does not really have hardware support for scrolling, but you can still scroll very efficiently because of the tile-based screen modes (screen 1, 2, 3 and on the v9938, screen 4). The screen’s entire tile-map is only 768 bytes in size, so scrolling an entire screen to any direction by multitudes of 8 pixels only involves moving 768 bytes around, something which the CPU can easily do inside the span of 1 interrupt. This is technically software-scrolling, but making good use of the VDP’s tile modes.
|
|
41
|
+
|
|
42
|
+
Additionally, you can scroll individual tiles, or groups of tiles, making it relatively easy to create for example a screen-wide ‘flowing water’-effect, where you just animate the tiles you use for water, and the entire screen will be updated accordingly.
|
|
43
|
+
|
|
44
|
+
### v9938 - MSX2
|
|
45
|
+
|
|
46
|
+
The MSX2 has a vertical scrolling register (r#23). With this register you can do smooth per-pixel scrolling in the bitmap modes. Examples of games which use the vertical scrolling register are Aleste, Quarth and Shrines of Enigma. These are all vertically-oriented games; MSX2 games which scroll horizontally usually use either the pattern-based screen mode 4, or software scrolling.
|
|
47
|
+
|
|
48
|
+
There is however a method to smoothly scroll horizontally on MSX2 using some hardware acceleration: the adjust register (r#18). With the adjust register, you can horizontally (and vertically) adjust the screen in 16 steps of 1 pixel. This has some limitations however, let’s sum up a few of them:
|
|
49
|
+
- You can only scroll 16 pixels and need to perform additional software scrolling to be able to scroll more than that.
|
|
50
|
+
- The left and the right borders of the screen move along with the adjust register, causing the borders to ‘flip’. This can be masked with sprites though.
|
|
51
|
+
- The adjust register is there for the user to center the screen on his display. By using this register for scrolling, you are ignoring the user’s settings.
|
|
52
|
+
- Changing the adjust register while performing a copy command causes VRAM corruption, see the _VDP Programming FAQ_.
|
|
53
|
+
|
|
54
|
+
Examples of games which use the adjust register are Space Manbow (in screen 4) and Pentaro Odyssey.
|
|
55
|
+
|
|
56
|
+
### v9958 - MSX2+ / turboR
|
|
57
|
+
|
|
58
|
+
The v9958 can also do horizontal scrolling in addition to the v9938’s vertical scrolling, using registers r#26 and r#27. The horizontal scrolling can span both a single page or two pages. The scrolling is smooth on the left border of the screen, however the right border flips for every 8th pixel. There is a setting to mask this, although this will reduce the horizontal resolution to 248 pixels.
|
|
59
|
+
|
|
60
|
+
Examples of games which use the v9958 scrolling capabilities are Sea Sardine, Sonyc, Space Manbow (where the border doesn’t flip like it does on MSX2) and F1 Spirit 3D (to achieve the 3D-effect).
|
|
61
|
+
|
|
62
|
+
### v9990 – Graphics9000
|
|
63
|
+
|
|
64
|
+
The v9990 has the best hardware support for scrolling. It has registers to scroll both horizontally and vertical accross multiple pages (r#17 to r#24), and in P1 mode even provides multilayer scrolling with 2 layers. Also, the P1 and P2 modes are tile-based modes, which will likely also be useful. In case your requirements are even higher, e.g. you want to scroll using more layers, software scrolling with the v9990’s copy commands is very fast as well.
|
|
65
|
+
|
|
66
|
+
## Software scrolling
|
|
67
|
+
|
|
68
|
+
When software scrolling, you are not using the hardware scroll capabilities of the VDP, but instead scroll by plainly copying data on the screen. Due to the limitations that imposes, it will probably not look as smooth as hardware scrolling. However, it will allow you to do certain things that would otherwise not be possible on the VDP of your choice.
|
|
69
|
+
|
|
70
|
+
Software scrolling is usually done in 8 pixel steps. In pattern modes this is because the patterns are 8×8 pixels and can only be moved in those units. And in bitmap modes the copy command is not fast enough to scroll one pixel at a time, but it can reach a decent speed scrolling 8 pixels at a time, while not looking too badly.
|
|
71
|
+
|
|
72
|
+
Software scrolling can be combined with hardware scrolling to achieve better performance or looks, e.g. the software scrolling could scroll in 8 pixel units, while the hardware scrolling deals with scrolling the one-pixel units inbetween.
|
|
73
|
+
|
|
74
|
+
### Optimising software scrolling
|
|
75
|
+
|
|
76
|
+
To improve the performance of software scrolling, there are various techniques you can use.
|
|
77
|
+
|
|
78
|
+
|
|
79
|
+
|
|
80
|
+
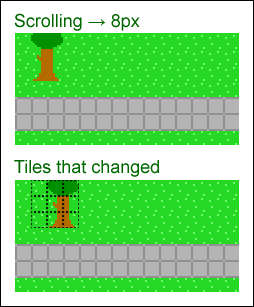
Illustrating selective copy optimisationThe most important technique to optimise a software scroll, is to do a selective copy — that is, only copy things that have actually changed. Instead of copying the whole screen 8 pixels at once, if you divide up the screen in 8×8 tiles and only copy the tiles where the new tile differs from the old one, you can reduce the amount of data that has to be copied greatly. This technique especially performs great when there are areas with lots of contiguous identical tiles, which is often the case with roofs and grass.
|
|
81
|
+
|
|
82
|
+
Using this technique it is also relatively easy to create high-performance multilayer scrolling where the background layer doesn’t move, or moves at a slower pace, which does not only look good but also improves rendering performance.
|
|
83
|
+
|
|
84
|
+
Optimisation can also be found in performing larger copies, because smaller copies are slower. A simple means to get bigger copies is to base your scroll routine on 16×16 tiles instead of 8×8 ones. More advanced techniques could involve caching of groups of tiles, or detection of sequences of tiles so they can be drawn with a single auto-repeating copy-command.
|
|
85
|
+
|
|
86
|
+
Another performance win is to draw tiles that are a solid colour with a faster block fill command instead of a copy command. In a sci-fi environment these kind of blocks may occur frequently (black space, metal plates, etc.).
|
|
87
|
+
|
|
88
|
+
If you use sprites, you could turn them off temporarily while scrolling, which significantly improves VDP copy speed. If you only use a sprite for e.g. a mouse cursor, this should be an acceptable trade-off.
|
|
89
|
+
|
|
90
|
+
Note however that with most of the above tricks, because the amount of work varies depending on the layout of the field, the direction you move in, etc., the scrolling will often not go at a very constant speed. When this gets too bad, you could consider to simply do nothing and wait for a while, in order to improve the fluency of the scrolling. Or rather, to already start doing preparative work for the next step in the scroll, under the assumption that the player does not change direction.
|
|
91
|
+
|
|
92
|
+
Examples of some effective applications of these optimisation methods are Falcom’s Ys games, and Cas Cremer’s Akin and the never-completed Core Dump (of which there is a demo). They are excellent examples of what kinds of performance can be achieved, even on a plain MSX2 without hardware-accelerated horizontal scrolling capability.
|
|
93
|
+
|
|
94
|
+
### Combining software and hardware scrolling
|
|
95
|
+
|
|
96
|
+
Other possible performance opportunities arise from combining software scrolling with using certain hardware capabilities.
|
|
97
|
+
|
|
98
|
+
For scrolling vertically, you could simply use the v9938’s vertical scrolling register, while for per-8-pixel horizontal scrolling you could use the horizontal adjust to speed up every other step. For the horizontal scrolling you would have to be careful to balance the amount of copying work between the two steps, and you would have to slow down the vertical scrolling speed to balance the two, but it could give decent results.
|
|
99
|
+
|
|
100
|
+
When you are using multi-layer scrolling, you could count the tiles that would change in a scenario with and without additional full-screen hardware scroll, and use the hardware scroll only if it improves performance (that is, there are more tiles moving than standing still). Or, if you have a lot of alternating tiles, also alternate screen pages that you render on.
|
|
101
|
+
|
|
102
|
+
Some time ago I constructed a test for full-screen smooth horizontal (and vertical) scrolling on the v9938 in screen 5, using the adjust register for horizontal scrolling support. For every 1-pixel scrolling step I copied 1/16th of the screen 16 pixels to the left or right on an alternate screen page. Every 16 pixels I toggled the visible page and reset the scroll register to the opposite side, and I masked the flipping of the borders with sprites.
|
|
103
|
+
|
|
104
|
+
Using this method I was able to scroll smoothly at 50 frames per second, but with only just enough time left to draw 1 software sprite. At 60 frames/second, I had to turn off the sprites to be able to achieve that. So generally spoken, I would say this method of horizontal scrolling is only useful when you just need to scroll a plain image, draw at 25 or 30 frames/second, or when you make the screen area smaller than 256×212.
|
|
105
|
+
|
|
106
|
+
## Closing thoughts
|
|
107
|
+
|
|
108
|
+
I’d say the key to high-performance scrolling on MSX is to either use a fast pattern mode such as screen 4, only use vertical scrolling, or to thoroughly apply optimisation techniques.
|
|
109
|
+
|
|
110
|
+
Even though they have colour limitations, MSX pattern mode graphics can still look pretty good and have an impressive amount of things going on. Look at Space Manbow, where a lot of full-screen animation is going on. And of course, if you are making something for the v9990, you can go all-out with all its patterns and layers and sprites.
|
|
111
|
+
|
|
112
|
+
When software scrolling, the performance difference between good optimisation and little to no optimisation can be huge, e.g. if you consider the speed of Falcom’s Ys, which is very well optimized, to the speed of Konami’s SD Snatcher or Metal Gear 2 (which does not even scroll!), you can see the big impact optimisation can have. With Konami’s games, for repetetive bits I often turn on the 7MHz mode of my MSX to speed it up a little, even though that makes the sound go bad. For Ys, not so, and doing that has little effect anyway.
|
|
113
|
+
|
|
114
|
+
As a rule of thumb, I always assert that, if you turn on the 7MHz (if you have it) and it is noticeably faster, then there is probably still opportunity for optimisation. Ideally, the VDP should be the bottleneck. You should try to do as much of your calculation work as possible while the VDP is continuously running copy commands.
|
|
115
|
+
|
|
116
|
+
Let me finish with a concept that I always found interesting: multi-VDP game engines. Imagine a screen-5 based RPG, that scrolls 8-pixels at a time on the v9938, scrolls smoothly on v9958, and has multilayer scrolling on the v9990. This way, you can reach a larger audience, while still having good-looking scrolling on post-MSX2 hardware. It would take more effort to create, though.
|
|
117
|
+
|
|
118
|
+
Well, that’s it. I hope this article has provided you with some useful insights.
|
|
119
|
+
|
|
120
|
+
~Grauw
|
|
121
|
+
|
|
122
|
+
## Source
|
|
123
|
+
|
|
124
|
+
https://map.grauw.nl/articles/scrolling.php
|
|
@@ -0,0 +1,227 @@
|
|
|
1
|
+
# The YJK screen modes
|
|
2
|
+
|
|
3
|
+
An exploration of the YJK screen modes of the MSX2+.
|
|
4
|
+
|
|
5
|
+
- [Introduction](#introduction)
|
|
6
|
+
- [Selecting the YJK modes](#selecting-the-yjk-modes)
|
|
7
|
+
- [The encoding of YJK](#the-encoding-of-yjk)
|
|
8
|
+
- [Conversion between YJK and RGB](#conversion-between-yjk-and-rgb)
|
|
9
|
+
- [Drawing techniques](#drawing-techniques)
|
|
10
|
+
- [Comparison to Y′UV](#comparison-to-yuv)
|
|
11
|
+
- [Relevant links](#relevant-links)
|
|
12
|
+
|
|
13
|
+
## Introduction
|
|
14
|
+
|
|
15
|
+
The Yamaha V9958 VDP used in the MSX2+ and MSX turbo R adds two high colour display modes which use a different colour encoding than traditional RGB, called YJK and YJK+YAE. These modes expand the colour count to 19268 and 12499 + 16 respectively, at the cost of colour attribute clash between groups of 4×1 pixels.
|
|
16
|
+
|
|
17
|
+
The YJK mode is MSX-BASIC’s SCREEN 12. It can show up to 19268 colours, and is particularly suited for photographic images because these are generally fairly unaffected by colour attribute clash. See art gallery.
|
|
18
|
+
|
|
19
|
+
The YJK+YAE mode is MSX-BASIC’s SCREEN 10 and 11. It can show up to 12499 YJK colours, and 16 palette colours (out of 512). Since the palette colours are set per-pixel they can be used to hide colour bleeding, while the YJK colours can be used to make the picture more colourful. Due to this YJK+YAE is more versatile in situations when you also want to display a user interface, like in a game. See art gallery.
|
|
20
|
+
|
|
21
|
+
An additional benefit of these new screen modes have compared to SCREEN 8 is that their sprites make use of the palette, rather than a limited set of predefined colours.
|
|
22
|
+
|
|
23
|
+
## Selecting the YJK modes
|
|
24
|
+
|
|
25
|
+
On the VDP the YJK mode is selected by following the procedure to select SCREEN 8 (G7), and then setting the YJK bit of register 25. To select the YJK+YAE mode, additionally set the YAE bit.
|
|
26
|
+
|
|
27
|
+
VDP register 25:
|
|
28
|
+
```
|
|
29
|
+
b7 b6 b5 b4 b3 b2 b1 b0
|
|
30
|
+
+-----+-----+-----+-----+-----+-----+-----+-----+
|
|
31
|
+
R#25 | 0 | CMD | VDS | YAE | YJK | WTE | MSK | SP2 |
|
|
32
|
+
+-----+-----+-----+-----+-----+-----+-----+-----+
|
|
33
|
+
```
|
|
34
|
+
|
|
35
|
+
Combination of YJK and YAE data:
|
|
36
|
+
|
|
37
|
+
|YJK|YAE|VRAM data|
|
|
38
|
+
|:-:|:-:|---|
|
|
39
|
+
|0|0|Via the conventional colour palette|
|
|
40
|
+
|0|1|Via the conventional colour palette|
|
|
41
|
+
|1|0|A=0: Via the RGB → YJK conversion table|
|
|
42
|
+
|1|1|A=1: Via the colour palette|
|
|
43
|
+
|
|
44
|
+
Use the CHGMOD BIOS call to switch to SCREEN 8 and then read the r#25 mirror RG25SA, set the YJK and YAE bits in r#25 appropriately and write the register back with WRTVDP.
|
|
45
|
+
|
|
46
|
+
Since a number of MSX2 computers exist that do have a V9958 but no BIOS support, as well modded MSX2 computers with their VDP replaced, consider setting r#25 directly rather than through the BIOS if the MSX version number is 1 (MSX2) and the VDP ID in s#1 bits 1-5 is 2 (V9958). In this case the other r#25 bits can be assumed 0.
|
|
47
|
+
|
|
48
|
+
In MSX-BASIC, SCREEN 12 and 11 have no special support for drawing in YJK other than using 8-bit colour operations. However SCREEN 10 is special, it gives a palette-colour view of YJK+YAE and allows you to draw on it like in SCREEN 5. Switching between SCREEN 10 and 11 will not clear the screen.
|
|
49
|
+
|
|
50
|
+
## The encoding of YJK
|
|
51
|
+
|
|
52
|
+
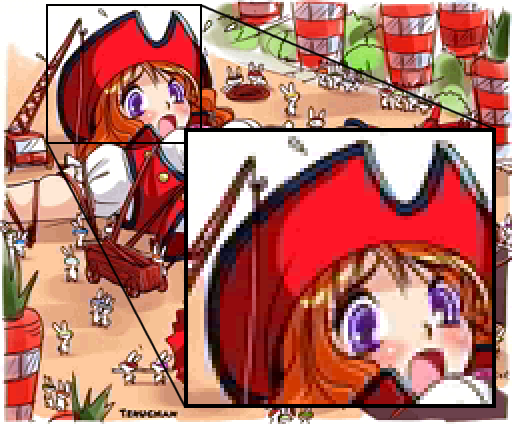
Pure red and pure black is a difficult combination for YJK.
|
|
53
|
+
|
|
54
|
+
|
|
55
|
+
YJK breaks down into three components. The Y component specifies brightness (luma) and a little bit of blue. The J and K components contain most of the colour information (chroma), expressed as a difference between Y and red and green, respectively. The concept behind this encoding is that the human eye is more sensitive to brightness than colour, and the colour resolution can therefore be reduced with relatively limited impact on the perceived result.
|
|
56
|
+
|
|
57
|
+
Use the visualisation widget above to get a feel of the YJK colour space. You can interact with this widget to view the various colour ramps available. The horizontal axis is the J value, the vertical axis is K. The column on the right controls the Y amount. All colours in the Y column can be used in the same four-pixel group. As you increase Y the colour becomes brighter, but notice that it becomes slightly more blue as well. This can be seen well in the grayish hue when both J and K are zero.
|
|
58
|
+
|
|
59
|
+
In YJK mode the VDP stores the J and K components in 6 bits as a two’s complement signed value (-32 to 31). These are shared between 4 adjacent pixels. The Y component is a 5-bit unsigned value (0 to 31). This one can be specified per-pixel.
|
|
60
|
+
|
|
61
|
+
#### YJK (SCREEN 12)
|
|
62
|
+
|
|
63
|
+
||C7 C6 C5 C4 C3 |C2 C1 C0|
|
|
64
|
+
|---|:-:|:-:|
|
|
65
|
+
|1 dot|Y1|K low|
|
|
66
|
+
|1 dot|Y2|K high|
|
|
67
|
+
|1 dot|Y3|J low|
|
|
68
|
+
|1 dot|Y4|J high|
|
|
69
|
+
|
|
70
|
+
In YJK+YAE mode the VDP still stores the J and K components in 6 bits as a two’s complement signed value (-32 to 31). However the Y component can now only specify even values (0, 2, 4 .. 30), as its least significant bit is used for the attribute bit A. If the A bit is set, the top four bits of the Y component specify a palette colour to use instead.
|
|
71
|
+
|
|
72
|
+
#### YJK+YAE (SCREEN 10-11)
|
|
73
|
+
|
|
74
|
+
||C7 C6 C5 C4|C3|C2 C1 C0|
|
|
75
|
+
|---|:-:|:-:|:-:|
|
|
76
|
+
|1 dot|Y1|A|K low|
|
|
77
|
+
|1 dot|Y2|A|K high|
|
|
78
|
+
|1 dot|Y3|A|J low|
|
|
79
|
+
|1 dot|Y4|A|J high|
|
|
80
|
+
|
|
81
|
+
The palette is still specified as 9 bits, with 3 bits per component. However the V9958’s DAC is 15-bit, so there must be some kind of mapping in place. Indeed, the 3-bit RGB palette component values map to 5 bits as follows:
|
|
82
|
+
|
|
83
|
+
#### 3-bit to 5-bit conversion
|
|
84
|
+
|
|
85
|
+
|V9938|V9958|
|
|
86
|
+
|:-:|:-:|
|
|
87
|
+
|0|0|
|
|
88
|
+
|1|4|
|
|
89
|
+
|2|9|
|
|
90
|
+
|3|13|
|
|
91
|
+
|4|18|
|
|
92
|
+
|5|22|
|
|
93
|
+
|6|27|
|
|
94
|
+
|7|31|
|
|
95
|
+
|
|
96
|
+
#### 3-bit to 5-bit conversion
|
|
97
|
+
|
|
98
|
+
$`c_{out} = \lfloor 4.5 c_{in} \rfloor`$
|
|
99
|
+
|
|
100
|
+
$`c_{out} = c_{in} << 2 \text{ OR } c_{in} >> 1`$
|
|
101
|
+
|
|
102
|
+
This applies to all screen modes, by the way.
|
|
103
|
+
|
|
104
|
+
## Conversion between YJK and RGB
|
|
105
|
+
|
|
106
|
+
The Y, J and K values specify 17 bits of information in total. The V9958 converts these to 15-bit RGB with 5 bits per colour component. The V9958 manual describes the following conversion formulas for YJK. The formulas for YJK+YAE are the same, but the least significant bit of Y is always zero so all its values are even.
|
|
107
|
+
|
|
108
|
+
#### YJK to RGB
|
|
109
|
+
|
|
110
|
+
$`r=y+j`$
|
|
111
|
+
|
|
112
|
+
$`g=y+k`$
|
|
113
|
+
|
|
114
|
+
$`b={{5y-2j-k} \over 4}`$
|
|
115
|
+
|
|
116
|
+
#### RGB to YJK
|
|
117
|
+
|
|
118
|
+
$`y={{4b+2r+g} \over 8}`$
|
|
119
|
+
|
|
120
|
+
$`j=r-y`$
|
|
121
|
+
|
|
122
|
+
$`k=g-y`$
|
|
123
|
+
|
|
124
|
+
Indeed those are fine formulas and perfect mathematical inverses of each other. However they do not take into account that the VDP both rounds and clips the result of the YJK to RGB conversion.
|
|
125
|
+
|
|
126
|
+
### Rounding
|
|
127
|
+
|
|
128
|
+
Let’s consider the rounding first. The y, j, k and r, g, b values are all integers, so when the blue value is calculated, it is rounded down to the nearest integer value ("floor"). To compensate for this in the RGB to YJK formula, you need to round up ("ceil") the value resulting from the y.
|
|
129
|
+
|
|
130
|
+
#### YJK to RGB (rounded)
|
|
131
|
+
|
|
132
|
+
$`r=y+j`$
|
|
133
|
+
|
|
134
|
+
$`g=y+k`$
|
|
135
|
+
|
|
136
|
+
$`b=\lfloor{5y-2j-k \over 4}\rfloor`$
|
|
137
|
+
|
|
138
|
+
#### RGB to YJK (rounded)
|
|
139
|
+
|
|
140
|
+
$`y=\lceil{4b+2r+g \over 8}\rceil`$
|
|
141
|
+
|
|
142
|
+
$`j=r-y`$
|
|
143
|
+
|
|
144
|
+
$`k=g-y`$
|
|
145
|
+
|
|
146
|
+
#### RGB to YJK+YAE (rounded)
|
|
147
|
+
|
|
148
|
+
$`y=2\lceil{4b+2r+g \over 16}\rceil`$
|
|
149
|
+
|
|
150
|
+
Using these formula you can express exactly half of what 15-bit RGB allows; 16384 out of 32768 colours (50%), and 8192 for YJK+YAE (25%). Each representable RGB value maps to one unique YJK value and vice versa. If you want to keep things simple, stop here and stick to these 16384 colours.
|
|
151
|
+
|
|
152
|
+
### Clipping
|
|
153
|
+
|
|
154
|
+
As we know though YJK mode can generate 19268 colours. Where did the remaining 2884 colours go? YJK’s 17 bits allow for 131072 different values, but most of these fall outside the range of 15-bit RGB. This is called "out of gamut". Values that are out of range are clipped to [0, 31].
|
|
155
|
+
|
|
156
|
+
#### YJK to RGB (clipped)
|
|
157
|
+
|
|
158
|
+
$`r = \text{clamp}(y + j, 0, 31)`$
|
|
159
|
+
|
|
160
|
+
$`g = \text{clamp}(y + k, 0, 31)`$
|
|
161
|
+
|
|
162
|
+
$`b = \text{clamp}\left(\left\lfloor{5y - 2j - k \over 4}\right\rfloor, 0, 31\right)`$
|
|
163
|
+
|
|
164
|
+
As a side effect of this clipping, 2884 colours which could not be represented by the previous YJK formulas become available. For example, take the colour (0, 24, 31). Without clipping this could not be expressed, since applying the previous RGB to YJK to RGB formula will yield (0, 24, 32). Due to the clipping of the blue component though, this colour is available to us after all.
|
|
165
|
+
|
|
166
|
+
If we calculate the number of colours affected by clipping, those which have one component of either 0 or 31, there are 32^3 - 30^3 = 5768 of them. Half of them are already covered by unclipped colours, 5768 / 2 = 2884, meaning that all of the colours where any RGB component is 0 or 31 can be represented. Some of these have only one YJK representation, others up to 3463.
|
|
167
|
+
|
|
168
|
+
You may notice no RGB to YJK formula is specified. This is because although colours whose components all fall within the [1, 30] range have a unique YJK representation which can be determined with the earlier formula, colours with one or more components of either 0 or 31 have multiple solutions.
|
|
169
|
+
|
|
170
|
+
In order to deal with this, consider that an RGB value is a point in a 3-dimensional (colour) space. For each potentially clipped component (0 or 31) a ray in the clip direction extends from the point, where two rays form a bounded plane, and three rays a volume. This colour space can be transformed to YJK with a matrix, and all YJK values overlapping this point, ray, plane or volume represent the same RGB colour.
|
|
171
|
+
|
|
172
|
+
More on this in part 2, which will be a deep dive into the topic of image conversion.
|
|
173
|
+
|
|
174
|
+
## Drawing techniques
|
|
175
|
+
|
|
176
|
+
I like grandpa’s dusty books by 京典, rearranged by FRS (SC12)
|
|
177
|
+

|
|
178
|
+
|
|
179
|
+
The YJK modes can be very nice for pixel art because of the wider range of colours that you an express with 15-bit RGB. Ever wanted that particular pastel colour that the V9938’s 9-bit RGB palette could not express? Or a smoother gradient? The V9958 can do in YJK. Additionally the high colour count allows you to create very colourful artwork.
|
|
180
|
+
|
|
181
|
+
However on the flipside the colour restrictions of YJK make it a difficult mode to work with. Below you will find some tips on how to work with the constraints of the YJK modes.
|
|
182
|
+
|
|
183
|
+
For pixel art I recommend to use the YJK+YAE mode. The availability of palette colours greatly increases your flexibility to work around the colour clash restrictions. The YJK mode is more suited for photographic material with smoother gradients and lower contrast.
|
|
184
|
+
|
|
185
|
+
The simplest technique is to approach the art like you would a SCREEN 5 image. Draw the majority of the image using the 16 palette colours. Consider it a layer on top of the YJK layer. Then "punch holes" through this layer by introducing YJK colours in select places, adhering to the 4×1 pixel group restrictions. The easiest way to do this is by simply using only a single colour per pixel group. This already allows you to introduce many more colour details without needing extra palette colours for them, while avoiding the complexities of YJK.
|
|
186
|
+
|
|
187
|
+
If you want to use multiple YJK colours within those 4 pixels, you need to pay attention to the colours available in the specific J, K combination for that quad. This requires a bit of planning, you’ll want to start by establishing a few useful colour ramps to reuse them througout the art piece. Choose colours from an Y ramp you like, for example using the tool at the top of this page, and then note them in a little scratch area for easy colour picking. Then whenever you need to draw e.g. some grassy bits, you can pick from the green ramp you’ve noted, while being mindful of the 4×1 grid.
|
|
188
|
+
|
|
189
|
+
For a more cartoony drawing style in YJK mode, you could draw the artwork in grayscale, and then paint the colour on a separate colour modifier layer with a blurry brush, so that there are no hard colour transitions. This will convert to YJK well.
|
|
190
|
+
|
|
191
|
+
Some additional tips:
|
|
192
|
+
- Align the vertical edges in your graphics to the 4×1 grid to minimise the effect of colour bleed.
|
|
193
|
+
- Use the out of gamut colours of the Y ramps to your advantage, their hue changes more than usual so they give some extra flexibility.
|
|
194
|
+
- In situations where you can’t use the colour you want, try to match its brightness so that the colour difference is harder to spot.
|
|
195
|
+
- The eye is sensitive to edges, so de-block visible edges of colour bleeding by adding detail or dithering in them.
|
|
196
|
+
|
|
197
|
+
In the end to which degree you want to apply these techniques depends on how much time you want to invest. Please share your experiences and tips and tricks in the [msx.org pixel art thread](https://www.msx.org/forum/msx-talk/development/creating-pixel-art)!
|
|
198
|
+
|
|
199
|
+
## Comparison to Y′UV
|
|
200
|
+
|
|
201
|
+
The YJK colour space is similar to the more common Y′UV colour space, with 4×1 chroma subsampling like the Y′UV411 encoding. However they differ in the weights applied to the different colour components. Where Y′UV assigns weights to make the Y component express luma (brightness), YJK has swapped the weights for green and blue, meaning that Y does not only affect luma but also the amount of blue.
|
|
202
|
+
|
|
203
|
+
This trait can be a bit unfortunate, as in natural scenes the amount of blue decreases under (sun)light, and increases in shade. Y′UV would work better in those situations. YJK is perhaps better suited for metallic, fluorescent and pastel colours.
|
|
204
|
+
|
|
205
|
+
In an interesting article ["Issues on YJK colour model implemented in Yamaha V9958 VDP chip"](http://rs.gr8bit.ru/Documentation/Issues-on-YJK-colour-model-implemented-in-Yamaha-V9958-VDP-chip.pdf), Ricardo Cancho Niemietz elaborates why this is not ideal from the perspective of the luminance-chrominance colour model, and suggests that it must be an unintentional mistake of the Yamaha engineers. Assuming though that Yamaha’s engineers were smart people, and wouldn’t make a colour model inspired by YUV but deviate in such a detail without reason, let’s try to find that reason.
|
|
206
|
+
|
|
207
|
+
In YJK’s 4-byte encoding there are six bits for J and K, but only five for Y. Due to this it can only represent half of the RGB colours, 21^4 instead of the 21^5 that 15-bit RGB can produce. Ideally Y would have 6 bits as well to get the full range, but this doesn’t fit in the byte encoding (and certainly not in YJK+YAE). So which RGB colour component’s resolution do we reduce by one bit?
|
|
208
|
+
|
|
209
|
+
The most logical answer here is blue, just like in SCREEN 8. Because our eyes are the least perceptive of blue, we won’t notice it as much. And indeed in YJK blue is effectively only 4-bit, in YJK+YAE effectively 3-bit. Had Yamaha gone for YUV, green would have gotten the least resolution, while it is the most visible colour, causing more banding in it. From this perspective, YJK spends its bits more effectively on the colours our eye perceive best.
|
|
210
|
+
|
|
211
|
+
A final note on this; the Yamaha V9990 VDP has both an YJK and an YUV mode, so on that VDP you can use the mode of your choosing. The YUV mode works identical to YJK on the V9958 but with the weights for the G and B components swapped. The weights do not perfectly match the real Y’UV but it’s pretty close.
|
|
212
|
+
|
|
213
|
+
## Relevant links:
|
|
214
|
+
|
|
215
|
+
- [Yamaha V9958 application manual](https://map.grauw.nl/resources/video/yamaha_v9958.pdf)
|
|
216
|
+
- [msx.org forum: Enhanced decoding of YJK images](https://www.msx.org/forum/msx-talk/software/enhanced-decoding-yjk-images)
|
|
217
|
+
- [msx.org forum: Creating pixel art](https://www.msx.org/forum/msx-talk/development/creating-pixel-art)
|
|
218
|
+
- [Issues on YJK colour model implemented in Yamaha V9958 VDP chip by Ricardo Cancho Niemietz.](http://rs.gr8bit.ru/Documentation/Issues-on-YJK-colour-model-implemented-in-Yamaha-V9958-VDP-chip.pdf)
|
|
219
|
+
- [The MSX2+ Screens by Alex Wulms (mirror), published in MCCM 72 (original Dutch).](http://www.msx-plaza.eu/home.php?page=mccm/mccm72/schermen_eng)
|
|
220
|
+
- [Screen 10-11 art gallery on Retro Gallery](http://tomseditor.com/gallery/browse?platform=msx&format=screen10)
|
|
221
|
+
- [Screen 12 art gallery on Retro Gallery](http://tomseditor.com/gallery/browse?platform=msx&format=screen12)
|
|
222
|
+
|
|
223
|
+
~Grauw
|
|
224
|
+
|
|
225
|
+
## Source
|
|
226
|
+
|
|
227
|
+
https://map.grauw.nl/articles/yjk/
|