mimo2codex 0.1.0 → 0.1.1
This diff represents the content of publicly available package versions that have been released to one of the supported registries. The information contained in this diff is provided for informational purposes only and reflects changes between package versions as they appear in their respective public registries.
- package/README.md +157 -412
- package/README.zh.md +146 -624
- package/dist/cli.js +12 -0
- package/dist/cli.js.map +1 -1
- package/dist/server.js +83 -2
- package/dist/server.js.map +1 -1
- package/dist/translate/reqToChat.js +23 -9
- package/dist/translate/reqToChat.js.map +1 -1
- package/dist/upstream/mimoClient.js +18 -2
- package/dist/upstream/mimoClient.js.map +1 -1
- package/package.json +4 -4
package/README.zh.md
CHANGED
|
@@ -2,749 +2,271 @@
|
|
|
2
2
|
|
|
3
3
|
> [English](./README.md) · 中文
|
|
4
4
|
|
|
5
|
-
让**最新版** OpenAI Codex CLI / Codex 桌面端无缝接入**小米 MiMo V2.5
|
|
5
|
+
让**最新版** OpenAI Codex CLI / Codex 桌面端无缝接入**小米 MiMo V2.5** 的本地代理。把 Codex 的 Responses API 实时翻译成 MiMo 的 Chat Completions API,纯本地无状态。
|
|
6
6
|
|
|
7
|
-
|
|
7
|
+
|
|
8
8
|
|
|
9
|
-
|
|
9
|
+
## 解决什么问题
|
|
10
10
|
|
|
11
|
-
|
|
11
|
+
小米米莫官方 [Codex 集成文档](https://platform.xiaomimimo.com/docs/zh-CN/integration/codex) 只支持 `wire_api = "chat"`,而最新版 Codex 已经把这个开关变成硬错误。官方建议是降级 Codex 到 0.80.0——但会丢掉 pet 宠物、桌面端新功能、新工具。mimo2codex 在中间挂个本地代理,**Codex 用最新版、MiMo 服务端不变**,两边都不用改。
|
|
12
12
|
|
|
13
|
-
|
|
13
|
+
类似 [openrouter](https://openrouter.ai)、[claude-code-router](https://github.com/musistudio/claude-code-router)、[y-router](https://github.com/luohy15/y-router)——纯协议网关。
|
|
14
14
|
|
|
15
|
-
|
|
16
|
-
>
|
|
17
|
-
> "Newer versions of Codex no longer support `wire_api = "chat"`. If you encounter the error `wire_api = chat is no longer supported`, please downgrade the Codex version."
|
|
15
|
+
## 支持
|
|
18
16
|
|
|
19
|
-
|
|
17
|
+
- ✅ Codex CLI 0.x(`wire_api = "responses"`)+ 桌面端
|
|
18
|
+
- ✅ 工具调用——function tools、并行调用、`local_shell`、`custom`、MCP `namespace`
|
|
19
|
+
- ✅ 联网搜索——翻译成 MiMo 原生 `web_search` builtin(需在控制台激活 Web Search Plugin)
|
|
20
|
+
- ✅ 视觉——`mimo-v2.5` / `mimo-v2-omni` 走视觉路径;pro/flash 自动剥图 + 占位文本
|
|
21
|
+
- ✅ 1M 长上下文——传 `mimo-v2.5-pro[1m]`
|
|
22
|
+
- ✅ 思维链透传(`--no-reasoning` 隐藏)
|
|
23
|
+
- ✅ cc-switch 集成(`mimo2codex print-cc-switch` 输出粘贴片段)
|
|
24
|
+
- ⚠️ **`/hatch` 自定义宠物生成**——纯 MiMo 做不到。Codex 的 `/hatch` 在客户端硬编码调 OpenAI 的 `image_gen` 工具,这步代理拦不住;MiMo 自己又没有图像生成 endpoint。绕路方案走 `mimoskill/`(免费,不要 OpenAI key),见下文。
|
|
20
25
|
|
|
21
|
-
|
|
22
|
-
- OpenAI 已弃用 Codex 的 `wire_api = "chat"`(2026 年 2 月起为硬错误)
|
|
23
|
-
- 官方建议的解决方案是**降级 Codex 到 0.80.0**——但这样就丢掉了 pet 宠物、桌面端新功能、新工具支持等改进
|
|
24
|
-
- cc-switch 的 Codex 预设里也没有 MiMo(只有 OpenAI 官方、Azure、AiHubMix、DMXAPI、PackyCode、OpenRouter 等)——同样因为 MiMo 不支持 Responses API
|
|
26
|
+
## 安装——任选一种
|
|
25
27
|
|
|
26
|
-
|
|
27
|
-
|
|
28
|
-
工作原理类似 [openrouter](https://openrouter.ai)、[claude-code-router](https://github.com/musistudio/claude-code-router)、[y-router](https://github.com/luohy15/y-router)——纯协议网关,不缓存、不调度、不存储。
|
|
29
|
-
|
|
30
|
-
## 支持的能力
|
|
31
|
-
|
|
32
|
-
- ✅ Codex CLI 0.x 最新版(`wire_api = "responses"`)
|
|
33
|
-
- ✅ Codex 桌面端(macOS / Windows)
|
|
34
|
-
- ✅ **Pet 宠物**(状态由 SSE 事件生命周期驱动,无需特殊处理)
|
|
35
|
-
- ✅ **工具调用**——function tools,含并行调用
|
|
36
|
-
- ✅ 多轮对话 + 混合工具调用 + reasoning
|
|
37
|
-
- ✅ 流式 SSE,完整 Responses 事件序列(`response.created` / `output_item.added` / `output_text.delta` / `function_call_arguments.delta` / `reasoning_summary_text.delta` / `completed` 等)
|
|
38
|
-
- ✅ **思维链透传**——MiMo 的 `reasoning_content` 在 Codex 终端显示为思考摘要,多轮工具调用时按 MiMo 官方推荐回填给上游
|
|
39
|
-
- ✅ **1M 长上下文**——把 model 写成 `mimo-v2.5-pro[1m]` 即可
|
|
40
|
-
- ✅ **可配进 cc-switch**——与 OpenAI 官方等其他供应商一键切换
|
|
41
|
-
|
|
42
|
-
## 工作原理
|
|
43
|
-
|
|
44
|
-
```
|
|
45
|
-
┌──────────────┐ POST /v1/responses ┌──────────────┐ POST /v1/chat/completions ┌──────────────┐
|
|
46
|
-
│ Codex CLI / │ (wire_api="responses") │ mimo2codex │ (chat completions, SSE) │ Xiaomimimo │
|
|
47
|
-
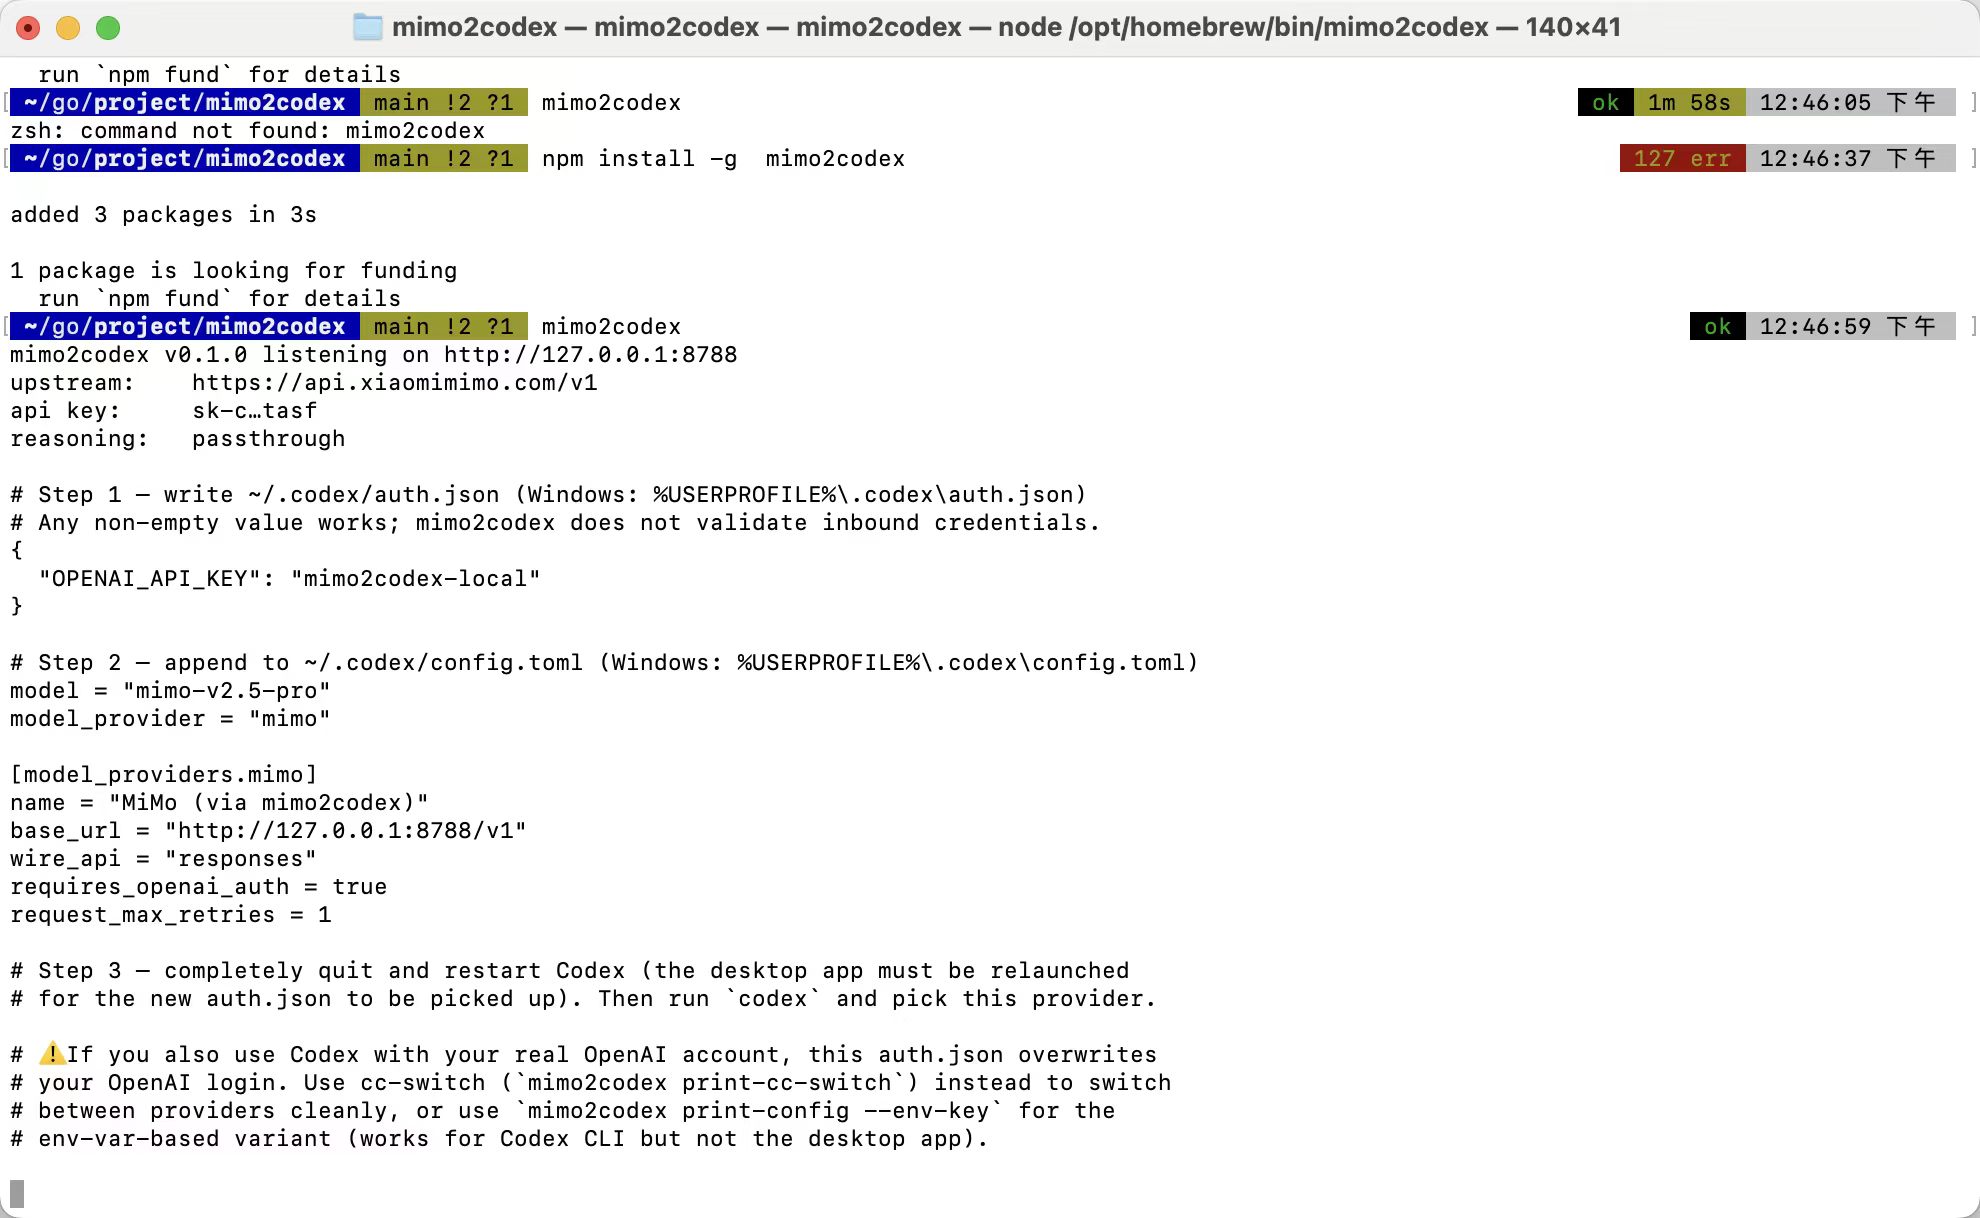
│ Codex 桌面端 │ ──────────────────────► │ 127.0.0.1 │ ──────────────────────────► │ MiMo V2.5 │
|
|
48
|
-
└──────────────┘ ◄────────────────────── │ :8788 │ ◄────────────────────────── └──────────────┘
|
|
49
|
-
Responses SSE 事件流 └──────────────┘ Chat Completions SSE
|
|
50
|
-
```
|
|
51
|
-
|
|
52
|
-
每个请求的处理:
|
|
53
|
-
|
|
54
|
-
1. Codex POST 一个 Responses 请求体(`input` 是 message / function_call / function_call_output / reasoning items 数组)
|
|
55
|
-
2. mimo2codex 把 `input` 翻译成 Chat `messages`,并把连续的 `reasoning` + `function_call` 折叠成一条带 `reasoning_content` + `tool_calls` 的 assistant 消息(这是 MiMo 推荐的多轮高质量做法)
|
|
56
|
-
3. mimo2codex 用你的 `MIMO_API_KEY` 调 MiMo 的 `/v1/chat/completions`
|
|
57
|
-
4. 流式读 Chat SSE 块,状态机改写成 Responses SSE 事件流回 Codex
|
|
58
|
-
|
|
59
|
-
整个代理**完全无状态**——不存 `previous_response_id`、不缓存、不校验入站 key。想跑几个实例都行。
|
|
60
|
-
|
|
61
|
-
---
|
|
62
|
-
|
|
63
|
-
## 安装
|
|
64
|
-
|
|
65
|
-
三选一,按你的偏好:
|
|
66
|
-
|
|
67
|
-
### 🟢 方式 1:npm 全局安装(最简单,推荐普通用户)
|
|
28
|
+
### 🟢 npm(最常用)
|
|
68
29
|
|
|
69
30
|
```bash
|
|
70
31
|
npm install -g mimo2codex
|
|
71
|
-
mimo2codex --version
|
|
72
32
|
```
|
|
73
33
|
|
|
74
|
-
|
|
34
|
+
### 🟡 一键脚本(不需要全局安装)
|
|
75
35
|
|
|
76
36
|
```bash
|
|
77
|
-
export MIMO_API_KEY=sk-xxxxxxxxxxxxxxxx
|
|
78
|
-
mimo2codex # 启动代理
|
|
79
|
-
mimo2codex print-config # 打印 ~/.codex/config.toml 片段
|
|
80
|
-
mimo2codex print-cc-switch # 打印 cc-switch 配置片段
|
|
81
|
-
mimo2codex --port 9000 --verbose # 改端口 + 详细日志
|
|
82
|
-
```
|
|
83
|
-
|
|
84
|
-
**升级到新版本**:
|
|
85
|
-
|
|
86
|
-
```bash
|
|
87
|
-
npm update -g mimo2codex
|
|
88
|
-
```
|
|
89
|
-
|
|
90
|
-
**卸载**:
|
|
91
|
-
|
|
92
|
-
```bash
|
|
93
|
-
npm rm -g mimo2codex
|
|
94
|
-
```
|
|
95
|
-
|
|
96
|
-
下面方式 2 / 3 是给开发者或想看源码的人准备的——如果你只是用,方式 1 已经够了,直接跳到 [**准备:拿一个 MiMo API Key**](#准备拿一个-mimo-api-key)。
|
|
97
|
-
|
|
98
|
-
---
|
|
99
|
-
|
|
100
|
-
### 🛠 方式 2:本地源码 + 一键脚本(贡献者首选)
|
|
101
|
-
|
|
102
|
-
仓库自带 [`scripts/install.sh`](./scripts/install.sh)(Linux / macOS / Git Bash / WSL)和 [`scripts/install.ps1`](./scripts/install.ps1)(Windows PowerShell)。脚本会自动:
|
|
103
|
-
|
|
104
|
-
1. 检测 git / Node.js ≥ 18 / npm,缺哪个就提示怎么装
|
|
105
|
-
2. 拉仓库(首次执行),或在已存在的克隆里 `git pull --ff-only`
|
|
106
|
-
3. `npm install` → `npm run build` → `npm test`
|
|
107
|
-
4. 打印「下一步该做什么」的清单
|
|
108
|
-
|
|
109
|
-
**Linux / macOS / Git Bash / WSL**:
|
|
110
|
-
|
|
111
|
-
```bash
|
|
112
|
-
# 远程一键(替换为实际 raw URL)
|
|
113
37
|
curl -fsSL https://raw.githubusercontent.com/7as0nch/mimo2codex/main/scripts/install.sh | bash
|
|
114
|
-
|
|
115
|
-
# 或本地:先 clone 再跑
|
|
116
|
-
git clone https://github.com/your-org/mimo2codex.git
|
|
117
|
-
cd mimo2codex
|
|
118
|
-
./scripts/install.sh
|
|
119
|
-
|
|
120
|
-
# 装完直接启动代理(需提前 export MIMO_API_KEY)
|
|
121
|
-
MIMO_API_KEY=sk-xxx ./scripts/install.sh --start
|
|
122
38
|
```
|
|
123
39
|
|
|
124
|
-
|
|
40
|
+
Windows PowerShell:
|
|
125
41
|
|
|
126
42
|
```powershell
|
|
127
|
-
# 远程一键
|
|
128
43
|
irm https://raw.githubusercontent.com/7as0nch/mimo2codex/main/scripts/install.ps1 | iex
|
|
129
|
-
|
|
130
|
-
# 或本地:先 clone 再跑
|
|
131
|
-
git clone https://github.com/your-org/mimo2codex.git
|
|
132
|
-
cd mimo2codex
|
|
133
|
-
.\scripts\install.ps1
|
|
134
|
-
|
|
135
|
-
# 装完直接启动代理
|
|
136
|
-
$env:MIMO_API_KEY = "sk-xxx"
|
|
137
|
-
.\scripts\install.ps1 -Start
|
|
138
44
|
```
|
|
139
45
|
|
|
140
|
-
|
|
141
|
-
> `Set-ExecutionPolicy -Scope CurrentUser -ExecutionPolicy RemoteSigned`
|
|
46
|
+
### 其他方式
|
|
142
47
|
|
|
143
|
-
|
|
48
|
+
- **git clone 手动构建**:`git clone https://github.com/7as0nch/mimo2codex && cd mimo2codex && npm install && npm run build`,想看源码 / 改代码用这个
|
|
49
|
+
- **`npm link`**:clone 完之后 `npm run build && npm link`,把本地仓库注册成全局命令,不用 publish
|
|
144
50
|
|
|
145
|
-
|
|
51
|
+
要求 Node.js ≥ 18。
|
|
146
52
|
|
|
147
|
-
|
|
53
|
+
## 使用
|
|
148
54
|
|
|
149
|
-
|
|
150
|
-
|
|
151
|
-
#### 0. 先决条件
|
|
152
|
-
|
|
153
|
-
| 软件 | 版本要求 | 检查命令 |
|
|
154
|
-
|---|---|---|
|
|
155
|
-
| Node.js | **≥ 18.0** | `node -v` |
|
|
156
|
-
| npm | 与 Node 同包 | `npm -v` |
|
|
157
|
-
| git | 任意版本 | `git --version` |
|
|
55
|
+
### 1. 拿一个 MiMo API Key
|
|
158
56
|
|
|
159
|
-
|
|
57
|
+
去 [platform.xiaomimimo.com](https://platform.xiaomimimo.com) → 控制台 → API Keys 创建。`sk-` 开头是按量付费,`tp-` 开头是 Token 套餐。
|
|
160
58
|
|
|
161
|
-
|
|
59
|
+
### 2. 启动代理
|
|
162
60
|
|
|
163
61
|
```bash
|
|
164
|
-
git clone https://github.com/your-org/mimo2codex.git
|
|
165
|
-
cd mimo2codex
|
|
166
|
-
npm install
|
|
167
|
-
```
|
|
168
|
-
|
|
169
|
-
`npm install` 会装大约 87 个包(typescript、vitest、tsx、nanoid、eventsource-parser),耗时 30 秒到 1 分钟。
|
|
170
|
-
|
|
171
|
-
#### 2. 选一种启动方式
|
|
172
|
-
|
|
173
|
-
下面三种任选其一。**A** 是最快上手的;**B** 启动最快、运行时占用最低;**C** 让 `mimo2codex` 像全局命令一样使用。
|
|
174
|
-
|
|
175
|
-
#### 方式 A:开发模式(推荐首次试用)
|
|
176
|
-
|
|
177
|
-
直接用 `tsx` 跑 TypeScript 源码,**不需要构建**:
|
|
178
|
-
|
|
179
|
-
```bash
|
|
180
|
-
# Linux / macOS / Git Bash
|
|
181
62
|
export MIMO_API_KEY=sk-xxxxxxxxxxxxxxxx
|
|
182
|
-
|
|
183
|
-
|
|
184
|
-
# Windows PowerShell
|
|
185
|
-
$env:MIMO_API_KEY="sk-xxxxxxxxxxxxxxxx"
|
|
186
|
-
npm run dev
|
|
187
|
-
|
|
188
|
-
# Windows CMD
|
|
189
|
-
set MIMO_API_KEY=sk-xxxxxxxxxxxxxxxx
|
|
190
|
-
npm run dev
|
|
191
|
-
```
|
|
192
|
-
|
|
193
|
-
要带额外参数(例如改端口):
|
|
194
|
-
|
|
195
|
-
```bash
|
|
196
|
-
npm run dev -- --port 9000
|
|
197
|
-
npm run dev -- --base-url https://token-plan-cn.xiaomimimo.com/v1
|
|
198
|
-
npm run dev -- print-cc-switch
|
|
199
|
-
```
|
|
200
|
-
|
|
201
|
-
> ⚠️ 注意 `--` 分隔符:`--` 前面是给 npm 的参数,后面才是给 mimo2codex 的。
|
|
202
|
-
|
|
203
|
-
#### 方式 B:构建后跑(推荐长期使用)
|
|
204
|
-
|
|
205
|
-
把 TypeScript 编译成 JavaScript,再用纯 Node 跑——启动快(< 100ms)、内存占用低、没有 tsx 的额外开销:
|
|
206
|
-
|
|
207
|
-
```bash
|
|
208
|
-
# 一次性构建
|
|
209
|
-
npm run build
|
|
210
|
-
|
|
211
|
-
# 启动(任选其一)
|
|
212
|
-
npm start
|
|
213
|
-
node dist/cli.js
|
|
214
|
-
```
|
|
215
|
-
|
|
216
|
-
带参数:
|
|
217
|
-
|
|
218
|
-
```bash
|
|
219
|
-
npm start -- --port 9000
|
|
220
|
-
node dist/cli.js --port 9000
|
|
221
|
-
node dist/cli.js print-cc-switch
|
|
222
|
-
```
|
|
223
|
-
|
|
224
|
-
构建产物在 `dist/`(已在 `.gitignore` 里,不会污染仓库)。改了源码记得重新 `npm run build`。
|
|
225
|
-
|
|
226
|
-
#### 方式 C:把 `mimo2codex` 注册为全局命令(不需要 publish)
|
|
227
|
-
|
|
228
|
-
在仓库根目录跑一次:
|
|
229
|
-
|
|
230
|
-
```bash
|
|
231
|
-
npm run build # 先确保 dist/ 已生成
|
|
232
|
-
npm link # 把当前目录注册为全局 mimo2codex
|
|
233
|
-
```
|
|
234
|
-
|
|
235
|
-
之后在**任何目录**都能直接用:
|
|
236
|
-
|
|
237
|
-
```bash
|
|
238
|
-
mimo2codex --version
|
|
239
|
-
mimo2codex print-cc-switch
|
|
240
|
-
MIMO_API_KEY=sk-xxx mimo2codex
|
|
241
|
-
```
|
|
242
|
-
|
|
243
|
-
要解除链接:在仓库根目录跑 `npm unlink`,或全局 `npm rm -g mimo2codex`。
|
|
244
|
-
|
|
245
|
-
> 💡 后文所有的 `mimo2codex ...` 命令示例,对应到方式 A 是 `npm run dev -- ...`、方式 B 是 `node dist/cli.js ...`、方式 C 是 `mimo2codex ...` 直接用。
|
|
246
|
-
|
|
247
|
-
#### 3. 跑测试(可选)
|
|
248
|
-
|
|
249
|
-
确认你这台机器上一切正常:
|
|
250
|
-
|
|
251
|
-
```bash
|
|
252
|
-
npm test
|
|
253
|
-
```
|
|
254
|
-
|
|
255
|
-
预期 25 个用例全过:
|
|
256
|
-
|
|
257
|
-
```
|
|
258
|
-
✓ test/respToResponses.test.ts (6 tests)
|
|
259
|
-
✓ test/reqToChat.test.ts (11 tests)
|
|
260
|
-
✓ test/streamToSse.test.ts (8 tests)
|
|
261
|
-
|
|
262
|
-
Test Files 3 passed (3)
|
|
263
|
-
Tests 25 passed (25)
|
|
264
|
-
```
|
|
265
|
-
|
|
266
|
-
#### 4. 让代理常驻后台
|
|
267
|
-
|
|
268
|
-
mimo2codex 是个长时运行的服务,开发时直接前台跑就行;如果想常驻:
|
|
269
|
-
|
|
270
|
-
#### macOS / Linux:systemd 用户单元(推荐)
|
|
271
|
-
|
|
272
|
-
新建 `~/.config/systemd/user/mimo2codex.service`:
|
|
273
|
-
|
|
274
|
-
```ini
|
|
275
|
-
[Unit]
|
|
276
|
-
Description=mimo2codex — Codex Responses → Xiaomi MiMo proxy
|
|
277
|
-
After=network.target
|
|
278
|
-
|
|
279
|
-
[Service]
|
|
280
|
-
Type=simple
|
|
281
|
-
WorkingDirectory=/绝对路径/到/mimo2codex
|
|
282
|
-
Environment="MIMO_API_KEY=sk-xxxxxxxxxxxxxxxx"
|
|
283
|
-
ExecStart=/usr/bin/node dist/cli.js
|
|
284
|
-
Restart=on-failure
|
|
285
|
-
|
|
286
|
-
[Install]
|
|
287
|
-
WantedBy=default.target
|
|
288
|
-
```
|
|
289
|
-
|
|
290
|
-
```bash
|
|
291
|
-
systemctl --user daemon-reload
|
|
292
|
-
systemctl --user enable --now mimo2codex
|
|
293
|
-
systemctl --user status mimo2codex # 看状态
|
|
294
|
-
journalctl --user -u mimo2codex -f # 看日志
|
|
295
|
-
```
|
|
296
|
-
|
|
297
|
-
#### 跨平台:[pm2](https://pm2.keymetrics.io)
|
|
298
|
-
|
|
299
|
-
```bash
|
|
300
|
-
npm install -g pm2
|
|
301
|
-
cd mimo2codex
|
|
302
|
-
npm run build
|
|
303
|
-
MIMO_API_KEY=sk-xxx pm2 start dist/cli.js --name mimo2codex
|
|
304
|
-
pm2 save
|
|
305
|
-
pm2 startup # 跟着提示开机自启
|
|
63
|
+
mimo2codex
|
|
306
64
|
```
|
|
307
65
|
|
|
308
|
-
|
|
66
|
+
启动横幅会直接打印好该贴到 `~/.codex/` 的 `auth.json` 和 `config.toml` 内容。默认走 auth.json 方式——CLI 和桌面端都能用,不依赖任何环境变量。
|
|
309
67
|
|
|
310
|
-
|
|
68
|
+
### 3. 配置 Codex
|
|
311
69
|
|
|
312
|
-
|
|
313
|
-
2. 触发器:登录时
|
|
314
|
-
3. 操作:启动程序
|
|
315
|
-
- 程序:`C:\Program Files\nodejs\node.exe`
|
|
316
|
-
- 参数:`D:\workspace\goproject\my\mimo2codex\dist\cli.js`
|
|
317
|
-
- 起始位置:`D:\workspace\goproject\my\mimo2codex`
|
|
318
|
-
4. 完成后右键任务 → 属性 → 设置「使用最高权限运行」可选;在「条件」/「设置」里关掉空闲限制
|
|
319
|
-
5. 在「环境变量」里把 `MIMO_API_KEY` 设上(或在系统属性 → 环境变量里全局设)
|
|
320
|
-
|
|
321
|
-
#### 5. 升级到新版本
|
|
322
|
-
|
|
323
|
-
```bash
|
|
324
|
-
cd mimo2codex
|
|
325
|
-
git pull
|
|
326
|
-
npm install # 拉了新依赖才需要
|
|
327
|
-
npm run build # 方式 B/C 必跑;方式 A 不用
|
|
328
|
-
# 重启你的常驻进程(systemctl restart / pm2 restart 等)
|
|
329
|
-
```
|
|
330
|
-
|
|
331
|
-
---
|
|
332
|
-
|
|
333
|
-
## 准备:拿一个 MiMo API Key
|
|
334
|
-
|
|
335
|
-
去 [platform.xiaomimimo.com](https://platform.xiaomimimo.com) 注册(用小米账号),在「控制台 → API Keys」里创建一个 Key。
|
|
336
|
-
|
|
337
|
-
- **按量付费**:`sk-xxx` 开头,BASE_URL 用 `https://api.xiaomimimo.com/v1`
|
|
338
|
-
- **Token 套餐**:`tp-xxx` 开头,BASE_URL 用订阅页面给出的专属 URL(一般是 `https://token-plan-cn.xiaomimimo.com/v1`)
|
|
339
|
-
|
|
340
|
-
---
|
|
341
|
-
|
|
342
|
-
## 使用方式
|
|
343
|
-
|
|
344
|
-
下面三种用法任选其一。**A** 是最简单的;**B** 适合已经在用 cc-switch 管理多家供应商的;**C** 是把 mimo2codex 与其他 Codex 供应商混合使用、随时切换。
|
|
345
|
-
|
|
346
|
-
### A. 独立使用(手动配 Codex)
|
|
347
|
-
|
|
348
|
-
#### 1. 启动代理
|
|
349
|
-
|
|
350
|
-
```bash
|
|
351
|
-
# 任选你前面装好的方式。这里用方式 A:
|
|
352
|
-
export MIMO_API_KEY=sk-xxxxxxxxxxxxxxxx
|
|
353
|
-
npm run dev
|
|
354
|
-
```
|
|
355
|
-
|
|
356
|
-
启动后会打印 Codex 需要的配置片段(默认 **auth.json 方式**——CLI 和桌面端都能用、不依赖任何环境变量):
|
|
357
|
-
|
|
358
|
-
```
|
|
359
|
-
mimo2codex v0.1.0 listening on http://127.0.0.1:8788
|
|
360
|
-
upstream: https://api.xiaomimimo.com/v1
|
|
361
|
-
api key: sk-x…xxxx
|
|
362
|
-
reasoning: passthrough
|
|
363
|
-
|
|
364
|
-
# Step 1 — 写 ~/.codex/auth.json (Windows: %USERPROFILE%\.codex\auth.json)
|
|
365
|
-
{
|
|
366
|
-
"OPENAI_API_KEY": "mimo2codex-local"
|
|
367
|
-
}
|
|
368
|
-
|
|
369
|
-
# Step 2 — 追加到 ~/.codex/config.toml
|
|
370
|
-
model = "mimo-v2.5-pro"
|
|
371
|
-
model_provider = "mimo"
|
|
372
|
-
|
|
373
|
-
[model_providers.mimo]
|
|
374
|
-
name = "MiMo (via mimo2codex)"
|
|
375
|
-
base_url = "http://127.0.0.1:8788/v1"
|
|
376
|
-
wire_api = "responses"
|
|
377
|
-
requires_openai_auth = true
|
|
378
|
-
request_max_retries = 1
|
|
379
|
-
```
|
|
380
|
-
|
|
381
|
-
#### 2. 写两个文件
|
|
382
|
-
|
|
383
|
-
按上面的 Step 1 / Step 2 把两段内容分别写到对应文件:
|
|
70
|
+
把启动横幅打的两段内容写到对应文件:
|
|
384
71
|
|
|
385
72
|
| 文件 | macOS / Linux | Windows |
|
|
386
73
|
|---|---|---|
|
|
387
74
|
| auth.json | `~/.codex/auth.json` | `%USERPROFILE%\.codex\auth.json` |
|
|
388
75
|
| config.toml | `~/.codex/config.toml` | `%USERPROFILE%\.codex\config.toml` |
|
|
389
76
|
|
|
390
|
-
|
|
391
|
-
|
|
392
|
-
`mimo2codex-local` 这个值是占位字符串,随便填非空都行——代理本身不校验。
|
|
393
|
-
|
|
394
|
-
#### 3. 重启 Codex(桌面端必须做)
|
|
395
|
-
|
|
396
|
-
如果你在用 **Codex 桌面端**:从托盘 / 任务栏完全退出(不只是关窗口),再重新启动。否则 Codex 不会重读新写的 auth.json。
|
|
397
|
-
|
|
398
|
-
如果你在用 **Codex CLI**:直接启动就行:
|
|
77
|
+
### 4. 跑 Codex
|
|
399
78
|
|
|
400
79
|
```bash
|
|
401
80
|
codex
|
|
402
|
-
>
|
|
403
|
-
```
|
|
404
|
-
|
|
405
|
-
Pet、工具调用、思考摘要、多轮对话都能正常工作。
|
|
406
|
-
|
|
407
|
-
> 💡 **想用环境变量方式的(不动 auth.json)**:跑 `npm run dev -- print-config --env-key` 拿环境变量版的 snippet。但**仅 CLI 适用**,桌面端从 Finder / 开始菜单启动**不会**读到 shell 的 env vars。
|
|
408
|
-
|
|
409
|
-
---
|
|
410
|
-
|
|
411
|
-
### B. 通过 cc-switch 添加自定义供应商
|
|
412
|
-
|
|
413
|
-
[cc-switch](https://github.com/farion1231/cc-switch) 是一个跨平台桌面 App,专门管理 Claude Code / Codex / OpenCode / OpenClaw / Gemini CLI 五个工具的多供应商切换。它的 Codex 预设里**没有 MiMo**(因为 MiMo 不支持 Responses API),所以我们用 mimo2codex 当桥,再以「自定义供应商」的方式加进 cc-switch。
|
|
414
|
-
|
|
415
|
-
> ⚠️ **流程要点**:mimo2codex 是个**本地 HTTP 代理服务**,必须**保持运行**才能接收 Codex 的请求。`print-cc-switch` 只是打印配置文本给你拷贝——它不启动任何东西。下面步骤 1(启代理)和步骤 2(拿配置文本)是两件独立的事。
|
|
416
|
-
|
|
417
|
-
#### 1. 启动 mimo2codex 代理(必须保持运行)
|
|
418
|
-
|
|
419
|
-
打开一个终端,进 mimo2codex 仓库目录:
|
|
420
|
-
|
|
421
|
-
```bash
|
|
422
|
-
cd /path/to/mimo2codex
|
|
423
|
-
export MIMO_API_KEY=sk-xxxxxxxxxxxxxxxx
|
|
424
|
-
npm run dev # 或 node dist/cli.js
|
|
81
|
+
> 写一个 Python 计算斐波那契并保存到 fib.py
|
|
425
82
|
```
|
|
426
83
|
|
|
427
|
-
|
|
84
|
+
宠物、工具调用、思考过程、多轮对话都正常。`--no-reasoning` 可以不在终端显示思考。
|
|
428
85
|
|
|
429
|
-
|
|
86
|
+
> 桌面端如果没读到新 `auth.json`,**完全退出后重启**(托盘 → 退出,不只是关窗口)。
|
|
430
87
|
|
|
431
|
-
|
|
432
|
-
|
|
433
|
-
**新开一个终端**(不要关掉步骤 1 的那个),跑:
|
|
434
|
-
|
|
435
|
-
```bash
|
|
436
|
-
cd /path/to/mimo2codex
|
|
437
|
-
npm run dev -- print-cc-switch # 或 node dist/cli.js print-cc-switch
|
|
438
|
-
```
|
|
439
|
-
|
|
440
|
-
输出:
|
|
441
|
-
|
|
442
|
-
```
|
|
443
|
-
# cc-switch — Add Provider → Codex tab → Custom
|
|
444
|
-
|
|
445
|
-
# ───────── auth.json (粘到 auth.json 文本框) ─────────
|
|
446
|
-
{
|
|
447
|
-
"OPENAI_API_KEY": "mimo2codex-local"
|
|
448
|
-
}
|
|
449
|
-
|
|
450
|
-
# ───────── config.toml (粘到 config.toml 文本框) ─────────
|
|
451
|
-
model_provider = "mimo2codex"
|
|
452
|
-
model = "mimo-v2.5-pro"
|
|
453
|
-
|
|
454
|
-
[model_providers.mimo2codex]
|
|
455
|
-
name = "MiMo (via mimo2codex)"
|
|
456
|
-
base_url = "http://127.0.0.1:8788/v1"
|
|
457
|
-
wire_api = "responses"
|
|
458
|
-
requires_openai_auth = true
|
|
459
|
-
request_max_retries = 1
|
|
460
|
-
```
|
|
461
|
-
|
|
462
|
-
#### 3. 在 cc-switch 里添加
|
|
463
|
-
|
|
464
|
-
打开 cc-switch → 顶部切到 **Codex** Tab → 点右上角 **+** 号 → 选「**应用专属供应商**」→ 预设选「**自定义**」(或 Custom):
|
|
465
|
-
|
|
466
|
-
| 字段 | 填入 |
|
|
467
|
-
|---|---|
|
|
468
|
-
| **名称** | `MiMo (via mimo2codex)` |
|
|
469
|
-
| **auth.json** | 上面 print-cc-switch 输出的 auth.json 部分(整段 JSON) |
|
|
470
|
-
| **config.toml** | 上面 print-cc-switch 输出的 config.toml 部分(整段 TOML) |
|
|
471
|
-
| **备注**(可选) | `本地 mimo2codex 代理 → MiMo V2.5 Pro` |
|
|
88
|
+
## 配合 cc-switch 使用
|
|
472
89
|
|
|
473
|
-
|
|
90
|
+
[cc-switch](https://github.com/farion1231/cc-switch) 是个跨平台桌面 App,专门管理 Claude Code / Codex / OpenCode / OpenClaw / Gemini CLI 的多供应商切换。它的 Codex 预设里没 MiMo(因为 MiMo 不支持 Responses API),mimo2codex 当桥用「自定义供应商」加进去:
|
|
474
91
|
|
|
475
|
-
|
|
92
|
+
1. 让 mimo2codex 一直跑(`MIMO_API_KEY=... mimo2codex`)
|
|
93
|
+
2. `mimo2codex print-cc-switch` 输出 `auth.json` + `config.toml` 两段文本
|
|
94
|
+
3. cc-switch GUI → **Codex** Tab → **+** → **自定义** → 把两段贴对应文本框 → 名称写 `MiMo (via mimo2codex)` → 添加
|
|
95
|
+
4. 点击新供应商激活——cc-switch 自动写 Codex 的配置文件。后续切回 OpenAI 官方 / Azure / OpenRouter 都是一键,mimo2codex 进程不需要重启,只在被路由到时收到流量。
|
|
476
96
|
|
|
477
|
-
|
|
478
|
-
|
|
479
|
-
然后跑:
|
|
480
|
-
|
|
481
|
-
```bash
|
|
482
|
-
codex
|
|
483
|
-
```
|
|
484
|
-
|
|
485
|
-
完事。
|
|
486
|
-
|
|
487
|
-
> 💡 **小贴士**:cc-switch 的「获取模型」按钮(下载图标)会调用 `/v1/models` 端点。mimo2codex 已经实现了这个端点,所以你点一下就能下拉选 `mimo-v2.5-pro` / `mimo-v2.5-pro[1m]` / `mimo-v2-flash`。
|
|
488
|
-
|
|
489
|
-
---
|
|
490
|
-
|
|
491
|
-
### C. 在多个 Codex 供应商之间随时切换
|
|
492
|
-
|
|
493
|
-
cc-switch 的核心价值就是**一键切换**。结合 mimo2codex 后,你可以同时拥有:
|
|
494
|
-
|
|
495
|
-
| 名称 | 用途 |
|
|
496
|
-
|---|---|
|
|
497
|
-
| OpenAI 官方(cc-switch 内置预设) | GPT-5.2、思考能力最强但贵 |
|
|
498
|
-
| **MiMo (via mimo2codex)** | MiMo V2.5 Pro,1M 上下文,国内访问快 |
|
|
499
|
-
| Azure OpenAI(cc-switch 内置) | 企业合规走 Azure |
|
|
500
|
-
| OpenRouter(cc-switch 内置) | 多家模型聚合 |
|
|
501
|
-
| AiHubMix / DMXAPI(cc-switch 内置) | 国内中转 |
|
|
502
|
-
|
|
503
|
-
切换流程:
|
|
504
|
-
|
|
505
|
-
1. 打开 cc-switch
|
|
506
|
-
2. Codex Tab 里点想用的那个供应商
|
|
507
|
-
3. 顶部托盘也能直接切(cc-switch 支持)
|
|
508
|
-
4. 当前 Codex 会话不需要重启——下次启动 `codex` 就用新的了
|
|
509
|
-
|
|
510
|
-
> ⚠️ **注意**:mimo2codex 进程要保持运行状态。即使你在 cc-switch 里切到了别的供应商也没关系——mimo2codex 只在被路由到时才接收请求,不会消耗资源。可以挂在 `pm2`、Windows 服务或 systemd 用户单元里常驻。
|
|
511
|
-
|
|
512
|
-
---
|
|
97
|
+
cc-switch 的「获取模型」按钮调 `/v1/models`,mimo2codex 已实现——下拉里能直接选 `mimo-v2.5-pro` / `mimo-v2.5-pro[1m]` / `mimo-v2-flash`。
|
|
513
98
|
|
|
514
99
|
## CLI 参数速查
|
|
515
100
|
|
|
516
101
|
| 参数 | 环境变量 | 默认 | 说明 |
|
|
517
102
|
|---|---|---|---|
|
|
518
103
|
| `--port`, `-p` | `MIMO2CODEX_PORT` | `8788` | 监听端口 |
|
|
519
|
-
| `--host` | `MIMO2CODEX_HOST` | `127.0.0.1` |
|
|
520
|
-
| `--base-url` | `MIMO_BASE_URL` | `https://api.xiaomimimo.com/v1` |
|
|
521
|
-
| `--api-key` | `MIMO_API_KEY` | _必填_ | 上游 MiMo
|
|
522
|
-
| `--no-reasoning` | `MIMO2CODEX_NO_REASONING=1` | 关 |
|
|
523
|
-
| `--verbose`, `-v` | `MIMO2CODEX_VERBOSE=1` | 关 |
|
|
104
|
+
| `--host` | `MIMO2CODEX_HOST` | `127.0.0.1` | 绑定地址 |
|
|
105
|
+
| `--base-url` | `MIMO_BASE_URL` | `https://api.xiaomimimo.com/v1` | Token 套餐改 `https://token-plan-cn.xiaomimimo.com/v1` |
|
|
106
|
+
| `--api-key` | `MIMO_API_KEY` | _必填_ | 上游 MiMo Key |
|
|
107
|
+
| `--no-reasoning` | `MIMO2CODEX_NO_REASONING=1` | 关 | 终端不显示思考(多轮工具调用仍回填给 MiMo) |
|
|
108
|
+
| `--verbose`, `-v` | `MIMO2CODEX_VERBOSE=1` | 关 | 打印每次翻译的请求体 |
|
|
524
109
|
|
|
525
110
|
子命令:
|
|
526
111
|
|
|
527
112
|
```bash
|
|
528
|
-
mimo2codex
|
|
529
|
-
mimo2codex print-config
|
|
530
|
-
mimo2codex print-cc-switch #
|
|
531
|
-
mimo2codex --port 9000 print-config # 端口换 9000 后再输出
|
|
113
|
+
mimo2codex print-config # 默认 auth.json + config.toml 两段
|
|
114
|
+
mimo2codex print-config --env-key # 老的环境变量方式(仅 CLI 适用)
|
|
115
|
+
mimo2codex print-cc-switch # cc-switch 自定义供应商片段
|
|
532
116
|
```
|
|
533
117
|
|
|
534
|
-
---
|
|
535
|
-
|
|
536
118
|
## 故障排查
|
|
537
119
|
|
|
538
|
-
|
|
539
|
-
|
|
540
|
-
A:你的 `~/.codex/config.toml` 里写了 `env_key = "MIMO2CODEX_KEY"`,Codex 启动时会去**自己进程的环境变量**里找这个名字,没找到就报错。
|
|
541
|
-
|
|
542
|
-
最容易踩的坑是 **Codex 桌面端**:你在终端 `export MIMO2CODEX_KEY=anything` 是对的,但桌面端是从 Finder / 开始菜单启动的,**不会继承 shell 的环境变量**。
|
|
543
|
-
|
|
544
|
-
**修复(推荐:改成 auth.json 方式,CLI 和桌面端通用)**:
|
|
545
|
-
|
|
546
|
-
1. 编辑 `~/.codex/config.toml`(Windows: `%USERPROFILE%\.codex\config.toml`),把 mimo2codex 段落里的:
|
|
547
|
-
```toml
|
|
548
|
-
env_key = "MIMO2CODEX_KEY"
|
|
549
|
-
```
|
|
550
|
-
**删掉**,改成:
|
|
551
|
-
```toml
|
|
552
|
-
requires_openai_auth = true
|
|
553
|
-
```
|
|
554
|
-
2. 写 `~/.codex/auth.json`(Windows: `%USERPROFILE%\.codex\auth.json`):
|
|
555
|
-
```json
|
|
556
|
-
{ "OPENAI_API_KEY": "mimo2codex-local" }
|
|
557
|
-
```
|
|
558
|
-
3. **完全退出并重启 Codex**(桌面端:托盘右键 → 退出,不只是关窗口)
|
|
559
|
-
|
|
560
|
-
或直接跑 `npm run dev -- print-config` 拿到现成的两段 snippet 复制即可。
|
|
561
|
-
|
|
562
|
-
**坚持用环境变量方式的(仅 CLI)**:
|
|
563
|
-
|
|
564
|
-
- macOS / Linux:在 `~/.bashrc` / `~/.zshrc` 末尾加 `export MIMO2CODEX_KEY=anything`,`source` 一下,再启 `codex`。
|
|
565
|
-
- Windows:用 `setx MIMO2CODEX_KEY anything`(不是 `set`),打开**新的** CMD 窗口再启动 Codex。`setx` 不会影响已经打开的窗口。
|
|
566
|
-
- **注意**:这两种都不解决桌面端问题。桌面端用 auth.json 方式或 cc-switch。
|
|
567
|
-
|
|
568
|
-
---
|
|
120
|
+
<details>
|
|
121
|
+
<summary><b>报 <code>Missing environment variable: MIMO2CODEX_KEY</code></b></summary>
|
|
569
122
|
|
|
570
|
-
|
|
123
|
+
你 `config.toml` 还在用老的 `env_key = "MIMO2CODEX_KEY"`,桌面端不读 shell 环境变量。换成 auth.json 方式:把 `env_key = "..."` 改成 `requires_openai_auth = true`,再写 `~/.codex/auth.json` 为 `{"OPENAI_API_KEY": "mimo2codex-local"}`。或者直接 `mimo2codex print-config` 重新拿默认输出粘贴。
|
|
571
124
|
|
|
572
|
-
|
|
125
|
+
</details>
|
|
573
126
|
|
|
574
|
-
|
|
575
|
-
|
|
576
|
-
3. config.toml 里的 `base_url` 有没有以 `/v1` 结尾?必须是 `http://127.0.0.1:8788/v1`,不是 `http://127.0.0.1:8788`
|
|
577
|
-
4. 端口冲突?默认 `8788`,被占了就 `npm run dev -- --port 9999`,**记得同步改 config.toml 里的 base_url**
|
|
127
|
+
<details>
|
|
128
|
+
<summary><b>报 <code>404: No endpoints found that support image input</code></b></summary>
|
|
578
129
|
|
|
579
|
-
|
|
130
|
+
模型不支持图。MiMo 系列里只有 `mimo-v2.5` 和 `mimo-v2-omni` 接受图片。把 `config.toml` 的 model 换成这两个之一,或交给 mimo2codex 自动剥图(`mimo-v2.5-pro` / `-flash` 上自动加占位文本)。
|
|
580
131
|
|
|
581
|
-
|
|
132
|
+
</details>
|
|
582
133
|
|
|
583
|
-
|
|
134
|
+
<details>
|
|
135
|
+
<summary><b>报 <code>400: Param Incorrect: text is not set</code></b></summary>
|
|
584
136
|
|
|
585
|
-
|
|
586
|
-
- `tp-xxx` → `--base-url https://token-plan-cn.xiaomimimo.com/v1`
|
|
137
|
+
MiMo 的图像 API 要求每条带图消息必须同时有 `text` part。mimo2codex 自动补一个空格——确保你是最新版(`npm update -g mimo2codex` 或 `git pull && npm run build`)。
|
|
587
138
|
|
|
588
|
-
|
|
139
|
+
</details>
|
|
589
140
|
|
|
590
|
-
|
|
141
|
+
<details>
|
|
142
|
+
<summary><b>生成宠物时 Codex 报 <code>image_gen tool not available</code></b></summary>
|
|
591
143
|
|
|
592
|
-
|
|
144
|
+
是 Codex 的 `/hatch` 想调 OpenAI 图像 API——MiMo 没有图像生成能力。改用仓库自带的 [`mimoskill/scripts/generate_pet.py`](./mimoskill/scripts/generate_pet.py),默认走免费的 Pollinations.ai,**不需要任何 OpenAI key**。完整流程见 [mimoskill/SKILL.md](./mimoskill/SKILL.md)。
|
|
593
145
|
|
|
594
|
-
|
|
146
|
+
</details>
|
|
595
147
|
|
|
596
|
-
|
|
597
|
-
|
|
598
|
-
| `mimo-v2.5` / `mimo-v2.5[1m]` | ✅ |
|
|
599
|
-
| `mimo-v2-omni` / `mimo-v2-omni[1m]` | ✅ |
|
|
600
|
-
| `mimo-v2.5-pro` / `mimo-v2.5-pro[1m]` | ❌(自动丢图 + 加文本说明) |
|
|
601
|
-
| `mimo-v2-flash` | ❌ |
|
|
602
|
-
|
|
603
|
-
要用视觉能力,把 model 改成 `mimo-v2.5` 或 `mimo-v2-omni`:
|
|
604
|
-
|
|
605
|
-
```toml
|
|
606
|
-
# ~/.codex/config.toml
|
|
607
|
-
model = "mimo-v2.5"
|
|
608
|
-
```
|
|
148
|
+
<details>
|
|
149
|
+
<summary><b>报 <code>stream disconnected before completion</code></b></summary>
|
|
609
150
|
|
|
610
|
-
|
|
151
|
+
老版本 bug——确保 ≥ 0.1.0。SSE 事件 data 里必须带 `type` 字段,老构建漏了。
|
|
611
152
|
|
|
612
|
-
|
|
153
|
+
</details>
|
|
613
154
|
|
|
614
|
-
|
|
155
|
+
<details>
|
|
156
|
+
<summary><b>日志被 <code>dropping unsupported tool type</code> 刷屏</b></summary>
|
|
615
157
|
|
|
616
|
-
|
|
158
|
+
已修——已知服务端工具(`code_interpreter`、`image_generation`、`computer_use` 等)默默丢弃;未知类型每个会话只 WARN 一次,不再每次请求都刷。
|
|
617
159
|
|
|
618
|
-
|
|
160
|
+
</details>
|
|
619
161
|
|
|
620
|
-
|
|
621
|
-
|
|
622
|
-
A:分情况:
|
|
623
|
-
|
|
624
|
-
| Codex 发来的工具类型 | mimo2codex 怎么处理 | 说明 |
|
|
625
|
-
|---|---|---|
|
|
626
|
-
| `function` | ✅ 透传 | 标准 function tool,所有 LLM 都认 |
|
|
627
|
-
| `local_shell` | ✅ 翻译成 `shell` 函数 | Codex 自动 fallback,调用照常 |
|
|
628
|
-
| `custom` | ✅ 翻译成 function tool | 自由格式 / grammar 工具,丢失了 grammar 约束但能调用 |
|
|
629
|
-
| `namespace` | ✅ 递归展开里面的子工具 | MCP 等分组工具 |
|
|
630
|
-
| **`web_search` / `web_search_preview`** | ✅ **翻译成 MiMo 的 `web_search` builtin** | 联网搜索!见下一题 |
|
|
631
|
-
| `code_interpreter` | ❌ 丢弃(仅 debug 日志) | OpenAI 服务端独占,MiMo 无等价物 |
|
|
632
|
-
| `file_search` / `image_generation` | ❌ 丢弃 | 同上 |
|
|
633
|
-
| `computer_use_preview` | ❌ 丢弃 | 同上 |
|
|
634
|
-
| 其他陌生类型 | ❌ 丢弃,**首次见到时打 WARN**(同类型只警告一次,不刷屏) | 欢迎提 issue 让我们加翻译 |
|
|
162
|
+
<details>
|
|
163
|
+
<summary><b>报 <code>400: web search tool found in the request body, but webSearchEnabled is false</b></summary>
|
|
635
164
|
|
|
636
|
-
|
|
165
|
+
是老版本。新版 mimo2codex 会自动捕获这个 400、剥掉 web_search 重试,并在本次进程里记住"插件未激活",后续请求自动跳过 web_search——**不会再报错**。升到最新即可:`npm update -g mimo2codex`(或 `git pull && npm run build`)。
|
|
637
166
|
|
|
638
|
-
|
|
167
|
+
如果你**确实**想让联网搜索工作,去 [MiMo 控制台 → 插件管理](https://platform.xiaomimimo.com/#/console/plugin) 激活 Web Search Plugin(独立计费),然后重启 mimo2codex 即可。
|
|
639
168
|
|
|
640
|
-
|
|
169
|
+
</details>
|
|
641
170
|
|
|
642
|
-
|
|
171
|
+
<details>
|
|
172
|
+
<summary><b>Codex 说"我现在做 X"然后回合就结束了,没真调工具</b></summary>
|
|
643
173
|
|
|
644
|
-
|
|
174
|
+
MiMo 在多步 agentic 编码任务上的弱点——模型把 token 花在"叙述"上不真调工具。mimo2codex 默认强制 `parallel_tool_calls: true`(一回合多个工具调用),通常能缓解。
|
|
645
175
|
|
|
646
|
-
|
|
647
|
-
- 透传 MiMo 特有参数 `max_keyword`、`force_search`、`limit`(如果 Codex 发了的话)
|
|
648
|
-
- 反向把 MiMo 返回的 `annotations`(搜索引用)翻译回 Codex 的 `url_citation` 格式,**Codex 终端会显示带链接的引用**
|
|
649
|
-
- 流式场景下,每条搜索源会发 `response.output_text.annotation.added` 事件,Codex 边写边亮引用
|
|
176
|
+
如果还是踩到,**最有效的技巧是改提示词**——用命令式替代"继续":
|
|
650
177
|
|
|
651
|
-
|
|
178
|
+
> 不要解释,直接调 apply_patch 写完整文件内容
|
|
652
179
|
|
|
653
|
-
|
|
654
|
-
2. 计费规则见 [Pricing 页面](https://platform.xiaomimimo.com/#/docs/pricing)
|
|
655
|
-
3. 一次问答里模型可能并发触发多个关键词搜索,每个都计一次费——可以通过 MiMo 自己的 `max_keyword` 限制
|
|
180
|
+
这种格式(具体指令 + 显式工具名 + "不要解释")对 MiMo 的稳定性比"继续"高得多。
|
|
656
181
|
|
|
657
|
-
|
|
182
|
+
</details>
|
|
658
183
|
|
|
659
|
-
|
|
184
|
+
## mimoskill——填补 MiMo 的能力缺口
|
|
660
185
|
|
|
661
|
-
|
|
186
|
+
[mimoskill/](./mimoskill/) 是仓库根目录下一捆**辅助脚本 + 参考文档**。它存在的原因是有些事 MiMo 原生不支持(主要是图像生成),而 Codex 在客户端硬编码了一些能力假设,代理层压根改不动。
|
|
662
187
|
|
|
663
|
-
|
|
188
|
+
### 为啥要这玩意
|
|
664
189
|
|
|
665
|
-
|
|
190
|
+
| 问题 | mimo2codex 自己为啥搞不定 |
|
|
191
|
+
|---|---|
|
|
192
|
+
| `/hatch` 自定义宠物生成 | Codex 在**客户端**直接调 OpenAI 的 `image_gen` 工具——MiMo 没图像生成 endpoint,代理也没法假装有,因为 Codex 根本不把这个请求送到代理来。 |
|
|
193
|
+
| Codex 内的图片生成 | 同上,代理拦不住客户端硬编码。 |
|
|
194
|
+
| 在 Codex 之外直接调 MiMo | mimo2codex 是代理不是 SDK——一次性调用走脚本比启代理简单得多。 |
|
|
195
|
+
| MiMo 的各种坑(图必须配 text、`max_completion_tokens`、`reasoning_content` 多轮回填等) | 每写一次脚本都要重学这些坑很烦,脚本里已经全踩好了。 |
|
|
666
196
|
|
|
667
|
-
|
|
197
|
+
### 里面有啥
|
|
668
198
|
|
|
669
|
-
|
|
199
|
+
| 文件 | 作用 |
|
|
200
|
+
|---|---|
|
|
201
|
+
| `SKILL.md` | Skill 清单——给 Claude / Codex agent 读的,描述什么时候该调哪个脚本 |
|
|
202
|
+
| `scripts/mimo_chat.py` | 直接调 MiMo 的聊天 / 视觉 / 联网搜索,**纯标准库**(不用 `pip install openai`) |
|
|
203
|
+
| `scripts/generate_pet.py` | 图片生成:`auto` 模式没 OpenAI key 时走免费 Pollinations,有就走 `gpt-image-1`;也支持 Replicate / 本地 SD |
|
|
204
|
+
| `scripts/install_pet.sh` | 把生成的 PNG 装到 Codex 宠物目录(自动探测 macOS / Linux / Windows 路径) |
|
|
205
|
+
| `references/models.md` | MiMo 模型能力矩阵 + 字段坑 |
|
|
206
|
+
| `references/pet_workflow.md` | 宠物生成完整流程(单图 vs 多状态 bundle) |
|
|
207
|
+
| `assets/pet_prompt_template.md` | 调好的 chibi 贴纸风格提示词模板 |
|
|
670
208
|
|
|
671
|
-
|
|
209
|
+
### 三种用法
|
|
672
210
|
|
|
673
|
-
|
|
211
|
+
**1. 直接调用(普通用户,零配置)**
|
|
674
212
|
|
|
675
|
-
|
|
213
|
+
```bash
|
|
214
|
+
python3 mimoskill/scripts/mimo_chat.py "讲个笑话"
|
|
215
|
+
python3 mimoskill/scripts/mimo_chat.py --image src.jpg "描述这张图"
|
|
216
|
+
python3 mimoskill/scripts/generate_pet.py --description "chibi shiba 程序员" --out pet.png
|
|
217
|
+
bash mimoskill/scripts/install_pet.sh pet.png shiba
|
|
218
|
+
```
|
|
676
219
|
|
|
677
|
-
|
|
220
|
+
**2. 当 Claude Code 的 Skill 用**——把目录软链到 `~/.claude/skills/`:
|
|
678
221
|
|
|
679
|
-
|
|
222
|
+
```bash
|
|
223
|
+
ln -s "$(pwd)/mimoskill" ~/.claude/skills/mimoskill
|
|
224
|
+
```
|
|
680
225
|
|
|
681
|
-
|
|
682
|
-
- pet 宠物(5月新出)
|
|
683
|
-
- 桌面端新版本的所有改进
|
|
684
|
-
- 后续所有 Codex 新功能
|
|
226
|
+
之后 Claude 会自动读 `SKILL.md`,遇到相关任务("帮我从这张图生成宠物")会自己路由到对应脚本。
|
|
685
227
|
|
|
686
|
-
|
|
228
|
+
**3. 当 Codex agent 指南**——已经通过仓库根的 [AGENTS.md](./AGENTS.md) 接好了。Codex 每次启会话自动读 AGENTS.md,遇到生图 / 宠物相关任务会路由到 mimoskill 脚本,**不会再去 `pip install openai`**。
|
|
687
229
|
|
|
688
|
-
|
|
230
|
+
### 用 mimoskill 替代 `/hatch` 生成宠物
|
|
689
231
|
|
|
690
|
-
|
|
232
|
+
```bash
|
|
233
|
+
# 生成(免费——没 OpenAI key 时默认用 Pollinations.ai)
|
|
234
|
+
python3 mimoskill/scripts/generate_pet.py --description "chibi shiba 程序员" --out pet.png
|
|
691
235
|
|
|
692
|
-
|
|
236
|
+
# 安装
|
|
237
|
+
bash mimoskill/scripts/install_pet.sh pet.png shiba
|
|
693
238
|
|
|
694
|
-
|
|
239
|
+
# 完全退出 + 重启 Codex,宠物菜单里挑新的
|
|
240
|
+
```
|
|
695
241
|
|
|
696
|
-
|
|
242
|
+
想要更高质量,设 `PET_OPENAI_API_KEY=sk-真OpenAI-key`(跟 `MIMO_API_KEY` 完全独立——只用于这一次图片生成调用),`auto` 模式会自动切到 `gpt-image-1`。多状态动画 bundle 用 `--bundle DIR/`。完整流程:[mimoskill/SKILL.md](./mimoskill/SKILL.md)。
|
|
697
243
|
|
|
698
|
-
|
|
699
|
-
- 解耦凭据:Codex / cc-switch 那边随便填一个非空字符串就行,真正的 MiMo Key 不会暴露给 Codex 进程
|
|
700
|
-
- 简化使用:换 MiMo Key 不需要改 Codex / cc-switch 配置
|
|
244
|
+
## 项目结构
|
|
701
245
|
|
|
702
|
-
|
|
246
|
+
|
|
703
247
|
|
|
704
|
-
|
|
248
|
+
```
|
|
249
|
+
src/ # TypeScript 源码(cli、server、translate、upstream、util)
|
|
250
|
+
test/ # 46 个 vitest 用例
|
|
251
|
+
mimoskill/ # MiMo 辅助工具 + 宠物生成绕路方案
|
|
252
|
+
scripts/install.{sh,ps1} # 一键安装脚本
|
|
253
|
+
dist/ # tsc 编译产物
|
|
254
|
+
AGENTS.md # Codex agent 说明(不要装 openai,用 mimoskill)
|
|
255
|
+
PUBLISHING.md # 维护者发布手册
|
|
256
|
+
```
|
|
705
257
|
|
|
706
|
-
|
|
258
|
+
## 开发
|
|
707
259
|
|
|
708
260
|
```bash
|
|
709
|
-
|
|
710
|
-
npm
|
|
711
|
-
#
|
|
712
|
-
|
|
713
|
-
#
|
|
714
|
-
mimo2codex --verbose
|
|
261
|
+
git clone https://github.com/7as0nch/mimo2codex && cd mimo2codex
|
|
262
|
+
npm install
|
|
263
|
+
npm run dev # tsx 直接跑,不用构建
|
|
264
|
+
npm test # 46 个 vitest
|
|
265
|
+
npm run build # 产出 dist/
|
|
715
266
|
```
|
|
716
267
|
|
|
717
|
-
|
|
718
|
-
|
|
719
|
-
---
|
|
720
|
-
|
|
721
|
-
## 项目结构
|
|
722
|
-
|
|
723
|
-
```
|
|
724
|
-
mimo2codex/
|
|
725
|
-
├── src/
|
|
726
|
-
│ ├── cli.ts # 入口:argv 解析、启动 server、打印片段
|
|
727
|
-
│ ├── server.ts # node:http server,路由 /v1/responses、/v1/models、/healthz
|
|
728
|
-
│ ├── config.ts # env + flags 合并
|
|
729
|
-
│ ├── upstream/
|
|
730
|
-
│ │ ├── mimoClient.ts # 调上游 fetch 包装(重试 / 错误归一化)
|
|
731
|
-
│ │ └── chatStream.ts # 上游 Chat SSE → ChatStreamChunk 异步迭代器
|
|
732
|
-
│ ├── translate/
|
|
733
|
-
│ │ ├── types.ts # Responses + ChatCompletions 类型定义
|
|
734
|
-
│ │ ├── reqToChat.ts # 请求方向翻译
|
|
735
|
-
│ │ ├── respToResponses.ts # 非流式响应翻译
|
|
736
|
-
│ │ └── streamToSse.ts # 流式响应状态机
|
|
737
|
-
│ └── util/
|
|
738
|
-
│ ├── ids.ts # resp_*, msg_*, fc_*, rs_* id 生成
|
|
739
|
-
│ ├── sse.ts # SSE 写入 / 测试用 in-memory sink
|
|
740
|
-
│ └── log.ts # debug/info/warn/error + 脱敏
|
|
741
|
-
├── test/ # 25 个 vitest 单测
|
|
742
|
-
├── dist/ # tsc 输出(构建后产生)
|
|
743
|
-
├── package.json
|
|
744
|
-
├── tsconfig.json
|
|
745
|
-
└── vitest.config.ts
|
|
746
|
-
```
|
|
268
|
+
把本地代码注册成全局 `mimo2codex` 命令:`npm run build && npm link`。
|
|
747
269
|
|
|
748
270
|
## 许可证
|
|
749
271
|
|
|
750
|
-
MIT
|
|
272
|
+
MIT,见 [LICENSE](./LICENSE)。
|