flashduty-knowledge-base 1.3.6 → 1.3.7
This diff represents the content of publicly available package versions that have been released to one of the supported registries. The information contained in this diff is provided for informational purposes only and reflects changes between package versions as they appear in their respective public registries.
- package/dist/en.d.ts +5 -0
- package/dist/esm/en.js +650 -40
- package/dist/esm/zh.js +672 -64
- package/dist/iife/en.js +630 -20
- package/dist/iife/zh.js +639 -31
- package/dist/zh.d.ts +5 -0
- package/package.json +1 -1
package/dist/iife/en.js
CHANGED
|
@@ -77,7 +77,7 @@ Field|Required|Type|Description
|
|
|
77
77
|
|
|
78
78
|
Field|Required|Type|Description
|
|
79
79
|
:-:|:-:|:-:|:---
|
|
80
|
-
| title_rule | Yes | string | Alert title, no more than \`512\` characters, will be truncated if exceeded.<br><br>Supports dynamic title generation based on alert content, see [Customizing Incidents](https://docs.flashcat.cloud/en/
|
|
80
|
+
| title_rule | Yes | string | Alert title, no more than \`512\` characters, will be truncated if exceeded.<br><br>Supports dynamic title generation based on alert content, see [Customizing Incidents](https://docs.flashcat.cloud/en/on-call/integration/alert-integration/alert-pipelines) for generation rules.
|
|
81
81
|
| event_status | Yes | string | Alert status.<br><br>Enumerated values (case-sensitive): *Critical*, *Warning*, *Info*, *Ok*.<br><br>When specified as Ok, it means automatic recovery of the alert.
|
|
82
82
|
| alert_key | No | string | Alert identifier, used to update or automatically recover existing alerts.<br><br>You can customize this value, but it cannot exceed \`255\` characters. You can also rely on system auto-generation, this value will be returned in the response.<br><br>If you're reporting a recovery event, this value must exist.
|
|
83
83
|
| description | No | string | Alert description, no more than \`2048\` characters, will be truncated if exceeded.
|
|
@@ -218,7 +218,7 @@ Failed Response:
|
|
|
218
218
|
3. The new event might be discarded due to matching exclusion, discard, suppression, or silence rules.
|
|
219
219
|
4. When a new event triggers a new alert, the system enters the second layer of noise reduction check, determining if the new alert can be merged into an active incident. If possible, it will only merge into the existing incident without generating a new one.
|
|
220
220
|
|
|
221
|
-
For more information, please refer to [Alert Noise Reduction](https://docs.flashcat.cloud/en/
|
|
221
|
+
For more information, please refer to [Alert Noise Reduction](https://docs.flashcat.cloud/en/on-call/channel/noise-reduction).
|
|
222
222
|
</details> `,a=`---
|
|
223
223
|
title: "Email Integration"
|
|
224
224
|
description: "Generate a unique email address in Flashduty to synchronize alert triggers and recoveries through email"
|
|
@@ -318,7 +318,8 @@ attachment_stripped = true
|
|
|
318
318
|
## Severity Mapping
|
|
319
319
|
---
|
|
320
320
|
|
|
321
|
-
Currently, all alerts pushed to Flashduty through the email integration are set to Warning severity. However, you can customize the severity using the [alert pipeline](https://docs.flashcat.cloud/en/
|
|
321
|
+
Currently, all alerts pushed to Flashduty through the email integration are set to Warning severity. However, you can customize the severity using the [alert pipeline](https://docs.flashcat.cloud/en/on-call/integration/alert-integration/alert-pipelines).
|
|
322
|
+
|
|
322
323
|
`,o=`---
|
|
323
324
|
title: "Nightingale/Flashcat Integration"
|
|
324
325
|
description: "Push alert events from Nightingale (n9e) or Flashcat to Flashduty via webhook. When an alert is triggered, send a trigger event to Flashduty; when an alert recovers, send a recovery event to Flashduty"
|
|
@@ -2776,7 +2777,7 @@ OCP Alert Notification - Single Alert
|
|
|
2776
2777
|
|OceanBase|Flashduty|Status|
|
|
2777
2778
|
|---|---|---|
|
|
2778
2779
|
|Down|Critical|Critical|
|
|
2779
|
-
|Critical|
|
|
2780
|
+
|Critical|Critical|Critical|
|
|
2780
2781
|
|Warning|Warning|Warning|
|
|
2781
2782
|
|Caution|Info|Info|
|
|
2782
2783
|
|Notice|Info|Info|
|
|
@@ -4525,7 +4526,7 @@ url: "https://docs.flashcat.cloud/en/flashduty/statecloud-integration-guide"
|
|
|
4525
4526
|
|
|
4526
4527
|
Sync StateCloud monitoring alert events to Flashduty via webhook for automated alert noise reduction.
|
|
4527
4528
|
|
|
4528
|
-
For resource monitoring events from StateCloud [secondary nodes](#secondary-nodes), please use Huawei Cloud integration. Refer to [Huawei Cloud Alert Integration Guide](https://docs.flashcat.cloud/en/
|
|
4529
|
+
For resource monitoring events from StateCloud [secondary nodes](#secondary-nodes), please use Huawei Cloud integration. Refer to [Huawei Cloud Alert Integration Guide](https://docs.flashcat.cloud/en/on-call/integration/alert-integration/alert-sources/huawei-ces).
|
|
4529
4530
|
|
|
4530
4531
|
|
|
4531
4532
|
<div class="hide">
|
|
@@ -4902,7 +4903,8 @@ Go to the **Permission Management** page and apply for the following permissions
|
|
|
4902
4903
|
|
|
4903
4904
|
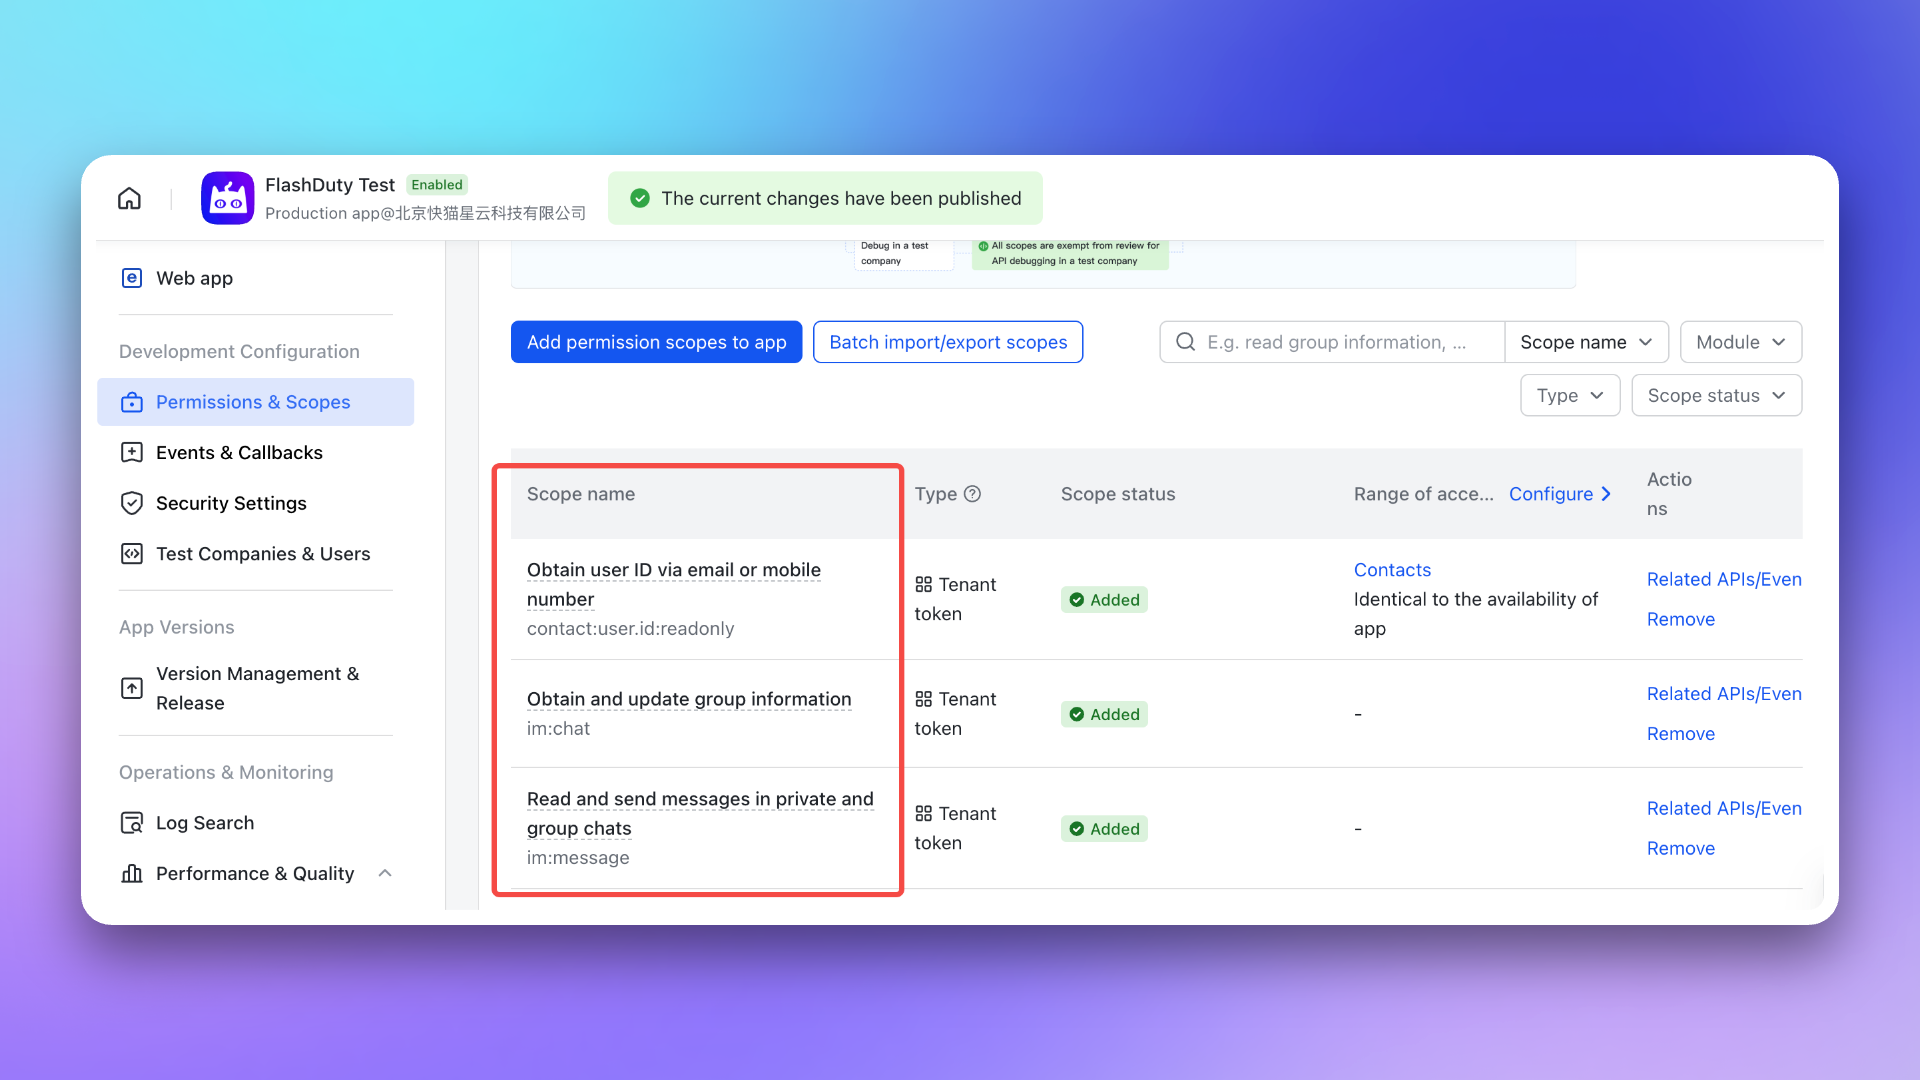
- \`im:chat\`: Get and update group information
|
|
4904
4905
|
- \`im:message\`: Get and send single chat and group messages
|
|
4905
|
-
- \`contact:user.id:readonly\`: Get user ID by phone number or email
|
|
4906
|
+
- \`contact:user.id:readonly\`: Get user ID by phone number or email
|
|
4907
|
+
- \`im:message.group_msg\`: Read group chat history (required for AI-generated post-mortem to access war room conversations) <span id="war-room-scope"></span>
|
|
4906
4908
|
|
|
4907
4909
|
|
|
4908
4910
|
|
|
@@ -4965,7 +4967,8 @@ After completing the previous steps, in the **Enhanced Features** module of the
|
|
|
4965
4967
|
> After exceeding API call limits, the Feishu/Lark application will not be able to push messages normally. It is recommended to use notification channels reasonably. See [Feishu/Lark official documentation](https://open.feishu.cn/document/uAjLw4CM/ugTN1YjL4UTN24CO1UjN/platform-updates-/custom-app-api-call-limit) for details.
|
|
4966
4968
|
5. **Why is the war room feature not working as expected?**
|
|
4967
4969
|
- Please check again whether you have configured the [required permissions](#war-room-scope) for the war room feature.
|
|
4968
|
-
- Please refer to the **FAQ** section of the Flashduty [War Room Introduction](https://docs.flashcat.cloud/en/flashduty/war-room?nav=01JCQ7A4N4WRWNXW8EWEHXCMF5)
|
|
4970
|
+
- Please refer to the **FAQ** section of the Flashduty [War Room Introduction](https://docs.flashcat.cloud/en/flashduty/war-room?nav=01JCQ7A4N4WRWNXW8EWEHXCMF5).
|
|
4971
|
+
`,Dingtalk:`---
|
|
4969
4972
|
title: "Dingtalk Integration"
|
|
4970
4973
|
description: "By integrating a custom Dingtalk application, you can receive and respond to alerts within Dingtalk."
|
|
4971
4974
|
date: "2025-05-19T10:00:00+08:00"
|
|
@@ -5354,6 +5357,8 @@ By integrating the Slack third-party application, you can receive and respond to
|
|
|
5354
5357
|
|
|
5355
5358
|
After completing the previous steps, in the **Enhanced Features** module of the Flashduty integration configuration page, check **Enable War Room** to enable this feature without additional configuration.
|
|
5356
5359
|
|
|
5360
|
+
To enable AI-generated post-mortem with war room chat history, the app requires additional \`channels:history\` permission. For existing Slack integrations, you need to manually re-authorize to grant this permission.
|
|
5361
|
+
|
|
5357
5362
|
## 3. FAQ
|
|
5358
5363
|
|
|
5359
5364
|
---
|
|
@@ -5384,7 +5389,8 @@ After completing the previous steps, in the **Enhanced Features** module of the
|
|
|
5384
5389
|
- If the error persists after retrying, please contact customer service to record and resolve new issues.
|
|
5385
5390
|
9. **Why is the war room feature not working as expected?**
|
|
5386
5391
|
- For previously authorized Slack IM integrations, you need to manually reauthorize Slack in the Flashduty integration configuration page to grant the application the additional permissions required for the war room feature.
|
|
5387
|
-
- Please refer to the **FAQ** section of the Flashduty [War Room Introduction](https://docs.flashcat.cloud/en/flashduty/war-room?nav=01JCQ7A4N4WRWNXW8EWEHXCMF5)
|
|
5392
|
+
- Please refer to the **FAQ** section of the Flashduty [War Room Introduction](https://docs.flashcat.cloud/en/flashduty/war-room?nav=01JCQ7A4N4WRWNXW8EWEHXCMF5).
|
|
5393
|
+
`,MicrosoftTeams:`---
|
|
5388
5394
|
title: "Microsoft Teams Integration"
|
|
5389
5395
|
description: "By integrating the Microsoft Teams third-party application, you can receive and respond to alerts within Microsoft Teams."
|
|
5390
5396
|
date: "2025-05-19T10:00:00+08:00"
|
|
@@ -5653,7 +5659,7 @@ curl -X POST 'https://example.com/alert/webhook?a=a' \\
|
|
|
5653
5659
|
|
|
5654
5660
|
2. **Will failed pushes continue to be pushed?**
|
|
5655
5661
|
|
|
5656
|
-
For specific network errors, retries will be attempted up to a maximum of
|
|
5662
|
+
For specific network errors, retries will be attempted up to a maximum of 1 times:
|
|
5657
5663
|
- context deadline exceeded (excluding cases involving "awaiting headers")
|
|
5658
5664
|
- i/o timeout
|
|
5659
5665
|
- eof
|
|
@@ -5864,7 +5870,7 @@ curl -X POST 'https://example.com/incident/webhook?a=a' \\
|
|
|
5864
5870
|
|
|
5865
5871
|
2. **Will failed pushes continue to be pushed?**
|
|
5866
5872
|
|
|
5867
|
-
For specific network errors, retries will be attempted up to a maximum of
|
|
5873
|
+
For specific network errors, retries will be attempted up to a maximum of 1 times:
|
|
5868
5874
|
- context deadline exceeded (excluding cases involving "awaiting headers")
|
|
5869
5875
|
- i/o timeout
|
|
5870
5876
|
- eof
|
|
@@ -6673,7 +6679,8 @@ If you want to display only key label information, you can refer to the code seg
|
|
|
6673
6679
|
\`\`\`
|
|
6674
6680
|
</div>
|
|
6675
6681
|
|
|
6676
|
-
<div class="
|
|
6682
|
+
<div class="feishu hide">
|
|
6683
|
+
|
|
6677
6684
|
|
|
6678
6685
|
## Feishu/Lark Bot
|
|
6679
6686
|
---
|
|
@@ -6943,6 +6950,7 @@ Description:{{toHtml .Description}}{{end}}{{if gt (len .Responders) 0}}
|
|
|
6943
6950
|
Responders:{{range .Responders}}@{{.PersonName}} {{end}}{{end}}
|
|
6944
6951
|
<br>Details:{{.DetailUrl}}
|
|
6945
6952
|
\`\`\`
|
|
6953
|
+
|
|
6946
6954
|
</div>
|
|
6947
6955
|
|
|
6948
6956
|
<div class="dingtalk hide">
|
|
@@ -7187,6 +7195,19 @@ You have a pending incident: {{toHtml .Title}}, Channel: {{.ChannelName}}, Sever
|
|
|
7187
7195
|
\`\`\`
|
|
7188
7196
|
</div>
|
|
7189
7197
|
|
|
7198
|
+
|
|
7199
|
+
<div class="voice hide">
|
|
7200
|
+
|
|
7201
|
+
## Voice
|
|
7202
|
+
---
|
|
7203
|
+
If no custom content is set, the system default template will be used for notifications:
|
|
7204
|
+
|
|
7205
|
+
\`\`\`go
|
|
7206
|
+
You have a pending incident: {{toHtml .Title}}, Channel: {{.ChannelName}}, Severity: {{.IncidentSeverity}}{{if gt .AlertCnt 1}}, Grouped {{.AlertCnt}} alerts{{end}}
|
|
7207
|
+
\`\`\`
|
|
7208
|
+
</div>
|
|
7209
|
+
|
|
7210
|
+
|
|
7190
7211
|
<div class="email hide">
|
|
7191
7212
|
|
|
7192
7213
|
## Email
|
|
@@ -8080,7 +8101,7 @@ By default, the system always creates new alerts for each message, but you can s
|
|
|
8080
8101
|
## Severity Mapping
|
|
8081
8102
|
---
|
|
8082
8103
|
|
|
8083
|
-
Currently, all alerts pushed to Flashduty through the Dingtalk integration are set to Warning severity. However, you can customize the severity using the [alert pipeline](https://docs.flashcat.cloud/en/
|
|
8104
|
+
Currently, all alerts pushed to Flashduty through the Dingtalk integration are set to Warning severity. However, you can customize the severity using the [alert pipeline](https://docs.flashcat.cloud/en/on-call/integration/alert-integration/alert-pipelines).
|
|
8084
8105
|
`,FeishuAlert:`---
|
|
8085
8106
|
title: "Feishu Alert Integration"
|
|
8086
8107
|
description: "Generate a unique Feishu robot address in Flashduty, and synchronize the occurrence and recovery of alerts through Feishu"
|
|
@@ -8162,7 +8183,7 @@ By default, the system always creates new alerts for each message, but you can s
|
|
|
8162
8183
|
## Severity Mapping
|
|
8163
8184
|
---
|
|
8164
8185
|
|
|
8165
|
-
Currently, all alerts pushed to Flashduty through the Feishu(lark) integration are set to Warning severity. However, you can customize the severity using the [alert pipeline](https://docs.flashcat.cloud/en/
|
|
8186
|
+
Currently, all alerts pushed to Flashduty through the Feishu(lark) integration are set to Warning severity. However, you can customize the severity using the [alert pipeline](https://docs.flashcat.cloud/en/on-call/integration/alert-integration/alert-pipelines).
|
|
8166
8187
|
`,VolcEngineDetect:`---
|
|
8167
8188
|
title: "Volcengine Cloud-Detect Alert Events"
|
|
8168
8189
|
description: "Sync Volcengine Cloud-Detect alert events to Flashduty via webhook for automated alert noise reduction"
|
|
@@ -8725,7 +8746,7 @@ After configuring the Webhook channel, you can use it in notification policies.
|
|
|
8725
8746
|
|
|
8726
8747
|
<div class="md-block">
|
|
8727
8748
|
|
|
8728
|
-
Currently, all alerts pushed to Flashduty through the Cloudflare integration are set to Warning severity. However, you can customize the severity using the [alert pipeline](https://docs.flashcat.cloud/en/
|
|
8749
|
+
Currently, all alerts pushed to Flashduty through the Cloudflare integration are set to Warning severity. However, you can customize the severity using the [alert pipeline](https://docs.flashcat.cloud/en/on-call/integration/alert-integration/alert-pipelines).
|
|
8729
8750
|
|
|
8730
8751
|
</div>
|
|
8731
8752
|
|
|
@@ -8804,12 +8825,12 @@ By default, the system always creates new alerts for each message, but you can s
|
|
|
8804
8825
|
|
|
8805
8826
|
### Notes
|
|
8806
8827
|
- Wecom alert integration URL only supports Text and Markdown message types; other message types cannot be received
|
|
8807
|
-
- Flashduty will generate a default alert title: "Wecom robot Alert , If you need to change the title, you can customize it using the [alert pipeline](https://docs.flashcat.cloud/en/
|
|
8828
|
+
- Flashduty will generate a default alert title: "Wecom robot Alert , If you need to change the title, you can customize it using the [alert pipeline](https://docs.flashcat.cloud/en/on-call/integration/alert-integration/alert-pipelines)"
|
|
8808
8829
|
|
|
8809
8830
|
## Severity Mapping
|
|
8810
8831
|
---
|
|
8811
8832
|
|
|
8812
|
-
Currently, all alerts pushed to Flashduty through the Wecom integration are set to Warning severity. However, you can customize the severity using the [alert pipeline](https://docs.flashcat.cloud/en/
|
|
8833
|
+
Currently, all alerts pushed to Flashduty through the Wecom integration are set to Warning severity. However, you can customize the severity using the [alert pipeline](https://docs.flashcat.cloud/en/on-call/integration/alert-integration/alert-pipelines).
|
|
8813
8834
|
|
|
8814
8835
|
---
|
|
8815
8836
|
title: "Wecom Alert Integration"
|
|
@@ -8886,12 +8907,12 @@ By default, the system always creates new alerts for each message, but you can s
|
|
|
8886
8907
|
|
|
8887
8908
|
### Notes
|
|
8888
8909
|
- Wecom alert integration URL only supports Text and Markdown message types; other message types cannot be received
|
|
8889
|
-
- Flashduty will generate a default alert title: "Wecom robot Alert , If you need to change the title, you can customize it using the [alert pipeline](https://docs.flashcat.cloud/en/
|
|
8910
|
+
- Flashduty will generate a default alert title: "Wecom robot Alert , If you need to change the title, you can customize it using the [alert pipeline](https://docs.flashcat.cloud/en/on-call/integration/alert-integration/alert-pipelines)"
|
|
8890
8911
|
|
|
8891
8912
|
## Severity Mapping
|
|
8892
8913
|
---
|
|
8893
8914
|
|
|
8894
|
-
Currently, all alerts pushed to Flashduty through the Wecom integration are set to Warning severity. However, you can customize the severity using the [alert pipeline](https://docs.flashcat.cloud/en/
|
|
8915
|
+
Currently, all alerts pushed to Flashduty through the Wecom integration are set to Warning severity. However, you can customize the severity using the [alert pipeline](https://docs.flashcat.cloud/en/on-call/integration/alert-integration/alert-pipelines).`,ServiceDeskPlusSync:`---
|
|
8895
8916
|
title: "ServiceDesk Plus Sync"
|
|
8896
8917
|
description: "Sync incidents with ServiceDesk Plus requests through ServiceDesk Plus sync webhook."
|
|
8897
8918
|
date: "2025-05-19T10:00:00+08:00"
|
|
@@ -9123,7 +9144,7 @@ Choose this method when you need to route alerts to different channels based on
|
|
|
9123
9144
|
## Severity Mapping
|
|
9124
9145
|
---
|
|
9125
9146
|
|
|
9126
|
-
Currently, all alerts pushed to Flashduty through the Harbor integration are set to Warning severity. However, you can customize the severity using the [alert pipeline](https://docs.flashcat.cloud/en/
|
|
9147
|
+
Currently, all alerts pushed to Flashduty through the Harbor integration are set to Warning severity. However, you can customize the severity using the [alert pipeline](https://docs.flashcat.cloud/en/on-call/integration/alert-integration/alert-pipelines).
|
|
9127
9148
|
|
|
9128
9149
|
`,LabelMappingAPI:`Configure Label Mapping API to automatically call your external API when alert events arrive, enabling dynamic enrichment and correlation of alert information. With this feature, you can automatically attach information from external data sources such as CMDB, HR systems, and more to your alerts.
|
|
9129
9150
|
|
|
@@ -9302,7 +9323,7 @@ To prevent security bypasses, request smuggling, IP spoofing, and cache poisonin
|
|
|
9302
9323
|
### Header Best Practices
|
|
9303
9324
|
|
|
9304
9325
|
1. **Allowlist Mode**: It is recommended to only allow custom Headers prefixed with \`X-Custom-\` or \`X-Enrich-\`
|
|
9305
|
-
2. **Length Limits**: The Key
|
|
9326
|
+
2. **Length Limits**: The Key length of a single Header should not exceed 1024 bytes, the Value length of a single Header should not exceed 4096 bytes
|
|
9306
9327
|
3. **Format Validation**: Header Values must not contain line breaks (\`\\r\`, \`\\n\`) to prevent Header injection attacks
|
|
9307
9328
|
|
|
9308
9329
|
## V. Best Practices
|
|
@@ -9329,4 +9350,593 @@ To prevent security bypasses, request smuggling, IP spoofing, and cache poisonin
|
|
|
9329
9350
|
3. **Can result_label_keys be changed dynamically?**
|
|
9330
9351
|
|
|
9331
9352
|
- Yes, you can modify the list of expected labels in Flashduty at any time without modifying the API code
|
|
9353
|
+
`,VolcEngineRTC:`---
|
|
9354
|
+
title: "Volcengine RTC Alert Events"
|
|
9355
|
+
description: "Sync Volcengine RTC alert events to Flashduty via webhook for automated alert noise reduction"
|
|
9356
|
+
date: "2024-07-05T10:00:00+08:00"
|
|
9357
|
+
url: "https://docs.flashcat.cloud/en/flashduty/volcengine-rtc-integration-guide"
|
|
9358
|
+
---
|
|
9359
|
+
|
|
9360
|
+
Sync Volcengine RTC alert events to Flashduty via webhook for automated alert noise reduction.
|
|
9361
|
+
|
|
9362
|
+
<div class="hide">
|
|
9363
|
+
|
|
9364
|
+
## In Flashduty
|
|
9365
|
+
---
|
|
9366
|
+
You can obtain an integration push URL through either of these two methods:
|
|
9367
|
+
|
|
9368
|
+
### Using Private Integration
|
|
9369
|
+
|
|
9370
|
+
Choose this method when you don't need to route alert events to different channels - it's simpler.
|
|
9371
|
+
|
|
9372
|
+
<details>
|
|
9373
|
+
<summary>Expand</summary>
|
|
9374
|
+
|
|
9375
|
+
1. Go to the Flashduty console, select **Channel**, and enter a channel's details page
|
|
9376
|
+
2. Select the **Integrations** tab, click **Add Integration** to enter the integration page
|
|
9377
|
+
3. Choose **Volcengine RTC** integration and click **Save** to generate a card
|
|
9378
|
+
4. Click the generated card to view the **Push URL**, copy it for later use, and you're done
|
|
9379
|
+
|
|
9380
|
+
</details>
|
|
9381
|
+
|
|
9382
|
+
### Using Shared Integration
|
|
9383
|
+
|
|
9384
|
+
Choose this method when you need to route alerts to different channels based on the alert event payload.
|
|
9385
|
+
|
|
9386
|
+
<details>
|
|
9387
|
+
<summary>Expand</summary>
|
|
9388
|
+
|
|
9389
|
+
1. Go to the Flashduty console, select **Integration Center=>Alert Events** to enter the integration selection page
|
|
9390
|
+
2. Select **Volcengine RTC** integration:
|
|
9391
|
+
- **Integration Name**: Define a name for this integration
|
|
9392
|
+
3. Configure the default route and select the corresponding channel (after the integration is created, you can go to \`Route\` to configure more routing rules)
|
|
9393
|
+
4. Click **Save** and copy the newly generated **push URL** for later use
|
|
9394
|
+
5. Done
|
|
9395
|
+
|
|
9396
|
+
</details>
|
|
9397
|
+
</div>
|
|
9398
|
+
|
|
9399
|
+
## In Volcengine
|
|
9400
|
+
---
|
|
9401
|
+
|
|
9402
|
+
### Configure Alert Rules
|
|
9403
|
+
|
|
9404
|
+
1. Login to your \`Volcengine\` console, find \`RTC\`, and enter the corresponding product console.
|
|
9405
|
+
2. In the left menu, select \`Monitor->Alert Notifications\`, and go to the \`Alert Rules\` page.
|
|
9406
|
+
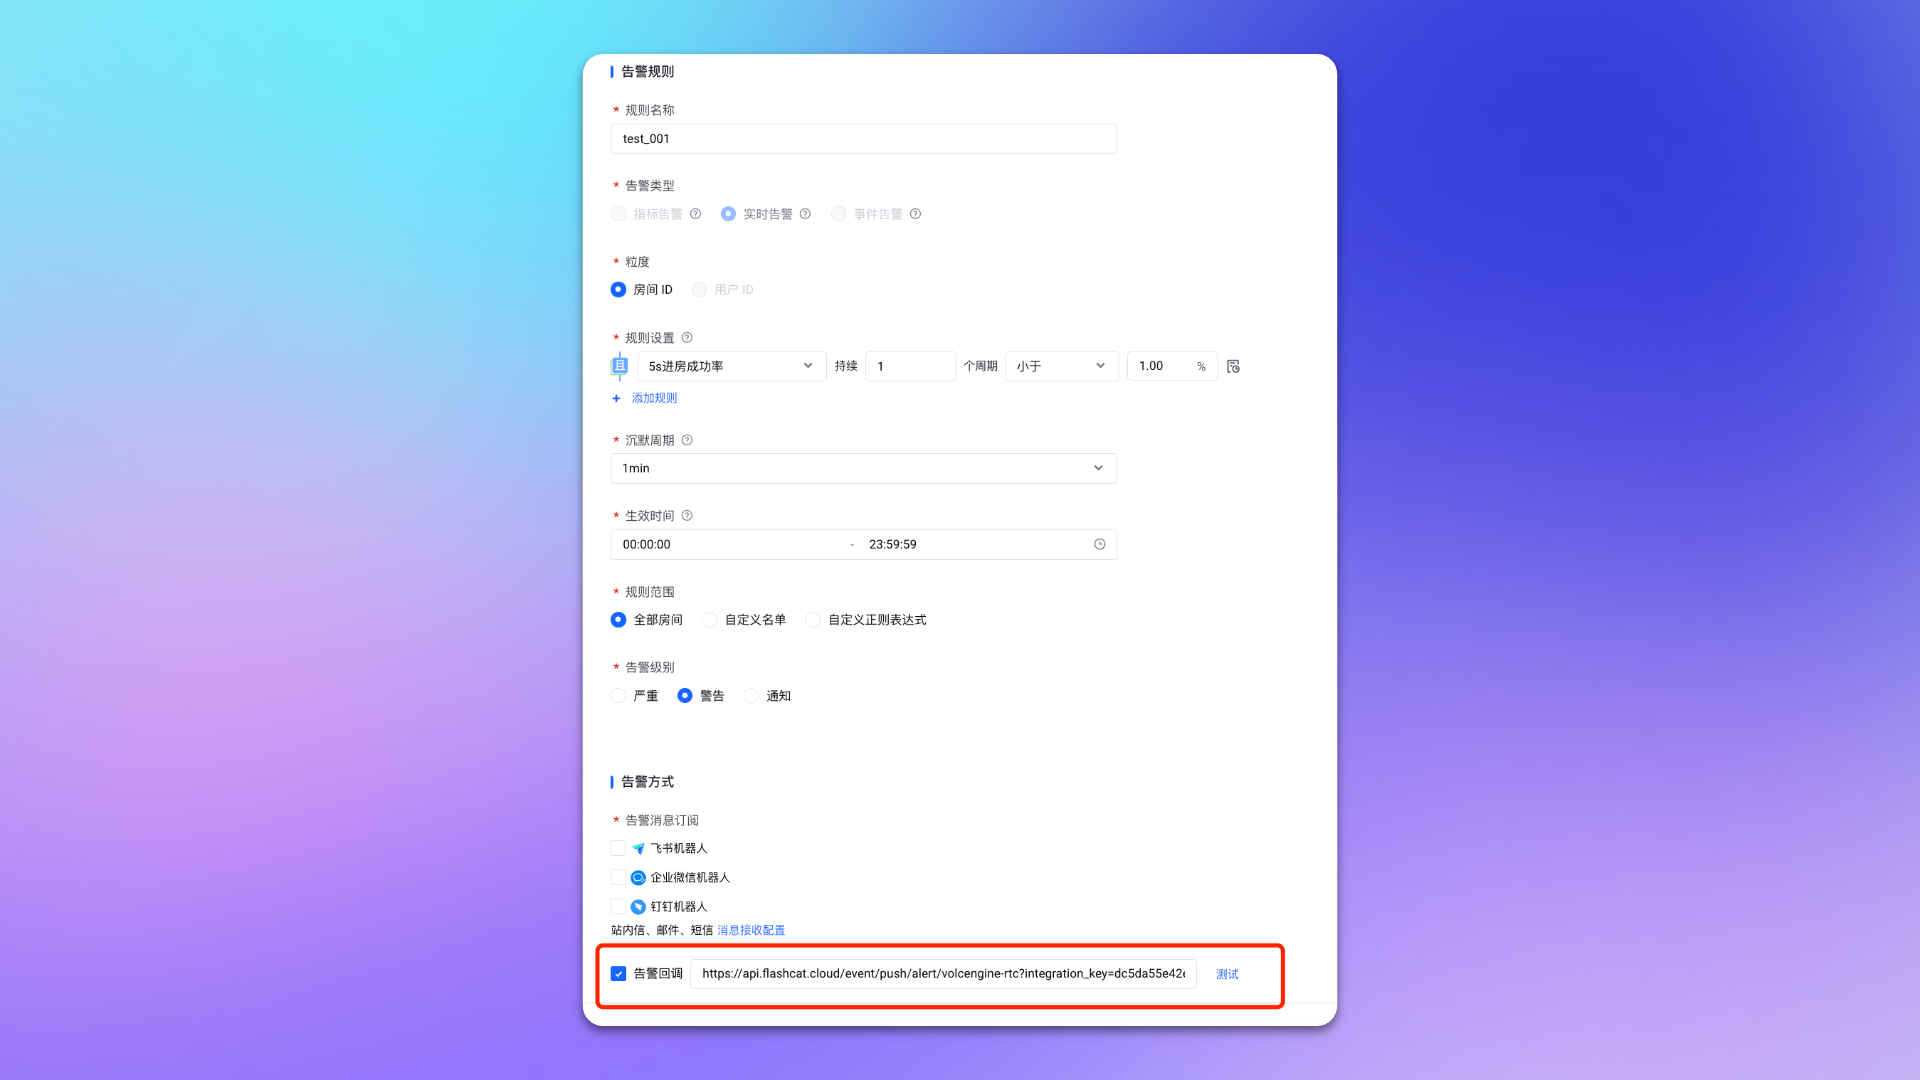
3. Create or edit an alert rule, check \`Alert Callback\` on the rule page and fill in the <span class='integration_url'>push URL</span> for the alert integration.
|
|
9407
|
+
4. Configure other options as needed.
|
|
9408
|
+
5. Click \`Confirm\` to complete the configuration.
|
|
9409
|
+
|
|
9410
|
+
|
|
9411
|
+
|
|
9412
|
+
## Status Mapping
|
|
9413
|
+
|
|
9414
|
+
|Volcengine RTC|Flashduty|Status|
|
|
9415
|
+
|---|---|---|
|
|
9416
|
+
|Critical|Critical|Critical|
|
|
9417
|
+
|Warning|Warning|Warning|
|
|
9418
|
+
|Notice|Info|Info|
|
|
9419
|
+
|
|
9420
|
+
|
|
9421
|
+
You can customize the severity through [Alert Processing Pipeline](https://docs.flashcat.cloud/en/on-call/integration/alert-integration/alert-pipelines).`,UcloudCloudWatch:`---
|
|
9422
|
+
title: "Ucloud CloudWatch Alert Events"
|
|
9423
|
+
description: "Sync Ucloud CloudWatch alert events to Flashduty via webhook for automated alert noise reduction"
|
|
9424
|
+
date: "2024-07-05T10:00:00+08:00"
|
|
9425
|
+
url: "https://docs.flashcat.cloud/en/flashduty/ucloud-cloudwatch-integration-guide"
|
|
9426
|
+
---
|
|
9427
|
+
|
|
9428
|
+
Sync Ucloud CloudWatch alert events to Flashduty via webhook for automated alert noise reduction.
|
|
9429
|
+
|
|
9430
|
+
<div class="hide">
|
|
9431
|
+
|
|
9432
|
+
## In Flashduty
|
|
9433
|
+
---
|
|
9434
|
+
You can obtain an integration push URL through either of these two methods:
|
|
9435
|
+
|
|
9436
|
+
### Using Private Integration
|
|
9437
|
+
|
|
9438
|
+
Choose this method when you don't need to route alert events to different channels - it's simpler.
|
|
9439
|
+
|
|
9440
|
+
<details>
|
|
9441
|
+
<summary>Expand</summary>
|
|
9442
|
+
|
|
9443
|
+
1. Go to the Flashduty console, select **Channel**, and enter a channel's details page
|
|
9444
|
+
2. Select the **Integrations** tab, click **Add Integration** to enter the integration page
|
|
9445
|
+
3. Choose **Ucloud CloudWatch** integration and click **Save** to generate a card
|
|
9446
|
+
4. Click the generated card to view the **Push URL**, copy it for later use, and you're done
|
|
9447
|
+
|
|
9448
|
+
</details>
|
|
9449
|
+
|
|
9450
|
+
### Using Shared Integration
|
|
9451
|
+
|
|
9452
|
+
Choose this method when you need to route alerts to different channels based on the alert event payload.
|
|
9453
|
+
|
|
9454
|
+
<details>
|
|
9455
|
+
<summary>Expand</summary>
|
|
9456
|
+
|
|
9457
|
+
1. Go to the Flashduty console, select **Integration Center=>Alert Events** to enter the integration selection page
|
|
9458
|
+
2. Select **Ucloud CloudWatch** integration:
|
|
9459
|
+
- **Integration Name**: Define a name for this integration
|
|
9460
|
+
3. Configure the default route and select the corresponding channel (after the integration is created, you can go to \`Route\` to configure more routing rules)
|
|
9461
|
+
4. Click **Save** and copy the newly generated **push URL** for later use
|
|
9462
|
+
5. Done
|
|
9463
|
+
|
|
9464
|
+
</details>
|
|
9465
|
+
</div>
|
|
9466
|
+
|
|
9467
|
+
## In Ucloud
|
|
9468
|
+
---
|
|
9469
|
+
|
|
9470
|
+
### Step 1: Configure Notice Template
|
|
9471
|
+
|
|
9472
|
+
1. Login to your Ucloud console, search for \`CloudWatch\` product, and enter the corresponding product console.
|
|
9473
|
+
2. In the menu, select \`Notice Management\`, and go to the \`Contact Template\` page.
|
|
9474
|
+
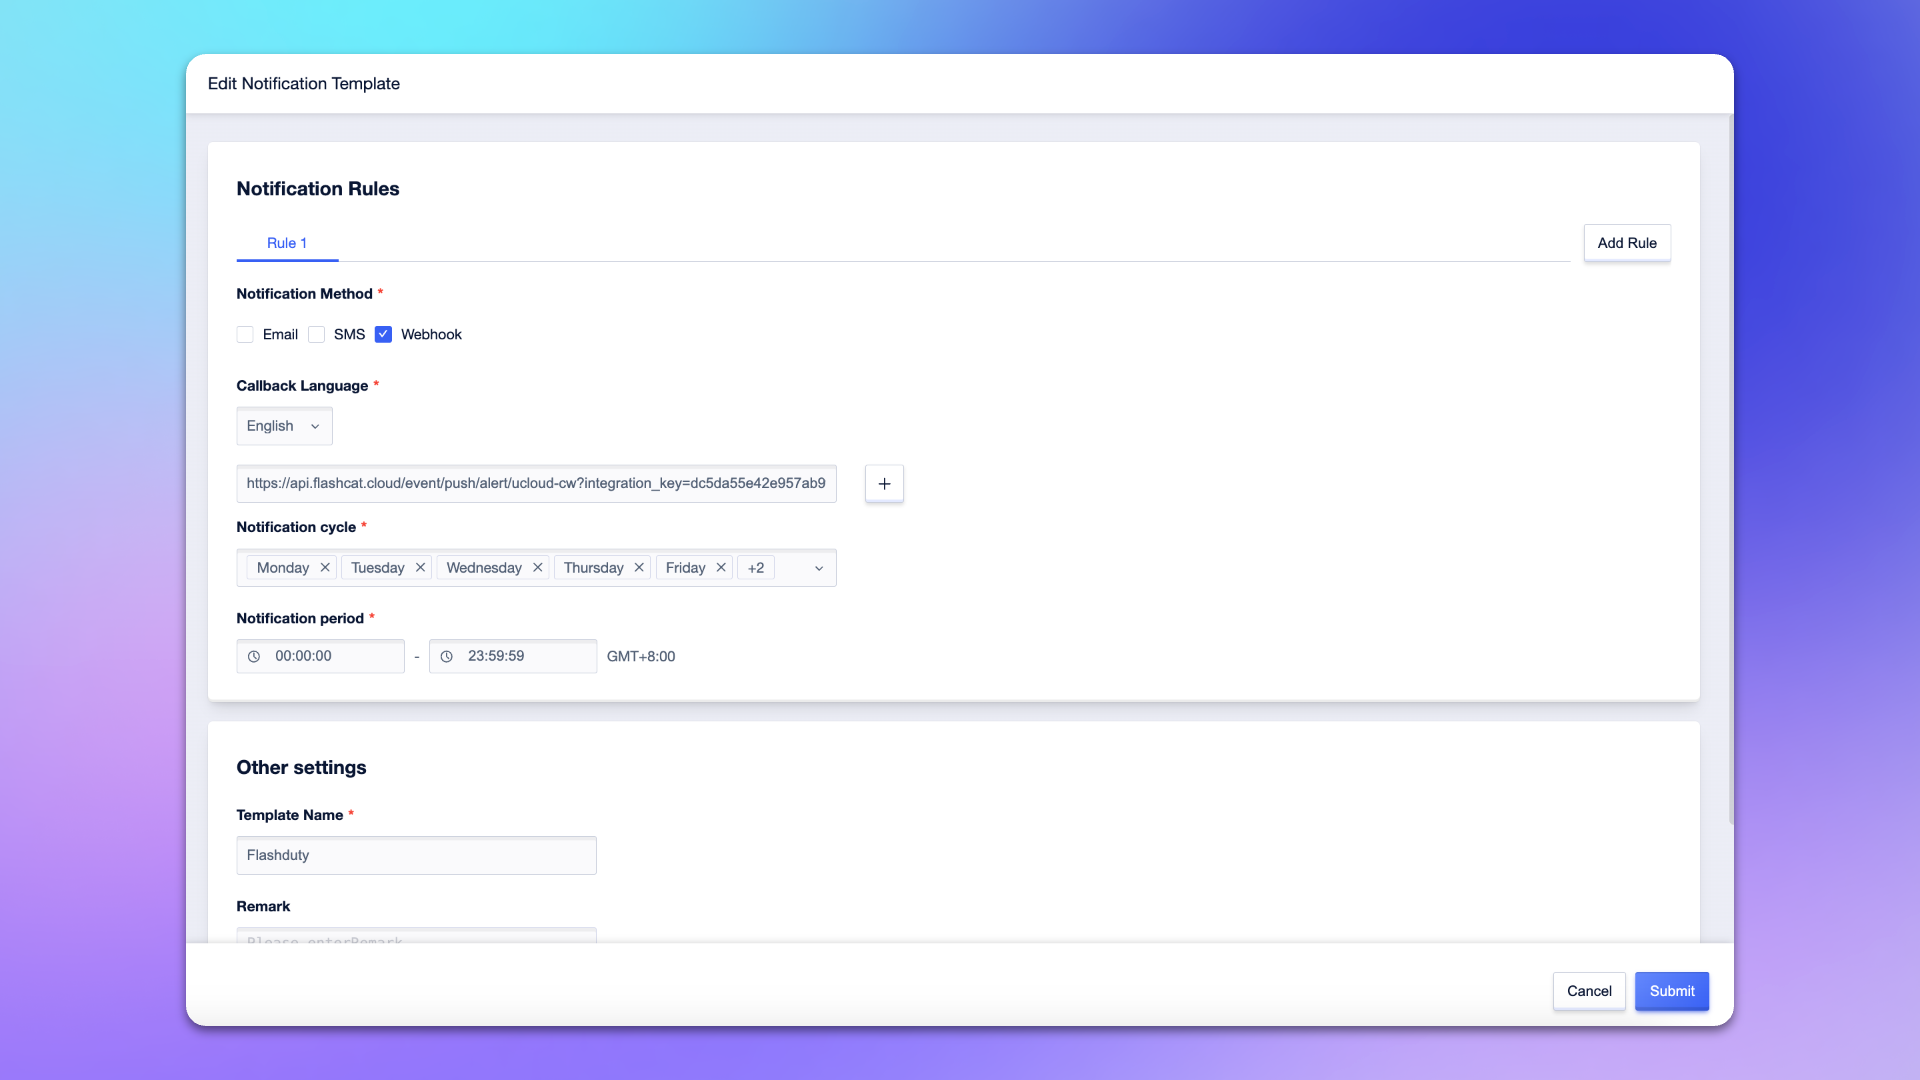
3. Create or edit a notification template, check \`Webhook\` on the template page.
|
|
9475
|
+
4. Select \`English\` for **Callback Language**, and enter the <span class='integration_url'>push URL</span> for the alert integration in the input box.
|
|
9476
|
+
5. Enter \`Flashduty\` or another name for the template name.
|
|
9477
|
+
6. Configure other options as needed.
|
|
9478
|
+
7. Click \`Submit\` to complete the configuration.
|
|
9479
|
+
|
|
9480
|
+
|
|
9481
|
+
|
|
9482
|
+
### Step 2: Configure Alert Policy
|
|
9483
|
+
1. Login to your Ucloud console, search for \`CloudWatch\` product, and enter the corresponding product console.
|
|
9484
|
+
2. In the menu, select \`Alarm Management\`, and go to the \`Alarm Policy\` page.
|
|
9485
|
+
3. Create or edit an alert policy, find the **Notification Settings** on the policy configuration page, and select the notification template created in **Step 1**.
|
|
9486
|
+
4. Configure other options as needed.
|
|
9487
|
+
5. Click \`Submit\` to complete the configuration.
|
|
9488
|
+
|
|
9489
|
+
|
|
9490
|
+
## Severity Mapping
|
|
9491
|
+
---
|
|
9492
|
+
Currently, all Ucloud CloudWatch alert events pushed to Flashduty have a severity of Warning. You can customize the severity through [Alert Processing Pipeline](https://docs.flashcat.cloud/en/on-call/integration/alert-integration/alert-pipelines).`,Nagios:`---
|
|
9493
|
+
title: "Nagios Integration"
|
|
9494
|
+
description: "Synchronize Nagios alert events to Flashduty via script to achieve automated alert noise reduction"
|
|
9495
|
+
date: "2025-05-19T10:00:00+08:00"
|
|
9496
|
+
url: "https://docs.flashcat.cloud/en/flashduty/nagios-integration-guide"
|
|
9497
|
+
---
|
|
9498
|
+
|
|
9499
|
+
Sync Nagios alert events to Flashduty via script to achieve automated alert noise reduction.
|
|
9500
|
+
|
|
9501
|
+
<div class="hide">
|
|
9502
|
+
|
|
9503
|
+
## In Flashduty
|
|
9504
|
+
---
|
|
9505
|
+
You can obtain an integration push URL through either of these two methods:
|
|
9506
|
+
|
|
9507
|
+
### Using Private Integration
|
|
9508
|
+
|
|
9509
|
+
Choose this method when you don't need to route alert events to different channels - it's simpler.
|
|
9510
|
+
|
|
9511
|
+
<details>
|
|
9512
|
+
<summary>Expand</summary>
|
|
9513
|
+
|
|
9514
|
+
1. Go to the Flashduty console, select **Channel**, and enter a channel's details page
|
|
9515
|
+
2. Select the **Integrations** tab, click **Add Integration** to enter the integration page
|
|
9516
|
+
3. Choose **Nagios** integration and click **Save** to generate a card
|
|
9517
|
+
4. Click the generated card to view the **Push URL**, copy it for later use, and you're done
|
|
9518
|
+
|
|
9519
|
+
</details>
|
|
9520
|
+
|
|
9521
|
+
### Using Shared Integration
|
|
9522
|
+
|
|
9523
|
+
Choose this method when you need to route alerts to different channels based on the alert event payload.
|
|
9524
|
+
|
|
9525
|
+
<details>
|
|
9526
|
+
<summary>Expand</summary>
|
|
9527
|
+
|
|
9528
|
+
1. Go to the Flashduty console, select **Integration Center=>Alert Events** to enter the integration selection page
|
|
9529
|
+
2. Select **Nagios** integration:
|
|
9530
|
+
- **Integration Name**: Define a name for this integration
|
|
9531
|
+
3. Configure the default route and select the corresponding channel (after the integration is created, you can go to \`Route\` to configure more routing rules)
|
|
9532
|
+
4. Click **Save** and copy the newly generated **push URL** for later use
|
|
9533
|
+
5. Done
|
|
9534
|
+
|
|
9535
|
+
</details>
|
|
9536
|
+
</div>
|
|
9537
|
+
|
|
9538
|
+
|
|
9539
|
+
## In Nagios
|
|
9540
|
+
|
|
9541
|
+
---
|
|
9542
|
+
|
|
9543
|
+
Nagios installation paths may vary depending on the system and installation method. Please adjust the paths in the following configuration according to your actual environment.
|
|
9544
|
+
|
|
9545
|
+
### Step 1: Download Notification Script
|
|
9546
|
+
|
|
9547
|
+
<div class="md-block">
|
|
9548
|
+
|
|
9549
|
+
Log in to the Nagios Server host and download the notification script to the Nagios plugin directory:
|
|
9550
|
+
|
|
9551
|
+
- **Debian/Ubuntu systems** (typically \`/usr/lib/nagios/plugins/\`):
|
|
9552
|
+
|
|
9553
|
+
\`\`\`bash
|
|
9554
|
+
cd /usr/lib/nagios/plugins/
|
|
9555
|
+
wget --header="Referer: https://console.flashcat.cloud" https://download.flashcat.cloud/flashduty/integration/nagios/send_to_flashduty.sh
|
|
9556
|
+
chmod +x send_to_flashduty.sh
|
|
9557
|
+
\`\`\`
|
|
9558
|
+
|
|
9559
|
+
- **RHEL/CentOS systems** (typically \`/usr/lib64/nagios/plugins/\`):
|
|
9560
|
+
|
|
9561
|
+
\`\`\`bash
|
|
9562
|
+
cd /usr/lib64/nagios/plugins/
|
|
9563
|
+
wget --header="Referer: https://console.flashcat.cloud" https://download.flashcat.cloud/flashduty/integration/nagios/send_to_flashduty.sh
|
|
9564
|
+
chmod +x send_to_flashduty.sh
|
|
9565
|
+
\`\`\`
|
|
9566
|
+
|
|
9567
|
+
- **Source installation** (typically \`/usr/local/nagios/libexec/\`):
|
|
9568
|
+
|
|
9569
|
+
\`\`\`bash
|
|
9570
|
+
cd /usr/local/nagios/libexec/
|
|
9571
|
+
wget --header="Referer: https://console.flashcat.cloud" https://download.flashcat.cloud/flashduty/integration/nagios/send_to_flashduty.sh
|
|
9572
|
+
chmod +x send_to_flashduty.sh
|
|
9573
|
+
\`\`\`
|
|
9574
|
+
|
|
9575
|
+
#### Note: The script uses the \`curl\` command. Please ensure curl is installed on your Nagios Server.
|
|
9576
|
+
|
|
9577
|
+
</div>
|
|
9578
|
+
|
|
9579
|
+
### Step 2: Create Flashduty Configuration File
|
|
9580
|
+
|
|
9581
|
+
<div class="md-block">
|
|
9582
|
+
|
|
9583
|
+
Download the Flashduty configuration file to the Nagios configuration directory:
|
|
9584
|
+
|
|
9585
|
+
- **Debian/Ubuntu systems** (typically \`/etc/nagios3/conf.d/\`):
|
|
9586
|
+
|
|
9587
|
+
\`\`\`bash
|
|
9588
|
+
cd /etc/nagios3/conf.d/
|
|
9589
|
+
wget --header="Referer: https://console.flashcat.cloud" https://download.flashcat.cloud/flashduty/integration/nagios/flashduty.cfg
|
|
9590
|
+
\`\`\`
|
|
9591
|
+
|
|
9592
|
+
- **RHEL/CentOS systems** (typically \`/etc/nagios/objects/\`):
|
|
9593
|
+
|
|
9594
|
+
\`\`\`bash
|
|
9595
|
+
cd /etc/nagios/objects/
|
|
9596
|
+
wget --header="Referer: https://console.flashcat.cloud" https://download.flashcat.cloud/flashduty/integration/nagios/flashduty.cfg
|
|
9597
|
+
\`\`\`
|
|
9598
|
+
|
|
9599
|
+
- **Source installation** (typically \`/usr/local/nagios/etc/objects/\`):
|
|
9600
|
+
|
|
9601
|
+
\`\`\`bash
|
|
9602
|
+
cd /usr/local/nagios/etc/objects/
|
|
9603
|
+
wget --header="Referer: https://console.flashcat.cloud" https://download.flashcat.cloud/flashduty/integration/nagios/flashduty.cfg
|
|
9604
|
+
\`\`\`
|
|
9605
|
+
|
|
9606
|
+
</div>
|
|
9607
|
+
|
|
9608
|
+
### Step 3: Modify Configuration File
|
|
9609
|
+
|
|
9610
|
+
<div class="md-block">
|
|
9611
|
+
|
|
9612
|
+
Edit the downloaded \`flashduty.cfg\` file and modify the following:
|
|
9613
|
+
|
|
9614
|
+
1. Replace the \`pager\` field value with the integration push URL obtained from the Flashduty console
|
|
9615
|
+
2. Modify the script path in \`command_line\` according to your Nagios installation path
|
|
9616
|
+
|
|
9617
|
+
Configuration file example:
|
|
9618
|
+
|
|
9619
|
+
\`\`\`
|
|
9620
|
+
define contact {
|
|
9621
|
+
contact_name Flashduty
|
|
9622
|
+
alias Flashduty Alert Receiver
|
|
9623
|
+
service_notification_commands notify-service-by-Flashduty
|
|
9624
|
+
host_notification_commands notify-host-by-Flashduty
|
|
9625
|
+
service_notification_options w,u,c,r
|
|
9626
|
+
host_notification_options d,u,r
|
|
9627
|
+
service_notification_period 24x7
|
|
9628
|
+
host_notification_period 24x7
|
|
9629
|
+
pager <YOUR_FLASHDUTY_PUSH_URL>
|
|
9630
|
+
}
|
|
9631
|
+
|
|
9632
|
+
|
|
9633
|
+
define command {
|
|
9634
|
+
command_name notify-host-by-Flashduty
|
|
9635
|
+
command_line <NAGIOS_PLUGIN_PATH>/send_to_flashduty.sh type=HOST WEBHOOK_URL="$CONTACTPAGER$" hostname="$HOSTNAME$" state="$HOSTSTATE$" output="$HOSTOUTPUT$" notification_type="$NOTIFICATIONTYPE$" time="$LONGDATETIME$" host_address="$HOSTADDRESS$" host_alias="$HOSTALIAS$" check_command="$HOSTCHECKCOMMAND$"
|
|
9636
|
+
}
|
|
9637
|
+
|
|
9638
|
+
define command {
|
|
9639
|
+
command_name notify-service-by-Flashduty
|
|
9640
|
+
command_line <NAGIOS_PLUGIN_PATH>/send_to_flashduty.sh type=SERVICE WEBHOOK_URL="$CONTACTPAGER$" hostname="$HOSTNAME$" state="$SERVICESTATE$" output="$SERVICEOUTPUT$" notification_type="$NOTIFICATIONTYPE$" time="$LONGDATETIME$" host_address="$HOSTADDRESS$" service_desc="$SERVICEDESC$" host_alias="$HOSTALIAS$" max_attempts="$MAXSERVICEATTEMPTS$"
|
|
9641
|
+
}
|
|
9642
|
+
\`\`\`
|
|
9643
|
+
|
|
9644
|
+
Parameter descriptions:
|
|
9645
|
+
- \`pager\`: Flashduty push URL, the integration push URL obtained from the Flashduty console
|
|
9646
|
+
- \`<NAGIOS_PLUGIN_PATH>\`: Replace with the actual script path, such as \`/usr/local/nagios/libexec\`
|
|
9647
|
+
- \`service_notification_options\`: Service alert notification options, w=warning, u=unknown, c=critical, r=recovery
|
|
9648
|
+
- \`host_notification_options\`: Host alert notification options, d=down, u=unreachable, r=recovery
|
|
9649
|
+
|
|
9650
|
+
**To include additional information in alerts, you can append parameters in \`key=value\` format at the end of \`command_line\`, for example: \`environment="production" region="$_HOSTREGION$"\`. These parameters will be pushed to Flashduty as labels.**
|
|
9651
|
+
|
|
9652
|
+
</div>
|
|
9653
|
+
|
|
9654
|
+
### Step 4: Include Configuration File
|
|
9655
|
+
|
|
9656
|
+
<div class="md-block">
|
|
9657
|
+
|
|
9658
|
+
If you are using **RHEL/CentOS systems** or **source installation**, you need to include the Flashduty configuration file in the Nagios main configuration file.
|
|
9659
|
+
|
|
9660
|
+
- **RHEL/CentOS systems**: Edit \`/etc/nagios/nagios.cfg\` and add:
|
|
9661
|
+
|
|
9662
|
+
\`\`\`
|
|
9663
|
+
cfg_file=/etc/nagios/objects/flashduty.cfg
|
|
9664
|
+
\`\`\`
|
|
9665
|
+
|
|
9666
|
+
- **Source installation**: Edit \`/usr/local/nagios/etc/nagios.cfg\` and add:
|
|
9667
|
+
|
|
9668
|
+
\`\`\`
|
|
9669
|
+
cfg_file=/usr/local/nagios/etc/objects/flashduty.cfg
|
|
9670
|
+
\`\`\`
|
|
9671
|
+
|
|
9672
|
+
:::tips
|
|
9673
|
+
Debian/Ubuntu systems typically auto-load all configuration files in the \`/etc/nagios3/conf.d/\` directory, so manual inclusion is not required.
|
|
9674
|
+
:::
|
|
9675
|
+
|
|
9676
|
+
</div>
|
|
9677
|
+
|
|
9678
|
+
### Step 5: Add Flashduty to Contact Group
|
|
9679
|
+
|
|
9680
|
+
<div class="md-block">
|
|
9681
|
+
|
|
9682
|
+
Edit the contacts configuration file to add the Flashduty contact to the \`admins\` contact group (or another contact group you use):
|
|
9683
|
+
|
|
9684
|
+
- **Debian/Ubuntu systems**: Edit \`/etc/nagios3/conf.d/contacts_nagios2.cfg\`
|
|
9685
|
+
- **RHEL/CentOS systems**: Edit \`/etc/nagios/objects/contacts.cfg\`
|
|
9686
|
+
- **Source installation**: Edit \`/usr/local/nagios/etc/objects/contacts.cfg\`
|
|
9687
|
+
|
|
9688
|
+
Find the contact group definition and add Flashduty to the members list:
|
|
9689
|
+
|
|
9690
|
+
\`\`\`
|
|
9691
|
+
define contactgroup {
|
|
9692
|
+
contactgroup_name admins
|
|
9693
|
+
alias Nagios Administrators
|
|
9694
|
+
members nagiosadmin,Flashduty
|
|
9695
|
+
}
|
|
9696
|
+
\`\`\`
|
|
9697
|
+
|
|
9698
|
+
</div>
|
|
9699
|
+
|
|
9700
|
+
### Step 6: Verify Configuration and Restart Service
|
|
9701
|
+
|
|
9702
|
+
<div class="md-block">
|
|
9703
|
+
|
|
9704
|
+
1. Verify the Nagios configuration file:
|
|
9705
|
+
|
|
9706
|
+
- **Debian/Ubuntu systems**:
|
|
9707
|
+
|
|
9708
|
+
\`\`\`bash
|
|
9709
|
+
/usr/sbin/nagios3 -v /etc/nagios3/nagios.cfg
|
|
9710
|
+
\`\`\`
|
|
9711
|
+
|
|
9712
|
+
- **RHEL/CentOS systems**:
|
|
9713
|
+
|
|
9714
|
+
\`\`\`bash
|
|
9715
|
+
/usr/sbin/nagios -v /etc/nagios/nagios.cfg
|
|
9716
|
+
\`\`\`
|
|
9717
|
+
|
|
9718
|
+
- **Source installation**:
|
|
9719
|
+
|
|
9720
|
+
\`\`\`bash
|
|
9721
|
+
/usr/local/nagios/bin/nagios -v /usr/local/nagios/etc/nagios.cfg
|
|
9722
|
+
\`\`\`
|
|
9723
|
+
|
|
9724
|
+
2. If verification passes, restart the Nagios service:
|
|
9725
|
+
|
|
9726
|
+
\`\`\`bash
|
|
9727
|
+
# Debian/Ubuntu
|
|
9728
|
+
systemctl restart nagios3
|
|
9729
|
+
# or
|
|
9730
|
+
service nagios3 restart
|
|
9731
|
+
|
|
9732
|
+
# RHEL/CentOS/Source installation
|
|
9733
|
+
systemctl restart nagios
|
|
9734
|
+
# or
|
|
9735
|
+
service nagios restart
|
|
9736
|
+
\`\`\`
|
|
9737
|
+
|
|
9738
|
+
3. After configuration is complete, Nagios will automatically push alerts to Flashduty when detected
|
|
9739
|
+
|
|
9740
|
+
</div>
|
|
9741
|
+
|
|
9742
|
+
## Status Mapping
|
|
9743
|
+
|
|
9744
|
+
---
|
|
9745
|
+
|
|
9746
|
+
<div class="md-block">
|
|
9747
|
+
|
|
9748
|
+
Nagios to Flashduty alert severity mapping:
|
|
9749
|
+
|
|
9750
|
+
| Nagios | Flashduty | Status |
|
|
9751
|
+
| --------------- | --------- | -------- |
|
|
9752
|
+
| CRITICAL | Critical | Critical |
|
|
9753
|
+
| DOWN | Critical | Critical |
|
|
9754
|
+
| UNREACHABLE | Critical | Critical |
|
|
9755
|
+
| WARNING | Warning | Warning |
|
|
9756
|
+
| OK | Ok | Recovered |
|
|
9757
|
+
| UP | Ok | Recovered |
|
|
9758
|
+
| UNKNOWN | Info | Info |
|
|
9759
|
+
|
|
9760
|
+
</div>
|
|
9761
|
+
`,JDCloudMonitor:`---
|
|
9762
|
+
title: "JD Cloud Monitoring Alert Events"
|
|
9763
|
+
description: "Sync JD Cloud monitoring alert events to Flashduty via webhook for automated alert noise reduction"
|
|
9764
|
+
date: "2025-05-19T10:00:00+08:00"
|
|
9765
|
+
url: "https://docs.flashcat.cloud/en/flashduty/jdcloud-integration-guide"
|
|
9766
|
+
---
|
|
9767
|
+
|
|
9768
|
+
Sync JD Cloud monitoring alert events to Flashduty via webhook for automated alert noise reduction.
|
|
9769
|
+
|
|
9770
|
+
<div class="hide">
|
|
9771
|
+
|
|
9772
|
+
## In Flashduty
|
|
9773
|
+
---
|
|
9774
|
+
You can obtain an integration push URL through either of these two methods:
|
|
9775
|
+
|
|
9776
|
+
### Using Private Integration
|
|
9777
|
+
|
|
9778
|
+
Choose this method when you don't need to route alert events to different channels - it's simpler.
|
|
9779
|
+
|
|
9780
|
+
<details>
|
|
9781
|
+
<summary>Expand</summary>
|
|
9782
|
+
|
|
9783
|
+
1. Go to the Flashduty console, select **Channel**, and enter a channel's details page
|
|
9784
|
+
2. Select the **Integrations** tab, click **Add Integration** to enter the integration page
|
|
9785
|
+
3. Choose **JD Cloud Monitoring** integration and click **Save** to generate a card
|
|
9786
|
+
4. Click the generated card to view the **Push URL**, copy it for later use, and you're done
|
|
9787
|
+
|
|
9788
|
+
</details>
|
|
9789
|
+
|
|
9790
|
+
### Using Shared Integration
|
|
9791
|
+
|
|
9792
|
+
Choose this method when you need to route alerts to different channels based on the alert event payload.
|
|
9793
|
+
|
|
9794
|
+
<details>
|
|
9795
|
+
<summary>Expand</summary>
|
|
9796
|
+
|
|
9797
|
+
1. Go to the Flashduty console, select **Integration Center=>Alert Events** to enter the integration selection page
|
|
9798
|
+
2. Select **JD Cloud Monitoring** integration:
|
|
9799
|
+
- **Integration Name**: Define a name for this integration
|
|
9800
|
+
3. Configure the default route and select the corresponding channel (after the integration is created, you can go to \`Route\` to configure more routing rules)
|
|
9801
|
+
4. Click **Save** and copy the newly generated **push URL** for later use
|
|
9802
|
+
5. Done
|
|
9803
|
+
|
|
9804
|
+
</details>
|
|
9805
|
+
|
|
9806
|
+
</div>
|
|
9807
|
+
|
|
9808
|
+
## In JD Cloud
|
|
9809
|
+
---
|
|
9810
|
+
|
|
9811
|
+
### Step 1: Create Notification Template
|
|
9812
|
+
1. Login to your JD Cloud console, search for \`Monitoring\` product, and enter the corresponding product console.
|
|
9813
|
+
2. In the left menu, select \`Alarm Management->Notice Templates\`, and create or edit a notification template.
|
|
9814
|
+
3. Check \`Alert Callback\` on the template page, and enter the <span class='integration_url'>push URL</span> for the alert integration in the \`URL\` field.
|
|
9815
|
+
4. Enter the following template content in the \`POST\` input box.
|
|
9816
|
+
\`\`\`
|
|
9817
|
+
{
|
|
9818
|
+
"resource_id": "\${resourceId}",
|
|
9819
|
+
"request_id": "\${requestId}",
|
|
9820
|
+
"metric": "\${metric}",
|
|
9821
|
+
"current_value": "\${currentValue}",
|
|
9822
|
+
"times": "\${times}",
|
|
9823
|
+
"tags": "\${tags}",
|
|
9824
|
+
"alert_time": "\${alertTime}",
|
|
9825
|
+
"region": "\${region}",
|
|
9826
|
+
"threshold": "\${threshold}",
|
|
9827
|
+
"service_code": "\${serviceCode}",
|
|
9828
|
+
"as_group_id": "\${asGroupId}",
|
|
9829
|
+
"unhealthy_instance": "\${unhealthyInstance}",
|
|
9830
|
+
"rule_policy_id": "\${rulePolicyId}",
|
|
9831
|
+
"service_code_en": "\${serviceCodeEN}",
|
|
9832
|
+
"service_code_cn": "\${serviceCodeCN}",
|
|
9833
|
+
"level": "\${level}",
|
|
9834
|
+
"resource_name": "\${resourceName}",
|
|
9835
|
+
"ip_address": "\${ipAddress}",
|
|
9836
|
+
"status": "\${status}"
|
|
9837
|
+
}
|
|
9838
|
+
|
|
9839
|
+
\`\`\`
|
|
9840
|
+
5. Configure other options as needed.
|
|
9841
|
+
6. Click \`Save\` to complete the configuration.
|
|
9842
|
+
|
|
9843
|
+
### Step 2: Configure Alert Rules
|
|
9844
|
+
1. Login to your JD Cloud console, search for \`Monitoring\` product, and enter the corresponding product console.
|
|
9845
|
+
2. In the left menu, select \`Alarm Management->Alarm Rules\`, and create or edit an alert rule.
|
|
9846
|
+
3. In the **Notification Policy** section of the rule configuration page, select \`Use Template\` and choose the template created in **Step 1**.
|
|
9847
|
+
4. Configure other options as needed.
|
|
9848
|
+
5. Click \`Save\` to complete the configuration.
|
|
9849
|
+
|
|
9850
|
+
## Severity Mapping
|
|
9851
|
+
---
|
|
9852
|
+
<div class="md-block">
|
|
9853
|
+
|
|
9854
|
+
JD Cloud Monitoring to Flashduty severity mapping:
|
|
9855
|
+
|
|
9856
|
+
| JD Cloud Monitoring | Flashduty | Status |
|
|
9857
|
+
| ------------------- | --------- | -------- |
|
|
9858
|
+
| Critical | Critical | Critical |
|
|
9859
|
+
| Major | Warning | Warning |
|
|
9860
|
+
| General | Info | Info |
|
|
9861
|
+
|
|
9862
|
+
</div>
|
|
9863
|
+
`,AliyunPrometheus:`---
|
|
9864
|
+
title: "Alibaba Cloud Monitor Prometheus"
|
|
9865
|
+
description: "Sync Alibaba Cloud Monitor Prometheus alert events to Flashduty via webhook for automated alert noise reduction"
|
|
9866
|
+
date: "2025-05-19T10:00:00+08:00"
|
|
9867
|
+
url: "https://docs.flashcat.cloud/en/flashduty/aliyun-prometheus-integration-guide"
|
|
9868
|
+
---
|
|
9869
|
+
|
|
9870
|
+
Sync Alibaba Cloud Monitor Prometheus alert events to Flashduty via webhook for automated alert noise reduction.
|
|
9871
|
+
|
|
9872
|
+
<div class="hide">
|
|
9873
|
+
|
|
9874
|
+
## In Flashduty
|
|
9875
|
+
---
|
|
9876
|
+
You can obtain an integration push URL through either of these two methods:
|
|
9877
|
+
|
|
9878
|
+
### Using Private Integration
|
|
9879
|
+
|
|
9880
|
+
Choose this method when you don't need to route alert events to different channels - it's simpler.
|
|
9881
|
+
|
|
9882
|
+
<details>
|
|
9883
|
+
<summary>Expand</summary>
|
|
9884
|
+
|
|
9885
|
+
1. Go to the Flashduty console, select **Channel**, and enter a channel's details page
|
|
9886
|
+
2. Select the **Integrations** tab, click **Add Integration** to enter the integration page
|
|
9887
|
+
3. Choose **Alibaba Cloud Monitor Prometheus** integration and click **Save** to generate a card
|
|
9888
|
+
4. Click the generated card to view the **Push URL**, copy it for later use, and you're done
|
|
9889
|
+
|
|
9890
|
+
</details>
|
|
9891
|
+
|
|
9892
|
+
### Using Shared Integration
|
|
9893
|
+
|
|
9894
|
+
Choose this method when you need to route alerts to different channels based on the alert event payload.
|
|
9895
|
+
|
|
9896
|
+
<details>
|
|
9897
|
+
<summary>Expand</summary>
|
|
9898
|
+
|
|
9899
|
+
1. Go to the Flashduty console, select **Integration Center=>Alert Events** to enter the integration selection page
|
|
9900
|
+
2. Select **Alibaba Cloud Monitor Prometheus** integration:
|
|
9901
|
+
- **Integration Name**: Define a name for this integration
|
|
9902
|
+
3. Configure the default route and select the corresponding channel (after the integration is created, you can go to \`Route\` to configure more routing rules)
|
|
9903
|
+
4. Click **Save** and copy the newly generated **push URL** for later use
|
|
9904
|
+
5. Done
|
|
9905
|
+
|
|
9906
|
+
</details>
|
|
9907
|
+
|
|
9908
|
+
</div>
|
|
9909
|
+
|
|
9910
|
+
## In Alibaba Cloud
|
|
9911
|
+
---
|
|
9912
|
+
|
|
9913
|
+
### Step 1: Create a Custom Webhook
|
|
9914
|
+
1. Login to your Alibaba Cloud console, search for \`Cloud Monitor\` product, and enter the corresponding product console.
|
|
9915
|
+
2. In the left menu, select \`Prometheus Monitoring->Notification Objects\`, and create or edit a \`Custom Webhook\`.
|
|
9916
|
+
3. On the edit page, enter \`Flashduty\` for both the name and identifier, and enter the <span class='integration_url'>push URL</span> for the alert integration in the \`URL\` field.
|
|
9917
|
+
4. In the \`Headers\` section, set **Header Key** to **Content-Type** and **Header Value** to **application/json**.
|
|
9918
|
+
5. Select **POST** for \`Method\` and **JSON** for \`Data Format\`.
|
|
9919
|
+
6. Click \`OK\` to complete the configuration.
|
|
9920
|
+
|
|
9921
|
+
### Step 2: Configure Alert Rules
|
|
9922
|
+
1. Login to your Alibaba Cloud console, search for \`Cloud Monitor\` product, and enter the corresponding product console.
|
|
9923
|
+
2. In the left menu, select \`Prometheus Monitoring->Alert Rules\`, and create or edit an alert rule.
|
|
9924
|
+
3. In the **Notification Mode** section of the rule configuration page, select \`Simple Mode\`.
|
|
9925
|
+
4. For \`Notification Object\`, select the custom webhook created in **Step 1**.
|
|
9926
|
+
5. Click \`OK\` to complete the configuration.
|
|
9927
|
+
|
|
9928
|
+
## Severity Mapping
|
|
9929
|
+
---
|
|
9930
|
+
<div class="md-block">
|
|
9931
|
+
|
|
9932
|
+
Alibaba Cloud Prometheus to Flashduty severity mapping:
|
|
9933
|
+
|
|
9934
|
+
| Alibaba Cloud Monitor | Flashduty | Status |
|
|
9935
|
+
| --------------------- | --------- | -------- |
|
|
9936
|
+
| Critical | Critical | Critical |
|
|
9937
|
+
| Error | Critical | Critical |
|
|
9938
|
+
| Warning | Warning | Warning |
|
|
9939
|
+
| Normal | Info | Info |
|
|
9940
|
+
|
|
9941
|
+
</div>
|
|
9332
9942
|
`};n.FlashDocsEn=h})(window);
|