@tencentcloud/sdk-mcp 1.3.2 → 1.3.4
This diff represents the content of publicly available package versions that have been released to one of the supported registries. The information contained in this diff is provided for informational purposes only and reflects changes between package versions as they appear in their respective public registries.
- package/package.json +1 -1
- package/resource/doc/livekit/live/android/live-audience-list.md +335 -0
- package/resource/doc/livekit/live/android/live-audio-effect.md +384 -0
- package/resource/doc/livekit/live/android/live-barrage.md +569 -0
- package/resource/doc/livekit/live/android/live-base-beauty.md +265 -0
- package/resource/doc/livekit/live/android/live-co-guest-interaction.md +600 -0
- package/resource/doc/livekit/live/android/live-gift.md +833 -0
- package/resource/doc/livekit/live/android/live-host-interaction.md +810 -0
- package/resource/doc/livekit/live/android/live-integration.md +883 -0
- package/resource/doc/livekit/live/android/live-live-list.md +657 -0
- package/resource/doc/livekit/live/android/workflow.md +189 -0
- package/tools/common/record-prompt.js +2 -2
- package/tools/common/record-prompt.js.map +1 -1
- package/tools/definitions/get_native_live_extra_features_def.js +109 -0
- package/tools/definitions/get_native_live_extra_features_def.js.map +1 -0
- package/tools/definitions/get_native_live_interaction_def.js +115 -0
- package/tools/definitions/get_native_live_interaction_def.js.map +1 -0
- package/tools/definitions/get_native_live_uikit_integration_def.js +50 -0
- package/tools/definitions/get_native_live_uikit_integration_def.js.map +1 -0
- package/tools/definitions/record_prompt_def.js +42 -11
- package/tools/definitions/record_prompt_def.js.map +1 -1
- package/tools/definitions/record_result_def.js +1 -1
- package/tools/index.js +6 -0
- package/tools/index.js.map +1 -1
- package/tools/live/get-native-live-uikit-integration.js +101 -0
- package/tools/live/get-native-live-uikit-integration.js.map +1 -0
- package/tools/live/get-web-live-component-detail.js +1 -1
- package/tools/live/get-web-live-component-detail.js.map +1 -1
- package/tools/live/get-web-live-state-detail.js +1 -1
- package/tools/live/get-web-live-state-detail.js.map +1 -1
- package/tools/live/get-web-live-uikit-integration.js +6 -6
- package/tools/live/get-web-live-uikit-integration.js.map +1 -1
- package/tools/live/get_native_live_extra_features.js +105 -0
- package/tools/live/get_native_live_extra_features.js.map +1 -0
- package/tools/live/get_native_live_interaction.js +101 -0
- package/tools/live/get_native_live_interaction.js.map +1 -0
- package/utils/generate-structured-result.js +1 -1
- package/utils/report-cls-client.js +1 -1
- package/utils/report-es-client.js +1 -1
- /package/resource/doc/livekit/{vue → live/vue}/components/barrage.md +0 -0
- /package/resource/doc/livekit/{vue → live/vue}/components/co-guest-panel.md +0 -0
- /package/resource/doc/livekit/{vue → live/vue}/components/live-audience-list.md +0 -0
- /package/resource/doc/livekit/{vue → live/vue}/components/live-scene-panel.md +0 -0
- /package/resource/doc/livekit/{vue → live/vue}/components/live-view.md +0 -0
- /package/resource/doc/livekit/{vue → live/vue}/components/stream-mixer.md +0 -0
- /package/resource/doc/livekit/{vue → live/vue}/faq.md +0 -0
- /package/resource/doc/livekit/{vue → live/vue}/live-list-integration.md +0 -0
- /package/resource/doc/livekit/{vue → live/vue}/live-player-desk-integration.md +0 -0
- /package/resource/doc/livekit/{vue → live/vue}/live-player-h5-integration.md +0 -0
- /package/resource/doc/livekit/{vue → live/vue}/live-pusher-integration.md +0 -0
- /package/resource/doc/livekit/{vue → live/vue}/states/live-state.md +0 -0
- /package/resource/doc/livekit/{vue → live/vue}/workflow.md +0 -0
|
@@ -0,0 +1,384 @@
|
|
|
1
|
+
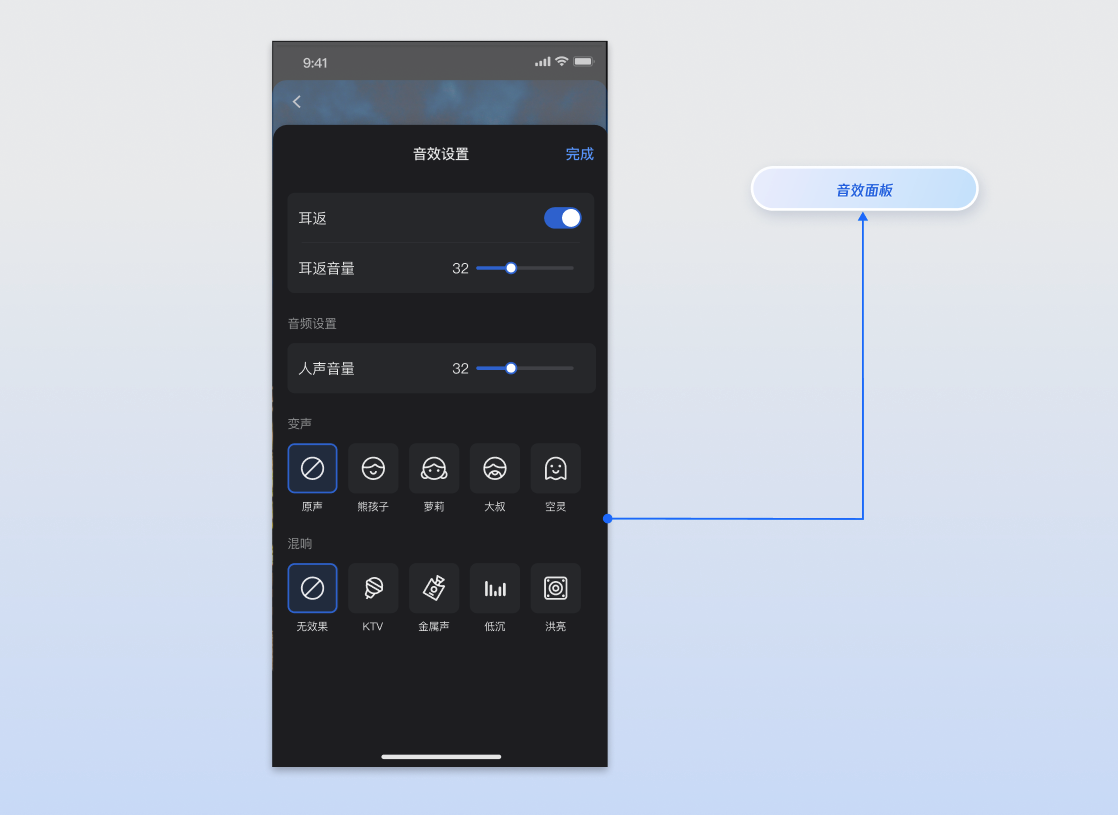
本篇文档旨在指导您如何使用 `AtomicXCore` 框架中的 `AudioEffectStore` 和 `DeviceStore` 模块,为您的直播应用快速集成音效控制功能,包括麦克风音量、耳返监听,并添加多种趣味变声效果和混响效果。
|
|
2
|
+
|
|
3
|
+
|
|
4
|
+
|
|
5
|
+
|
|
6
|
+
## 核心功能
|
|
7
|
+
|
|
8
|
+
通过组合 `AudioEffectStore` 和 `DeviceStore`,您将能实现以下核心功能:
|
|
9
|
+
- **人声音量调节**:控制本地音频上行的采集音量大小,即观众听到的您的声音大小。
|
|
10
|
+
|
|
11
|
+
- **耳返功能**:允许主播或连麦用户通过耳机实时听到自己的声音,用于监听和矫正发音。
|
|
12
|
+
|
|
13
|
+
- **变声效果**:提供多种趣味变声选项,例如萝莉、大叔、熊孩子等。
|
|
14
|
+
|
|
15
|
+
- **混响效果**:模拟不同环境的声场效果,例如 KTV、金属声、低沉、洪亮等。
|
|
16
|
+
|
|
17
|
+
|
|
18
|
+
## 概念说明
|
|
19
|
+
<table>
|
|
20
|
+
<tr>
|
|
21
|
+
<td rowspan="1" colSpan="1" >**核心概念**</td>
|
|
22
|
+
|
|
23
|
+
<td rowspan="1" colSpan="1" >**类型**</td>
|
|
24
|
+
|
|
25
|
+
<td rowspan="1" colSpan="1" >**核心职责与描述**</td>
|
|
26
|
+
</tr>
|
|
27
|
+
|
|
28
|
+
<tr>
|
|
29
|
+
<td rowspan="1" colSpan="1" >`AudioChangerType`</td>
|
|
30
|
+
|
|
31
|
+
<td rowspan="1" colSpan="1" >`enum class`</td>
|
|
32
|
+
|
|
33
|
+
<td rowspan="1" colSpan="1" >变声效果枚举,例如,“小孩”,“男人”等。</td>
|
|
34
|
+
</tr>
|
|
35
|
+
|
|
36
|
+
<tr>
|
|
37
|
+
<td rowspan="1" colSpan="1" ><br>`AudioReverbType`<br></td>
|
|
38
|
+
|
|
39
|
+
<td rowspan="1" colSpan="1" >`enum class`</td>
|
|
40
|
+
|
|
41
|
+
<td rowspan="1" colSpan="1" >混响效果枚举,例如,“ktv”,“礼堂”等。</td>
|
|
42
|
+
</tr>
|
|
43
|
+
|
|
44
|
+
<tr>
|
|
45
|
+
<td rowspan="1" colSpan="1" >`AudioEffectState`</td>
|
|
46
|
+
|
|
47
|
+
<td rowspan="1" colSpan="1" >`data class`</td>
|
|
48
|
+
|
|
49
|
+
<td rowspan="1" colSpan="1" >代表音效模块的当前状态,通常用于 UI 渲染。包括变声状态、混响状态、耳返开启状态、耳返音量。</td>
|
|
50
|
+
</tr>
|
|
51
|
+
|
|
52
|
+
<tr>
|
|
53
|
+
<td rowspan="1" colSpan="1" >`AudioEffectStore`</td>
|
|
54
|
+
|
|
55
|
+
<td rowspan="1" colSpan="1" >`abstract class`</td>
|
|
56
|
+
|
|
57
|
+
<td rowspan="1" colSpan="1" >代表音效模块**单例数据管理类**。通过它您可以调用修改音效接口,当您调用接口后,相应的 `state` 属性会自动更新,可以通过订阅这个 state 响应式数据来接收和监听状态更新。</td>
|
|
58
|
+
</tr>
|
|
59
|
+
|
|
60
|
+
<tr>
|
|
61
|
+
<td rowspan="1" colSpan="1" >`DeviceState`</td>
|
|
62
|
+
|
|
63
|
+
<td rowspan="1" colSpan="1" >`data class`</td>
|
|
64
|
+
|
|
65
|
+
<td rowspan="1" colSpan="1" >代表设备模块的当前状态,通常用于 UI 渲染。核心属性包括摄像头、麦克风的设备状态。</td>
|
|
66
|
+
</tr>
|
|
67
|
+
|
|
68
|
+
<tr>
|
|
69
|
+
<td rowspan="1" colSpan="1" >`DeviceStore`</td>
|
|
70
|
+
|
|
71
|
+
<td rowspan="1" colSpan="1" >`abstract class`</td>
|
|
72
|
+
|
|
73
|
+
<td rowspan="1" colSpan="1" >代表设备模块**单例数据管理类**。通过它您可以调用操作摄像头、麦克风接口,当您调用接口后,相应的`state`属性会自动更新,可以通过订阅这个 state 响应式数据来接收和监听状态更新。</td>
|
|
74
|
+
</tr>
|
|
75
|
+
</table>
|
|
76
|
+
|
|
77
|
+
|
|
78
|
+
## 实现步骤
|
|
79
|
+
|
|
80
|
+
### 步骤1:组件集成
|
|
81
|
+
|
|
82
|
+
请参考 [快速接入](https://write.woa.com/document/192834878686547968) 集成 **AtomicXCore。**
|
|
83
|
+
|
|
84
|
+
### 步骤2:获取 Store 实例
|
|
85
|
+
|
|
86
|
+
`AudioEffectStore` 和 `DeviceStore`是单例对象,您可以直接通过 shared 属性在项目的任何位置获取实例。您也可以参考 TUILiveKit 开源UI demo项目中的 [AudioEffectPanel.kt](https://github.com/Tencent-RTC/TUIKit_Android/blob/main/live/tuilivekit/src/main/java/com/trtc/uikit/livekit/component/audioeffect/AudioEffectPanel.kt) 文件来了解完整的实现逻辑。
|
|
87
|
+
``` java
|
|
88
|
+
import io.trtc.tuikit.atomicxcore.api.device.AudioEffectStore
|
|
89
|
+
import io.trtc.tuikit.atomicxcore.api.device.DeviceStore
|
|
90
|
+
|
|
91
|
+
val audioEffectStore = AudioEffectStore.shared()
|
|
92
|
+
val deviceStore = DeviceStore.shared()
|
|
93
|
+
```
|
|
94
|
+
|
|
95
|
+
### 步骤3:实现耳返功能
|
|
96
|
+
|
|
97
|
+
耳返功能允许用户实时监听自己的麦克风声音,可以通过调用本节介绍的接口管理耳返功能。
|
|
98
|
+
|
|
99
|
+
> **注意:**
|
|
100
|
+
>
|
|
101
|
+
|
|
102
|
+
> 耳返功能通常需要连接耳机才能正常工作。
|
|
103
|
+
>
|
|
104
|
+
|
|
105
|
+
|
|
106
|
+
#### 实现方式:
|
|
107
|
+
1. **开关耳返**:您可以使用`Switch`控件实现开关耳返功能。
|
|
108
|
+
|
|
109
|
+
2. **设置耳返音量值**:您可以使用 `SeekBar` 控件实现左右拖动滑块来调节音量的功能,并将 `SeekBar` 的值映射为音量值,调用`setOutputVolume(volume)。`请注意,该接口接收的参数范围是 `[0, 150],`所以您需要将 UI 控件的值(例如 UISlider 的 `0 - 1.0`)映射到 `0 - 150` 的范围。
|
|
110
|
+
|
|
111
|
+
3. **监听状态更新 UI**:您可以订阅实时的耳返状态值更新 `UI`。
|
|
112
|
+
|
|
113
|
+
|
|
114
|
+
#### 代码示例:
|
|
115
|
+
``` java
|
|
116
|
+
import io.trtc.tuikit.atomicxcore.api.device.AudioEffectStore
|
|
117
|
+
import kotlinx.coroutines.CoroutineScope
|
|
118
|
+
import kotlinx.coroutines.Dispatchers
|
|
119
|
+
import kotlinx.coroutines.launch
|
|
120
|
+
|
|
121
|
+
// 1. 开启耳返(建议提示用户插入耳机)
|
|
122
|
+
audioEffectStore.setVoiceEarMonitorEnable(true)
|
|
123
|
+
|
|
124
|
+
// 2. 调节耳返音量
|
|
125
|
+
audioEffectStore.setVoiceEarMonitorVolume(80)
|
|
126
|
+
|
|
127
|
+
// 3. 关闭耳返
|
|
128
|
+
audioEffectStore.setVoiceEarMonitorEnable(false)
|
|
129
|
+
|
|
130
|
+
// 4. 监听状态
|
|
131
|
+
CoroutineScope(Dispatchers.Main).launch {
|
|
132
|
+
audioEffectStore.audioEffectState.earMonitorVolume.collect {
|
|
133
|
+
print("耳返音量: $it")
|
|
134
|
+
//更新UI 显示数值
|
|
135
|
+
}
|
|
136
|
+
}
|
|
137
|
+
```
|
|
138
|
+
|
|
139
|
+
#### setVoiceEarMonitorEnable 接口参数
|
|
140
|
+
<table>
|
|
141
|
+
<tr>
|
|
142
|
+
<td rowspan="1" colSpan="1" >**参数名**</td>
|
|
143
|
+
|
|
144
|
+
<td rowspan="1" colSpan="1" >**类型**</td>
|
|
145
|
+
|
|
146
|
+
<td rowspan="1" colSpan="1" >**描述**</td>
|
|
147
|
+
</tr>
|
|
148
|
+
|
|
149
|
+
<tr>
|
|
150
|
+
<td rowspan="1" colSpan="1" >`enable`</td>
|
|
151
|
+
|
|
152
|
+
<td rowspan="1" colSpan="1" >`Boolean`</td>
|
|
153
|
+
|
|
154
|
+
<td rowspan="1" colSpan="1" >是否开启耳返。<br>- true:开启<br>- false:关闭</td>
|
|
155
|
+
</tr>
|
|
156
|
+
</table>
|
|
157
|
+
|
|
158
|
+
|
|
159
|
+
#### setVoiceEarMonitorVolume 接口参数
|
|
160
|
+
<table>
|
|
161
|
+
<tr>
|
|
162
|
+
<td rowspan="1" colSpan="1" >**参数名**</td>
|
|
163
|
+
|
|
164
|
+
<td rowspan="1" colSpan="1" >**类型**</td>
|
|
165
|
+
|
|
166
|
+
<td rowspan="1" colSpan="1" >**描述**</td>
|
|
167
|
+
</tr>
|
|
168
|
+
|
|
169
|
+
<tr>
|
|
170
|
+
<td rowspan="1" colSpan="1" >`volume`</td>
|
|
171
|
+
|
|
172
|
+
<td rowspan="1" colSpan="1" >`Int`</td>
|
|
173
|
+
|
|
174
|
+
<td rowspan="1" colSpan="1" >耳返音量大小。<br>- 取值范围: [0, 150]<br>- 默认值:100</td>
|
|
175
|
+
</tr>
|
|
176
|
+
</table>
|
|
177
|
+
|
|
178
|
+
|
|
179
|
+
### 步骤4:实现人声音量调节
|
|
180
|
+
|
|
181
|
+
当主播希望调节自己的上行采集音量大小时,调用`DeviceStore`的`setCaptureVolume(volume)`方法传入音量值即可。
|
|
182
|
+
|
|
183
|
+
#### 实现方式:
|
|
184
|
+
1. **设置采集音量值**:您可以使用 `SeekBar` 控件实现左右拖动滑块来调节音量的功能,并将 `SeekBar` 的值映射成音量值后调用`setCaptureVolume(80)。`请注意,该接口接收的参数范围是 `[0, 150],`所以您需要将 `UI` 控件的值(例如 `SeekBar` 的 `0 - 150`)映射到 `0 - 150` 的范围。
|
|
185
|
+
|
|
186
|
+
2. **监听状态更新 UI**:您可以订阅实时的音量状态值更新 UI。
|
|
187
|
+
|
|
188
|
+
|
|
189
|
+
#### 示例代码:
|
|
190
|
+
``` java
|
|
191
|
+
import kotlinx.coroutines.CoroutineScope
|
|
192
|
+
import kotlinx.coroutines.Dispatchers
|
|
193
|
+
import kotlinx.coroutines.launch
|
|
194
|
+
import io.trtc.tuikit.atomicxcore.api.device.AudioEffectStore
|
|
195
|
+
import io.trtc.tuikit.atomicxcore.api.device.DeviceStore
|
|
196
|
+
|
|
197
|
+
// 1. 调节音量
|
|
198
|
+
deviceStore.setCaptureVolume(80)
|
|
199
|
+
|
|
200
|
+
// 2. 监听数据变化
|
|
201
|
+
CoroutineScope(Dispatchers.Main).launch {
|
|
202
|
+
deviceStore.deviceState.captureVolume.collect {
|
|
203
|
+
//更新显示数值
|
|
204
|
+
print("采集音量: $it")
|
|
205
|
+
}
|
|
206
|
+
}
|
|
207
|
+
```
|
|
208
|
+
|
|
209
|
+
#### setCaptureVolume 接口参数
|
|
210
|
+
<table>
|
|
211
|
+
<tr>
|
|
212
|
+
<td rowspan="1" colSpan="1" >**参数名**</td>
|
|
213
|
+
|
|
214
|
+
<td rowspan="1" colSpan="1" >**类型**</td>
|
|
215
|
+
|
|
216
|
+
<td rowspan="1" colSpan="1" >**描述**</td>
|
|
217
|
+
</tr>
|
|
218
|
+
|
|
219
|
+
<tr>
|
|
220
|
+
<td rowspan="1" colSpan="1" >`volume`</td>
|
|
221
|
+
|
|
222
|
+
<td rowspan="1" colSpan="1" >`Int`</td>
|
|
223
|
+
|
|
224
|
+
<td rowspan="1" colSpan="1" >采集音量大小。<br>- 取值范围: [0, 150]<br>- 默认值:100</td>
|
|
225
|
+
</tr>
|
|
226
|
+
</table>
|
|
227
|
+
|
|
228
|
+
|
|
229
|
+
### 步骤5:实现变声效果
|
|
230
|
+
|
|
231
|
+
当主播希望改变自己的声音时,您可以调用 `setAudioChangerType(type)`方法,传入相应的Type 枚举值即可切换效果。
|
|
232
|
+
|
|
233
|
+
#### 示例代码:
|
|
234
|
+
``` java
|
|
235
|
+
import io.trtc.tuikit.atomicxcore.api.device.AudioEffectStore
|
|
236
|
+
import io.trtc.tuikit.atomicxcore.api.device.AudioChangerType
|
|
237
|
+
|
|
238
|
+
// 示例:设置变声为“萝莉”
|
|
239
|
+
audioEffectStore.setAudioChangerType(AudioChangerType.LITTLE_GIRL)
|
|
240
|
+
|
|
241
|
+
// 示例:关闭变声
|
|
242
|
+
audioEffectStore.setAudioChangerType(AudioChangerType.NONE)
|
|
243
|
+
```
|
|
244
|
+
|
|
245
|
+
#### setAudioChangerType 接口参数
|
|
246
|
+
<table>
|
|
247
|
+
<tr>
|
|
248
|
+
<td rowspan="1" colSpan="1" >**参数名**</td>
|
|
249
|
+
|
|
250
|
+
<td rowspan="1" colSpan="1" >**类型**</td>
|
|
251
|
+
|
|
252
|
+
<td rowspan="1" colSpan="1" >**描述**</td>
|
|
253
|
+
</tr>
|
|
254
|
+
|
|
255
|
+
<tr>
|
|
256
|
+
<td rowspan="1" colSpan="1" >`type`</td>
|
|
257
|
+
|
|
258
|
+
<td rowspan="1" colSpan="1" >`AudioChangerType`</td>
|
|
259
|
+
|
|
260
|
+
<td rowspan="1" colSpan="1" >变声效果枚举。</td>
|
|
261
|
+
</tr>
|
|
262
|
+
</table>
|
|
263
|
+
|
|
264
|
+
|
|
265
|
+
### 步骤6:实现混响效果
|
|
266
|
+
|
|
267
|
+
当主播希望给自己的声音添加混响效果时,您可以调用`setAudioReverbType(type)` 方法,传入相应的Type 枚举值即可切换效果。
|
|
268
|
+
``` java
|
|
269
|
+
import io.trtc.tuikit.atomicxcore.api.device.AudioEffectStore
|
|
270
|
+
import io.trtc.tuikit.atomicxcore.api.device.AudioReverbType
|
|
271
|
+
|
|
272
|
+
// 示例:设置混响为“KTV”
|
|
273
|
+
audioEffectStore.setAudioReverbType(AudioReverbType.KTV)
|
|
274
|
+
|
|
275
|
+
// 示例:关闭混响
|
|
276
|
+
audioEffectStore.setAudioReverbType(AudioReverbType.NONE)
|
|
277
|
+
```
|
|
278
|
+
|
|
279
|
+
#### setAudioReverbType 接口参数
|
|
280
|
+
<table>
|
|
281
|
+
<tr>
|
|
282
|
+
<td rowspan="1" colSpan="1" >**参数名**</td>
|
|
283
|
+
|
|
284
|
+
<td rowspan="1" colSpan="1" >**类型**</td>
|
|
285
|
+
|
|
286
|
+
<td rowspan="1" colSpan="1" >**描述**</td>
|
|
287
|
+
</tr>
|
|
288
|
+
|
|
289
|
+
<tr>
|
|
290
|
+
<td rowspan="1" colSpan="1" >`type`</td>
|
|
291
|
+
|
|
292
|
+
<td rowspan="1" colSpan="1" >`AudioReverbType`</td>
|
|
293
|
+
|
|
294
|
+
<td rowspan="1" colSpan="1" >混响效果枚举。</td>
|
|
295
|
+
</tr>
|
|
296
|
+
</table>
|
|
297
|
+
|
|
298
|
+
|
|
299
|
+
### 步骤7:重置音效设置
|
|
300
|
+
|
|
301
|
+
> **重要:**
|
|
302
|
+
>
|
|
303
|
+
|
|
304
|
+
> `AudioEffectStore` 和 `DeviceStore` 是单例,这意味着音效和设备设置是全局生效的,如果您在当前直播间的设置不想影响到您创建的其他直播间,就需要在当前直播间结束的时候重置音效和设备设置。
|
|
305
|
+
>
|
|
306
|
+
|
|
307
|
+
|
|
308
|
+
以下两种情况您可能需要重置音效设置:
|
|
309
|
+
1. 当前直播间结束时,需要重置音效设置。
|
|
310
|
+
|
|
311
|
+
2. 您需要提供“一键恢复”的功能,可以通过调用 `store` 的 `reset()` 方法实现。
|
|
312
|
+
|
|
313
|
+
``` java
|
|
314
|
+
import io.trtc.tuikit.atomicxcore.api.device.AudioEffectStore
|
|
315
|
+
import io.trtc.tuikit.atomicxcore.api.device.DeviceStore
|
|
316
|
+
|
|
317
|
+
// 一键重置所有变声和混响效果
|
|
318
|
+
AudioEffectStore.shared().reset()
|
|
319
|
+
DeviceStore.shared().reset()
|
|
320
|
+
|
|
321
|
+
```
|
|
322
|
+
|
|
323
|
+
## API 文档
|
|
324
|
+
|
|
325
|
+
关于 [AudioEffectStore](https://tencent-rtc.github.io/TUIKit_Android/-atomic-x%20-core%20-a-p-i/io.trtc.tuikit.atomicxcore.api.device/-audio-effect-store/index.html) 和 [DeviceStore](https://tencent-rtc.github.io/TUIKit_Android/-atomic-x%20-core%20-a-p-i/io.trtc.tuikit.atomicxcore.api.device/-device-store/index.html) 及其相关类的所有公开接口、属性的详细信息,请参阅随 [AtomicXCore](https://tencent-rtc.github.io/TUIKit_iOS/documentation/atomicxcore) 框架的官方 API 文档。
|
|
326
|
+
<table>
|
|
327
|
+
<tr>
|
|
328
|
+
<td rowspan="1" colSpan="1" >**Store/Component**</td>
|
|
329
|
+
|
|
330
|
+
<td rowspan="1" colSpan="1" >**功能描述**</td>
|
|
331
|
+
|
|
332
|
+
<td rowspan="1" colSpan="1" >**API 文档**</td>
|
|
333
|
+
</tr>
|
|
334
|
+
|
|
335
|
+
<tr>
|
|
336
|
+
<td rowspan="1" colSpan="1" >**AudioEffectStore**</td>
|
|
337
|
+
|
|
338
|
+
<td rowspan="1" colSpan="1" >音效管理:进行音效设置,并获取实时音效状态。</td>
|
|
339
|
+
|
|
340
|
+
<td rowspan="1" colSpan="1" >[API 文档](https://tencent-rtc.github.io/TUIKit_Android/-atomic-x%20-core%20-a-p-i/io.trtc.tuikit.atomicxcore.api.device/-audio-effect-store/index.html)</td>
|
|
341
|
+
</tr>
|
|
342
|
+
|
|
343
|
+
<tr>
|
|
344
|
+
<td rowspan="1" colSpan="1" >**DeviceStore **</td>
|
|
345
|
+
|
|
346
|
+
<td rowspan="1" colSpan="1" >设备管理:进行摄像头、麦克风操作,并获取实时设备状态。</td>
|
|
347
|
+
|
|
348
|
+
<td rowspan="1" colSpan="1" >[API 文档](https://tencent-rtc.github.io/TUIKit_Android/-atomic-x%20-core%20-a-p-i/io.trtc.tuikit.atomicxcore.api.device/-device-store/index.html)</td>
|
|
349
|
+
</tr>
|
|
350
|
+
</table>
|
|
351
|
+
|
|
352
|
+
|
|
353
|
+
## 常见问题
|
|
354
|
+
|
|
355
|
+
### 音效和设备接口的调用时机有没有要求?
|
|
356
|
+
|
|
357
|
+
没有限制。`AudioEffectStore`和`DeviceStore` 的设置是全局生效的,您可以在进入直播间之前或之后随时调用相关接口(例如设置变声、混响或耳返),设置会立即生效并被保留。
|
|
358
|
+
|
|
359
|
+
### **“人声音量” 和“耳返音量” 有什么区别?**
|
|
360
|
+
|
|
361
|
+
这是一个非常重要且易混淆的概念,区别如下:
|
|
362
|
+
- **人声音量 (CaptureVolume):**通过 `DeviceStore.setCaptureVolume()` 设置**。它决定了观众**能听到的您的声音大小。
|
|
363
|
+
|
|
364
|
+
- **耳返音量 (EarMonitorVolume):**通过 `AudioEffectStore.setVoiceEarMonitorVolume()`** 设置。它只**决定了**您自己**在耳机里听到的监听声音大小,**不会**影响观众。
|
|
365
|
+
|
|
366
|
+
|
|
367
|
+
### **新创建的直播间为什么直接就有音效、或者出现音量很大、很小等问题?**
|
|
368
|
+
|
|
369
|
+
`AudioEffectStore`和`DeviceStore`是单例,这意味着音效和设备设置是全局生效的,出现这种情况很可能是因为您之前设置过音效但是没有重置,需要在合适的地方调用`reset()`方法重置。
|
|
370
|
+
|
|
371
|
+
### **为什么我开启了“耳返”,但是听不到自己的声音?**
|
|
372
|
+
|
|
373
|
+
请您按照以下步骤检查:
|
|
374
|
+
1. **是否插入耳机**:耳返功能绝大多数情况下依赖耳机才能生效,请确保已连接有线或蓝牙耳机。
|
|
375
|
+
|
|
376
|
+
2. **音量是否为0**:检查“耳返音量”是否被设置为了 0。
|
|
377
|
+
|
|
378
|
+
3. **麦克风是否开启**:确认 `DeviceStore` 中的麦克风是开启状态(即已调用 `openLocalMicrophone`)。
|
|
379
|
+
|
|
380
|
+
|
|
381
|
+
### **变声效果 和混响效果 可以同时生效吗?**
|
|
382
|
+
|
|
383
|
+
可以。`AudioChangerType` 和 `AudioReverbType` 是可以叠加生效的。例如,您可以同时设置 `AudioChangerType.LITTLE_GIRL` 变声和 `AudioReverbType.KTV` 混响。
|
|
384
|
+
|