@tencent-rtc/mcp 1.2.8 → 1.3.0
This diff represents the content of publicly available package versions that have been released to one of the supported registries. The information contained in this diff is provided for informational purposes only and reflects changes between package versions as they appear in their respective public registries.
- package/package.json +1 -1
- package/resource/doc/chatuikit/faq/common/server.md +44 -0
- package/resource/doc/chatuikit/faq/web_sdk/faq.md +57 -0
- package/resource/doc/livekit/vue/components/co-guest-panel.md +3 -3
- package/resource/doc/livekit/vue/components/live-view.md +4 -4
- package/resource/doc/livekit/vue/{components/live-list.md → live-list-integration.md} +7 -7
- package/resource/doc/livekit/vue/{components/live-player.md → live-player-desk-integration.md} +8 -8
- package/resource/doc/livekit/vue/live-player-h5-integration.md +269 -0
- package/resource/doc/livekit/vue/workflow.md +218 -0
- package/resource/doc/native_live/android/V2TXLiveCode_api_android.md +312 -0
- package/resource/doc/native_live/android/V2TXLiveDef_api_android.md +430 -0
- package/resource/doc/native_live/android/V2TXLivePlayerObserver_api_android.md +679 -0
- package/resource/doc/native_live/android/V2TXLivePlayer_api_android.md +671 -0
- package/resource/doc/native_live/android/V2TXLivePremier_api_android.md +271 -0
- package/resource/doc/native_live/android/V2TXLivePusherObserver_api_android.md +849 -0
- package/resource/doc/native_live/android/V2TXLivePusher_api_android.md +1046 -0
- package/resource/doc/native_live/flutter/V2TXLiveCode_api_flutter.md +460 -0
- package/resource/doc/native_live/flutter/V2TXLiveDef_api_flutter.md +558 -0
- package/resource/doc/native_live/flutter/V2TXLivePlayerObserver_api_flutter.md +865 -0
- package/resource/doc/native_live/flutter/V2TXLivePlayer_api_flutter.md +657 -0
- package/resource/doc/native_live/flutter/V2TXLivePremier_api_flutter.md +437 -0
- package/resource/doc/native_live/flutter/V2TXLivePusherObserver_api_flutter.md +335 -0
- package/resource/doc/native_live/flutter/V2TXLivePusher_api_flutter.md +748 -0
- package/resource/doc/native_live/iOS/V2TXLiveCode_api_iOS.md +327 -0
- package/resource/doc/native_live/iOS/V2TXLiveDef_api_iOS.md +507 -0
- package/resource/doc/native_live/iOS/V2TXLivePlayerObserver_api_iOS.md +507 -0
- package/resource/doc/native_live/iOS/V2TXLivePlayer_api_iOS.md +659 -0
- package/resource/doc/native_live/iOS/V2TXLivePremier_api_iOS.md +284 -0
- package/resource/doc/native_live/iOS/V2TXLivePusherObserver_api_iOS.md +814 -0
- package/resource/doc/native_live/iOS/V2TXLivePusher_api_iOS.md +1000 -0
- package/resource/doc/trtc/C++/ITRTCCloud.md +4119 -0
- package/resource/doc/trtc/C++/ITRTCStatistics.md +325 -0
- package/resource/doc/trtc/C++/ITXAudioEffectManager.md +1289 -0
- package/resource/doc/trtc/C++/ITXDeviceManager.md +1028 -0
- package/resource/doc/trtc/C++/TRTCCloudCallback.md +2650 -0
- package/resource/doc/trtc/C++/TRTCTypeDef.md +3600 -0
- package/resource/doc/trtc/C++/TXLiteAVCode.md +921 -0
- package/resource/doc/trtc/android/TRTCCloud.md +3782 -0
- package/resource/doc/trtc/android/TRTCCloudDef.md +3880 -0
- package/resource/doc/trtc/android/TRTCCloudListener.md +2431 -0
- package/resource/doc/trtc/android/TRTCStatistics.md +295 -0
- package/resource/doc/trtc/android/TXAudioEffectManager.md +1289 -0
- package/resource/doc/trtc/android/TXBeautyManager.md +979 -0
- package/resource/doc/trtc/android/TXDeviceManager.md +440 -0
- package/resource/doc/trtc/android/TXLiteAVCode.md +905 -0
- package/resource/doc/trtc/iOS/TRTCCloud.md +4238 -0
- package/resource/doc/trtc/iOS/TRTCCloudDef.md +3730 -0
- package/resource/doc/trtc/iOS/TRTCCloudDelegate.md +2531 -0
- package/resource/doc/trtc/iOS/TRTCStatistics.md +295 -0
- package/resource/doc/trtc/iOS/TXAudioEffectManager.md +1100 -0
- package/resource/doc/trtc/iOS/TXBeautyManager.md +985 -0
- package/resource/doc/trtc/iOS/TXDeviceManager.md +1024 -0
- package/resource/doc/trtc/iOS/TXLiteAVCode.md +928 -0
- package/tools/definitions/get_faq_def.js +4 -0
- package/tools/definitions/get_faq_def.js.map +1 -1
- package/tools/definitions/get_native_live_api_def.js +23 -0
- package/tools/definitions/get_native_live_api_def.js.map +1 -0
- package/tools/definitions/get_trtc_native_api_def.js +16 -0
- package/tools/definitions/get_trtc_native_api_def.js.map +1 -0
- package/tools/definitions/get_web_live_uikit_component_detail_def.js +13 -8
- package/tools/definitions/get_web_live_uikit_component_detail_def.js.map +1 -1
- package/tools/definitions/get_web_live_uikit_integration_def.js +32 -0
- package/tools/definitions/get_web_live_uikit_integration_def.js.map +1 -0
- package/tools/index.js +8 -0
- package/tools/index.js.map +1 -1
- package/tools/live/get-web-live-uikit-integration.js +52 -0
- package/tools/live/get-web-live-uikit-integration.js.map +1 -0
- package/tools/native_live/get-native-live-api.js +31 -0
- package/tools/native_live/get-native-live-api.js.map +1 -0
- package/tools/trtc/get-trtc-native-api.js +31 -0
- package/tools/trtc/get-trtc-native-api.js.map +1 -0
- package/utils/generate-structured-result.js +34 -0
- package/utils/generate-structured-result.js.map +1 -0
- package/utils/handle-component-name.js +0 -8
- package/utils/handle-component-name.js.map +1 -1
- package/utils/report-cls-client.js +1 -1
- package/utils/report-es-client.js +1 -1
- /package/resource/doc/livekit/vue/{components/broadcast.md → live-pusher-integration.md} +0 -0
package/package.json
CHANGED
|
@@ -0,0 +1,44 @@
|
|
|
1
|
+
---
|
|
2
|
+
product: 'Chat'
|
|
3
|
+
tech_stack: 'server'
|
|
4
|
+
framework: 'common'
|
|
5
|
+
title: 'Common Issues Knowledge Base'
|
|
6
|
+
keywords: ['console', 'server-side userSig generation', 'restapi', 'pre-callback', 'post-callback', 'nodejs/go/java/python and other server-side language userSig generation example code']
|
|
7
|
+
---
|
|
8
|
+
|
|
9
|
+
# Common Issues Knowledge Base
|
|
10
|
+
|
|
11
|
+
## UserSig Solutions
|
|
12
|
+
|
|
13
|
+
### Q: How to generate userSig on the server side?
|
|
14
|
+
**A:** For specific methods of generating userSig on the server side, please refer to: https://trtc.io/document/34385?product=chat&menulabel=uikit&platform=react. The documentation provides solutions for multiple server-side languages.
|
|
15
|
+
|
|
16
|
+
### Q: What's the difference in message format between pre-send and post-send callbacks in Chat? How to distinguish system messages from user messages?
|
|
17
|
+
**A:**
|
|
18
|
+
1. Group message pre-send callback content does not include MsgSeq, MsgTime and other information. For details, please refer to the following documentation:
|
|
19
|
+
- One-to-one pre-send callback: https://trtc.io/document/34364?product=chat&menulabel=uikit&platform=react
|
|
20
|
+
- One-to-one post-send callback: https://trtc.io/document/34365?product=chat&menulabel=uikit&platform=react
|
|
21
|
+
- Group pre-send callback: https://trtc.io/document/34374?product=chat&menulabel=uikit&platform=react
|
|
22
|
+
- Group post-send callback: https://trtc.io/document/34375?product=chat&menulabel=uikit&platform=react
|
|
23
|
+
2. Normal message format: https://trtc.io/document/33527?product=chat&menulabel=uikit&platform=react
|
|
24
|
+
|
|
25
|
+
### Q: What are group message priorities and group message frequency controls?
|
|
26
|
+
**A:** Group messages are divided into 3 priorities (`High`, `Normal`, `Low`). If messages in a group exceed the frequency limit, the backend will prioritize delivering high-priority messages. Therefore, users should choose an appropriate priority based on the importance of the message. Total message frequency control refers to the limit on the maximum number of messages that can be sent per second across all endpoints for a single group. The default value is 40 messages/second, using average frequency limiting per second. When the number of messages exceeds the limit, the backend prioritizes delivering messages with relatively higher priority, and messages with the same priority are randomly ordered.
|
|
27
|
+
|
|
28
|
+
### Q: How to intercept messages sent by users?
|
|
29
|
+
**A:** Business servers can intercept through pre-send callbacks. For specific documentation, please refer to:
|
|
30
|
+
- One-to-one pre-send callback: https://trtc.io/document/34364?product=chat&menulabel=uikit&platform=react
|
|
31
|
+
- Group pre-send callback: https://trtc.io/document/34375?product=chat&menulabel=uikit&platform=react
|
|
32
|
+
|
|
33
|
+
### Q: How to delete and manage accounts?
|
|
34
|
+
**A:** REST API can be used to delete, import, and query accounts. For specific documentation, please refer to:
|
|
35
|
+
- Delete account: https://trtc.io/document/34955?product=chat&menulabel=uikit&platform=react
|
|
36
|
+
- Import single account: https://trtc.io/document/34953?product=chat&menulabel=uikit&platform=react
|
|
37
|
+
- Import multiple accounts: https://trtc.io/document/34954?product=chat&menulabel=uikit&platform=react
|
|
38
|
+
- Query account: https://trtc.io/document/34956?product=chat&menulabel=uikit&platform=react
|
|
39
|
+
|
|
40
|
+
### Q: How to handle when the number of accounts exceeds the limit?
|
|
41
|
+
**A:** When importing accounts, if the number of accounts exceeds the limit and you need to create more than 100 accounts, you need to upgrade your application to the Professional Edition. For specific operation instructions, please refer to: https://trtc.io/document/55096.
|
|
42
|
+
|
|
43
|
+
### Q: How to delete conversations on the server side?
|
|
44
|
+
**A:** Server-side conversation deletion can be done using REST API. For specific documentation, please refer to: https://trtc.io/document/34348?product=chat&menulabel=uikit&platform=react.
|
|
@@ -103,3 +103,60 @@ promise.then(function(imResponse) {
|
|
|
103
103
|
|
|
104
104
|
### Q: How to send file messages with Web SDK?
|
|
105
105
|
**A:** Use [createFileMessage](https://trtc.io/document/47993?product=chat&menulabel=core%20sdk&platform=javascript#creating-a-file-message) to create a file message instance, then use [sendMessage](https://trtc.io/document/47993?product=chat&menulabel=core%20sdk&platform=javascript#sending-a-message) to send the file message.
|
|
106
|
+
|
|
107
|
+
### Q: How to implement user online status feature in Chat?
|
|
108
|
+
**A:**
|
|
109
|
+
1. Chat SDK provides **user status query, subscription, unSubscription APIs and status change event notifications**. For details, please refer to: https://trtc.io/document/49561.
|
|
110
|
+
2. For server-side **online status change callback**, please refer to: https://trtc.io/document/34357?product=chat&menulabel=core%20sdk&platform=javascript.
|
|
111
|
+
|
|
112
|
+
### Q: How to implement message list feature without UI in Chat SDK?
|
|
113
|
+
**A:** To implement message list feature without UI, you need to combine SDK's `sendMessage`, `getMessageList` APIs and `MESSAGE_RECEIVED` event.
|
|
114
|
+
|
|
115
|
+
### Q: How to implement @all and @someone features without UI in Chat SDK?
|
|
116
|
+
**A:** SDK provides `createTextAtMessage` API for implementing @ mentions. For details, please refer to: https://trtc.io/document/47993?product=chat&menulabel=core%20sdk&platform=javascript#creating-an-.40-message.
|
|
117
|
+
|
|
118
|
+
### Q: How to implement search functionality in Chat SDK?
|
|
119
|
+
**A:** SDK provides **cloud search** capabilities, supporting message search, user search, group search, and group member search. API details can be found in the following links:
|
|
120
|
+
- Search messages: https://trtc.io/document/67677?product=chat&menulabel=core%20sdk&platform=javascript
|
|
121
|
+
- Search users: https://trtc.io/document/67679?product=chat&menulabel=core%20sdk&platform=javascript
|
|
122
|
+
- Search groups: https://trtc.io/document/67681?product=chat&menulabel=core%20sdk&platform=javascript
|
|
123
|
+
- Search group members: https://trtc.io/document/67683?product=chat&menulabel=core%20sdk&platform=javascript
|
|
124
|
+
|
|
125
|
+
### Q: How to create groups, add group members, and set administrators in Chat SDK?
|
|
126
|
+
**A:** For specific information about creating groups, adding group members, and setting administrators in SDK, please refer to the documentation below:
|
|
127
|
+
- Create group: https://trtc.io/document/48465?product=chat&menulabel=core%20sdk&platform=javascript
|
|
128
|
+
- Add group members: https://trtc.io/document/48180?product=chat&menulabel=core%20sdk&platform=javascript#49b805dd-4898-44a3-89a4-3b201f839fce
|
|
129
|
+
- Modify group member role (can set administrator): https://trtc.io/document/48180?product=chat&menulabel=core%20sdk&platform=javascript#f35fb570-648c-4b97-99a1-cef5b81b1284
|
|
130
|
+
|
|
131
|
+
### Q: How to create a C2C one-to-one conversation?
|
|
132
|
+
**A:** The UI layer can create a one-to-one conversation by querying conversation profile using `getConversationProfile`. The `conversationID` format is: `C2C${userID}`. After SDK successfully creates the conversation, it will notify the conversation list update through the `CONVERSATION_LIST_UPDATE` event.
|
|
133
|
+
|
|
134
|
+
### Q: How to get total unread message count and listen to real-time changes?
|
|
135
|
+
**A:** For detailed information about total unread message count, please refer to: https://trtc.io/document/48319?product=chat&menulabel=core%20sdk&platform=javascript.
|
|
136
|
+
1. To get total unread message count, call `getTotalUnreadMessageCount` API.
|
|
137
|
+
2. To listen for total unread count changes, monitor the `TOTAL_UNREAD_MESSAGE_COUNT_UPDATED` event.
|
|
138
|
+
Note: During initialization, it's recommended to listen to the `TOTAL_UNREAD_MESSAGE_COUNT_UPDATED` event to get the total unread message count, because the calculation of total unread count depends on the synchronization of cloud conversation list. Calling `getTotalUnreadMessageCount` directly after successful login may return 0 because the cloud conversation list hasn't finished synchronizing yet.
|
|
139
|
+
|
|
140
|
+
### Q: How to get original and thumbnail images in SDK image messages?
|
|
141
|
+
**A:** For image messages, high-resolution original image (type = 0), thumbnail (type = 1), and large image (type = 2) can be obtained. For details, please refer to the Message structure documentation: https://trtc.io/document/47990?product=chat&menulabel=core%20sdk&platform=javascript#893c75e0-e592-475a-bd9a-0c4ec30114b9.
|
|
142
|
+
|
|
143
|
+
### Q: How to handle message sending failures in SDK?
|
|
144
|
+
**A:** When SDK message sending fails, the `sendMessage` interface will throw an error, which needs to be caught using `sendMessage().catch()`. The error contains the complete message structure, where message.status is `fail`. You can resend the failed message using `resendMessage`.
|
|
145
|
+
|
|
146
|
+
### Q: In weak network environments, how does SDK ensure WebSocket stability and reconnection?
|
|
147
|
+
**A:** In weak network environments, if WebSocket disconnects, SDK will automatically reconnect. WebSocket status changes can be monitored through the `NET_STATE_CHANGE` event (https://trtc.io/document/47967?platform=javascript&product=chat&menulabel=sdk#d39fb50f-f0f2-4b67-9b15-acd7e8608105).
|
|
148
|
+
|
|
149
|
+
### Q: How to delete conversations in SDK?
|
|
150
|
+
**A:** Conversation deletion only supports one-way deletion. SDK delete conversation API is `deleteConversation`. Reference documentation: https://trtc.io/document/48313?product=chat&menulabel=core%20sdk&platform=javascript.
|
|
151
|
+
|
|
152
|
+
### Q: How to get friend list in SDK?
|
|
153
|
+
**A:** Get friend list using `getFriendList` API. Friend list updates can be monitored through the `FRIEND_LIST_UPDATED` event. Reference documentation: https://trtc.io/document/48158?product=chat&menulabel=core%20sdk&platform=javascript.
|
|
154
|
+
|
|
155
|
+
### Q: How to listen for friend online status updates in SDK?
|
|
156
|
+
**A:** Friend online status changes can be implemented in two ways:
|
|
157
|
+
1. If you have enabled automatic friend status notification in the IM Console, when a friend's status changes, SDK will dispatch the `USER_STATUS_UPDATED` event, where you can get the friend's latest status.
|
|
158
|
+
2. If you haven't enabled automatic friend status notification and still want to sense friend status changes, you need to call `subscribeUserStatus` to actively subscribe to friend status. When a friend's status changes, SDK will dispatch the `USER_STATUS_UPDATED` callback.
|
|
159
|
+
For detailed documentation, please refer to: https://trtc.io/document/49561?product=chat&menulabel=core%20sdk&platform=javascript.
|
|
160
|
+
|
|
161
|
+
### Q: How to delete conversation history messages in SDK?
|
|
162
|
+
**A:** SDK provides the `clearHistoryMessage` API to clear conversation history messages. For detailed documentation, please refer to: https://trtc.io/document/53498?product=chat&menulabel=core%20sdk&platform=javascript.
|
|
@@ -44,19 +44,19 @@ Before performing quick integration, you need to refer to [preparations](https:/
|
|
|
44
44
|
|
|
45
45
|
【npm】
|
|
46
46
|
``` bash
|
|
47
|
-
npm install tuikit-atomicx-vue3
|
|
47
|
+
npm install tuikit-atomicx-vue3 @tencentcloud/uikit-base-component-vue3 --save
|
|
48
48
|
```
|
|
49
49
|
|
|
50
50
|
|
|
51
51
|
【pnpm】
|
|
52
52
|
``` bash
|
|
53
|
-
pnpm add tuikit-atomicx-vue3
|
|
53
|
+
pnpm add tuikit-atomicx-vue3 @tencentcloud/uikit-base-component-vue3
|
|
54
54
|
```
|
|
55
55
|
|
|
56
56
|
|
|
57
57
|
【yarn】
|
|
58
58
|
``` bash
|
|
59
|
-
yarn add tuikit-atomicx-vue3
|
|
59
|
+
yarn add tuikit-atomicx-vue3 @tencentcloud/uikit-base-component-vue3
|
|
60
60
|
```
|
|
61
61
|
|
|
62
62
|
### Step 3: Integrating the Link Management Panel
|
|
@@ -38,19 +38,19 @@ Before quick integration, you need to refer to [preparations](https://write.woa.
|
|
|
38
38
|
|
|
39
39
|
【npm】
|
|
40
40
|
``` bash
|
|
41
|
-
npm install tuikit-atomicx-vue3
|
|
41
|
+
npm install tuikit-atomicx-vue3 @tencentcloud/uikit-base-component-vue3 --save
|
|
42
42
|
```
|
|
43
43
|
|
|
44
44
|
|
|
45
45
|
【pnpm】
|
|
46
46
|
``` bash
|
|
47
|
-
pnpm add tuikit-atomicx-vue3
|
|
47
|
+
pnpm add tuikit-atomicx-vue3 @tencentcloud/uikit-base-component-vue3
|
|
48
48
|
```
|
|
49
49
|
|
|
50
50
|
|
|
51
51
|
【yarn】
|
|
52
52
|
``` bash
|
|
53
|
-
yarn add tuikit-atomicx-vue3
|
|
53
|
+
yarn add tuikit-atomicx-vue3 @tencentcloud/uikit-base-component-vue3
|
|
54
54
|
```
|
|
55
55
|
|
|
56
56
|
### Step 3: Joining the Live Room and Performing Voice Chat
|
|
@@ -395,4 +395,4 @@ const isAnchor = (userInfo: SeatUserInfo) => {
|
|
|
395
395
|
</script>
|
|
396
396
|
|
|
397
397
|
<style scoped>.live-stream-view{position:relative;width:100%;height:100%;border-radius:8px;overflow:hidden}.live-stream-view.is-anchor{border:3px solid #ff6b35;box-shadow:0 0 20px rgba(255,107,53,.3)}.live-stream-view.is-guest{border:1px solid #ddd}.video-area{width:100%;height:100%;background:#000}.user-overlay{position:absolute;bottom:0;left:0;right:0;background:linear-gradient(transparent,rgba(0,0,0,.8));padding:10px;color:#fff}.user-badge{display:inline-block;padding:2px 8px;border-radius:10px;font-size:12px;margin-bottom:5px;background:#666}.anchor-badge{background:#ff6b35;color:#fff}.user-name{font-weight:700;margin-bottom:5px}.device-status span{margin-right:5px;opacity:.8}.device-status .camera.Off,.device-status .mic.Off{opacity:.3}</style>
|
|
398
|
-
```
|
|
398
|
+
```
|
|
@@ -9,7 +9,7 @@ This document provides a detailed introduction to the **Live Stream List Page**
|
|
|
9
9
|
|
|
10
10
|
### Step 1: Configuring the Environment and Activating the Service
|
|
11
11
|
|
|
12
|
-
Before performing quick connection, you need to refer to [Preparations](https://write.woa.com/document/
|
|
12
|
+
Before performing quick connection, you need to refer to [Preparations](https://write.woa.com/document/163673134112337920) to meet the required environment configuration and activate the corresponding service.
|
|
13
13
|
|
|
14
14
|
### Step 2: Dependency Installation
|
|
15
15
|
|
|
@@ -20,19 +20,19 @@ You can choose any method below to install dependencies:
|
|
|
20
20
|
|
|
21
21
|
【npm】
|
|
22
22
|
``` bash
|
|
23
|
-
npm install tuikit-atomicx-vue3
|
|
23
|
+
npm install tuikit-atomicx-vue3 @tencentcloud/uikit-base-component-vue3 --save
|
|
24
24
|
```
|
|
25
25
|
|
|
26
26
|
|
|
27
27
|
【pnpm】
|
|
28
28
|
``` bash
|
|
29
|
-
pnpm add tuikit-atomicx-vue3
|
|
29
|
+
pnpm add tuikit-atomicx-vue3 @tencentcloud/uikit-base-component-vue3
|
|
30
30
|
```
|
|
31
31
|
|
|
32
32
|
|
|
33
33
|
【yarn】
|
|
34
34
|
``` bash
|
|
35
|
-
yarn add tuikit-atomicx-vue3
|
|
35
|
+
yarn add tuikit-atomicx-vue3 @tencentcloud/uikit-base-component-vue3
|
|
36
36
|
```
|
|
37
37
|
|
|
38
38
|
### Step 3: Live Stream List Page Integration
|
|
@@ -118,7 +118,7 @@ As shown in the above feature diagram, we also support you to customize the live
|
|
|
118
118
|
|
|
119
119
|
## Designate a Live Streaming Room
|
|
120
120
|
|
|
121
|
-
To handle the redirect logic from the live list (or homepage) to the live streaming room, you need to configure Vue Router. In the `src` directory of your project, create a new `router` folder and create the `index.ts` file. Then, in your main file (such as **main.ts** or **index.ts**), import and use the router. See the [GitHub sample code](https://github.com/Tencent-RTC/TUILiveKit/blob/main/Web/web-vite-vue3/src/main.ts). If you need the live list, see the documentation for the [Live Stream List Page](https://write.woa.com
|
|
121
|
+
To handle the redirect logic from the live list (or homepage) to the live streaming room, you need to configure Vue Router. In the `src` directory of your project, create a new `router` folder and create the `index.ts` file. Then, in your main file (such as **main.ts** or **index.ts**), import and use the router. See the [GitHub sample code](https://github.com/Tencent-RTC/TUILiveKit/blob/main/Web/web-vite-vue3/src/main.ts). If you need the live list, see the documentation for the [Live Stream List Page](https://write.woa.com/#).
|
|
122
122
|
``` typescript
|
|
123
123
|
// live-list.vue can be incrementally added to your code
|
|
124
124
|
<template>
|
|
@@ -186,7 +186,7 @@ Congratulations! You have successfully integrated the live broadcast list page.
|
|
|
186
186
|
|
|
187
187
|
<td rowspan="1" colSpan="1" >The live streamer's entire live streaming process is supported, including pre-streaming preparation and post-streaming interactions.</td>
|
|
188
188
|
|
|
189
|
-
<td rowspan="1" colSpan="1" >[Host Streaming](https://write.woa.com/document/
|
|
189
|
+
<td rowspan="1" colSpan="1" >[Host Streaming](https://write.woa.com/document/194114399449153536)</td>
|
|
190
190
|
</tr>
|
|
191
191
|
|
|
192
192
|
<tr>
|
|
@@ -194,7 +194,7 @@ Congratulations! You have successfully integrated the live broadcast list page.
|
|
|
194
194
|
|
|
195
195
|
<td rowspan="1" colSpan="1" >Viewers can enter the live streamer's room to watch the live stream, connect to the microphone, view live stream room information, view online viewers, and display comments.</td>
|
|
196
196
|
|
|
197
|
-
<td rowspan="1" colSpan="1" >[Audience Viewing](https://write.woa.com/document/
|
|
197
|
+
<td rowspan="1" colSpan="1" >[Audience Viewing](https://write.woa.com/document/194114585866043392)</td>
|
|
198
198
|
</tr>
|
|
199
199
|
</table>
|
|
200
200
|
|
package/resource/doc/livekit/vue/{components/live-player.md → live-player-desk-integration.md}
RENAMED
|
@@ -51,32 +51,32 @@ The watch page provides default behavior and style, but if the default behavior
|
|
|
51
51
|
|
|
52
52
|
### Step 1: Environment Configuration and Service Activation
|
|
53
53
|
|
|
54
|
-
Before using Quick Access, you need to refer to [Preparations](https://write.woa.com/document/
|
|
54
|
+
Before using Quick Access, you need to refer to [Preparations](https://write.woa.com/document/163673134112337920) configuration requirements and activate the corresponding services.
|
|
55
55
|
|
|
56
56
|
|
|
57
57
|
|
|
58
58
|
|
|
59
59
|
【npm】
|
|
60
60
|
``` bash
|
|
61
|
-
npm install tuikit-atomicx-vue3
|
|
61
|
+
npm install tuikit-atomicx-vue3 @tencentcloud/uikit-base-component-vue3 --save
|
|
62
62
|
```
|
|
63
63
|
|
|
64
64
|
|
|
65
65
|
【pnpm】
|
|
66
66
|
``` bash
|
|
67
|
-
pnpm add tuikit-atomicx-vue3
|
|
67
|
+
pnpm add tuikit-atomicx-vue3 @tencentcloud/uikit-base-component-vue3
|
|
68
68
|
```
|
|
69
69
|
|
|
70
70
|
|
|
71
71
|
【yarn】
|
|
72
72
|
``` bash
|
|
73
|
-
yarn add tuikit-atomicx-vue3
|
|
73
|
+
yarn add tuikit-atomicx-vue3 @tencentcloud/uikit-base-component-vue3
|
|
74
74
|
```
|
|
75
75
|
|
|
76
76
|
### Step 2: Access the viewing page
|
|
77
77
|
|
|
78
78
|
Create a live-player.vue file in your project and copy the following code to integrate the watch page into your project.
|
|
79
|
-
```
|
|
79
|
+
``` java
|
|
80
80
|
<template>
|
|
81
81
|
<UIKitProvider language="zh-CN">
|
|
82
82
|
<div class="container">
|
|
@@ -190,7 +190,7 @@ As shown in the functional diagram above, we also support customizing the UI of
|
|
|
190
190
|
#### Method 1: Playing by Specifying a LiveId
|
|
191
191
|
|
|
192
192
|
If you need to specify a LiveId for playback, you need to add the following code based on the code in [step 3](https://write.woa.com/#c1b852bc-da02-4c9f-bb11-2a63582ce978) of the Quick Access section above. The reference method is as follows:
|
|
193
|
-
```
|
|
193
|
+
``` java
|
|
194
194
|
// live-player.vue
|
|
195
195
|
import { onMounted } from 'vue';
|
|
196
196
|
import { useLiveState } from 'tuikit-atomicx-vue3';
|
|
@@ -256,7 +256,7 @@ Congratulations! You've successfully integrated the watch page. Next, you can im
|
|
|
256
256
|
|
|
257
257
|
<td rowspan="1" colSpan="1" >The complete workflow for a host to start a stream, including pre-stream setup and various in-stream interactions.</td>
|
|
258
258
|
|
|
259
|
-
<td rowspan="1" colSpan="1" >[Host Streaming](https://write.woa.com/document/
|
|
259
|
+
<td rowspan="1" colSpan="1" >[Host Streaming](https://write.woa.com/document/194114399449153536)</td>
|
|
260
260
|
</tr>
|
|
261
261
|
|
|
262
262
|
<tr>
|
|
@@ -264,6 +264,6 @@ Congratulations! You've successfully integrated the watch page. Next, you can im
|
|
|
264
264
|
|
|
265
265
|
<td rowspan="1" colSpan="1" >Display the live broadcast list interface and functions, including live broadcast list and room information display function</td>
|
|
266
266
|
|
|
267
|
-
<td rowspan="1" colSpan="1" >[Live Stream List](https://write.woa.com/document/
|
|
267
|
+
<td rowspan="1" colSpan="1" >[Live Stream List](https://write.woa.com/document/194114814480777216)</td>
|
|
268
268
|
</tr>
|
|
269
269
|
</table>
|
|
@@ -0,0 +1,269 @@
|
|
|
1
|
+
This article provides a detailed introduction to the watch page in **TUILiveKit **Demo. You can directly refer to this document to integrate the watch page we developed in your existing project, or you can deeply customize the page style, layout, and functional items according to your needs according to the content in the document.
|
|
2
|
+
|
|
3
|
+
### Function Overview
|
|
4
|
+
<table>
|
|
5
|
+
<tr>
|
|
6
|
+
<td rowspan="1" colSpan="1" >**Functional classification**</td>
|
|
7
|
+
|
|
8
|
+
<td rowspan="1" colSpan="1" >**Specific capabilities**</td>
|
|
9
|
+
</tr>
|
|
10
|
+
|
|
11
|
+
<tr>
|
|
12
|
+
<td rowspan="1" colSpan="1" >**Live video playback**</td>
|
|
13
|
+
|
|
14
|
+
<td rowspan="1" colSpan="1" >HD and smooth live streaming experience</td>
|
|
15
|
+
</tr>
|
|
16
|
+
|
|
17
|
+
<tr>
|
|
18
|
+
<td rowspan="1" colSpan="1" >**Barrage Interaction**</td>
|
|
19
|
+
|
|
20
|
+
<td rowspan="1" colSpan="1" >Real-time Barrage chat</td>
|
|
21
|
+
</tr>
|
|
22
|
+
|
|
23
|
+
<tr>
|
|
24
|
+
<td rowspan="1" colSpan="1" >**Viewer List**</td>
|
|
25
|
+
|
|
26
|
+
<td rowspan="1" colSpan="1" >View online viewer information</td>
|
|
27
|
+
</tr>
|
|
28
|
+
|
|
29
|
+
<tr>
|
|
30
|
+
<td rowspan="1" colSpan="1" >**Follow Streamer**</td>
|
|
31
|
+
|
|
32
|
+
<td rowspan="1" colSpan="1" >Follow your favorite streamers with one click</td>
|
|
33
|
+
</tr>
|
|
34
|
+
|
|
35
|
+
<tr>
|
|
36
|
+
<td rowspan="1" colSpan="1" >**Full Screen Play**</td>
|
|
37
|
+
|
|
38
|
+
<td rowspan="1" colSpan="1" >Immersive viewing experience</td>
|
|
39
|
+
</tr>
|
|
40
|
+
</table>
|
|
41
|
+
|
|
42
|
+
|
|
43
|
+
## Function Display
|
|
44
|
+
|
|
45
|
+
The watch page provides default behavior and style, but if the default behavior and style don't fully meet your needs, you can also customize the UI. The numbers shown in the figure correspond to categories in the specific function list. These mainly include live broadcast information display, video broadcast area, online audience, audio and video operation, live broadcast duration, screen resolution switching, full screen function, chat interaction, message list, etc.
|
|
46
|
+
|
|
47
|
+
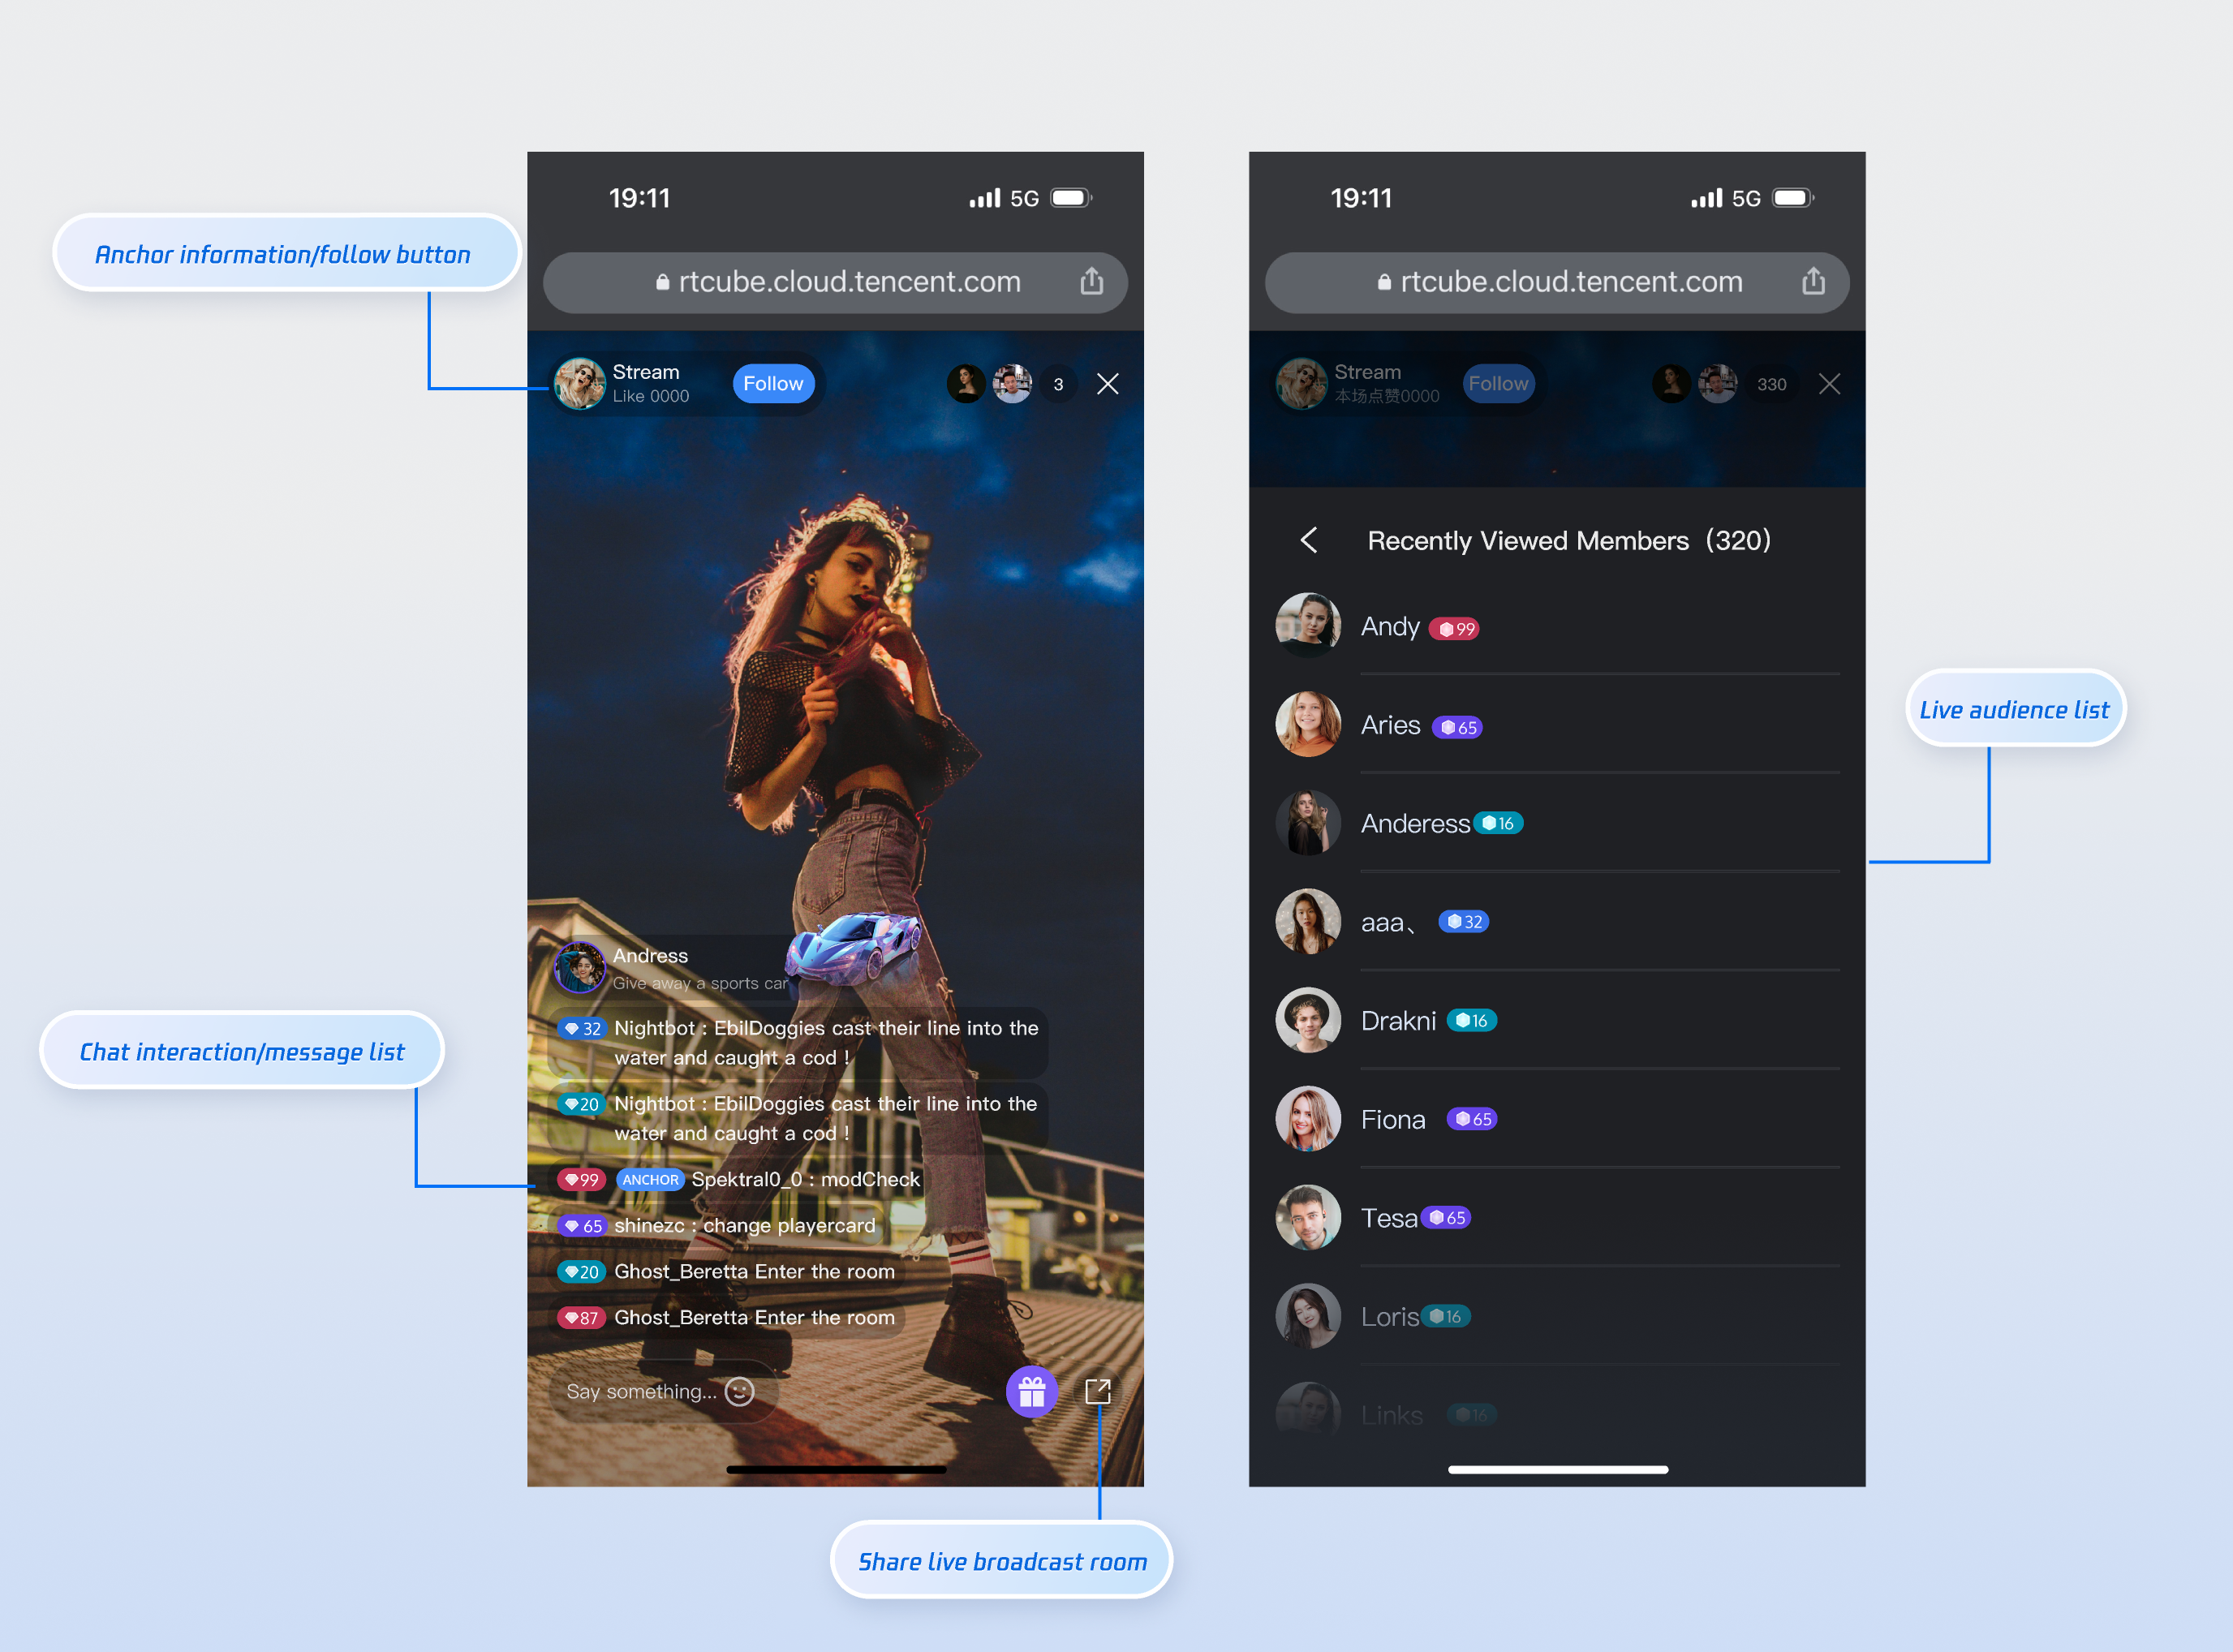
|
|
48
|
+
|
|
49
|
+
|
|
50
|
+
## Quick Access
|
|
51
|
+
|
|
52
|
+
### Step 1: Environment Configuration and Service Activation
|
|
53
|
+
|
|
54
|
+
Before using Quick Access, you need to refer to [Preparations](https://write.woa.com/document/163673134112337920) configuration requirements and activate the corresponding services.
|
|
55
|
+
|
|
56
|
+
|
|
57
|
+
|
|
58
|
+
|
|
59
|
+
【npm】
|
|
60
|
+
``` bash
|
|
61
|
+
npm install tuikit-atomicx-vue3 @tencentcloud/uikit-base-component-vue3 --save
|
|
62
|
+
```
|
|
63
|
+
|
|
64
|
+
|
|
65
|
+
【pnpm】
|
|
66
|
+
``` bash
|
|
67
|
+
pnpm add tuikit-atomicx-vue3 @tencentcloud/uikit-base-component-vue3
|
|
68
|
+
```
|
|
69
|
+
|
|
70
|
+
|
|
71
|
+
【yarn】
|
|
72
|
+
``` bash
|
|
73
|
+
yarn add tuikit-atomicx-vue3 @tencentcloud/uikit-base-component-vue3
|
|
74
|
+
```
|
|
75
|
+
|
|
76
|
+
### Step 2: Access the viewing page
|
|
77
|
+
|
|
78
|
+
Create a live-player.vue file in your project and copy the following code to integrate the watch page into your project.
|
|
79
|
+
``` java
|
|
80
|
+
<template>
|
|
81
|
+
<UIKitProvider language="zh-CN">
|
|
82
|
+
<div class="container">
|
|
83
|
+
<!-- Live core area -->
|
|
84
|
+
<section class="live">
|
|
85
|
+
<header class="header">
|
|
86
|
+
<IconArrowStrokeBack class="back-btn" size="20" />
|
|
87
|
+
<Avatar :src="currentLive?.liveOwner.avatarUrl" :size="32" class="avatar" />
|
|
88
|
+
<span class="user-name">{{ currentLive?.liveOwner.userName || currentLive?.liveOwner.userId }}</span>
|
|
89
|
+
</header>
|
|
90
|
+
<LiveCoreView class="player" />
|
|
91
|
+
</section>
|
|
92
|
+
|
|
93
|
+
<div class="sidebar">
|
|
94
|
+
<!-- Online viewers list -->
|
|
95
|
+
<section class="audience">
|
|
96
|
+
<header class="section-header">
|
|
97
|
+
<h3> online viewers <span>({{ audienceList.length }})</span></h3>
|
|
98
|
+
</header>
|
|
99
|
+
<LiveAudienceList class="list" />
|
|
100
|
+
</section>
|
|
101
|
+
|
|
102
|
+
<!-- Message List & Message List -->
|
|
103
|
+
<section class="barrage">
|
|
104
|
+
<header class="section-header">
|
|
105
|
+
<h3>MessageList</h3>
|
|
106
|
+
</header>
|
|
107
|
+
<BarrageList class="list" />
|
|
108
|
+
<BarrageInput class="input" height="48px" />
|
|
109
|
+
</section>
|
|
110
|
+
</div>
|
|
111
|
+
</div>
|
|
112
|
+
</UIKitProvider>
|
|
113
|
+
</template>
|
|
114
|
+
|
|
115
|
+
<script setup lang="ts">
|
|
116
|
+
import { LiveAudienceList, BarrageList, BarrageInput, useLiveAudienceState, LiveCoreView, useLiveState, Avatar, useLoginState } from 'tuikit-atomicx-vue3';
|
|
117
|
+
import { UIKitProvider, IconArrowStrokeBack } from '@tencentcloud/uikit-base-component-vue3';
|
|
118
|
+
|
|
119
|
+
const { audienceList } = useLiveAudienceState();
|
|
120
|
+
const { currentLive } = useLiveState();
|
|
121
|
+
const { login } = useLoginState();
|
|
122
|
+
|
|
123
|
+
async function initLogin() {
|
|
124
|
+
try {
|
|
125
|
+
await login({
|
|
126
|
+
sdkAppId: 0, // SDKAppId, refer to step 1 to obtain
|
|
127
|
+
userId: '', // UserID, refer to step 1 to obtain
|
|
128
|
+
userSig: '', // userSig, refer to step 1 to obtain
|
|
129
|
+
});
|
|
130
|
+
} catch (error) {
|
|
131
|
+
console.error('Login Failed:', error);
|
|
132
|
+
}
|
|
133
|
+
}
|
|
134
|
+
|
|
135
|
+
onMounted(async () => {
|
|
136
|
+
await initLogin();
|
|
137
|
+
});
|
|
138
|
+
|
|
139
|
+
</script>
|
|
140
|
+
|
|
141
|
+
<style>:global(body){height:100vh;width:100vw;margin:0;padding:0;overflow:hidden;font-size:15px;line-height:1.6;text-rendering:optimizeLegibility;}:global(*),:global(*::before),:global(*::after){box-sizing:border-box;margin:0;}.container{display:grid;grid-template-columns:70% 30%;height:100vh;width:100vw;gap:16px;padding:16px;background:var(--bg-color-default);box-sizing:border-box;overflow:hidden;}.live{display:flex;flex-direction:column;background:var(--bg-color-operate);border-radius:12px;overflow:hidden;box-shadow:0 2px 8px var(--shadow-color);}.header{display:flex;align-items:center;gap:12px;padding:16px;border-bottom:1px solid var(--stroke-color-primary);}.back-btn{cursor:pointer;color:var(--text-color-tertiary);transition:color 0.2s;}.back-btn:hover{color:var(--text-color-link-hover);}.avatar{border:1px solid var(--uikit-color-white-7);}.user-name{color:var(--text-color-primary);font-weight:500;}.player{flex:1;background:var(--uikit-color-black-1);}.sidebar{display:flex;flex-direction:column;gap:16px;height:100%;overflow:hidden;}.audience{display:flex;flex-direction:column;background:var(--bg-color-operate);border-radius:12px;overflow:hidden;box-shadow:0 2px 8px var(--shadow-color);flex:1;min-height:0;}.barrage{display:flex;flex-direction:column;background:var(--bg-color-operate);border-radius:12px;overflow:hidden;box-shadow:0 2px 8px var(--shadow-color);flex:1;min-height:0;}.section-header{padding:16px;border-bottom:1px solid var(--stroke-color-primary);background:var(--bg-color-operate);}.section-header h3{margin:0;font-size:16px;font-weight:600;color:var(--text-color-primary);}.section-header span{font-weight:400;color:var(--text-color-secondary);font-size:14px;}.list{flex:1;min-height:0;overflow-y:auto;}.input{border-top:1px solid var(--stroke-color-primary);flex-shrink:0;height:48px;}@media (max-width:1200px){.container{grid-template-columns:1fr;grid-template-rows:60% 20% 20%;gap:12px;}.sidebar{gap:12px;}.audience,.barrage{min-height:200px;}}@media (max-width:768px){.container{padding:8px;gap:8px;grid-template-rows:50% 25% 25%;}.header,.section-header{padding:12px;}.sidebar{gap:8px;}}</style>
|
|
142
|
+
|
|
143
|
+
```
|
|
144
|
+
|
|
145
|
+
### Step 3: Start the project
|
|
146
|
+
``` bash
|
|
147
|
+
npm run dev
|
|
148
|
+
```
|
|
149
|
+
|
|
150
|
+
## Customizable
|
|
151
|
+
|
|
152
|
+
As shown in the functional diagram above, we also support customizing the UI of the watch page based on your project needs. The following table lists the main customizable features.
|
|
153
|
+
<table>
|
|
154
|
+
<tr>
|
|
155
|
+
<td rowspan="1" colSpan="1" >**Category**</td>
|
|
156
|
+
|
|
157
|
+
<td rowspan="1" colSpan="1" >**Function**</td>
|
|
158
|
+
|
|
159
|
+
<td rowspan="1" colSpan="1" >**Description**</td>
|
|
160
|
+
</tr>
|
|
161
|
+
|
|
162
|
+
<tr>
|
|
163
|
+
<td rowspan="1" colSpan="1" >**Live information display**</td>
|
|
164
|
+
|
|
165
|
+
<td rowspan="1" colSpan="1" >Customize the display of the watch page information area</td>
|
|
166
|
+
|
|
167
|
+
<td rowspan="1" colSpan="1" >**Supports:**<br>- **Show/hide the logo, replace it with your desired logo**<br>- **UI customization, show/hide the follow button, and replace it with your desired button style**</td>
|
|
168
|
+
</tr>
|
|
169
|
+
|
|
170
|
+
<tr>
|
|
171
|
+
<td rowspan="1" colSpan="1" >**Online viewers**</td>
|
|
172
|
+
|
|
173
|
+
<td rowspan="1" colSpan="1" >Customize audience information display</td>
|
|
174
|
+
|
|
175
|
+
<td rowspan="1" colSpan="1" >**Supports:**<br>- **Show/hide audience level**<br>- **Customize audience information font and color UI**<br>- **Replace icon style with your desired style**</td>
|
|
176
|
+
</tr>
|
|
177
|
+
|
|
178
|
+
<tr>
|
|
179
|
+
<td rowspan="1" colSpan="1" >**MessageList**</td>
|
|
180
|
+
|
|
181
|
+
<td rowspan="1" colSpan="1" >Custom message barrage area display</td>
|
|
182
|
+
|
|
183
|
+
<td rowspan="1" colSpan="1" >**Supports:**<br>- **Show/hide chat input area**<br>- **Supports UI customization for chat bubble style, audience level, etc.**</td>
|
|
184
|
+
</tr>
|
|
185
|
+
</table>
|
|
186
|
+
|
|
187
|
+
|
|
188
|
+
## Playing a Live Stream
|
|
189
|
+
|
|
190
|
+
#### Method 1: Playing by Specifying a LiveId
|
|
191
|
+
|
|
192
|
+
If you need to specify a LiveId for playback, you need to add the following code based on the code in [step 3](https://write.woa.com/#c1b852bc-da02-4c9f-bb11-2a63582ce978) of the Quick Access section above. The reference method is as follows:
|
|
193
|
+
``` java
|
|
194
|
+
// live-player.vue
|
|
195
|
+
import { onMounted } from 'vue';
|
|
196
|
+
import { useLiveState } from 'tuikit-atomicx-vue3';
|
|
197
|
+
|
|
198
|
+
const { joinLive } = useLiveState();
|
|
199
|
+
|
|
200
|
+
onMounted(async () => {
|
|
201
|
+
// Enter liveId to join the live broadcast room. For the specific meaning of the parameters,
|
|
202
|
+
// please refer to the preparation work in step 1.
|
|
203
|
+
await joinLive({ liveId: 'xxx' });
|
|
204
|
+
});
|
|
205
|
+
```
|
|
206
|
+
|
|
207
|
+
#### Method 2: Routing Configuration
|
|
208
|
+
|
|
209
|
+
Because of the logic involved in redirecting from the live stream list (or homepage) to the live stream room, you'll need to configure Vue Router. Create a new router folder in the project's src directory and create an index.ts file. Then, import and use the router in your main file (e.g., main.ts or index.ts). See the [GitHub code examples](https://github.com/Tencent-RTC/TUILiveKit/blob/main/Web/web-vite-vue3/src/main.ts) for more information. For a live stream list, see the Live Stream List documentation.
|
|
210
|
+
``` typescript
|
|
211
|
+
// src/router/index.ts
|
|
212
|
+
import { createRouter, createWebHistory } from 'vue-router';
|
|
213
|
+
|
|
214
|
+
const routes = [
|
|
215
|
+
{
|
|
216
|
+
path: '/live-player',
|
|
217
|
+
component: () => import('../views/live-player.vue'),
|
|
218
|
+
},
|
|
219
|
+
// If you need the live broadcast list function, you can add the following route
|
|
220
|
+
// {
|
|
221
|
+
// path: '/live-list',
|
|
222
|
+
// component: () => import('../views/live-list.vue'),
|
|
223
|
+
// },
|
|
224
|
+
];
|
|
225
|
+
|
|
226
|
+
const router = createRouter({
|
|
227
|
+
history: createWebHistory(),
|
|
228
|
+
routes,
|
|
229
|
+
});
|
|
230
|
+
export default router;
|
|
231
|
+
|
|
232
|
+
// src/main.ts
|
|
233
|
+
import { createApp } from 'vue';
|
|
234
|
+
import App from './App.vue';
|
|
235
|
+
import router from './router';
|
|
236
|
+
|
|
237
|
+
const app = createApp(App);
|
|
238
|
+
app.use(router);
|
|
239
|
+
app.mount('#app');
|
|
240
|
+
```
|
|
241
|
+
|
|
242
|
+
### Next Steps
|
|
243
|
+
|
|
244
|
+
Congratulations! You've successfully integrated the watch page. Next, you can implement content such as the anchor's start page and live broadcast list page. Please refer to the table below:
|
|
245
|
+
<table>
|
|
246
|
+
<tr>
|
|
247
|
+
<td rowspan="1" colSpan="1" >**Function**</td>
|
|
248
|
+
|
|
249
|
+
<td rowspan="1" colSpan="1" >**Description**</td>
|
|
250
|
+
|
|
251
|
+
<td rowspan="1" colSpan="1" >**Integration Guide**</td>
|
|
252
|
+
</tr>
|
|
253
|
+
|
|
254
|
+
<tr>
|
|
255
|
+
<td rowspan="1" colSpan="1" >**Host Streaming**</td>
|
|
256
|
+
|
|
257
|
+
<td rowspan="1" colSpan="1" >The complete workflow for a host to start a stream, including pre-stream setup and various in-stream interactions.</td>
|
|
258
|
+
|
|
259
|
+
<td rowspan="1" colSpan="1" >[Host Streaming](https://write.woa.com/document/194114399449153536)</td>
|
|
260
|
+
</tr>
|
|
261
|
+
|
|
262
|
+
<tr>
|
|
263
|
+
<td rowspan="1" colSpan="1" >**Live Stream List**</td>
|
|
264
|
+
|
|
265
|
+
<td rowspan="1" colSpan="1" >Display the live broadcast list interface and functions, including live broadcast list and room information display function</td>
|
|
266
|
+
|
|
267
|
+
<td rowspan="1" colSpan="1" >[Live Stream List](https://write.woa.com/document/194114814480777216)</td>
|
|
268
|
+
</tr>
|
|
269
|
+
</table>
|