@nocobase/plugin-ai 2.2.0-beta.2 → 2.2.0-beta.5
This diff represents the content of publicly available package versions that have been released to one of the supported registries. The information contained in this diff is provided for informational purposes only and reflects changes between package versions as they appear in their respective public registries.
- package/dist/ai/docs/nocobase/ai/install-nocobase-app.md +17 -4
- package/dist/ai/docs/nocobase/ai/upgrade-from-2-0-to-2-1.md +57 -0
- package/dist/ai/docs/nocobase/ai/upgrade-nocobase-app.md +6 -0
- package/dist/ai/docs/nocobase/api/cli/init.md +1 -1
- package/dist/ai/docs/nocobase/api/cli/skills/install.md +1 -0
- package/dist/ai/docs/nocobase/api/cli/skills/update.md +1 -0
- package/dist/ai/docs/nocobase/get-started/deployment/how-to-deploy-nocobase-faster.mdx +2 -2
- package/dist/ai/docs/nocobase/interface-builder/blocks/data-blocks/map.md +105 -0
- package/dist/ai/docs/nocobase/nocobase-cli/installation/cli.md +1 -1
- package/dist/ai/docs/nocobase/ops-management/backup-manager/index.mdx +9 -7
- package/dist/ai/docs/nocobase/ops-management/migration-manager/built-in-tables.md +423 -0
- package/dist/ai/docs/nocobase/ops-management/migration-manager/index.md +12 -9
- package/dist/ai/docs/nocobase/ops-management/release-management/index.md +111 -24
- package/dist/ai/docs/nocobase/plugins/@nocobase/plugin-app-sso/index.md +1 -1
- package/dist/ai/docs/nocobase/plugins/@nocobase/plugin-map/index.md +85 -3
- package/dist/ai/docs/nocobase/plugins/@nocobase/plugin-workflow-transaction/index.md +16 -0
- package/dist/ai/docs/nocobase/workflow/nodes/index.md +2 -1
- package/dist/ai/docs/nocobase/workflow/nodes/transaction.md +81 -0
- package/dist/client/ai-employees/form-filler/tools/index.d.ts +8 -0
- package/dist/client/index.js +3 -3
- package/dist/externalVersion.js +16 -16
- package/dist/node_modules/@langchain/xai/package.json +1 -1
- package/dist/node_modules/fs-extra/package.json +1 -1
- package/dist/node_modules/jsonrepair/package.json +1 -1
- package/dist/node_modules/just-bash/package.json +1 -1
- package/dist/node_modules/nodejs-snowflake/package.json +1 -1
- package/dist/node_modules/openai/package.json +1 -1
- package/dist/node_modules/zod/package.json +1 -1
- package/package.json +2 -2
|
@@ -24,23 +24,36 @@ If you often work with multiple terminals or want to operate in parallel with AI
|
|
|
24
24
|
|
|
25
25
|
## Step 2: Initialize the app
|
|
26
26
|
|
|
27
|
-
We recommend
|
|
27
|
+
We recommend installing through the UI wizard:
|
|
28
28
|
|
|
29
29
|
```bash
|
|
30
30
|
nb init --ui
|
|
31
31
|
```
|
|
32
32
|
|
|
33
|
-
|
|
33
|
+
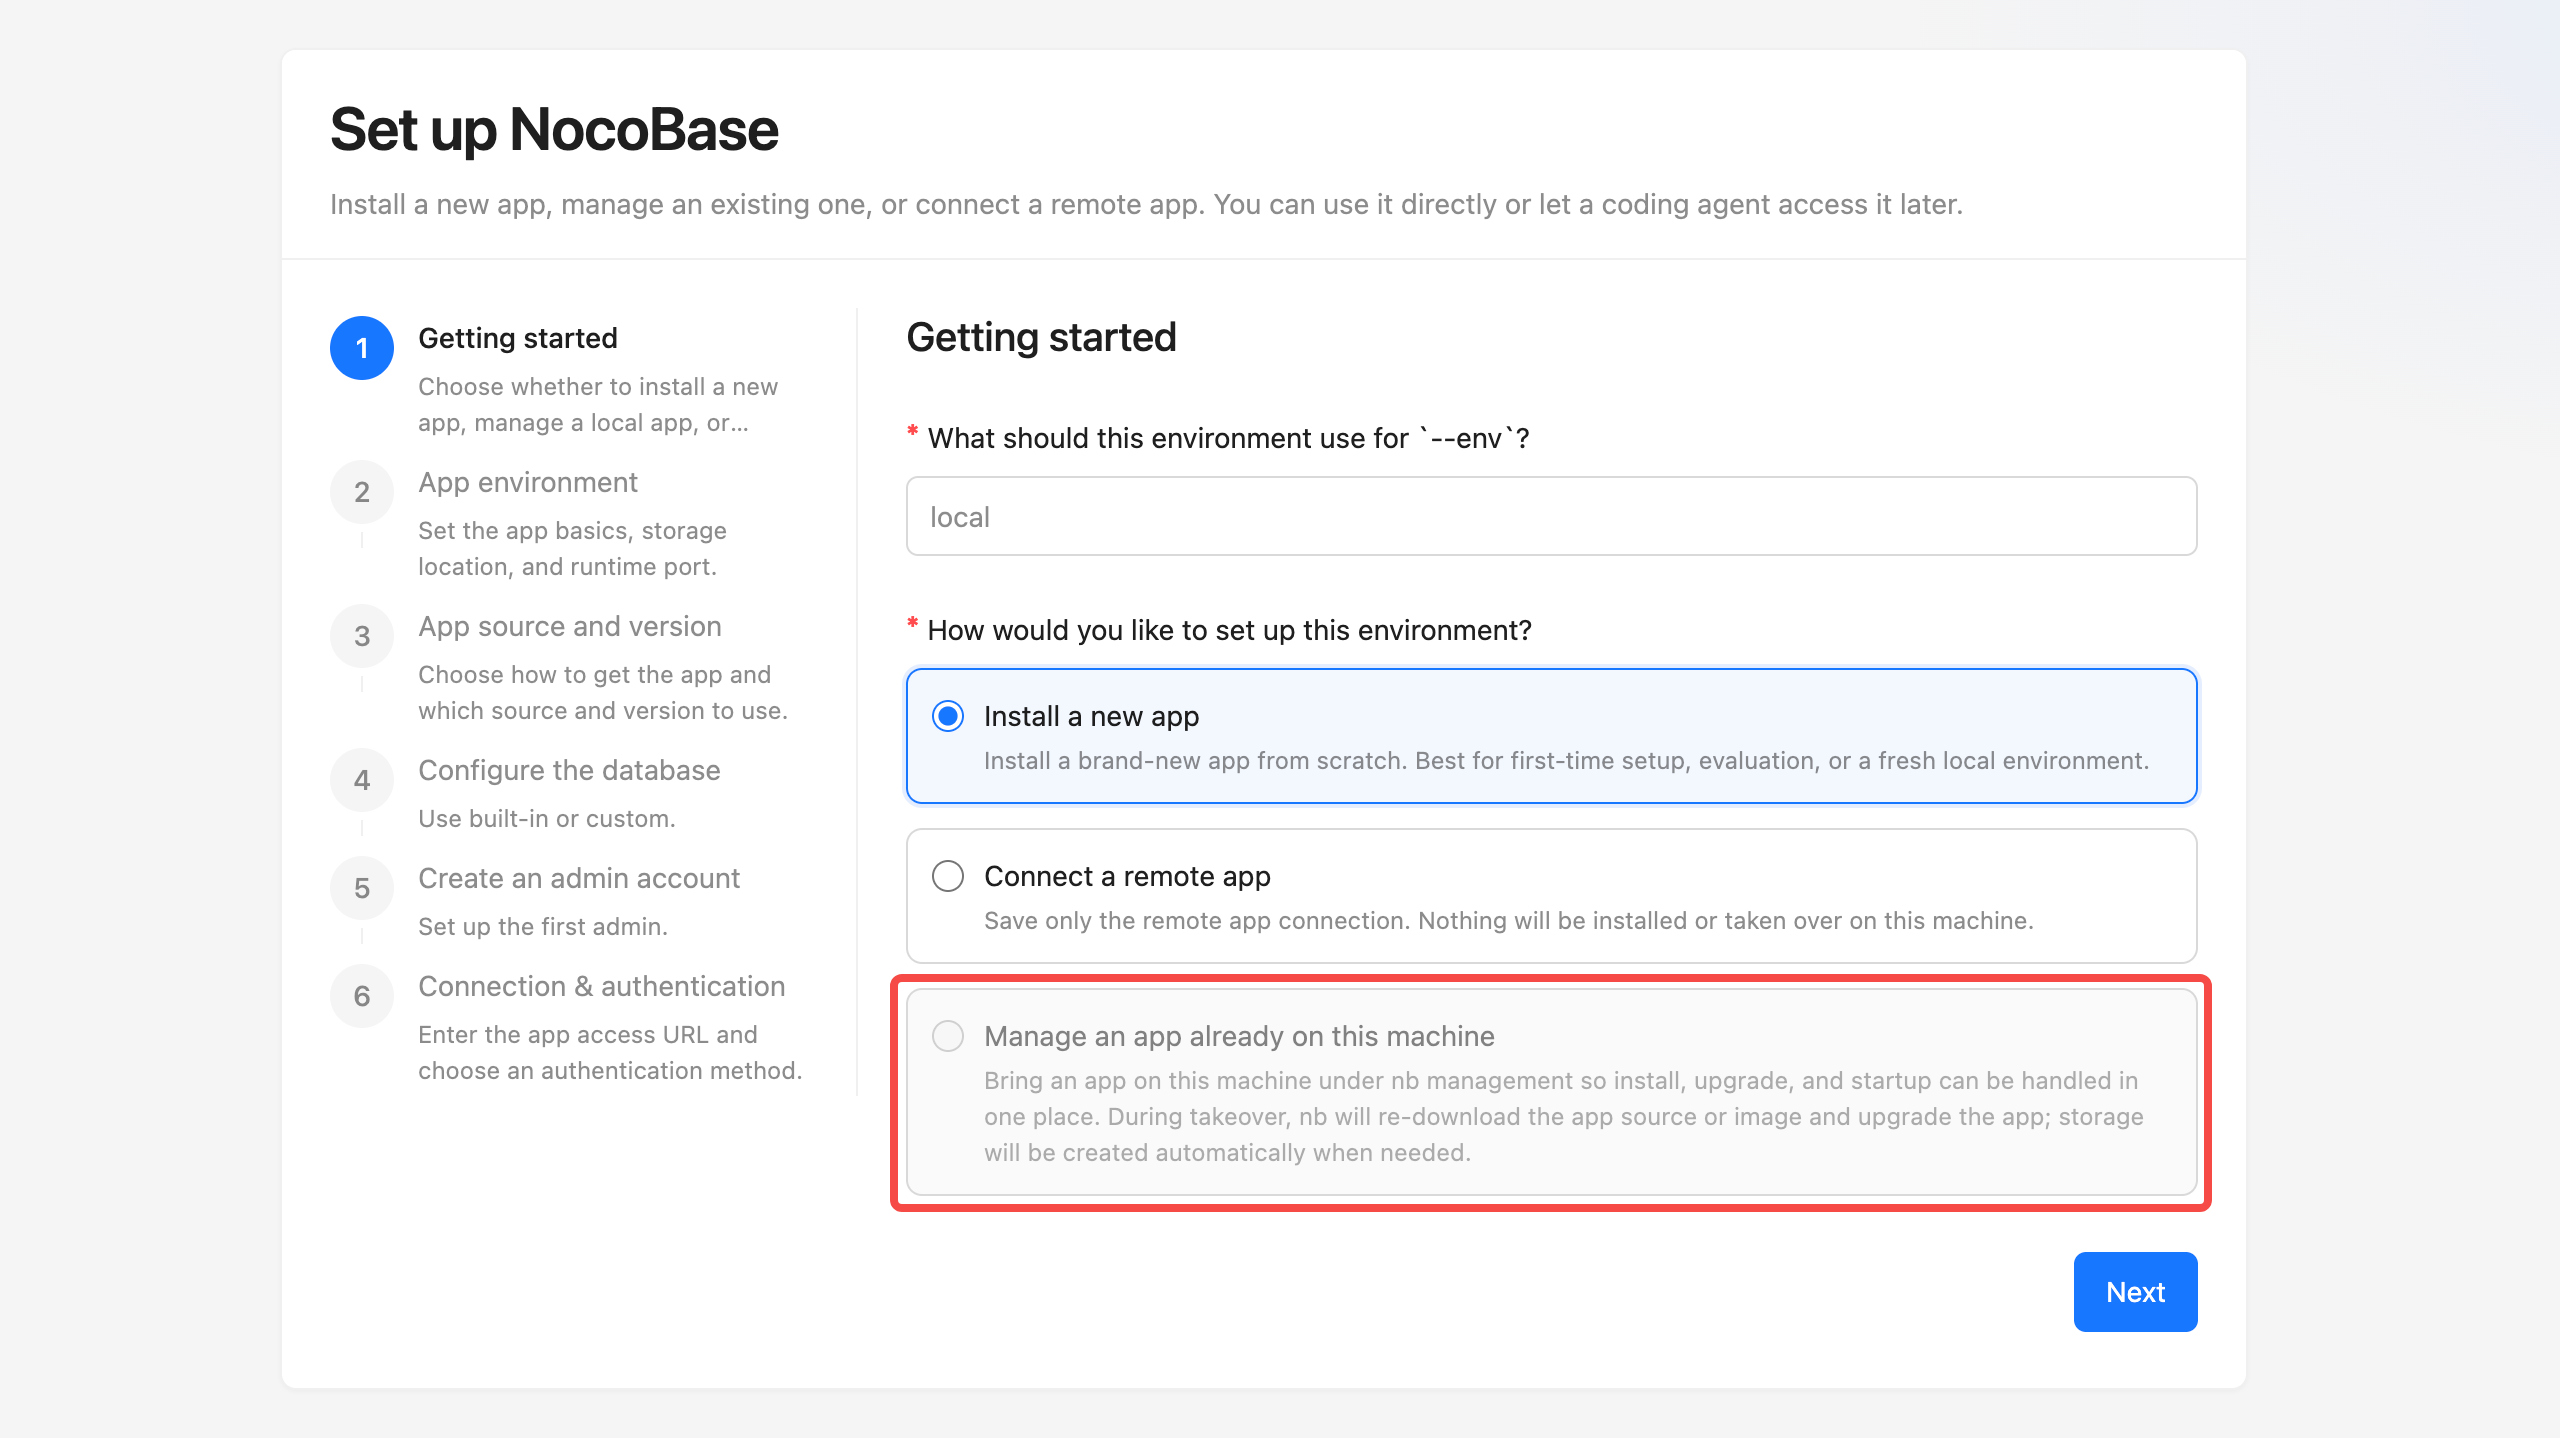
1. `Getting started` - set the `--env` identifier and choose `Install a new app`
|
|
34
34
|
|
|
35
|
-
|
|
35
|
+

|
|
36
36
|
|
|
37
|
-
1. `Getting started` - set the `--env` identifier and choose `Install a new app`
|
|
38
37
|
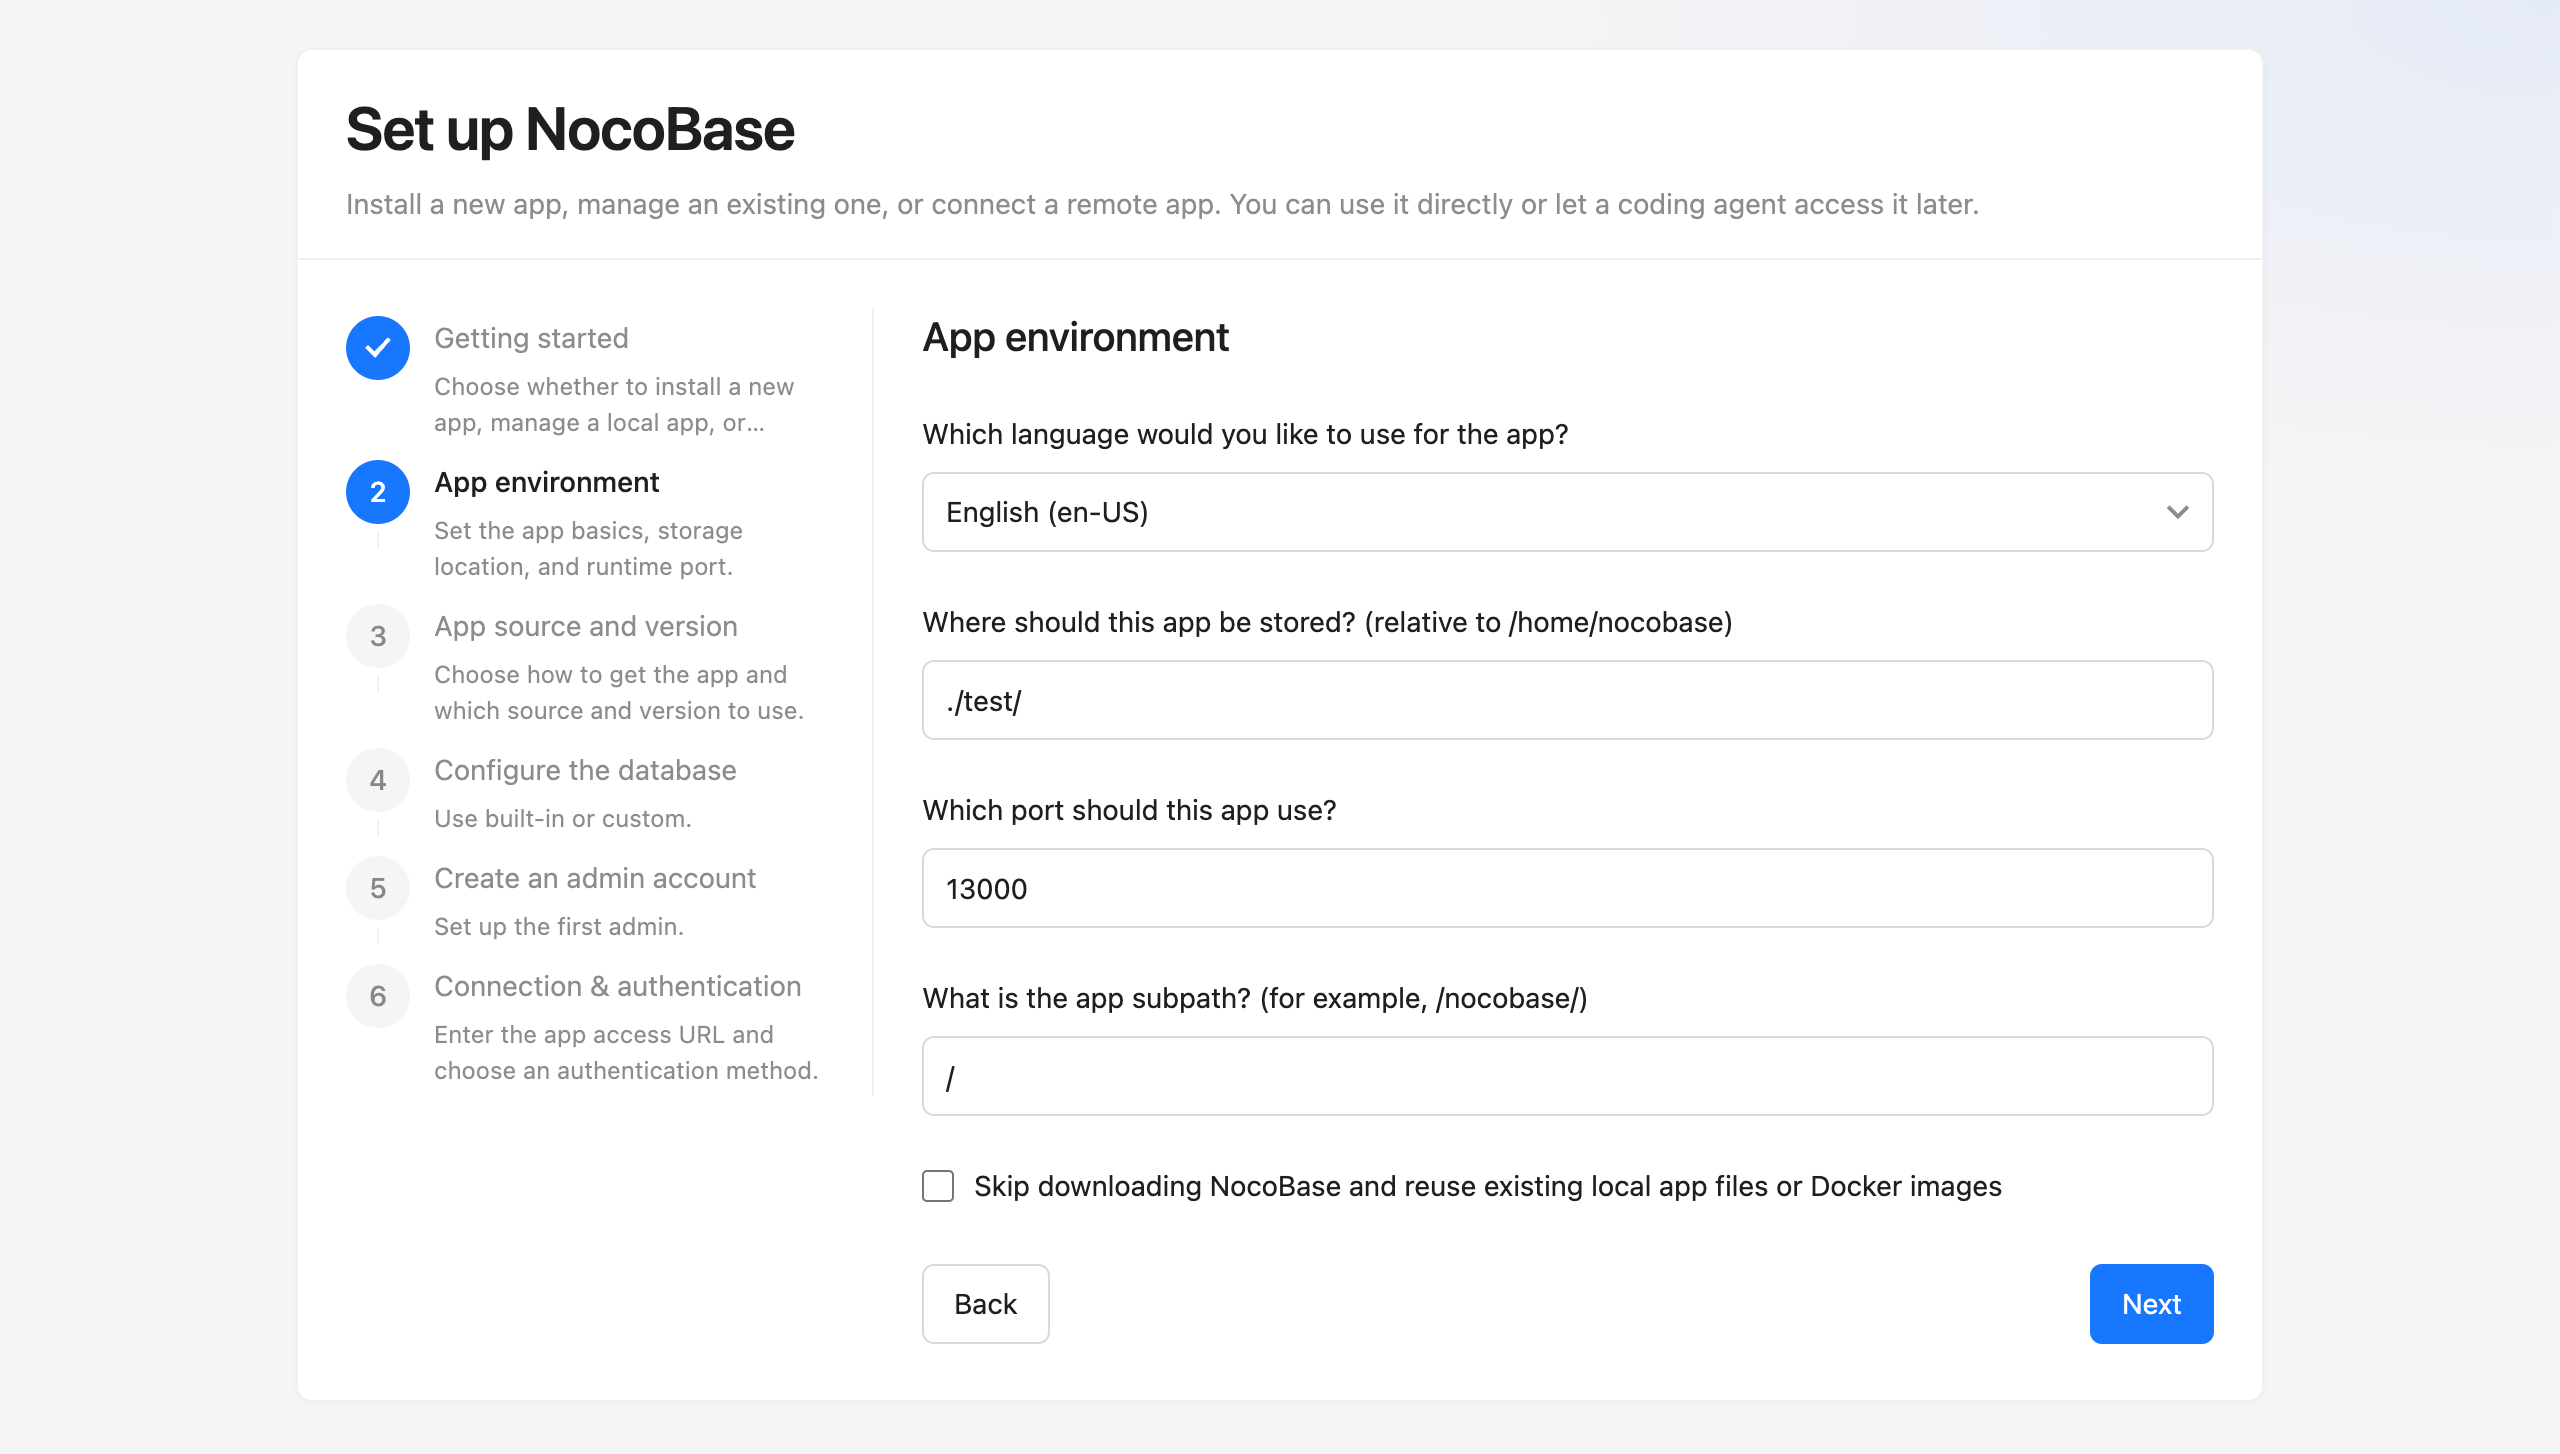
2. `App environment` - set the app basics, storage location, and runtime port
|
|
38
|
+
|
|
39
|
+
|
|
40
|
+
|
|
39
41
|
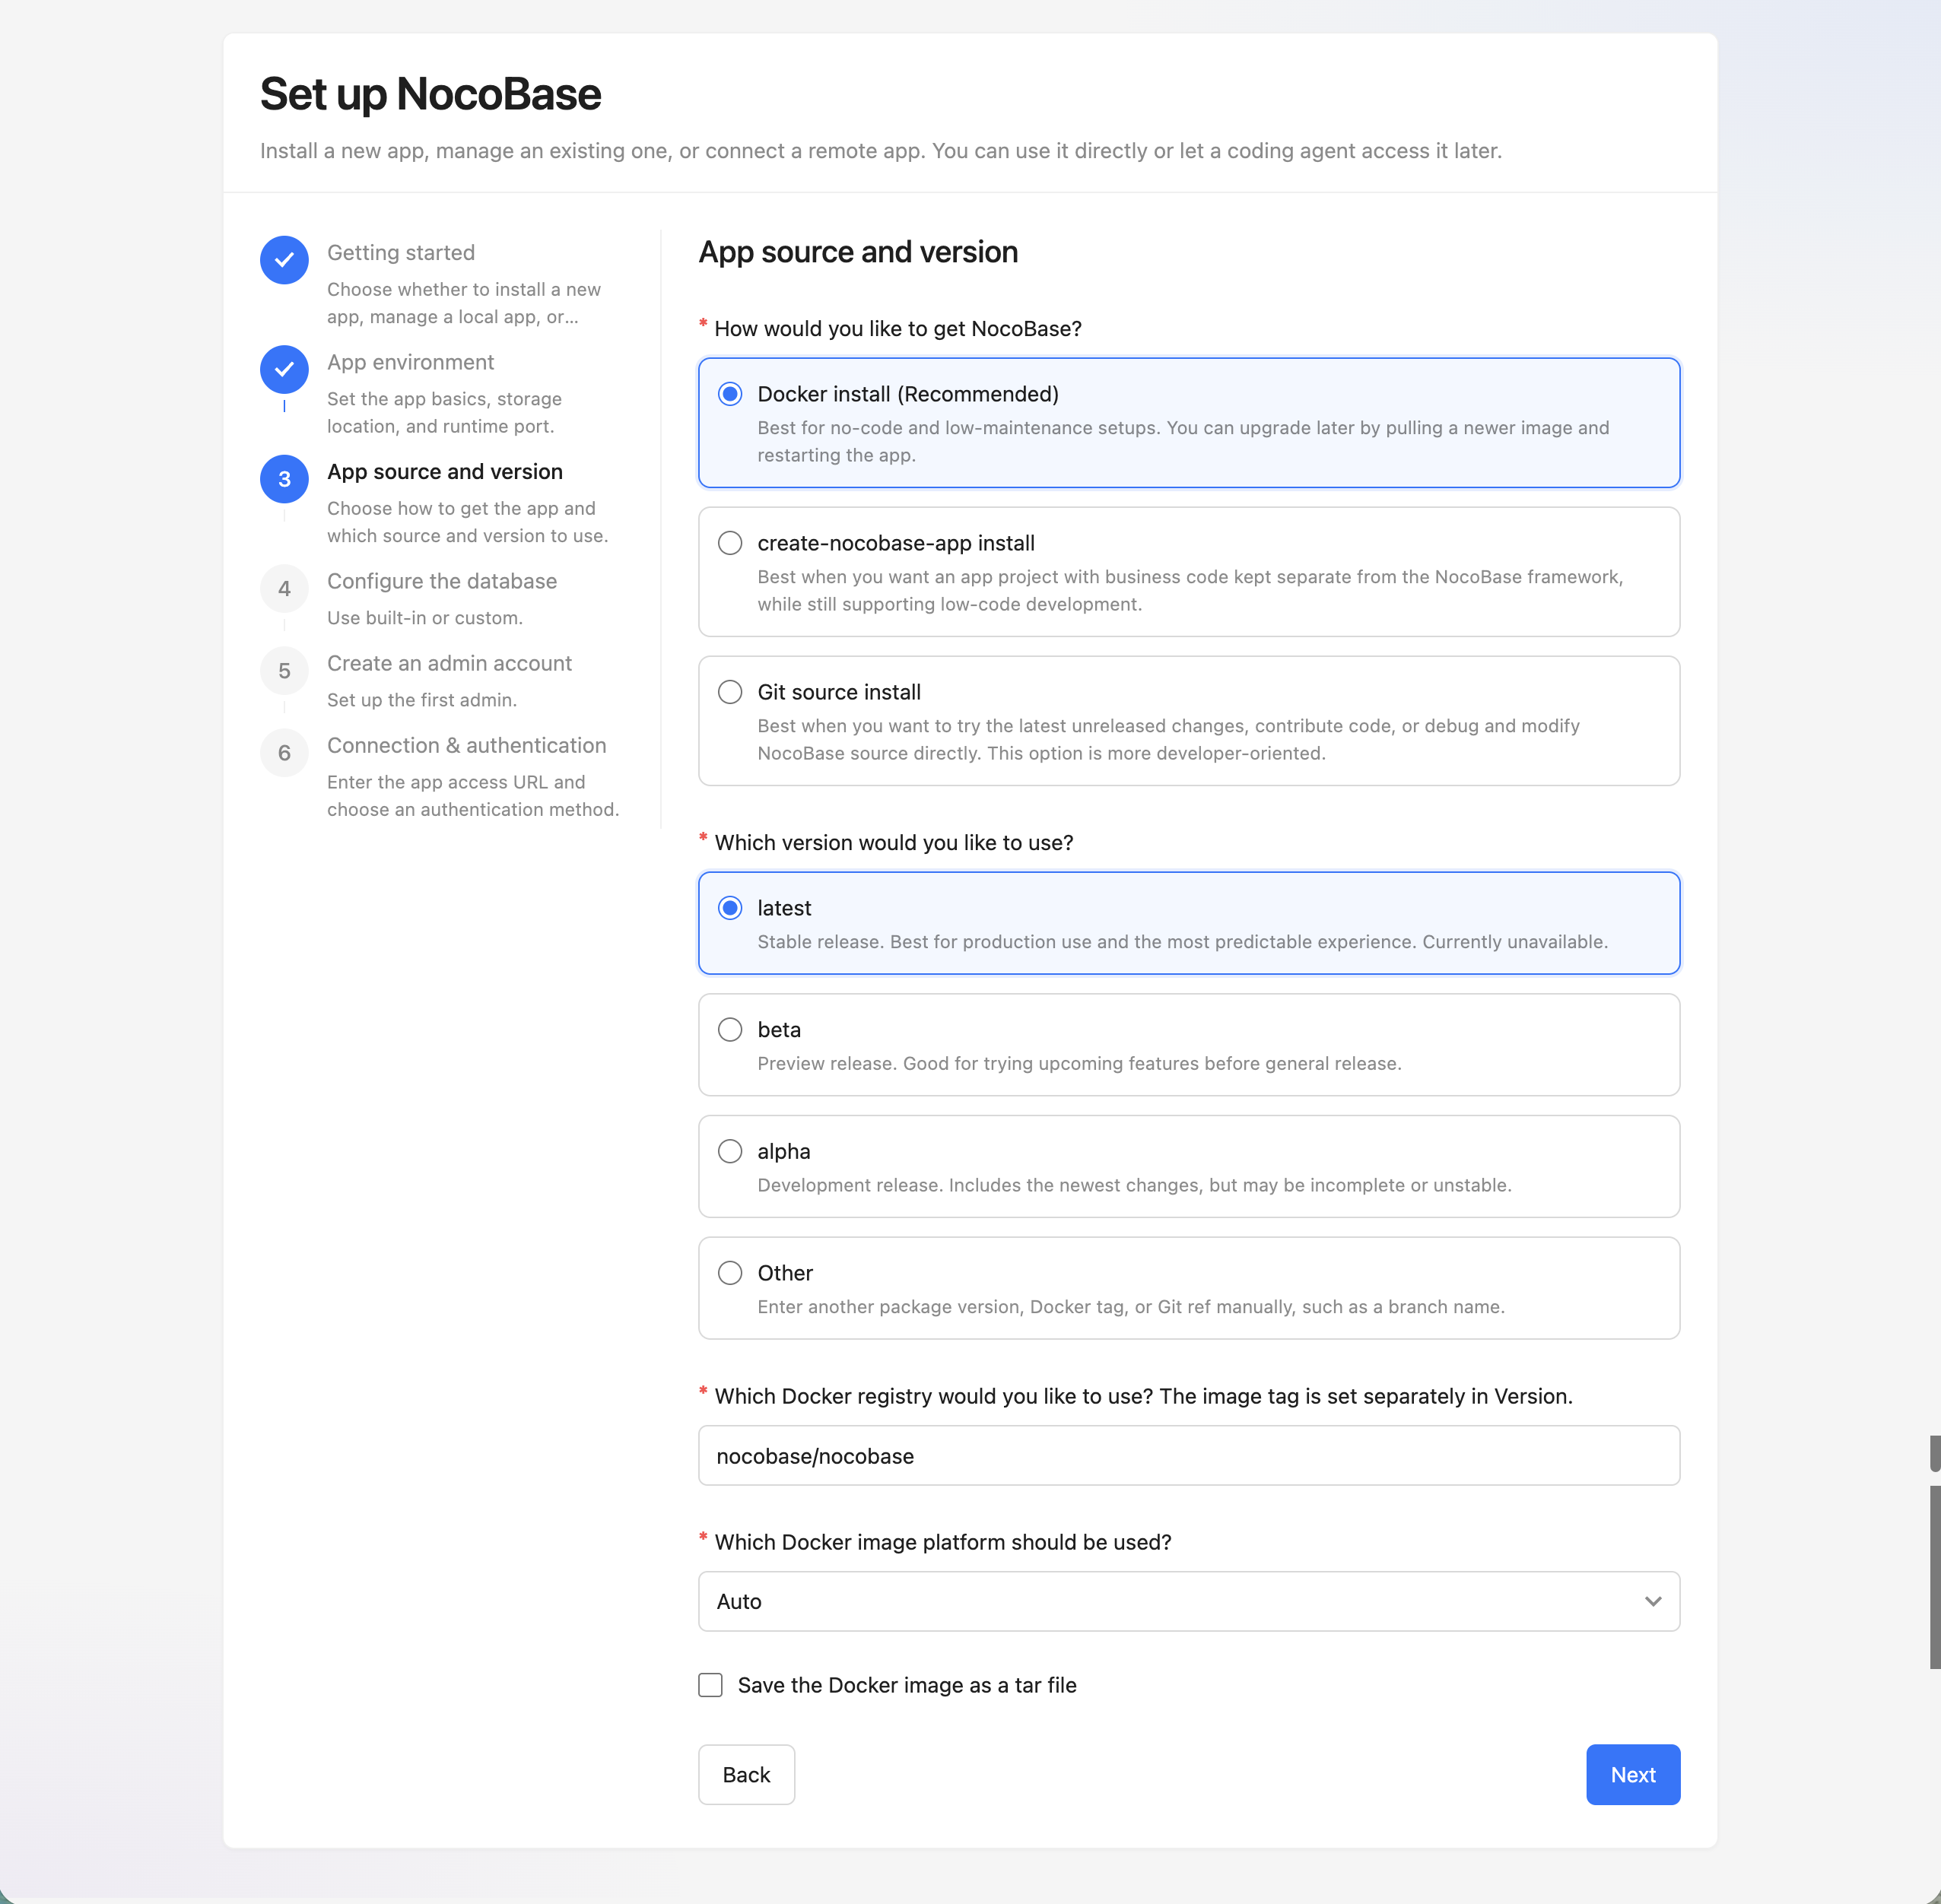
3. `App source and version` - choose how to get the app and which source and version to use
|
|
42
|
+
|
|
43
|
+
|
|
44
|
+
|
|
40
45
|
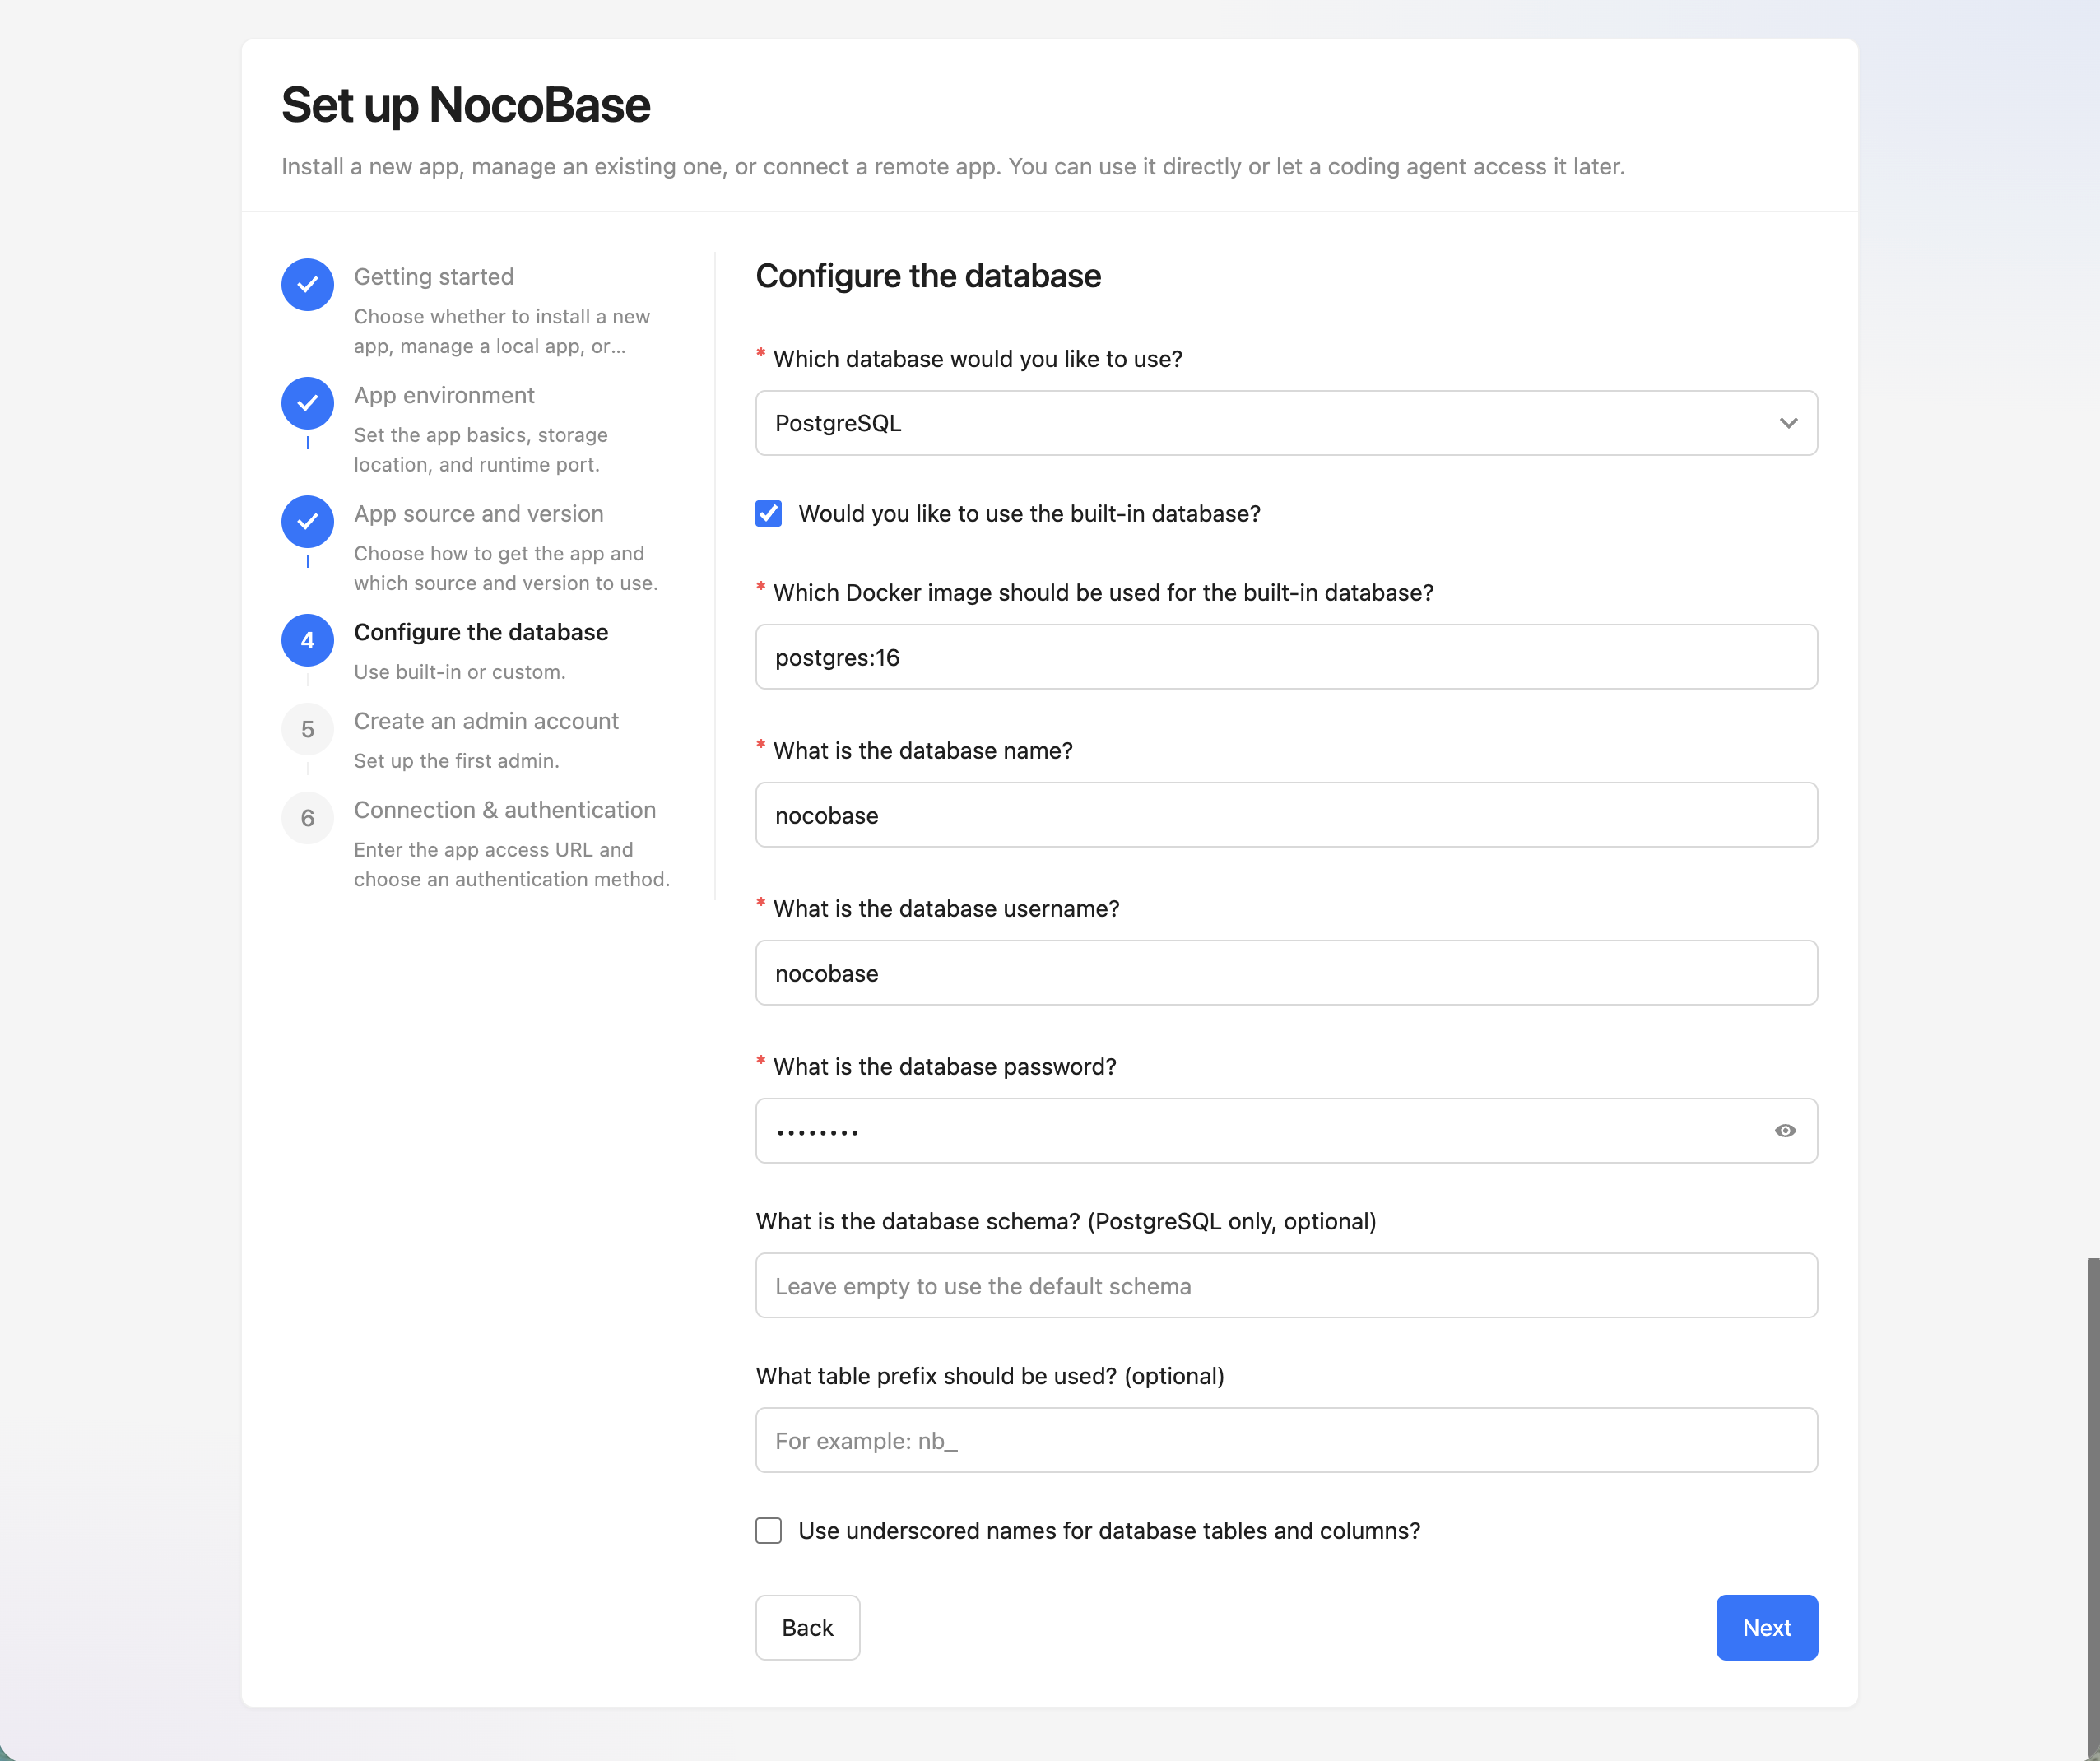
4. `Configure the database` - choose the built-in database or a custom database
|
|
46
|
+
|
|
47
|
+
|
|
48
|
+
|
|
41
49
|
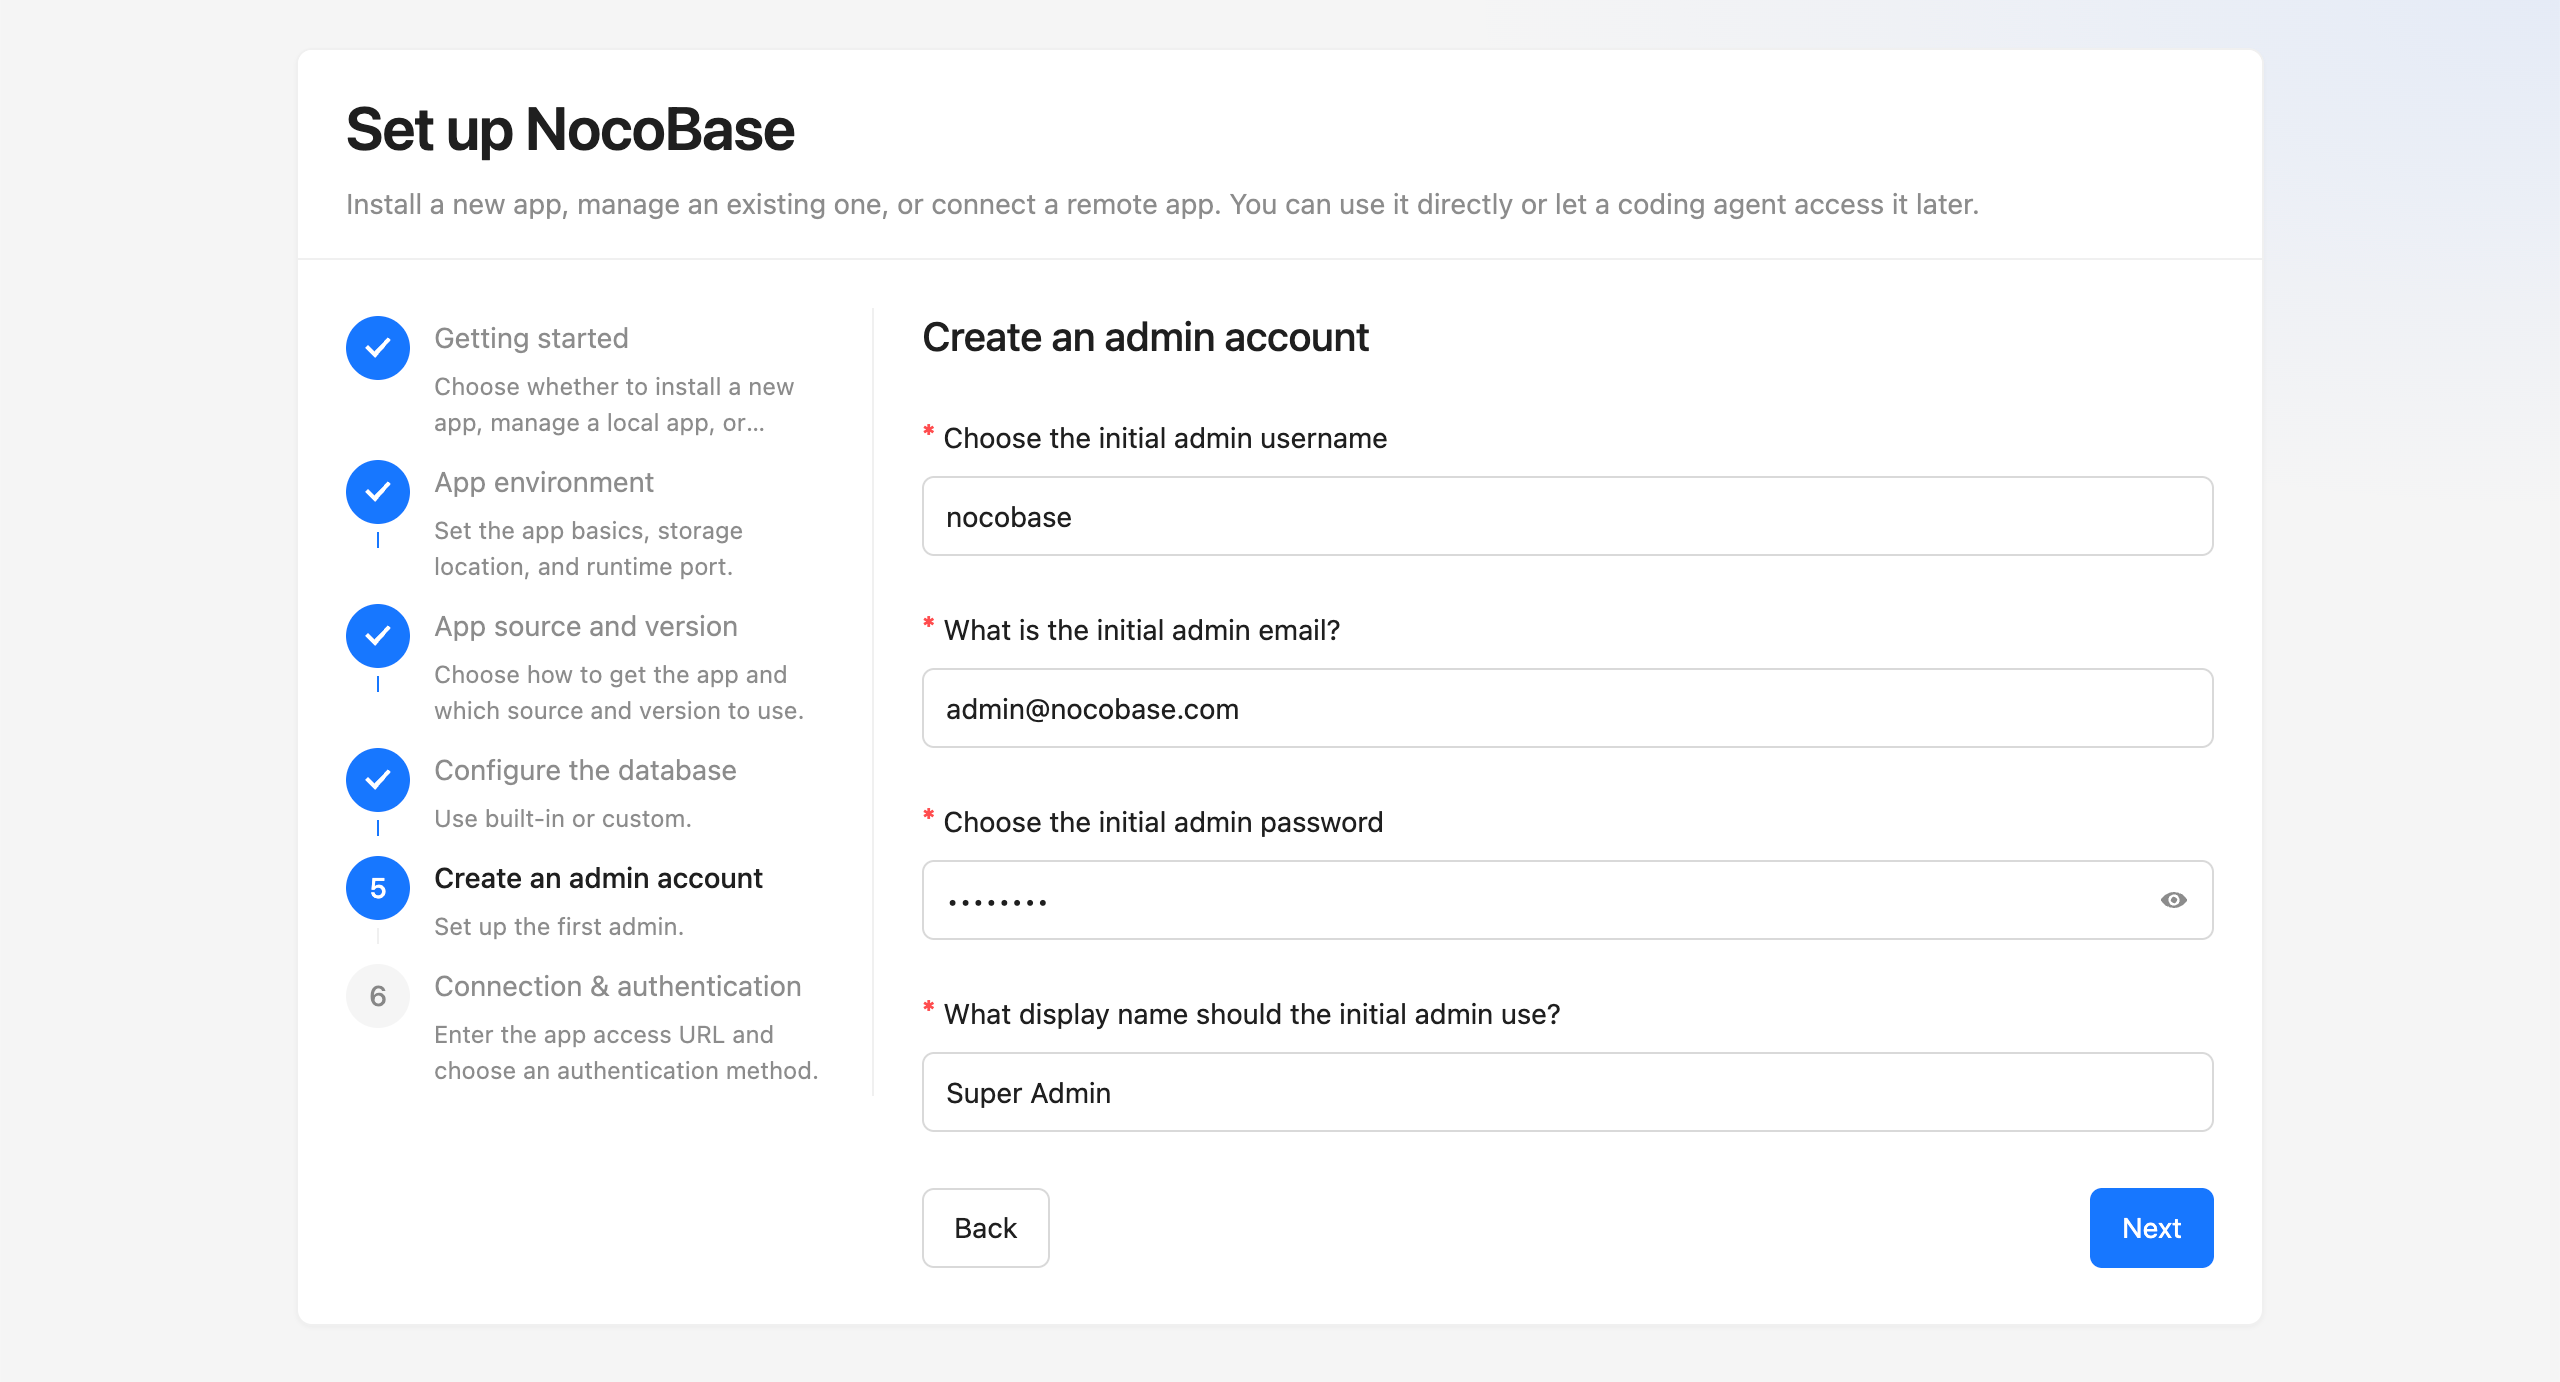
5. `Create an admin account` - set up the first admin account
|
|
50
|
+
|
|
51
|
+
|
|
52
|
+
|
|
42
53
|
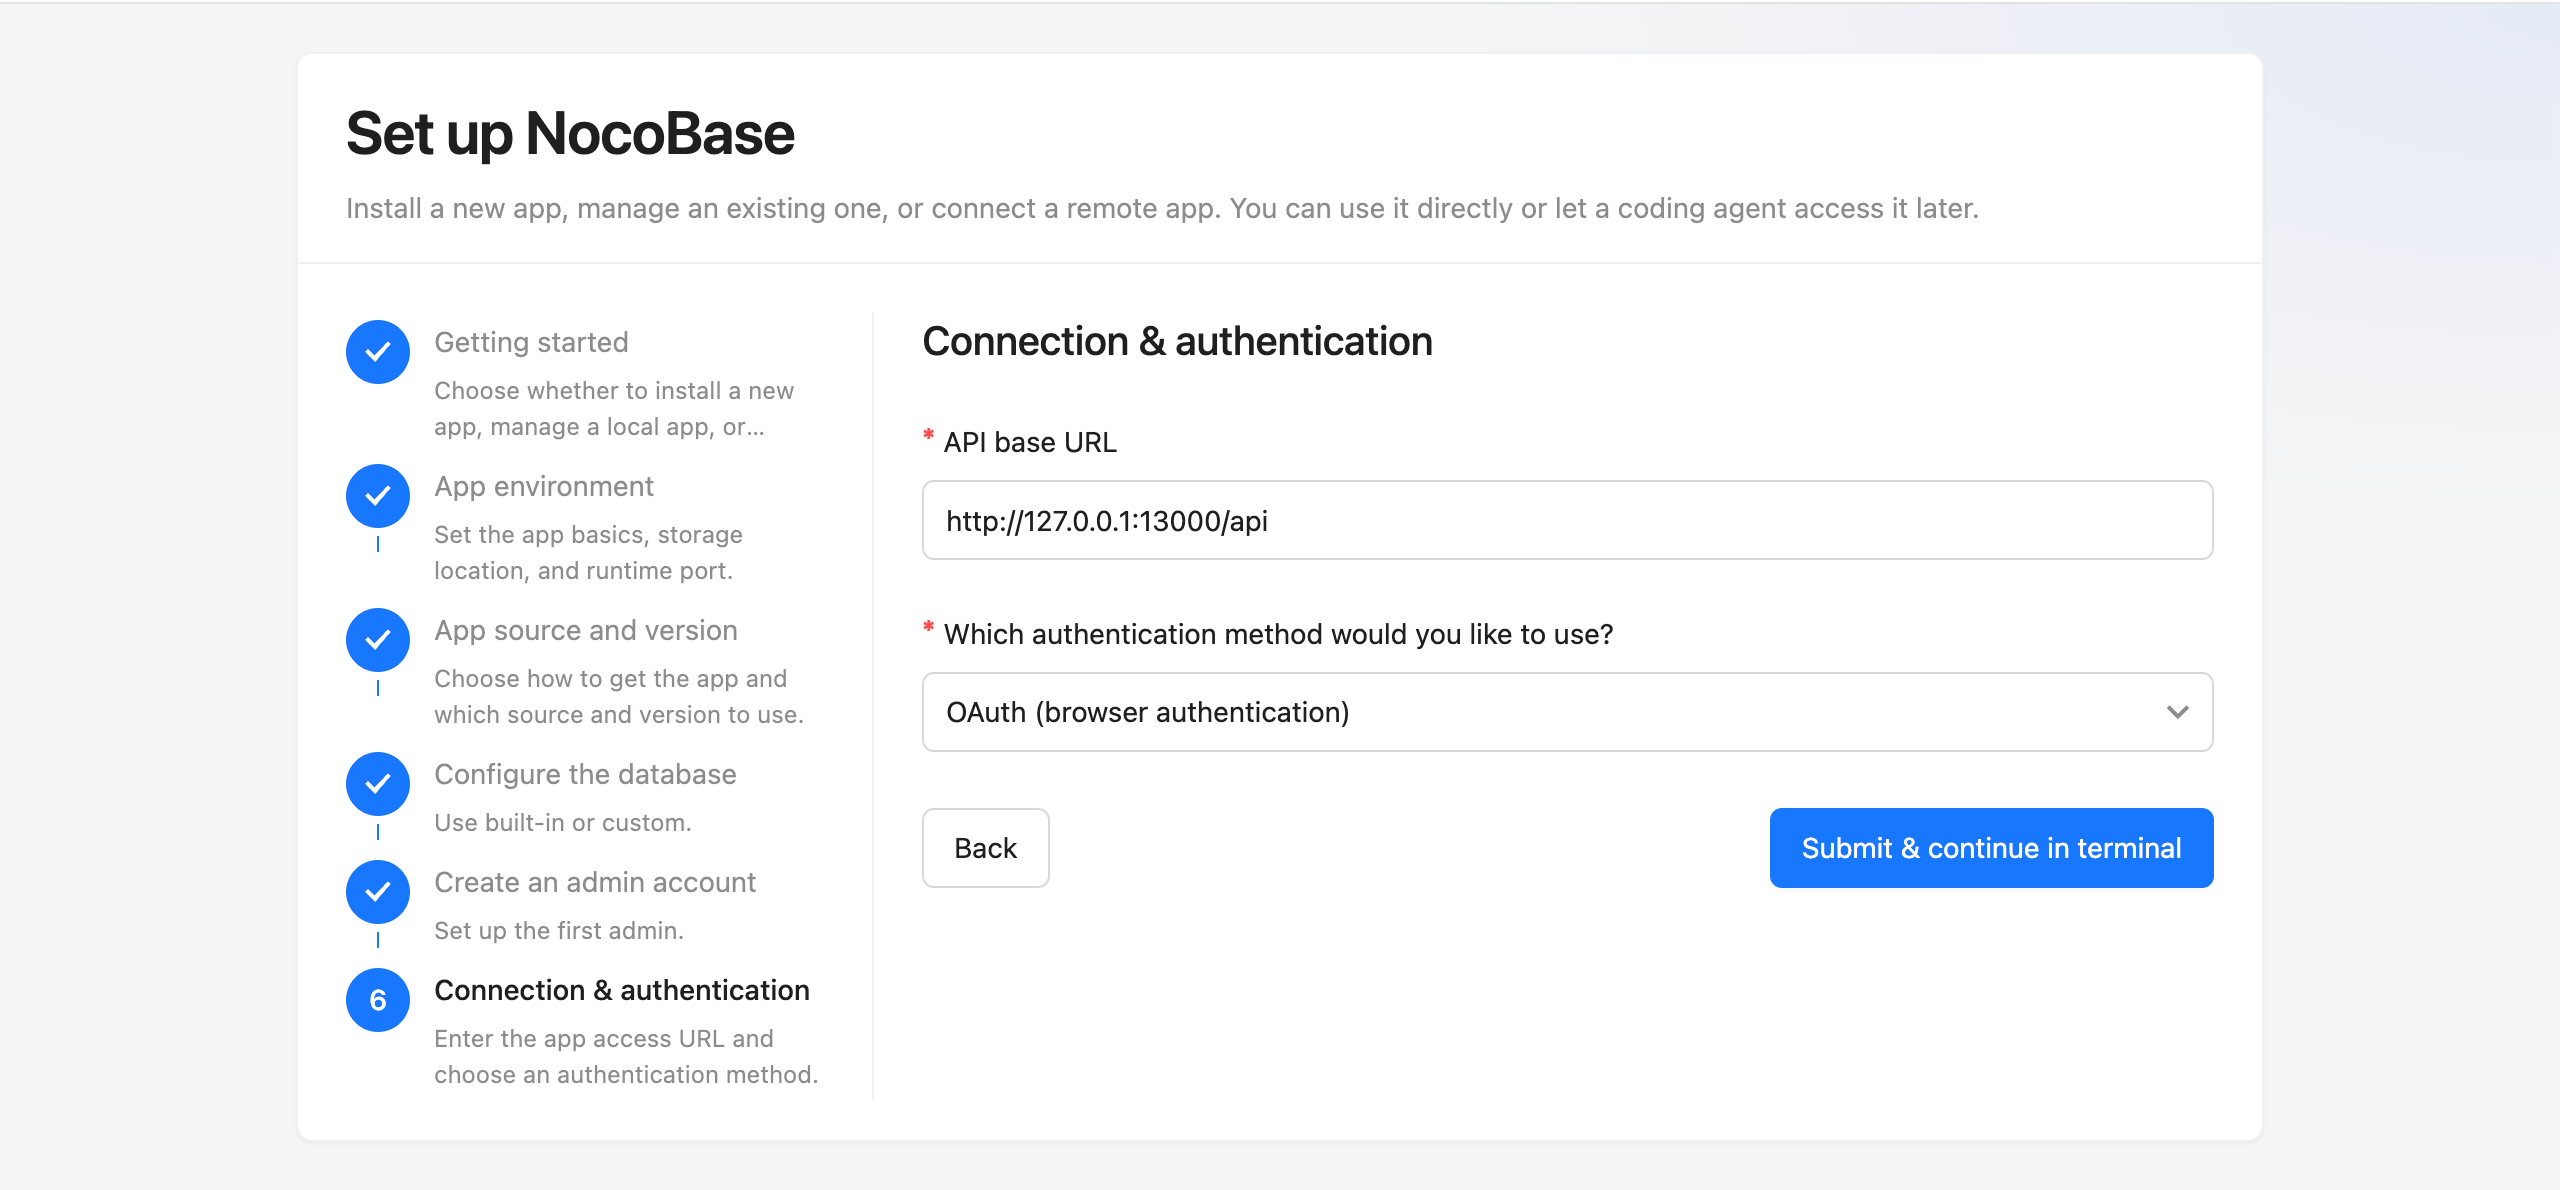
6. `Connection & authentication` - enter the app access URL and choose an authentication method
|
|
43
54
|
|
|
55
|
+
|
|
56
|
+
|
|
44
57
|
If you prefer terminal interaction, you can also run:
|
|
45
58
|
|
|
46
59
|
```bash
|
|
@@ -0,0 +1,57 @@
|
|
|
1
|
+
---
|
|
2
|
+
title: NocoBase 2.0 to 2.1 Upgrade Guide
|
|
3
|
+
description: Upgrade a NocoBase 2.0 app to 2.1, including old installation methods, nb CLI options, and the recommended migration path.
|
|
4
|
+
---
|
|
5
|
+
|
|
6
|
+
# How to Upgrade NocoBase from 2.0 to 2.1
|
|
7
|
+
|
|
8
|
+
Upgrading from NocoBase 2.0 to NocoBase 2.1 is smooth for the app itself. The bigger change is the NocoBase CLI.
|
|
9
|
+
|
|
10
|
+
Where:
|
|
11
|
+
|
|
12
|
+
- In 2.0 and earlier, CLI commands usually start with `yarn nocobase`
|
|
13
|
+
- In 2.1 and later, CLI commands use the globally installed `nb`
|
|
14
|
+
|
|
15
|
+
Old apps do not have to move to `nb` right away. If you only need to upgrade an already stable NocoBase 2.0 app to 2.1, continue using the original installation and upgrade method by default. For newly installed apps, we recommend using the new `nb` CLI.
|
|
16
|
+
|
|
17
|
+
## Continue Using the Original Installation and Upgrade Method
|
|
18
|
+
|
|
19
|
+
If you are already used to the previous installation method, you can keep using it. Follow the original installation and upgrade docs as before.
|
|
20
|
+
|
|
21
|
+
### Install NocoBase
|
|
22
|
+
|
|
23
|
+
- [Docker installation](/get-started/installation/docker)
|
|
24
|
+
- [create-nocobase-app installation](/get-started/installation/create-nocobase-app)
|
|
25
|
+
- [Git source installation](/get-started/installation/git)
|
|
26
|
+
|
|
27
|
+
### Upgrade NocoBase
|
|
28
|
+
|
|
29
|
+
- [Upgrade a Docker installation](/get-started/upgrading/docker)
|
|
30
|
+
- [Upgrade a create-nocobase-app installation](/get-started/upgrading/create-nocobase-app)
|
|
31
|
+
- [Upgrade a Git source installation](/get-started/upgrading/git)
|
|
32
|
+
|
|
33
|
+
## Use `nb` CLI for New Apps
|
|
34
|
+
|
|
35
|
+
For new apps, we recommend the more convenient `nb` installation and upgrade flow.
|
|
36
|
+
|
|
37
|
+
### Install NocoBase
|
|
38
|
+
|
|
39
|
+
- [Install NocoBase App](./install-nocobase-app.md)
|
|
40
|
+
|
|
41
|
+
### Upgrade NocoBase
|
|
42
|
+
|
|
43
|
+
- [Upgrade NocoBase App](./upgrade-nocobase-app.md)
|
|
44
|
+
|
|
45
|
+
## How to Migrate to `nb` CLI
|
|
46
|
+
|
|
47
|
+
If you want to manage apps with `nb` consistently in the future, the more reliable approach for now is to create a new app and migrate the old app data into it.
|
|
48
|
+
|
|
49
|
+
Migration steps:
|
|
50
|
+
|
|
51
|
+
1. Create a new CLI app with `nb init`
|
|
52
|
+
2. Migrate the old app's database, `storage`, and required environment variables
|
|
53
|
+
3. After verifying that the new app works properly, switch the production environment over to it
|
|
54
|
+
|
|
55
|
+
You can also wait for a while. The ability for `nb` to take over existing local apps is still under development.
|
|
56
|
+
|
|
57
|
+
|
|
@@ -5,6 +5,12 @@ description: Upgrade a NocoBase app saved as a CLI env with nb app upgrade, incl
|
|
|
5
5
|
|
|
6
6
|
# Upgrade NocoBase App
|
|
7
7
|
|
|
8
|
+
:::tip Scope
|
|
9
|
+
|
|
10
|
+
This guide applies to apps installed with `nb init`. If your app was installed with the old method, read [How to upgrade NocoBase from 2.0 to 2.1](./upgrade-from-2-0-to-2-1.md) first.
|
|
11
|
+
|
|
12
|
+
:::
|
|
13
|
+
|
|
8
14
|
## Step 1: Confirm the Current Env
|
|
9
15
|
|
|
10
16
|
```bash
|
|
@@ -121,7 +121,7 @@ The “Default” below means the value or behavior that `nb init` usually uses
|
|
|
121
121
|
| `--ui` | boolean | `false` | Open the local browser wizard; cannot be used with `--yes` or `--resume` |
|
|
122
122
|
| `--verbose` | boolean | `false` | Show detailed command output |
|
|
123
123
|
| `--skip-skills` | boolean | `false` | Skip syncing NocoBase AI coding skills |
|
|
124
|
-
| `--ui-host` | string | `127.0.0.1` |
|
|
124
|
+
| `--ui-host` | string | `127.0.0.1` | Browser-accessible host shown in the `--ui` wizard URL; the local service always listens on `0.0.0.0` |
|
|
125
125
|
| `--ui-port` | integer | `0` | Port for the `--ui` local service; `0` means automatic assignment |
|
|
126
126
|
| `--locale` | string | Follows `NB_LOCALE`, CLI config, or system locale; final fallback is `en-US` | Language for CLI prompts and the local setup UI: `en-US` or `zh-CN` |
|
|
127
127
|
| `--resume` | boolean | `false` | Continue the last unfinished initialization and reuse the saved workspace env config |
|
|
@@ -116,7 +116,7 @@ When users access NocoBase, requests go directly to your server. An appropriate
|
|
|
116
116
|
- Disadvantages: This method is simple but performs poorly when handling high concurrency or static files; suitable for development and testing only.
|
|
117
117
|
- Recommendation: Please avoid this method if possible.
|
|
118
118
|
|
|
119
|
-
> Reference "[Installation Documentation](https://
|
|
119
|
+
> Reference "[Installation Documentation](https://docs.nocobase.com/get-started/quickstart)"
|
|
120
120
|
|
|
121
121
|
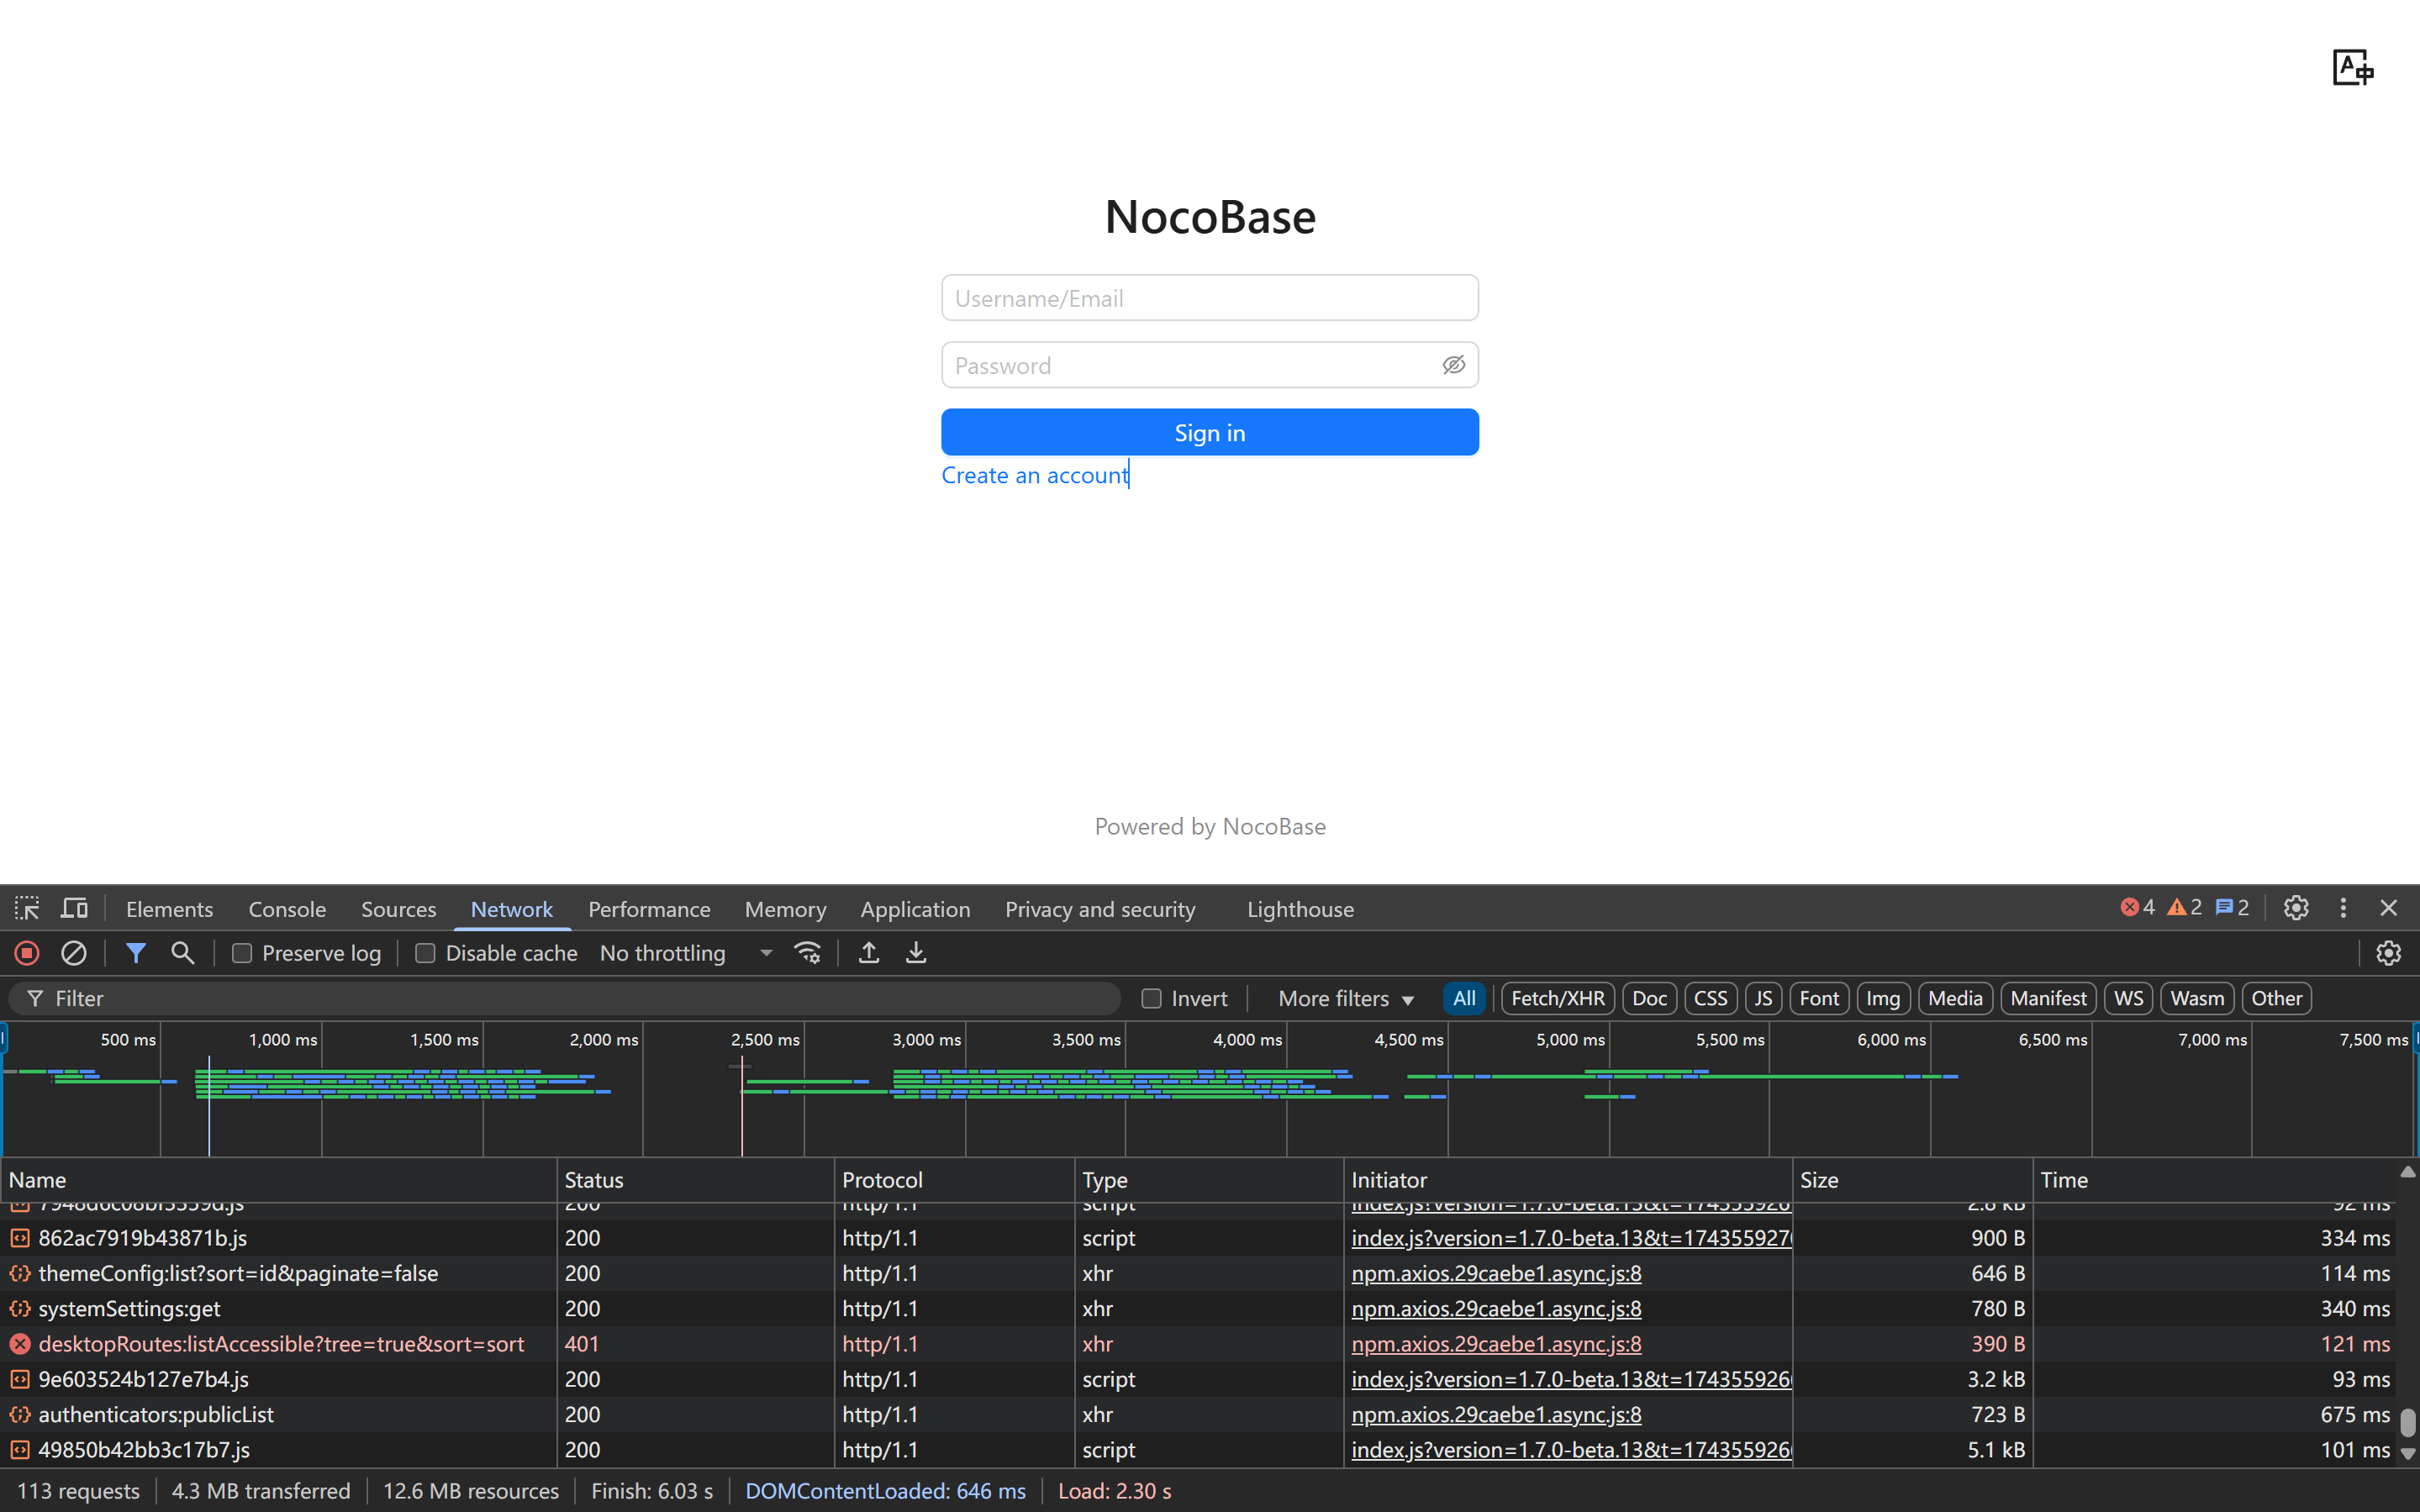
Without a reverse proxy, homepage loading takes about 6.1 seconds
|
|
122
122
|
|
|
@@ -126,7 +126,7 @@ Without a reverse proxy, homepage loading takes about 6.1 seconds
|
|
|
126
126
|
- Advantages: Reverse proxy servers can efficiently handle concurrent connections, serve static files, implement load balancing, and make HTTP/2 configuration simple.
|
|
127
127
|
- Recommendation: In production environments, after application deployment (source code deployment / create-nocobase-app / Docker image), use Nginx or Caddy as a reverse proxy.
|
|
128
128
|
|
|
129
|
-
> Reference "[Deployment Documentation](https://
|
|
129
|
+
> Reference "[Deployment Documentation](https://docs.nocobase.com/get-started/deployment/production)"
|
|
130
130
|
|
|
131
131
|
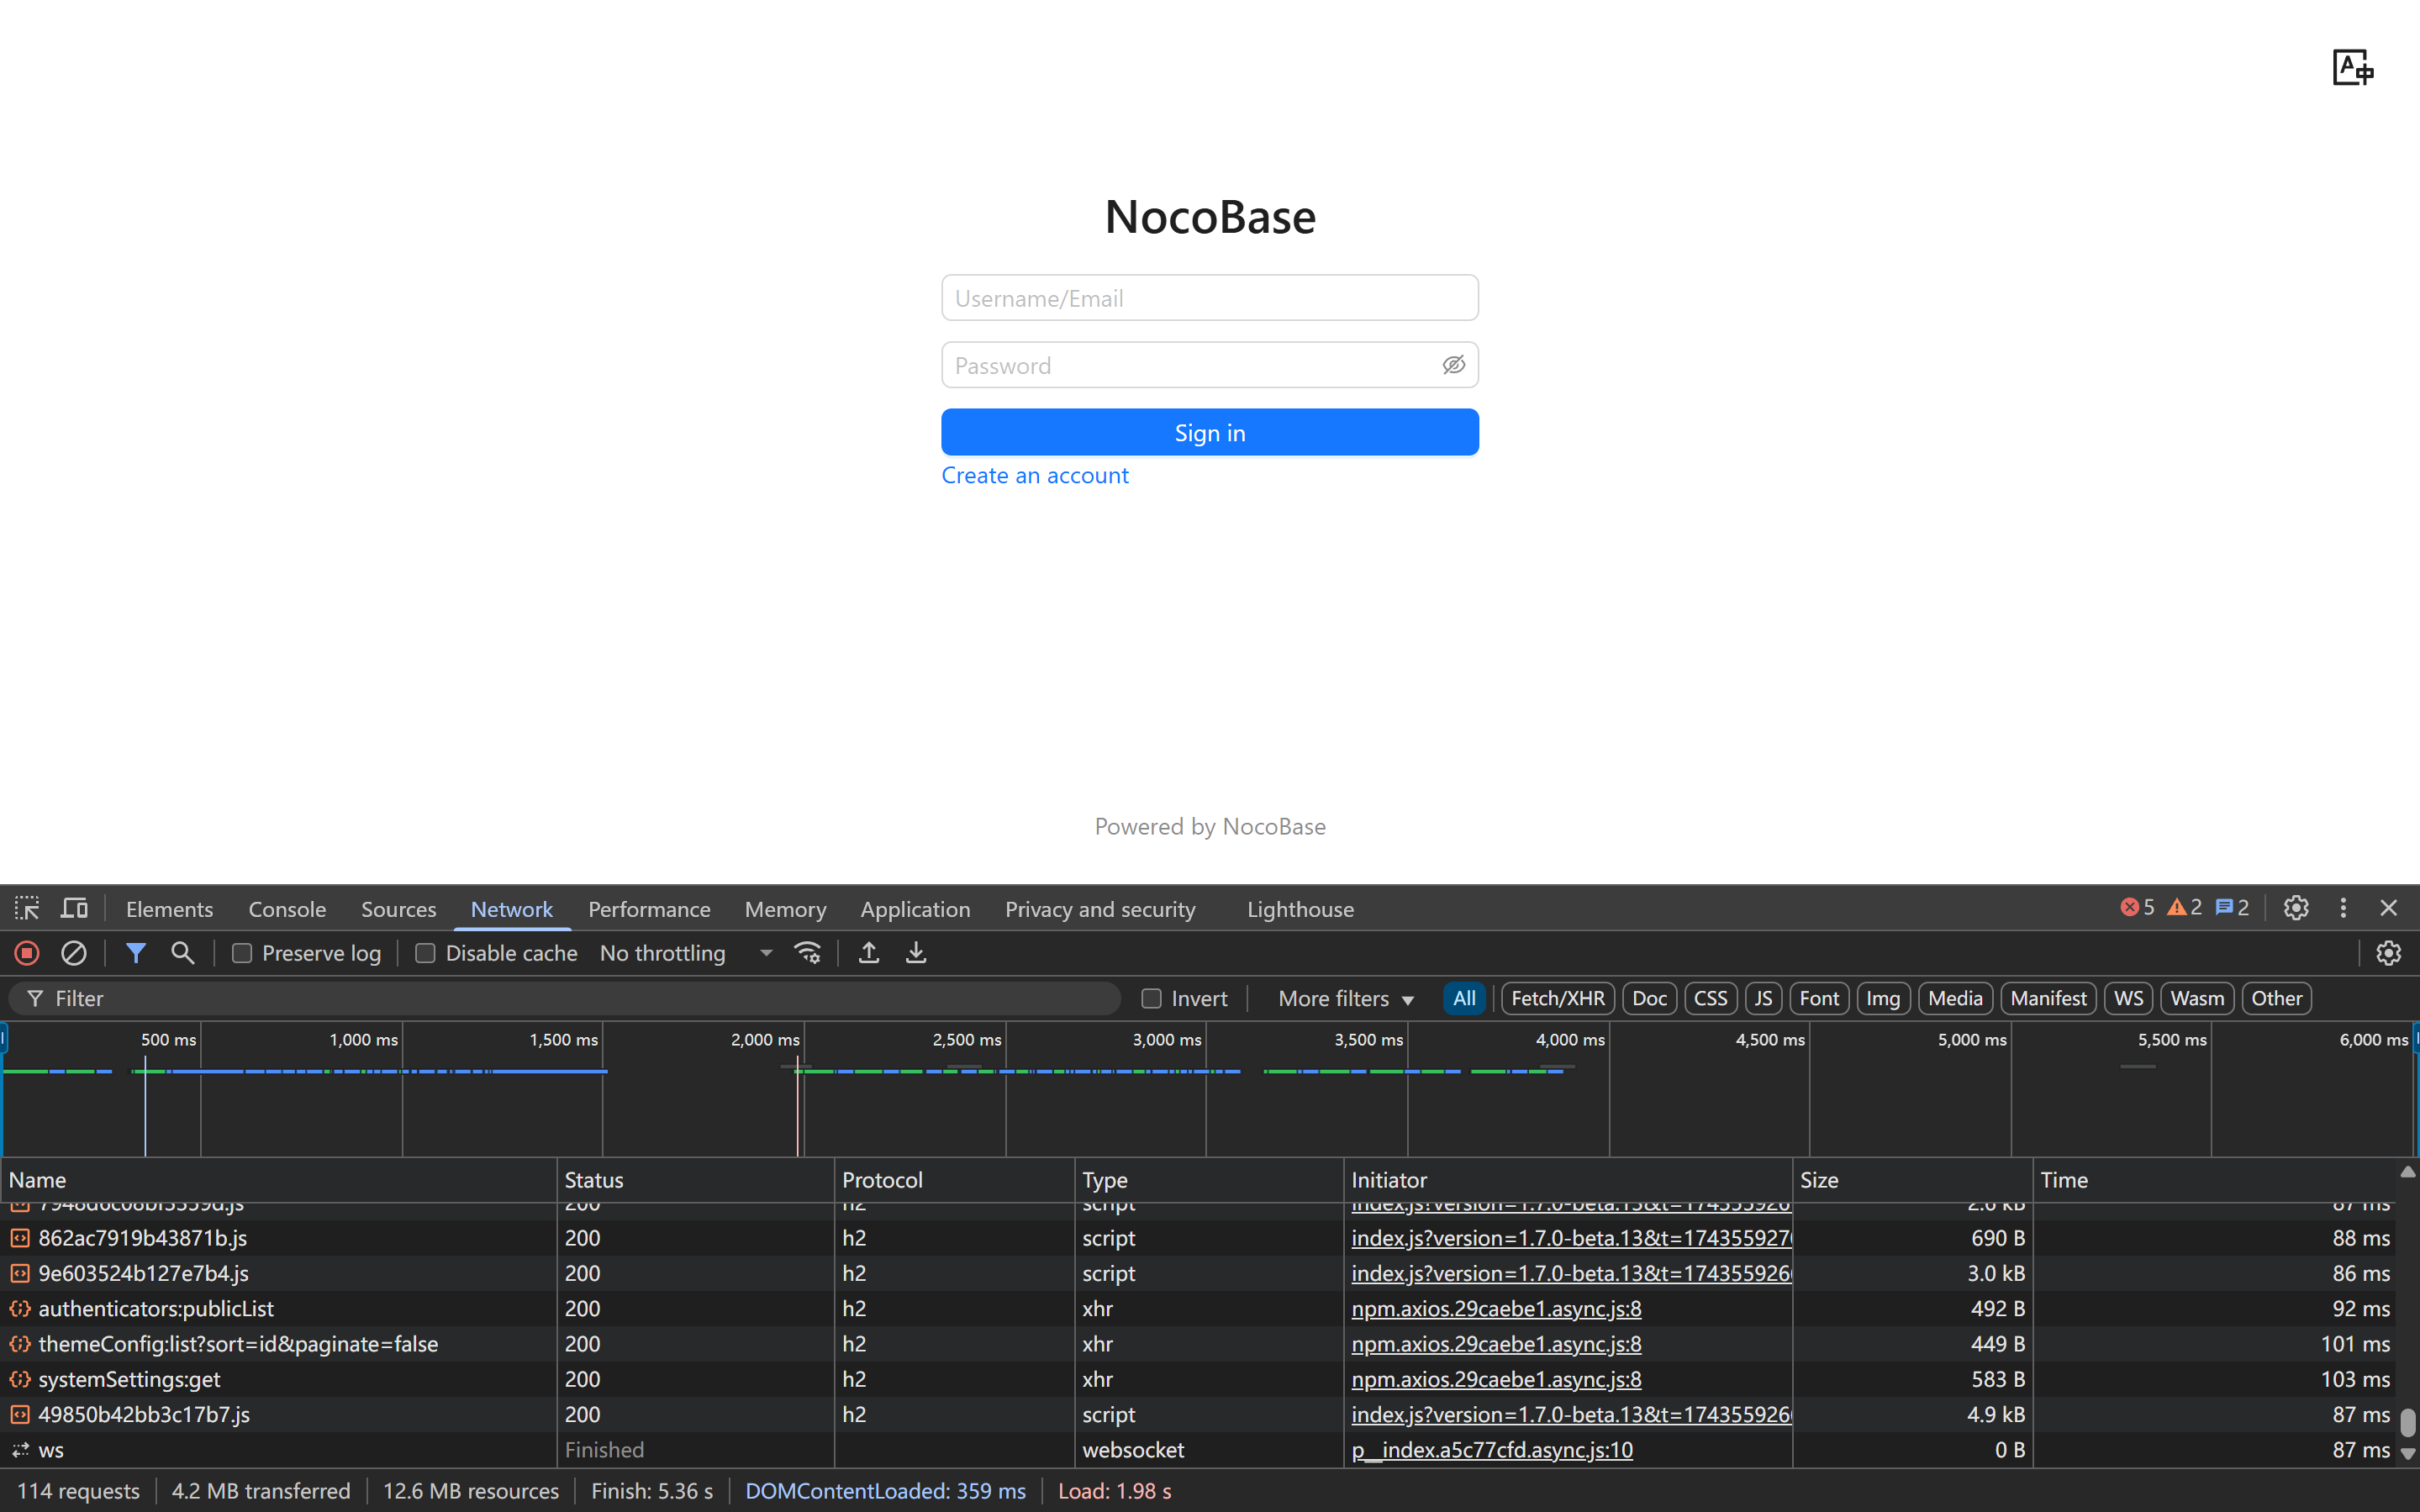
With Nginx proxy, homepage loading takes about 3-4 seconds
|
|
132
132
|
|
|
@@ -0,0 +1,105 @@
|
|
|
1
|
+
---
|
|
2
|
+
pkg: '@nocobase/plugin-map'
|
|
3
|
+
title: 'Map Block'
|
|
4
|
+
description: 'The Map block displays collection records on AMap or Google Maps, and supports point, line, polygon, and circle fields.'
|
|
5
|
+
keywords: 'Map Block,AMap,Google Maps,Point,Line,Polygon,Circle,NocoBase'
|
|
6
|
+
---
|
|
7
|
+
|
|
8
|
+
# Map block
|
|
9
|
+
|
|
10
|
+
## Introduction
|
|
11
|
+
|
|
12
|
+
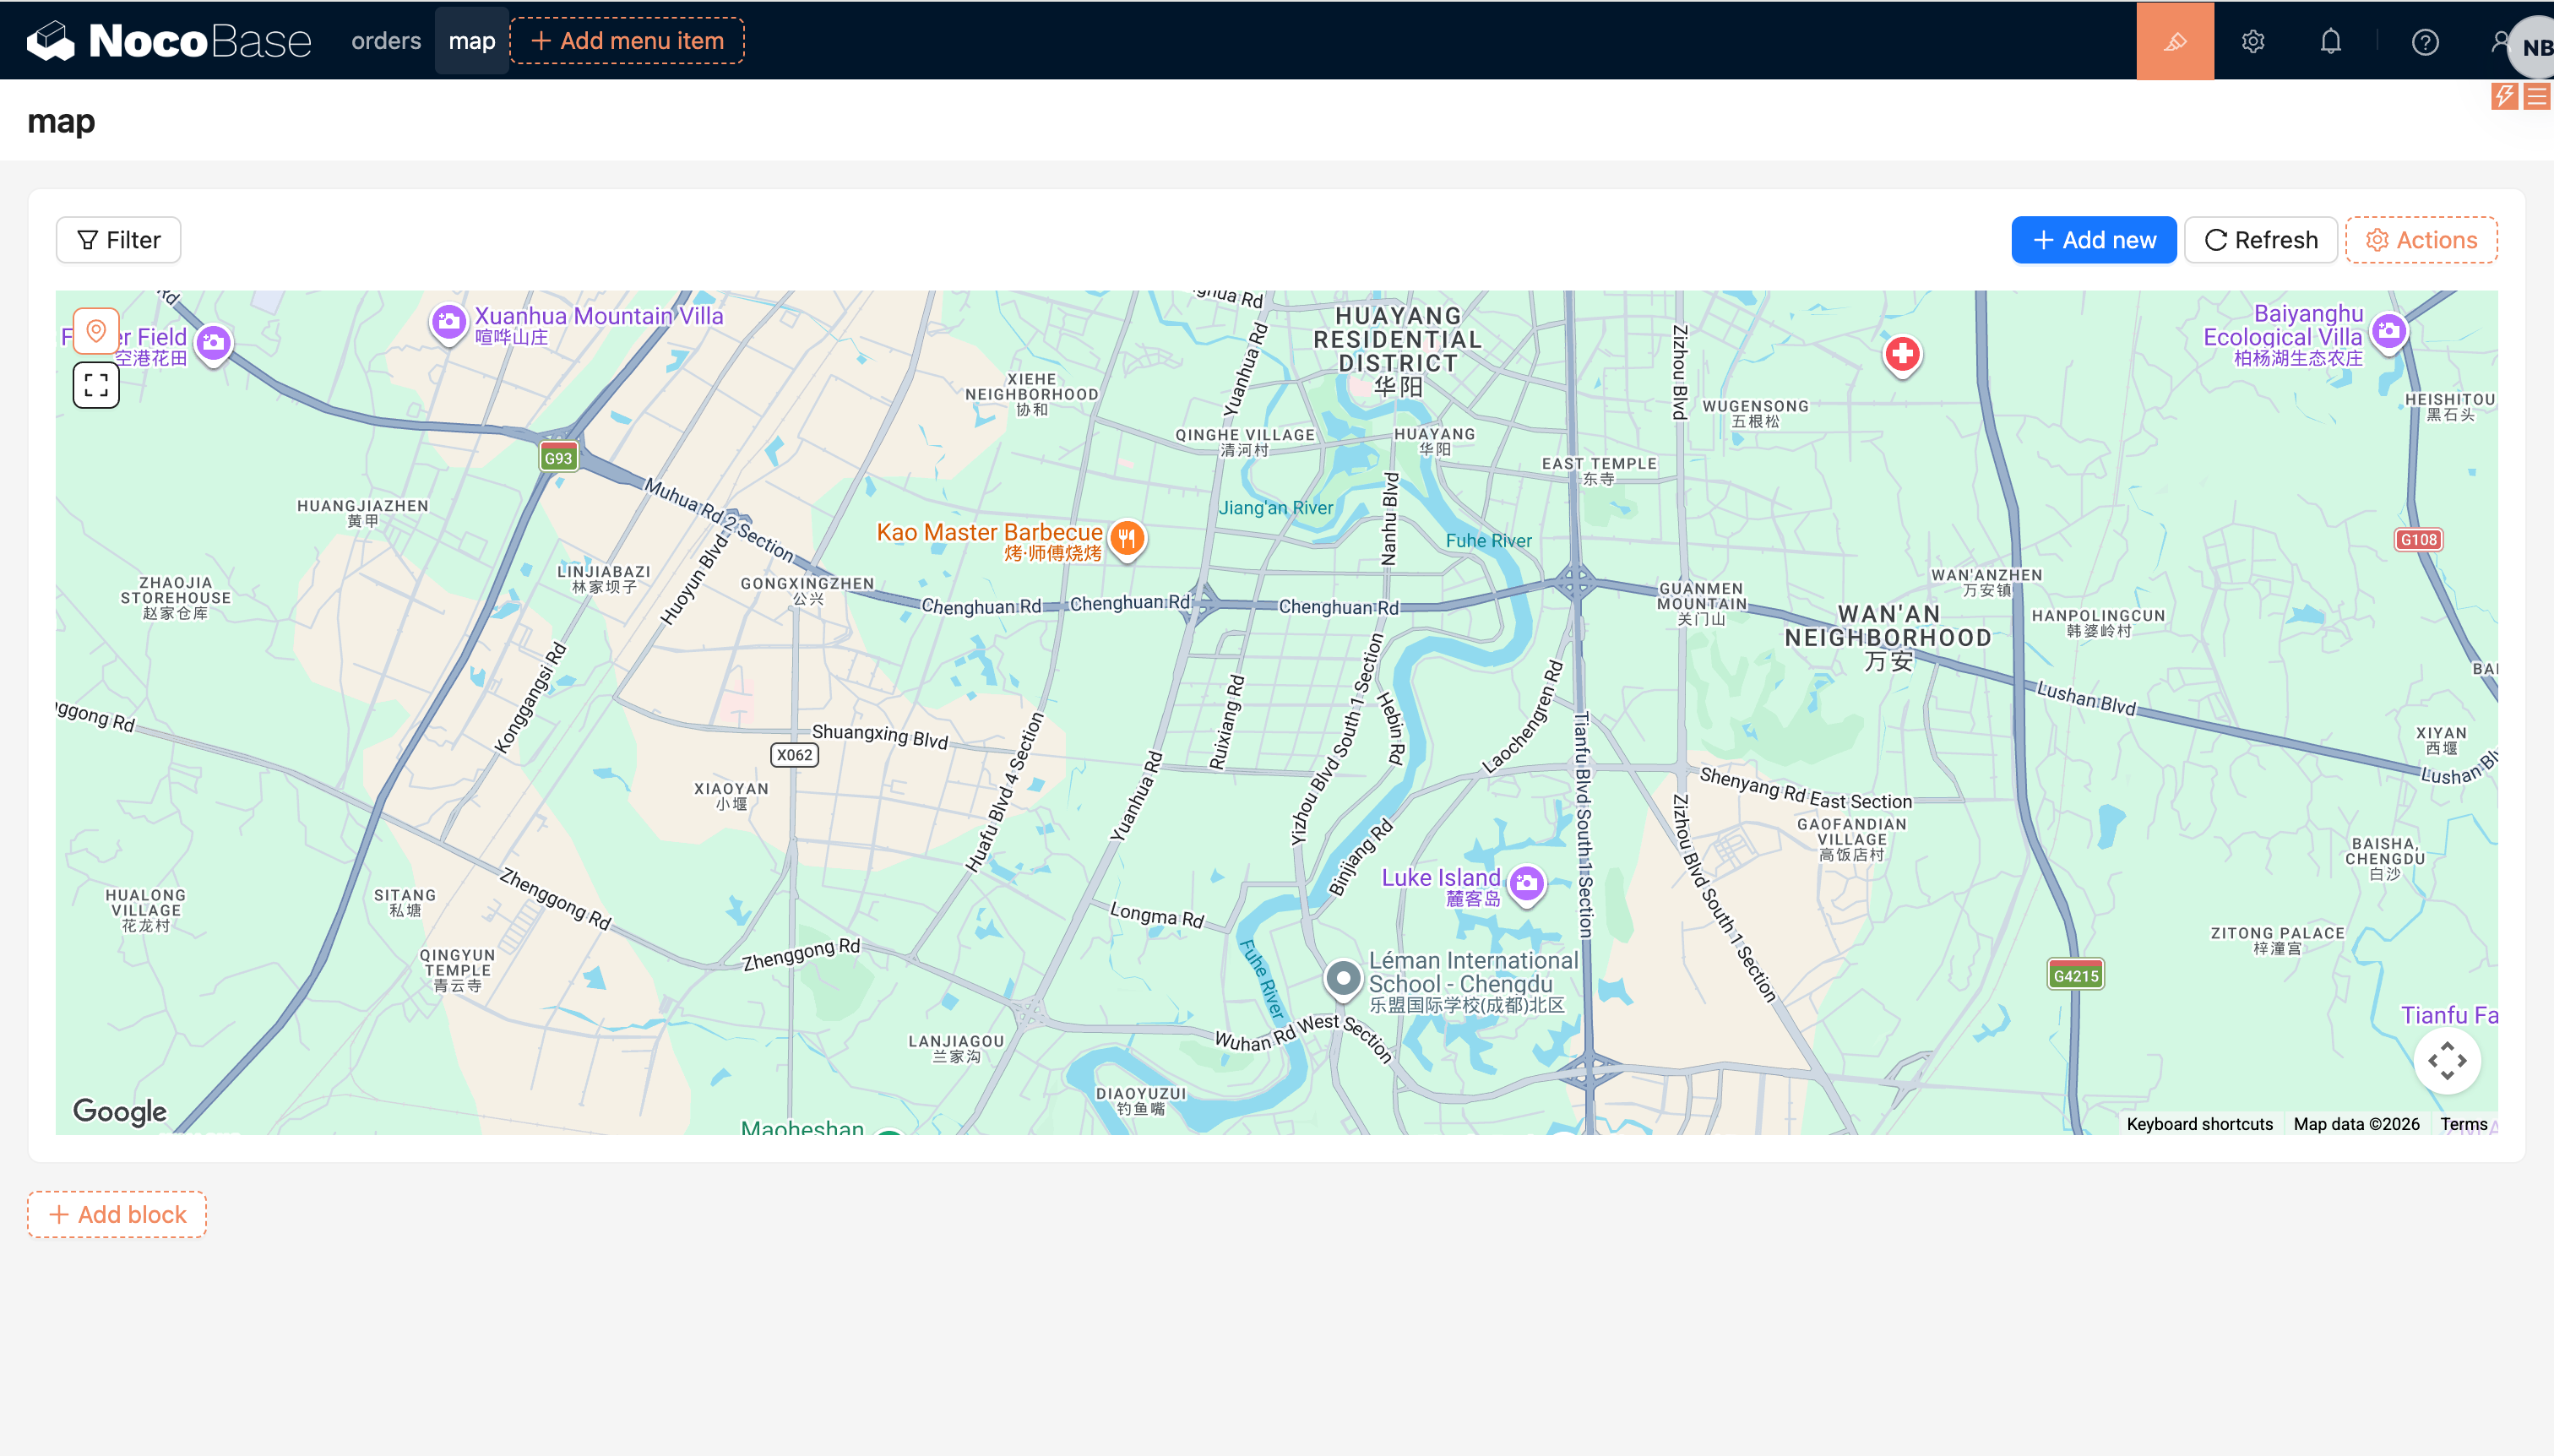
The Map block displays geographic data from a collection on a map. It is suitable for scenarios such as store locations, customer addresses, device distribution, route tracking, and area management.
|
|
13
|
+
|
|
14
|
+
The Map block supports AMap and Google Maps. It can render point, line, polygon, and circle fields, and can open record views or run block actions from map overlays.
|
|
15
|
+
|
|
16
|
+
|
|
17
|
+
|
|
18
|
+
## Installation
|
|
19
|
+
|
|
20
|
+
The Map block is provided by the built-in `@nocobase/plugin-map` plugin. Enable the plugin before adding the block.
|
|
21
|
+
|
|
22
|
+
After enabling the plugin, go to "Plugin settings / Map manager" and configure the map provider:
|
|
23
|
+
|
|
24
|
+
- **AMap**: configure `Access key`, plus `securityJsCode` or `serviceHost`
|
|
25
|
+
- **Google Maps**: configure `Api key`
|
|
26
|
+
|
|
27
|
+
If the map cannot be loaded, check whether the key is valid, whether the domain whitelist includes the current access domain, and whether the browser can access the selected map provider.
|
|
28
|
+
|
|
29
|
+
## Prepare map fields
|
|
30
|
+
|
|
31
|
+
Before adding a Map block, create at least one map field in the target collection. You can find these field types in the "Map-based geometry" group:
|
|
32
|
+
|
|
33
|
+
| Field type | Usage |
|
|
34
|
+
| ---------- | --------------------------------------------------------------------- |
|
|
35
|
+
| Point | Marks a single location, such as a store, device, or customer address |
|
|
36
|
+
| Line | Represents a route or track |
|
|
37
|
+
| Polygon | Represents an area |
|
|
38
|
+
| Circle | Represents a radius around a center point |
|
|
39
|
+
|
|
40
|
+
When creating the field, choose the "Map type". This determines whether the field editor and the block use AMap or Google Maps.
|
|
41
|
+
|
|
42
|
+
## Add block
|
|
43
|
+
|
|
44
|
+
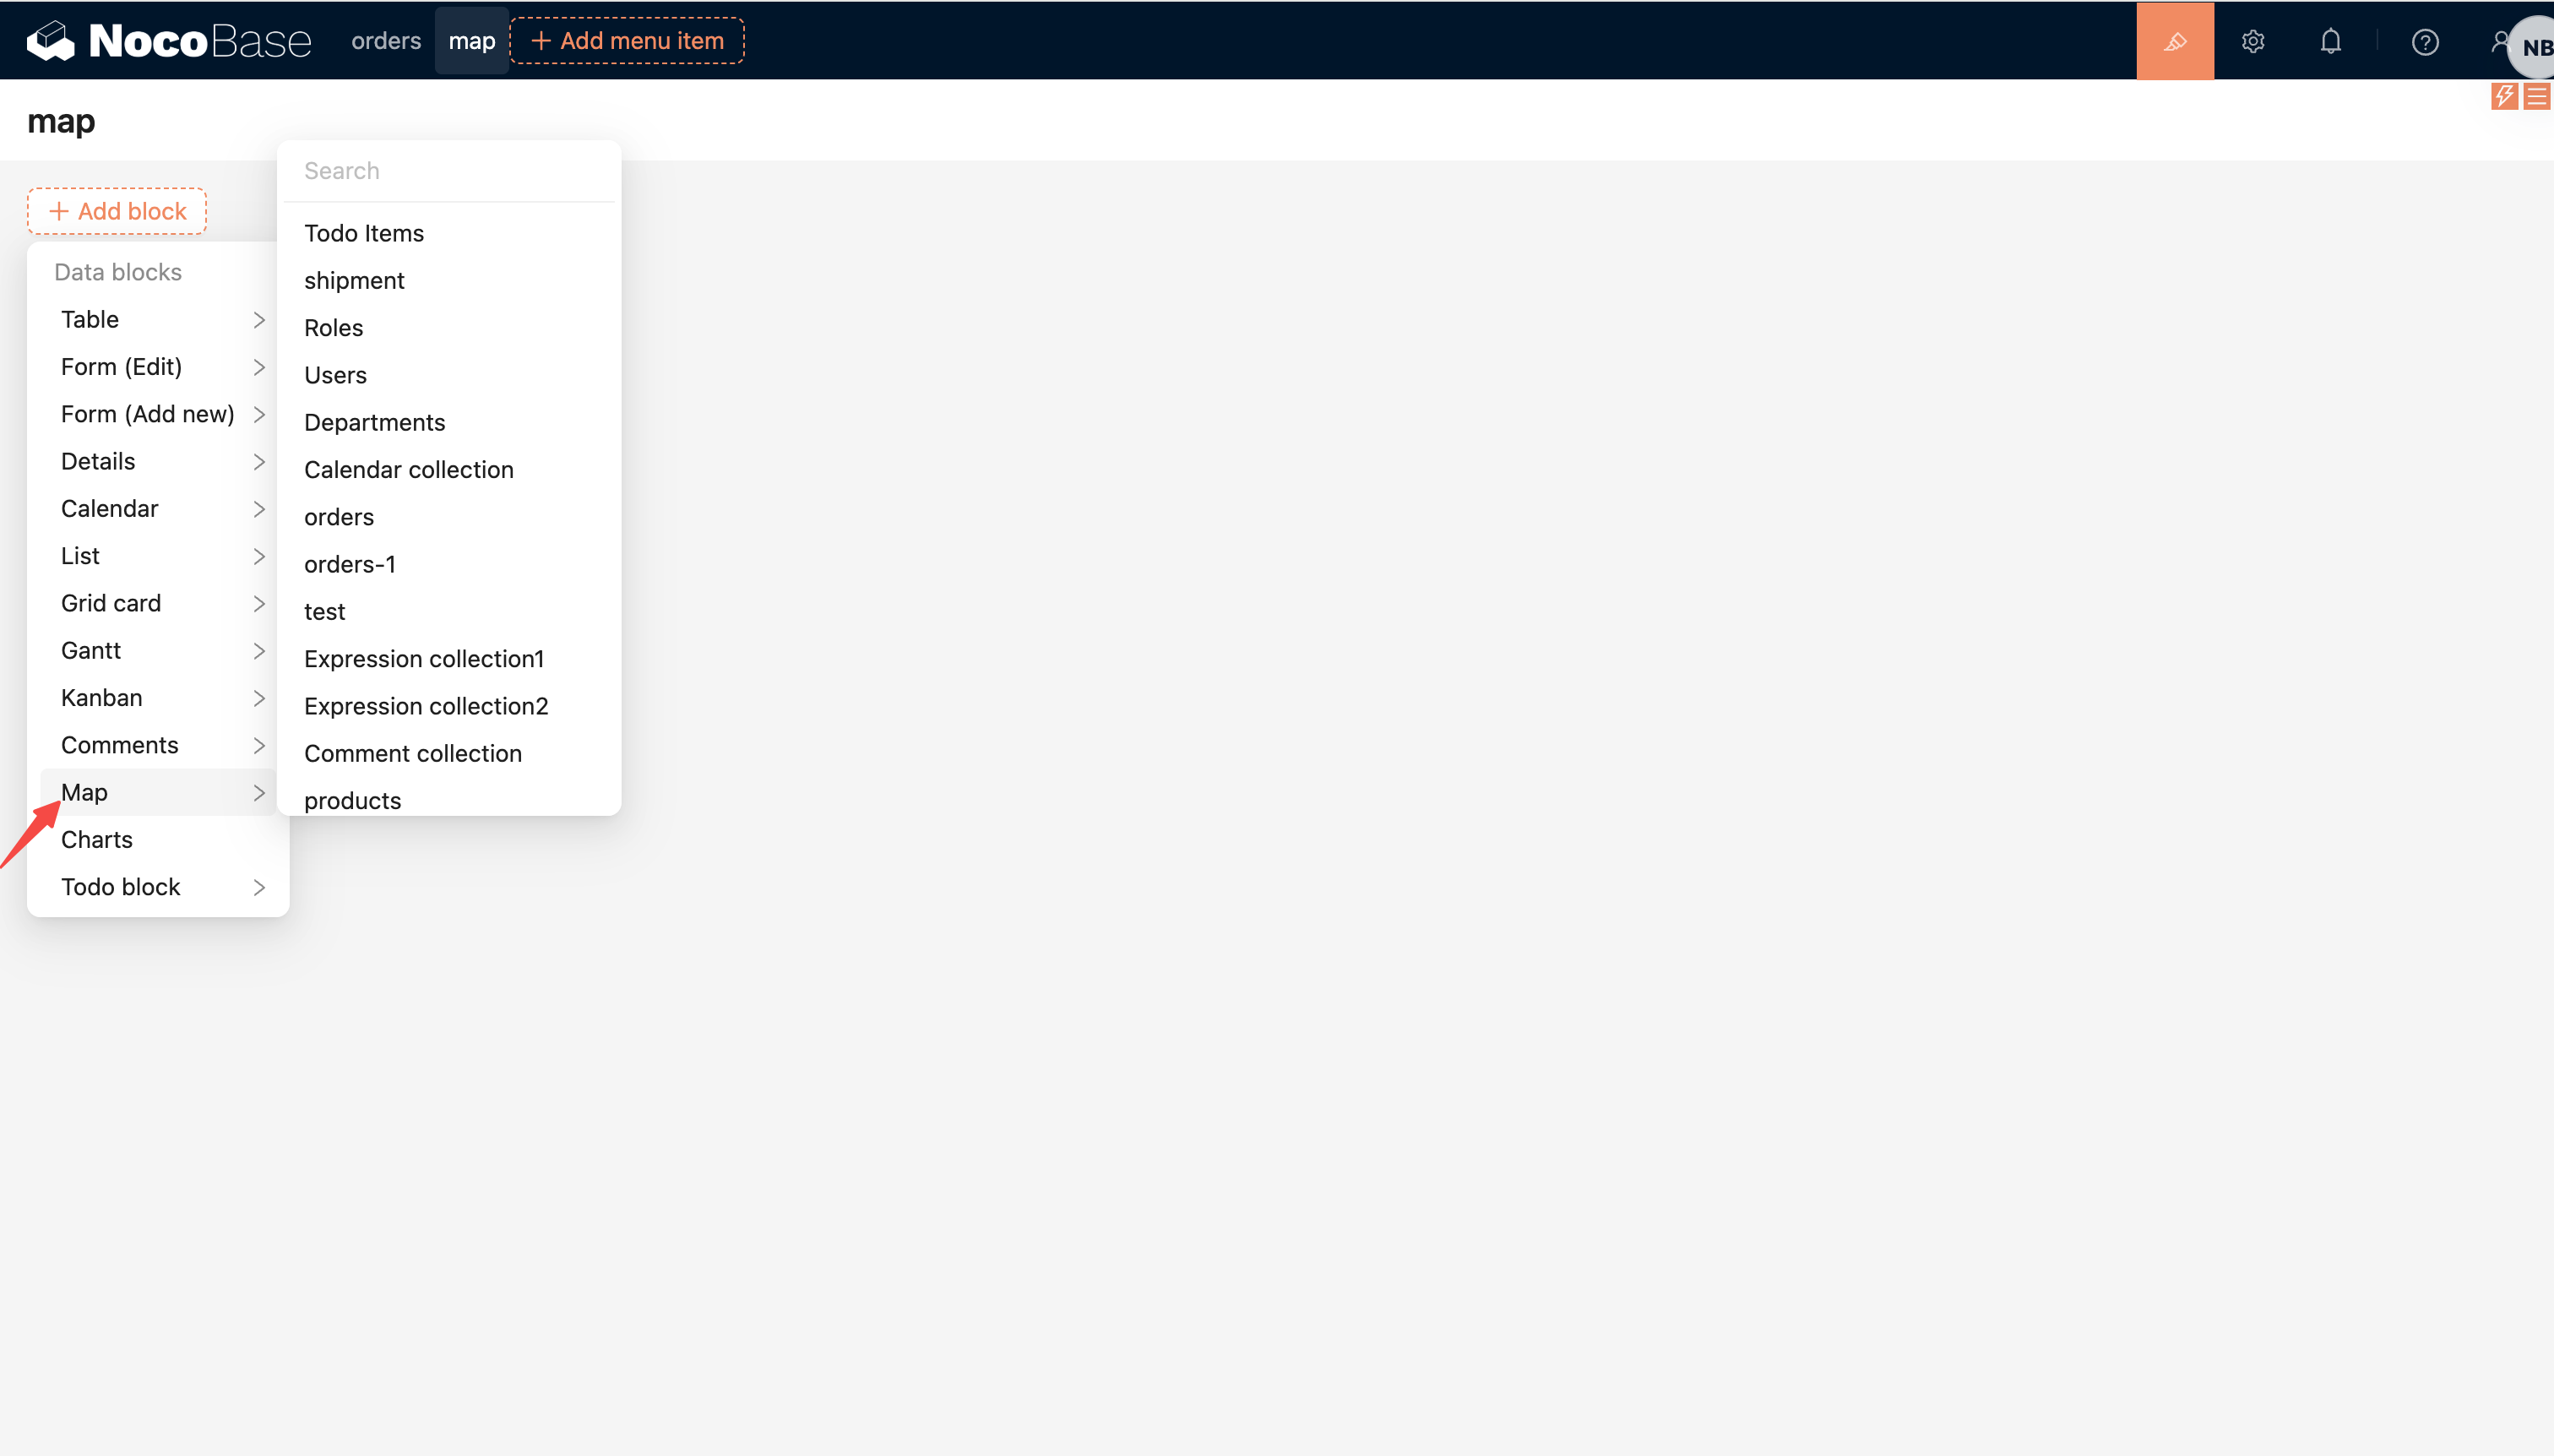
In page configuration mode, click "Add block" and choose "Map" from "Data Blocks".
|
|
45
|
+
|
|
46
|
+
|
|
47
|
+
|
|
48
|
+
When creating the block, configure:
|
|
49
|
+
|
|
50
|
+
1. Select the collection to display.
|
|
51
|
+
2. Select the "Map field" used to draw map overlays. It can be a field in the current collection or a map field reached through an association field.
|
|
52
|
+
3. Optionally select the "Marker field". When the map field is a point field, this field is used as the point label.
|
|
53
|
+
|
|
54
|
+
If the collection has no available map field, the "Map field" selector will be empty. Add a point, line, polygon, or circle field to the collection first.
|
|
55
|
+
|
|
56
|
+
## Block settings
|
|
57
|
+
|
|
58
|
+
### Map field and marker field
|
|
59
|
+
|
|
60
|
+
Used to change the map field displayed by the block and the marker label field.
|
|
61
|
+
|
|
62
|
+
The marker field only applies to point fields. It is usually a text field such as name, address, or code.
|
|
63
|
+
|
|
64
|
+
### Data scope
|
|
65
|
+
|
|
66
|
+
Used to restrict the records displayed in the Map block.
|
|
67
|
+
|
|
68
|
+
For large datasets, configure a data scope or add filter actions to narrow the displayed records. The Map block loads all records that match the data scope without pagination.
|
|
69
|
+
|
|
70
|
+
For more details, see: [Set Data Scope](/interface-builder/blocks/block-settings/data-scope)
|
|
71
|
+
|
|
72
|
+
### Concatenation order field
|
|
73
|
+
|
|
74
|
+
Used to sort point records and connect them into a route.
|
|
75
|
+
|
|
76
|
+
This setting only takes effect when the map field is a point field.
|
|
77
|
+
|
|
78
|
+
### Default zoom level
|
|
79
|
+
|
|
80
|
+
Used to set the initial zoom level of the map.
|
|
81
|
+
|
|
82
|
+
## Actions
|
|
83
|
+
|
|
84
|
+
The Map block supports adding actions at the top of the block, such as:
|
|
85
|
+
|
|
86
|
+
- Filter
|
|
87
|
+
- Add new
|
|
88
|
+
- Popup
|
|
89
|
+
- Link
|
|
90
|
+
- Refresh
|
|
91
|
+
- Custom request
|
|
92
|
+
- AI employee
|
|
93
|
+
- JS action
|
|
94
|
+
|
|
95
|
+
Clicking a map overlay triggers the record opening flow, which is usually used to open a popup, drawer, or another record view.
|
|
96
|
+
|
|
97
|
+
## Select records
|
|
98
|
+
|
|
99
|
+
The Map block provides selection tools in the upper-left corner:
|
|
100
|
+
|
|
101
|
+
- Location icon: exits selection mode and returns to normal viewing
|
|
102
|
+
- Selection icon: enters selection mode and lets you draw a polygon area on the map
|
|
103
|
+
- Confirm icon: confirms the current selection area and adds records inside it to the selected state
|
|
104
|
+
|
|
105
|
+
Selected records are synced to the block resource and can be used by later block actions.
|
|
@@ -48,7 +48,7 @@ Replace `<server-ip>` with the actual IP of the current server that is accessibl
|
|
|
48
48
|
|
|
49
49
|
Generally speaking:
|
|
50
50
|
|
|
51
|
-
- `default-ui-host` is used
|
|
51
|
+
- `default-ui-host` is used to generate the browser-accessible URL for the `nb init --ui` wizard; the wizard service itself always listens on `0.0.0.0`
|
|
52
52
|
- `default-api-host` for the API address generated by default on new installations
|
|
53
53
|
|
|
54
54
|
If deployed on a server, both values should usually be changed to IPs accessible to the current server, rather than continuing to use the default local address.
|
|
@@ -8,18 +8,20 @@ pkg: '@nocobase/plugin-backups'
|
|
|
8
8
|
|
|
9
9
|
The NocoBase backup manager plugin provides features for fully backing up of the NocoBase database and user uploaded files, including backup's scheduling, downloading, deleting, and restoring operation.
|
|
10
10
|
|
|
11
|
-
:::warning
|
|
12
|
-
The Backup Manager plugin is included in the Professional and Enterprise editions. For Community and Standard edition users, you can directly back up the database; see details at: [`How to Backup and Restore NocoBase`](https://www.nocobase.com/en/blog/nocobase-backup-restore)
|
|
13
|
-
:::
|
|
14
|
-
|
|
15
11
|
## Install Database Client
|
|
16
12
|
|
|
17
|
-
|
|
13
|
+
Backup Manager depends on the database client for the primary database. Before use, confirm that the current runtime environment has a client that matches your database version.
|
|
14
|
+
|
|
15
|
+
:::tip
|
|
16
|
+
When installing NocoBase with Docker, use the corresponding `full` image when possible, such as `latest-full`, `beta-full`, or `alpha-full`. These images already include common database clients, so manual installation is usually not required.
|
|
17
|
+
:::
|
|
18
|
+
|
|
19
|
+
If the current environment does not have the required database client, download the client that matches your database version from the official website:
|
|
18
20
|
|
|
19
21
|
- MySQL: https://dev.mysql.com/downloads/
|
|
20
22
|
- PostgreSQL: https://www.postgresql.org/download/
|
|
21
23
|
|
|
22
|
-
|
|
24
|
+
If you need to install it manually in a Docker environment, you can write a script in the `./storage/scripts` directory:
|
|
23
25
|
|
|
24
26
|
```bash
|
|
25
27
|
mkdir ./storage/scripts
|
|
@@ -188,4 +190,4 @@ Switch to the "Settings" tab, modify the backup settings, and click `Save` to ta
|
|
|
188
190
|
- `Backup local storage files`: Whether to include files uploaded by users to the server's local storage (storage/uploads) in the backup.
|
|
189
191
|
- `Restore password`: If a restore password is set, it must be entered when restoring the backup.
|
|
190
192
|
|
|
191
|
-
> **Please keep the restore password safe. Forgetting the password will make it impossible to restore the backup file.**
|
|
193
|
+
> **Please keep the restore password safe. Forgetting the password will make it impossible to restore the backup file.**
|