@nocobase/plugin-ai 2.1.0-beta.44 → 2.1.0-beta.45
This diff represents the content of publicly available package versions that have been released to one of the supported registries. The information contained in this diff is provided for informational purposes only and reflects changes between package versions as they appear in their respective public registries.
- package/dist/ai/docs/nocobase/ai/install-upgrade-migration.mdx +127 -132
- package/dist/ai/docs/nocobase/ai-dev/capabilities.md +1 -1
- package/dist/ai/docs/nocobase/ai-dev/index.md +1 -1
- package/dist/ai/docs/nocobase/ai-dev/watermark-plugin.md +1 -1
- package/dist/ai/docs/nocobase/api/cli/app/autostart/disable.md +44 -0
- package/dist/ai/docs/nocobase/api/cli/app/autostart/enable.md +44 -0
- package/dist/ai/docs/nocobase/api/cli/app/autostart/index.md +63 -0
- package/dist/ai/docs/nocobase/api/cli/app/autostart/list.md +41 -0
- package/dist/ai/docs/nocobase/api/cli/app/autostart/run.md +50 -0
- package/dist/ai/docs/nocobase/api/cli/app/index.md +18 -15
- package/dist/ai/docs/nocobase/api/cli/app/restart.md +3 -11
- package/dist/ai/docs/nocobase/api/cli/app/start.md +3 -11
- package/dist/ai/docs/nocobase/api/cli/app/stop.md +22 -12
- package/dist/ai/docs/nocobase/api/cli/app/upgrade.md +6 -6
- package/dist/ai/docs/nocobase/api/cli/backup/create.md +49 -0
- package/dist/ai/docs/nocobase/api/cli/backup/index.md +46 -0
- package/dist/ai/docs/nocobase/api/cli/backup/restore.md +46 -0
- package/dist/ai/docs/nocobase/api/cli/config/delete.md +11 -9
- package/dist/ai/docs/nocobase/api/cli/config/get.md +11 -8
- package/dist/ai/docs/nocobase/api/cli/config/index.md +28 -24
- package/dist/ai/docs/nocobase/api/cli/config/set.md +14 -12
- package/dist/ai/docs/nocobase/api/cli/db/stop.md +10 -11
- package/dist/ai/docs/nocobase/api/cli/env/index.md +25 -23
- package/dist/ai/docs/nocobase/api/cli/env/info.md +12 -10
- package/dist/ai/docs/nocobase/api/cli/env/proxy/caddy.md +108 -0
- package/dist/ai/docs/nocobase/api/cli/env/proxy/index.md +54 -0
- package/dist/ai/docs/nocobase/api/cli/env/proxy/nginx.md +104 -0
- package/dist/ai/docs/nocobase/api/cli/env/remove.md +18 -14
- package/dist/ai/docs/nocobase/api/cli/env/update.md +115 -14
- package/dist/ai/docs/nocobase/api/cli/index.md +66 -52
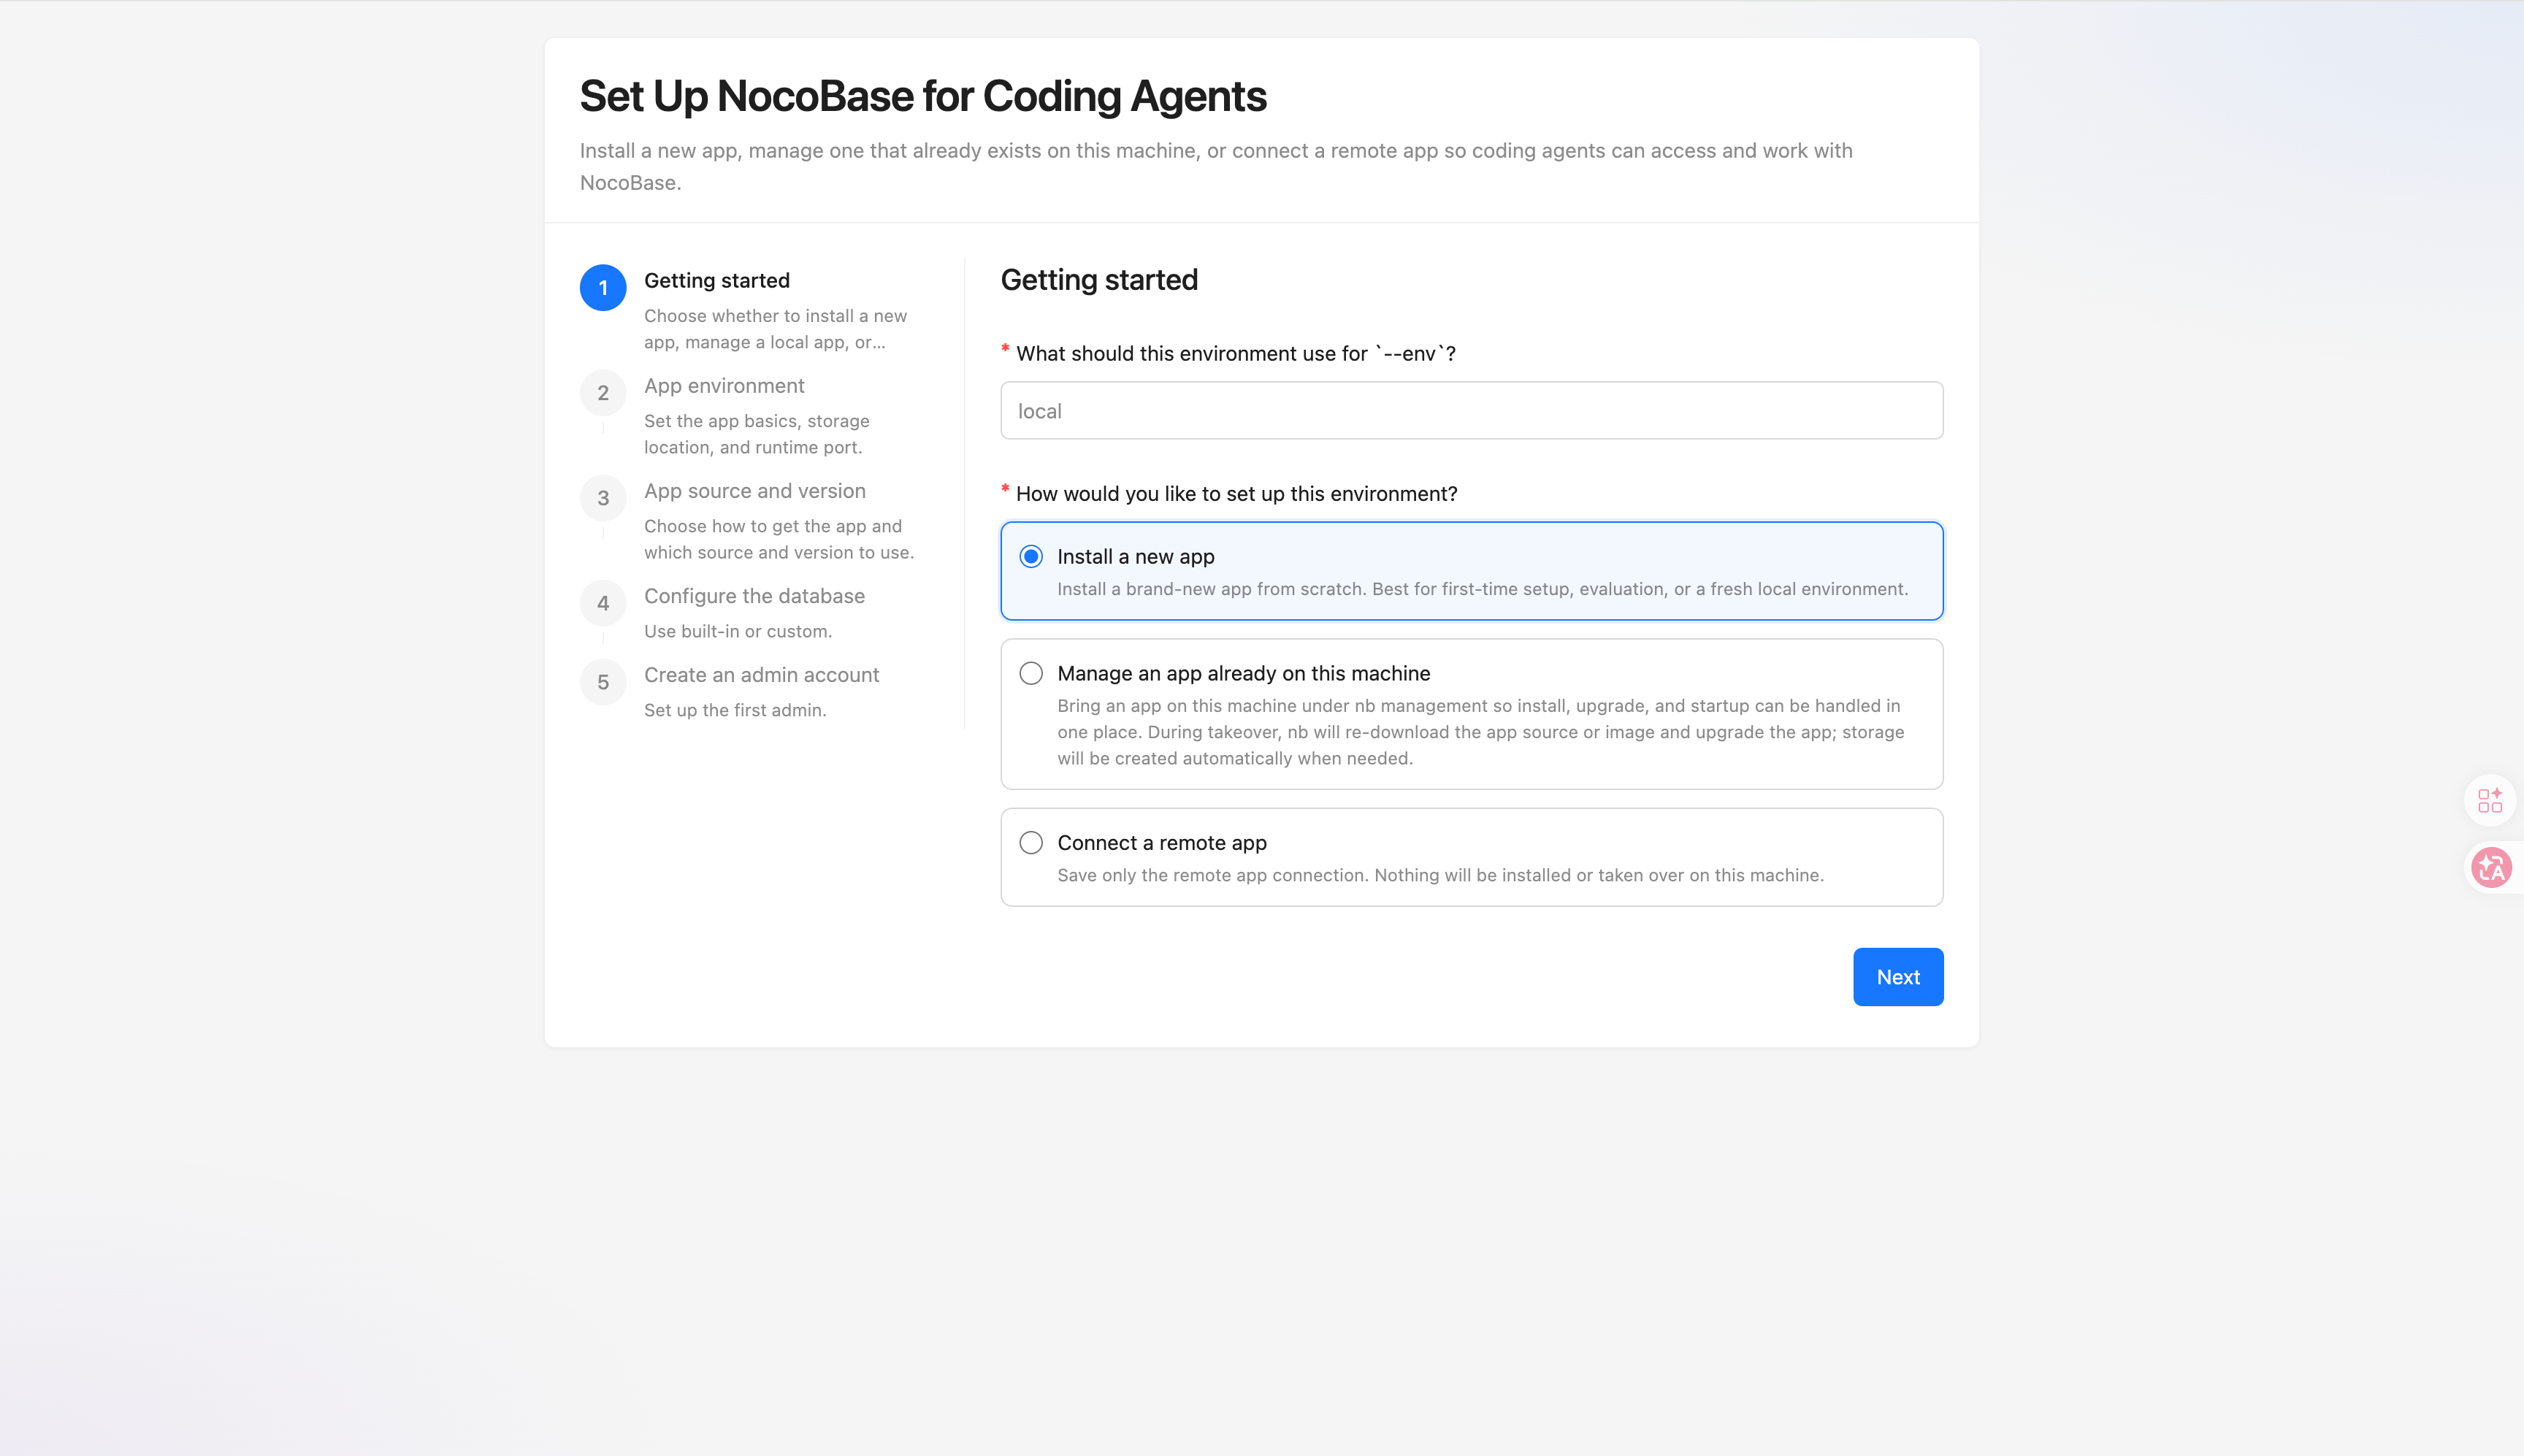
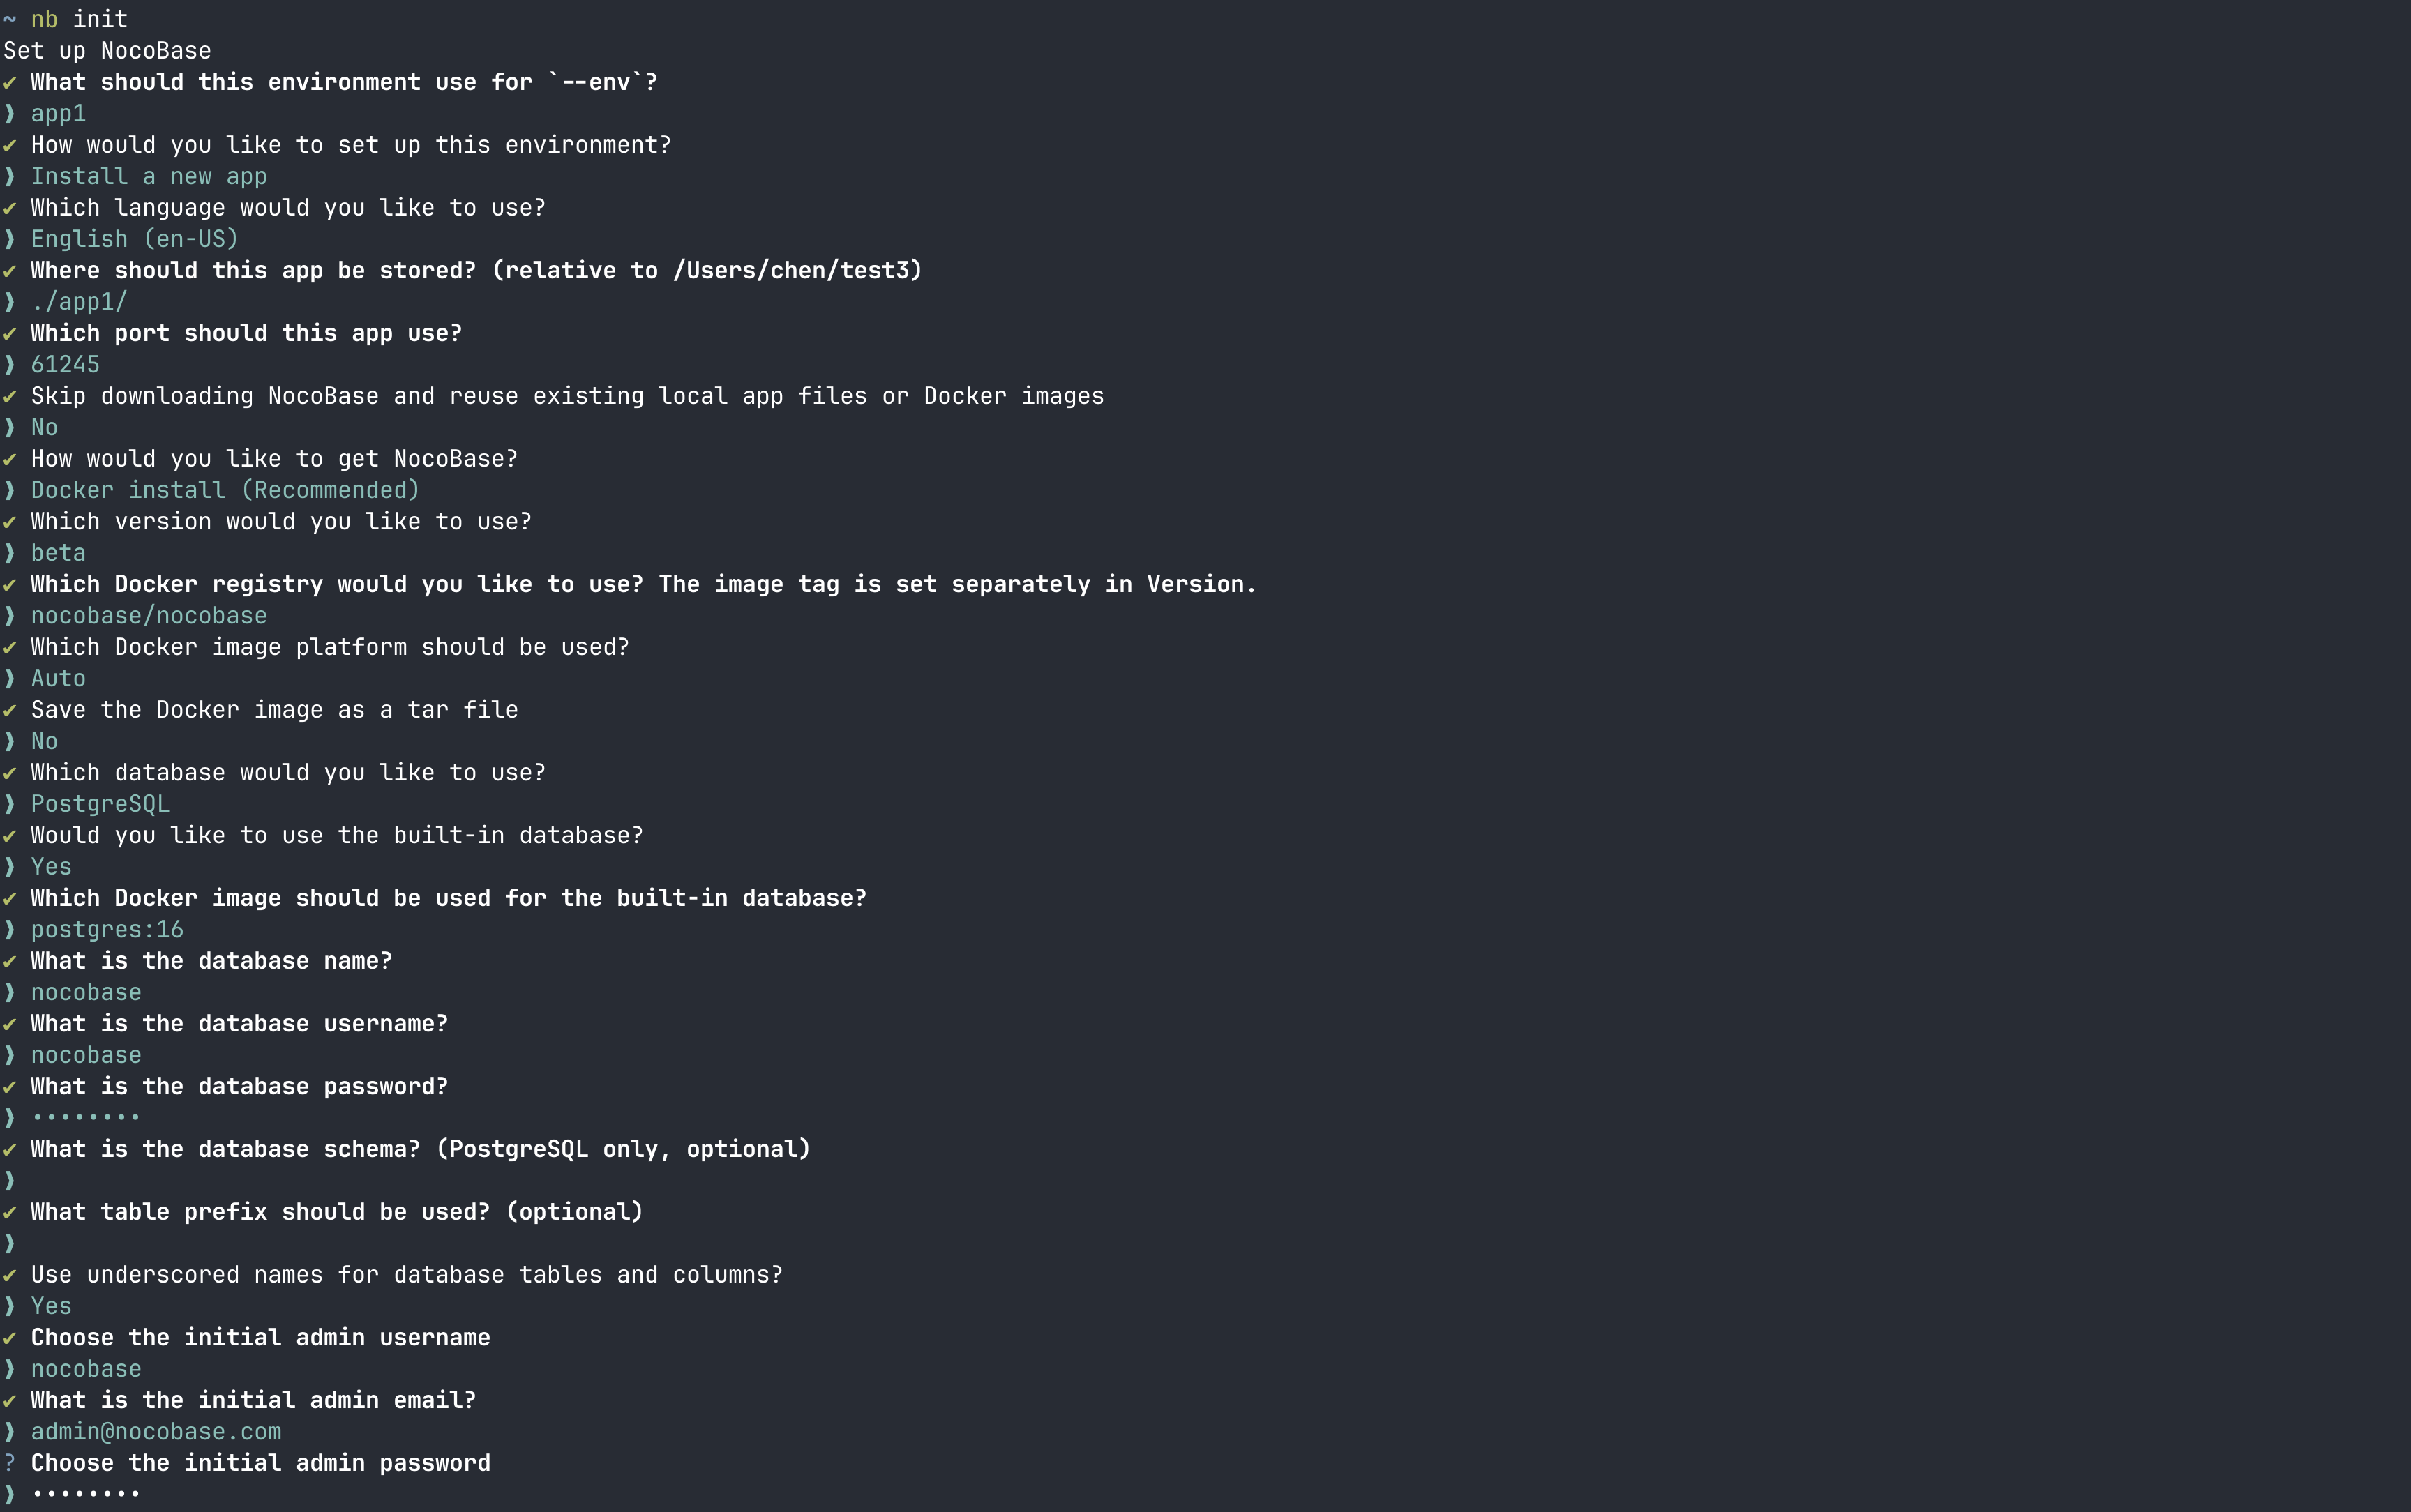
- package/dist/ai/docs/nocobase/api/cli/init.md +244 -62
- package/dist/ai/docs/nocobase/api/cli/license/activate.md +13 -12
- package/dist/ai/docs/nocobase/api/cli/license/index.md +2 -2
- package/dist/ai/docs/nocobase/api/cli/plugin/import.md +74 -0
- package/dist/ai/docs/nocobase/api/cli/plugin/index.md +4 -2
- package/dist/ai/docs/nocobase/get-started/deployment/how-to-deploy-nocobase-faster.mdx +384 -0
- package/dist/ai/docs/nocobase/get-started/install-upgrade-plugins.mdx +16 -10
- package/dist/ai/docs/nocobase/get-started/upgrading/docker.md +1 -1
- package/dist/ai/docs/nocobase/index.md +3 -3
- package/dist/ai/docs/nocobase/multi-app/multi-app/app-block-and-switcher.md +68 -0
- package/dist/ai/docs/nocobase/multi-app/multi-app/app-sso.md +71 -0
- package/dist/ai/docs/nocobase/multi-app/multi-app/index.md +9 -1
- package/dist/ai/docs/nocobase/multi-app/multi-app/sub-app-api.md +112 -0
- package/dist/ai/docs/nocobase/plugin-development/client/appendix/faq.md +3 -3
- package/dist/ai/docs/nocobase/plugin-development/client/component/index.md +1 -1
- package/dist/ai/docs/nocobase/plugin-development/client/ctx/common-capabilities.md +2 -2
- package/dist/ai/docs/nocobase/plugin-development/client/ctx/index.md +1 -1
- package/dist/ai/docs/nocobase/plugin-development/client/router.md +11 -11
- package/dist/ai/docs/nocobase/quickstart/index.md +27 -0
- package/dist/ai/docs/nocobase/quickstart/installation/airgap.md +67 -0
- package/dist/ai/docs/nocobase/quickstart/installation/cli.md +205 -0
- package/dist/ai/docs/nocobase/quickstart/installation/docker-compose.md +123 -0
- package/dist/ai/docs/nocobase/quickstart/installation/env.md +101 -0
- package/dist/ai/docs/nocobase/quickstart/installation/migration.md +50 -0
- package/dist/ai/docs/nocobase/quickstart/operations/backup-restore.md +94 -0
- package/dist/ai/docs/nocobase/quickstart/operations/manage-app.md +166 -0
- package/dist/ai/docs/nocobase/quickstart/operations/multi-environment.md +171 -0
- package/dist/ai/docs/nocobase/quickstart/plugins/third-party.md +86 -0
- package/dist/ai/docs/nocobase/quickstart/production/index.md +163 -0
- package/dist/ai/docs/nocobase/quickstart/production/reverse-proxy/caddy.md +158 -0
- package/dist/ai/docs/nocobase/quickstart/production/reverse-proxy/index.md +100 -0
- package/dist/ai/docs/nocobase/quickstart/production/reverse-proxy/nginx.md +166 -0
- package/dist/ai/docs/nocobase/quickstart/release-management.md +1 -0
- package/dist/ai/docs/nocobase/solution/all-in-one/installation.md +181 -0
- package/dist/ai/docs/nocobase/solution/crm/changelog.md +0 -3
- package/dist/ai/docs/nocobase/solution/crm/installation.md +6 -76
- package/dist/ai/docs/nocobase/solution/crm/v1.md +6 -35
- package/dist/ai/docs/nocobase/solution/ticket-system/changelog.md +0 -2
- package/dist/ai/docs/nocobase/solution/ticket-system/installation.md +6 -69
- package/dist/ai/docs/nocobase/workflow/advanced/options.md +45 -1
- package/dist/client/{406.15c09d98faa2ccf1.js → 406.9a530334eae8cede.js} +1 -1
- package/dist/client/{428.e9f38da3b0d8b498.js → 428.431a00d29107058e.js} +1 -1
- package/dist/client/index.js +2 -2
- package/dist/client-v2/index.js +1 -1
- package/dist/externalVersion.js +16 -16
- package/dist/locale/de-DE.json +1 -0
- package/dist/locale/en-US.json +2 -1
- package/dist/locale/es-ES.json +1 -0
- package/dist/locale/fr-FR.json +1 -0
- package/dist/locale/hu-HU.json +1 -0
- package/dist/locale/id-ID.json +1 -0
- package/dist/locale/it-IT.json +1 -0
- package/dist/locale/ja-JP.json +1 -0
- package/dist/locale/ko-KR.json +1 -0
- package/dist/locale/nl-NL.json +1 -0
- package/dist/locale/pt-BR.json +1 -0
- package/dist/locale/ru-RU.json +1 -0
- package/dist/locale/tr-TR.json +1 -0
- package/dist/locale/uk-UA.json +1 -0
- package/dist/locale/vi-VN.json +1 -0
- package/dist/locale/zh-CN.json +2 -1
- package/dist/locale/zh-TW.json +1 -0
- package/dist/node_modules/@langchain/xai/package.json +1 -1
- package/dist/node_modules/fs-extra/package.json +1 -1
- package/dist/node_modules/jsonrepair/package.json +1 -1
- package/dist/node_modules/just-bash/package.json +1 -1
- package/dist/node_modules/nodejs-snowflake/package.json +1 -1
- package/dist/node_modules/openai/package.json +1 -1
- package/dist/node_modules/zod/package.json +1 -1
- package/dist/server/resource/ai.js +11 -9
- package/dist/server/workflow/nodes/employee/index.js +2 -4
- package/dist/server/workflow/nodes/employee/types.d.ts +2 -2
- package/package.json +2 -2
- package/dist/ai/docs/nocobase/api/cli/app/down.md +0 -41
|
@@ -0,0 +1,112 @@
|
|
|
1
|
+
---
|
|
2
|
+
pkg: '@nocobase/plugin-app-supervisor'
|
|
3
|
+
title: 'Calling sub-app APIs'
|
|
4
|
+
description: 'How to call sub-app APIs in multi-app: access sub-app APIs through the entry app and specify the target sub-app with a path prefix, request header, or query parameter.'
|
|
5
|
+
keywords: 'multi-app,sub-app API,AppSupervisor,entry app,API call,NocoBase'
|
|
6
|
+
---
|
|
7
|
+
|
|
8
|
+
# Calling sub-app APIs
|
|
9
|
+
|
|
10
|
+
In a multi-app setup, each sub-app has its own independent APIs. When calling a sub-app API, the entry app needs to know which sub-app the request should be routed to.
|
|
11
|
+
|
|
12
|
+
For example, a main app API is usually:
|
|
13
|
+
|
|
14
|
+
```bash
|
|
15
|
+
GET /api/users:list
|
|
16
|
+
```
|
|
17
|
+
|
|
18
|
+
`/api` is the default API prefix and can be customized with the `API_BASE_PATH` environment variable.
|
|
19
|
+
|
|
20
|
+
To call the same API in a sub-app, specify the sub-app name in the request.
|
|
21
|
+
|
|
22
|
+
## Use a path prefix
|
|
23
|
+
|
|
24
|
+
Use the `/api/__app/<appName>/` prefix to call sub-app APIs:
|
|
25
|
+
|
|
26
|
+
```bash
|
|
27
|
+
GET /api/__app/a_xxx/users:list
|
|
28
|
+
```
|
|
29
|
+
|
|
30
|
+
Where:
|
|
31
|
+
|
|
32
|
+
- `a_xxx` is the sub-app name
|
|
33
|
+
- `users:list` is the resource and action to call
|
|
34
|
+
- `/api` is the current system's API base path
|
|
35
|
+
|
|
36
|
+
Query parameters can be appended as usual:
|
|
37
|
+
|
|
38
|
+
```bash
|
|
39
|
+
GET /api/__app/a_xxx/users:list?page=1&pageSize=20
|
|
40
|
+
```
|
|
41
|
+
|
|
42
|
+
This approach is explicit and works well when sub-app APIs are accessed through the entry app in multi-environment deployments.
|
|
43
|
+
|
|
44
|
+
## Specify the sub-app with a request header
|
|
45
|
+
|
|
46
|
+
If the caller already uses a fixed `/api/...` address, specify the sub-app with the `X-App` request header:
|
|
47
|
+
|
|
48
|
+
```bash
|
|
49
|
+
curl \
|
|
50
|
+
-H "X-App: a_xxx" \
|
|
51
|
+
http://localhost:13003/api/users:list
|
|
52
|
+
```
|
|
53
|
+
|
|
54
|
+
This is suitable for backend service calls, or when a frontend request utility already centralizes API URLs and only needs an additional header.
|
|
55
|
+
|
|
56
|
+
## Specify the sub-app with a query parameter
|
|
57
|
+
|
|
58
|
+
You can also specify the sub-app with the `__appName` query parameter:
|
|
59
|
+
|
|
60
|
+
```bash
|
|
61
|
+
GET /api/users:list?__appName=a_xxx
|
|
62
|
+
```
|
|
63
|
+
|
|
64
|
+
If there are other query parameters, pass them together:
|
|
65
|
+
|
|
66
|
+
```bash
|
|
67
|
+
GET /api/users:list?__appName=a_xxx&page=1&pageSize=20
|
|
68
|
+
```
|
|
69
|
+
|
|
70
|
+
In general, the path prefix or request header is clearer because the target sub-app is more explicit.
|
|
71
|
+
|
|
72
|
+
## API address in multi-environment deployments
|
|
73
|
+
|
|
74
|
+
In multi-environment deployments, there is usually an entry app and multiple runtime environments.
|
|
75
|
+
|
|
76
|
+
For example:
|
|
77
|
+
|
|
78
|
+
- Entry app address: `http://localhost:13003`
|
|
79
|
+
- Runtime environment address: `http://localhost:14000`
|
|
80
|
+
|
|
81
|
+
When calling sub-app APIs, it is recommended to access them through the entry app:
|
|
82
|
+
|
|
83
|
+
```bash
|
|
84
|
+
GET http://localhost:13003/api/__app/a_xxx/users:list
|
|
85
|
+
```
|
|
86
|
+
|
|
87
|
+
The entry app routes the request to the corresponding sub-app according to the app configuration. If you clearly know which runtime environment to access, you can also call through that environment address.
|
|
88
|
+
|
|
89
|
+
```bash
|
|
90
|
+
GET http://localhost:14000/api/__app/a_xxx/users:list
|
|
91
|
+
```
|
|
92
|
+
|
|
93
|
+
## Sub-app custom domains
|
|
94
|
+
|
|
95
|
+
If a sub-app has its own access domain, you can also call that sub-app's APIs directly through that domain:
|
|
96
|
+
|
|
97
|
+
```bash
|
|
98
|
+
GET https://app-example.example.com/api/users:list
|
|
99
|
+
```
|
|
100
|
+
|
|
101
|
+
If you want to go through the entry app uniformly, continue using the entry app's `/api/__app/<appName>/...` address.
|
|
102
|
+
|
|
103
|
+
## Authentication
|
|
104
|
+
|
|
105
|
+
When calling sub-app APIs, permission checks are still based on the target sub-app.
|
|
106
|
+
|
|
107
|
+
This means:
|
|
108
|
+
|
|
109
|
+
- A sign-in state or access token valid for the sub-app is required
|
|
110
|
+
- The main app sign-in state does not automatically equal API permissions in the sub-app
|
|
111
|
+
|
|
112
|
+
If the request does not carry valid authentication information, the sub-app returns an unauthenticated or unauthorized error according to its own authentication configuration.
|
|
@@ -38,11 +38,11 @@ If client code changes don't hot reload, try refreshing the browser first.
|
|
|
38
38
|
|
|
39
39
|
### Registered page route is not accessible
|
|
40
40
|
|
|
41
|
-
NocoBase v2 routes automatically add a `/
|
|
41
|
+
NocoBase v2 routes automatically add a `/v` prefix. For example, if you registered `path: '/hello'`, the actual URL is `/v/hello`:
|
|
42
42
|
|
|
43
43
|
```ts
|
|
44
44
|
this.router.add('hello', {
|
|
45
|
-
path: '/hello', // actual URL -> /
|
|
45
|
+
path: '/hello', // actual URL -> /v/hello
|
|
46
46
|
componentLoader: () => import('./pages/HelloPage'),
|
|
47
47
|
});
|
|
48
48
|
```
|
|
@@ -285,7 +285,7 @@ NocoBase's build system maintains an [external list](../../dependency-management
|
|
|
285
285
|
## Related Links
|
|
286
286
|
|
|
287
287
|
- [Plugin](../plugin) — Plugin entry and lifecycle
|
|
288
|
-
- [Router](../router) — Route registration and the `/
|
|
288
|
+
- [Router](../router) — Route registration and the `/v` prefix
|
|
289
289
|
- [FlowEngine Overview](../flow-engine/index.md) — FlowModel basics
|
|
290
290
|
- [FlowEngine - Block Extension](../flow-engine/block) — BlockModel, TableBlockModel, filterCollection
|
|
291
291
|
- [FlowEngine - Field Extension](../flow-engine/field) — FieldModel, bindModelToInterface
|
|
@@ -118,7 +118,7 @@ const msg = ctx.t('Save success', { ns: '@my-project/plugin-hello' });
|
|
|
118
118
|
Use `ctx.router.navigate()` for page navigation:
|
|
119
119
|
|
|
120
120
|
```tsx
|
|
121
|
-
ctx.router.navigate('/some-page'); // -> /
|
|
121
|
+
ctx.router.navigate('/some-page'); // -> /v/some-page
|
|
122
122
|
```
|
|
123
123
|
|
|
124
124
|
Get current route parameters:
|
|
@@ -316,7 +316,7 @@ Navigate between pages in components via `ctx.router.navigate()`:
|
|
|
316
316
|
|
|
317
317
|
```tsx
|
|
318
318
|
const ctx = useFlowContext();
|
|
319
|
-
ctx.router.navigate('/hello'); // -> /
|
|
319
|
+
ctx.router.navigate('/hello'); // -> /v/hello
|
|
320
320
|
```
|
|
321
321
|
|
|
322
322
|
### Route Information (ctx.route)
|
|
@@ -351,7 +351,7 @@ interface RouteOptions {
|
|
|
351
351
|
```tsx
|
|
352
352
|
const ctx = useFlowContext();
|
|
353
353
|
|
|
354
|
-
console.log(ctx.location.pathname); // '/
|
|
354
|
+
console.log(ctx.location.pathname); // '/v/hello'
|
|
355
355
|
console.log(ctx.location.search); // '?page=1'
|
|
356
356
|
console.log(ctx.location.hash); // '#section'
|
|
357
357
|
```
|
|
@@ -15,7 +15,7 @@ Route registration is typically done in the plugin's `load()` method. See [Plugi
|
|
|
15
15
|
|
|
16
16
|
:::warning Note
|
|
17
17
|
|
|
18
|
-
For NocoBase v2 plugins, registered routes automatically get a `/
|
|
18
|
+
For NocoBase v2 plugins, registered routes automatically get a `/v` prefix. You need to include this prefix when accessing the routes.
|
|
19
19
|
|
|
20
20
|
:::
|
|
21
21
|
|
|
@@ -25,9 +25,9 @@ NocoBase has the following default routes registered:
|
|
|
25
25
|
|
|
26
26
|
| Name | Path | Component | Description |
|
|
27
27
|
| -------------- | --------------------- | ------------------- | ------------------------- |
|
|
28
|
-
| admin | /
|
|
29
|
-
| admin.page | /
|
|
30
|
-
| admin.settings | /
|
|
28
|
+
| admin | /v/admin/\* | AdminLayout | Admin pages |
|
|
29
|
+
| admin.page | /v/admin/:name | AdminDynamicPage | Dynamically created pages |
|
|
30
|
+
| admin.settings | /v/admin/settings/\* | AdminSettingsLayout | Plugin settings pages |
|
|
31
31
|
|
|
32
32
|
## Page Routes
|
|
33
33
|
|
|
@@ -55,7 +55,7 @@ class MyPlugin extends Plugin {
|
|
|
55
55
|
async load() {
|
|
56
56
|
this.router.add('hello', {
|
|
57
57
|
path: '/hello',
|
|
58
|
-
// Lazy loading: the module is loaded only when /
|
|
58
|
+
// Lazy loading: the module is loaded only when /v/hello is visited
|
|
59
59
|
componentLoader: () => import('./pages/HelloPage'),
|
|
60
60
|
});
|
|
61
61
|
}
|
|
@@ -103,12 +103,12 @@ class MyPlugin extends Plugin {
|
|
|
103
103
|
|
|
104
104
|
// Child route, using componentLoader for lazy loading
|
|
105
105
|
this.router.add('root.home', {
|
|
106
|
-
path: '/', // -> /
|
|
106
|
+
path: '/', // -> /v/
|
|
107
107
|
componentLoader: () => import('./pages/HomePage'),
|
|
108
108
|
});
|
|
109
109
|
|
|
110
110
|
this.router.add('root.about', {
|
|
111
|
-
path: '/about', // -> /
|
|
111
|
+
path: '/about', // -> /v/about
|
|
112
112
|
componentLoader: () => import('./pages/AboutPage'),
|
|
113
113
|
});
|
|
114
114
|
}
|
|
@@ -121,7 +121,7 @@ Route paths support dynamic parameters:
|
|
|
121
121
|
|
|
122
122
|
```tsx
|
|
123
123
|
this.router.add('root.user', {
|
|
124
|
-
path: '/user/:id', // -> /
|
|
124
|
+
path: '/user/:id', // -> /v/user/:id
|
|
125
125
|
componentLoader: () => import('./pages/UserPage'),
|
|
126
126
|
});
|
|
127
127
|
```
|
|
@@ -176,7 +176,7 @@ export class HelloPlugin extends Plugin<any, Application> {
|
|
|
176
176
|
}
|
|
177
177
|
```
|
|
178
178
|
|
|
179
|
-
After registration, the access path is `/admin/settings/hello`. When there is only one page under the menu, the top tab bar is automatically hidden.
|
|
179
|
+
After registration, the access path is `/v/admin/settings/hello`. When there is only one page under the menu, the top tab bar is automatically hidden.
|
|
180
180
|
|
|
181
181
|
### Multi-Tab Settings Page
|
|
182
182
|
|
|
@@ -194,7 +194,7 @@ class HelloPlugin extends Plugin<any, Application> {
|
|
|
194
194
|
icon: 'ApiOutlined',
|
|
195
195
|
});
|
|
196
196
|
|
|
197
|
-
// Tab 1: General settings (key 'index' maps to /admin/settings/hello)
|
|
197
|
+
// Tab 1: General settings (key 'index' maps to /v/admin/settings/hello)
|
|
198
198
|
this.pluginSettingsManager.addPageTabItem({
|
|
199
199
|
menuKey: 'hello',
|
|
200
200
|
key: 'index',
|
|
@@ -202,7 +202,7 @@ class HelloPlugin extends Plugin<any, Application> {
|
|
|
202
202
|
componentLoader: () => import('./settings/GeneralPage'),
|
|
203
203
|
});
|
|
204
204
|
|
|
205
|
-
// Tab 2: Advanced settings (maps to /admin/settings/hello/advanced)
|
|
205
|
+
// Tab 2: Advanced settings (maps to /v/admin/settings/hello/advanced)
|
|
206
206
|
this.pluginSettingsManager.addPageTabItem({
|
|
207
207
|
menuKey: 'hello',
|
|
208
208
|
key: 'advanced',
|
|
@@ -0,0 +1,27 @@
|
|
|
1
|
+
# 快速开始
|
|
2
|
+
|
|
3
|
+
NocoBase 的快速开始主要解决三件事:先把应用装起来,再把插件装起来,最后把应用稳定地跑起来。你不需要一次把所有文档都看完,按你当前所在的阶段往下走就够了。
|
|
4
|
+
|
|
5
|
+
如果你还没决定用哪种方式安装,默认先看 [使用 CLI 安装(推荐)](./installation/cli.md)。如果你更习惯直接在服务器上用容器跑起来,继续看 [通过 Docker Compose 安装](./installation/docker-compose.md)。
|
|
6
|
+
|
|
7
|
+
## 快速索引
|
|
8
|
+
|
|
9
|
+
| 我想要…… | 去哪里看 |
|
|
10
|
+
| --- | --- |
|
|
11
|
+
| 直接安装一个新的 NocoBase 应用 | [使用 CLI 安装(推荐)](./installation/cli.md) |
|
|
12
|
+
| 把旧的安装方式逐步迁移到 CLI | [从旧方式迁移到 CLI](./installation/migration.md) |
|
|
13
|
+
| 用 Docker Compose 在服务器上部署 | [通过 Docker Compose 安装](./installation/docker-compose.md) |
|
|
14
|
+
| 在无法访问公网的环境里安装 | [内网安装](./installation/airgap.md) |
|
|
15
|
+
| 先确认应用运行需要的关键环境变量 | [应用环境变量](./installation/env.md) |
|
|
16
|
+
| 激活商业插件或安装第三方插件 | [商业插件激活与升级](../api/cli/license/index.md) / [第三方插件安装与升级](./plugins/third-party.md) |
|
|
17
|
+
| 给生产环境加上反向代理 | [Nginx](./production/reverse-proxy/nginx.md) / [Caddy](./production/reverse-proxy/caddy.md) |
|
|
18
|
+
| 查看应用、切换环境、备份还原 | [管理应用](./operations/manage-app.md) / [多环境管理](./operations/multi-environment.md) / [备份还原](./operations/backup-restore.md) |
|
|
19
|
+
|
|
20
|
+
## 默认路径
|
|
21
|
+
|
|
22
|
+
如果你不确定该怎么选,通常来说按下面这条路径走最省心:
|
|
23
|
+
|
|
24
|
+
1. 先看 [使用 CLI 安装(推荐)](./installation/cli.md)。
|
|
25
|
+
2. 应用跑起来后,再确认 [应用环境变量](./installation/env.md)。
|
|
26
|
+
3. 如果要正式上线,再补上 [Nginx](./production/reverse-proxy/nginx.md) 或 [Caddy](./production/reverse-proxy/caddy.md)。
|
|
27
|
+
4. 后续日常维护时,再看 [管理应用](./operations/manage-app.md) 和 [备份还原](./operations/backup-restore.md)。
|
|
@@ -0,0 +1,67 @@
|
|
|
1
|
+
# 内网安装
|
|
2
|
+
|
|
3
|
+
如果你的服务器无法访问公网,安装方式就要提前准备好离线所需的镜像、依赖和插件包。默认推荐先用 Docker 方式,路径最短,也最容易复现。
|
|
4
|
+
|
|
5
|
+
## 默认推荐:离线准备 Docker 镜像
|
|
6
|
+
|
|
7
|
+
在一台可以访问公网的机器上,先把应用镜像和数据库镜像拉下来:
|
|
8
|
+
|
|
9
|
+
```bash
|
|
10
|
+
docker pull registry.cn-shanghai.aliyuncs.com/nocobase/nocobase:latest-full
|
|
11
|
+
docker pull registry.cn-shanghai.aliyuncs.com/nocobase/postgres:16
|
|
12
|
+
```
|
|
13
|
+
|
|
14
|
+
然后导出为离线文件:
|
|
15
|
+
|
|
16
|
+
```bash
|
|
17
|
+
docker save -o nocobase-app.tar \
|
|
18
|
+
registry.cn-shanghai.aliyuncs.com/nocobase/nocobase:latest-full
|
|
19
|
+
|
|
20
|
+
docker save -o nocobase-postgres.tar \
|
|
21
|
+
registry.cn-shanghai.aliyuncs.com/nocobase/postgres:16
|
|
22
|
+
```
|
|
23
|
+
|
|
24
|
+
如果你还需要商业插件,也建议在外网环境先准备好插件包,再一起带入内网。
|
|
25
|
+
|
|
26
|
+
## 把文件拷贝到内网服务器
|
|
27
|
+
|
|
28
|
+
至少准备这些文件:
|
|
29
|
+
|
|
30
|
+
- `nocobase-app.tar`
|
|
31
|
+
- `nocobase-postgres.tar`
|
|
32
|
+
- `docker-compose.yml`
|
|
33
|
+
- `.env` 或你自己的部署说明
|
|
34
|
+
|
|
35
|
+
## 在内网服务器导入镜像
|
|
36
|
+
|
|
37
|
+
```bash
|
|
38
|
+
docker load -i nocobase-app.tar
|
|
39
|
+
docker load -i nocobase-postgres.tar
|
|
40
|
+
```
|
|
41
|
+
|
|
42
|
+
## 启动应用
|
|
43
|
+
|
|
44
|
+
准备好 `docker-compose.yml` 后,直接启动:
|
|
45
|
+
|
|
46
|
+
```bash
|
|
47
|
+
docker compose up -d
|
|
48
|
+
docker compose logs -f app
|
|
49
|
+
```
|
|
50
|
+
|
|
51
|
+
如果你还没写 compose 文件,先看 [通过 Docker Compose 安装](./docker-compose.md),把里面的示例保存到本地即可。
|
|
52
|
+
|
|
53
|
+
## 不能使用 Docker 怎么办
|
|
54
|
+
|
|
55
|
+
如果你的内网环境不能使用 Docker,也可以在外网环境先用 `create-nocobase-app` 创建完整项目、安装依赖并打包,再把整个项目拷贝到内网服务器。
|
|
56
|
+
|
|
57
|
+
这条路径会更长,不过在没有容器能力的环境里更实用。整体流程通常是:
|
|
58
|
+
|
|
59
|
+
1. 在外网环境创建项目并安装依赖。
|
|
60
|
+
2. 把项目目录打包。
|
|
61
|
+
3. 拷贝到内网服务器。
|
|
62
|
+
4. 在内网解压、补齐 `.env` 后启动应用。
|
|
63
|
+
|
|
64
|
+
## 下一步去哪里看
|
|
65
|
+
|
|
66
|
+
- 如果你还没确认应用配置,继续看 [应用环境变量](./env.md)
|
|
67
|
+
- 如果你准备把应用正式开放给业务用户,继续看 [Nginx](../production/reverse-proxy/nginx.md) 或 [Caddy](../production/reverse-proxy/caddy.md)
|
|
@@ -0,0 +1,205 @@
|
|
|
1
|
+
# 使用 CLI 安装(推荐)
|
|
2
|
+
|
|
3
|
+
NocoBase 2.1.0 之后,官方提供了基于 CLI 的安装和管理方式。你可以用它完成安装、连接、升级和日常维护,也可以顺手给 AI Agent 准备一个可连接、可操作的环境。
|
|
4
|
+
|
|
5
|
+
## 安装 NocoBase CLI
|
|
6
|
+
|
|
7
|
+
仅在第一次安装 CLI 时执行。
|
|
8
|
+
|
|
9
|
+
先全局安装 CLI:
|
|
10
|
+
|
|
11
|
+
```bash
|
|
12
|
+
npm install -g @nocobase/cli@beta
|
|
13
|
+
nb --version
|
|
14
|
+
```
|
|
15
|
+
|
|
16
|
+
:::tip 建议先开启 session mode
|
|
17
|
+
|
|
18
|
+
如果你会同时开多个终端、多个 shell,或者要让 AI Agent 和你自己并行操作,默认推荐先执行一次 [`nb session setup`](../../api/cli/session/setup.md)。这样每个会话都能维护自己的 `current env`,不容易互相影响。
|
|
19
|
+
|
|
20
|
+
```bash
|
|
21
|
+
nb session setup
|
|
22
|
+
```
|
|
23
|
+
|
|
24
|
+
:::
|
|
25
|
+
|
|
26
|
+
如果你打算长期用中文界面,通常来说先把 locale 设好就够了:
|
|
27
|
+
|
|
28
|
+
```bash
|
|
29
|
+
nb config set locale zh-CN
|
|
30
|
+
```
|
|
31
|
+
|
|
32
|
+
CLI 默认会检查自更新。你可以按自己的习惯调整更新策略:
|
|
33
|
+
|
|
34
|
+
- `prompt`:发现新版本时提示
|
|
35
|
+
- `auto`:自动更新
|
|
36
|
+
- `off`:关闭自动更新
|
|
37
|
+
|
|
38
|
+
```bash
|
|
39
|
+
nb config set update.policy prompt
|
|
40
|
+
nb config set update.policy auto
|
|
41
|
+
nb config set update.policy off
|
|
42
|
+
```
|
|
43
|
+
|
|
44
|
+
如果你准备把 NocoBase 部署到服务器上,并且希望从远程浏览器打开 `nb init --ui` 向导,建议先把 CLI 的默认 host 改成当前服务器 IP:
|
|
45
|
+
|
|
46
|
+
```bash
|
|
47
|
+
nb config set default-ui-host <server-ip>
|
|
48
|
+
nb config set default-api-host <server-ip>
|
|
49
|
+
```
|
|
50
|
+
|
|
51
|
+
将 `<server-ip>` 替换为当前服务器对你可访问的实际 IP。
|
|
52
|
+
|
|
53
|
+
`nb config` 是 CLI 的全局配置。通常只需要设置一次,后续再次运行 `nb init --ui` 时会自动沿用这些默认值,不需要每次重复配置。
|
|
54
|
+
|
|
55
|
+
通常来说:
|
|
56
|
+
|
|
57
|
+
- `default-ui-host` 用于 `nb init --ui` 启动向导页面时的默认监听地址
|
|
58
|
+
- `default-api-host` 用于新安装时默认生成的 API 地址
|
|
59
|
+
|
|
60
|
+
如果是在服务器上部署,这两个值通常都应该改成当前服务器可访问的 IP,而不是继续使用默认的本机地址。
|
|
61
|
+
|
|
62
|
+
:::warning 这只是安装向导或临时访问方式,不是生产环境推荐入口
|
|
63
|
+
|
|
64
|
+
把 `default-ui-host` / `default-api-host` 设成服务器 IP,主要是为了让你能从远程浏览器打开 `nb init --ui`,或者在安装完成后临时验证服务是否可访问。
|
|
65
|
+
|
|
66
|
+
这不代表生产环境应该长期使用 `IP + port` 对外提供服务。正式部署时,仍然推荐使用域名,并通过 Nginx 或 Caddy 这类反向代理统一接入,再启用 HTTPS。
|
|
67
|
+
|
|
68
|
+
:::
|
|
69
|
+
|
|
70
|
+
## 安装 NocoBase
|
|
71
|
+
|
|
72
|
+
### 方式一:通过 UI 向导安装
|
|
73
|
+
|
|
74
|
+
这是默认推荐的入口。你只需要运行:
|
|
75
|
+
|
|
76
|
+
```bash
|
|
77
|
+
nb init --ui
|
|
78
|
+
```
|
|
79
|
+
|
|
80
|
+
如果你想给向导页面指定一个固定端口,可以直接加上 `--ui-port`,例如:
|
|
81
|
+
|
|
82
|
+
```bash
|
|
83
|
+
nb init --ui --ui-port 3000
|
|
84
|
+
```
|
|
85
|
+
|
|
86
|
+
|
|
87
|
+
|
|
88
|
+
向导会根据当前场景,带你一步一步完成安装或连接所需的配置。
|
|
89
|
+
|
|
90
|
+
### 方式二:通过终端交互
|
|
91
|
+
|
|
92
|
+
如果你更习惯在终端里一步一步输入,可以直接运行:
|
|
93
|
+
|
|
94
|
+
```bash
|
|
95
|
+
nb init
|
|
96
|
+
```
|
|
97
|
+
|
|
98
|
+
|
|
99
|
+
|
|
100
|
+
### 方式三:通过非交互命令
|
|
101
|
+
|
|
102
|
+
如果你在脚本、CI/CD 或其他非交互环境里运行,直接用 `--yes` 就行。这个模式下必须显式传 `--env`,没有显式指定的参数会按默认值处理。
|
|
103
|
+
|
|
104
|
+
最短的默认写法是:
|
|
105
|
+
|
|
106
|
+
```bash
|
|
107
|
+
nb init --yes --env app1
|
|
108
|
+
```
|
|
109
|
+
|
|
110
|
+
具体到不同安装来源、版本选择、`basic` 认证、CI/CD 连接已有应用,以及数据库命名这类常见组合,直接看 [`nb init` 命令参考的示例](../../api/cli/init.md#示例) 就行。
|
|
111
|
+
|
|
112
|
+
## 安装完成后先确认什么
|
|
113
|
+
|
|
114
|
+
`--env` 是 CLI 里的环境名。通常来说,安装完成后你接下来做的事都围绕这个 env 展开。
|
|
115
|
+
|
|
116
|
+
通常建议先确认这 3 件事:
|
|
117
|
+
|
|
118
|
+
1. env 是否已经创建并保存成功
|
|
119
|
+
2. 应用是否可以正常启动、日志是否正常
|
|
120
|
+
3. 如果准备正式对外开放,是否已经规划好生产环境入口,而不是继续直接使用 `IP + port`
|
|
121
|
+
|
|
122
|
+
### 安装目录
|
|
123
|
+
|
|
124
|
+
如果你刚用 `nb init --env app1` 新装了一个本地应用,可以通过 `nb env info app1 --field app.appPath` 查看完整路径。
|
|
125
|
+
|
|
126
|
+
默认情况下,CLI 会在 `app-path` 下按下面这套约定组织本地文件:
|
|
127
|
+
|
|
128
|
+
```text
|
|
129
|
+
<app-path>/
|
|
130
|
+
├── source/ # 应用源码或下载内容对应的默认目录
|
|
131
|
+
├── storage/ # 运行时数据目录
|
|
132
|
+
└── .env # 可选的应用环境变量文件
|
|
133
|
+
```
|
|
134
|
+
|
|
135
|
+
通常来说:
|
|
136
|
+
|
|
137
|
+
- `source/` 主要对应 npm / Git env 的本地应用目录。对于 Docker env,CLI 也会保留这套默认路径推导,不过大多数时候你不需要手动关心它
|
|
138
|
+
- `storage/` 用来放运行时数据,比如内置数据库数据、插件、日志等内容
|
|
139
|
+
- `.env` 是可选的应用环境变量文件。只有当你需要自定义环境变量时,才需要在 `<app-path>/.env` 里添加它;如果这个文件存在,Docker、npm 和 Git 这几种安装来源默认都会读取它
|
|
140
|
+
|
|
141
|
+
更完整的说明见 [`nb init` 命令参考](../../api/cli/init.md)。
|
|
142
|
+
|
|
143
|
+
### 生产环境部署提醒
|
|
144
|
+
|
|
145
|
+
如果你现在只是刚装完,想先验证安装结果,那么用 `IP + port` 打开页面通常没有问题。
|
|
146
|
+
|
|
147
|
+
但如果这个 env 接下来要正式对外提供服务,需要特别注意:
|
|
148
|
+
|
|
149
|
+
- `nb init --ui` 本身只是安装向导的临时页面,用来完成安装或初始化,不是应用正式对外服务入口
|
|
150
|
+
- 通过 `nb init` 安装完成后,应用当前暴露出来的 `IP + port` 更适合调试阶段、验证阶段或内网临时访问
|
|
151
|
+
- 生产环境不建议直接把 NocoBase 应用端口暴露给公网长期使用
|
|
152
|
+
- 正式对外访问时,推荐使用域名,并通过 Nginx 或 Caddy 反向代理到 NocoBase
|
|
153
|
+
- 生产环境应优先启用 HTTPS,而不是长期使用裸露的 `http://IP:port`
|
|
154
|
+
|
|
155
|
+
也就是说,`default-ui-host` 和 `default-api-host` 只是为了让安装向导和默认地址生成更方便,并不代表最终生产环境的访问入口。
|
|
156
|
+
|
|
157
|
+
如果这个 env 准备正式上线,建议把“接入反向代理并启用 HTTPS”视为安装完成后的下一步,而不是可选优化项。
|
|
158
|
+
|
|
159
|
+
如果你现在就准备继续做正式部署,建议先从 [生产环境部署](../production/index.md) 开始,再按需要继续看 [Nginx](../production/reverse-proxy/nginx.md) 或 [Caddy](../production/reverse-proxy/caddy.md) 的反向代理配置。
|
|
160
|
+
|
|
161
|
+
### 日常操作
|
|
162
|
+
|
|
163
|
+
你可以先确认这个 env 是否已经保存成功:
|
|
164
|
+
|
|
165
|
+
```bash
|
|
166
|
+
nb env current
|
|
167
|
+
nb env list
|
|
168
|
+
nb env status
|
|
169
|
+
nb env info app1
|
|
170
|
+
nb env info app1 --json
|
|
171
|
+
```
|
|
172
|
+
|
|
173
|
+
如果你想继续做安装后的后续操作,可以按下面这个索引往下看:
|
|
174
|
+
|
|
175
|
+
| 我想要…… | 去哪里看 |
|
|
176
|
+
| --- | --- |
|
|
177
|
+
| 如果你准备把这个 env 正式对外开放,给它接上生产环境反向代理,并使用域名和 HTTPS 暴露服务。 | [Nginx](../production/reverse-proxy/nginx.md) / [Caddy](../production/reverse-proxy/caddy.md)。 |
|
|
178
|
+
| 确认 env 是否保存成功、查看当前用了哪个 env、在多个 env 之间切换。 | [`nb env`](../../api/cli/env/index.md)、[多环境管理](../operations/multi-environment.md)。 |
|
|
179
|
+
| 启动、停止、重启应用,查看日志,或者继续升级应用。 | [`nb app`](../../api/cli/app/index.md)、[管理应用](../operations/manage-app.md)。 |
|
|
180
|
+
| 检查数据库连接、查看内置数据库状态,或者排查数据库容器问题。 | [`nb db`](../../api/cli/db/index.md)。 |
|
|
181
|
+
| 查看已安装插件,启用或停用插件。 | [`nb plugin`](../../api/cli/plugin/index.md)。 |
|
|
182
|
+
| 激活商业授权、查看授权状态、同步商业插件。 | [`nb license`](../../api/cli/license/index.md)。 |
|
|
183
|
+
| 管理本地源码工程,比如下载源码、启动开发模式、构建或测试。这个通常用于 npm / Git env。 | [`nb source`](../../api/cli/source/index.md)。 |
|
|
184
|
+
|
|
185
|
+
如果你刚装完一个本地应用,通常可以先跑这几条命令:
|
|
186
|
+
|
|
187
|
+
```bash
|
|
188
|
+
nb env use app1
|
|
189
|
+
nb app start
|
|
190
|
+
nb app logs
|
|
191
|
+
nb plugin list
|
|
192
|
+
```
|
|
193
|
+
|
|
194
|
+
如果你同时维护多个 env,后续切换和查看状态的方式见 [多环境管理](../operations/multi-environment.md)。
|
|
195
|
+
|
|
196
|
+
如果你后续要升级应用,直接看 [管理应用](../operations/manage-app.md) 和 [`nb app upgrade` 命令参考](../../api/cli/app/upgrade.md) 就行。
|
|
197
|
+
|
|
198
|
+
## 相关链接
|
|
199
|
+
|
|
200
|
+
- [`nb init` 命令参考](../../api/cli/init.md)
|
|
201
|
+
- [`nb env info` 命令参考](../../api/cli/env/info.md)
|
|
202
|
+
- [生产环境反向代理:Nginx](../production/reverse-proxy/nginx.md) / [Caddy](../production/reverse-proxy/caddy.md)
|
|
203
|
+
- [从旧方式迁移到 CLI](./migration.md)
|
|
204
|
+
- [多环境管理](../operations/multi-environment.md)
|
|
205
|
+
- [管理应用](../operations/manage-app.md)
|
|
@@ -0,0 +1,123 @@
|
|
|
1
|
+
# 通过 Docker Compose 安装
|
|
2
|
+
|
|
3
|
+
如果你希望直接在服务器上把 NocoBase 跑起来,`docker compose` 仍然是最直接的方式。大部分场景用一份 `docker-compose.yml` 就够了。
|
|
4
|
+
|
|
5
|
+
不过生产环境里,建议固定具体版本号,不要长期直接使用 `latest`。这样升级时更可控。
|
|
6
|
+
|
|
7
|
+
## 前提条件
|
|
8
|
+
|
|
9
|
+
- 已安装 Docker 和 Docker Compose
|
|
10
|
+
- 确保 Docker 服务已经启动
|
|
11
|
+
- 已准备好一个要对外开放的端口,比如 `13000`
|
|
12
|
+
|
|
13
|
+
## 第一步:创建项目目录
|
|
14
|
+
|
|
15
|
+
```bash
|
|
16
|
+
mkdir my-nocobase-app
|
|
17
|
+
cd my-nocobase-app
|
|
18
|
+
```
|
|
19
|
+
|
|
20
|
+
## 第二步:创建 `docker-compose.yml`
|
|
21
|
+
|
|
22
|
+
下面这个示例使用 PostgreSQL,也是默认最省心的一种组合:
|
|
23
|
+
|
|
24
|
+
```yml
|
|
25
|
+
networks:
|
|
26
|
+
nocobase:
|
|
27
|
+
driver: bridge
|
|
28
|
+
|
|
29
|
+
services:
|
|
30
|
+
app:
|
|
31
|
+
image: registry.cn-shanghai.aliyuncs.com/nocobase/nocobase:latest-full
|
|
32
|
+
restart: always
|
|
33
|
+
networks:
|
|
34
|
+
- nocobase
|
|
35
|
+
depends_on:
|
|
36
|
+
- postgres
|
|
37
|
+
environment:
|
|
38
|
+
- APP_KEY=replace-with-your-secret-key
|
|
39
|
+
- DB_DIALECT=postgres
|
|
40
|
+
- DB_HOST=postgres
|
|
41
|
+
- DB_PORT=5432
|
|
42
|
+
- DB_DATABASE=nocobase
|
|
43
|
+
- DB_USER=nocobase
|
|
44
|
+
- DB_PASSWORD=nocobase
|
|
45
|
+
- TZ=Asia/Shanghai
|
|
46
|
+
volumes:
|
|
47
|
+
- ./storage:/app/nocobase/storage
|
|
48
|
+
ports:
|
|
49
|
+
- '13000:80'
|
|
50
|
+
|
|
51
|
+
postgres:
|
|
52
|
+
image: registry.cn-shanghai.aliyuncs.com/nocobase/postgres:16
|
|
53
|
+
restart: always
|
|
54
|
+
command: postgres -c wal_level=logical
|
|
55
|
+
environment:
|
|
56
|
+
POSTGRES_USER: nocobase
|
|
57
|
+
POSTGRES_DB: nocobase
|
|
58
|
+
POSTGRES_PASSWORD: nocobase
|
|
59
|
+
volumes:
|
|
60
|
+
- ./storage/db/postgres:/var/lib/postgresql/data
|
|
61
|
+
networks:
|
|
62
|
+
- nocobase
|
|
63
|
+
```
|
|
64
|
+
|
|
65
|
+
其中:
|
|
66
|
+
|
|
67
|
+
- `APP_KEY` 记得改成你自己的随机字符串
|
|
68
|
+
- `13000:80` 代表把主机的 `13000` 端口映射到容器的 `80` 端口
|
|
69
|
+
- 如果你已经有数据库服务,可以删掉 `postgres` 这一段,并把 `DB_HOST` 改成现有数据库地址
|
|
70
|
+
|
|
71
|
+
如果你使用 MySQL 或 MariaDB,记得把 `DB_DIALECT` 改成对应类型,并补上:
|
|
72
|
+
|
|
73
|
+
```bash
|
|
74
|
+
DB_UNDERSCORED=true
|
|
75
|
+
```
|
|
76
|
+
|
|
77
|
+
## 第三步:启动应用
|
|
78
|
+
|
|
79
|
+
```bash
|
|
80
|
+
docker compose up -d
|
|
81
|
+
```
|
|
82
|
+
|
|
83
|
+
查看日志:
|
|
84
|
+
|
|
85
|
+
```bash
|
|
86
|
+
docker compose logs -f app
|
|
87
|
+
```
|
|
88
|
+
|
|
89
|
+
## 第四步:访问应用
|
|
90
|
+
|
|
91
|
+
应用启动完成后,打开:
|
|
92
|
+
|
|
93
|
+
```text
|
|
94
|
+
http://<服务器IP>:13000
|
|
95
|
+
```
|
|
96
|
+
|
|
97
|
+
如果是第一次启动,按页面提示初始化管理员账号即可。
|
|
98
|
+
|
|
99
|
+
## 常用命令
|
|
100
|
+
|
|
101
|
+
启动或更新容器:
|
|
102
|
+
|
|
103
|
+
```bash
|
|
104
|
+
docker compose up -d
|
|
105
|
+
```
|
|
106
|
+
|
|
107
|
+
停止应用:
|
|
108
|
+
|
|
109
|
+
```bash
|
|
110
|
+
docker compose down
|
|
111
|
+
```
|
|
112
|
+
|
|
113
|
+
查看日志:
|
|
114
|
+
|
|
115
|
+
```bash
|
|
116
|
+
docker compose logs -f app
|
|
117
|
+
```
|
|
118
|
+
|
|
119
|
+
## 下一步去哪里看
|
|
120
|
+
|
|
121
|
+
- 如果你要调整密钥、端口、数据库等配置,继续看 [应用环境变量](./env.md)
|
|
122
|
+
- 如果你准备正式上线,继续看 [Nginx](../production/reverse-proxy/nginx.md) 或 [Caddy](../production/reverse-proxy/caddy.md)
|
|
123
|
+
- 如果你后续要备份数据,继续看 [备份还原](../operations/backup-restore.md)
|