@aigne/doc-smith 0.8.2 → 0.8.4
This diff represents the content of publicly available package versions that have been released to one of the supported registries. The information contained in this diff is provided for informational purposes only and reflects changes between package versions as they appear in their respective public registries.
- package/.aigne/doc-smith/config.yaml +3 -3
- package/.aigne/doc-smith/preferences.yml +58 -12
- package/.aigne/doc-smith/upload-cache.yaml +600 -207
- package/CHANGELOG.md +17 -0
- package/README.md +77 -5
- package/docs/advanced-how-it-works.md +55 -60
- package/docs/advanced-how-it-works.zh.md +60 -65
- package/docs/advanced-quality-assurance.md +73 -38
- package/docs/advanced-quality-assurance.zh.md +73 -38
- package/docs/advanced.md +2 -14
- package/docs/advanced.zh.md +5 -17
- package/docs/changelog.md +41 -4
- package/docs/changelog.zh.md +77 -40
- package/docs/cli-reference.md +79 -13
- package/docs/cli-reference.zh.md +92 -26
- package/docs/configuration-interactive-setup.md +102 -49
- package/docs/configuration-interactive-setup.zh.md +102 -49
- package/docs/configuration-language-support.md +69 -39
- package/docs/configuration-language-support.zh.md +68 -38
- package/docs/configuration-llm-setup.md +25 -62
- package/docs/configuration-llm-setup.zh.md +25 -62
- package/docs/configuration-preferences.md +79 -67
- package/docs/configuration-preferences.zh.md +78 -67
- package/docs/configuration.md +122 -109
- package/docs/configuration.zh.md +130 -117
- package/docs/features-generate-documentation.md +44 -24
- package/docs/features-generate-documentation.zh.md +52 -32
- package/docs/features-publish-your-docs.md +41 -40
- package/docs/features-publish-your-docs.zh.md +50 -49
- package/docs/features-translate-documentation.md +73 -17
- package/docs/features-translate-documentation.zh.md +76 -20
- package/docs/features-update-and-refine.md +72 -21
- package/docs/features-update-and-refine.zh.md +80 -29
- package/docs/features.md +24 -28
- package/docs/features.zh.md +25 -29
- package/docs/getting-started.md +87 -38
- package/docs/getting-started.zh.md +88 -39
- package/docs/overview.md +17 -35
- package/docs/overview.zh.md +18 -36
- package/package.json +9 -8
- package/prompts/content-detail-generator.md +1 -0
- package/prompts/document/custom-code-block.md +101 -0
- package/prompts/document/d2-chart/rules.md +941 -1031
- package/prompts/document/detail-generator.md +7 -53
- package/tests/kroki-utils.test.mjs +88 -17
- package/utils/constants.mjs +15 -1
- package/utils/kroki-utils.mjs +22 -14
- package/utils/markdown-checker.mjs +1 -1
- package/utils/utils.mjs +3 -2
- package/prompts/document/d2-chart/diy-examples.md +0 -44
- package/prompts/document/d2-chart/shape-rules.md +0 -182
package/docs/features.zh.md
CHANGED
|
@@ -1,56 +1,52 @@
|
|
|
1
|
-
---
|
|
2
|
-
labels: ["Reference"]
|
|
3
|
-
---
|
|
4
|
-
|
|
5
1
|
# 核心功能
|
|
6
2
|
|
|
7
|
-
AIGNE DocSmith
|
|
8
|
-
|
|
9
|
-
典型的工作流程遵循一个逻辑顺序,让您可以生成、优化、翻译并最终发布您的文档。
|
|
3
|
+
AIGNE DocSmith 提供了一系列命令来管理您的文档生命周期,从初始创建到全球分发。该过程被组织成一个标准工作流:生成、优化、翻译和发布您的文档。
|
|
10
4
|
|
|
11
5
|
```d2
|
|
12
|
-
direction:
|
|
6
|
+
direction: down
|
|
13
7
|
|
|
14
|
-
|
|
15
|
-
|
|
16
|
-
|
|
8
|
+
Generate: {
|
|
9
|
+
label: "1. 生成\naigne doc generate"
|
|
10
|
+
shape: rectangle
|
|
11
|
+
description: "从您的源代码创建一整套文档。"
|
|
17
12
|
}
|
|
18
13
|
|
|
19
|
-
|
|
20
|
-
|
|
21
|
-
|
|
14
|
+
Refine: {
|
|
15
|
+
label: "2. 更新与优化\naigne doc update"
|
|
16
|
+
shape: rectangle
|
|
17
|
+
description: "保持文档与代码同步,并应用有针对性的反馈。"
|
|
22
18
|
}
|
|
23
19
|
|
|
24
|
-
|
|
25
|
-
|
|
26
|
-
|
|
20
|
+
Translate: {
|
|
21
|
+
label: "3. 翻译\naigne doc translate"
|
|
22
|
+
shape: rectangle
|
|
23
|
+
description: "将内容本地化为多种语言,以面向全球受众。"
|
|
27
24
|
}
|
|
28
25
|
|
|
29
|
-
|
|
30
|
-
|
|
31
|
-
|
|
26
|
+
Publish: {
|
|
27
|
+
label: "4. 发布\naigne doc publish"
|
|
28
|
+
shape: rectangle
|
|
29
|
+
description: "将您的文档部署到公共或私有平台。"
|
|
32
30
|
}
|
|
33
31
|
|
|
34
|
-
|
|
35
|
-
style.animated: true
|
|
36
|
-
}
|
|
32
|
+
Generate -> Refine -> Translate -> Publish
|
|
37
33
|
```
|
|
38
34
|
|
|
39
|
-
|
|
35
|
+
在以下各节中探索 DocSmith 的主要功能:
|
|
40
36
|
|
|
41
37
|
<x-cards data-columns="2">
|
|
42
38
|
<x-card data-title="生成文档" data-icon="lucide:file-plus-2" data-href="/features/generate-documentation">
|
|
43
|
-
|
|
39
|
+
使用单个命令从您的源代码创建一整套文档。
|
|
44
40
|
</x-card>
|
|
45
41
|
<x-card data-title="更新与优化" data-icon="lucide:edit" data-href="/features/update-and-refine">
|
|
46
|
-
|
|
42
|
+
保持您的文档与代码更改同步,或根据有针对性的反馈重新生成特定文档。
|
|
47
43
|
</x-card>
|
|
48
44
|
<x-card data-title="翻译文档" data-icon="lucide:languages" data-href="/features/translate-documentation">
|
|
49
|
-
|
|
45
|
+
将您的内容翻译成多种支持的语言,使您的项目能够面向全球受众。
|
|
50
46
|
</x-card>
|
|
51
47
|
<x-card data-title="发布您的文档" data-icon="lucide:send" data-href="/features/publish-your-docs">
|
|
52
|
-
|
|
48
|
+
将您生成的文档发布到官方 DocSmith 平台或您自己的自托管实例。
|
|
53
49
|
</x-card>
|
|
54
50
|
</x-cards>
|
|
55
51
|
|
|
56
|
-
|
|
52
|
+
这些功能为文档管理提供了一个结构化的工作流。要获取所有可用命令及其选项的详细列表,请参阅 [CLI 命令参考](./cli-reference.md)。
|
package/docs/getting-started.md
CHANGED
|
@@ -1,74 +1,123 @@
|
|
|
1
|
-
---
|
|
2
|
-
labels: ["Reference"]
|
|
3
|
-
---
|
|
4
|
-
|
|
5
1
|
# Getting Started
|
|
6
2
|
|
|
7
|
-
This guide
|
|
3
|
+
This guide provides a step-by-step walkthrough to install AIGNE DocSmith, configure a project, and generate a complete set of documentation from your source code.
|
|
4
|
+
|
|
5
|
+
## Step 1: Prerequisites
|
|
6
|
+
|
|
7
|
+
Before you begin, ensure you have Node.js and its package manager, npm, installed on your system. DocSmith is a command-line tool that runs on the Node.js environment.
|
|
8
|
+
|
|
9
|
+
### Installing Node.js
|
|
10
|
+
|
|
11
|
+
Here are brief instructions for installing Node.js on various operating systems.
|
|
12
|
+
|
|
13
|
+
**Windows**
|
|
14
|
+
1. Download the installer from the official [Node.js website](https://nodejs.org/).
|
|
15
|
+
2. Run the `.msi` installer and follow the steps in the installation wizard.
|
|
8
16
|
|
|
9
|
-
|
|
17
|
+
**macOS**
|
|
10
18
|
|
|
11
|
-
|
|
19
|
+
The recommended method is using [Homebrew](https://brew.sh/):
|
|
12
20
|
|
|
13
|
-
|
|
14
|
-
|
|
21
|
+
```bash Terminal icon=lucide:apple
|
|
22
|
+
# Install Homebrew if you don't have it
|
|
23
|
+
/bin/bash -c "$(curl -fsSL https://raw.githubusercontent.com/Homebrew/install/HEAD/install.sh)"
|
|
15
24
|
|
|
16
|
-
|
|
25
|
+
# Install Node.js
|
|
26
|
+
brew install node
|
|
27
|
+
```
|
|
28
|
+
|
|
29
|
+
Alternatively, you can download the `.pkg` installer from the [Node.js website](https://nodejs.org/).
|
|
30
|
+
|
|
31
|
+
**Linux**
|
|
32
|
+
|
|
33
|
+
For Ubuntu/Debian-based systems:
|
|
34
|
+
|
|
35
|
+
```bash Terminal icon=lucide:laptop
|
|
36
|
+
sudo apt update
|
|
37
|
+
curl -fsSL https://deb.nodesource.com/setup_lts.x | sudo -E bash -
|
|
38
|
+
sudo apt-get install -y nodejs
|
|
39
|
+
```
|
|
17
40
|
|
|
18
|
-
|
|
41
|
+
For CentOS/RHEL/Fedora systems:
|
|
19
42
|
|
|
20
|
-
```bash
|
|
43
|
+
```bash Terminal icon=lucide:laptop
|
|
44
|
+
curl -fsSL https://rpm.nodesource.com/setup_lts.x | sudo bash -
|
|
45
|
+
sudo yum install nodejs
|
|
46
|
+
```
|
|
47
|
+
|
|
48
|
+
### Verification
|
|
49
|
+
|
|
50
|
+
After installation, verify that Node.js and npm are available by running these commands in your terminal:
|
|
51
|
+
|
|
52
|
+
```bash Terminal
|
|
53
|
+
node --version
|
|
54
|
+
npm --version
|
|
55
|
+
```
|
|
56
|
+
|
|
57
|
+
## Step 2: Install AIGNE CLI
|
|
58
|
+
|
|
59
|
+
The DocSmith tool is included within the AIGNE Command Line Interface (CLI). Install the latest version of the AIGNE CLI globally using npm:
|
|
60
|
+
|
|
61
|
+
```bash Terminal icon=logos:npm
|
|
21
62
|
npm i -g @aigne/cli
|
|
22
63
|
```
|
|
23
64
|
|
|
24
|
-
|
|
65
|
+
After the installation is complete, verify it by running the help command for the documentation tool:
|
|
25
66
|
|
|
26
|
-
```bash
|
|
67
|
+
```bash Terminal
|
|
27
68
|
aigne doc -h
|
|
28
69
|
```
|
|
29
70
|
|
|
30
|
-
This command
|
|
71
|
+
This command will display the help menu for DocSmith, confirming it is ready for use.
|
|
31
72
|
|
|
32
|
-
## Step
|
|
73
|
+
## Step 3: Generate Your Documentation
|
|
33
74
|
|
|
34
|
-
With the
|
|
75
|
+
With the CLI installed, you can generate your documents with a single command. Navigate to your project's root directory in your terminal and run:
|
|
35
76
|
|
|
36
|
-
```bash
|
|
77
|
+
```bash Terminal icon=lucide:sparkles
|
|
37
78
|
aigne doc generate
|
|
38
79
|
```
|
|
39
80
|
|
|
40
|
-
###
|
|
41
|
-
|
|
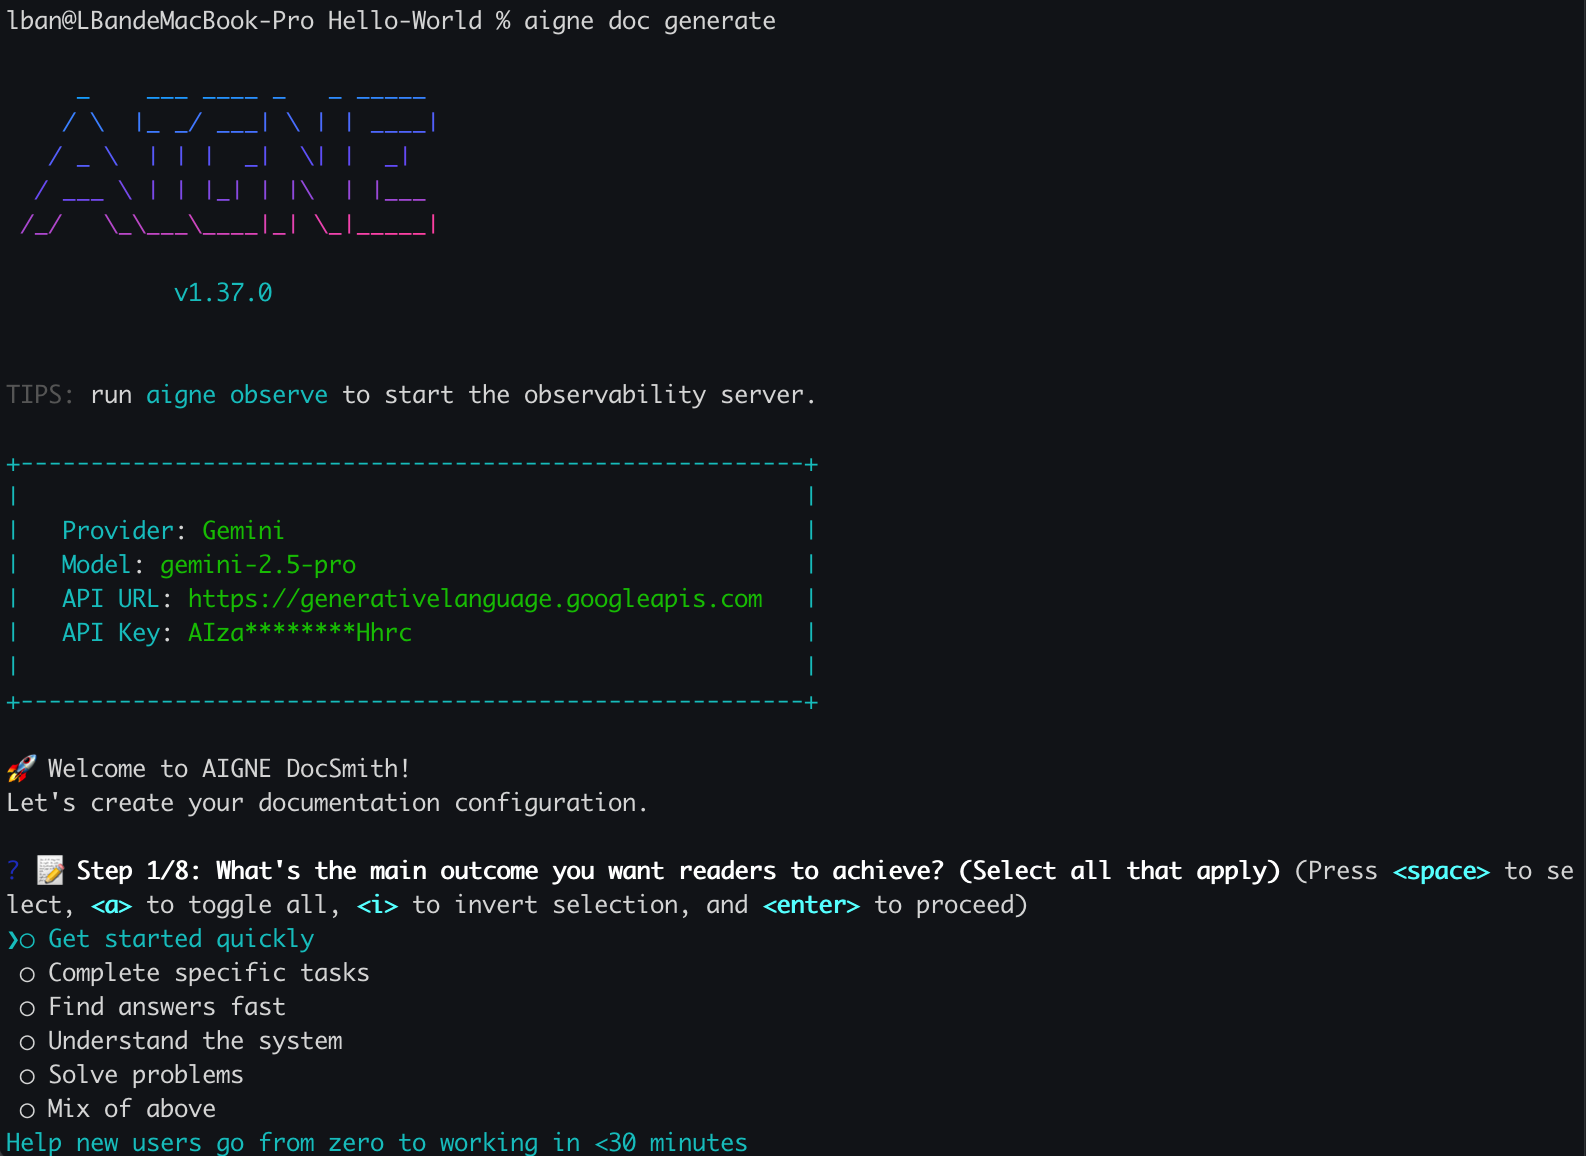
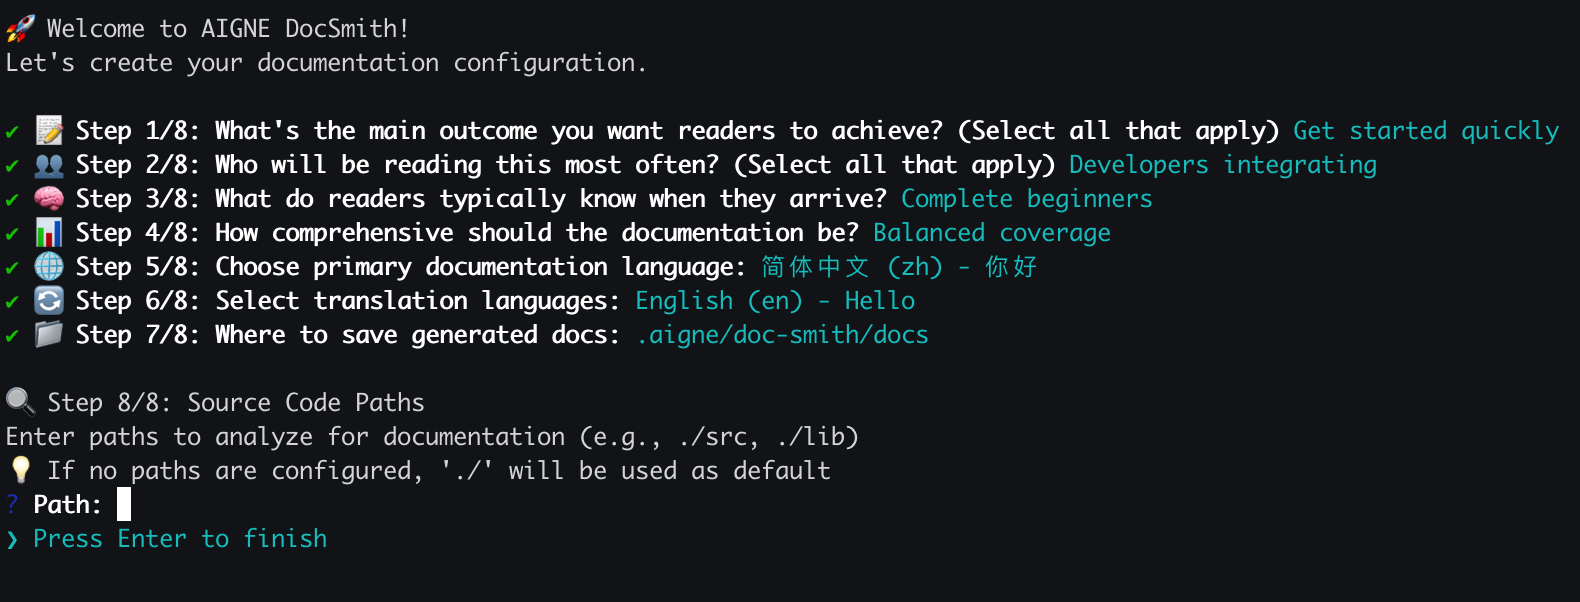
42
|
-
If this is your first time running DocSmith in the project, it will automatically detect that no configuration exists and launch an interactive setup wizard to guide you.
|
|
81
|
+
### Automatic Configuration
|
|
43
82
|
|
|
44
|
-
|
|
83
|
+
When you run this command for the first time in a project, DocSmith detects that no configuration exists and automatically launches an interactive setup wizard.
|
|
45
84
|
|
|
46
|
-
|
|
85
|
+
|
|
47
86
|
|
|
48
|
-
|
|
87
|
+
You will be prompted with a series of questions to define the documentation's characteristics, including:
|
|
49
88
|
|
|
50
|
-
- The primary purpose and style
|
|
51
|
-
-
|
|
89
|
+
- The primary purpose and style.
|
|
90
|
+
- The intended target audience.
|
|
52
91
|
- The primary language and any additional languages for translation.
|
|
53
92
|
- The source code paths for the AI to analyze.
|
|
54
|
-
- The output directory
|
|
93
|
+
- The output directory for the generated documents.
|
|
55
94
|
|
|
56
|
-
|
|
57
96
|
|
|
58
|
-
|
|
97
|
+
Once the configuration is complete, DocSmith will proceed to analyze your source code, plan the document structure, and generate the content.
|
|
59
98
|
|
|
60
|
-
|
|
99
|
+
|
|
61
100
|
|
|
62
|
-
|
|
101
|
+
## Step 4: Review Your Output
|
|
63
102
|
|
|
64
|
-
|
|
103
|
+
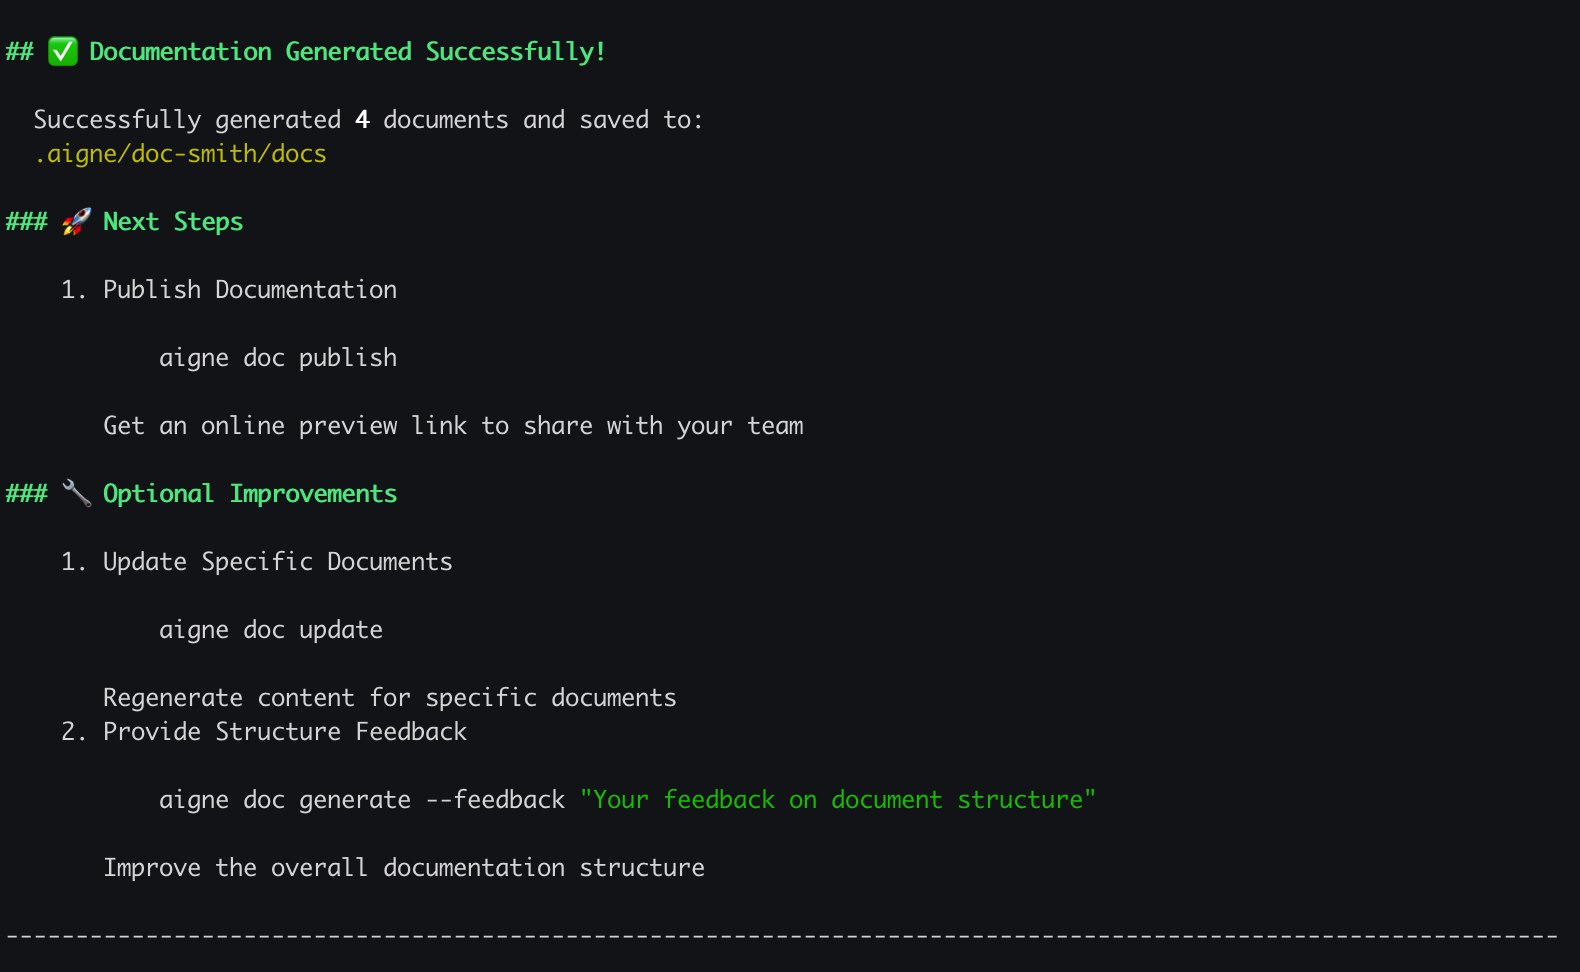
After the generation process is finished, a confirmation message will be displayed in your terminal.
|
|
65
104
|
|
|
66
|
-
|
|
67
106
|
|
|
68
|
-
|
|
107
|
+
Your new documentation is now available in the output directory you specified during the setup process. The default location is `.aigne/doc-smith/docs`.
|
|
69
108
|
|
|
70
|
-
|
|
109
|
+
## What's Next?
|
|
71
110
|
|
|
72
|
-
|
|
73
|
-
|
|
74
|
-
|
|
111
|
+
Now that you have generated your first set of documents, you can explore other features:
|
|
112
|
+
|
|
113
|
+
<x-cards>
|
|
114
|
+
<x-card data-title="Core Features" data-icon="lucide:box" data-href="/features">
|
|
115
|
+
Explore the main commands and capabilities, from updating documents to publishing them online.
|
|
116
|
+
</x-card>
|
|
117
|
+
<x-card data-title="Configuration Guide" data-icon="lucide:settings" data-href="/configuration">
|
|
118
|
+
Learn how to fine-tune your documentation's style, audience, and languages by editing the config.yaml file.
|
|
119
|
+
</x-card>
|
|
120
|
+
<x-card data-title="CLI Command Reference" data-icon="lucide:terminal" data-href="/cli-reference">
|
|
121
|
+
Get a complete reference for all available `aigne doc` commands and their options.
|
|
122
|
+
</x-card>
|
|
123
|
+
</x-cards>
|
|
@@ -1,74 +1,123 @@
|
|
|
1
|
-
|
|
2
|
-
labels: ["Reference"]
|
|
3
|
-
---
|
|
1
|
+
# 入门指南
|
|
4
2
|
|
|
5
|
-
|
|
3
|
+
本指南将引导您逐步完成 AIGNE DocSmith 的安装、项目配置,并从源代码生成一套完整的文档。
|
|
6
4
|
|
|
7
|
-
|
|
5
|
+
## 第 1 步:准备工作
|
|
8
6
|
|
|
9
|
-
|
|
7
|
+
在开始之前,请确保您的系统中已安装 Node.js 及其包管理器 npm。DocSmith 是一个在 Node.js 环境下运行的命令行工具。
|
|
10
8
|
|
|
11
|
-
|
|
9
|
+
### 安装 Node.js
|
|
12
10
|
|
|
13
|
-
|
|
14
|
-
- [pnpm](https://pnpm.io/)
|
|
11
|
+
以下是在各种操作系统上安装 Node.js 的简要说明。
|
|
15
12
|
|
|
16
|
-
|
|
13
|
+
**Windows**
|
|
14
|
+
1. 从 [Node.js 官网](https://nodejs.org/) 下载安装程序。
|
|
15
|
+
2. 运行 `.msi` 安装程序,并按照安装向导的步骤进行操作。
|
|
17
16
|
|
|
18
|
-
|
|
17
|
+
**macOS**
|
|
19
18
|
|
|
20
|
-
|
|
19
|
+
推荐使用 [Homebrew](https://brew.sh/) 进行安装:
|
|
20
|
+
|
|
21
|
+
```bash Terminal icon=lucide:apple
|
|
22
|
+
# Install Homebrew if you don't have it
|
|
23
|
+
/bin/bash -c "$(curl -fsSL https://raw.githubusercontent.com/Homebrew/install/HEAD/install.sh)"
|
|
24
|
+
|
|
25
|
+
# Install Node.js
|
|
26
|
+
brew install node
|
|
27
|
+
```
|
|
28
|
+
|
|
29
|
+
或者,您也可以从 [Node.js 网站](https://nodejs.org/) 下载 `.pkg` 安装程序。
|
|
30
|
+
|
|
31
|
+
**Linux**
|
|
32
|
+
|
|
33
|
+
对于基于 Ubuntu/Debian 的系统:
|
|
34
|
+
|
|
35
|
+
```bash Terminal icon=lucide:laptop
|
|
36
|
+
sudo apt update
|
|
37
|
+
curl -fsSL https://deb.nodesource.com/setup_lts.x | sudo -E bash -
|
|
38
|
+
sudo apt-get install -y nodejs
|
|
39
|
+
```
|
|
40
|
+
|
|
41
|
+
对于基于 CentOS/RHEL/Fedora 的系统:
|
|
42
|
+
|
|
43
|
+
```bash Terminal icon=lucide:laptop
|
|
44
|
+
curl -fsSL https://rpm.nodesource.com/setup_lts.x | sudo bash -
|
|
45
|
+
sudo yum install nodejs
|
|
46
|
+
```
|
|
47
|
+
|
|
48
|
+
### 验证
|
|
49
|
+
|
|
50
|
+
安装完成后,在终端中运行以下命令,验证 Node.js 和 npm 是否可用:
|
|
51
|
+
|
|
52
|
+
```bash Terminal
|
|
53
|
+
node --version
|
|
54
|
+
npm --version
|
|
55
|
+
```
|
|
56
|
+
|
|
57
|
+
## 第 2 步:安装 AIGNE CLI
|
|
58
|
+
|
|
59
|
+
DocSmith 工具包含在 AIGNE 命令行界面 (CLI) 中。使用 npm 全局安装最新版本的 AIGNE CLI:
|
|
60
|
+
|
|
61
|
+
```bash Terminal icon=logos:npm
|
|
21
62
|
npm i -g @aigne/cli
|
|
22
63
|
```
|
|
23
64
|
|
|
24
|
-
|
|
65
|
+
安装完成后,运行文档工具的帮助命令进行验证:
|
|
25
66
|
|
|
26
|
-
```bash
|
|
67
|
+
```bash Terminal
|
|
27
68
|
aigne doc -h
|
|
28
69
|
```
|
|
29
70
|
|
|
30
|
-
|
|
71
|
+
该命令将显示 DocSmith 的帮助菜单,确认其已准备就绪。
|
|
31
72
|
|
|
32
|
-
## 第
|
|
73
|
+
## 第 3 步:生成您的文档
|
|
33
74
|
|
|
34
|
-
安装
|
|
75
|
+
安装 CLI 后,您只需一个命令即可生成文档。在终端中导航到您项目的根目录并运行:
|
|
35
76
|
|
|
36
|
-
```bash
|
|
77
|
+
```bash Terminal icon=lucide:sparkles
|
|
37
78
|
aigne doc generate
|
|
38
79
|
```
|
|
39
80
|
|
|
40
|
-
###
|
|
81
|
+
### 自动配置
|
|
41
82
|
|
|
42
|
-
|
|
83
|
+
当您首次在项目中运行此命令时,DocSmith 会检测到尚无配置,并自动启动一个交互式设置向导。
|
|
43
84
|
|
|
44
|
-

|
|
45
86
|
|
|
46
|
-
|
|
87
|
+
系统将提示您回答一系列问题,以定义文档的特性,包括:
|
|
47
88
|
|
|
48
|
-
|
|
49
|
-
|
|
50
|
-
-
|
|
51
|
-
- 目标受众及其技术知识水平。
|
|
52
|
-
- 主要语言以及任何需要翻译的其他语言。
|
|
89
|
+
- 主要目的和风格。
|
|
90
|
+
- 目标受众。
|
|
91
|
+
- 主要语言及其他需要翻译的语言。
|
|
53
92
|
- 供 AI 分析的源代码路径。
|
|
54
|
-
-
|
|
93
|
+
- 生成文档的输出目录。
|
|
94
|
+
|
|
95
|
+

|
|
55
96
|
|
|
56
|
-
|
|
97
|
+
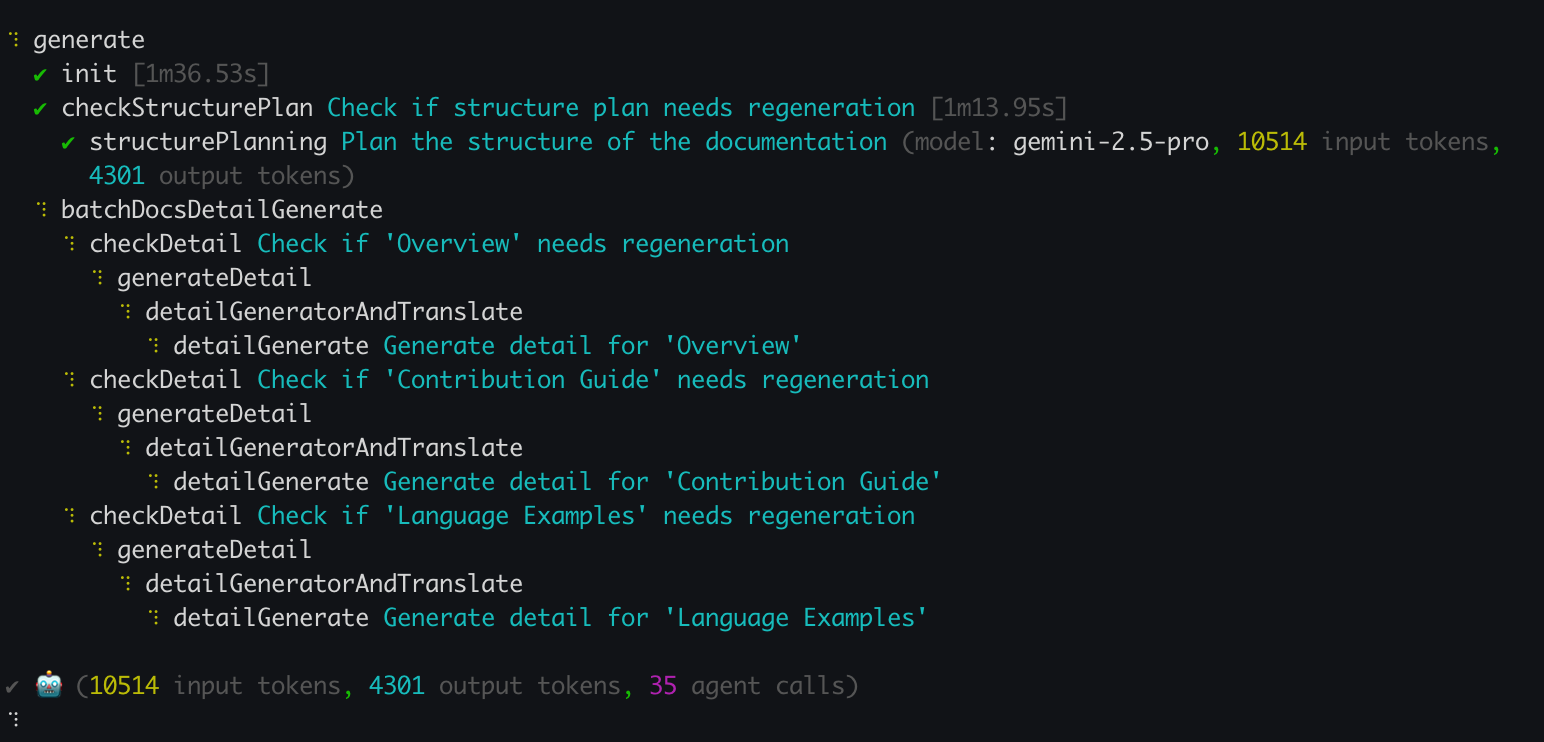
配置完成后,DocSmith 将开始分析您的源代码、规划文档结构并生成内容。
|
|
57
98
|
|
|
58
|
-
|
|
99
|
+

|
|
59
100
|
|
|
60
|
-
|
|
101
|
+
## 第 4 步:查看您的输出
|
|
61
102
|
|
|
62
|
-
|
|
103
|
+
生成过程结束后,您的终端将显示一条确认消息。
|
|
63
104
|
|
|
64
|
-
|
|
105
|
+

|
|
65
106
|
|
|
66
|
-
|
|
107
|
+
您的新文档现已位于您在设置过程中指定的输出目录中。默认位置是 `.aigne/doc-smith/docs`。
|
|
67
108
|
|
|
68
|
-
##
|
|
109
|
+
## 下一步?
|
|
69
110
|
|
|
70
|
-
|
|
111
|
+
既然您已经生成了第一套文档,可以探索其他功能:
|
|
71
112
|
|
|
72
|
-
<x-
|
|
73
|
-
|
|
74
|
-
|
|
113
|
+
<x-cards>
|
|
114
|
+
<x-card data-title="核心功能" data-icon="lucide:box" data-href="/features">
|
|
115
|
+
探索主要命令和功能,从更新文档到在线发布。
|
|
116
|
+
</x-card>
|
|
117
|
+
<x-card data-title="配置指南" data-icon="lucide:settings" data-href="/configuration">
|
|
118
|
+
了解如何通过编辑 config.yaml 文件来微调文档的风格、受众和语言。
|
|
119
|
+
</x-card>
|
|
120
|
+
<x-card data-title="CLI 命令参考" data-icon="lucide:terminal" data-href="/cli-reference">
|
|
121
|
+
获取所有可用 `aigne doc` 命令及其选项的完整参考。
|
|
122
|
+
</x-card>
|
|
123
|
+
</x-cards>
|
package/docs/overview.md
CHANGED
|
@@ -1,48 +1,30 @@
|
|
|
1
|
-
---
|
|
2
|
-
labels: ["Reference"]
|
|
3
|
-
---
|
|
4
|
-
|
|
5
1
|
# Overview
|
|
6
2
|
|
|
7
|
-
AIGNE DocSmith is an AI-driven documentation
|
|
3
|
+
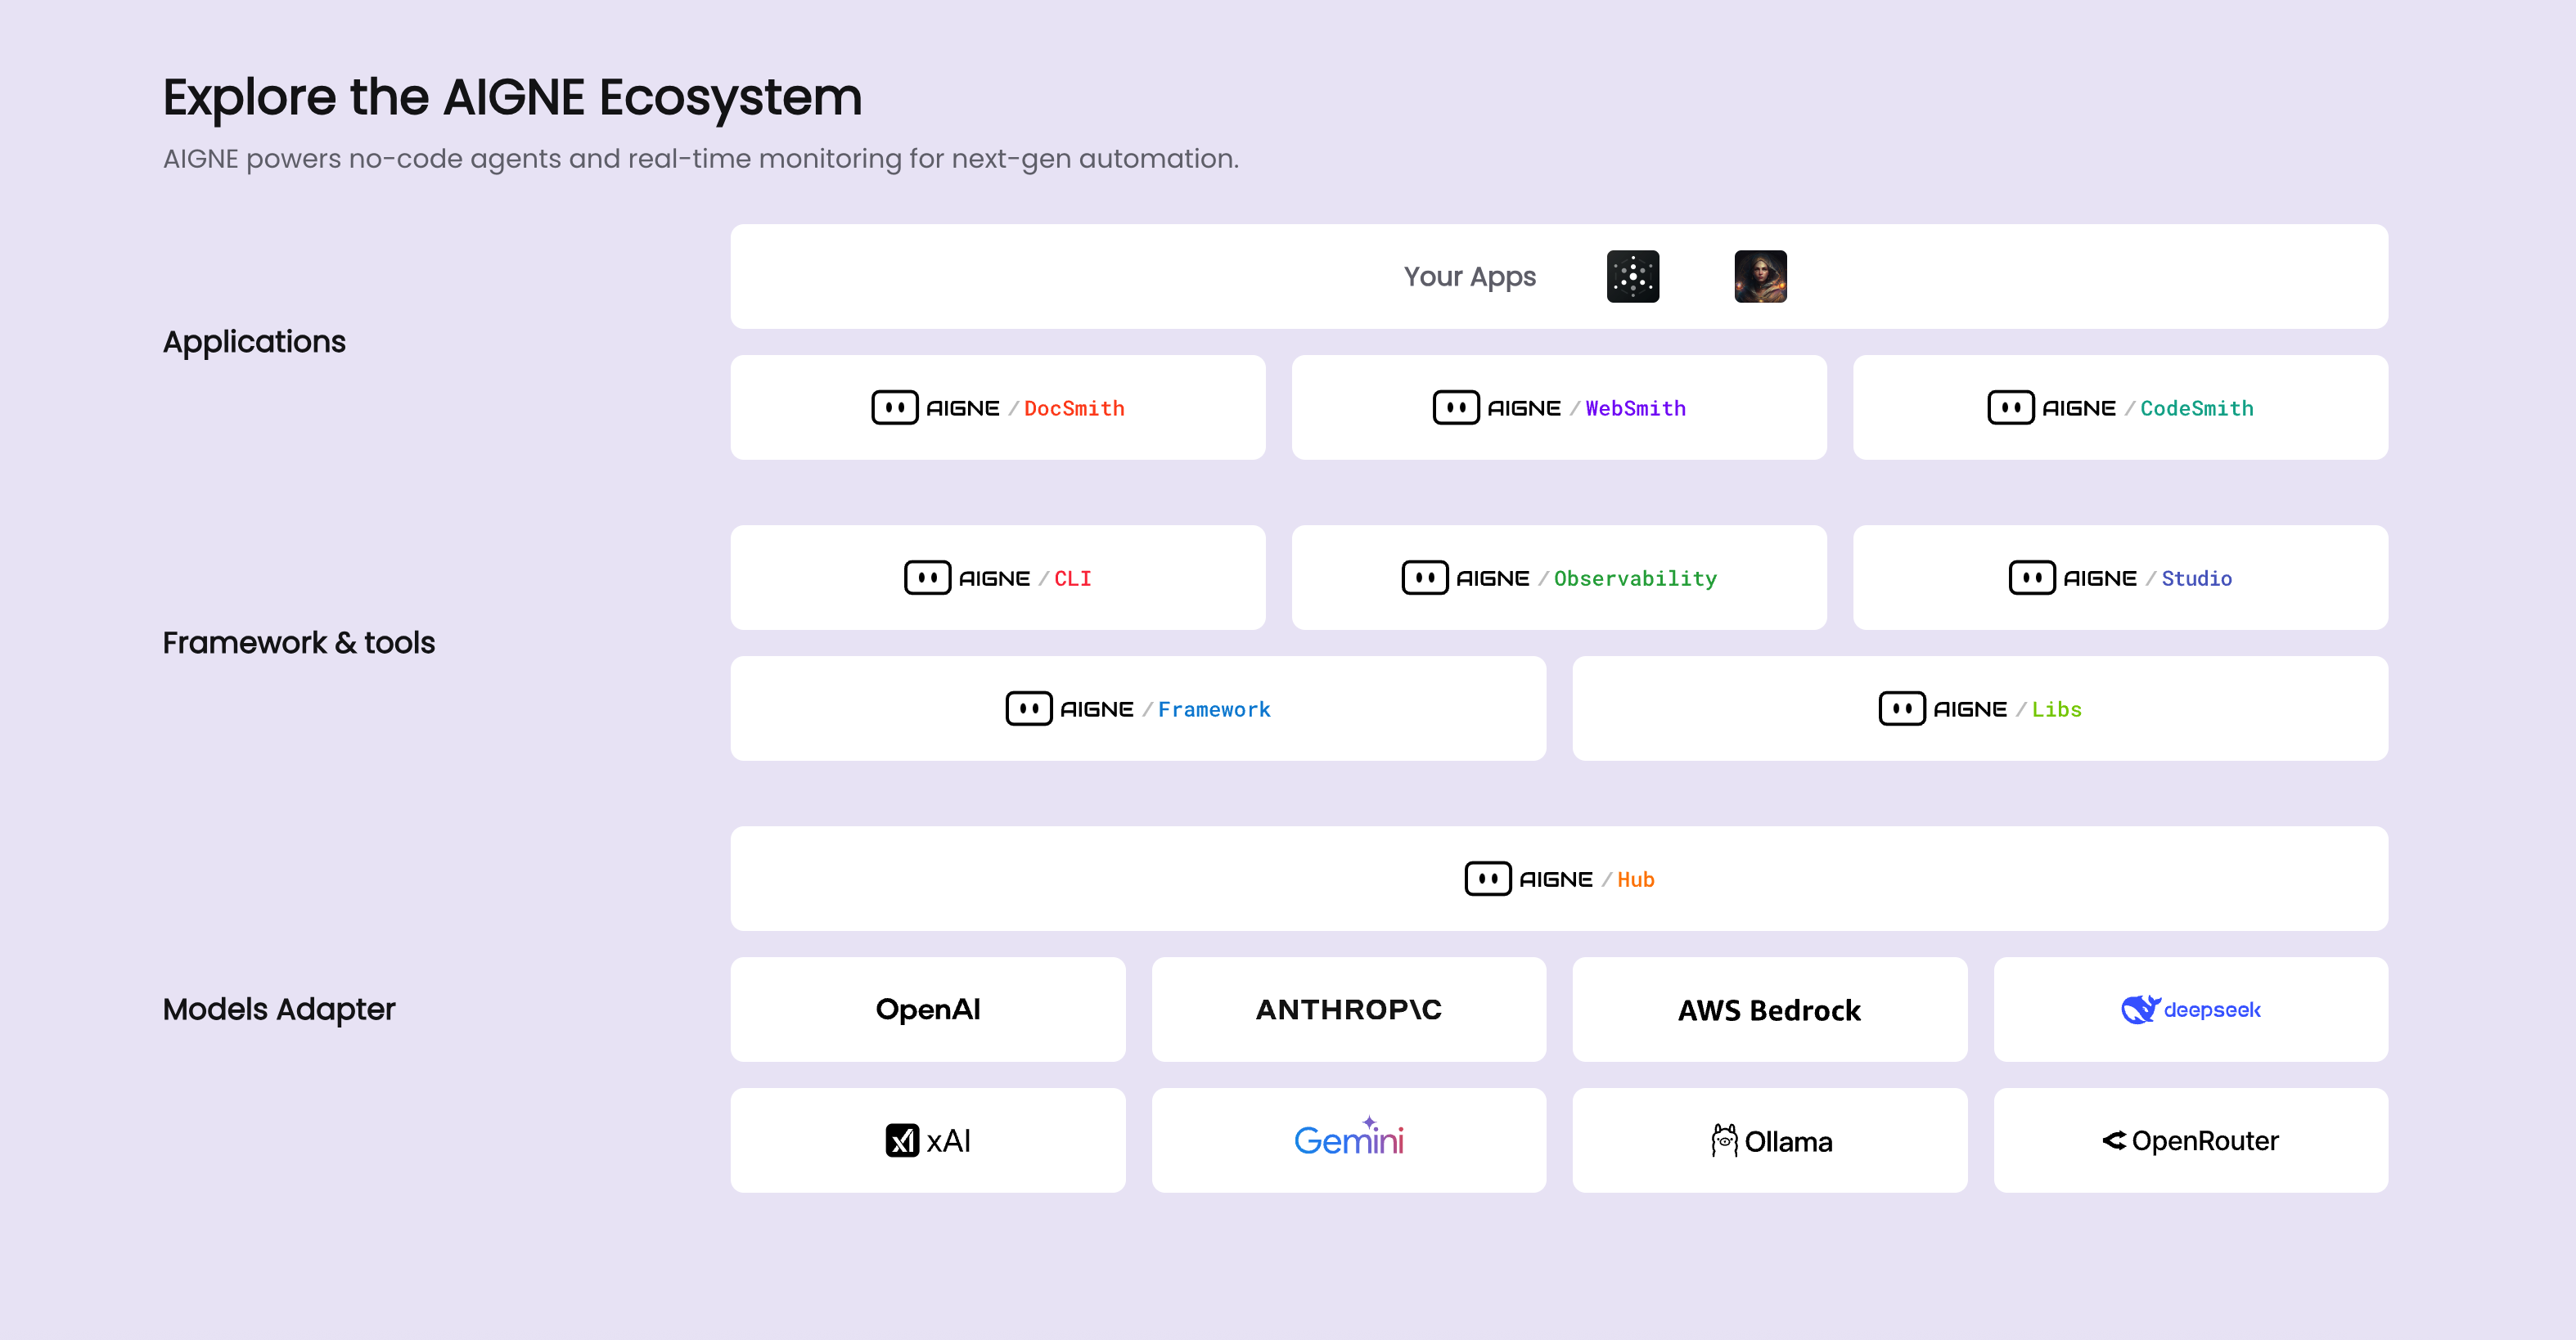
AIGNE DocSmith is an AI-driven tool that generates documentation directly from your source code. Built on the [AIGNE Framework](https://www.aigne.io/en/framework), it automates the creation of structured, multi-language documents. This process reduces the manual effort of writing and maintaining documentation, ensuring it stays synchronized with the codebase.
|
|
8
4
|
|
|
9
5
|
## Part of the AIGNE Ecosystem
|
|
10
6
|
|
|
11
|
-
DocSmith is a key component of the [AIGNE](https://www.aigne.io) ecosystem, a
|
|
7
|
+
DocSmith is a key component of the [AIGNE](https://www.aigne.io) ecosystem, a platform for developing AI applications. It integrates with other AIGNE components to use the platform's AI capabilities and infrastructure.
|
|
12
8
|
|
|
13
9
|
The following diagram illustrates how DocSmith fits within the AIGNE architecture:
|
|
14
10
|
|
|
15
11
|
|
|
16
12
|
|
|
17
|
-
##
|
|
18
|
-
|
|
19
|
-
DocSmith
|
|
20
|
-
|
|
21
|
-
|
|
22
|
-
|
|
23
|
-
|
|
24
|
-
|
|
25
|
-
|
|
26
|
-
|
|
27
|
-
|
|
28
|
-
|
|
29
|
-
|
|
30
|
-
|
|
31
|
-
<x-card data-title="AIGNE Hub Integration" data-icon="lucide:plug-zap">
|
|
32
|
-
Use various LLMs through AIGNE Hub without needing your own API keys, and switch between models easily.
|
|
33
|
-
</x-card>
|
|
34
|
-
<x-card data-title="Discuss Kit Publishing" data-icon="lucide:send">
|
|
35
|
-
Publish your generated documentation to the official platform or your own self-hosted Discuss Kit instance.
|
|
36
|
-
</x-card>
|
|
37
|
-
<x-card data-title="Intelligent Updates" data-icon="lucide:git-pull-request-arrow">
|
|
38
|
-
Automatically detects source code changes to update documentation or lets you refine specific documents with targeted feedback.
|
|
39
|
-
</x-card>
|
|
40
|
-
</x-cards>
|
|
41
|
-
|
|
42
|
-
## Get Started
|
|
43
|
-
|
|
44
|
-
Whether you're a developer looking to eliminate the manual effort of documentation or a project manager aiming for consistent, high-quality user guides, DocSmith provides the tools to get it done efficiently.
|
|
13
|
+
## Core Features
|
|
14
|
+
|
|
15
|
+
DocSmith provides a set of features to automate and simplify the documentation process:
|
|
16
|
+
|
|
17
|
+
* **Structure Planning:** Analyzes a codebase to generate a logical document structure.
|
|
18
|
+
* **Content Generation:** Populates the planned document structure with content generated from the source code.
|
|
19
|
+
* **Multi-Language Support:** Translates documentation into 12 languages, including English, Chinese, Japanese, and Spanish.
|
|
20
|
+
* **AIGNE Hub Integration:** Uses [AIGNE Hub](https://www.aigne.io/en/hub) as an LLM provider, allowing model switching without managing individual API keys.
|
|
21
|
+
* **Document Publishing:** Publishes documentation to the official platform at [docsmith.aigne.io](https://docsmith.aigne.io/app/) or to a user's own [Discuss Kit](https://www.arcblock.io/docs/web3-kit/en/discuss-kit) instance.
|
|
22
|
+
* **Iterative Updates:** Detects source code changes to update documentation and supports targeted regeneration of specific documents based on user feedback.
|
|
23
|
+
|
|
24
|
+
## Next Steps
|
|
25
|
+
|
|
26
|
+
To begin using DocSmith, proceed to the installation and configuration guide.
|
|
45
27
|
|
|
46
28
|
<x-card data-title="Next: Getting Started" data-href="/getting-started" data-icon="lucide:arrow-right-circle" data-cta="Start the guide">
|
|
47
|
-
Follow
|
|
29
|
+
Follow the step-by-step guide to install the tool, configure your first project, and generate documentation.
|
|
48
30
|
</x-card>
|
package/docs/overview.zh.md
CHANGED
|
@@ -1,48 +1,30 @@
|
|
|
1
|
-
---
|
|
2
|
-
labels: ["Reference"]
|
|
3
|
-
---
|
|
4
|
-
|
|
5
1
|
# 概述
|
|
6
2
|
|
|
7
|
-
AIGNE DocSmith
|
|
3
|
+
AIGNE DocSmith 是一款 AI 驱动的工具,可直接从源代码生成文档。它基于 [AIGNE 框架](https://www.aigne.io/en/framework),可自动创建结构化的多语言文档。此过程减少了编写和维护文档的人工工作量,确保文档与代码库保持同步。
|
|
8
4
|
|
|
9
5
|
## AIGNE 生态系统的一部分
|
|
10
6
|
|
|
11
|
-
DocSmith 是 [AIGNE](https://www.aigne.io)
|
|
7
|
+
DocSmith 是 [AIGNE](https://www.aigne.io) 生态系统的一个关键组件,该生态系统是一个用于开发 AI 应用的平台。它与其他 AIGNE 组件集成,以使用该平台的 AI 功能和基础设施。
|
|
12
8
|
|
|
13
|
-
下图说明了 DocSmith
|
|
9
|
+
下图说明了 DocSmith 如何融入 AIGNE 架构:
|
|
14
10
|
|
|
15
11
|

|
|
16
12
|
|
|
17
|
-
##
|
|
18
|
-
|
|
19
|
-
DocSmith
|
|
20
|
-
|
|
21
|
-
|
|
22
|
-
|
|
23
|
-
|
|
24
|
-
|
|
25
|
-
|
|
26
|
-
|
|
27
|
-
|
|
28
|
-
|
|
29
|
-
|
|
30
|
-
|
|
31
|
-
<x-card data-title="AIGNE Hub 集成" data-icon="lucide:plug-zap">
|
|
32
|
-
通过 AIGNE Hub 使用各种大语言模型,无需您自己的 API 密钥,并可轻松切换模型。
|
|
33
|
-
</x-card>
|
|
34
|
-
<x-card data-title="Discuss Kit 发布" data-icon="lucide:send">
|
|
35
|
-
将生成的文档发布到官方平台或您自己托管的 Discuss Kit 实例。
|
|
36
|
-
</x-card>
|
|
37
|
-
<x-card data-title="智能更新" data-icon="lucide:git-pull-request-arrow">
|
|
38
|
-
自动检测源代码变更以更新文档,或允许您通过有针对性的反馈来优化特定文档。
|
|
39
|
-
</x-card>
|
|
40
|
-
</x-cards>
|
|
41
|
-
|
|
42
|
-
## 开始入门
|
|
43
|
-
|
|
44
|
-
无论您是希望摆脱手动编写文档工作的开发者,还是追求一致、高质量用户指南的项目经理,DocSmith 都能为您提供高效完成这些任务的工具。
|
|
13
|
+
## 核心功能
|
|
14
|
+
|
|
15
|
+
DocSmith 提供了一系列功能来自动化和简化文档流程:
|
|
16
|
+
|
|
17
|
+
* **结构规划:** 分析代码库以生成逻辑化的文档结构。
|
|
18
|
+
* **内容生成:** 使用从源代码生成的内容填充规划好的文档结构。
|
|
19
|
+
* **多语言支持:** 将文档翻译成 12 种语言,包括英语、中文、日语和西班牙语。
|
|
20
|
+
* **AIGNE Hub 集成:** 使用 [AIGNE Hub](https://www.aigne.io/en/hub) 作为 LLM 提供商,无需管理独立的 API 密钥即可切换模型。
|
|
21
|
+
* **文档发布:** 将文档发布到官方平台 [docsmith.aigne.io](https://docsmith.aigne.io/app/) 或用户自己的 [Discuss Kit](https://www.arcblock.io/docs/web3-kit/en/discuss-kit) 实例。
|
|
22
|
+
* **迭代更新:** 检测源代码变更以更新文档,并支持根据用户反馈对特定文档进行定向重新生成。
|
|
23
|
+
|
|
24
|
+
## 后续步骤
|
|
25
|
+
|
|
26
|
+
要开始使用 DocSmith,请继续阅读安装和配置指南。
|
|
45
27
|
|
|
46
28
|
<x-card data-title="下一步:开始入门" data-href="/getting-started" data-icon="lucide:arrow-right-circle" data-cta="开始阅读指南">
|
|
47
|
-
|
|
29
|
+
按照分步指南安装工具、配置你的第一个项目并生成文档。
|
|
48
30
|
</x-card>
|
package/package.json
CHANGED
|
@@ -1,6 +1,6 @@
|
|
|
1
1
|
{
|
|
2
2
|
"name": "@aigne/doc-smith",
|
|
3
|
-
"version": "0.8.
|
|
3
|
+
"version": "0.8.4",
|
|
4
4
|
"description": "",
|
|
5
5
|
"publishConfig": {
|
|
6
6
|
"access": "public"
|
|
@@ -12,14 +12,15 @@
|
|
|
12
12
|
"author": "Arcblock <blocklet@arcblock.io> https://github.com/blocklet",
|
|
13
13
|
"license": "MIT",
|
|
14
14
|
"dependencies": {
|
|
15
|
-
"@aigne/aigne-hub": "^0.8.
|
|
16
|
-
"@aigne/anthropic": "^0.
|
|
17
|
-
"@aigne/cli": "^1.
|
|
18
|
-
"@aigne/core": "^1.
|
|
19
|
-
"@aigne/gemini": "^0.
|
|
20
|
-
"@aigne/openai": "^0.
|
|
21
|
-
"@aigne/publish-docs": "^0.9.
|
|
15
|
+
"@aigne/aigne-hub": "^0.8.10",
|
|
16
|
+
"@aigne/anthropic": "^0.12.3",
|
|
17
|
+
"@aigne/cli": "^1.44.3",
|
|
18
|
+
"@aigne/core": "^1.58.3",
|
|
19
|
+
"@aigne/gemini": "^0.12.3",
|
|
20
|
+
"@aigne/openai": "^0.14.3",
|
|
21
|
+
"@aigne/publish-docs": "^0.9.6",
|
|
22
22
|
"chalk": "^5.5.0",
|
|
23
|
+
"debug": "^4.4.1",
|
|
23
24
|
"dompurify": "^3.2.6",
|
|
24
25
|
"fs-extra": "^11.3.1",
|
|
25
26
|
"glob": "^11.0.3",
|