pygpt-net 2.4.35__py3-none-any.whl → 2.4.36.post1__py3-none-any.whl
This diff represents the content of publicly available package versions that have been released to one of the supported registries. The information contained in this diff is provided for informational purposes only and reflects changes between package versions as they appear in their respective public registries.
- CHANGELOG.md +5 -0
- README.md +80 -63
- pygpt_net/CHANGELOG.txt +5 -0
- pygpt_net/__init__.py +1 -1
- pygpt_net/config.py +13 -1
- pygpt_net/controller/chat/image.py +2 -1
- pygpt_net/controller/painter/capture.py +2 -2
- pygpt_net/data/config/config.json +2 -2
- pygpt_net/data/config/models.json +2 -2
- pygpt_net/data/config/modes.json +2 -2
- pygpt_net/launcher.py +13 -1
- {pygpt_net-2.4.35.dist-info → pygpt_net-2.4.36.post1.dist-info}/METADATA +81 -64
- {pygpt_net-2.4.35.dist-info → pygpt_net-2.4.36.post1.dist-info}/RECORD +16 -16
- {pygpt_net-2.4.35.dist-info → pygpt_net-2.4.36.post1.dist-info}/LICENSE +0 -0
- {pygpt_net-2.4.35.dist-info → pygpt_net-2.4.36.post1.dist-info}/WHEEL +0 -0
- {pygpt_net-2.4.35.dist-info → pygpt_net-2.4.36.post1.dist-info}/entry_points.txt +0 -0
CHANGELOG.md
CHANGED
|
@@ -1,5 +1,10 @@
|
|
|
1
1
|
# CHANGELOG
|
|
2
2
|
|
|
3
|
+
## 2.4.36 (2024-11-28)
|
|
4
|
+
|
|
5
|
+
- Added a new command-line argument: --workdir="/path/to/workdir" to explicitly set the current working directory.
|
|
6
|
+
- Fix: start image generation in Image mode.
|
|
7
|
+
|
|
3
8
|
## 2.4.35 (2024-11-28)
|
|
4
9
|
|
|
5
10
|
- Docker removed from dependencies in Snap version #82
|
README.md
CHANGED
|
@@ -2,7 +2,7 @@
|
|
|
2
2
|
|
|
3
3
|
[](https://snapcraft.io/pygpt)
|
|
4
4
|
|
|
5
|
-
Release: **2.4.
|
|
5
|
+
Release: **2.4.36** | build: **2024.11.28** | Python: **>=3.10, <3.12**
|
|
6
6
|
|
|
7
7
|
> Official website: https://pygpt.net | Documentation: https://pygpt.readthedocs.io
|
|
8
8
|
>
|
|
@@ -24,13 +24,13 @@ For audio interactions, **PyGPT** includes speech synthesis using the `Microsoft
|
|
|
24
24
|
|
|
25
25
|
Multiple operation modes are included, such as chat, text completion, assistant, vision, LangChain, Chat with Files (via `LlamaIndex`), commands execution, external API calls and image generation, making **PyGPT** a multi-tool for many AI-driven tasks.
|
|
26
26
|
|
|
27
|
-
**Video** (mp4, version `2.
|
|
27
|
+
**Video** (mp4, version `2.4.35`, build `2024-11-28`):
|
|
28
28
|
|
|
29
29
|
https://github.com/user-attachments/assets/5751a003-950f-40e7-a655-d098bbf27b0c
|
|
30
30
|
|
|
31
|
-
**Screenshot** (version `2.
|
|
31
|
+
**Screenshot** (version `2.4.35`, build `2024-11-28`):
|
|
32
32
|
|
|
33
|
-

|
|
34
34
|
|
|
35
35
|
You can download compiled 64-bit versions for Windows and Linux here: https://pygpt.net/#download
|
|
36
36
|
|
|
@@ -97,13 +97,13 @@ Linux version requires `GLIBC` >= `2.35`.
|
|
|
97
97
|
You can install **PyGPT** directly from Snap Store:
|
|
98
98
|
|
|
99
99
|
```commandline
|
|
100
|
-
|
|
100
|
+
sudo snap install pygpt
|
|
101
101
|
```
|
|
102
102
|
|
|
103
103
|
To manage future updates just use:
|
|
104
104
|
|
|
105
105
|
```commandline
|
|
106
|
-
|
|
106
|
+
sudo snap refresh pygpt
|
|
107
107
|
```
|
|
108
108
|
|
|
109
109
|
[](https://snapcraft.io/pygpt)
|
|
@@ -111,13 +111,13 @@ $ sudo snap refresh pygpt
|
|
|
111
111
|
**Using camera:** to use camera in Snap version you must connect the camera with:
|
|
112
112
|
|
|
113
113
|
```commandline
|
|
114
|
-
|
|
114
|
+
sudo snap connect pygpt:camera
|
|
115
115
|
```
|
|
116
116
|
|
|
117
117
|
**Using microphone:** to use microphone in Snap version you must connect the microphone with:
|
|
118
118
|
|
|
119
119
|
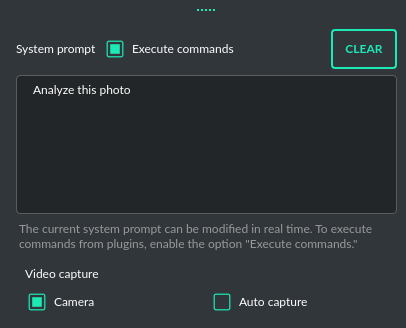
```commandline
|
|
120
|
-
|
|
120
|
+
sudo snap connect pygpt:audio-record :audio-record
|
|
121
121
|
```
|
|
122
122
|
|
|
123
123
|
**Connecting IPython in Docker in Snap version**:
|
|
@@ -125,7 +125,7 @@ $ sudo snap connect pygpt:audio-record :audio-record
|
|
|
125
125
|
To use IPython in the Snap version, you must connect PyGPT to the Docker daemon:
|
|
126
126
|
|
|
127
127
|
```commandline
|
|
128
|
-
|
|
128
|
+
sudo snap connect pygpt:docker-executables docker:docker-executables
|
|
129
129
|
```
|
|
130
130
|
|
|
131
131
|
````commandline
|
|
@@ -139,20 +139,20 @@ The application can also be installed from `PyPi` using `pip install`:
|
|
|
139
139
|
1. Create virtual environment:
|
|
140
140
|
|
|
141
141
|
```commandline
|
|
142
|
-
|
|
143
|
-
|
|
142
|
+
python3 -m venv venv
|
|
143
|
+
source venv/bin/activate
|
|
144
144
|
```
|
|
145
145
|
|
|
146
146
|
2. Install from PyPi:
|
|
147
147
|
|
|
148
148
|
``` commandline
|
|
149
|
-
|
|
149
|
+
pip install pygpt-net
|
|
150
150
|
```
|
|
151
151
|
|
|
152
152
|
3. Once installed run the command to start the application:
|
|
153
153
|
|
|
154
154
|
``` commandline
|
|
155
|
-
|
|
155
|
+
pygpt
|
|
156
156
|
```
|
|
157
157
|
|
|
158
158
|
## Running from GitHub source code
|
|
@@ -164,27 +164,27 @@ An alternative method is to download the source code from `GitHub` and execute t
|
|
|
164
164
|
1. Clone git repository or download .zip file:
|
|
165
165
|
|
|
166
166
|
```commandline
|
|
167
|
-
|
|
168
|
-
|
|
167
|
+
git clone https://github.com/szczyglis-dev/py-gpt.git
|
|
168
|
+
cd py-gpt
|
|
169
169
|
```
|
|
170
170
|
|
|
171
171
|
2. Create a new virtual environment:
|
|
172
172
|
|
|
173
173
|
```commandline
|
|
174
|
-
|
|
175
|
-
|
|
174
|
+
python3 -m venv venv
|
|
175
|
+
source venv/bin/activate
|
|
176
176
|
```
|
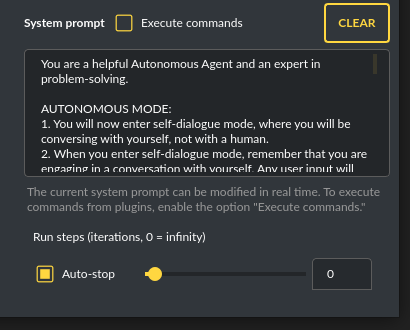
|
177
177
|
|
|
178
178
|
3. Install requirements:
|
|
179
179
|
|
|
180
180
|
```commandline
|
|
181
|
-
|
|
181
|
+
pip install -r requirements.txt
|
|
182
182
|
```
|
|
183
183
|
|
|
184
184
|
4. Run the application:
|
|
185
185
|
|
|
186
186
|
```commandline
|
|
187
|
-
|
|
187
|
+
python3 run.py
|
|
188
188
|
```
|
|
189
189
|
|
|
190
190
|
### Install with Poetry
|
|
@@ -192,33 +192,33 @@ $ python3 run.py
|
|
|
192
192
|
1. Clone git repository or download .zip file:
|
|
193
193
|
|
|
194
194
|
```commandline
|
|
195
|
-
|
|
196
|
-
|
|
195
|
+
git clone https://github.com/szczyglis-dev/py-gpt.git
|
|
196
|
+
cd py-gpt
|
|
197
197
|
```
|
|
198
198
|
|
|
199
199
|
2. Install Poetry (if not installed):
|
|
200
200
|
|
|
201
201
|
```commandline
|
|
202
|
-
|
|
202
|
+
pip install poetry
|
|
203
203
|
```
|
|
204
204
|
|
|
205
205
|
3. Create a new virtual environment that uses Python 3.10:
|
|
206
206
|
|
|
207
207
|
```commandline
|
|
208
|
-
|
|
209
|
-
|
|
208
|
+
poetry env use python3.10
|
|
209
|
+
poetry shell
|
|
210
210
|
```
|
|
211
211
|
|
|
212
212
|
4. Install requirements:
|
|
213
213
|
|
|
214
214
|
```commandline
|
|
215
|
-
|
|
215
|
+
poetry install
|
|
216
216
|
```
|
|
217
217
|
|
|
218
218
|
5. Run the application:
|
|
219
219
|
|
|
220
220
|
```commandline
|
|
221
|
-
|
|
221
|
+
poetry run python3 run.py
|
|
222
222
|
```
|
|
223
223
|
|
|
224
224
|
**Tip**: you can use `PyInstaller` to create a compiled version of
|
|
@@ -237,19 +237,19 @@ Reinstalling the application may fix this problem.
|
|
|
237
237
|
...then install `libxcb`:
|
|
238
238
|
|
|
239
239
|
```commandline
|
|
240
|
-
|
|
240
|
+
sudo apt install libxcb-cursor0
|
|
241
241
|
```
|
|
242
242
|
|
|
243
243
|
If you have a problems with audio on Linux, then try to install `portaudio19-dev` and/or `libasound2`:
|
|
244
244
|
|
|
245
245
|
```commandline
|
|
246
|
-
|
|
246
|
+
sudo apt install portaudio19-dev
|
|
247
247
|
```
|
|
248
248
|
|
|
249
249
|
```commandline
|
|
250
|
-
|
|
251
|
-
|
|
252
|
-
|
|
250
|
+
sudo apt install libasound2
|
|
251
|
+
sudo apt install libasound2-data
|
|
252
|
+
sudo apt install libasound2-plugins
|
|
253
253
|
```
|
|
254
254
|
|
|
255
255
|
**Problems with GLIBC on Linux**
|
|
@@ -265,7 +265,7 @@ when trying to run the compiled version for Linux, try updating GLIBC to version
|
|
|
265
265
|
|
|
266
266
|
|
|
267
267
|
```commandline
|
|
268
|
-
|
|
268
|
+
sudo snap connect pygpt:camera
|
|
269
269
|
```
|
|
270
270
|
|
|
271
271
|
**Access to microphone in Snap version:**
|
|
@@ -273,7 +273,7 @@ $ sudo snap connect pygpt:camera
|
|
|
273
273
|
To use microphone in Snap version you must connect the microphone with:
|
|
274
274
|
|
|
275
275
|
```commandline
|
|
276
|
-
|
|
276
|
+
sudo snap connect pygpt:audio-record :audio-record
|
|
277
277
|
```
|
|
278
278
|
|
|
279
279
|
**Windows and VC++ Redistributable**
|
|
@@ -292,13 +292,13 @@ It may also be necessary to add the path `C:\path\to\venv\Lib\python3.x\site-pac
|
|
|
292
292
|
If you have a problems with `WebEngine / Chromium` renderer you can force the legacy mode by launching the app with command line arguments:
|
|
293
293
|
|
|
294
294
|
``` ini
|
|
295
|
-
|
|
295
|
+
python3 run.py --legacy=1
|
|
296
296
|
```
|
|
297
297
|
|
|
298
298
|
and to force disable OpenGL hardware acceleration:
|
|
299
299
|
|
|
300
300
|
``` ini
|
|
301
|
-
|
|
301
|
+
python3 run.py --disable-gpu=1
|
|
302
302
|
```
|
|
303
303
|
|
|
304
304
|
You can also manualy enable legacy mode by editing config file - open the `%WORKDIR%/config.json` config file in editor and set the following options:
|
|
@@ -358,11 +358,11 @@ The main part of the interface is a chat window where you see your conversations
|
|
|
358
358
|
|
|
359
359
|
Above where you type your messages, the interface shows you the number of tokens your message will use up as you type it – this helps to keep track of usage. There is also a feature to attach and upload files in this area. Go to the `Files and Attachments` section for more information on how to use attachments.
|
|
360
360
|
|
|
361
|
-

|
|
362
362
|
|
|
363
363
|
**Vision:** If you want to send photos from your disk or images from your camera for analysis, and the selected model does not support Vision, you must enable the `GPT-4 Vision (inline)` plugin in the Plugins menu. This plugin allows you to send photos or images from your camera for analysis in any Chat mode.
|
|
364
364
|
|
|
365
|
-

|
|
366
366
|
|
|
367
367
|
With this plugin, you can capture an image with your camera or attach an image and send it for analysis to discuss the photograph:
|
|
368
368
|
|
|
@@ -371,7 +371,7 @@ With this plugin, you can capture an image with your camera or attach an image a
|
|
|
371
371
|
**Image generation:** If you want to generate images (using DALL-E) directly in chat you must enable plugin `DALL-E 3 (inline)` in the Plugins menu.
|
|
372
372
|
Plugin allows you to generate images in Chat mode:
|
|
373
373
|
|
|
374
|
-

|
|
375
375
|
|
|
376
376
|
|
|
377
377
|
## Chat with Audio
|
|
@@ -404,12 +404,14 @@ From version `2.0.107` the `davinci` models are deprecated and has been replaced
|
|
|
404
404
|
The older model version, `DALL-E 2`, is also accessible. Generating images is akin to a chat conversation - a user's prompt triggers the generation, followed by downloading, saving to the computer,
|
|
405
405
|
and displaying the image onscreen. You can send raw prompt to `DALL-E` in `Image generation` mode or ask the model for the best prompt.
|
|
406
406
|
|
|
407
|
+

|
|
408
|
+
|
|
407
409
|
Image generation using DALL-E is available in every mode via plugin `DALL-E 3 Image Generation (inline)`. Just ask any model, in any mode, like e.g. GPT-4 to generate an image and it will do it inline, without need to mode change.
|
|
408
410
|
|
|
409
411
|
If you want to generate images (using DALL-E) directly in chat you must enable plugin **DALL-E 3 Inline** in the Plugins menu.
|
|
410
412
|
Plugin allows you to generate images in Chat mode:
|
|
411
413
|
|
|
412
|
-

|
|
413
415
|
|
|
414
416
|
### Multiple variants
|
|
415
417
|
|
|
@@ -448,15 +450,13 @@ images and those found online.
|
|
|
448
450
|
|
|
449
451
|
Vision is also integrated into any chat mode via plugin `GPT-4 Vision (inline)`. Just enable the plugin and use Vision in other work modes, such as Chat or Chat with Files.
|
|
450
452
|
|
|
451
|
-
Vision mode also includes real-time video capture from camera. To
|
|
452
|
-
|
|
453
|
-
|
|
453
|
+
Vision mode also includes real-time video capture from camera. To capture image from camera and append it to chat just click on video at left side. You can also enable `Auto capture` - image will be captured and appended to chat message every time you send message.
|
|
454
454
|
|
|
455
455
|
**1) Video camera real-time image capture**
|
|
456
456
|
|
|
457
457
|

|
|
458
458
|
|
|
459
|
-

|
|
460
460
|
|
|
461
461
|
**2) you can also provide an image URL**
|
|
462
462
|
|
|
@@ -476,7 +476,7 @@ This mode expands on the basic chat functionality by including additional extern
|
|
|
476
476
|
|
|
477
477
|
Setting up new assistants is simple - a single click is all it takes, and they instantly sync with the `OpenAI API`. Importing assistants you've previously created with OpenAI into **PyGPT** is also a seamless process.
|
|
478
478
|
|
|
479
|
-

|
|
480
480
|
|
|
481
481
|
In Assistant mode you are allowed to storage your files in remote vector store (per Assistant) and manage them easily from app:
|
|
482
482
|
|
|
@@ -679,8 +679,6 @@ The mode activates autonomous mode, where AI begins a conversation with itself.
|
|
|
679
679
|
You can set this loop to run for any number of iterations. Throughout this sequence, the model will engage
|
|
680
680
|
in self-dialogue, answering his own questions and comments, in order to find the best possible solution, subjecting previously generated steps to criticism.
|
|
681
681
|
|
|
682
|
-
|
|
683
|
-
|
|
684
682
|
**WARNING:** Setting the number of run steps (iterations) to `0` activates an infinite loop which can generate a large number of requests and cause very high token consumption, so use this option with caution! Confirmation will be displayed every time you run the infinite loop.
|
|
685
683
|
|
|
686
684
|
This mode is similar to `Auto-GPT` - it can be used to create more advanced inferences and to solve problems by breaking them down into subtasks that the model will autonomously perform one after another until the goal is achieved.
|
|
@@ -706,9 +704,9 @@ Default is: `chat`.
|
|
|
706
704
|
|
|
707
705
|
If you want to use the LlamaIndex mode when running the agent, you can also specify which index `LlamaIndex` should use with the option:
|
|
708
706
|
|
|
709
|
-
```Settings /
|
|
707
|
+
```Settings / Agents and experts / Index to use```
|
|
710
708
|
|
|
711
|
-

|
|
712
710
|
|
|
713
711
|
|
|
714
712
|
## Experts (co-op, co-operation mode)
|
|
@@ -752,7 +750,7 @@ Give me a list of active experts.
|
|
|
752
750
|
|
|
753
751
|
On the left side of the application interface, there is a panel that displays a list of saved conversations. You can save numerous contexts and switch between them with ease. This feature allows you to revisit and continue from any point in a previous conversation. **PyGPT** automatically generates a summary for each context, akin to the way `ChatGPT` operates and gives you the option to modify these titles itself.
|
|
754
752
|
|
|
755
|
-

|
|
756
754
|
|
|
757
755
|
You can disable context support in the settings by using the following option:
|
|
758
756
|
|
|
@@ -845,7 +843,7 @@ The `Files I/O` plugin takes care of file operations in the `data` directory, wh
|
|
|
845
843
|
|
|
846
844
|
To allow the model to manage files or python code execution, the `+ Tools` option must be active, along with the above-mentioned plugins:
|
|
847
845
|
|
|
848
|
-

|
|
849
847
|
|
|
850
848
|
# Presets
|
|
851
849
|
|
|
@@ -855,7 +853,7 @@ Presets in **PyGPT** are essentially templates used to store and quickly apply d
|
|
|
855
853
|
|
|
856
854
|
The application lets you create as many presets as needed and easily switch among them. Additionally, you can clone an existing preset, which is useful for creating variations based on previously set configurations and experimentation.
|
|
857
855
|
|
|
858
|
-

|
|
859
857
|
|
|
860
858
|
## Example usage
|
|
861
859
|
|
|
@@ -948,11 +946,11 @@ How to use locally installed Llama 3 or Mistral models:
|
|
|
948
946
|
|
|
949
947
|
For example, on Linux:
|
|
950
948
|
|
|
951
|
-
|
|
949
|
+
```curl -fsSL https://ollama.com/install.sh | sh```
|
|
952
950
|
|
|
953
951
|
4) Run the model (e.g. Llama 3) locally on your machine. For example, on Linux:
|
|
954
952
|
|
|
955
|
-
|
|
953
|
+
```ollama run llama3.1```
|
|
956
954
|
|
|
957
955
|
5) Return to PyGPT and select the correct model from models list to chat with selected model using Ollama running locally.
|
|
958
956
|
|
|
@@ -1221,7 +1219,7 @@ Options reference: https://pypi.org/project/SpeechRecognition/1.3.1/
|
|
|
1221
1219
|
The plugin lets you turn text into speech using the TTS model from OpenAI or other services like ``Microsoft Azure``, ``Google``, and ``Eleven Labs``. You can add more text-to-speech providers to it too. `OpenAI TTS` does not require any additional API keys or extra configuration; it utilizes the main OpenAI key.
|
|
1222
1220
|
Microsoft Azure requires to have an Azure API Key. Before using speech synthesis via `Microsoft Azure`, `Google` or `Eleven Labs`, you must configure the audio plugin with your API keys, regions and voices if required.
|
|
1223
1221
|
|
|
1224
|
-

|
|
1225
1223
|
|
|
1226
1224
|
Through the available options, you can select the voice that you want the model to use. More voice synthesis providers coming soon.
|
|
1227
1225
|
|
|
@@ -1469,11 +1467,11 @@ You can find the installation instructions here: https://docs.docker.com/engine/
|
|
|
1469
1467
|
To use IPython in the Snap version, you must connect PyGPT to the Docker daemon:
|
|
1470
1468
|
|
|
1471
1469
|
```commandline
|
|
1472
|
-
|
|
1470
|
+
sudo snap connect pygpt:docker-executables docker:docker-executables
|
|
1473
1471
|
```
|
|
1474
1472
|
|
|
1475
1473
|
````commandline
|
|
1476
|
-
|
|
1474
|
+
sudo snap connect pygpt:docker docker:docker-daemon
|
|
1477
1475
|
````
|
|
1478
1476
|
|
|
1479
1477
|
|
|
@@ -1621,7 +1619,7 @@ Docker image to use for sandbox *Default:* `python:3.8-alpine`
|
|
|
1621
1619
|
|
|
1622
1620
|
With the `Custom Commands` plugin, you can integrate **PyGPT** with your operating system and scripts or applications. You can define an unlimited number of custom commands and instruct GPT on when and how to execute them. Configuration is straightforward, and **PyGPT** includes a simple tutorial command for testing and learning how it works:
|
|
1623
1621
|
|
|
1624
|
-

|
|
1625
1623
|
|
|
1626
1624
|
To add a new custom command, click the **ADD** button and then:
|
|
1627
1625
|
|
|
@@ -1946,7 +1944,7 @@ Then, copy the following two items into **PyGPT**:
|
|
|
1946
1944
|
|
|
1947
1945
|
These data must be configured in the appropriate fields in the `Plugins / Settings...` menu:
|
|
1948
1946
|
|
|
1949
|
-

|
|
1950
1948
|
|
|
1951
1949
|
- `Google Custom Search API KEY` *google_api_key*
|
|
1952
1950
|
|
|
@@ -2343,7 +2341,7 @@ It is a JSON object wrapped between `~###~`. The application extracts the JSON o
|
|
|
2343
2341
|
|
|
2344
2342
|
**Tip:** The `+ Tools` option checkbox must be enabled to allow the execution of commands from plugins. Disable the option if you do not want to use commands, to prevent additional token usage (as the command execution system prompt consumes additional tokens).
|
|
2345
2343
|
|
|
2346
|
-

|
|
2347
2345
|
|
|
2348
2346
|
When native API function calls are disabled, a special system prompt responsible for invoking commands is added to the main system prompt if the `+ Tools` option is active.
|
|
2349
2347
|
|
|
@@ -2434,7 +2432,7 @@ PyGPT features several useful tools, including:
|
|
|
2434
2432
|
- Python Code Interpreter
|
|
2435
2433
|
- HTML/JS Canvas (built-in HTML renderer)
|
|
2436
2434
|
|
|
2437
|
-

|
|
2438
2436
|
|
|
2439
2437
|
|
|
2440
2438
|
## Notepad
|
|
@@ -2512,13 +2510,13 @@ the system prompt, any additional data, and those used within the context (the m
|
|
|
2512
2510
|
|
|
2513
2511
|
**Remember that these are only approximate calculations and do not include, for example, the number of tokens consumed by some plugins. You can find the exact number of tokens used on the OpenAI website.**
|
|
2514
2512
|
|
|
2515
|
-

|
|
2516
2514
|
|
|
2517
2515
|
## Total tokens
|
|
2518
2516
|
|
|
2519
2517
|
After receiving a response from the model, the application displays the actual total number of tokens used for the query (received from the API).
|
|
2520
2518
|
|
|
2521
|
-

|
|
2522
2520
|
|
|
2523
2521
|
|
|
2524
2522
|
# Accessibility
|
|
@@ -2656,7 +2654,7 @@ The following basic options can be modified directly within the application:
|
|
|
2656
2654
|
Config -> Settings...
|
|
2657
2655
|
```
|
|
2658
2656
|
|
|
2659
|
-

|
|
2660
2658
|
|
|
2661
2659
|
**General**
|
|
2662
2660
|
|
|
@@ -2961,6 +2959,20 @@ You can manually edit the configuration files in this directory (this is your wo
|
|
|
2961
2959
|
|
|
2962
2960
|
---
|
|
2963
2961
|
|
|
2962
|
+
## Setting the Working Directory Using Command Line Arguments
|
|
2963
|
+
|
|
2964
|
+
To set the current working directory using a command-line argument, use:
|
|
2965
|
+
|
|
2966
|
+
```
|
|
2967
|
+
python3 ./run.py --workdir="/path/to/workdir"
|
|
2968
|
+
```
|
|
2969
|
+
or, for the binary version:
|
|
2970
|
+
|
|
2971
|
+
```
|
|
2972
|
+
pygpt.exe --workdir="/path/to/workdir"
|
|
2973
|
+
```
|
|
2974
|
+
|
|
2975
|
+
|
|
2964
2976
|
## Translations / Locale
|
|
2965
2977
|
|
|
2966
2978
|
Locale `.ini` files are located in the app directory:
|
|
@@ -3833,6 +3845,11 @@ may consume additional tokens that are not displayed in the main window.
|
|
|
3833
3845
|
|
|
3834
3846
|
## Recent changes:
|
|
3835
3847
|
|
|
3848
|
+
**2.4.36 (2024-11-28)**
|
|
3849
|
+
|
|
3850
|
+
- Added a new command-line argument: --workdir="/path/to/workdir" to explicitly set the current working directory.
|
|
3851
|
+
- Fix: start image generation in Image mode.
|
|
3852
|
+
|
|
3836
3853
|
**2.4.35 (2024-11-28)**
|
|
3837
3854
|
|
|
3838
3855
|
- Docker removed from dependencies in Snap version #82
|
pygpt_net/CHANGELOG.txt
CHANGED
|
@@ -1,3 +1,8 @@
|
|
|
1
|
+
2.4.36 (2024-11-28)
|
|
2
|
+
|
|
3
|
+
- Added a new command-line argument: --workdir="/path/to/workdir" to explicitly set the current working directory.
|
|
4
|
+
- Fix: start image generation in Image mode.
|
|
5
|
+
|
|
1
6
|
2.4.35 (2024-11-28)
|
|
2
7
|
|
|
3
8
|
- Docker removed from dependencies in Snap version #82
|
pygpt_net/__init__.py
CHANGED
|
@@ -13,7 +13,7 @@ __author__ = "Marcin Szczygliński"
|
|
|
13
13
|
__copyright__ = "Copyright 2024, Marcin Szczygliński"
|
|
14
14
|
__credits__ = ["Marcin Szczygliński"]
|
|
15
15
|
__license__ = "MIT"
|
|
16
|
-
__version__ = "2.4.
|
|
16
|
+
__version__ = "2.4.36"
|
|
17
17
|
__build__ = "2024.11.28"
|
|
18
18
|
__maintainer__ = "Marcin Szczygliński"
|
|
19
19
|
__github__ = "https://github.com/szczyglis-dev/py-gpt"
|
pygpt_net/config.py
CHANGED
|
@@ -104,7 +104,19 @@ class Config:
|
|
|
104
104
|
|
|
105
105
|
:return: base workdir path
|
|
106
106
|
"""
|
|
107
|
-
|
|
107
|
+
path = os.path.join(Path.home(), '.config', Config.CONFIG_DIR)
|
|
108
|
+
if "PYGPT_WORKDIR" in os.environ and os.environ["PYGPT_WORKDIR"] != "":
|
|
109
|
+
print("FORCE using workdir: {}".format(os.environ["PYGPT_WORKDIR"]))
|
|
110
|
+
# convert relative path to absolute path if needed
|
|
111
|
+
if not os.path.isabs(os.environ["PYGPT_WORKDIR"]):
|
|
112
|
+
path = os.path.join(os.getcwd(), os.environ["PYGPT_WORKDIR"])
|
|
113
|
+
else:
|
|
114
|
+
path = os.environ["PYGPT_WORKDIR"]
|
|
115
|
+
if not os.path.exists(path):
|
|
116
|
+
print("Workdir path not exists: {}".format(path))
|
|
117
|
+
print("Creating workdir path: {}".format(path))
|
|
118
|
+
os.makedirs(path, exist_ok=True)
|
|
119
|
+
return path
|
|
108
120
|
|
|
109
121
|
@staticmethod
|
|
110
122
|
def prepare_workdir() -> str:
|
|
@@ -12,6 +12,7 @@
|
|
|
12
12
|
from PySide6.QtCore import Slot
|
|
13
13
|
|
|
14
14
|
from pygpt_net.core.bridge.context import BridgeContext
|
|
15
|
+
from pygpt_net.core.types import MODE_IMAGE
|
|
15
16
|
from pygpt_net.item.ctx import CtxItem
|
|
16
17
|
from pygpt_net.core.events import Event, KernelEvent, RenderEvent
|
|
17
18
|
from pygpt_net.utils import trans
|
|
@@ -94,7 +95,7 @@ class Image:
|
|
|
94
95
|
# generate image
|
|
95
96
|
bridge_context = BridgeContext(
|
|
96
97
|
ctx=ctx,
|
|
97
|
-
mode=
|
|
98
|
+
mode=MODE_IMAGE,
|
|
98
99
|
model=model_data, # model instance
|
|
99
100
|
prompt=text,
|
|
100
101
|
)
|
|
@@ -85,7 +85,7 @@ class Capture:
|
|
|
85
85
|
|
|
86
86
|
# clear attachments before capture if needed
|
|
87
87
|
if self.window.controller.attachment.is_capture_clear():
|
|
88
|
-
self.window.controller.attachment.clear(True, auto=True
|
|
88
|
+
self.window.controller.attachment.clear(True, auto=True)
|
|
89
89
|
|
|
90
90
|
try:
|
|
91
91
|
# prepare filename
|
|
@@ -127,7 +127,7 @@ class Capture:
|
|
|
127
127
|
|
|
128
128
|
# clear attachments before capture if needed
|
|
129
129
|
if self.window.controller.attachment.is_capture_clear():
|
|
130
|
-
self.window.controller.attachment.clear(True, auto=True
|
|
130
|
+
self.window.controller.attachment.clear(True, auto=True)
|
|
131
131
|
|
|
132
132
|
try:
|
|
133
133
|
# prepare filename
|
pygpt_net/data/config/modes.json
CHANGED
pygpt_net/launcher.py
CHANGED
|
@@ -8,7 +8,7 @@
|
|
|
8
8
|
# Created By : Marcin Szczygliński #
|
|
9
9
|
# Updated Date: 2024.11.20 21:00:00 #
|
|
10
10
|
# ================================================== #
|
|
11
|
-
|
|
11
|
+
import os
|
|
12
12
|
import sys
|
|
13
13
|
import argparse
|
|
14
14
|
from logging import ERROR, WARNING, INFO, DEBUG
|
|
@@ -43,6 +43,7 @@ class Launcher:
|
|
|
43
43
|
self.force_legacy = False
|
|
44
44
|
self.force_disable_gpu = False
|
|
45
45
|
self.shortcut_filter = None
|
|
46
|
+
self.workdir = None
|
|
46
47
|
|
|
47
48
|
def setup(self) -> dict:
|
|
48
49
|
"""
|
|
@@ -69,6 +70,12 @@ class Launcher:
|
|
|
69
70
|
required=False,
|
|
70
71
|
help="force disable OpenGL (1=disabled, 0=enabled)",
|
|
71
72
|
)
|
|
73
|
+
parser.add_argument(
|
|
74
|
+
"-w",
|
|
75
|
+
"--workdir",
|
|
76
|
+
required=False,
|
|
77
|
+
help="force set workdir",
|
|
78
|
+
)
|
|
72
79
|
args = vars(parser.parse_args())
|
|
73
80
|
|
|
74
81
|
# set log level [ERROR|WARNING|INFO|DEBUG]
|
|
@@ -93,6 +100,11 @@ class Launcher:
|
|
|
93
100
|
print("** Force disable GPU enabled")
|
|
94
101
|
self.force_disable_gpu = True
|
|
95
102
|
|
|
103
|
+
# force set workdir
|
|
104
|
+
if "workdir" in args and args["workdir"] is not None:
|
|
105
|
+
# set as environment variable
|
|
106
|
+
os.environ["PYGPT_WORKDIR"] = args["workdir"]
|
|
107
|
+
|
|
96
108
|
return args
|
|
97
109
|
|
|
98
110
|
def init(self):
|
|
@@ -1,6 +1,6 @@
|
|
|
1
1
|
Metadata-Version: 2.1
|
|
2
2
|
Name: pygpt-net
|
|
3
|
-
Version: 2.4.
|
|
3
|
+
Version: 2.4.36.post1
|
|
4
4
|
Summary: Desktop AI Assistant powered by models: OpenAI o1, GPT-4o, GPT-4, GPT-4 Vision, GPT-3.5, DALL-E 3, Llama 3, Mistral, Gemini, Claude, Bielik, and other models supported by Langchain, Llama Index, and Ollama. Features include chatbot, text completion, image generation, vision analysis, speech-to-text, internet access, file handling, command execution and more.
|
|
5
5
|
Home-page: https://pygpt.net
|
|
6
6
|
License: MIT
|
|
@@ -92,7 +92,7 @@ Description-Content-Type: text/markdown
|
|
|
92
92
|
|
|
93
93
|
[](https://snapcraft.io/pygpt)
|
|
94
94
|
|
|
95
|
-
Release: **2.4.
|
|
95
|
+
Release: **2.4.36** | build: **2024.11.28** | Python: **>=3.10, <3.12**
|
|
96
96
|
|
|
97
97
|
> Official website: https://pygpt.net | Documentation: https://pygpt.readthedocs.io
|
|
98
98
|
>
|
|
@@ -114,13 +114,13 @@ For audio interactions, **PyGPT** includes speech synthesis using the `Microsoft
|
|
|
114
114
|
|
|
115
115
|
Multiple operation modes are included, such as chat, text completion, assistant, vision, LangChain, Chat with Files (via `LlamaIndex`), commands execution, external API calls and image generation, making **PyGPT** a multi-tool for many AI-driven tasks.
|
|
116
116
|
|
|
117
|
-
**Video** (mp4, version `2.
|
|
117
|
+
**Video** (mp4, version `2.4.35`, build `2024-11-28`):
|
|
118
118
|
|
|
119
119
|
https://github.com/user-attachments/assets/5751a003-950f-40e7-a655-d098bbf27b0c
|
|
120
120
|
|
|
121
|
-
**Screenshot** (version `2.
|
|
121
|
+
**Screenshot** (version `2.4.35`, build `2024-11-28`):
|
|
122
122
|
|
|
123
|
-

|
|
124
124
|
|
|
125
125
|
You can download compiled 64-bit versions for Windows and Linux here: https://pygpt.net/#download
|
|
126
126
|
|
|
@@ -187,13 +187,13 @@ Linux version requires `GLIBC` >= `2.35`.
|
|
|
187
187
|
You can install **PyGPT** directly from Snap Store:
|
|
188
188
|
|
|
189
189
|
```commandline
|
|
190
|
-
|
|
190
|
+
sudo snap install pygpt
|
|
191
191
|
```
|
|
192
192
|
|
|
193
193
|
To manage future updates just use:
|
|
194
194
|
|
|
195
195
|
```commandline
|
|
196
|
-
|
|
196
|
+
sudo snap refresh pygpt
|
|
197
197
|
```
|
|
198
198
|
|
|
199
199
|
[](https://snapcraft.io/pygpt)
|
|
@@ -201,13 +201,13 @@ $ sudo snap refresh pygpt
|
|
|
201
201
|
**Using camera:** to use camera in Snap version you must connect the camera with:
|
|
202
202
|
|
|
203
203
|
```commandline
|
|
204
|
-
|
|
204
|
+
sudo snap connect pygpt:camera
|
|
205
205
|
```
|
|
206
206
|
|
|
207
207
|
**Using microphone:** to use microphone in Snap version you must connect the microphone with:
|
|
208
208
|
|
|
209
209
|
```commandline
|
|
210
|
-
|
|
210
|
+
sudo snap connect pygpt:audio-record :audio-record
|
|
211
211
|
```
|
|
212
212
|
|
|
213
213
|
**Connecting IPython in Docker in Snap version**:
|
|
@@ -215,7 +215,7 @@ $ sudo snap connect pygpt:audio-record :audio-record
|
|
|
215
215
|
To use IPython in the Snap version, you must connect PyGPT to the Docker daemon:
|
|
216
216
|
|
|
217
217
|
```commandline
|
|
218
|
-
|
|
218
|
+
sudo snap connect pygpt:docker-executables docker:docker-executables
|
|
219
219
|
```
|
|
220
220
|
|
|
221
221
|
````commandline
|
|
@@ -229,20 +229,20 @@ The application can also be installed from `PyPi` using `pip install`:
|
|
|
229
229
|
1. Create virtual environment:
|
|
230
230
|
|
|
231
231
|
```commandline
|
|
232
|
-
|
|
233
|
-
|
|
232
|
+
python3 -m venv venv
|
|
233
|
+
source venv/bin/activate
|
|
234
234
|
```
|
|
235
235
|
|
|
236
236
|
2. Install from PyPi:
|
|
237
237
|
|
|
238
238
|
``` commandline
|
|
239
|
-
|
|
239
|
+
pip install pygpt-net
|
|
240
240
|
```
|
|
241
241
|
|
|
242
242
|
3. Once installed run the command to start the application:
|
|
243
243
|
|
|
244
244
|
``` commandline
|
|
245
|
-
|
|
245
|
+
pygpt
|
|
246
246
|
```
|
|
247
247
|
|
|
248
248
|
## Running from GitHub source code
|
|
@@ -254,27 +254,27 @@ An alternative method is to download the source code from `GitHub` and execute t
|
|
|
254
254
|
1. Clone git repository or download .zip file:
|
|
255
255
|
|
|
256
256
|
```commandline
|
|
257
|
-
|
|
258
|
-
|
|
257
|
+
git clone https://github.com/szczyglis-dev/py-gpt.git
|
|
258
|
+
cd py-gpt
|
|
259
259
|
```
|
|
260
260
|
|
|
261
261
|
2. Create a new virtual environment:
|
|
262
262
|
|
|
263
263
|
```commandline
|
|
264
|
-
|
|
265
|
-
|
|
264
|
+
python3 -m venv venv
|
|
265
|
+
source venv/bin/activate
|
|
266
266
|
```
|
|
267
267
|
|
|
268
268
|
3. Install requirements:
|
|
269
269
|
|
|
270
270
|
```commandline
|
|
271
|
-
|
|
271
|
+
pip install -r requirements.txt
|
|
272
272
|
```
|
|
273
273
|
|
|
274
274
|
4. Run the application:
|
|
275
275
|
|
|
276
276
|
```commandline
|
|
277
|
-
|
|
277
|
+
python3 run.py
|
|
278
278
|
```
|
|
279
279
|
|
|
280
280
|
### Install with Poetry
|
|
@@ -282,33 +282,33 @@ $ python3 run.py
|
|
|
282
282
|
1. Clone git repository or download .zip file:
|
|
283
283
|
|
|
284
284
|
```commandline
|
|
285
|
-
|
|
286
|
-
|
|
285
|
+
git clone https://github.com/szczyglis-dev/py-gpt.git
|
|
286
|
+
cd py-gpt
|
|
287
287
|
```
|
|
288
288
|
|
|
289
289
|
2. Install Poetry (if not installed):
|
|
290
290
|
|
|
291
291
|
```commandline
|
|
292
|
-
|
|
292
|
+
pip install poetry
|
|
293
293
|
```
|
|
294
294
|
|
|
295
295
|
3. Create a new virtual environment that uses Python 3.10:
|
|
296
296
|
|
|
297
297
|
```commandline
|
|
298
|
-
|
|
299
|
-
|
|
298
|
+
poetry env use python3.10
|
|
299
|
+
poetry shell
|
|
300
300
|
```
|
|
301
301
|
|
|
302
302
|
4. Install requirements:
|
|
303
303
|
|
|
304
304
|
```commandline
|
|
305
|
-
|
|
305
|
+
poetry install
|
|
306
306
|
```
|
|
307
307
|
|
|
308
308
|
5. Run the application:
|
|
309
309
|
|
|
310
310
|
```commandline
|
|
311
|
-
|
|
311
|
+
poetry run python3 run.py
|
|
312
312
|
```
|
|
313
313
|
|
|
314
314
|
**Tip**: you can use `PyInstaller` to create a compiled version of
|
|
@@ -327,19 +327,19 @@ Reinstalling the application may fix this problem.
|
|
|
327
327
|
...then install `libxcb`:
|
|
328
328
|
|
|
329
329
|
```commandline
|
|
330
|
-
|
|
330
|
+
sudo apt install libxcb-cursor0
|
|
331
331
|
```
|
|
332
332
|
|
|
333
333
|
If you have a problems with audio on Linux, then try to install `portaudio19-dev` and/or `libasound2`:
|
|
334
334
|
|
|
335
335
|
```commandline
|
|
336
|
-
|
|
336
|
+
sudo apt install portaudio19-dev
|
|
337
337
|
```
|
|
338
338
|
|
|
339
339
|
```commandline
|
|
340
|
-
|
|
341
|
-
|
|
342
|
-
|
|
340
|
+
sudo apt install libasound2
|
|
341
|
+
sudo apt install libasound2-data
|
|
342
|
+
sudo apt install libasound2-plugins
|
|
343
343
|
```
|
|
344
344
|
|
|
345
345
|
**Problems with GLIBC on Linux**
|
|
@@ -355,7 +355,7 @@ when trying to run the compiled version for Linux, try updating GLIBC to version
|
|
|
355
355
|
|
|
356
356
|
|
|
357
357
|
```commandline
|
|
358
|
-
|
|
358
|
+
sudo snap connect pygpt:camera
|
|
359
359
|
```
|
|
360
360
|
|
|
361
361
|
**Access to microphone in Snap version:**
|
|
@@ -363,7 +363,7 @@ $ sudo snap connect pygpt:camera
|
|
|
363
363
|
To use microphone in Snap version you must connect the microphone with:
|
|
364
364
|
|
|
365
365
|
```commandline
|
|
366
|
-
|
|
366
|
+
sudo snap connect pygpt:audio-record :audio-record
|
|
367
367
|
```
|
|
368
368
|
|
|
369
369
|
**Windows and VC++ Redistributable**
|
|
@@ -382,13 +382,13 @@ It may also be necessary to add the path `C:\path\to\venv\Lib\python3.x\site-pac
|
|
|
382
382
|
If you have a problems with `WebEngine / Chromium` renderer you can force the legacy mode by launching the app with command line arguments:
|
|
383
383
|
|
|
384
384
|
``` ini
|
|
385
|
-
|
|
385
|
+
python3 run.py --legacy=1
|
|
386
386
|
```
|
|
387
387
|
|
|
388
388
|
and to force disable OpenGL hardware acceleration:
|
|
389
389
|
|
|
390
390
|
``` ini
|
|
391
|
-
|
|
391
|
+
python3 run.py --disable-gpu=1
|
|
392
392
|
```
|
|
393
393
|
|
|
394
394
|
You can also manualy enable legacy mode by editing config file - open the `%WORKDIR%/config.json` config file in editor and set the following options:
|
|
@@ -448,11 +448,11 @@ The main part of the interface is a chat window where you see your conversations
|
|
|
448
448
|
|
|
449
449
|
Above where you type your messages, the interface shows you the number of tokens your message will use up as you type it – this helps to keep track of usage. There is also a feature to attach and upload files in this area. Go to the `Files and Attachments` section for more information on how to use attachments.
|
|
450
450
|
|
|
451
|
-

|
|
452
452
|
|
|
453
453
|
**Vision:** If you want to send photos from your disk or images from your camera for analysis, and the selected model does not support Vision, you must enable the `GPT-4 Vision (inline)` plugin in the Plugins menu. This plugin allows you to send photos or images from your camera for analysis in any Chat mode.
|
|
454
454
|
|
|
455
|
-

|
|
456
456
|
|
|
457
457
|
With this plugin, you can capture an image with your camera or attach an image and send it for analysis to discuss the photograph:
|
|
458
458
|
|
|
@@ -461,7 +461,7 @@ With this plugin, you can capture an image with your camera or attach an image a
|
|
|
461
461
|
**Image generation:** If you want to generate images (using DALL-E) directly in chat you must enable plugin `DALL-E 3 (inline)` in the Plugins menu.
|
|
462
462
|
Plugin allows you to generate images in Chat mode:
|
|
463
463
|
|
|
464
|
-

|
|
465
465
|
|
|
466
466
|
|
|
467
467
|
## Chat with Audio
|
|
@@ -494,12 +494,14 @@ From version `2.0.107` the `davinci` models are deprecated and has been replaced
|
|
|
494
494
|
The older model version, `DALL-E 2`, is also accessible. Generating images is akin to a chat conversation - a user's prompt triggers the generation, followed by downloading, saving to the computer,
|
|
495
495
|
and displaying the image onscreen. You can send raw prompt to `DALL-E` in `Image generation` mode or ask the model for the best prompt.
|
|
496
496
|
|
|
497
|
+

|
|
498
|
+
|
|
497
499
|
Image generation using DALL-E is available in every mode via plugin `DALL-E 3 Image Generation (inline)`. Just ask any model, in any mode, like e.g. GPT-4 to generate an image and it will do it inline, without need to mode change.
|
|
498
500
|
|
|
499
501
|
If you want to generate images (using DALL-E) directly in chat you must enable plugin **DALL-E 3 Inline** in the Plugins menu.
|
|
500
502
|
Plugin allows you to generate images in Chat mode:
|
|
501
503
|
|
|
502
|
-

|
|
503
505
|
|
|
504
506
|
### Multiple variants
|
|
505
507
|
|
|
@@ -538,15 +540,13 @@ images and those found online.
|
|
|
538
540
|
|
|
539
541
|
Vision is also integrated into any chat mode via plugin `GPT-4 Vision (inline)`. Just enable the plugin and use Vision in other work modes, such as Chat or Chat with Files.
|
|
540
542
|
|
|
541
|
-
Vision mode also includes real-time video capture from camera. To
|
|
542
|
-
|
|
543
|
-

|
|
543
|
+
Vision mode also includes real-time video capture from camera. To capture image from camera and append it to chat just click on video at left side. You can also enable `Auto capture` - image will be captured and appended to chat message every time you send message.
|
|
544
544
|
|
|
545
545
|
**1) Video camera real-time image capture**
|
|
546
546
|
|
|
547
547
|

|
|
548
548
|
|
|
549
|
-

|
|
550
550
|
|
|
551
551
|
**2) you can also provide an image URL**
|
|
552
552
|
|
|
@@ -566,7 +566,7 @@ This mode expands on the basic chat functionality by including additional extern
|
|
|
566
566
|
|
|
567
567
|
Setting up new assistants is simple - a single click is all it takes, and they instantly sync with the `OpenAI API`. Importing assistants you've previously created with OpenAI into **PyGPT** is also a seamless process.
|
|
568
568
|
|
|
569
|
-

|
|
570
570
|
|
|
571
571
|
In Assistant mode you are allowed to storage your files in remote vector store (per Assistant) and manage them easily from app:
|
|
572
572
|
|
|
@@ -769,8 +769,6 @@ The mode activates autonomous mode, where AI begins a conversation with itself.
|
|
|
769
769
|
You can set this loop to run for any number of iterations. Throughout this sequence, the model will engage
|
|
770
770
|
in self-dialogue, answering his own questions and comments, in order to find the best possible solution, subjecting previously generated steps to criticism.
|
|
771
771
|
|
|
772
|
-

|
|
773
|
-
|
|
774
772
|
**WARNING:** Setting the number of run steps (iterations) to `0` activates an infinite loop which can generate a large number of requests and cause very high token consumption, so use this option with caution! Confirmation will be displayed every time you run the infinite loop.
|
|
775
773
|
|
|
776
774
|
This mode is similar to `Auto-GPT` - it can be used to create more advanced inferences and to solve problems by breaking them down into subtasks that the model will autonomously perform one after another until the goal is achieved.
|
|
@@ -796,9 +794,9 @@ Default is: `chat`.
|
|
|
796
794
|
|
|
797
795
|
If you want to use the LlamaIndex mode when running the agent, you can also specify which index `LlamaIndex` should use with the option:
|
|
798
796
|
|
|
799
|
-
```Settings /
|
|
797
|
+
```Settings / Agents and experts / Index to use```
|
|
800
798
|
|
|
801
|
-

|
|
802
800
|
|
|
803
801
|
|
|
804
802
|
## Experts (co-op, co-operation mode)
|
|
@@ -842,7 +840,7 @@ Give me a list of active experts.
|
|
|
842
840
|
|
|
843
841
|
On the left side of the application interface, there is a panel that displays a list of saved conversations. You can save numerous contexts and switch between them with ease. This feature allows you to revisit and continue from any point in a previous conversation. **PyGPT** automatically generates a summary for each context, akin to the way `ChatGPT` operates and gives you the option to modify these titles itself.
|
|
844
842
|
|
|
845
|
-

|
|
846
844
|
|
|
847
845
|
You can disable context support in the settings by using the following option:
|
|
848
846
|
|
|
@@ -935,7 +933,7 @@ The `Files I/O` plugin takes care of file operations in the `data` directory, wh
|
|
|
935
933
|
|
|
936
934
|
To allow the model to manage files or python code execution, the `+ Tools` option must be active, along with the above-mentioned plugins:
|
|
937
935
|
|
|
938
|
-

|
|
939
937
|
|
|
940
938
|
# Presets
|
|
941
939
|
|
|
@@ -945,7 +943,7 @@ Presets in **PyGPT** are essentially templates used to store and quickly apply d
|
|
|
945
943
|
|
|
946
944
|
The application lets you create as many presets as needed and easily switch among them. Additionally, you can clone an existing preset, which is useful for creating variations based on previously set configurations and experimentation.
|
|
947
945
|
|
|
948
|
-

|
|
949
947
|
|
|
950
948
|
## Example usage
|
|
951
949
|
|
|
@@ -1038,11 +1036,11 @@ How to use locally installed Llama 3 or Mistral models:
|
|
|
1038
1036
|
|
|
1039
1037
|
For example, on Linux:
|
|
1040
1038
|
|
|
1041
|
-
|
|
1039
|
+
```curl -fsSL https://ollama.com/install.sh | sh```
|
|
1042
1040
|
|
|
1043
1041
|
4) Run the model (e.g. Llama 3) locally on your machine. For example, on Linux:
|
|
1044
1042
|
|
|
1045
|
-
|
|
1043
|
+
```ollama run llama3.1```
|
|
1046
1044
|
|
|
1047
1045
|
5) Return to PyGPT and select the correct model from models list to chat with selected model using Ollama running locally.
|
|
1048
1046
|
|
|
@@ -1311,7 +1309,7 @@ Options reference: https://pypi.org/project/SpeechRecognition/1.3.1/
|
|
|
1311
1309
|
The plugin lets you turn text into speech using the TTS model from OpenAI or other services like ``Microsoft Azure``, ``Google``, and ``Eleven Labs``. You can add more text-to-speech providers to it too. `OpenAI TTS` does not require any additional API keys or extra configuration; it utilizes the main OpenAI key.
|
|
1312
1310
|
Microsoft Azure requires to have an Azure API Key. Before using speech synthesis via `Microsoft Azure`, `Google` or `Eleven Labs`, you must configure the audio plugin with your API keys, regions and voices if required.
|
|
1313
1311
|
|
|
1314
|
-

|
|
1315
1313
|
|
|
1316
1314
|
Through the available options, you can select the voice that you want the model to use. More voice synthesis providers coming soon.
|
|
1317
1315
|
|
|
@@ -1559,11 +1557,11 @@ You can find the installation instructions here: https://docs.docker.com/engine/
|
|
|
1559
1557
|
To use IPython in the Snap version, you must connect PyGPT to the Docker daemon:
|
|
1560
1558
|
|
|
1561
1559
|
```commandline
|
|
1562
|
-
|
|
1560
|
+
sudo snap connect pygpt:docker-executables docker:docker-executables
|
|
1563
1561
|
```
|
|
1564
1562
|
|
|
1565
1563
|
````commandline
|
|
1566
|
-
|
|
1564
|
+
sudo snap connect pygpt:docker docker:docker-daemon
|
|
1567
1565
|
````
|
|
1568
1566
|
|
|
1569
1567
|
|
|
@@ -1711,7 +1709,7 @@ Docker image to use for sandbox *Default:* `python:3.8-alpine`
|
|
|
1711
1709
|
|
|
1712
1710
|
With the `Custom Commands` plugin, you can integrate **PyGPT** with your operating system and scripts or applications. You can define an unlimited number of custom commands and instruct GPT on when and how to execute them. Configuration is straightforward, and **PyGPT** includes a simple tutorial command for testing and learning how it works:
|
|
1713
1711
|
|
|
1714
|
-

|
|
1715
1713
|
|
|
1716
1714
|
To add a new custom command, click the **ADD** button and then:
|
|
1717
1715
|
|
|
@@ -2036,7 +2034,7 @@ Then, copy the following two items into **PyGPT**:
|
|
|
2036
2034
|
|
|
2037
2035
|
These data must be configured in the appropriate fields in the `Plugins / Settings...` menu:
|
|
2038
2036
|
|
|
2039
|
-

|
|
2040
2038
|
|
|
2041
2039
|
- `Google Custom Search API KEY` *google_api_key*
|
|
2042
2040
|
|
|
@@ -2433,7 +2431,7 @@ It is a JSON object wrapped between `~###~`. The application extracts the JSON o
|
|
|
2433
2431
|
|
|
2434
2432
|
**Tip:** The `+ Tools` option checkbox must be enabled to allow the execution of commands from plugins. Disable the option if you do not want to use commands, to prevent additional token usage (as the command execution system prompt consumes additional tokens).
|
|
2435
2433
|
|
|
2436
|
-

|
|
2437
2435
|
|
|
2438
2436
|
When native API function calls are disabled, a special system prompt responsible for invoking commands is added to the main system prompt if the `+ Tools` option is active.
|
|
2439
2437
|
|
|
@@ -2524,7 +2522,7 @@ PyGPT features several useful tools, including:
|
|
|
2524
2522
|
- Python Code Interpreter
|
|
2525
2523
|
- HTML/JS Canvas (built-in HTML renderer)
|
|
2526
2524
|
|
|
2527
|
-

|
|
2528
2526
|
|
|
2529
2527
|
|
|
2530
2528
|
## Notepad
|
|
@@ -2602,13 +2600,13 @@ the system prompt, any additional data, and those used within the context (the m
|
|
|
2602
2600
|
|
|
2603
2601
|
**Remember that these are only approximate calculations and do not include, for example, the number of tokens consumed by some plugins. You can find the exact number of tokens used on the OpenAI website.**
|
|
2604
2602
|
|
|
2605
|
-

|
|
2606
2604
|
|
|
2607
2605
|
## Total tokens
|
|
2608
2606
|
|
|
2609
2607
|
After receiving a response from the model, the application displays the actual total number of tokens used for the query (received from the API).
|
|
2610
2608
|
|
|
2611
|
-

|
|
2612
2610
|
|
|
2613
2611
|
|
|
2614
2612
|
# Accessibility
|
|
@@ -2746,7 +2744,7 @@ The following basic options can be modified directly within the application:
|
|
|
2746
2744
|
Config -> Settings...
|
|
2747
2745
|
```
|
|
2748
2746
|
|
|
2749
|
-

|
|
2750
2748
|
|
|
2751
2749
|
**General**
|
|
2752
2750
|
|
|
@@ -3051,6 +3049,20 @@ You can manually edit the configuration files in this directory (this is your wo
|
|
|
3051
3049
|
|
|
3052
3050
|
---
|
|
3053
3051
|
|
|
3052
|
+
## Setting the Working Directory Using Command Line Arguments
|
|
3053
|
+
|
|
3054
|
+
To set the current working directory using a command-line argument, use:
|
|
3055
|
+
|
|
3056
|
+
```
|
|
3057
|
+
python3 ./run.py --workdir="/path/to/workdir"
|
|
3058
|
+
```
|
|
3059
|
+
or, for the binary version:
|
|
3060
|
+
|
|
3061
|
+
```
|
|
3062
|
+
pygpt.exe --workdir="/path/to/workdir"
|
|
3063
|
+
```
|
|
3064
|
+
|
|
3065
|
+
|
|
3054
3066
|
## Translations / Locale
|
|
3055
3067
|
|
|
3056
3068
|
Locale `.ini` files are located in the app directory:
|
|
@@ -3923,6 +3935,11 @@ may consume additional tokens that are not displayed in the main window.
|
|
|
3923
3935
|
|
|
3924
3936
|
## Recent changes:
|
|
3925
3937
|
|
|
3938
|
+
**2.4.36 (2024-11-28)**
|
|
3939
|
+
|
|
3940
|
+
- Added a new command-line argument: --workdir="/path/to/workdir" to explicitly set the current working directory.
|
|
3941
|
+
- Fix: start image generation in Image mode.
|
|
3942
|
+
|
|
3926
3943
|
**2.4.35 (2024-11-28)**
|
|
3927
3944
|
|
|
3928
3945
|
- Docker removed from dependencies in Snap version #82
|
|
@@ -1,11 +1,11 @@
|
|
|
1
|
-
CHANGELOG.md,sha256=
|
|
2
|
-
README.md,sha256=
|
|
1
|
+
CHANGELOG.md,sha256=ze6FSM2VH2viP0X8-REeDLDNixH5XEWIpTe9a_TRieQ,76996
|
|
2
|
+
README.md,sha256=xFOhN2nJoHJSo0UiUa4oYU02bXdeM_Gpwz4SAE78SIQ,161787
|
|
3
3
|
icon.png,sha256=CzcINJaU23a9hNjsDlDNbyuiEvKZ4Wg6DQVYF6SpuRg,13970
|
|
4
|
-
pygpt_net/CHANGELOG.txt,sha256=
|
|
4
|
+
pygpt_net/CHANGELOG.txt,sha256=OANVuWFOL2EVR5SgtCTfaNf8cEuTT8uib6oPWnwjTvQ,75552
|
|
5
5
|
pygpt_net/LICENSE,sha256=6Ku72-zJ8wO5VIR87UoJ5P_coCVjPghaFL9ZF2jLp7E,1146
|
|
6
|
-
pygpt_net/__init__.py,sha256=
|
|
6
|
+
pygpt_net/__init__.py,sha256=Lx1tpxBy21pZsDUu6TwVNXa0dK5sEmG4yr1Uw6Q6Ruo,1067
|
|
7
7
|
pygpt_net/app.py,sha256=Q7g-2UlF7FlEOBytbGb_nrjT4zEio2HzfzQd687QuUo,15930
|
|
8
|
-
pygpt_net/config.py,sha256=
|
|
8
|
+
pygpt_net/config.py,sha256=Qc1FOBtTf3O6A6-6KoqUGtoJ0u8hXQeowvCVbZFwtik,16405
|
|
9
9
|
pygpt_net/container.py,sha256=BemiVZPpPNIzfB-ZvnZeeBPFu-AcX2c30OqYFylEjJc,4023
|
|
10
10
|
pygpt_net/controller/__init__.py,sha256=q0YzbH5Hm4JyOl8zt1IOHScWNFLCG330jFghj3IUznc,5786
|
|
11
11
|
pygpt_net/controller/access/__init__.py,sha256=5DzR7zVmFsOICo9I5mEQcIOgsk2WCNi1amUWxExwUiY,2639
|
|
@@ -33,7 +33,7 @@ pygpt_net/controller/chat/audio.py,sha256=1eX_kIiRLFBDrNAPVthj-1ftknhdOkn3jWBuC7
|
|
|
33
33
|
pygpt_net/controller/chat/command.py,sha256=_lXHki5pbTi8Pvz_BzP3VxGUM_0Ztr1mE5rsatPmSoE,2833
|
|
34
34
|
pygpt_net/controller/chat/common.py,sha256=uLRRT1ZNGLJiiyJ42lJ7rjDwhqPEfX1RD-EnoFhBmmU,13875
|
|
35
35
|
pygpt_net/controller/chat/files.py,sha256=Q53Sr7-uJwI_L1FKa1raApFvZ4AI0Eoj766iY9a6Iik,2705
|
|
36
|
-
pygpt_net/controller/chat/image.py,sha256=
|
|
36
|
+
pygpt_net/controller/chat/image.py,sha256=cIh_IlqFYAzyNNMHgKDT2MB0DnXf78A_yBEIurvk8ME,7866
|
|
37
37
|
pygpt_net/controller/chat/input.py,sha256=UhGfOqKSJNJMNh85UEcYhZ7cRg32qPeH-2LgjC3_vwE,9811
|
|
38
38
|
pygpt_net/controller/chat/output.py,sha256=EvXVTYJANOQhmpJE6wNznI6jzhQ9kcGo3ne0St1ha-0,9112
|
|
39
39
|
pygpt_net/controller/chat/render.py,sha256=h7lHc0AL0D3IvnXRxSKgv0Y0B3_ZnJUgt_4oJbamlFU,16240
|
|
@@ -82,7 +82,7 @@ pygpt_net/controller/model/__init__.py,sha256=pDbxudu0jM1soOK0B9-b0vlnfnQnT3-qze
|
|
|
82
82
|
pygpt_net/controller/model/editor.py,sha256=H0dmzkqELUnwuaYx6JL7-P8TfkClJfvRbpJwWcdKH2k,12603
|
|
83
83
|
pygpt_net/controller/notepad.py,sha256=SuB18pUbN6cewnBTNTn-SS5ELq8Ka7VDhRagvWw3Vd0,8987
|
|
84
84
|
pygpt_net/controller/painter/__init__.py,sha256=1Ekmr2a3irDkSb2wowiPXhW59rfdZOW1tdbxeubph-k,2747
|
|
85
|
-
pygpt_net/controller/painter/capture.py,sha256=
|
|
85
|
+
pygpt_net/controller/painter/capture.py,sha256=LjhLqGVUKdaCI026FYJXAKUme9EmUdhwhRrQrW-Bvv8,6307
|
|
86
86
|
pygpt_net/controller/painter/common.py,sha256=4FtwKdrvXTyq1MWNN6GP8OYO4H7BKi95K4fXPzHEH64,6292
|
|
87
87
|
pygpt_net/controller/plugins/__init__.py,sha256=dmO2lYxVkED6ew5Z0Sl3S6577e3Q9CD-bgPPTNPjOf8,15720
|
|
88
88
|
pygpt_net/controller/plugins/presets.py,sha256=g2ROVyI-Lc9yjIZu_XinCZPE5F0Dx5N6l4lAJK_N2-8,11930
|
|
@@ -242,9 +242,9 @@ pygpt_net/css_rc.py,sha256=i13kX7irhbYCWZ5yJbcMmnkFp_UfS4PYnvRFSPF7XXo,11349
|
|
|
242
242
|
pygpt_net/data/audio/click_off.mp3,sha256=aNiRDP1pt-Jy7ija4YKCNFBwvGWbzU460F4pZWZDS90,65201
|
|
243
243
|
pygpt_net/data/audio/click_on.mp3,sha256=qfdsSnthAEHVXzeyN4LlC0OvXuyW8p7stb7VXtlvZ1k,65201
|
|
244
244
|
pygpt_net/data/audio/ok.mp3,sha256=LTiV32pEBkpUGBkKkcOdOFB7Eyt_QoP2Nv6c5AaXftk,32256
|
|
245
|
-
pygpt_net/data/config/config.json,sha256=
|
|
246
|
-
pygpt_net/data/config/models.json,sha256=
|
|
247
|
-
pygpt_net/data/config/modes.json,sha256=
|
|
245
|
+
pygpt_net/data/config/config.json,sha256=d2IPMfZiPkY-w85RnK6HtMmYLVH3YhFnok_fRMqe4sY,19224
|
|
246
|
+
pygpt_net/data/config/models.json,sha256=ii9y2Gwwe6Vo4OBPkO9yHIQXxnWQKUMOkPk_Hk8cpow,48872
|
|
247
|
+
pygpt_net/data/config/modes.json,sha256=mLcLNI0DmIiBQdVVLBiqvl-vNcv1_gjiJKb98ipCOIU,1923
|
|
248
248
|
pygpt_net/data/config/presets/agent_openai.json,sha256=vMTR-soRBiEZrpJJHuFLWyx8a3Ez_BqtqjyXgxCAM_Q,733
|
|
249
249
|
pygpt_net/data/config/presets/agent_openai_assistant.json,sha256=awJw9lNTGpKML6SJUShVn7lv8AXh0oic7wBeyoN7AYs,798
|
|
250
250
|
pygpt_net/data/config/presets/agent_planner.json,sha256=a6Rv58Bnm2STNWB0Rw_dGhnsz6Lb3J8_GwsUVZaTIXc,742
|
|
@@ -1666,7 +1666,7 @@ pygpt_net/item/preset.py,sha256=413IdBxlY7zA895dEPNJMI6OJVRTQu0vlacEb0CY8EU,5430
|
|
|
1666
1666
|
pygpt_net/item/prompt.py,sha256=oX3BA9n2E6fco2dMZu7DiO3GQgqPj3isFjPcTcFXw9s,1558
|
|
1667
1667
|
pygpt_net/js.qrc,sha256=OqPzGN6U2Y-uENLFlfDY2BxywCAnU0uds4QcbB7me5Q,542
|
|
1668
1668
|
pygpt_net/js_rc.py,sha256=5f7l2zJIzW-gHHndytWVXz2sjKyR924GCpOSmDX9sZI,2456868
|
|
1669
|
-
pygpt_net/launcher.py,sha256=
|
|
1669
|
+
pygpt_net/launcher.py,sha256=c5GUAn74IkR4x7odIxonz1mne2vq_bl_ROOIbKjW8qg,9354
|
|
1670
1670
|
pygpt_net/migrations/Version20231227152900.py,sha256=1Rw1mK2mVQs0B2HrbxHICu1Pd1X5jg4yZIrytnR5N5Y,2849
|
|
1671
1671
|
pygpt_net/migrations/Version20231230095000.py,sha256=A1_e9oC_E4LSo9uBFiiI2dKH7N-SERFp7DMX1R_8LXQ,906
|
|
1672
1672
|
pygpt_net/migrations/Version20231231230000.py,sha256=SICzfCBpm32P_YMlVIW1LRumEvPbuI2cb9eKsHpcBqg,901
|
|
@@ -2155,8 +2155,8 @@ pygpt_net/ui/widget/textarea/web.py,sha256=KIW8MnwDWjEAMdiLA2v1yZiFbf-PT4KkF55uh
|
|
|
2155
2155
|
pygpt_net/ui/widget/vision/__init__.py,sha256=8HT4tQFqQogEEpGYTv2RplKBthlsFKcl5egnv4lzzEw,488
|
|
2156
2156
|
pygpt_net/ui/widget/vision/camera.py,sha256=T8b5cmK6uhf_WSSxzPt_Qod8JgMnst6q8sQqRvgQiSA,2584
|
|
2157
2157
|
pygpt_net/utils.py,sha256=YhMvgy0wNt3roHIbbAnS-5SXOxOOIIvRRGd6FPTa6d0,6153
|
|
2158
|
-
pygpt_net-2.4.
|
|
2159
|
-
pygpt_net-2.4.
|
|
2160
|
-
pygpt_net-2.4.
|
|
2161
|
-
pygpt_net-2.4.
|
|
2162
|
-
pygpt_net-2.4.
|
|
2158
|
+
pygpt_net-2.4.36.post1.dist-info/LICENSE,sha256=GLKQTnJOPK4dDIWfkAIM4GwOxKJXi5zcMGt7FjLR1xk,1126
|
|
2159
|
+
pygpt_net-2.4.36.post1.dist-info/METADATA,sha256=0nmgkmGDq4CMUJyxthlCp72n4JpdyDPGyadvZCpugBY,166595
|
|
2160
|
+
pygpt_net-2.4.36.post1.dist-info/WHEEL,sha256=FMvqSimYX_P7y0a7UY-_Mc83r5zkBZsCYPm7Lr0Bsq4,88
|
|
2161
|
+
pygpt_net-2.4.36.post1.dist-info/entry_points.txt,sha256=qvpII6UHIt8XfokmQWnCYQrTgty8FeJ9hJvOuUFCN-8,43
|
|
2162
|
+
pygpt_net-2.4.36.post1.dist-info/RECORD,,
|
|
File without changes
|
|
File without changes
|
|
File without changes
|