opentryon 0.0.1__py3-none-any.whl
This diff represents the content of publicly available package versions that have been released to one of the supported registries. The information contained in this diff is provided for informational purposes only and reflects changes between package versions as they appear in their respective public registries.
- opentryon-0.0.1.dist-info/METADATA +1470 -0
- opentryon-0.0.1.dist-info/RECORD +56 -0
- opentryon-0.0.1.dist-info/WHEEL +5 -0
- opentryon-0.0.1.dist-info/top_level.txt +2 -0
- tryon/__init__.py +0 -0
- tryon/api/__init__.py +19 -0
- tryon/api/flux2.py +1203 -0
- tryon/api/kling_ai.py +733 -0
- tryon/api/lumaAI/__init__.py +22 -0
- tryon/api/lumaAI/adapter.py +661 -0
- tryon/api/lumaAI/luma_video_adapter.py +330 -0
- tryon/api/nano_banana/__init__.py +17 -0
- tryon/api/nano_banana/adapter.py +872 -0
- tryon/api/nova_canvas.py +340 -0
- tryon/api/segmind.py +456 -0
- tryon/datasets/__init__.py +50 -0
- tryon/datasets/base.py +132 -0
- tryon/datasets/example_usage.py +324 -0
- tryon/datasets/fashion_mnist.py +298 -0
- tryon/datasets/subjects200k.py +604 -0
- tryon/datasets/viton_hd.py +851 -0
- tryon/models/__init__.py +0 -0
- tryon/preprocessing/__init__.py +3 -0
- tryon/preprocessing/captioning/__init__.py +2 -0
- tryon/preprocessing/captioning/generate_caption.py +108 -0
- tryon/preprocessing/extract_garment_new.py +91 -0
- tryon/preprocessing/preprocess_garment.py +107 -0
- tryon/preprocessing/preprocess_human.py +86 -0
- tryon/preprocessing/sam2/__init__.py +23 -0
- tryon/preprocessing/u2net/__init__.py +3 -0
- tryon/preprocessing/u2net/data_loader.py +277 -0
- tryon/preprocessing/u2net/load_u2net.py +47 -0
- tryon/preprocessing/u2net/u2net_cloth_segm.py +550 -0
- tryon/preprocessing/u2net/u2net_human_segm.py +520 -0
- tryon/preprocessing/u2net/utils.py +10 -0
- tryon/preprocessing/utils.py +91 -0
- tryondiffusion/__init__.py +0 -0
- tryondiffusion/diffusion.py +275 -0
- tryondiffusion/ema.py +26 -0
- tryondiffusion/network.py +865 -0
- tryondiffusion/pre_processing/__init__.py +0 -0
- tryondiffusion/pre_processing/generate_cloth_agnostic_rgb.py +33 -0
- tryondiffusion/pre_processing/generate_segmented_garment.py +30 -0
- tryondiffusion/pre_processing/openpose_pytorch/__init__.py +0 -0
- tryondiffusion/pre_processing/openpose_pytorch/body_pose.py +233 -0
- tryondiffusion/pre_processing/openpose_pytorch/model.py +220 -0
- tryondiffusion/pre_processing/openpose_pytorch/utils.py +147 -0
- tryondiffusion/pre_processing/save_pose_embeddings.py +87 -0
- tryondiffusion/pre_processing/segment_cloth_u2net.py +33 -0
- tryondiffusion/pre_processing/u2net_cloth_seg/__init__.py +67 -0
- tryondiffusion/pre_processing/u2net_cloth_seg/unet.py +550 -0
- tryondiffusion/pre_processing/u2net_cloth_seg/utils.py +85 -0
- tryondiffusion/trainer.py +48 -0
- tryondiffusion/utils/__init__.py +2 -0
- tryondiffusion/utils/dataloader_train.py +92 -0
- tryondiffusion/utils/utils.py +119 -0
|
@@ -0,0 +1,1470 @@
|
|
|
1
|
+
Metadata-Version: 2.4
|
|
2
|
+
Name: opentryon
|
|
3
|
+
Version: 0.0.1
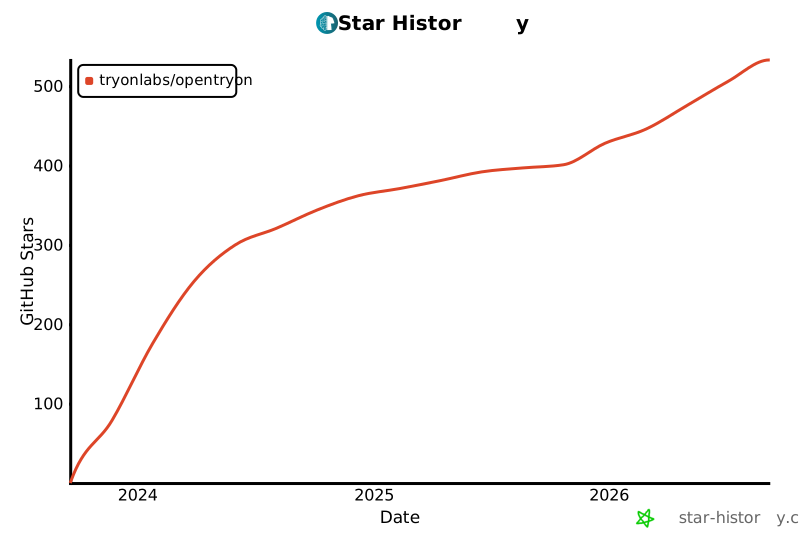
|
|
4
|
+
Summary: Open-source AI toolkit for fashion tech and virtual try-on
|
|
5
|
+
Home-page: https://github.com/tryonlabs/opentryon
|
|
6
|
+
Author: TryOn Labs
|
|
7
|
+
Author-email: contact@tryonlabs.ai
|
|
8
|
+
License: CC-BY-NC-4.0
|
|
9
|
+
Project-URL: Documentation, https://tryonlabs.github.io/opentryon/
|
|
10
|
+
Project-URL: Source, https://github.com/tryonlabs/opentryon
|
|
11
|
+
Project-URL: Bug Reports, https://github.com/tryonlabs/opentryon/issues
|
|
12
|
+
Project-URL: Discord, https://discord.gg/T5mPpZHxkY
|
|
13
|
+
Keywords: virtual try-on,fashion tech,diffusion models,garment segmentation,pose estimation,outfit generation,try-on diffusion,computer vision,deep learning,artificial intelligence,image generation
|
|
14
|
+
Classifier: Development Status :: 3 - Alpha
|
|
15
|
+
Classifier: Intended Audience :: Developers
|
|
16
|
+
Classifier: Intended Audience :: Science/Research
|
|
17
|
+
Classifier: License :: Free for non-commercial use
|
|
18
|
+
Classifier: Operating System :: OS Independent
|
|
19
|
+
Classifier: Programming Language :: Python :: 3
|
|
20
|
+
Classifier: Topic :: Scientific/Engineering :: Artificial Intelligence
|
|
21
|
+
Classifier: Topic :: Scientific/Engineering :: Image Processing
|
|
22
|
+
Classifier: Programming Language :: Python :: 3.10
|
|
23
|
+
Classifier: Programming Language :: Python :: 3.11
|
|
24
|
+
Classifier: Programming Language :: Python :: 3.12
|
|
25
|
+
Classifier: License :: Free For Home Use
|
|
26
|
+
Classifier: License :: Other/Proprietary License
|
|
27
|
+
Requires-Python: >=3.10
|
|
28
|
+
Description-Content-Type: text/markdown
|
|
29
|
+
Requires-Dist: torch==2.1.2
|
|
30
|
+
Requires-Dist: torchvision==0.16.2
|
|
31
|
+
Requires-Dist: numpy==1.26.4
|
|
32
|
+
Requires-Dist: opencv-python==4.8.1.78
|
|
33
|
+
Requires-Dist: pillow==10.1.0
|
|
34
|
+
Requires-Dist: tqdm==4.66.1
|
|
35
|
+
Requires-Dist: scikit-image==0.22.0
|
|
36
|
+
Requires-Dist: python-dotenv==1.0.1
|
|
37
|
+
Requires-Dist: transformers==4.42.4
|
|
38
|
+
Requires-Dist: boto3==1.40.64
|
|
39
|
+
Requires-Dist: requests>=2.31.0
|
|
40
|
+
Requires-Dist: PyJWT>=2.10.1
|
|
41
|
+
Requires-Dist: google-genai>=1.52.0
|
|
42
|
+
Requires-Dist: fastapi==0.124.0
|
|
43
|
+
Requires-Dist: uvicorn[standard]==0.38.0
|
|
44
|
+
Requires-Dist: python-multipart==0.0.20
|
|
45
|
+
Requires-Dist: lumaai>=1.18.1
|
|
46
|
+
Provides-Extra: demos
|
|
47
|
+
Requires-Dist: gradio>=6.0.0; extra == "demos"
|
|
48
|
+
Provides-Extra: training
|
|
49
|
+
Requires-Dist: diffusers>=0.21.0; extra == "training"
|
|
50
|
+
Requires-Dist: accelerate>=0.20.0; extra == "training"
|
|
51
|
+
Provides-Extra: all
|
|
52
|
+
Requires-Dist: gradio>=6.0.0; extra == "all"
|
|
53
|
+
Requires-Dist: diffusers>=0.21.0; extra == "all"
|
|
54
|
+
Requires-Dist: accelerate>=0.20.0; extra == "all"
|
|
55
|
+
Dynamic: author
|
|
56
|
+
Dynamic: author-email
|
|
57
|
+
Dynamic: classifier
|
|
58
|
+
Dynamic: description
|
|
59
|
+
Dynamic: description-content-type
|
|
60
|
+
Dynamic: home-page
|
|
61
|
+
Dynamic: keywords
|
|
62
|
+
Dynamic: license
|
|
63
|
+
Dynamic: project-url
|
|
64
|
+
Dynamic: provides-extra
|
|
65
|
+
Dynamic: requires-dist
|
|
66
|
+
Dynamic: requires-python
|
|
67
|
+
Dynamic: summary
|
|
68
|
+
|
|
69
|
+
# OpenTryOn: Open-source AI toolkit for fashion tech and virtual try-on
|
|
70
|
+
|
|
71
|
+
[](https://tryonlabs.github.io/opentryon/)
|
|
72
|
+
[](https://discord.gg/T5mPpZHxkY)
|
|
73
|
+
[](https://creativecommons.org/licenses/by-nc/4.0/)
|
|
74
|
+
|
|
75
|
+
OpenTryOn is an open-source AI toolkit designed for fashion technology and virtual try-on applications. This project provides a comprehensive suite of tools for garment segmentation, human parsing, pose estimation, and virtual try-on using state-of-the-art diffusion models.
|
|
76
|
+
|
|
77
|
+
📚 **Documentation**: Comprehensive documentation is available at [https://tryonlabs.github.io/opentryon/](https://tryonlabs.github.io/opentryon/)
|
|
78
|
+
|
|
79
|
+
## Star History
|
|
80
|
+
|
|
81
|
+
[](https://www.star-history.com/#tryonlabs/opentryon&type=date&legend=top-left)
|
|
82
|
+
|
|
83
|
+
## 🎯 Features
|
|
84
|
+
|
|
85
|
+
- **Virtual Try-On**:
|
|
86
|
+
- Amazon Nova Canvas virtual try-on using AWS Bedrock
|
|
87
|
+
- Kling AI virtual try-on using Kolors API
|
|
88
|
+
- Segmind Try-On Diffusion API integration
|
|
89
|
+
- Advanced diffusion-based virtual try-on capabilities using TryOnDiffusion
|
|
90
|
+
- **Image Generation**:
|
|
91
|
+
- Nano Banana (Gemini 2.5 Flash Image) for fast, efficient image generation
|
|
92
|
+
- Nano Banana Pro (Gemini 3 Pro Image Preview) for advanced 4K image generation with search grounding
|
|
93
|
+
- FLUX.2 [PRO] high-quality image generation with text-to-image, image editing, and multi-image composition
|
|
94
|
+
- FLUX.2 [FLEX] flexible image generation with advanced controls (guidance, steps, prompt upsampling)
|
|
95
|
+
- Photon-Flash-1 (Luma AI): Fast and cost efficient image generation, ideal for rapid iteration and scale
|
|
96
|
+
- Photon-1 (Luma AI): High-fidelity default model for professional-grade quality, creativity and detailed prompt handling
|
|
97
|
+
- **Video Generation**:
|
|
98
|
+
- Luma AI Video Generation Model (Dream Machine): High-quality video generation with text-to-image and image-to-video modes.
|
|
99
|
+
- **Datasets Module**:
|
|
100
|
+
- Fashion-MNIST dataset loader with automatic download
|
|
101
|
+
- VITON-HD dataset loader with lazy loading via PyTorch DataLoader
|
|
102
|
+
- Class-based adapter pattern for easy dataset integration
|
|
103
|
+
- Support for both small and large datasets
|
|
104
|
+
- **Garment Preprocessing**:
|
|
105
|
+
- Garment segmentation using U2Net
|
|
106
|
+
- Garment extraction and preprocessing
|
|
107
|
+
- Human segmentation and parsing
|
|
108
|
+
- **Pose Estimation**: OpenPose-based pose keypoint extraction for garments and humans
|
|
109
|
+
- **Outfit Generation**: FLUX.1-dev LoRA-based outfit generation from text descriptions
|
|
110
|
+
- **Model Swap**: Swap garments on different models
|
|
111
|
+
- **Interactive Demos**: Gradio-based web interfaces for all features
|
|
112
|
+
- **Preprocessing Pipeline**: Complete preprocessing pipeline for training and inference
|
|
113
|
+
|
|
114
|
+
## 📋 Table of Contents
|
|
115
|
+
|
|
116
|
+
- [Documentation](#documentation)
|
|
117
|
+
- [Installation](#installation)
|
|
118
|
+
- [Quick Start](#quick-start)
|
|
119
|
+
- [Usage](#usage)
|
|
120
|
+
- [Datasets Module](#datasets-module)
|
|
121
|
+
- [Virtual Try-On with Amazon Nova Canvas](#virtual-try-on-with-amazon-nova-canvas)
|
|
122
|
+
- [Virtual Try-On with Kling AI](#virtual-try-on-with-kling-ai)
|
|
123
|
+
- [Virtual Try-On with Segmind](#virtual-try-on-with-segmind)
|
|
124
|
+
- [Image Generation with Nano Banana](#image-generation-with-nano-banana)
|
|
125
|
+
- [Image Generation with FLUX.2](#image-generation-with-flux2)
|
|
126
|
+
- [Video Generation with Luma AI](#video-generation-with-luma-ai)
|
|
127
|
+
- [Preprocessing Functions](#preprocessing-functions)
|
|
128
|
+
- [Demos](#demos)
|
|
129
|
+
- [Project Structure](#project-structure)
|
|
130
|
+
- [TryOnDiffusion Roadmap](#tryondiffusion-roadmap)
|
|
131
|
+
- [Contributing](#contributing)
|
|
132
|
+
- [License](#license)
|
|
133
|
+
|
|
134
|
+
## 📚 Documentation
|
|
135
|
+
|
|
136
|
+
**Complete documentation** for OpenTryOn is available at **[https://tryonlabs.github.io/opentryon/](https://tryonlabs.github.io/opentryon/)**
|
|
137
|
+
|
|
138
|
+
The documentation includes:
|
|
139
|
+
- Getting Started guides
|
|
140
|
+
- API Reference for all modules
|
|
141
|
+
- Usage examples and tutorials
|
|
142
|
+
- Datasets documentation (Fashion-MNIST, VITON-HD)
|
|
143
|
+
- API adapters documentation (Segmind, Kling AI, Amazon Nova Canvas)
|
|
144
|
+
- Interactive demos and examples
|
|
145
|
+
- Advanced guides and troubleshooting
|
|
146
|
+
|
|
147
|
+
Visit the [documentation site](https://tryonlabs.github.io/opentryon/) to explore all features, learn how to use OpenTryOn, and get started quickly!
|
|
148
|
+
|
|
149
|
+
## 🚀 Installation
|
|
150
|
+
|
|
151
|
+
### Prerequisites
|
|
152
|
+
|
|
153
|
+
- Python 3.10
|
|
154
|
+
- CUDA-capable GPU (recommended)
|
|
155
|
+
- Conda or Miniconda
|
|
156
|
+
|
|
157
|
+
### Step 1: Clone the Repository
|
|
158
|
+
|
|
159
|
+
```bash
|
|
160
|
+
git clone https://github.com/tryonlabs/opentryon.git
|
|
161
|
+
cd opentryon
|
|
162
|
+
```
|
|
163
|
+
|
|
164
|
+
### Step 2: Create Conda Environment
|
|
165
|
+
|
|
166
|
+
```bash
|
|
167
|
+
conda env create -f environment.yml
|
|
168
|
+
conda activate opentryon
|
|
169
|
+
```
|
|
170
|
+
|
|
171
|
+
Alternatively, you can install dependencies using pip:
|
|
172
|
+
|
|
173
|
+
```bash
|
|
174
|
+
pip install -r requirements.txt
|
|
175
|
+
```
|
|
176
|
+
|
|
177
|
+
### Step 3: Install Package
|
|
178
|
+
|
|
179
|
+
```bash
|
|
180
|
+
pip install -e .
|
|
181
|
+
```
|
|
182
|
+
|
|
183
|
+
### Step 4: Environment Variables
|
|
184
|
+
|
|
185
|
+
Create a `.env` file in the project root with the following variables:
|
|
186
|
+
|
|
187
|
+
```env
|
|
188
|
+
U2NET_CLOTH_SEG_CHECKPOINT_PATH=cloth_segm.pth
|
|
189
|
+
|
|
190
|
+
# AWS Credentials for Amazon Nova Canvas (optional, can use AWS CLI default profile)
|
|
191
|
+
AWS_ACCESS_KEY_ID=your_access_key
|
|
192
|
+
AWS_SECRET_ACCESS_KEY=your_secret_key
|
|
193
|
+
AMAZON_NOVA_REGION=us-east-1 # Optional: us-east-1, ap-northeast-1, eu-west-1
|
|
194
|
+
AMAZON_NOVA_MODEL_ID=amazon.nova-canvas-v1:0 # Optional
|
|
195
|
+
|
|
196
|
+
# Kling AI Credentials (required for Kling AI virtual try-on)
|
|
197
|
+
KLING_AI_API_KEY=your_kling_api_key
|
|
198
|
+
KLING_AI_SECRET_KEY=your_kling_secret_key
|
|
199
|
+
KLING_AI_BASE_URL=https://api-singapore.klingai.com # Optional, defaults to Singapore endpoint
|
|
200
|
+
|
|
201
|
+
# Segmind Credentials (required for Segmind virtual try-on)
|
|
202
|
+
SEGMIND_API_KEY=your_segmind_api_key
|
|
203
|
+
|
|
204
|
+
# Google Gemini Credentials (required for Nano Banana image generation)
|
|
205
|
+
GEMINI_API_KEY=your_gemini_api_key
|
|
206
|
+
|
|
207
|
+
# BFL API Credentials (required for FLUX.2 image generation)
|
|
208
|
+
BFL_API_KEY=your_bfl_api_key
|
|
209
|
+
|
|
210
|
+
# Luma AI Credentials (required for Luma AI image generation)
|
|
211
|
+
LUMA_AI_API_KEY=your_luma_ai_api_key
|
|
212
|
+
```
|
|
213
|
+
|
|
214
|
+
**Notes**:
|
|
215
|
+
- Download the U2Net checkpoint file from the [huggingface-cloth-segmentation repository](https://github.com/wildoctopus/huggingface-cloth-segmentation)
|
|
216
|
+
- For Amazon Nova Canvas, ensure you have AWS credentials configured (via `.env` file or AWS CLI) and Nova Canvas enabled in your AWS Bedrock console
|
|
217
|
+
- For Kling AI, obtain your API key and secret key from the [Kling AI Developer Portal](https://app.klingai.com/global/dev/document-api/apiReference/model/functionalityTry)
|
|
218
|
+
|
|
219
|
+
- For Segmind, obtain your API key from the [Segmind API Portal](https://www.segmind.com/models/try-on-diffusion/api)
|
|
220
|
+
- For Nano Banana, obtain your API key from the [Google AI Studio](https://aistudio.google.com/app/apikey)
|
|
221
|
+
- For FLUX.2 models, obtain your API key from [BFL AI](https://docs.bfl.ai/)
|
|
222
|
+
|
|
223
|
+
- For FLUX.2 models, obtain your API key from [BFL AI](https://docs.bfl.ai/)
|
|
224
|
+
- For Luma AI, obtain your API key from the [Luma Labs AI](https://lumalabs.ai/api)
|
|
225
|
+
|
|
226
|
+
## 🎮 Quick Start
|
|
227
|
+
|
|
228
|
+
### Basic Preprocessing
|
|
229
|
+
|
|
230
|
+
```python
|
|
231
|
+
from dotenv import load_dotenv
|
|
232
|
+
load_dotenv()
|
|
233
|
+
|
|
234
|
+
from tryon.preprocessing import segment_garment, extract_garment, segment_human
|
|
235
|
+
|
|
236
|
+
# Segment garment
|
|
237
|
+
segment_garment(
|
|
238
|
+
inputs_dir="data/original_cloth",
|
|
239
|
+
outputs_dir="data/garment_segmented",
|
|
240
|
+
cls="upper" # Options: "upper", "lower", "all"
|
|
241
|
+
)
|
|
242
|
+
|
|
243
|
+
# Extract garment
|
|
244
|
+
extract_garment(
|
|
245
|
+
inputs_dir="data/original_cloth",
|
|
246
|
+
outputs_dir="data/cloth",
|
|
247
|
+
cls="upper",
|
|
248
|
+
resize_to_width=400
|
|
249
|
+
)
|
|
250
|
+
|
|
251
|
+
# Segment human
|
|
252
|
+
segment_human(
|
|
253
|
+
image_path="data/original_human/model.jpg",
|
|
254
|
+
output_dir="data/human_segmented"
|
|
255
|
+
)
|
|
256
|
+
```
|
|
257
|
+
|
|
258
|
+
### Command Line Interface
|
|
259
|
+
|
|
260
|
+
```bash
|
|
261
|
+
# Segment garment
|
|
262
|
+
python main.py --dataset data --action segment_garment --cls upper
|
|
263
|
+
|
|
264
|
+
# Extract garment
|
|
265
|
+
python main.py --dataset data --action extract_garment --cls upper
|
|
266
|
+
|
|
267
|
+
# Segment human
|
|
268
|
+
python main.py --dataset data --action segment_human
|
|
269
|
+
```
|
|
270
|
+
|
|
271
|
+
## 📖 Usage
|
|
272
|
+
|
|
273
|
+
### Datasets Module
|
|
274
|
+
|
|
275
|
+
The `tryon.datasets` module provides easy-to-use interfaces for downloading and loading datasets commonly used in fashion and virtual try-on applications. The module uses a class-based adapter pattern for consistency and extensibility.
|
|
276
|
+
|
|
277
|
+
#### Supported Datasets
|
|
278
|
+
|
|
279
|
+
- **Fashion-MNIST**: A dataset of Zalando's article images (60K training, 10K test, 10 classes, 28×28 grayscale images)
|
|
280
|
+
- **VITON-HD**: A high-resolution virtual try-on dataset (11,647 training pairs, 2,032 test pairs, 1024×768 RGB images)
|
|
281
|
+
- **Subjects200K**: A large-scale dataset with 200,000 paired images for subject consistency research (loaded from HuggingFace)
|
|
282
|
+
|
|
283
|
+
#### Quick Example
|
|
284
|
+
|
|
285
|
+
```python
|
|
286
|
+
from tryon.datasets import FashionMNIST, VITONHD
|
|
287
|
+
from torchvision import transforms
|
|
288
|
+
|
|
289
|
+
# Fashion-MNIST: Small dataset, loads entirely into memory
|
|
290
|
+
fashion_dataset = FashionMNIST(download=True)
|
|
291
|
+
(train_images, train_labels), (test_images, test_labels) = fashion_dataset.load(
|
|
292
|
+
normalize=True,
|
|
293
|
+
flatten=False
|
|
294
|
+
)
|
|
295
|
+
print(f"Training set: {train_images.shape}") # (60000, 28, 28)
|
|
296
|
+
|
|
297
|
+
# VITON-HD: Large dataset, uses lazy loading via DataLoader
|
|
298
|
+
viton_dataset = VITONHD(data_dir="./datasets/viton_hd", download=False)
|
|
299
|
+
transform = transforms.Compose([
|
|
300
|
+
transforms.Resize((512, 384)),
|
|
301
|
+
transforms.ToTensor(),
|
|
302
|
+
transforms.Normalize(mean=[0.5, 0.5, 0.5], std=[0.5, 0.5, 0.5])
|
|
303
|
+
])
|
|
304
|
+
train_loader = viton_dataset.get_dataloader(
|
|
305
|
+
split='train',
|
|
306
|
+
batch_size=8,
|
|
307
|
+
shuffle=True,
|
|
308
|
+
transform=transform
|
|
309
|
+
)
|
|
310
|
+
|
|
311
|
+
# Subjects200K: Large-scale paired images from HuggingFace
|
|
312
|
+
from tryon.datasets import Subjects200K
|
|
313
|
+
|
|
314
|
+
subjects_dataset = Subjects200K()
|
|
315
|
+
hf_dataset = subjects_dataset.get_hf_dataset()
|
|
316
|
+
sample = hf_dataset['train'][0]
|
|
317
|
+
image = sample['image'] # PIL Image with paired images
|
|
318
|
+
collection = sample['collection'] # 'collection_1', 'collection_2', or 'collection_3'
|
|
319
|
+
|
|
320
|
+
# Get PyTorch DataLoader with quality filtering
|
|
321
|
+
dataloader = subjects_dataset.get_dataloader(
|
|
322
|
+
batch_size=16,
|
|
323
|
+
transform=transform,
|
|
324
|
+
collection='collection_2',
|
|
325
|
+
filter_high_quality=True
|
|
326
|
+
)
|
|
327
|
+
```
|
|
328
|
+
|
|
329
|
+
#### Documentation
|
|
330
|
+
|
|
331
|
+
For comprehensive documentation, API reference, usage examples, and best practices, see the [Datasets Module Documentation](tryon/datasets/README.md).
|
|
332
|
+
|
|
333
|
+
**Key Features:**
|
|
334
|
+
- ✅ Automatic download for Fashion-MNIST
|
|
335
|
+
- ✅ Lazy loading for large datasets (VITON-HD)
|
|
336
|
+
- ✅ PyTorch DataLoader integration
|
|
337
|
+
- ✅ Consistent API across datasets
|
|
338
|
+
- ✅ Class-based and function-based interfaces
|
|
339
|
+
- ✅ Support for custom transforms and preprocessing
|
|
340
|
+
|
|
341
|
+
### Virtual Try-On with Amazon Nova Canvas
|
|
342
|
+
|
|
343
|
+
Generate realistic virtual try-on images using Amazon Nova Canvas through AWS Bedrock. This feature combines a source image (person/model) with a reference image (garment/product) to create realistic try-on results.
|
|
344
|
+
|
|
345
|
+
#### Prerequisites
|
|
346
|
+
|
|
347
|
+
1. **AWS Account Setup**:
|
|
348
|
+
- Ensure you have an AWS account with access to Amazon Bedrock
|
|
349
|
+
- Enable Nova Canvas model access in the AWS Bedrock console (Model access section)
|
|
350
|
+
- Configure AWS credentials (via `.env` file or AWS CLI)
|
|
351
|
+
|
|
352
|
+
2. **Image Requirements**:
|
|
353
|
+
- Maximum image size: 4.1M pixels (equivalent to 2,048 x 2,048)
|
|
354
|
+
- Supported formats: JPG, PNG
|
|
355
|
+
- Both source and reference images must meet size requirements
|
|
356
|
+
|
|
357
|
+
#### Command Line Usage
|
|
358
|
+
|
|
359
|
+
```bash
|
|
360
|
+
# Basic usage with GARMENT mask (default) - Nova Canvas
|
|
361
|
+
python vton.py --provider nova --source data/person.jpg --reference data/garment.jpg
|
|
362
|
+
|
|
363
|
+
# Specify garment class - Nova Canvas
|
|
364
|
+
python vton.py --provider nova --source person.jpg --reference garment.jpg --garment-class LOWER_BODY
|
|
365
|
+
|
|
366
|
+
# Use IMAGE mask type with custom mask - Nova Canvas
|
|
367
|
+
python vton.py --provider nova --source person.jpg --reference garment.jpg --mask-type IMAGE --mask-image mask.png
|
|
368
|
+
|
|
369
|
+
# Use different AWS region - Nova Canvas
|
|
370
|
+
python vton.py --provider nova --source person.jpg --reference garment.jpg --region ap-northeast-1
|
|
371
|
+
|
|
372
|
+
# Basic usage - Kling AI
|
|
373
|
+
python vton.py --provider kling --source person.jpg --reference garment.jpg
|
|
374
|
+
|
|
375
|
+
# Specify model version - Kling AI
|
|
376
|
+
python vton.py --provider kling --source person.jpg --reference garment.jpg --model kolors-virtual-try-on-v1-5
|
|
377
|
+
|
|
378
|
+
# Basic usage - Segmind
|
|
379
|
+
python vton.py --provider segmind --source person.jpg --reference garment.jpg --category "Upper body"
|
|
380
|
+
|
|
381
|
+
# Specify inference parameters - Segmind
|
|
382
|
+
python vton.py --provider segmind --source person.jpg --reference garment.jpg --category "Lower body" --num-steps 35 --guidance-scale 2.5
|
|
383
|
+
|
|
384
|
+
# Save output to specific directory
|
|
385
|
+
python vton.py --provider nova --source person.jpg --reference garment.jpg --output-dir results/
|
|
386
|
+
```
|
|
387
|
+
|
|
388
|
+
#### Python API Usage
|
|
389
|
+
|
|
390
|
+
```python
|
|
391
|
+
from dotenv import load_dotenv
|
|
392
|
+
load_dotenv()
|
|
393
|
+
|
|
394
|
+
from tryon.api import AmazonNovaCanvasVTONAdapter
|
|
395
|
+
from PIL import Image
|
|
396
|
+
|
|
397
|
+
# Initialize adapter
|
|
398
|
+
adapter = AmazonNovaCanvasVTONAdapter(region="us-east-1")
|
|
399
|
+
|
|
400
|
+
# Generate virtual try-on images
|
|
401
|
+
images = adapter.generate_and_decode(
|
|
402
|
+
source_image="data/person.jpg",
|
|
403
|
+
reference_image="data/garment.jpg",
|
|
404
|
+
mask_type="GARMENT", # Options: "GARMENT", "IMAGE"
|
|
405
|
+
garment_class="UPPER_BODY" # Options: "UPPER_BODY", "LOWER_BODY", "FULL_BODY", "FOOTWEAR"
|
|
406
|
+
)
|
|
407
|
+
|
|
408
|
+
# Save results
|
|
409
|
+
for idx, image in enumerate(images):
|
|
410
|
+
image.save(f"outputs/vton_result_{idx}.png")
|
|
411
|
+
```
|
|
412
|
+
|
|
413
|
+
#### Mask Types
|
|
414
|
+
|
|
415
|
+
1. **GARMENT** (Default): Automatically detects and masks garment area based on garment class
|
|
416
|
+
- `UPPER_BODY`: Tops, shirts, jackets, hoodies
|
|
417
|
+
- `LOWER_BODY`: Pants, skirts, shorts
|
|
418
|
+
- `FULL_BODY`: Dresses, jumpsuits
|
|
419
|
+
- `FOOTWEAR`: Shoes, boots
|
|
420
|
+
|
|
421
|
+
2. **IMAGE**: Uses a custom black-and-white mask image
|
|
422
|
+
- Black areas = replaced with garment
|
|
423
|
+
- White areas = preserved from source image
|
|
424
|
+
|
|
425
|
+
#### Supported AWS Regions
|
|
426
|
+
|
|
427
|
+
- `us-east-1` (US East - N. Virginia) - Default
|
|
428
|
+
- `ap-northeast-1` (Asia Pacific - Tokyo)
|
|
429
|
+
- `eu-west-1` (Europe - Ireland)
|
|
430
|
+
|
|
431
|
+
#### Example: Complete Workflow
|
|
432
|
+
|
|
433
|
+
```python
|
|
434
|
+
from tryon.api import AmazonNovaCanvasVTONAdapter
|
|
435
|
+
|
|
436
|
+
# Initialize adapter
|
|
437
|
+
adapter = AmazonNovaCanvasVTONAdapter(region="us-east-1")
|
|
438
|
+
|
|
439
|
+
# Generate try-on for upper body garment
|
|
440
|
+
images = adapter.generate_and_decode(
|
|
441
|
+
source_image="data/person.jpg",
|
|
442
|
+
reference_image="data/shirt.jpg",
|
|
443
|
+
mask_type="GARMENT",
|
|
444
|
+
garment_class="UPPER_BODY"
|
|
445
|
+
)
|
|
446
|
+
|
|
447
|
+
# Generate try-on for lower body garment
|
|
448
|
+
images = adapter.generate_and_decode(
|
|
449
|
+
source_image="data/person.jpg",
|
|
450
|
+
reference_image="data/pants.jpg",
|
|
451
|
+
mask_type="GARMENT",
|
|
452
|
+
garment_class="LOWER_BODY"
|
|
453
|
+
)
|
|
454
|
+
|
|
455
|
+
# Save all results
|
|
456
|
+
for idx, image in enumerate(images):
|
|
457
|
+
image.save(f"outputs/result_{idx}.png")
|
|
458
|
+
```
|
|
459
|
+
|
|
460
|
+
**Reference**: [Amazon Nova Canvas Virtual Try-On Documentation](https://aws.amazon.com/blogs/aws/amazon-nova-canvas-update-virtual-try-on-and-style-options-now-available/)
|
|
461
|
+
|
|
462
|
+
### Virtual Try-On with Kling AI
|
|
463
|
+
|
|
464
|
+
Generate realistic virtual try-on images using Kling AI's Kolors virtual try-on API. This feature combines a source image (person/model) with a reference image (garment/product) to create realistic try-on results with automatic task polling until completion.
|
|
465
|
+
|
|
466
|
+
#### Prerequisites
|
|
467
|
+
|
|
468
|
+
1. **Kling AI Account Setup**:
|
|
469
|
+
- Sign up for a Kling AI account at [Kling AI Developer Portal](https://app.klingai.com/)
|
|
470
|
+
- Obtain your API key (access key) and secret key from the developer portal
|
|
471
|
+
- Configure credentials in your `.env` file (see Environment Variables section)
|
|
472
|
+
|
|
473
|
+
2. **Image Requirements**:
|
|
474
|
+
- Maximum image size: 16M pixels (equivalent to 4,096 x 4,096)
|
|
475
|
+
- Maximum dimension: 4,096 pixels per side
|
|
476
|
+
- Supported formats: JPG, PNG
|
|
477
|
+
- Both source and reference images must meet size requirements
|
|
478
|
+
|
|
479
|
+
#### Command Line Usage
|
|
480
|
+
|
|
481
|
+
```bash
|
|
482
|
+
# Basic usage
|
|
483
|
+
python vton.py --provider kling --source person.jpg --reference garment.jpg
|
|
484
|
+
|
|
485
|
+
# Specify model version
|
|
486
|
+
python vton.py --provider kling --source person.jpg --reference garment.jpg --model kolors-virtual-try-on-v1-5
|
|
487
|
+
|
|
488
|
+
# Use custom base URL
|
|
489
|
+
python vton.py --provider kling --source person.jpg --reference garment.jpg --base-url https://api-singapore.klingai.com
|
|
490
|
+
|
|
491
|
+
# Save output to specific directory
|
|
492
|
+
python vton.py --provider kling --source person.jpg --reference garment.jpg --output-dir results/
|
|
493
|
+
```
|
|
494
|
+
|
|
495
|
+
#### Python API Usage
|
|
496
|
+
|
|
497
|
+
```python
|
|
498
|
+
from dotenv import load_dotenv
|
|
499
|
+
load_dotenv()
|
|
500
|
+
|
|
501
|
+
from tryon.api import KlingAIVTONAdapter
|
|
502
|
+
from PIL import Image
|
|
503
|
+
|
|
504
|
+
# Initialize adapter (uses environment variables by default)
|
|
505
|
+
adapter = KlingAIVTONAdapter()
|
|
506
|
+
|
|
507
|
+
# Or specify credentials directly
|
|
508
|
+
adapter = KlingAIVTONAdapter(
|
|
509
|
+
api_key="your_api_key",
|
|
510
|
+
secret_key="your_secret_key",
|
|
511
|
+
base_url="https://api-singapore.klingai.com" # Optional
|
|
512
|
+
)
|
|
513
|
+
|
|
514
|
+
# Generate virtual try-on images
|
|
515
|
+
images = adapter.generate_and_decode(
|
|
516
|
+
source_image="data/person.jpg",
|
|
517
|
+
reference_image="data/garment.jpg",
|
|
518
|
+
model="kolors-virtual-try-on-v1-5" # Optional, uses API default if not specified
|
|
519
|
+
)
|
|
520
|
+
|
|
521
|
+
# Save results
|
|
522
|
+
for idx, image in enumerate(images):
|
|
523
|
+
image.save(f"outputs/vton_result_{idx}.png")
|
|
524
|
+
```
|
|
525
|
+
|
|
526
|
+
#### Model Versions
|
|
527
|
+
|
|
528
|
+
Kling AI supports multiple model versions:
|
|
529
|
+
- `kolors-virtual-try-on-v1`: Original model version
|
|
530
|
+
- `kolors-virtual-try-on-v1-5`: Enhanced version
|
|
531
|
+
|
|
532
|
+
If not specified, the API uses the default model version.
|
|
533
|
+
|
|
534
|
+
#### Asynchronous Processing
|
|
535
|
+
|
|
536
|
+
Kling AI processes virtual try-on requests asynchronously. The adapter automatically:
|
|
537
|
+
1. Submits the request and receives a `task_id`
|
|
538
|
+
2. Polls the task status endpoint until completion
|
|
539
|
+
3. Returns image URLs when the task succeeds
|
|
540
|
+
4. Raises errors if the task fails or times out (default timeout: 5 minutes)
|
|
541
|
+
|
|
542
|
+
You can customize polling behavior:
|
|
543
|
+
|
|
544
|
+
```python
|
|
545
|
+
# Manual polling
|
|
546
|
+
adapter = KlingAIVTONAdapter()
|
|
547
|
+
|
|
548
|
+
# Submit task
|
|
549
|
+
response = adapter.generate(
|
|
550
|
+
source_image="person.jpg",
|
|
551
|
+
reference_image="garment.jpg"
|
|
552
|
+
)
|
|
553
|
+
# This automatically polls until completion
|
|
554
|
+
|
|
555
|
+
# Or poll manually with custom settings
|
|
556
|
+
task_id = "your_task_id"
|
|
557
|
+
image_urls = adapter.poll_task_until_complete(
|
|
558
|
+
task_id=task_id,
|
|
559
|
+
poll_interval=2, # Check every 2 seconds
|
|
560
|
+
max_wait_time=600 # Maximum 10 minutes
|
|
561
|
+
)
|
|
562
|
+
```
|
|
563
|
+
|
|
564
|
+
#### Example: Complete Workflow
|
|
565
|
+
|
|
566
|
+
```python
|
|
567
|
+
from tryon.api import KlingAIVTONAdapter
|
|
568
|
+
|
|
569
|
+
# Initialize adapter
|
|
570
|
+
adapter = KlingAIVTONAdapter()
|
|
571
|
+
|
|
572
|
+
# Generate try-on
|
|
573
|
+
images = adapter.generate_and_decode(
|
|
574
|
+
source_image="data/person.jpg",
|
|
575
|
+
reference_image="data/shirt.jpg",
|
|
576
|
+
model="kolors-virtual-try-on-v1-5"
|
|
577
|
+
)
|
|
578
|
+
|
|
579
|
+
# Save all results
|
|
580
|
+
for idx, image in enumerate(images):
|
|
581
|
+
image.save(f"outputs/result_{idx}.png")
|
|
582
|
+
```
|
|
583
|
+
|
|
584
|
+
#### Supported Base URLs
|
|
585
|
+
|
|
586
|
+
- `https://api-singapore.klingai.com` (Singapore) - Default
|
|
587
|
+
- Other regional endpoints may be available (check Kling AI documentation)
|
|
588
|
+
|
|
589
|
+
**Reference**: [Kling AI API Documentation](https://app.klingai.com/global/dev/document-api/apiReference/model/functionalityTry)
|
|
590
|
+
|
|
591
|
+
### Virtual Try-On with Segmind
|
|
592
|
+
|
|
593
|
+
Generate realistic virtual try-on images using Segmind's Try-On Diffusion API. This feature combines a model image (person) with a cloth image (garment/product) to create realistic try-on results.
|
|
594
|
+
|
|
595
|
+
#### Prerequisites
|
|
596
|
+
|
|
597
|
+
1. **Segmind Account Setup**:
|
|
598
|
+
- Sign up for a Segmind account at [Segmind API Portal](https://www.segmind.com/models/try-on-diffusion/api)
|
|
599
|
+
- Obtain your API key from the Segmind dashboard
|
|
600
|
+
- Configure credentials in your `.env` file (see Environment Variables section)
|
|
601
|
+
|
|
602
|
+
2. **Image Requirements**:
|
|
603
|
+
- Images can be provided as file paths, URLs, or base64-encoded strings
|
|
604
|
+
- Supported formats: JPG, PNG
|
|
605
|
+
- Both model and cloth images must be valid image files
|
|
606
|
+
|
|
607
|
+
#### Command Line Usage
|
|
608
|
+
|
|
609
|
+
```bash
|
|
610
|
+
# Basic usage
|
|
611
|
+
python vton.py --provider segmind --source person.jpg --reference garment.jpg --category "Upper body"
|
|
612
|
+
|
|
613
|
+
# Specify garment category
|
|
614
|
+
python vton.py --provider segmind --source person.jpg --reference garment.jpg --category "Lower body"
|
|
615
|
+
|
|
616
|
+
# Use custom inference parameters
|
|
617
|
+
python vton.py --provider segmind --source person.jpg --reference garment.jpg --category "Dress" --num-steps 35 --guidance-scale 2.5 --seed 42
|
|
618
|
+
|
|
619
|
+
# Save output to specific directory
|
|
620
|
+
python vton.py --provider segmind --source person.jpg --reference garment.jpg --category "Upper body" --output-dir results/
|
|
621
|
+
```
|
|
622
|
+
|
|
623
|
+
#### Python API Usage
|
|
624
|
+
|
|
625
|
+
```python
|
|
626
|
+
from dotenv import load_dotenv
|
|
627
|
+
load_dotenv()
|
|
628
|
+
|
|
629
|
+
from tryon.api import SegmindVTONAdapter
|
|
630
|
+
from PIL import Image
|
|
631
|
+
|
|
632
|
+
# Initialize adapter (uses environment variable by default)
|
|
633
|
+
adapter = SegmindVTONAdapter()
|
|
634
|
+
|
|
635
|
+
# Or specify API key directly
|
|
636
|
+
adapter = SegmindVTONAdapter(api_key="your_api_key")
|
|
637
|
+
|
|
638
|
+
# Generate virtual try-on images
|
|
639
|
+
images = adapter.generate_and_decode(
|
|
640
|
+
model_image="data/person.jpg",
|
|
641
|
+
cloth_image="data/garment.jpg",
|
|
642
|
+
category="Upper body", # Options: "Upper body", "Lower body", "Dress"
|
|
643
|
+
num_inference_steps=35, # Optional: 20-100, default: 25
|
|
644
|
+
guidance_scale=2.5, # Optional: 1-25, default: 2
|
|
645
|
+
seed=42 # Optional: -1 to 999999999999999, default: -1
|
|
646
|
+
)
|
|
647
|
+
|
|
648
|
+
# Save results
|
|
649
|
+
for idx, image in enumerate(images):
|
|
650
|
+
image.save(f"outputs/vton_result_{idx}.png")
|
|
651
|
+
```
|
|
652
|
+
|
|
653
|
+
#### Garment Categories
|
|
654
|
+
|
|
655
|
+
Segmind supports three garment categories:
|
|
656
|
+
- `"Upper body"`: Tops, shirts, jackets, hoodies (default)
|
|
657
|
+
- `"Lower body"`: Pants, skirts, shorts
|
|
658
|
+
- `"Dress"`: Dresses, jumpsuits
|
|
659
|
+
|
|
660
|
+
#### Inference Parameters
|
|
661
|
+
|
|
662
|
+
- **num_inference_steps**: Number of denoising steps (default: 25, range: 20-100)
|
|
663
|
+
- Higher values may produce better quality but take longer
|
|
664
|
+
- **guidance_scale**: Scale for classifier-free guidance (default: 2, range: 1-25)
|
|
665
|
+
- Higher values make the model follow the input more closely
|
|
666
|
+
- **seed**: Seed for reproducible results (default: -1 for random, range: -1 to 999999999999999)
|
|
667
|
+
|
|
668
|
+
#### Example: Complete Workflow
|
|
669
|
+
|
|
670
|
+
```python
|
|
671
|
+
from tryon.api import SegmindVTONAdapter
|
|
672
|
+
|
|
673
|
+
# Initialize adapter
|
|
674
|
+
adapter = SegmindVTONAdapter()
|
|
675
|
+
|
|
676
|
+
# Generate try-on for upper body garment
|
|
677
|
+
images = adapter.generate_and_decode(
|
|
678
|
+
model_image="data/person.jpg",
|
|
679
|
+
cloth_image="data/shirt.jpg",
|
|
680
|
+
category="Upper body"
|
|
681
|
+
)
|
|
682
|
+
|
|
683
|
+
# Generate try-on for lower body garment with custom parameters
|
|
684
|
+
images = adapter.generate_and_decode(
|
|
685
|
+
model_image="data/person.jpg",
|
|
686
|
+
cloth_image="data/pants.jpg",
|
|
687
|
+
category="Lower body",
|
|
688
|
+
num_inference_steps=35,
|
|
689
|
+
guidance_scale=2.5,
|
|
690
|
+
seed=42
|
|
691
|
+
)
|
|
692
|
+
|
|
693
|
+
# Save all results
|
|
694
|
+
for idx, image in enumerate(images):
|
|
695
|
+
image.save(f"outputs/result_{idx}.png")
|
|
696
|
+
```
|
|
697
|
+
|
|
698
|
+
**Reference**: [Segmind Try-On Diffusion API Documentation](https://www.segmind.com/models/try-on-diffusion/api)
|
|
699
|
+
|
|
700
|
+
### Image Generation with Nano Banana
|
|
701
|
+
|
|
702
|
+
Generate high-quality images using Google's Gemini image generation models (Nano Banana and Nano Banana Pro). These models support text-to-image generation, image editing, multi-image composition, and batch generation.
|
|
703
|
+
|
|
704
|
+
#### Prerequisites
|
|
705
|
+
|
|
706
|
+
1. **Google Gemini Account Setup**:
|
|
707
|
+
- Sign up for a Google AI Studio account at [Google AI Studio](https://aistudio.google.com/)
|
|
708
|
+
- Obtain your API key from the [API Keys page](https://aistudio.google.com/app/apikey)
|
|
709
|
+
- Configure credentials in your `.env` file (see Environment Variables section)
|
|
710
|
+
|
|
711
|
+
2. **Model Selection**:
|
|
712
|
+
- **Nano Banana (Gemini 2.5 Flash Image)**: Fast, efficient, 1024px resolution - ideal for high-volume tasks
|
|
713
|
+
- **Nano Banana Pro (Gemini 3 Pro Image Preview)**: Advanced, up to 4K resolution, search grounding - ideal for professional production
|
|
714
|
+
|
|
715
|
+
#### Command Line Usage
|
|
716
|
+
|
|
717
|
+
```bash
|
|
718
|
+
# Text-to-image with Nano Banana (Fast)
|
|
719
|
+
python image_gen.py --provider nano-banana --prompt "A stylish fashion model wearing a modern casual outfit in a studio setting"
|
|
720
|
+
|
|
721
|
+
# Text-to-image with Nano Banana Pro (4K)
|
|
722
|
+
python image_gen.py --provider nano-banana-pro --prompt "Professional fashion photography of elegant evening wear on a runway" --resolution 4K
|
|
723
|
+
|
|
724
|
+
# Image editing
|
|
725
|
+
python image_gen.py --provider nano-banana --mode edit --image person.jpg --prompt "Change the outfit to a formal business suit"
|
|
726
|
+
|
|
727
|
+
# Multi-image composition
|
|
728
|
+
python image_gen.py --provider nano-banana --mode compose --images outfit1.jpg outfit2.jpg --prompt "Create a fashion catalog layout combining these clothing styles"
|
|
729
|
+
|
|
730
|
+
# Batch generation
|
|
731
|
+
python image_gen.py --provider nano-banana --batch prompts.txt --output-dir results/
|
|
732
|
+
```
|
|
733
|
+
|
|
734
|
+
#### Python API Usage
|
|
735
|
+
|
|
736
|
+
**Nano Banana (Fast):**
|
|
737
|
+
|
|
738
|
+
```python
|
|
739
|
+
from dotenv import load_dotenv
|
|
740
|
+
load_dotenv()
|
|
741
|
+
|
|
742
|
+
from tryon.api.nano_banana import NanoBananaAdapter
|
|
743
|
+
|
|
744
|
+
# Initialize adapter
|
|
745
|
+
adapter = NanoBananaAdapter()
|
|
746
|
+
|
|
747
|
+
# Text-to-image generation
|
|
748
|
+
images = adapter.generate_text_to_image(
|
|
749
|
+
prompt="A stylish fashion model wearing a modern casual outfit in a studio setting",
|
|
750
|
+
aspect_ratio="16:9" # Optional: "1:1", "2:3", "3:2", "3:4", "4:3", "4:5", "5:4", "9:16", "16:9", "21:9"
|
|
751
|
+
)
|
|
752
|
+
|
|
753
|
+
# Image editing
|
|
754
|
+
images = adapter.generate_image_edit(
|
|
755
|
+
image="person.jpg",
|
|
756
|
+
prompt="Change the outfit to a formal business suit"
|
|
757
|
+
)
|
|
758
|
+
|
|
759
|
+
# Multi-image composition
|
|
760
|
+
images = adapter.generate_multi_image(
|
|
761
|
+
images=["outfit1.jpg", "outfit2.jpg"],
|
|
762
|
+
prompt="Create a fashion catalog layout combining these clothing styles"
|
|
763
|
+
)
|
|
764
|
+
|
|
765
|
+
# Batch generation
|
|
766
|
+
results = adapter.generate_batch([
|
|
767
|
+
"A fashion model showcasing summer collection",
|
|
768
|
+
"Professional photography of formal wear",
|
|
769
|
+
"Casual street style outfit on a model"
|
|
770
|
+
])
|
|
771
|
+
|
|
772
|
+
# Save results
|
|
773
|
+
for idx, image in enumerate(images):
|
|
774
|
+
image.save(f"outputs/generated_{idx}.png")
|
|
775
|
+
```
|
|
776
|
+
|
|
777
|
+
**Nano Banana Pro (Advanced):**
|
|
778
|
+
|
|
779
|
+
```python
|
|
780
|
+
from tryon.api.nano_banana import NanoBananaProAdapter
|
|
781
|
+
|
|
782
|
+
# Initialize adapter
|
|
783
|
+
adapter = NanoBananaProAdapter()
|
|
784
|
+
|
|
785
|
+
# Text-to-image with 4K resolution
|
|
786
|
+
images = adapter.generate_text_to_image(
|
|
787
|
+
prompt="Professional fashion photography of elegant evening wear on a runway",
|
|
788
|
+
resolution="4K", # Options: "1K", "2K", "4K"
|
|
789
|
+
aspect_ratio="16:9",
|
|
790
|
+
use_search_grounding=True # Optional: Use Google Search for real-world grounding
|
|
791
|
+
)
|
|
792
|
+
|
|
793
|
+
# Image editing with 2K resolution
|
|
794
|
+
images = adapter.generate_image_edit(
|
|
795
|
+
image="person.jpg",
|
|
796
|
+
prompt="Change the outfit to a formal business suit",
|
|
797
|
+
resolution="2K"
|
|
798
|
+
)
|
|
799
|
+
|
|
800
|
+
# Save results
|
|
801
|
+
images[0].save("result.png")
|
|
802
|
+
```
|
|
803
|
+
|
|
804
|
+
#### Supported Features
|
|
805
|
+
|
|
806
|
+
- **Text-to-Image**: Generate images from text descriptions
|
|
807
|
+
- **Image Editing**: Edit images using text prompts (add, remove, modify elements)
|
|
808
|
+
- **Multi-Image Composition**: Combine multiple images with style transfer
|
|
809
|
+
- **Batch Generation**: Generate multiple images in batch
|
|
810
|
+
- **Aspect Ratios**: 10 supported aspect ratios (1:1, 2:3, 3:2, 3:4, 4:3, 4:5, 5:4, 9:16, 16:9, 21:9)
|
|
811
|
+
- **High Resolution**: Up to 4K resolution with Nano Banana Pro
|
|
812
|
+
- **Search Grounding**: Real-world grounding using Google Search (Nano Banana Pro only)
|
|
813
|
+
|
|
814
|
+
#### Aspect Ratios
|
|
815
|
+
|
|
816
|
+
**Nano Banana (1024px):**
|
|
817
|
+
- `"1:1"` (1024x1024)
|
|
818
|
+
- `"16:9"` (1344x768)
|
|
819
|
+
- `"9:16"` (768x1344)
|
|
820
|
+
- And 7 more options
|
|
821
|
+
|
|
822
|
+
**Nano Banana Pro (1K/2K/4K):**
|
|
823
|
+
- Same aspect ratios with resolution-specific dimensions
|
|
824
|
+
- `"1K"`: Standard resolution
|
|
825
|
+
- `"2K"`: High resolution
|
|
826
|
+
- `"4K"`: Ultra-high resolution
|
|
827
|
+
|
|
828
|
+
**Reference**: [Gemini Image Generation Documentation](https://ai.google.dev/gemini-api/docs/image-generation)
|
|
829
|
+
|
|
830
|
+
### Image Generation with FLUX.2
|
|
831
|
+
|
|
832
|
+
Generate high-quality images using FLUX.2 [PRO] and FLUX.2 [FLEX] models from BFL AI. These models support text-to-image generation, image editing, multi-image composition, and advanced controls.
|
|
833
|
+
|
|
834
|
+
#### Prerequisites
|
|
835
|
+
|
|
836
|
+
1. **BFL AI Account Setup**:
|
|
837
|
+
- Sign up for a BFL AI account at [BFL AI](https://docs.bfl.ai/)
|
|
838
|
+
- Obtain your API key from the BFL AI dashboard
|
|
839
|
+
- Configure credentials in your `.env` file (see Environment Variables section)
|
|
840
|
+
|
|
841
|
+
2. **Model Selection**:
|
|
842
|
+
- **FLUX.2 [PRO]**: High-quality image generation with standard controls - ideal for most use cases
|
|
843
|
+
- **FLUX.2 [FLEX]**: Flexible generation with advanced controls (guidance scale, steps, prompt upsampling) - ideal for fine-tuned control
|
|
844
|
+
|
|
845
|
+
#### Command Line Usage
|
|
846
|
+
|
|
847
|
+
```bash
|
|
848
|
+
# Text-to-image with FLUX.2 PRO
|
|
849
|
+
python image_gen.py --provider flux2-pro --prompt "A professional fashion model wearing elegant evening wear" --width 1024 --height 1024
|
|
850
|
+
|
|
851
|
+
# Text-to-image with FLUX.2 FLEX (Advanced controls)
|
|
852
|
+
python image_gen.py --provider flux2-flex --prompt "A stylish fashion model wearing elegant evening wear" --width 1024 --height 1024 --guidance 7.5 --steps 50
|
|
853
|
+
|
|
854
|
+
# Image editing
|
|
855
|
+
python image_gen.py --provider flux2-pro --mode edit --image person.jpg --prompt "Change the outfit to casual streetwear"
|
|
856
|
+
|
|
857
|
+
# Multi-image composition
|
|
858
|
+
python image_gen.py --provider flux2-pro --mode compose --images outfit1.jpg outfit2.jpg --prompt "Combine these clothing styles into a cohesive outfit"
|
|
859
|
+
```
|
|
860
|
+
|
|
861
|
+
#### Python API Usage
|
|
862
|
+
|
|
863
|
+
**FLUX.2 [PRO]:**
|
|
864
|
+
|
|
865
|
+
```python
|
|
866
|
+
from dotenv import load_dotenv
|
|
867
|
+
load_dotenv()
|
|
868
|
+
|
|
869
|
+
from tryon.api import Flux2ProAdapter
|
|
870
|
+
|
|
871
|
+
# Initialize adapter
|
|
872
|
+
adapter = Flux2ProAdapter()
|
|
873
|
+
|
|
874
|
+
# Text-to-image generation
|
|
875
|
+
images = adapter.generate_text_to_image(
|
|
876
|
+
prompt="A professional fashion model wearing elegant evening wear on a runway",
|
|
877
|
+
width=1024,
|
|
878
|
+
height=1024,
|
|
879
|
+
seed=42
|
|
880
|
+
)
|
|
881
|
+
|
|
882
|
+
# Image editing
|
|
883
|
+
images = adapter.generate_image_edit(
|
|
884
|
+
prompt="Change the outfit to casual streetwear style",
|
|
885
|
+
input_image="model.jpg",
|
|
886
|
+
width=1024,
|
|
887
|
+
height=1024
|
|
888
|
+
)
|
|
889
|
+
|
|
890
|
+
# Multi-image composition
|
|
891
|
+
images = adapter.generate_multi_image(
|
|
892
|
+
prompt="Create a fashion catalog layout combining these clothing styles",
|
|
893
|
+
images=["outfit1.jpg", "outfit2.jpg", "accessories.jpg"],
|
|
894
|
+
width=1024,
|
|
895
|
+
height=1024
|
|
896
|
+
)
|
|
897
|
+
|
|
898
|
+
# Save results
|
|
899
|
+
images[0].save("result.png")
|
|
900
|
+
```
|
|
901
|
+
|
|
902
|
+
**FLUX.2 [FLEX]:**
|
|
903
|
+
|
|
904
|
+
```python
|
|
905
|
+
from tryon.api import Flux2FlexAdapter
|
|
906
|
+
|
|
907
|
+
# Initialize adapter
|
|
908
|
+
adapter = Flux2FlexAdapter()
|
|
909
|
+
|
|
910
|
+
# Text-to-image with advanced controls
|
|
911
|
+
images = adapter.generate_text_to_image(
|
|
912
|
+
prompt="A stylish fashion model wearing elegant evening wear",
|
|
913
|
+
width=1024,
|
|
914
|
+
height=1024,
|
|
915
|
+
guidance=7.5, # Higher guidance = more adherence to prompt (1.5-10)
|
|
916
|
+
steps=50, # More steps = higher quality (default: 28)
|
|
917
|
+
prompt_upsampling=True, # Enhance prompt quality
|
|
918
|
+
seed=42
|
|
919
|
+
)
|
|
920
|
+
|
|
921
|
+
# Image editing with advanced controls
|
|
922
|
+
images = adapter.generate_image_edit(
|
|
923
|
+
prompt="Transform the outfit to match a vintage 1920s fashion style",
|
|
924
|
+
input_image="model.jpg",
|
|
925
|
+
width=1024,
|
|
926
|
+
height=1024,
|
|
927
|
+
guidance=8.0,
|
|
928
|
+
steps=50,
|
|
929
|
+
prompt_upsampling=True
|
|
930
|
+
)
|
|
931
|
+
|
|
932
|
+
# Save results
|
|
933
|
+
images[0].save("result.png")
|
|
934
|
+
```
|
|
935
|
+
|
|
936
|
+
#### Supported Features
|
|
937
|
+
|
|
938
|
+
- **Text-to-Image**: Generate images from text descriptions
|
|
939
|
+
- **Image Editing**: Edit images using text prompts (add, remove, modify elements)
|
|
940
|
+
- **Multi-Image Composition**: Combine up to 8 images with style transfer
|
|
941
|
+
- **Custom Dimensions**: Control width and height (minimum: 64 pixels)
|
|
942
|
+
- **Advanced Controls** (FLEX only): Guidance scale (1.5-10), steps (default: 28), prompt upsampling
|
|
943
|
+
- **Reproducibility**: Seed support for consistent results
|
|
944
|
+
- **Safety Controls**: Moderation tolerance (0-5, default: 2)
|
|
945
|
+
- **Output Formats**: JPEG or PNG
|
|
946
|
+
|
|
947
|
+
#### Key Differences: PRO vs FLEX
|
|
948
|
+
|
|
949
|
+
- **FLUX.2 [PRO]**: Simpler API, faster generation, good for most use cases
|
|
950
|
+
- **FLUX.2 [FLEX]**: Advanced controls (guidance, steps, prompt upsampling), more fine-tuned control over generation quality
|
|
951
|
+
|
|
952
|
+
**Reference**: [FLUX.2 API Documentation](https://docs.bfl.ai/api-reference/models/generate-or-edit-an-image-with-flux2-[pro])
|
|
953
|
+
|
|
954
|
+
### Luma AI Image Generation
|
|
955
|
+
|
|
956
|
+
Generate high-quality images using Luma AI’s (Photon-Flash-1 and Photon-1) models. Supports text-to-image generation, image reference, style reference, character reference and precise image modification for production workflows.
|
|
957
|
+
|
|
958
|
+
#### Prerequisites
|
|
959
|
+
|
|
960
|
+
1. **Luma AI Account Setup**:
|
|
961
|
+
- Sign up for a Luma AI account at the [Luma AI Developer Console](https://lumalabs.ai/)
|
|
962
|
+
- Create and copy your API key from the [API Keys section](https://lumalabs.ai/api)
|
|
963
|
+
- Add the key to your `.env` file (see Environment Variables section)
|
|
964
|
+
|
|
965
|
+
2. **Model Selection**:
|
|
966
|
+
- **Luma AI (Photon-Flash-1)**: Fast and cost efficient image generation, ideal for rapid iteration and scale
|
|
967
|
+
- **Luma AI (Photon-1)**: High-fidelity default model for professional-grade quality, creativity and detailed prompt handling
|
|
968
|
+
|
|
969
|
+
#### Command Line Usage
|
|
970
|
+
|
|
971
|
+
```bash
|
|
972
|
+
# Text-to-image with Luma AI ((default) photon-1, photon-flash-1)
|
|
973
|
+
python luma_image.py --provider photon-1 --prompt "A stylish fashion model wearing a modern casual outfit in a studio setting"
|
|
974
|
+
|
|
975
|
+
# Text-to-image with Luma AI (with aspect ratio)
|
|
976
|
+
python luma_image.py --provider photon-1 --prompt "A model wearing a red saree" --aspect_ratio "16:9"
|
|
977
|
+
|
|
978
|
+
# Ouptput to a particular directory
|
|
979
|
+
python luma_image.py --provider photon-1 --prompt "A model wearing a red saree" --aspect_ratio "16:9" --output_dir folder_name
|
|
980
|
+
|
|
981
|
+
# Image generation using Image Reference (single image)
|
|
982
|
+
python luma_image.py --provider photon-1 --mode img-ref --prompt "model wearing sunglasses" --images person.jpg --weights 0.8 --aspect_ratio "1:1"
|
|
983
|
+
|
|
984
|
+
# Image generation using Image Reference (multiple images)
|
|
985
|
+
python luma_image.py --provider photon-flash-1 --mode img-ref --prompt "model wearing sunglasses" --images person_1.jpg person_2.jpg --weights 0.8 0.9 --aspect_ratio "9:21"
|
|
986
|
+
|
|
987
|
+
# Image generation using Style Reference(single image)
|
|
988
|
+
python luma_image.py --provider photon-flash-1 --mode style-ref --prompt "model wearing a blue shirt" --images person.jpg --weights 0.75 --aspect_ratio "16:9"
|
|
989
|
+
|
|
990
|
+
# Image generation using Style Reference(multiple images)
|
|
991
|
+
python luma_image.py --provider photon-flash-1 --mode style-ref --prompt "hat" --images person_1.jpg person_2.jpg --weights 0.75 0.9 --aspect_ratio "16:9"
|
|
992
|
+
|
|
993
|
+
# Image generation using Character Reference
|
|
994
|
+
python luma_image.py --provider photon-flash-1 --mode char-ref --char_id identity0 --prompt "Professional fashion photography of elegant evening wear on a runway" --char_images person.jpg --aspect_ratio "16:9"
|
|
995
|
+
|
|
996
|
+
# Image modification (only single image)
|
|
997
|
+
python luma_image.py --provider photon-flash-1 --mode modify --prompt "change the suit color to yellow" --images person.jpg --weights 0.85
|
|
998
|
+
```
|
|
999
|
+
|
|
1000
|
+
#### Python API Usage
|
|
1001
|
+
|
|
1002
|
+
**Luma AI:**
|
|
1003
|
+
|
|
1004
|
+
```python
|
|
1005
|
+
from dotenv import load_dotenv
|
|
1006
|
+
load_dotenv()
|
|
1007
|
+
|
|
1008
|
+
from tryon.api.lumaAI import LumaAIAdapter
|
|
1009
|
+
|
|
1010
|
+
adapter = LumaAIAdapter()
|
|
1011
|
+
|
|
1012
|
+
list_of_images = []
|
|
1013
|
+
|
|
1014
|
+
images = adapter.generate_text_to_image(
|
|
1015
|
+
prompt="person with a hat",
|
|
1016
|
+
aspect_ratio= "16:9"
|
|
1017
|
+
)
|
|
1018
|
+
|
|
1019
|
+
list_of_images.extend(images)
|
|
1020
|
+
|
|
1021
|
+
images = adapter.generate_with_image_reference(
|
|
1022
|
+
prompt="hat",
|
|
1023
|
+
aspect_ratio= '16:9',
|
|
1024
|
+
image_ref= [
|
|
1025
|
+
{
|
|
1026
|
+
"url": "person.jpg",
|
|
1027
|
+
"weight": 0.85
|
|
1028
|
+
}
|
|
1029
|
+
]
|
|
1030
|
+
)
|
|
1031
|
+
|
|
1032
|
+
list_of_images.extend(images)
|
|
1033
|
+
|
|
1034
|
+
images = adapter.generate_with_style_reference(
|
|
1035
|
+
prompt="tiger",
|
|
1036
|
+
aspect_ratio= '16:9',
|
|
1037
|
+
style_ref= [
|
|
1038
|
+
{
|
|
1039
|
+
"url": "person.jpg",
|
|
1040
|
+
"weight": 0.8
|
|
1041
|
+
}
|
|
1042
|
+
]
|
|
1043
|
+
)
|
|
1044
|
+
|
|
1045
|
+
list_of_images.extend(images)
|
|
1046
|
+
|
|
1047
|
+
images = adapter.generate_with_character_reference(
|
|
1048
|
+
prompt="man as a pilot",
|
|
1049
|
+
aspect_ratio= '16:9',
|
|
1050
|
+
character_ref= {
|
|
1051
|
+
"identity0": {
|
|
1052
|
+
"images": [
|
|
1053
|
+
"person.jpg"
|
|
1054
|
+
]
|
|
1055
|
+
}
|
|
1056
|
+
}
|
|
1057
|
+
)
|
|
1058
|
+
|
|
1059
|
+
list_of_images.extend(images)
|
|
1060
|
+
|
|
1061
|
+
images = adapter.generate_with_modify_image(
|
|
1062
|
+
prompt="transform all flowers to oranges",
|
|
1063
|
+
images= "person.jpg",
|
|
1064
|
+
weights= 0.9,
|
|
1065
|
+
aspect_ratio= '16:9'
|
|
1066
|
+
)
|
|
1067
|
+
|
|
1068
|
+
list_of_images.extend(images)
|
|
1069
|
+
|
|
1070
|
+
for idx, img in enumerate(list_of_images):
|
|
1071
|
+
img.save(f"outputs/generated_{idx}.png")
|
|
1072
|
+
```
|
|
1073
|
+
|
|
1074
|
+
#### Supported Features
|
|
1075
|
+
|
|
1076
|
+
- **Text-to-Image**: Generate images from text descriptions
|
|
1077
|
+
- **Image Reference**: Useful when you want to create variations of an image
|
|
1078
|
+
- **Style Reference**: Apply specific style to the generation
|
|
1079
|
+
- **Character Reference**: A feature that allows you to create consistent and personalized characters
|
|
1080
|
+
- **Modify Image**: Make changes to an image
|
|
1081
|
+
- **Weights**: weight value can be any float value from (0 - 1)
|
|
1082
|
+
- **Aspect Ratios**: 7 supported aspect ratios (1:1, 3:4, 4:3, 9:16, 16:9, 21:9, 9:21)
|
|
1083
|
+
- **Multiple Images**: Accepts upto 4 images for image-reference, style-reference and character-reference modes
|
|
1084
|
+
- **Output Format**: JPEG
|
|
1085
|
+
|
|
1086
|
+
#### Aspect Ratios
|
|
1087
|
+
|
|
1088
|
+
**LUMA AI:**
|
|
1089
|
+
- `"1:1"` (1536x1536)
|
|
1090
|
+
- `"16:9"` (2048x1152)
|
|
1091
|
+
- `"9:16"` (1152x2048)
|
|
1092
|
+
- And 4 more options
|
|
1093
|
+
|
|
1094
|
+
**Reference**: [Luma AI Image Generation Documentation](https://docs.lumalabs.ai/docs/python-image-generation)
|
|
1095
|
+
|
|
1096
|
+
### Video Generation with Luma AI
|
|
1097
|
+
|
|
1098
|
+
Generate smooth, high-fidelity videos using Luma AI’s Ray models (Ray 1.6, Ray 2, and Ray Flash 2). These models support text-to-video and image-to-video generation with optional keyframe interpolation. Image-to-video accepts either a single image or two keyframe images (frame0, frame1) for controlled motion.
|
|
1099
|
+
|
|
1100
|
+
#### Prerequisites
|
|
1101
|
+
|
|
1102
|
+
1. **Luma AI Account Setup**:
|
|
1103
|
+
- Sign up for a Luma AI account at the [Luma AI Developer Console](https://lumalabs.ai/)
|
|
1104
|
+
- Create and copy your API key from the [API Keys section](https://lumalabs.ai/api)
|
|
1105
|
+
- Add the key to your `.env` file (see Environment Variables section)
|
|
1106
|
+
|
|
1107
|
+
2. **Model Selection**:
|
|
1108
|
+
- **Ray 1.6 (ray-1-6)**: Balanced quality model for general video generation; slower but stable.
|
|
1109
|
+
- **Ray 2 (ray-2)**: High-quality flagship model with the best motion, detail, and consistency.
|
|
1110
|
+
- **Ray Flash 2 (ray-flash-2)**: Fast, lower-latency model optimized for quick iterations and previews.
|
|
1111
|
+
|
|
1112
|
+
#### Command Line Usage
|
|
1113
|
+
|
|
1114
|
+
```bash
|
|
1115
|
+
# Text to Video with Luma AI
|
|
1116
|
+
python video_gen.py --provider ray-2 --mode text_video --prompt "A model walking in red saree on a ramp" --resolution 720p --duration 5s --aspect 16:9 --output_dir outputs
|
|
1117
|
+
|
|
1118
|
+
# Text to Video with loop
|
|
1119
|
+
python video_gen.py --provider ray-2 --mode image_video --prompt "A model walking in red saree on a ramp" --resolution 720p --duration 5s --aspect 16:9 --loop
|
|
1120
|
+
|
|
1121
|
+
# Image to Video with start keyframe
|
|
1122
|
+
python video_gen.py --provider ray-flash-2 --mode image_video --prompt "Model walking" --start_image person.jpg --resolution 4k --duration 10s --aspect 21:9
|
|
1123
|
+
|
|
1124
|
+
# Image to Video with End Keyframe
|
|
1125
|
+
python video_gen.py --provider ray-flash-2 --mode image_video --prompt "Model walking" --end_image person.jpg --resolution 720p --duration 10s --aspect 21:9
|
|
1126
|
+
|
|
1127
|
+
# Image to Video with start and End Keyframe
|
|
1128
|
+
python video_gen.py --provider ray-2 --mode image_video --prompt "Model sitting on a fence" --start_image person.jpg --end_image person.jpg --resolution 4k --duration 10s --aspect 21:9
|
|
1129
|
+
```
|
|
1130
|
+
|
|
1131
|
+
#### Python API Usage
|
|
1132
|
+
|
|
1133
|
+
**Luma AI:**
|
|
1134
|
+
|
|
1135
|
+
```python
|
|
1136
|
+
|
|
1137
|
+
from dotenv import load_dotenv
|
|
1138
|
+
load_dotenv()
|
|
1139
|
+
|
|
1140
|
+
from tryon.api.lumaAI import LumaAIVideoAdapter
|
|
1141
|
+
from pathlib import Path
|
|
1142
|
+
|
|
1143
|
+
adapter = LumaAIVideoAdapter()
|
|
1144
|
+
|
|
1145
|
+
video_list = []
|
|
1146
|
+
|
|
1147
|
+
|
|
1148
|
+
def save_video(video_bytes: bytes, idx: int):
|
|
1149
|
+
Path("outputs").mkdir(exist_ok=True)
|
|
1150
|
+
out_path = Path("outputs") / f"generated_{idx}.mp4"
|
|
1151
|
+
with open(out_path, "wb") as f:
|
|
1152
|
+
f.write(video_bytes)
|
|
1153
|
+
print(f"[SAVED] {out_path}")
|
|
1154
|
+
|
|
1155
|
+
|
|
1156
|
+
# TEXT → VIDEO
|
|
1157
|
+
video = adapter.generate_text_to_video(
|
|
1158
|
+
prompt="a model riding a car with long hair",
|
|
1159
|
+
resolution="540p",
|
|
1160
|
+
duration="5s",
|
|
1161
|
+
model="ray-2",
|
|
1162
|
+
)
|
|
1163
|
+
video_list.append(video)
|
|
1164
|
+
|
|
1165
|
+
|
|
1166
|
+
# IMAGE → VIDEO (start + end)
|
|
1167
|
+
video = adapter.generate_image_to_video(
|
|
1168
|
+
prompt="Man riding a bike",
|
|
1169
|
+
start_image="start_img.png",
|
|
1170
|
+
end_image="end_img.png",
|
|
1171
|
+
resolution="540p",
|
|
1172
|
+
duration="5s",
|
|
1173
|
+
model="ray-2",
|
|
1174
|
+
)
|
|
1175
|
+
video_list.append(video)
|
|
1176
|
+
|
|
1177
|
+
|
|
1178
|
+
# IMAGE → VIDEO (only end image; no start)
|
|
1179
|
+
video = adapter.generate_image_to_video(
|
|
1180
|
+
prompt="A man walking on a ramp",
|
|
1181
|
+
end_image="end_img_only.png",
|
|
1182
|
+
resolution="540p",
|
|
1183
|
+
duration="5s",
|
|
1184
|
+
model="ray-2",
|
|
1185
|
+
)
|
|
1186
|
+
video_list.append(video)
|
|
1187
|
+
|
|
1188
|
+
# SAVE ALL RESULTS
|
|
1189
|
+
for idx, vid_bytes in enumerate(video_list):
|
|
1190
|
+
save_video(vid_bytes, idx)
|
|
1191
|
+
```
|
|
1192
|
+
|
|
1193
|
+
#### Supported Features
|
|
1194
|
+
|
|
1195
|
+
- **Text to Video**: Generate videos using test descriptions.
|
|
1196
|
+
- **Image to Video**: Generate videos using keyframes.
|
|
1197
|
+
- **Keyframe Generation**: Generate videos using a start keyframe or an end keyframe or both.
|
|
1198
|
+
- **Duration**: Durations in seconds (5s, 9s, 10s)
|
|
1199
|
+
- **Resolution**: Quality of the Video (540p, 720p, 1080p, 4k)
|
|
1200
|
+
- **Aspect Ratios**: 7 supported aspect ratios (1:1, 3:4, 4:3, 9:16, 16:9, 21:9, 9:21)
|
|
1201
|
+
- **Loop**: Enable seamless looping when generating video from a single image or text prompt. Works for single image when only start_image is provided.
|
|
1202
|
+
|
|
1203
|
+
#### Aspect Ratios
|
|
1204
|
+
|
|
1205
|
+
**LUMA AI:**
|
|
1206
|
+
- `"1:1"` (1024x1024)
|
|
1207
|
+
- `"16:9"` (1280x720)
|
|
1208
|
+
- `"9:16"` (720x1280)
|
|
1209
|
+
- And 4 more options
|
|
1210
|
+
|
|
1211
|
+
**Reference**: [Luma AI Video Generation Documentation](https://docs.lumalabs.ai/docs/video-generation)
|
|
1212
|
+
|
|
1213
|
+
### Preprocessing Functions
|
|
1214
|
+
|
|
1215
|
+
#### Segment Garment
|
|
1216
|
+
|
|
1217
|
+
Segments garments from images using U2Net model.
|
|
1218
|
+
|
|
1219
|
+
```python
|
|
1220
|
+
from tryon.preprocessing import segment_garment
|
|
1221
|
+
|
|
1222
|
+
segment_garment(
|
|
1223
|
+
inputs_dir="path/to/input/images",
|
|
1224
|
+
outputs_dir="path/to/output/segments",
|
|
1225
|
+
cls="upper" # "upper", "lower", or "all"
|
|
1226
|
+
)
|
|
1227
|
+
```
|
|
1228
|
+
|
|
1229
|
+
#### Extract Garment
|
|
1230
|
+
|
|
1231
|
+
Extracts and preprocesses garments from images.
|
|
1232
|
+
|
|
1233
|
+
```python
|
|
1234
|
+
from tryon.preprocessing import extract_garment
|
|
1235
|
+
|
|
1236
|
+
extract_garment(
|
|
1237
|
+
inputs_dir="path/to/input/images",
|
|
1238
|
+
outputs_dir="path/to/output/garments",
|
|
1239
|
+
cls="upper",
|
|
1240
|
+
resize_to_width=400
|
|
1241
|
+
)
|
|
1242
|
+
```
|
|
1243
|
+
|
|
1244
|
+
#### Segment Human
|
|
1245
|
+
|
|
1246
|
+
Segments human subjects from images.
|
|
1247
|
+
|
|
1248
|
+
```python
|
|
1249
|
+
from tryon.preprocessing import segment_human
|
|
1250
|
+
|
|
1251
|
+
segment_human(
|
|
1252
|
+
image_path="path/to/human/image.jpg",
|
|
1253
|
+
output_dir="path/to/output/directory"
|
|
1254
|
+
)
|
|
1255
|
+
```
|
|
1256
|
+
|
|
1257
|
+
## 🎨 Demos
|
|
1258
|
+
|
|
1259
|
+
The project includes several interactive demos for easy experimentation:
|
|
1260
|
+
|
|
1261
|
+
### Virtual Try-On Demo (Web App) ⭐ NEW
|
|
1262
|
+
|
|
1263
|
+
A modern, full-stack virtual try-on web application with FastAPI backend and Next.js frontend.
|
|
1264
|
+
|
|
1265
|
+
**Features**:
|
|
1266
|
+
- Support for 4 AI models: Nano Banana, Nano Banana Pro, FLUX 2 Pro, FLUX 2 Flex
|
|
1267
|
+
- Multi-image upload with drag & drop
|
|
1268
|
+
- Real-time credit estimation
|
|
1269
|
+
- Modern, responsive UI
|
|
1270
|
+
- Production-ready API server
|
|
1271
|
+
|
|
1272
|
+
**Quick Start**:
|
|
1273
|
+
|
|
1274
|
+
1. Start the backend:
|
|
1275
|
+
```bash
|
|
1276
|
+
python api_server.py
|
|
1277
|
+
```
|
|
1278
|
+
|
|
1279
|
+
2. In a new terminal, start the frontend:
|
|
1280
|
+
```bash
|
|
1281
|
+
cd demo/virtual-tryon
|
|
1282
|
+
npm install
|
|
1283
|
+
npm run dev
|
|
1284
|
+
```
|
|
1285
|
+
|
|
1286
|
+
3. Open `http://localhost:3000` in your browser
|
|
1287
|
+
|
|
1288
|
+
**Documentation**: See [`demo/virtual-tryon/README.md`](demo/virtual-tryon/README.md) and [`README_API_SERVER.md`](README_API_SERVER.md) for detailed instructions.
|
|
1289
|
+
|
|
1290
|
+
### Extract Garment Demo
|
|
1291
|
+
|
|
1292
|
+
```bash
|
|
1293
|
+
python run_demo.py --name extract_garment
|
|
1294
|
+
```
|
|
1295
|
+
|
|
1296
|
+
### Model Swap Demo
|
|
1297
|
+
|
|
1298
|
+
```bash
|
|
1299
|
+
python run_demo.py --name model_swap
|
|
1300
|
+
```
|
|
1301
|
+
|
|
1302
|
+
### Outfit Generator Demo
|
|
1303
|
+
|
|
1304
|
+
```bash
|
|
1305
|
+
python run_demo.py --name outfit_generator
|
|
1306
|
+
```
|
|
1307
|
+
|
|
1308
|
+
### Fashion Prompt Builder Demo
|
|
1309
|
+
|
|
1310
|
+
A modern Next.js web application for generating prompts for fashion model generation.
|
|
1311
|
+
|
|
1312
|
+
```bash
|
|
1313
|
+
cd demo/fashion-prompt-builder
|
|
1314
|
+
npm install
|
|
1315
|
+
npm run dev
|
|
1316
|
+
```
|
|
1317
|
+
|
|
1318
|
+
Open `http://localhost:3000` to access the prompt builder interface.
|
|
1319
|
+
|
|
1320
|
+
**Features**:
|
|
1321
|
+
- Template-based prompt generation
|
|
1322
|
+
- Prompt gallery with examples
|
|
1323
|
+
- Raw prompt editor with tips
|
|
1324
|
+
- Real-time preview and validation
|
|
1325
|
+
- Support for multiple AI models
|
|
1326
|
+
|
|
1327
|
+
Gradio demos launch a web interface where you can interact with the models through a user-friendly UI.
|
|
1328
|
+
|
|
1329
|
+
## 📁 Project Structure
|
|
1330
|
+
|
|
1331
|
+
```
|
|
1332
|
+
opentryon/
|
|
1333
|
+
├── tryon/ # Main try-on preprocessing module
|
|
1334
|
+
│ ├── api/ # API adapters
|
|
1335
|
+
│ │ ├── nova_canvas.py # Amazon Nova Canvas VTON adapter
|
|
1336
|
+
│ │ ├── kling_ai.py # Kling AI VTON adapter
|
|
1337
|
+
│ │ ├── lumaAI/ # Luma AI Image generation adapter
|
|
1338
|
+
│ │ │ └── adapter.py # LumaAIAdapter
|
|
1339
|
+
│ │ ├── segmind.py # Segmind Try-On Diffusion adapter
|
|
1340
|
+
│ │ ├── nano_banana/ # Nano Banana (Gemini) image generation adapters
|
|
1341
|
+
│ │ │ └── adapter.py # NanoBananaAdapter and NanoBananaProAdapter
|
|
1342
|
+
│ │ └── flux2.py # FLUX.2 [PRO] and [FLEX] image generation adapters
|
|
1343
|
+
│ ├── datasets/ # Dataset loaders
|
|
1344
|
+
│ │ ├── base.py # Base dataset interface
|
|
1345
|
+
│ │ ├── fashion_mnist.py # Fashion-MNIST dataset
|
|
1346
|
+
│ │ ├── viton_hd.py # VITON-HD dataset
|
|
1347
|
+
│ │ ├── example_usage.py # Usage examples
|
|
1348
|
+
│ │ └── README.md # Datasets documentation
|
|
1349
|
+
│ ├── preprocessing/ # Preprocessing utilities
|
|
1350
|
+
│ │ ├── captioning/ # Image captioning
|
|
1351
|
+
│ │ ├── sam2/ # SAM2 segmentation
|
|
1352
|
+
│ │ ├── u2net/ # U2Net segmentation models
|
|
1353
|
+
│ │ └── utils.py # Utility functions
|
|
1354
|
+
│ └── models/ # Model implementations
|
|
1355
|
+
│ └── ootdiffusion/ # OOTDiffusion model
|
|
1356
|
+
├── tryondiffusion/ # TryOnDiffusion implementation
|
|
1357
|
+
│ ├── diffusion.py # Diffusion model
|
|
1358
|
+
│ ├── network.py # Network architecture
|
|
1359
|
+
│ ├── trainer.py # Training utilities
|
|
1360
|
+
│ ├── pre_processing/ # Preprocessing for training
|
|
1361
|
+
│ └── utils/ # Utility functions
|
|
1362
|
+
├── demo/ # Interactive demos
|
|
1363
|
+
│ ├── virtual-tryon/ # Virtual try-on demo (Nextjs+Tailwindcss)
|
|
1364
|
+
│ ├── extract_garment/ # Garment extraction demo (Gradio)
|
|
1365
|
+
│ ├── model_swap/ # Model swap demo (Gradio)
|
|
1366
|
+
│ ├── outfit_generator/ # Outfit generator demo (Gradio)
|
|
1367
|
+
│ └── fashion-prompt-builder/ # Fashion prompt builder (Next.js)
|
|
1368
|
+
├── scripts/ # Installation scripts
|
|
1369
|
+
├── api_server.py # FastAPI server for virtual try-on demo
|
|
1370
|
+
├── main.py # Main CLI entry point
|
|
1371
|
+
├── run_demo.py # Demo launcher (Gradio demos)
|
|
1372
|
+
├── vton.py # Virtual try-on CLI (Amazon Nova Canvas, Kling AI, Segmind)
|
|
1373
|
+
├── image_gen.py # Image generation CLI (Nano Banana, FLUX.2)
|
|
1374
|
+
├── requirements.txt # Python dependencies
|
|
1375
|
+
├── environment.yml # Conda environment
|
|
1376
|
+
├── README_API_SERVER.md # API server documentation
|
|
1377
|
+
└── setup.py # Package installation
|
|
1378
|
+
```
|
|
1379
|
+
|
|
1380
|
+
## 🗺️ TryOnDiffusion: Roadmap
|
|
1381
|
+
|
|
1382
|
+
Based on the [TryOnDiffusion paper](https://arxiv.org/abs/2306.08276):
|
|
1383
|
+
|
|
1384
|
+
1. ~~Prepare initial implementation~~
|
|
1385
|
+
2. Test initial implementation with small dataset (VITON-HD)
|
|
1386
|
+
3. Gather sufficient data and compute resources
|
|
1387
|
+
4. Prepare and train final implementation
|
|
1388
|
+
5. Publicly release parameters
|
|
1389
|
+
|
|
1390
|
+
## 🤝 Contributing
|
|
1391
|
+
|
|
1392
|
+
We welcome contributions! Please follow these steps:
|
|
1393
|
+
|
|
1394
|
+
### 1. Open an Issue
|
|
1395
|
+
|
|
1396
|
+
We recommend opening an issue (if one doesn't already exist) and discussing your intended changes before making any modifications. This helps us provide feedback and confirm the planned changes.
|
|
1397
|
+
|
|
1398
|
+
### 2. Fork and Set Up
|
|
1399
|
+
|
|
1400
|
+
1. Fork the repository
|
|
1401
|
+
2. Set up the environment using the installation instructions above
|
|
1402
|
+
3. Install dependencies
|
|
1403
|
+
4. Make your changes
|
|
1404
|
+
|
|
1405
|
+
### 3. Create Pull Request
|
|
1406
|
+
|
|
1407
|
+
Create a pull request to the main branch from your fork's branch. Please ensure:
|
|
1408
|
+
- Your code follows the project's style guidelines
|
|
1409
|
+
- You've tested your changes
|
|
1410
|
+
- Documentation is updated if needed
|
|
1411
|
+
|
|
1412
|
+
### 4. Review Process
|
|
1413
|
+
|
|
1414
|
+
Once the pull request is created, we will review the code changes and merge the pull request as soon as possible.
|
|
1415
|
+
|
|
1416
|
+
### Writing Documentation
|
|
1417
|
+
|
|
1418
|
+
If you're interested in improving documentation, you can:
|
|
1419
|
+
- Add content to `README.md`
|
|
1420
|
+
- Create new documentation files as needed
|
|
1421
|
+
- Submit a pull request with your documentation improvements
|
|
1422
|
+
|
|
1423
|
+
For detailed contribution guidelines, see [CONTRIBUTING.md](CONTRIBUTING.md).
|
|
1424
|
+
|
|
1425
|
+
## 📝 Requirements
|
|
1426
|
+
|
|
1427
|
+
Key dependencies include:
|
|
1428
|
+
- PyTorch (== 2.1.2)
|
|
1429
|
+
- torchvision (== 0.16.2)
|
|
1430
|
+
- diffusers (== 0.29.2)
|
|
1431
|
+
- transformers (== 4.42.4)
|
|
1432
|
+
- opencv-python (== 4.8.1.78)
|
|
1433
|
+
- scikit-image (== 0.22.0)
|
|
1434
|
+
- numpy (== 1.26.4)
|
|
1435
|
+
- einops (== 0.7.0)
|
|
1436
|
+
- requests (>= 2.31.0)
|
|
1437
|
+
- PyJWT (>= 2.10.1)
|
|
1438
|
+
- boto3 (== 1.40.64)
|
|
1439
|
+
- python-dotenv (== 1.0.1)
|
|
1440
|
+
- google-genai (>= 1.52.0)
|
|
1441
|
+
- fastapi (== 0.124.0)
|
|
1442
|
+
- uvicorn[standard] (== 0.38.0)
|
|
1443
|
+
- python-multipart (== 0.0.20)
|
|
1444
|
+
- lumaai (== 1.18.1)
|
|
1445
|
+
|
|
1446
|
+
See `requirements.txt` or `environment.yml` for the complete list of dependencies.
|
|
1447
|
+
|
|
1448
|
+
## 📚 Additional Resources
|
|
1449
|
+
|
|
1450
|
+
- **TryOnDiffusion Paper**: [arXiv:2306.08276](https://arxiv.org/abs/2306.08276)
|
|
1451
|
+
- **Amazon Nova Canvas**: [AWS Blog Post](https://aws.amazon.com/blogs/aws/amazon-nova-canvas-update-virtual-try-on-and-style-options-now-available/)
|
|
1452
|
+
- **Kling AI**: [Kling AI API Documentation](https://app.klingai.com/global/dev/document-api/apiReference/model/functionalityTry)
|
|
1453
|
+
- **Segmind**: [Segmind Try-On Diffusion API](https://www.segmind.com/models/try-on-diffusion/api)
|
|
1454
|
+
- **Nano Banana**: [Gemini Image Generation Documentation](https://ai.google.dev/gemini-api/docs/image-generation)
|
|
1455
|
+
- **FLUX.2**: [BFL AI Documentation](https://docs.bfl.ai/)
|
|
1456
|
+
- **Luma AI**: [Luma AI Image Generation Documentation](https://docs.lumalabs.ai/docs/python-image-generation)
|
|
1457
|
+
- **Discord Community**: [Join our Discord](https://discord.gg/T5mPpZHxkY)
|
|
1458
|
+
- **Outfit Generator Model**: [FLUX.1-dev LoRA Outfit Generator](https://huggingface.co/tryonlabs/FLUX.1-dev-LoRA-Outfit-Generator)
|
|
1459
|
+
|
|
1460
|
+
## 📄 License
|
|
1461
|
+
|
|
1462
|
+
All material is made available under [Creative Commons BY-NC 4.0](https://creativecommons.org/licenses/by-nc/4.0/).
|
|
1463
|
+
|
|
1464
|
+
You can **use** the material for **non-commercial purposes**, as long as you:
|
|
1465
|
+
- Give appropriate credit by **citing our original [GitHub repository](https://github.com/tryonlabs/opentryon)**
|
|
1466
|
+
- **Indicate any changes** that you've made to the code
|
|
1467
|
+
|
|
1468
|
+
---
|
|
1469
|
+
|
|
1470
|
+
Made with ❤️ by [TryOn Labs](https://www.tryonlabs.ai)
|