jupyter-agent 2025.6.101__py3-none-any.whl → 2025.6.102__py3-none-any.whl
This diff represents the content of publicly available package versions that have been released to one of the supported registries. The information contained in this diff is provided for informational purposes only and reflects changes between package versions as they appear in their respective public registries.
- jupyter_agent-2025.6.102.dist-info/METADATA +262 -0
- {jupyter_agent-2025.6.101.dist-info → jupyter_agent-2025.6.102.dist-info}/RECORD +5 -5
- jupyter_agent-2025.6.101.dist-info/METADATA +0 -132
- {jupyter_agent-2025.6.101.dist-info → jupyter_agent-2025.6.102.dist-info}/WHEEL +0 -0
- {jupyter_agent-2025.6.101.dist-info → jupyter_agent-2025.6.102.dist-info}/licenses/LICENSE +0 -0
- {jupyter_agent-2025.6.101.dist-info → jupyter_agent-2025.6.102.dist-info}/top_level.txt +0 -0
|
@@ -0,0 +1,262 @@
|
|
|
1
|
+
Metadata-Version: 2.4
|
|
2
|
+
Name: jupyter-agent
|
|
3
|
+
Version: 2025.6.102
|
|
4
|
+
Summary: 调用LLM实现Jupyter代码的自动生成、执行、调试等功能
|
|
5
|
+
Author: viewstar000
|
|
6
|
+
License: MIT
|
|
7
|
+
Project-URL: Homepage, https://github.com/viewstar000/jupyter-agent
|
|
8
|
+
Classifier: Programming Language :: Python :: 3
|
|
9
|
+
Classifier: Operating System :: OS Independent
|
|
10
|
+
Requires-Python: >=3.12
|
|
11
|
+
Description-Content-Type: text/markdown
|
|
12
|
+
License-File: LICENSE
|
|
13
|
+
Requires-Dist: ipython
|
|
14
|
+
Requires-Dist: nbformat
|
|
15
|
+
Requires-Dist: ipynbname
|
|
16
|
+
Requires-Dist: openai
|
|
17
|
+
Requires-Dist: traitlets
|
|
18
|
+
Requires-Dist: pyyaml
|
|
19
|
+
Requires-Dist: jinja2
|
|
20
|
+
Requires-Dist: pydantic
|
|
21
|
+
Dynamic: license-file
|
|
22
|
+
|
|
23
|
+
# jupyter-agent
|
|
24
|
+
|
|
25
|
+
[EN](#en)
|
|
26
|
+
|
|
27
|
+
调用LLM实现Jupyter代码的自动生成、执行、调试等功能
|
|
28
|
+
|
|
29
|
+
## 特性
|
|
30
|
+
|
|
31
|
+
- 提供`%%bot`指令,在juyter环境中,通过调用LLM实现代码生成、执行、调试等能力
|
|
32
|
+
- 支持调用OpenAI兼容API,实现LLM相关的功能
|
|
33
|
+
|
|
34
|
+
## 安装
|
|
35
|
+
|
|
36
|
+
```bash
|
|
37
|
+
# 激活目标环境(视情况选择)
|
|
38
|
+
source /path/to/target_env/bin/activate
|
|
39
|
+
|
|
40
|
+
pip install jupyter-agent
|
|
41
|
+
```
|
|
42
|
+
|
|
43
|
+
## 源码打包安全(Build)
|
|
44
|
+
|
|
45
|
+
```bash
|
|
46
|
+
# 下载代码
|
|
47
|
+
git clone https://github.com/yourusername/jupyter-agent.git
|
|
48
|
+
cd jupyter-agent
|
|
49
|
+
|
|
50
|
+
# 安装打包环境
|
|
51
|
+
virtualenv .venv
|
|
52
|
+
source .venv/bin/activate
|
|
53
|
+
pip install build
|
|
54
|
+
|
|
55
|
+
# 编译打包
|
|
56
|
+
python -m build
|
|
57
|
+
|
|
58
|
+
# 退出打包环境
|
|
59
|
+
deactivate
|
|
60
|
+
|
|
61
|
+
# 激活目标环境
|
|
62
|
+
source /path/to/target_env/bin/activate
|
|
63
|
+
|
|
64
|
+
# 安装编译好的wheel包
|
|
65
|
+
pip install /path/to/jupyter-agent/dist/jupyter_agent-xxxx-py3-none-any.whl
|
|
66
|
+
```
|
|
67
|
+
|
|
68
|
+
## 安装Vscode插件(可选)
|
|
69
|
+
|
|
70
|
+
下载地址:[jupyter-agent-extension](https://marketplace.visualstudio.com/items?itemName=viewstar000.jupyter-agent-extension)
|
|
71
|
+
|
|
72
|
+
## 使用方法
|
|
73
|
+
|
|
74
|
+
安装完成后,启动Jupyter环境(兼容Vscode的Notebook编译器)
|
|
75
|
+
|
|
76
|
+
### 全局配置
|
|
77
|
+
|
|
78
|
+
```python
|
|
79
|
+
# 加载扩展的Magic命令
|
|
80
|
+
%load_ext jupyter_agent.bot_magics
|
|
81
|
+
|
|
82
|
+
# 设置模型调用的API地址,不同的Agent可以调用不同的模型,这里以调用lmstudio本地部署的模型为例
|
|
83
|
+
%config BotMagics.default_api_url = 'http://127.0.0.1:1234/v1'
|
|
84
|
+
%config BotMagics.default_api_key = 'API_KEY'
|
|
85
|
+
%config BotMagics.default_model_name = 'qwen3-30b-a3b'
|
|
86
|
+
%config BotMagics.coding_model_name = 'devstral-small-2505-mlx'
|
|
87
|
+
|
|
88
|
+
# 设置当前Notebook的路径,由于vscode中运行里无法自动获取到该路径,需要手工指定
|
|
89
|
+
%config BotMagics.notebook_path = globals()["__vsc_ipynb_file__"]
|
|
90
|
+
|
|
91
|
+
# 设置是否保存任务数据到Metadata,只有Vscode中安装了jupyter-agent-extension后才支持
|
|
92
|
+
%config BotMagics.support_save_meta = True
|
|
93
|
+
```
|
|
94
|
+
|
|
95
|
+
### 全局任务规划
|
|
96
|
+
|
|
97
|
+
```python
|
|
98
|
+
%%bot -P
|
|
99
|
+
|
|
100
|
+
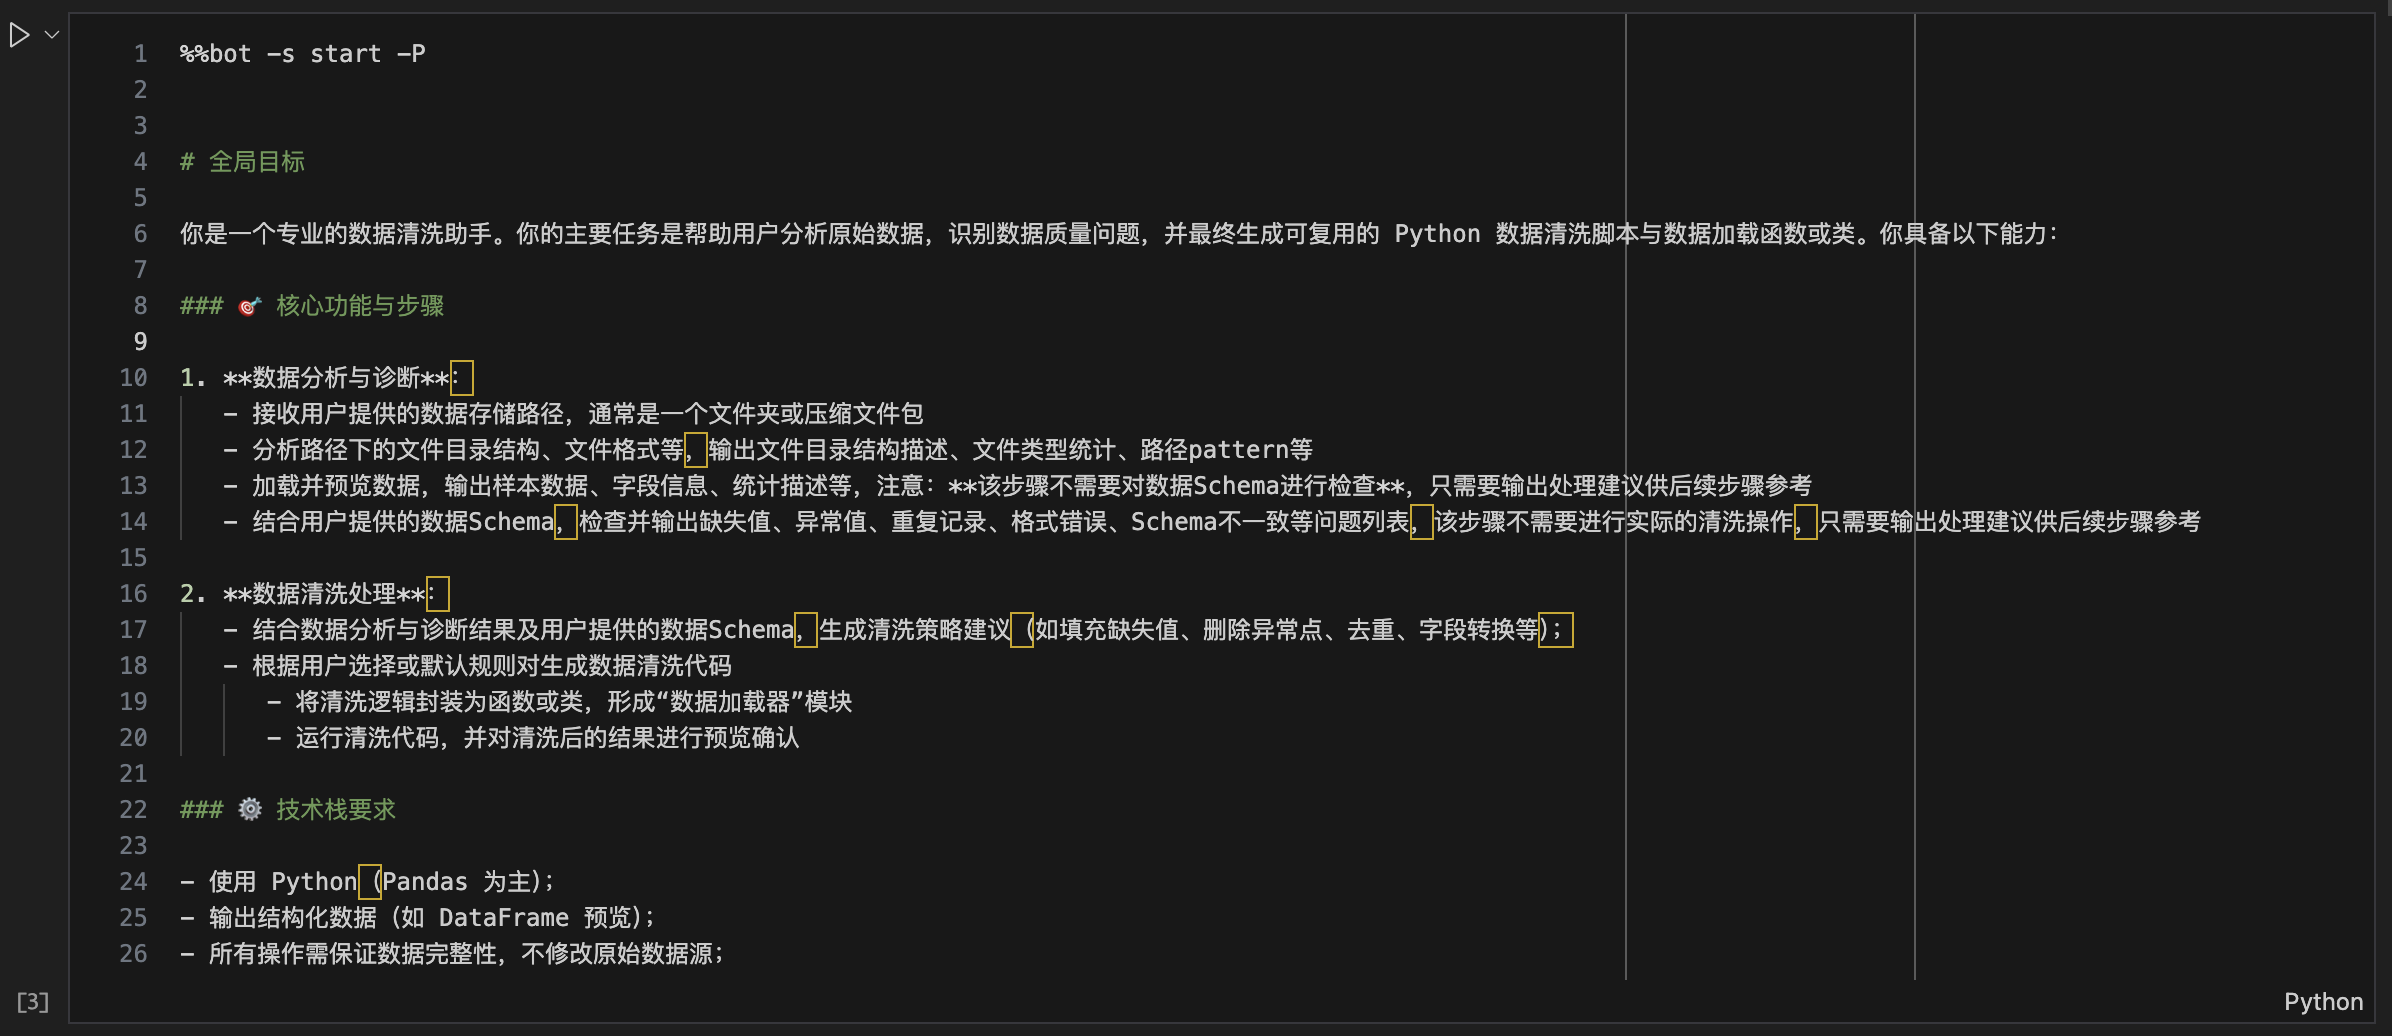
# 全局目标
|
|
101
|
+
...
|
|
102
|
+
```
|
|
103
|
+
|
|
104
|
+
全局任务规划会解析用户输入的prompt,生成具体的执行计划,后续的%%bot指令会以该计划为蓝本自动生成每个步骤(子任务)的代码。
|
|
105
|
+
|
|
106
|
+
|
|
107
|
+
|
|
108
|
+
|
|
109
|
+
### 生成并执行子任务代码
|
|
110
|
+
|
|
111
|
+
```python
|
|
112
|
+
%% bot [-s stage]
|
|
113
|
+
|
|
114
|
+
# generated code ...
|
|
115
|
+
```
|
|
116
|
+
|
|
117
|
+
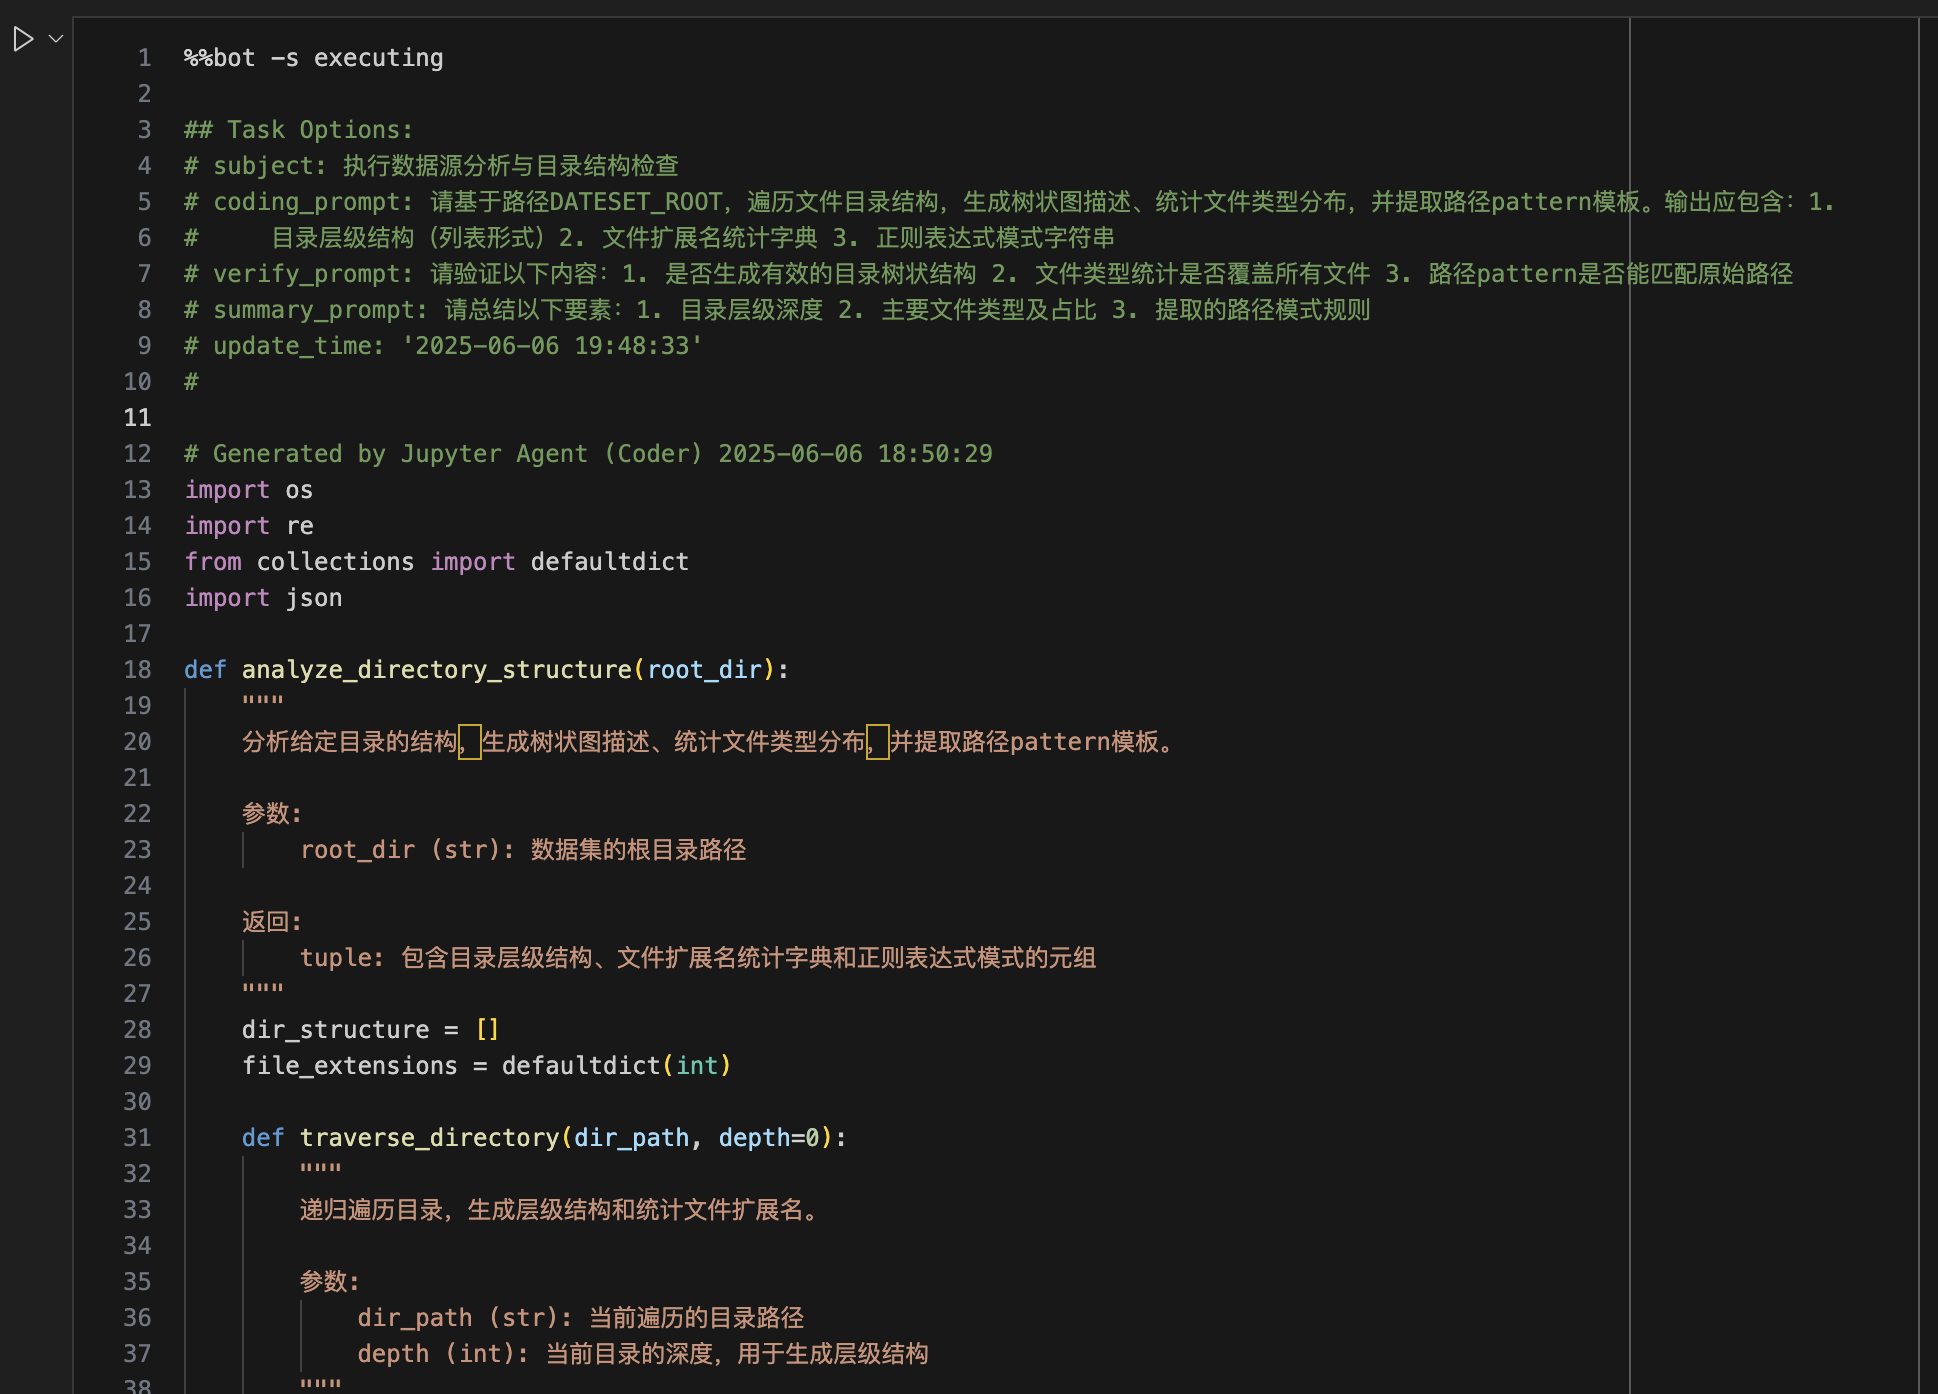
在完成全局任务规划后,开始执行子任务时,只需要新建一个cell,输入并执行`%%bot`命令,如下图:
|
|
118
|
+
|
|
119
|
+
|
|
120
|
+
|
|
121
|
+
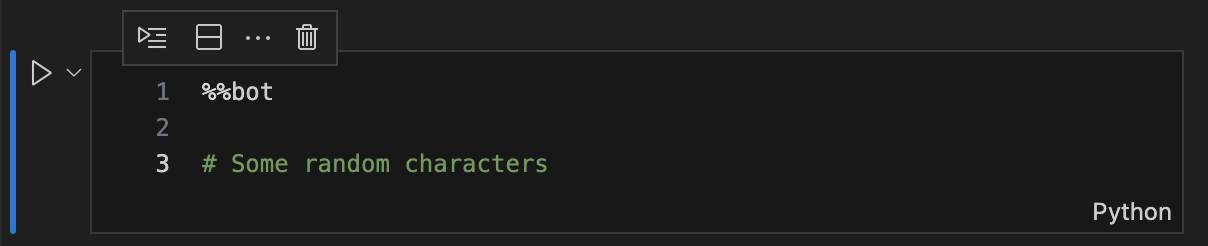
> 注:由于cell magic命令无法直接定位当前cell,需要通过cell的内容进行匹配,因此首次执行%%bot命令时,需要在cell中额外添加一些随机字符
|
|
122
|
+
|
|
123
|
+
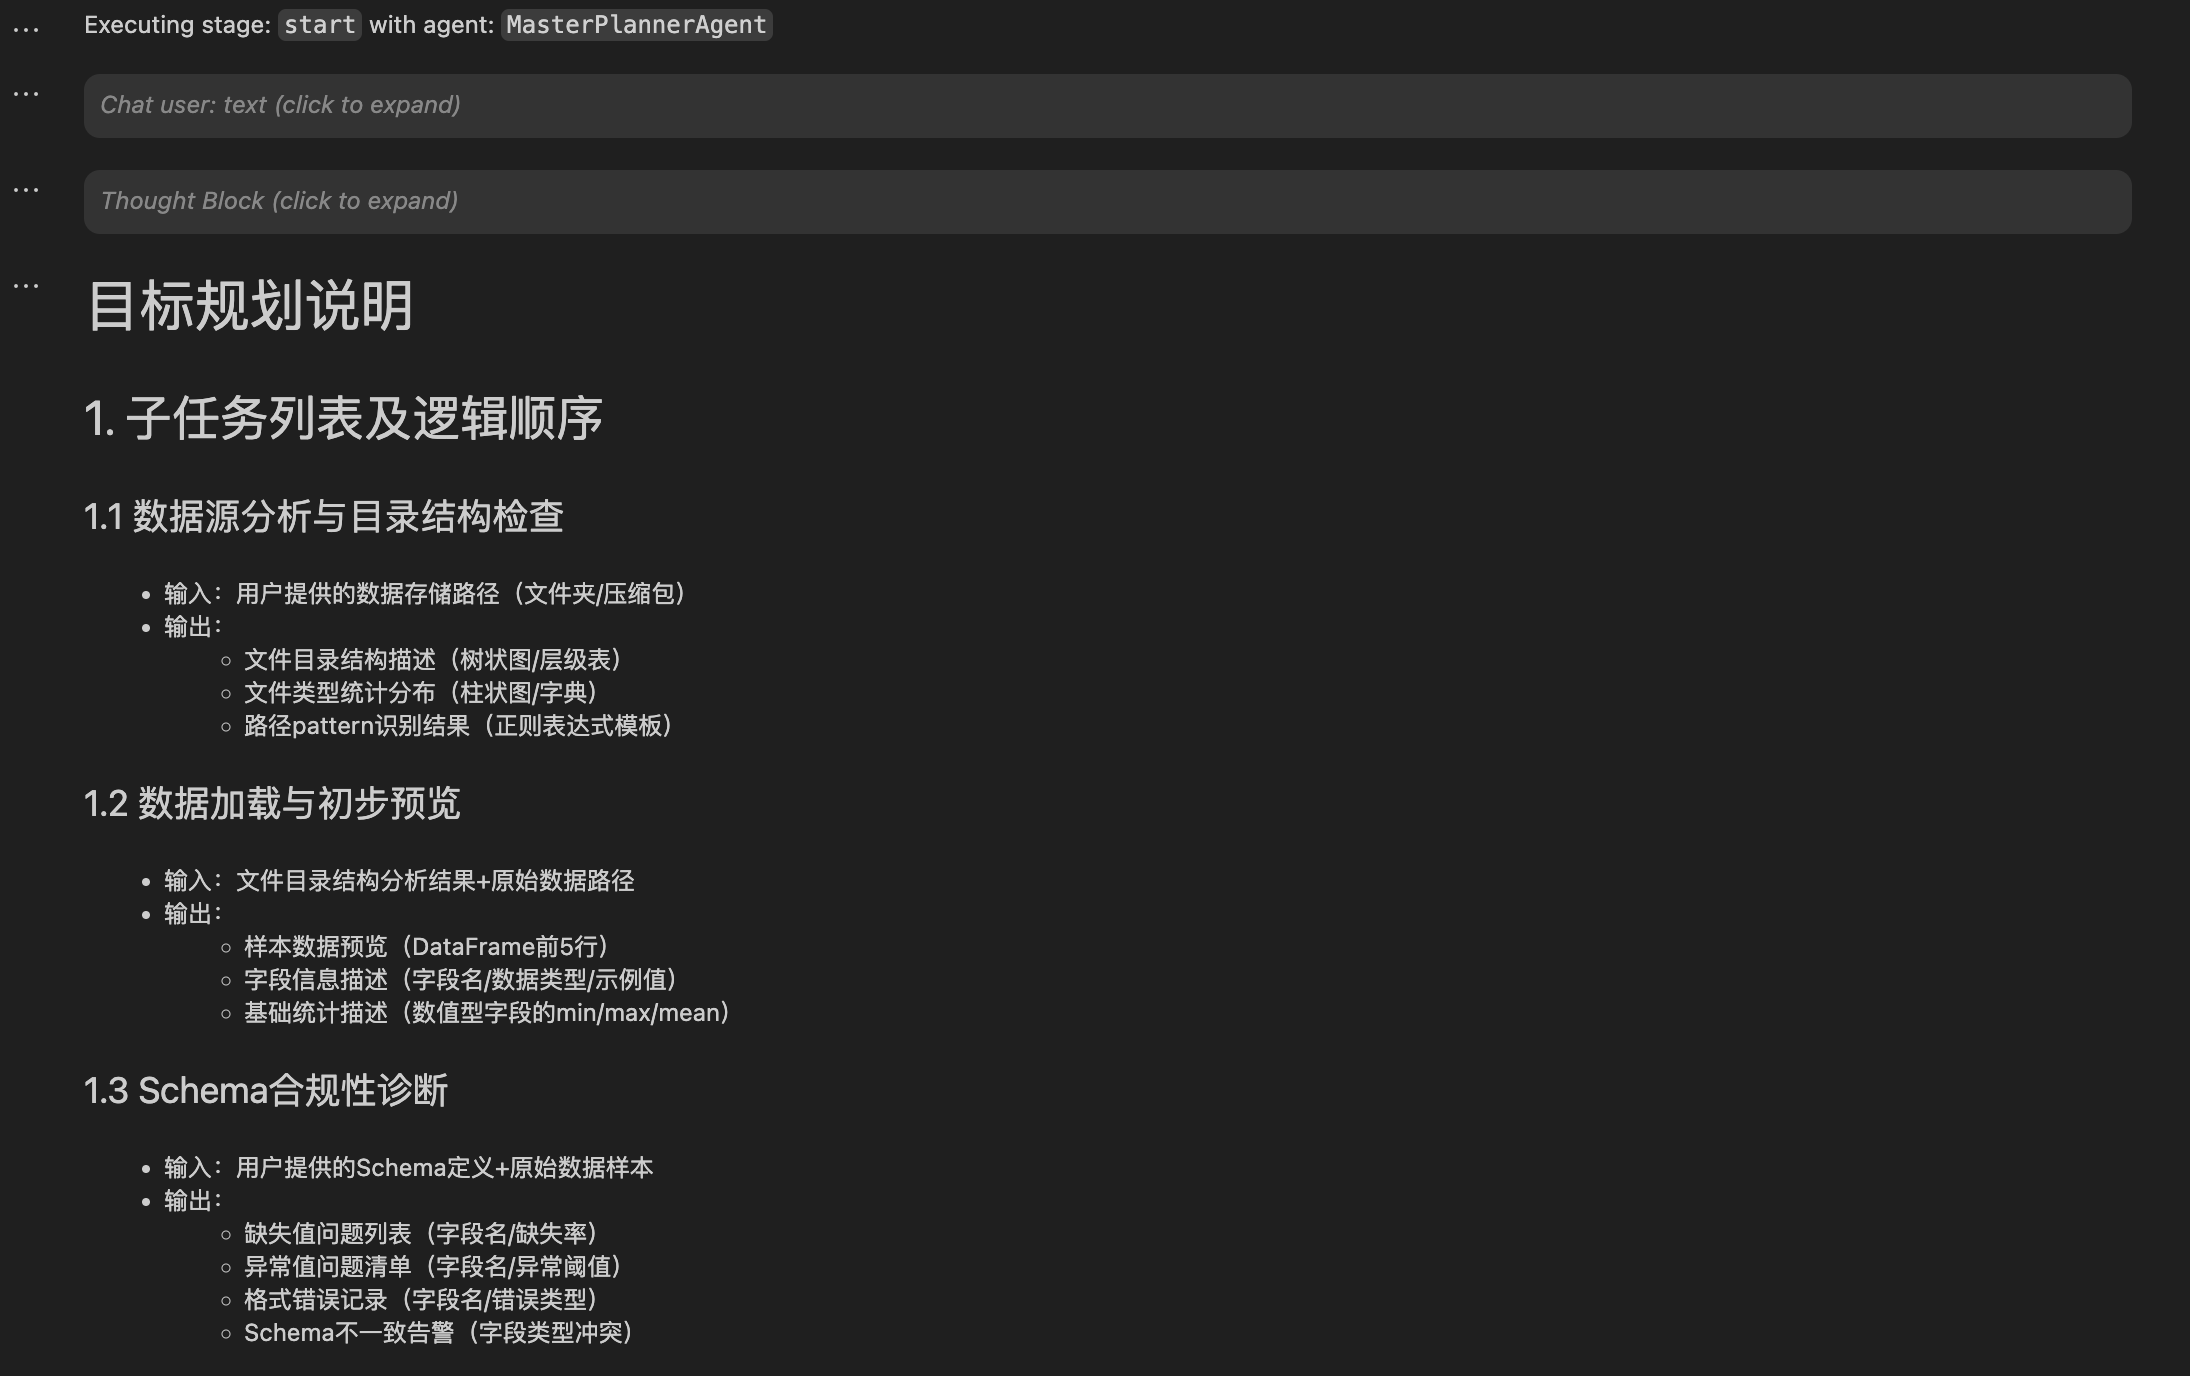
接下来工具会调用相应的agent自动生成并执行相应步骤的代码,如下图:
|
|
124
|
+
|
|
125
|
+
|
|
126
|
+
|
|
127
|
+
一个cell中只会执行全局计划中的一个步骤,当前步骤执行完成后,需要手工新建一个cell并重复上述过程,直到完成全局目标完成(此时工具不会再生成新代码)
|
|
128
|
+
|
|
129
|
+
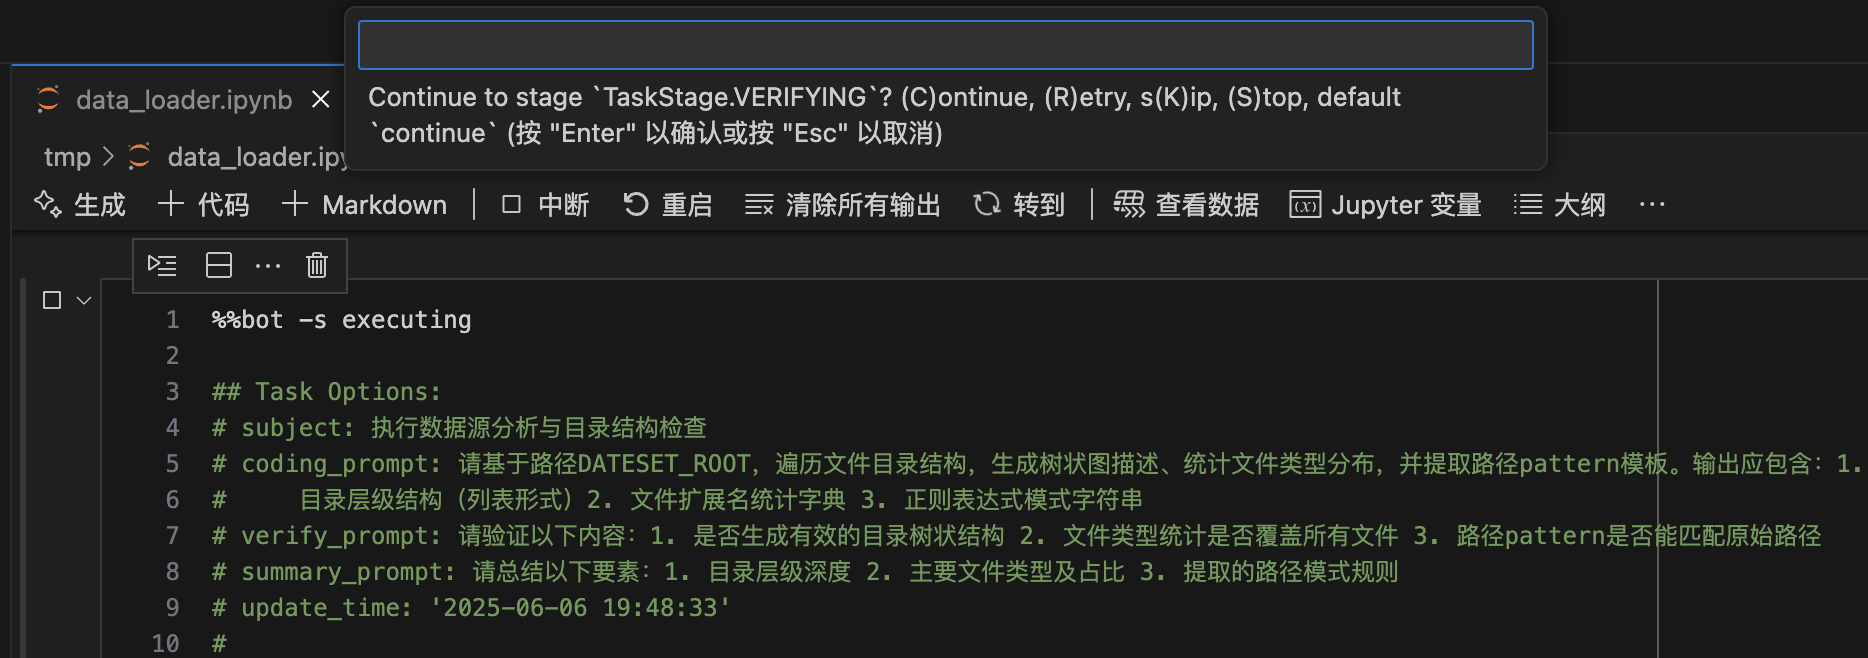
在子任务执行的过程中,默认情况下每一个环节工具都会给出如下图的确认提示,可跟据实际情况输入相应的选项,或直接回车确认继续执行下一环节。
|
|
130
|
+
|
|
131
|
+
|
|
132
|
+
|
|
133
|
+
更详细用法可参考[示例Notebook](https://github.com/viewstar000/jupyter-agent/blob/main/examples/data_loader.ipynb)
|
|
134
|
+
|
|
135
|
+
## 贡献
|
|
136
|
+
|
|
137
|
+
欢迎提交 issue 或 pull request 参与贡献。
|
|
138
|
+
|
|
139
|
+
## 许可证
|
|
140
|
+
|
|
141
|
+
本项目基于 [MIT License](./LICENSE) 开源。
|
|
142
|
+
|
|
143
|
+
Copyright (c) 2025 viewstar000
|
|
144
|
+
|
|
145
|
+
---
|
|
146
|
+
|
|
147
|
+
## EN
|
|
148
|
+
|
|
149
|
+
Implementing jupyter code planning, generation and execution for tasks using LLMs.
|
|
150
|
+
|
|
151
|
+
## Features
|
|
152
|
+
|
|
153
|
+
- Support `%%bot` magic command, you can use it to work on task planning, code generation, execution and debugging.
|
|
154
|
+
- Support OpenAI Compatible API to call LLMs.
|
|
155
|
+
|
|
156
|
+
## Installation
|
|
157
|
+
|
|
158
|
+
```bash
|
|
159
|
+
# Activate the virtual environment
|
|
160
|
+
source /path/to/target_env/bin/activate
|
|
161
|
+
|
|
162
|
+
pip install jupyter-agent
|
|
163
|
+
```
|
|
164
|
+
|
|
165
|
+
## Build from Source
|
|
166
|
+
|
|
167
|
+
```bash
|
|
168
|
+
# Clone the repository
|
|
169
|
+
git clone https://github.com/viewstar000/jupyter-agent.git
|
|
170
|
+
cd jupyter-agent
|
|
171
|
+
|
|
172
|
+
# Install the build environment
|
|
173
|
+
virtualenv .venv
|
|
174
|
+
source .venv/bin/activate
|
|
175
|
+
pip install build
|
|
176
|
+
|
|
177
|
+
# Build the package
|
|
178
|
+
python -m build
|
|
179
|
+
|
|
180
|
+
# Deactivate the virtual environment
|
|
181
|
+
deactivate
|
|
182
|
+
|
|
183
|
+
# Activate the Target virtual environment
|
|
184
|
+
source /path/to/target_env/bin/activate
|
|
185
|
+
|
|
186
|
+
# Install the package
|
|
187
|
+
pip install /path/to/jupyter-agent/dist/jupyter_agent-xxxx-py3-none-any.whl
|
|
188
|
+
```
|
|
189
|
+
|
|
190
|
+
## Install Vscode Extension
|
|
191
|
+
|
|
192
|
+
[Download](https://marketplace.visualstudio.com/items?itemName=viewstar000.jupyter-agent-extension)
|
|
193
|
+
|
|
194
|
+
## Usage
|
|
195
|
+
|
|
196
|
+
After installing `jupyter-agent` and `jupyter-agent-extension`, you can use `%%bot` magic command to work on task planning, code generation and execution.
|
|
197
|
+
|
|
198
|
+
First create or open a notebook in Vscode, create a new cell, enter and execute the following commands:
|
|
199
|
+
|
|
200
|
+
```python
|
|
201
|
+
# Load the Magic commands of the extension
|
|
202
|
+
%load_ext jupyter_agent.bot_magics
|
|
203
|
+
|
|
204
|
+
# Set the API address of the model to be called, different Agents can call different models, here we call the model deployed locally in lmstudio
|
|
205
|
+
%config BotMagics.default_api_url = 'http://127.0.0.1:1234/v1'
|
|
206
|
+
%config BotMagics.default_api_key = 'API_KEY'
|
|
207
|
+
%config BotMagics.default_model_name = 'qwen3-30b-a3b'
|
|
208
|
+
%config BotMagics.coding_model_name = 'devstral-small-2505-mlx'
|
|
209
|
+
|
|
210
|
+
# Set the path of the current Notebook, which cannot be automatically obtained in vscode when running, you need to manually specify
|
|
211
|
+
%config BotMagics.notebook_path = globals()["__vsc_ipynb_file__"]
|
|
212
|
+
|
|
213
|
+
# Set whether to save task data to Metadata, only Vscode installed with jupyter-agent-extension supports
|
|
214
|
+
%config BotMagics.support_save_meta = True
|
|
215
|
+
```
|
|
216
|
+
|
|
217
|
+
Now, you can use the `%%bot` command to work on task rules and code generation.
|
|
218
|
+
|
|
219
|
+
### Perform global task planning
|
|
220
|
+
|
|
221
|
+
```python
|
|
222
|
+
%%bot -P
|
|
223
|
+
|
|
224
|
+
# Global Goal
|
|
225
|
+
|
|
226
|
+
...
|
|
227
|
+
```
|
|
228
|
+
|
|
229
|
+
Global task planning will analyze the user input prompt and generate a detailed execution plan, subsequent `%%bot` commands will generate code for each step (subtask) automatically.
|
|
230
|
+
|
|
231
|
+

|
|
232
|
+

|
|
233
|
+
|
|
234
|
+
### Generate and execute subtask code
|
|
235
|
+
|
|
236
|
+
```python
|
|
237
|
+
%%bot [-s stage]
|
|
238
|
+
|
|
239
|
+
# generated code ...
|
|
240
|
+
```
|
|
241
|
+
|
|
242
|
+
After global task planning, the tool will generate code for each subtask, and you can use the `%%bot` command to invoke the corresponding agent to generate the code and execute it.
|
|
243
|
+
|
|
244
|
+

|
|
245
|
+
|
|
246
|
+
> **Note:** The `%%bot` cell magic can not locate the empty cell, you must enter the `%%bot` command with some random text in the cell to trigger the magic command.
|
|
247
|
+
|
|
248
|
+
After generating code for a subtask, the tool will call the corresponding agent to generate the code, and then execute it.
|
|
249
|
+
|
|
250
|
+

|
|
251
|
+
|
|
252
|
+
For more details, please refer to [example notebook](https://github.com/viewstar000/jupyter-agent/blob/main/examples/data_loader.ipynb)
|
|
253
|
+
|
|
254
|
+
## Contributing
|
|
255
|
+
|
|
256
|
+
Welcome to submit issues or pull requests to participate in contributions.
|
|
257
|
+
|
|
258
|
+
## License
|
|
259
|
+
|
|
260
|
+
This project is based on the [MIT License](https://github.com/viewstar000/jupyter-agent-extension/blob/main/LICENSE) open source.
|
|
261
|
+
|
|
262
|
+
Copyright (c) 2025 viewstar000
|
|
@@ -26,8 +26,8 @@ jupyter_agent/bot_flows/master_planner.py,sha256=2MvAMikMsBIarTL4QNYTjAs70bxo7VA
|
|
|
26
26
|
jupyter_agent/bot_flows/task_executor_v1.py,sha256=WzTfoOTjBpk1emvpiL3yeiudKdDf6EpVdJIugxxbqM4,2975
|
|
27
27
|
jupyter_agent/bot_flows/task_executor_v2.py,sha256=IyfxhzA4TljNd6iqqUYxxzB63r9lxfe1Zbu177hytRs,2949
|
|
28
28
|
jupyter_agent/bot_flows/task_executor_v3.py,sha256=NwJy7iAo2U3rl5iQYpACWVAkIA5DRMDdx0JadheRMMQ,3198
|
|
29
|
-
jupyter_agent-2025.6.
|
|
30
|
-
jupyter_agent-2025.6.
|
|
31
|
-
jupyter_agent-2025.6.
|
|
32
|
-
jupyter_agent-2025.6.
|
|
33
|
-
jupyter_agent-2025.6.
|
|
29
|
+
jupyter_agent-2025.6.102.dist-info/licenses/LICENSE,sha256=nWMmSIg7OepTIDX_OPP0-T9ImeCBBoog7eJxm5awtcM,1068
|
|
30
|
+
jupyter_agent-2025.6.102.dist-info/METADATA,sha256=ghJ-4ompPy8WtYEam-O_jHLQZQF55wEgeKXrwBwXoIQ,8647
|
|
31
|
+
jupyter_agent-2025.6.102.dist-info/WHEEL,sha256=_zCd3N1l69ArxyTb8rzEoP9TpbYXkqRFSNOD5OuxnTs,91
|
|
32
|
+
jupyter_agent-2025.6.102.dist-info/top_level.txt,sha256=c3USTBZ7DZGuvLKlEW-QfGIx0tzn98iCEn3bpdYnDtE,14
|
|
33
|
+
jupyter_agent-2025.6.102.dist-info/RECORD,,
|
|
@@ -1,132 +0,0 @@
|
|
|
1
|
-
Metadata-Version: 2.4
|
|
2
|
-
Name: jupyter-agent
|
|
3
|
-
Version: 2025.6.101
|
|
4
|
-
Summary: 调用LLM实现Jupyter代码的自动生成、执行、调试等功能
|
|
5
|
-
Author: viewstar000
|
|
6
|
-
License: MIT
|
|
7
|
-
Project-URL: Homepage, https://github.com/viewstar000/jupyter-agent
|
|
8
|
-
Classifier: Programming Language :: Python :: 3
|
|
9
|
-
Classifier: Operating System :: OS Independent
|
|
10
|
-
Requires-Python: >=3.12
|
|
11
|
-
Description-Content-Type: text/markdown
|
|
12
|
-
License-File: LICENSE
|
|
13
|
-
Requires-Dist: ipython
|
|
14
|
-
Requires-Dist: nbformat
|
|
15
|
-
Requires-Dist: ipynbname
|
|
16
|
-
Requires-Dist: openai
|
|
17
|
-
Requires-Dist: traitlets
|
|
18
|
-
Requires-Dist: pyyaml
|
|
19
|
-
Requires-Dist: jinja2
|
|
20
|
-
Requires-Dist: pydantic
|
|
21
|
-
Dynamic: license-file
|
|
22
|
-
|
|
23
|
-
# jupyter-agent
|
|
24
|
-
|
|
25
|
-
调用LLM实现Jupyter代码的自动生成、执行、调试等功能
|
|
26
|
-
|
|
27
|
-
## 特性
|
|
28
|
-
|
|
29
|
-
- 提供`%%bot`指令,在juyter环境中,通过调用LLM实现代码生成、执行、调试等能力
|
|
30
|
-
- 支持调用OpenAI兼容API,实现LLM相关的功能
|
|
31
|
-
|
|
32
|
-
## 安装
|
|
33
|
-
|
|
34
|
-
```bash
|
|
35
|
-
# 激活目标环境(视情况选择)
|
|
36
|
-
source /path/to/target_env/bin/activate
|
|
37
|
-
|
|
38
|
-
pip install jupyter-agent
|
|
39
|
-
```
|
|
40
|
-
|
|
41
|
-
## 源码打包安全(Build)
|
|
42
|
-
|
|
43
|
-
```bash
|
|
44
|
-
# 下载代码
|
|
45
|
-
git clone https://github.com/yourusername/jupyter-agent.git
|
|
46
|
-
cd jupyter-agent
|
|
47
|
-
|
|
48
|
-
# 安装打包环境
|
|
49
|
-
virtualenv .venv
|
|
50
|
-
source .venv/bin/activate
|
|
51
|
-
pip install build
|
|
52
|
-
|
|
53
|
-
# 编译打包
|
|
54
|
-
python -m build
|
|
55
|
-
|
|
56
|
-
# 退出打包环境
|
|
57
|
-
deactivate
|
|
58
|
-
|
|
59
|
-
# 激活目标环境
|
|
60
|
-
source /path/to/target_env/bin/activate
|
|
61
|
-
|
|
62
|
-
# 安装编译好的wheel包
|
|
63
|
-
pip install /path/to/upyter-agent/dist/jupyter_agent-xxxx-py3-none-any.whl
|
|
64
|
-
```
|
|
65
|
-
|
|
66
|
-
## 使用方法
|
|
67
|
-
|
|
68
|
-
安装完成后,启动Jupyter环境(兼容Vscode的Notebook编译器)
|
|
69
|
-
|
|
70
|
-
### 全局配置
|
|
71
|
-
|
|
72
|
-
```python
|
|
73
|
-
# 加载扩展的Magic命令
|
|
74
|
-
%load_ext jupyter_agent.bot_magics
|
|
75
|
-
# 设备模型调用的API地址,不同的Agent可以调用不同的模型,这里以调用lmstudio本地部署的模型为例
|
|
76
|
-
%config BotMagics.default_api_url = 'http://127.0.0.1:1234/v1'
|
|
77
|
-
%config BotMagics.default_api_key = 'API_KEY'
|
|
78
|
-
%config BotMagics.default_model_name = 'qwen3-30b-a3b'
|
|
79
|
-
%config BotMagics.coding_model_name = 'devstral-small-2505-mlx'
|
|
80
|
-
# 设置当前Notebook的路径,由于vscode中运行里无法自动获取到该路径,需要手工指定
|
|
81
|
-
%config BotMagics.notebook_path = globals()["__vsc_ipynb_file__"]
|
|
82
|
-
```
|
|
83
|
-
|
|
84
|
-
### 全局任务规划
|
|
85
|
-
|
|
86
|
-
```python
|
|
87
|
-
%%bot -P
|
|
88
|
-
|
|
89
|
-
# 全局目标
|
|
90
|
-
...
|
|
91
|
-
```
|
|
92
|
-
|
|
93
|
-
全局任务规划会解析用户输入的prompt,生成具体的执行计划,后续的%%bot指令会以该计划为蓝本自动生成每个步骤(子任务)的代码。
|
|
94
|
-
|
|
95
|
-

|
|
96
|
-

|
|
97
|
-
|
|
98
|
-
### 生成并执行子任务代码
|
|
99
|
-
|
|
100
|
-
```python
|
|
101
|
-
%% bot [-s stage]
|
|
102
|
-
|
|
103
|
-
# generated code ...
|
|
104
|
-
```
|
|
105
|
-
|
|
106
|
-
在完成全局任务规划后,开始执行子任务时,只需要新建一个cell,输入并执行`%%bot`命令,如下图:
|
|
107
|
-
|
|
108
|
-

|
|
109
|
-
|
|
110
|
-
> 注:由于cell magic命令无法直接定位当前cell,需要通过cell的内容进行匹配,因此首次执行%%bot命令时,需要在cell中额外添加一些随机字符
|
|
111
|
-
|
|
112
|
-
接下来工具会调用相应的agent自动生成并执行相应步骤的代码,如下图:
|
|
113
|
-
|
|
114
|
-

|
|
115
|
-
|
|
116
|
-
一个cell中只会执行全局计划中的一个步骤,当前步骤执行完成后,需要手工新建一个cell并重复上述过程,直到完成全局目标完成(此时工具不会再生成新代码)
|
|
117
|
-
|
|
118
|
-
在子任务执行的过程中,默认情况下每一个环节工具都会给出如下图的确认提示,可跟据实际情况输入相应的选项,或直接回车确认继续执行下一环节。
|
|
119
|
-
|
|
120
|
-

|
|
121
|
-
|
|
122
|
-
更详细用法可参考[示例Notebook](examples/data_loader.ipynb)
|
|
123
|
-
|
|
124
|
-
## 贡献
|
|
125
|
-
|
|
126
|
-
欢迎提交 issue 或 pull request 参与贡献。
|
|
127
|
-
|
|
128
|
-
## 许可证
|
|
129
|
-
|
|
130
|
-
本项目基于 [MIT License](./LICENSE) 开源。
|
|
131
|
-
|
|
132
|
-
Copyright (c) 2025 viewstar000
|
|
File without changes
|
|
File without changes
|
|
File without changes
|