emhass 0.10.6__py3-none-any.whl → 0.11.1__py3-none-any.whl
This diff represents the content of publicly available package versions that have been released to one of the supported registries. The information contained in this diff is provided for informational purposes only and reflects changes between package versions as they appear in their respective public registries.
- emhass/command_line.py +178 -85
- emhass/data/associations.csv +63 -0
- emhass/data/config_defaults.json +117 -0
- emhass/forecast.py +38 -36
- emhass/machine_learning_forecaster.py +2 -1
- emhass/machine_learning_regressor.py +7 -2
- emhass/optimization.py +62 -62
- emhass/retrieve_hass.py +9 -4
- emhass/static/advanced.html +2 -1
- emhass/static/basic.html +4 -2
- emhass/static/configuration_list.html +44 -0
- emhass/static/configuration_script.js +872 -0
- emhass/static/data/param_definitions.json +424 -0
- emhass/static/script.js +345 -322
- emhass/static/style.css +267 -8
- emhass/templates/configuration.html +75 -0
- emhass/templates/index.html +15 -8
- emhass/utils.py +626 -302
- emhass/web_server.py +322 -213
- {emhass-0.10.6.dist-info → emhass-0.11.1.dist-info}/METADATA +207 -169
- emhass-0.11.1.dist-info/RECORD +32 -0
- {emhass-0.10.6.dist-info → emhass-0.11.1.dist-info}/WHEEL +1 -1
- emhass-0.10.6.dist-info/RECORD +0 -26
- {emhass-0.10.6.dist-info → emhass-0.11.1.dist-info}/LICENSE +0 -0
- {emhass-0.10.6.dist-info → emhass-0.11.1.dist-info}/entry_points.txt +0 -0
- {emhass-0.10.6.dist-info → emhass-0.11.1.dist-info}/top_level.txt +0 -0
|
@@ -1,6 +1,6 @@
|
|
|
1
1
|
Metadata-Version: 2.1
|
|
2
2
|
Name: emhass
|
|
3
|
-
Version: 0.
|
|
3
|
+
Version: 0.11.1
|
|
4
4
|
Summary: An Energy Management System for Home Assistant
|
|
5
5
|
Home-page: https://github.com/davidusb-geek/emhass
|
|
6
6
|
Author: David HERNANDEZ
|
|
@@ -16,22 +16,22 @@ Requires-Python: >=3.10, <3.12
|
|
|
16
16
|
Description-Content-Type: text/markdown
|
|
17
17
|
License-File: LICENSE
|
|
18
18
|
Requires-Dist: wheel
|
|
19
|
-
Requires-Dist: numpy
|
|
20
|
-
Requires-Dist: scipy
|
|
21
|
-
Requires-Dist: pandas
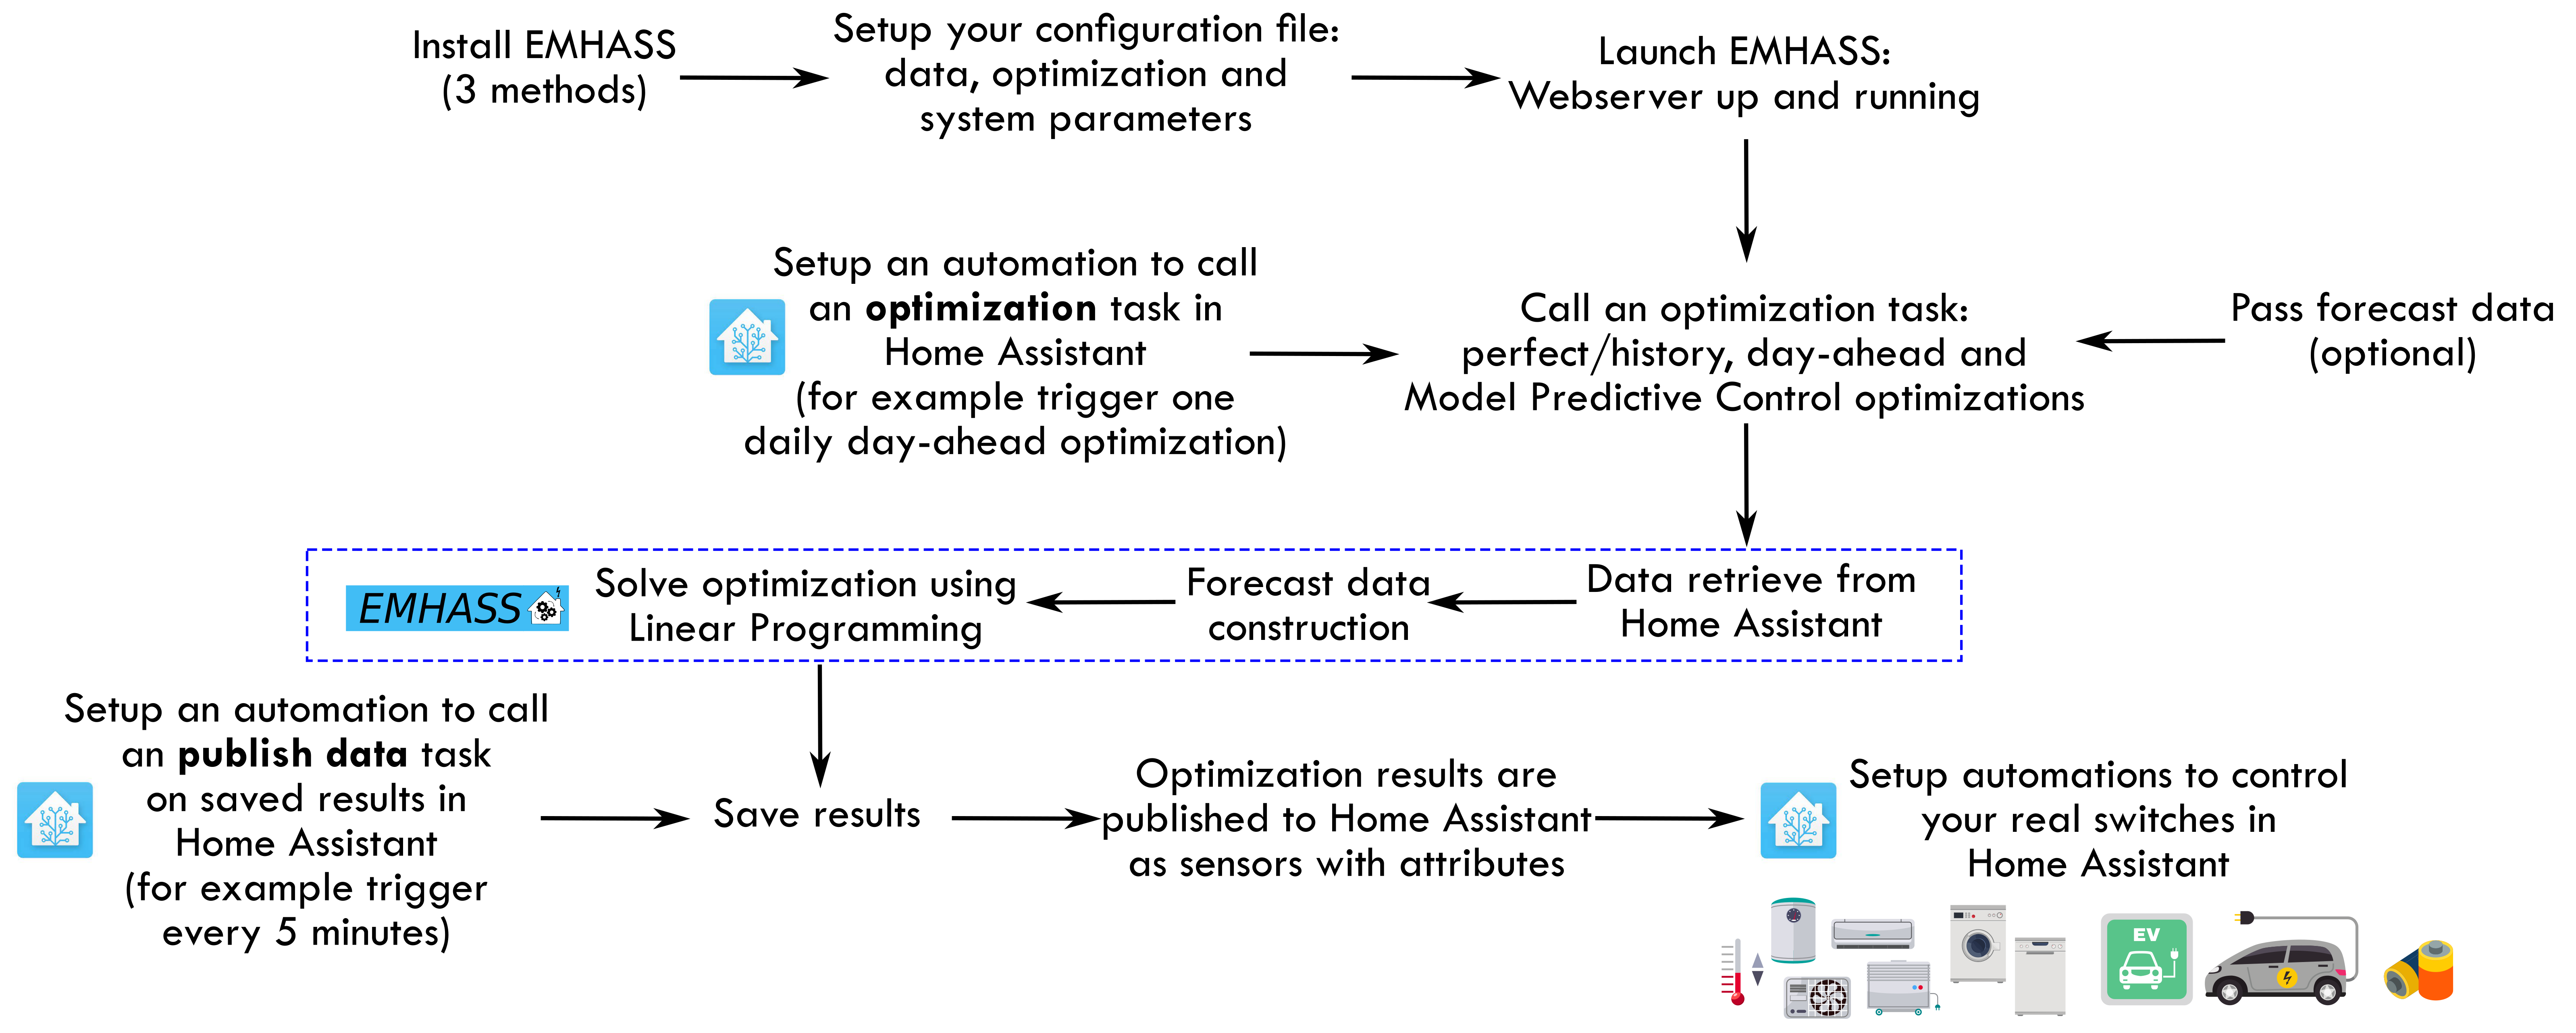
|
|
22
|
-
Requires-Dist: pvlib
|
|
23
|
-
Requires-Dist: protobuf
|
|
24
|
-
Requires-Dist: pytz
|
|
25
|
-
Requires-Dist: requests
|
|
26
|
-
Requires-Dist: beautifulsoup4
|
|
27
|
-
Requires-Dist: h5py
|
|
28
|
-
Requires-Dist: pulp
|
|
29
|
-
Requires-Dist: pyyaml
|
|
30
|
-
Requires-Dist: tables
|
|
31
|
-
Requires-Dist: skforecast
|
|
32
|
-
Requires-Dist: flask
|
|
33
|
-
Requires-Dist: waitress
|
|
34
|
-
Requires-Dist: plotly
|
|
19
|
+
Requires-Dist: numpy==1.26.4
|
|
20
|
+
Requires-Dist: scipy==1.12.0
|
|
21
|
+
Requires-Dist: pandas<=2.0.3
|
|
22
|
+
Requires-Dist: pvlib>=0.10.2
|
|
23
|
+
Requires-Dist: protobuf>=3.0.0
|
|
24
|
+
Requires-Dist: pytz>=2021.1
|
|
25
|
+
Requires-Dist: requests>=2.25.1
|
|
26
|
+
Requires-Dist: beautifulsoup4>=4.9.3
|
|
27
|
+
Requires-Dist: h5py==3.12.1
|
|
28
|
+
Requires-Dist: pulp>=2.4
|
|
29
|
+
Requires-Dist: pyyaml>=5.4.1
|
|
30
|
+
Requires-Dist: tables<=3.9.1
|
|
31
|
+
Requires-Dist: skforecast==0.13.0
|
|
32
|
+
Requires-Dist: flask>=2.0.3
|
|
33
|
+
Requires-Dist: waitress>=2.1.1
|
|
34
|
+
Requires-Dist: plotly>=5.6.0
|
|
35
35
|
|
|
36
36
|
<div align="center">
|
|
37
37
|
<br>
|
|
@@ -46,7 +46,10 @@ Requires-Dist: plotly >=5.6.0
|
|
|
46
46
|
<img alt="GitHub release (latest by date)" src="https://img.shields.io/github/v/release/davidusb-geek/emhass">
|
|
47
47
|
</a>
|
|
48
48
|
<a style="text-decoration:none" href="https://github.com/davidusb-geek/emhass/actions">
|
|
49
|
-
<img alt="GitHub Workflow Status" src="https://
|
|
49
|
+
<img alt="EMHASS GitHub Workflow Status" src="https://github.com/davidusb-geek/emhass/actions/workflows/publish_docker.yaml/badge.svg?event=release">
|
|
50
|
+
</a>
|
|
51
|
+
<a style="text-decoration:none" href="https://github.com/davidusb-geek/emhass-add-on/actions">
|
|
52
|
+
<img alt="EMHASS-Add-on GitHub Workflow Status" src="https://github.com/davidusb-geek/emhass-add-on/actions/workflows/publish_docker.yaml/badge.svg?event=release">
|
|
50
53
|
</a>
|
|
51
54
|
<a hstyle="text-decoration:none" ref="https://codecov.io/github/davidusb-geek/emhass" >
|
|
52
55
|
<img src="https://codecov.io/github/davidusb-geek/emhass/branch/master/graph/badge.svg?token=BW7KSCHN90"/>
|
|
@@ -108,7 +111,7 @@ Home Assistant provides a platform for the automation of household devices based
|
|
|
108
111
|
|
|
109
112
|
One of the main benefits of integrating EMHASS and Home Assistant is the ability to customize and tailor the energy management solution to the specific needs and preferences of each household. With EMHASS, households can define their energy management objectives and constraints, such as maximizing self-consumption or minimizing energy costs, and the system will generate an optimization plan accordingly. Home Assistant provides a platform for the automation of devices based on the optimization plan, allowing households to create a fully customized and optimized energy management solution.
|
|
110
113
|
|
|
111
|
-
Overall, the integration of EMHASS and Home Assistant offers a comprehensive energy management solution that provides significant cost savings, increased energy efficiency, and greater sustainability for households. By leveraging advanced energy management features and automation capabilities, households can achieve their energy management objectives while enjoying the benefits of
|
|
114
|
+
Overall, the integration of EMHASS and Home Assistant offers a comprehensive energy management solution that provides significant cost savings, increased energy efficiency, and greater sustainability for households. By leveraging advanced energy management features and automation capabilities, households can achieve their energy management objectives while enjoying the benefits of more efficient and sustainable energy usage, including optimized EV charging schedules.
|
|
112
115
|
|
|
113
116
|
The package flow can be graphically represented as follows:
|
|
114
117
|
|
|
@@ -116,98 +119,130 @@ The package flow can be graphically represented as follows:
|
|
|
116
119
|
|
|
117
120
|
## Configuration and Installation
|
|
118
121
|
|
|
119
|
-
The package is meant to be highly configurable with an object
|
|
120
|
-
EMHASS was designed to be integrated with Home Assistant, hence
|
|
122
|
+
The package is meant to be highly configurable with an object-oriented modular approach and a main configuration file defined by the user.
|
|
123
|
+
EMHASS was designed to be integrated with Home Assistant, hence its name.
|
|
121
124
|
Installation instructions and example Home Assistant automation configurations are given below.
|
|
122
125
|
|
|
123
126
|
You must follow these steps to make EMHASS work properly:
|
|
124
127
|
|
|
125
|
-
1)
|
|
128
|
+
1) Install and run EMHASS.
|
|
129
|
+
- There are multiple methods of installing and Running EMHASS. See [Installation Method](##Installation-Methods) below to pick a method that best suits your use case.
|
|
126
130
|
|
|
127
|
-
2)
|
|
131
|
+
2) Define all the parameters in the configuration file *(`config.json`)* or configuration page *(`YOURIP:5000/configuration`)*.
|
|
132
|
+
- See the description for each parameter in the [configuration](https://emhass.readthedocs.io/en/latest/config.html) docs.
|
|
133
|
+
- You will most notably need to define the main data entering EMHASS. This will be the Home Assistant sensor/variable `sensor.power_photovoltaics` for the name of your Home Assistant variable containing the PV produced power, and the sensor/variable `sensor.power_load_no_var_loads`, for the load power of your household excluding the power of the deferrable loads that you want to optimize.
|
|
134
|
+
- If you have a PV installation then this dedicated web app can be useful for finding your inverter and solar panel models: [https://emhass-pvlib-database.streamlit.app/](https://emhass-pvlib-database.streamlit.app/)
|
|
128
135
|
|
|
129
|
-
|
|
136
|
+
4) Launch the optimization and check the results.
|
|
137
|
+
- This can be done manually using the buttons in the web UI
|
|
138
|
+
- Or with a `curl` command like this: `curl -i -H 'Content-Type:application/json' -X POST -d '{}' http://localhost:5000/action/dayahead-optim`.
|
|
130
139
|
|
|
131
|
-
|
|
140
|
+
5) If you’re satisfied with the optimization results then you can set the optimization and data publish task commands in an automation.
|
|
141
|
+
- You can read more about this in the [usage](##usage) section below.
|
|
132
142
|
|
|
133
|
-
|
|
143
|
+
6) The final step is to link the deferrable loads variables to real switches on your installation.
|
|
144
|
+
- An example code for this using automations and the shell command integration is presented below in the [usage](##usage) section.
|
|
134
145
|
|
|
135
146
|
A more detailed workflow is given below:
|
|
136
147
|
|
|
137
|
-
|
|
148
|
+

|
|
149
|
+
|
|
150
|
+
## Installation Methods
|
|
138
151
|
|
|
139
152
|
### Method 1) The EMHASS add-on for Home Assistant OS and supervised users
|
|
140
153
|
|
|
141
|
-
For Home Assistant OS and HA Supervised users,
|
|
154
|
+
For Home Assistant OS and HA Supervised users, A [EMHASS an add-on repository](https://github.com/davidusb-geek/emhass-add-on) has been developed to allow the EMHASS Docker container to run as a [Home Assistant Addon](https://www.home-assistant.io/addons/). The add-on is more user-friendly as the Home Assistant secrets (URL and API key) are automatically placed inside of the EMHASS container, and web server port *(default 5000)* is already opened.
|
|
142
155
|
|
|
143
156
|
You can find the add-on with the installation instructions here: [https://github.com/davidusb-geek/emhass-add-on](https://github.com/davidusb-geek/emhass-add-on)
|
|
144
157
|
|
|
145
|
-
The add-on usage instructions can be found on the documentation pane of the add-on once installed or directly here: [EMHASS Add-on documentation](https://github.com/davidusb-geek/emhass-add-on/blob/main/emhass/DOCS.md)
|
|
146
|
-
|
|
147
158
|
These architectures are supported: `amd64`, `armv7`, `armhf` and `aarch64`.
|
|
148
159
|
|
|
149
|
-
|
|
160
|
+
_Note: Both EMHASS via Docker and EMHASS-Add-on contain the same Docker image. The EMHASS-Add-on repository however, stores Home Assistant addon specific configuration information and maintains EMHASS image version control._
|
|
150
161
|
|
|
151
|
-
|
|
152
|
-
```bash
|
|
153
|
-
docker pull davidusb/emhass-docker-standalone
|
|
154
|
-
```
|
|
162
|
+
### Method 2) Running EMHASS in Docker
|
|
155
163
|
|
|
156
|
-
You can also
|
|
164
|
+
You can also install EMHASS using Docker as a container. This can be in the same machine as Home Assistant (if your running Home Assistant as a Docker container) or in a different distant machine. To install first pull the latest image:
|
|
157
165
|
```bash
|
|
158
|
-
|
|
166
|
+
# pull Docker image
|
|
167
|
+
docker pull ghcr.io/davidusb-geek/emhass:latest
|
|
168
|
+
# run Docker image, mounting config.json and secrets_emhass.yaml from host
|
|
169
|
+
docker run --rm -it --restart always -p 5000:5000 --name emhass-container -v ./config.json:/share/config.json -v ./secrets_emhass.yaml:/app/secrets_emhass.yaml ghcr.io/davidusb-geek/emhass:latest
|
|
159
170
|
```
|
|
160
|
-
|
|
171
|
+
*Note it is not recommended to install the latest EMHASS image with `:latest` *(as you would likely want to control when you update EMHASS version)*. Instead, find the [latest version tag](https://github.com/davidusb-geek/emhass/pkgs/container/emhass) (E.g: `v0.2.1`) and replace `latest`*
|
|
172
|
+
|
|
173
|
+
You can also build your image locally. For this clone this repository, and build the image from the Dockerfile:
|
|
161
174
|
```bash
|
|
162
|
-
|
|
163
|
-
|
|
164
|
-
|
|
175
|
+
# git clone EMHASS repo
|
|
176
|
+
git clone https://github.com/davidusb-geek/emhass.git
|
|
177
|
+
# move to EMHASS directory
|
|
178
|
+
cd emhass
|
|
179
|
+
# build Docker image
|
|
180
|
+
# may need to set architecture tag (docker build --build-arg TARGETARCH=amd64 -t emhass-local .)
|
|
181
|
+
docker build -t emhass-local .
|
|
182
|
+
# run built Docker image, mounting config.json and secrets_emhass.yaml from host
|
|
183
|
+
docker run --rm -it --restart always -p 5000:5000 --name emhass-container -v ./config.json:/share/config.json -v ./secrets_emhass.yaml:/app/secrets_emhass.yaml emhass-local
|
|
184
|
+
```
|
|
185
|
+
|
|
186
|
+
Before running the docker container, make sure you have a designated folder for emhass on your host device and a `secrets_emhass.yaml` file. You can get a example of the secrets file from [`secrets_emhass(example).yaml`](https://github.com/davidusb-geek/emhass/blob/master/secrets_emhass(example).yaml) file on this repository.
|
|
165
187
|
```bash
|
|
166
|
-
|
|
167
|
-
|
|
168
|
-
|
|
169
|
-
|
|
170
|
-
|
|
171
|
-
|
|
172
|
-
|
|
173
|
-
|
|
188
|
+
# cli example of creating an emhass directory and appending a secrets_emhass.yaml file inside
|
|
189
|
+
mkdir ~/emhass
|
|
190
|
+
cd ~/emhass
|
|
191
|
+
cat <<EOT >> ~/emhass/secrets_emhass.yaml
|
|
192
|
+
hass_url: https://myhass.duckdns.org/
|
|
193
|
+
long_lived_token: thatverylongtokenhere
|
|
194
|
+
time_zone: Europe/Paris
|
|
195
|
+
Latitude: 45.83
|
|
196
|
+
Longitude: 6.86
|
|
197
|
+
Altitude: 4807.8
|
|
198
|
+
EOT
|
|
199
|
+
docker run --rm -it --restart always -p 5000:5000 --name emhass-container -v ./config.json:/share/config.json -v ./secrets_emhass.yaml:/app/secrets_emhass.yaml ghcr.io/davidusb-geek/emhass:latest
|
|
200
|
+
```
|
|
201
|
+
|
|
202
|
+
#### Docker, things to note
|
|
203
|
+
|
|
204
|
+
- You can create a `config.json` file prior to running emhass. *(obtain a example from: [config_defaults.json](https://github.com/davidusb-geek/emhass/blob/enhass-standalone-addon-merge/src/emhass/data/config_defaults.json)* Alteratively, you can insert your parameters into the configuration page on the EMHASS web server. (for EMHASS to auto create a config.json) With either option, the volume mount `-v ./config.json:/share/config.json` should be applied to make sure your config is stored on the host device. (to be not deleted when the EMHASS container gets removed/image updated)*
|
|
205
|
+
|
|
206
|
+
- If you wish to keep a local, semi-persistent copy of the EMHASS-generated data, create a local folder on your device, then mount said folder inside the container.
|
|
207
|
+
```bash
|
|
208
|
+
#create data folder
|
|
209
|
+
mkdir -p ~/emhass/data
|
|
210
|
+
docker run -it --restart always -p 5000:5000 -e LOCAL_COSTFUN="profit" -v ~/emhass/config.json:/app/config.json -v ~/emhass/data:/app/data -v ~/emhass/secrets_emhass.yaml:/app/secrets_emhass.yaml --name DockerEMHASS <REPOSITORY:TAG>
|
|
211
|
+
```
|
|
174
212
|
|
|
175
|
-
If you wish to set the web_server's diagrams to a timezone other than UTC, set `TZ` environment variable on:
|
|
176
|
-
```bash
|
|
177
|
-
docker run -it --restart always -p 5000:5000 -e TZ="Europe/Paris"
|
|
178
|
-
```
|
|
179
|
-
### Method 3) Legacy method using a Python virtual environment
|
|
213
|
+
- If you wish to set the web_server's homepage optimization diagrams to a timezone other than UTC, set `TZ` environment variable on docker run:
|
|
214
|
+
```bash
|
|
215
|
+
docker run -it --restart always -p 5000:5000 -e TZ="Europe/Paris" -v ~/emhass/config.json:/app/config.json -v ~/emhass/secrets_emhass.yaml:/app/secrets_emhass.yaml --name DockerEMHASS <REPOSITORY:TAG>
|
|
216
|
+
```
|
|
217
|
+
### Method 3) Legacy method using a Python virtual environment *(Legacy CLI)*
|
|
218
|
+
If you wish to run EMHASS optimizations with cli commands. *(no persistent web server session)* you can run EMHASS via the python package alone *(not wrapped in a Docker container)*.
|
|
180
219
|
|
|
181
220
|
With this method it is recommended to install on a virtual environment.
|
|
182
|
-
Create and activate a virtual environment:
|
|
183
|
-
```bash
|
|
184
|
-
python3 -m venv emhassenv
|
|
185
|
-
cd emhassenv
|
|
186
|
-
source bin/activate
|
|
187
|
-
```
|
|
188
|
-
Install using the distribution files:
|
|
189
|
-
```bash
|
|
190
|
-
python3 -m pip install emhass
|
|
191
|
-
```
|
|
192
|
-
|
|
193
|
-
|
|
194
|
-
|
|
195
|
-
|
|
196
|
-
```
|
|
197
|
-
|
|
198
|
-
|
|
199
|
-
To upgrade the installation in the future just use:
|
|
200
|
-
```bash
|
|
201
|
-
python3 -m pip install --upgrade emhass
|
|
202
|
-
```
|
|
221
|
+
- Create and activate a virtual environment:
|
|
222
|
+
```bash
|
|
223
|
+
python3 -m venv ~/emhassenv
|
|
224
|
+
cd ~/emhassenv
|
|
225
|
+
source bin/activate
|
|
226
|
+
```
|
|
227
|
+
- Install using the distribution files:
|
|
228
|
+
```bash
|
|
229
|
+
python3 -m pip install emhass
|
|
230
|
+
```
|
|
231
|
+
- Create and store configuration (config.json), secret (secrets_emhass.yaml) and data (/data) files in the emhass dir (`~/emhassenv`)
|
|
232
|
+
Note: You may wish to copy the `config.json` (config_defaults.json), `secrets_emhass.yaml` (secrets_emhass(example).yaml) and/or `/scripts/` files from this repository to the `~/emhassenv` folder for a starting point and/or to run the bash scripts described below.
|
|
233
|
+
|
|
234
|
+
- To upgrade the installation in the future just use:
|
|
235
|
+
```bash
|
|
236
|
+
python3 -m pip install --upgrade emhass
|
|
237
|
+
```
|
|
203
238
|
|
|
204
239
|
## Usage
|
|
205
240
|
|
|
206
|
-
### Method 1) Add-on and
|
|
241
|
+
### Method 1) Add-on and Docker
|
|
207
242
|
|
|
208
|
-
If using the add-on or the
|
|
243
|
+
If using the add-on or the Docker installation, it exposes a simple webserver on port 5000. You can access it directly using your browser. (E.g.: http://localhost:5000)
|
|
209
244
|
|
|
210
|
-
With this web server you can perform RESTful POST commands on multiple ENDPOINTS with prefix `action/*`:
|
|
245
|
+
With this web server, you can perform RESTful POST commands on multiple ENDPOINTS with the prefix `action/*`:
|
|
211
246
|
|
|
212
247
|
- A POST call to `action/perfect-optim` to perform a perfect optimization task on the historical data.
|
|
213
248
|
- A POST call to `action/dayahead-optim` to perform a day-ahead optimization task of your home energy.
|
|
@@ -215,7 +250,7 @@ With this web server you can perform RESTful POST commands on multiple ENDPOINTS
|
|
|
215
250
|
- A POST call to `action/publish-data` to publish the optimization results data for the current timestamp.
|
|
216
251
|
- A POST call to `action/forecast-model-fit` to train a machine learning forecaster model with the passed data (see the [dedicated section](https://emhass.readthedocs.io/en/latest/mlforecaster.html) for more help).
|
|
217
252
|
- A POST call to `action/forecast-model-predict` to obtain a forecast from a pre-trained machine learning forecaster model (see the [dedicated section](https://emhass.readthedocs.io/en/latest/mlforecaster.html) for more help).
|
|
218
|
-
- A POST call to `action/forecast-model-tune` to optimize the machine learning forecaster models hyperparameters using
|
|
253
|
+
- A POST call to `action/forecast-model-tune` to optimize the machine learning forecaster models hyperparameters using Bayesian optimization (see the [dedicated section](https://emhass.readthedocs.io/en/latest/mlforecaster.html) for more help).
|
|
219
254
|
|
|
220
255
|
A `curl` command can then be used to launch an optimization task like this: `curl -i -H 'Content-Type:application/json' -X POST -d '{}' http://localhost:5000/action/dayahead-optim`.
|
|
221
256
|
|
|
@@ -223,26 +258,29 @@ A `curl` command can then be used to launch an optimization task like this: `cur
|
|
|
223
258
|
|
|
224
259
|
To run a command simply use the `emhass` CLI command followed by the needed arguments.
|
|
225
260
|
The available arguments are:
|
|
226
|
-
- `--action`:
|
|
227
|
-
- `--config`: Define path to the config.
|
|
261
|
+
- `--action`: This is used to set the desired action, options are: `perfect-optim`, `dayahead-optim`, `naive-mpc-optim`, `publish-data`, `forecast-model-fit`, `forecast-model-predict` and `forecast-model-tune`.
|
|
262
|
+
- `--config`: Define the path to the config.json file (including the yaml file itself)
|
|
263
|
+
- `--secrets`: Define secret parameter file (secrets_emhass.yaml) path
|
|
228
264
|
- `--costfun`: Define the type of cost function, this is optional and the options are: `profit` (default), `cost`, `self-consumption`
|
|
229
265
|
- `--log2file`: Define if we should log to a file or not, this is optional and the options are: `True` or `False` (default)
|
|
230
266
|
- `--params`: Configuration as JSON.
|
|
231
267
|
- `--runtimeparams`: Data passed at runtime. This can be used to pass your own forecast data to EMHASS.
|
|
232
268
|
- `--debug`: Use `True` for testing purposes.
|
|
233
269
|
- `--version`: Show the current version of EMHASS.
|
|
270
|
+
- `--root`: Define path emhass root (E.g. ~/emhass )
|
|
271
|
+
- `--data`: Define path to the Data files (.csv & .pkl) (E.g. ~/emhass/data/ )
|
|
234
272
|
|
|
235
273
|
For example, the following line command can be used to perform a day-ahead optimization task:
|
|
236
274
|
```bash
|
|
237
|
-
emhass --action 'dayahead-optim' --config
|
|
275
|
+
emhass --action 'dayahead-optim' --config ~/emhass/config.json --costfun 'profit'
|
|
238
276
|
```
|
|
239
|
-
Before running any valuable command you need to modify the `
|
|
277
|
+
Before running any valuable command you need to modify the `config.json` and `secrets_emhass.yaml` files. These files should contain the information adapted to your own system. To do this take a look at the special section for this in the [documentation](https://emhass.readthedocs.io/en/latest/config.html).
|
|
240
278
|
|
|
241
|
-
## Home Assistant
|
|
279
|
+
## Home Assistant Automation
|
|
242
280
|
|
|
243
|
-
To
|
|
244
|
-
In the next few paragraphs we are going to consider the `dayahead-optim` optimization strategy, which is also the first that was implemented, and we will also cover how to publish the results.
|
|
245
|
-
|
|
281
|
+
To automate EMHASS with Home Assistant, we will need to define some shell commands in the Home Assistant `configuration.yaml` file and some basic automations in the `automations.yaml` file.
|
|
282
|
+
In the next few paragraphs, we are going to consider the `dayahead-optim` optimization strategy, which is also the first that was implemented, and we will also cover how to publish the optimization results.
|
|
283
|
+
Additional optimization strategies were developed later, that can be used in combination with/replace the `dayahead-optim` strategy, such as MPC, or to expand the functionalities such as the Machine Learning method to predict your household consumption. Each of them has some specificities and features and will be considered in dedicated sections.
|
|
246
284
|
|
|
247
285
|
### Dayahead Optimization - Method 1) Add-on and docker standalone
|
|
248
286
|
|
|
@@ -257,27 +295,27 @@ shell_command:
|
|
|
257
295
|
In `configuration.yaml`:
|
|
258
296
|
```yaml
|
|
259
297
|
shell_command:
|
|
260
|
-
dayahead_optim:
|
|
261
|
-
publish_data:
|
|
298
|
+
dayahead_optim: ~/emhass/scripts/dayahead_optim.sh
|
|
299
|
+
publish_data: ~/emhass/scripts/publish_data.sh
|
|
262
300
|
```
|
|
263
301
|
Create the file `dayahead_optim.sh` with the following content:
|
|
264
302
|
```bash
|
|
265
303
|
#!/bin/bash
|
|
266
|
-
.
|
|
267
|
-
emhass --action 'dayahead-optim' --config
|
|
304
|
+
. ~/emhassenv/bin/activate
|
|
305
|
+
emhass --action 'dayahead-optim' --config ~/emhass/config.json
|
|
268
306
|
```
|
|
269
307
|
And the file `publish_data.sh` with the following content:
|
|
270
308
|
```bash
|
|
271
309
|
#!/bin/bash
|
|
272
|
-
.
|
|
273
|
-
emhass --action 'publish-data' --config
|
|
310
|
+
. ~/emhassenv/bin/activate
|
|
311
|
+
emhass --action 'publish-data' --config ~/emhass/config.json
|
|
274
312
|
```
|
|
275
313
|
Then specify user rights and make the files executables:
|
|
276
314
|
```bash
|
|
277
|
-
sudo chmod -R 755
|
|
278
|
-
sudo chmod -R 755
|
|
279
|
-
sudo chmod +x
|
|
280
|
-
sudo chmod +x
|
|
315
|
+
sudo chmod -R 755 ~/emhass/scripts/dayahead_optim.sh
|
|
316
|
+
sudo chmod -R 755 ~/emhass/scripts/publish_data.sh
|
|
317
|
+
sudo chmod +x ~/emhass/scripts/dayahead_optim.sh
|
|
318
|
+
sudo chmod +x ~/emhass/scripts/publish_data.sh
|
|
281
319
|
```
|
|
282
320
|
### Common for any installation method
|
|
283
321
|
|
|
@@ -298,9 +336,9 @@ In `automations.yaml`:
|
|
|
298
336
|
action:
|
|
299
337
|
- service: shell_command.publish_data
|
|
300
338
|
```
|
|
301
|
-
In these
|
|
339
|
+
In these automations the day-ahead optimization is performed once a day, every day at 5:30am, and the data *(output of automation)* is published every 5 minutes.
|
|
302
340
|
|
|
303
|
-
#### Option 2, EMHASS
|
|
341
|
+
#### Option 2, EMHASS automated publish
|
|
304
342
|
|
|
305
343
|
In `automations.yaml`:
|
|
306
344
|
```yaml
|
|
@@ -312,20 +350,20 @@ In `automations.yaml`:
|
|
|
312
350
|
- service: shell_command.dayahead_optim
|
|
313
351
|
- service: shell_command.publish_data
|
|
314
352
|
```
|
|
315
|
-
in configuration page/`
|
|
353
|
+
in configuration page/`config.json`
|
|
316
354
|
```json
|
|
317
|
-
|
|
318
|
-
|
|
355
|
+
'method_ts_round': "first"
|
|
356
|
+
'continual_publish': true
|
|
319
357
|
```
|
|
320
|
-
In this automation the day-ahead optimization is performed once a day,
|
|
321
|
-
If the `
|
|
358
|
+
In this automation, the day-ahead optimization is performed once a day, every day at 5:30am.
|
|
359
|
+
If the `optimization_time_step` parameter is set to `30` *(default)* in the configuration, the results of the day-ahead optimization will generate 48 values *(for each entity)*, a value for every 30 minutes in a day *(i.e. 24 hrs x 2)*.
|
|
322
360
|
|
|
323
|
-
Setting the parameter `continual_publish` to `true` in the configuration page
|
|
361
|
+
Setting the parameter `continual_publish` to `true` in the configuration page will allow EMHASS to store the optimization results as entities/sensors into separate json files. `continual_publish` will periodically (every `optimization_time_step` amount of minutes) run a publish, and publish the optimization results of each generated entities/sensors to Home Assistant. The current state of the sensor/entity being updated every time publish runs, selecting one of the 48 stored values, by comparing the stored values' timestamps, the current timestamp and [`'method_ts_round': "first"`](#the-publish-data-specificities) to select the optimal stored value for the current state.
|
|
324
362
|
|
|
325
|
-
option 1 and 2 are very similar, however option 2 (`continual_publish`) will require a
|
|
363
|
+
option 1 and 2 are very similar, however, option 2 (`continual_publish`) will require a CPU thread to constantly be run inside of EMHASS, lowering efficiency. The reason why you may pick one over the other is explained in more detail below in [continual_publish](#continual_publish-emhass-automation).
|
|
326
364
|
|
|
327
|
-
Lastly, we can link
|
|
328
|
-
For example, imagine that I want to control my water heater. I can use a published `deferrable` EMHASS entity to control my water
|
|
365
|
+
Lastly, we can link an EMHASS published entity/sensor's current state to a Home Assistant entity on/off switch, controlling a desired controllable load.
|
|
366
|
+
For example, imagine that I want to control my water heater. I can use a published `deferrable` EMHASS entity to control my water heater's desired behavior. In this case, we could use an automation like the below, to control the desired water heater on and off:
|
|
329
367
|
|
|
330
368
|
on:
|
|
331
369
|
```yaml
|
|
@@ -357,13 +395,13 @@ automation:
|
|
|
357
395
|
- service: homeassistant.turn_off
|
|
358
396
|
entity_id: switch.water_heater_switch
|
|
359
397
|
```
|
|
360
|
-
|
|
398
|
+
These automations will turn on and off the Home Assistant entity `switch.water_heater_switch` using the current state from the EMHASS entity `sensor.p_deferrable0`. `sensor.p_deferrable0` being the entity generated from the EMHASS day-ahead optimization and published by examples above. The `sensor.p_deferrable0` entity's current state is updated every 30 minutes (or `optimization_time_step` minutes) via an automated publish option 1 or 2. *(selecting one of the 48 stored data values)*
|
|
361
399
|
|
|
362
400
|
## The publish-data specificities
|
|
363
401
|
|
|
364
|
-
`publish-data` (which is either run manually
|
|
402
|
+
`publish-data` (which is either run manually or automatically via `continual_publish` or Home Assistant automation), will push the optimization results to Home Assistant for each deferrable load defined in the configuration. For example, if you have defined two deferrable loads, then the command will publish `sensor.p_deferrable0` and `sensor.p_deferrable1` to Home Assistant. When the `dayahead-optim` is launched, after the optimization, either entity json files or a csv file will be saved on disk. The `publish-data` command will load the latest csv/json files to look for the closest timestamp that matches the current time using the `datetime.now()` method in Python. This means that if EMHASS is configured for 30-minute time step optimizations, the csv/json will be saved with timestamps 00:00, 00:30, 01:00, 01:30, ... and so on. If the current time is 00:05, and parameter `method_ts_round` is set to `nearest` in the configuration, then the closest timestamp of the optimization results that will be published is 00:00. If the current time is 00:25, then the closest timestamp of the optimization results that will be published is 00:30.
|
|
365
403
|
|
|
366
|
-
The `publish-data` command will also publish PV and load forecast data on sensors `p_pv_forecast` and `p_load_forecast`. If using a battery, then the battery
|
|
404
|
+
The `publish-data` command will also publish PV and load forecast data on sensors `p_pv_forecast` and `p_load_forecast`. If using a battery, then the battery-optimized power and the SOC will be published on sensors `p_batt_forecast` and `soc_batt_forecast`. On these sensors, the future values are passed as nested attributes.
|
|
367
405
|
|
|
368
406
|
If you run publish manually *(or via a Home Assistant Automation)*, it is possible to provide custom sensor names for all the data exported by the `publish-data` command. For this, when using the `publish-data` endpoint we can just add some runtime parameters as dictionaries like this:
|
|
369
407
|
```yaml
|
|
@@ -378,7 +416,7 @@ If you provide the `custom_deferrable_forecast_id` then the passed data should b
|
|
|
378
416
|
shell_command:
|
|
379
417
|
publish_data: "curl -i -H \"Content-Type:application/json\" -X POST -d '{\"custom_deferrable_forecast_id\": [{\"entity_id\": \"sensor.p_deferrable0\",\"unit_of_measurement\": \"W\", \"friendly_name\": \"Deferrable Load 0\"},{\"entity_id\": \"sensor.p_deferrable1\",\"unit_of_measurement\": \"W\", \"friendly_name\": \"Deferrable Load 1\"}]}' http://localhost:5000/action/publish-data"
|
|
380
418
|
```
|
|
381
|
-
|
|
419
|
+
You should be careful that the list of dictionaries has the correct length, which is the number of defined deferrable loads.
|
|
382
420
|
|
|
383
421
|
### Computed variables and published data
|
|
384
422
|
|
|
@@ -388,8 +426,8 @@ Below you can find a list of the variables resulting from EMHASS computation, sh
|
|
|
388
426
|
| --------------- | ---------- | --------------------------------|
|
|
389
427
|
| P_PV | Forecasted power generation from your solar panels (Watts). This helps you predict how much solar energy you will produce during the forecast period. | sensor.p_pv_forecast |
|
|
390
428
|
| P_Load | Forecasted household power consumption (Watts). This gives you an idea of how much energy your appliances are expected to use. | sensor.p_load_forecast |
|
|
391
|
-
| P_deferrableX<br/>[X = 0, 1, 2, ...] | Forecasted power consumption of deferrable loads (Watts). Deferable loads are appliances that can be managed by EMHASS. EMHASS helps you
|
|
392
|
-
| P_grid_pos | Forecasted power imported from the grid (Watts). This indicates the amount of energy you are expected to draw from the grid when your solar production is insufficient to meet your needs or it is
|
|
429
|
+
| P_deferrableX<br/>[X = 0, 1, 2, ...] | Forecasted power consumption of deferrable loads (Watts). Deferable loads are appliances that can be managed by EMHASS. EMHASS helps you optimize energy usage by prioritizing solar self-consumption and minimizing reliance on the grid or by taking advantage or supply and feed-in tariff volatility. You can have multiple deferable loads and you use this sensor in HA to control these loads via smart switch or other IoT means at your disposal. | sensor.p_deferrableX |
|
|
430
|
+
| P_grid_pos | Forecasted power imported from the grid (Watts). This indicates the amount of energy you are expected to draw from the grid when your solar production is insufficient to meet your needs or it is advantageous to consume from the grid. | - |
|
|
393
431
|
| P_grid_neg | Forecasted power exported to the grid (Watts). This indicates the amount of excess solar energy you are expected to send back to the grid during the forecast period. | - |
|
|
394
432
|
| P_batt | Forecasted (dis)charge power load (Watts) for the battery (if installed). If negative it indicates the battery is charging, if positive that the battery is discharging. | sensor.p_batt_forecast |
|
|
395
433
|
| P_grid | Forecasted net power flow between your home and the grid (Watts). This is calculated as P_grid_pos - P_grid_neg. A positive value indicates net export, while a negative value indicates net import. | sensor.p_grid_forecast |
|
|
@@ -403,61 +441,61 @@ Below you can find a list of the variables resulting from EMHASS computation, sh
|
|
|
403
441
|
|
|
404
442
|
## Passing your own data
|
|
405
443
|
|
|
406
|
-
In EMHASS we have
|
|
444
|
+
In EMHASS we have 4 forecasts to deal with:
|
|
407
445
|
|
|
408
446
|
- PV power production forecast (internally based on the weather forecast and the characteristics of your PV plant). This is given in Watts.
|
|
409
447
|
|
|
410
|
-
- Load power forecast: how much power your house will demand
|
|
448
|
+
- Load power forecast: how much power your house will demand in the next 24 hours. This is given in Watts.
|
|
411
449
|
|
|
412
|
-
- Load cost forecast: the price of the energy from the grid
|
|
450
|
+
- Load cost forecast: the price of the energy from the grid in the next 24 hours. This is given in EUR/kWh.
|
|
413
451
|
|
|
414
|
-
- PV production selling price forecast: at what price are you selling your excess PV production
|
|
452
|
+
- PV production selling price forecast: at what price are you selling your excess PV production in the next 24 hours. This is given in EUR/kWh.
|
|
415
453
|
|
|
416
|
-
The sensor containing the load data should be specified in parameter `
|
|
454
|
+
The sensor containing the load data should be specified in the parameter `sensor_power_load_no_var_loads` in the configuration file. As we want to optimize household energy, we need to forecast the load power consumption. The default method for this is a naive approach using 1-day persistence. The load data variable should not contain the data from the deferrable loads themselves. For example, let's say that you set your deferrable load to be the washing machine. The variables that you should enter in EMHASS will be: `sensor_power_load_no_var_loads: 'sensor.power_load_no_var_loads'` and `sensor.power_load_no_var_loads = sensor.power_load - sensor.power_washing_machine`. This is supposing that the overall load of your house is contained in the variable: `sensor.power_load`. The sensor `sensor.power_load_no_var_loads` can be easily created with a new template sensor in Home Assistant.
|
|
417
455
|
|
|
418
|
-
If you are implementing
|
|
456
|
+
If you are implementing an MPC controller, then you should also need to provide some data at the optimization runtime using the key `runtimeparams`.
|
|
419
457
|
|
|
420
|
-
The valid values to pass for both forecast data and MPC
|
|
458
|
+
The valid values to pass for both forecast data and MPC-related data are explained below.
|
|
421
459
|
|
|
422
460
|
### Alternative publish methods
|
|
423
|
-
Due to the flexibility of EMHASS, multiple different approaches to publishing the optimization results have been created. Select
|
|
461
|
+
Due to the flexibility of EMHASS, multiple different approaches to publishing the optimization results have been created. Select an option that best meets your use case:
|
|
424
462
|
|
|
425
463
|
#### publish last optimization *(manual)*
|
|
426
|
-
By default, running an optimization in EMHASS will output the results into the
|
|
464
|
+
By default, running an optimization in EMHASS will output the results into the CSV file: `data_path/opt_res_latest.csv` *(overriding the existing data on that file)*. We run the publish command to publish the last optimization saved in the `opt_res_latest.csv`:
|
|
427
465
|
```bash
|
|
428
466
|
# RUN dayahead
|
|
429
467
|
curl -i -H 'Content-Type:application/json' -X POST -d {} http://localhost:5000/action/dayahead-optim
|
|
430
468
|
# Then publish teh results of dayahead
|
|
431
469
|
curl -i -H 'Content-Type:application/json' -X POST -d {} http://localhost:5000/action/publish-data
|
|
432
470
|
```
|
|
433
|
-
*Note, the published entities from the publish-data action will not automatically update the entities current state (current state being used to check when to turn on and off appliances via Home Assistant
|
|
471
|
+
*Note, the published entities from the publish-data action will not automatically update the entities' current state (current state being used to check when to turn on and off appliances via Home Assistant automations). To update the EMHASS entities state, another publish would have to be re-run later when the current time matches the next value's timestamp (e.g. every 30 minutes). See examples below for methods to automate the publish-action.*
|
|
434
472
|
|
|
435
473
|
#### continual_publish *(EMHASS Automation)*
|
|
436
|
-
As discussed in [Common for any installation method - option 2](#option-2-emhass-automate-publish), setting `continual_publish` to `true` in the configuration saves the output of the optimization into the `data_path/entities` folder *(a .json file for each sensor/entity)*. A constant loop (in `
|
|
474
|
+
As discussed in [Common for any installation method - option 2](#option-2-emhass-automate-publish), setting `continual_publish` to `true` in the configuration saves the output of the optimization into the `data_path/entities` folder *(a .json file for each sensor/entity)*. A constant loop (in `optimization_time_step` minutes) will run, observe the .json files in that folder, and publish the saved files periodically (updating the current state of the entity by comparing date.now with the saved data value timestamps).
|
|
437
475
|
|
|
438
|
-
For users that wish to run multiple different optimizations, you can set the runtime parameter: `publish_prefix` to something like: `"mpc_"` or `"dh_"`. This will generate unique entity_id names per optimization and save these unique entities as separate files in the folder. All the entity files will then be updated when the next loop iteration runs. If a different `
|
|
476
|
+
For users that wish to run multiple different optimizations, you can set the runtime parameter: `publish_prefix` to something like: `"mpc_"` or `"dh_"`. This will generate unique entity_id names per optimization and save these unique entities as separate files in the folder. All the entity files will then be updated when the next loop iteration runs. If a different `optimization_time_step` integer was passed as a runtime parameter in an optimization, the `continual_publish` loop will be based on the lowest `optimization_time_step` saved. An example:
|
|
439
477
|
|
|
440
478
|
```bash
|
|
441
|
-
# RUN dayahead, with
|
|
479
|
+
# RUN dayahead, with optimization_time_step=30 (default), prefix=dh_
|
|
442
480
|
curl -i -H 'Content-Type:application/json' -X POST -d '{"publish_prefix":"dh_"}' http://localhost:5000/action/dayahead-optim
|
|
443
|
-
# RUN MPC, with
|
|
444
|
-
curl -i -H 'Content-Type:application/json' -X POST -d '{
|
|
481
|
+
# RUN MPC, with optimization_time_step=5, prefix=mpc_
|
|
482
|
+
curl -i -H 'Content-Type:application/json' -X POST -d '{'optimization_time_step':5,"publish_prefix":"mpc_"}' http://localhost:5000/action/naive-mpc-optim
|
|
445
483
|
```
|
|
446
|
-
This will tell continual_publish to loop every 5 minutes based on the
|
|
484
|
+
This will tell continual_publish to loop every 5 minutes based on the optimization_time_step passed in MPC. All entities from the output of dayahead "dh_" and MPC "mpc_" will be published every 5 minutes.
|
|
447
485
|
|
|
448
486
|
</br>
|
|
449
487
|
|
|
450
|
-
*It is recommended to use the 2 other options
|
|
488
|
+
*It is recommended to use the 2 other options below once you have a more advanced understanding of EMHASS and/or Home Assistant.*
|
|
451
489
|
|
|
452
490
|
#### Mixture of continual_publish and manual *(Home Assistant Automation for Publish)*
|
|
453
491
|
|
|
454
|
-
You can choose to save one optimization for continual_publish and bypass another optimization by setting `
|
|
492
|
+
You can choose to save one optimization for continual_publish and bypass another optimization by setting `'continual_publish':false` runtime parameter:
|
|
455
493
|
```bash
|
|
456
|
-
# RUN dayahead, with
|
|
494
|
+
# RUN dayahead, with optimization_time_step=30 (default), prefix=dh_, included into continual_publish
|
|
457
495
|
curl -i -H 'Content-Type:application/json' -X POST -d '{"publish_prefix":"dh_"}' http://localhost:5000/action/dayahead-optim
|
|
458
496
|
|
|
459
|
-
# RUN MPC, with
|
|
460
|
-
curl -i -H 'Content-Type:application/json' -X POST -d '{
|
|
497
|
+
# RUN MPC, with optimization_time_step=5, prefix=mpc_, Manually publish, excluded from continual_publish loop
|
|
498
|
+
curl -i -H 'Content-Type:application/json' -X POST -d '{'continual_publish':false,'optimization_time_step':5,"publish_prefix":"mpc_"}' http://localhost:5000/action/naive-mpc-optim
|
|
461
499
|
# Publish MPC output
|
|
462
500
|
curl -i -H 'Content-Type:application/json' -X POST -d {} http://localhost:5000/action/publish-data
|
|
463
501
|
```
|
|
@@ -465,18 +503,18 @@ This example saves the dayahead optimization into `data_path/entities` as .json
|
|
|
465
503
|
|
|
466
504
|
#### Manual *(Home Assistant Automation for Publish)*
|
|
467
505
|
|
|
468
|
-
For users who wish to have full control of exactly when they
|
|
506
|
+
For users who wish to have full control of exactly when they would like to run a publish and have the ability to save multiple different optimizations. The `entity_save` runtime parameter has been created to save the optimization output entities to .json files whilst `continual_publish` is set to `false` in the configuration. Allowing the user to reference the saved .json files manually via a publish:
|
|
469
507
|
|
|
470
|
-
in configuration page/`
|
|
508
|
+
in configuration page/`config.json` :
|
|
471
509
|
```json
|
|
472
|
-
|
|
510
|
+
'continual_publish': false
|
|
473
511
|
```
|
|
474
512
|
POST action :
|
|
475
513
|
```bash
|
|
476
|
-
# RUN dayahead, with
|
|
514
|
+
# RUN dayahead, with optimization_time_step=30 (default), prefix=dh_, save entity
|
|
477
515
|
curl -i -H 'Content-Type:application/json' -X POST -d '{"entity_save": true, "publish_prefix":"dh_"}' http://localhost:5000/action/dayahead-optim
|
|
478
|
-
# RUN MPC, with
|
|
479
|
-
curl -i -H 'Content-Type:application/json' -X POST -d '{"entity_save": true",
|
|
516
|
+
# RUN MPC, with optimization_time_step=5, prefix=mpc_, save entity
|
|
517
|
+
curl -i -H 'Content-Type:application/json' -X POST -d '{"entity_save": true", 'optimization_time_step':5,"publish_prefix":"mpc_"}' http://localhost:5000/action/naive-mpc-optim
|
|
480
518
|
```
|
|
481
519
|
You can then reference these .json saved entities via their `publish_prefix`. Include the same `publish_prefix` in the `publish_data` action:
|
|
482
520
|
```bash
|
|
@@ -494,15 +532,15 @@ This action will publish the dayahead (_dh) and MPC (_mpc) optimization results
|
|
|
494
532
|
|
|
495
533
|
### Forecast data at runtime
|
|
496
534
|
|
|
497
|
-
It is possible to provide EMHASS with your own forecast data. For this just add the data as list of values to a data dictionary during the call to `emhass` using the `runtimeparams` option.
|
|
535
|
+
It is possible to provide EMHASS with your own forecast data. For this just add the data as a list of values to a data dictionary during the call to `emhass` using the `runtimeparams` option.
|
|
498
536
|
|
|
499
|
-
For example if using the add-on or the standalone docker installation you can pass this data as list of values to the data dictionary during the `curl` POST:
|
|
537
|
+
For example, if using the add-on or the standalone docker installation you can pass this data as a list of values to the data dictionary during the `curl` POST:
|
|
500
538
|
```bash
|
|
501
539
|
curl -i -H 'Content-Type:application/json' -X POST -d '{"pv_power_forecast":[0, 0, 0, 0, 0, 0, 0, 0, 0, 0, 0, 0, 0, 0, 0, 0, 70, 141.22, 246.18, 513.5, 753.27, 1049.89, 1797.93, 1697.3, 3078.93, 1164.33, 1046.68, 1559.1, 2091.26, 1556.76, 1166.73, 1516.63, 1391.13, 1720.13, 820.75, 804.41, 251.63, 79.25, 0, 0, 0, 0, 0, 0, 0, 0, 0, 0]}' http://localhost:5000/action/dayahead-optim
|
|
502
540
|
```
|
|
503
541
|
Or if using the legacy method using a Python virtual environment:
|
|
504
542
|
```bash
|
|
505
|
-
emhass --action 'dayahead-optim' --config
|
|
543
|
+
emhass --action 'dayahead-optim' --config ~/emhass/config.json --runtimeparams '{"pv_power_forecast":[0, 0, 0, 0, 0, 0, 0, 0, 0, 0, 0, 0, 0, 0, 0, 0, 70, 141.22, 246.18, 513.5, 753.27, 1049.89, 1797.93, 1697.3, 3078.93, 1164.33, 1046.68, 1559.1, 2091.26, 1556.76, 1166.73, 1516.63, 1391.13, 1720.13, 820.75, 804.41, 251.63, 79.25, 0, 0, 0, 0, 0, 0, 0, 0, 0, 0]}'
|
|
506
544
|
```
|
|
507
545
|
|
|
508
546
|
The possible dictionary keys to pass data are:
|
|
@@ -517,25 +555,25 @@ The possible dictionary keys to pass data are:
|
|
|
517
555
|
|
|
518
556
|
### Passing other data at runtime
|
|
519
557
|
|
|
520
|
-
It is possible to also pass other data during runtime
|
|
558
|
+
It is possible to also pass other data during runtime to automate energy management. For example, it could be useful to dynamically update the total number of hours for each deferrable load (`operating_hours_of_each_deferrable_load`) using for instance a correlation with the outdoor temperature (useful for water heater for example).
|
|
521
559
|
|
|
522
560
|
Here is the list of the other additional dictionary keys that can be passed at runtime:
|
|
523
561
|
|
|
524
|
-
- `
|
|
562
|
+
- `number_of_deferrable_loads` for the number of deferrable loads to consider.
|
|
525
563
|
|
|
526
|
-
- `
|
|
564
|
+
- `nominal_power_of_deferrable_loads` for the nominal power for each deferrable load in Watts.
|
|
527
565
|
|
|
528
|
-
- `
|
|
566
|
+
- `operating_hours_of_each_deferrable_load` for the total number of hours that each deferrable load should operate.
|
|
529
567
|
|
|
530
|
-
- `
|
|
568
|
+
- `start_timesteps_of_each_deferrable_load` for the timestep from which each deferrable load is allowed to operate (if you don't want the deferrable load to use the whole optimization timewindow).
|
|
531
569
|
|
|
532
|
-
- `
|
|
570
|
+
- `end_timesteps_of_each_deferrable_load` for the timestep before which each deferrable load should operate (if you don't want the deferrable load to use the whole optimization timewindow).
|
|
533
571
|
|
|
534
572
|
- `def_current_state` Pass this as a list of booleans (True/False) to indicate the current deferrable load state. This is used internally to avoid incorrectly penalizing a deferrable load start if a forecast is run when that load is already running.
|
|
535
573
|
|
|
536
|
-
- `
|
|
574
|
+
- `treat_deferrable_load_as_semi_cont` to define if we should treat each deferrable load as a semi-continuous variable.
|
|
537
575
|
|
|
538
|
-
- `
|
|
576
|
+
- `set_deferrable_load_single_constant` to define if we should set each deferrable load as a constant fixed value variable with just one startup for each optimization task.
|
|
539
577
|
|
|
540
578
|
- `solcast_api_key` for the SolCast API key if you want to use this service for PV power production forecast.
|
|
541
579
|
|
|
@@ -543,23 +581,23 @@ Here is the list of the other additional dictionary keys that can be passed at r
|
|
|
543
581
|
|
|
544
582
|
- `solar_forecast_kwp` for the PV peak installed power in kW used for the solar.forecast API call.
|
|
545
583
|
|
|
546
|
-
- `
|
|
584
|
+
- `battery_minimum_state_of_charge` the minimum possible SOC.
|
|
547
585
|
|
|
548
|
-
- `
|
|
586
|
+
- `battery_maximum_state_of_charge` the maximum possible SOC.
|
|
549
587
|
|
|
550
|
-
- `
|
|
588
|
+
- `battery_target_state_of_charge` for the desired target value of the initial and final SOC.
|
|
551
589
|
|
|
552
|
-
- `
|
|
590
|
+
- `battery_discharge_power_max` for the maximum battery discharge power.
|
|
553
591
|
|
|
554
|
-
- `
|
|
592
|
+
- `battery_charge_power_max` for the maximum battery charge power.
|
|
555
593
|
|
|
556
|
-
- `publish_prefix` use this key to pass a common prefix to all published data. This will add a prefix to the sensor name but also
|
|
594
|
+
- `publish_prefix` use this key to pass a common prefix to all published data. This will add a prefix to the sensor name but also the forecast attribute keys within the sensor.
|
|
557
595
|
|
|
558
596
|
## A naive Model Predictive Controller
|
|
559
597
|
|
|
560
|
-
|
|
598
|
+
An MPC controller was introduced in v0.3.0. This is an informal/naive representation of an MPC controller. This can be used in combination with/as a replacement for the Dayahead Optimization.
|
|
561
599
|
|
|
562
|
-
|
|
600
|
+
An MPC controller performs the following actions:
|
|
563
601
|
|
|
564
602
|
- Set the prediction horizon and receding horizon parameters.
|
|
565
603
|
- Perform an optimization on the prediction horizon.
|
|
@@ -570,26 +608,26 @@ This is the receding horizon principle.
|
|
|
570
608
|
|
|
571
609
|
When applying this controller, the following `runtimeparams` should be defined:
|
|
572
610
|
|
|
573
|
-
- `prediction_horizon` for the MPC prediction horizon. Fix this at
|
|
611
|
+
- `prediction_horizon` for the MPC prediction horizon. Fix this at least 5 times the optimization time step.
|
|
574
612
|
|
|
575
613
|
- `soc_init` for the initial value of the battery SOC for the current iteration of the MPC.
|
|
576
614
|
|
|
577
615
|
- `soc_final` for the final value of the battery SOC for the current iteration of the MPC.
|
|
578
616
|
|
|
579
|
-
- `
|
|
617
|
+
- `operating_hours_of_each_deferrable_load` for the list of deferrable loads functioning hours. These values can decrease as the day advances to take into account receding horizon daily energy objectives for each deferrable load.
|
|
580
618
|
|
|
581
|
-
- `
|
|
619
|
+
- `start_timesteps_of_each_deferrable_load` for the timestep from which each deferrable load is allowed to operate (if you don't want the deferrable load to use the whole optimization timewindow). If you specify a value of 0 (or negative), the deferrable load will be optimized as from the beginning of the complete prediction horizon window.
|
|
582
620
|
|
|
583
|
-
- `
|
|
621
|
+
- `end_timesteps_of_each_deferrable_load` for the timestep before which each deferrable load should operate (if you don't want the deferrable load to use the whole optimization timewindow). If you specify a value of 0 (or negative), the deferrable load optimization window will extend up to the end of the prediction horizon window.
|
|
584
622
|
|
|
585
|
-
A correct call for
|
|
623
|
+
A correct call for an MPC optimization should look like this:
|
|
586
624
|
|
|
587
625
|
```bash
|
|
588
626
|
curl -i -H 'Content-Type:application/json' -X POST -d '{"pv_power_forecast":[0, 70, 141.22, 246.18, 513.5, 753.27, 1049.89, 1797.93, 1697.3, 3078.93], "prediction_horizon":10, "soc_init":0.5,"soc_final":0.6}' http://192.168.3.159:5000/action/naive-mpc-optim
|
|
589
627
|
```
|
|
590
|
-
*Example with :`
|
|
628
|
+
*Example with :`operating_hours_of_each_deferrable_load`, `start_timesteps_of_each_deferrable_load`, `end_timesteps_of_each_deferrable_load`.*
|
|
591
629
|
```bash
|
|
592
|
-
curl -i -H 'Content-Type:application/json' -X POST -d '{"pv_power_forecast":[0, 70, 141.22, 246.18, 513.5, 753.27, 1049.89, 1797.93, 1697.3, 3078.93], "prediction_horizon":10, "soc_init":0.5,"soc_final":0.6,
|
|
630
|
+
curl -i -H 'Content-Type:application/json' -X POST -d '{"pv_power_forecast":[0, 70, 141.22, 246.18, 513.5, 753.27, 1049.89, 1797.93, 1697.3, 3078.93], "prediction_horizon":10, "soc_init":0.5,"soc_final":0.6,'operating_hours_of_each_deferrable_load':[1,3],'start_timesteps_of_each_deferrable_load':[0,3],'end_timesteps_of_each_deferrable_load':[0,6]}' http://localhost:5000/action/naive-mpc-optim
|
|
593
631
|
```
|
|
594
632
|
|
|
595
633
|
## A machine learning forecaster
|
|
@@ -600,11 +638,11 @@ Check the dedicated section in the documentation here: [https://emhass.readthedo
|
|
|
600
638
|
|
|
601
639
|
## Development
|
|
602
640
|
|
|
603
|
-
Pull
|
|
641
|
+
Pull requests are very much accepted on this project. For development, you can find some instructions here [Development](https://emhass.readthedocs.io/en/latest/develop.html).
|
|
604
642
|
|
|
605
643
|
## Troubleshooting
|
|
606
644
|
|
|
607
|
-
Some problems may arise from solver
|
|
645
|
+
Some problems may arise from solver-related issues in the Pulp package. It was found that for arm64 architectures (ie. Raspberry Pi4, 64 bits) the default solver is not available. A workaround is to use another solver. The `glpk` solver is an option.
|
|
608
646
|
|
|
609
647
|
This can be controlled in the configuration file with parameters `lp_solver` and `lp_solver_path`. The options for `lp_solver` are: 'PULP_CBC_CMD', 'GLPK_CMD' and 'COIN_CMD'. If using 'COIN_CMD' as the solver you will need to provide the correct path to this solver in parameter `lp_solver_path`, ex: '/usr/bin/cbc'.
|
|
610
648
|
|