zapier-platform-cli 12.0.0 → 12.0.3
This diff represents the content of publicly available package versions that have been released to one of the supported registries. The information contained in this diff is provided for informational purposes only and reflects changes between package versions as they appear in their respective public registries.
- package/README-source.md +2017 -0
- package/README.md +101 -91
- package/oclif.manifest.json +1 -1
- package/package.json +1 -1
- package/src/oclif/commands/team/add.js +26 -13
- package/src/oclif/commands/team/get.js +17 -21
- package/src/oclif/commands/team/remove.js +23 -26
- package/src/utils/team.js +33 -0
package/README-source.md
ADDED
|
@@ -0,0 +1,2017 @@
|
|
|
1
|
+
<h1 align="center">
|
|
2
|
+
<a href="https://zapier.com"><img src="https://raw.githubusercontent.com/zapier/zapier-platform/master/packages/cli/goodies/zapier-logomark.png" alt="Zapier" width="200"></a>
|
|
3
|
+
<br>
|
|
4
|
+
Zapier Platform CLI
|
|
5
|
+
<br>
|
|
6
|
+
<br>
|
|
7
|
+
</h1>
|
|
8
|
+
|
|
9
|
+
<p align="center">
|
|
10
|
+
<a href="https://www.npmjs.com/package/zapier-platform-cli"><img src="https://img.shields.io/npm/v/zapier-platform-cli.svg" alt="npm version"></a>
|
|
11
|
+
</p>
|
|
12
|
+
|
|
13
|
+
Zapier is a platform for creating integrations and workflows. This CLI is your gateway to creating custom applications on the Zapier platform.
|
|
14
|
+
|
|
15
|
+
You may find docs duplicate or outdated across the Zapier site. The most up-to-date contents are always available on GitHub:
|
|
16
|
+
|
|
17
|
+
- [Latest CLI Docs](https://github.com/zapier/zapier-platform/blob/master/packages/cli/README.md)
|
|
18
|
+
- [Latest CLI Reference](https://github.com/zapier/zapier-platform/blob/master/packages/cli/docs/cli.md)
|
|
19
|
+
- [Latest Schema Docs](https://github.com/zapier/zapier-platform/blob/master/packages/schema/docs/build/schema.md)
|
|
20
|
+
|
|
21
|
+
Our code is updated frequently. To see a full list of changes, look no further than [the CHANGELOG](https://github.com/zapier/zapier-platform/blob/master/CHANGELOG.md).
|
|
22
|
+
|
|
23
|
+
This doc describes the latest CLI version (**PACKAGE_VERSION**), as of this writing. If you're using an older version of the CLI, you may want to check out these historical releases:
|
|
24
|
+
|
|
25
|
+
- CLI Docs: [10.2.0](https://github.com/zapier/zapier-platform/blob/zapier-platform-cli@10.2.0/packages/cli/README.md), [9.6.0](https://github.com/zapier/zapier-platform/blob/zapier-platform-cli@9.6.0/packages/cli/README.md), [8.4.2](https://github.com/zapier/zapier-platform/blob/zapier-platform-cli@8.4.2/packages/cli/README.md)
|
|
26
|
+
- CLI Reference: [10.2.0](https://github.com/zapier/zapier-platform/blob/zapier-platform-cli@10.2.0/packages/cli/docs/cli.md), [9.6.0](https://github.com/zapier/zapier-platform/blob/zapier-platform-cli@9.6.0/packages/cli/docs/cli.md), [8.4.2](https://github.com/zapier/zapier-platform/blob/zapier-platform-cli@8.4.2/packages/cli/docs/cli.md)
|
|
27
|
+
- Schema Docs: [10.2.0](https://github.com/zapier/zapier-platform/blob/zapier-platform-schema@10.2.0/packages/schema/docs/build/schema.md), [9.6.0](https://github.com/zapier/zapier-platform/blob/zapier-platform-schema@9.6.0/packages/schema/docs/build/schema.md), [8.4.2](https://github.com/zapier/zapier-platform/blob/zapier-platform-schema@8.4.2/packages/schema/docs/build/schema.md)
|
|
28
|
+
|
|
29
|
+
## Table of Contents
|
|
30
|
+
|
|
31
|
+
<!-- toc -->
|
|
32
|
+
<!-- tocstop -->
|
|
33
|
+
|
|
34
|
+
|
|
35
|
+
## Getting Started
|
|
36
|
+
|
|
37
|
+
> If you're new to Zapier Platform CLI, we strongly recommend you to walk through the [Tutorial](https://zapier.com/developer/start) for a more thorough introduction.
|
|
38
|
+
|
|
39
|
+
### What is an App?
|
|
40
|
+
|
|
41
|
+
> Note: this document uses "app" while modern Zapier nomenclature refers instead to "integrations". In both cases, the phrase refers to your code that connects your API with Zapier.
|
|
42
|
+
|
|
43
|
+
A CLI App is an implementation of your app's API. You build a Node.js application
|
|
44
|
+
that exports a single object ([JSON Schema](https://github.com/zapier/zapier-platform/blob/master/packages/schema/docs/build/schema.md#appschema)) and upload it to Zapier.
|
|
45
|
+
Zapier introspects that definition to find out what your app is capable of and
|
|
46
|
+
what options to present end users in the Zap Editor.
|
|
47
|
+
|
|
48
|
+
For those not familiar with Zapier terminology, here is how concepts in the CLI map to the end user experience:
|
|
49
|
+
|
|
50
|
+
* [Authentication](#authentication), (usually) which lets us know what credentials to ask users
|
|
51
|
+
for. This is used during the "Connect Accounts" section of the Zap Editor.
|
|
52
|
+
* [Triggers](#triggerssearchescreates), which read data *from* your API. These have their own section in the Zap Editor.
|
|
53
|
+
* [Creates](#triggerssearchescreates), which send data *to* your API to create new records. These are listed under "Actions" in the Zap Editor.
|
|
54
|
+
* [Searches](#triggerssearchescreates), which find specific records *in* your system. These are also listed under "Actions" in the Zap Editor.
|
|
55
|
+
* [Resources](#resources), which define an object type in your API (say a contact) and the operations available to perform on it. These are automatically extracted into Triggers, Searches, and Creates.
|
|
56
|
+
|
|
57
|
+
### How does Zapier Platform CLI Work?
|
|
58
|
+
|
|
59
|
+
Zapier takes the App you upload and sends it over to Amazon Web Service's Lambda. We then make calls to execute the operations your App defines as we execute Zaps. Your App takes the input data we provide (if any), makes the necessary HTTP calls, and returns the relevant data, which gets fed back into Zapier.
|
|
60
|
+
|
|
61
|
+
### Zapier Platform CLI vs UI
|
|
62
|
+
|
|
63
|
+
The Zapier Platform includes two ways to build integrations: a CLI (to build integrations in your local development environment and deploy them from the command line), and a Visual Builder (to create integrations with a visual builder from your browser). Both use the same underlying platform, so pick the one that fits your team's needs best. The main difference is how you make changes to your code.
|
|
64
|
+
|
|
65
|
+
Zapier Platform CLI is designed to be used by development teams who collaborate with version control and CI, and can be used to build more advanced integrations with custom coding for every part of your API calls and response parsing.
|
|
66
|
+
|
|
67
|
+
[Zapier Platform UI](https://zapier.com/app/developer/) is designed to quickly spin up new integrations, and collaborate on them with teams that include non-developers. It's the quickest way to start using the Zapier platform—and you can manage your CLI apps' core details from its online UI as well. You can also [export](https://platform.zapier.com/docs/export) Zapier Platform UI integrations to CLI to start development in your browser, then finish out the core features in your local development environment.
|
|
68
|
+
|
|
69
|
+
> Learn more in our [Zapier Platform UI vs CLI](https://platform.zapier.com/docs/vs) post.
|
|
70
|
+
|
|
71
|
+
### Requirements
|
|
72
|
+
|
|
73
|
+
All Zapier CLI apps are run using Node.js `LAMBDA_VERSION`.
|
|
74
|
+
|
|
75
|
+
You can develop using any version of Node you'd like, but your eventual code must be compatible with `LAMBDA_VERSION`. If you're using features not yet available in `LAMBDA_VERSION`, you can transpile your code to a compatible format with [Babel](https://babeljs.io/) (or similar).
|
|
76
|
+
|
|
77
|
+
To ensure stability for our users, we strongly encourage you run tests on `LAMBDA_VERSION` sometime before your code reaches users. This can be done multiple ways.
|
|
78
|
+
|
|
79
|
+
Firstly, by using a CI tool (like [Travis CI](https://travis-ci.org/) or [Circle CI](https://circleci.com/), which are free for open source projects). We provide a sample [.travis.yml](https://github.com/zapier/zapier-platform/blob/master/example-apps/trigger/.travis.yml) file in our template apps to get you started.
|
|
80
|
+
|
|
81
|
+
Alternatively, you can change your local node version with tools such as [nvm](https://github.com/nvm-sh/nvm#installation-and-update). Then you can either swap to that version with `nvm use LAMBDA_VERSION`, or do `nvm exec LAMBDA_VERSION zapier test` so you can run tests without having to switch versions while developing.
|
|
82
|
+
|
|
83
|
+
|
|
84
|
+
### Quick Setup Guide
|
|
85
|
+
|
|
86
|
+
First up is installing the CLI and setting up your auth to create a working "Zapier Example" application. It will be private to you and visible in your live [Zap Editor](https://zapier.com/app/editor).
|
|
87
|
+
|
|
88
|
+
```bash
|
|
89
|
+
# install the CLI globally
|
|
90
|
+
npm install -g zapier-platform-cli
|
|
91
|
+
|
|
92
|
+
# setup auth to Zapier's platform with a deploy key
|
|
93
|
+
zapier login
|
|
94
|
+
```
|
|
95
|
+
> Note: If you log into Zapier via the single sign-on (Google, Facebook, or Microsoft), you may not have a Zapier password. If that's the case, you'll need to generate a deploy key, go to [your Zapier developer accont here](https://zapier.com/developer/partner-settings/deploy-keys/) and create/copy a key, then run ```zapier login``` command with the --sso flag.
|
|
96
|
+
|
|
97
|
+
Your Zapier CLI should be installed and ready to go at this point. Next up, we'll create our first app!
|
|
98
|
+
|
|
99
|
+
```bash
|
|
100
|
+
# create a directory with the minimum required files
|
|
101
|
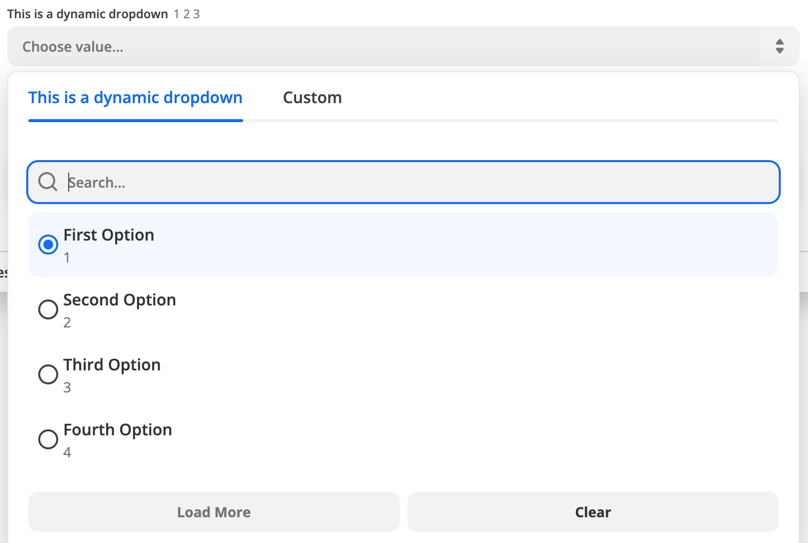
+
zapier init example-app
|
|
102
|
+
|
|
103
|
+
# move into the new directory
|
|
104
|
+
cd example-app
|
|
105
|
+
|
|
106
|
+
# install all the libraries needed for your app
|
|
107
|
+
npm install
|
|
108
|
+
```
|
|
109
|
+
|
|
110
|
+
> Note: When you run `zapier init`, you'll be presented with a list of templates to start with. Pick the one that matches a feature you'll need (such as "dynamic-dropdown" for an integration with [dynamic dropdown fields](#dynamic-dropdowns)), or select "minimal" for an integration with only the essentials. [View more example apps here](https://github.com/zapier/zapier-platform/tree/master/example-apps).
|
|
111
|
+
|
|
112
|
+
You should now have a working local app. You can run several local commands to try it out.
|
|
113
|
+
|
|
114
|
+
```bash
|
|
115
|
+
# run the local tests
|
|
116
|
+
# the same as npm test, but adds some extra things to the environment
|
|
117
|
+
zapier test
|
|
118
|
+
```
|
|
119
|
+
|
|
120
|
+
Next, you'll probably want to upload app to Zapier itself so you can start testing live.
|
|
121
|
+
|
|
122
|
+
```bash
|
|
123
|
+
# push your app to Zapier
|
|
124
|
+
zapier push
|
|
125
|
+
```
|
|
126
|
+
|
|
127
|
+
> Go check out our [full CLI reference documentation](https://zapier.github.io/zapier-platform/cli) to see all the other commands!
|
|
128
|
+
|
|
129
|
+
|
|
130
|
+
### Tutorial
|
|
131
|
+
|
|
132
|
+
For a full tutorial, head over to our [Tutorial](https://zapier.com/developer/start) for a comprehensive walkthrough for creating your first app. If this isn't your first rodeo, read on!
|
|
133
|
+
|
|
134
|
+
## Creating a Local App
|
|
135
|
+
|
|
136
|
+
> Tip: Check the [Quick Setup](#quick-setup-guide) if this is your first time using the platform!
|
|
137
|
+
|
|
138
|
+
Creating an App can be done entirely locally and they are fairly simple Node.js apps using the standard Node environment and should be completely testable. However, a local app stays local until you `zapier register`.
|
|
139
|
+
|
|
140
|
+
```bash
|
|
141
|
+
# make your folder
|
|
142
|
+
mkdir zapier-example
|
|
143
|
+
cd zapier-example
|
|
144
|
+
|
|
145
|
+
# create the needed files from a template
|
|
146
|
+
zapier init . --template minimal
|
|
147
|
+
|
|
148
|
+
# install all the libraries needed for your app
|
|
149
|
+
npm install
|
|
150
|
+
```
|
|
151
|
+
|
|
152
|
+
If you'd like to manage your **local App**, use these commands:
|
|
153
|
+
|
|
154
|
+
* `zapier init myapp` - initialize/start a local app project
|
|
155
|
+
* `zapier convert 1234 .` - initialize/start from an existing app
|
|
156
|
+
* `zapier scaffold resource Contact` - auto-injects a new resource, trigger, etc.
|
|
157
|
+
* `zapier test` - run the same tests as `npm test`
|
|
158
|
+
* `zapier validate` - ensure your app is valid
|
|
159
|
+
* `zapier describe` - print some helpful information about your app
|
|
160
|
+
|
|
161
|
+
### Local Project Structure
|
|
162
|
+
|
|
163
|
+
In your app's folder, you should see this general recommended structure. The `index.js` is Zapier's entry point to your app. Zapier expects you to export an `App` definition there.
|
|
164
|
+
|
|
165
|
+
```
|
|
166
|
+
$ tree .
|
|
167
|
+
.
|
|
168
|
+
├── README.md
|
|
169
|
+
├── index.js
|
|
170
|
+
├── package.json
|
|
171
|
+
├── triggers
|
|
172
|
+
│ └── contact-by-tag.js
|
|
173
|
+
├── resources
|
|
174
|
+
│ └── Contact.js
|
|
175
|
+
├── test
|
|
176
|
+
│ ├── basic.js
|
|
177
|
+
│ ├── triggers.js
|
|
178
|
+
│ └── resources.js
|
|
179
|
+
├── build
|
|
180
|
+
│ └── build.zip
|
|
181
|
+
└── node_modules
|
|
182
|
+
├── ...
|
|
183
|
+
└── ...
|
|
184
|
+
```
|
|
185
|
+
|
|
186
|
+
### Local App Definition
|
|
187
|
+
|
|
188
|
+
The core definition of your `App` will look something like this, and is what your `index.js` should provide as the _only_ export:
|
|
189
|
+
|
|
190
|
+
```js
|
|
191
|
+
[insert-file:./snippets/app-def.js]
|
|
192
|
+
```
|
|
193
|
+
|
|
194
|
+
> Tip: You can use higher order functions to create any part of your App definition!
|
|
195
|
+
|
|
196
|
+
|
|
197
|
+
## Registering an App
|
|
198
|
+
|
|
199
|
+
Registering your App with Zapier is a necessary first step which only enables basic administrative functions. It should happen before `zapier push` which is to used to actually expose an App Version in the Zapier interface and editor.
|
|
200
|
+
|
|
201
|
+
```bash
|
|
202
|
+
# register your app
|
|
203
|
+
zapier register "Zapier Example"
|
|
204
|
+
|
|
205
|
+
# list your apps
|
|
206
|
+
zapier integrations
|
|
207
|
+
```
|
|
208
|
+
|
|
209
|
+
> Note: This doesn't put your app in the editor - see the docs on pushing an App Version to do that!
|
|
210
|
+
|
|
211
|
+
If you'd like to manage your **App**, use these commands:
|
|
212
|
+
|
|
213
|
+
* `zapier integrations` - list the apps in Zapier you can administer
|
|
214
|
+
* `zapier register "App Title"` - creates a new app in Zapier
|
|
215
|
+
* `zapier link` - lists and links a selected app in Zapier to your current folder
|
|
216
|
+
* `zapier history` - print the history of your app
|
|
217
|
+
* `zapier team:add user@example.com admin` - add an admin to help maintain/develop your app
|
|
218
|
+
* `zapier users:add user@example.com 1.0.0` - invite a user try your app version 1.0.0
|
|
219
|
+
|
|
220
|
+
## Deploying an App Version
|
|
221
|
+
|
|
222
|
+
An App Version is related to a specific App but is an "immutable" implementation of your app. This makes it easy to run multiple versions for multiple users concurrently. The App Version is pulled from the version within the `package.json`. To create a new App Version, update the version number in that file. By default, **every App Version is private** but you can `zapier promote` it to production for use by over 1 million Zapier users.
|
|
223
|
+
|
|
224
|
+
```bash
|
|
225
|
+
# push your app version to Zapier
|
|
226
|
+
zapier push
|
|
227
|
+
|
|
228
|
+
# list your versions
|
|
229
|
+
zapier versions
|
|
230
|
+
```
|
|
231
|
+
|
|
232
|
+
If you'd like to manage your **Version**, use these commands:
|
|
233
|
+
|
|
234
|
+
* `zapier versions` - list the versions for the current directory's app
|
|
235
|
+
* `zapier push` - push the current version of current directory's app & version (read from `package.json`)
|
|
236
|
+
* `zapier promote 1.0.0` - mark a version as the "production" version
|
|
237
|
+
* `zapier migrate 1.0.0 1.0.1 [100%]` - move users between versions, regardless of deployment status
|
|
238
|
+
* `zapier deprecate 1.0.0 2020-06-01` - mark a version as deprecated, but let users continue to use it (we'll email them)
|
|
239
|
+
* `zapier env:set 1.0.0 KEY=VALUE` - set an environment variable to some value
|
|
240
|
+
* `zapier delete:version 1.0.0` - delete a version entirely. This is mostly for clearing out old test apps you used personally. It will fail if there are any users. You probably want `deprecate` instead.
|
|
241
|
+
|
|
242
|
+
> Note: To see the changes that were just pushed reflected in the browser, you have to manually refresh the browser each time you push.
|
|
243
|
+
|
|
244
|
+
|
|
245
|
+
### Private App Version (default)
|
|
246
|
+
|
|
247
|
+
A simple `zapier push` will only create the App Version in your editor. No one else using Zapier can see it or use it.
|
|
248
|
+
|
|
249
|
+
|
|
250
|
+
### Sharing an App Version
|
|
251
|
+
|
|
252
|
+
This is how you would share your app with friends, co-workers or clients. This is perfect for quality assurance, testing with active users or just sharing any app you like.
|
|
253
|
+
|
|
254
|
+
```bash
|
|
255
|
+
# sends an email this user to let them view the app version 1.0.0 in the UI privately
|
|
256
|
+
zapier users:add user@example.com 1.0.0
|
|
257
|
+
|
|
258
|
+
# sends an email this user to let them admin the app (make changes just like you)
|
|
259
|
+
zapier team:add user@example.com
|
|
260
|
+
```
|
|
261
|
+
|
|
262
|
+
You can also invite anyone on the internet to your app by using the links from `zapier users:links`. The link should look something like `https://zapier.com/platform/public-invite/1/222dcd03aed943a8676dc80e2427a40d/`. You can put this in your help docs, post it to Twitter, add it to your email campaign, etc. You can choose an invite link specific to an app version or for the entire app (i.e. all app versions).
|
|
263
|
+
|
|
264
|
+
### Promoting an App Version
|
|
265
|
+
|
|
266
|
+
Promotion is how you would share your app with every one of the 1 million+ Zapier users. If this is your first time promoting - you may have to wait for the Zapier team to review and approve your app.
|
|
267
|
+
|
|
268
|
+
If this isn't the first time you've promoted your app - you might have users on older versions. You can `zapier migrate` to either move users over (which can be dangerous if you have breaking changes). Or, you can `zapier deprecate` to give users some time to move over themselves.
|
|
269
|
+
|
|
270
|
+
```bash
|
|
271
|
+
# promote your app version to all Zapier users
|
|
272
|
+
zapier promote 1.0.1
|
|
273
|
+
|
|
274
|
+
# OPTIONAL - migrate your users between one app version to another
|
|
275
|
+
zapier migrate 1.0.0 1.0.1
|
|
276
|
+
|
|
277
|
+
# OR - mark the old version as deprecated
|
|
278
|
+
zapier deprecate 1.0.0 2020-06-01
|
|
279
|
+
```
|
|
280
|
+
|
|
281
|
+
## Converting an Existing App
|
|
282
|
+
|
|
283
|
+
If you have an existing Zapier [legacy Web Builder app](https://zapier.com/developer/builder/), you can use it as a template to kickstart your local application.
|
|
284
|
+
|
|
285
|
+
```bash
|
|
286
|
+
# Convert an existing Web Builder app to a CLI app in the my-app directory
|
|
287
|
+
# App ID 1234 is from URL https://zapier.com/developer/builder/app/1234/development
|
|
288
|
+
zapier convert 1234 my-app
|
|
289
|
+
```
|
|
290
|
+
|
|
291
|
+
Your CLI app will be created and you can continue working on it.
|
|
292
|
+
|
|
293
|
+
> Note: There is no way to convert a CLI app to a Web Builder app and we do not plan on implementing this.
|
|
294
|
+
|
|
295
|
+
Introduced in v8.2.0, you are able to convert new integrations built in Zapier Platform UI to CLI.
|
|
296
|
+
|
|
297
|
+
```bash
|
|
298
|
+
# the --version flag is what denotes this command is interacting with a Visual Builder app
|
|
299
|
+
# zapier convert <APP_ID> --version <APP_VERSION> <PATH>
|
|
300
|
+
zapier convert 1234 --version 1.0.1 my-app
|
|
301
|
+
```
|
|
302
|
+
|
|
303
|
+
## Authentication
|
|
304
|
+
|
|
305
|
+
Most applications require some sort of authentication. The Zapier platform provides core behaviors for several common authentication methods that might be used with your application, as well as the ability to customize authentication further.
|
|
306
|
+
|
|
307
|
+
When a user authenticates to your application through Zapier, a "connection" is created representing their authentication details. Data tied to a specific authentication connection is included in the [bundle object](#bundle-object) under `bundle.authData`.
|
|
308
|
+
|
|
309
|
+
### Basic
|
|
310
|
+
|
|
311
|
+
Useful if your app requires two pieces of information to authenticate: `username` and `password`, which only the end user can provide. By default, Zapier will do the standard Basic authentication base64 header encoding for you (via an automatically registered middleware).
|
|
312
|
+
|
|
313
|
+
> To create a new integration with basic authentication, run `zapier init [your app name] --template basic-auth`. You can also review an example of that code [here](https://github.com/zapier/zapier-platform/tree/master/example-apps/basic-auth).
|
|
314
|
+
|
|
315
|
+
If your app uses Basic auth with an encoded API key rather than a username and password, like `Authorization: Basic APIKEYHERE:x`, consider the [Custom](#custom) authentication method instead.
|
|
316
|
+
|
|
317
|
+
```js
|
|
318
|
+
[insert-file:./snippets/basic-auth.js]
|
|
319
|
+
```
|
|
320
|
+
|
|
321
|
+
### Digest
|
|
322
|
+
|
|
323
|
+
*New in v7.4.0.*
|
|
324
|
+
|
|
325
|
+
The setup and user experience of Digest Auth is identical to Basic Auth. Users provide Zapier their username and password, and Zapier handles all the nonce and quality of protection details automatically.
|
|
326
|
+
|
|
327
|
+
> To create a new integration with digest authentication, run `zapier init [your app name] --template digest-auth`. You can also review an example of that code [here](https://github.com/zapier/zapier-platform/tree/master/example-apps/digest-auth).
|
|
328
|
+
|
|
329
|
+
> Limitation: Currently, MD5-sess and SHA are not implemented. Only the MD5 algorithm is supported. In addition, server nonces are not reused. That means for every `z.request` call, Zapier will send an additional request beforehand to get the server nonce.
|
|
330
|
+
|
|
331
|
+
```js
|
|
332
|
+
[insert-file:./snippets/digest-auth.js]
|
|
333
|
+
```
|
|
334
|
+
|
|
335
|
+
### Custom
|
|
336
|
+
|
|
337
|
+
Custom auth is most commonly used for apps that authenticate with API keys, although it also provides flexibility for any unusual authentication setup. You'll likely provide some custom `beforeRequest` middleware or a `requestTemplate` (see [Making HTTP Requests](#making-http-requests)) to pass in data returned from the authentication process, most commonly by adding/computing needed headers.
|
|
338
|
+
|
|
339
|
+
> To create a new integration with custom authentication, run `zapier init [your app name] --custom-auth`. You can also review an example of that code [here](https://github.com/zapier/zapier-platform/tree/master/example-apps/custom-auth).
|
|
340
|
+
|
|
341
|
+
```js
|
|
342
|
+
[insert-file:./snippets/custom-auth.js]
|
|
343
|
+
```
|
|
344
|
+
|
|
345
|
+
### Session
|
|
346
|
+
|
|
347
|
+
Session auth gives you the ability to exchange some user-provided data for some authentication data; for example, username and password for a session key. It can be used to implement almost any authentication method that uses that pattern - for example, alternative OAuth flows.
|
|
348
|
+
|
|
349
|
+
> To create a new integration with session authentication, run `zapier init [your app name] --template session-auth`. You can also review an example of that code [here](https://github.com/zapier/zapier-platform/tree/master/example-apps/session-auth).
|
|
350
|
+
|
|
351
|
+
```js
|
|
352
|
+
[insert-file:./snippets/session-auth.js]
|
|
353
|
+
```
|
|
354
|
+
|
|
355
|
+
For Session auth, the function that fetches the additional authentication data needed to make API calls (`authentication.sessionConfig.perform`) has the user-provided fields in `bundle.inputData`. Afterwards, `bundle.authData` contains the data returned by that function (usually the session key or token).
|
|
356
|
+
|
|
357
|
+
### OAuth1
|
|
358
|
+
|
|
359
|
+
*New in `v7.5.0`.*
|
|
360
|
+
|
|
361
|
+
Zapier's OAuth1 implementation matches [Twitter](https://developer.twitter.com/en/docs/tutorials/authenticating-with-twitter-api-for-enterprise/authentication-method-overview#oauth1.0a) and [Trello](https://developer.atlassian.com/cloud/trello/guides/rest-api/authorization/#using-basic-oauth) implementations of the 3-legged OAuth flow.
|
|
362
|
+
|
|
363
|
+
> To create a new integration with OAuth1, run `zapier init [your app name] --template oauth1-trello`. You can also check out [oauth1-trello](https://github.com/zapier/zapier-platform/tree/master/example-apps/oauth1-trello), [oauth1-tumblr](https://github.com/zapier/zapier-platform/tree/master/example-apps/oauth1-tumblr), and [oauth1-twitter](https://github.com/zapier/zapier-platform/tree/master/example-apps/oauth1-twitter) for working example apps with OAuth1.
|
|
364
|
+
|
|
365
|
+
The flow works like this:
|
|
366
|
+
|
|
367
|
+
1. Zapier makes a call to your API requesting a "request token" (also known as "temporary credentials").
|
|
368
|
+
2. Zapier sends the user to the authorization URL, defined by your app, along with the request token.
|
|
369
|
+
3. Once authorized, your website sends the user to the `redirect_uri` Zapier provided. Use `zapier describe` command to find out what it is: 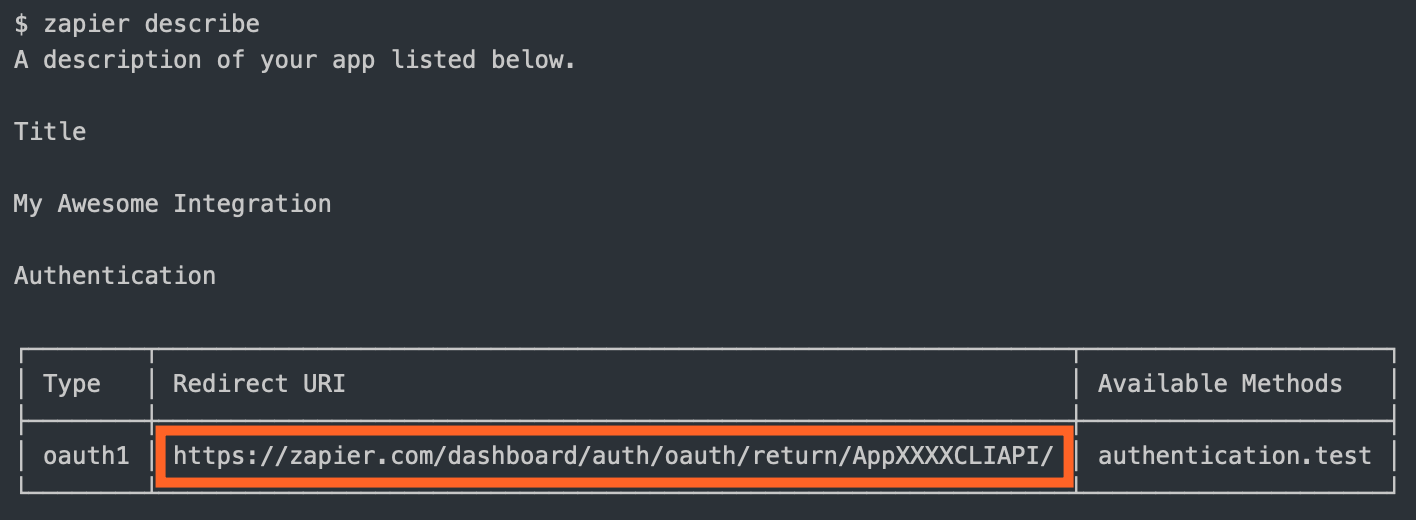
|
|
370
|
+
4. Zapier makes a backend call to your API to exchange the request token for an "access token" (also known as "long-lived credentials").
|
|
371
|
+
5. Zapier stores the `access_token` and uses it to make calls on behalf of the user.
|
|
372
|
+
|
|
373
|
+
You are required to define:
|
|
374
|
+
|
|
375
|
+
* `getRequestToken`: The API call to fetch the request token
|
|
376
|
+
* `authorizeUrl`: The authorization URL
|
|
377
|
+
* `getAccessToken`: The API call to fetch the access token
|
|
378
|
+
|
|
379
|
+
You'll also likely need to set your `CLIENT_ID` and `CLIENT_SECRET` as environment variables. These are the consumer key and secret in OAuth1 terminology.
|
|
380
|
+
|
|
381
|
+
```bash
|
|
382
|
+
# setting the environment variables on Zapier.com
|
|
383
|
+
$ zapier env:set 1.0.0 CLIENT_ID=1234
|
|
384
|
+
$ zapier env:set 1.0.0 CLIENT_SECRET=abcd
|
|
385
|
+
|
|
386
|
+
# and when running tests locally, don't forget to define them in .env or in the command!
|
|
387
|
+
$ CLIENT_ID=1234 CLIENT_SECRET=abcd zapier test
|
|
388
|
+
```
|
|
389
|
+
|
|
390
|
+
Your auth definition would look something like this:
|
|
391
|
+
|
|
392
|
+
```js
|
|
393
|
+
[insert-file:./snippets/oauth1.js]
|
|
394
|
+
```
|
|
395
|
+
|
|
396
|
+
For OAuth1, `authentication.oauth1Config.getRequestToken`, `authentication.oauth1Config.authorizeUrl`, and `authentication.oauth1Config.getAccessToken` have fields like `redirect_uri` and the temporary credentials in `bundle.inputData`. After `getAccessToken` runs, the resulting token value(s) will be stored in `bundle.authData` for the connection.
|
|
397
|
+
|
|
398
|
+
Also, `authentication.oauth1Config.getAccessToken` has access to the additional return values in `rawRequest` and `cleanedRequest` should you need to extract other values (for example, from the query string).
|
|
399
|
+
|
|
400
|
+
### OAuth2
|
|
401
|
+
|
|
402
|
+
Zapier's OAuth2 implementation is based on the `authorization_code` flow, similar to [GitHub](https://developer.github.com/v3/oauth/) and [Facebook](https://developers.facebook.com/docs/authentication/server-side/).
|
|
403
|
+
|
|
404
|
+
> To create a new integration with OAuth2, run `zapier init [your app name] --template oauth2`. You can also check out [our working example app](https://github.com/zapier/zapier-platform/tree/master/example-apps/oauth2).
|
|
405
|
+
|
|
406
|
+
If your app's OAuth2 flow uses a different grant type, such as `client_credentials`, try using [Session auth](#session) instead.
|
|
407
|
+
|
|
408
|
+
The OAuth2 flow looks like this:
|
|
409
|
+
|
|
410
|
+
1. Zapier sends the user to the authorization URL defined by your app.
|
|
411
|
+
2. Once authorized, your website sends the user to the `redirect_uri` Zapier provided. Use the `zapier describe` command to find out what it is: 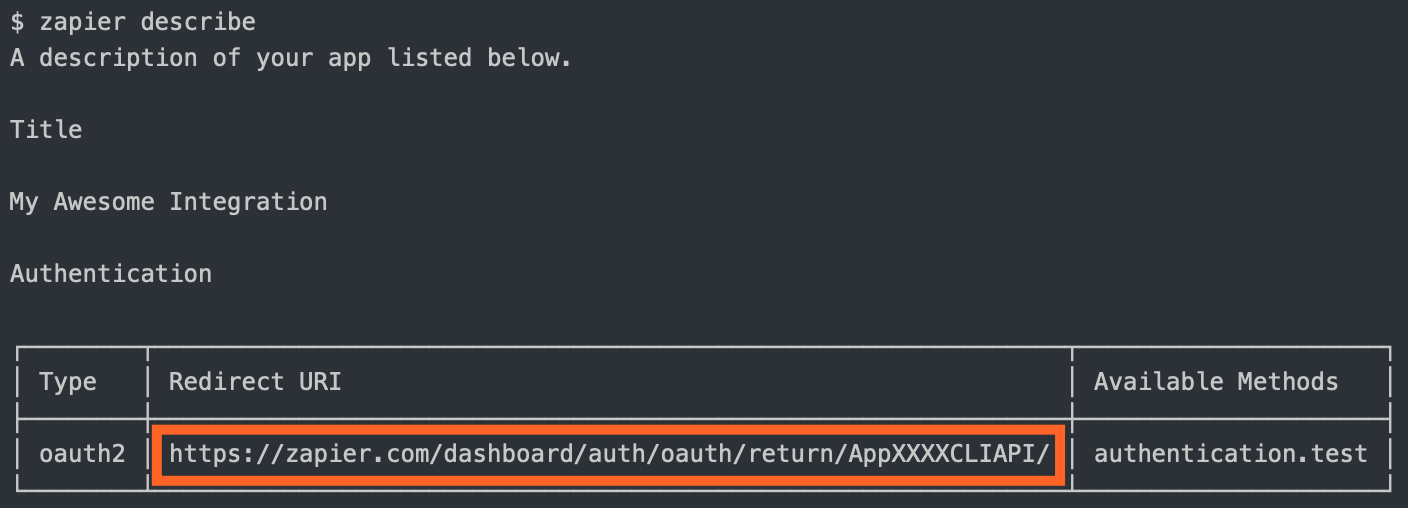
|
|
412
|
+
3. Zapier makes a backend call to your API to exchange the `code` for an `access_token`.
|
|
413
|
+
4. Zapier stores the `access_token` and uses it to make calls on behalf of the user.
|
|
414
|
+
5. (Optionally) Zapier can refresh the token if it expires.
|
|
415
|
+
|
|
416
|
+
You are required to define:
|
|
417
|
+
|
|
418
|
+
* `authorizeUrl`: The authorization URL
|
|
419
|
+
* `getAccessToken`: The API call to fetch the access token
|
|
420
|
+
|
|
421
|
+
If the access token has a limited life and you want to refresh the token when it expires, you'll also need to define the API call to perform that refresh (`refreshAccessToken`). You can choose to set `autoRefresh: true`, as in the example app, if you want Zapier to automatically make a call to refresh the token after receiving a 401. See [Stale Authentication Credentials](#stale-authentication-credentials) for more details on handling auth refresh.
|
|
422
|
+
|
|
423
|
+
You'll also likely want to set your `CLIENT_ID` and `CLIENT_SECRET` as environment variables:
|
|
424
|
+
|
|
425
|
+
```bash
|
|
426
|
+
# setting the environment variables on Zapier.com
|
|
427
|
+
$ zapier env:set 1.0.0 CLIENT_ID=1234
|
|
428
|
+
$ zapier env:set 1.0.0 CLIENT_SECRET=abcd
|
|
429
|
+
|
|
430
|
+
# and when running tests locally, don't forget to define them in .env or in the command!
|
|
431
|
+
$ CLIENT_ID=1234 CLIENT_SECRET=abcd zapier test
|
|
432
|
+
```
|
|
433
|
+
|
|
434
|
+
Your auth definition would look something like this:
|
|
435
|
+
|
|
436
|
+
```js
|
|
437
|
+
[insert-file:./snippets/oauth2.js]
|
|
438
|
+
```
|
|
439
|
+
|
|
440
|
+
For OAuth2, `authentication.oauth2Config.authorizeUrl`, `authentication.oauth2Config.getAccessToken`, and `authentication.oauth2Config.refreshAccessToken` have fields like `redirect_uri` and `state` in `bundle.inputData`. After the code is exchanged for an access token and/or refresh token, those tokens are stored in `bundle.authData` for the connection.
|
|
441
|
+
|
|
442
|
+
Also, `authentication.oauth2Config.getAccessToken` has access to the additional return values in `rawRequest` and `cleanedRequest` should you need to extract other values (for example, from the query string).
|
|
443
|
+
|
|
444
|
+
|
|
445
|
+
## Resources
|
|
446
|
+
|
|
447
|
+
A `resource` is a representation (as a JavaScript object) of one of the REST resources of your API. Say you have a `/recipes`
|
|
448
|
+
endpoint for working with recipes; you can define a recipe resource in your app that will tell Zapier how to do create,
|
|
449
|
+
read, and search operations on that resource.
|
|
450
|
+
|
|
451
|
+
```js
|
|
452
|
+
[insert-file:./snippets/resources.js]
|
|
453
|
+
```
|
|
454
|
+
|
|
455
|
+
The quickest way to create a resource is with the `zapier scaffold` command:
|
|
456
|
+
|
|
457
|
+
```bash
|
|
458
|
+
zapier scaffold resource "Recipe"
|
|
459
|
+
```
|
|
460
|
+
|
|
461
|
+
This will generate the resource file and add the necessary statements to the `index.js` file to import it.
|
|
462
|
+
|
|
463
|
+
|
|
464
|
+
### Resource Definition
|
|
465
|
+
|
|
466
|
+
A resource has a few basic properties. The first is the `key`, which allows Zapier to identify the resource on our backend.
|
|
467
|
+
The second is the `noun`, the user-friendly name of the resource that is presented to users throughout the Zapier UI.
|
|
468
|
+
|
|
469
|
+
> Check out [this working example app](https://github.com/zapier/zapier-platform/tree/master/example-apps/resource) to see resources in action.
|
|
470
|
+
|
|
471
|
+
After those, there is a set of optional properties that tell Zapier what methods can be performed on the resource.
|
|
472
|
+
The complete list of available methods can be found in the [Resource Schema Docs](https://github.com/zapier/zapier-platform/blob/master/packages/schema/docs/build/schema.md#resourceschema).
|
|
473
|
+
For now, let's focus on two:
|
|
474
|
+
|
|
475
|
+
* `list` - Tells Zapier how to fetch a set of this resource. This becomes a Trigger in the Zapier Editor.
|
|
476
|
+
* `create` - Tells Zapier how to create a new instance of the resource. This becomes an Action in the Zapier Editor.
|
|
477
|
+
|
|
478
|
+
Here is a complete example of what the list method might look like
|
|
479
|
+
|
|
480
|
+
```js
|
|
481
|
+
[insert-file:./snippets/recipe-list.js]
|
|
482
|
+
```
|
|
483
|
+
|
|
484
|
+
The method is made up of two properties, a `display` and an `operation`. The `display` property ([schema](https://github.com/zapier/zapier-platform/blob/master/packages/schema/docs/build/schema.md#basicdisplayschema)) holds the info needed to present the method as an available Trigger in the Zapier Editor. The `operation` ([schema](https://github.com/zapier/zapier-platform/blob/master/packages/schema/docs/build/schema.md#resourceschema)) provides the implementation to make the API call.
|
|
485
|
+
|
|
486
|
+
Adding a create method looks very similar.
|
|
487
|
+
|
|
488
|
+
```js
|
|
489
|
+
[insert-file:./snippets/recipe-create.js]
|
|
490
|
+
```
|
|
491
|
+
|
|
492
|
+
Every method you define on a `resource` Zapier converts to the appropriate Trigger, Create, or Search. Our examples
|
|
493
|
+
above would result in an app with a New Recipe Trigger and an Add Recipe Create.
|
|
494
|
+
|
|
495
|
+
Note the keys for the Trigger, Create, Search, and Search or Create are automatically generated (in case you want to use them in a dynamic dropdown), like: `{resourceName}List`, `{resourceName}Create`, `{resourceName}Search`, and `{resourceName}SearchOrCreate`; in the examples above, `{resourceName}` would be `recipe`.
|
|
496
|
+
|
|
497
|
+
|
|
498
|
+
## Triggers/Searches/Creates
|
|
499
|
+
|
|
500
|
+
Triggers, Searches, and Creates are the way an app defines what it is able to do. Triggers read
|
|
501
|
+
data into Zapier (i.e. watch for new recipes). Searches locate individual records (find recipe by title). Creates create
|
|
502
|
+
new records in your system (add a recipe to the catalog).
|
|
503
|
+
|
|
504
|
+
The definition for each of these follows the same structure. Here is an example of a trigger:
|
|
505
|
+
|
|
506
|
+
```js
|
|
507
|
+
[insert-file:./snippets/trigger.js]
|
|
508
|
+
```
|
|
509
|
+
|
|
510
|
+
You can find more details on the definition for each by looking at the [Trigger Schema](https://github.com/zapier/zapier-platform/blob/master/packages/schema/docs/build/schema.md#triggerschema),
|
|
511
|
+
[Search Schema](https://github.com/zapier/zapier-platform/blob/master/packages/schema/docs/build/schema.md#searchschema), and [Create Schema](https://github.com/zapier/zapier-platform/blob/master/packages/schema/docs/build/schema.md#createschema).
|
|
512
|
+
|
|
513
|
+
> To create a new integration with a premade trigger, search, or create, run `zapier init [your app name]` and select from the list that appears. You can also check out our working example apps [here](https://github.com/zapier/zapier-platform/tree/master/example-apps).
|
|
514
|
+
|
|
515
|
+
> To add a trigger, search, or create to an existing integration, run `zapier scaffold [trigger|search|create] [noun]` to create the necessary files to your project. For example, `zapier scaffold trigger post` will create a new trigger called "New Post".
|
|
516
|
+
### Return Types
|
|
517
|
+
|
|
518
|
+
Each of the 3 types of function expects a certain type of object. As of core v1.0.11, there are automated checks to let you know when you're trying to pass the wrong type back. For reference, each expects:
|
|
519
|
+
|
|
520
|
+
| Method | Return Type | Notes |
|
|
521
|
+
|---------|-------------|----------------------------------------------------------------------------------------------------------------------|
|
|
522
|
+
| Trigger | Array | 0 or more objects; passed to the [deduper](https://zapier.com/developer/documentation/v2/deduplication/) if polling |
|
|
523
|
+
| Search | Array | 0 or more objects. Only the first object will be returned, so if len > 1, put the best match first |
|
|
524
|
+
| Action | Object | Return values are evaluated by [`isPlainObject`](https://lodash.com/docs#isPlainObject) |
|
|
525
|
+
|
|
526
|
+
When a trigger function returns an empty array, the Zap will not trigger. For REST Hook triggers, this can be used to filter data if the available subscription options are not specific enough for the Zap's needs.
|
|
527
|
+
|
|
528
|
+
### Fallback Sample
|
|
529
|
+
In cases where Zapier needs to show an example record to the user, but we are unable to get a live example from the API, Zapier will fallback to this hard-coded sample. This should reflect the data structure of the Trigger's perform method, and have dummy values that we can show to any user.
|
|
530
|
+
|
|
531
|
+
```js
|
|
532
|
+
,sample: {
|
|
533
|
+
dummydata_field1: 'This will be compared against your perform method output'
|
|
534
|
+
style: 'mediterranean'
|
|
535
|
+
}
|
|
536
|
+
```
|
|
537
|
+
|
|
538
|
+
## Input Fields
|
|
539
|
+
|
|
540
|
+
On each trigger, search, or create in the `operation` directive - you can provide an array of objects as fields under the `inputFields`. Input Fields are what your users would see in the main Zapier user interface. For example, you might have a "Create Contact" action with fields like "First name", "Last name", "Email", etc. These fields will be able to accept input from previous steps in a Zap, for example:
|
|
541
|
+
|
|
542
|
+
|
|
543
|
+
|
|
544
|
+
You can find more details about setting action fields from a user perspective in [our help documentation](https://zapier.com/help/creating-zap/#set-up-action-template).
|
|
545
|
+
|
|
546
|
+
Those fields have various options you can provide, here is a succinct example:
|
|
547
|
+
|
|
548
|
+
```js
|
|
549
|
+
[insert-file:./snippets/fields.js]
|
|
550
|
+
```
|
|
551
|
+
|
|
552
|
+
You can find more details on the different field schema options at [our Field Schema](https://github.com/zapier/zapier-platform/blob/master/packages/schema/docs/build/schema.md#fieldschema).
|
|
553
|
+
|
|
554
|
+
### Custom/Dynamic Fields
|
|
555
|
+
|
|
556
|
+
In some cases, you may need to provide dynamically-generated fields - especially for custom ones. This is common functionality for CRMs, form software, databases, and other highly-customizable platforms. Instead of an explicit field definition, you can provide a function we'll evaluate to return a list of fields - merging the dynamic with the static fields.
|
|
557
|
+
|
|
558
|
+
> You should see `bundle.inputData` partially filled in as users provide data - even in field retrieval. This allows you to build hierarchical relationships into fields (e.g. only show issues from the previously selected project).
|
|
559
|
+
|
|
560
|
+
> A function that returns a list of dynamic fields cannot include additional functions in that list to call for dynamic fields.
|
|
561
|
+
|
|
562
|
+
```js
|
|
563
|
+
[insert-file:./snippets/custom-fields.js]
|
|
564
|
+
```
|
|
565
|
+
|
|
566
|
+
Additionally, if there is a field that affects the generation of dynamic fields, you can set the property `altersDynamicFields: true`. This informs the Zapier UI whenever the value of that field changes, the input fields need to be recomputed. For example, imagine the selection on a static dropdown called "Dessert Type" determining whether the function generating dynamic fields includes the field "With Sprinkles?" or not. If the value in one input field affects others, this is an important property to set.
|
|
567
|
+
|
|
568
|
+
```js
|
|
569
|
+
[insert-file:./snippets/alters-dynamic-fields.js]
|
|
570
|
+
```
|
|
571
|
+
|
|
572
|
+
> Only dropdowns support `altersDynamicFields`.
|
|
573
|
+
|
|
574
|
+
When using dynamic fields, the fields will be retrieved in three different contexts:
|
|
575
|
+
|
|
576
|
+
* Whenever the value of a field with `altersDynamicFields` is changed, as described above.
|
|
577
|
+
* Whenever the Zap Editor opens the "Set up" section for the trigger or action.
|
|
578
|
+
* Whenever the "Refresh fields" button at the bottom of the Editor's "Set up" section is clicked.
|
|
579
|
+
|
|
580
|
+
Be sure to set up your code accordingly - for example, don't rely on any input fields already having a value, since they won't have one the first time the "Set up" section loads.
|
|
581
|
+
|
|
582
|
+
### Dynamic Dropdowns
|
|
583
|
+
|
|
584
|
+
Sometimes, API endpoints require clients to specify a parent object in order to create or access the child resources. For instance, specifying a spreadsheet id in order to retrieve its worksheets. Since people don't speak in auto-incremented ID's, it is necessary that Zapier offer a simple way to select that parent using human readable handles.
|
|
585
|
+
|
|
586
|
+
Our solution is to present users a dropdown that is populated by making a live API call to fetch a list of parent objects. We call these special dropdowns "dynamic dropdowns."
|
|
587
|
+
|
|
588
|
+
To define one you include the `dynamic` property on the `inputFields` object. The value for the property is a dot-separated _string_ concatenation.
|
|
589
|
+
|
|
590
|
+
```js
|
|
591
|
+
[insert-file:./snippets/dynamic-dropdowns-one.js]
|
|
592
|
+
```
|
|
593
|
+
|
|
594
|
+
The dot-separated string concatenation follows this pattern:
|
|
595
|
+
|
|
596
|
+
- The key of the trigger you want to use to power the dropdown. _required_
|
|
597
|
+
- The value to be made available in bundle.inputData. _required_
|
|
598
|
+
- The human friendly value to be shown on the left of the dropdown in bold. _optional_
|
|
599
|
+
|
|
600
|
+
In the above code example the dynamic property makes reference to a trigger with a key of project. Assuming the project trigger returns an array of objects and each object contains an id and name key, i.e.
|
|
601
|
+
|
|
602
|
+
```js
|
|
603
|
+
[insert-file:./snippets/dynamic-dropdowns-two.js]
|
|
604
|
+
```
|
|
605
|
+
|
|
606
|
+
The dynamic dropdown would look something like this.
|
|
607
|
+
|
|
608
|
+
|
|
609
|
+
In the first code example the dynamic dropdown is powered by a trigger. You can also use a resource to power a dynamic dropdown. To do this combine the resource key and the resource method using camel case.
|
|
610
|
+
|
|
611
|
+
```js
|
|
612
|
+
[insert-file:./snippets/dynamic-dropdowns-three.js]
|
|
613
|
+
```
|
|
614
|
+
|
|
615
|
+
In some cases you will need to power a dynamic dropdown but do not want to make the Trigger available to the end user. Here it is best practice to create the trigger and set `hidden: true` on it's display object.
|
|
616
|
+
|
|
617
|
+
```js
|
|
618
|
+
[insert-file:./snippets/dynamic-dropdowns-four.js]
|
|
619
|
+
```
|
|
620
|
+
|
|
621
|
+
You can have multiple dynamic dropdowns in a single Trigger or Action. And a dynamic dropdown can depend on the value chosen in another dynamic dropdown when making it's API call. Such as a Spreadsheet and Worksheet dynamic dropdown in a trigger or action. This means you must make sure that the key of the first dynamic dropdown is the same as referenced in the trigger powering the second.
|
|
622
|
+
|
|
623
|
+
Let's say you have a Worksheet trigger with a `perform` method similar to this.
|
|
624
|
+
|
|
625
|
+
```js
|
|
626
|
+
[insert-file:./snippets/dynamic-dropdowns-five.js]
|
|
627
|
+
```
|
|
628
|
+
|
|
629
|
+
And your New Records trigger has a Spreadsheet and a Worksheet dynamic dropdown. The Spreadsheet dynamic dropdown must have a key of `spreadsheet_id`. When the user selects a spreadsheet via the dynamic dropdown the value chosen is made available in `bundle.inputData`. It will then be passed to the Worksheet trigger when the user clicks on the Worksheet dynamic dropdown.
|
|
630
|
+
|
|
631
|
+
```js
|
|
632
|
+
[insert-file:./snippets/dynamic-dropdowns-six.js]
|
|
633
|
+
```
|
|
634
|
+
|
|
635
|
+
The [Google Sheets](https://zapier.com/apps/google-sheets/integrations#triggers-and-actions) integration is an example of this pattern.
|
|
636
|
+
|
|
637
|
+
If you want your trigger to perform specific scripting for a dynamic dropdown you will need to make use of `bundle.meta.isFillingDynamicDropdown`. This can be useful if need to make use of [pagination](#whats-the-deal-with-pagination-when-is-it-used-and-how-does-it-work) in the dynamic dropdown to load more options.
|
|
638
|
+
|
|
639
|
+
```js
|
|
640
|
+
[insert-file:./snippets/dynamic-dropdowns-seven.js]
|
|
641
|
+
```
|
|
642
|
+
|
|
643
|
+
### Search-Powered Fields
|
|
644
|
+
|
|
645
|
+
For fields that take id of another object to create a relationship between the two (EG: a project id for a ticket), you can specify the `search` property on the field to indicate that Zapier needs to prompt the user to setup a Search step to populate the value for this field. Similar to dynamic dropdowns, the value for this property is a dot-separated concatenation of a search's key and the field to use for the value.
|
|
646
|
+
|
|
647
|
+
```js
|
|
648
|
+
[insert-file:./snippets/search-field.js]
|
|
649
|
+
```
|
|
650
|
+
|
|
651
|
+
**NOTE:** This has to be combined with the `dynamic` property to give the user a guided experience when setting up a Zap.
|
|
652
|
+
|
|
653
|
+
If you don't define a trigger for the `dynamic` property, the search connector won't show.
|
|
654
|
+
|
|
655
|
+
### Computed Fields
|
|
656
|
+
|
|
657
|
+
In OAuth and Session Auth, Zapier automatically stores every value from an integration’s auth API response i.e. that’s `getAccessToken` and `refreshAccessToken` for OAuth and `getSessionKey` for session auth.
|
|
658
|
+
|
|
659
|
+
You can return additional fields in these responses, on top of the expected `access_token` or `refresh_token` for OAuth and `sessionKey` for Session auth. They will be saved in `bundle.authData`. You can reference these fields in any subsequent API call as needed.
|
|
660
|
+
|
|
661
|
+
> Note: Only OAuth and Session Auth support computed fields.
|
|
662
|
+
|
|
663
|
+
If you want Zapier to validate that these additional fields exist, you need to use Computed Fields. If you define computed fields in your integration, Zapier will check to make sure those fields exist when it runs the authentication test API call.
|
|
664
|
+
|
|
665
|
+
Computed fields work like any other field, though with `computed: true` property, and `required: false` as user can not enter computed fields themselves. Reference computed fields in API calls as `{{bundle.authData.field}}`, replacing `field` with that field's name from your test API call response.
|
|
666
|
+
|
|
667
|
+
You can see examples of computed fields in the [OAuth2](#oauth2) or [Session Auth](#session) example sections.
|
|
668
|
+
|
|
669
|
+
### Nested & Children (Line Item) Fields
|
|
670
|
+
|
|
671
|
+
When your action needs to accept an array of items, you can include an input field with the `children` attribute. The `children` attribute accepts a list of [fields](https://github.com/zapier/zapier-platform/blob/master/packages/schema/docs/build/schema.md#fieldschema) that can be input for each item in this array.
|
|
672
|
+
|
|
673
|
+
```js
|
|
674
|
+
[insert-file:./snippets/input-fields-children.js]
|
|
675
|
+
```
|
|
676
|
+
|
|
677
|
+
## Output Fields
|
|
678
|
+
|
|
679
|
+
On each trigger, search, or create in the operation directive - you can provide an array of objects as fields under the `outputFields`. Output Fields are what your users would see when they select a field provided by your trigger, search or create to map it to another.
|
|
680
|
+
|
|
681
|
+
Output Fields are optional, but can be used to:
|
|
682
|
+
|
|
683
|
+
- Define friendly labels for the returned fields. By default, we will *humanize* for example `my_key` as *My Key*.
|
|
684
|
+
- Make sure that custom fields that may not be found in every live sample and - since they're custom to the connected account - cannot be defined in the static sample, can still be mapped.
|
|
685
|
+
|
|
686
|
+
The [schema](https://github.com/zapier/zapier-platform/blob/master/packages/schema/docs/build/schema.md#fieldschema) for `outputFields` is shared with `inputFields` but only the `key` and `required` properties are relevant.
|
|
687
|
+
|
|
688
|
+
Custom/Dynamic Output Fields are defined in the same way as [Custom/Dynamic Input Fields](#customdynamic-fields).
|
|
689
|
+
|
|
690
|
+
### Nested & Children (Line Item) Fields
|
|
691
|
+
|
|
692
|
+
To define an Output Field for a nested field use `{{parent}}__{{key}}`. For children (line item) fields use `{{parent}}[]{{key}}`.
|
|
693
|
+
|
|
694
|
+
```js
|
|
695
|
+
[insert-file:./snippets/output-fields.js]
|
|
696
|
+
```
|
|
697
|
+
|
|
698
|
+
## Z Object
|
|
699
|
+
|
|
700
|
+
We provide several methods off of the `z` object, which is provided as the first argument to all function calls in your app.
|
|
701
|
+
|
|
702
|
+
> The `z` object is passed into your functions as the first argument - IE: `perform: (z) => {}`.
|
|
703
|
+
|
|
704
|
+
### `z.request([url], options)`
|
|
705
|
+
|
|
706
|
+
`z.request([url], options)` is a promise based HTTP client with some Zapier-specific goodies. See [Making HTTP Requests](#making-http-requests).
|
|
707
|
+
|
|
708
|
+
### `z.console`
|
|
709
|
+
|
|
710
|
+
`z.console.log(message)` is a logging console, similar to Node.js `console` but logs remotely, as well as to stdout in tests. See [Log Statements](#console-logging)
|
|
711
|
+
|
|
712
|
+
### `z.dehydrate(func, inputData)`
|
|
713
|
+
|
|
714
|
+
`z.dehydrate(func, inputData)` is used to lazily evaluate a function, perfect to avoid API calls during polling or for reuse. See [Dehydration](#dehydration).
|
|
715
|
+
|
|
716
|
+
### `z.dehydrateFile(func, inputData)`
|
|
717
|
+
|
|
718
|
+
`z.dehydrateFile` is used to lazily download a file, perfect to avoid API calls during polling or for reuse. See [File Dehydration](#file-dehydration).
|
|
719
|
+
|
|
720
|
+
### `z.stashFile(bufferStringStream, [knownLength], [filename], [contentType])`
|
|
721
|
+
|
|
722
|
+
`z.stashFile(bufferStringStream, [knownLength], [filename], [contentType])` is a promise based file stasher that returns a URL file pointer. See [Stashing Files](#stashing-files).
|
|
723
|
+
|
|
724
|
+
### `z.JSON`
|
|
725
|
+
|
|
726
|
+
`z.JSON` is similar to the JSON built-in like `z.JSON.parse('...')`, but catches errors and produces nicer tracebacks.
|
|
727
|
+
|
|
728
|
+
### `z.hash()`
|
|
729
|
+
|
|
730
|
+
`z.hash()` is a crypto tool for doing things like `z.hash('sha256', 'my password')`
|
|
731
|
+
|
|
732
|
+
### `z.errors`
|
|
733
|
+
|
|
734
|
+
`z.errors` is a collection error classes that you can throw in your code, like `throw new z.errors.HaltedError('...')`.
|
|
735
|
+
|
|
736
|
+
The available errors are:
|
|
737
|
+
|
|
738
|
+
* `Error` (_new in v9.3.0_) - Stops the current operation, allowing for (auto) replay. Read more on [General Errors](#general-errors)
|
|
739
|
+
* `HaltedError` - Stops current operation, but will never turn off Zap. Read more on [Halting Execution](#halting-execution)
|
|
740
|
+
* `ExpiredAuthError` - Turns off Zap and emails user to manually reconnect. Read more on [Stale Authentication Credentials](#stale-authentication-credentials)
|
|
741
|
+
* `RefreshAuthError` - (OAuth2 or Session Auth) Tells Zapier to refresh credentials and retry operation. Read more on [Stale Authentication Credentials](#stale-authentication-credentials)
|
|
742
|
+
* `ThrottledError` (_new in v11.2.0_) - Tells Zapier to retry the current operation after a delay specified in seconds. Read more on [Handling Throttled Requests](#handling-throttled-requests)
|
|
743
|
+
|
|
744
|
+
For more details on error handling in general, see [here](#error-handling).
|
|
745
|
+
|
|
746
|
+
### `z.cursor`
|
|
747
|
+
|
|
748
|
+
The `z.cursor` object exposes two methods:
|
|
749
|
+
|
|
750
|
+
* `z.cursor.get(): Promise<string|null>`
|
|
751
|
+
* `z.cursor.set(string): Promise<null>`
|
|
752
|
+
|
|
753
|
+
Any data you `set` will be available to that Zap for about an hour (or until it's overwritten). For more information, see: [paging](#paging).
|
|
754
|
+
|
|
755
|
+
### `z.generateCallbackUrl()`
|
|
756
|
+
|
|
757
|
+
The `z.generateCallbackUrl()` will return a callback URL your app can `POST` to later for handling long running tasks (like transcription or encoding jobs). In the meantime, the Zap and Task will wait for your response and the user will see the Task marked as waiting.
|
|
758
|
+
|
|
759
|
+
For example, in your `perform` you might do:
|
|
760
|
+
|
|
761
|
+
```js
|
|
762
|
+
const perform = async (z, bundle) => {
|
|
763
|
+
// something like this url:
|
|
764
|
+
// https://zapier.com/hooks/callback/123/abcdef01-2345-6789-abcd-ef0123456789/abcdef0123456789abcdef0123456789abcdef01/
|
|
765
|
+
const callbackUrl = z.generateCallbackUrl();
|
|
766
|
+
await z.request({
|
|
767
|
+
url: 'https://example.com/api/slow-job',
|
|
768
|
+
method: 'POST',
|
|
769
|
+
body: {
|
|
770
|
+
// ... whatever your integration needs
|
|
771
|
+
url: callbackUrl,
|
|
772
|
+
},
|
|
773
|
+
});
|
|
774
|
+
return {"hello": "world"}; // available later in bundle.outputData
|
|
775
|
+
};
|
|
776
|
+
```
|
|
777
|
+
|
|
778
|
+
And in your own `/api/slow-job` view (or more likely, an async job) you'd make this request to Zapier when the long-running job completes to populate `bundle.cleanedRequest`:
|
|
779
|
+
|
|
780
|
+
```http
|
|
781
|
+
POST /hooks/callback/123/abcdef01-2345-6789-abcd-ef0123456789/abcdef0123456789abcdef0123456789abcdef01/ HTTP/1.1
|
|
782
|
+
Host: zapier.com
|
|
783
|
+
Content-Type: application/json
|
|
784
|
+
|
|
785
|
+
{"foo":"bar"}
|
|
786
|
+
```
|
|
787
|
+
|
|
788
|
+
And finally, in a `performResume` to handle the final step which will receive three bundle properties:
|
|
789
|
+
|
|
790
|
+
* `bundle.outputData` is `{"hello": "world"}`, the data returned from the initial `perform`
|
|
791
|
+
* `bundle.cleanedRequest` is `{"foo": "bar"}`, the payload from the callback URL
|
|
792
|
+
* `bundle.rawRequest` is the full request object corresponding to `bundle.cleanedRequest`
|
|
793
|
+
|
|
794
|
+
```js
|
|
795
|
+
const performResume = async (z, bundle) => {
|
|
796
|
+
// this will give a final value of: {"hello": "world", "foo": "bar"}
|
|
797
|
+
return { ...bundle.outputData, ...bundle.cleanedRequest };
|
|
798
|
+
};
|
|
799
|
+
```
|
|
800
|
+
|
|
801
|
+
> The app will have a maximum of 30 days to `POST` to the callback URL. If a user deletes or modifies the Zap or Task in the meantime, we will not resume the task.
|
|
802
|
+
|
|
803
|
+
|
|
804
|
+
## Bundle Object
|
|
805
|
+
|
|
806
|
+
This object holds the user's auth details and the data for the API requests.
|
|
807
|
+
|
|
808
|
+
> The `bundle` object is passed into your functions as the second argument - IE: `perform: (z, bundle) => {}`.
|
|
809
|
+
|
|
810
|
+
### `bundle.authData`
|
|
811
|
+
|
|
812
|
+
`bundle.authData` is user-provided authentication data, like `api_key` or `access_token`. [Read more on authentication.](#authentication)
|
|
813
|
+
|
|
814
|
+
### `bundle.inputData`
|
|
815
|
+
|
|
816
|
+
`bundle.inputData` is user-provided data for this particular run of the trigger/search/create, as defined by the [`inputFields`](#input-fields). For example:
|
|
817
|
+
|
|
818
|
+
```js
|
|
819
|
+
{
|
|
820
|
+
createdBy: 'his name is Bobby Flay',
|
|
821
|
+
style: 'he cooks mediterranean',
|
|
822
|
+
scheduledAt: "2021-09-09T09:00:00-07:00"
|
|
823
|
+
}
|
|
824
|
+
```
|
|
825
|
+
|
|
826
|
+
### `bundle.inputDataRaw`
|
|
827
|
+
|
|
828
|
+
`bundle.inputDataRaw` is like `bundle.inputData`, but before processing such as interpreting friendly datetimes and rendering `{{curlies}}`:
|
|
829
|
+
|
|
830
|
+
```js
|
|
831
|
+
{
|
|
832
|
+
createdBy: 'his name is {{123__chef_name}}',
|
|
833
|
+
style: 'he cooks {{456__style}}',
|
|
834
|
+
scheduledAt: "today"
|
|
835
|
+
}
|
|
836
|
+
```
|
|
837
|
+
|
|
838
|
+
> "curlies" represent data mapped in from previous steps. They take the form `{{NODE_ID__key_name}}`.
|
|
839
|
+
|
|
840
|
+
You'll usually want to use `bundle.inputData` instead.
|
|
841
|
+
|
|
842
|
+
### `bundle.meta`
|
|
843
|
+
|
|
844
|
+
`bundle.meta` contains extra information useful for doing advanced behaviors depending on what the user is doing. It has the following options:
|
|
845
|
+
|
|
846
|
+
| key | default | description |
|
|
847
|
+
| --- | --- | --- |
|
|
848
|
+
| `isLoadingSample` | `false` | If true, this run was initiated manually via the Zap Editor |
|
|
849
|
+
| `isFillingDynamicDropdown` | `false` | If true, this poll is being used to populate a dynamic dropdown. You only need to return the fields you specified (such as `id` and `name`), though returning everything is fine too |
|
|
850
|
+
| `isPopulatingDedupe` | `false` | If true, the results of this poll will be used to initialize the deduplication list rather than trigger a zap. You should grab as many items as possible. See also: [deduplication](#dedup) |
|
|
851
|
+
| `limit` | `-1` | The number of items you should fetch. `-1` indicates there's no limit. Build this into your calls insofar as you are able |
|
|
852
|
+
| `page` | `0` | Used in [paging](#paging) to uniquely identify which page of results should be returned |
|
|
853
|
+
| `isTestingAuth` | `false` | (legacy property) If true, the poll was triggered by a user testing their account (via [clicking "test"](https://cdn.zapier.com/storage/photos/5c94c304ce11b02c073a973466a7b846.png) or during setup). We use this data to populate the auth label, but it's mostly used to verify we made a successful authenticated request |
|
|
854
|
+
|
|
855
|
+
> Before v8.0.0, the information in `bundle.meta` was different. See [the old docs](https://github.com/zapier/zapier-platform-cli/blob/a058e6d538a75d215d2e0c52b9f49a97218640c4/README.md#bundlemeta) for the previous values and [the wiki](https://github.com/zapier/zapier-platform/wiki/bundle.meta-changes) for a mapping of old values to new.
|
|
856
|
+
|
|
857
|
+
Here's an example of a polling trigger that is also used to power a dynamic dropdown:
|
|
858
|
+
|
|
859
|
+
```js
|
|
860
|
+
const perform = async (z, bundle) => {
|
|
861
|
+
const params = { per_page: 100 }; // poll for the most recent 100 teams
|
|
862
|
+
|
|
863
|
+
if (bundle.meta.isFillingDynamicDropdown) {
|
|
864
|
+
// dynamic dropdowns support pagination
|
|
865
|
+
params.per_page = 30;
|
|
866
|
+
params.offset = params.per_page * bundle.meta.page;
|
|
867
|
+
}
|
|
868
|
+
|
|
869
|
+
const response = await z.request({
|
|
870
|
+
url: `${API_BASE_URL}/teams`,
|
|
871
|
+
params,
|
|
872
|
+
});
|
|
873
|
+
|
|
874
|
+
return response.json;
|
|
875
|
+
};
|
|
876
|
+
// ...
|
|
877
|
+
```
|
|
878
|
+
|
|
879
|
+
|
|
880
|
+
|
|
881
|
+
### `bundle.rawRequest`
|
|
882
|
+
|
|
883
|
+
> `bundle.rawRequest` is only available in the `perform` for webhooks, `getAccessToken` for OAuth authentication methods, and `performResume` in a callback action.
|
|
884
|
+
|
|
885
|
+
`bundle.rawRequest` holds raw information about the HTTP request that triggered the `perform` method or that represents the user's browser request that triggered the `getAccessToken` call:
|
|
886
|
+
|
|
887
|
+
```
|
|
888
|
+
{
|
|
889
|
+
method: 'POST',
|
|
890
|
+
querystring: 'foo=bar&baz=qux',
|
|
891
|
+
headers: {
|
|
892
|
+
'Content-Type': 'application/json'
|
|
893
|
+
},
|
|
894
|
+
content: '{"hello": "world"}'
|
|
895
|
+
}
|
|
896
|
+
```
|
|
897
|
+
|
|
898
|
+
In `bundle.rawRequest`, headers other than `Content-Length` and `Content-Type` will be prefixed with `Http-`, and all headers will be named in Camel-Case. For example, the header `X-Time-GMT` would become `Http-X-Time-Gmt`.
|
|
899
|
+
|
|
900
|
+
### `bundle.cleanedRequest`
|
|
901
|
+
|
|
902
|
+
> `bundle.cleanedRequest` is only available in the `perform` for webhooks, `getAccessToken` for oauth authentication methods, and `performResume` in a callback action.
|
|
903
|
+
|
|
904
|
+
`bundle.cleanedRequest` will return a formatted and parsed version of the request. Some or all of the following will be available:
|
|
905
|
+
|
|
906
|
+
```
|
|
907
|
+
{
|
|
908
|
+
method: 'POST',
|
|
909
|
+
querystring: {
|
|
910
|
+
foo: 'bar',
|
|
911
|
+
baz: 'qux'
|
|
912
|
+
},
|
|
913
|
+
headers: {
|
|
914
|
+
'Content-Type': 'application/json'
|
|
915
|
+
},
|
|
916
|
+
content: {
|
|
917
|
+
hello: 'world'
|
|
918
|
+
}
|
|
919
|
+
}
|
|
920
|
+
```
|
|
921
|
+
|
|
922
|
+
### `bundle.outputData`
|
|
923
|
+
|
|
924
|
+
> `bundle.outputData` is only available in the `performResume` in a callback action.
|
|
925
|
+
|
|
926
|
+
`bundle.outputData` will return a whatever data you originally returned in the `perform`, allowing you to mix that with `bundle.rawRequest` or `bundle.cleanedRequest`.
|
|
927
|
+
|
|
928
|
+
|
|
929
|
+
### `bundle.targetUrl`
|
|
930
|
+
|
|
931
|
+
> `bundle.targetUrl` is only available in the `performSubscribe` and `performUnsubscribe` methods for webhooks.
|
|
932
|
+
|
|
933
|
+
This the URL to which you should send hook data. It'll look something like `https://hooks.zapier.com/1234/abcd`. We provide it so you can make a POST request to your server. Your server should store this URL and use is as a destination when there's new data to report.
|
|
934
|
+
|
|
935
|
+
For example:
|
|
936
|
+
|
|
937
|
+
```js
|
|
938
|
+
const subscribeHook = async (z, bundle) => {
|
|
939
|
+
|
|
940
|
+
const options = {
|
|
941
|
+
url: 'https://57b20fb546b57d1100a3c405.mockapi.io/api/hooks',
|
|
942
|
+
method: 'POST',
|
|
943
|
+
body: {
|
|
944
|
+
url: bundle.targetUrl, // bundle.targetUrl has the Hook URL this app should call
|
|
945
|
+
},
|
|
946
|
+
};
|
|
947
|
+
|
|
948
|
+
const response = await z.request(options);
|
|
949
|
+
return response.data; // or response.json if you're using core v9 or older
|
|
950
|
+
};
|
|
951
|
+
|
|
952
|
+
module.exports = {
|
|
953
|
+
// ...
|
|
954
|
+
performSubscribe: subscribeHook,
|
|
955
|
+
// ...
|
|
956
|
+
};
|
|
957
|
+
```
|
|
958
|
+
|
|
959
|
+
Read more in the [REST hook example](https://github.com/zapier/zapier-platform/blob/master/example-apps/rest-hooks/triggers/recipe.js).
|
|
960
|
+
|
|
961
|
+
### `bundle.subscribeData`
|
|
962
|
+
|
|
963
|
+
> `bundle.subscribeData` is available in the `perform` and `performUnsubscribe` method for webhooks.
|
|
964
|
+
|
|
965
|
+
This is an object that contains the data you returned from the `performSubscribe` function. It should contain whatever information you need send a `DELETE` request to your server to stop sending webhooks to Zapier.
|
|
966
|
+
|
|
967
|
+
Read more in the [REST hook example](https://github.com/zapier/zapier-platform/blob/master/example-apps/rest-hooks/triggers/recipe.js).
|
|
968
|
+
|
|
969
|
+
## Environment
|
|
970
|
+
|
|
971
|
+
Apps can define environment variables that are available when the app's code executes. They work just like environment
|
|
972
|
+
variables defined on the command line. They are useful when you have data like an OAuth client ID and secret that you
|
|
973
|
+
don't want to commit to source control. Environment variables can also be used as a quick way to toggle between
|
|
974
|
+
a staging and production environment during app development.
|
|
975
|
+
|
|
976
|
+
It is important to note that **variables are defined on a per-version basis!** When you push a new version, the
|
|
977
|
+
existing variables from the previous version are copied, so you don't have to manually add them. However, edits
|
|
978
|
+
made to one version's environment will not affect the other versions.
|
|
979
|
+
|
|
980
|
+
### Defining Environment Variables
|
|
981
|
+
|
|
982
|
+
To define an environment variable, use the `env` command:
|
|
983
|
+
|
|
984
|
+
```bash
|
|
985
|
+
# Will set the environment variable on Zapier.com
|
|
986
|
+
zapier env:set 1.0.0 MY_SECRET_VALUE=1234
|
|
987
|
+
```
|
|
988
|
+
|
|
989
|
+
You will likely also want to set the value locally for testing.
|
|
990
|
+
|
|
991
|
+
```bash
|
|
992
|
+
export MY_SECRET_VALUE=1234
|
|
993
|
+
```
|
|
994
|
+
|
|
995
|
+
Alternatively, we provide some extra tooling to work with an `.env` (or `.environment`, see below note) that looks like this:
|
|
996
|
+
|
|
997
|
+
```
|
|
998
|
+
MY_SECRET_VALUE=1234
|
|
999
|
+
```
|
|
1000
|
+
|
|
1001
|
+
> `.env` is the new recommended name for the environment file since v5.1.0. The old name `.environment` is deprecated but will continue to work for backward compatibility.
|
|
1002
|
+
|
|
1003
|
+
And then in your `test/basic.js` file:
|
|
1004
|
+
|
|
1005
|
+
```js
|
|
1006
|
+
const zapier = require('zapier-platform-core');
|
|
1007
|
+
|
|
1008
|
+
should('some tests', () => {
|
|
1009
|
+
zapier.tools.env.inject(); // testing only!
|
|
1010
|
+
console.log(process.env.MY_SECRET_VALUE);
|
|
1011
|
+
// should print '1234'
|
|
1012
|
+
});
|
|
1013
|
+
```
|
|
1014
|
+
|
|
1015
|
+
> This is a popular way to provide `process.env.ACCESS_TOKEN || bundle.authData.access_token` for convenient testing.
|
|
1016
|
+
|
|
1017
|
+
> **NOTE** Variables defined via `zapier env:set` will _always_ be uppercased. For example, you would access the variable defined by `zapier env:set 1.0.0 foo_bar=1234` with `process.env.FOO_BAR`.
|
|
1018
|
+
|
|
1019
|
+
|
|
1020
|
+
### Accessing Environment Variables
|
|
1021
|
+
|
|
1022
|
+
To view existing environment variables, use the `env` command.
|
|
1023
|
+
|
|
1024
|
+
```bash
|
|
1025
|
+
# Will print a table listing the variables for this version
|
|
1026
|
+
zapier env:get 1.0.0
|
|
1027
|
+
```
|
|
1028
|
+
|
|
1029
|
+
Within your app, you can access the environment via the standard `process.env` - any values set via local `export` or `zapier env:set` will be there.
|
|
1030
|
+
|
|
1031
|
+
For example, you can access the `process.env` in your perform functions and in templates:
|
|
1032
|
+
|
|
1033
|
+
```js
|
|
1034
|
+
[insert-file:./snippets/process-env.js]
|
|
1035
|
+
```
|
|
1036
|
+
|
|
1037
|
+
> Note! Be sure to lazily access your environment variables - see [When to use placeholders or curlies?](#when-to-use-placeholders-or-curlies).
|
|
1038
|
+
|
|
1039
|
+
|
|
1040
|
+
## Making HTTP Requests
|
|
1041
|
+
|
|
1042
|
+
There are two ways to make HTTP requests:
|
|
1043
|
+
|
|
1044
|
+
1. [**Shorthand HTTP Requests**](#shorthand-http-requests) - Easy to use, but limits what you can control. Best for simple requests.
|
|
1045
|
+
2. [**Manual HTTP Requests**](#manual-http-requests) - Gives you full control over the request and response.
|
|
1046
|
+
|
|
1047
|
+
Use these helper constructs to reduce boilerplate:
|
|
1048
|
+
|
|
1049
|
+
1. `requestTemplate` - an object literal of [HTTP request options](#http-request-options) that will be merged with every request.
|
|
1050
|
+
2. `beforeRequest` - [middleware](#using-http-middleware) that mutates every request before it is sent.
|
|
1051
|
+
3. `afterResponse` - [middleware](#using-http-middleware) that mutates every response before it is completed.
|
|
1052
|
+
|
|
1053
|
+
> Note: you can install any HTTP client you like - but this is greatly discouraged as you lose [automatic HTTP logging](#http-logging) and middleware.
|
|
1054
|
+
|
|
1055
|
+
### Shorthand HTTP Requests
|
|
1056
|
+
|
|
1057
|
+
For simple HTTP requests that do not require special pre- or post-processing, you can specify the [HTTP request options](#http-request-options) as an object literal in your app definition.
|
|
1058
|
+
|
|
1059
|
+
This features:
|
|
1060
|
+
|
|
1061
|
+
1. Lazy `{{curly}}` replacement.
|
|
1062
|
+
2. JSON and form body de-serialization.
|
|
1063
|
+
3. Automatic non-2xx error raising.
|
|
1064
|
+
|
|
1065
|
+
```js
|
|
1066
|
+
[insert-file:./snippets/shorthand-request.js]
|
|
1067
|
+
```
|
|
1068
|
+
|
|
1069
|
+
In the URL above, `{{bundle.authData.subdomain}}` is automatically replaced with the live value from the bundle. If the call returns a non 2xx return code, an error is automatically raised. The response body is automatically parsed as JSON or form-encoded and returned.
|
|
1070
|
+
|
|
1071
|
+
An error will be raised if the response cannot be parsed as JSON or form-encoded. To use shorthand requests with other response types, add [middleware](#using-http-middleware) that sets `response.data` to the parsed response.
|
|
1072
|
+
|
|
1073
|
+
### Manual HTTP Requests
|
|
1074
|
+
|
|
1075
|
+
Use this when you need full control over the request/response. For example:
|
|
1076
|
+
|
|
1077
|
+
1. To do processing (usually involving [`bundle.inputData`](#bundleinputdata)) before a request is made
|
|
1078
|
+
2. To do processing of an API's response before you return data to Zapier
|
|
1079
|
+
3. To process an unusual response type, such as XML
|
|
1080
|
+
|
|
1081
|
+
To make a manual request, pass your [request options](#http-request-options) to `z.request()` then use the resulting [response object](#http-response-object) to return the data you want:
|
|
1082
|
+
|
|
1083
|
+
```js
|
|
1084
|
+
[insert-file:./snippets/manual-request.js]
|
|
1085
|
+
```
|
|
1086
|
+
|
|
1087
|
+
Manual requests perform lazy `{{curly}}` replacement. In the URL above, `{{bundle.authData.subdomain}}` is automatically replaced with the live value from the bundle.
|
|
1088
|
+
|
|
1089
|
+
#### POST and PUT Requests
|
|
1090
|
+
|
|
1091
|
+
To POST or PUT data to your API you can do this:
|
|
1092
|
+
|
|
1093
|
+
```js
|
|
1094
|
+
[insert-file:./snippets/put.js]
|
|
1095
|
+
```
|
|
1096
|
+
|
|
1097
|
+
> Note: you need to call `z.JSON.stringify()` before setting the `body`.
|
|
1098
|
+
|
|
1099
|
+
### Using HTTP middleware
|
|
1100
|
+
|
|
1101
|
+
To process all HTTP requests in a certain way, use the `beforeRequest` and `afterResponse` middleware functions.
|
|
1102
|
+
|
|
1103
|
+
Middleware functions go in your app definition:
|
|
1104
|
+
|
|
1105
|
+
```js
|
|
1106
|
+
[insert-file:./snippets/middleware.js]
|
|
1107
|
+
```
|
|
1108
|
+
|
|
1109
|
+
A `beforeRequest` middleware function takes a request options object, and returns a (possibly mutated) request object. An `afterResponse` middleware function takes a response object, and returns a (possibly mutated) response object. Middleware functions are executed in the order specified in the app definition, and each subsequent middleware receives the request or response object returned by the previous middleware.
|
|
1110
|
+
|
|
1111
|
+
Middleware functions can be asynchronous - just return a promise from the middleware function.
|
|
1112
|
+
|
|
1113
|
+
The second argument for middleware is the `z` object, but it does *not* include `z.request()` as using that would easily create infinite loops.
|
|
1114
|
+
|
|
1115
|
+
Here is the full request lifecycle when you call `z.request({...})`:
|
|
1116
|
+
|
|
1117
|
+
1. set defaults on the `request` object
|
|
1118
|
+
2. run your `beforeRequest` middleware functions in order
|
|
1119
|
+
3. add applicable auth headers (e.g. adding `Basic ...` for `basic` auth), if applicable
|
|
1120
|
+
4. add `request.params` to `request.url`
|
|
1121
|
+
5. execute the `request`, store the result in `response`
|
|
1122
|
+
6. try to auto-parse response body for non-raw requests, store result in `response.data`
|
|
1123
|
+
7. log the request to Zapier's logging server
|
|
1124
|
+
8. if the status code is `401`, you're using a refresh-able auth (such as `oauth2` or `session`) _and_ `autoRefresh` is `true` in your auth configuration, throw a `RefreshAuthError`. The server will attempt to refresh the authentication again and retry the whole step
|
|
1125
|
+
9. run your `afterResponse` middleware functions in order
|
|
1126
|
+
10. call `response.throwForStatus()` unless `response.skipThrowForStatus` is `true`
|
|
1127
|
+
|
|
1128
|
+
The resulting response object is returned from `z.request()`.
|
|
1129
|
+
|
|
1130
|
+
> Example App: check out https://github.com/zapier/zapier-platform/tree/master/example-apps/middleware for a working example app using HTTP middleware.
|
|
1131
|
+
|
|
1132
|
+
#### Error Response Handling
|
|
1133
|
+
|
|
1134
|
+
Since `v10.0.0`, `z.request()` calls `response.throwForStatus()` before it returns a response. You can disable automatic error throwing by setting `skipThrowForStatus` on the request object:
|
|
1135
|
+
|
|
1136
|
+
```js
|
|
1137
|
+
// Disable automatic error throwing on the request object
|
|
1138
|
+
const perform = async (z, bundle) => {
|
|
1139
|
+
const response = await z.request({
|
|
1140
|
+
url: '...',
|
|
1141
|
+
skipThrowForStatus: true
|
|
1142
|
+
});
|
|
1143
|
+
// Now you handle error response on your own.
|
|
1144
|
+
// The following is equivalent to response.throwForStatus(),
|
|
1145
|
+
// but you have to remember to do it on every request
|
|
1146
|
+
if (response.status >= 400) {
|
|
1147
|
+
throw new z.errors.ResponseError(response);
|
|
1148
|
+
}
|
|
1149
|
+
};
|
|
1150
|
+
```
|
|
1151
|
+
|
|
1152
|
+
You can also do it in `afterResponse` if the API uses a status code >= 400 that should not be treated as an error.
|
|
1153
|
+
|
|
1154
|
+
```js
|
|
1155
|
+
// Don't throw an error when response status is 456
|
|
1156
|
+
const disableAutoThrowOn456 = (response, z) => {
|
|
1157
|
+
if (response.status === 456) {
|
|
1158
|
+
response.skipThrowForStatus = true;
|
|
1159
|
+
}
|
|
1160
|
+
return response;
|
|
1161
|
+
};
|
|
1162
|
+
const App = {
|
|
1163
|
+
// ...
|
|
1164
|
+
afterResponse: [disableAutoThrowOn456],
|
|
1165
|
+
// ...
|
|
1166
|
+
};
|
|
1167
|
+
```
|
|
1168
|
+
|
|
1169
|
+
For developers using v9.x and below, it's your responsibility to throw an exception for an error response. That means you should call `response.throwForStatus()` or throw an error yourself, likely following the `z.request` call.
|
|
1170
|
+
|
|
1171
|
+
This behavior has changed periodically across major versions, which changes how/when you have to worry about handling errors. Here's a diagram to illustrate that:
|
|
1172
|
+
|
|
1173
|
+
<!-- diagram source: https://excalidraw.com/#json=stm4O1SLW3ko4FCX9rvsI,6NgRCAK81Cc8M3MuXhNDNA -->
|
|
1174
|
+
|
|
1175
|
+
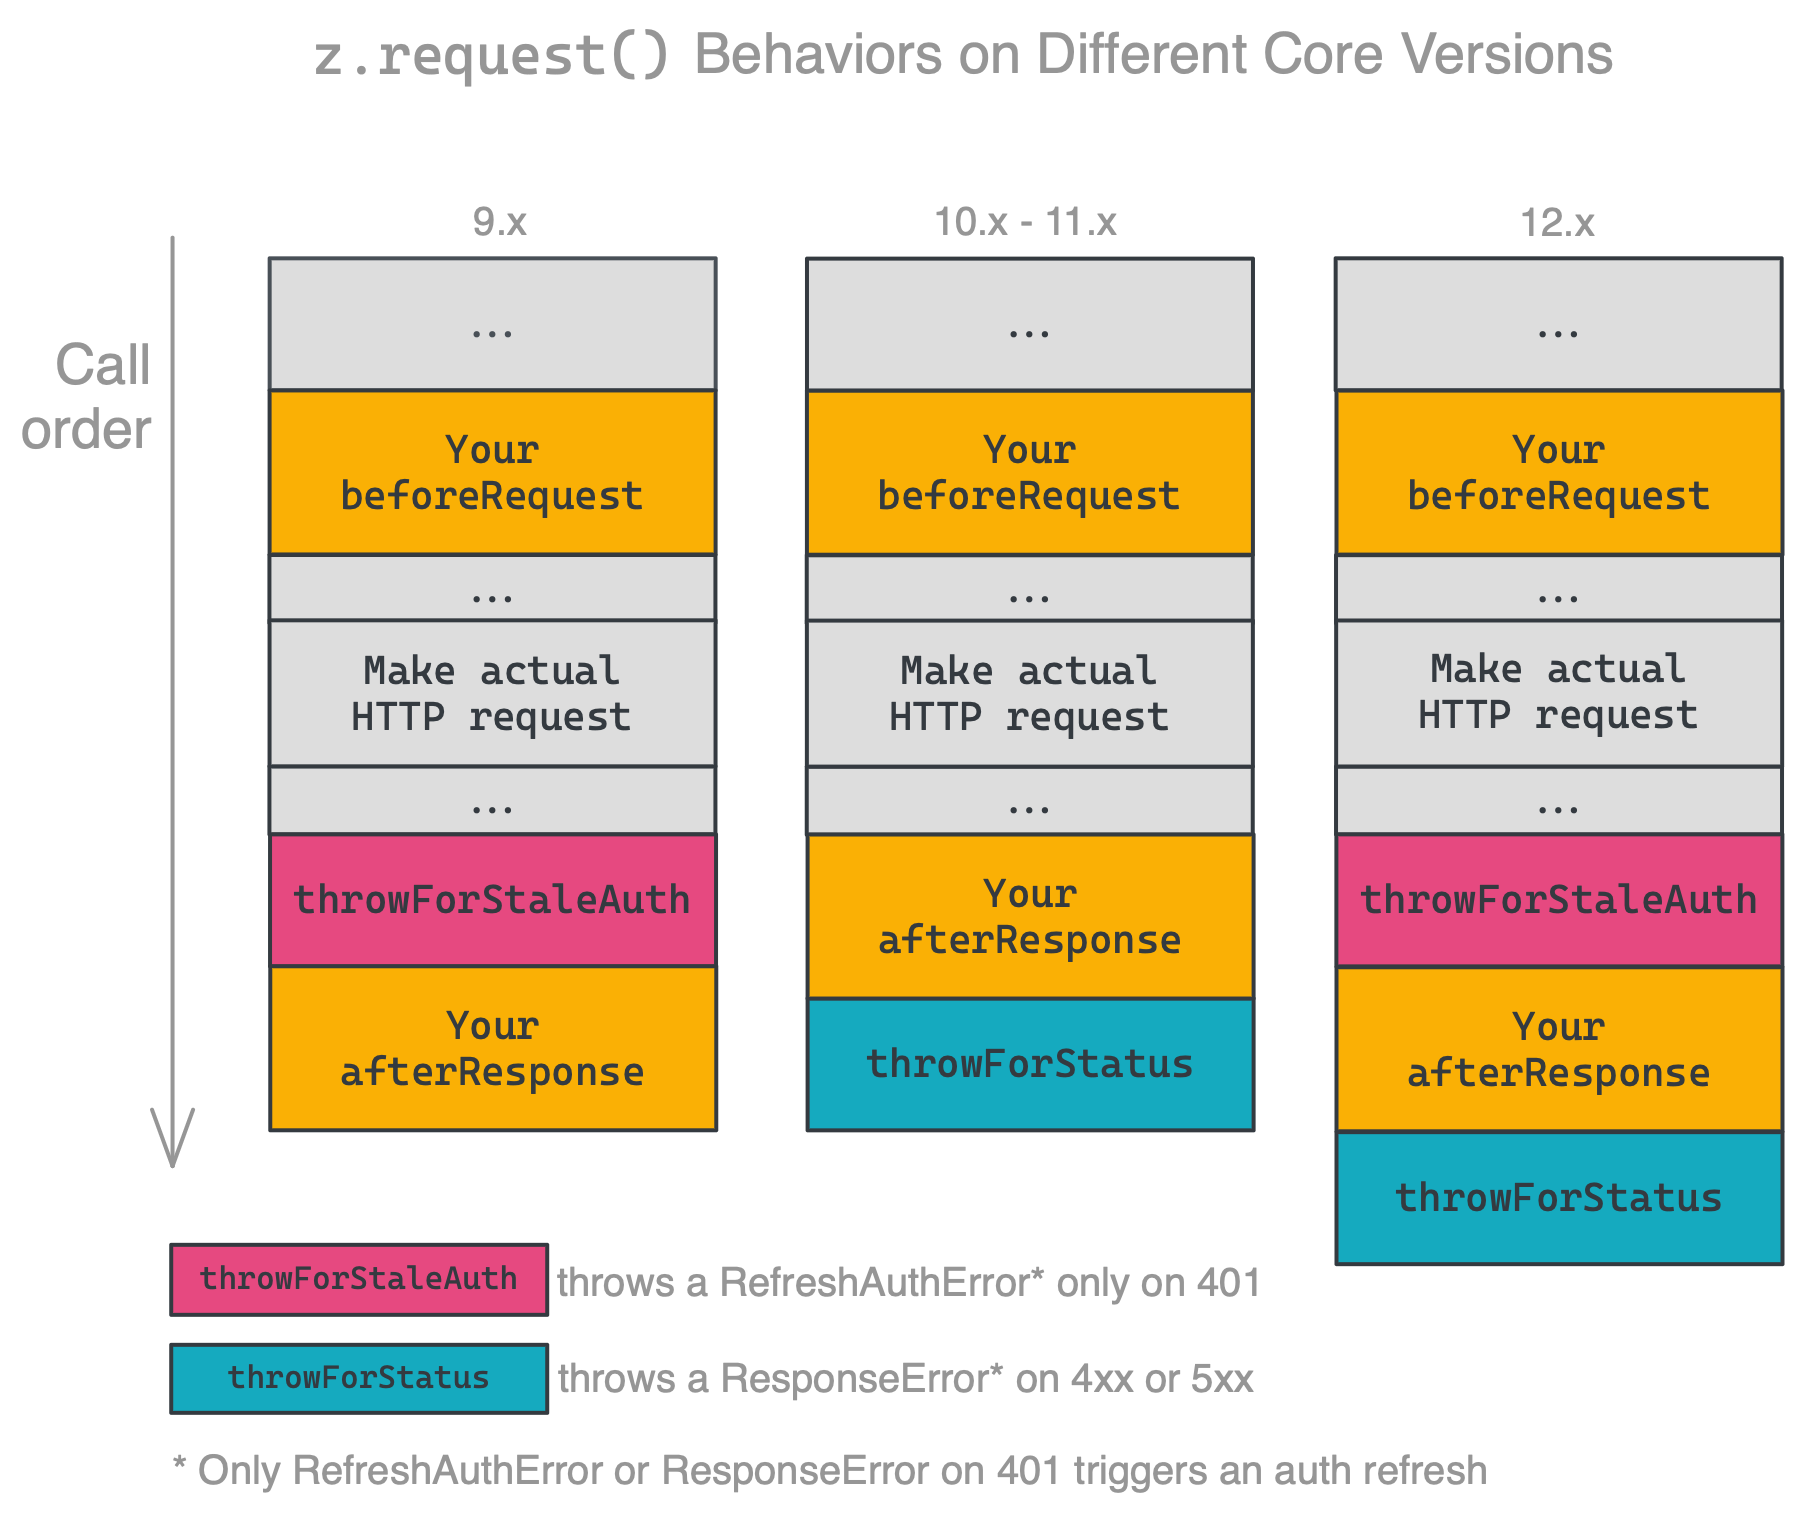
|
|
1176
|
+
|
|
1177
|
+
Ensure you're handling errors correctly for your platform version. The latest released version is **PACKAGE_VERSION**.
|
|
1178
|
+
|
|
1179
|
+
### HTTP Request Options
|
|
1180
|
+
|
|
1181
|
+
[Shorthand requests](#shorthand-http-requests) and [manual requests](#manual-http-requests) support the following HTTP `options`:
|
|
1182
|
+
|
|
1183
|
+
* `url`: HTTP url, you can provide it as a separate argument (`z.request(url, options)`) or as part of the `options` object (`z.request({url: url, ...})`).
|
|
1184
|
+
* `method`: HTTP method, default is `GET`.
|
|
1185
|
+
* `headers`: request headers object, format `{'header-key': 'header-value'}`.
|
|
1186
|
+
* `params`: URL query params object, format `{'query-key': 'query-value'}`.
|
|
1187
|
+
* `body`: request body, can be a string, buffer, readable stream or plain object. When it is an object/array and the `Content-Type` header is `application/x-www-form-urlencoded` the body will be transformed to query string parameters, otherwise we'll set the header to `application/json; charset=utf-8` and JSON encode the body. Default is `null`.
|
|
1188
|
+
* `json`: shortcut object/array/etc. you want to JSON encode into body. Default is `null`.
|
|
1189
|
+
* `form`: shortcut object. you want to form encode into body. Default is `null`.
|
|
1190
|
+
* `raw`: set this to stream the response instead of consuming it immediately. Default is `false`.
|
|
1191
|
+
* `redirect`: set to `manual` to extract redirect headers, `error` to reject redirect, default is `follow`.
|
|
1192
|
+
* `follow`: maximum redirect count, set to `0` to not follow redirects. default is `20`.
|
|
1193
|
+
* `compress`: support gzip/deflate content encoding. Set to `false` to disable. Default is `true`.
|
|
1194
|
+
* `agent`: Node.js `http.Agent` instance, allows custom proxy, certificate etc. Default is `null`.
|
|
1195
|
+
* `timeout`: request / response timeout in ms. Set to `0` to disable (OS limit still applies), timeout reset on `redirect`. Default is `0` (disabled).
|
|
1196
|
+
* `size`: maximum response body size in bytes. Set to `0` to disable. Default is `0` (disabled).
|
|
1197
|
+
* `skipThrowForStatus` (_new in v10.0.0_): don't call `response.throwForStatus()` before resolving the request with `response`. See [HTTP Response Object](#http-response-object).
|
|
1198
|
+
|
|
1199
|
+
```js
|
|
1200
|
+
const response = await z.request({
|
|
1201
|
+
url: 'https://example.com',
|
|
1202
|
+
method: 'POST',
|
|
1203
|
+
headers: {
|
|
1204
|
+
'Content-Type': 'application/json'
|
|
1205
|
+
},
|
|
1206
|
+
// only provide body, json or form...
|
|
1207
|
+
body: {hello: 'world'}, // or '{"hello": "world"}' or 'hello=world'
|
|
1208
|
+
json: {hello: 'world'},
|
|
1209
|
+
form: {hello: 'world'},
|
|
1210
|
+
// access node-fetch style response.body
|
|
1211
|
+
raw: false,
|
|
1212
|
+
redirect: 'follow',
|
|
1213
|
+
follow: 20,
|
|
1214
|
+
compress: true,
|
|
1215
|
+
agent: null,
|
|
1216
|
+
timeout: 0,
|
|
1217
|
+
size: 0,
|
|
1218
|
+
})
|
|
1219
|
+
```
|
|
1220
|
+
|
|
1221
|
+
### HTTP Response Object
|
|
1222
|
+
|
|
1223
|
+
The response object returned by `z.request([url], options)` supports the following fields and methods:
|
|
1224
|
+
|
|
1225
|
+
* `status`: The response status code, i.e. `200`, `404`, etc.
|
|
1226
|
+
* `content`: The response content as a String. For Buffer, try `options.raw = true`.
|
|
1227
|
+
* `data` (_new in v10.0.0_): The response content as an object if the content is JSON or `application/x-www-form-urlencoded` (`undefined` otherwise).
|
|
1228
|
+
* `headers`: Response headers object. The header keys are all lower case.
|
|
1229
|
+
* `getHeader(key)`: Retrieve response header, case insensitive: `response.getHeader('My-Header')`
|
|
1230
|
+
* `skipThrowForStatus` (_new in v10.0.0_): don't call `throwForStatus()` before resolving the request with this response.
|
|
1231
|
+
* `throwForStatus()`: Throws an error if `400 <= statusCode < 600`.
|
|
1232
|
+
* `request`: The original request options object (see above).
|
|
1233
|
+
|
|
1234
|
+
Additionally, if `request.raw` is `true`, the raw response has the following properties:
|
|
1235
|
+
|
|
1236
|
+
* `json()`: Get the response content as an object, if `options.raw = true` and content is JSON (returns a promise). `undefined` in non-raw requests.
|
|
1237
|
+
* `body`: A stream available only if you provide `options.raw = true`.
|
|
1238
|
+
|
|
1239
|
+
```js
|
|
1240
|
+
const response = await z.request({
|
|
1241
|
+
// options
|
|
1242
|
+
});
|
|
1243
|
+
|
|
1244
|
+
// A bunch of examples for demonstration
|
|
1245
|
+
response.status;
|
|
1246
|
+
response.headers['Content-Type'];
|
|
1247
|
+
response.getHeader('content-type');
|
|
1248
|
+
response.request; // original request options
|
|
1249
|
+
response.throwForStatus();
|
|
1250
|
+
|
|
1251
|
+
if (options.raw === false) { // (default)
|
|
1252
|
+
// If you're core v10+
|
|
1253
|
+
response.data; // same as...
|
|
1254
|
+
z.JSON.parse(response.content); // or...
|
|
1255
|
+
querystring.parse(response.content);
|
|
1256
|
+
|
|
1257
|
+
// If you're core v9 or older...
|
|
1258
|
+
response.json; // same as
|
|
1259
|
+
z.JSON.parse(response.content);
|
|
1260
|
+
} else {
|
|
1261
|
+
const buf = await response.buffer();
|
|
1262
|
+
buf.toString();
|
|
1263
|
+
|
|
1264
|
+
const text = await response.text();
|
|
1265
|
+
|
|
1266
|
+
const json = await response.json();
|
|
1267
|
+
|
|
1268
|
+
response.body.pipe(otherStream);
|
|
1269
|
+
}
|
|
1270
|
+
```
|
|
1271
|
+
|
|
1272
|
+
## Dehydration
|
|
1273
|
+
|
|
1274
|
+
Dehydration, and its counterpart Hydration, is a tool that can lazily load data that might be otherwise expensive to retrieve aggressively.
|
|
1275
|
+
|
|
1276
|
+
* **Dehydration** - think of this as "make a pointer", you control the creation of pointers with `z.dehydrate(func, inputData)` (or `z.dehydrateFile(func, inputData)` for files). This usually happens in a trigger step.
|
|
1277
|
+
* **Hydration** - think of this as an automatic step that "consumes a pointer" and "returns some data", Zapier does this automatically behind the scenes. This usually happens in an action step.
|
|
1278
|
+
|
|
1279
|
+
> This is very common when [Stashing Files](#stashing-files) - but that isn't their only use!
|
|
1280
|
+
|
|
1281
|
+
The method `z.dehydrate(func, inputData)` has two required arguments:
|
|
1282
|
+
|
|
1283
|
+
* `func` - the function to call to fetch the extra data. Can be any raw `function`, defined in the file doing the dehydration or imported from another part of your app. You must also register the function in the app's `hydrators` property
|
|
1284
|
+
* `inputData` - this is an object that contains things like a `path` or `id` - whatever you need to load data on the other side
|
|
1285
|
+
|
|
1286
|
+
> **Why do I need to register my functions?** Because of how JavaScript works with its module system, we need an explicit handle on the function that can be accessed from the App definition without trying to "automagically" (and sometimes incorrectly) infer code locations.
|
|
1287
|
+
|
|
1288
|
+
Here is an example that pulls in extra data for a movie:
|
|
1289
|
+
|
|
1290
|
+
```js
|
|
1291
|
+
[insert-file:./snippets/dehydration.js]
|
|
1292
|
+
```
|
|
1293
|
+
|
|
1294
|
+
And in future steps of the Zap - if Zapier encounters a pointer as returned by `z.dehydrate(func, inputData)` - Zapier will tie it back to your app and pull in the data lazily.
|
|
1295
|
+
|
|
1296
|
+
> **Why can't I just load the data immediately?** Isn't it easier? In some cases it can be - but imagine an API that returns 100 records when polling - doing 100x `GET /id.json` aggressive inline HTTP calls when 99% of the time Zapier doesn't _need_ the data yet is wasteful.
|
|
1297
|
+
|
|
1298
|
+
### Merging Hydrated Data
|
|
1299
|
+
|
|
1300
|
+
As you've seen, the usual call to dehydrate will assign the result to an object property:
|
|
1301
|
+
|
|
1302
|
+
```js
|
|
1303
|
+
movie.details = z.dehydrate(getMovieDetails, { id: movie.id });
|
|
1304
|
+
```
|
|
1305
|
+
|
|
1306
|
+
In this example, all of the movie details will be located in the `details` property (e.g. `details.releaseDate`) after hydration occurs. But what if you want these results available at the top-level (e.g. `releaseDate`)? Zapier supports a specific keyword for this scenario:
|
|
1307
|
+
|
|
1308
|
+
```js
|
|
1309
|
+
movie.$HOIST$ = z.dehydrate(getMovieDetails, { id: movie.id });
|
|
1310
|
+
```
|
|
1311
|
+
|
|
1312
|
+
Using `$HOIST$` as the key will signal to Zapier that the results should be merged into the object containing the `$HOIST$` key. You can also use this to merge your hydrated data into a property containing "partial" data that exists before dehydration occurs:
|
|
1313
|
+
|
|
1314
|
+
```js
|
|
1315
|
+
movie.details = {
|
|
1316
|
+
title: movie.title,
|
|
1317
|
+
$HOIST$: z.dehydrate(getMovieDetails, { id: movie.id })
|
|
1318
|
+
};
|
|
1319
|
+
```
|
|
1320
|
+
|
|
1321
|
+
### File Dehydration
|
|
1322
|
+
|
|
1323
|
+
*New in v7.3.0.*
|
|
1324
|
+
|
|
1325
|
+
The method `z.dehydrateFile(func, inputData)` allows you to download a file lazily. It takes the identical arguments as `z.dehydrate(func, inputData)` does.
|
|
1326
|
+
|
|
1327
|
+
An example can be found in the [Stashing Files](#stashing-files) section.
|
|
1328
|
+
|
|
1329
|
+
What makes `z.dehydrateFile` different from `z.dehydrate` has to do with efficiency and when Zapier chooses to hydrate data. Knowing which pointers give us back files helps us delay downloading files until its absolutely necessary. A good example is users creating Zaps in the Zap Editor. If a pointer is made by `z.dehydrate`, the Zap Editor will hydrate the data immediately after pulling in samples. This allows users to map fields from the hydrated data into the subsequent steps of the Zap. If, however, the pointer is made by `z.dehydrateFile`, the Zap Editor will wait to hydrate the file. There's nothing in binary file data for users to map in the subsequent steps.
|
|
1330
|
+
|
|
1331
|
+
> `z.dehydrateFile(func, inputData)` is new in v7.3.0. We used to recommend to use `z.dehydrate(func, inputData)` for files, but it's not the case anymore. Please change it to `z.dehydrateFile(func, inputData)` for a better user experience.
|
|
1332
|
+
|
|
1333
|
+
## Stashing Files
|
|
1334
|
+
|
|
1335
|
+
It can be expensive to download and stream files or they can require complex handshakes to authorize downloads - so we provide a helpful stash routine that will take any `String`, `Buffer` or `Stream` and return a URL file pointer suitable for returning from triggers, searches, creates, etc.
|
|
1336
|
+
|
|
1337
|
+
The interface `z.stashFile(bufferStringStream, [knownLength], [filename], [contentType])` takes a single required argument - the extra three arguments will be automatically populated in most cases. For example - a full example is this:
|
|
1338
|
+
|
|
1339
|
+
```js
|
|
1340
|
+
const content = 'Hello world!';
|
|
1341
|
+
const url = await z.stashFile(content, content.length, 'hello.txt', 'text/plain');
|
|
1342
|
+
z.console.log(url);
|
|
1343
|
+
// https://zapier-dev-files.s3.amazonaws.com/cli-platform/f75e2819-05e2-41d0-b70e-9f8272f9eebf
|
|
1344
|
+
```
|
|
1345
|
+
|
|
1346
|
+
Most likely you'd want to stream from another URL - note the usage of `z.request({raw: true})`:
|
|
1347
|
+
|
|
1348
|
+
```js
|
|
1349
|
+
const fileRequest = z.request({url: 'https://example.com/file.pdf', raw: true});
|
|
1350
|
+
const url = await z.stashFile(fileRequest); // knownLength and filename will be sniffed from the request. contentType will be binary/octet-stream
|
|
1351
|
+
z.console.log(url);
|
|
1352
|
+
// https://zapier-dev-files.s3.amazonaws.com/cli-platform/74bc623c-d94d-4cac-81f1-f71d7d517bc7
|
|
1353
|
+
```
|
|
1354
|
+
|
|
1355
|
+
> Note: you should only be using `z.stashFile()` in a hydration method or a hook trigger's `perform` if you're sending over a short-lived URL to a file. Otherwise, it can be very expensive to stash dozens of files in a polling call - for example!
|
|
1356
|
+
|
|
1357
|
+
See a full example with dehydration/hydration wired in correctly:
|
|
1358
|
+
|
|
1359
|
+
```js
|
|
1360
|
+
[insert-file:./snippets/stash-file.js]
|
|
1361
|
+
```
|
|
1362
|
+
|
|
1363
|
+
> To create a new integration for handling files, run `zapier init [your app name] --template files`. You can also check out our working example app [here](https://github.com/zapier/zapier-platform/tree/master/example-apps/files).
|
|
1364
|
+
|
|
1365
|
+
|
|
1366
|
+
## Logging
|
|
1367
|
+
|
|
1368
|
+
There are two types of logs for a Zapier app, console logs and HTTP logs. The console logs are created by your app through the use of the `z.console.log` method ([see below for details](#console-logging)). The HTTP logs are created automatically by Zapier whenever your app makes HTTP requests (as long as you use `z.request([url], options)` or shorthand request objects).
|
|
1369
|
+
|
|
1370
|
+
To view the logs for your application, use the `zapier logs` command. There are three types of logs, `http` (logged automatically by Zapier on HTTP requests), `bundle` (logged automatically on every method execution), and `console` (manual logs via `z.console.log()` statements).
|
|
1371
|
+
|
|
1372
|
+
For advanced logging options including only displaying the logs for a certain user or app version, look at the help for the logs command:
|
|
1373
|
+
|
|
1374
|
+
```bash
|
|
1375
|
+
zapier help logs
|
|
1376
|
+
```
|
|
1377
|
+
|
|
1378
|
+
### Console Logging
|
|
1379
|
+
|
|
1380
|
+
To manually print a log statement in your code, use `z.console.log`:
|
|
1381
|
+
|
|
1382
|
+
```js
|
|
1383
|
+
z.console.log('Here are the input fields', bundle.inputData);
|
|
1384
|
+
```
|
|
1385
|
+
|
|
1386
|
+
The `z.console` object has all the same methods and works just like the Node.js [`Console`](https://nodejs.org/docs/latest-v6.x/api/console.html) class - the only difference is we'll log to our distributed datastore and you can view them via `zapier logs` (more below).
|
|
1387
|
+
|
|
1388
|
+
### Viewing Console Logs
|
|
1389
|
+
|
|
1390
|
+
To see your `z.console.log` logs, do:
|
|
1391
|
+
|
|
1392
|
+
```bash
|
|
1393
|
+
zapier logs --type=console
|
|
1394
|
+
```
|
|
1395
|
+
|
|
1396
|
+
### Viewing Bundle Logs
|
|
1397
|
+
|
|
1398
|
+
To see the bundle logs, do:
|
|
1399
|
+
|
|
1400
|
+
```bash
|
|
1401
|
+
zapier logs --type=bundle
|
|
1402
|
+
```
|
|
1403
|
+
|
|
1404
|
+
### HTTP Logging
|
|
1405
|
+
|
|
1406
|
+
If you are using the `z.request()` shortcut that we provide - HTTP logging is handled automatically for you. For example:
|
|
1407
|
+
|
|
1408
|
+
```js
|
|
1409
|
+
z.request('https://57b20fb546b57d1100a3c405.mockapi.io/api/recipes')
|
|
1410
|
+
.then((res) => {
|
|
1411
|
+
// do whatever you like, this request is already getting logged! :-D
|
|
1412
|
+
return res;
|
|
1413
|
+
})
|
|
1414
|
+
```
|
|
1415
|
+
|
|
1416
|
+
### Viewing HTTP Logs
|
|
1417
|
+
|
|
1418
|
+
To see the HTTP logs, do:
|
|
1419
|
+
|
|
1420
|
+
```bash
|
|
1421
|
+
zapier logs --type=http
|
|
1422
|
+
```
|
|
1423
|
+
To see detailed http logs including headers, request and response bodies, etc, do:
|
|
1424
|
+
|
|
1425
|
+
```bash
|
|
1426
|
+
zapier logs --type=http --detailed
|
|
1427
|
+
```
|
|
1428
|
+
|
|
1429
|
+
|
|
1430
|
+
## Error Handling
|
|
1431
|
+
|
|
1432
|
+
APIs are not always available. Users do not always input data correctly to
|
|
1433
|
+
formulate valid requests. Thus, it is a good idea to write apps defensively and
|
|
1434
|
+
plan for 4xx and 5xx responses from APIs. Without proper handling, errors often
|
|
1435
|
+
have incomprehensible messages for end users, or possibly go uncaught.
|
|
1436
|
+
|
|
1437
|
+
Zapier provides a couple of tools to help with error handling. First is the
|
|
1438
|
+
`afterResponse` middleware ([docs](#using-http-middleware)), which provides a hook for
|
|
1439
|
+
processing all responses from HTTP calls. Second is `response.throwForStatus()`
|
|
1440
|
+
([docs](#http-response-object)), which throws an error if the response status indicates
|
|
1441
|
+
an error (status >= 400). Since v10.0.0, we automatically call this method before returning the
|
|
1442
|
+
response, unless you set `skipThrowForStatus` on the request or response object. The
|
|
1443
|
+
last tool is the collection of errors in `z.errors` ([docs](#zerrors)), which control
|
|
1444
|
+
the behavior of Zaps when various kinds of errors occur.
|
|
1445
|
+
|
|
1446
|
+
### General Errors
|
|
1447
|
+
|
|
1448
|
+
Errors due to a misconfiguration in a user's Zap should be handled in your app
|
|
1449
|
+
by throwing `z.errors.Error` with a user-friendly message and optional error and
|
|
1450
|
+
status code. Typically, this will be prettifying 4xx responses or APIs that return
|
|
1451
|
+
errors as 200s with a payload that describes the error.
|
|
1452
|
+
|
|
1453
|
+
Example: `throw new z.errors.Error('Contact name is too long.', 'InvalidData', 400);`
|
|
1454
|
+
|
|
1455
|
+
> `z.errors.Error` is new in v9.3.0. If you're on an older version of `zapier-platform-core`, throw a standard JavaScript `Error` instead, such as `throw new Error('A user-friendly message')`.
|
|
1456
|
+
|
|
1457
|
+
A couple best practices to keep in mind:
|
|
1458
|
+
|
|
1459
|
+
* Elaborate on terse messages. "not_authenticated" -> "Your API Key is invalid. Please reconnect your account."
|
|
1460
|
+
* If the error calls out a specific field, surface that information to the user. "Provided data is invalid" -> "Contact name is invalid"
|
|
1461
|
+
* If the error provides details about why a field is invalid, add that in too! "Contact name is invalid" -> "Contact name is too long"
|
|
1462
|
+
* The second, optional argument should be a code that a computer could use to identify the type of error.
|
|
1463
|
+
* The last, optional argument should be the HTTP status code, if any.
|
|
1464
|
+
|
|
1465
|
+
The code and status can be used by us to provide relevant troubleshooting to the
|
|
1466
|
+
user when we communicate the error.
|
|
1467
|
+
|
|
1468
|
+
Note that if a Zap raises too many error messages it will be automatically
|
|
1469
|
+
turned off, so only use these if the scenario is truly an error that needs to
|
|
1470
|
+
be fixed.
|
|
1471
|
+
|
|
1472
|
+
### Halting Execution
|
|
1473
|
+
|
|
1474
|
+
Any operation can be interrupted or "halted" (not success, not error, but
|
|
1475
|
+
stopped for some specific reason) with a `HaltedError`. You might find yourself
|
|
1476
|
+
using this error in cases where a required pre-condition is not met. For instance,
|
|
1477
|
+
in a create to add an email address to a list where duplicates are not allowed,
|
|
1478
|
+
you would want to throw a `HaltedError` if the Zap attempted to add a duplicate.
|
|
1479
|
+
This would indicate failure, but it would be treated as a soft failure.
|
|
1480
|
+
|
|
1481
|
+
Unlike throwing `z.errors.Error`, a Zap will never by turned off when this error is thrown
|
|
1482
|
+
(even if it is raised more often than not).
|
|
1483
|
+
|
|
1484
|
+
Example: `throw new z.errors.HaltedError('Your reason.');`
|
|
1485
|
+
|
|
1486
|
+
### Stale Authentication Credentials
|
|
1487
|
+
|
|
1488
|
+
For apps that require manual refresh of authorization on a regular basis, Zapier
|
|
1489
|
+
provides a mechanism to notify users of expired credentials. With the
|
|
1490
|
+
`ExpiredAuthError`, the current operation is interrupted and a predefined email
|
|
1491
|
+
is sent out asking the user to refresh the credentials. While the auth is
|
|
1492
|
+
disconnected, Zap runs will not be executed, to prevent more calls with expired
|
|
1493
|
+
credentials. (The runs will be
|
|
1494
|
+
[Held](https://zapier.com/help/manage/history/view-and-manage-your-zap-history#holding),
|
|
1495
|
+
and the user will be able to replay them after reconnecting.)
|
|
1496
|
+
|
|
1497
|
+
Example: `throw new z.errors.ExpiredAuthError('You must manually reconnect this auth.');`
|
|
1498
|
+
|
|
1499
|
+
For apps that use OAuth2 with `autoRefresh: true` or Session Auth, `core` injects
|
|
1500
|
+
a built-in `afterResponse` middleware that throws an error when the response status
|
|
1501
|
+
is 401. The error will signal Zapier to refresh the credentials and then retry the
|
|
1502
|
+
failed operation. You can also throw this error manually if your server doesn't use the 401 status or you want to trigger an auth refresh even if the credentials aren't stale.
|
|
1503
|
+
|
|
1504
|
+
Example: `throw new z.errors.RefreshAuthError();`
|
|
1505
|
+
|
|
1506
|
+
### Handling Throttled Requests
|
|
1507
|
+
|
|
1508
|
+
Since v11.2.0, there are two types of errors that can cause Zapier to throttle an operation and retry at a later time.
|
|
1509
|
+
This is useful if the API you're interfacing with is reports it is receiving too many requests, often indicated by
|
|
1510
|
+
receiving a response status code of 429.
|
|
1511
|
+
|
|
1512
|
+
If a response receives a status code of 429 and is not caught, Zapier will re-attempt the operation after a delay.
|
|
1513
|
+
The delay can be customized by the server response containing a
|
|
1514
|
+
[Retry-After](https://developer.mozilla.org/en-US/docs/Web/HTTP/Headers/Retry-After) header.
|
|
1515
|
+
|
|
1516
|
+
Another way to request Zapier retry an operation is to throw a `ThrottledError`, which may also optionally specify a
|
|
1517
|
+
delay in seconds:
|
|
1518
|
+
|
|
1519
|
+
```js
|
|
1520
|
+
const yourAfterResponse = (resp) => {
|
|
1521
|
+
if (resp.status === 429) {
|
|
1522
|
+
throw new ThrottledError('message here', 60); // Zapier will retry in 60 seconds
|
|
1523
|
+
}
|
|
1524
|
+
return resp;
|
|
1525
|
+
};
|
|
1526
|
+
```
|
|
1527
|
+
|
|
1528
|
+
## Testing
|
|
1529
|
+
|
|
1530
|
+
You can write unit tests for your Zapier integration that run locally, outside of the Zapier editor.
|
|
1531
|
+
You can run these tests in a CI tool like [Travis](https://travis-ci.com/).
|
|
1532
|
+
|
|
1533
|
+
### Writing Unit Tests
|
|
1534
|
+
|
|
1535
|
+
From v10 of `zapier-platform-cli`, we recommend using the [Jest](https://jestjs.io/) testing framework. After running `zapier init` you should find an example test to start from in the `test` directory.
|
|
1536
|
+
|
|
1537
|
+
> Note: On v9, the recommendation was [Mocha](https://mochajs.org/). You can still use Mocha if you prefer.
|
|
1538
|
+
|
|
1539
|
+
```js
|
|
1540
|
+
[insert-file:./snippets/jest-test.js]
|
|
1541
|
+
```
|
|
1542
|
+
|
|
1543
|
+
### Using the `z` Object in Tests
|
|
1544
|
+
|
|
1545
|
+
Introduced in `core@11.1.0`, `appTester` can now run arbitrary functions:
|
|
1546
|
+
|
|
1547
|
+
```js
|
|
1548
|
+
[insert-file:./snippets/jest-adhoc-func.js]
|
|
1549
|
+
```
|
|
1550
|
+
|
|
1551
|
+
### Mocking Requests
|
|
1552
|
+
|
|
1553
|
+
It's useful to test your code without actually hitting any external services. [Nock](https://github.com/node-nock/nock) is a Node.js utility that intercepts requests before they ever leave your computer. You can specify a response code, body, headers, and more. It works out of the box with `z.request` by setting up your `nock` before calling `appTester`.
|
|
1554
|
+
|
|
1555
|
+
```js
|
|
1556
|
+
[insert-file:./snippets/jest-mocked-test.js]
|
|
1557
|
+
```
|
|
1558
|
+
|
|
1559
|
+
Here's more info about nock and its usage in the [README](https://github.com/node-nock/nock/blob/master/README.md).
|
|
1560
|
+
|
|
1561
|
+
### Running Unit Tests
|
|
1562
|
+
|
|
1563
|
+
To run all your tests do:
|
|
1564
|
+
|
|
1565
|
+
```bash
|
|
1566
|
+
zapier test
|
|
1567
|
+
```
|
|
1568
|
+
|
|
1569
|
+
> You can also go direct with `npm test` or `node_modules/.bin/jest`.
|
|
1570
|
+
|
|
1571
|
+
### Testing & Environment Variables
|
|
1572
|
+
|
|
1573
|
+
The best way to store sensitive values (like API keys, OAuth secrets, or passwords) is in an `.env` (or `.environment`, see below note) file ([learn more](https://github.com/motdotla/dotenv#faq)). Then, you can include the following before your tests run:
|
|
1574
|
+
|
|
1575
|
+
```js
|
|
1576
|
+
const zapier = require('zapier-platform-core');
|
|
1577
|
+
zapier.tools.env.inject(); // inject() can take a filename; defaults to ".env"
|
|
1578
|
+
|
|
1579
|
+
// now process.env has all the values in your .env file
|
|
1580
|
+
```
|
|
1581
|
+
|
|
1582
|
+
> `.env` is the new recommended name for the environment file since v5.1.0. The old name `.environment` is deprecated but will continue to work for backward compatibility.
|
|
1583
|
+
|
|
1584
|
+
> Remember: **NEVER** add your secrets file to version control!
|
|
1585
|
+
|
|
1586
|
+
Additionally, you can provide them dynamically at runtime:
|
|
1587
|
+
|
|
1588
|
+
```bash
|
|
1589
|
+
CLIENT_ID=1234 CLIENT_SECRET=abcd zapier test
|
|
1590
|
+
```
|
|
1591
|
+
|
|
1592
|
+
Or, `export` them explicitly and place them into the environment:
|
|
1593
|
+
|
|
1594
|
+
```bash
|
|
1595
|
+
export CLIENT_ID=1234
|
|
1596
|
+
export CLIENT_SECRET=abcd
|
|
1597
|
+
zapier test
|
|
1598
|
+
```
|
|
1599
|
+
|
|
1600
|
+
### Testing in Your CI
|
|
1601
|
+
|
|
1602
|
+
Whether you use Travis, Circle, Jenkins, or another service, we aim to make it painless to test in an automated environment.
|
|
1603
|
+
|
|
1604
|
+
Behind the scenes `zapier test` does a standard `npm test`, which could be [Jest](https://jestjs.io/) or [Mocha](https://mochajs.org/), based on your project setup.
|
|
1605
|
+
|
|
1606
|
+
This makes it straightforward to integrate into your testing interface. For example, if you want to test with [Travis CI](https://travis-ci.com/), the `.travis.yml` would look something like this:
|
|
1607
|
+
|
|
1608
|
+
```yaml
|
|
1609
|
+
language: node_js
|
|
1610
|
+
node_js:
|
|
1611
|
+
- "LAMBDA_VERSION"
|
|
1612
|
+
before_script: npm install -g zapier-platform-cli
|
|
1613
|
+
script: CLIENT_ID=1234 CLIENT_SECRET=abcd zapier test
|
|
1614
|
+
```
|
|
1615
|
+
|
|
1616
|
+
You can substitute `zapier test` with `npm test`, or a direct call to `node_modules/.bin/jest`. We recommend putting environment variables directly into the configuration screens Jenkins, Travis, or other services provide.
|
|
1617
|
+
|
|
1618
|
+
Alternatively to reading the deploy key from root (the default location), you may set the `ZAPIER_DEPLOY_KEY` environment variable to run privileged commands without the human input needed for `zapier login`. We suggest encrypting your deploy key in the manner your CI provides (such as [these instructions](https://docs.travis-ci.com/user/environment-variables/#Defining-encrypted-variables-in-.travis.yml), for Travis).
|
|
1619
|
+
|
|
1620
|
+
### Debugging Tests
|
|
1621
|
+
|
|
1622
|
+
Sometimes tests aren't enough, and you may want to step through your code and set breakpoints. The testing suite is a regular Node.js process, so debugging it doesn't take anything special. Because we recommend `jest` for testing, these instructions will outline steps for debugging w/ jest, but other test runners will work similarly. You can also refer to [Jest's own docs on the subject](https://jestjs.io/docs/en/troubleshooting#tests-are-failing-and-you-dont-know-why).
|
|
1623
|
+
|
|
1624
|
+
To start, add the following line to the `scripts` section of your `package.json`:
|
|
1625
|
+
|
|
1626
|
+
```
|
|
1627
|
+
"test:debug": "node --inspect-brk node_modules/.bin/jest --runInBand"
|
|
1628
|
+
```
|
|
1629
|
+
|
|
1630
|
+
This will tell `node` to inspect the `jest` processes, which is exactly what we need.
|
|
1631
|
+
|
|
1632
|
+
Next, add a `debugger;` statement somewhere in your code, probably in a `perform` method:
|
|
1633
|
+
|
|
1634
|
+
```js
|
|
1635
|
+
// triggers on a new pizza with a certain tag
|
|
1636
|
+
const perform = async (z, bundle) => {
|
|
1637
|
+
const response = await z.request({
|
|
1638
|
+
url: "https://jsonplaceholder.typicode.com/posts",
|
|
1639
|
+
params: {
|
|
1640
|
+
tag: bundle.inputData.tagName,
|
|
1641
|
+
},
|
|
1642
|
+
});
|
|
1643
|
+
debugger;
|
|
1644
|
+
// this should return an array of objects
|
|
1645
|
+
return response.data;
|
|
1646
|
+
};
|
|
1647
|
+
```
|
|
1648
|
+
|
|
1649
|
+
This creates a _breakpoint_ while `inspect`ing, or a starting point for our manual inspection.
|
|
1650
|
+
|
|
1651
|
+
Next, you'll need an inspection client. The most available one is probably the Google Chrome browser, but there are [lots of options](https://nodejs.org/en/docs/guides/debugging-getting-started/#inspector-clients). We'll use Chrome for this example. In your terminal (and in your integration's root directory), run `yarn test:debug` (or `npm run test:debug`). You should see the following:
|
|
1652
|
+
|
|
1653
|
+
```
|
|
1654
|
+
% yarn test:debug
|
|
1655
|
+
yarn run v1.22.10
|
|
1656
|
+
$ node --inspect-brk node_modules/.bin/jest --runInBand
|
|
1657
|
+
Debugger listening on ws://127.0.0.1:9229/5edaab3c-a1d3-45e4-b374-0536095c559b
|
|
1658
|
+
For help, see: https://nodejs.org/en/docs/inspector
|
|
1659
|
+
```
|
|
1660
|
+
|
|
1661
|
+
Now in Chrome, go to chrome://inspect. Make sure `Discover Network Targets` is checked and you should see a path to your `jest` file on your local machine:
|
|
1662
|
+
|
|
1663
|
+
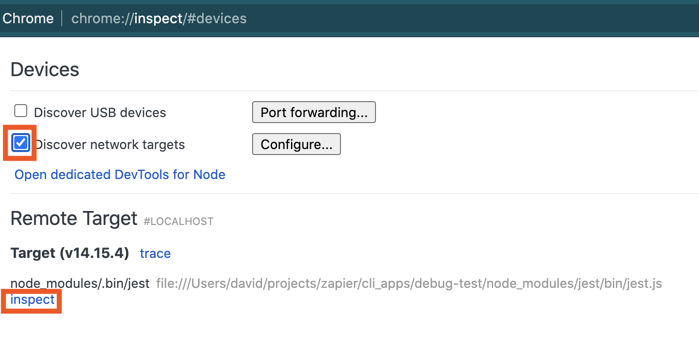
|
|
1664
|
+
|
|
1665
|
+
Click `inspect`. A new window will open. Next, click the little blue arrow in the top right to actually run the code:
|
|
1666
|
+
|
|
1667
|
+
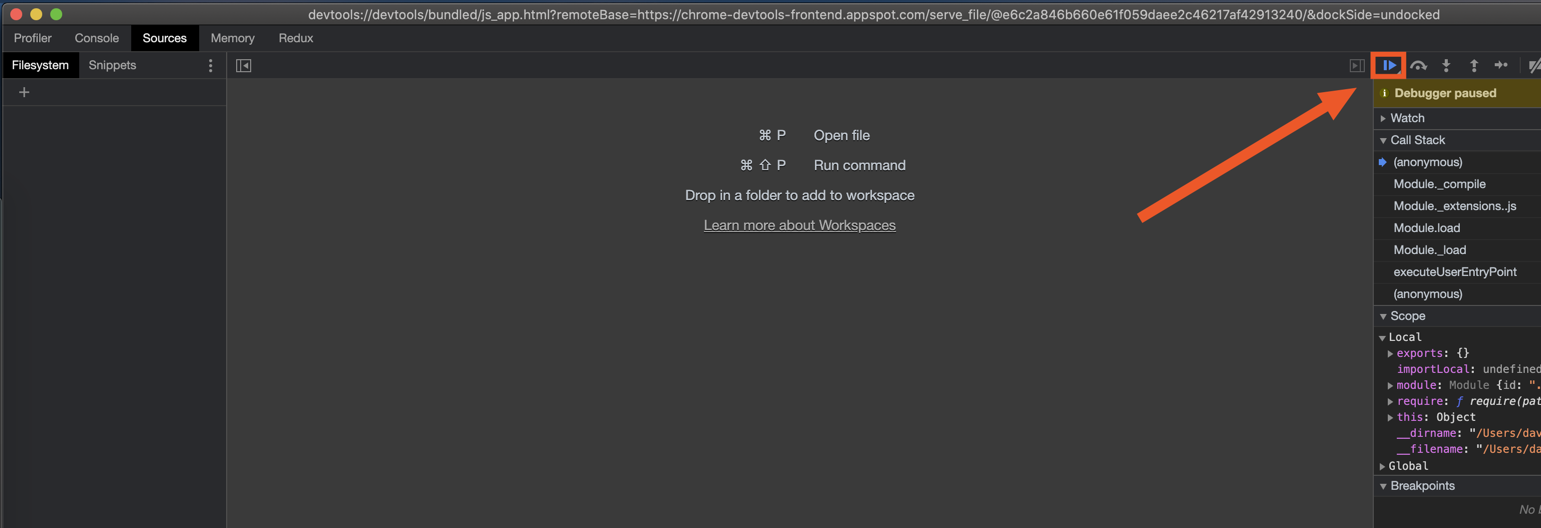
|
|
1668
|
+
|
|
1669
|
+
After a few seconds, you'll see your code, the `debugger` statement, and info about the current environment on the right panel. You should see familiar data in the `Locals` section, such as the `response` variable, and the `z` object.
|
|
1670
|
+
|
|
1671
|
+
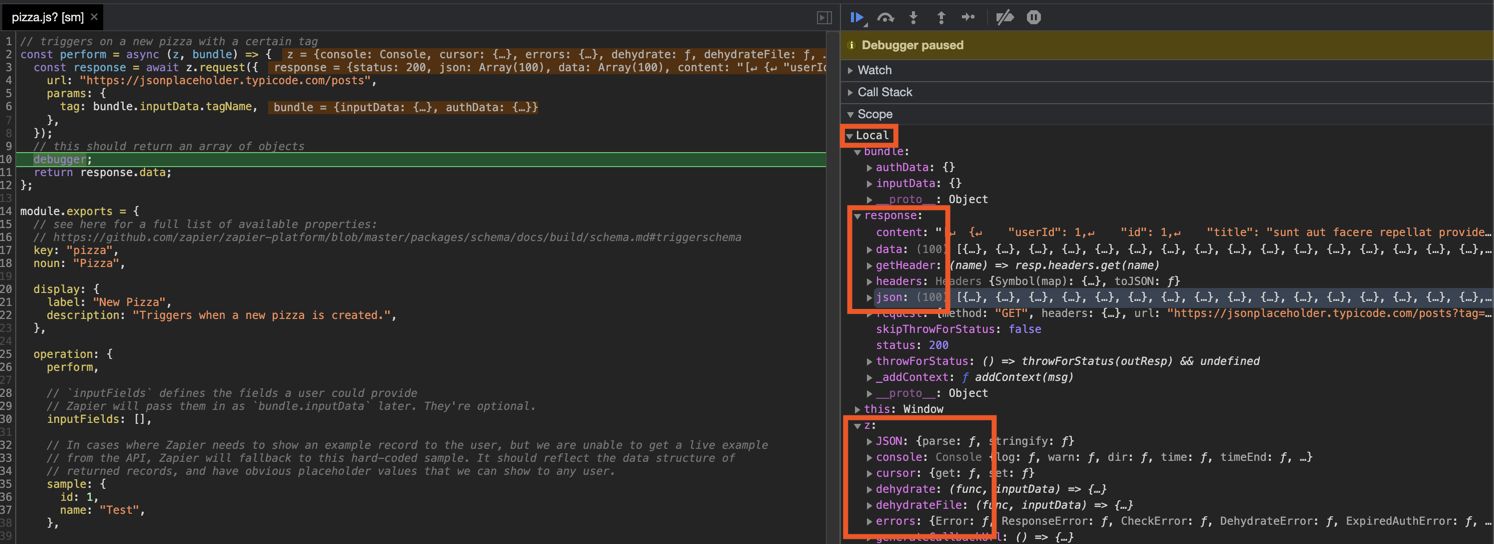
|
|
1672
|
+
|
|
1673
|
+
Debugging combined with thorough unit tests will hopefully equip you in keeping your Zapier integration in smooth working order.
|
|
1674
|
+
|
|
1675
|
+
## Using `npm` Modules
|
|
1676
|
+
|
|
1677
|
+
Use `npm` modules just like you would use them in any other node app, for example:
|
|
1678
|
+
|
|
1679
|
+
```bash
|
|
1680
|
+
npm install --save jwt
|
|
1681
|
+
```
|
|
1682
|
+
|
|
1683
|
+
And then `package.json` will be updated, and you can use them like anything else:
|
|
1684
|
+
|
|
1685
|
+
```js
|
|
1686
|
+
const jwt = require('jwt');
|
|
1687
|
+
```
|
|
1688
|
+
|
|
1689
|
+
During the `zapier build` or `zapier push` step - we'll copy all your code to a temporary folder and do a fresh re-install of modules.
|
|
1690
|
+
|
|
1691
|
+
> Note: If your package isn't being pushed correctly (IE: you get "Error: Cannot find module 'whatever'" in production), try adding the `--disable-dependency-detection` flag to `zapier push`.
|
|
1692
|
+
|
|
1693
|
+
> Note 2: You can also try adding a `includeInBuild` array property (with paths to include, which will be evaluated to RegExp, with a case insensitive flag) to your `.zapierapprc` file, to make it look like:
|
|
1694
|
+
|
|
1695
|
+
```json
|
|
1696
|
+
{
|
|
1697
|
+
"id": 1,
|
|
1698
|
+
"key": "App1",
|
|
1699
|
+
"includeInBuild": [
|
|
1700
|
+
"test.txt",
|
|
1701
|
+
"testing.json"
|
|
1702
|
+
]
|
|
1703
|
+
}
|
|
1704
|
+
|
|
1705
|
+
```
|
|
1706
|
+
|
|
1707
|
+
> Warning: Do not use compiled libraries unless you run your build on the AWS AMI `ami-4fffc834`, or follow the Docker instructions below.
|
|
1708
|
+
|
|
1709
|
+
## Building Native Packages with Docker
|
|
1710
|
+
|
|
1711
|
+
Unfortunately if you are developing on a macOS or Windows box you won't be able to build native libraries locally. If you try and push locally build native modules, you'll get runtime errors during usage. However, you can use Docker and Docker Compose to do this in a pinch. Make sure you have all the necessary Docker programs installed and follow along.
|
|
1712
|
+
|
|
1713
|
+
First, create your `Dockerfile`:
|
|
1714
|
+
|
|
1715
|
+
```Dockerfile
|
|
1716
|
+
FROM amazonlinux:2017.03.1.20170812
|
|
1717
|
+
|
|
1718
|
+
RUN yum install zip findutils wget gcc44 gcc-c++ libgcc44 cmake -y
|
|
1719
|
+
|
|
1720
|
+
RUN wget https://nodejs.org/dist/v8.10.0/node-v8.10.0.tar.gz && \
|
|
1721
|
+
tar -zxvf node-v8.10.0.tar.gz && \
|
|
1722
|
+
cd node-v8.10.0 && \
|
|
1723
|
+
./configure && \
|
|
1724
|
+
make && \
|
|
1725
|
+
make install && \
|
|
1726
|
+
cd .. && \
|
|
1727
|
+
rm -rf node-v8.10.0 node-v8.10.0.tar.gz
|
|
1728
|
+
|
|
1729
|
+
RUN npm i -g zapier-platform-cli
|
|
1730
|
+
|
|
1731
|
+
WORKDIR /app
|
|
1732
|
+
```
|
|
1733
|
+
|
|
1734
|
+
And finally, create your `docker-compose.yml` file:
|
|
1735
|
+
|
|
1736
|
+
```yml
|
|
1737
|
+
version: '3.4'
|
|
1738
|
+
|
|
1739
|
+
services:
|
|
1740
|
+
pusher:
|
|
1741
|
+
build: .
|
|
1742
|
+
volumes:
|
|
1743
|
+
- .:/app
|
|
1744
|
+
- node_modules:/app/node_modules:delegated
|
|
1745
|
+
- ~/.zapierrc:/root/.zapierrc
|
|
1746
|
+
command: 'bash -c "npm i && zapier push"'
|
|
1747
|
+
environment:
|
|
1748
|
+
ZAPIER_DEPLOY_KEY: ${ZAPIER_DEPLOY_KEY}
|
|
1749
|
+
|
|
1750
|
+
volumes:
|
|
1751
|
+
node_modules:
|
|
1752
|
+
```
|
|
1753
|
+
|
|
1754
|
+
> Note: Watch out for your `package-lock.json` file, if it exists for local install it might incorrectly pin a native version.
|
|
1755
|
+
|
|
1756
|
+
Now you should be able to run `docker-compose run pusher` and see the build and push successfully complete!
|
|
1757
|
+
|
|
1758
|
+
|
|
1759
|
+
## Using Transpilers
|
|
1760
|
+
|
|
1761
|
+
If you would like to use a transpiler like `babel`, you can add a script named `_zapier-build` to your `package.json`, which will be run during `zapier build`,
|
|
1762
|
+
`zapier push`, and `zapier upload`. See the following example:
|
|
1763
|
+
|
|
1764
|
+
```json
|
|
1765
|
+
{
|
|
1766
|
+
"scripts": {
|
|
1767
|
+
"zapier-dev": "babel src --out-dir lib --watch",
|
|
1768
|
+
"_zapier-build": "babel src --out-dir lib"
|
|
1769
|
+
}
|
|
1770
|
+
}
|
|
1771
|
+
```
|
|
1772
|
+
|
|
1773
|
+
Then, you can have your fancy ES7 code in `src/*` and a root `index.js` like this:
|
|
1774
|
+
|
|
1775
|
+
```js
|
|
1776
|
+
module.exports = require('./lib');
|
|
1777
|
+
```
|
|
1778
|
+
|
|
1779
|
+
And work with commands like this:
|
|
1780
|
+
|
|
1781
|
+
```bash
|
|
1782
|
+
# watch and recompile
|
|
1783
|
+
npm run zapier-dev
|
|
1784
|
+
|
|
1785
|
+
# tests should work fine
|
|
1786
|
+
zapier test
|
|
1787
|
+
|
|
1788
|
+
# every build ensures a fresh build
|
|
1789
|
+
zapier push
|
|
1790
|
+
```
|
|
1791
|
+
|
|
1792
|
+
There are a lot of details left out - check out the full example app for a working setup.
|
|
1793
|
+
|
|
1794
|
+
> To create a new integration with Babel, run `zapier init [your app name] --template babel`. You can also check out our working example app [here](https://github.com/zapier/zapier-platform/tree/master/example-apps/babel).
|
|
1795
|
+
|
|
1796
|
+
## FAQs
|
|
1797
|
+
|
|
1798
|
+
### Why doesn't Zapier support newer versions of Node.js?
|
|
1799
|
+
|
|
1800
|
+
We run your code on AWS Lambda, which only supports a few [versions](https://docs.aws.amazon.com/lambda/latest/dg/programming-model.html) of Node (the latest of which is `LAMBDA_VERSION`. As that updates, so too will we.
|
|
1801
|
+
|
|
1802
|
+
### How do I manually set the Node.js version to run my app with?
|
|
1803
|
+
|
|
1804
|
+
Update your `zapier-platform-core` dependency in `package.json`. Each major version ties to a specific version of Node.js. You can find the mapping [here](https://github.com/zapier/zapier-platform/blob/master/packages/cli/src/version-store.js). We only support the version(s) supported by [AWS Lambda](https://docs.aws.amazon.com/lambda/latest/dg/programming-model.html).
|
|
1805
|
+
|
|
1806
|
+
**IMPORTANT CAVEAT**: AWS periodically deprecates Node versions as they reach EOL. They announce this[on their blog](https://aws.amazon.com/blogs/developer/node-js-6-is-approaching-end-of-life-upgrade-your-aws-lambda-functions-to-the-node-js-10-lts/). Similar info and dates are available on [github](https://github.com/nodejs/Release). Well before this date, we'll have a version of `core` that targets the newer Node version.
|
|
1807
|
+
|
|
1808
|
+
If you don't upgrade before the cutoff date, there's a chance that AWS will throw an error when attempting to run your app's code. If that's the case, we'll instead run it under the oldest Node version still supported. All that is to say, **we may run your code on a newer version of Node.js than you intend** if you don't update your app's dependencies periodically.
|
|
1809
|
+
|
|
1810
|
+
### When to use placeholders or curlies?
|
|
1811
|
+
|
|
1812
|
+
You will see both [template literal placeholders](https://developer.mozilla.org/en-US/docs/Web/JavaScript/Reference/Template_literals#Expression_interpolation) `${var}` and (double) "curlies" `{{var}}` used in examples.
|
|
1813
|
+
|
|
1814
|
+
In general, use `${var}` within functions and use `{{var}}` anywhere else.
|
|
1815
|
+
|
|
1816
|
+
Placeholders get evaluated as soon as the line of code is evaluated. This means that if you use `${process.env.VAR}` in a trigger configuration, `zapier push` will substitute it with your local environment's value for `VAR` when it builds your app and the value set via `zapier env:set` will not be used.
|
|
1817
|
+
|
|
1818
|
+
> If you're not familiar with [template literals](https://developer.mozilla.org/en-US/docs/Web/JavaScript/Reference/Template_literals), know that `const val = "a" + b + "c"` is essentially the same as <code>const val = `a${b}c`</code>.
|
|
1819
|
+
|
|
1820
|
+
### Does Zapier support XML (SOAP) APIs?
|
|
1821
|
+
|
|
1822
|
+
Not natively, but it can! Users have reported that the following `npm` modules are compatible with the CLI Platform:
|
|
1823
|
+
|
|
1824
|
+
* [pixl-xml](https://github.com/jhuckaby/pixl-xml)
|
|
1825
|
+
* [xml2js](https://github.com/Leonidas-from-XIV/node-xml2js)
|
|
1826
|
+
* [fast-xml-parser](https://github.com/NaturalIntelligence/fast-xml-parser)
|
|
1827
|
+
|
|
1828
|
+
Since core v10, it's possible for [shorthand requests](#shorthand-http-requests) to parse XML. Use an `afterResponse` [middleware](#using-http-middleware) that sets `response.data` to the parsed XML:
|
|
1829
|
+
|
|
1830
|
+
```js
|
|
1831
|
+
[insert-file:./snippets/xml.js]
|
|
1832
|
+
```
|
|
1833
|
+
|
|
1834
|
+
### Is it possible to iterate over pages in a polling trigger?
|
|
1835
|
+
|
|
1836
|
+
Yes, though there are caveats. Your entire function only gets 30 seconds to run. HTTP requests are costly, so paging through a list may time out (which you should avoid at all costs).
|
|
1837
|
+
|
|
1838
|
+
```js
|
|
1839
|
+
[insert-file:./snippets/paging-poll.js]
|
|
1840
|
+
```
|
|
1841
|
+
|
|
1842
|
+
If you need to do more requests conditionally based on the results of an HTTP call (such as the "next URL" param or similar value), using `async/await` (as shown in the example below) is a good way to go. If you go this route, only page as far as you need to. Keep an eye on the polling [guidelines](https://zapier.com/developer/documentation/v2/deduplication/), namely the part about only iterating until you hit items that have probably been seen in a previous poll.
|
|
1843
|
+
|
|
1844
|
+
```js
|
|
1845
|
+
[insert-file:./snippets/async-polling.js]
|
|
1846
|
+
```
|
|
1847
|
+
|
|
1848
|
+
### How do search-powered fields relate to dynamic dropdowns and why are they both required together?
|
|
1849
|
+
|
|
1850
|
+
To understand search-powered fields, we have to have a good understanding of dynamic dropdowns.
|
|
1851
|
+
|
|
1852
|
+
When users are selecting specific resources (for instance, a Google Sheet), it's important they're able to select the exact sheet they want. Instead of referencing the sheet by name (which may change), we match via `id` instead. Rather than directing the user copy and paste an id for every item they might encounter, there is the notion of a **dynamic dropdown**. A dropdown is a trigger that returns a list of resources. It can pull double duty and use its results to power another trigger, search, or action in the same app. It provides a list of ids with labels that show the item's name:
|
|
1853
|
+
|
|
1854
|
+

|
|
1855
|
+
|
|
1856
|
+
The field's value reaches your app as an id. You define this connection with the `dynamic` property, which is a string: `trigger_key.id_key.label_key`. This approach works great if the user setting up the Zap always wants the Zap to use the same spreadsheet. They specify the id during setup and the Zap runs happily.
|
|
1857
|
+
|
|
1858
|
+
**Search fields** take this connection a step further. Rather than set the spreadsheet id at setup, the user could precede the action with a search field to make the id dynamic. For instance, let's say you have a different spreadsheet for every day of the week. You could build the following zap:
|
|
1859
|
+
|
|
1860
|
+
1. Some Trigger
|
|
1861
|
+
2. Calculate what day of the week it is today (Code)
|
|
1862
|
+
3. Find the spreadsheet that matches the day from Step 2
|
|
1863
|
+
4. Update the spreadsheet (with the id from step 3) with some data
|
|
1864
|
+
|
|
1865
|
+
If the connection between steps 3 and 4 is a common one, you can indicate that in your field by specifying `search` as a `search_key.id_key`. When paired **with a dynamic dropdown**, this will add a button to the editor that will add the search step to the user's Zap and map the id field correctly.
|
|
1866
|
+
|
|
1867
|
+
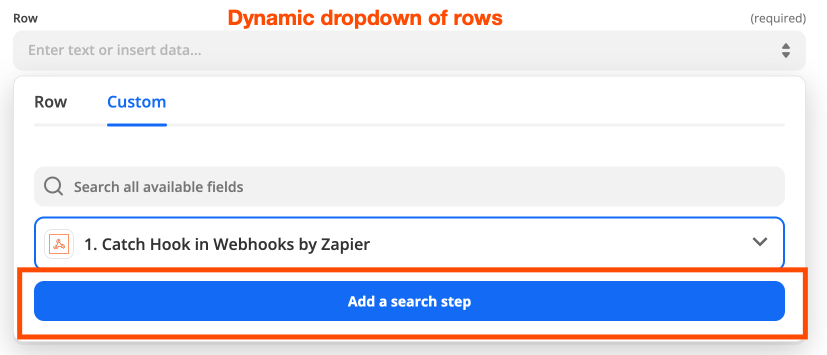
|
|
1868
|
+
|
|
1869
|
+
This is paired most often with "update" actions, where a required parameter will be a resource id.
|
|
1870
|
+
|
|
1871
|
+
<a id="paging"></a>
|
|
1872
|
+
### What's the deal with pagination? When is it used and how does it work?
|
|
1873
|
+
|
|
1874
|
+
Paging is **only used when a trigger is part of a dynamic dropdown**. Depending on how many items exist and how many are returned in the first poll, it's possible that the resource the user is looking for isn't in the initial poll. If they hit the "see more" button, we'll increment the value of `bundle.meta.page` and poll again.
|
|
1875
|
+
|
|
1876
|
+
Paging is a lot like a regular trigger except the range of items returned is dynamic. The most common example of this is when you can pass a `offset` parameter:
|
|
1877
|
+
|
|
1878
|
+
```js
|
|
1879
|
+
const perform = async (z, bundle) => {
|
|
1880
|
+
const response = await z.request({
|
|
1881
|
+
url: 'https://example.com/api/list.json',
|
|
1882
|
+
params: {
|
|
1883
|
+
limit: 100,
|
|
1884
|
+
offset: 100 * bundle.meta.page
|
|
1885
|
+
}
|
|
1886
|
+
});
|
|
1887
|
+
return response.data; // or response.json you're using core v9 or older
|
|
1888
|
+
};
|
|
1889
|
+
```
|
|
1890
|
+
|
|
1891
|
+
If your API uses cursor-based paging instead of an offset, you can use `z.cursor.get` and `z.cursor.set`:
|
|
1892
|
+
|
|
1893
|
+
```js
|
|
1894
|
+
[insert-file:./snippets/paging-cursor.js]
|
|
1895
|
+
```
|
|
1896
|
+
|
|
1897
|
+
Cursors are stored per-zap and last about an hour. Per the above, make sure to only include the cursor if `bundle.meta.page !== 0`, so you don't accidentally reuse a cursor from a previous poll.
|
|
1898
|
+
|
|
1899
|
+
Lastly, you need to set `canPaginate` to `true` in your polling definition (per the [schema](https://github.com/zapier/zapier-platform/blob/master/packages/schema/docs/build/schema.md#basicpollingoperationschema)) for the `z.cursor` methods to work as expected.
|
|
1900
|
+
|
|
1901
|
+
<a id="dedup"></a>
|
|
1902
|
+
### How does deduplication work?
|
|
1903
|
+
|
|
1904
|
+
Each time a polling Zap runs, Zapier needs to decide which of the items in the response should trigger the zap. To do this, we compare the `id`s to all those we've seen before, trigger on new objects, and update the list of seen `id`s. When a Zap is turned on, we initialize the list of seen `id`s with a single poll. When it's turned off, we clear that list. For this reason, it's important that calls to a polling endpoint always return the newest items.
|
|
1905
|
+
|
|
1906
|
+
For example, the initial poll returns objects 4, 5, and 6 (where a higher `id` is newer). If a later poll increases the limit and returns objects 1-6, then 1, 2, and 3 will be (incorrectly) treated like new objects.
|
|
1907
|
+
|
|
1908
|
+
There's a more in-depth explanation [here](https://platform.zapier.com/legacy/dedupe).
|
|
1909
|
+
|
|
1910
|
+
### Why are my triggers complaining if I don't provide an explicit `id` field?
|
|
1911
|
+
|
|
1912
|
+
For deduplication to work, we need to be able to identify and use a unique field. In older, legacy Zapier Web Builder apps, we guessed if `id` wasn't present. In order to ensure we don't guess wrong, we now require that the developers send us an `id` field. If your objects have a differently-named unique field, feel free to adapt this snippet and ensure this test passes:
|
|
1913
|
+
|
|
1914
|
+
```js
|
|
1915
|
+
// ...
|
|
1916
|
+
let items = response.data.items; // or response.json.items if you're using core v9 or older
|
|
1917
|
+
return items.map((item) => {
|
|
1918
|
+
item.id = item.contactId;
|
|
1919
|
+
return item;
|
|
1920
|
+
});
|
|
1921
|
+
```
|
|
1922
|
+
|
|
1923
|
+
### Node X No Longer Supported
|
|
1924
|
+
|
|
1925
|
+
If you're seeing errors like the following:
|
|
1926
|
+
|
|
1927
|
+
```
|
|
1928
|
+
InvalidParameterValueException An error occurred (InvalidParameterValueException) when calling the CreateFunction operation: The runtime parameter of nodejs6.10 is no longer supported for creating or updating AWS Lambda functions. We recommend you use the new runtime (nodejsX.Y) while creating or updating functions.
|
|
1929
|
+
```
|
|
1930
|
+
|
|
1931
|
+
... then you need to update your `zapier-platform-core` dependency to a non-deprecated version that uses a newer version of Node.js. Complete the following instructions as soon as possible:
|
|
1932
|
+
|
|
1933
|
+
1. Edit `package.json` to depend on a later major version of `zapier-platform-core`. There's a list of all breaking changes (marked with a :exclamation:) in the [changelog](https://github.com/zapier/zapier-platform/blob/master/CHANGELOG.md).
|
|
1934
|
+
2. Increment the `version` property in `package.json`
|
|
1935
|
+
3. Ensure you're using version `LAMBDA_VERSION` (or greater) of node locally (`node -v`). Use [nvm](https://github.com/nvm-sh/nvm) to use a different one if need be.
|
|
1936
|
+
4. Run `rm -rf node_modules && npm i` to get a fresh copy of everything
|
|
1937
|
+
5. Run `zapier test` to ensure your tests still pass
|
|
1938
|
+
6. Run `zapier push`
|
|
1939
|
+
7. Run `zapier promote YOUR_NEW_VERSION` (from step 2)
|
|
1940
|
+
8. Migrate your users from the previous version (`zapier migrate OLD_VERSION YOUR_NEW_VERSION`)
|
|
1941
|
+
|
|
1942
|
+
<a id="analytics"></a>
|
|
1943
|
+
### What Analytics are Collected?
|
|
1944
|
+
|
|
1945
|
+
Starting with v8.4.0, Zapier collects information about each invocation of the CLI tool.
|
|
1946
|
+
|
|
1947
|
+
This data is collected purely to improve the CLI experience and will **never** be used for advertising or any non-product purpose. There are 3 collection modes that are set on a per-computer basis.
|
|
1948
|
+
|
|
1949
|
+
**Anonymous**
|
|
1950
|
+
|
|
1951
|
+
When you run a command with analytics in `anonymous` mode, the following data is sent to Zapier:
|
|
1952
|
+
|
|
1953
|
+
* which command you ran
|
|
1954
|
+
* if that command is a known command
|
|
1955
|
+
* how many arguments you supplied (but not the contents of the arguments)
|
|
1956
|
+
* which flags you used (but not their contents)
|
|
1957
|
+
* the version of CLI that you're using
|
|
1958
|
+
|
|
1959
|
+
**Enabled** (the default)
|
|
1960
|
+
|
|
1961
|
+
When analytics are fully `enabled`, the above is sent, plus:
|
|
1962
|
+
|
|
1963
|
+
* your operating system (the result of calling [`process.platform`](https://nodejs.org/api/process.html#process_process_platform))
|
|
1964
|
+
* your Zapier user id
|
|
1965
|
+
|
|
1966
|
+
**Disabled**
|
|
1967
|
+
|
|
1968
|
+
Lastly, analytics can be `disabled` entirely, either by running `zapier analytics --mode disabled` or setting the `DISABLE_ZAPIER_ANALYTICS` environment variable to `1`.
|
|
1969
|
+
|
|
1970
|
+
We take great care not to collect any information about your filesystem or anything otherwise secret. You can see exactly what's being collecting at runtime by prefixing any command with `DEBUG=zapier:analytics`.
|
|
1971
|
+
|
|
1972
|
+
### What's the Difference Between an "App" and an "Integration"?
|
|
1973
|
+
|
|
1974
|
+
We're in the process of doing some renaming across our Zapier marketing terms. Eventually we'll use "integration" everywhere. Until then, know that these terms are interchangeable and describe the code that you write that connects your API to Zapier.
|
|
1975
|
+
|
|
1976
|
+
## Command Line Tab Completion
|
|
1977
|
+
|
|
1978
|
+
Introduced in v9.1.0, the `zapier autocomplete` command shows instructions for generating command line autocomplete.
|
|
1979
|
+
|
|
1980
|
+
Follow those instructions to enable completion for `zapier` commands and flags!
|
|
1981
|
+
|
|
1982
|
+
## The Zapier Platform Packages
|
|
1983
|
+
|
|
1984
|
+
The Zapier Platform consists of 3 npm packages that are released simultaneously.
|
|
1985
|
+
|
|
1986
|
+
- [`zapier-platform-cli`](https://github.com/zapier/zapier-platform/tree/master/packages/cli) is the code that powers the `zapier` command. You use it most commonly with the `test`, `scaffold`, and `push` commands. It's installed with `npm install -g zapier-platform-cli` and does not correspond to a particular app.
|
|
1987
|
+
- [`zapier-platform-core`](https://github.com/zapier/zapier-platform/tree/master/packages/core) is what allows your app to interact with Zapier. It holds the `z` object and app tester code. Your app depends on a specific version of `zapier-platform-core` in the `package.json` file. It's installed via `npm install` along with the rest of your app's dependencies.
|
|
1988
|
+
- [`zapier-platform-schema`](https://github.com/zapier/zapier-platform/tree/master/packages/schema) enforces app structure behind the scenes. It's a dependency of `core`, so it will be installed automatically.
|
|
1989
|
+
|
|
1990
|
+
To learn more about the structure of the code (especially if you're interested in contributing), check out the `ARCHITECTURE.md` file(s).
|
|
1991
|
+
|
|
1992
|
+
### Updating These Packages
|
|
1993
|
+
|
|
1994
|
+
The Zapier platform and its tools are under active development. While you don't need to install every release, we release new versions because they are better than the last. We do our best to adhere to [Semantic Versioning](https://semver.org/) wherein we won't break your code unless there's a `major` release. Otherwise, we're just fixing bugs (`patch`) and adding features (`minor`).
|
|
1995
|
+
|
|
1996
|
+
Broadly speaking, all releases will continue to work indefinitely. While you never *have* to upgrade your app's `zapier-platform-core` dependency, we recommend keeping an eye on the [changelog](https://github.com/zapier/zapier-platform/blob/master/CHANGELOG.md) to see what new features and bug fixes are available.
|
|
1997
|
+
|
|
1998
|
+
For more info about which Node versions are supported, see [the faq](#how-do-i-manually-set-the-nodejs-version-to-run-my-app-with).
|
|
1999
|
+
|
|
2000
|
+
<!-- TODO: if we decouple releases, change this -->
|
|
2001
|
+
The most recently released version of `cli` and `core` is **PACKAGE_VERSION**. You can see the versions you're working with by running `zapier -v`.
|
|
2002
|
+
|
|
2003
|
+
To update `cli`, run `npm install -g zapier-platform-cli`.
|
|
2004
|
+
|
|
2005
|
+
To update the version of `core` your app depends on, set the `zapier-platform-core` dependency in your `package.json` to a version listed [here](https://www.npmjs.com/package/zapier-platform-core?activeTab=versions) and reinstall your dependencies (either `yarn` or `npm install`).
|
|
2006
|
+
|
|
2007
|
+
For maximum compatibility, keep the versions of `cli` and `core` in sync.
|
|
2008
|
+
|
|
2009
|
+
## Get Help!
|
|
2010
|
+
|
|
2011
|
+
You can get help by either emailing `partners@zapier.com` or by [joining our developer community here](https://community.zapier.com/developer-discussion-13).
|
|
2012
|
+
|
|
2013
|
+
---
|
|
2014
|
+
|
|
2015
|
+
## Developing on the CLI
|
|
2016
|
+
|
|
2017
|
+
For Zapier employees, see [this quip doc](https://zapier.quip.com/bns4AxqwaMIm/Working-on-the-CLI-Platform-CoreSchemaCLI) for info about creating releases.
|