trtc-electron-sdk 12.0.605 → 12.1.607
This diff represents the content of publicly available package versions that have been released to one of the supported registries. The information contained in this diff is provided for informational purposes only and reflects changes between package versions as they appear in their respective public registries.
- package/README.md +117 -204
- package/liteav/VideoRenderControl/VideoRenderFPSMonitor.d.ts +37 -0
- package/liteav/VideoRenderControl/VideoRenderFPSMonitor.js +127 -0
- package/liteav/trtc.d.ts +57 -11
- package/liteav/trtc.js +77 -26
- package/liteav/trtc_define.d.ts +18 -16
- package/liteav/trtc_define.js +73 -9
- package/package.json +15 -9
- package/scripts/copy-sdk.js +4 -0
- package/scripts/download.js +228 -187
- package/scripts/utils.js +91 -26
package/README.md
CHANGED
|
@@ -1,221 +1,134 @@
|
|
|
1
|
-
# TRTC
|
|
2
|
-
|
|
3
|
-
|
|
4
|
-
## 跑通 DEMO
|
|
5
|
-
<span id="step1"></span>
|
|
6
|
-
### 步骤1:创建新的应用
|
|
7
|
-
1. 登录实时音视频控制台,选择【开发辅助】>【[快速跑通Demo](https://console.cloud.tencent.com/trtc/quickstart)】。
|
|
8
|
-
2. 单击【立即开始】,输入应用名称,例如`TestTRTC`,单击【创建应用】。
|
|
9
|
-
|
|
10
|
-
<span id="step2"></span>
|
|
11
|
-
### 步骤2:下载 SDK 和 Demo 源码
|
|
12
|
-
1. 鼠标移动至对应卡片,单击【[Github](https://github.com/tencentyun/TRTCSDK/tree/master/Electron)】跳转至 Github(或单击【[ZIP](http://liteavsdk-1252463788.cosgz.myqcloud.com/TXLiteAVSDK_TRTC_Electron_latest.zip)】),下载相关 SDK 及配套的 Demo 源码。
|
|
13
|
-
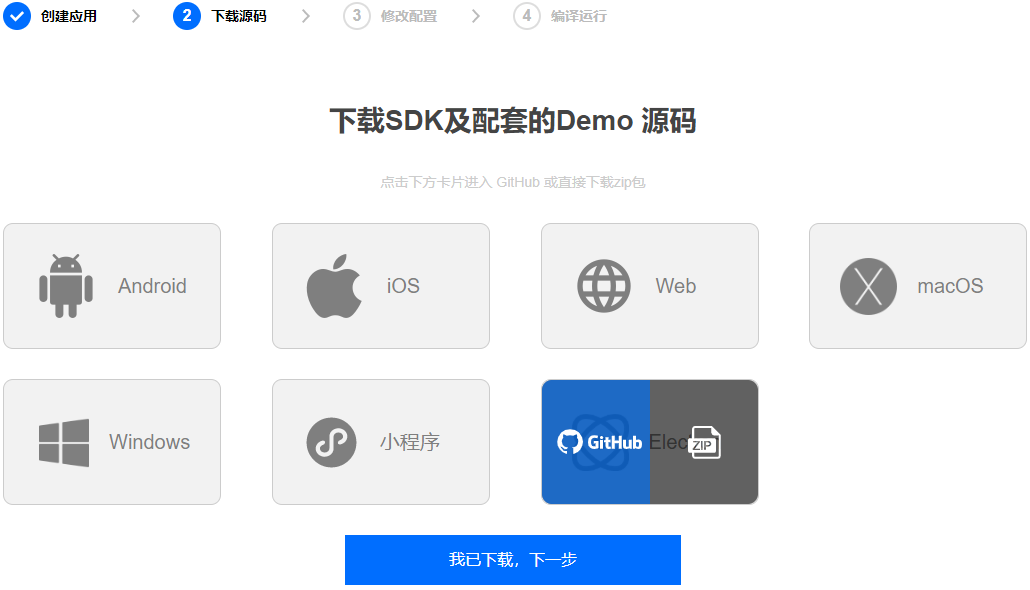
|
|
14
|
-
2. 下载完成后,返回实时音视频控制台,单击【我已下载,下一步】,可以查看 SDKAppID 和密钥信息。
|
|
15
|
-
|
|
16
|
-
<span id="step3"></span>
|
|
17
|
-
### 步骤3:配置 Demo 工程文件
|
|
18
|
-
1. 解压 [步骤2](#step2) 中下载的源码包。
|
|
19
|
-
2. 找到并打开 `TRTCSDK/Electron/js/GenerateTestUserSig.js` 文件。
|
|
20
|
-
3. 设置 `GenerateTestUserSig.js` 文件中的相关参数:
|
|
21
|
-
<ul><li>SDKAPPID:默认为0,请设置为实际的 SDKAppID。</li>
|
|
22
|
-
<li>SECRETKEY:默认为空字符串,请设置为实际的密钥信息。</li></ul>
|
|
23
|
-
<img src="https://main.qcloudimg.com/raw/a82e1c7c3b4edde3b9ac1326b2556147.png"/>
|
|
24
|
-
4. 返回实时音视频控制台,单击【粘贴完成,下一步】。
|
|
25
|
-
5. 单击【关闭指引,进入控制台管理应用】。
|
|
26
|
-
|
|
27
|
-
<span id="step4"></span>
|
|
28
|
-
### 步骤4:编译运行
|
|
29
|
-
|
|
30
|
-
#### Windows 平台
|
|
31
|
-
1. 下载最新版本的 [Node.js](https://nodejs.org/en/download/) 安装包,如果您的电脑是64位操作系统,请选择 Windows Installer (.msi) 64-bit,32位操作系统请选择 Windows Installer (.msi) 32-bit。
|
|
32
|
-
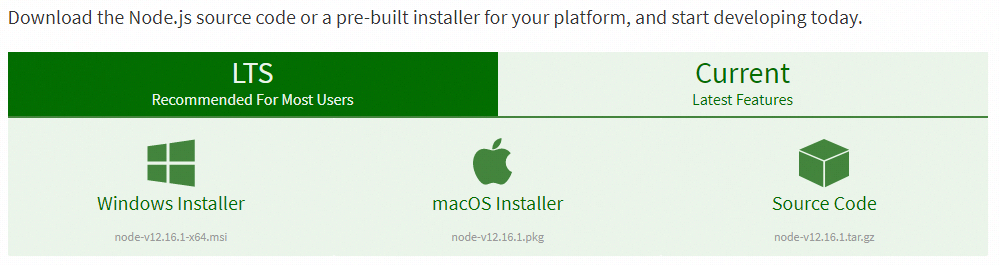
|
|
33
|
-
2. 打开应用程序列表中的 `Node.js command prompt`,启动命令行窗口,并将目录定位到 [步骤3](#step3) 中解压到的目标路径,并运行如下命令:
|
|
34
|
-
```
|
|
35
|
-
npm install
|
|
36
|
-
```
|
|
37
|
-
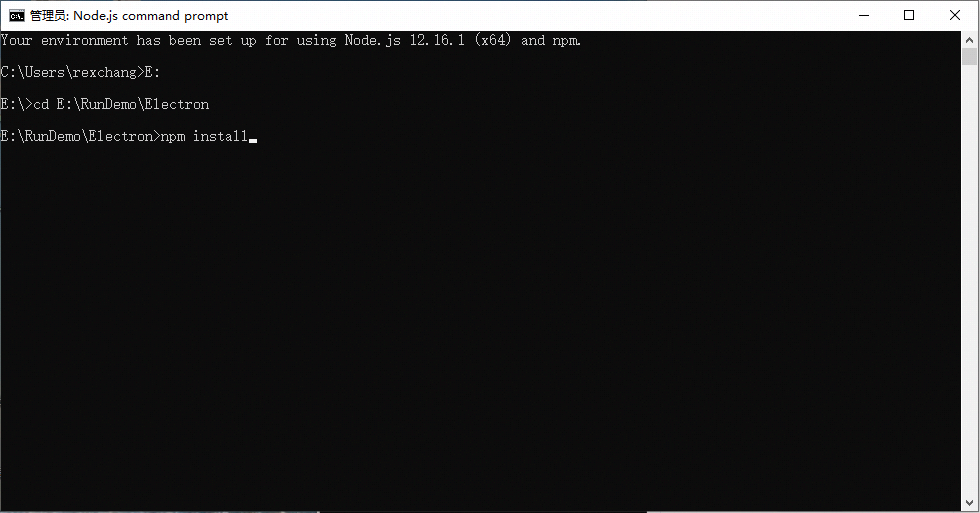
|
|
38
|
-
3. 如果您在中国大陆,可能会遭遇下载 electron 压缩包很慢的问题:
|
|
39
|
-
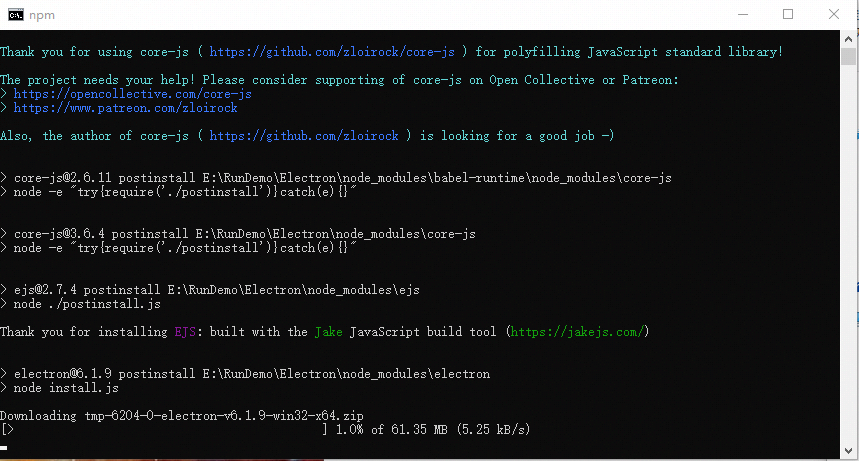
|
|
40
|
-
此时可以通过配置国内的镜像地址,或者从 [Github](https://github.com/electron/electron/releases) 下载对应的版本和 `SHASUMS256.txt` 文件到 `C:\Users\[您的用户名]\AppData\Local\electron\Cache` 目录下,如下图:
|
|
41
|
-
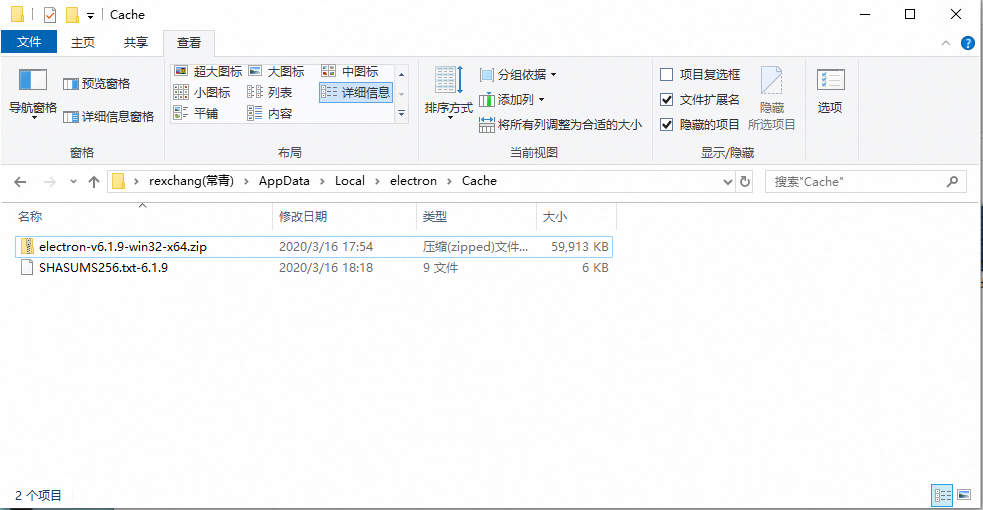
|
|
42
|
-
4. 待 npm 的依赖包都安装完成后,继续在命令行窗口运行如下命令,即可运行起 Electron Demo。
|
|
43
|
-
```
|
|
44
|
-
npm start
|
|
45
|
-
```
|
|
46
|
-
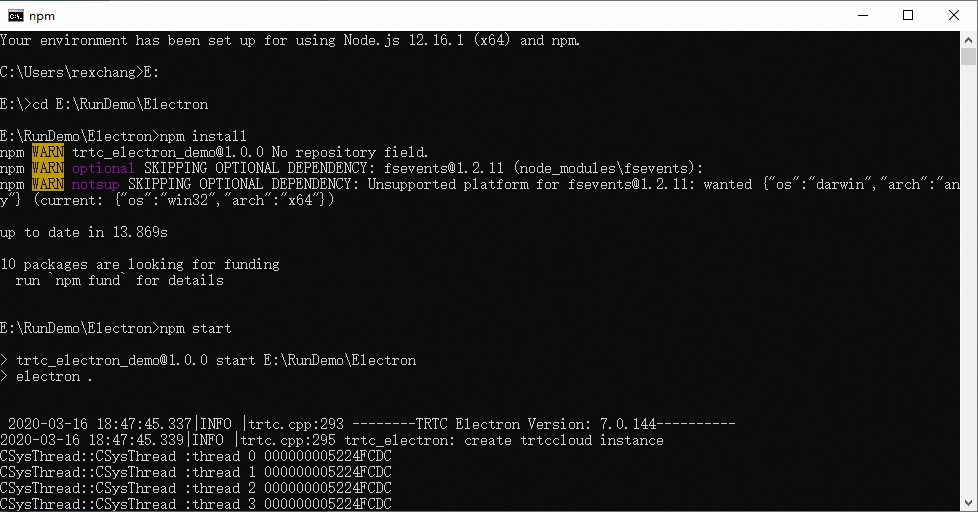
|
|
1
|
+
# TRTC SDK for Electron
|
|
2
|
+
Tencent Real-Time Communication (TRTC) is a set of low-latency, high-quality real-time communication services provided by Tencent Cloud, which is committed to providing stable, reliable and low-cost audio and video transmission capabilities for Tencent Cloud customers.
|
|
47
3
|
|
|
4
|
+
## ✨ Features
|
|
5
|
+
- 📺 [Video call](https://www.tencentcloud.com/document/product/647/35428)
|
|
6
|
+
- 🎵 [Audio call](https://www.tencentcloud.com/document/product/647/35428)
|
|
7
|
+
- 🚿 [Interactive video streaming](https://www.tencentcloud.com/document/product/647/35428)
|
|
8
|
+
- 💧 [Interactive audio streaming](https://www.tencentcloud.com/document/product/647/35428)
|
|
9
|
+
- 📼 [On-Cloud Recording](https://www.tencentcloud.com/document/product/647/45169)
|
|
10
|
+
- 📼 [On-Cloud MixTranscoding](https://www.tencentcloud.com/document/product/647/47858#)
|
|
11
|
+
- ⬆️ [Publishing to CSS CDN](https://www.tencentcloud.com/document/product/647/47858#)
|
|
48
12
|
|
|
49
|
-
|
|
50
|
-
|
|
51
|
-
|
|
52
|
-
|
|
53
|
-
```
|
|
54
|
-
2. 继续键入如下命令,安装 Node.js:
|
|
55
|
-
```
|
|
56
|
-
$ brew install node
|
|
57
|
-
```
|
|
58
|
-
3. 如果您在中国大陆,可能会发现使用 Homebrew 的默认地址安装 Node.js 会比较慢,此时可以考虑替换为国内镜像地址。
|
|
59
|
-
```cmd
|
|
60
|
-
$ cd `brew --repo`
|
|
61
|
-
$ git remote set-url origin https://mirrors.tuna.tsinghua.edu.cn/git/homebrew/brew.git
|
|
62
|
-
$ brew update
|
|
63
|
-
```
|
|
64
|
-
4. 通过 cd 命令定位到 [步骤3](#step3) 中解压到的目标路径,并运行如下命令:
|
|
65
|
-
```
|
|
66
|
-
npm install
|
|
67
|
-
```
|
|
68
|
-
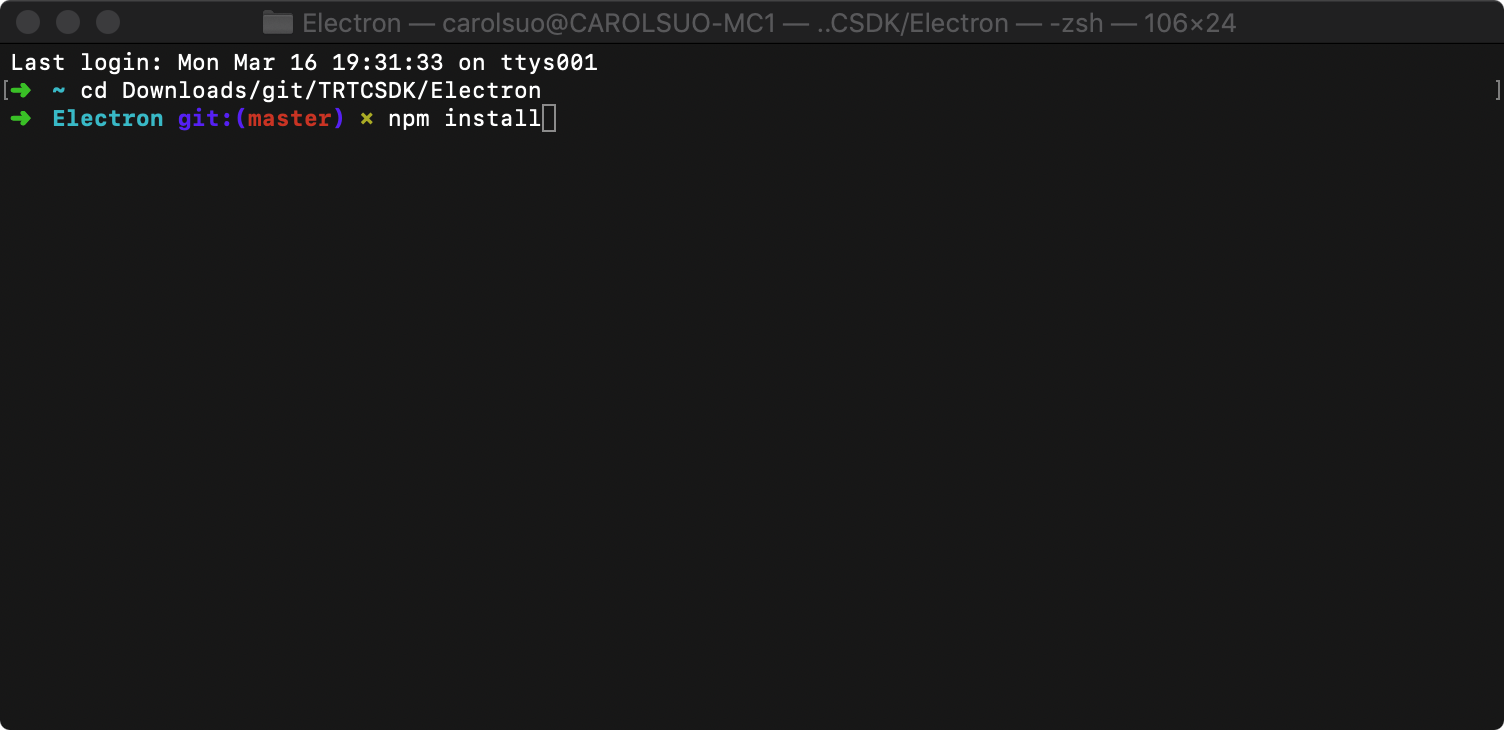
|
|
69
|
-
5. 待 npm 的依赖包都安装完成后,继续在命令行窗口运行如下命令,即可运行起 Electron Demo。
|
|
70
|
-
```
|
|
71
|
-
npm start
|
|
72
|
-
```
|
|
73
|
-
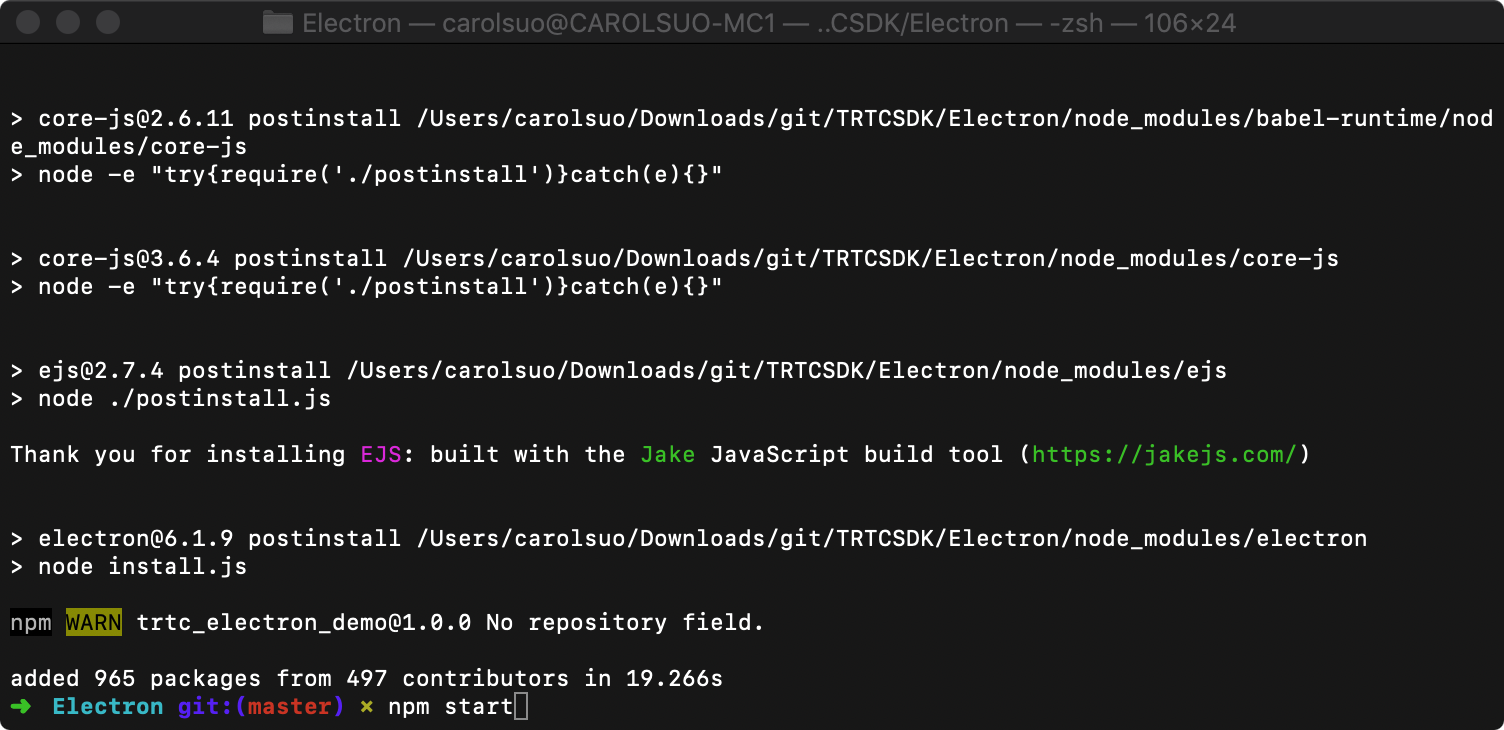
|
|
74
|
-
|
|
13
|
+
## 💻 Environment Support
|
|
14
|
+
- 🍎 Support macOS x64 and arm64(**Electron 11+**)
|
|
15
|
+
- ⚙️ Support Windows ia32 and x64
|
|
16
|
+
- 🌈 Electron: 8.5.0 ~ 24.8.8
|
|
75
17
|
|
|
76
|
-
|
|
77
|
-
|
|
18
|
+
| macOS | Windows | Electron |
|
|
19
|
+
| :----------: | :---------: | :------------: |
|
|
20
|
+
| x64 \| arm64 | ia32 \| x64 | 8.5.0 ~ 24.8.8 |
|
|
78
21
|
|
|
79
|
-
## 快速集成
|
|
80
22
|
|
|
81
|
-
|
|
82
|
-
|
|
83
|
-
npm install trtc-electron-sdk@latest --save-dev
|
|
84
|
-
```
|
|
23
|
+
## ⏬ Install
|
|
24
|
+
By default, it will install the SDK compatible with your device Operation System platform and node.js CPU architecture. If you want to install SDK for specific Operating System or CPU architecture. You can configure the `platform` and `arch` you want in `package.json` or `.npmrc` file as following code. If you configure both, the configuration in `package.json` will work and override that in `.npmrc`.
|
|
85
25
|
|
|
86
|
-
#### step2. 对接基本功能函数
|
|
87
26
|
```js
|
|
88
|
-
//
|
|
89
|
-
|
|
90
|
-
|
|
91
|
-
|
|
92
|
-
|
|
93
|
-
|
|
94
|
-
TRTCVideoResolutionMode,
|
|
95
|
-
TRTCParams
|
|
96
|
-
} = require('trtc-electron-sdk/liteav/trtc_define');
|
|
97
|
-
|
|
98
|
-
//2、构建 TRTCCloud
|
|
99
|
-
this.rtcCloud = new TRTCCloud();
|
|
100
|
-
|
|
101
|
-
//3、注册回调
|
|
102
|
-
subscribeEvents = (rtcCloud) => {
|
|
103
|
-
rtcCloud.on('onError', (errcode, errmsg) => {
|
|
104
|
-
console.info('trtc_demo: onError :' + errcode + " msg" + errmsg);
|
|
105
|
-
});
|
|
106
|
-
|
|
107
|
-
rtcCloud.on('onEnterRoom', (elapsed) => {
|
|
108
|
-
console.info('trtc_demo: onEnterRoom elapsed:' + elapsed);
|
|
109
|
-
});
|
|
110
|
-
rtcCloud.on('onExitRoom', (reason) => {
|
|
111
|
-
console.info('trtc_demo: onExitRoom reason:' + reason);
|
|
112
|
-
});
|
|
113
|
-
|
|
114
|
-
// 注册远程视频的可用状态
|
|
115
|
-
rtcCloud.on('onUserVideoAvailable', (uid, available) => {
|
|
116
|
-
console.info('trtc_demo: onUserVideoAvailable uid:' + uid + " available:" + available);
|
|
117
|
-
if (available) {
|
|
118
|
-
let view = this.findVideoView(uid, TRTCVideoStreamType.TRTCVideoStreamTypeBig);
|
|
119
|
-
this.rtcCloud.startRemoteView(uid, view);
|
|
120
|
-
}
|
|
121
|
-
else {
|
|
122
|
-
this.rtcCloud.stopRemoteView(uid);
|
|
123
|
-
this.destroyVideoView(uid, TRTCVideoStreamType.TRTCVideoStreamTypeBig);
|
|
124
|
-
}
|
|
125
|
-
});
|
|
126
|
-
|
|
127
|
-
//.....
|
|
128
|
-
//.....
|
|
129
|
-
};
|
|
130
|
-
subscribeEvents(this.rtcCloud);
|
|
131
|
-
|
|
132
|
-
//4、进入房间
|
|
133
|
-
enterroom () {
|
|
134
|
-
//1. 进房参数
|
|
135
|
-
let param = new TRTCParams();
|
|
136
|
-
param.sdkAppId = sdkInfo.sdkappid;
|
|
137
|
-
param.roomId = parseInt(this.roomId);
|
|
138
|
-
param.userSig = userSig;
|
|
139
|
-
param.userId = this.userId;
|
|
140
|
-
param.privateMapKey = '';
|
|
141
|
-
param.businessInfo = '';
|
|
142
|
-
this.rtcCloud.enterRoom(param, TRTCAppScene.TRTCAppSceneVideoCall);
|
|
143
|
-
//2. 编码参数
|
|
144
|
-
let encparam = new TRTCVideoEncParam();
|
|
145
|
-
encparam.videoResolution = TRTCVideoResolution.TRTCVideoResolution_640_360;
|
|
146
|
-
encparam.resMode = TRTCVideoResolutionMode.TRTCVideoResolutionModeLandscape;
|
|
147
|
-
encparam.videoFps = 15;
|
|
148
|
-
encparam.videoBitrate = 550;
|
|
149
|
-
this.rtcCloud.setVideoEncoderParam(encparam);
|
|
150
|
-
//3. 打开采集和预览本地视频、采集音频
|
|
151
|
-
enableVideoCapture(true);
|
|
152
|
-
enableAudioCapture(true);
|
|
153
|
-
},
|
|
154
|
-
|
|
155
|
-
//5、退出房间
|
|
156
|
-
exitroom() {
|
|
157
|
-
this.rtcCloud.exitRoom();
|
|
158
|
-
},
|
|
159
|
-
|
|
160
|
-
//6、开启视频
|
|
161
|
-
enableVideoCapture(bEnable) {
|
|
162
|
-
if (bEnable) {
|
|
163
|
-
let view = this.findView("local", TRTCVideoStreamType.TRTCVideoStreamTypeBig);
|
|
164
|
-
this.rtcCloud.startLocalPreview(view);
|
|
27
|
+
// package.json
|
|
28
|
+
{
|
|
29
|
+
...
|
|
30
|
+
"trtc_electron" : {
|
|
31
|
+
"platform" : "win32",
|
|
32
|
+
"arch" : "ia32"
|
|
165
33
|
}
|
|
166
|
-
|
|
167
|
-
|
|
168
|
-
}
|
|
169
|
-
},
|
|
34
|
+
...
|
|
35
|
+
}
|
|
170
36
|
|
|
171
|
-
//
|
|
172
|
-
|
|
173
|
-
|
|
174
|
-
|
|
175
|
-
}
|
|
176
|
-
else {
|
|
177
|
-
this.rtcCloud.stopLocalAudio();
|
|
178
|
-
}
|
|
179
|
-
},
|
|
180
|
-
|
|
181
|
-
//8、找个DOM结点,作为视频显示的view
|
|
182
|
-
findVideoView(uid, streamtype) {
|
|
183
|
-
let key = uid + String(streamtype);
|
|
184
|
-
var userVideoEl = document.getElementById(key);
|
|
185
|
-
if (!userVideoEl) {
|
|
186
|
-
userVideoEl = document.createElement('div');
|
|
187
|
-
userVideoEl.id = key;
|
|
188
|
-
userVideoEl.classList.add('video_view');
|
|
189
|
-
document.querySelector("#video_wrap").appendChild(userVideoEl);
|
|
190
|
-
}
|
|
191
|
-
return userVideoEl;
|
|
192
|
-
},
|
|
193
|
-
|
|
194
|
-
//9、在视频退出时,清掉一个DOM结点
|
|
195
|
-
destroyVideoView(uid, streamtype) {
|
|
196
|
-
let key = uid + String(streamtype);
|
|
197
|
-
var userVideoEl = document.getElementById(key);
|
|
198
|
-
if (userVideoEl) {
|
|
199
|
-
document.querySelector("#video_wrap").removeChild(userVideoEl);
|
|
200
|
-
}
|
|
201
|
-
},
|
|
37
|
+
// .npmrc
|
|
38
|
+
trtc_electron_platform=win32
|
|
39
|
+
trtc_electron_arch=ia32 // only support windows
|
|
40
|
+
```
|
|
202
41
|
|
|
42
|
+
Properties detail:
|
|
43
|
+
- platform: darwin or win32
|
|
44
|
+
- arch: if not set, it will be `process.arch` of your installation node.js. **Only windows Supported.**
|
|
45
|
+
|
|
46
|
+
```bash
|
|
47
|
+
npm install trtc-electron-sdk
|
|
203
48
|
```
|
|
204
49
|
|
|
205
|
-
##
|
|
50
|
+
## ⚠️ Notice
|
|
51
|
+
You can build Electron application for Windows and macOS on macOS.
|
|
206
52
|
|
|
207
|
-
### 1. 查看密钥时只能获取公钥和私钥信息,要如何获取密钥?
|
|
208
|
-
TRTC SDK 6.6 版本(2019年08月)开始启用新的签名算法 HMAC-SHA256。在此之前已创建的应用,需要先升级签名算法才能获取新的加密密钥。如不升级,您也可以继续使用 [老版本算法 ECDSA-SHA256](https://cloud.tencent.com/document/product/647/17275#.E8.80.81.E7.89.88.E6.9C.AC.E7.AE.97.E6.B3.95)。
|
|
209
53
|
|
|
210
|
-
|
|
211
|
-
1. 登录 [实时音视频控制台](https://console.cloud.tencent.com/trtc)。
|
|
212
|
-
2. 在左侧导航栏选择【应用管理】,单击目标应用所在行的【应用信息】。
|
|
213
|
-
3. 选择【快速上手】页签,单击【第二步 获取签发UserSig的密钥】区域的【点此升级】。
|
|
54
|
+
On Windows you can only build Electron application for Windows.Can't build Electron application for macOS, for detail:https://www.electron.build/multi-platform-build.
|
|
214
55
|
|
|
215
|
-
|
|
216
|
-
|
|
56
|
+
## 👋 Usage
|
|
57
|
+
```js
|
|
58
|
+
import TRTCCloud from 'trtc-electron-sdk';
|
|
217
59
|
|
|
218
|
-
|
|
60
|
+
const rtcCloud = TRTCCloud.getTRTCShareInstance();
|
|
61
|
+
// Obtain the SDK version
|
|
62
|
+
const version = rtcCloud.getSDKVersion();
|
|
63
|
+
```
|
|
64
|
+
|
|
65
|
+
## 📦 Build
|
|
66
|
+
Taking webpack and electron-builder as example.
|
|
67
|
+
|
|
68
|
+
```js
|
|
69
|
+
// webpack config
|
|
70
|
+
module.exports = {
|
|
71
|
+
...
|
|
72
|
+
|
|
73
|
+
module: {
|
|
74
|
+
rules: [
|
|
75
|
+
{
|
|
76
|
+
test: /\.node$/,
|
|
77
|
+
loader: "native-ext-loader",
|
|
78
|
+
options: {
|
|
79
|
+
emit: true,
|
|
80
|
+
rewritePath:
|
|
81
|
+
process.env.NODE_ENV === "production"
|
|
82
|
+
? process.platform === "win32"
|
|
83
|
+
? ".\\"
|
|
84
|
+
: "../"
|
|
85
|
+
: "node_modules/trtc-electron-sdk/build/Release",
|
|
86
|
+
},
|
|
87
|
+
},
|
|
88
|
+
...
|
|
89
|
+
],
|
|
90
|
+
},
|
|
91
|
+
|
|
92
|
+
...
|
|
93
|
+
}
|
|
94
|
+
|
|
95
|
+
// electron-builder config
|
|
96
|
+
{
|
|
97
|
+
...
|
|
98
|
+
|
|
99
|
+
"build": {
|
|
100
|
+
"win": {
|
|
101
|
+
"extraFiles": [
|
|
102
|
+
{
|
|
103
|
+
"from": "node_modules/trtc-electron-sdk/build/Release/",
|
|
104
|
+
"to": "./"
|
|
105
|
+
},
|
|
106
|
+
...
|
|
107
|
+
]
|
|
108
|
+
},
|
|
109
|
+
"mac": {
|
|
110
|
+
"extraFiles": [
|
|
111
|
+
{
|
|
112
|
+
"from": "node_modules/trtc-electron-sdk/build/Release/${arch}/trtc_electron_sdk.node",
|
|
113
|
+
"to": "./"
|
|
114
|
+
},
|
|
115
|
+
{
|
|
116
|
+
"from": "node_modules/trtc-electron-sdk/build/mac-framework/${arch}/",
|
|
117
|
+
"to": "./Frameworks"
|
|
118
|
+
},
|
|
119
|
+
...
|
|
120
|
+
]
|
|
121
|
+
}
|
|
122
|
+
}
|
|
123
|
+
|
|
124
|
+
...
|
|
125
|
+
}
|
|
126
|
+
|
|
127
|
+
```
|
|
219
128
|
|
|
220
|
-
|
|
221
|
-
|
|
129
|
+
## 🔗 Links
|
|
130
|
+
- [Official Site](https://trtc.io/products/rtc)
|
|
131
|
+
- [API Document](https://web.sdk.qcloud.com/trtc/electron/doc/en-us/trtc_electron_sdk/index.html
|
|
132
|
+
)
|
|
133
|
+
- [Online Demo](https://trtc.io/demo)
|
|
134
|
+
- [Github demo]( https://github.com/Tencent-RTC/TRTC_Electron)
|
|
@@ -0,0 +1,37 @@
|
|
|
1
|
+
/**
|
|
2
|
+
* @class RenderFPSMonitor
|
|
3
|
+
*/
|
|
4
|
+
declare class VideoRenderFPSMonitor {
|
|
5
|
+
private logPrefix;
|
|
6
|
+
private emitter;
|
|
7
|
+
private nextAnimationFrame;
|
|
8
|
+
private lastTimestamp;
|
|
9
|
+
private refreshCount;
|
|
10
|
+
private pageRefreshFPS;
|
|
11
|
+
private lastPageRefreshFPS;
|
|
12
|
+
private videoRenderFPS;
|
|
13
|
+
private lastVideoRenderFPS;
|
|
14
|
+
private statisticDuration;
|
|
15
|
+
constructor();
|
|
16
|
+
private initPageRefreshFPSStatistic;
|
|
17
|
+
private statisticPageRefreshFPS;
|
|
18
|
+
/**
|
|
19
|
+
* 规则:
|
|
20
|
+
* 页面刷新帧率低于 10 时,设置渲染帧率为 5
|
|
21
|
+
* 页面刷新帧率低于 20 时,设置渲染帧率为 15
|
|
22
|
+
* 页面刷新帧率低于 30 时,设置渲染帧率为 25
|
|
23
|
+
* 页面刷新帧率高于 30 时,设置渲染帧率为 -1,负数表示关闭渲染帧率限制
|
|
24
|
+
* 页面刷新帧率从低于 10 到 30+ 时,持续 2 秒后,设置渲染帧率为 15
|
|
25
|
+
* 页面刷新帧率从低于 20 到 30+ 时,持续 2 秒后,设置渲染帧率为 25
|
|
26
|
+
* 页面刷新帧率从低于 30 到 30+ 时,持续 2 秒后,设置渲染帧率为 -1,负数表示关闭渲染帧率限制
|
|
27
|
+
*/
|
|
28
|
+
private statisticVideoRenderFPS;
|
|
29
|
+
private onVisibilityChange;
|
|
30
|
+
private notifyFPS;
|
|
31
|
+
destroy(): void;
|
|
32
|
+
on(event: string, listener: (...args: any[]) => void): void;
|
|
33
|
+
off(event: string, listener: (...args: any[]) => void): void;
|
|
34
|
+
emit(event: string, ...args: any[]): void;
|
|
35
|
+
}
|
|
36
|
+
export declare const videoRenderFPSMonitor: VideoRenderFPSMonitor;
|
|
37
|
+
export default VideoRenderFPSMonitor;
|
|
@@ -0,0 +1,127 @@
|
|
|
1
|
+
"use strict";
|
|
2
|
+
var __importDefault = (this && this.__importDefault) || function (mod) {
|
|
3
|
+
return (mod && mod.__esModule) ? mod : { "default": mod };
|
|
4
|
+
};
|
|
5
|
+
Object.defineProperty(exports, "__esModule", { value: true });
|
|
6
|
+
exports.videoRenderFPSMonitor = void 0;
|
|
7
|
+
const events_1 = require("events");
|
|
8
|
+
const logger_1 = __importDefault(require("../logger"));
|
|
9
|
+
/**
|
|
10
|
+
* @class RenderFPSMonitor
|
|
11
|
+
*/
|
|
12
|
+
class VideoRenderFPSMonitor {
|
|
13
|
+
constructor() {
|
|
14
|
+
this.logPrefix = '[RenderFPSMonitor]';
|
|
15
|
+
this.emitter = new events_1.EventEmitter();
|
|
16
|
+
this.nextAnimationFrame = 0;
|
|
17
|
+
this.lastTimestamp = 0;
|
|
18
|
+
this.refreshCount = 0;
|
|
19
|
+
this.pageRefreshFPS = 0;
|
|
20
|
+
this.lastPageRefreshFPS = 60;
|
|
21
|
+
this.videoRenderFPS = 0;
|
|
22
|
+
this.lastVideoRenderFPS = -1;
|
|
23
|
+
this.statisticDuration = 2000;
|
|
24
|
+
this.statisticPageRefreshFPS = this.statisticPageRefreshFPS.bind(this);
|
|
25
|
+
this.onVisibilityChange = this.onVisibilityChange.bind(this);
|
|
26
|
+
this.initPageRefreshFPSStatistic();
|
|
27
|
+
document.addEventListener('visibilitychange', this.onVisibilityChange);
|
|
28
|
+
}
|
|
29
|
+
initPageRefreshFPSStatistic() {
|
|
30
|
+
if (window.requestAnimationFrame) {
|
|
31
|
+
this.nextAnimationFrame = window.requestAnimationFrame(this.statisticPageRefreshFPS);
|
|
32
|
+
}
|
|
33
|
+
}
|
|
34
|
+
statisticPageRefreshFPS(timestamp) {
|
|
35
|
+
if (this.lastTimestamp === 0) {
|
|
36
|
+
this.lastTimestamp = timestamp;
|
|
37
|
+
}
|
|
38
|
+
this.refreshCount++;
|
|
39
|
+
const duration = timestamp - this.lastTimestamp;
|
|
40
|
+
if (duration >= this.statisticDuration) {
|
|
41
|
+
this.lastPageRefreshFPS = this.pageRefreshFPS;
|
|
42
|
+
this.pageRefreshFPS = Math.round(this.refreshCount * 1000 / duration);
|
|
43
|
+
setTimeout(() => {
|
|
44
|
+
this.statisticVideoRenderFPS();
|
|
45
|
+
}, 0);
|
|
46
|
+
this.lastTimestamp = timestamp;
|
|
47
|
+
this.refreshCount = 0;
|
|
48
|
+
}
|
|
49
|
+
this.nextAnimationFrame = window.requestAnimationFrame(this.statisticPageRefreshFPS);
|
|
50
|
+
}
|
|
51
|
+
/**
|
|
52
|
+
* 规则:
|
|
53
|
+
* 页面刷新帧率低于 10 时,设置渲染帧率为 5
|
|
54
|
+
* 页面刷新帧率低于 20 时,设置渲染帧率为 15
|
|
55
|
+
* 页面刷新帧率低于 30 时,设置渲染帧率为 25
|
|
56
|
+
* 页面刷新帧率高于 30 时,设置渲染帧率为 -1,负数表示关闭渲染帧率限制
|
|
57
|
+
* 页面刷新帧率从低于 10 到 30+ 时,持续 2 秒后,设置渲染帧率为 15
|
|
58
|
+
* 页面刷新帧率从低于 20 到 30+ 时,持续 2 秒后,设置渲染帧率为 25
|
|
59
|
+
* 页面刷新帧率从低于 30 到 30+ 时,持续 2 秒后,设置渲染帧率为 -1,负数表示关闭渲染帧率限制
|
|
60
|
+
*/
|
|
61
|
+
statisticVideoRenderFPS() {
|
|
62
|
+
if (this.pageRefreshFPS <= 10) {
|
|
63
|
+
this.videoRenderFPS = this.pageRefreshFPS < 5 ? this.pageRefreshFPS : 5;
|
|
64
|
+
}
|
|
65
|
+
else if (this.pageRefreshFPS <= 20) {
|
|
66
|
+
this.videoRenderFPS = this.pageRefreshFPS < 15 ? this.pageRefreshFPS : 15;
|
|
67
|
+
}
|
|
68
|
+
else if (this.pageRefreshFPS <= 30) {
|
|
69
|
+
this.videoRenderFPS = this.pageRefreshFPS < 25 ? this.pageRefreshFPS : 25;
|
|
70
|
+
}
|
|
71
|
+
else if (this.pageRefreshFPS > 30 && this.lastPageRefreshFPS <= 10) {
|
|
72
|
+
this.videoRenderFPS = 15;
|
|
73
|
+
}
|
|
74
|
+
else if (this.pageRefreshFPS > 30 && this.lastPageRefreshFPS <= 20) {
|
|
75
|
+
this.videoRenderFPS = 25;
|
|
76
|
+
}
|
|
77
|
+
else {
|
|
78
|
+
this.videoRenderFPS = -1;
|
|
79
|
+
}
|
|
80
|
+
if (this.lastVideoRenderFPS !== this.videoRenderFPS) {
|
|
81
|
+
this.lastVideoRenderFPS = this.videoRenderFPS;
|
|
82
|
+
this.notifyFPS();
|
|
83
|
+
}
|
|
84
|
+
}
|
|
85
|
+
onVisibilityChange() {
|
|
86
|
+
if (document.hidden) {
|
|
87
|
+
logger_1.default.info(`${this.logPrefix} document hidden`);
|
|
88
|
+
this.videoRenderFPS = 1;
|
|
89
|
+
this.pageRefreshFPS = 1;
|
|
90
|
+
}
|
|
91
|
+
else {
|
|
92
|
+
logger_1.default.info(`${this.logPrefix} document show`);
|
|
93
|
+
this.videoRenderFPS = 5; // 慢启动
|
|
94
|
+
this.pageRefreshFPS = 5;
|
|
95
|
+
}
|
|
96
|
+
this.lastVideoRenderFPS = this.videoRenderFPS;
|
|
97
|
+
this.lastTimestamp = 0;
|
|
98
|
+
this.refreshCount = 0;
|
|
99
|
+
this.notifyFPS();
|
|
100
|
+
}
|
|
101
|
+
notifyFPS() {
|
|
102
|
+
logger_1.default.debug(`${this.logPrefix} pageRefreshFPS:${this.pageRefreshFPS} videoRenderFPS: ${this.videoRenderFPS}`);
|
|
103
|
+
this.emit('videoRenderFPS', {
|
|
104
|
+
pageFPS: this.pageRefreshFPS,
|
|
105
|
+
videoFPS: this.videoRenderFPS,
|
|
106
|
+
});
|
|
107
|
+
}
|
|
108
|
+
destroy() {
|
|
109
|
+
if (this.nextAnimationFrame) {
|
|
110
|
+
window.cancelAnimationFrame(this.nextAnimationFrame);
|
|
111
|
+
this.nextAnimationFrame = 0;
|
|
112
|
+
}
|
|
113
|
+
this.emitter.removeAllListeners();
|
|
114
|
+
document.removeEventListener('visibilitychange', this.onVisibilityChange);
|
|
115
|
+
}
|
|
116
|
+
on(event, listener) {
|
|
117
|
+
this.emitter.on(event, listener);
|
|
118
|
+
}
|
|
119
|
+
off(event, listener) {
|
|
120
|
+
this.emitter.off(event, listener);
|
|
121
|
+
}
|
|
122
|
+
emit(event, ...args) {
|
|
123
|
+
this.emitter.emit(event, ...args);
|
|
124
|
+
}
|
|
125
|
+
}
|
|
126
|
+
exports.videoRenderFPSMonitor = new VideoRenderFPSMonitor();
|
|
127
|
+
exports.default = VideoRenderFPSMonitor;
|
package/liteav/trtc.d.ts
CHANGED
|
@@ -1,7 +1,7 @@
|
|
|
1
1
|
/// <reference types="node" />
|
|
2
2
|
import { EventEmitter } from 'events';
|
|
3
3
|
import { TRTCConfig } from './Renderer/util';
|
|
4
|
-
import { AudioMusicParam, Rect, TRTCAppScene, TRTCAudioEffectParam, TRTCAudioQuality, TRTCBeautyStyle, TRTCDeviceState, TRTCDeviceType, TRTCLogLevel, TRTCRenderParams, TRTCRoleType, TRTCSpeedTestResult, TRTCStatistics, TRTCSwitchRoomParam, TRTCVideoBufferType, TRTCVideoFillMode, TRTCAudioFrame, TRTCVideoPixelFormat, TRTCVideoRotation, TRTCVideoStreamType, TRTCVolumeInfo, TRTCWaterMarkSrcType, TRTCQualityInfo, TRTCPluginType, TRTCPluginInfo, TRTCVideoProcessPluginOptions, TRTCMediaEncryptDecryptPluginOptions, TRTCAudioRecordingParams, TRTCScreenCaptureSourceInfo, TRTCScreenCaptureProperty, TRTCSpeedTestParams, TRTCRecordType, TRTCDeviceInfo, TRTCCameraCaptureParams, TRTCImageBuffer, TRTCInitConfig, TRTCAudioParallelParams, TRTCVoiceReverbType, TRTCMusicPlayObserver, TRTCAudioFrameCallback } from './trtc_define';
|
|
4
|
+
import { AudioMusicParam, Rect, TRTCAppScene, TRTCAudioEffectParam, TRTCAudioQuality, TRTCBeautyStyle, TRTCDeviceState, TRTCDeviceType, TRTCLogLevel, TRTCRenderParams, TRTCRoleType, TRTCSpeedTestResult, TRTCStatistics, TRTCSwitchRoomParam, TRTCVideoBufferType, TRTCVideoFillMode, TRTCAudioFrame, TRTCVideoPixelFormat, TRTCVideoRotation, TRTCVideoStreamType, TRTCVolumeInfo, TRTCWaterMarkSrcType, TRTCQualityInfo, TRTCPluginType, TRTCPluginInfo, TRTCVideoProcessPluginOptions, TRTCMediaEncryptDecryptPluginOptions, TRTCAudioRecordingParams, TRTCScreenCaptureSourceInfo, TRTCScreenCaptureProperty, TRTCSpeedTestParams, TRTCRecordType, TRTCDeviceInfo, TRTCCameraCaptureParams, TRTCImageBuffer, TRTCInitConfig, TRTCAudioParallelParams, TRTCVoiceReverbType, TRTCVoiceChangerType, TRTCMusicPlayObserver, TRTCAudioFrameCallback, TRTCAudioProcessPluginOptions } from './trtc_define';
|
|
5
5
|
export * from './trtc_define';
|
|
6
6
|
export * from './trtc_code';
|
|
7
7
|
export * from './vod_player';
|
|
@@ -67,6 +67,7 @@ declare class TRTCCloud extends EventEmitter {
|
|
|
67
67
|
* 注释:会同时销毁所有子实例
|
|
68
68
|
*/
|
|
69
69
|
static destroyTRTCShareInstance(): void;
|
|
70
|
+
private onFPSChanged;
|
|
70
71
|
/**
|
|
71
72
|
* 创建子实例
|
|
72
73
|
*
|
|
@@ -1026,6 +1027,7 @@ declare class TRTCCloud extends EventEmitter {
|
|
|
1026
1027
|
* @param {Number} params.videoFps - 视频采集帧率
|
|
1027
1028
|
* @param {Number} params.videoBitrate - 视频上行码率
|
|
1028
1029
|
* @param {Number} params.minVideoBitrate - 视频最小码率
|
|
1030
|
+
* @param {Boolean} params.enableAdjustRes - 是否允许动态调整分辨率,默认值:关闭。
|
|
1029
1031
|
*/
|
|
1030
1032
|
setVideoEncoderParam(params: any): void;
|
|
1031
1033
|
/**
|
|
@@ -1208,7 +1210,6 @@ declare class TRTCCloud extends EventEmitter {
|
|
|
1208
1210
|
* 如果录制任务在退出房间前尚未通过本接口停止,则退出房间后录音任务会自动被停止。
|
|
1209
1211
|
*/
|
|
1210
1212
|
stopLocalRecording(): void;
|
|
1211
|
-
setVideoRenderFPS(fps: number): void;
|
|
1212
1213
|
/**
|
|
1213
1214
|
* 开启本地音频的采集和上行
|
|
1214
1215
|
*
|
|
@@ -1630,8 +1631,8 @@ declare class TRTCCloud extends EventEmitter {
|
|
|
1630
1631
|
* true, // enable capture mouse
|
|
1631
1632
|
* true, // enable highlight
|
|
1632
1633
|
* true, // enable high performance
|
|
1633
|
-
*
|
|
1634
|
-
*
|
|
1634
|
+
* 0xFF66FF, // highlight color.
|
|
1635
|
+
* 8, // highlight width
|
|
1635
1636
|
* false // disable capture child window
|
|
1636
1637
|
* );
|
|
1637
1638
|
*
|
|
@@ -2204,16 +2205,59 @@ declare class TRTCCloud extends EventEmitter {
|
|
|
2204
2205
|
* @param {Number} volume - 音量大小,100为正常音量,取值范围为0 - 100;默认值:100
|
|
2205
2206
|
*/
|
|
2206
2207
|
setMusicPublishVolume(id: number, volume: number): void;
|
|
2208
|
+
/**
|
|
2209
|
+
* 开启耳返
|
|
2210
|
+
*
|
|
2211
|
+
* 主播开启耳返后,可以在耳机里听到麦克风采集到的自己发出的声音,该特效适用于主播唱歌的应用场景中。
|
|
2212
|
+
*
|
|
2213
|
+
* 需要您注意的是,由于蓝牙耳机的硬件延迟非常高,所以在主播佩戴蓝牙耳机时无法开启此特效,请尽量在用户界面上提示主播佩戴有线耳机。同时也需要注意,并非所有的手机开启此特效后都能达到优秀的耳返效果,我们已经对部分耳返效果不佳的手机屏蔽了该特效。
|
|
2214
|
+
* @param {Boolean} enable - 是否开启耳返。
|
|
2215
|
+
*/
|
|
2216
|
+
enableVoiceEarMonitor(enable: boolean): void;
|
|
2217
|
+
/**
|
|
2218
|
+
* 设置耳返音量
|
|
2219
|
+
*
|
|
2220
|
+
* 通过该接口您可以设置耳返特效中声音的音量大小。
|
|
2221
|
+
*
|
|
2222
|
+
* 如果将 volume 设置成 100 之后感觉音量还是太小,可以将 volume 最大设置成 150,但超过 100 的 volume 会有爆音的风险,请谨慎操作。
|
|
2223
|
+
* @param {Number} volumn - 音量大小,取值范围为0 - 100,默认值:100。
|
|
2224
|
+
*/
|
|
2225
|
+
setVoiceEarMonitorVolume(volumn: number): void;
|
|
2226
|
+
/**
|
|
2227
|
+
* 设置语音音量
|
|
2228
|
+
*
|
|
2229
|
+
* 该接口可以设置语音音量的大小,一般配合音乐音量的设置接口 setAllMusicVolume 协同使用,用于调谐语音和音乐在混音前各自的音量占比。
|
|
2230
|
+
*
|
|
2231
|
+
* 如果将 volume 设置成 100 之后感觉音量还是太小,可以将 volume 最大设置成 150,但超过 100 的 volume 会有爆音的风险,请谨慎操作。
|
|
2232
|
+
* @param {Number} volume - 音量大小,取值范围为0 - 100,默认值:100。
|
|
2233
|
+
*/
|
|
2234
|
+
setVoiceCaptureVolume(volume: number): void;
|
|
2235
|
+
/**
|
|
2236
|
+
* 设置语音音调
|
|
2237
|
+
*
|
|
2238
|
+
* 该接口可以设置语音音调,用于实现变调不变速的目的。
|
|
2239
|
+
* @param {Number} pitch - 音调,取值范围为-1.0f~1.0f,默认值:0.0f。
|
|
2240
|
+
*/
|
|
2241
|
+
setVoicePitch(pitch: number): void;
|
|
2207
2242
|
/**
|
|
2208
2243
|
* 设置人声的混响效果
|
|
2209
2244
|
*
|
|
2210
|
-
*
|
|
2245
|
+
* 通过该接口您可以设置人声的混响效果,具体特效请参见枚举定义。
|
|
2211
2246
|
*
|
|
2212
2247
|
* 注意:设置的效果在退出房间后会自动失效,如果下次进房还需要对应特效,需要调用此接口再次进行设置。
|
|
2213
2248
|
*
|
|
2214
|
-
* @param {TRTCVoiceReverbType} type -
|
|
2249
|
+
* @param {TRTCVoiceReverbType} type - 人声的混响效果类型。
|
|
2215
2250
|
*/
|
|
2216
2251
|
setVoiceReverbType(type: TRTCVoiceReverbType): void;
|
|
2252
|
+
/**
|
|
2253
|
+
* 设置人声的变声效果
|
|
2254
|
+
*
|
|
2255
|
+
* 通过该接口您可以设置人声的变声效果,具体特效请参见枚举定义
|
|
2256
|
+
*
|
|
2257
|
+
* 注意:设置的效果在退出房间后会自动失效,如果下次进房还需要对应特效,需要调用此接口再次进行设置
|
|
2258
|
+
* @param {TRTCVoiceChangerType} type - 人声的变声效果类型 。
|
|
2259
|
+
*/
|
|
2260
|
+
setVoiceChangerType(type: TRTCVoiceChangerType): void;
|
|
2217
2261
|
/**
|
|
2218
2262
|
* 废弃接口: 播放音效
|
|
2219
2263
|
*
|
|
@@ -2384,10 +2428,12 @@ declare class TRTCCloud extends EventEmitter {
|
|
|
2384
2428
|
/**
|
|
2385
2429
|
* 设置日志保存路径
|
|
2386
2430
|
*
|
|
2387
|
-
*
|
|
2388
|
-
* - windows 日志文件默认保存在 C:/Users/[系统用户名]/AppData/Roaming/
|
|
2431
|
+
* 通过该接口您可以更改 SDK 本地日志的默认存储路径,SDK 默认的本地日志的存储位置:
|
|
2432
|
+
* - windows 日志文件默认保存在 C:/Users/[系统用户名]/AppData/Roaming/liteav/log,即 %appdata%/liteav/log 下,如需修改,必须在所有方法前调用。
|
|
2389
2433
|
* - mac 日志文件默认保存在 sandbox Documents/log 下,如需修改,必须在所有方法前调用。
|
|
2390
2434
|
*
|
|
2435
|
+
* 注意:请务必在所有其他接口之前调用,并且保证您指定的目录是存在的,并且您的应用程序拥有对该目录的读写权限。
|
|
2436
|
+
*
|
|
2391
2437
|
* @param {String} path - 存储日志的文件夹,例如 "D:\\Log",UTF-8 编码
|
|
2392
2438
|
*/
|
|
2393
2439
|
setLogDirPath(path: string): void;
|
|
@@ -2426,9 +2472,9 @@ declare class TRTCCloud extends EventEmitter {
|
|
|
2426
2472
|
* 调用 [addPlugin]{@link TRTCCloud#addPlugin} 接口添加插件前,需要先调用本接口设置配置参数,否则插件不会启动、运行。
|
|
2427
2473
|
*
|
|
2428
2474
|
* @param type {TRTCPluginType} - 插件类型
|
|
2429
|
-
* @param config {
|
|
2475
|
+
* @param config {TRTCVideoProcessPluginOptions | TRTCMediaEncryptDecryptPluginOptions | TRTCAudioProcessPluginOptions} - 插件配置参数
|
|
2430
2476
|
*/
|
|
2431
|
-
setPluginParams(type: TRTCPluginType, options: TRTCVideoProcessPluginOptions | TRTCMediaEncryptDecryptPluginOptions): void;
|
|
2477
|
+
setPluginParams(type: TRTCPluginType, options: TRTCVideoProcessPluginOptions | TRTCMediaEncryptDecryptPluginOptions | TRTCAudioProcessPluginOptions): void;
|
|
2432
2478
|
private _setVideoProcessPluginParams;
|
|
2433
2479
|
private _setMediaEncryptDecryptPluginParams;
|
|
2434
2480
|
private _setAudioProcessPluginParams;
|
|
@@ -2465,7 +2511,7 @@ declare class TRTCCloud extends EventEmitter {
|
|
|
2465
2511
|
* - pluginId - 插件ID
|
|
2466
2512
|
* - errorCode - 错误码。0、-1、-2、-3、-4、-5 是 SDK 内部定义错误码,其它错误码是插件自定义错误码。
|
|
2467
2513
|
* - 0 表示 addPlugin 成功
|
|
2468
|
-
* - -1
|
|
2514
|
+
* - -1 插件库加载失败
|
|
2469
2515
|
* - -2 插件库缺少插件创建函数
|
|
2470
2516
|
* - -3 创建函数执行失败
|
|
2471
2517
|
* - -4 插件初始化函数执行失败
|