storybook-addon-sdc 0.0.1
This diff represents the content of publicly available package versions that have been released to one of the supported registries. The information contained in this diff is provided for informational purposes only and reflects changes between package versions as they appear in their respective public registries.
- package/LICENSE +21 -0
- package/README.md +233 -0
- package/dist/preset.cjs +691 -0
- package/dist/preset.cjs.map +1 -0
- package/package.json +84 -0
package/LICENSE
ADDED
|
@@ -0,0 +1,21 @@
|
|
|
1
|
+
MIT License
|
|
2
|
+
|
|
3
|
+
Copyright (c) 2023 Storybook contributors
|
|
4
|
+
|
|
5
|
+
Permission is hereby granted, free of charge, to any person obtaining a copy
|
|
6
|
+
of this software and associated documentation files (the "Software"), to deal
|
|
7
|
+
in the Software without restriction, including without limitation the rights
|
|
8
|
+
to use, copy, modify, merge, publish, distribute, sublicense, and/or sell
|
|
9
|
+
copies of the Software, and to permit persons to whom the Software is
|
|
10
|
+
furnished to do so, subject to the following conditions:
|
|
11
|
+
|
|
12
|
+
The above copyright notice and this permission notice shall be included in all
|
|
13
|
+
copies or substantial portions of the Software.
|
|
14
|
+
|
|
15
|
+
THE SOFTWARE IS PROVIDED "AS IS", WITHOUT WARRANTY OF ANY KIND, EXPRESS OR
|
|
16
|
+
IMPLIED, INCLUDING BUT NOT LIMITED TO THE WARRANTIES OF MERCHANTABILITY,
|
|
17
|
+
FITNESS FOR A PARTICULAR PURPOSE AND NONINFRINGEMENT. IN NO EVENT SHALL THE
|
|
18
|
+
AUTHORS OR COPYRIGHT HOLDERS BE LIABLE FOR ANY CLAIM, DAMAGES OR OTHER
|
|
19
|
+
LIABILITY, WHETHER IN AN ACTION OF CONTRACT, TORT OR OTHERWISE, ARISING FROM,
|
|
20
|
+
OUT OF OR IN CONNECTION WITH THE SOFTWARE OR THE USE OR OTHER DEALINGS IN THE
|
|
21
|
+
SOFTWARE.
|
package/README.md
ADDED
|
@@ -0,0 +1,233 @@
|
|
|
1
|
+
# Storybook Addon Storybook Addon SDC
|
|
2
|
+
Drupal Single Directory Components as stories
|
|
3
|
+
|
|
4
|
+
### Development scripts
|
|
5
|
+
|
|
6
|
+
- `npm run start` runs babel in watch mode and starts Storybook
|
|
7
|
+
- `npm run build` build and package your addon code
|
|
8
|
+
|
|
9
|
+
### Switch from TypeScript to JavaScript
|
|
10
|
+
|
|
11
|
+
Don't want to use TypeScript? We offer a handy eject command: `npm run eject-ts`
|
|
12
|
+
|
|
13
|
+
This will convert all code to JS. It is a destructive process, so we recommended running this before you start writing any code.
|
|
14
|
+
|
|
15
|
+
## What's included?
|
|
16
|
+
|
|
17
|
+
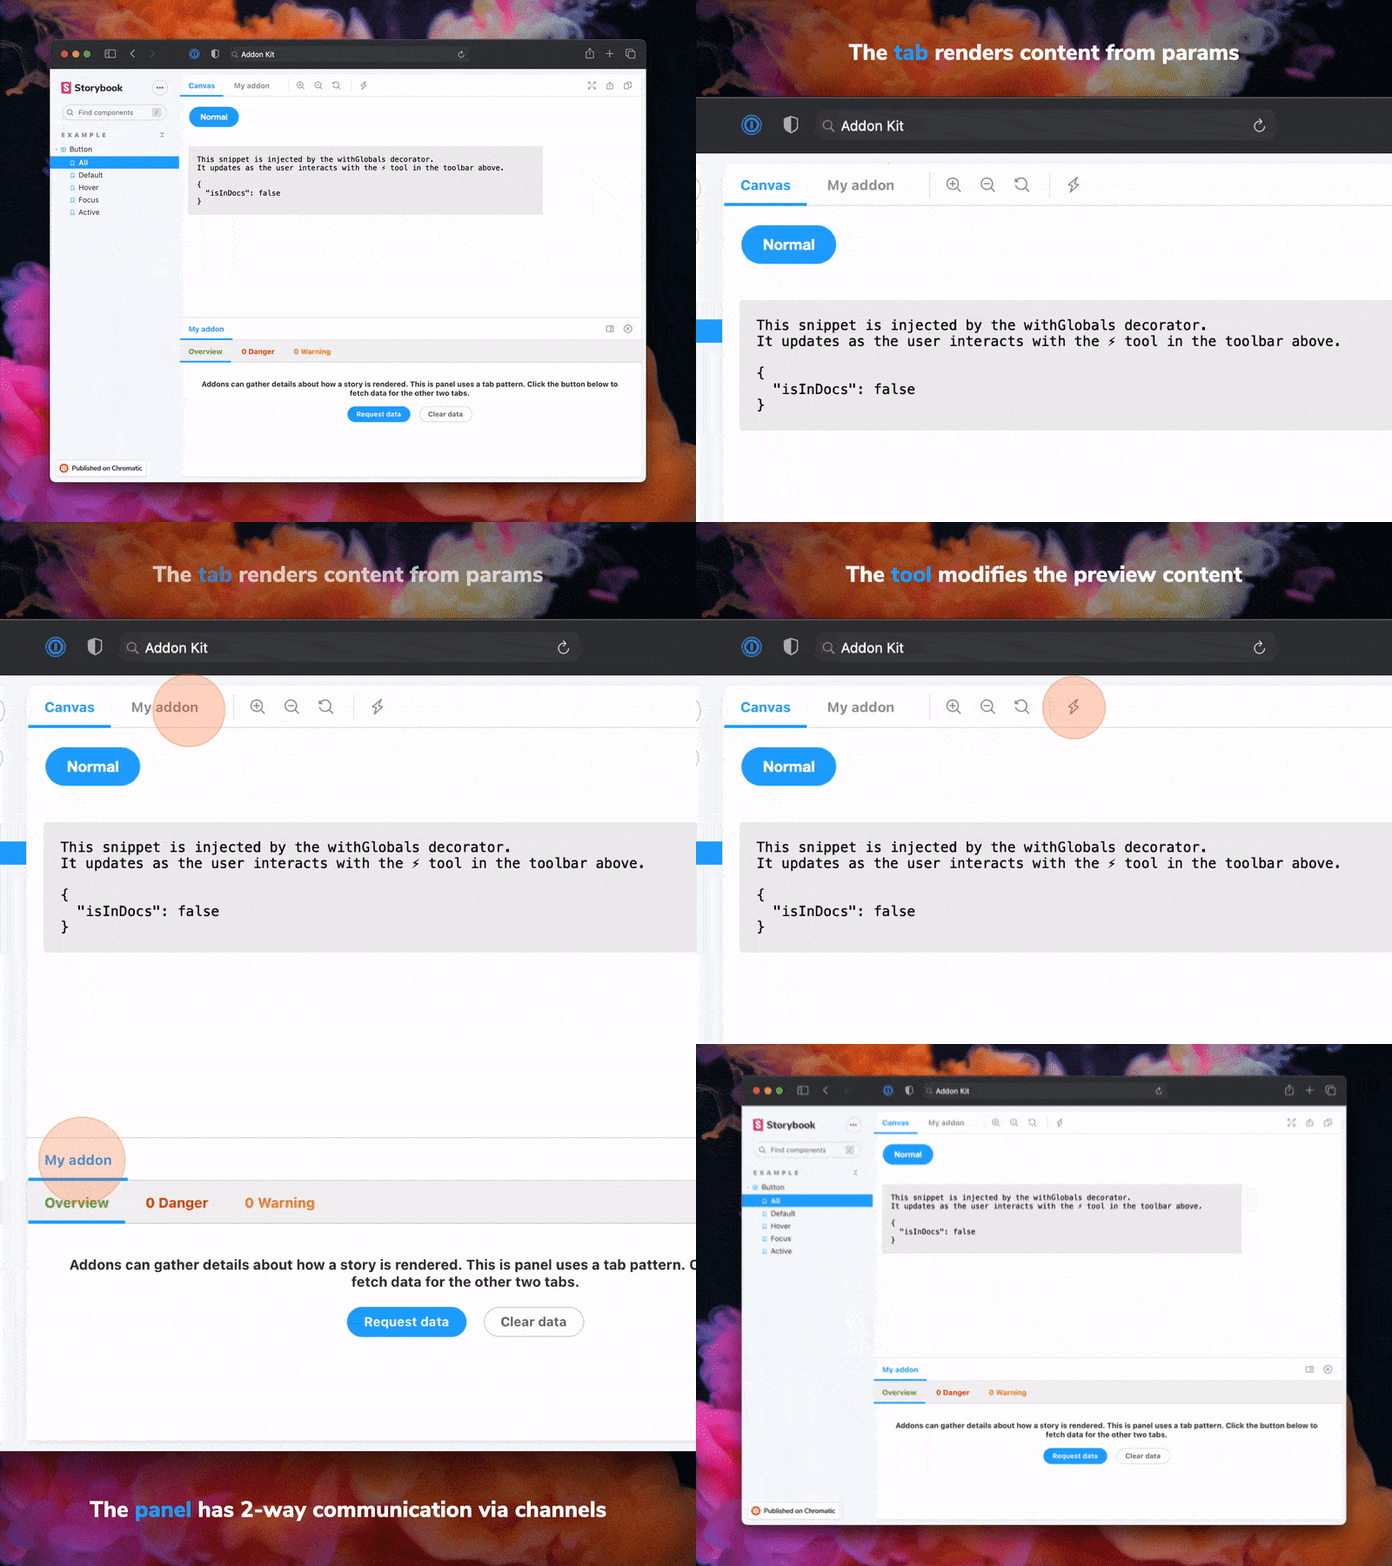
|
|
18
|
+
|
|
19
|
+
The addon code lives in `src`. It demonstrates all core addon related concepts. The three [UI paradigms](https://storybook.js.org/docs/react/addons/addon-types#ui-based-addons)
|
|
20
|
+
|
|
21
|
+
- `src/Tool.tsx`
|
|
22
|
+
- `src/Panel.tsx`
|
|
23
|
+
- `src/Tab.tsx`
|
|
24
|
+
|
|
25
|
+
Which, along with the addon itself, are registered in `src/manager.ts`.
|
|
26
|
+
|
|
27
|
+
Managing State and interacting with a story:
|
|
28
|
+
|
|
29
|
+
- `src/withGlobals.ts` & `src/Tool.tsx` demonstrates how to use `useGlobals` to manage global state and modify the contents of a Story.
|
|
30
|
+
- `src/withRoundTrip.ts` & `src/Panel.tsx` demonstrates two-way communication using channels.
|
|
31
|
+
- `src/Tab.tsx` demonstrates how to use `useParameter` to access the current story's parameters.
|
|
32
|
+
|
|
33
|
+
Your addon might use one or more of these patterns. Feel free to delete unused code. Update `src/manager.ts` and `src/preview.ts` accordingly.
|
|
34
|
+
|
|
35
|
+
Lastly, configure you addon name in `src/constants.ts`.
|
|
36
|
+
|
|
37
|
+
### Bundling
|
|
38
|
+
|
|
39
|
+
Addons can interact with a Storybook project in multiple ways. It is recommended to familiarize yourself with [the basics](https://storybook.js.org/docs/react/addons/introduction) before getting started.
|
|
40
|
+
|
|
41
|
+
- Manager entries are used to add UI or behavior to the Storybook manager UI.
|
|
42
|
+
- Preview entries are used to add UI or behavior to the preview iframe where stories are rendered.
|
|
43
|
+
- Presets are used to modify the Storybook configuration, similar to how [users can configure their `main.ts` configurations](https://storybook.js.org/docs/react/api/main-config).
|
|
44
|
+
|
|
45
|
+
Since each of these places represents a different environment with different features and modules, it is also recommended to split and build your modules accordingly. This addon-kit comes with a preconfigured [bundling configuration](./tsup.config.ts) that supports this split, and you are free to modify and extend it as needed.
|
|
46
|
+
|
|
47
|
+
You can define which modules match which environments in the [`package.json#bundler`](./package.json) property:
|
|
48
|
+
|
|
49
|
+
- `exportEntries` is a list of module entries that users can manually import from anywhere they need to. For example, you could have decorators that users need to import into their `preview.ts` file or utility functions that can be used in their `main.ts` files.
|
|
50
|
+
- `managerEntries` is a list of module entries meant only for the manager UI. These modules will be bundled to ESM and won't include types since they are mostly loaded by Storybook directly.
|
|
51
|
+
- `previewEntries` is a list of module entries meant only for the preview UI. These modules will be bundled to ESM and won't include types since they are mostly loaded by Storybook directly.
|
|
52
|
+
|
|
53
|
+
Manager and preview entries are only used in the browser so they only output ESM modules. Export entries could be used both in the browser and in Node depending on their use case, so they both output ESM and CJS modules.
|
|
54
|
+
|
|
55
|
+
#### Globalized packages
|
|
56
|
+
|
|
57
|
+
Storybook provides a predefined set of packages that are available in the manager UI and the preview UI. In the final bundle of your addon, these packages should not be included. Instead, the imports should stay in place, allowing Storybook to replace those imports with the actual packages during the Storybook build process.
|
|
58
|
+
|
|
59
|
+
The list of packages differs between the manager and the preview, which is why there is a slight difference between `managerEntries` and `previewEntries`. Most notably, `react` and `react-dom` are prebundled in the manager but not in the preview. This means that your manager entries can use React to build UI without bundling it or having a direct reference to it. Therefore, it is safe to have React as a `devDependency` even though you are using it in production. _Requiring React as a peer dependency would unnecessarily force your users to install React._
|
|
60
|
+
|
|
61
|
+
An exception to this rule is if you are using React to inject UI into the preview, which does not come prebundled with React. In such cases, you need to move `react` and `react-dom` to a peer dependency. However, we generally advise against this pattern since it would limit the usage of your addon to React-based Storybooks.
|
|
62
|
+
|
|
63
|
+
### Metadata
|
|
64
|
+
|
|
65
|
+
Storybook addons are listed in the [catalog](https://storybook.js.org/addons) and distributed via npm. The catalog is populated by querying npm's registry for Storybook-specific metadata in `package.json`. This project has been configured with sample data. Learn more about available options in the [Addon metadata docs](https://storybook.js.org/docs/react/addons/addon-catalog#addon-metadata).
|
|
66
|
+
|
|
67
|
+
## Documentation
|
|
68
|
+
|
|
69
|
+
To help the community use your addon and understand its capabilities, please document it thoroughly.
|
|
70
|
+
|
|
71
|
+
To get started, replace this README with the content in this sample template, modeled after how essential addons (like [Actions](https://storybook.js.org/docs/essentials/actions)) are documented. Then update the content to describe your addon.
|
|
72
|
+
|
|
73
|
+
### Sample documentation template
|
|
74
|
+
|
|
75
|
+
````md
|
|
76
|
+
# My Addon
|
|
77
|
+
|
|
78
|
+
## Installation
|
|
79
|
+
|
|
80
|
+
First, install the package.
|
|
81
|
+
|
|
82
|
+
```sh
|
|
83
|
+
npm install --save-dev my-addon
|
|
84
|
+
```
|
|
85
|
+
|
|
86
|
+
Then, register it as an addon in `.storybook/main.js`.
|
|
87
|
+
|
|
88
|
+
```js
|
|
89
|
+
// .storybook/main.ts
|
|
90
|
+
|
|
91
|
+
// Replace your-framework with the framework you are using (e.g., react-webpack5, vue3-vite)
|
|
92
|
+
import type { StorybookConfig } from '@storybook/your-framework';
|
|
93
|
+
|
|
94
|
+
const config: StorybookConfig = {
|
|
95
|
+
// ...rest of config
|
|
96
|
+
addons: [
|
|
97
|
+
'@storybook/addon-essentials'
|
|
98
|
+
'my-addon', // 👈 register the addon here
|
|
99
|
+
],
|
|
100
|
+
};
|
|
101
|
+
|
|
102
|
+
export default config;
|
|
103
|
+
```
|
|
104
|
+
|
|
105
|
+
## Usage
|
|
106
|
+
|
|
107
|
+
The primary way to use this addon is to define the `exampleParameter` parameter. You can do this the
|
|
108
|
+
component level, as below, to affect all stories in the file, or you can do it for a single story.
|
|
109
|
+
|
|
110
|
+
```js
|
|
111
|
+
// Button.stories.ts
|
|
112
|
+
|
|
113
|
+
// Replace your-framework with the name of your framework
|
|
114
|
+
import type { Meta } from '@storybook/your-framework';
|
|
115
|
+
|
|
116
|
+
import { Button } from './Button';
|
|
117
|
+
|
|
118
|
+
const meta: Meta<typeof Button> = {
|
|
119
|
+
component: Button,
|
|
120
|
+
parameters: {
|
|
121
|
+
myAddon: {
|
|
122
|
+
exampleParameter: true,
|
|
123
|
+
// See API section below for available parameters
|
|
124
|
+
}
|
|
125
|
+
}
|
|
126
|
+
};
|
|
127
|
+
|
|
128
|
+
export default meta;
|
|
129
|
+
```
|
|
130
|
+
|
|
131
|
+
Another way to use the addon is...
|
|
132
|
+
|
|
133
|
+
## API
|
|
134
|
+
|
|
135
|
+
### Parameters
|
|
136
|
+
|
|
137
|
+
This addon contributes the following parameters to Storybook, under the `myAddon` namespace:
|
|
138
|
+
|
|
139
|
+
#### `disable`
|
|
140
|
+
|
|
141
|
+
Type: `boolean`
|
|
142
|
+
|
|
143
|
+
Disable this addon's behavior. This parameter is most useful to allow overriding at more specific
|
|
144
|
+
levels. For example, if this parameter is set to true at the project level, it could then be
|
|
145
|
+
re-enabled by setting it to false at the meta (component) or story level.
|
|
146
|
+
|
|
147
|
+
### Options
|
|
148
|
+
|
|
149
|
+
When registering this addon, you can configure it with the following options, which are passed when
|
|
150
|
+
registering the addon, like so:
|
|
151
|
+
|
|
152
|
+
```ts
|
|
153
|
+
// .storybook/main.ts
|
|
154
|
+
|
|
155
|
+
// Replace your-framework with the framework you are using (e.g., react-webpack5, vue3-vite)
|
|
156
|
+
import type { StorybookConfig } from '@storybook/your-framework';
|
|
157
|
+
|
|
158
|
+
const config: StorybookConfig = {
|
|
159
|
+
// ...rest of config
|
|
160
|
+
addons: [
|
|
161
|
+
'@storybook/essentials',
|
|
162
|
+
{
|
|
163
|
+
name: 'my-addon',
|
|
164
|
+
options: {
|
|
165
|
+
// 👈 options for my-addon go here
|
|
166
|
+
},
|
|
167
|
+
},
|
|
168
|
+
],
|
|
169
|
+
};
|
|
170
|
+
|
|
171
|
+
export default config;
|
|
172
|
+
```
|
|
173
|
+
|
|
174
|
+
#### `useExperimentalBehavior`
|
|
175
|
+
|
|
176
|
+
Type: `boolean`
|
|
177
|
+
|
|
178
|
+
Enable experimental behavior to...
|
|
179
|
+
|
|
180
|
+
````
|
|
181
|
+
|
|
182
|
+
## Release Management
|
|
183
|
+
|
|
184
|
+
### Setup
|
|
185
|
+
|
|
186
|
+
This project is configured to use [auto](https://github.com/intuit/auto) for release management. It generates a changelog and pushes it to both GitHub and npm. Therefore, you need to configure access to both:
|
|
187
|
+
|
|
188
|
+
- [`NPM_TOKEN`](https://docs.npmjs.com/creating-and-viewing-access-tokens#creating-access-tokens) Create a token with both _Read and Publish_ permissions.
|
|
189
|
+
- [`GH_TOKEN`](https://github.com/settings/tokens) Create a token with the `repo` scope.
|
|
190
|
+
|
|
191
|
+
Then open your `package.json` and edit the following fields:
|
|
192
|
+
|
|
193
|
+
- `name`
|
|
194
|
+
- `author`
|
|
195
|
+
- `repository`
|
|
196
|
+
|
|
197
|
+
#### Local
|
|
198
|
+
|
|
199
|
+
To use `auto` locally create a `.env` file at the root of your project and add your tokens to it:
|
|
200
|
+
|
|
201
|
+
```bash
|
|
202
|
+
GH_TOKEN=<value you just got from GitHub>
|
|
203
|
+
NPM_TOKEN=<value you just got from npm>
|
|
204
|
+
```
|
|
205
|
+
|
|
206
|
+
Lastly, **create labels on GitHub**. You’ll use these labels in the future when making changes to the package.
|
|
207
|
+
|
|
208
|
+
```bash
|
|
209
|
+
npx auto create-labels
|
|
210
|
+
```
|
|
211
|
+
|
|
212
|
+
If you check on GitHub, you’ll now see a set of labels that `auto` would like you to use. Use these to tag future pull requests.
|
|
213
|
+
|
|
214
|
+
#### GitHub Actions
|
|
215
|
+
|
|
216
|
+
This template comes with GitHub actions already set up to publish your addon anytime someone pushes to your repository.
|
|
217
|
+
|
|
218
|
+
Go to `Settings > Secrets`, click `New repository secret`, and add your `NPM_TOKEN`.
|
|
219
|
+
|
|
220
|
+
### Creating a release
|
|
221
|
+
|
|
222
|
+
To create a release locally you can run the following command, otherwise the GitHub action will make the release for you.
|
|
223
|
+
|
|
224
|
+
```sh
|
|
225
|
+
npm run release
|
|
226
|
+
```
|
|
227
|
+
|
|
228
|
+
That will:
|
|
229
|
+
|
|
230
|
+
- Build and package the addon code
|
|
231
|
+
- Bump the version
|
|
232
|
+
- Push a release to GitHub and npm
|
|
233
|
+
- Push a changelog to GitHub
|