iobroker.zigbee 1.9.3 → 1.9.4
This diff represents the content of publicly available package versions that have been released to one of the supported registries. The information contained in this diff is provided for informational purposes only and reflects changes between package versions as they appear in their respective public registries.
- package/LICENSE +21 -21
- package/README.md +433 -430
- package/admin/adapter-settings.js +244 -244
- package/admin/admin.js +2991 -2991
- package/admin/i18n/de/translations.json +108 -108
- package/admin/i18n/en/translations.json +108 -108
- package/admin/i18n/es/translations.json +102 -102
- package/admin/i18n/fr/translations.json +108 -108
- package/admin/i18n/it/translations.json +102 -102
- package/admin/i18n/nl/translations.json +108 -108
- package/admin/i18n/pl/translations.json +108 -108
- package/admin/i18n/pt/translations.json +102 -102
- package/admin/i18n/ru/translations.json +108 -108
- package/admin/i18n/uk/translations.json +108 -108
- package/admin/i18n/zh-cn/translations.json +102 -102
- package/admin/img/philips_hue_lom001.png +0 -0
- package/admin/index.html +163 -163
- package/admin/index_m.html +1360 -1360
- package/admin/moment.min.js +1 -1
- package/admin/shuffle.min.js +2 -2
- package/admin/tab_m.html +1021 -1021
- package/admin/vis-network.min.css +1 -1
- package/admin/vis-network.min.js +26 -26
- package/admin/words.js +110 -110
- package/docs/de/basedocu.md +19 -19
- package/docs/de/readme.md +126 -126
- package/docs/en/readme.md +128 -128
- package/docs/flashing_via_arduino_(en).md +110 -110
- package/docs/ru/readme.md +28 -28
- package/docs/tutorial/groups-1.png +0 -0
- package/docs/tutorial/groups-2.png +0 -0
- package/docs/tutorial/tab-dev-1.png +0 -0
- package/io-package.json +14 -14
- package/lib/backup.js +171 -171
- package/lib/binding.js +319 -319
- package/lib/colors.js +465 -465
- package/lib/developer.js +151 -151
- package/lib/devicemgmt.js +374 -374
- package/lib/devices.js +3139 -3139
- package/lib/exclude.js +162 -162
- package/lib/groups.js +345 -345
- package/lib/json.js +59 -59
- package/lib/networkmap.js +55 -55
- package/lib/ota.js +198 -198
- package/lib/rgb.js +297 -297
- package/lib/seriallist.js +48 -48
- package/lib/states.js +6420 -6420
- package/lib/tools.js +54 -54
- package/lib/utils.js +165 -165
- package/lib/zbBaseExtension.js +36 -36
- package/lib/zbDelayedAction.js +144 -144
- package/lib/zbDeviceAvailability.js +319 -319
- package/lib/zbDeviceConfigure.js +148 -148
- package/lib/zbDeviceEvent.js +48 -48
- package/lib/zigbeecontroller.js +1014 -1014
- package/main.js +1 -1
- package/package.json +1 -1
- package/support/docgen.js +93 -93
|
@@ -1,110 +1,110 @@
|
|
|
1
|
-
Flashing firmware via Arduino is implemented using the project https://github.com/wavesoft/CCLib
|
|
2
|
-
**But with minor improvements!!!**
|
|
3
|
-
|
|
4
|
-
[AndrewLinden](https://github.com/AndrewLinden) described that he was able to flash CC2531 using CCLib [with comments](https://github.com/wavesoft/CCLib/issues/19).
|
|
5
|
-
|
|
6
|
-
As described [I made a fork of the CCLib library with minor changes](https://github.com/kirovilya/CCLib) for flashing firmware via Arduino:
|
|
7
|
-
* Timeouts of operations
|
|
8
|
-
* After opening the port (I have in Windows 7) Arduino reboots and, accordingly, does not respond to requests - made a 3 seconds pause (found somewhere in internet).
|
|
9
|
-
* The port speed is reduced to 9600, because at another speed leaving communication errors:
|
|
10
|
-
`ERROR: Could not read from the serial port!`
|
|
11
|
-
|
|
12
|
-
## Checked on Arduino UNO on CC2531-stick
|
|
13
|
-
|
|
14
|
-
0. Download and unpack the archive with the library https://github.com/kirovilya/CCLib.
|
|
15
|
-
|
|
16
|
-
1. Flashing Arduino sketch via Arduino IDE
|
|
17
|
-
CCLib\Arduino\CCLib\Examples\CCLib_proxy\CCLib_proxy.ino
|
|
18
|
-
|
|
19
|
-
2. Install Python 2.7 or later (tested with python 2.7.13), if not installed
|
|
20
|
-
|
|
21
|
-
3. Install pyserial 3.0.1, if not installed
|
|
22
|
-
`pip install -r CCLib\Python\requirements.txt`
|
|
23
|
-
or
|
|
24
|
-
`pip install pyserial==3.0.1`
|
|
25
|
-
|
|
26
|
-
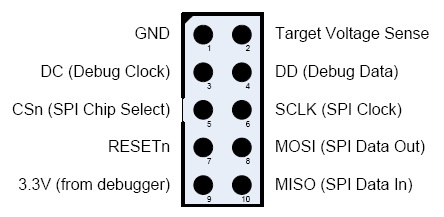
4. Connect the contacts as described https://github.com/kirovilya/CCLib#1-prepare-your-arduino-board
|
|
27
|
-
**But in my case, I connected completely without resistors, combined the contacts CC_DD_I and CC_DD_O together and connected to the DD pin of the DEBUG connector!**
|
|
28
|
-
|
|
29
|
-
|
|
30
|
-
|
|
31
|
-
I connected only 3 specified contacts and GND. During the firmware, the stick and Arduino must be connected to the USB.
|
|
32
|
-
|
|
33
|
-

|
|
34
|
-

|
|
35
|
-

|
|
36
|
-
|
|
37
|
-
5. After that, try to get information about the chip - if it works, then the connection is correct (example for COM9 port - Arduino port):
|
|
38
|
-
|
|
39
|
-
```
|
|
40
|
-
C:\Projects\CCLib\Python>python cc_info.py -p COM9
|
|
41
|
-
INFO: Found a CC2531 chip on COM9
|
|
42
|
-
|
|
43
|
-
Chip information:
|
|
44
|
-
Chip ID : 0xb524
|
|
45
|
-
Flash size : 256 Kb
|
|
46
|
-
Page size : 2 Kb
|
|
47
|
-
SRAM size : 8 Kb
|
|
48
|
-
USB : Yes
|
|
49
|
-
|
|
50
|
-
Device information:
|
|
51
|
-
IEEE Address : 00124b0014aa
|
|
52
|
-
PC : 0000
|
|
53
|
-
|
|
54
|
-
Debug status:
|
|
55
|
-
[ ] CHIP_ERASE_BUSY
|
|
56
|
-
[ ] PCON_IDLE
|
|
57
|
-
[X] CPU_HALTED
|
|
58
|
-
[ ] PM_ACTIVE
|
|
59
|
-
[ ] HALT_STATUS
|
|
60
|
-
[ ] DEBUG_LOCKED
|
|
61
|
-
[X] OSCILLATOR_STABLE
|
|
62
|
-
[ ] STACK_OVERFLOW
|
|
63
|
-
|
|
64
|
-
Debug config:
|
|
65
|
-
[ ] SOFT_POWER_MODE
|
|
66
|
-
[ ] TIMERS_OFF
|
|
67
|
-
[X] DMA_PAUSE
|
|
68
|
-
[X] TIMER_SUSPEND
|
|
69
|
-
```
|
|
70
|
-
[Another example of connection on MacOS](https://github.com/wavesoft/CCLib/issues/22#issuecomment-384452424)
|
|
71
|
-
|
|
72
|
-
6. If everything is successful, then download [modified firmware for flashing via Arduino](https://github.com/kirovilya/files/blob/master/CC2531ZNP-Pro-Secure_LinkKeyJoin_mod.hex)
|
|
73
|
-
|
|
74
|
-
7. Start the flashing firmware (it takes a long time, about 2-3 hours):
|
|
75
|
-
|
|
76
|
-
```
|
|
77
|
-
C:\Projects\ZigBee>python cc_write_flash.py -e -p COM9 --in=CC2531ZNP-Pro-Secure_LinkKeyJoin_mod.hex
|
|
78
|
-
INFO: Found a CC2531 chip on COM9
|
|
79
|
-
|
|
80
|
-
Chip information:
|
|
81
|
-
Chip ID : 0xb524
|
|
82
|
-
Flash size : 256 Kb
|
|
83
|
-
Page size : 2 Kb
|
|
84
|
-
SRAM size : 8 Kb
|
|
85
|
-
USB : Yes
|
|
86
|
-
Sections in CC2531ZNP-Pro-Secure_LinkKeyJoin_mod.hex:
|
|
87
|
-
|
|
88
|
-
Addr. Size
|
|
89
|
-
-------- -------------
|
|
90
|
-
0x0000 8176 B
|
|
91
|
-
0x1ff6 10 B
|
|
92
|
-
0x3fff0 1 B
|
|
93
|
-
0x2000 239616 B
|
|
94
|
-
|
|
95
|
-
This is going to ERASE and REPROGRAM the chip. Are you sure? <y/N>: y
|
|
96
|
-
|
|
97
|
-
Flashing:
|
|
98
|
-
- Chip erase...
|
|
99
|
-
- Flashing 4 memory blocks...
|
|
100
|
-
-> 0x0000 : 8176 bytes
|
|
101
|
-
Progress 100%... OK
|
|
102
|
-
-> 0x1ff6 : 10 bytes
|
|
103
|
-
Progress 100%... OK
|
|
104
|
-
-> 0x3fff0 : 1 bytes
|
|
105
|
-
Progress 100%... OK
|
|
106
|
-
-> 0x2000 : 239616 bytes
|
|
107
|
-
Progress 100%... OK
|
|
108
|
-
|
|
109
|
-
Completed
|
|
110
|
-
```
|
|
1
|
+
Flashing firmware via Arduino is implemented using the project https://github.com/wavesoft/CCLib
|
|
2
|
+
**But with minor improvements!!!**
|
|
3
|
+
|
|
4
|
+
[AndrewLinden](https://github.com/AndrewLinden) described that he was able to flash CC2531 using CCLib [with comments](https://github.com/wavesoft/CCLib/issues/19).
|
|
5
|
+
|
|
6
|
+
As described [I made a fork of the CCLib library with minor changes](https://github.com/kirovilya/CCLib) for flashing firmware via Arduino:
|
|
7
|
+
* Timeouts of operations
|
|
8
|
+
* After opening the port (I have in Windows 7) Arduino reboots and, accordingly, does not respond to requests - made a 3 seconds pause (found somewhere in internet).
|
|
9
|
+
* The port speed is reduced to 9600, because at another speed leaving communication errors:
|
|
10
|
+
`ERROR: Could not read from the serial port!`
|
|
11
|
+
|
|
12
|
+
## Checked on Arduino UNO on CC2531-stick
|
|
13
|
+
|
|
14
|
+
0. Download and unpack the archive with the library https://github.com/kirovilya/CCLib.
|
|
15
|
+
|
|
16
|
+
1. Flashing Arduino sketch via Arduino IDE
|
|
17
|
+
CCLib\Arduino\CCLib\Examples\CCLib_proxy\CCLib_proxy.ino
|
|
18
|
+
|
|
19
|
+
2. Install Python 2.7 or later (tested with python 2.7.13), if not installed
|
|
20
|
+
|
|
21
|
+
3. Install pyserial 3.0.1, if not installed
|
|
22
|
+
`pip install -r CCLib\Python\requirements.txt`
|
|
23
|
+
or
|
|
24
|
+
`pip install pyserial==3.0.1`
|
|
25
|
+
|
|
26
|
+
4. Connect the contacts as described https://github.com/kirovilya/CCLib#1-prepare-your-arduino-board
|
|
27
|
+
**But in my case, I connected completely without resistors, combined the contacts CC_DD_I and CC_DD_O together and connected to the DD pin of the DEBUG connector!**
|
|
28
|
+
|
|
29
|
+

|
|
30
|
+
|
|
31
|
+
I connected only 3 specified contacts and GND. During the firmware, the stick and Arduino must be connected to the USB.
|
|
32
|
+
|
|
33
|
+

|
|
34
|
+

|
|
35
|
+

|
|
36
|
+
|
|
37
|
+
5. After that, try to get information about the chip - if it works, then the connection is correct (example for COM9 port - Arduino port):
|
|
38
|
+
|
|
39
|
+
```
|
|
40
|
+
C:\Projects\CCLib\Python>python cc_info.py -p COM9
|
|
41
|
+
INFO: Found a CC2531 chip on COM9
|
|
42
|
+
|
|
43
|
+
Chip information:
|
|
44
|
+
Chip ID : 0xb524
|
|
45
|
+
Flash size : 256 Kb
|
|
46
|
+
Page size : 2 Kb
|
|
47
|
+
SRAM size : 8 Kb
|
|
48
|
+
USB : Yes
|
|
49
|
+
|
|
50
|
+
Device information:
|
|
51
|
+
IEEE Address : 00124b0014aa
|
|
52
|
+
PC : 0000
|
|
53
|
+
|
|
54
|
+
Debug status:
|
|
55
|
+
[ ] CHIP_ERASE_BUSY
|
|
56
|
+
[ ] PCON_IDLE
|
|
57
|
+
[X] CPU_HALTED
|
|
58
|
+
[ ] PM_ACTIVE
|
|
59
|
+
[ ] HALT_STATUS
|
|
60
|
+
[ ] DEBUG_LOCKED
|
|
61
|
+
[X] OSCILLATOR_STABLE
|
|
62
|
+
[ ] STACK_OVERFLOW
|
|
63
|
+
|
|
64
|
+
Debug config:
|
|
65
|
+
[ ] SOFT_POWER_MODE
|
|
66
|
+
[ ] TIMERS_OFF
|
|
67
|
+
[X] DMA_PAUSE
|
|
68
|
+
[X] TIMER_SUSPEND
|
|
69
|
+
```
|
|
70
|
+
[Another example of connection on MacOS](https://github.com/wavesoft/CCLib/issues/22#issuecomment-384452424)
|
|
71
|
+
|
|
72
|
+
6. If everything is successful, then download [modified firmware for flashing via Arduino](https://github.com/kirovilya/files/blob/master/CC2531ZNP-Pro-Secure_LinkKeyJoin_mod.hex)
|
|
73
|
+
|
|
74
|
+
7. Start the flashing firmware (it takes a long time, about 2-3 hours):
|
|
75
|
+
|
|
76
|
+
```
|
|
77
|
+
C:\Projects\ZigBee>python cc_write_flash.py -e -p COM9 --in=CC2531ZNP-Pro-Secure_LinkKeyJoin_mod.hex
|
|
78
|
+
INFO: Found a CC2531 chip on COM9
|
|
79
|
+
|
|
80
|
+
Chip information:
|
|
81
|
+
Chip ID : 0xb524
|
|
82
|
+
Flash size : 256 Kb
|
|
83
|
+
Page size : 2 Kb
|
|
84
|
+
SRAM size : 8 Kb
|
|
85
|
+
USB : Yes
|
|
86
|
+
Sections in CC2531ZNP-Pro-Secure_LinkKeyJoin_mod.hex:
|
|
87
|
+
|
|
88
|
+
Addr. Size
|
|
89
|
+
-------- -------------
|
|
90
|
+
0x0000 8176 B
|
|
91
|
+
0x1ff6 10 B
|
|
92
|
+
0x3fff0 1 B
|
|
93
|
+
0x2000 239616 B
|
|
94
|
+
|
|
95
|
+
This is going to ERASE and REPROGRAM the chip. Are you sure? <y/N>: y
|
|
96
|
+
|
|
97
|
+
Flashing:
|
|
98
|
+
- Chip erase...
|
|
99
|
+
- Flashing 4 memory blocks...
|
|
100
|
+
-> 0x0000 : 8176 bytes
|
|
101
|
+
Progress 100%... OK
|
|
102
|
+
-> 0x1ff6 : 10 bytes
|
|
103
|
+
Progress 100%... OK
|
|
104
|
+
-> 0x3fff0 : 1 bytes
|
|
105
|
+
Progress 100%... OK
|
|
106
|
+
-> 0x2000 : 239616 bytes
|
|
107
|
+
Progress 100%... OK
|
|
108
|
+
|
|
109
|
+
Completed
|
|
110
|
+
```
|
package/docs/ru/readme.md
CHANGED
|
@@ -1,28 +1,28 @@
|
|
|
1
|
-
# Драйвер ioBroker для работы с Zigbee-устройствами
|
|
2
|
-
При помощи координатора Zigbee-сети на базе Texas Instruments SoC cc253x (и другими) создается собственная сеть, в которую подключаются zigbee-устройства. Взаимодействуя напрямую с координатором сети, драйвер позволяет управлять устройствами без дополнительных шлюзов/бриджей от производителей устройств (Xiaomi/TRADFRI/Hue). Про устройство Zigbee-сети можно прочитать [тут (на английском языке)](https://github.com/Koenkk/zigbee2mqtt/wiki/ZigBee-network).
|
|
3
|
-
|
|
4
|
-
## Оборудование
|
|
5
|
-
Для работы необходимо одно из перечисленных устройств, прошитое специальной ZNP-прошивкой: [cc2531, cc2530, cc2530+RF](https://github.com/Koenkk/zigbee2mqtt/wiki/Supported-sniffer-devices#zigbee-coordinator)
|
|
6
|
-
|
|
7
|
-

|
|
8
|
-

|
|
9
|
-

|
|
10
|
-

|
|
11
|
-
Необходимое для прошивки оборудование и процесс подготовки устройства описан [тут (на английском языке)](https://github.com/Koenkk/zigbee2mqtt/wiki/Getting-started) или [тут (на русском языке)](https://github.com/kirovilya/ioBroker.zigbee/wiki/%D0%9F%D1%80%D0%BE%D1%88%D0%B8%D0%B2%D0%BA%D0%B0)
|
|
12
|
-
|
|
13
|
-
Подключенные к Zigbee-сети устройства сообщают координатору своё состояние и информируют о событиях (нажатия кнопки, обнаружение движения, изменение температуры). Эти сведения отражаются в виде объектов-состояний ioBroker. Некоторые состояния имеют обратную связь и могут отправлять команды zigbee-устройству при изменении состояния (переключение состояния розетки и лампы, изменение сцены или яркости лампы).
|
|
14
|
-
|
|
15
|
-
## Работа с драйвером
|
|
16
|
-
Для запуска драйвера необходимо указать имя порта, на котором подключено устройство cc253x.
|
|
17
|
-
Как узнать порт написано [тут (на русском языке)](https://github.com/kirovilya/ioBroker.zigbee/wiki#%D0%9D%D0%B0%D1%81%D1%82%D1%80%D0%BE%D0%B9%D0%BA%D0%B0-%D0%B0%D0%B4%D0%B0%D0%BF%D1%82%D0%B5%D1%80%D0%B0)
|
|
18
|
-
|
|
19
|
-
Для подключения устройств необходимо перевести координатор Zigbee-сети в режим сопряжения, нажав зеленую кнопку. Начнется обратный отсчет времени (60 сек) пока будет доступна возможность подключения устройств.
|
|
20
|
-
Для подключения Zigbee-устройств в большинстве случаев достаточно нажать кнопку сопряжения на самом устройстве. Но существуют особенности для некоторых устройств. Подробнее о сопряжении с устройствами читайте [тут (на английском языке)](https://github.com/Koenkk/zigbee2mqtt/wiki/Pairing-devices) или [тут (на русском языке)](https://github.com/kirovilya/ioBroker.zigbee/wiki#%D0%9F%D0%BE%D0%B4%D0%B4%D0%B5%D1%80%D0%B6%D0%B8%D0%B2%D0%B0%D0%B5%D0%BC%D1%8B%D0%B5-%D1%83%D1%81%D1%82%D1%80%D0%BE%D0%B9%D1%81%D1%82%D0%B2%D0%B0).
|
|
21
|
-
|
|
22
|
-
После успешного сопряжения, устройство появится в панели устройств. Если устройство появилось в панели устройств, но имеет тип undefined, то это неизвестное устройство и с ним нельзя будет взаимодействовать. Если устройство есть в списке доступных устройств, но добавилось как undefined, то попробуйте удалить устройство и добавить заново.
|
|
23
|
-
Если не получается подключить устройство, то напиши issue.
|
|
24
|
-
|
|
25
|
-
## Дополнительные сведения
|
|
26
|
-
Существует [дружественный проект](https://github.com/koenkk/zigbee2mqtt) со схожим функционалом на тех же технологиях, в котором с этими же устройствами можно работать по протоколу MQTT.
|
|
27
|
-
Поэтому, если какие-либо улучшения или поддержка новых zigbee-устройств происходит в проекте Zigbee2MQTT, то можно перенести и добавить этот же функционал в этот драйвер. Если заметили это, то напиши issue - перенесем.
|
|
28
|
-
|
|
1
|
+
# Драйвер ioBroker для работы с Zigbee-устройствами
|
|
2
|
+
При помощи координатора Zigbee-сети на базе Texas Instruments SoC cc253x (и другими) создается собственная сеть, в которую подключаются zigbee-устройства. Взаимодействуя напрямую с координатором сети, драйвер позволяет управлять устройствами без дополнительных шлюзов/бриджей от производителей устройств (Xiaomi/TRADFRI/Hue). Про устройство Zigbee-сети можно прочитать [тут (на английском языке)](https://github.com/Koenkk/zigbee2mqtt/wiki/ZigBee-network).
|
|
3
|
+
|
|
4
|
+
## Оборудование
|
|
5
|
+
Для работы необходимо одно из перечисленных устройств, прошитое специальной ZNP-прошивкой: [cc2531, cc2530, cc2530+RF](https://github.com/Koenkk/zigbee2mqtt/wiki/Supported-sniffer-devices#zigbee-coordinator)
|
|
6
|
+
|
|
7
|
+

|
|
8
|
+

|
|
9
|
+

|
|
10
|
+

|
|
11
|
+
Необходимое для прошивки оборудование и процесс подготовки устройства описан [тут (на английском языке)](https://github.com/Koenkk/zigbee2mqtt/wiki/Getting-started) или [тут (на русском языке)](https://github.com/kirovilya/ioBroker.zigbee/wiki/%D0%9F%D1%80%D0%BE%D1%88%D0%B8%D0%B2%D0%BA%D0%B0)
|
|
12
|
+
|
|
13
|
+
Подключенные к Zigbee-сети устройства сообщают координатору своё состояние и информируют о событиях (нажатия кнопки, обнаружение движения, изменение температуры). Эти сведения отражаются в виде объектов-состояний ioBroker. Некоторые состояния имеют обратную связь и могут отправлять команды zigbee-устройству при изменении состояния (переключение состояния розетки и лампы, изменение сцены или яркости лампы).
|
|
14
|
+
|
|
15
|
+
## Работа с драйвером
|
|
16
|
+
Для запуска драйвера необходимо указать имя порта, на котором подключено устройство cc253x.
|
|
17
|
+
Как узнать порт написано [тут (на русском языке)](https://github.com/kirovilya/ioBroker.zigbee/wiki#%D0%9D%D0%B0%D1%81%D1%82%D1%80%D0%BE%D0%B9%D0%BA%D0%B0-%D0%B0%D0%B4%D0%B0%D0%BF%D1%82%D0%B5%D1%80%D0%B0)
|
|
18
|
+
|
|
19
|
+
Для подключения устройств необходимо перевести координатор Zigbee-сети в режим сопряжения, нажав зеленую кнопку. Начнется обратный отсчет времени (60 сек) пока будет доступна возможность подключения устройств.
|
|
20
|
+
Для подключения Zigbee-устройств в большинстве случаев достаточно нажать кнопку сопряжения на самом устройстве. Но существуют особенности для некоторых устройств. Подробнее о сопряжении с устройствами читайте [тут (на английском языке)](https://github.com/Koenkk/zigbee2mqtt/wiki/Pairing-devices) или [тут (на русском языке)](https://github.com/kirovilya/ioBroker.zigbee/wiki#%D0%9F%D0%BE%D0%B4%D0%B4%D0%B5%D1%80%D0%B6%D0%B8%D0%B2%D0%B0%D0%B5%D0%BC%D1%8B%D0%B5-%D1%83%D1%81%D1%82%D1%80%D0%BE%D0%B9%D1%81%D1%82%D0%B2%D0%B0).
|
|
21
|
+
|
|
22
|
+
После успешного сопряжения, устройство появится в панели устройств. Если устройство появилось в панели устройств, но имеет тип undefined, то это неизвестное устройство и с ним нельзя будет взаимодействовать. Если устройство есть в списке доступных устройств, но добавилось как undefined, то попробуйте удалить устройство и добавить заново.
|
|
23
|
+
Если не получается подключить устройство, то напиши issue.
|
|
24
|
+
|
|
25
|
+
## Дополнительные сведения
|
|
26
|
+
Существует [дружественный проект](https://github.com/koenkk/zigbee2mqtt) со схожим функционалом на тех же технологиях, в котором с этими же устройствами можно работать по протоколу MQTT.
|
|
27
|
+
Поэтому, если какие-либо улучшения или поддержка новых zigbee-устройств происходит в проекте Zigbee2MQTT, то можно перенести и добавить этот же функционал в этот драйвер. Если заметили это, то напиши issue - перенесем.
|
|
28
|
+
|
|
File without changes
|
|
File without changes
|
|
File without changes
|
package/io-package.json
CHANGED
|
@@ -1,8 +1,21 @@
|
|
|
1
1
|
{
|
|
2
2
|
"common": {
|
|
3
3
|
"name": "zigbee",
|
|
4
|
-
"version": "1.9.
|
|
4
|
+
"version": "1.9.4",
|
|
5
5
|
"news": {
|
|
6
|
+
"1.9.4": {
|
|
7
|
+
"en": "type",
|
|
8
|
+
"de": "typ",
|
|
9
|
+
"ru": "тип",
|
|
10
|
+
"pt": "tipo",
|
|
11
|
+
"nl": "type type type type type type type type type type type type type type type type type type type type type type type type type type type type type typety type type type type type type type type type type type type type type type typety type type type type type type type type type type type type type type type type type type type type type type type type type type type type type type type type type type type type type type type type type type type type type type type type type type type typety type type type type type type type type type type type type type type type type type type type type type type type type type type type type type type type type type type type type type type type type type type type type type type type type type type type type type type type type type type type type type type type type type type type type type type type type type type type type type type type type type type type type type type type type type type type type type type type type type type type type type type type type type type type type type type type type type type type type type type type type type type type type type type type type type type type type type type type type type type type type type type type type type type type type type type type type type type type",
|
|
12
|
+
"fr": "type",
|
|
13
|
+
"it": "tipo",
|
|
14
|
+
"es": "tipo",
|
|
15
|
+
"pl": "typ",
|
|
16
|
+
"uk": "тип",
|
|
17
|
+
"zh-cn": "类型"
|
|
18
|
+
},
|
|
6
19
|
"1.9.3": {
|
|
7
20
|
"en": "last zhc Version 16.x\ncorr reboot in statecontroller",
|
|
8
21
|
"de": "letzte Version 16.x\nkorr reboot in statecontroller",
|
|
@@ -80,19 +93,6 @@
|
|
|
80
93
|
"pl": "kor toZigbee message\ndodać manager",
|
|
81
94
|
"uk": "corr toZigbee повідомлення\nдодати пристрій Менеджер",
|
|
82
95
|
"zh-cn": "信\n增加装置 管理人员"
|
|
83
|
-
},
|
|
84
|
-
"1.8.25": {
|
|
85
|
-
"en": "zhc 16.x \ncorr group from exclude dialog",
|
|
86
|
-
"de": "zhc 16.x\nkorr gruppe aus ausschluss dialog",
|
|
87
|
-
"ru": "жк 16.x\nгруппа корр от исключает диалог",
|
|
88
|
-
"pt": "zhc 16.x\ncorr grupo de excluir diálogo",
|
|
89
|
-
"nl": "zhc 16\ncorr groep uitgesloten dialog",
|
|
90
|
-
"fr": "zhc 16.x\ngroupe corr de l'exclusion du dialogue",
|
|
91
|
-
"it": "zhc 16.x\ngruppo corr da escludere finestra di dialogo",
|
|
92
|
-
"es": "zhc 16.x\ngrupo de corr de excluir diálogo",
|
|
93
|
-
"pl": "żc 16.x\ngrupa kor z wyłączeniem dialogu",
|
|
94
|
-
"uk": "жк 16.x\nгрупа з виключення діалогу",
|
|
95
|
-
"zh-cn": "页: 1\n集团排除了口号"
|
|
96
96
|
}
|
|
97
97
|
},
|
|
98
98
|
"titleLang": {
|