iobroker.zigbee 1.8.3 → 1.8.7
This diff represents the content of publicly available package versions that have been released to one of the supported registries. The information contained in this diff is provided for informational purposes only and reflects changes between package versions as they appear in their respective public registries.
- package/README.md +6 -0
- package/admin/adapter-settings.js +244 -0
- package/admin/admin.js +520 -494
- package/admin/index_m.html +1171 -1001
- package/admin/tab_m.html +44 -2
- package/docs/de/img/CC2531.png +0 -0
- package/docs/de/img/CC2538_CC2592_PA.PNG +0 -0
- package/docs/de/img/CC2591.png +0 -0
- package/docs/de/img/boards.jpg +0 -0
- package/docs/de/img/cc26x2r.PNG +0 -0
- package/docs/de/img/results.jpg +0 -0
- package/docs/de/img/sku_429478_2.png +0 -0
- package/docs/de/img/sku_429601_2.png +0 -0
- package/docs/de/readme.md +27 -0
- package/docs/en/img/CC2531.png +0 -0
- package/docs/en/img/CC2591.png +0 -0
- package/docs/en/img/deconz.png +0 -0
- package/docs/en/img/sku_429478_2.png +0 -0
- package/docs/en/img/sku_429601_2.png +0 -0
- package/docs/en/readme.md +30 -0
- package/docs/flashing_via_arduino_(en).md +110 -0
- package/docs/ru/img/CC2531.png +0 -0
- package/docs/ru/img/CC2591.png +0 -0
- package/docs/ru/img/sku_429478_2.png +0 -0
- package/docs/ru/img/sku_429601_2.png +0 -0
- package/docs/ru/readme.md +28 -0
- package/docs/tutorial/CC2530_20190425.zip +0 -0
- package/docs/tutorial/CC2530_CC2591_20190515.zip +0 -0
- package/docs/tutorial/CC2530_CC2592_20190515.zip +0 -0
- package/docs/tutorial/CC2531_20190425.zip +0 -0
- package/docs/tutorial/adm5_1.PNG +0 -0
- package/docs/tutorial/adm5_2.PNG +0 -0
- package/docs/tutorial/cat.PNG +0 -0
- package/docs/tutorial/groups-1.png +0 -0
- package/docs/tutorial/groups-2.png +0 -0
- package/docs/tutorial/inst.PNG +0 -0
- package/docs/tutorial/reflash-finish.PNG +0 -0
- package/docs/tutorial/reflash-step0.png +0 -0
- package/docs/tutorial/reflash-step1.PNG +0 -0
- package/docs/tutorial/reflash-step2.PNG +0 -0
- package/docs/tutorial/settings.png +0 -0
- package/docs/tutorial/tab-dev-1.png +0 -0
- package/docs/tutorial/zigbee.png +0 -0
- package/docs/tutorial/zigbee15.png +0 -0
- package/io-package.json +34 -33
- package/lib/backup.js +2 -2
- package/lib/binding.js +32 -37
- package/lib/colors.js +163 -158
- package/lib/commands.js +100 -91
- package/lib/developer.js +9 -12
- package/lib/devices.js +168 -178
- package/lib/exclude.js +30 -36
- package/lib/exposes.js +168 -143
- package/lib/groups.js +81 -83
- package/lib/json.js +5 -6
- package/lib/networkmap.js +2 -3
- package/lib/ota.js +34 -18
- package/lib/rgb.js +114 -72
- package/lib/seriallist.js +25 -20
- package/lib/statescontroller.js +206 -183
- package/lib/utils.js +29 -23
- package/lib/zbBaseExtension.js +4 -4
- package/lib/zbDelayedAction.js +5 -13
- package/lib/zbDeviceAvailability.js +69 -65
- package/lib/zbDeviceConfigure.js +9 -21
- package/lib/zbDeviceEvent.js +3 -4
- package/lib/zigbeecontroller.js +133 -128
- package/main.js +169 -154
- package/package.json +28 -14
- package/.eslintignore +0 -2
- package/.eslintrc.json +0 -37
- package/.github/FUNDING.yml +0 -3
- package/.github/auto-merge.yml +0 -17
- package/.github/dependabot.yml +0 -24
- package/.github/stale.yml +0 -13
- package/.github/workflows/codeql.yml +0 -41
- package/.github/workflows/dependabot-automerge.yml +0 -22
- package/.github/workflows/test-and-release.yml +0 -149
- package/.releaseconfig.json +0 -3
- package/.travis/wiki.sh +0 -28
- package/.travis.yml +0 -41
- package/gulpfile.js +0 -464
- package/test/integration.js +0 -5
- package/test/mocha.custom.opts +0 -2
- package/test/mocha.setup.js +0 -14
- package/test/package.js +0 -5
- package/test/unit.js +0 -5
package/admin/tab_m.html
CHANGED
|
@@ -16,12 +16,54 @@
|
|
|
16
16
|
<script type="text/javascript" src="../../lib/js/materialize.js"></script>
|
|
17
17
|
<script type="text/javascript" >var noConfigDialog = true;</script><!-- Deactivate buttons -->
|
|
18
18
|
<script type="text/javascript" src="adapter-settings.js"></script>
|
|
19
|
+
|
|
20
|
+
<script>
|
|
21
|
+
// overload showMessage
|
|
22
|
+
function showMessage(message, title, icon) {
|
|
23
|
+
var $dialogMessage;
|
|
24
|
+
// noinspection JSJQueryEfficiency
|
|
25
|
+
$dialogMessage = $('#dialog-message');
|
|
26
|
+
if (!$dialogMessage.length) {
|
|
27
|
+
$('body').append(
|
|
28
|
+
'<div class="m"><div id="dialog-message" class="modal modal-fixed-footer">' +
|
|
29
|
+
' <div class="modal-content">' +
|
|
30
|
+
' <h6 class="dialog-title title"></h6>' +
|
|
31
|
+
' <p><i class="large material-icons dialog-icon"></i><span class="dialog-text"></span></p>' +
|
|
32
|
+
' </div>' +
|
|
33
|
+
' <div class="modal-footer">' +
|
|
34
|
+
' <a class="modal-action modal-close waves-effect waves-green btn-flat translate">Ok</a>' +
|
|
35
|
+
' </div>' +
|
|
36
|
+
'</div></div>');
|
|
37
|
+
$dialogMessage = $('#dialog-message');
|
|
38
|
+
}
|
|
39
|
+
if (icon) {
|
|
40
|
+
$dialogMessage.find('.dialog-icon')
|
|
41
|
+
.show()
|
|
42
|
+
.html(icon);
|
|
43
|
+
} else {
|
|
44
|
+
$dialogMessage.find('.dialog-icon').hide();
|
|
45
|
+
}
|
|
46
|
+
if (title) {
|
|
47
|
+
$dialogMessage.find('.dialog-title').html(title).show();
|
|
48
|
+
} else {
|
|
49
|
+
$dialogMessage.find('.dialog-title').hide();
|
|
50
|
+
}
|
|
51
|
+
$dialogMessage.find('.dialog-text').html(message);
|
|
52
|
+
$dialogMessage.modal().modal('open');
|
|
53
|
+
}
|
|
54
|
+
</script>
|
|
19
55
|
<script type="text/javascript" src="words.js"></script>
|
|
20
56
|
|
|
21
57
|
<script type="text/javascript" src="admin.js"></script>
|
|
22
58
|
<script type="text/javascript" src="shuffle.min.js"></script>
|
|
23
59
|
<script type="text/javascript" src="moment.min.js"></script>
|
|
24
60
|
<style>
|
|
61
|
+
.m.react-dark .tabs {
|
|
62
|
+
background-color: #272727 !important;
|
|
63
|
+
}
|
|
64
|
+
.row.navbar-fixed {
|
|
65
|
+
height: 0 !important;
|
|
66
|
+
}
|
|
25
67
|
.m .col .select-wrapper+label, .m .col input+label:not(.active) {
|
|
26
68
|
top: -26px;
|
|
27
69
|
}
|
|
@@ -50,8 +92,8 @@
|
|
|
50
92
|
.input-field.suffix a {
|
|
51
93
|
position: absolute;
|
|
52
94
|
font-size: 2rem;
|
|
53
|
-
top:
|
|
54
|
-
right:
|
|
95
|
+
top: 0;
|
|
96
|
+
right: 0;
|
|
55
97
|
}
|
|
56
98
|
|
|
57
99
|
.input-field.suffix a.active {
|
|
Binary file
|
|
Binary file
|
|
Binary file
|
|
Binary file
|
|
Binary file
|
|
Binary file
|
|
Binary file
|
|
Binary file
|
|
@@ -0,0 +1,27 @@
|
|
|
1
|
+
# ioBroker Adapter für Zigbee-Geräte
|
|
2
|
+
Mit Hilfe eines Koordinators für Zigbee-Netz, basierend auf Texas Instruments SoC cc253x (und anderen), wird ein eigenes Netz erschaffen, welchem sich andere Zigbee Geräte beitreten können. Dank der direkten Interaktion mit dem Koordinator, erlaubt der Zigbee Adapter die Steuerung der Geräte ohne jegliche Gateways/Bridges der Hersteller (Xiaomi/Tradfri/Hue). Über Funktionsweise der Zigbee-Netze kann man [hier nachlesen (Englisch)](https://github.com/Koenkk/zigbee2mqtt/wiki/ZigBee-network).
|
|
3
|
+
|
|
4
|
+
## Die Hardware
|
|
5
|
+
Für die Umsetzung wird einer der aufgezählten Geräte/Sticks verwendet, welche mit spezieller ZNP-Firmware geflasht sind: [cc2530, cc2530, cc2530+RF.](https://github.com/Koenkk/zigbee2mqtt/wiki/Supported-sniffer-devices#zigbee-coordinator)
|
|
6
|
+
|
|
7
|
+

|
|
8
|
+

|
|
9
|
+

|
|
10
|
+

|
|
11
|
+
|
|
12
|
+
Der benötigte Flasher/Programmer und der Prozess der Vorbereitung werden [hier (Englisch)](https://github.com/Koenkk/zigbee2mqtt/wiki/Getting-started) oder [hier (Russisch)](https://github.com/kirovilya/ioBroker.zigbee/wiki/%D0%9F%D1%80%D0%BE%D1%88%D0%B8%D0%B2%D0%BA%D0%B0) beschrieben.
|
|
13
|
+
|
|
14
|
+
Die mit dem Zigbee-Netz verbundenen Geräte übermitteln dem Koordinator ihren Zustand und benachrichtigen über Ereignisse (Knopfdruck, Bewegungserkennung, Temperaturänderung). Diese Infos werden im Adapter unter den jeweiligen Objekten angezeigt. Außerdem ist es möglich manche Ereignisse/Status zurück zum Zigbee-Gerät zusenden (Zustandsänderung Steckdosen und Lampen, Farb- und Helligkeitseinstellungen).
|
|
15
|
+
|
|
16
|
+
## Einstellungen und Pairing
|
|
17
|
+
|
|
18
|
+
|
|
19
|
+
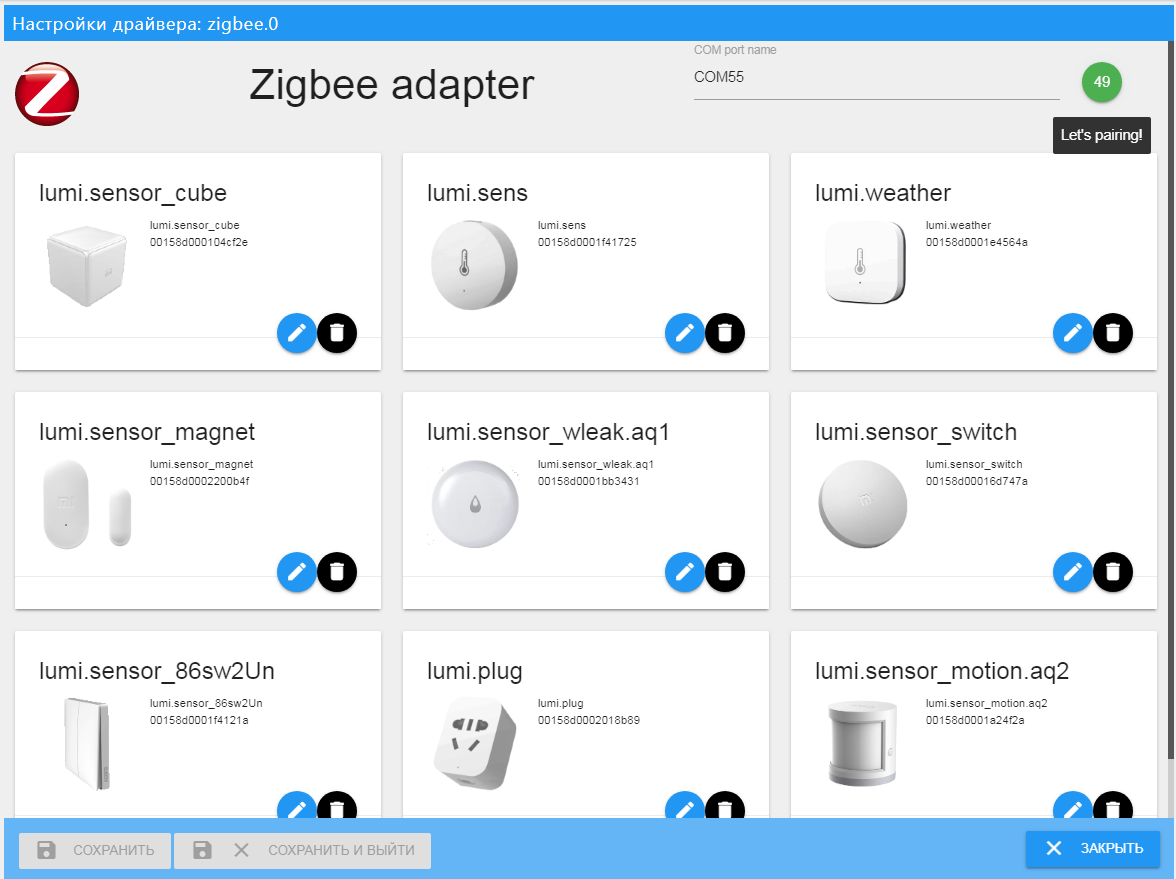
Zu Beginn muss der USB-Port angegeben werden, an welchem der cc253x angeschlossen ist. Wie man diesen Erkennt ist [hier beschrieben (Russisch)](https://github.com/kirovilya/ioBroker.zigbee/wiki#%D0%9D%D0%B0%D1%81%D1%82%D1%80%D0%BE%D0%B9%D0%BA%D0%B0-%D0%B0%D0%B4%D0%B0%D0%BF%D1%82%D0%B5%D1%80%D0%B0)
|
|
20
|
+
|
|
21
|
+
Zum Verbinden der Geräte muss der Koordinator für Zigbee-Netz in den Pairingmodus versetzt werden, dazu auf den grünen Knopf im Adapter klicken. Pairingmodus ist ab jetzt für 60 Sekunden aktiv. Um die Geräte zu verbinden, reicht im Normallfall ein Betätigen des Knopfes auf dem zu verbindendem Gerät. Es gibt aber auch „besondere“ Geräte. Wie man diese verbindet ist [hier Englisch](https://github.com/Koenkk/zigbee2mqtt/wiki/Pairing-devices) [oder Russisch](https://github.com/kirovilya/ioBroker.zigbee/wiki#%D0%9F%D0%BE%D0%B4%D0%B4%D0%B5%D1%80%D0%B6%D0%B8%D0%B2%D0%B0%D0%B5%D0%BC%D1%8B%D0%B5-%D1%83%D1%81%D1%82%D1%80%D0%BE%D0%B9%D1%81%D1%82%D0%B2%D0%B0) beschrieben.
|
|
22
|
+
|
|
23
|
+
Nach erfolgreichem Pairing, wird das Gerät im Adapter angezeigt. Sollte ein Gerät (aus der Liste) den Namen „undefined“ haben, dann versucht es zu löschen und nochmal zu pairen. Sollte es trotzdem nicht funktionieren, schreibt bitte ein Issue.
|
|
24
|
+
Zigbee-Geräte die nicht in der Liste aufgeführt sind, können zwar gepairt werden, aber der Adapter kann mit diesen nicht kommunizieren.
|
|
25
|
+
|
|
26
|
+
## Zusätzliche Informationen
|
|
27
|
+
Es gibt noch ein [Freundschaftprojekt](https://github.com/koenkk/zigbee2mqtt) mit gleichen Funktionen und gleicher Technologie, welcher mit denselben Geräten über ein MQTT Protokoll kommuniziert. Wenn irgendwelche Verbesserungen oder neu unterstütze Geräte im Projekt Zigbee2MQTT eingefügt werden, können jene auch in dieses Projekt hinzugefügt werden. Solltet Ihr unterschiede merken, schreibt bitte ein Issue, wir kümmern uns darum
|
|
Binary file
|
|
Binary file
|
|
Binary file
|
|
Binary file
|
|
Binary file
|
|
@@ -0,0 +1,30 @@
|
|
|
1
|
+
# ioBroker adapter for working with Zigbee-devices
|
|
2
|
+
With the Zigbee-coordinator based on Texas Instruments SoC cc253x (and others), it creates its own zigbee-network, into which zigbee-devices are connected. By work directly with the coordinator, the driver allows you to manage devices without additional gateways / bridge from device manufacturers (Xiaomi / TRADFRI / Hue). About the device Zigbee-network can be read [here (in English)](https://github.com/Koenkk/zigbee2mqtt/wiki/ZigBee-network).
|
|
3
|
+
|
|
4
|
+
## Hardware
|
|
5
|
+
For work, you need one of the following devices, flashed with a special ZNP firmware: [cc2531, cc2530, cc2530 + RF](https://github.com/Koenkk/zigbee2mqtt/wiki/Supported-sniffer-devices#zigbee-coordinator)
|
|
6
|
+
|
|
7
|
+

|
|
8
|
+

|
|
9
|
+

|
|
10
|
+

|
|
11
|
+
|
|
12
|
+
The necessary equipment for the firmware and the device preparation process is described [here (in English)](https://github.com/Koenkk/zigbee2mqtt/wiki/Getting-started) or [here (in Russian)](https://github.com/kirovilya/ioBroker.zigbee/wiki/%D0%9F%D1%80%D0%BE%D1%88%D0%B8%D0%B2%D0%BA%D0%B0)
|
|
13
|
+
|
|
14
|
+
The devices connected to the Zigbee-network inform the coordinator of their status and events (button presses, motion detection, temperature change). This information is reflected in the ioBroker object-states. Some ioBroker states have feedback and send commands to the zigbee-device when the value changes (switching the state of the outlet or lamp, changing the scene or the brightness of the lamp).
|
|
15
|
+
|
|
16
|
+
## Work with adapter
|
|
17
|
+
To start the driver, you must specify the name of the port on which the cc253x device is connected.
|
|
18
|
+
|
|
19
|
+
To connect devices, you need to switch the Zigbee-coordinator to pairing mode by pressing the green button. The countdown will begin (60 seconds) until the device connectivity is available.
|
|
20
|
+
To connect Zigbee devices in most cases, just press the pairing button on the device itself. But there are features for some devices. More information about pairing with devices can be found [here (in English)](https://github.com/Koenkk/zigbee2mqtt/wiki/Pairing-devices) or [here (in Russian)](https://github.com/kirovilya/ioBroker.zigbee/wiki#%D0%9F%D0%BE%D0%B4%D0%B4%D0%B5%D1%80%D0%B6%D0%B8%D0%B2%D0%B0%D0%B5%D0%BC%D1%8B%D0%B5-%D1%83%D1%81%D1%82%D1%80%D0%BE%D0%B9%D1%81%D1%82%D0%B2%D0%B0)
|
|
21
|
+
|
|
22
|
+
After successful pairing, the device appears in the configuration panel. If the device appears in the configuration panel but has the type "undefined", then this is an unknown device and can not be work with it. If the device is in the list of available devices, but added as "undefined", then try to remove the device and add it again.
|
|
23
|
+
|
|
24
|
+
## Additional info
|
|
25
|
+
There is a [friendly project](https://github.com/koenkk/zigbee2mqtt) with similar functionality on the same technologies, where you can work with the same devices using the MQTT protocol. Therefore, if any improvements or support for new zigbee-devices occur in the Zigbee2MQTT project, we can transfer and add the same functionality to this adapter. If you notice this, then write the issue - we'll postpone it.
|
|
26
|
+
|
|
27
|
+
There are knowledge bases that can be useful for working with Zigbee-devices and equipment:
|
|
28
|
+
* in English https://github.com/koenkk/zigbee2mqtt/wiki
|
|
29
|
+
* in Russian https://github.com/kirovilya/ioBroker.zigbee/wiki
|
|
30
|
+
|
|
@@ -0,0 +1,110 @@
|
|
|
1
|
+
Flashing firmware via Arduino is implemented using the project https://github.com/wavesoft/CCLib
|
|
2
|
+
**But with minor improvements!!!**
|
|
3
|
+
|
|
4
|
+
[AndrewLinden](https://github.com/AndrewLinden) described that he was able to flash CC2531 using CCLib [with comments](https://github.com/wavesoft/CCLib/issues/19).
|
|
5
|
+
|
|
6
|
+
As described [I made a fork of the CCLib library with minor changes](https://github.com/kirovilya/CCLib) for flashing firmware via Arduino:
|
|
7
|
+
* Timeouts of operations
|
|
8
|
+
* After opening the port (I have in Windows 7) Arduino reboots and, accordingly, does not respond to requests - made a 3 seconds pause (found somewhere in internet).
|
|
9
|
+
* The port speed is reduced to 9600, because at another speed leaving communication errors:
|
|
10
|
+
`ERROR: Could not read from the serial port!`
|
|
11
|
+
|
|
12
|
+
## Checked on Arduino UNO on CC2531-stick
|
|
13
|
+
|
|
14
|
+
0. Download and unpack the archive with the library https://github.com/kirovilya/CCLib.
|
|
15
|
+
|
|
16
|
+
1. Flashing Arduino sketch via Arduino IDE
|
|
17
|
+
CCLib\Arduino\CCLib\Examples\CCLib_proxy\CCLib_proxy.ino
|
|
18
|
+
|
|
19
|
+
2. Install Python 2.7 or later (tested with python 2.7.13), if not installed
|
|
20
|
+
|
|
21
|
+
3. Install pyserial 3.0.1, if not installed
|
|
22
|
+
`pip install -r CCLib\Python\requirements.txt`
|
|
23
|
+
or
|
|
24
|
+
`pip install pyserial==3.0.1`
|
|
25
|
+
|
|
26
|
+
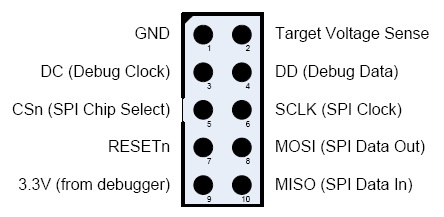
4. Connect the contacts as described https://github.com/kirovilya/CCLib#1-prepare-your-arduino-board
|
|
27
|
+
**But in my case, I connected completely without resistors, combined the contacts CC_DD_I and CC_DD_O together and connected to the DD pin of the DEBUG connector!**
|
|
28
|
+
|
|
29
|
+
|
|
30
|
+
|
|
31
|
+
I connected only 3 specified contacts and GND. During the firmware, the stick and Arduino must be connected to the USB.
|
|
32
|
+
|
|
33
|
+

|
|
34
|
+

|
|
35
|
+

|
|
36
|
+
|
|
37
|
+
5. After that, try to get information about the chip - if it works, then the connection is correct (example for COM9 port - Arduino port):
|
|
38
|
+
|
|
39
|
+
```
|
|
40
|
+
C:\Projects\CCLib\Python>python cc_info.py -p COM9
|
|
41
|
+
INFO: Found a CC2531 chip on COM9
|
|
42
|
+
|
|
43
|
+
Chip information:
|
|
44
|
+
Chip ID : 0xb524
|
|
45
|
+
Flash size : 256 Kb
|
|
46
|
+
Page size : 2 Kb
|
|
47
|
+
SRAM size : 8 Kb
|
|
48
|
+
USB : Yes
|
|
49
|
+
|
|
50
|
+
Device information:
|
|
51
|
+
IEEE Address : 00124b0014aa
|
|
52
|
+
PC : 0000
|
|
53
|
+
|
|
54
|
+
Debug status:
|
|
55
|
+
[ ] CHIP_ERASE_BUSY
|
|
56
|
+
[ ] PCON_IDLE
|
|
57
|
+
[X] CPU_HALTED
|
|
58
|
+
[ ] PM_ACTIVE
|
|
59
|
+
[ ] HALT_STATUS
|
|
60
|
+
[ ] DEBUG_LOCKED
|
|
61
|
+
[X] OSCILLATOR_STABLE
|
|
62
|
+
[ ] STACK_OVERFLOW
|
|
63
|
+
|
|
64
|
+
Debug config:
|
|
65
|
+
[ ] SOFT_POWER_MODE
|
|
66
|
+
[ ] TIMERS_OFF
|
|
67
|
+
[X] DMA_PAUSE
|
|
68
|
+
[X] TIMER_SUSPEND
|
|
69
|
+
```
|
|
70
|
+
[Another example of connection on MacOS](https://github.com/wavesoft/CCLib/issues/22#issuecomment-384452424)
|
|
71
|
+
|
|
72
|
+
6. If everything is successful, then download [modified firmware for flashing via Arduino](https://github.com/kirovilya/files/blob/master/CC2531ZNP-Pro-Secure_LinkKeyJoin_mod.hex)
|
|
73
|
+
|
|
74
|
+
7. Start the flashing firmware (it takes a long time, about 2-3 hours):
|
|
75
|
+
|
|
76
|
+
```
|
|
77
|
+
C:\Projects\ZigBee>python cc_write_flash.py -e -p COM9 --in=CC2531ZNP-Pro-Secure_LinkKeyJoin_mod.hex
|
|
78
|
+
INFO: Found a CC2531 chip on COM9
|
|
79
|
+
|
|
80
|
+
Chip information:
|
|
81
|
+
Chip ID : 0xb524
|
|
82
|
+
Flash size : 256 Kb
|
|
83
|
+
Page size : 2 Kb
|
|
84
|
+
SRAM size : 8 Kb
|
|
85
|
+
USB : Yes
|
|
86
|
+
Sections in CC2531ZNP-Pro-Secure_LinkKeyJoin_mod.hex:
|
|
87
|
+
|
|
88
|
+
Addr. Size
|
|
89
|
+
-------- -------------
|
|
90
|
+
0x0000 8176 B
|
|
91
|
+
0x1ff6 10 B
|
|
92
|
+
0x3fff0 1 B
|
|
93
|
+
0x2000 239616 B
|
|
94
|
+
|
|
95
|
+
This is going to ERASE and REPROGRAM the chip. Are you sure? <y/N>: y
|
|
96
|
+
|
|
97
|
+
Flashing:
|
|
98
|
+
- Chip erase...
|
|
99
|
+
- Flashing 4 memory blocks...
|
|
100
|
+
-> 0x0000 : 8176 bytes
|
|
101
|
+
Progress 100%... OK
|
|
102
|
+
-> 0x1ff6 : 10 bytes
|
|
103
|
+
Progress 100%... OK
|
|
104
|
+
-> 0x3fff0 : 1 bytes
|
|
105
|
+
Progress 100%... OK
|
|
106
|
+
-> 0x2000 : 239616 bytes
|
|
107
|
+
Progress 100%... OK
|
|
108
|
+
|
|
109
|
+
Completed
|
|
110
|
+
```
|
|
Binary file
|
|
Binary file
|
|
Binary file
|
|
Binary file
|
|
@@ -0,0 +1,28 @@
|
|
|
1
|
+
# Драйвер ioBroker для работы с Zigbee-устройствами
|
|
2
|
+
При помощи координатора Zigbee-сети на базе Texas Instruments SoC cc253x (и другими) создается собственная сеть, в которую подключаются zigbee-устройства. Взаимодействуя напрямую с координатором сети, драйвер позволяет управлять устройствами без дополнительных шлюзов/бриджей от производителей устройств (Xiaomi/TRADFRI/Hue). Про устройство Zigbee-сети можно прочитать [тут (на английском языке)](https://github.com/Koenkk/zigbee2mqtt/wiki/ZigBee-network).
|
|
3
|
+
|
|
4
|
+
## Оборудование
|
|
5
|
+
Для работы необходимо одно из перечисленных устройств, прошитое специальной ZNP-прошивкой: [cc2531, cc2530, cc2530+RF](https://github.com/Koenkk/zigbee2mqtt/wiki/Supported-sniffer-devices#zigbee-coordinator)
|
|
6
|
+
|
|
7
|
+

|
|
8
|
+

|
|
9
|
+

|
|
10
|
+

|
|
11
|
+
Необходимое для прошивки оборудование и процесс подготовки устройства описан [тут (на английском языке)](https://github.com/Koenkk/zigbee2mqtt/wiki/Getting-started) или [тут (на русском языке)](https://github.com/kirovilya/ioBroker.zigbee/wiki/%D0%9F%D1%80%D0%BE%D1%88%D0%B8%D0%B2%D0%BA%D0%B0)
|
|
12
|
+
|
|
13
|
+
Подключенные к Zigbee-сети устройства сообщают координатору своё состояние и информируют о событиях (нажатия кнопки, обнаружение движения, изменение температуры). Эти сведения отражаются в виде объектов-состояний ioBroker. Некоторые состояния имеют обратную связь и могут отправлять команды zigbee-устройству при изменении состояния (переключение состояния розетки и лампы, изменение сцены или яркости лампы).
|
|
14
|
+
|
|
15
|
+
## Работа с драйвером
|
|
16
|
+
Для запуска драйвера необходимо указать имя порта, на котором подключено устройство cc253x.
|
|
17
|
+
Как узнать порт написано [тут (на русском языке)](https://github.com/kirovilya/ioBroker.zigbee/wiki#%D0%9D%D0%B0%D1%81%D1%82%D1%80%D0%BE%D0%B9%D0%BA%D0%B0-%D0%B0%D0%B4%D0%B0%D0%BF%D1%82%D0%B5%D1%80%D0%B0)
|
|
18
|
+
|
|
19
|
+
Для подключения устройств необходимо перевести координатор Zigbee-сети в режим сопряжения, нажав зеленую кнопку. Начнется обратный отсчет времени (60 сек) пока будет доступна возможность подключения устройств.
|
|
20
|
+
Для подключения Zigbee-устройств в большинстве случаев достаточно нажать кнопку сопряжения на самом устройстве. Но существуют особенности для некоторых устройств. Подробнее о сопряжении с устройствами читайте [тут (на английском языке)](https://github.com/Koenkk/zigbee2mqtt/wiki/Pairing-devices) или [тут (на русском языке)](https://github.com/kirovilya/ioBroker.zigbee/wiki#%D0%9F%D0%BE%D0%B4%D0%B4%D0%B5%D1%80%D0%B6%D0%B8%D0%B2%D0%B0%D0%B5%D0%BC%D1%8B%D0%B5-%D1%83%D1%81%D1%82%D1%80%D0%BE%D0%B9%D1%81%D1%82%D0%B2%D0%B0).
|
|
21
|
+
|
|
22
|
+
После успешного сопряжения, устройство появится в панели устройств. Если устройство появилось в панели устройств, но имеет тип undefined, то это неизвестное устройство и с ним нельзя будет взаимодействовать. Если устройство есть в списке доступных устройств, но добавилось как undefined, то попробуйте удалить устройство и добавить заново.
|
|
23
|
+
Если не получается подключить устройство, то напиши issue.
|
|
24
|
+
|
|
25
|
+
## Дополнительные сведения
|
|
26
|
+
Существует [дружественный проект](https://github.com/koenkk/zigbee2mqtt) со схожим функционалом на тех же технологиях, в котором с этими же устройствами можно работать по протоколу MQTT.
|
|
27
|
+
Поэтому, если какие-либо улучшения или поддержка новых zigbee-устройств происходит в проекте Zigbee2MQTT, то можно перенести и добавить этот же функционал в этот драйвер. Если заметили это, то напиши issue - перенесем.
|
|
28
|
+
|
|
Binary file
|
|
Binary file
|
|
Binary file
|
|
Binary file
|
|
Binary file
|
|
Binary file
|
|
Binary file
|
|
Binary file
|
|
Binary file
|
|
Binary file
|
|
Binary file
|
|
Binary file
|
|
Binary file
|
|
Binary file
|
|
Binary file
|
|
Binary file
|
|
Binary file
|
|
Binary file
|
package/io-package.json
CHANGED
|
@@ -1,8 +1,41 @@
|
|
|
1
1
|
{
|
|
2
2
|
"common": {
|
|
3
3
|
"name": "zigbee",
|
|
4
|
-
"version": "1.8.
|
|
4
|
+
"version": "1.8.7",
|
|
5
5
|
"news": {
|
|
6
|
+
"1.8.7": {
|
|
7
|
+
"en": "fix exposes",
|
|
8
|
+
"de": "belichtet fix",
|
|
9
|
+
"ru": "исправить экспозиции",
|
|
10
|
+
"pt": "corrigir expões",
|
|
11
|
+
"nl": "vertaling:",
|
|
12
|
+
"fr": "fix expose",
|
|
13
|
+
"it": "fix espone",
|
|
14
|
+
"es": "arreglar expone",
|
|
15
|
+
"pl": "naprawić",
|
|
16
|
+
"uk": "фіксувати висадки",
|
|
17
|
+
"zh-cn": "fix 暴露"
|
|
18
|
+
},
|
|
19
|
+
"1.8.6": {
|
|
20
|
+
"en": "fix exposes",
|
|
21
|
+
"de": "fix exposes"
|
|
22
|
+
},
|
|
23
|
+
"1.8.5": {
|
|
24
|
+
"en": "fix for new code",
|
|
25
|
+
"de": "fix für neuen code",
|
|
26
|
+
"ru": "исправить для нового кода",
|
|
27
|
+
"pt": "corrigir para novo código",
|
|
28
|
+
"nl": "vertaling:",
|
|
29
|
+
"fr": "correction du nouveau code",
|
|
30
|
+
"it": "correzione per nuovo codice",
|
|
31
|
+
"es": "fijar para nuevo código",
|
|
32
|
+
"pl": "naprawić nowy kod",
|
|
33
|
+
"uk": "виправити для нового коду",
|
|
34
|
+
"zh-cn": "f 新的守则的ix"
|
|
35
|
+
},
|
|
36
|
+
"1.8.4": {
|
|
37
|
+
"en": "fix for new code"
|
|
38
|
+
},
|
|
6
39
|
"1.8.3": {
|
|
7
40
|
"en": "back to old source",
|
|
8
41
|
"de": "zurück zur alten quelle",
|
|
@@ -32,38 +65,6 @@
|
|
|
32
65
|
"pl": "Pakiet\nDodane nazwy portów seryjnych w dialogach konfiguracyjnych",
|
|
33
66
|
"uk": "Пакети оновлені\nДодано імена серійних портів у діалоговому вікні конфігурації",
|
|
34
67
|
"zh-cn": "更新的包装\n加 口号港口"
|
|
35
|
-
},
|
|
36
|
-
"1.7.7": {
|
|
37
|
-
"en": "Update dependencies",
|
|
38
|
-
"de": "Update dependencies"
|
|
39
|
-
},
|
|
40
|
-
"1.7.6": {
|
|
41
|
-
"en": "ikea fix ",
|
|
42
|
-
"de": "ikea fix "
|
|
43
|
-
},
|
|
44
|
-
"1.7.5": {
|
|
45
|
-
"en": "error message for undefined devices or icons ",
|
|
46
|
-
"de": "Fehlermeldung für undefinierte Geräte oder Symbole",
|
|
47
|
-
"ru": "сообщение об ошибке для неопределенных устройств или значков",
|
|
48
|
-
"pt": "mensagem de erro para dispositivos ou ícones indefinidos",
|
|
49
|
-
"nl": "foutmelding voor ongedefinieerde apparaten of pictogrammen",
|
|
50
|
-
"fr": "message d'erreur pour les périphériques ou les icônes non définis",
|
|
51
|
-
"it": "messaggio di errore per dispositivi o icone non definiti",
|
|
52
|
-
"es": "mensaje de error para dispositivos o iconos no definidos",
|
|
53
|
-
"pl": "komunikat o błędzie dla niezdefiniowanych urządzeń lub ikon",
|
|
54
|
-
"zh-cn": "未定义设备或图标的错误消息"
|
|
55
|
-
},
|
|
56
|
-
"1.7.4": {
|
|
57
|
-
"en": "missing icons with multiple description",
|
|
58
|
-
"de": "fehlende Symbole mit mehrfacher Beschreibung",
|
|
59
|
-
"ru": "отсутствующие значки с несколькими описаниями",
|
|
60
|
-
"pt": "ícones ausentes com descrição múltipla",
|
|
61
|
-
"nl": "ontbrekende pictogrammen met meerdere beschrijvingen",
|
|
62
|
-
"fr": "icônes manquantes avec plusieurs descriptions",
|
|
63
|
-
"it": "icone mancanti con descrizione multipla",
|
|
64
|
-
"es": "faltan iconos con descripción múltiple",
|
|
65
|
-
"pl": "brakujące ikony z wieloma opisami",
|
|
66
|
-
"zh-cn": "缺少具有多个描述的图标"
|
|
67
68
|
}
|
|
68
69
|
},
|
|
69
70
|
"title": "Zigbee",
|
package/lib/backup.js
CHANGED
|
@@ -49,7 +49,7 @@ class Backup {
|
|
|
49
49
|
}
|
|
50
50
|
}
|
|
51
51
|
|
|
52
|
-
async configure
|
|
52
|
+
async configure(zigbeeOptions) {
|
|
53
53
|
this.zigbeeOptions = zigbeeOptions;
|
|
54
54
|
this.backup(zigbeeOptions);
|
|
55
55
|
const allBackupFiles = this.listBackupsFiles(zigbeeOptions);
|
|
@@ -121,7 +121,7 @@ class Backup {
|
|
|
121
121
|
delBackupsFiles(options, files) {
|
|
122
122
|
const arr = files.length;
|
|
123
123
|
if (arr > 10) {
|
|
124
|
-
this.info('delete old Backup files. keep only last 10')
|
|
124
|
+
this.info('delete old Backup files. keep only last 10');
|
|
125
125
|
}
|
|
126
126
|
|
|
127
127
|
for (let i = 10; i < files.length; i++) {
|