flashduty-knowledge-base 1.3.5 → 1.3.6
This diff represents the content of publicly available package versions that have been released to one of the supported registries. The information contained in this diff is provided for informational purposes only and reflects changes between package versions as they appear in their respective public registries.
- package/README.md +5 -1
- package/dist/en.d.ts +3 -1
- package/dist/esm/en.js +833 -248
- package/dist/esm/zh.js +749 -231
- package/dist/iife/en.js +804 -219
- package/dist/iife/zh.js +725 -207
- package/dist/zh.d.ts +3 -1
- package/package.json +1 -1
package/dist/iife/en.js
CHANGED
|
@@ -82,6 +82,15 @@ Field|Required|Type|Description
|
|
|
82
82
|
| alert_key | No | string | Alert identifier, used to update or automatically recover existing alerts.<br><br>You can customize this value, but it cannot exceed \`255\` characters. You can also rely on system auto-generation, this value will be returned in the response.<br><br>If you're reporting a recovery event, this value must exist.
|
|
83
83
|
| description | No | string | Alert description, no more than \`2048\` characters, will be truncated if exceeded.
|
|
84
84
|
| labels | No | map | Alert label collection, key is the label name, value is the label value:<br><br>1. Both key and value of labels are string type, case-sensitive.<br>2. Label key should not exceed \`128\` characters, following Prometheus label naming conventions. Value should not exceed \`2048\` characters, will be truncated if exceeded.<br>3. Maximum of \`50\` labels. See \`Label Content Reference\` in [Best Practices](#best-practices).<br><br>Example: "resource": "171.26.23.22", "check": "api latency > 500ms"
|
|
85
|
+
| images | No | [][image](#image) | Array of images, used for image display in frontend or Feishu/DingTalk application notifications.The system merged/overwritten based on alt, for the same alt (including empty strings), only one is retained
|
|
86
|
+
|
|
87
|
+
#### image Structure <span id="image"></span>
|
|
88
|
+
|
|
89
|
+
Field|Required|Type|Description
|
|
90
|
+
:-:|:-:|:-:|:---
|
|
91
|
+
| alt | No | string | Image alternative text, limit 128 characters, truncated if exceeded.
|
|
92
|
+
| src | Yes | string | Image source, value: http/https URL or image_key returned by [Image Upload API](https://developer.flashcat.cloud/api-344943718). Limit 256 characters, discarded if exceeded
|
|
93
|
+
| href | No | string | Hyperlink reference path, limit 256 characters, truncated if exceeded
|
|
85
94
|
|
|
86
95
|
</div>
|
|
87
96
|
|
|
@@ -310,7 +319,7 @@ attachment_stripped = true
|
|
|
310
319
|
---
|
|
311
320
|
|
|
312
321
|
Currently, all alerts pushed to Flashduty through the email integration are set to Warning severity. However, you can customize the severity using the [alert pipeline](https://docs.flashcat.cloud/en/flashduty/alert-pipelines).
|
|
313
|
-
`,
|
|
322
|
+
`,o=`---
|
|
314
323
|
title: "Nightingale/Flashcat Integration"
|
|
315
324
|
description: "Push alert events from Nightingale (n9e) or Flashcat to Flashduty via webhook. When an alert is triggered, send a trigger event to Flashduty; when an alert recovers, send a recovery event to Flashduty"
|
|
316
325
|
date: "2025-05-19T10:00:00+08:00"
|
|
@@ -387,7 +396,7 @@ In the new version, although you can configure the collaboration space directly
|
|
|
387
396
|
#### Step 1: Add Notification Media
|
|
388
397
|
|
|
389
398
|
1. Log in to your n9e console, select Alerting > Media types and click **Add**
|
|
390
|
-
2. Fill in the media name and identifier, select **
|
|
399
|
+
2. Fill in the media name and identifier, select **Flashduty** type, and enter the integration push URL in the \`URL\` section
|
|
391
400
|
3. Click **Save** and complete
|
|
392
401
|
|
|
393
402
|
<img alt="drawing" width="600" src="https://download.flashcat.cloud/flashduty/doc/en/fd/n9e-1.png" />
|
|
@@ -396,7 +405,7 @@ In the new version, although you can configure the collaboration space directly
|
|
|
396
405
|
|
|
397
406
|
1. Log in to your n9e console, select Alerting > Rules and click **Add** or edit the existing alert rules
|
|
398
407
|
2. Configure the basic information as needed
|
|
399
|
-
3. Select the \`
|
|
408
|
+
3. Select the \`Flashduty\` notification media added in the previous step
|
|
400
409
|
4. Select the collaboration space (the collaboration space must be created in [Flashduty](https://console.flashcat.cloud/channel) in advance), and select other options as needed
|
|
401
410
|
5. Click **Save** and complete
|
|
402
411
|
|
|
@@ -405,7 +414,7 @@ In the new version, although you can configure the collaboration space directly
|
|
|
405
414
|
#### Step 3: Select Notification Rules in Alert Rules
|
|
406
415
|
|
|
407
416
|
1. Log in to your n9e console, select Alerting > Alert Rules and click **Add** or edit the existing alert rules
|
|
408
|
-
2. Select the \`
|
|
417
|
+
2. Select the \`Flashduty\` notification rule added in the previous step, and select other options as needed
|
|
409
418
|
3. Click **Save** and complete
|
|
410
419
|
|
|
411
420
|
<img alt="drawing" width="600" src="https://download.flashcat.cloud/flashduty/doc/en/fd/n9e-3.png" />
|
|
@@ -506,7 +515,7 @@ Nightingale/Flashcat to Flashduty alert severity mapping:
|
|
|
506
515
|
|
|
507
516
|
</details>
|
|
508
517
|
|
|
509
|
-
`,
|
|
518
|
+
`,i=`---
|
|
510
519
|
title: "Prometheus Integration Guide"
|
|
511
520
|
description: "Push Prometheus alert events to Flashduty through AlertManager using webhooks. When an alert is triggered, it sends a trigger event to Flashduty, and when the alert recovers, it sends a recovery event."
|
|
512
521
|
date: "2025-05-19T10:00:00+08:00"
|
|
@@ -890,7 +899,7 @@ The media type must be associated with a user to send events. The user must have
|
|
|
890
899
|
1. Log in to the Zabbix console, select \`Users > Users\`, select Admin user, select media, select Add to enter the editing window:
|
|
891
900
|
|
|
892
901
|
- Type: Select the Flashduty media type created above
|
|
893
|
-
- Send To: Fill in
|
|
902
|
+
- Send To: Fill in Flashduty
|
|
894
903
|
- Keep other configurations unchanged using default settings
|
|
895
904
|
|
|
896
905
|
<img alt="drawing" width="600" src="https://download.flashcat.cloud/flashduty/doc/zabbix-3.png" />
|
|
@@ -904,7 +913,7 @@ Sending notifications is one of the operations executed by actions in Zabbix. Th
|
|
|
904
913
|
|
|
905
914
|
1. Click \`Create action\` to enter the action editing page
|
|
906
915
|
|
|
907
|
-
- Name: Fill in "Send To
|
|
916
|
+
- Name: Fill in "Send To Flashduty"
|
|
908
917
|
|
|
909
918
|
2. Select \`Operations\`, add notification sending configurations for three scenarios respectively:
|
|
910
919
|
|
|
@@ -978,7 +987,7 @@ Sending notifications is one of the operations executed by actions in Zabbix. Th
|
|
|
978
987
|
|
|
979
988
|
1. Click \`Create action\` to enter the action editing page
|
|
980
989
|
|
|
981
|
-
- Name: Fill in "Send To
|
|
990
|
+
- Name: Fill in "Send To Flashduty"
|
|
982
991
|
|
|
983
992
|
2. Select \`Operations\`, add notification sending configurations for three scenarios respectively:
|
|
984
993
|
|
|
@@ -1015,7 +1024,7 @@ Log in to the Zabbix console, select \`Monitoring > Problems\` to view the lates
|
|
|
1015
1024
|
|
|
1016
1025
|
- \`{ALERT.SUBJECT}\`: Alert title, keep as first parameter
|
|
1017
1026
|
- \`{ALERT.MESSAGE}\`: Alert message, keep as second parameter
|
|
1018
|
-
- \`
|
|
1027
|
+
- \`Flashduty webhook push URL\`, simply copy the integration push URL, keep as third parameter
|
|
1019
1028
|
- \`Zabbix console address\`, copy directly (if your page is configured with tomcat/nginx forwarding path, please include it), used to generate alert detail page links. Leave empty if none, keep as fourth parameter
|
|
1020
1029
|
- \`HTTPProxy\`: If your Zabbix Server cannot directly access Flashduty services, you can set this parameter to a proxy address. Leave empty if none, keep as fifth parameter
|
|
1021
1030
|
|
|
@@ -1059,7 +1068,7 @@ Sending notifications is one of the operations executed by actions in Zabbix. Th
|
|
|
1059
1068
|
|
|
1060
1069
|
1. Click \`Create action\` to enter the action editing page
|
|
1061
1070
|
|
|
1062
|
-
- Name: Fill in "Send To
|
|
1071
|
+
- Name: Fill in "Send To Flashduty"
|
|
1063
1072
|
|
|
1064
1073
|
2. Select \`Operations\`, update notification user configurations for three scenarios respectively:
|
|
1065
1074
|
|
|
@@ -1074,10 +1083,10 @@ Sending notifications is one of the operations executed by actions in Zabbix. Th
|
|
|
1074
1083
|
|
|
1075
1084
|
3. Select \`Operations\`, update notification content configurations for three scenarios respectively:
|
|
1076
1085
|
|
|
1077
|
-
- **In the Default Message configuration item, completely copy the following content and paste it after the default content**.
|
|
1086
|
+
- **In the Default Message configuration item, completely copy the following content and paste it after the default content**. Flashduty will parse corresponding text after receiving events to find alert attribute information:
|
|
1078
1087
|
|
|
1079
1088
|
\`\`\`
|
|
1080
|
-
-----
|
|
1089
|
+
-----Flashduty Required Starts-----event_severity={TRIGGER.SEVERITY}||event_name={TRIGGER.NAME}||event_id={EVENT.ID}||event_tags={EVENT.TAGS}||event_ack={EVENT.ACK.STATUS}||event_value={EVENT.VALUE}||trigger_id={TRIGGER.ID}||trigger_desc={TRIGGER.DESCRIPTION}||trigger_expr={TRIGGER.EXPRESSION}||host_group={TRIGGER.HOSTGROUP.NAME}||host_ip={HOST.IP}||host_name={HOST.NAME}||item_name={ITEM.NAME}||item_value={ITEM.VALUE}-----Flashduty Required Ends-----
|
|
1081
1090
|
\`\`\`
|
|
1082
1091
|
|
|
1083
1092
|
- Repeat the above steps to complete the configuration of \`Recovery operations\` and \`Update operations\`
|
|
@@ -1163,7 +1172,7 @@ Choose this option when you need to route alerts to different channels based on
|
|
|
1163
1172
|
**Step 1: Set up Notification Channel**
|
|
1164
1173
|
|
|
1165
1174
|
1. Go to \`Settings -> Notifications\` page, click Setup to edit, as shown below;
|
|
1166
|
-
2. Select \`
|
|
1175
|
+
2. Select \`Flashduty (Flashduty)\` as the \`Notification Type\`;
|
|
1167
1176
|
3. Copy and paste the integration_key parameter value from the integration push URL into \`Integration Key\`;
|
|
1168
1177
|
4. Select \`Severity\` as needed;
|
|
1169
1178
|
5. Submit and save
|
|
@@ -1176,7 +1185,7 @@ Choose this option when you need to route alerts to different channels based on
|
|
|
1176
1185
|
|
|
1177
1186
|
1. Click \`Add New Monitor\` or edit existing monitors, configure monitoring settings as needed;
|
|
1178
1187
|
2. As shown, enable the notification method created in the previous step in the \`Notifications\` section;
|
|
1179
|
-
3. If needed, add \`Tags\`. Note that only tags with both Key/Value will be pushed to
|
|
1188
|
+
3. If needed, add \`Tags\`. Note that only tags with both Key/Value will be pushed to Flashduty;
|
|
1180
1189
|
4. Submit and save, then wait for alerts to trigger.
|
|
1181
1190
|
|
|
1182
1191
|
<img src="https://download.flashcat.cloud/flashduty/doc/en/upk/upk-2.png" alt="drawing" width="500"/>
|
|
@@ -1575,7 +1584,7 @@ Choose this option when you need to route alerts to different channels based on
|
|
|
1575
1584
|
<img src="https://download.flashcat.cloud/flashduty/doc/en/aliyun/sls-5.png" alt="drawing" width="500"/>
|
|
1576
1585
|
|
|
1577
1586
|
4. Click the \`Confirm\` button to save
|
|
1578
|
-
5. Repeat these steps for all other rules to push all alerts to
|
|
1587
|
+
5. Repeat these steps for all other rules to push all alerts to Flashduty
|
|
1579
1588
|
|
|
1580
1589
|
</div>
|
|
1581
1590
|
|
|
@@ -1594,7 +1603,7 @@ Alibaba Cloud SLS monitoring to Flashduty alert severity mapping:
|
|
|
1594
1603
|
| 2 | Info | Info |
|
|
1595
1604
|
|
|
1596
1605
|
</div>
|
|
1597
|
-
`,h={CustomAlert:t,Email:a,N9e:
|
|
1606
|
+
`,h={CustomAlert:t,Email:a,N9e:o,Prometheus:i,Grafana:s,Zabbix:r,UptimeKuma:l,AliyunARMS:d,AliyunCmEvent:c,AliyunCm:u,AliyunSLS:e,AWSCW:e,AzureMonitor:`---
|
|
1598
1607
|
title: "AWS CloudWatch Integration"
|
|
1599
1608
|
description: "Sync AWS CloudWatch alert events to Flashduty via webhook to achieve automated alert noise reduction"
|
|
1600
1609
|
date: "2025-05-19T10:00:00+08:00"
|
|
@@ -1646,10 +1655,10 @@ Choose this method when you need to route alerts to different channels based on
|
|
|
1646
1655
|
|
|
1647
1656
|
1. Log in to your AWS Console, search for \`Simple Notification Service\` product and enter its console
|
|
1648
1657
|
2. Go to the \`Topics\` page, click the \`Create topic\` button to start creating a topic
|
|
1649
|
-
3. Select \`Standard\` for \`Type\`, enter \`
|
|
1658
|
+
3. Select \`Standard\` for \`Type\`, enter \`Flashduty\` as the name
|
|
1650
1659
|
4. Click the \`Create Topic\` button to complete topic creation
|
|
1651
1660
|
5. Go to the \`Subscriptions\` page, click the \`Create subscription\` button to create a subscription for the topic
|
|
1652
|
-
6. Select \`
|
|
1661
|
+
6. Select \`Flashduty\` for \`Topic ARN\`, choose \`HTTPS\` for \`Protocol\`, enter the integration push URL for \`Endpoint\` (enter the integration name on the current page, the URL will be generated after saving)
|
|
1653
1662
|
7. Click the \`Create subscription\` button to complete subscription creation
|
|
1654
1663
|
|
|
1655
1664
|
<img alt="drawing" width="600" src="https://download.flashcat.cloud/aws-cloudwatch-subscribe.png" />
|
|
@@ -1657,7 +1666,7 @@ Choose this method when you need to route alerts to different channels based on
|
|
|
1657
1666
|
8. Return to the \`Subscriptions\` page. When the subscription status shows \`Confirmed\`, the subscription URL verification is successful; otherwise, please contact Flashduty
|
|
1658
1667
|
9. Search for the \`CloudWatch\` product and enter its console
|
|
1659
1668
|
10. Go to the \`All alarms\` page, choose to create or edit existing alarm policies
|
|
1660
|
-
11. For the \`Notification\` step, select \`
|
|
1669
|
+
11. For the \`Notification\` step, select \`Flashduty\` as the \`SNS topic\` for all three states: \`In alarm\`, \`OK\`, and \`Insufficient data\`, as shown below:
|
|
1661
1670
|
|
|
1662
1671
|
<img alt="drawing" width="600" src="https://download.flashcat.cloud/aws-cloudwatch-alram.png" />
|
|
1663
1672
|
|
|
@@ -1806,7 +1815,7 @@ Choose this method when you need to route alerts to different channels based on
|
|
|
1806
1815
|
<img src="https://download.flashcat.cloud/flashduty/doc/en/hw/hw-1.png" alt="drawing" width="500"/>
|
|
1807
1816
|
|
|
1808
1817
|
5. Go to \`Alarm-Alarm Notifications-Notification Groups\` page, click \`Create Notification Group\` button
|
|
1809
|
-
6. Enter \`
|
|
1818
|
+
6. Enter \`Flashduty\` as group name, check the \`flashduty\` notification object created earlier
|
|
1810
1819
|
7. Click \`OK\` button to complete notification group creation
|
|
1811
1820
|
|
|
1812
1821
|
<img src="https://download.flashcat.cloud/flashduty/doc/en/hw/hw-2.png" alt="drawing" width="500"/>
|
|
@@ -1814,7 +1823,7 @@ Choose this method when you need to route alerts to different channels based on
|
|
|
1814
1823
|
Note: When creating a notification group, Huawei Cloud will send a request to Flashduty to verify the push URL. Check the notification group's object list - alerts will only be pushed normally when the notification object status is \`Confirmed\`
|
|
1815
1824
|
|
|
1816
1825
|
8. Go to \`Alarm-Alarm Rules\` page, edit existing alarm rules or create new ones to open the \`Alarm Rule Details\` page
|
|
1817
|
-
9. Select \`
|
|
1826
|
+
9. Select \`Flashduty\` as the notification group, check both \`Alarm Triggered\` and \`Cleared\` conditions. Click \`OK\` button to save changes
|
|
1818
1827
|
|
|
1819
1828
|
<img src="https://download.flashcat.cloud/flashduty/doc/en/hw/hw-3.png" alt="drawing" width="500"/>
|
|
1820
1829
|
|
|
@@ -1891,7 +1900,7 @@ Supports Influxdata versions 1.x ~ 2.x, with different configurations for each v
|
|
|
1891
1900
|
#### Step 1: Create Alert Channel
|
|
1892
1901
|
1. Log in to your \`Influxdata\` console and navigate to the \`Alerts > Notification Endpoints\` page.
|
|
1893
1902
|
2. Click \`Create\` to create an alert notification channel.
|
|
1894
|
-
3. Select \`HTTP\` for \`Destination\` and enter \`
|
|
1903
|
+
3. Select \`HTTP\` for \`Destination\` and enter \`Flashduty\` for \`Name\`.
|
|
1895
1904
|
4. Choose \`POST\` for \`HTTP Method\` and enter the integration push URL.
|
|
1896
1905
|
|
|
1897
1906
|
<img alt="drawing" width="600" src="https://download.flashcat.cloud/flashduty/doc/influxdb-1.png" />
|
|
@@ -1900,7 +1909,7 @@ Supports Influxdata versions 1.x ~ 2.x, with different configurations for each v
|
|
|
1900
1909
|
1. Log in to your \`Influxdata\` console and navigate to the \`Alerts > Notification Rules\` page.
|
|
1901
1910
|
2. Click \`Create\` to create an alert notification rule.
|
|
1902
1911
|
3. Configure \`About\` and \`Conditions\` as needed.
|
|
1903
|
-
4. Select \`
|
|
1912
|
+
4. Select \`Flashduty\` created in Step 1 for \`Message\`.
|
|
1904
1913
|
|
|
1905
1914
|
<img alt="drawing" width="600" src="https://download.flashcat.cloud/flashduty/doc/influxdb-2.png" />
|
|
1906
1915
|
|
|
@@ -2164,7 +2173,7 @@ filter:
|
|
|
2164
2173
|
query_string:
|
|
2165
2174
|
query: "created_at:*"
|
|
2166
2175
|
|
|
2167
|
-
# -------
|
|
2176
|
+
# ------- Flashduty ----------------
|
|
2168
2177
|
alert: pagerduty
|
|
2169
2178
|
pagerduty_service_key: xxx
|
|
2170
2179
|
pagerduty_client_name: wahaha
|
|
@@ -2174,7 +2183,7 @@ pagerduty_v2_payload_component: mysql
|
|
|
2174
2183
|
pagerduty_v2_payload_group: app-stack
|
|
2175
2184
|
pagerduty_v2_payload_severity: error
|
|
2176
2185
|
pagerduty_v2_payload_source: mysql.host.name
|
|
2177
|
-
# -------
|
|
2186
|
+
# ------- Flashduty ----------------
|
|
2178
2187
|
\`\`\`
|
|
2179
2188
|
|
|
2180
2189
|
4. Step 4: Restart ElastAlert and wait for alerts to trigger
|
|
@@ -2238,7 +2247,7 @@ BlueKing alert policies can trigger \`Action Plans\`, which can integrate with e
|
|
|
2238
2247
|
|
|
2239
2248
|
1. Log in to your BlueKing desktop and enter the \`Monitor Platform\`;
|
|
2240
2249
|
2. Go to \`Configuration-Action Plans\` page, click the \`Add Plan\` button to start creating an action plan;
|
|
2241
|
-
3. Enter the name as \`Send To
|
|
2250
|
+
3. Enter the name as \`Send To Flashduty\`, select \`HTTP Callback\` as the plan type, choose \`POST\` as the push method, and fill in the integration push URL (obtained after saving the integration), as shown below:
|
|
2242
2251
|
|
|
2243
2252
|
<img alt="drawing" width="600" src="https://download.flashcat.cloud/flashduty/integration/tencent-bk/create_package.jpg" />
|
|
2244
2253
|
|
|
@@ -2256,12 +2265,12 @@ BlueKing alert policies can trigger \`Action Plans\`, which can integrate with e
|
|
|
2256
2265
|
<div class="md-block">
|
|
2257
2266
|
|
|
2258
2267
|
1. Go to \`Configuration-Alert Policies\` page, select an existing policy to edit or create a new one;
|
|
2259
|
-
2. Scroll down to the \`Alert Processing\` section, select the \`Send To
|
|
2268
|
+
2. Scroll down to the \`Alert Processing\` section, select the \`Send To Flashduty\` action plan for all three scenarios, and disable \`Defense Rules\`, as shown below:
|
|
2260
2269
|
|
|
2261
2270
|
<img alt="drawing" width="600" src="https://download.flashcat.cloud/flashduty/integration/tencent-bk/update_alert_rule.jpg" />
|
|
2262
2271
|
|
|
2263
2272
|
3. Submit and save to complete;
|
|
2264
|
-
4. Repeat these steps for other alerts you want to push to
|
|
2273
|
+
4. Repeat these steps for other alerts you want to push to Flashduty.
|
|
2265
2274
|
|
|
2266
2275
|
</div>
|
|
2267
2276
|
|
|
@@ -2398,7 +2407,7 @@ Choose this option when you need to route alerts to different channels based on
|
|
|
2398
2407
|
"record_group_id": "{{escape .RecordGroupId}}",
|
|
2399
2408
|
"detail_url": "{{escape .DetailUrl}}",
|
|
2400
2409
|
"query_url": "{{escape .QueryUrl}}",
|
|
2401
|
-
"message": {{.Message}},
|
|
2410
|
+
"message": "{{.Message}}",
|
|
2402
2411
|
"query_result": {{.QueryResult}},
|
|
2403
2412
|
"query_log": {{.QueryLog}},
|
|
2404
2413
|
"analysis_result": {{.AnalysisResult}}
|
|
@@ -2545,7 +2554,7 @@ Choose this method when you need to route alerts to different channels based on
|
|
|
2545
2554
|
|
|
2546
2555
|
1. Log in to your Tencent Cloud Console and select EventBridge service
|
|
2547
2556
|
2. Go to the Event Rules page, click the New button to start editing rules
|
|
2548
|
-
3. Enter the name as
|
|
2557
|
+
3. Enter the name as Flashduty, as shown below:
|
|
2549
2558
|
|
|
2550
2559
|
<img alt="drawing" width="600" src="https://download.flashcat.cloud/tencent-eb-new-rule.png" />
|
|
2551
2560
|
|
|
@@ -2646,12 +2655,12 @@ Choose this method when you need to route alerts to different channels based on
|
|
|
2646
2655
|
|
|
2647
2656
|
<img alt="drawing" width="600" src="https://fcpub-1301667576.cos.ap-nanjing.myqcloud.com/flashduty/doc/oceanbase-1.png" />
|
|
2648
2657
|
|
|
2649
|
-
5. Copy the following script content into the channel configuration, and **please add the integration_key value from your
|
|
2658
|
+
5. Copy the following script content into the channel configuration, and **please add the integration_key value from your Flashduty push URL to the integration_key parameter in the script**
|
|
2650
2659
|
|
|
2651
2660
|
\`\`\`
|
|
2652
2661
|
#!/usr/bin/env bash
|
|
2653
2662
|
|
|
2654
|
-
function
|
|
2663
|
+
function sendToFlashduty() {
|
|
2655
2664
|
URL="\${address}/event/push/alert/standard?integration_key=\${integration_key}"
|
|
2656
2665
|
curl -s -X POST \${URL} -H 'Content-Type: application/json' -d '{
|
|
2657
2666
|
"event_status": "'\${alert_level}'",
|
|
@@ -2715,7 +2724,7 @@ elif [[ \${statusMd5} == "\${active}" ]];then
|
|
|
2715
2724
|
fi
|
|
2716
2725
|
|
|
2717
2726
|
if [[ \${statusMd5} == \${active} || \${statusMd5} == \${Inactive} ]];then
|
|
2718
|
-
|
|
2727
|
+
sendToFlashduty
|
|
2719
2728
|
fi
|
|
2720
2729
|
\`\`\`
|
|
2721
2730
|
|
|
@@ -2753,7 +2762,7 @@ OCP Alert Notification - Single Alert
|
|
|
2753
2762
|
<img alt="drawing" width="600" src="https://fcpub-1301667576.cos.ap-nanjing.myqcloud.com/flashduty/doc/oceanbase-2.png" />
|
|
2754
2763
|
|
|
2755
2764
|
3. Select **English** for push language
|
|
2756
|
-
4. Select **
|
|
2765
|
+
4. Select **Flashduty** for alert channel
|
|
2757
2766
|
5. Enable **Recovery Notification**
|
|
2758
2767
|
6. Submit
|
|
2759
2768
|
|
|
@@ -2834,7 +2843,7 @@ Choose this option when you need to route alerts to different channels based on
|
|
|
2834
2843
|
|
|
2835
2844
|
<img alt="drawing" width="600" src="https://fcpub-1301667576.cos.ap-nanjing.myqcloud.com/flashduty/doc/graylog-2.png" />
|
|
2836
2845
|
|
|
2837
|
-
6. Enter the
|
|
2846
|
+
6. Enter the Flashduty URL you obtained (URL whitelist required for first-time use)
|
|
2838
2847
|
|
|
2839
2848
|
<img alt="drawing" width="600" src="https://fcpub-1301667576.cos.ap-nanjing.myqcloud.com/flashduty/doc/graylog-3.png" />
|
|
2840
2849
|
|
|
@@ -2846,11 +2855,11 @@ Choose this option when you need to route alerts to different channels based on
|
|
|
2846
2855
|
|
|
2847
2856
|
<img alt="drawing" width="600" src="https://fcpub-1301667576.cos.ap-nanjing.myqcloud.com/flashduty/doc/graylog-5.png" />
|
|
2848
2857
|
|
|
2849
|
-
### Step 2: Use
|
|
2858
|
+
### Step 2: Use Flashduty Alert Channel in Alert Events
|
|
2850
2859
|
1. Create or edit existing Event Definition
|
|
2851
2860
|
2. Skip other alert configurations here (configure alert conditions according to business requirements)
|
|
2852
2861
|
3. Configure channel in Notifications
|
|
2853
|
-
4. Add Notification and select
|
|
2862
|
+
4. Add Notification and select Flashduty channel
|
|
2854
2863
|
5. Click Done
|
|
2855
2864
|
6. Complete the next step to finish
|
|
2856
2865
|
|
|
@@ -2936,7 +2945,7 @@ rules:
|
|
|
2936
2945
|
tags:
|
|
2937
2946
|
level: Warning
|
|
2938
2947
|
\`\`\`
|
|
2939
|
-
4. Add the
|
|
2948
|
+
4. Add the Flashduty webhook URL
|
|
2940
2949
|
|
|
2941
2950
|
\`\`\`
|
|
2942
2951
|
# Add at the bottom of the configuration file
|
|
@@ -3022,12 +3031,12 @@ Sentry provides two types of alert mechanisms: Issue Alerts and Metric Alerts. W
|
|
|
3022
3031
|
|
|
3023
3032
|
## II. Sentry Alert Push Configuration
|
|
3024
3033
|
|
|
3025
|
-
### Step 1: Add
|
|
3034
|
+
### Step 1: Add Flashduty Custom Integrations
|
|
3026
3035
|
|
|
3027
3036
|
1. Log in to the Sentry management console
|
|
3028
3037
|
2. In the left navigation bar, locate **Settings => Custom Integrations**
|
|
3029
3038
|
3. Click Create New Integration and select **Internal Integration**
|
|
3030
|
-
4. On the editing page, **enter
|
|
3039
|
+
4. On the editing page, **enter Flashduty for Name and paste the integration push URL into WebhookURL**
|
|
3031
3040
|
5. Enable **Alert Rule Action**, configure as shown below:
|
|
3032
3041
|
|
|
3033
3042
|
<img alt="drawing" width="600" src="https://fcpub-1301667576.cos.ap-nanjing.myqcloud.com/flashduty/doc/sentry-1.png" />
|
|
@@ -3039,11 +3048,11 @@ Sentry provides two types of alert mechanisms: Issue Alerts and Metric Alerts. W
|
|
|
3039
3048
|
<img alt="drawing" width="600" src="https://fcpub-1301667576.cos.ap-nanjing.myqcloud.com/flashduty/doc/sentry-2.png" />
|
|
3040
3049
|
|
|
3041
3050
|
**Special notes about WEBHOOKS configuration:**
|
|
3042
|
-
1. After checking **issue**,
|
|
3051
|
+
1. After checking **issue**, Flashduty can receive resolved events for issues, meaning when manually triggering resolved for an issue in the issue list, we will automatically recover the associated incident in Flashduty
|
|
3043
3052
|
2. Other issue events such as create, assigned, archived, and unresolved are not supported
|
|
3044
|
-
3. If error and comment are also checked,
|
|
3053
|
+
3. If error and comment are also checked, Flashduty will not receive or process these types of events
|
|
3045
3054
|
|
|
3046
|
-
### Step 2: Use
|
|
3055
|
+
### Step 2: Use Flashduty Integration in Alerts
|
|
3047
3056
|
1. In the left navigation bar, locate **Alerts => Create Alert**
|
|
3048
3057
|
2. Select the type of Alert to create, such as Issue
|
|
3049
3058
|
|
|
@@ -3055,7 +3064,7 @@ Sentry provides two types of alert mechanisms: Issue Alerts and Metric Alerts. W
|
|
|
3055
3064
|
|
|
3056
3065
|
<img alt="drawing" width="600" src="https://fcpub-1301667576.cos.ap-nanjing.myqcloud.com/flashduty/doc/sentry-4.png" />
|
|
3057
3066
|
|
|
3058
|
-
5. Select **
|
|
3067
|
+
5. Select **Flashduty** added above as the notification channel
|
|
3059
3068
|
|
|
3060
3069
|
<img alt="drawing" width="600" src="https://fcpub-1301667576.cos.ap-nanjing.myqcloud.com/flashduty/doc/sentry-5.png" />
|
|
3061
3070
|
|
|
@@ -3136,7 +3145,7 @@ Choose this option when you need to route alerts to different channels based on
|
|
|
3136
3145
|
|
|
3137
3146
|
<img alt="drawing" width="600" src="https://fcpub-1301667576.cos.ap-nanjing.myqcloud.com/flashduty/doc/jkb-2.png" />
|
|
3138
3147
|
|
|
3139
|
-
4. Enter
|
|
3148
|
+
4. Enter Flashduty as the custom name, and input the copied integration push URL
|
|
3140
3149
|
5. Select **POST** as the callback method and **JSON** as the data format
|
|
3141
3150
|
6. Check **Enable URL Callback**, configure other options as needed, refer to the image below
|
|
3142
3151
|
|
|
@@ -3144,10 +3153,10 @@ Choose this option when you need to route alerts to different channels based on
|
|
|
3144
3153
|
|
|
3145
3154
|
7. Click Save
|
|
3146
3155
|
|
|
3147
|
-
### Step 2: Use
|
|
3156
|
+
### Step 2: Use Flashduty Alert Channel in Monitoring Tasks
|
|
3148
3157
|
1. Create or edit an existing monitoring task
|
|
3149
3158
|
2. Other alert configurations are omitted here
|
|
3150
|
-
3. Under Webhook notification, select the
|
|
3159
|
+
3. Under Webhook notification, select the Flashduty channel
|
|
3151
3160
|
|
|
3152
3161
|
<img alt="drawing" width="600" src="https://fcpub-1301667576.cos.ap-nanjing.myqcloud.com/flashduty/doc/jkb-4.png" />
|
|
3153
3162
|
|
|
@@ -3225,10 +3234,10 @@ Choose this option when you need to route alerts to different channels based on
|
|
|
3225
3234
|
|
|
3226
3235
|
<img alt="drawing" width="600" src="https://download.flashcat.cloud/flashduty/doc/aws-eb-3.png" />
|
|
3227
3236
|
|
|
3228
|
-
4. In the \`Connection details\` section, enter \`
|
|
3237
|
+
4. In the \`Connection details\` section, enter \`Flashduty\` for \`Connection name\`
|
|
3229
3238
|
5. In the \`Authorization\` section, select \`Other\` for \`Destination type\`
|
|
3230
3239
|
6. Select \`API Key\` for \`Authorization type\`
|
|
3231
|
-
7. Enter \`
|
|
3240
|
+
7. Enter \`Flashduty\` for \`API key name\`, and enter the \`integration_key\` from the integration push URL for \`Value\`
|
|
3232
3241
|
8. Click \`Create\` to save
|
|
3233
3242
|
|
|
3234
3243
|
<img alt="drawing" width="600" src="https://download.flashcat.cloud/flashduty/doc/aws-eb-4.png" />
|
|
@@ -3239,10 +3248,10 @@ Choose this option when you need to route alerts to different channels based on
|
|
|
3239
3248
|
|
|
3240
3249
|
<img alt="drawing" width="600" src="https://download.flashcat.cloud/flashduty/doc/aws-eb-5.png" />
|
|
3241
3250
|
|
|
3242
|
-
2. Fill in the information in the \`API destination detail\` editing interface, enter \`
|
|
3251
|
+
2. Fill in the information in the \`API destination detail\` editing interface, enter \`Flashduty\` for \`Name\`
|
|
3243
3252
|
3. Enter the integration push URL for \`API destination endpoint\`
|
|
3244
3253
|
4. Select \`POST\` for \`HTTP method\`
|
|
3245
|
-
5. Select \`Use an existing connection\` for \`Connection type\` and choose the \`
|
|
3254
|
+
5. Select \`Use an existing connection\` for \`Connection type\` and choose the \`Flashduty\` Connection added in Step 1
|
|
3246
3255
|
6. Click \`Create\` to save
|
|
3247
3256
|
|
|
3248
3257
|
<img alt="drawing" width="600" src="https://download.flashcat.cloud/flashduty/doc/aws-eb-6.png" />
|
|
@@ -3252,7 +3261,7 @@ Choose this option when you need to route alerts to different channels based on
|
|
|
3252
3261
|
2. Select \`Buses=>Rules\` from the left navigation bar, create or edit existing rules
|
|
3253
3262
|
3. Other configurations are omitted here
|
|
3254
3263
|
4. For \`Target types\`, select \`EventBridge API destination\` as the target type
|
|
3255
|
-
5. Under \`API destination\`, select \`Use an existing API destination\` and choose the \`
|
|
3264
|
+
5. Under \`API destination\`, select \`Use an existing API destination\` and choose the \`Flashduty\` API destination created in Step 2 from the dropdown
|
|
3256
3265
|
6. Click \`Next\`, configure as needed, and save
|
|
3257
3266
|
|
|
3258
3267
|
<img alt="drawing" width="600" src="https://download.flashcat.cloud/flashduty/doc/aws-eb-7.png" />
|
|
@@ -3261,8 +3270,8 @@ Choose this option when you need to route alerts to different channels based on
|
|
|
3261
3270
|
|
|
3262
3271
|
<div class="md-block">
|
|
3263
3272
|
|
|
3264
|
-
1. Since AWS EventBridge events don't have severity levels, all events pushed to
|
|
3265
|
-
2. AWS EventBridge events only have triggers without recovery states, so events received by
|
|
3273
|
+
1. Since AWS EventBridge events don't have severity levels, all events pushed to Flashduty will have a Warning severity
|
|
3274
|
+
2. AWS EventBridge events only have triggers without recovery states, so events received by Flashduty won't automatically associate with recovery
|
|
3266
3275
|
|
|
3267
3276
|
</div>
|
|
3268
3277
|
|
|
@@ -3335,7 +3344,7 @@ Choose this option when you need to route alerts to different channels based on
|
|
|
3335
3344
|
<img alt="drawing" width="600" src="https://download.flashcat.cloud/flashduty/doc/dyn-3.png" />
|
|
3336
3345
|
|
|
3337
3346
|
5. Under \`Notification type\`, select \`Custom Integration\`
|
|
3338
|
-
6. Fill in \`Display name\` with \`
|
|
3347
|
+
6. Fill in \`Display name\` with \`Flashduty\`
|
|
3339
3348
|
7. In \`Webhook URL\`, enter the integration push URL (generated after saving the integration name on the current page)
|
|
3340
3349
|
8. Keep \`Call webhook if problem is closed\` enabled
|
|
3341
3350
|
|
|
@@ -3426,14 +3435,14 @@ Choose this option when you need to route alerts to different channels based on
|
|
|
3426
3435
|
|
|
3427
3436
|
## I. Huawei Cloud LTS Alert Push Configuration
|
|
3428
3437
|
|
|
3429
|
-
### Step 1: Create
|
|
3438
|
+
### Step 1: Create Flashduty Alert Channel
|
|
3430
3439
|
1. Log in to your Huawei Cloud Console, search for \`SMN\` (Simple Message Notification) service and enter its console
|
|
3431
3440
|
2. Select \`Topic Management=>Topics\` from the left navigation bar
|
|
3432
|
-
3. Click \`Create Topic\`, enter \`
|
|
3441
|
+
3. Click \`Create Topic\`, enter \`Flashduty\` as the topic name in the edit page and confirm
|
|
3433
3442
|
|
|
3434
3443
|
<img src="https://download.flashcat.cloud/flashduty/doc/en/hw/lts-1.png" alt="drawing" width="500"/>
|
|
3435
3444
|
|
|
3436
|
-
4. Return to the topic list and click \`Add Subscription\` in the newly created
|
|
3445
|
+
4. Return to the topic list and click \`Add Subscription\` in the newly created Flashduty topic
|
|
3437
3446
|
|
|
3438
3447
|
<img src="https://download.flashcat.cloud/flashduty/doc/en/hw/lts-2.png" alt="drawing" width="500"/>
|
|
3439
3448
|
|
|
@@ -3452,14 +3461,14 @@ Choose this option when you need to route alerts to different channels based on
|
|
|
3452
3461
|
|
|
3453
3462
|
<img src="https://download.flashcat.cloud/flashduty/doc/en/hw/lts-5.png" alt="drawing" width="500"/>
|
|
3454
3463
|
|
|
3455
|
-
3. In the template edit page, enter **
|
|
3464
|
+
3. In the template edit page, enter **Flashduty** as the name, select \`English\` as the message header language
|
|
3456
3465
|
4. Select \`HTTP/HTTPS\` as notification type and \`JSON\` as data type
|
|
3457
3466
|
5. Click \`Confirm\` to save
|
|
3458
3467
|
|
|
3459
3468
|
<img src="https://download.flashcat.cloud/flashduty/doc/en/hw/lts-6.png" alt="drawing" width="500"/>
|
|
3460
3469
|
|
|
3461
3470
|
6. Return to the \`Alert Action Rules\` list and click \`Create\`
|
|
3462
|
-
7. Enter **
|
|
3471
|
+
7. Enter **Flashduty** as the rule name, select the previously created **Flashduty** topic and template
|
|
3463
3472
|
|
|
3464
3473
|
<img src="https://download.flashcat.cloud/flashduty/doc/en/hw/lts-7.png" alt="drawing" width="500"/>
|
|
3465
3474
|
|
|
@@ -3469,7 +3478,7 @@ Choose this option when you need to route alerts to different channels based on
|
|
|
3469
3478
|
2. Create or edit existing alert rules
|
|
3470
3479
|
3. Other configurations are omitted here
|
|
3471
3480
|
4. In \`Advanced Settings\`, check both \`Alert Trigger\` and \`Alert Recovery\` in notification scenarios
|
|
3472
|
-
5. Enable action rules and select the **
|
|
3481
|
+
5. Enable action rules and select the **Flashduty** rule created in \`Step 2\`
|
|
3473
3482
|
6. Select \`English\` as language, click \`Confirm\` to save after configuration is complete
|
|
3474
3483
|
|
|
3475
3484
|
<img src="https://download.flashcat.cloud/flashduty/doc/en/hw/lts-8.png" alt="drawing" width="500"/>
|
|
@@ -3547,18 +3556,18 @@ Choose this option when you need to route alerts to different channels based on
|
|
|
3547
3556
|
|
|
3548
3557
|
3. Find \`Webhooks\` on the Notification channels page and click \`ADD NEW\`
|
|
3549
3558
|
4. Enter the integration push URL in the \`Endpoint URL\` field (the URL will be generated after saving the integration name on the current page)
|
|
3550
|
-
5. Enter **
|
|
3559
|
+
5. Enter **Flashduty** in the \`Display Name\` field
|
|
3551
3560
|
6. Click \`TEST CONNECTION\` and then \`SAVE\` to complete
|
|
3552
3561
|
|
|
3553
3562
|
<img alt="drawing" width="600" src="https://download.flashcat.cloud/flashduty/doc/google-cm-2.png" />
|
|
3554
3563
|
|
|
3555
|
-
### Step 2: Use
|
|
3564
|
+
### Step 2: Use Flashduty Alert Channel in Alert Policy
|
|
3556
3565
|
|
|
3557
3566
|
1. Return to the \`Alerting\` page
|
|
3558
3567
|
2. Create or edit an existing policy
|
|
3559
3568
|
3. Skip other policy configurations (configure alert conditions according to business requirements)
|
|
3560
3569
|
4. On the \`Notifications and name\` page, keep \`Use notification channel\` enabled
|
|
3561
|
-
5. Select the **
|
|
3570
|
+
5. Select the **Flashduty** channel created in **Step 1** from the \`Notification channels\` dropdown, and check \`Notify on incident closure\`
|
|
3562
3571
|
6. Complete other configurations and save the policy
|
|
3563
3572
|
|
|
3564
3573
|
<img alt="drawing" width="600" src="https://download.flashcat.cloud/flashduty/doc/google-cm-3.png" />
|
|
@@ -3778,14 +3787,14 @@ Choose this method when you need to route alerts to different channels based on
|
|
|
3778
3787
|
|
|
3779
3788
|
## I. AppDynamics Alert Push Configuration
|
|
3780
3789
|
|
|
3781
|
-
### Step 1: Configure
|
|
3790
|
+
### Step 1: Configure Flashduty Alert Channel
|
|
3782
3791
|
|
|
3783
3792
|
1. Log in to your AppDynamics console
|
|
3784
3793
|
2. Find \`Alert Respond\`, select \`HTTP Request Templates\`, and click \`New\` to create an alert channel
|
|
3785
3794
|
|
|
3786
3795
|
<img alt="drawing" width="600" src="https://download.flashcat.cloud/flashduty/doc/appdyn-1.png" />
|
|
3787
3796
|
|
|
3788
|
-
3. In the template configuration, enter **
|
|
3797
|
+
3. In the template configuration, enter **Flashduty** as the \`Name\`
|
|
3789
3798
|
4. In the \`Request URL\` section, select **POST** as the \`Method\`, and enter the integration push URL in \`Raw URL\` (enter the integration name on this page, and the URL will be generated after saving)
|
|
3790
3799
|
|
|
3791
3800
|
<img alt="drawing" width="600" src="https://download.flashcat.cloud/flashduty/doc/appdyn-2.png" />
|
|
@@ -3858,7 +3867,7 @@ If you need to configure \`Custom Templating Variables\`, you can refer to the f
|
|
|
3858
3867
|
|
|
3859
3868
|
<img alt="drawing" width="600" src="https://download.flashcat.cloud/flashduty/doc/appdyn-6.png" />
|
|
3860
3869
|
|
|
3861
|
-
3. In the \`Create HTTP Action\` popup, enter a Name, select **
|
|
3870
|
+
3. In the \`Create HTTP Action\` popup, enter a Name, select **Flashduty** created in \`Step 1\` as the \`HTTP Request Template\`, and click \`SAVE\`
|
|
3862
3871
|
|
|
3863
3872
|
<img alt="drawing" width="600" src="https://download.flashcat.cloud/flashduty/doc/appdyn-7.png" />
|
|
3864
3873
|
|
|
@@ -3938,11 +3947,11 @@ Choose this option when you need to route alerts to different channels based on
|
|
|
3938
3947
|
|
|
3939
3948
|
## I. SolarWinds Alert Push Configuration
|
|
3940
3949
|
|
|
3941
|
-
### Step 1: Configure
|
|
3950
|
+
### Step 1: Configure Flashduty Alert Channel
|
|
3942
3951
|
|
|
3943
3952
|
**Prerequisites**
|
|
3944
3953
|
1. SolarWinds has five types of alerts (Anomaly, Entity, Event, Log, Metric Group), each requiring a different alert channel, so five alert channels need to be created
|
|
3945
|
-
2. When creating Webhook channels, it's recommended to name them using the format:
|
|
3954
|
+
2. When creating Webhook channels, it's recommended to name them using the format: Type_Flashduty, for example: Anomaly_Flashduty
|
|
3946
3955
|
3. When selecting **Select Custom Body Template Based On The Alert Types**, the system will generate a default **HTTP POST Body**. **Please do not modify the generated template content**
|
|
3947
3956
|
|
|
3948
3957
|
**Getting Started**
|
|
@@ -3952,7 +3961,7 @@ Choose this option when you need to route alerts to different channels based on
|
|
|
3952
3961
|
<img alt="drawing" width="600" src="https://download.flashcat.cloud/flashduty/doc/sw-1.png" />
|
|
3953
3962
|
|
|
3954
3963
|
3. Click \`CREATE CONFIGURATION\` to create the corresponding alert channel
|
|
3955
|
-
4. Select **POST** for \`Method\`, name it according to the prerequisites, e.g.,
|
|
3964
|
+
4. Select **POST** for \`Method\`, name it according to the prerequisites, e.g., Anomaly_Flashduty
|
|
3956
3965
|
5. Fill in the integration push URL in \`Destination URL\` (enter the integration name on the current page, save to generate the URL)
|
|
3957
3966
|
6. Select **application/json** for \`Content Type\`
|
|
3958
3967
|
7. Choose the type you need to create in \`Select Custom Body Template Based On The Alert Types\`, e.g., Anomaly Based Alert
|
|
@@ -3968,7 +3977,7 @@ Choose this option when you need to route alerts to different channels based on
|
|
|
3968
3977
|
1. Find \`Alerts\` in the left navigation bar, select \`Alert Settings\`
|
|
3969
3978
|
2. Create or edit existing policies (configure alert rules as needed, alert rule configuration is omitted here)
|
|
3970
3979
|
3. In the \`Actions\` section of the policy configuration page, select **Webhook** for \`Services\`
|
|
3971
|
-
4. Select the
|
|
3980
|
+
4. Select the Anomaly_Flashduty channel created in Step 1 for \`Configuration\`
|
|
3972
3981
|
5. Keep \`Send an additional notification when the Alert is cleared\` enabled
|
|
3973
3982
|
|
|
3974
3983
|
<img alt="drawing" width="600" src="https://download.flashcat.cloud/flashduty/doc/sw-4.png" />
|
|
@@ -4041,14 +4050,14 @@ Choose this method when you need to route alerts to different channels based on
|
|
|
4041
4050
|
|
|
4042
4051
|
## I. Volcengine Cloud Monitor Alert Push Configuration
|
|
4043
4052
|
|
|
4044
|
-
### Step 1: Create
|
|
4053
|
+
### Step 1: Create Flashduty Alert Channel
|
|
4045
4054
|
1. Log in to your Volcengine console, search for \`Cloud Monitor\` product, and enter the corresponding product console
|
|
4046
4055
|
2. Select \`Notification Groups=>Callback\` from the left navigation bar
|
|
4047
4056
|
3. Click \`Create Callback URL\`
|
|
4048
4057
|
|
|
4049
4058
|
<img src="https://download.flashcat.cloud/flashduty/doc/en/volcengine/event-1.png" alt="drawing" width="500"/>
|
|
4050
4059
|
|
|
4051
|
-
4. Fill in the information on the edit page, enter \`
|
|
4060
|
+
4. Fill in the information on the edit page, enter \`Flashduty_Metric\` as the callback URL name
|
|
4052
4061
|
5. Select \`General Callback URL\` as the callback URL type
|
|
4053
4062
|
6. Enter the **integration push URL** (enter the integration name on the current page, save to generate the URL)
|
|
4054
4063
|
7. Click \`Confirm\` to complete the creation (connectivity testing is not supported; even if the test shows connectivity failure, it won't affect alert reception)
|
|
@@ -4061,7 +4070,7 @@ Choose this method when you need to route alerts to different channels based on
|
|
|
4061
4070
|
2. Create or edit existing alert policies (configure policies as needed, skipped here)
|
|
4062
4071
|
3. On the policy edit page, select \`Rules and Resources\` for \`Send Aggregation Policy\`
|
|
4063
4072
|
4. Keep \`Alert Recovery Notification\` enabled
|
|
4064
|
-
5. Check \`Alert Callback\` in \`Alert Channels\`, and select the \`
|
|
4073
|
+
5. Check \`Alert Callback\` in \`Alert Channels\`, and select the \`Flashduty_Metric\` channel created in **Step 1** from the dropdown menu
|
|
4065
4074
|
6. After completing other configurations, click \`Confirm\` to finish
|
|
4066
4075
|
|
|
4067
4076
|
<img src="https://download.flashcat.cloud/flashduty/doc/en/volcengine/event-3.png" alt="drawing" width="500"/>
|
|
@@ -4130,14 +4139,14 @@ Choose this method when you need to route alerts to different channels based on
|
|
|
4130
4139
|
|
|
4131
4140
|
## I. Volcengine Cloud Monitor Event Center Alert Push Configuration
|
|
4132
4141
|
|
|
4133
|
-
### Step 1: Create
|
|
4142
|
+
### Step 1: Create Flashduty Alert Channel
|
|
4134
4143
|
1. Log in to your Volcengine console, search for \`Cloud Monitor\` product, and enter the corresponding product console
|
|
4135
4144
|
2. Select \`Notification Groups=>Callback\` from the left navigation bar
|
|
4136
4145
|
3. Click \`Create Callback URL\`
|
|
4137
4146
|
|
|
4138
4147
|
<img src="https://download.flashcat.cloud/flashduty/doc/en/volcengine/event-1.png" alt="drawing" width="500"/>
|
|
4139
4148
|
|
|
4140
|
-
4. Fill in the information on the edit page, enter \`
|
|
4149
|
+
4. Fill in the information on the edit page, enter \`Flashduty_Event\` as the callback URL name
|
|
4141
4150
|
5. Select \`General Callback URL\` as the callback URL type
|
|
4142
4151
|
6. Enter the **integration push URL** (enter the integration name on the current page, save to generate the URL)
|
|
4143
4152
|
7. Click \`Confirm\` to complete the creation (connectivity testing is not supported; even if the test shows connectivity failure, it won't affect alert reception)
|
|
@@ -4148,7 +4157,7 @@ Choose this method when you need to route alerts to different channels based on
|
|
|
4148
4157
|
|
|
4149
4158
|
1. Select \`Event Center=>Event Rules\` from the left navigation bar
|
|
4150
4159
|
2. Create or edit existing event rules (configure rules as needed, skipped here)
|
|
4151
|
-
3. On the rule editing page, check \`Alert Callback\` under delivery channels, and select the \`
|
|
4160
|
+
3. On the rule editing page, check \`Alert Callback\` under delivery channels, and select the \`Flashduty_Event\` channel created in **Step 1** from the alert callback dropdown
|
|
4152
4161
|
4. After completing other configurations, click \`Confirm\` to finish
|
|
4153
4162
|
|
|
4154
4163
|
<img src="https://download.flashcat.cloud/flashduty/doc/en/volcengine/metric-3.png" alt="drawing" width="500"/>
|
|
@@ -4217,14 +4226,14 @@ Choose this method when you need to route alerts to different channels based on
|
|
|
4217
4226
|
|
|
4218
4227
|
## I. Volcengine Log Service (TLS) Alert Push Configuration
|
|
4219
4228
|
|
|
4220
|
-
### Step 1: Create
|
|
4229
|
+
### Step 1: Create Flashduty Alert Channel
|
|
4221
4230
|
1. Log in to your Volcengine console, search for \`TLS\` Log Service product, and enter the corresponding product console
|
|
4222
4231
|
2. Select \`Alert=>Notification Management\` from the left navigation bar
|
|
4223
4232
|
3. Choose \`Webhook Alert Integration\` and click \`Create Webhook Alert Integration\`
|
|
4224
4233
|
|
|
4225
4234
|
<img src="https://download.flashcat.cloud/flashduty/doc/en/volcengine/tls-1.png" alt="drawing" width="500"/>
|
|
4226
4235
|
|
|
4227
|
-
4. Fill in the information in the pop-up editor, enter \`
|
|
4236
|
+
4. Fill in the information in the pop-up editor, enter \`Flashduty\` as the name
|
|
4228
4237
|
5. Select \`Custom Webhook\` as type and \`POST\` as request method
|
|
4229
4238
|
6. Enter the **Integration Push URL** as the request URL (generated after saving the integration name on the current page)
|
|
4230
4239
|
7. Keep the request headers as default and click \`Create\`
|
|
@@ -4235,7 +4244,7 @@ Choose this method when you need to route alerts to different channels based on
|
|
|
4235
4244
|
|
|
4236
4245
|
1. Return to the \`Notification Management\` page
|
|
4237
4246
|
2. Select \`Content Templates\` and click \`Create Content Template\`
|
|
4238
|
-
3. Fill in the relevant information, enter \`
|
|
4247
|
+
3. Fill in the relevant information, enter \`Flashduty\` as the template name
|
|
4239
4248
|
4. Other channel content can be empty. In the \`Custom Webhook\` notification content, enter the following template:
|
|
4240
4249
|
|
|
4241
4250
|
\`\`\`
|
|
@@ -4268,11 +4277,11 @@ Choose this method when you need to route alerts to different channels based on
|
|
|
4268
4277
|
|
|
4269
4278
|
1. Return to the \`Notification Management\` page
|
|
4270
4279
|
2. Select \`Notification Groups\` and click \`Create Notification Group\`
|
|
4271
|
-
3. Fill in the relevant information, enter \`
|
|
4280
|
+
3. Fill in the relevant information, enter \`Flashduty\` as the group name
|
|
4272
4281
|
4. Configure notification rules and other settings as needed (skipped here)
|
|
4273
4282
|
5. In notification channel configuration, keep \`Custom Webhook\` checked
|
|
4274
|
-
6. Select the **
|
|
4275
|
-
7. Select the **
|
|
4283
|
+
6. Select the **Flashduty** channel created in **Step 1** for \`Webhook\`
|
|
4284
|
+
7. Select the **Flashduty** template created in **Step 2** for \`Content Template\`
|
|
4276
4285
|
8. Click \`Save\` after completing other configurations
|
|
4277
4286
|
|
|
4278
4287
|
<img src="https://download.flashcat.cloud/flashduty/doc/en/volcengine/tls-4.png" alt="drawing" width="500"/>
|
|
@@ -4283,7 +4292,7 @@ Choose this method when you need to route alerts to different channels based on
|
|
|
4283
4292
|
2. Create a new or edit an existing alert policy
|
|
4284
4293
|
3. Configure alert rules as needed (skipped here)
|
|
4285
4294
|
4. Click \`Associate Notification Group\` in the \`Notification Group\` section
|
|
4286
|
-
5. In the pop-up selection box, choose the **
|
|
4295
|
+
5. In the pop-up selection box, choose the **Flashduty** notification group created in **Step 3**, then click \`Associate\`
|
|
4287
4296
|
6. Click \`Create/Save\` after configuring other settings
|
|
4288
4297
|
|
|
4289
4298
|
<img src="https://download.flashcat.cloud/flashduty/doc/en/volcengine/tls-5.png" alt="drawing" width="500"/>
|
|
@@ -4419,7 +4428,7 @@ Choose this method when you need to route alerts to different channels based on
|
|
|
4419
4428
|
|
|
4420
4429
|
10. Select the devices you want to apply this configuration to, move them to the selected devices window using the right arrow, then click next
|
|
4421
4430
|
11. Configure Time Window/Delayed Trigger/Recurring Trigger as needed, then click next
|
|
4422
|
-
12. Add the name \`
|
|
4431
|
+
12. Add the name \`Flashduty\` for this configuration profile, then click \`Save\` to complete the setup
|
|
4423
4432
|
|
|
4424
4433
|
</dev>
|
|
4425
4434
|
|
|
@@ -4491,7 +4500,7 @@ Choose this option when you need to route alerts to different channels based on
|
|
|
4491
4500
|
1. Log in to your \`Meraki\` console and select the device you want to configure alerts for
|
|
4492
4501
|
2. On the \`Alerts\` page, configure \`Cellular gateway\` and other sections as needed
|
|
4493
4502
|
3. Under \`Webhooks\`, configure \`HTTPS receivers\`
|
|
4494
|
-
4. Enter \`
|
|
4503
|
+
4. Enter \`Flashduty\` for \`Name\`, and enter the **integration push URL** for \`URL\`
|
|
4495
4504
|
5. Leave \`Shared secret\` empty, and keep \`Payload template\` as the default \`Meraki(included)\`
|
|
4496
4505
|
6. Click \`Save\` to save the settings
|
|
4497
4506
|
|
|
@@ -4659,7 +4668,7 @@ Choose this option when you need to route alerts to different channels based on
|
|
|
4659
4668
|
|
|
4660
4669
|
1. Log in to your \`Guance\` console, select \`Alert Strategies\` under \`Monitoring\`
|
|
4661
4670
|
2. Create new or modify existing alert policies on the \`Alert Strategies\` page
|
|
4662
|
-
3. In the notification configuration section of the alert strategies editing page, select \`severity\` and choose \`
|
|
4671
|
+
3. In the notification configuration section of the alert strategies editing page, select \`severity\` and choose \`Flashduty\` created in Step 1 as the \`Notification Tragets\`
|
|
4663
4672
|
4. Configure other options as needed and click \`Save\` to complete
|
|
4664
4673
|
|
|
4665
4674
|
<img alt="drawing" width="600" src="https://download.flashcat.cloud/flashduty/doc/en/fd/guance-2.png" />
|
|
@@ -5245,13 +5254,13 @@ This document supports both [integrating third-party applications](#third-party)
|
|
|
5245
5254
|
|
|
5246
5255
|
6. On the application details page, obtain the \`Secret\` and fill it in the Flashduty integration configuration page.
|
|
5247
5256
|
|
|
5248
|
-
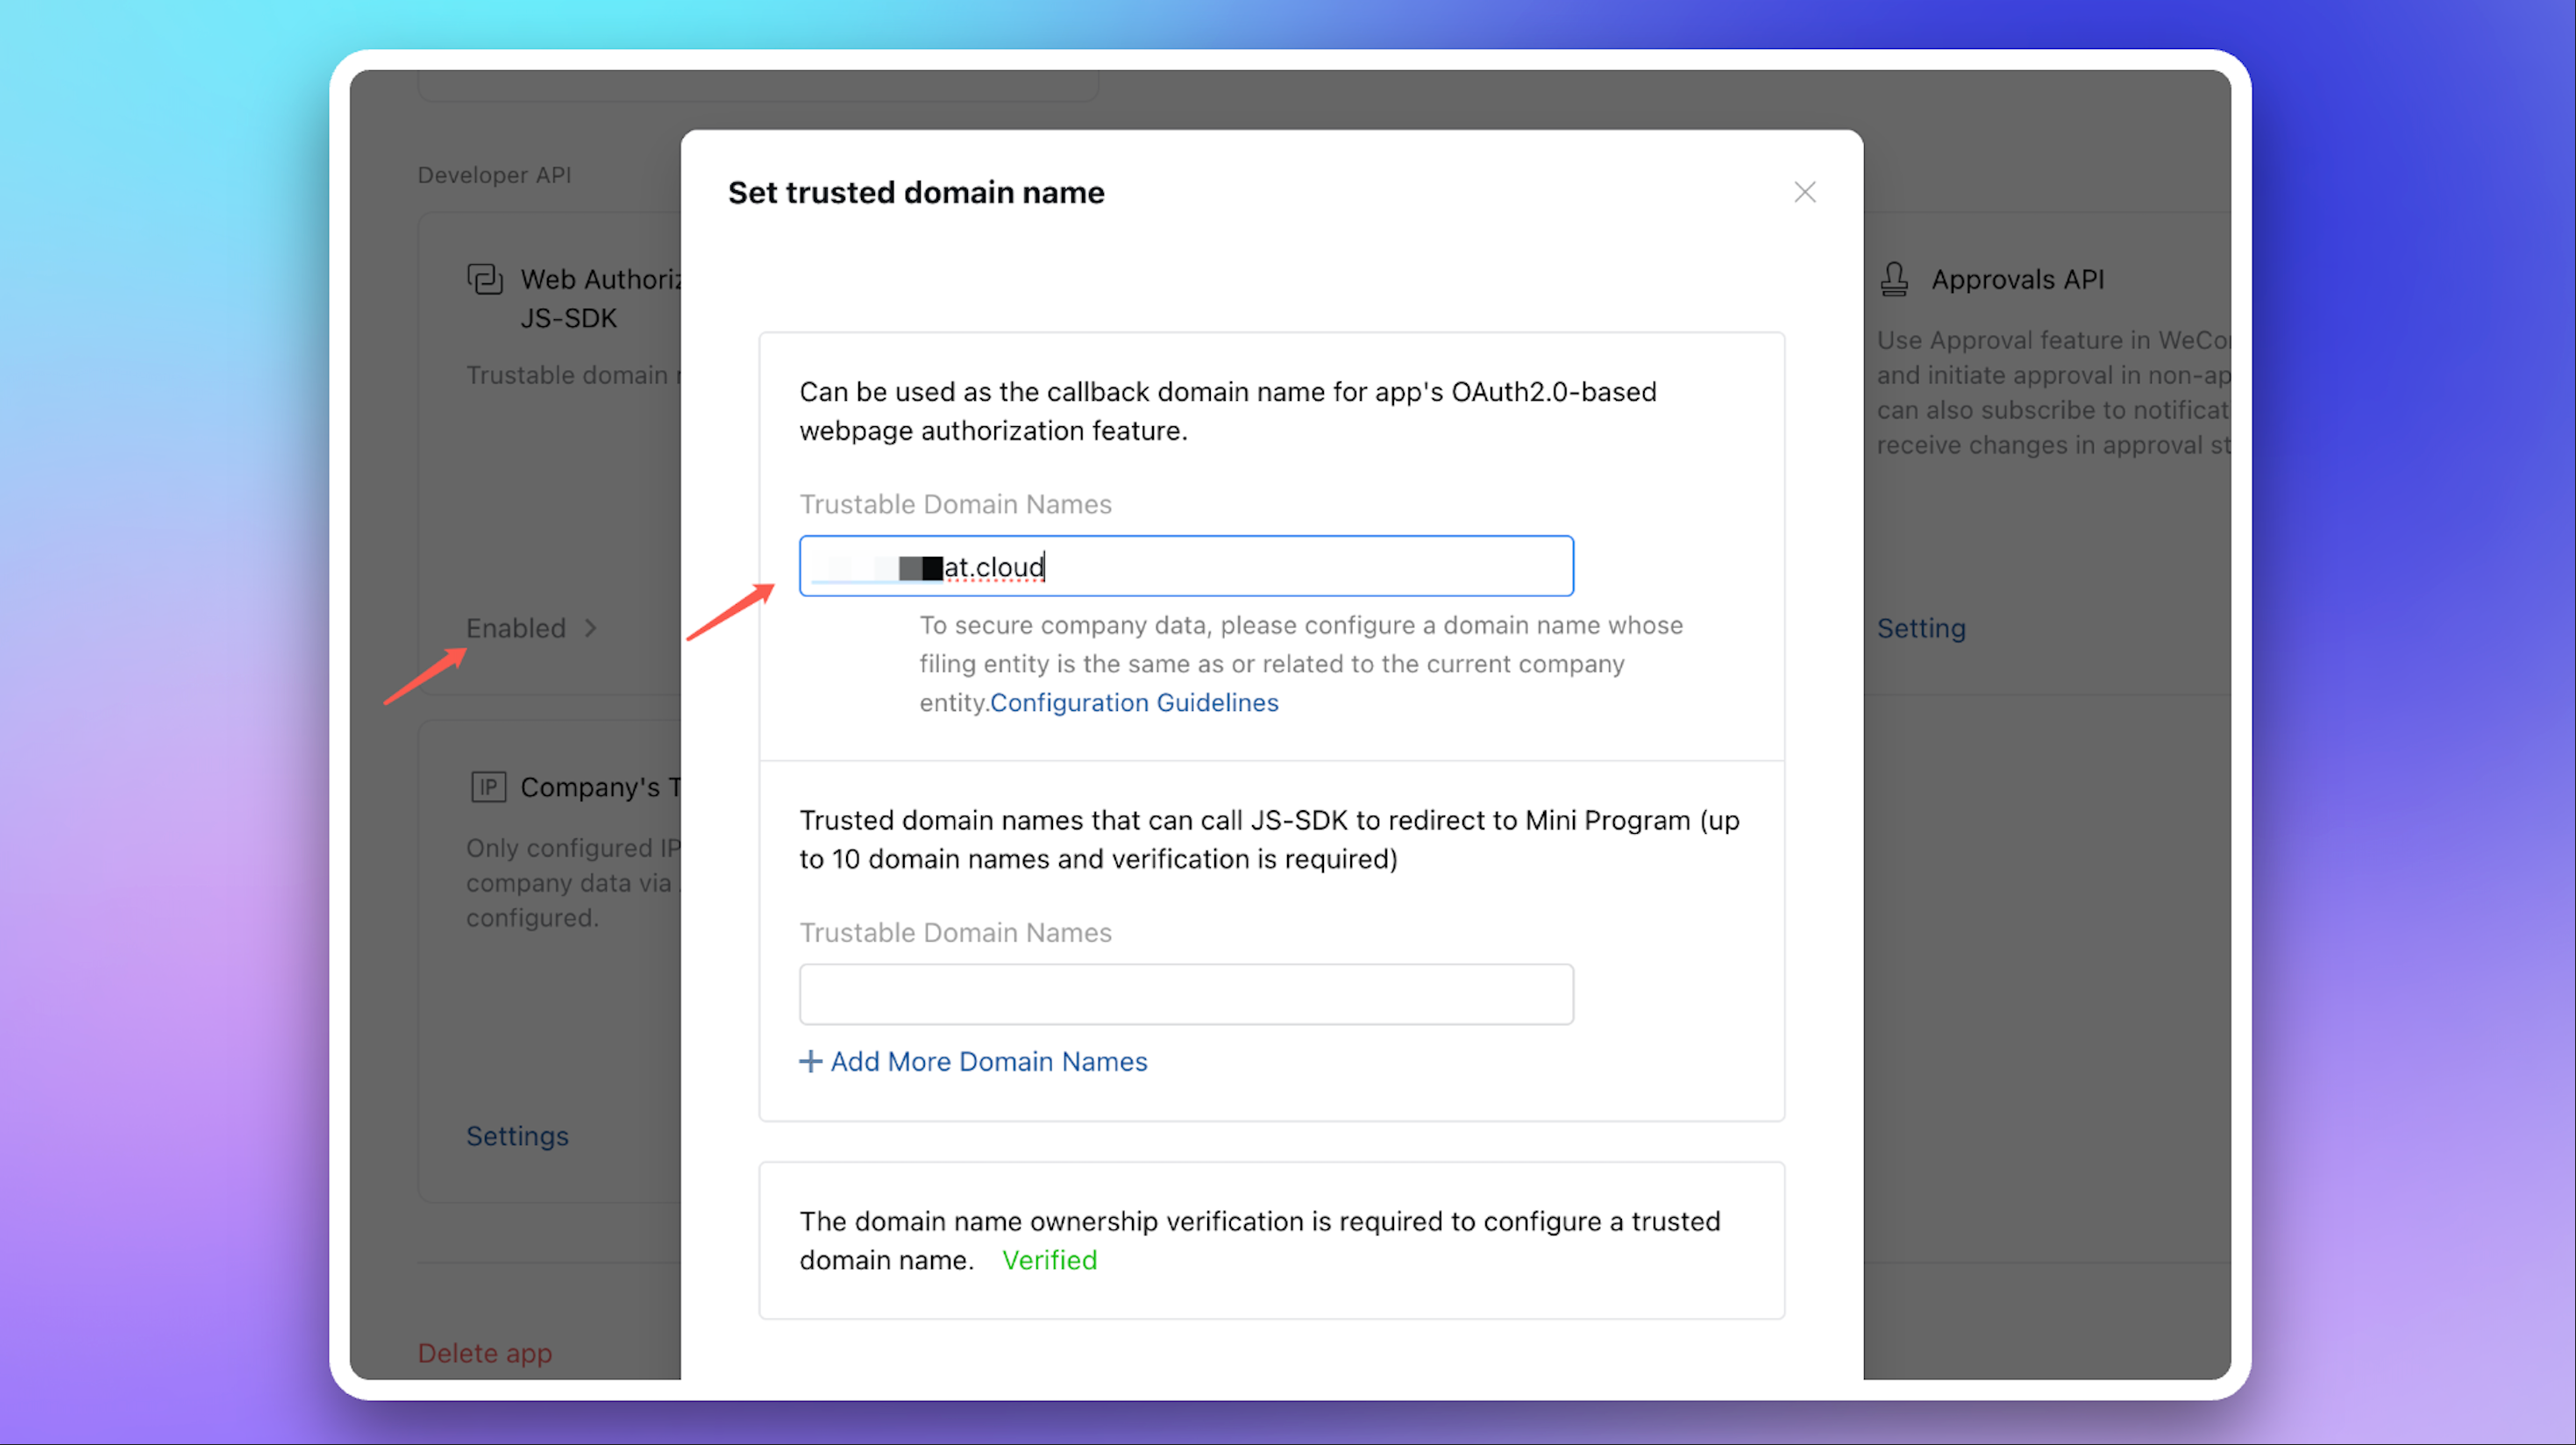
7. On the application details page, go to **Web Authorization and JS-SDK** page, click **Set Trusted Domain
|
|
5257
|
+
7. On the application details page, go to **Web Authorization and JS-SDK** page, click **Set Trusted Domain**.
|
|
5249
5258
|
|
|
5250
5259
|
> The trusted domain needs to point to Flashduty's backend address \`{api_host}\` (can be achieved through CNAME or proxy forwarding).
|
|
5251
5260
|
>
|
|
5252
5261
|
> For trusted domain requirements, see the official WeCom documentation [《Internal Development Domain Configuration Guide》](https://open.work.weixin.qq.com/wwopen/common/readDocument/40754).
|
|
5253
5262
|
|
|
5254
|
-
|
|
5263
|
+
|
|
5255
5264
|
|
|
5256
5265
|
Return to the Flashduty integration configuration page, fill in this domain, and complete the verification.
|
|
5257
5266
|
|
|
@@ -5265,9 +5274,20 @@ This document supports both [integrating third-party applications](#third-party)
|
|
|
5265
5274
|
|
|
5266
5275
|
|
|
5267
5276
|
|
|
5268
|
-
10. Company's Trusted IP : 47.94.95.118; 123.56.8.183; 47.94.193.81; 1.13.19.96
|
|
5269
5277
|
|
|
5270
|
-
|
|
5278
|
+
10. Configure **Frontend Trusted Domain**
|
|
5279
|
+
|
|
5280
|
+
> The trusted domain needs to point to Flashduty's frontend address \`console.flashcat.cloud\` (can be implemented through CNAME or proxy forwarding).
|
|
5281
|
+
>
|
|
5282
|
+
> For requirements regarding trusted domains, please refer to the WeCom official documentation ['Enterprise Internal Development Domain Configuration Guide'](https://open.work.weixin.qq.com/wwopen/common/readDocument/40754).
|
|
5283
|
+
|
|
5284
|
+
After the frontend trusted domain verification passes, configure the generated **homepage address** to the WeCom application's **workbench application homepage**.
|
|
5285
|
+
|
|
5286
|
+

|
|
5287
|
+
|
|
5288
|
+
11. Configure **Trusted IP Address**: \`47.93.12.134\`
|
|
5289
|
+
|
|
5290
|
+
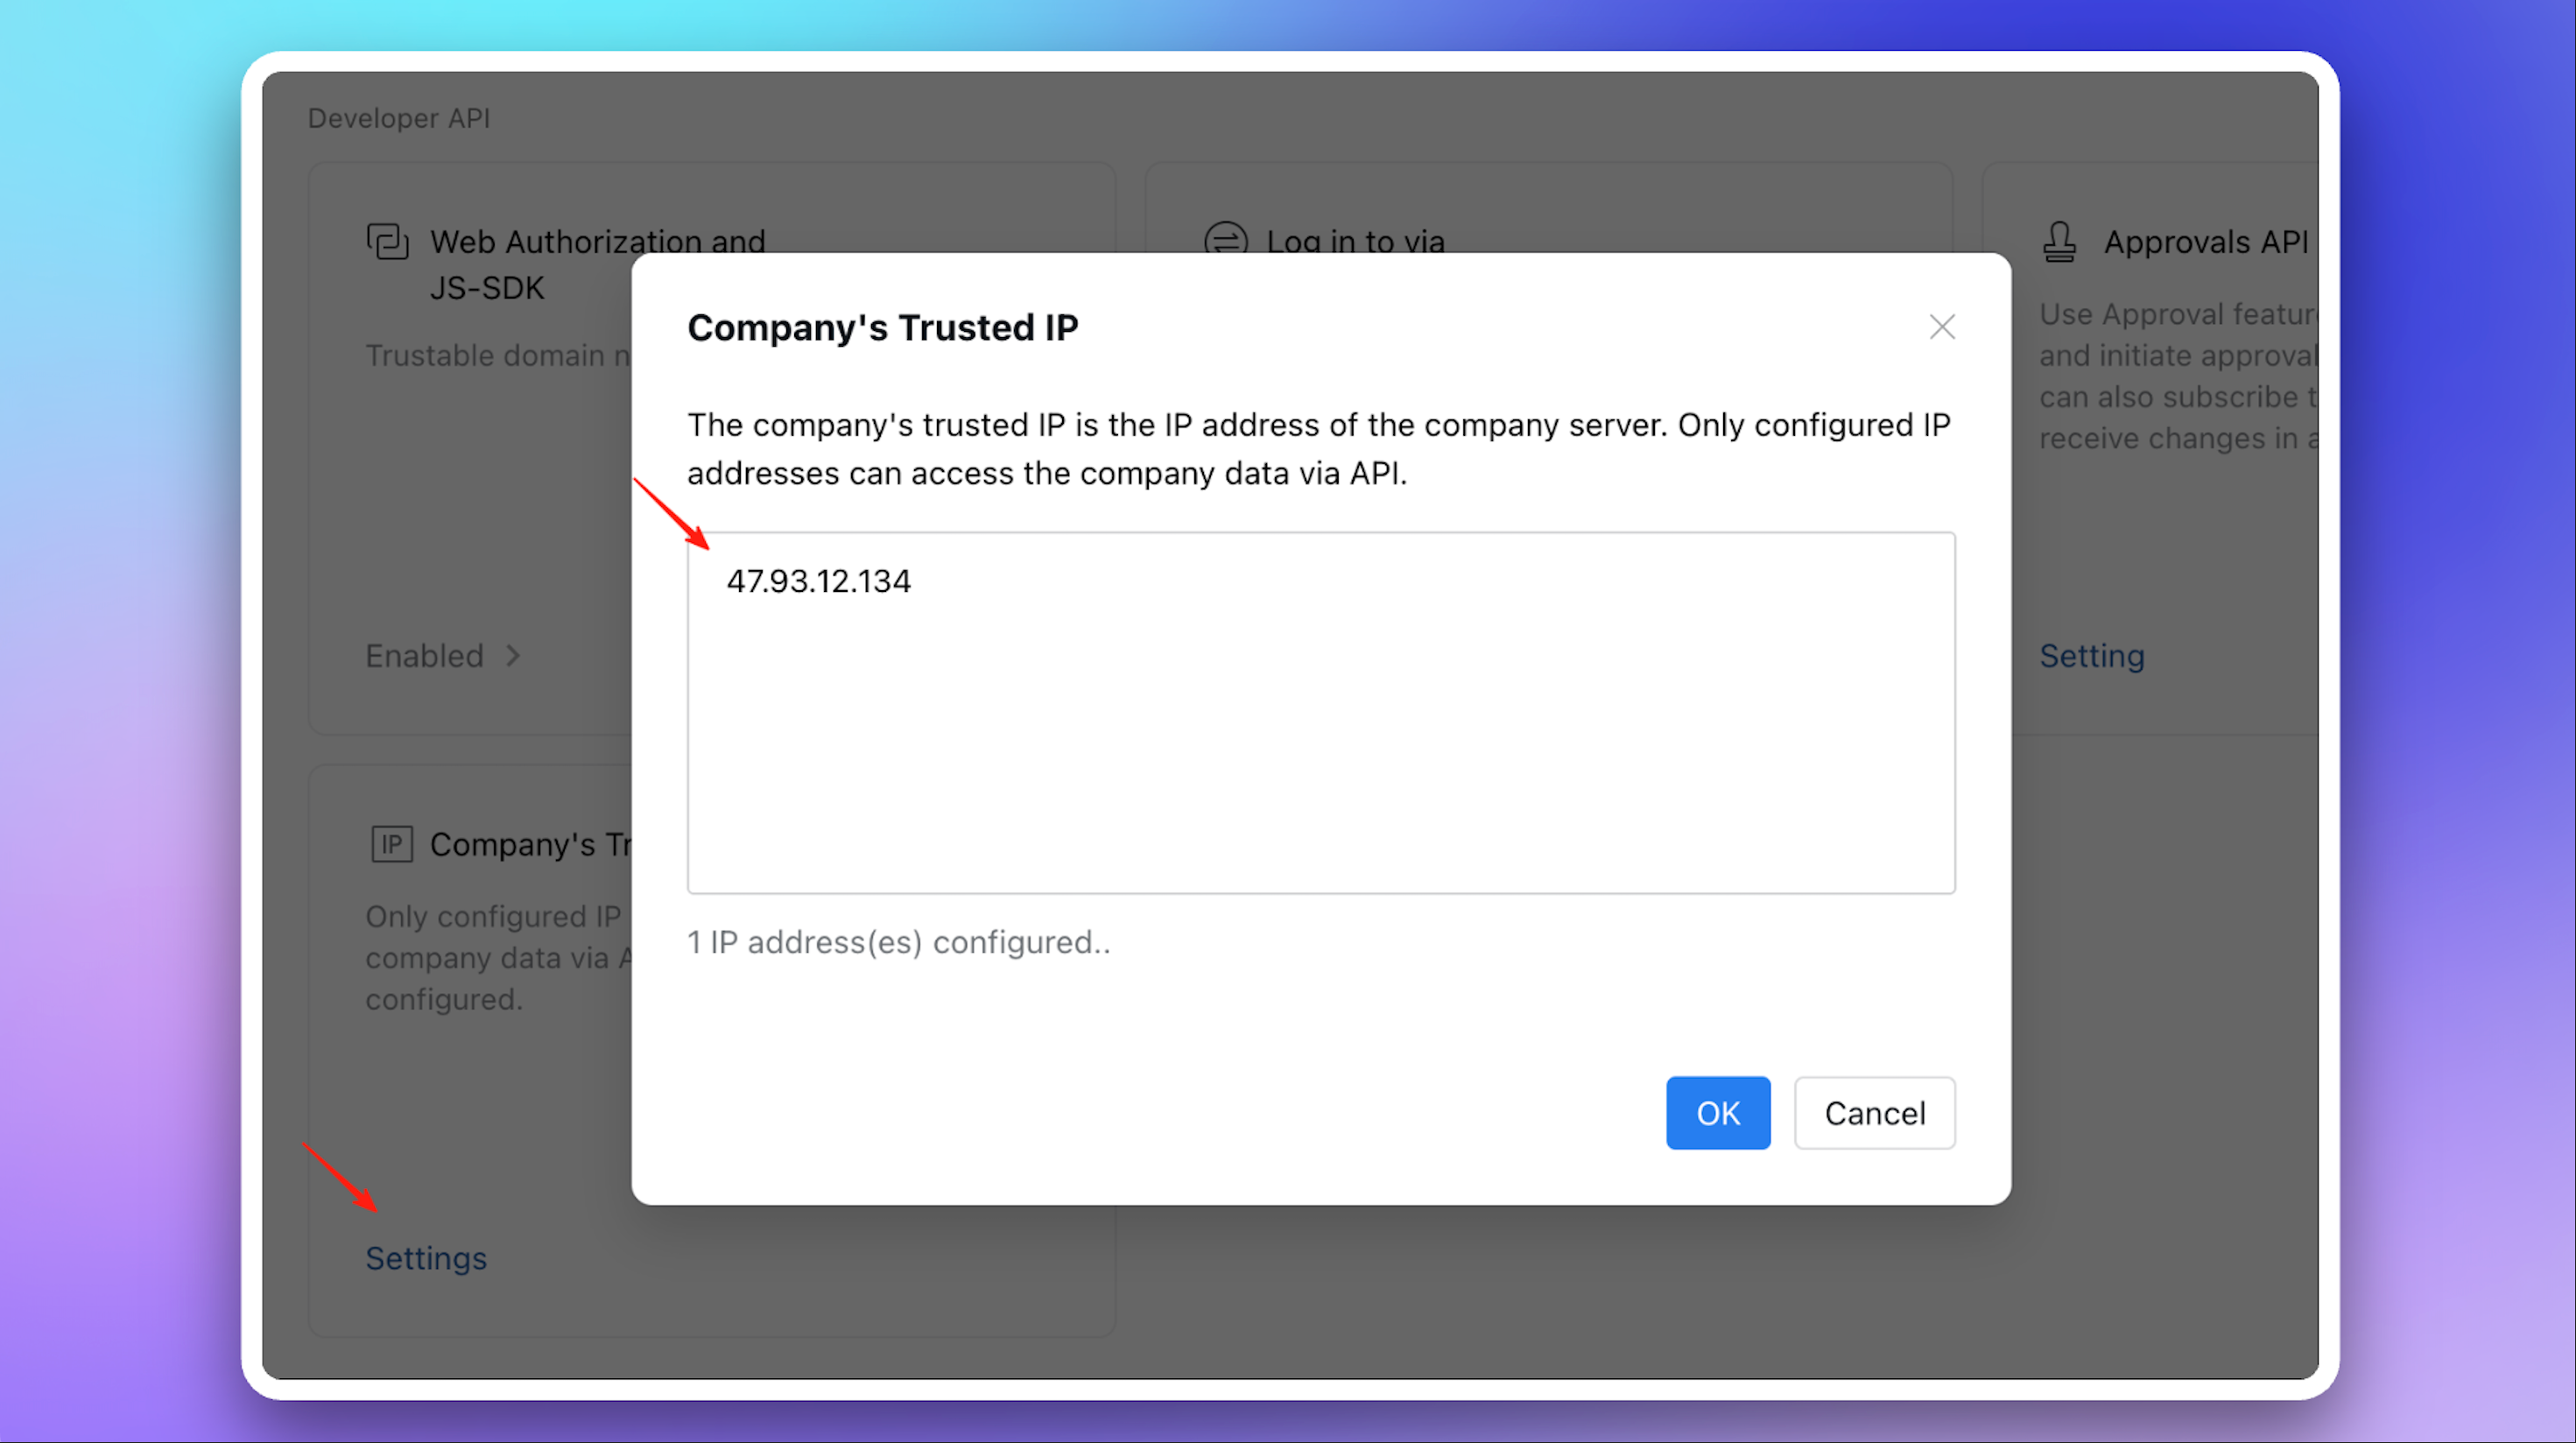
|
|
5271
5291
|
|
|
5272
5292
|
## 3. Configure war room
|
|
5273
5293
|
|
|
@@ -5308,7 +5328,9 @@ After completing the previous steps, in the **Enhanced Features** module of the
|
|
|
5308
5328
|
7. **Incident notification failed with prompt \`WeCom license not activated\`?**
|
|
5309
5329
|
- Please contact Flashduty customer service or your dedicated technical support to purchase and activate the license for you.
|
|
5310
5330
|
8. **Why is the war room feature not working as expected?**
|
|
5311
|
-
- Please refer to the **FAQ** section of the Flashduty [War Room Introduction](https://docs.flashcat.cloud/en/flashduty/war-room?nav=01JCQ7A4N4WRWNXW8EWEHXCMF5)
|
|
5331
|
+
- Please refer to the **FAQ** section of the Flashduty [War Room Introduction](https://docs.flashcat.cloud/en/flashduty/war-room?nav=01JCQ7A4N4WRWNXW8EWEHXCMF5).
|
|
5332
|
+
9. **Why does it prompt "redirect_uri needs to use the application's trusted domain" when opening the app in the WeCom workspace?**
|
|
5333
|
+
- Please confirm whether the domain in the \`redirect_uri\` parameter of the **App Homepage** URL has completed the domain ownership verification required by WeCom. For details, see the WeCom official documentation ['Enterprise Internal Development Domain Configuration Guide'](https://open.work.weixin.qq.com/wwopen/common/readDocument/40754).`,Slack:`---
|
|
5312
5334
|
title: "Slack Integration"
|
|
5313
5335
|
description: "By integrating the Slack third-party application, you can receive and respond to alerts within Slack."
|
|
5314
5336
|
date: "2025-05-19T10:00:00+08:00"
|
|
@@ -5380,10 +5402,10 @@ This step needs to be completed by a Microsoft Teams administrator.
|
|
|
5380
5402
|
:::
|
|
5381
5403
|
|
|
5382
5404
|
### 1. Download application
|
|
5383
|
-
Download [
|
|
5405
|
+
Download [FlashdutyBot-v1.0.3.zip](https://flashduty-docs.oss-cn-beijing.aliyuncs.com/docs/FlashdutyBot-v1.0.3.zip) to your local device.
|
|
5384
5406
|
|
|
5385
5407
|
### 2. Install application
|
|
5386
|
-
In Microsoft Teams, navigate to +Apps → Manage your apps → Upload an app → **Upload an app to your org's app catalog**, then upload the application package \`
|
|
5408
|
+
In Microsoft Teams, navigate to +Apps → Manage your apps → Upload an app → **Upload an app to your org's app catalog**, then upload the application package \`FlashdutyBot.zip\`.
|
|
5387
5409
|
|
|
5388
5410
|
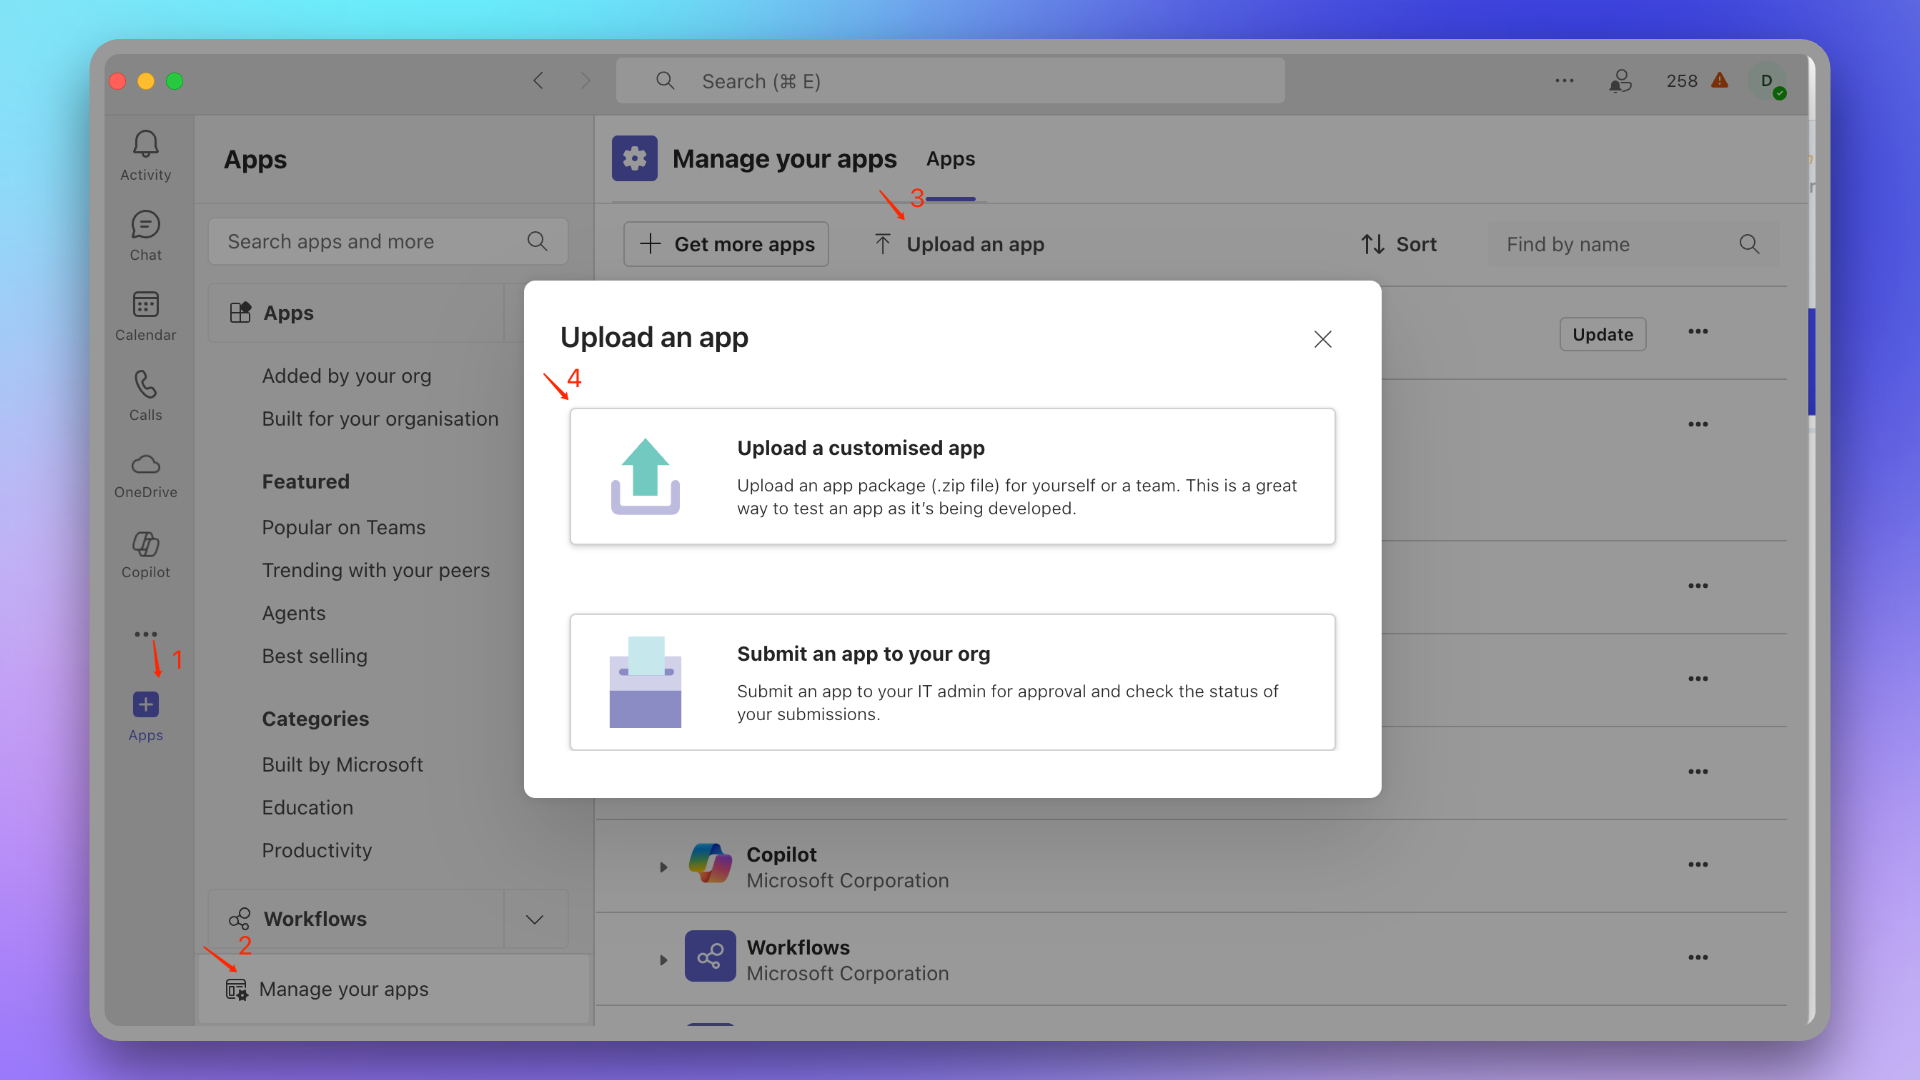
|
|
5389
5411
|
|
|
@@ -5543,13 +5565,11 @@ email | string | Yes | Email address
|
|
|
5543
5565
|
| alert_key | string | Yes | Alert correlation basis |
|
|
5544
5566
|
| alert_severity | string | Yes | Severity level, enum: Critical, Warning, Info |
|
|
5545
5567
|
| alert_status | string | Yes | Alert status, enum: Critical, Warning, Info, Ok |
|
|
5546
|
-
| progress | string | Yes | Processing progress, enum: Triggered, Closed |
|
|
5547
5568
|
| created_at | int64 | Yes | Creation time |
|
|
5548
5569
|
| updated_at | int64 | Yes | Update time |
|
|
5549
5570
|
| start_time | int64 | Yes | First trigger time (time of first event received by platform), Unix timestamp in seconds |
|
|
5550
5571
|
| last_time | int64 | Yes | Latest event time (time of most recent event received by platform), Unix timestamp in seconds |
|
|
5551
5572
|
| end_time | int64 | No | Alert recovery time (time when platform last received end-type event), Unix timestamp in seconds, defaults to 0 |
|
|
5552
|
-
| close_time | int64 | No | Closure time, different from end_time, this indicates progress closure, not actual alert recovery. Unix timestamp in seconds, defaults to 0 |
|
|
5553
5573
|
| labels | map[string]string | No | Label key-value pairs, both Key and Value are strings |
|
|
5554
5574
|
| event_cnt | int64 | No | Number of associated events |
|
|
5555
5575
|
| incident | [Incident](#Incident) | No | Associated incident |
|
|
@@ -5582,13 +5602,12 @@ curl -X POST 'https://example.com/alert/webhook?a=a' \\
|
|
|
5582
5602
|
"alert_status":"Warning",
|
|
5583
5603
|
"channel_id":1163577812973,
|
|
5584
5604
|
"channel_name":"Order System",
|
|
5585
|
-
"close_time":0,
|
|
5586
5605
|
"created_at":1683766015,
|
|
5587
5606
|
"data_source_id":1571358104973,
|
|
5588
5607
|
"data_source_name":"Aliyun SLS",
|
|
5589
5608
|
"data_source_ref_id":"",
|
|
5590
5609
|
"data_source_type":"aliyun-sls.alert",
|
|
5591
|
-
"description":"Test alert trigger to
|
|
5610
|
+
"description":"Test alert trigger to Flashduty",
|
|
5592
5611
|
"end_time":0,
|
|
5593
5612
|
"event_cnt":1,
|
|
5594
5613
|
"incident":{
|
|
@@ -5600,7 +5619,7 @@ curl -X POST 'https://example.com/alert/webhook?a=a' \\
|
|
|
5600
5619
|
"alert_type":"sls_alert",
|
|
5601
5620
|
"alert_url":"https://sls.console.aliyun.com/lognext/project/sls-api-testing/alert/alert-1683548531-071659",
|
|
5602
5621
|
"aliuid":"1082109605037616",
|
|
5603
|
-
"check":"Test send to
|
|
5622
|
+
"check":"Test send to Flashduty",
|
|
5604
5623
|
"fire_results":"{\\"_col0\\":\\"true\\"}",
|
|
5605
5624
|
"fire_results_count":"1",
|
|
5606
5625
|
"project":"sls-api-testing",
|
|
@@ -5610,9 +5629,8 @@ curl -X POST 'https://example.com/alert/webhook?a=a' \\
|
|
|
5610
5629
|
"severity":"6"
|
|
5611
5630
|
},
|
|
5612
5631
|
"last_time":1683809153,
|
|
5613
|
-
"progress":"Triggered",
|
|
5614
5632
|
"start_time":1683766013,
|
|
5615
|
-
"title":"Test alert trigger to
|
|
5633
|
+
"title":"Test alert trigger to Flashduty",
|
|
5616
5634
|
"title_rule":"$resource::$check",
|
|
5617
5635
|
"updated_at":1683809170
|
|
5618
5636
|
},
|
|
@@ -5631,11 +5649,14 @@ curl -X POST 'https://example.com/alert/webhook?a=a' \\
|
|
|
5631
5649
|
|
|
5632
5650
|
1. **Is there a response timeout for the service?**
|
|
5633
5651
|
|
|
5634
|
-
-
|
|
5652
|
+
- Services must respond within 2 second, responses after 2 second are considered failed
|
|
5635
5653
|
|
|
5636
5654
|
2. **Will failed pushes continue to be pushed?**
|
|
5637
5655
|
|
|
5638
|
-
|
|
5656
|
+
For specific network errors, retries will be attempted up to a maximum of 2 times:
|
|
5657
|
+
- context deadline exceeded (excluding cases involving "awaiting headers")
|
|
5658
|
+
- i/o timeout
|
|
5659
|
+
- eof
|
|
5639
5660
|
|
|
5640
5661
|
3. **How is push order guaranteed?**
|
|
5641
5662
|
|
|
@@ -5839,11 +5860,14 @@ curl -X POST 'https://example.com/incident/webhook?a=a' \\
|
|
|
5839
5860
|
|
|
5840
5861
|
1. **Is there a response timeout for the service?**
|
|
5841
5862
|
|
|
5842
|
-
- Services must respond within
|
|
5863
|
+
- Services must respond within 2 second, responses after 2 second are considered failed
|
|
5843
5864
|
|
|
5844
5865
|
2. **Will failed pushes continue to be pushed?**
|
|
5845
5866
|
|
|
5846
|
-
|
|
5867
|
+
For specific network errors, retries will be attempted up to a maximum of 2 times:
|
|
5868
|
+
- context deadline exceeded (excluding cases involving "awaiting headers")
|
|
5869
|
+
- i/o timeout
|
|
5870
|
+
- eof
|
|
5847
5871
|
|
|
5848
5872
|
3. **How is push order guaranteed?**
|
|
5849
5873
|
|
|
@@ -5856,7 +5880,7 @@ curl -X POST 'https://example.com/incident/webhook?a=a' \\
|
|
|
5856
5880
|
|
|
5857
5881
|
## I. Creating Actions
|
|
5858
5882
|
|
|
5859
|
-
1. Log in to the
|
|
5883
|
+
1. Log in to the Flashduty console and navigate to [Integration Center-Webhook]
|
|
5860
5884
|
2. Click to add a Custom Action integration
|
|
5861
5885
|
3. Configure the action name, which will appear as a button in the incident details
|
|
5862
5886
|
4. Configure channels (multiple can be configured, but each channel can have up to three custom actions)
|
|
@@ -5949,13 +5973,11 @@ acknowledged_at | int64| No | Acknowledgment time
|
|
|
5949
5973
|
| alert_key | string | Yes | Alert correlation basis |
|
|
5950
5974
|
| alert_severity | string | Yes | Severity level, enum: Critical, Warning, Info |
|
|
5951
5975
|
| alert_status | string | Yes | Alert status, enum: Critical, Warning, Info, Ok |
|
|
5952
|
-
| progress | string | Yes | Processing progress, enum: Triggered, Closed |
|
|
5953
5976
|
| created_at | int64 | Yes | Creation time |
|
|
5954
5977
|
| updated_at | int64 | Yes | Update time |
|
|
5955
5978
|
| start_time | int64 | Yes | First trigger time (time of first event received by platform), Unix timestamp in seconds |
|
|
5956
5979
|
| last_time | int64 | Yes | Latest event time (time of latest event received by platform), Unix timestamp in seconds |
|
|
5957
5980
|
| end_time | int64 | No | Alert recovery time (time of last end-type event received by platform), Unix timestamp in seconds, default 0 |
|
|
5958
|
-
| close_time | int64 | No | Close time, different from end_time, this is processing progress closure, doesn't mean alert actually recovered. Unix timestamp in seconds, default 0 |
|
|
5959
5981
|
| labels | map[string]string | No | Label KV pairs, both Key and Value are strings |
|
|
5960
5982
|
|
|
5961
5983
|
</div>
|
|
@@ -5986,7 +6008,6 @@ curl -X POST 'https://example.com/incident/action?a=a' \\
|
|
|
5986
6008
|
"alert_key": "asdflasdfl2xzasd112621",
|
|
5987
6009
|
"alert_severity": "Critical",
|
|
5988
6010
|
"alert_status": "Critical",
|
|
5989
|
-
"close_time": 0,
|
|
5990
6011
|
"created_at": 1699869567,
|
|
5991
6012
|
"data_source_id": 2398086111504,
|
|
5992
6013
|
"description": "cpu.idle < 20%",
|
|
@@ -6002,10 +6023,6 @@ curl -X POST 'https://example.com/incident/action?a=a' \\
|
|
|
6002
6023
|
"v": "v"
|
|
6003
6024
|
},
|
|
6004
6025
|
"last_time": 1699869562,
|
|
6005
|
-
"progress": "Triggered",
|
|
6006
|
-
"responder_email": "",
|
|
6007
|
-
"responder_id": 0,
|
|
6008
|
-
"responder_name": "",
|
|
6009
6026
|
"start_time": 1699869562,
|
|
6010
6027
|
"title": "nj / es.nj.01 - 自定义字段测试",
|
|
6011
6028
|
"title_rule": "$cluster::$resource::$check",
|
|
@@ -6091,7 +6108,7 @@ When host memory or CPU is maxed out, trigger host restart scripts for quick rec
|
|
|
6091
6108
|
|
|
6092
6109
|
### Information Enrichment
|
|
6093
6110
|
|
|
6094
|
-
When an incident occurs, callback to your service to retrieve Tracing, Logging, topology, and other information based on alert details. Actively call
|
|
6111
|
+
When an incident occurs, callback to your service to retrieve Tracing, Logging, topology, and other information based on alert details. Actively call Flashduty Open API to update incident information, such as adding labels or setting custom fields to assist troubleshooting.
|
|
6095
6112
|
|
|
6096
6113
|
### Rollback Changes
|
|
6097
6114
|
|
|
@@ -6233,10 +6250,8 @@ Title | string | Yes | Alert title
|
|
|
6233
6250
|
Description | string | Yes | Alert description, can be empty
|
|
6234
6251
|
AlertSeverity | string | Yes | Severity level, enum values: Critical, Warning, Info
|
|
6235
6252
|
AlertStatus | string | Yes | Alert status, enum values: Critical, Warning, Info, Ok
|
|
6236
|
-
Progress | string | Yes | Processing progress, enum values: Triggered, Processing, Closed
|
|
6237
6253
|
StartTime | int64 | Yes | Trigger time, Unix timestamp in seconds
|
|
6238
6254
|
EndTime | int64 | No | Recovery time, Unix timestamp in seconds, default 0
|
|
6239
|
-
CloseTime | int64 | No | Close time, EndTime is alert recovery time, CloseTime is processing progress close time. Alert automatically closes upon recovery, manual closure doesn't affect alert recovery. Unix timestamp in seconds, default 0
|
|
6240
6255
|
\`Labels\` | map[string]string | No | Label key-value pairs, both Key and Value are strings
|
|
6241
6256
|
|
|
6242
6257
|
## Common Questions
|
|
@@ -7186,80 +7201,319 @@ If no custom content is set, the system default template will be used for notifi
|
|
|
7186
7201
|
|
|
7187
7202
|
<head data-id="__react-email-head">
|
|
7188
7203
|
<style>
|
|
7189
|
-
|
|
7190
|
-
|
|
7191
|
-
|
|
7192
|
-
|
|
7193
|
-
|
|
7194
|
-
|
|
7195
|
-
|
|
7196
|
-
|
|
7197
|
-
|
|
7198
|
-
|
|
7204
|
+
/* Light mode colors */
|
|
7205
|
+
:root {
|
|
7206
|
+
--bg-color: rgb(255, 255, 255);
|
|
7207
|
+
--text-color: rgb(55, 65, 81);
|
|
7208
|
+
--label-key-color: #000;
|
|
7209
|
+
--section-bg: rgb(255, 255, 255);
|
|
7210
|
+
--border-color: rgb(229, 231, 235);
|
|
7211
|
+
}
|
|
7212
|
+
|
|
7213
|
+
/* Dark mode colors */
|
|
7214
|
+
@media (prefers-color-scheme: dark) {
|
|
7215
|
+
:root {
|
|
7216
|
+
--bg-color: rgb(31, 41, 55);
|
|
7217
|
+
--text-color: rgb(209, 213, 219);
|
|
7218
|
+
--label-key-color: rgb(229, 231, 235);
|
|
7219
|
+
--section-bg: rgb(17, 24, 39);
|
|
7220
|
+
--border-color: rgb(75, 85, 99);
|
|
7221
|
+
}
|
|
7222
|
+
}
|
|
7223
|
+
|
|
7224
|
+
/* Severity background colors */
|
|
7225
|
+
.severity-Critical {
|
|
7226
|
+
background-color: #C80000;
|
|
7227
|
+
color: #ffffff;
|
|
7228
|
+
padding: 4px 12px;
|
|
7229
|
+
border-radius: 12px;
|
|
7230
|
+
display: inline-block;
|
|
7231
|
+
font-weight: 600;
|
|
7232
|
+
font-size: 13px;
|
|
7233
|
+
}
|
|
7234
|
+
.severity-Warning {
|
|
7235
|
+
background-color: #fef3c7;
|
|
7236
|
+
color: #92400e;
|
|
7237
|
+
padding: 4px 12px;
|
|
7238
|
+
border-radius: 12px;
|
|
7239
|
+
display: inline-block;
|
|
7240
|
+
font-weight: 600;
|
|
7241
|
+
font-size: 13px;
|
|
7242
|
+
}
|
|
7243
|
+
.severity-Info {
|
|
7244
|
+
background-color: rgb(108,83,177);
|
|
7245
|
+
color: #ffffff;
|
|
7246
|
+
padding: 0.25rem 0.75rem;
|
|
7247
|
+
border-radius: 0.25rem;
|
|
7248
|
+
display: inline-block;
|
|
7249
|
+
font-weight: 500;
|
|
7250
|
+
}
|
|
7251
|
+
.severity-Ok {
|
|
7252
|
+
background-color: rgb(132 204 22);
|
|
7253
|
+
color:rgb(100, 239, 73);
|
|
7254
|
+
padding: 0.25rem 0.75rem;
|
|
7255
|
+
border-radius: 0.25rem;
|
|
7256
|
+
display: inline-block;
|
|
7257
|
+
font-weight: 500;
|
|
7258
|
+
}
|
|
7259
|
+
|
|
7260
|
+
/* Progress status colors */
|
|
7261
|
+
.progress-Triggered {
|
|
7262
|
+
background-color: #dbeafe;
|
|
7263
|
+
color: #1e40af;
|
|
7264
|
+
padding: 4px 12px;
|
|
7265
|
+
border-radius: 12px;
|
|
7266
|
+
display: inline-block;
|
|
7267
|
+
font-weight: 600;
|
|
7268
|
+
font-size: 13px;
|
|
7269
|
+
}
|
|
7270
|
+
.progress-Acknowledged {
|
|
7271
|
+
background-color: #ede9fe;
|
|
7272
|
+
color: #6b21a8;
|
|
7273
|
+
padding: 4px 12px;
|
|
7274
|
+
border-radius: 12px;
|
|
7275
|
+
display: inline-block;
|
|
7276
|
+
font-weight: 600;
|
|
7277
|
+
font-size: 13px;
|
|
7278
|
+
}
|
|
7279
|
+
.progress-Resolved {
|
|
7280
|
+
background-color: #d1fae5;
|
|
7281
|
+
color: #065f46;
|
|
7282
|
+
padding: 4px 12px;
|
|
7283
|
+
border-radius: 12px;
|
|
7284
|
+
display: inline-block;
|
|
7285
|
+
font-weight: 600;
|
|
7286
|
+
font-size: 13px;
|
|
7287
|
+
}
|
|
7288
|
+
.progress-Closed {
|
|
7289
|
+
background-color: #f3f4f6;
|
|
7290
|
+
color: #374151;
|
|
7291
|
+
padding: 4px 12px;
|
|
7292
|
+
border-radius: 12px;
|
|
7293
|
+
display: inline-block;
|
|
7294
|
+
font-weight: 600;
|
|
7295
|
+
font-size: 13px;
|
|
7296
|
+
}
|
|
7297
|
+
|
|
7298
|
+
/* Field row styles */
|
|
7299
|
+
.field-row {
|
|
7300
|
+
padding: 1rem 0;
|
|
7301
|
+
border-bottom: 1px solid var(--border-color);
|
|
7302
|
+
}
|
|
7303
|
+
.field-row:first-child {
|
|
7304
|
+
padding-top: 0;
|
|
7305
|
+
}
|
|
7306
|
+
.field-row:last-child {
|
|
7307
|
+
border-bottom: none;
|
|
7308
|
+
}
|
|
7309
|
+
.field-label {
|
|
7310
|
+
color: #6b7280;
|
|
7311
|
+
font-size: 0.875rem;
|
|
7312
|
+
margin-bottom: 0.25rem;
|
|
7313
|
+
}
|
|
7314
|
+
.field-value {
|
|
7315
|
+
color: var(--text-color);
|
|
7316
|
+
word-break: break-word;
|
|
7317
|
+
overflow-wrap: break-word;
|
|
7318
|
+
}
|
|
7319
|
+
|
|
7320
|
+
body {
|
|
7321
|
+
background-color: var(--bg-color);
|
|
7322
|
+
color: var(--text-color);
|
|
7323
|
+
}
|
|
7324
|
+
|
|
7325
|
+
.labels-section {
|
|
7326
|
+
background-color: #f3f4f6;
|
|
7327
|
+
padding: 1rem;
|
|
7328
|
+
border-radius: 0.375rem;
|
|
7329
|
+
margin-top: 0.5rem;
|
|
7330
|
+
}
|
|
7331
|
+
@media (prefers-color-scheme: dark) {
|
|
7332
|
+
.labels-section {
|
|
7333
|
+
background-color: rgb(55, 65, 81);
|
|
7334
|
+
}
|
|
7335
|
+
}
|
|
7199
7336
|
</style>
|
|
7200
7337
|
</head>
|
|
7201
7338
|
|
|
7202
|
-
<body data-id="__react-email-body" style="
|
|
7203
|
-
|
|
7204
|
-
<
|
|
7205
|
-
<
|
|
7206
|
-
|
|
7207
|
-
|
|
7208
|
-
|
|
7209
|
-
|
|
7210
|
-
|
|
7211
|
-
|
|
7212
|
-
|
|
7213
|
-
|
|
7214
|
-
|
|
7215
|
-
|
|
7216
|
-
|
|
7217
|
-
|
|
7218
|
-
|
|
7219
|
-
|
|
7220
|
-
|
|
7221
|
-
|
|
7222
|
-
|
|
7223
|
-
|
|
7224
|
-
|
|
7225
|
-
|
|
7226
|
-
|
|
7227
|
-
|
|
7228
|
-
|
|
7229
|
-
|
|
7230
|
-
|
|
7231
|
-
|
|
7232
|
-
|
|
7233
|
-
|
|
7234
|
-
|
|
7235
|
-
|
|
7236
|
-
|
|
7237
|
-
|
|
7238
|
-
|
|
7239
|
-
|
|
7240
|
-
|
|
7241
|
-
|
|
7242
|
-
|
|
7243
|
-
|
|
7244
|
-
|
|
7245
|
-
|
|
7246
|
-
|
|
7247
|
-
|
|
7248
|
-
|
|
7249
|
-
|
|
7250
|
-
|
|
7251
|
-
|
|
7252
|
-
|
|
7253
|
-
|
|
7254
|
-
|
|
7255
|
-
|
|
7256
|
-
|
|
7257
|
-
|
|
7258
|
-
|
|
7259
|
-
|
|
7260
|
-
|
|
7339
|
+
<body data-id="__react-email-body" style="margin:0;padding:0;background-color:#f3f4f6;font-family:ui-sans-serif, system-ui, -apple-system, BlinkMacSystemFont, Segoe UI, Roboto, Helvetica Neue, Arial, Noto Sans, sans-serif, Apple Color Emoji, Segoe UI Emoji, Segoe UI Symbol, Noto Color Emoji">
|
|
7340
|
+
<!-- Outer wrapper table for centering -->
|
|
7341
|
+
<table width="100%" cellpadding="0" cellspacing="0" border="0" style="background-color:#f3f4f6">
|
|
7342
|
+
<tr>
|
|
7343
|
+
<td align="center" style="padding:40px 20px">
|
|
7344
|
+
<!-- Main container table with fixed width -->
|
|
7345
|
+
<table width="600" cellpadding="0" cellspacing="0" border="0" style="background-color:#ffffff;max-width:600px">
|
|
7346
|
+
<!-- Purple header bar with logo -->
|
|
7347
|
+
<tr>
|
|
7348
|
+
<td style="padding:32px 0 32px 32px;text-align:left">
|
|
7349
|
+
<img data-id="react-email-img" src="https://flashduty-public.oss-cn-beijing.aliyuncs.com/icons/flashduty-20251216.png" height="70" style="display:block;outline:none;border:none;text-decoration:none;height:70px;width:auto" alt="Flashduty" />
|
|
7350
|
+
</td>
|
|
7351
|
+
</tr>
|
|
7352
|
+
|
|
7353
|
+
<!-- Divider after logo -->
|
|
7354
|
+
<tr>
|
|
7355
|
+
<td style="padding:0 32px">
|
|
7356
|
+
<div style="border-top:1px solid #e5e7eb"></div>
|
|
7357
|
+
</td>
|
|
7358
|
+
</tr>
|
|
7359
|
+
|
|
7360
|
+
<!-- Main content -->
|
|
7361
|
+
<tr>
|
|
7362
|
+
<td style="padding:16px 32px 32px 32px">
|
|
7363
|
+
<!-- Title and Description -->
|
|
7364
|
+
<table width="100%" cellpadding="0" cellspacing="0" border="0">
|
|
7365
|
+
<tr>
|
|
7366
|
+
<td>
|
|
7367
|
+
<h1 style="margin:0;font-size:24px;font-weight:600;color:#111827;line-height:1.5">{{.Title}}</h1>
|
|
7368
|
+
{{if .Description}}
|
|
7369
|
+
<p style="margin:8px 0 0 0;font-size:16px;color:#6b7280;line-height:1.5">{{toHtml .Description}}</p>
|
|
7370
|
+
{{end}}
|
|
7371
|
+
</td>
|
|
7372
|
+
</tr>
|
|
7373
|
+
</table>
|
|
7374
|
+
|
|
7375
|
+
<!-- Divider after title -->
|
|
7376
|
+
<div style="border-top:1px solid #e5e7eb;margin:32px 0"></div>
|
|
7377
|
+
|
|
7378
|
+
<!-- Fields section -->
|
|
7379
|
+
<table width="100%" cellpadding="0" cellspacing="0" border="0" style="margin-bottom:30px">
|
|
7380
|
+
<tr>
|
|
7381
|
+
<td style="padding:16px 0;border-bottom:1px solid #e5e7eb;background-color:#ffffff">
|
|
7382
|
+
<table width="100%" cellpadding="0" cellspacing="0" border="0">
|
|
7383
|
+
<tr>
|
|
7384
|
+
<td width="120" style="font-weight:600;color:#374151;font-size:14px;vertical-align:top;padding-left:16px">Severity</td>
|
|
7385
|
+
<td style="color:#6b7280;font-size:14px;word-break:break-word;padding-right:16px"><span class="severity-{{.IncidentSeverity}}">{{.IncidentSeverity}}</span></td>
|
|
7386
|
+
</tr>
|
|
7387
|
+
</table>
|
|
7388
|
+
</td>
|
|
7389
|
+
</tr>
|
|
7390
|
+
|
|
7391
|
+
<tr>
|
|
7392
|
+
<td style="padding:16px 0;border-bottom:1px solid #e5e7eb;background-color:#ffffff">
|
|
7393
|
+
<table width="100%" cellpadding="0" cellspacing="0" border="0">
|
|
7394
|
+
<tr>
|
|
7395
|
+
<td width="120" style="font-weight:600;color:#374151;font-size:14px;vertical-align:top;padding-left:16px">Channel</td>
|
|
7396
|
+
<td style="color:#6b7280;font-size:14px;word-break:break-word;padding-right:16px">{{if .ChannelName}}{{.ChannelName}}{{else}}None{{end}}</td>
|
|
7397
|
+
</tr>
|
|
7398
|
+
</table>
|
|
7399
|
+
</td>
|
|
7400
|
+
</tr>
|
|
7401
|
+
|
|
7402
|
+
<tr>
|
|
7403
|
+
<td style="padding:16px 0;border-bottom:1px solid #e5e7eb;background-color:#ffffff">
|
|
7404
|
+
<table width="100%" cellpadding="0" cellspacing="0" border="0">
|
|
7405
|
+
<tr>
|
|
7406
|
+
<td width="120" style="font-weight:600;color:#374151;font-size:14px;vertical-align:top;padding-left:16px">Triggered at</td>
|
|
7407
|
+
<td style="color:#6b7280;font-size:14px;word-break:break-word;padding-right:16px">{{date "2006-01-02 15:04:05" .StartTime}}</td>
|
|
7408
|
+
</tr>
|
|
7409
|
+
</table>
|
|
7410
|
+
</td>
|
|
7411
|
+
</tr>
|
|
7412
|
+
|
|
7413
|
+
{{if .CreatorID}}
|
|
7414
|
+
<tr>
|
|
7415
|
+
<td style="padding:16px 0;border-bottom:1px solid #e5e7eb;background-color:#ffffff">
|
|
7416
|
+
<table width="100%" cellpadding="0" cellspacing="0" border="0">
|
|
7417
|
+
<tr>
|
|
7418
|
+
<td width="120" style="font-weight:600;color:#374151;font-size:14px;vertical-align:top;padding-left:16px">Creator</td>
|
|
7419
|
+
<td style="color:#6b7280;font-size:14px;word-break:break-word;padding-right:16px">{{.Creator.PersonName}}</td>
|
|
7420
|
+
</tr>
|
|
7421
|
+
</table>
|
|
7422
|
+
</td>
|
|
7423
|
+
</tr>
|
|
7424
|
+
{{end}}
|
|
7425
|
+
|
|
7426
|
+
{{if gt (len .Responders) 0}}
|
|
7427
|
+
<tr>
|
|
7428
|
+
<td style="padding:16px 0;border-bottom:1px solid #e5e7eb;background-color:#ffffff">
|
|
7429
|
+
<table width="100%" cellpadding="0" cellspacing="0" border="0">
|
|
7430
|
+
<tr>
|
|
7431
|
+
<td width="120" style="font-weight:600;color:#374151;font-size:14px;vertical-align:top;padding-left:16px">Responders</td>
|
|
7432
|
+
<td style="color:#6b7280;font-size:14px;word-break:break-word;padding-right:16px">{{range .Responders}}@{{.PersonName}} {{end}}</td>
|
|
7433
|
+
</tr>
|
|
7434
|
+
</table>
|
|
7435
|
+
</td>
|
|
7436
|
+
</tr>
|
|
7437
|
+
{{end}}
|
|
7438
|
+
|
|
7439
|
+
<tr>
|
|
7440
|
+
<td style="padding:16px 0;border-bottom:1px solid #e5e7eb;background-color:#ffffff">
|
|
7441
|
+
<table width="100%" cellpadding="0" cellspacing="0" border="0">
|
|
7442
|
+
<tr>
|
|
7443
|
+
<td width="120" style="font-weight:600;color:#374151;font-size:14px;vertical-align:top;padding-left:16px">Progress</td>
|
|
7444
|
+
<td style="color:#6b7280;font-size:14px;word-break:break-word;padding-right:16px"><span class="progress-{{.Progress}}">{{.Progress}}</span></td>
|
|
7445
|
+
</tr>
|
|
7446
|
+
</table>
|
|
7447
|
+
</td>
|
|
7448
|
+
</tr>
|
|
7449
|
+
|
|
7450
|
+
{{if .Labels.resource}}
|
|
7451
|
+
<tr>
|
|
7452
|
+
<td style="padding:16px 0;border-bottom:1px solid #e5e7eb;background-color:#ffffff">
|
|
7453
|
+
<table width="100%" cellpadding="0" cellspacing="0" border="0">
|
|
7454
|
+
<tr>
|
|
7455
|
+
<td width="120" style="font-weight:600;color:#374151;font-size:14px;vertical-align:top;padding-left:16px">Resource</td>
|
|
7456
|
+
<td style="color:#6b7280;font-size:14px;word-break:break-word;padding-right:16px">{{(joinAlertLabels . "resource" ", ")}}</td>
|
|
7457
|
+
</tr>
|
|
7458
|
+
</table>
|
|
7459
|
+
</td>
|
|
7460
|
+
</tr>
|
|
7461
|
+
{{end}}
|
|
7462
|
+
|
|
7463
|
+
{{if gt (len .Labels) 0}}
|
|
7464
|
+
<tr>
|
|
7465
|
+
<td style="padding:16px 0">
|
|
7466
|
+
<table width="100%" cellpadding="0" cellspacing="0" border="0">
|
|
7467
|
+
<tr>
|
|
7468
|
+
<td width="120" style="font-weight:600;color:#374151;font-size:14px;vertical-align:top;padding-left:16px">Labels</td>
|
|
7469
|
+
<td style="color:#6b7280;font-size:14px;word-break:break-word;padding-right:16px;background-color:#f9fafb;padding:16px">
|
|
7470
|
+
<pre style="margin:0;font-family:'Courier New',monospace;font-size:13px;color:#374151;white-space:pre-wrap;word-break:break-word">{{mustToPrettyJson .Labels}}</pre>
|
|
7471
|
+
</td>
|
|
7472
|
+
</tr>
|
|
7473
|
+
</table>
|
|
7474
|
+
</td>
|
|
7475
|
+
</tr>
|
|
7476
|
+
{{end}}
|
|
7477
|
+
</table>
|
|
7478
|
+
|
|
7479
|
+
<!-- Action buttons -->
|
|
7480
|
+
<table width="100%" cellpadding="0" cellspacing="0" border="0" style="margin-top:32px">
|
|
7481
|
+
<tr>
|
|
7482
|
+
<td width="48%" align="center" style="padding:0">
|
|
7483
|
+
<table cellpadding="0" cellspacing="0" border="0" style="width:100%">
|
|
7484
|
+
<tr>
|
|
7485
|
+
<td align="center" style="background-color:rgb(108,83,177);border-radius:6px;padding:14px 32px">
|
|
7486
|
+
<a href="{{.DetailUrl}}?ack=1" data-id="react-email-button" target="_blank" style="color:#ffffff;font-size:16px;font-weight:600;text-decoration:none;display:block">Acknowledge Now</a>
|
|
7487
|
+
</td>
|
|
7488
|
+
</tr>
|
|
7489
|
+
</table>
|
|
7490
|
+
</td>
|
|
7491
|
+
<td width="4%" style="padding:0"></td>
|
|
7492
|
+
<td width="48%" align="center" style="padding:0">
|
|
7493
|
+
<table cellpadding="0" cellspacing="0" border="0" style="width:100%">
|
|
7494
|
+
<tr>
|
|
7495
|
+
<td align="center" style="background-color:#ffffff;border:2px solid rgb(108,83,177);border-radius:6px;padding:14px 32px">
|
|
7496
|
+
<a href="{{.DetailUrl}}" data-id="react-email-button" target="_blank" style="color:rgb(108,83,177);font-size:16px;font-weight:600;text-decoration:none;display:block">View Details</a>
|
|
7497
|
+
</td>
|
|
7498
|
+
</tr>
|
|
7499
|
+
</table>
|
|
7500
|
+
</td>
|
|
7501
|
+
</tr>
|
|
7502
|
+
</table>
|
|
7503
|
+
</td>
|
|
7504
|
+
</tr>
|
|
7505
|
+
|
|
7506
|
+
<!-- Footer -->
|
|
7507
|
+
<tr>
|
|
7508
|
+
<td style="background-color:#f9fafb;padding:20px;text-align:center">
|
|
7509
|
+
<p style="margin:0;font-size:12px;color:#9ca3af">ALL RIGHTS RESERVED © FLASHCAT.CLOUD</p>
|
|
7510
|
+
</td>
|
|
7511
|
+
</tr>
|
|
7512
|
+
</table>
|
|
7513
|
+
</td>
|
|
7514
|
+
</tr>
|
|
7515
|
+
</table>
|
|
7261
7516
|
</body>
|
|
7262
|
-
|
|
7263
7517
|
</html>
|
|
7264
7518
|
\`\`\`
|
|
7265
7519
|
|
|
@@ -7320,15 +7574,15 @@ When you need to route alerts to different channels based on alert payload infor
|
|
|
7320
7574
|
|
|
7321
7575
|
## I. Huawei Cloud APM Alert Push Configuration
|
|
7322
7576
|
|
|
7323
|
-
### Create
|
|
7577
|
+
### Create Flashduty Alert Channel
|
|
7324
7578
|
|
|
7325
7579
|
1. Log in to your Huawei Cloud Console, search for \`SMN\` (Simple Message Notification) service and enter its console
|
|
7326
7580
|
2. Select \`Topic Management=>Topics\` from the left navigation bar
|
|
7327
|
-
3. Click \`Create Topic\`, enter \`
|
|
7581
|
+
3. Click \`Create Topic\`, enter \`Flashduty\` as the topic name in the edit page and confirm
|
|
7328
7582
|
|
|
7329
7583
|
<img src="https://download.flashcat.cloud/flashduty/doc/en/hw/lts-1.png" alt="drawing" width="500"/>
|
|
7330
7584
|
|
|
7331
|
-
4. Return to the topic list and click \`Add Subscription\` in the newly created
|
|
7585
|
+
4. Return to the topic list and click \`Add Subscription\` in the newly created Flashduty topic
|
|
7332
7586
|
|
|
7333
7587
|
<img src="https://download.flashcat.cloud/flashduty/doc/en/hw/lts-2.png" alt="drawing" width="500"/>
|
|
7334
7588
|
|
|
@@ -7344,7 +7598,7 @@ When you need to route alerts to different channels based on alert payload infor
|
|
|
7344
7598
|
|
|
7345
7599
|
#### Step 1: Add Notification Configuration
|
|
7346
7600
|
1. Log in to your \`Huawei Cloud APM\` console, under \`Application Monitoring=>Metrics\`, click \`Notification\`
|
|
7347
|
-
2. Select the corresponding region, click \`Add\`, and select the created \`
|
|
7601
|
+
2. Select the corresponding region, click \`Add\`, and select the created \`Flashduty\` topic
|
|
7348
7602
|
3. Click \`Confirm\` to complete the configuration
|
|
7349
7603
|
|
|
7350
7604
|
<img alt="drawing" width="600" src="https://download.flashcat.cloud/flashduty/doc/en/hw/hw-apm-1.png" />
|
|
@@ -7354,7 +7608,7 @@ When you need to route alerts to different channels based on alert payload infor
|
|
|
7354
7608
|
2. Select \`Alarm Policy\`, click \`Add Custom Alarm Policy\` or edit an existing alarm policy
|
|
7355
7609
|
3. In the \`Alarm Policy\` edit page, configure alert metrics and conditions according to your business needs
|
|
7356
7610
|
4. In \`Notification Content\`, when referencing variables, it's recommended to use K:V format for easier alert parsing, such as host:\${hostInfo}
|
|
7357
|
-
5. In \`Notification Object\`, select the created \`
|
|
7611
|
+
5. In \`Notification Object\`, select the created \`Flashduty\` notification channel
|
|
7358
7612
|
6. Click \`Confirm\` to complete the configuration
|
|
7359
7613
|
|
|
7360
7614
|
<img alt="drawing" width="600" src="https://download.flashcat.cloud/flashduty/doc/en/hw/hw-apm-2.png" />
|
|
@@ -7675,7 +7929,7 @@ Choose this method when you need to route alerts to different channels based on
|
|
|
7675
7929
|
---
|
|
7676
7930
|
|
|
7677
7931
|
### Configure ElastAlert 2 Alerts
|
|
7678
|
-
Follow the [ElastAlert
|
|
7932
|
+
Follow the [ElastAlert Flashduty](https://elastalert2.readthedocs.io/en/latest/alerts.html#flashduty) push configuration document
|
|
7679
7933
|
|
|
7680
7934
|
1. Create or edit the alert rule file, for example \`rules/elastalert2_alert.yaml\`.
|
|
7681
7935
|
2. Fill in the \`flashduty\` alert type in the \`alert\` field.
|
|
@@ -7727,7 +7981,7 @@ filter:
|
|
|
7727
7981
|
query_string:
|
|
7728
7982
|
query: "created_at:*"
|
|
7729
7983
|
|
|
7730
|
-
# -------
|
|
7984
|
+
# ------- Flashduty ----------------
|
|
7731
7985
|
alert: flashduty
|
|
7732
7986
|
flashduty_integration_key: "xxxx"
|
|
7733
7987
|
flashduty_title: "elastalert2 alert"
|
|
@@ -7742,7 +7996,7 @@ flashduty_group: "group1"
|
|
|
7742
7996
|
flashduty_cluster: "bj"
|
|
7743
7997
|
flashduty_app: "app1"
|
|
7744
7998
|
flashduty_env: "dev"
|
|
7745
|
-
# -------
|
|
7999
|
+
# ------- Flashduty ----------------
|
|
7746
8000
|
\`\`\`
|
|
7747
8001
|
|
|
7748
8002
|
5. Restart ElastAlert and wait for the alert to trigger.`,DingtalkAlert:`---
|
|
@@ -8536,6 +8790,88 @@ The system will generate a unique Wecom alert integration URL for you. This URL
|
|
|
8536
8790
|
|
|
8537
8791
|
By default, the system always creates new alerts for each message, but you can switch to these modes:
|
|
8538
8792
|
|
|
8793
|
+
**Trigger or Close Alert Based on Rules**: In this mode, when receiving a new message, the system matches messages according to your rules and triggers new alerts or closes existing alerts based on the matching results.
|
|
8794
|
+
|
|
8795
|
+
- You need to fill in at least one **trigger** rule
|
|
8796
|
+
- You must set up regex extraction rules for Alert Key. The system uses this field to find historical alerts for updates or closure. **If regex extraction fails, the system will use the message title to generate an Alert Key** to ensure alerts won't be lost due to configuration errors
|
|
8797
|
+
- You can choose whether to discard messages when none of the rules match
|
|
8798
|
+
|
|
8799
|
+
Configuration example:
|
|
8800
|
+
|
|
8801
|
+
- Receive all messages, close the alert when the message content contains **RESOLVED**, otherwise trigger a new alert
|
|
8802
|
+
- Extract Alert Key from messages using the rule **/(.*)/**.
|
|
8803
|
+
|
|
8804
|
+
|
|
8805
|
+
### Notes
|
|
8806
|
+
- Wecom alert integration URL only supports Text and Markdown message types; other message types cannot be received
|
|
8807
|
+
- Flashduty will generate a default alert title: "Wecom robot Alert , If you need to change the title, you can customize it using the [alert pipeline](https://docs.flashcat.cloud/en/flashduty/alert-pipelines)"
|
|
8808
|
+
|
|
8809
|
+
## Severity Mapping
|
|
8810
|
+
---
|
|
8811
|
+
|
|
8812
|
+
Currently, all alerts pushed to Flashduty through the Wecom integration are set to Warning severity. However, you can customize the severity using the [alert pipeline](https://docs.flashcat.cloud/en/flashduty/alert-pipelines).
|
|
8813
|
+
|
|
8814
|
+
---
|
|
8815
|
+
title: "Wecom Alert Integration"
|
|
8816
|
+
description: "Generate a unique Wecom robot address in Flashduty, and synchronize the occurrence and recovery of alerts through Wecom"
|
|
8817
|
+
date: "2025-05-19T10:00:00+08:00"
|
|
8818
|
+
url: "https://docs.flashcat.cloud/en/flashduty/Wecom-alert-integration-guide"
|
|
8819
|
+
---
|
|
8820
|
+
|
|
8821
|
+
Generate a unique Wecom robot address in Flashduty, and synchronize the occurrence and recovery of alerts through Wecom.
|
|
8822
|
+
|
|
8823
|
+
<div class="hide">
|
|
8824
|
+
|
|
8825
|
+
## Operation Steps
|
|
8826
|
+
---
|
|
8827
|
+
|
|
8828
|
+
### Create Wecom Alert Integration
|
|
8829
|
+
|
|
8830
|
+
You can obtain a Wecom alert integration address through either of these two methods:
|
|
8831
|
+
|
|
8832
|
+
#### Using Dedicated Integration
|
|
8833
|
+
|
|
8834
|
+
Choose this method when you don't need to route alert events to different channels. It's simpler and recommended.
|
|
8835
|
+
|
|
8836
|
+
<details>
|
|
8837
|
+
<summary>Expand</summary>
|
|
8838
|
+
|
|
8839
|
+
1. Go to the Flashduty console, select **Channel**, and enter a specific channel's details page
|
|
8840
|
+
2. Select the **Integration** tab, click **Add Integration** to enter the integration page
|
|
8841
|
+
3. Choose **Wecom Alert** integration and click **Save** to generate a card
|
|
8842
|
+
4. Click the generated card to view the **Wecom Alert Integration URL**, copy it for later use, and you're done
|
|
8843
|
+
|
|
8844
|
+
</details>
|
|
8845
|
+
|
|
8846
|
+
#### Using Shared Integration
|
|
8847
|
+
|
|
8848
|
+
Choose this method when you need to route alerts to different channels based on the alert event's payload information.
|
|
8849
|
+
|
|
8850
|
+
<details>
|
|
8851
|
+
<summary>Expand</summary>
|
|
8852
|
+
|
|
8853
|
+
1. Go to the Flashduty console, select **Integration Center => Alert Events** to enter the integration selection page
|
|
8854
|
+
2. Select **Wecom Alert** integration:
|
|
8855
|
+
- **Integration Name**: Define a name for the current integration
|
|
8856
|
+
- **Message Type**: Select Wecom alert message type, currently only Text and Markdown are supported
|
|
8857
|
+
- **Push Mode**: Choose when to trigger or recover alerts for Wecom notifications
|
|
8858
|
+
3. Copy the **Wecom Alert Integration URL** for later use
|
|
8859
|
+
4. Configure the default route and select the corresponding channel (after integration creation, you can go to \`Routes\` to configure more routing rules)
|
|
8860
|
+
5. Done
|
|
8861
|
+
|
|
8862
|
+
</details>
|
|
8863
|
+
</div>
|
|
8864
|
+
|
|
8865
|
+
### Customize Wecom Alert Integration
|
|
8866
|
+
|
|
8867
|
+
#### Wecom Alert Integration URL
|
|
8868
|
+
|
|
8869
|
+
The system will generate a unique Wecom alert integration URL for you. This URL is compatible with Wecom robot message protocol. When platforms only support Wecom robot channels, you can use this URL to receive corresponding messages.
|
|
8870
|
+
|
|
8871
|
+
#### Push Mode
|
|
8872
|
+
|
|
8873
|
+
By default, the system always creates new alerts for each message, but you can switch to these modes:
|
|
8874
|
+
|
|
8539
8875
|
**Trigger or Close Alert Based on Rules**: In this mode, when receiving a new message, the system matches messages according to your rules and triggers new alerts or closes existing alerts based on the matching results.
|
|
8540
8876
|
|
|
8541
8877
|
- You need to fill in at least one **trigger** rule
|
|
@@ -8627,30 +8963,19 @@ Please select the corresponding API Endpoint and Accounts Server URL according t
|
|
|
8627
8963
|
- Manual Trigger: Requires manual triggering of ServiceDesk Plus sync in the More Actions section of the incident details page (the integration configuration name is the trigger name).
|
|
8628
8964
|
|
|
8629
8965
|
5. **Channel:** Select the channel where this integration takes effect.
|
|
8630
|
-
6. **Request Template:** Select the template to use when creating requests.
|
|
8631
|
-
7. **Severity Mapping:**
|
|
8966
|
+
6. **Request Template:** Select the template to use when creating requests. If empty, the default template will be used to create the request.
|
|
8967
|
+
7. **Severity Mapping:** You can choose to map the values of severity, incident labels, or custom fields to the Priority field in ServiceDesk Plus. If empty, this field will not be passed when creating requests.
|
|
8632
8968
|
8. **Custom Field Mapping:** You can map labels or custom fields in incidents to corresponding text fields in ServiceDesk Plus tickets to achieve automatic information filling. This feature supports syncing common context information (such as service name, instance address, metric name, etc.) to ServiceDesk Plus for subsequent troubleshooting and tracking.
|
|
8633
8969
|
- Only supports target fields of single-line text or multi-line text type.
|
|
8634
8970
|
- Supports extracting values from incident labels (such as service, instance) or custom attributes.
|
|
8635
8971
|
- If the source field is empty, the target field will also remain empty and will not overwrite existing content.
|
|
8636
|
-
- Mapping configuration is managed uniformly in integration settings without manual filling each time.
|
|
8637
8972
|
|
|
8638
8973
|
9. **Assignee Mapping:** When Flashduty incidents are synced to ServiceDesk Plus and need to be automatically assigned to Technician or Group, you can get the value of Flashduty incident labels as the assignee (if the corresponding assignee does not exist, it will cause sync failure, please choose carefully).
|
|
8639
|
-
|
|
8640
|
-
|
|
8974
|
+
10. **Requester:** The requester to be specified when creating a request. This needs to be configured if the field is mandatory when creating requests.
|
|
8975
|
+
11. Click \`Save\` to complete the configuration.
|
|
8641
8976
|
|
|
8642
8977
|
### In ServiceDesk Plus
|
|
8643
|
-
#### Step 2
|
|
8644
|
-
When Flashduty incidents are synced to ServiceDesk Plus, the Requester automatically set by the system
|
|
8645
|
-
|
|
8646
|
-
1. Log in to the ServiceDesk Plus console and find the \`Setup\` configuration page.
|
|
8647
|
-
2. Select \`Users & Permissions\`, then enter the \`Users\` creation page and select \`New Requester\`.
|
|
8648
|
-
3. Fill in **flashduty** for \`Name (Display Name)\` and \`First Name\`, fill in **flashduty-sync@flashcat.cloud** for \`Email\`.
|
|
8649
|
-
4. Other settings can be configured as needed, click \`Save\` to save the configuration.
|
|
8650
|
-
|
|
8651
|
-
|
|
8652
|
-
|
|
8653
|
-
#### Step 3 Configure Sync <span id="configure-sync"></span>
|
|
8978
|
+
#### Step 2 Configure Sync <span id="configure-sync"></span>
|
|
8654
8979
|
To achieve synchronization of ServiceDesk Plus requests to Flashduty, please refer to this configuration item. **Note:** Different versions may have slightly different paths, but the configuration method is the same.
|
|
8655
8980
|
##### Create Webhook
|
|
8656
8981
|
1. Log in to the ServiceDesk Plus console and find the \`Setup\` configuration page.
|
|
@@ -8689,7 +9014,7 @@ To achieve synchronization of ServiceDesk Plus requests to Flashduty, please ref
|
|
|
8689
9014
|
|
|
8690
9015
|
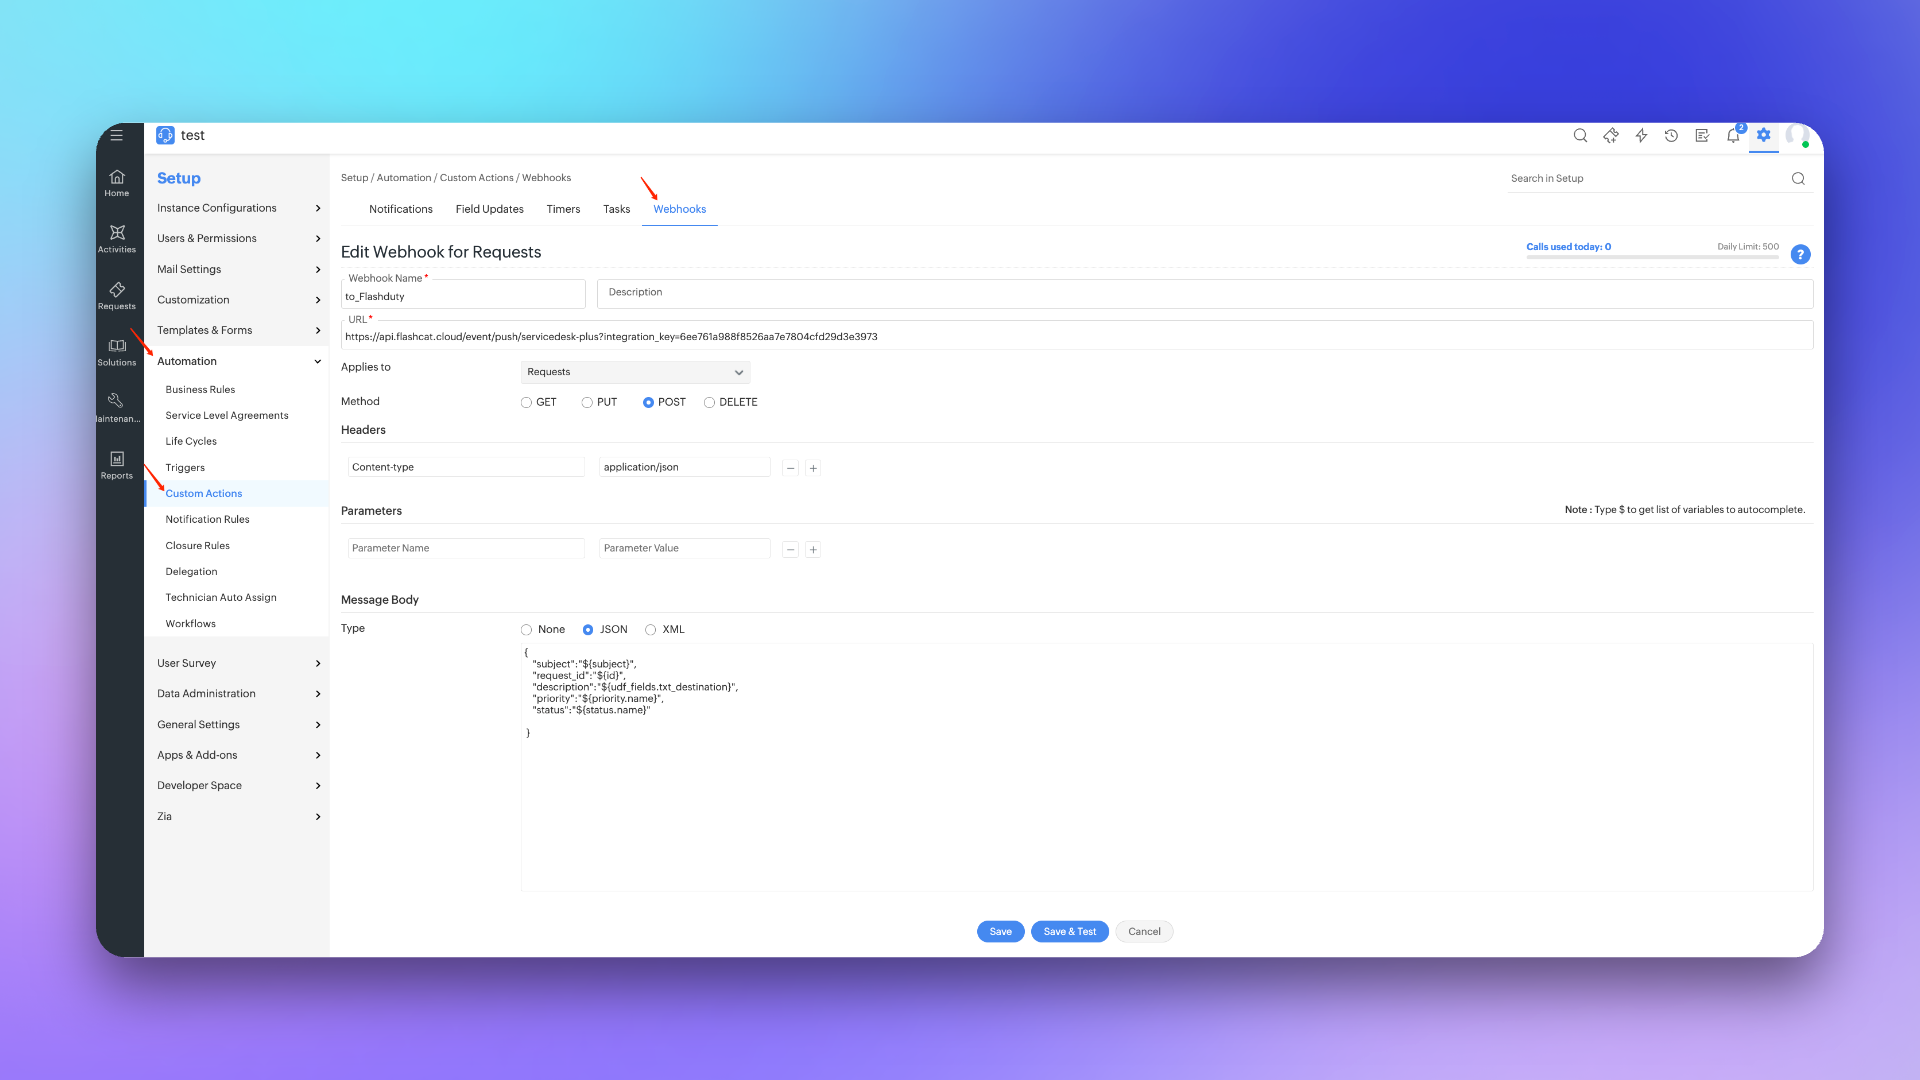
|
|
8691
9016
|
|
|
8692
|
-
##### Create Trigger
|
|
9017
|
+
##### Step 3 Create Trigger
|
|
8693
9018
|
1. Log in to the ServiceDesk Plus console and find the \`Setup\` configuration page.
|
|
8694
9019
|
2. Select \`Automation\`, then enter the \`Triggers\` page and select \`Request\`.
|
|
8695
9020
|
3. Click \`New Trigger\`, fill in **to_Flashduty** for \`Name\` in the edit page.
|
|
@@ -8729,14 +9054,6 @@ To achieve synchronization of ServiceDesk Plus requests to Flashduty, please ref
|
|
|
8729
9054
|
| Canceled | CLosed | |
|
|
8730
9055
|
| Rejected | CLosed | |
|
|
8731
9056
|
|
|
8732
|
-
### Priority Mapping <span id="priority-mapping"></span>
|
|
8733
|
-
|
|
8734
|
-
| ServiceDesk Plus | Flashduty | Notes |
|
|
8735
|
-
| ---------- | --------- | ----- |
|
|
8736
|
-
| Low | Info | |
|
|
8737
|
-
| Medium | Warning | |
|
|
8738
|
-
| High | Critical | |
|
|
8739
|
-
|
|
8740
9057
|
|
|
8741
9058
|
## FAQ
|
|
8742
9059
|
|
|
@@ -8744,4 +9061,272 @@ To achieve synchronization of ServiceDesk Plus requests to Flashduty, please ref
|
|
|
8744
9061
|
<summary> Can the Scope be changed</summary>
|
|
8745
9062
|
No, the Scope currently used is already the smallest unit. Flashduty needs to perform get/create/update operations when syncing requests with ServiceDesk Plus, and needs to obtain priority/custom field lists when configuring integration, so corresponding permission support is required.
|
|
8746
9063
|
</details>
|
|
9064
|
+
`,Harbor:`---
|
|
9065
|
+
title: "Harbor Alert Events"
|
|
9066
|
+
description: "Sync Harbor alert events to Flashduty via webhook for automated alert noise reduction"
|
|
9067
|
+
date: "2024-07-05T10:00:00+08:00"
|
|
9068
|
+
url: "https://docs.flashcat.cloud/en/flashduty/volcengine-tls-integration-guide"
|
|
9069
|
+
---
|
|
9070
|
+
|
|
9071
|
+
Sync Harbor alert events to Flashduty via webhook for automated alert noise reduction.
|
|
9072
|
+
|
|
9073
|
+
<div class="hide">
|
|
9074
|
+
|
|
9075
|
+
## In Flashduty
|
|
9076
|
+
---
|
|
9077
|
+
You can obtain an integration push URL through either of these two methods:
|
|
9078
|
+
|
|
9079
|
+
### Using Private Integration
|
|
9080
|
+
|
|
9081
|
+
Choose this method when you don't need to route alert events to different channels - it's simpler.
|
|
9082
|
+
|
|
9083
|
+
<details>
|
|
9084
|
+
<summary>Expand</summary>
|
|
9085
|
+
|
|
9086
|
+
1. Go to the Flashduty console, select **Channel**, and enter a channel's details page
|
|
9087
|
+
2. Select the **Integrations** tab, click **Add Integration** to enter the integration page
|
|
9088
|
+
3. Choose **Harbor** integration and click **Save** to generate a card
|
|
9089
|
+
4. Click the generated card to view the **Push URL**, copy it for later use, and you're done
|
|
9090
|
+
|
|
9091
|
+
</details>
|
|
9092
|
+
|
|
9093
|
+
### Using Shared Integration
|
|
9094
|
+
|
|
9095
|
+
Choose this method when you need to route alerts to different channels based on the alert event payload.
|
|
9096
|
+
|
|
9097
|
+
<details>
|
|
9098
|
+
<summary>Expand</summary>
|
|
9099
|
+
|
|
9100
|
+
1. Go to the Flashduty console, select **Integration Center=>Alert Events** to enter the integration selection page
|
|
9101
|
+
2. Select **Harbor** integration:
|
|
9102
|
+
- **Integration Name**: Define a name for this integration
|
|
9103
|
+
3. Configure the default route and select the corresponding channel (after the integration is created, you can go to \`Route\` to configure more routing rules)
|
|
9104
|
+
4. Click **Save** and copy the newly generated **push URL** for later use
|
|
9105
|
+
5. Done
|
|
9106
|
+
|
|
9107
|
+
</details>
|
|
9108
|
+
</div>
|
|
9109
|
+
|
|
9110
|
+
## In Harbor
|
|
9111
|
+
---
|
|
9112
|
+
|
|
9113
|
+
### Configure Webhooks
|
|
9114
|
+
|
|
9115
|
+
1. Log in to the Harbor interface with an account that has at least project administrator privileges.
|
|
9116
|
+
2. Go to \`Projects\`, select a project, and select \`Webhooks\`.
|
|
9117
|
+
3. Select notify type \`HTTP\`, so the webhook will be send to a HTTP endpoint.
|
|
9118
|
+
4. Select payload format as \`Default or CloudEvents\` when choose the HTTP notify type.
|
|
9119
|
+
5. Select events that you want to subscribe.
|
|
9120
|
+
6. Enter the alert integration's <span class='integration_url'>PUSH URL</span> in the Endpoint URL field.
|
|
9121
|
+
7. Click Add to create the webhook.
|
|
9122
|
+
|
|
9123
|
+
## Severity Mapping
|
|
9124
|
+
---
|
|
9125
|
+
|
|
9126
|
+
Currently, all alerts pushed to Flashduty through the Harbor integration are set to Warning severity. However, you can customize the severity using the [alert pipeline](https://docs.flashcat.cloud/en/flashduty/alert-pipelines).
|
|
9127
|
+
|
|
9128
|
+
`,LabelMappingAPI:`Configure Label Mapping API to automatically call your external API when alert events arrive, enabling dynamic enrichment and correlation of alert information. With this feature, you can automatically attach information from external data sources such as CMDB, HR systems, and more to your alerts.
|
|
9129
|
+
|
|
9130
|
+
## I. Overview
|
|
9131
|
+
|
|
9132
|
+
The Label Mapping API allows you to build custom external services to enrich alert labels. The workflow is as follows:
|
|
9133
|
+
|
|
9134
|
+
1. Flashduty receives an alert event
|
|
9135
|
+
2. The system sends event information and the list of expected labels to your API based on configuration
|
|
9136
|
+
3. Your API queries external data sources (such as CMDB, databases, etc.)
|
|
9137
|
+
4. The API returns the computed enrichment labels
|
|
9138
|
+
5. Flashduty attaches the returned labels to the alert
|
|
9139
|
+
|
|
9140
|
+
<span id="ApiSpec"></span>
|
|
9141
|
+
|
|
9142
|
+
## II. API Specification
|
|
9143
|
+
|
|
9144
|
+
### Request Method
|
|
9145
|
+
|
|
9146
|
+
<div class="md-block">
|
|
9147
|
+
|
|
9148
|
+
POST, Content-Type:"application/json"
|
|
9149
|
+
|
|
9150
|
+
</div>
|
|
9151
|
+
|
|
9152
|
+
### Request Payload:
|
|
9153
|
+
|
|
9154
|
+
<div class="md-block">
|
|
9155
|
+
|
|
9156
|
+
| Field | Type | Required | Description |
|
|
9157
|
+
| :--------: | :-------------------: | :--: | :--------- |
|
|
9158
|
+
| result_label_keys | []string | Yes | List of expected label keys to return, configured by users in Flashduty |
|
|
9159
|
+
| event | [Event](#Event) | Yes | Complete information of the current alert event |
|
|
9160
|
+
|
|
9161
|
+
<span id="Event"></span>
|
|
9162
|
+
**Event**:
|
|
9163
|
+
|
|
9164
|
+
| Field | Type | Required | Description |
|
|
9165
|
+
| :--------: | :-------------------: | :--: | :--------- |
|
|
9166
|
+
| account_id | int64 | Yes | Account ID |
|
|
9167
|
+
| channel_id | int64 | Yes | Channel ID |
|
|
9168
|
+
| data_source_id | int64 | Yes | Data source ID |
|
|
9169
|
+
| data_source_type | string | Yes | Data source type, e.g., prometheus, zabbix, etc. |
|
|
9170
|
+
| title | string | Yes | Alert title |
|
|
9171
|
+
| title_rule | string | No | Title rule |
|
|
9172
|
+
| description | string | No | Alert description |
|
|
9173
|
+
| alert_key | string | Yes | Alert unique identifier |
|
|
9174
|
+
| alert_id | string | Yes | Alert ID |
|
|
9175
|
+
| event_severity | string | Yes | Event severity, enum: Critical, Warning, Info |
|
|
9176
|
+
| event_status | string | Yes | Event status, enum: Critical, Warning, Info, Ok |
|
|
9177
|
+
| event_time | int64 | Yes | Event time, Unix timestamp in seconds |
|
|
9178
|
+
| labels | map[string]string | No | Alert original label key-value pairs |
|
|
9179
|
+
| images | []string | No | List of alert-related images |
|
|
9180
|
+
|
|
9181
|
+
</div>
|
|
9182
|
+
|
|
9183
|
+
### Request Example
|
|
9184
|
+
|
|
9185
|
+
<div class="md-block">
|
|
9186
|
+
|
|
9187
|
+
\`\`\`json
|
|
9188
|
+
{
|
|
9189
|
+
"result_label_keys": ["owner_team", "service_tier", "host_ip"],
|
|
9190
|
+
"event": {
|
|
9191
|
+
"account_id": 1,
|
|
9192
|
+
"channel_id": 20,
|
|
9193
|
+
"data_source_id": 15,
|
|
9194
|
+
"data_source_type": "prometheus",
|
|
9195
|
+
"description": "CPU usage for instance '10.0.1.101:9100' is over 95%",
|
|
9196
|
+
"title": "High CPU Usage on instance 10.0.1.101:9100",
|
|
9197
|
+
"title_rule": "",
|
|
9198
|
+
"alert_key": "d41d8cd98f00b204e9800998ecf8427e",
|
|
9199
|
+
"alert_id": "62d6c0f6b8f1b2b3c4d5e6f7",
|
|
9200
|
+
"event_severity": "Critical",
|
|
9201
|
+
"event_status": "Critical",
|
|
9202
|
+
"event_time": 1678886400,
|
|
9203
|
+
"labels": {
|
|
9204
|
+
"region": "us-east-1",
|
|
9205
|
+
"service": "service-A",
|
|
9206
|
+
"env": "production",
|
|
9207
|
+
"instance": "10.0.1.101:9100"
|
|
9208
|
+
},
|
|
9209
|
+
"images": []
|
|
9210
|
+
}
|
|
9211
|
+
}
|
|
9212
|
+
\`\`\`
|
|
9213
|
+
|
|
9214
|
+
</div>
|
|
9215
|
+
|
|
9216
|
+
### Response Specification
|
|
9217
|
+
|
|
9218
|
+
<div class="md-block">
|
|
9219
|
+
|
|
9220
|
+
**Successful Response:**
|
|
9221
|
+
|
|
9222
|
+
| Field | Type | Required | Description |
|
|
9223
|
+
| :--------: | :-------------------: | :--: | :--------- |
|
|
9224
|
+
| result_labels | map[string]string | Yes | Returned enrichment label key-value object |
|
|
9225
|
+
|
|
9226
|
+
- HTTP Status Code: \`200 OK\`
|
|
9227
|
+
- Response body must be a JSON object containing the \`result_labels\` field
|
|
9228
|
+
- Keys in \`result_labels\` must be label names specified in the request's \`result_label_keys\`
|
|
9229
|
+
- If a label cannot be retrieved, it **should not** be included in the response
|
|
9230
|
+
|
|
9231
|
+
**Successful Response Example:**
|
|
9232
|
+
|
|
9233
|
+
\`\`\`json
|
|
9234
|
+
{
|
|
9235
|
+
"result_labels": {
|
|
9236
|
+
"owner_team": "team-database",
|
|
9237
|
+
"service_tier": "tier-1",
|
|
9238
|
+
"host_ip": "10.0.1.101"
|
|
9239
|
+
}
|
|
9240
|
+
}
|
|
9241
|
+
\`\`\`
|
|
9242
|
+
|
|
9243
|
+
**Failure Response:**
|
|
9244
|
+
|
|
9245
|
+
| Status Code | Meaning |
|
|
9246
|
+
| :--------: | :--------- |
|
|
9247
|
+
| 404 Not Found | No data available for enrichment based on the event information |
|
|
9248
|
+
| 400 Bad Request | Request body format error or event object missing required fields |
|
|
9249
|
+
| 5xx | Unexpected internal API error (e.g., database connection failure) |
|
|
9250
|
+
|
|
9251
|
+
> **Note:** Returning \`200 OK\` status code with an empty \`result_labels: {}\` object will also be treated as "no results", but using the \`404\` status code is the more standard approach.
|
|
9252
|
+
|
|
9253
|
+
</div>
|
|
9254
|
+
|
|
9255
|
+
<span id="ServiceConfig"></span>
|
|
9256
|
+
|
|
9257
|
+
## III. Configure Mapping Service
|
|
9258
|
+
|
|
9259
|
+
When configuring label mapping in Flashduty, you need to first create a mapping service, then reference that service in your label enrichment rules.
|
|
9260
|
+
|
|
9261
|
+
### Mapping Service Field Description
|
|
9262
|
+
|
|
9263
|
+
<div class="md-block">
|
|
9264
|
+
|
|
9265
|
+
| Field | Type | Required | Description |
|
|
9266
|
+
| :--------: | :-------------------: | :--: | :--------- |
|
|
9267
|
+
| api_name | string | Yes | Human-readable service name for selection and reference in the UI, e.g., "CMDB Asset Query API" |
|
|
9268
|
+
| description | string | No | Detailed description of the service |
|
|
9269
|
+
| url | string | Yes | API request URL, supports template variables |
|
|
9270
|
+
| headers | map[string]string | No | HTTP request headers for passing custom authentication, subject to [security blacklist](#HeaderBlacklist) restrictions |
|
|
9271
|
+
| timeout | int | No | Request timeout (in seconds),scope: 1~3 |
|
|
9272
|
+
| retry_count | int | No | Number of retries after request failure, ,scope: 0~1 |
|
|
9273
|
+
| insecure_skip_verify | bool | No | Skip certificate verification for HTTPS requests |
|
|
9274
|
+
| status | string | No | Service status, e.g., enabled, disabled |
|
|
9275
|
+
|
|
9276
|
+
</div>
|
|
9277
|
+
|
|
9278
|
+
### Label Enrichment Rule Configuration
|
|
9279
|
+
|
|
9280
|
+
When configuring label enrichment rules, you only need to focus on the following settings:
|
|
9281
|
+
|
|
9282
|
+
1. **result_label_keys**: Specify the list of labels you expect to retrieve from the API. Flashduty will automatically combine this list with the current \`event\` object into a request body and send it to your API
|
|
9283
|
+
2. **Mapping Service**: Select or configure the API service URL, Headers, and other information
|
|
9284
|
+
|
|
9285
|
+
<span id="HeaderBlacklist"></span>
|
|
9286
|
+
|
|
9287
|
+
## IV. Header Security Constraints
|
|
9288
|
+
|
|
9289
|
+
To prevent security bypasses, request smuggling, IP spoofing, and cache poisoning, the following Headers are **prohibited** when customizing API request headers. The system gateway will automatically filter or reject requests containing these Headers.
|
|
9290
|
+
|
|
9291
|
+
<div class="md-block">
|
|
9292
|
+
|
|
9293
|
+
| Category | Blacklisted Headers | Risk Description |
|
|
9294
|
+
| :--- | :--- | :--- |
|
|
9295
|
+
| **Authentication & Authorization** | \`authorization\`, \`proxy-authorization\`, \`cookie\`, \`x-api-key\`, \`x-access-token\` | Prevents credential leakage or unauthorized hijacking of existing authentication contexts |
|
|
9296
|
+
| **IP & Geolocation Spoofing** | \`x-forwarded-for\`, \`x-real-ip\`, \`true-client-ip\`, \`x-client-ip\` | Prevents clients from spoofing source IP to bypass rate limits or allowlists/blocklists |
|
|
9297
|
+
| **Host & Routing Manipulation** | \`host\`, \`x-forwarded-host\`, \`x-forwarded-proto\`, \`x-internal-id\`, \`x-user-id\` | Prevents Host injection attacks, redirect loops, or spoofing internal system IDs |
|
|
9298
|
+
| **Protocol & Request Smuggling** | \`transfer-encoding\`, \`upgrade\`, \`connection\` | Prevents request smuggling attacks exploiting HTTP protocol differences |
|
|
9299
|
+
|
|
9300
|
+
</div>
|
|
9301
|
+
|
|
9302
|
+
### Header Best Practices
|
|
9303
|
+
|
|
9304
|
+
1. **Allowlist Mode**: It is recommended to only allow custom Headers prefixed with \`X-Custom-\` or \`X-Enrich-\`
|
|
9305
|
+
2. **Length Limits**: The Key or Value length of a single Header should not exceed 1024 bytes
|
|
9306
|
+
3. **Format Validation**: Header Values must not contain line breaks (\`\\r\`, \`\\n\`) to prevent Header injection attacks
|
|
9307
|
+
|
|
9308
|
+
## V. Best Practices
|
|
9309
|
+
|
|
9310
|
+
1. **Performance First:** This API is on the critical path of alert processing and must ensure low latency. Queries to external data sources should be as fast as possible, and implementing caching is recommended.
|
|
9311
|
+
|
|
9312
|
+
2. **Clear Error Handling:** Make good use of HTTP status codes (especially \`404\`) to convey clear execution results.
|
|
9313
|
+
|
|
9314
|
+
3. **Idempotency:** The API design should be as idempotent as possible. Multiple calls for the same \`event\` should return the same result.
|
|
9315
|
+
|
|
9316
|
+
4. **Security:** The API must be protected through authentication and authorization mechanisms. Using custom Headers (e.g., \`X-Custom-Auth\`) for passing authentication information is recommended.
|
|
9317
|
+
|
|
9318
|
+
## VI. FAQ
|
|
9319
|
+
|
|
9320
|
+
1. **Is there a response timeout for the service?**
|
|
9321
|
+
|
|
9322
|
+
- The service must respond within the configured timeout period; exceeding this is considered a failure
|
|
9323
|
+
|
|
9324
|
+
2. **What happens if the API returns a failure?**
|
|
9325
|
+
|
|
9326
|
+
- The alert will be processed normally, but no enrichment labels will be attached
|
|
9327
|
+
- Based on the configured retry count, the system may retry the request
|
|
9328
|
+
|
|
9329
|
+
3. **Can result_label_keys be changed dynamically?**
|
|
9330
|
+
|
|
9331
|
+
- Yes, you can modify the list of expected labels in Flashduty at any time without modifying the API code
|
|
8747
9332
|
`};n.FlashDocsEn=h})(window);
|