create-chayns-app 1.1.6-beta.0 → 1.1.7
This diff represents the content of publicly available package versions that have been released to one of the supported registries. The information contained in this diff is provided for informational purposes only and reflects changes between package versions as they appear in their respective public registries.
- package/.github/workflows/publish.yml +20 -20
- package/LICENSE +20 -20
- package/README.md +180 -180
- package/dist/index.js +3 -2
- package/package.json +56 -56
- package/templates/api-v5/page/src/components/App.jsx +9 -9
- package/templates/api-v5/page/src/index.html +19 -19
- package/templates/api-v5/page/src/index.jsx +17 -17
- package/templates/api-v5/page-module/src/components/App.jsx +30 -30
- package/templates/api-v5/page-module/src/components/AppWrapper.jsx +16 -16
- package/templates/api-v5/page-module/src/components/app.scss +3 -3
- package/templates/api-v5/page-module-redux/src/components/App.jsx +32 -32
- package/templates/api-v5/page-module-redux/src/components/AppWrapper.jsx +20 -20
- package/templates/api-v5/page-module-redux/src/components/app.scss +3 -3
- package/templates/api-v5/page-redux/src/components/App.jsx +7 -7
- package/templates/api-v5/page-redux/src/components/AppWrapper.jsx +17 -17
- package/templates/api-v5/page-redux/src/index.html +19 -19
- package/templates/api-v5/page-redux/src/index.jsx +15 -15
- package/templates/api-v5/page-ts/src/components/App.tsx +7 -7
- package/templates/api-v5/page-ts/src/index.html +19 -19
- package/templates/api-v5/page-ts/src/index.tsx +18 -16
- package/templates/api-v5/page-ts-module/src/components/App.tsx +30 -30
- package/templates/api-v5/page-ts-module/src/components/AppWrapper.tsx +16 -16
- package/templates/api-v5/page-ts-module/src/components/app.scss +3 -3
- package/templates/api-v5/page-ts-module-redux/src/components/App.tsx +31 -31
- package/templates/api-v5/page-ts-module-redux/src/components/AppWrapper.tsx +16 -16
- package/templates/api-v5/page-ts-module-redux/src/components/app.scss +3 -3
- package/templates/api-v5/page-ts-redux/src/components/App.tsx +7 -7
- package/templates/api-v5/page-ts-redux/src/components/AppWrapper.tsx +17 -17
- package/templates/api-v5/page-ts-redux/src/index.html +19 -19
- package/templates/api-v5/page-ts-redux/src/index.tsx +17 -15
- package/templates/api-v5/shared/js/src/redux-modules/counter/counterSelectors.js +3 -3
- package/templates/api-v5/shared/js/src/redux-modules/counter/counterSlice.js +23 -23
- package/templates/api-v5/shared/js/src/redux-modules/index.js +11 -11
- package/templates/api-v5/shared/js/template-package-redux.json +36 -36
- package/templates/api-v5/shared/js/template-package.json +34 -34
- package/templates/api-v5/shared/toolkit.config-module.js +9 -9
- package/templates/api-v5/shared/toolkit.config.js +5 -5
- package/templates/api-v5/shared/ts/src/redux-modules/counter/counterSelectors.ts +4 -4
- package/templates/api-v5/shared/ts/src/redux-modules/counter/counterSlice.ts +23 -23
- package/templates/api-v5/shared/ts/src/redux-modules/index.ts +14 -14
- package/templates/api-v5/shared/ts/template-package-redux.json +39 -39
- package/templates/api-v5/shared/ts/template-package.json +37 -37
- package/templates/api-v5/shared/ts/tsconfig.json +21 -21
- package/templates/page/README.md +51 -51
- package/templates/page/src/components/App.jsx +7 -7
- package/templates/page/src/index.html +19 -19
- package/templates/page/src/index.jsx +15 -15
- package/templates/page/template-gitignore +30 -30
- package/templates/page/template-package.json +33 -33
- package/templates/shared/README.md +51 -51
- package/templates/shared/template-gitignore +30 -30
- package/.idea/create-chayns-app.iml +0 -12
- package/.idea/inspectionProfiles/Project_Default.xml +0 -6
- package/.idea/modules.xml +0 -8
- package/.idea/vcs.xml +0 -40
|
@@ -1,20 +1,20 @@
|
|
|
1
|
-
name: Publish to NPM
|
|
2
|
-
|
|
3
|
-
on:
|
|
4
|
-
workflow_dispatch:
|
|
5
|
-
release:
|
|
6
|
-
types: [published]
|
|
7
|
-
|
|
8
|
-
jobs:
|
|
9
|
-
build:
|
|
10
|
-
runs-on: ubuntu-latest
|
|
11
|
-
steps:
|
|
12
|
-
- uses: actions/checkout@v2
|
|
13
|
-
- uses: actions/setup-node@v1
|
|
14
|
-
with:
|
|
15
|
-
node-version: '12.19.0'
|
|
16
|
-
registry-url: https://registry.npmjs.org/
|
|
17
|
-
- run:
|
|
18
|
-
- run:
|
|
19
|
-
env:
|
|
20
|
-
NODE_AUTH_TOKEN: ${{ secrets.NPM_TOKEN }}
|
|
1
|
+
name: Publish to NPM
|
|
2
|
+
|
|
3
|
+
on:
|
|
4
|
+
workflow_dispatch:
|
|
5
|
+
release:
|
|
6
|
+
types: [published]
|
|
7
|
+
|
|
8
|
+
jobs:
|
|
9
|
+
build:
|
|
10
|
+
runs-on: ubuntu-latest
|
|
11
|
+
steps:
|
|
12
|
+
- uses: actions/checkout@v2
|
|
13
|
+
- uses: actions/setup-node@v1
|
|
14
|
+
with:
|
|
15
|
+
node-version: '12.19.0'
|
|
16
|
+
registry-url: https://registry.npmjs.org/
|
|
17
|
+
- run: npm install --immutable
|
|
18
|
+
- run: npm publish
|
|
19
|
+
env:
|
|
20
|
+
NODE_AUTH_TOKEN: ${{ secrets.NPM_TOKEN }}
|
package/LICENSE
CHANGED
|
@@ -1,21 +1,21 @@
|
|
|
1
|
-
MIT License
|
|
2
|
-
|
|
3
|
-
Copyright (c) 2020 Tobit.Labs™
|
|
4
|
-
|
|
5
|
-
Permission is hereby granted, free of charge, to any person obtaining a copy
|
|
6
|
-
of this software and associated documentation files (the "Software"), to deal
|
|
7
|
-
in the Software without restriction, including without limitation the rights
|
|
8
|
-
to use, copy, modify, merge, publish, distribute, sublicense, and/or sell
|
|
9
|
-
copies of the Software, and to permit persons to whom the Software is
|
|
10
|
-
furnished to do so, subject to the following conditions:
|
|
11
|
-
|
|
12
|
-
The above copyright notice and this permission notice shall be included in all
|
|
13
|
-
copies or substantial portions of the Software.
|
|
14
|
-
|
|
15
|
-
THE SOFTWARE IS PROVIDED "AS IS", WITHOUT WARRANTY OF ANY KIND, EXPRESS OR
|
|
16
|
-
IMPLIED, INCLUDING BUT NOT LIMITED TO THE WARRANTIES OF MERCHANTABILITY,
|
|
17
|
-
FITNESS FOR A PARTICULAR PURPOSE AND NONINFRINGEMENT. IN NO EVENT SHALL THE
|
|
18
|
-
AUTHORS OR COPYRIGHT HOLDERS BE LIABLE FOR ANY CLAIM, DAMAGES OR OTHER
|
|
19
|
-
LIABILITY, WHETHER IN AN ACTION OF CONTRACT, TORT OR OTHERWISE, ARISING FROM,
|
|
20
|
-
OUT OF OR IN CONNECTION WITH THE SOFTWARE OR THE USE OR OTHER DEALINGS IN THE
|
|
1
|
+
MIT License
|
|
2
|
+
|
|
3
|
+
Copyright (c) 2020 Tobit.Labs™
|
|
4
|
+
|
|
5
|
+
Permission is hereby granted, free of charge, to any person obtaining a copy
|
|
6
|
+
of this software and associated documentation files (the "Software"), to deal
|
|
7
|
+
in the Software without restriction, including without limitation the rights
|
|
8
|
+
to use, copy, modify, merge, publish, distribute, sublicense, and/or sell
|
|
9
|
+
copies of the Software, and to permit persons to whom the Software is
|
|
10
|
+
furnished to do so, subject to the following conditions:
|
|
11
|
+
|
|
12
|
+
The above copyright notice and this permission notice shall be included in all
|
|
13
|
+
copies or substantial portions of the Software.
|
|
14
|
+
|
|
15
|
+
THE SOFTWARE IS PROVIDED "AS IS", WITHOUT WARRANTY OF ANY KIND, EXPRESS OR
|
|
16
|
+
IMPLIED, INCLUDING BUT NOT LIMITED TO THE WARRANTIES OF MERCHANTABILITY,
|
|
17
|
+
FITNESS FOR A PARTICULAR PURPOSE AND NONINFRINGEMENT. IN NO EVENT SHALL THE
|
|
18
|
+
AUTHORS OR COPYRIGHT HOLDERS BE LIABLE FOR ANY CLAIM, DAMAGES OR OTHER
|
|
19
|
+
LIABILITY, WHETHER IN AN ACTION OF CONTRACT, TORT OR OTHERWISE, ARISING FROM,
|
|
20
|
+
OUT OF OR IN CONNECTION WITH THE SOFTWARE OR THE USE OR OTHER DEALINGS IN THE
|
|
21
21
|
SOFTWARE.
|
package/README.md
CHANGED
|
@@ -1,180 +1,180 @@
|
|
|
1
|
-
<div align="center">
|
|
2
|
-
<h1>
|
|
3
|
-
<img src="https://raw.githubusercontent.com/TobitSoftware/create-chayns-app/HEAD/assets/logo.png" width="500px" alt="create-chayns-app" />
|
|
4
|
-
</h1>
|
|
5
|
-
<p>Create a new chayns® development project in one command.</p>
|
|
6
|
-
<div>
|
|
7
|
-
<a href="https://github.com/TobitSoftware/create-chayns-app/blob/master/LICENSE">
|
|
8
|
-
<img src="https://img.shields.io/github/license/TobitSoftware/create-chayns-app?style=for-the-badge" alt="" />
|
|
9
|
-
</a>
|
|
10
|
-
<a href="https://www.npmjs.com/package/create-chayns-app">
|
|
11
|
-
<img src="https://img.shields.io/npm/v/create-chayns-app?style=for-the-badge" alt="" />
|
|
12
|
-
</a>
|
|
13
|
-
<a href="https://github.com/TobitSoftware/create-chayns-app/commits">
|
|
14
|
-
<img src="https://img.shields.io/github/last-commit/TobitSoftware/create-chayns-app?style=for-the-badge" alt="" />
|
|
15
|
-
</a>
|
|
16
|
-
<a href="https://github.com/TobitSoftware/create-chayns-app/issues">
|
|
17
|
-
<img src="https://img.shields.io/github/issues-raw/TobitSoftware/create-chayns-app?style=for-the-badge" alt="" />
|
|
18
|
-
</a>
|
|
19
|
-
</div>
|
|
20
|
-
<hr />
|
|
21
|
-
<img src="https://raw.githubusercontent.com/TobitSoftware/create-chayns-app/HEAD/assets/demo.gif" alt="Demo of using create-chayns-app">
|
|
22
|
-
</div>
|
|
23
|
-
|
|
24
|
-
## Overview
|
|
25
|
-
|
|
26
|
-
- [Get Started](#get-started)
|
|
27
|
-
- [Developing a Custom Page](#developing-a-custom-page)
|
|
28
|
-
- [Developing a Pagemaker Plugin](#developing-a-pagemaker-plugin)
|
|
29
|
-
- [FAQ](#faq)
|
|
30
|
-
- [What is the difference between an Pagemaker plugin and a complete page?](#what-is-the-difference-between-an-pagemaker-plugin-and-a-complete-page)
|
|
31
|
-
- [How can I deploy the application so it will be permanently available to all users of my Site?](#how-can-i-deploy-the-application-so-it-will-be-permanently-available-to-all-users-of-my-site)
|
|
32
|
-
|
|
33
|
-
## Get Started
|
|
34
|
-
|
|
35
|
-
To bootstrap a new chayns® project, simply run
|
|
36
|
-
|
|
37
|
-
```bash
|
|
38
|
-
npx create-chayns-app
|
|
39
|
-
```
|
|
40
|
-
|
|
41
|
-
or
|
|
42
|
-
|
|
43
|
-
```bash
|
|
44
|
-
yarn create chayns-app
|
|
45
|
-
```
|
|
46
|
-
|
|
47
|
-
This will start an interactive wizard to guide you through the creation of your
|
|
48
|
-
project.
|
|
49
|
-
|
|
50
|
-
> A folder will be created in the current working directory of your terminal
|
|
51
|
-
> with the name of your project.
|
|
52
|
-
|
|
53
|
-
Depending on wether you choose to create a complete page or a pagemaker plugin,
|
|
54
|
-
continue with the ["Developing a Custom Page"](#developing-a-custom-page) or the
|
|
55
|
-
["Developing a Pagemaker Plugin"](#developing-a-pagemaker-plugin) guides
|
|
56
|
-
respectively.
|
|
57
|
-
|
|
58
|
-
> Don't know what to choose? Check out the
|
|
59
|
-
> [FAQ](#what-is-the-difference-between-an-pagemaker-plugin-and-a-complete-page).
|
|
60
|
-
|
|
61
|
-
### Developing a Custom Page
|
|
62
|
-
|
|
63
|
-
Since you chose the `A complete page` option for your project, we will be
|
|
64
|
-
creating a custom page. You can start a local development server by running
|
|
65
|
-
|
|
66
|
-
```bash
|
|
67
|
-
npm run dev
|
|
68
|
-
```
|
|
69
|
-
|
|
70
|
-
or
|
|
71
|
-
|
|
72
|
-
```bash
|
|
73
|
-
yarn dev
|
|
74
|
-
```
|
|
75
|
-
|
|
76
|
-
You need to develop the project in a chayns-environment for all features to work
|
|
77
|
-
properly. You have to create a Page on a chayns-Site you can manage, if you do
|
|
78
|
-
not have one yet, create one [here](https://chayns.net/).
|
|
79
|
-
|
|
80
|
-
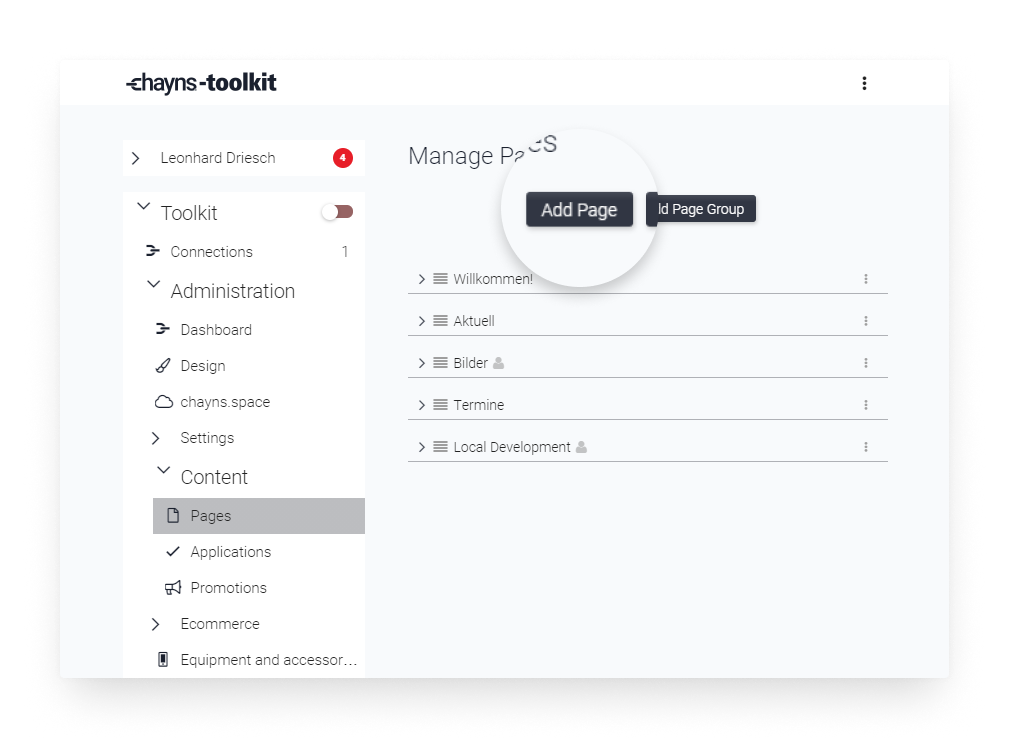
After finishing the setup of your site, head to **Administration > Content >
|
|
81
|
-
Pages** and click the "Add Page" button at the top.
|
|
82
|
-
|
|
83
|
-
|
|
84
|
-
|
|
85
|
-
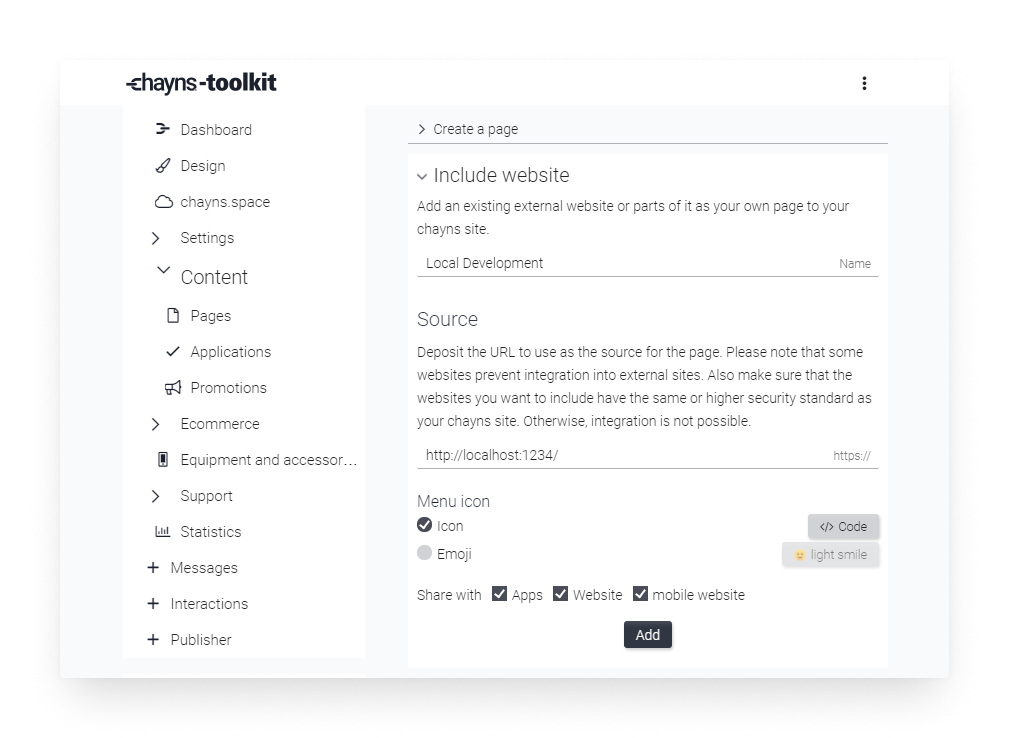
Choose the "Include website" option and enter a name you like (e.g. "Local
|
|
86
|
-
Development"). Set the source to `http://localhost:1234/`, the address at which
|
|
87
|
-
your local development server operates.
|
|
88
|
-
|
|
89
|
-
|
|
90
|
-
|
|
91
|
-
Your freshly created page should appear in the menu. Navigate to the page by
|
|
92
|
-
clicking it.
|
|
93
|
-
|
|
94
|
-
**Congrats!** You are now ready to develop your custom page! Start making
|
|
95
|
-
changes to your code and you should see them reflected on your Page in
|
|
96
|
-
real-time.
|
|
97
|
-
|
|
98
|
-
### Developing a Pagemaker Plugin
|
|
99
|
-
|
|
100
|
-
Since you chose the `A pagemaker plugin` option, we will be creating a plugin
|
|
101
|
-
for the Pagemaker, the powerful website editing tool included in chayns.
|
|
102
|
-
|
|
103
|
-
First you should start the local development server of your project by running
|
|
104
|
-
|
|
105
|
-
```bash
|
|
106
|
-
npm run dev
|
|
107
|
-
```
|
|
108
|
-
|
|
109
|
-
or
|
|
110
|
-
|
|
111
|
-
```bash
|
|
112
|
-
yarn dev
|
|
113
|
-
```
|
|
114
|
-
|
|
115
|
-
You need to develop the project in a chayns-environment for all features to work
|
|
116
|
-
properly. You have to create a Page on a chayns-Site you can manage, if you do
|
|
117
|
-
not have one yet, create one [here](https://chayns.net/).
|
|
118
|
-
|
|
119
|
-
After finishing the setup of your site, head to **Administration > Content >
|
|
120
|
-
Pages** and click the "Add Page" button at the top.
|
|
121
|
-
|
|
122
|
-

|
|
123
|
-
|
|
124
|
-
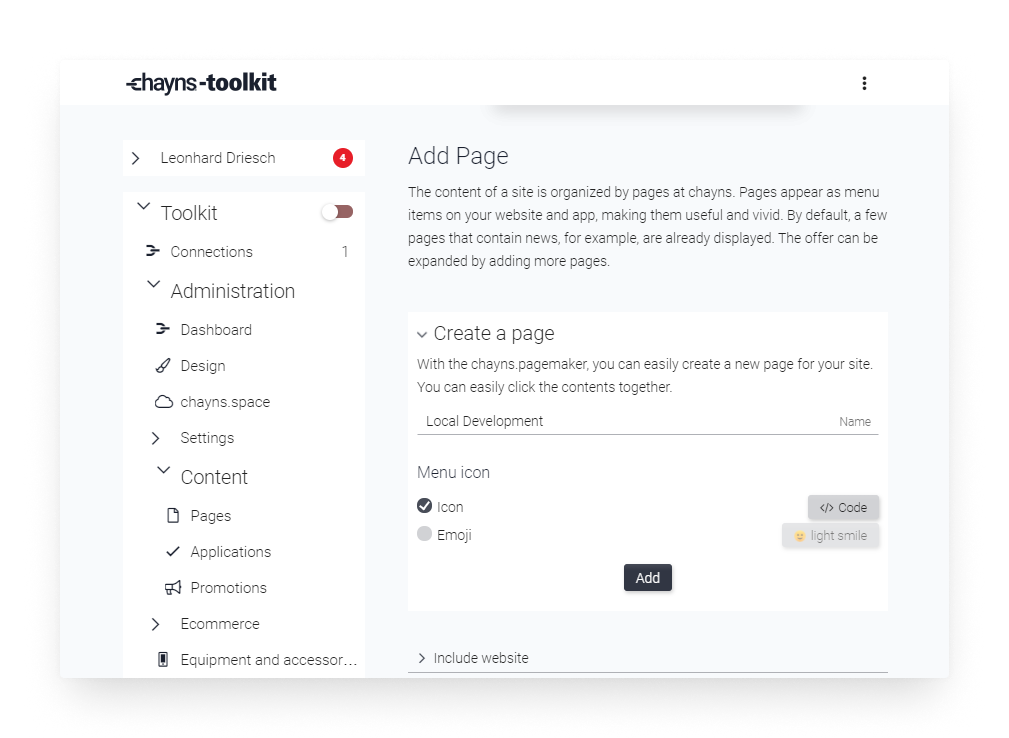
Choose the "Create a page" option and enter a name you like (e.g. "Local
|
|
125
|
-
Development"). Click the "Add" button to create the Page.
|
|
126
|
-
|
|
127
|
-
|
|
128
|
-
|
|
129
|
-
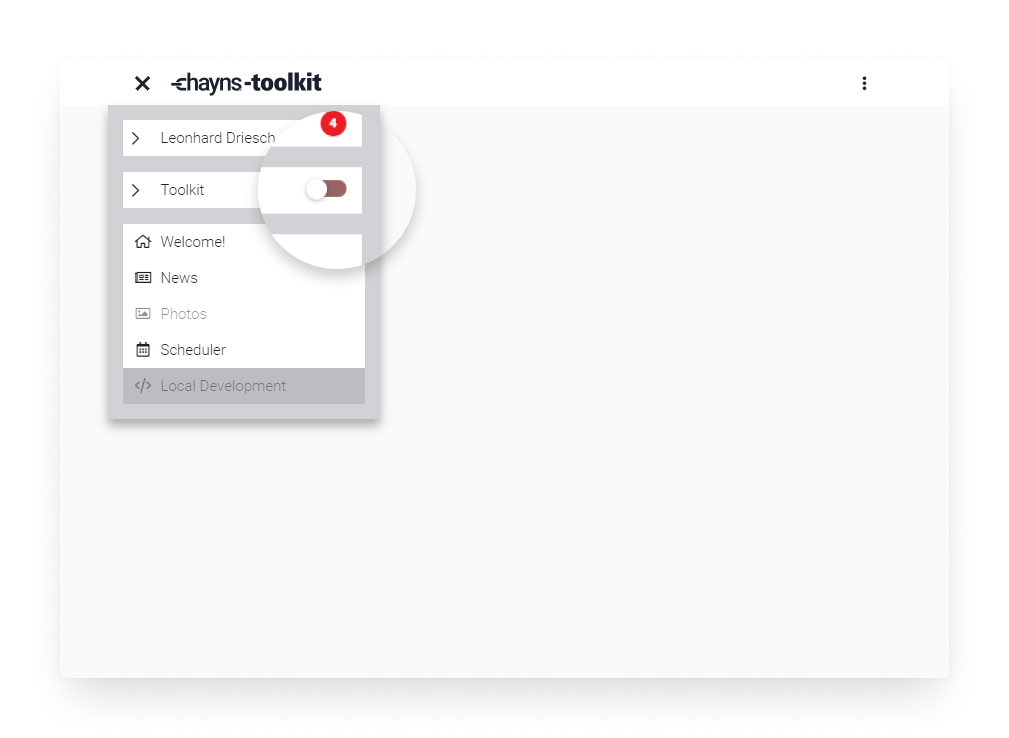
Your freshly created page should appear in the menu. Navigate to the page by
|
|
130
|
-
clicking it. There we want to enter _"admin-mode"_ by activating the switch in
|
|
131
|
-
the main menu, next to the name of your Site.
|
|
132
|
-
|
|
133
|
-
|
|
134
|
-
|
|
135
|
-
A floating button with a big plus sign should appear in the bottom right corner.
|
|
136
|
-
Click it and choose **Interactive > Iframe** in the flyout-menu to add an iframe
|
|
137
|
-
to your Page.
|
|
138
|
-
|
|
139
|
-
|
|
140
|
-
|
|
141
|
-
Hover over your newly created iframe and activate the chayns-API by clicking on
|
|
142
|
-
the code-symbol and confirming your choice in the dialog.
|
|
143
|
-
|
|
144
|
-
|
|
145
|
-
|
|
146
|
-
Now we have to set the iframe source (_"Quelle"_) to the address of your local
|
|
147
|
-
development server by tapping on the gear-icon and entering
|
|
148
|
-
`http://localhost:1234/` in the second input field.
|
|
149
|
-
|
|
150
|
-
|
|
151
|
-
|
|
152
|
-
**Congrats!** You are now ready to develop your Pagemaker plugin! Start making
|
|
153
|
-
changes to your code and you should see them reflected on your Page in
|
|
154
|
-
real-time.
|
|
155
|
-
|
|
156
|
-
## FAQ
|
|
157
|
-
|
|
158
|
-
### What is the difference between an Pagemaker plugin and a complete page?
|
|
159
|
-
|
|
160
|
-
A Pagemaker plugin only takes up a slice of your Page and you can add regular
|
|
161
|
-
Pagemaker elements like text, videos, graphics or other interactive elements
|
|
162
|
-
above and below your Plugin, that can be easily edited with the MS Word-like
|
|
163
|
-
interface of the Pagemaker, by anyone, including non-developers.
|
|
164
|
-
|
|
165
|
-
When developing a complete page, your application will take up all the space on
|
|
166
|
-
one page. On one hand you will have slightly more space to work with, but on the
|
|
167
|
-
other had this means that you cannot easily add content to this page with the
|
|
168
|
-
Pagemaker. Of course you can still add headings (`<h1>`) and other elements in
|
|
169
|
-
your code with HTML, but they will not be easily editable by other people,
|
|
170
|
-
especially non-developers.
|
|
171
|
-
|
|
172
|
-
### How can I deploy the application so it will be permanently available to all users of my Site?
|
|
173
|
-
|
|
174
|
-
The most simple way of deploying your app is to use a cloud deployment platform
|
|
175
|
-
like [Vercel](https://vercel.com/home) or [Netlify](https://www.netlify.com/).
|
|
176
|
-
These services will deploy any project for you, aslong as it is managed with a
|
|
177
|
-
Git repository on GitHub or similar services.
|
|
178
|
-
|
|
179
|
-
If these platforms ask for a build command, enter `chayns-toolkit build` and if
|
|
180
|
-
they ask for a publish directory, enter `build`.
|
|
1
|
+
<div align="center">
|
|
2
|
+
<h1>
|
|
3
|
+
<img src="https://raw.githubusercontent.com/TobitSoftware/create-chayns-app/HEAD/assets/logo.png" width="500px" alt="create-chayns-app" />
|
|
4
|
+
</h1>
|
|
5
|
+
<p>Create a new chayns® development project in one command.</p>
|
|
6
|
+
<div>
|
|
7
|
+
<a href="https://github.com/TobitSoftware/create-chayns-app/blob/master/LICENSE">
|
|
8
|
+
<img src="https://img.shields.io/github/license/TobitSoftware/create-chayns-app?style=for-the-badge" alt="" />
|
|
9
|
+
</a>
|
|
10
|
+
<a href="https://www.npmjs.com/package/create-chayns-app">
|
|
11
|
+
<img src="https://img.shields.io/npm/v/create-chayns-app?style=for-the-badge" alt="" />
|
|
12
|
+
</a>
|
|
13
|
+
<a href="https://github.com/TobitSoftware/create-chayns-app/commits">
|
|
14
|
+
<img src="https://img.shields.io/github/last-commit/TobitSoftware/create-chayns-app?style=for-the-badge" alt="" />
|
|
15
|
+
</a>
|
|
16
|
+
<a href="https://github.com/TobitSoftware/create-chayns-app/issues">
|
|
17
|
+
<img src="https://img.shields.io/github/issues-raw/TobitSoftware/create-chayns-app?style=for-the-badge" alt="" />
|
|
18
|
+
</a>
|
|
19
|
+
</div>
|
|
20
|
+
<hr />
|
|
21
|
+
<img src="https://raw.githubusercontent.com/TobitSoftware/create-chayns-app/HEAD/assets/demo.gif" alt="Demo of using create-chayns-app">
|
|
22
|
+
</div>
|
|
23
|
+
|
|
24
|
+
## Overview
|
|
25
|
+
|
|
26
|
+
- [Get Started](#get-started)
|
|
27
|
+
- [Developing a Custom Page](#developing-a-custom-page)
|
|
28
|
+
- [Developing a Pagemaker Plugin](#developing-a-pagemaker-plugin)
|
|
29
|
+
- [FAQ](#faq)
|
|
30
|
+
- [What is the difference between an Pagemaker plugin and a complete page?](#what-is-the-difference-between-an-pagemaker-plugin-and-a-complete-page)
|
|
31
|
+
- [How can I deploy the application so it will be permanently available to all users of my Site?](#how-can-i-deploy-the-application-so-it-will-be-permanently-available-to-all-users-of-my-site)
|
|
32
|
+
|
|
33
|
+
## Get Started
|
|
34
|
+
|
|
35
|
+
To bootstrap a new chayns® project, simply run
|
|
36
|
+
|
|
37
|
+
```bash
|
|
38
|
+
npx create-chayns-app
|
|
39
|
+
```
|
|
40
|
+
|
|
41
|
+
or
|
|
42
|
+
|
|
43
|
+
```bash
|
|
44
|
+
yarn create chayns-app
|
|
45
|
+
```
|
|
46
|
+
|
|
47
|
+
This will start an interactive wizard to guide you through the creation of your
|
|
48
|
+
project.
|
|
49
|
+
|
|
50
|
+
> A folder will be created in the current working directory of your terminal
|
|
51
|
+
> with the name of your project.
|
|
52
|
+
|
|
53
|
+
Depending on wether you choose to create a complete page or a pagemaker plugin,
|
|
54
|
+
continue with the ["Developing a Custom Page"](#developing-a-custom-page) or the
|
|
55
|
+
["Developing a Pagemaker Plugin"](#developing-a-pagemaker-plugin) guides
|
|
56
|
+
respectively.
|
|
57
|
+
|
|
58
|
+
> Don't know what to choose? Check out the
|
|
59
|
+
> [FAQ](#what-is-the-difference-between-an-pagemaker-plugin-and-a-complete-page).
|
|
60
|
+
|
|
61
|
+
### Developing a Custom Page
|
|
62
|
+
|
|
63
|
+
Since you chose the `A complete page` option for your project, we will be
|
|
64
|
+
creating a custom page. You can start a local development server by running
|
|
65
|
+
|
|
66
|
+
```bash
|
|
67
|
+
npm run dev
|
|
68
|
+
```
|
|
69
|
+
|
|
70
|
+
or
|
|
71
|
+
|
|
72
|
+
```bash
|
|
73
|
+
yarn dev
|
|
74
|
+
```
|
|
75
|
+
|
|
76
|
+
You need to develop the project in a chayns-environment for all features to work
|
|
77
|
+
properly. You have to create a Page on a chayns-Site you can manage, if you do
|
|
78
|
+
not have one yet, create one [here](https://chayns.net/).
|
|
79
|
+
|
|
80
|
+
After finishing the setup of your site, head to **Administration > Content >
|
|
81
|
+
Pages** and click the "Add Page" button at the top.
|
|
82
|
+
|
|
83
|
+

|
|
84
|
+
|
|
85
|
+
Choose the "Include website" option and enter a name you like (e.g. "Local
|
|
86
|
+
Development"). Set the source to `http://localhost:1234/`, the address at which
|
|
87
|
+
your local development server operates.
|
|
88
|
+
|
|
89
|
+

|
|
90
|
+
|
|
91
|
+
Your freshly created page should appear in the menu. Navigate to the page by
|
|
92
|
+
clicking it.
|
|
93
|
+
|
|
94
|
+
**Congrats!** You are now ready to develop your custom page! Start making
|
|
95
|
+
changes to your code and you should see them reflected on your Page in
|
|
96
|
+
real-time.
|
|
97
|
+
|
|
98
|
+
### Developing a Pagemaker Plugin
|
|
99
|
+
|
|
100
|
+
Since you chose the `A pagemaker plugin` option, we will be creating a plugin
|
|
101
|
+
for the Pagemaker, the powerful website editing tool included in chayns.
|
|
102
|
+
|
|
103
|
+
First you should start the local development server of your project by running
|
|
104
|
+
|
|
105
|
+
```bash
|
|
106
|
+
npm run dev
|
|
107
|
+
```
|
|
108
|
+
|
|
109
|
+
or
|
|
110
|
+
|
|
111
|
+
```bash
|
|
112
|
+
yarn dev
|
|
113
|
+
```
|
|
114
|
+
|
|
115
|
+
You need to develop the project in a chayns-environment for all features to work
|
|
116
|
+
properly. You have to create a Page on a chayns-Site you can manage, if you do
|
|
117
|
+
not have one yet, create one [here](https://chayns.net/).
|
|
118
|
+
|
|
119
|
+
After finishing the setup of your site, head to **Administration > Content >
|
|
120
|
+
Pages** and click the "Add Page" button at the top.
|
|
121
|
+
|
|
122
|
+

|
|
123
|
+
|
|
124
|
+
Choose the "Create a page" option and enter a name you like (e.g. "Local
|
|
125
|
+
Development"). Click the "Add" button to create the Page.
|
|
126
|
+
|
|
127
|
+

|
|
128
|
+
|
|
129
|
+
Your freshly created page should appear in the menu. Navigate to the page by
|
|
130
|
+
clicking it. There we want to enter _"admin-mode"_ by activating the switch in
|
|
131
|
+
the main menu, next to the name of your Site.
|
|
132
|
+
|
|
133
|
+

|
|
134
|
+
|
|
135
|
+
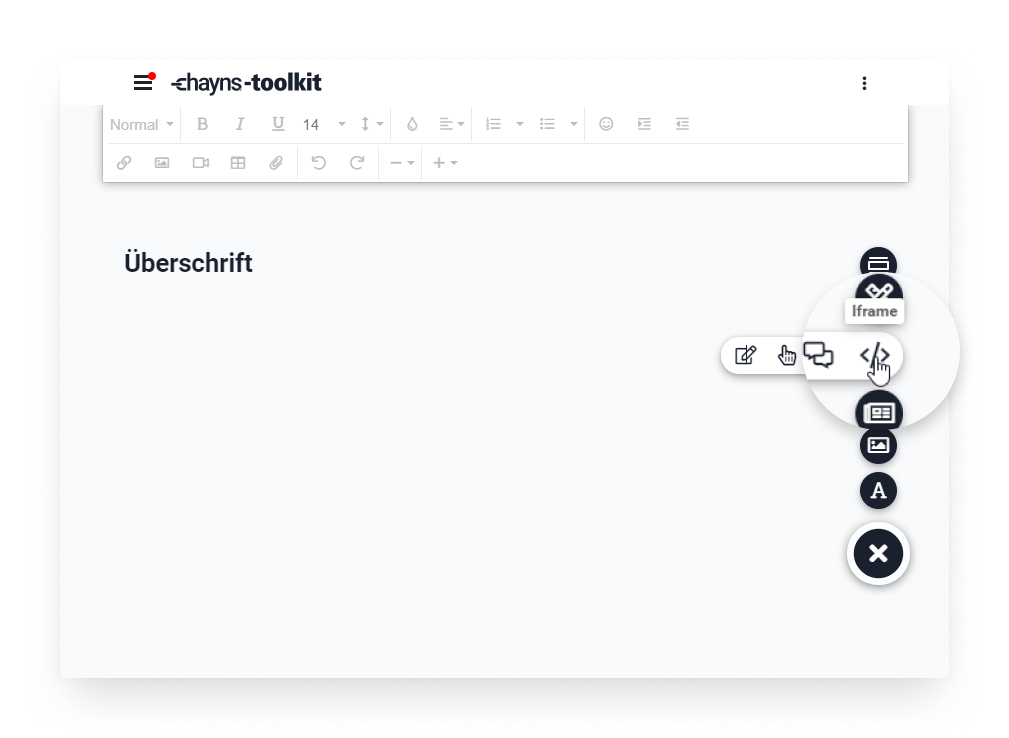
A floating button with a big plus sign should appear in the bottom right corner.
|
|
136
|
+
Click it and choose **Interactive > Iframe** in the flyout-menu to add an iframe
|
|
137
|
+
to your Page.
|
|
138
|
+
|
|
139
|
+

|
|
140
|
+
|
|
141
|
+
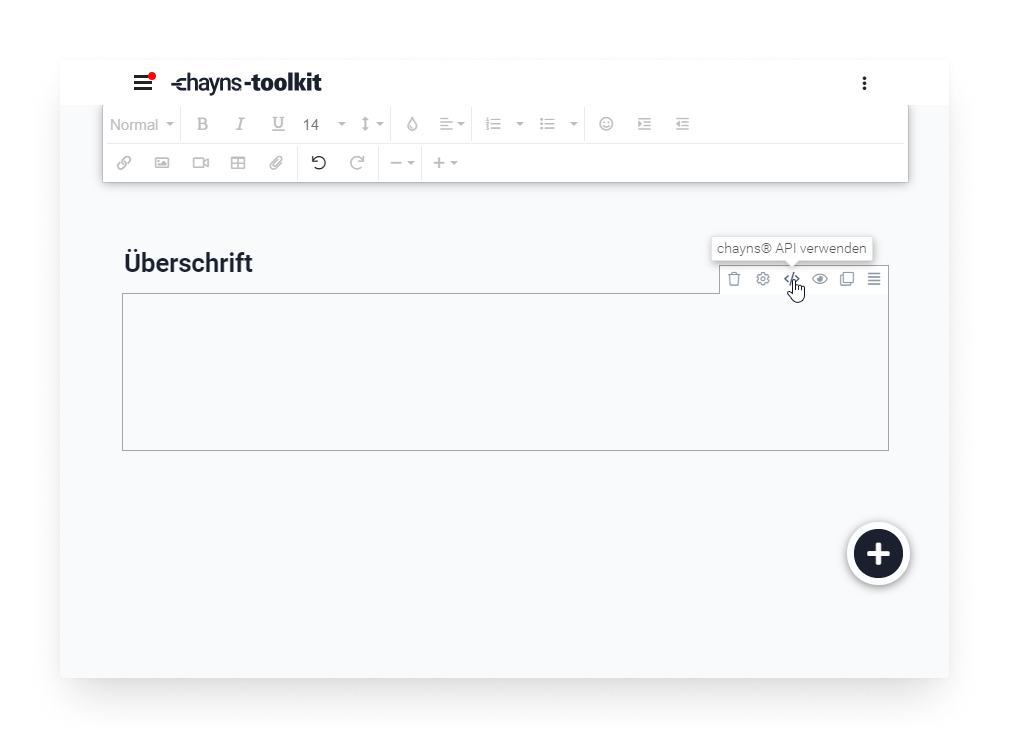
Hover over your newly created iframe and activate the chayns-API by clicking on
|
|
142
|
+
the code-symbol and confirming your choice in the dialog.
|
|
143
|
+
|
|
144
|
+

|
|
145
|
+
|
|
146
|
+
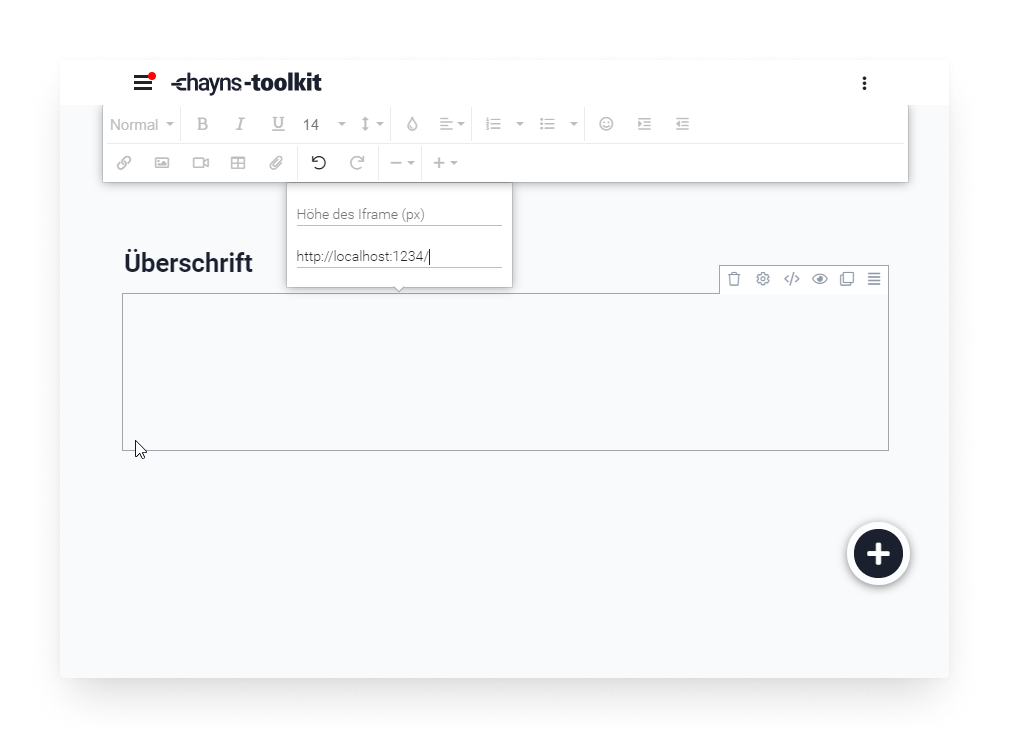
Now we have to set the iframe source (_"Quelle"_) to the address of your local
|
|
147
|
+
development server by tapping on the gear-icon and entering
|
|
148
|
+
`http://localhost:1234/` in the second input field.
|
|
149
|
+
|
|
150
|
+

|
|
151
|
+
|
|
152
|
+
**Congrats!** You are now ready to develop your Pagemaker plugin! Start making
|
|
153
|
+
changes to your code and you should see them reflected on your Page in
|
|
154
|
+
real-time.
|
|
155
|
+
|
|
156
|
+
## FAQ
|
|
157
|
+
|
|
158
|
+
### What is the difference between an Pagemaker plugin and a complete page?
|
|
159
|
+
|
|
160
|
+
A Pagemaker plugin only takes up a slice of your Page and you can add regular
|
|
161
|
+
Pagemaker elements like text, videos, graphics or other interactive elements
|
|
162
|
+
above and below your Plugin, that can be easily edited with the MS Word-like
|
|
163
|
+
interface of the Pagemaker, by anyone, including non-developers.
|
|
164
|
+
|
|
165
|
+
When developing a complete page, your application will take up all the space on
|
|
166
|
+
one page. On one hand you will have slightly more space to work with, but on the
|
|
167
|
+
other had this means that you cannot easily add content to this page with the
|
|
168
|
+
Pagemaker. Of course you can still add headings (`<h1>`) and other elements in
|
|
169
|
+
your code with HTML, but they will not be easily editable by other people,
|
|
170
|
+
especially non-developers.
|
|
171
|
+
|
|
172
|
+
### How can I deploy the application so it will be permanently available to all users of my Site?
|
|
173
|
+
|
|
174
|
+
The most simple way of deploying your app is to use a cloud deployment platform
|
|
175
|
+
like [Vercel](https://vercel.com/home) or [Netlify](https://www.netlify.com/).
|
|
176
|
+
These services will deploy any project for you, aslong as it is managed with a
|
|
177
|
+
Git repository on GitHub or similar services.
|
|
178
|
+
|
|
179
|
+
If these platforms ask for a build command, enter `chayns-toolkit build` and if
|
|
180
|
+
they ask for a publish directory, enter `build`.
|