apifox-mcp-server 0.0.3 → 0.0.5
This diff represents the content of publicly available package versions that have been released to one of the supported registries. The information contained in this diff is provided for informational purposes only and reflects changes between package versions as they appear in their respective public registries.
- package/README.md +23 -55
- package/index.js +32 -11080
- package/package.json +4 -1
package/README.md
CHANGED
|
@@ -1,50 +1,28 @@
|
|
|
1
|
+
# 使用 Apifox Mcp Server
|
|
2
|
+
|
|
1
3
|
## 环境要求
|
|
2
4
|
|
|
3
5
|
- NodeJS >= 18
|
|
4
6
|
|
|
5
|
-
## 1.
|
|
6
|
-
|
|
7
|
-
### 1.1 克隆 Apifox MCP 项目
|
|
8
|
-
|
|
9
|
-
```shell
|
|
10
|
-
git clone https://github.com/Tzott/apifox-mcp-demo.git
|
|
11
|
-
```
|
|
12
|
-
|
|
13
|
-
### 1.2 创建环境变量
|
|
14
|
-
|
|
15
|
-
```shell
|
|
16
|
-
cd apifox-mcp-demo
|
|
17
|
-
cp .env.example .env
|
|
18
|
-
```
|
|
19
|
-
|
|
20
|
-
### 1.3 在 Apifox 客户端中创建一个Access Token ,并写入到 .env 文件中
|
|
7
|
+
## 1. 前置准备
|
|
21
8
|
|
|
22
|
-
|
|
9
|
+
### 在 Apifox 客户端中创建一个Access Token
|
|
23
10
|
|
|
24
|
-

|
|
25
12
|
|
|
26
|
-
|
|
13
|
+
## 2. 在 不同的 MCP Client 中配置 Apifox Mcp Server
|
|
27
14
|
|
|
28
|
-
|
|
29
|
-
# 如果没有安装 pnpm,可先运行:npm i -g pnpm
|
|
15
|
+
### 2.1 Cursor
|
|
30
16
|
|
|
31
|
-
|
|
32
|
-
```
|
|
17
|
+
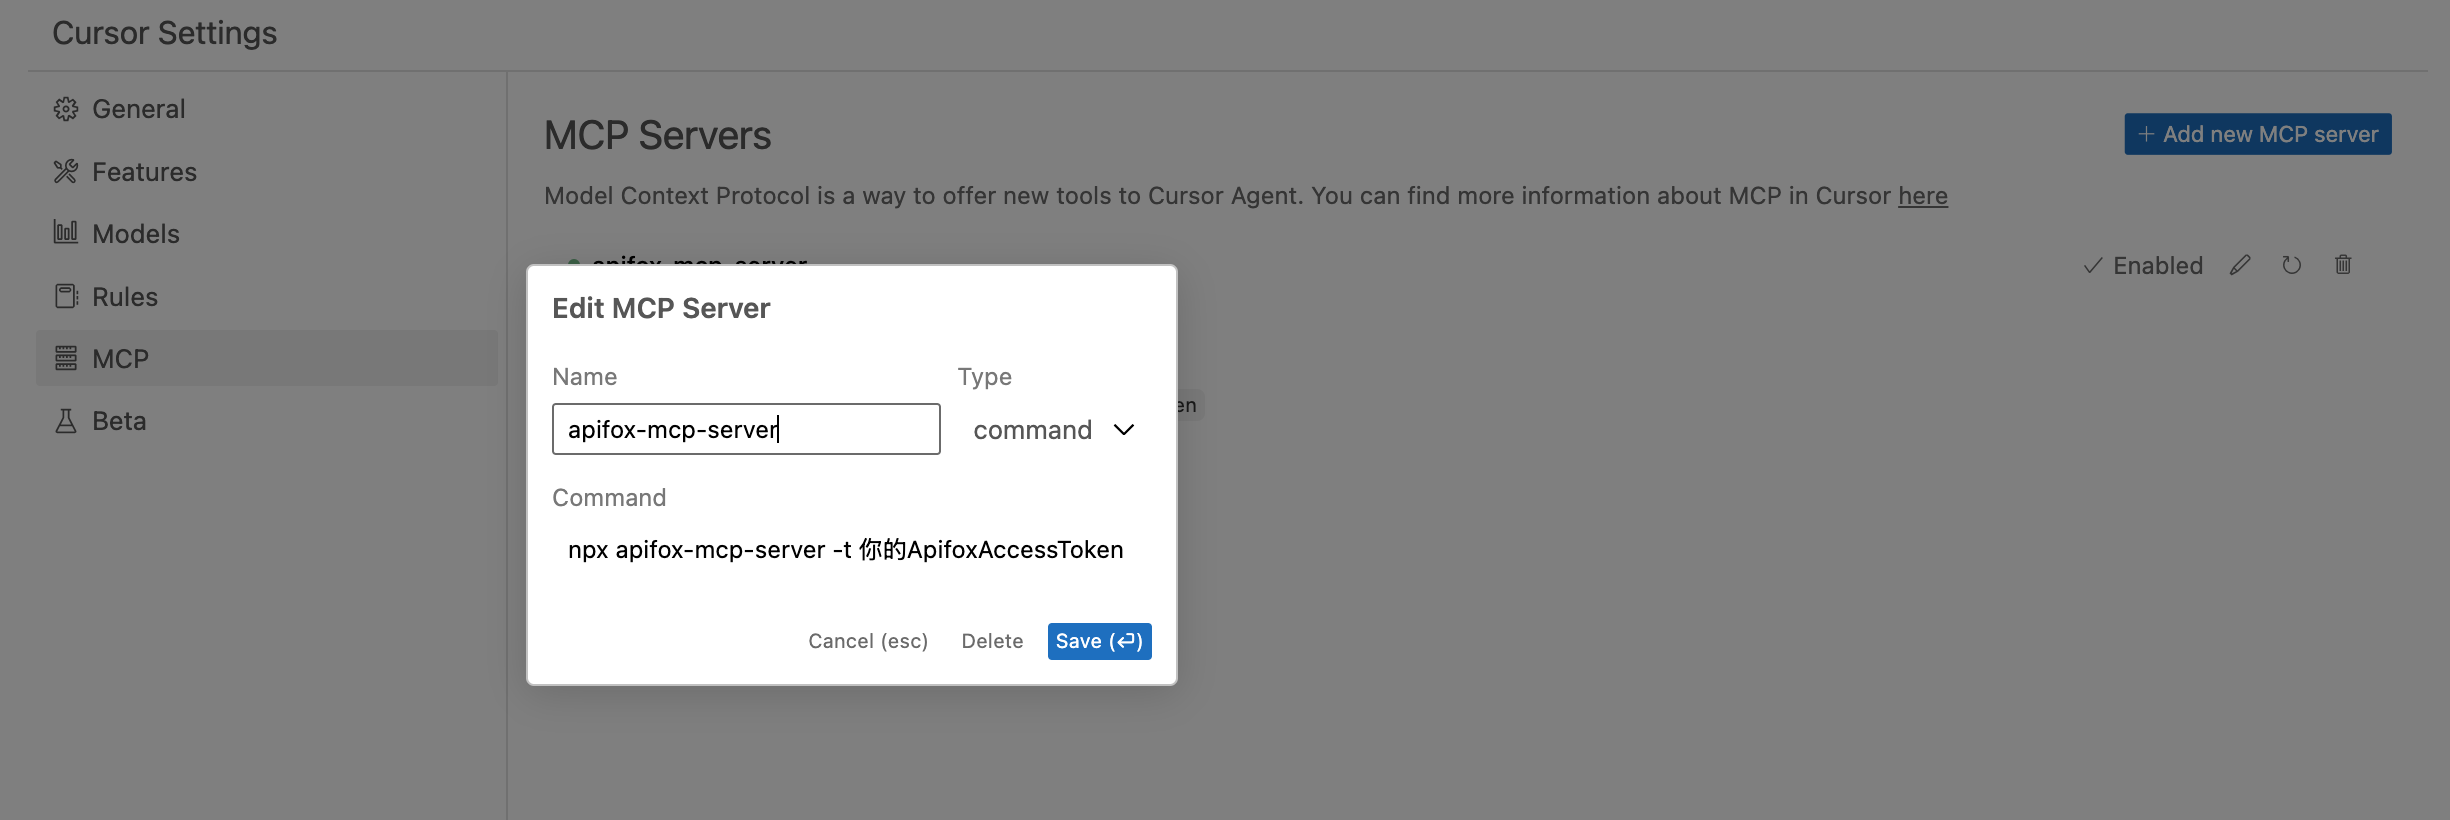
|
|
33
18
|
|
|
34
|
-
###
|
|
19
|
+
### 2.2 Cline
|
|
35
20
|
|
|
36
|
-
|
|
37
|
-
> apifox-mcp-demo@0.0.1 start /Users/code/apifox-mcp-demo
|
|
38
|
-
> node lib/index.js
|
|
39
|
-
|
|
40
|
-
SSE endpoint: http://localhost:4444/sse
|
|
41
|
-
Message endpoint: http://localhost:4444/messages
|
|
42
|
-
HTTP server listening on port 4444
|
|
43
|
-
```
|
|
21
|
+
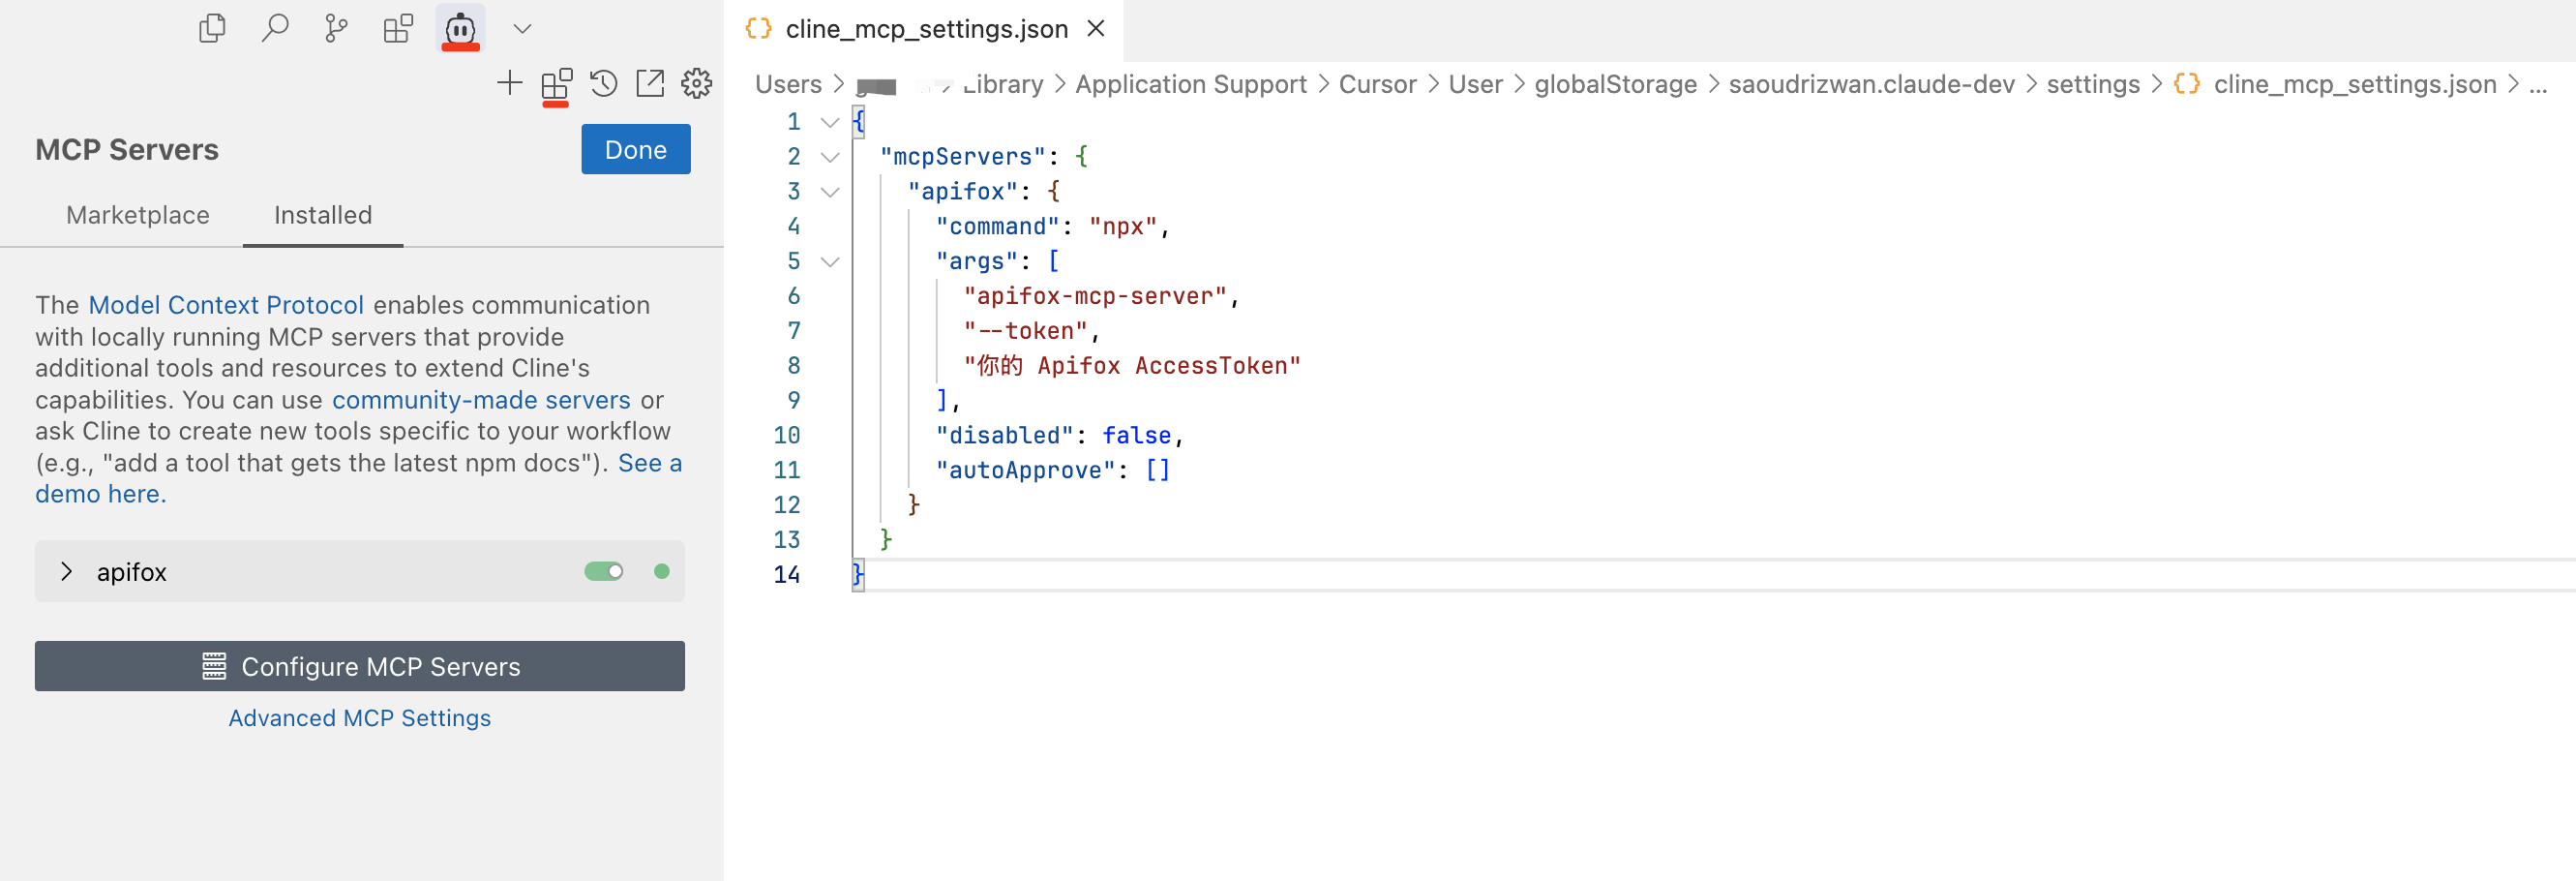
|
|
44
22
|
|
|
45
|
-
##
|
|
23
|
+
## 3. 使用 Apifox Mcp Server 以 Cursor 为例
|
|
46
24
|
|
|
47
|
-
###
|
|
25
|
+
### 3.1 创建一个空白的 Nestjs 项目
|
|
48
26
|
|
|
49
27
|
```shell
|
|
50
28
|
npm i -g @nestjs/cli
|
|
@@ -52,25 +30,15 @@ nest new nest-ai-demo
|
|
|
52
30
|
cd nest-ai-demo
|
|
53
31
|
```
|
|
54
32
|
|
|
55
|
-
###
|
|
56
|
-
|
|
57
|
-
从 `apifox-mcp-demo` 项目中复制 `sse 的地址`,填到 `Server URL` 中。
|
|
58
|
-
|
|
59
|
-

|
|
60
|
-
|
|
61
|
-
可以看到MCP 服务连接成功
|
|
62
|
-
|
|
63
|
-

|
|
64
|
-
|
|
65
|
-
### 2.3 打开 Cursor Composer,并切换到 Agent 模式
|
|
33
|
+
### 3.2 打开 Cursor Composer,并切换到 Agent 模式
|
|
66
34
|
|
|
67
|
-

|
|
68
36
|
|
|
69
|
-
###
|
|
37
|
+
### 3.3 复制一个 Apifox 接口的协作链接
|
|
70
38
|
|
|
71
|
-

|
|
72
40
|
|
|
73
|
-
###
|
|
41
|
+
### 3.4 粘贴到 Composer 中,并让其实现接口
|
|
74
42
|
|
|
75
43
|
```plaintext
|
|
76
44
|
https://app.apifox.com/link/project/5898808/apis/api-263537040
|
|
@@ -80,15 +48,15 @@ https://app.apifox.com/link/project/5898808/apis/api-263537040
|
|
|
80
48
|
注意:技术是:nestjs + typescript,项目我已经搭建了好了,直接实现即可。
|
|
81
49
|
```
|
|
82
50
|
|
|
83
|
-
###
|
|
51
|
+
### 3.5 Cursor Composer 实现完毕,并 Accepted 结果
|
|
84
52
|
|
|
85
|
-

|
|
86
54
|
|
|
87
|
-
###
|
|
55
|
+
### 3.6 启动 Nestjs服务,通过 Apifox 调用AI 写的接口,断言通过
|
|
88
56
|
|
|
89
|
-

|
|
90
58
|
|
|
91
|
-
|
|
59
|
+
### 3.7 其他
|
|
92
60
|
|
|
93
61
|
分页也简单实现了
|
|
94
|
-

|