@tencent-rtc/mcp 1.3.5 → 1.3.6
This diff represents the content of publicly available package versions that have been released to one of the supported registries. The information contained in this diff is provided for informational purposes only and reflects changes between package versions as they appear in their respective public registries.
- package/index.js +4 -4
- package/index.js.map +1 -1
- package/package.json +1 -1
- package/resource/doc/tuicallkit/flutter/workflow.md +331 -0
- package/tools/call/get-native-call-integration.js +27 -11
- package/tools/call/get-native-call-integration.js.map +1 -1
- package/tools/definitions/get_native_call_uikit_integration_def.js +17 -7
- package/tools/definitions/get_native_call_uikit_integration_def.js.map +1 -1
- package/utils/report-cls-client.js +1 -1
- package/utils/report-es-client.js +1 -1
- package/resource/doc/tuicallkit/flutter/how_to_run_flutter_callkit_demo.md +0 -101
- package/resource/doc/tuicallkit/iOS/how_to_run_iOS_callkit_demo.md +0 -98
- /package/resource/doc/tuicallkit/android/{how_to_integrated_android_callkit.md → integration.md} +0 -0
- /package/resource/doc/tuicallkit/android/{.gitkeep → workflow.md} +0 -0
- /package/resource/doc/tuicallkit/{android/api_TUICallObserver.md → faq/android_sdk/call-observer-api.md} +0 -0
- /package/resource/doc/tuicallkit/{android/api_TUICallKit.md → faq/android_sdk/callkit-api.md} +0 -0
- /package/resource/doc/tuicallkit/{flutter/api_TUICallDefine.md → faq/flutter_sdk/call-define-api.md} +0 -0
- /package/resource/doc/tuicallkit/{flutter/api_TUICallObserver.md → faq/flutter_sdk/call-observer-api.md} +0 -0
- /package/resource/doc/tuicallkit/{flutter/api_TUICallKit.md → faq/flutter_sdk/callkit-api.md} +0 -0
- /package/resource/doc/tuicallkit/{iOS/api_TUICallObserver.md → faq/ios_sdk/call-observer-api.md} +0 -0
- /package/resource/doc/tuicallkit/{iOS/api_TUICallKit.md → faq/ios_sdk/callkit-api.md} +0 -0
- /package/resource/doc/tuicallkit/flutter/{how_to_integrated_flutter_callkit.md → integration.md} +0 -0
- /package/resource/doc/tuicallkit/iOS/{how_to_integrated_iOS_callkit.md → integration.md} +0 -0
package/index.js
CHANGED
|
@@ -5,10 +5,10 @@ import { ServerConfig } from './server-config.js';
|
|
|
5
5
|
// 启动服务器
|
|
6
6
|
async function main() {
|
|
7
7
|
ServerConfig.getInstance();
|
|
8
|
-
const { SDKAppID } = ServerConfig.getInstance().getConfig();
|
|
9
|
-
if (isNaN(SDKAppID)) {
|
|
10
|
-
|
|
11
|
-
}
|
|
8
|
+
// const { SDKAppID } = ServerConfig.getInstance().getConfig();
|
|
9
|
+
// if (isNaN(SDKAppID)) {
|
|
10
|
+
// throw new Error('You have not configured the SDKAppID, or the configured SDKAppID is invalid. Please configure the correct SDKAppID through the `env` parameter in MCP.');
|
|
11
|
+
// }
|
|
12
12
|
const server = createServer();
|
|
13
13
|
const transport = new StdioServerTransport();
|
|
14
14
|
await server.connect(transport);
|
package/index.js.map
CHANGED
|
@@ -1 +1 @@
|
|
|
1
|
-
{"version":3,"file":"index.js","sourceRoot":"","sources":["../src/index.ts"],"names":[],"mappings":";AAEA,OAAO,EAAE,oBAAoB,EAAE,MAAM,2CAA2C,CAAC;AACjF,OAAO,EAAE,YAAY,EAAE,MAAM,aAAa,CAAC;AAC3C,OAAO,EAAE,YAAY,EAAE,MAAM,oBAAoB,CAAC;AAElD,QAAQ;AACR,KAAK,UAAU,IAAI;IACjB,YAAY,CAAC,WAAW,EAAE,CAAC;IAC3B
|
|
1
|
+
{"version":3,"file":"index.js","sourceRoot":"","sources":["../src/index.ts"],"names":[],"mappings":";AAEA,OAAO,EAAE,oBAAoB,EAAE,MAAM,2CAA2C,CAAC;AACjF,OAAO,EAAE,YAAY,EAAE,MAAM,aAAa,CAAC;AAC3C,OAAO,EAAE,YAAY,EAAE,MAAM,oBAAoB,CAAC;AAElD,QAAQ;AACR,KAAK,UAAU,IAAI;IACjB,YAAY,CAAC,WAAW,EAAE,CAAC;IAC3B,+DAA+D;IAC/D,yBAAyB;IACzB,+KAA+K;IAC/K,IAAI;IACJ,MAAM,MAAM,GAAc,YAAY,EAAE,CAAC;IACzC,MAAM,SAAS,GAAG,IAAI,oBAAoB,EAAE,CAAC;IAC7C,MAAM,MAAM,CAAC,OAAO,CAAC,SAAS,CAAC,CAAC;IAChC,OAAO,CAAC,KAAK,CAAC,0CAA0C,CAAC,CAAC;AAC5D,CAAC;AAED,IAAI,EAAE,CAAC,KAAK,CAAC,CAAC,KAAK,EAAE,EAAE;IACrB,OAAO,CAAC,KAAK,CAAC,eAAe,EAAE,KAAK,CAAC,CAAC;IACtC,OAAO,CAAC,IAAI,CAAC,CAAC,CAAC,CAAC;AAClB,CAAC,CAAC,CAAC"}
|
package/package.json
CHANGED
|
@@ -0,0 +1,331 @@
|
|
|
1
|
+
# Flutter TUICallKit Audio/Video Call Application Code Generation Workflow Instructions
|
|
2
|
+
|
|
3
|
+
## 📋 Purpose
|
|
4
|
+
|
|
5
|
+
To provide Agents with a **code generation blueprint for implementing Flutter TUICallKit core audio/video call features**, and guide Agents to **prioritize using the latest documentation content retrieved in real-time by tools**, specifically for Flutter audio/video call application scenarios.
|
|
6
|
+
|
|
7
|
+
---
|
|
8
|
+
|
|
9
|
+
## 🛑 Agent Execution Hard Constraints (Guardrails)
|
|
10
|
+
|
|
11
|
+
Agents must strictly follow these instructions when generating code:
|
|
12
|
+
|
|
13
|
+
### 0. 🚨 Core Principles (Highest Priority)
|
|
14
|
+
|
|
15
|
+
- ✅ Strictly generate code according to the sample code in the integration documentation, do not modify arbitrarily
|
|
16
|
+
- ✅ Fully implement login, one-on-one call, and group call features
|
|
17
|
+
- ✅ Use the `get_usersig` tool to generate UserSig for test accounts
|
|
18
|
+
- ✅ Use the latest version of the `tencent_calls_uikit` package (use `any` for version number)
|
|
19
|
+
|
|
20
|
+
### 1. Documentation-Driven Integration
|
|
21
|
+
- Strictly follow the steps in `llm_code_generation_instructions_md` returned by the tool
|
|
22
|
+
- Follow best practices and sample code from the integration documentation
|
|
23
|
+
|
|
24
|
+
### 2. Package Import Method
|
|
25
|
+
- **Configure pubspec.yaml**: Directly edit the file to add dependencies (avoid issues with flutter command not found)
|
|
26
|
+
```yaml
|
|
27
|
+
dependencies:
|
|
28
|
+
tencent_calls_uikit: any # ⚠️ Use any by default to automatically get the latest version
|
|
29
|
+
```
|
|
30
|
+
- Import statement: `import 'package:tencent_calls_uikit/tencent_calls_uikit.dart';`
|
|
31
|
+
- **⚠️ Prohibited**: `latest`, `^latest` and similar notations (not supported by Flutter, will cause installation failure)
|
|
32
|
+
|
|
33
|
+
### 3. Silent Integration Execution
|
|
34
|
+
- After all code writing is complete, automatically install dependencies and start the project in the final step
|
|
35
|
+
- **Dependency Installation Method**: Directly edit `pubspec.yaml` to add `tencent_calls_uikit: any`
|
|
36
|
+
- **Do not use `flutter pub add` command** (avoid failure due to flutter command not found)
|
|
37
|
+
- **Flutter Command Execution Strategy (Multi-level Degradation to Ensure Success)**:
|
|
38
|
+
1. **First Priority**: Try to execute `flutter pub get` directly
|
|
39
|
+
2. **Second Priority**: If failed, use `which flutter` to get the full path and execute
|
|
40
|
+
3. **Third Priority**: If still failed, try common paths:
|
|
41
|
+
- macOS/Linux: `$HOME/flutter/bin/flutter`
|
|
42
|
+
- macOS (Homebrew): `/opt/homebrew/bin/flutter`
|
|
43
|
+
4. **Final Degradation**: If all fail, **guide user to execute manually** (see guidance below)
|
|
44
|
+
- After successful startup, prompt the user to run the app on simulator or physical device
|
|
45
|
+
|
|
46
|
+
#### 📋 Manual Execution Degradation Guidance
|
|
47
|
+
|
|
48
|
+
**When automatic execution fails, guide the user to execute manually**:
|
|
49
|
+
|
|
50
|
+
```bash
|
|
51
|
+
# 1. Install dependencies
|
|
52
|
+
flutter pub get
|
|
53
|
+
|
|
54
|
+
# 2. iOS project additional execution
|
|
55
|
+
cd ios && pod install && cd ..
|
|
56
|
+
|
|
57
|
+
# 3. Start project
|
|
58
|
+
flutter run
|
|
59
|
+
```
|
|
60
|
+
|
|
61
|
+
**Common Issues**: flutter command not found → Check PATH environment variable; pod install failed → Execute `pod repo update`
|
|
62
|
+
|
|
63
|
+
### 4. Authentication Credentials Configuration (Important)
|
|
64
|
+
- Call the `get_usersig` tool to get SDKAppID, UserID, and UserSig
|
|
65
|
+
- Generate UserSig for 4 test accounts (user001/002/003/004)
|
|
66
|
+
- Authentication information can be hardcoded during testing, but must be annotated as test-only
|
|
67
|
+
- ⚠️ Security Warning: Inform users that UserSig must be generated on the server side in production environment
|
|
68
|
+
|
|
69
|
+
### 5. LoginPage Implementation Constraints 🔴
|
|
70
|
+
|
|
71
|
+
**⚠️ Priority Check: Whether Login Page Already Exists in Project**:
|
|
72
|
+
- Before implementing the login page, **must first check whether a login page already exists in the project**
|
|
73
|
+
- If a login page already exists, **must ask the user whether to execute default behavior**:
|
|
74
|
+
- **Option 1**: Use default behavior (create new LoginPage with dropdown, 3 test accounts, etc.)
|
|
75
|
+
- **Option 2**: Modify based on existing login page (keep user's UI and interaction logic, only add necessary TUICallKit login logic)
|
|
76
|
+
- If user chooses Option 2, should:
|
|
77
|
+
- Keep user's existing login page UI and interaction logic
|
|
78
|
+
- Only call `TUICallKit.instance.login` for secondary login after successful login
|
|
79
|
+
- Do not force use of dropdown and 3 test accounts
|
|
80
|
+
- If no login page exists in the project, or user chooses Option 1, implement according to default behavior below
|
|
81
|
+
|
|
82
|
+
**Default Login Page Implementation Requirements**:
|
|
83
|
+
- **Must implement login page**, including the following features:
|
|
84
|
+
1. **Dropdown to select UserID**: Provide four options: user001, user002, user003, user004
|
|
85
|
+
2. **Display SDKAppID**: Get from `get_usersig` and display (read-only, not editable)
|
|
86
|
+
3. **Auto-generate UserSig**: Automatically match from pre-generated UserSig based on selected UserID
|
|
87
|
+
4. **Login button**: Call `TUICallKit.instance.login` to login
|
|
88
|
+
- **Login interface must call `TUICallKit.instance.login`**, passing complete credentials obtained from `get_usersig`
|
|
89
|
+
- Automatically navigate to home page (HomePage) after successful login
|
|
90
|
+
|
|
91
|
+
**LoginPage Core Implementation Points**:
|
|
92
|
+
|
|
93
|
+
```dart
|
|
94
|
+
// 1. Define test account mapping table (obtained from get_usersig)
|
|
95
|
+
final Map<String, String> userSigMap = {
|
|
96
|
+
'user001': 'xxx', 'user002': 'xxx', 'user003': 'xxx', 'user004': 'xxx'
|
|
97
|
+
};
|
|
98
|
+
|
|
99
|
+
// 2. UI Components
|
|
100
|
+
// - SDKAppID display (read-only TextField)
|
|
101
|
+
// - UserID dropdown (DropdownButtonFormField, options generated from userSigMap.keys)
|
|
102
|
+
// - Login button
|
|
103
|
+
|
|
104
|
+
// 3. Login logic see integration documentation
|
|
105
|
+
```
|
|
106
|
+
|
|
107
|
+
### 6. HomePage Implementation Constraints 🔴
|
|
108
|
+
|
|
109
|
+
**Must implement home page**, including the following features:
|
|
110
|
+
|
|
111
|
+
1. **Display current logged-in UserID**
|
|
112
|
+
2. **Audio/Video call features** (unified user selection):
|
|
113
|
+
- **User list (multi-select)**: Display selectable users (user002, user003, user004, excluding current logged-in user)
|
|
114
|
+
- **Smart call type determination**:
|
|
115
|
+
- Select **1 user** → Automatically initiate **one-on-one call**
|
|
116
|
+
- Select **multiple users** → Automatically initiate **group call**
|
|
117
|
+
- **Voice call button**: Call `TUICallKit.instance.calls` to initiate voice call
|
|
118
|
+
- **Video call button**: Call `TUICallKit.instance.calls` to initiate video call
|
|
119
|
+
- **Implementation method**: Use `CheckboxListTile` for multi-select, supporting single and multiple selection
|
|
120
|
+
3. **Logout button**: Call `TUICallKit.instance.logout` to logout
|
|
121
|
+
|
|
122
|
+
**HomePage Core Implementation Points**:
|
|
123
|
+
|
|
124
|
+
```dart
|
|
125
|
+
// 1. Display current logged-in user (Card + ListTile)
|
|
126
|
+
|
|
127
|
+
// 2. User selection area (unified one-on-one/group calls)
|
|
128
|
+
// - User list: List<String> availableUsers = ['user002', 'user003', 'user004'].where((u) => u != currentUserId).toList();
|
|
129
|
+
// - Multi-select checkbox: CheckboxListTile (supports selecting 1 or multiple users)
|
|
130
|
+
// - Selected users: List<String> selectedUsers = [];
|
|
131
|
+
|
|
132
|
+
// 3. Call button area
|
|
133
|
+
// - Voice call button: ElevatedButton
|
|
134
|
+
// - Video call button: ElevatedButton
|
|
135
|
+
|
|
136
|
+
// 4. Initiate call and logout logic see integration documentation
|
|
137
|
+
```
|
|
138
|
+
|
|
139
|
+
### 7. MaterialApp Configuration Constraints 🔴
|
|
140
|
+
|
|
141
|
+
**Must add TUICallKit.navigatorObserver in MaterialApp**:
|
|
142
|
+
|
|
143
|
+
```dart
|
|
144
|
+
MaterialApp(
|
|
145
|
+
navigatorObservers: [TUICallKit.navigatorObserver], // ⚠️ Must be added
|
|
146
|
+
home: const LoginPage(),
|
|
147
|
+
)
|
|
148
|
+
```
|
|
149
|
+
|
|
150
|
+
### 8. Platform Configuration 🔴
|
|
151
|
+
|
|
152
|
+
**Android and iOS platform configuration please refer to integration documentation**:
|
|
153
|
+
- Android obfuscation rules and Multidex configuration see integration documentation "Step 2: Project Configuration - Android" section
|
|
154
|
+
- iOS permissions configuration (camera, microphone) see integration documentation "Step 2: Project Configuration - iOS" section
|
|
155
|
+
|
|
156
|
+
**⚠️ Android Obfuscation Configuration Syntax Check (Important)**:
|
|
157
|
+
Before configuring Android obfuscation rules, **must first check the build script type used in the project**, and choose the correct syntax based on actual situation:
|
|
158
|
+
|
|
159
|
+
| Build Script File | Syntax Type | Obfuscation Configuration Syntax |
|
|
160
|
+
|-------------------|-------------|----------------------------------|
|
|
161
|
+
| `android/app/build.gradle` | Groovy DSL | `minifyEnabled true` |
|
|
162
|
+
| `android/app/build.gradle.kts` | Kotlin DSL | `isMinifyEnabled = true` |
|
|
163
|
+
|
|
164
|
+
**Check Steps**:
|
|
165
|
+
1. Check the build script file name in `android/app/` directory
|
|
166
|
+
2. If it's `build.gradle` → Use Groovy syntax: `minifyEnabled true`
|
|
167
|
+
3. If it's `build.gradle.kts` → Use Kotlin DSL syntax: `isMinifyEnabled = true`
|
|
168
|
+
|
|
169
|
+
**⚠️ iOS Podfile Platform Version Configuration (Important)**:
|
|
170
|
+
When configuring iOS project, **must set minimum platform version to iOS 14.0 in `ios/Podfile`**:
|
|
171
|
+
|
|
172
|
+
```ruby
|
|
173
|
+
platform :ios, '14.0'
|
|
174
|
+
```
|
|
175
|
+
|
|
176
|
+
**Configuration Location**: Add this line at the top of Podfile, before the target configuration
|
|
177
|
+
|
|
178
|
+
### 9. Flutter Project Specifications
|
|
179
|
+
- Use Flutter >= 3.24.0, Dart >= 3.5.0 versions
|
|
180
|
+
- Follow Flutter official code style and best practices
|
|
181
|
+
|
|
182
|
+
### 10. Environment Dependency Preparation
|
|
183
|
+
- Ensure user has installed Flutter SDK
|
|
184
|
+
- **Flutter command execution follows multi-level degradation strategy in Section 3**
|
|
185
|
+
- iOS platform requires additional execution of `cd ios && pod install && cd ..` to install Pods dependencies
|
|
186
|
+
- **If automatic execution fails, must generate degradation script for user to execute manually**
|
|
187
|
+
|
|
188
|
+
---
|
|
189
|
+
|
|
190
|
+
## 📦 Core Version Requirements
|
|
191
|
+
|
|
192
|
+
| Tool/Platform | Minimum Version Requirement |
|
|
193
|
+
|---------------|----------------------------|
|
|
194
|
+
| **Flutter** | >= 3.24.0 |
|
|
195
|
+
| **Dart** | >= 3.5.0 |
|
|
196
|
+
|
|
197
|
+
**For detailed tool version requirements (Android Studio, Gradle, JDK, Xcode, etc.), please refer to integration documentation "Preparation - Environment Requirements" section**
|
|
198
|
+
|
|
199
|
+
---
|
|
200
|
+
|
|
201
|
+
## 📦 Automated Execution Commands
|
|
202
|
+
|
|
203
|
+
After Agent code generation is complete, execute in order:
|
|
204
|
+
|
|
205
|
+
```bash
|
|
206
|
+
FLUTTER_PATH=$(which flutter) # Get actual path
|
|
207
|
+
$FLUTTER_PATH pub get # Get dependencies (based on edited pubspec.yaml)
|
|
208
|
+
cd ios && pod install && cd .. # iOS dependencies (macOS)
|
|
209
|
+
$FLUTTER_PATH run # Start project
|
|
210
|
+
```
|
|
211
|
+
|
|
212
|
+
**Dependency Addition Method**: Directly edit `pubspec.yaml` to add `tencent_calls_uikit: any`, avoid executing `flutter pub add` command
|
|
213
|
+
|
|
214
|
+
**Degradation Strategy**: `which flutter` fails → Try `$HOME/flutter/bin/flutter` → Guide user to execute manually
|
|
215
|
+
|
|
216
|
+
---
|
|
217
|
+
|
|
218
|
+
## 📱 Physical Device Debugging Guide (User Instructions)
|
|
219
|
+
|
|
220
|
+
### iOS Physical Device Debugging
|
|
221
|
+
1. Connect device via USB, trust computer
|
|
222
|
+
2. **Open `ios/Runner.xcworkspace`** (not .xcodeproj)
|
|
223
|
+
3. Xcode configure signing (Automatically manage signing + Apple ID + modify Bundle ID)
|
|
224
|
+
4. Execute `flutter run -d ios` or `flutter devices` to view device then specify run
|
|
225
|
+
5. First run requires trusting developer on device: Settings → General → VPN & Device Management → Trust
|
|
226
|
+
|
|
227
|
+
### Android Physical Device Debugging
|
|
228
|
+
1. Connect device via USB
|
|
229
|
+
2. Enable developer mode (tap build number 7 times) + USB debugging
|
|
230
|
+
3. Device authorize USB debugging (allow)
|
|
231
|
+
4. Execute `adb devices` to verify connection, then `flutter run -d android`
|
|
232
|
+
|
|
233
|
+
---
|
|
234
|
+
|
|
235
|
+
## 🔄 Complete Automation Workflow
|
|
236
|
+
|
|
237
|
+
```mermaid
|
|
238
|
+
graph TD
|
|
239
|
+
A[Receive user requirements] --> B[Get Flutter actual path: which flutter]
|
|
240
|
+
B --> C[Check Flutter environment]
|
|
241
|
+
C --> D[Edit pubspec.yaml to add tencent_calls_uikit: any]
|
|
242
|
+
D --> E[Configure Android platform: obfuscation rules, Multidex]
|
|
243
|
+
E --> F[Configure iOS platform: Info.plist permissions]
|
|
244
|
+
F --> G[Configure main.dart: add navigatorObserver]
|
|
245
|
+
G --> H[Call get_usersig tool to generate UserSig for 3 accounts]
|
|
246
|
+
H --> I[Implement LoginPage: dropdown to select UserID]
|
|
247
|
+
I --> J[Implement HomePage: one-on-one and group calls]
|
|
248
|
+
J --> K[Call record_result to record integration results]
|
|
249
|
+
K --> L[Execute with full path: $FLUTTER_PATH pub get]
|
|
250
|
+
L --> M{iOS platform?}
|
|
251
|
+
M -->|Yes| N[Execute pod install]
|
|
252
|
+
M -->|No| O[Skip pod install]
|
|
253
|
+
N --> P[Guide user to connect physical device for debugging]
|
|
254
|
+
O --> P
|
|
255
|
+
P --> Q{Choose run method}
|
|
256
|
+
Q -->|Simulator| R[Execute: $FLUTTER_PATH run]
|
|
257
|
+
Q -->|iOS physical device| S[Execute: $FLUTTER_PATH run -d ios]
|
|
258
|
+
Q -->|Android physical device| T[Execute: $FLUTTER_PATH run -d android]
|
|
259
|
+
R --> U[Project startup successful]
|
|
260
|
+
S --> U
|
|
261
|
+
T --> U
|
|
262
|
+
```
|
|
263
|
+
|
|
264
|
+
---
|
|
265
|
+
|
|
266
|
+
## 📝 Key Points Summary
|
|
267
|
+
|
|
268
|
+
| Category | Requirement |
|
|
269
|
+
|----------|------------|
|
|
270
|
+
| **Framework Version** | Flutter >= 3.24.0, Dart >= 3.5.0 |
|
|
271
|
+
| **Integration Method** | pub package method (edit `pubspec.yaml` to add `tencent_calls_uikit: any`) |
|
|
272
|
+
| **Documentation Priority** | ⚠️ Strictly follow sample code in integration documentation, do not modify arbitrarily |
|
|
273
|
+
| **Silent Integration** | Automatically install dependencies and start project after code writing is complete, **must use `which flutter` to get actual path** |
|
|
274
|
+
| **Credential Acquisition** | ⚠️ Must use `get_usersig` tool to generate UserSig for 4 test accounts (user001/002/003/004) |
|
|
275
|
+
| **Login Page** | ⚠️ Must implement dropdown to select UserID, automatically match UserSig, prohibit manual input |
|
|
276
|
+
| **Home Page** | ⚠️ Must support unified user list, selecting 1 user automatically initiates one-on-one call, selecting multiple users automatically initiates group call |
|
|
277
|
+
| **Security Reminder** | ⚠️ Must inform user: Client-generated UserSig is only suitable for testing, production environment must generate on server side |
|
|
278
|
+
| **Result Recording** | ⚠️ Must call `record_result` tool to record results after integration is complete |
|
|
279
|
+
| **Platform Configuration** | ⚠️ Android and iOS platform configuration see integration documentation "Step 2: Project Configuration" section |
|
|
280
|
+
| **Navigator Observer** | ⚠️ Must add `TUICallKit.navigatorObserver` in MaterialApp |
|
|
281
|
+
|
|
282
|
+
---
|
|
283
|
+
|
|
284
|
+
## 🎯 Agent Execution Checklist
|
|
285
|
+
|
|
286
|
+
After completing code generation, Agent must confirm all the following items:
|
|
287
|
+
|
|
288
|
+
### Project Initialization
|
|
289
|
+
- [ ] Edited `pubspec.yaml` to add `tencent_calls_uikit: any` dependency
|
|
290
|
+
- [ ] Configured Android and iOS platforms according to integration documentation (see "Step 2: Project Configuration")
|
|
291
|
+
|
|
292
|
+
### Code Generation
|
|
293
|
+
- [ ] Configured `main.dart`, added `TUICallKit.navigatorObserver`
|
|
294
|
+
- [ ] Called `get_usersig` tool to generate UserSig for 4 accounts
|
|
295
|
+
- [ ] Implemented LoginPage (dropdown to select UserID, no manual input fields)
|
|
296
|
+
- [ ] Implemented HomePage (unified user list, select 1 for one-on-one call, select multiple for group call)
|
|
297
|
+
|
|
298
|
+
### Final Check
|
|
299
|
+
- [ ] Called `record_result` tool to record integration results
|
|
300
|
+
- [ ] Executed `flutter pub get` and `pod install` (iOS)
|
|
301
|
+
- [ ] Started project, prompted user to choose device
|
|
302
|
+
- [ ] Informed user: Production environment must generate UserSig on server side
|
|
303
|
+
|
|
304
|
+
---
|
|
305
|
+
|
|
306
|
+
## 🔗 Required Tools
|
|
307
|
+
|
|
308
|
+
### `get_usersig` - Get Test Authentication Information
|
|
309
|
+
Get SDKAppID, UserID (user001/002/003/004), UserSig.
|
|
310
|
+
- LoginPage: Dropdown to select UserID
|
|
311
|
+
- HomePage: Display selectable user list (excluding current logged-in user)
|
|
312
|
+
- Prohibit manual input of SDKAppID/SecretKey/UserSig
|
|
313
|
+
|
|
314
|
+
### `record_result` - Record Integration Results
|
|
315
|
+
Call after completing all integration steps and successfully starting project
|
|
316
|
+
|
|
317
|
+
---
|
|
318
|
+
|
|
319
|
+
## 📚 Related Resource Links
|
|
320
|
+
|
|
321
|
+
- **TUICallKit Flutter Pub Package**: https://pub.dev/packages/tencent_calls_uikit
|
|
322
|
+
- **Tencent Cloud Real-Time Communication TRTC Console**: https://console.cloud.tencent.com/trtc
|
|
323
|
+
- **Server-side UserSig Generation**: https://cloud.tencent.com/document/product/647/17275
|
|
324
|
+
- **Activate TRTC Service**: https://cloud.tencent.com/document/product/647/16788
|
|
325
|
+
- **Flutter Official Documentation**: https://flutter.dev/docs
|
|
326
|
+
|
|
327
|
+
---
|
|
328
|
+
|
|
329
|
+
**Applicable Platforms**: Flutter (Android & iOS)
|
|
330
|
+
**TUICallKit Version**: tencent_calls_uikit (latest version)
|
|
331
|
+
**Minimum Requirements**: Flutter >= 3.24.0, Dart >= 3.5.0
|
|
@@ -2,26 +2,42 @@ import { z } from 'zod';
|
|
|
2
2
|
import { GET_NATIVE_CALL_UIKIT_DEFINITION } from '../definitions/get_native_call_uikit_integration_def.js';
|
|
3
3
|
import { getDocContent } from '../../utils/get-doc-content.js';
|
|
4
4
|
import { reportCLSClient } from '../../utils/report-cls-client.js';
|
|
5
|
-
|
|
5
|
+
import { generateStructuredResult } from '../../utils/generate-structured-result.js';
|
|
6
|
+
async function getResultText(params) {
|
|
6
7
|
const { framework = '' } = params;
|
|
7
8
|
reportCLSClient({
|
|
8
9
|
method: 'get_native_call_uikit_integration',
|
|
9
|
-
framework
|
|
10
|
+
framework,
|
|
10
11
|
});
|
|
11
|
-
|
|
12
|
+
// 获取工作流指令
|
|
13
|
+
const baseInstructions = getDocContent(['tuicallkit', framework, 'workflow.md']);
|
|
14
|
+
// Call 默认全量集成,无需 goals 参数
|
|
15
|
+
const result = await generateStructuredResult({
|
|
16
|
+
baseInstructions,
|
|
17
|
+
goals: ['full-featured'], // 默认全量集成
|
|
18
|
+
framework,
|
|
19
|
+
pathMap: {
|
|
20
|
+
'full-featured': ['tuicallkit', framework, 'integration.md'],
|
|
21
|
+
},
|
|
22
|
+
});
|
|
23
|
+
return result;
|
|
12
24
|
}
|
|
13
25
|
const registryGetNativeCallIntegrationTool = (mcpServer) => {
|
|
14
26
|
const { name, description, parameter_descriptions } = GET_NATIVE_CALL_UIKIT_DEFINITION;
|
|
15
27
|
mcpServer.tool(name, description, {
|
|
16
28
|
framework: z.enum(['flutter', 'android', 'ios']).describe(parameter_descriptions.framework),
|
|
17
|
-
}, (params) =>
|
|
18
|
-
|
|
19
|
-
|
|
20
|
-
|
|
21
|
-
|
|
22
|
-
|
|
23
|
-
|
|
24
|
-
|
|
29
|
+
}, async (params) => {
|
|
30
|
+
const result = await getResultText(params);
|
|
31
|
+
return {
|
|
32
|
+
content: [
|
|
33
|
+
{
|
|
34
|
+
type: 'text',
|
|
35
|
+
text: result.llm_code_generation_instructions_md,
|
|
36
|
+
}
|
|
37
|
+
],
|
|
38
|
+
result: result,
|
|
39
|
+
};
|
|
40
|
+
});
|
|
25
41
|
};
|
|
26
42
|
export { registryGetNativeCallIntegrationTool };
|
|
27
43
|
//# sourceMappingURL=get-native-call-integration.js.map
|
|
@@ -1 +1 @@
|
|
|
1
|
-
{"version":3,"file":"get-native-call-integration.js","sourceRoot":"","sources":["../../../src/tools/call/get-native-call-integration.ts"],"names":[],"mappings":"AACA,OAAO,EAAE,CAAC,EAAE,MAAM,KAAK,CAAC;AACxB,OAAO,EAAE,gCAAgC,EAAE,MAAM,yDAAyD,CAAC;AAC3G,OAAO,EAAE,aAAa,EAAE,MAAM,gCAAgC,CAAC;AAC/D,OAAO,EAAE,eAAe,EAAE,MAAM,kCAAkC,CAAC;
|
|
1
|
+
{"version":3,"file":"get-native-call-integration.js","sourceRoot":"","sources":["../../../src/tools/call/get-native-call-integration.ts"],"names":[],"mappings":"AACA,OAAO,EAAE,CAAC,EAAE,MAAM,KAAK,CAAC;AACxB,OAAO,EAAE,gCAAgC,EAAE,MAAM,yDAAyD,CAAC;AAC3G,OAAO,EAAE,aAAa,EAAE,MAAM,gCAAgC,CAAC;AAC/D,OAAO,EAAE,eAAe,EAAE,MAAM,kCAAkC,CAAC;AACnE,OAAO,EAAE,wBAAwB,EAAE,MAAM,2CAA2C,CAAC;AAErF,KAAK,UAAU,aAAa,CAAC,MAA2B;IACtD,MAAM,EAAE,SAAS,GAAG,EAAE,EAAE,GAAG,MAAM,CAAC;IAClC,eAAe,CAAC;QACd,MAAM,EAAE,mCAAmC;QAC3C,SAAS;KACV,CAAC,CAAC;IACH,UAAU;IACV,MAAM,gBAAgB,GAAG,aAAa,CAAC,CAAC,YAAY,EAAE,SAAS,EAAE,aAAa,CAAC,CAAC,CAAC;IACjF,0BAA0B;IAC1B,MAAM,MAAM,GAAG,MAAM,wBAAwB,CAAC;QAC5C,gBAAgB;QAChB,KAAK,EAAE,CAAC,eAAe,CAAC,EAAE,SAAS;QACnC,SAAS;QACT,OAAO,EAAE;YACP,eAAe,EAAE,CAAC,YAAY,EAAE,SAAS,EAAE,gBAAgB,CAAC;SAC7D;KACF,CAAC,CAAA;IACF,OAAO,MAAM,CAAC;AAChB,CAAC;AAED,MAAM,oCAAoC,GAAG,CAAC,SAAoB,EAAE,EAAE;IACpE,MAAM,EAAE,IAAI,EAAE,WAAW,EAAE,sBAAsB,EAAE,GAAG,gCAAgC,CAAC;IACvF,SAAS,CAAC,IAAI,CACZ,IAAI,EACJ,WAAW,EACX;QACE,SAAS,EAAE,CAAC,CAAC,IAAI,CAAC,CAAC,SAAS,EAAE,SAAS,EAAE,KAAK,CAAC,CAAC,CAAC,QAAQ,CAAC,sBAAsB,CAAC,SAAS,CAAC;KAC5F,EACD,KAAK,EAAE,MAAW,EAAE,EAAE;QACpB,MAAM,MAAM,GAAG,MAAM,aAAa,CAAC,MAAM,CAAC,CAAA;QAC1C,OAAO;YACL,OAAO,EAAE;gBACP;oBACE,IAAI,EAAE,MAAM;oBACZ,IAAI,EAAE,MAAM,CAAC,mCAAmC;iBACjD;aACF;YACD,MAAM,EAAE,MAAM;SACf,CAAA;IACL,CAAC,CAAC,CAAC;AACL,CAAC,CAAC;AAEF,OAAO,EAAE,oCAAoC,EAAE,CAAC"}
|
|
@@ -1,17 +1,27 @@
|
|
|
1
1
|
const TOOL_DESCRIPTION = `
|
|
2
|
-
|
|
2
|
+
【Core Purpose】: As a professional Native audio/video call TUICallKit integration assistant, this tool is specifically designed to provide Agents with workflow action instructions and real-time aggregated latest documentation content to guide LLM in helping users implement mobile audio/video call features.
|
|
3
3
|
|
|
4
|
-
|
|
4
|
+
【Functional Goals】:
|
|
5
|
+
Integrate complete audio/video call features. Including one-on-one calls, group calls, call answering, call interface, etc. **Suitable for building WeChat/WeCom-style audio/video call applications, supporting one-on-one and group call scenarios.**
|
|
5
6
|
|
|
6
|
-
|
|
7
|
+
【Keywords】:
|
|
8
|
+
'Native', 'Mobile', 'Call', 'TUICallKit', 'Audio/Video Call', 'Video Call', 'Voice Call', 'WeChat', 'WeCom', 'Flutter', 'Android', 'iOS', 'Integration', 'One-on-One Call', 'Group Call', 'Call', 'Answer'.
|
|
7
9
|
|
|
8
|
-
|
|
10
|
+
【Action Instructions and Workflow Guidance】:
|
|
11
|
+
When handling user requirements, Agents should use the llm_code_generation_instructions_md field returned by this tool. This field contains:
|
|
12
|
+
1. Core workflow instructions: Including environment preparation, dependency installation, SDK initialization, UserSig authentication, and component version information.
|
|
13
|
+
2. Real-time documentation content: Providing the latest content from official integration guides.
|
|
9
14
|
|
|
10
|
-
|
|
11
|
-
|
|
15
|
+
LLM must prioritize and exclusively use the real-time content returned by this tool to generate code, avoiding accessing external URLs independently.
|
|
16
|
+
|
|
17
|
+
【Mandatory Constraints】:
|
|
18
|
+
1. Platform Selection Constraint: If the user has not explicitly specified a platform, or the intent is unclear, must first call the 'present_framework_choice' tool to guide the user to choose among flutter, android, ios.
|
|
19
|
+
2. Result Recording Constraint: After TUICallKit component integration is complete and the project starts successfully, must call the 'record_result' tool to record integration results.
|
|
20
|
+
|
|
21
|
+
【Supported Platforms】: flutter, android, ios.
|
|
12
22
|
`;
|
|
13
23
|
const PARAMETER_DESCRIPTIONS = {
|
|
14
|
-
framework: '
|
|
24
|
+
framework: 'Native audio/video call TUICallKit platform type. Available values: flutter (Flutter cross-platform), android (Android native), ios (iOS native).',
|
|
15
25
|
};
|
|
16
26
|
export const GET_NATIVE_CALL_UIKIT_DEFINITION = {
|
|
17
27
|
name: 'get_native_call_uikit_integration',
|
|
@@ -1 +1 @@
|
|
|
1
|
-
{"version":3,"file":"get_native_call_uikit_integration_def.js","sourceRoot":"","sources":["../../../src/tools/definitions/get_native_call_uikit_integration_def.ts"],"names":[],"mappings":"AAAA,MAAM,gBAAgB,GAAG
|
|
1
|
+
{"version":3,"file":"get_native_call_uikit_integration_def.js","sourceRoot":"","sources":["../../../src/tools/definitions/get_native_call_uikit_integration_def.ts"],"names":[],"mappings":"AAAA,MAAM,gBAAgB,GAAG;;;;;;;;;;;;;;;;;;;;;CAqBxB,CAAC;AAEF,MAAM,sBAAsB,GAAG;IAC7B,SAAS,EAAE,mJAAmJ;CAC/J,CAAC;AAEF,MAAM,CAAC,MAAM,gCAAgC,GAAG;IAC9C,IAAI,EAAE,mCAAmC;IACzC,WAAW,EAAE,gBAAgB;IAC7B,sBAAsB,EAAE,sBAAsB;CAC/C,CAAC"}
|
|
@@ -1,101 +0,0 @@
|
|
|
1
|
-
This article will guide you on how to quickly run through the Audio and Video Call Demo. By following this document, you can have the Demo up and running in 10 minutes, and ultimately experience an Audio and Video Call feature with a complete UI interface.
|
|
2
|
-
<table>
|
|
3
|
-
<tr>
|
|
4
|
-
<td rowspan="1" colSpan="1" >1v1 Video Call</td>
|
|
5
|
-
|
|
6
|
-
<td rowspan="1" colSpan="1" >Group call</td>
|
|
7
|
-
</tr>
|
|
8
|
-
|
|
9
|
-
<tr>
|
|
10
|
-
<td rowspan="1" colSpan="1" >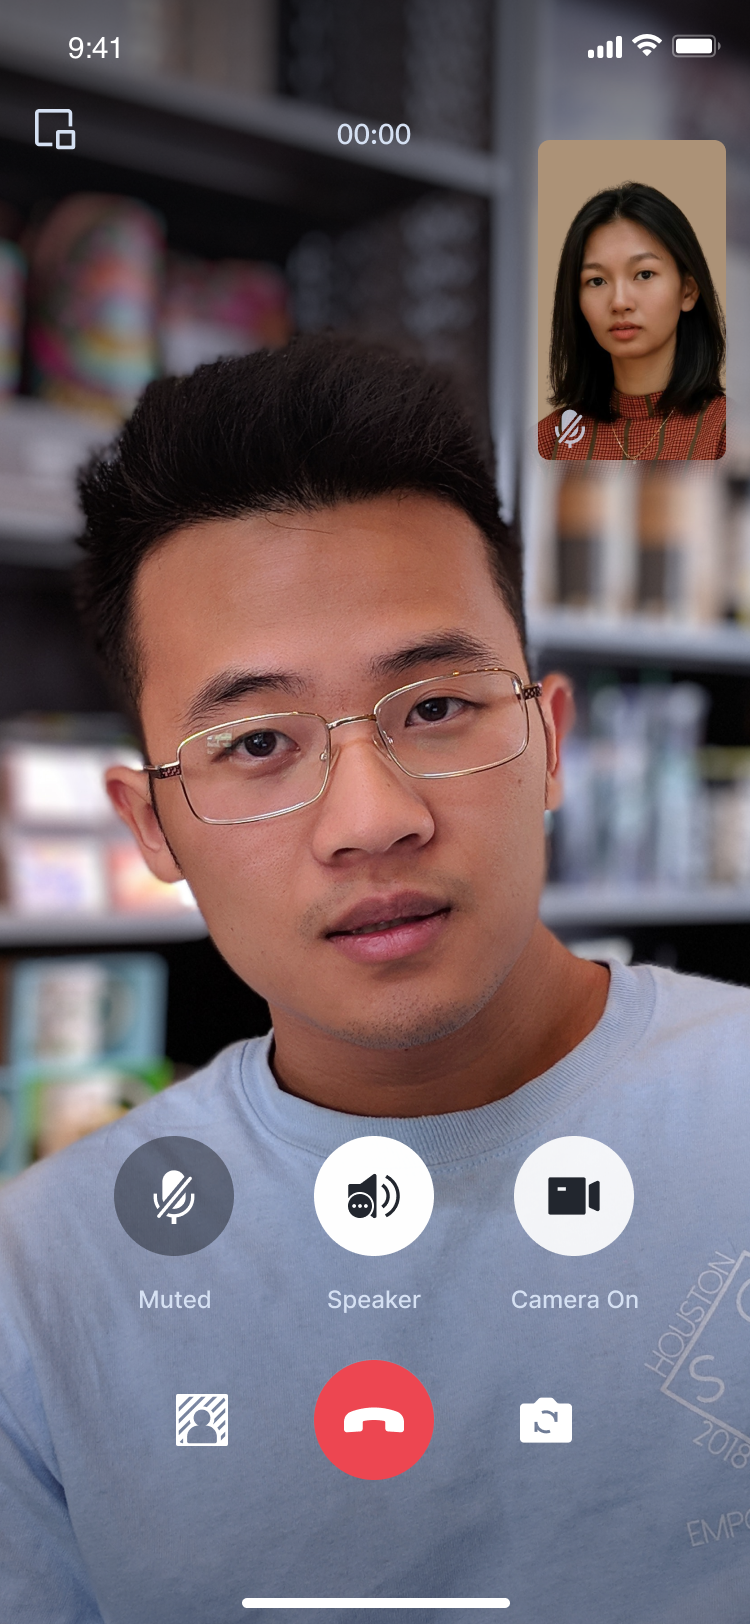</td>
|
|
11
|
-
|
|
12
|
-
<td rowspan="1" colSpan="1" >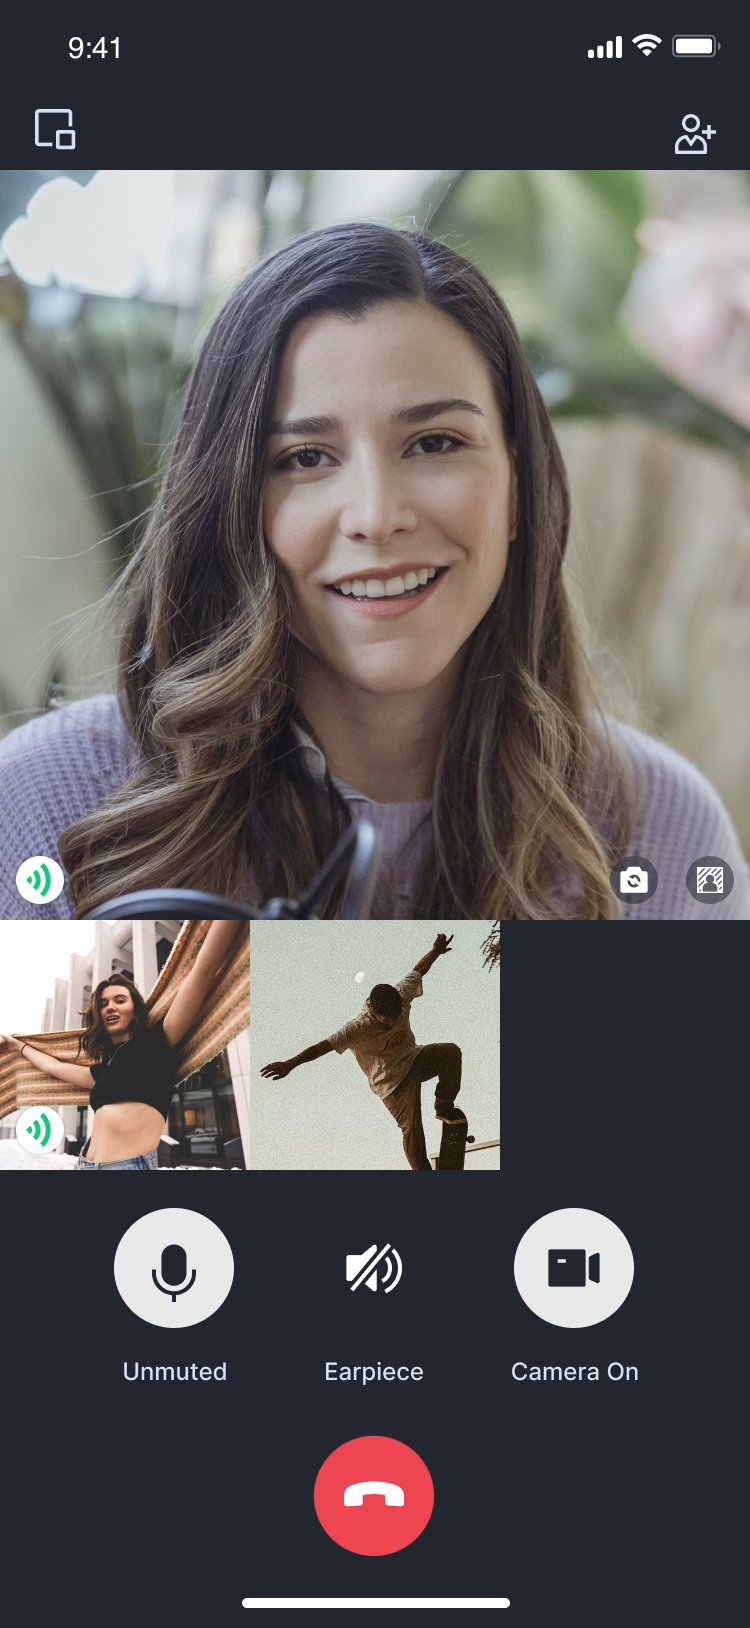</td>
|
|
13
|
-
</tr>
|
|
14
|
-
</table>
|
|
15
|
-
|
|
16
|
-
|
|
17
|
-
## Environment preparations
|
|
18
|
-
|
|
19
|
-
### Flutter
|
|
20
|
-
|
|
21
|
-
Flutter 3.0 or later.
|
|
22
|
-
|
|
23
|
-
### Android
|
|
24
|
-
- Android Studio 3.5 or above.
|
|
25
|
-
|
|
26
|
-
- Android devices with Android 4.1 or higher versions.
|
|
27
|
-
|
|
28
|
-
|
|
29
|
-
### iOS
|
|
30
|
-
- Xcode 13.0 or above.
|
|
31
|
-
|
|
32
|
-
- Please ensure your project is set up with a valid developer signature.
|
|
33
|
-
|
|
34
|
-
|
|
35
|
-
## Step 1: Download the Demo
|
|
36
|
-
1. Download the [TUICallKit Demo](https://github.com/Tencent-RTC/TUICallKit/tree/main) source code from GitHub, or directly run the following command in the command line:
|
|
37
|
-
|
|
38
|
-
``` bash
|
|
39
|
-
git clone
|
|
40
|
-
```
|
|
41
|
-
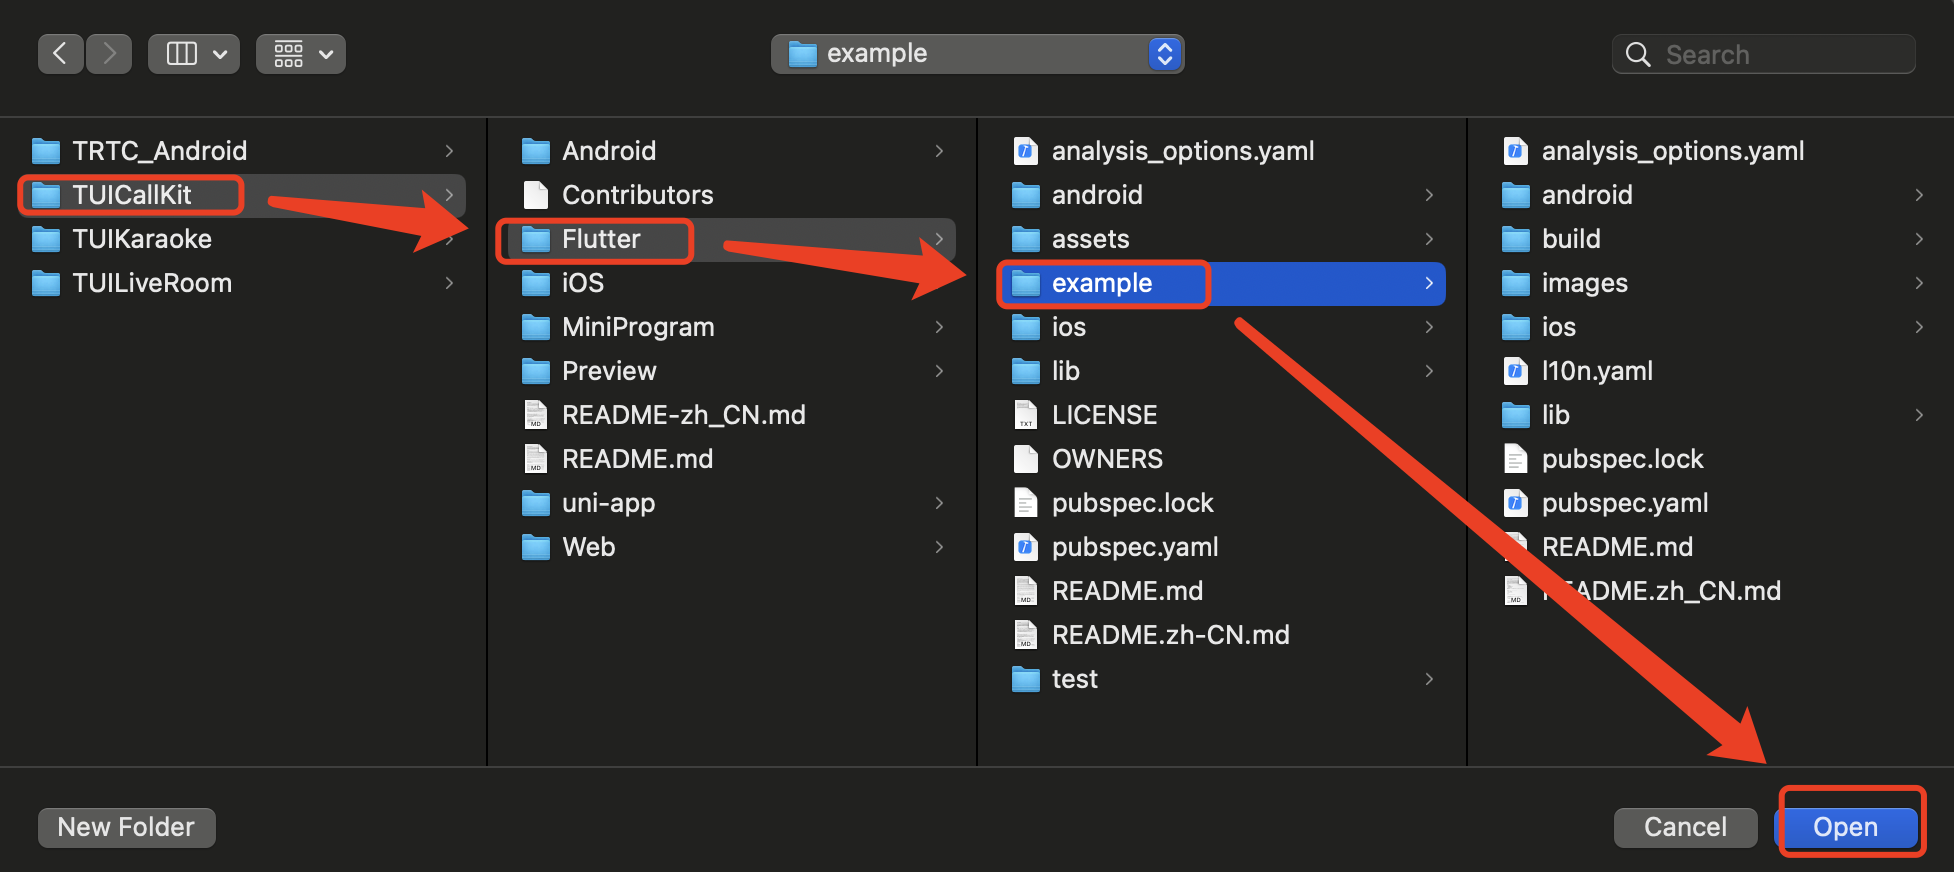
2. Open the TUICallKit Flutter example in Android Studio or VSCode. The following process will take Android Studio as an example:
|
|
42
|
-
|
|
43
|
-
|
|
44
|
-
|
|
45
|
-
|
|
46
|
-
|
|
47
|
-
## Step 2: Configure the Demo
|
|
48
|
-
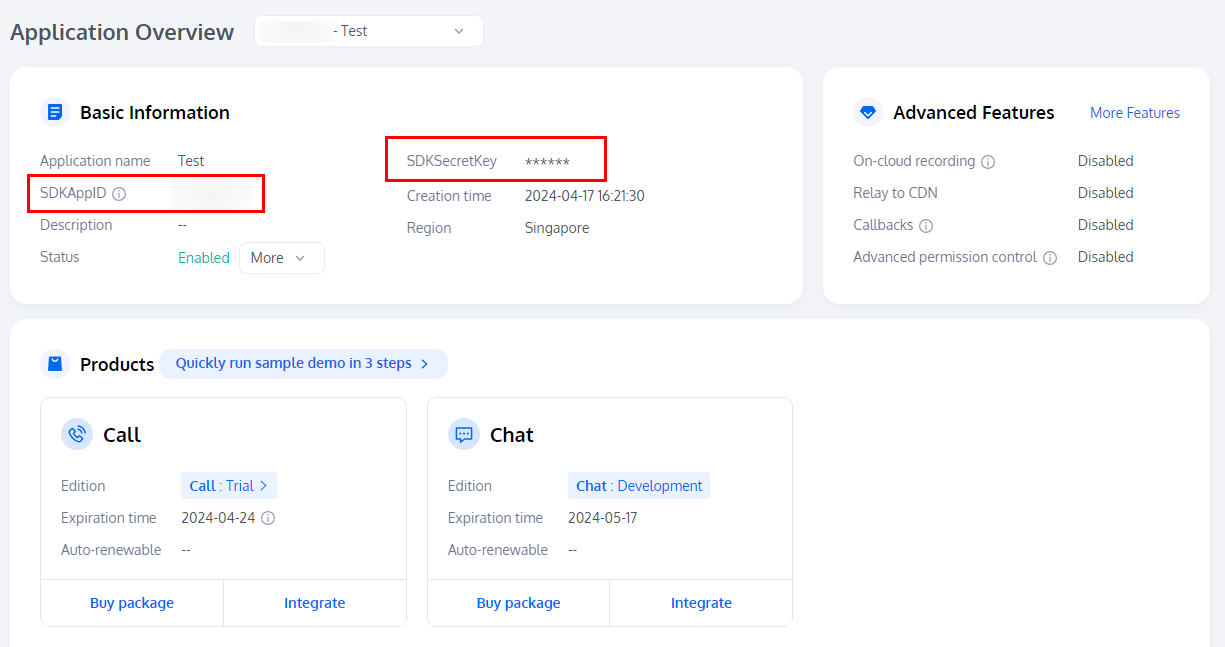
1. [Activate the audio and video services](https://write.woa.com/document/140196392040579072), to obtain the **SDKAppID** and **SDKSecretKey**.
|
|
49
|
-
|
|
50
|
-
|
|
51
|
-
|
|
52
|
-
|
|
53
|
-
2. Open the `Flutter/example/lib/debug/generate_test_user_sig.dart` file and fill in the SDKAppID and SDKSecretKey obtained when [Activating the Service](https://write.woa.com/document/140196392040579072):
|
|
54
|
-
|
|
55
|
-
|
|
56
|
-
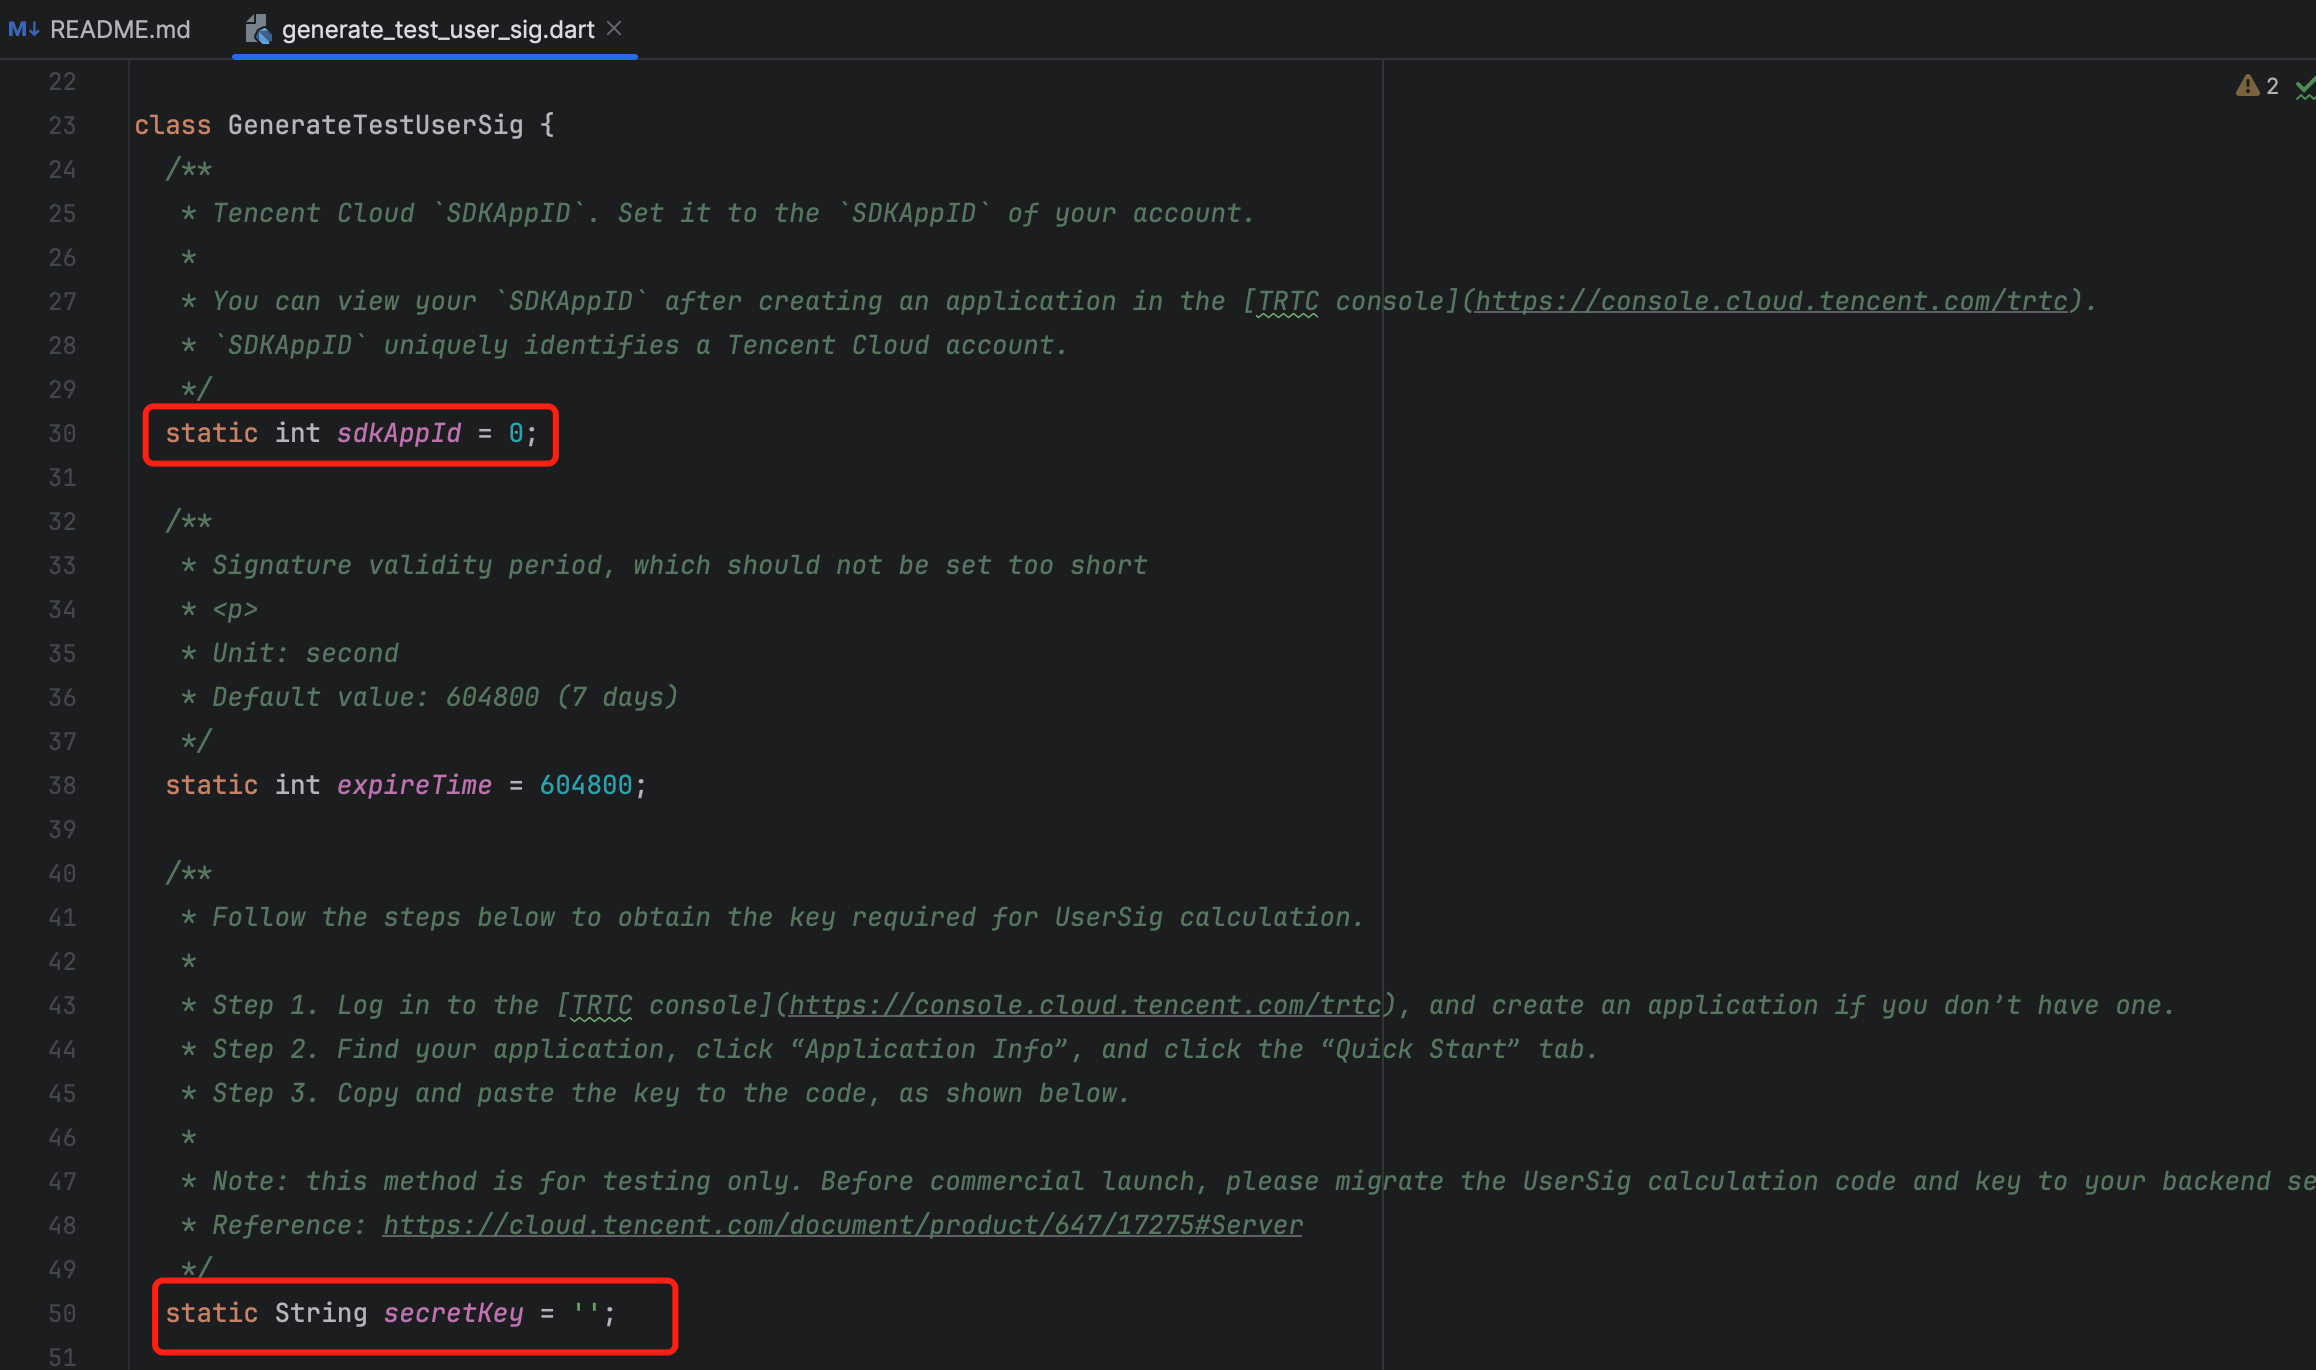
|
|
57
|
-
|
|
58
|
-
|
|
59
|
-
## Step 3: Running the Demo
|
|
60
|
-
1. In the top right corner of Android Studio, select the device you want to run the Demo on as shown below:
|
|
61
|
-
|
|
62
|
-
|
|
63
|
-
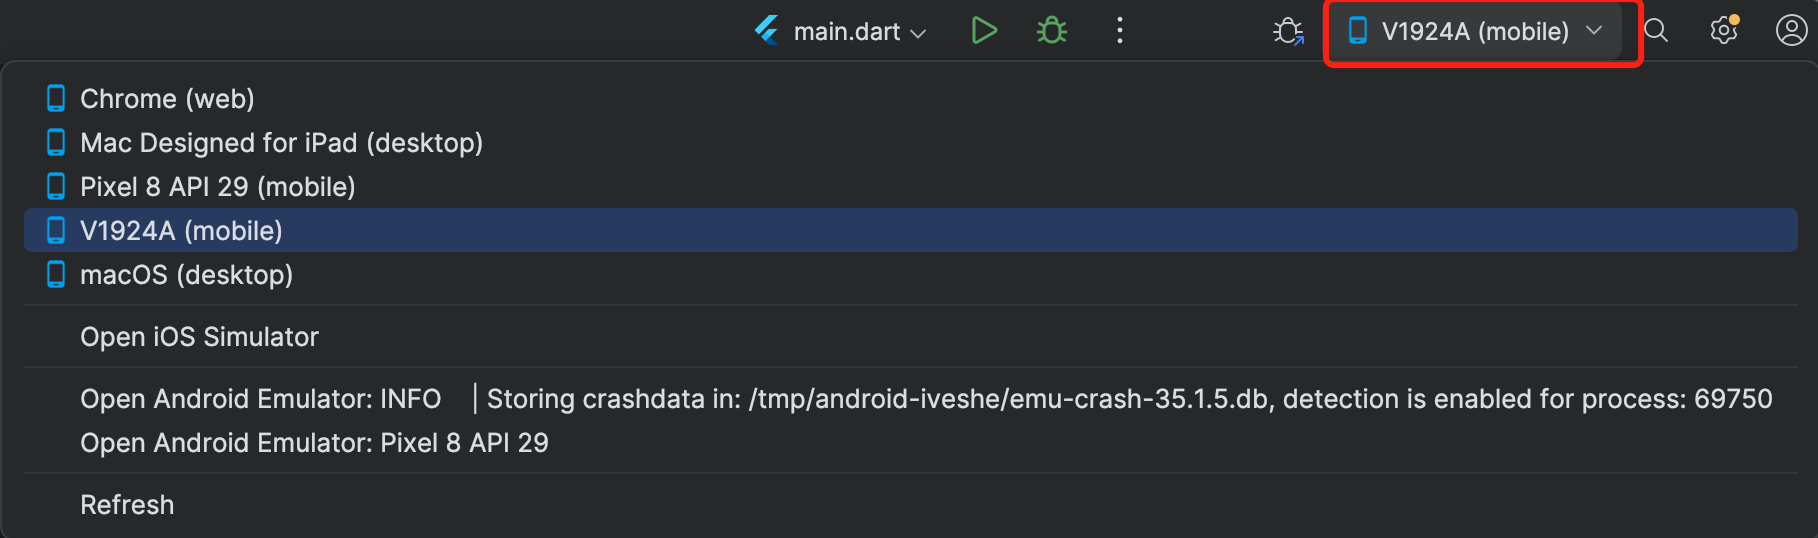
|
|
64
|
-
|
|
65
|
-
2. After selecting, click Run to execute the TUICallKit Android Demo on the target device.
|
|
66
|
-
|
|
67
|
-
|
|
68
|
-

|
|
69
|
-
|
|
70
|
-
|
|
71
|
-
## Make the first call
|
|
72
|
-
|
|
73
|
-
> **Note:**
|
|
74
|
-
>
|
|
75
|
-
|
|
76
|
-
> To experience the complete audio and video calling process, please log into the Demo on two devices as two different users, with one acting as the caller and the other as the callee.
|
|
77
|
-
>
|
|
78
|
-
|
|
79
|
-
1. Log in & Signup
|
|
80
|
-
|
|
81
|
-
|
|
82
|
-
Please enter the ID at the `User ID`. If your current User ID has not been used before, you will be taken to the **Signup** screen, where you can set your own avatar and nickname.
|
|
83
|
-
|
|
84
|
-
|
|
85
|
-
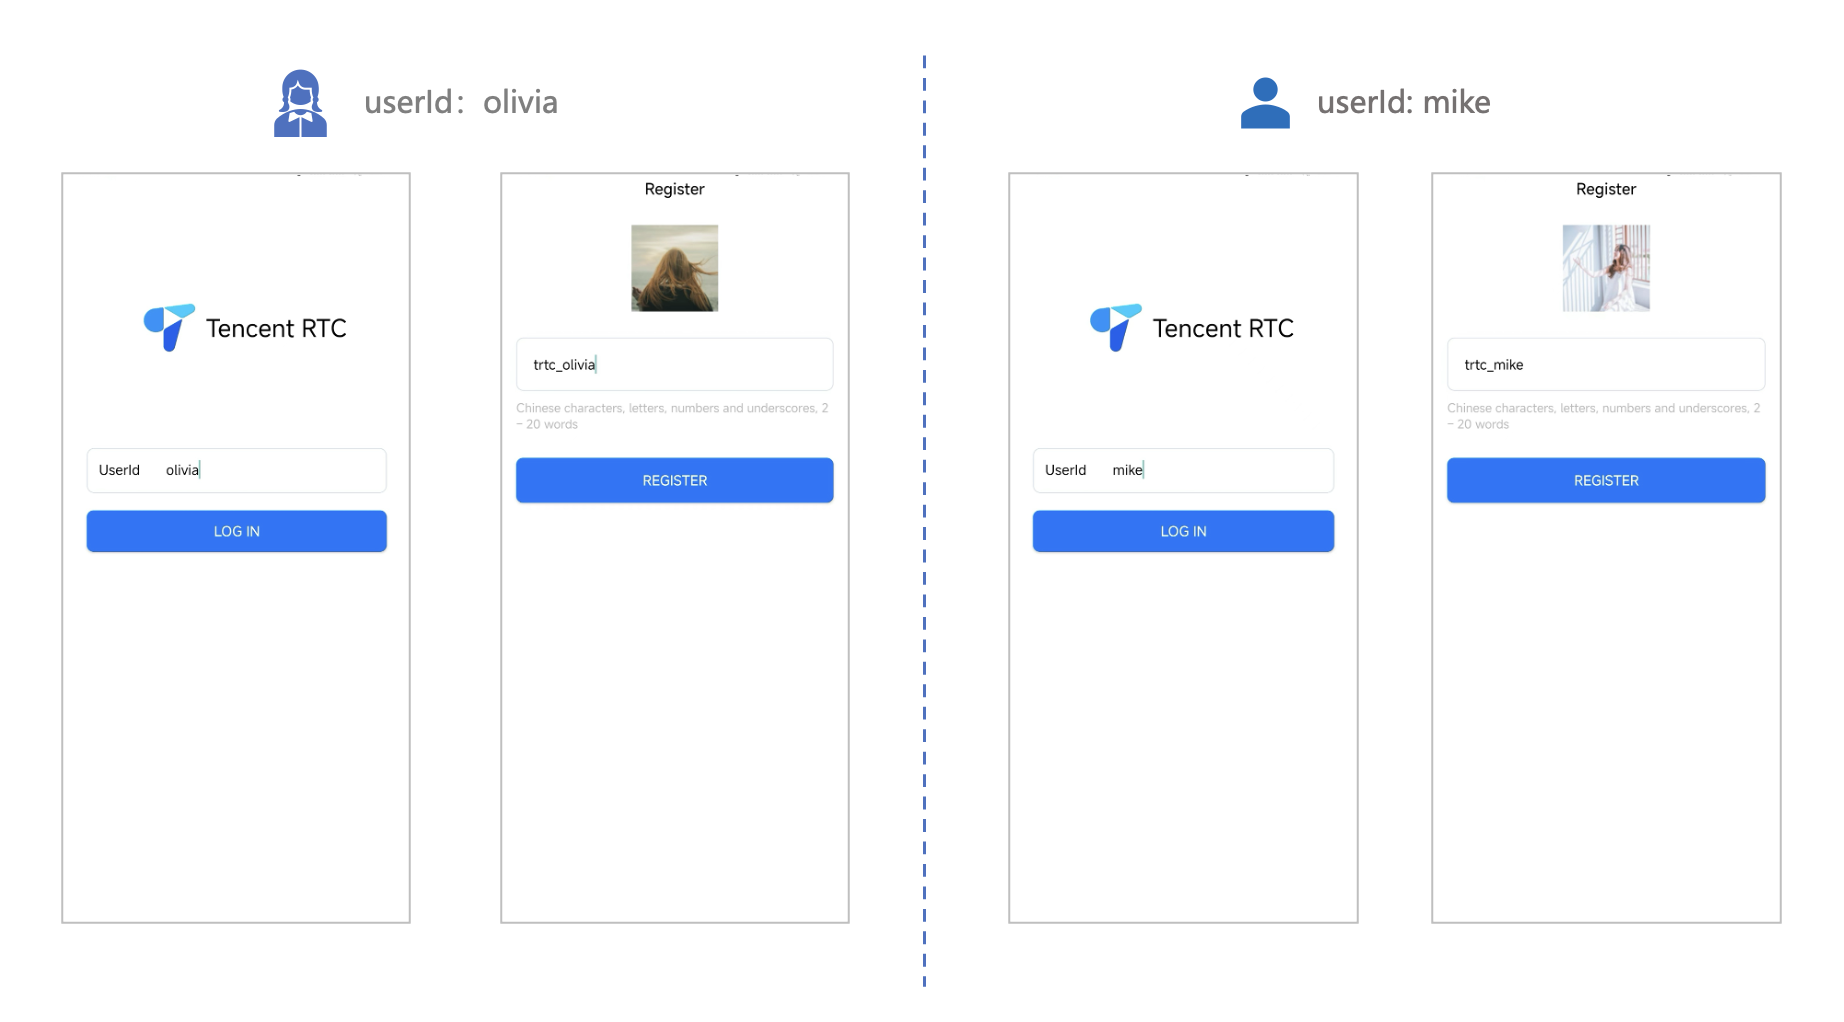
|
|
86
|
-
|
|
87
|
-
|
|
88
|
-
> **Note:**
|
|
89
|
-
>
|
|
90
|
-
|
|
91
|
-
> Try to avoid setting your User ID to simple strings like "1", "123", "111", as TRTC does not support the same User ID being logged into from multiple devices. Such User IDs like "1", "123", "111" are easily occupied by your colleagues during collaborative development, leading to login failures. Therefore, we recommend setting highly recognizable User IDs while debugging.
|
|
92
|
-
>
|
|
93
|
-
|
|
94
|
-
2. Make a phone call
|
|
95
|
-
|
|
96
|
-
1. The caller should click **1V1 Call** on the interface, enter the callee's User ID in the pop-up interface, and select the desired call type.
|
|
97
|
-
|
|
98
|
-
2. Click **Initiate Call**.
|
|
99
|
-
|
|
100
|
-
|
|
101
|
-
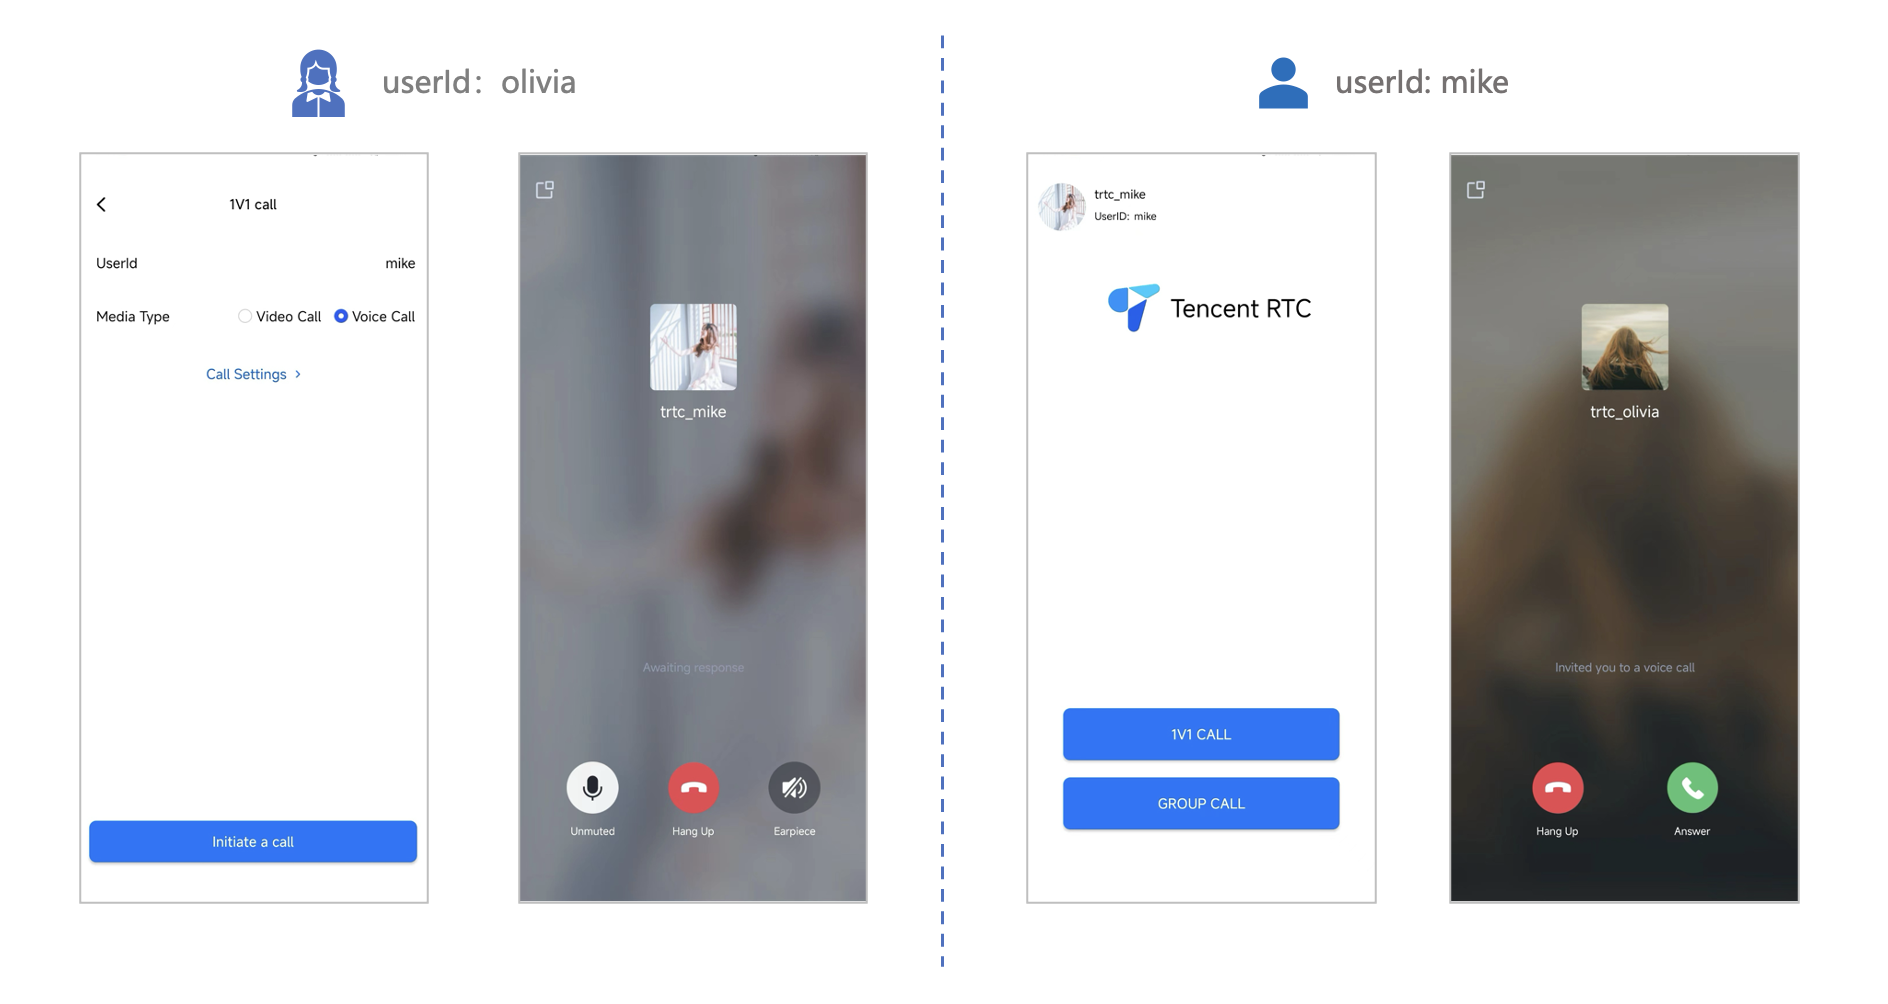
|
|
@@ -1,98 +0,0 @@
|
|
|
1
|
-
This article will guide you on how to quickly run through the Audio and Video Call Demo. By following this document, you can have the Demo up and running in 10 minutes, and ultimately experience an Audio and Video Call feature with a complete UI interface.
|
|
2
|
-
<table>
|
|
3
|
-
<tr>
|
|
4
|
-
<td rowspan="1" colSpan="1" >1v1 Video Call</td>
|
|
5
|
-
|
|
6
|
-
<td rowspan="1" colSpan="1" >Group call</td>
|
|
7
|
-
</tr>
|
|
8
|
-
|
|
9
|
-
<tr>
|
|
10
|
-
<td rowspan="1" colSpan="1" ></td>
|
|
11
|
-
|
|
12
|
-
<td rowspan="1" colSpan="1" ></td>
|
|
13
|
-
</tr>
|
|
14
|
-
</table>
|
|
15
|
-
|
|
16
|
-
|
|
17
|
-
## Environment preparations
|
|
18
|
-
- Xcode 13 or later.
|
|
19
|
-
|
|
20
|
-
- Two iOS 13.0 or later devices.
|
|
21
|
-
|
|
22
|
-
|
|
23
|
-
## Step 1: Download the Demo
|
|
24
|
-
1. Download the [TUICallKit Demo](https://github.com/Tencent-RTC/TUICallKit/tree/main) source code from GitHub, or directly run the following command in the command line:
|
|
25
|
-
|
|
26
|
-
``` bash
|
|
27
|
-
git clone
|
|
28
|
-
```
|
|
29
|
-
2. Enter the iOS project directory in the command line:
|
|
30
|
-
|
|
31
|
-
``` plaintext
|
|
32
|
-
cd TUICallKit/iOS/Example
|
|
33
|
-
```
|
|
34
|
-
3. Load the dependency library:
|
|
35
|
-
|
|
36
|
-
``` plaintext
|
|
37
|
-
pod install
|
|
38
|
-
```
|
|
39
|
-
|
|
40
|
-
> **Note:**
|
|
41
|
-
>
|
|
42
|
-
|
|
43
|
-
> If you haven't installed CocoaPods, you can refer to [this](https://guides.cocoapods.org/using/getting-started.html) for instructions on how to install.
|
|
44
|
-
>
|
|
45
|
-
|
|
46
|
-
|
|
47
|
-
## Step 2: Configure the Demo
|
|
48
|
-
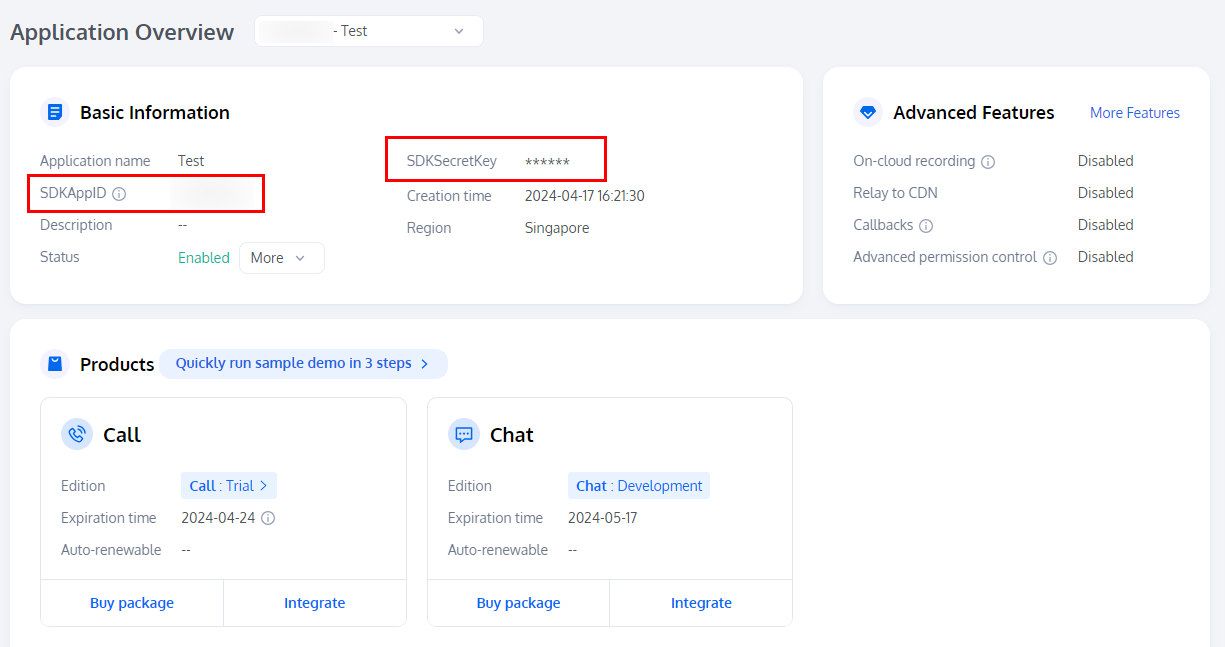
1. [Activate the audio and video services](https://write.woa.com/document/140196392040579072), to obtain the **SDKAppID** and **SDKSecretKey**.
|
|
49
|
-
|
|
50
|
-
|
|
51
|
-
|
|
52
|
-
|
|
53
|
-
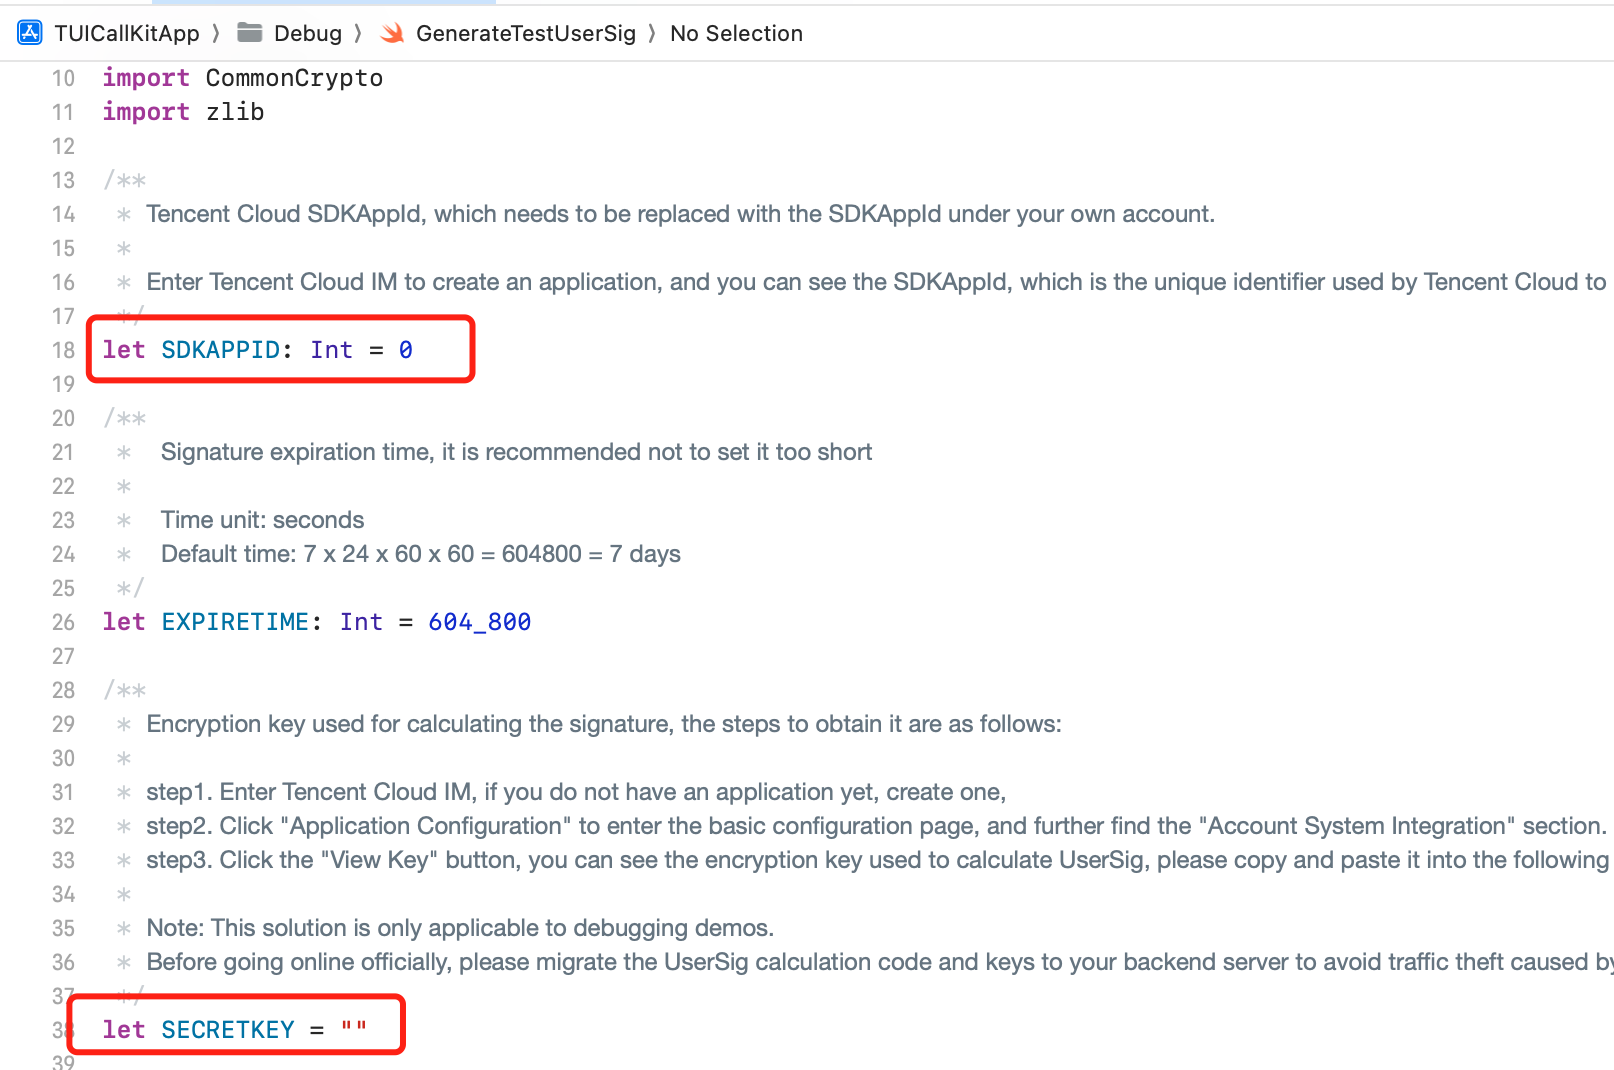
2. Open the `/iOS/Example/Debug/GenerateTestUserSig.swift` file and enter the SDKAppID and SDKSecretKey obtained when [activating the service](https://write.woa.com/document/140196392040579072):
|
|
54
|
-
|
|
55
|
-
|
|
56
|
-
|
|
57
|
-
|
|
58
|
-
|
|
59
|
-
## Step 3: Running the Demo
|
|
60
|
-
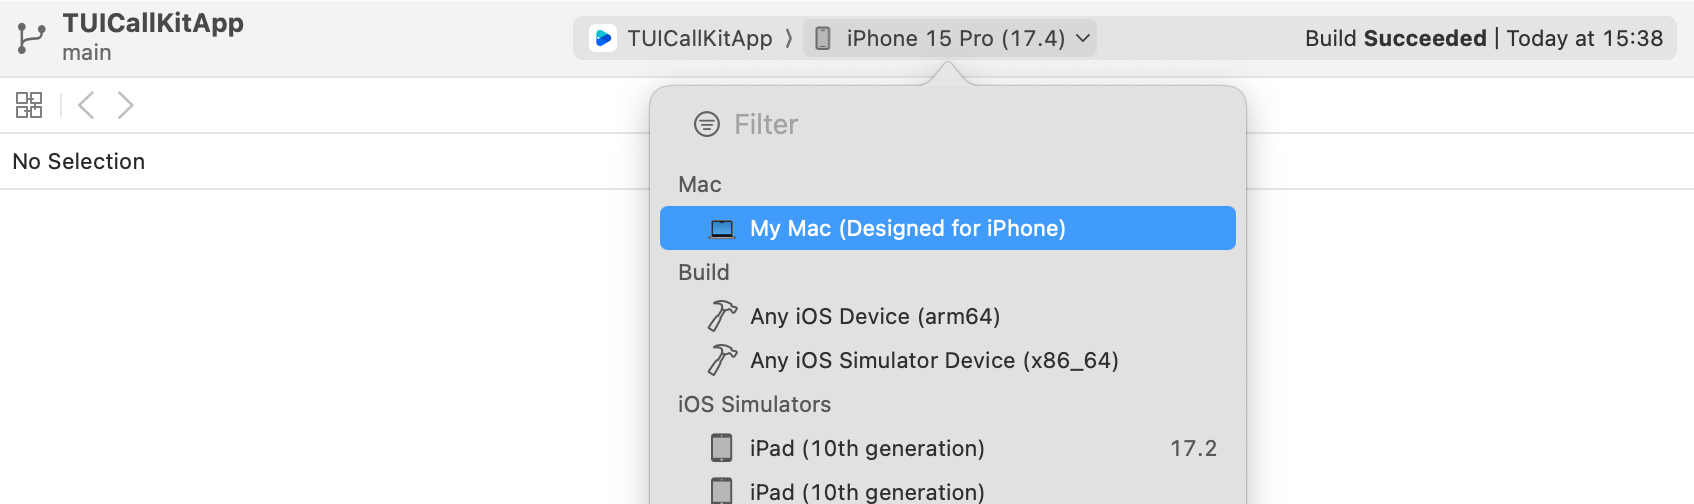
1. In XCode, select the device you want to run the Demo on as shown below:
|
|
61
|
-
|
|
62
|
-
|
|
63
|
-
|
|
64
|
-
|
|
65
|
-
2. After selection, click run to deploy our TUICallKit iOS Demo to the target device.
|
|
66
|
-
|
|
67
|
-
|
|
68
|
-
## Make the first call
|
|
69
|
-
|
|
70
|
-
> **Note:**
|
|
71
|
-
>
|
|
72
|
-
|
|
73
|
-
> To experience the complete audio and video calling process, please log into the Demo on two devices as two different users, with one acting as the caller and the other as the callee.
|
|
74
|
-
>
|
|
75
|
-
|
|
76
|
-
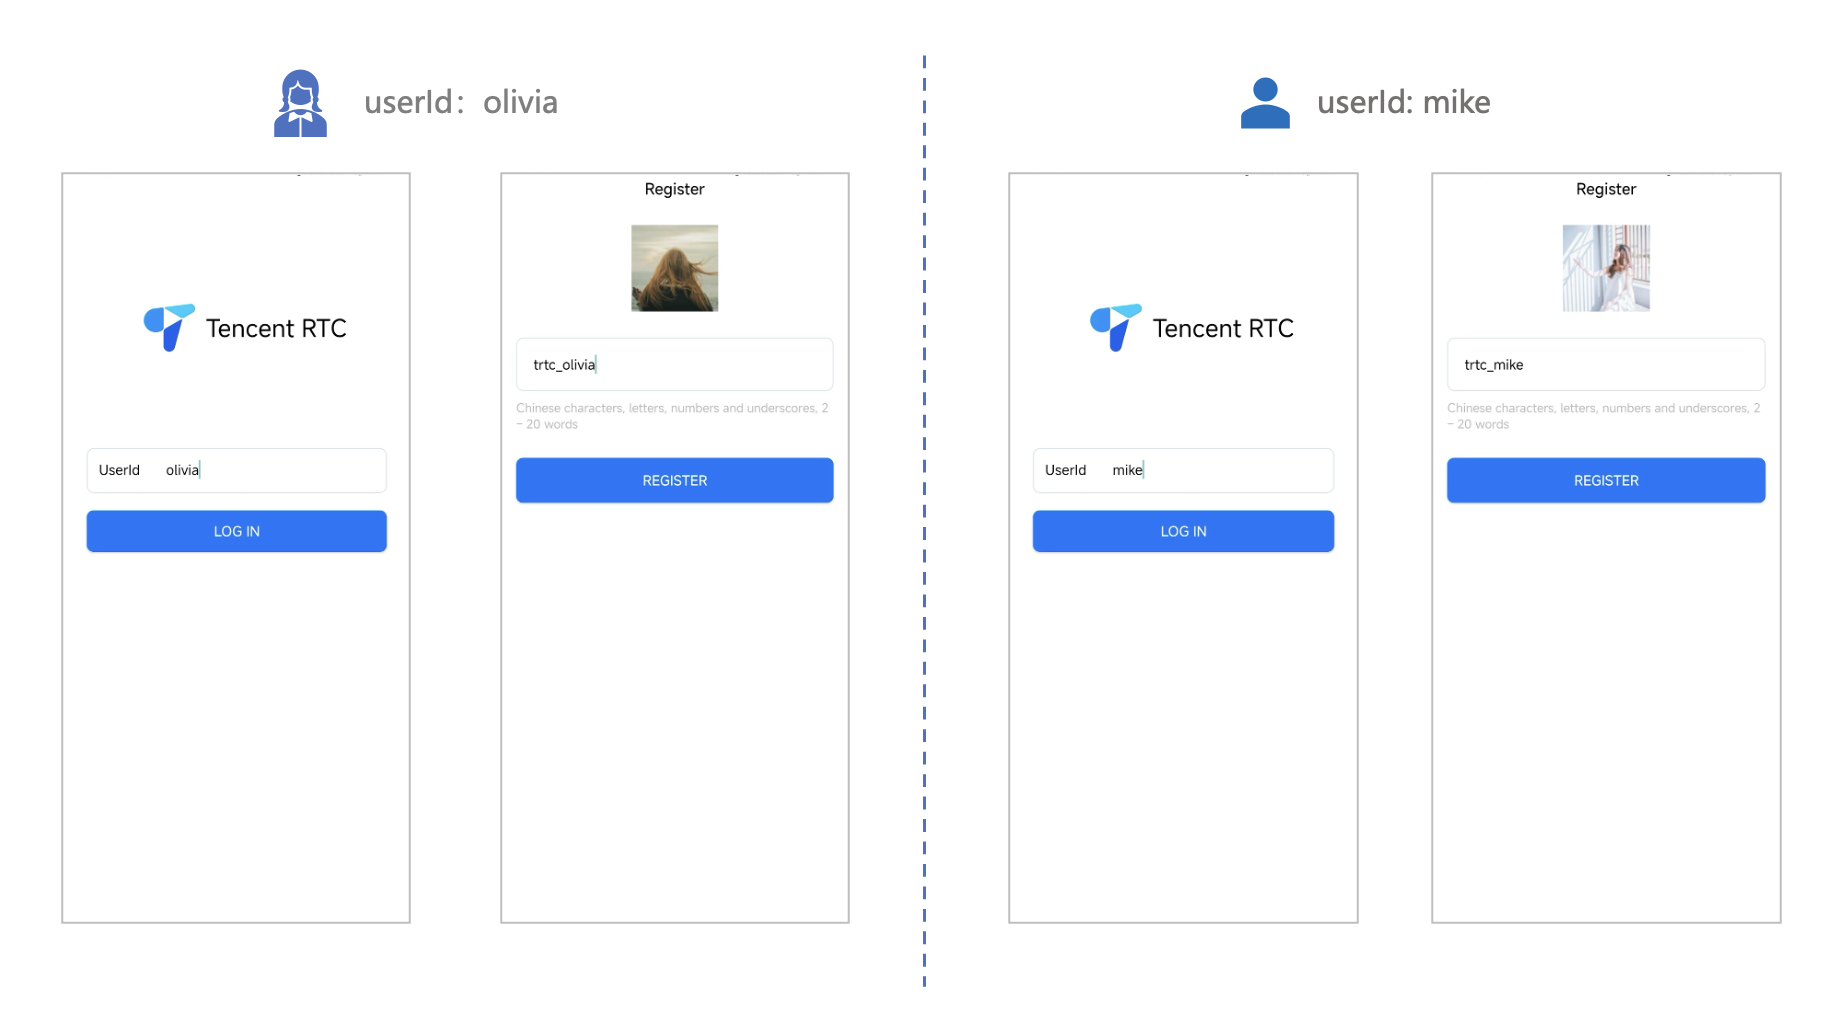
1. Log in & Signup
|
|
77
|
-
|
|
78
|
-
|
|
79
|
-
Please enter the ID at the `User ID`. If your current User ID has not been used before, you will be taken to the **Signup** screen, where you can set your own avatar and nickname.
|
|
80
|
-
|
|
81
|
-
|
|
82
|
-
|
|
83
|
-
|
|
84
|
-
|
|
85
|
-
> **Note:**
|
|
86
|
-
>
|
|
87
|
-
|
|
88
|
-
> Try to avoid setting your User ID to simple strings like "1", "123", "111", as TRTC does not support the same User ID being logged into from multiple devices. Such User IDs like "1", "123", "111" are easily occupied by your colleagues during collaborative development, leading to login failures. Therefore, we recommend setting highly recognizable User IDs while debugging.
|
|
89
|
-
>
|
|
90
|
-
|
|
91
|
-
2. Make a phone call
|
|
92
|
-
|
|
93
|
-
1. The caller should click **1V1 Call** on the interface, enter the callee's User ID in the pop-up interface, and select the desired call type.
|
|
94
|
-
|
|
95
|
-
2. Click **Initiate Call**.
|
|
96
|
-
|
|
97
|
-
|
|
98
|
-
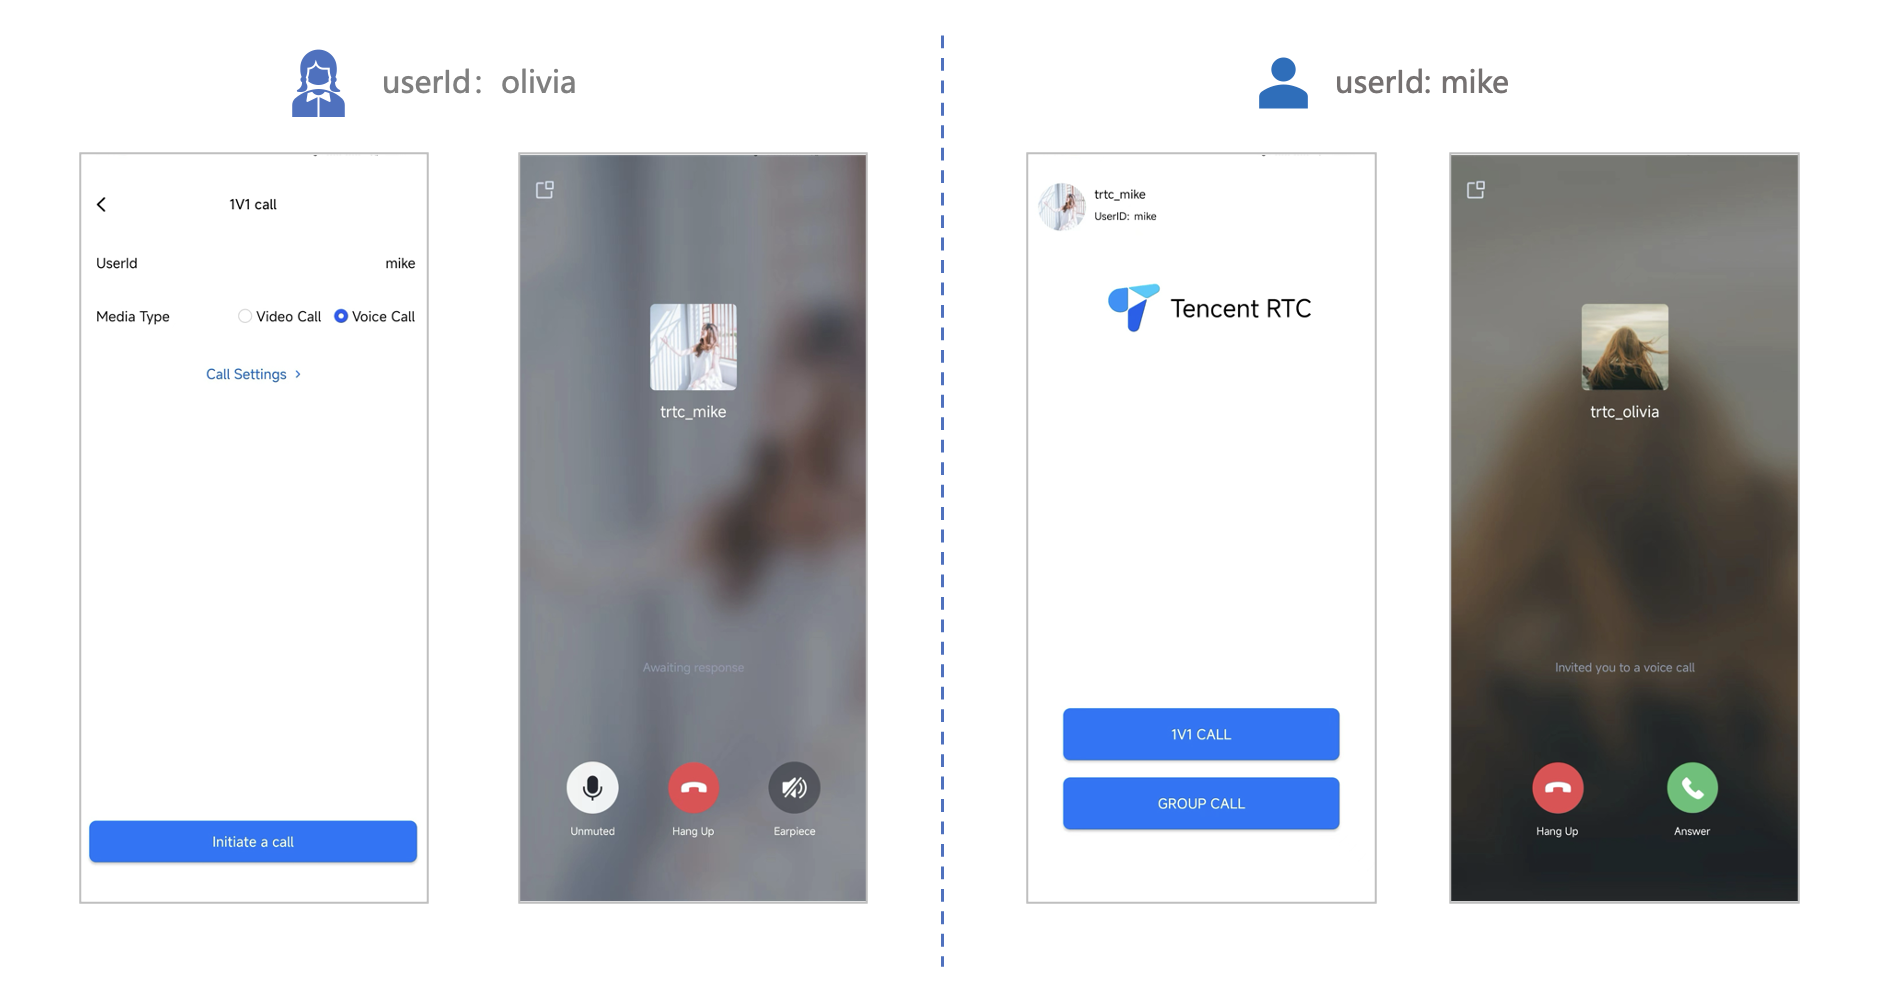
|
/package/resource/doc/tuicallkit/android/{how_to_integrated_android_callkit.md → integration.md}
RENAMED
|
File without changes
|
|
File without changes
|
|
File without changes
|
/package/resource/doc/tuicallkit/{android/api_TUICallKit.md → faq/android_sdk/callkit-api.md}
RENAMED
|
File without changes
|
/package/resource/doc/tuicallkit/{flutter/api_TUICallDefine.md → faq/flutter_sdk/call-define-api.md}
RENAMED
|
File without changes
|
|
File without changes
|
/package/resource/doc/tuicallkit/{flutter/api_TUICallKit.md → faq/flutter_sdk/callkit-api.md}
RENAMED
|
File without changes
|
/package/resource/doc/tuicallkit/{iOS/api_TUICallObserver.md → faq/ios_sdk/call-observer-api.md}
RENAMED
|
File without changes
|
|
File without changes
|
/package/resource/doc/tuicallkit/flutter/{how_to_integrated_flutter_callkit.md → integration.md}
RENAMED
|
File without changes
|
|
File without changes
|