@tencent-rtc/mcp 1.0.2 → 1.0.3
This diff represents the content of publicly available package versions that have been released to one of the supported registries. The information contained in this diff is provided for informational purposes only and reflects changes between package versions as they appear in their respective public registries.
package/package.json
CHANGED
|
@@ -1,23 +1,13 @@
|
|
|
1
|
-
This article will guide you through the
|
|
2
|
-
<table>
|
|
3
|
-
<tr>
|
|
4
|
-
<td rowspan="1" colSpan="1" >Video Call</td>
|
|
1
|
+
This article will guide you through the quick integration of the TUICallKit component. You will complete several key steps within 10 minutes, ultimately obtaining a video call feature with a complete UI interface.
|
|
5
2
|
|
|
6
|
-
|
|
7
|
-
</tr>
|
|
3
|
+

|
|
8
4
|
|
|
9
|
-
|
|
10
|
-
|
|
5
|
+
## Prerequisites
|
|
6
|
+
- React version 18+.
|
|
11
7
|
|
|
12
|
-
<td rowspan="1" colSpan="1" ></td>
|
|
13
|
-
</tr>
|
|
14
|
-
</table>
|
|
15
|
-
|
|
16
|
-
|
|
17
|
-
## Environment Preparations
|
|
18
8
|
- [Node.js](https://nodejs.org/en/) version 16+.
|
|
19
9
|
|
|
20
|
-
-
|
|
10
|
+
- Modern browser, supporting WebRTC APIs.
|
|
21
11
|
|
|
22
12
|
|
|
23
13
|
## Step 1. Activate the service
|
|
@@ -25,13 +15,13 @@ This article will guide you through the process of integrating the TUICallKit co
|
|
|
25
15
|
Refer to [Activate the Service](https://trtc.io/document/59832?platform=web&product=call) to obtain `SDKAppID, SDKSecretKey`, which will be used as **Mandatory Parameters in **[Initialize the TUICallKit](https://write.woa.com/document/133160392291844096)**.**
|
|
26
16
|
|
|
27
17
|
## Step 2. Download the TUICallKit
|
|
28
|
-
1. Download the [@tencentcloud/call-uikit-react
|
|
18
|
+
1. Download the [@tencentcloud/call-uikit-react](https://www.npmjs.com/package/@tencentcloud/call-uikit-react) component.
|
|
29
19
|
|
|
30
20
|
|
|
31
21
|
|
|
32
22
|
【shell】
|
|
33
23
|
``` bash
|
|
34
|
-
|
|
24
|
+
npm install @tencentcloud/call-uikit-react
|
|
35
25
|
```
|
|
36
26
|
2. Copy the `debug` directory to your project directory `src/debug`, it is necessary when generating userSig locally.
|
|
37
27
|
|
|
@@ -41,45 +31,66 @@ Refer to [Activate the Service](https://trtc.io/document/59832?platform=web&prod
|
|
|
41
31
|
|
|
42
32
|
【MacOS】
|
|
43
33
|
``` bash
|
|
44
|
-
cp -r node_modules/@tencentcloud/call-uikit-react
|
|
34
|
+
cp -r node_modules/@tencentcloud/call-uikit-react/debug ./src
|
|
45
35
|
```
|
|
46
36
|
|
|
47
37
|
|
|
48
38
|
【Windows】
|
|
49
39
|
``` bash
|
|
50
|
-
xcopy node_modules\@tencentcloud\call-uikit-react\
|
|
40
|
+
xcopy node_modules\@tencentcloud\call-uikit-react\debug .\src\debug /i /e
|
|
51
41
|
```
|
|
52
42
|
|
|
53
43
|
|
|
54
|
-
## Step 3.
|
|
44
|
+
## Step 3. Initialize the TUICallKit
|
|
55
45
|
|
|
56
46
|
You can choose to import the sample code in the `/src/App.tsx` file.
|
|
57
47
|
1. Import the call uikit.
|
|
58
48
|
|
|
59
49
|
``` javascript
|
|
60
|
-
import {
|
|
50
|
+
import { useState } from 'react';
|
|
51
|
+
import { TUICallKit, TUICallKitServer, TUICallType } from "@tencentcloud/call-uikit-react";
|
|
61
52
|
import * as GenerateTestUserSig from "./debug/GenerateTestUserSig-es"; // Refer to Step 2.2
|
|
62
53
|
```
|
|
63
|
-
2. using the [TUICallKit
|
|
54
|
+
2. using the [<TUICallKit />](https://trtc.io/document/51015#call#tuicallkit), which contains the complete UI interaction during a call.
|
|
64
55
|
|
|
65
56
|
``` javascript
|
|
66
|
-
|
|
67
|
-
|
|
68
|
-
|
|
69
|
-
|
|
57
|
+
return (
|
|
58
|
+
<>
|
|
59
|
+
<span> caller's ID: </span>
|
|
60
|
+
<input type="text" placeholder='input caller userID' onChange={(event) => setCallerUserID(event.target.value)} />
|
|
61
|
+
<button onClick={init}> step1. init </button> <br />
|
|
62
|
+
<span> callee's ID: </span>
|
|
63
|
+
<input type="text" placeholder='input callee userID' onChange={(event) => setCalleeUserID(event.target.value)} />
|
|
64
|
+
<button onClick={call}> step2. call </button>
|
|
70
65
|
|
|
71
|
-
|
|
66
|
+
{/* 【1】Import the TUICallKit component: Call interface UI */}
|
|
67
|
+
<TUICallKit />
|
|
68
|
+
</>
|
|
69
|
+
);
|
|
70
|
+
```
|
|
71
|
+
3. using the [TUICallKitServer.init](https://trtc.io/document/51015#call#init) API to log in to the component, you need to `fill in``SDKAppID, SDKSecretKey `as two parameters in the code.
|
|
72
|
+
|
|
73
|
+
``` javascript
|
|
74
|
+
const SDKAppID = 0; // TODO: Replace with your SDKAppID (Notice: SDKAppID is of type number)
|
|
75
|
+
const SDKSecretKey = ''; // TODO: Replace with your SDKSecretKey
|
|
72
76
|
|
|
73
|
-
|
|
74
|
-
|
|
75
|
-
|
|
76
|
-
|
|
77
|
-
|
|
78
|
-
|
|
79
|
-
|
|
80
|
-
|
|
81
|
-
|
|
82
|
-
};
|
|
77
|
+
const [callerUserID, setCallerUserID] = useState('');
|
|
78
|
+
const [calleeUserID, setCalleeUserID] = useState('');
|
|
79
|
+
|
|
80
|
+
//【2】Initialize the TUICallKit component
|
|
81
|
+
const init = async () => {
|
|
82
|
+
const { userSig } = GenerateTestUserSig.genTestUserSig({
|
|
83
|
+
userID: callerUserID,
|
|
84
|
+
SDKAppID,
|
|
85
|
+
SecretKey: SDKSecretKey,
|
|
86
|
+
});
|
|
87
|
+
await TUICallKitServer.init({
|
|
88
|
+
userID: callerUserID,
|
|
89
|
+
userSig,
|
|
90
|
+
SDKAppID,
|
|
91
|
+
});
|
|
92
|
+
alert('TUICallKit init succeed');
|
|
93
|
+
}
|
|
83
94
|
```
|
|
84
95
|
<table>
|
|
85
96
|
<tr>
|
|
@@ -91,7 +102,7 @@ You can choose to import the sample code in the `/src/App.tsx` file.
|
|
|
91
102
|
</tr>
|
|
92
103
|
|
|
93
104
|
<tr>
|
|
94
|
-
<td rowspan="1" colSpan="1" >
|
|
105
|
+
<td rowspan="1" colSpan="1" >userID</td>
|
|
95
106
|
|
|
96
107
|
<td rowspan="1" colSpan="1" >String</td>
|
|
97
108
|
|
|
@@ -107,7 +118,7 @@ You can choose to import the sample code in the `/src/App.tsx` file.
|
|
|
107
118
|
</tr>
|
|
108
119
|
|
|
109
120
|
<tr>
|
|
110
|
-
<td rowspan="1" colSpan="1" >
|
|
121
|
+
<td rowspan="1" colSpan="1" >SDKSecretKey</td>
|
|
111
122
|
|
|
112
123
|
<td rowspan="1" colSpan="1" >String</td>
|
|
113
124
|
|
|
@@ -131,33 +142,51 @@ You can choose to import the sample code in the `/src/App.tsx` file.
|
|
|
131
142
|
|
|
132
143
|
|
|
133
144
|
## Step 4. Make your first call
|
|
134
|
-
1. using the [
|
|
145
|
+
1. using the [TUICallKitServer.calls API](https://trtc.io/document/51015#calls) to make a call.
|
|
135
146
|
|
|
136
147
|
``` javascript
|
|
137
148
|
//【3】Make a 1v1 video call
|
|
138
|
-
const users: string[] = ["mike"];
|
|
139
149
|
const call = async () => {
|
|
140
|
-
await
|
|
141
|
-
|
|
142
|
-
|
|
150
|
+
await TUICallKitServer.calls({
|
|
151
|
+
userIDIDList: [calleeUserID],
|
|
152
|
+
type: TUICallType.VIDEO_CALL,
|
|
143
153
|
});
|
|
144
154
|
};
|
|
145
155
|
```
|
|
146
|
-
2.
|
|
156
|
+
2. Run the project.
|
|
157
|
+
|
|
147
158
|
|
|
148
|
-
|
|
149
|
-
|
|
150
|
-
<td rowspan="1" colSpan="1" >Caller initiates an audio call</td>
|
|
159
|
+
> **Warning:**
|
|
160
|
+
>
|
|
151
161
|
|
|
152
|
-
|
|
153
|
-
|
|
162
|
+
> **For local environment, please access under localhost protocol. For public network experience, please access under HTTPS protocol. For details, see **[Description of Network Access Protocol](https://web.sdk.qcloud.com/trtc/webrtc/doc/en/tutorial-05-info-browser.html#h2-3)**.**
|
|
163
|
+
>
|
|
154
164
|
|
|
155
|
-
|
|
156
|
-
<td rowspan="1" colSpan="1" ><br></td>
|
|
165
|
+
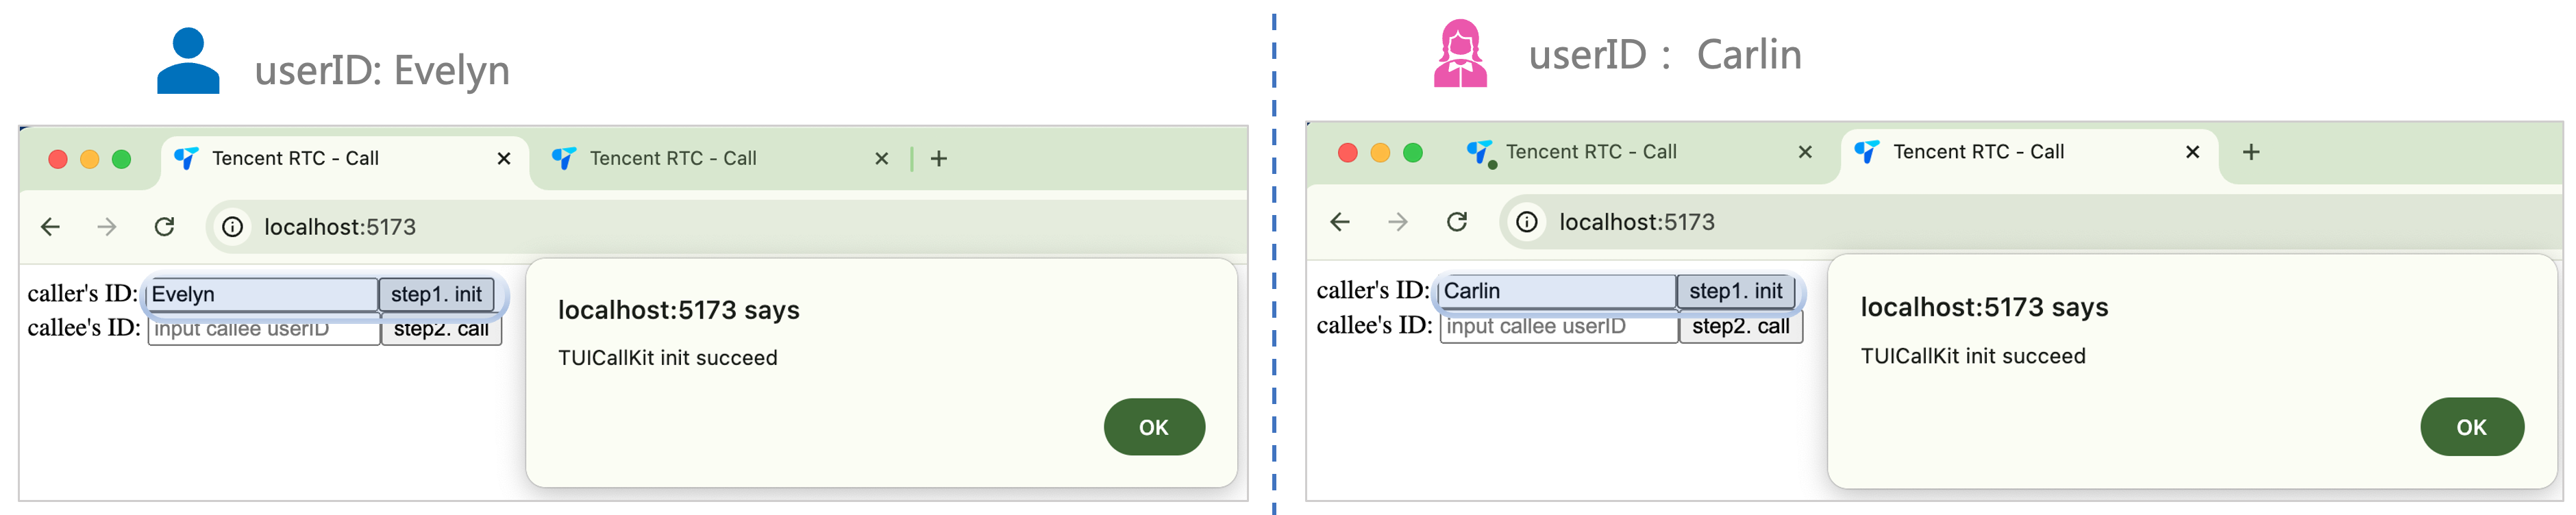
3. Open two browser pages,** enter different userID (defined by you) **click `step1. init` to login (caller and callee).
|
|
157
166
|
|
|
158
|
-
|
|
159
|
-
|
|
160
|
-
|
|
167
|
+
|
|
168
|
+
|
|
169
|
+
|
|
170
|
+
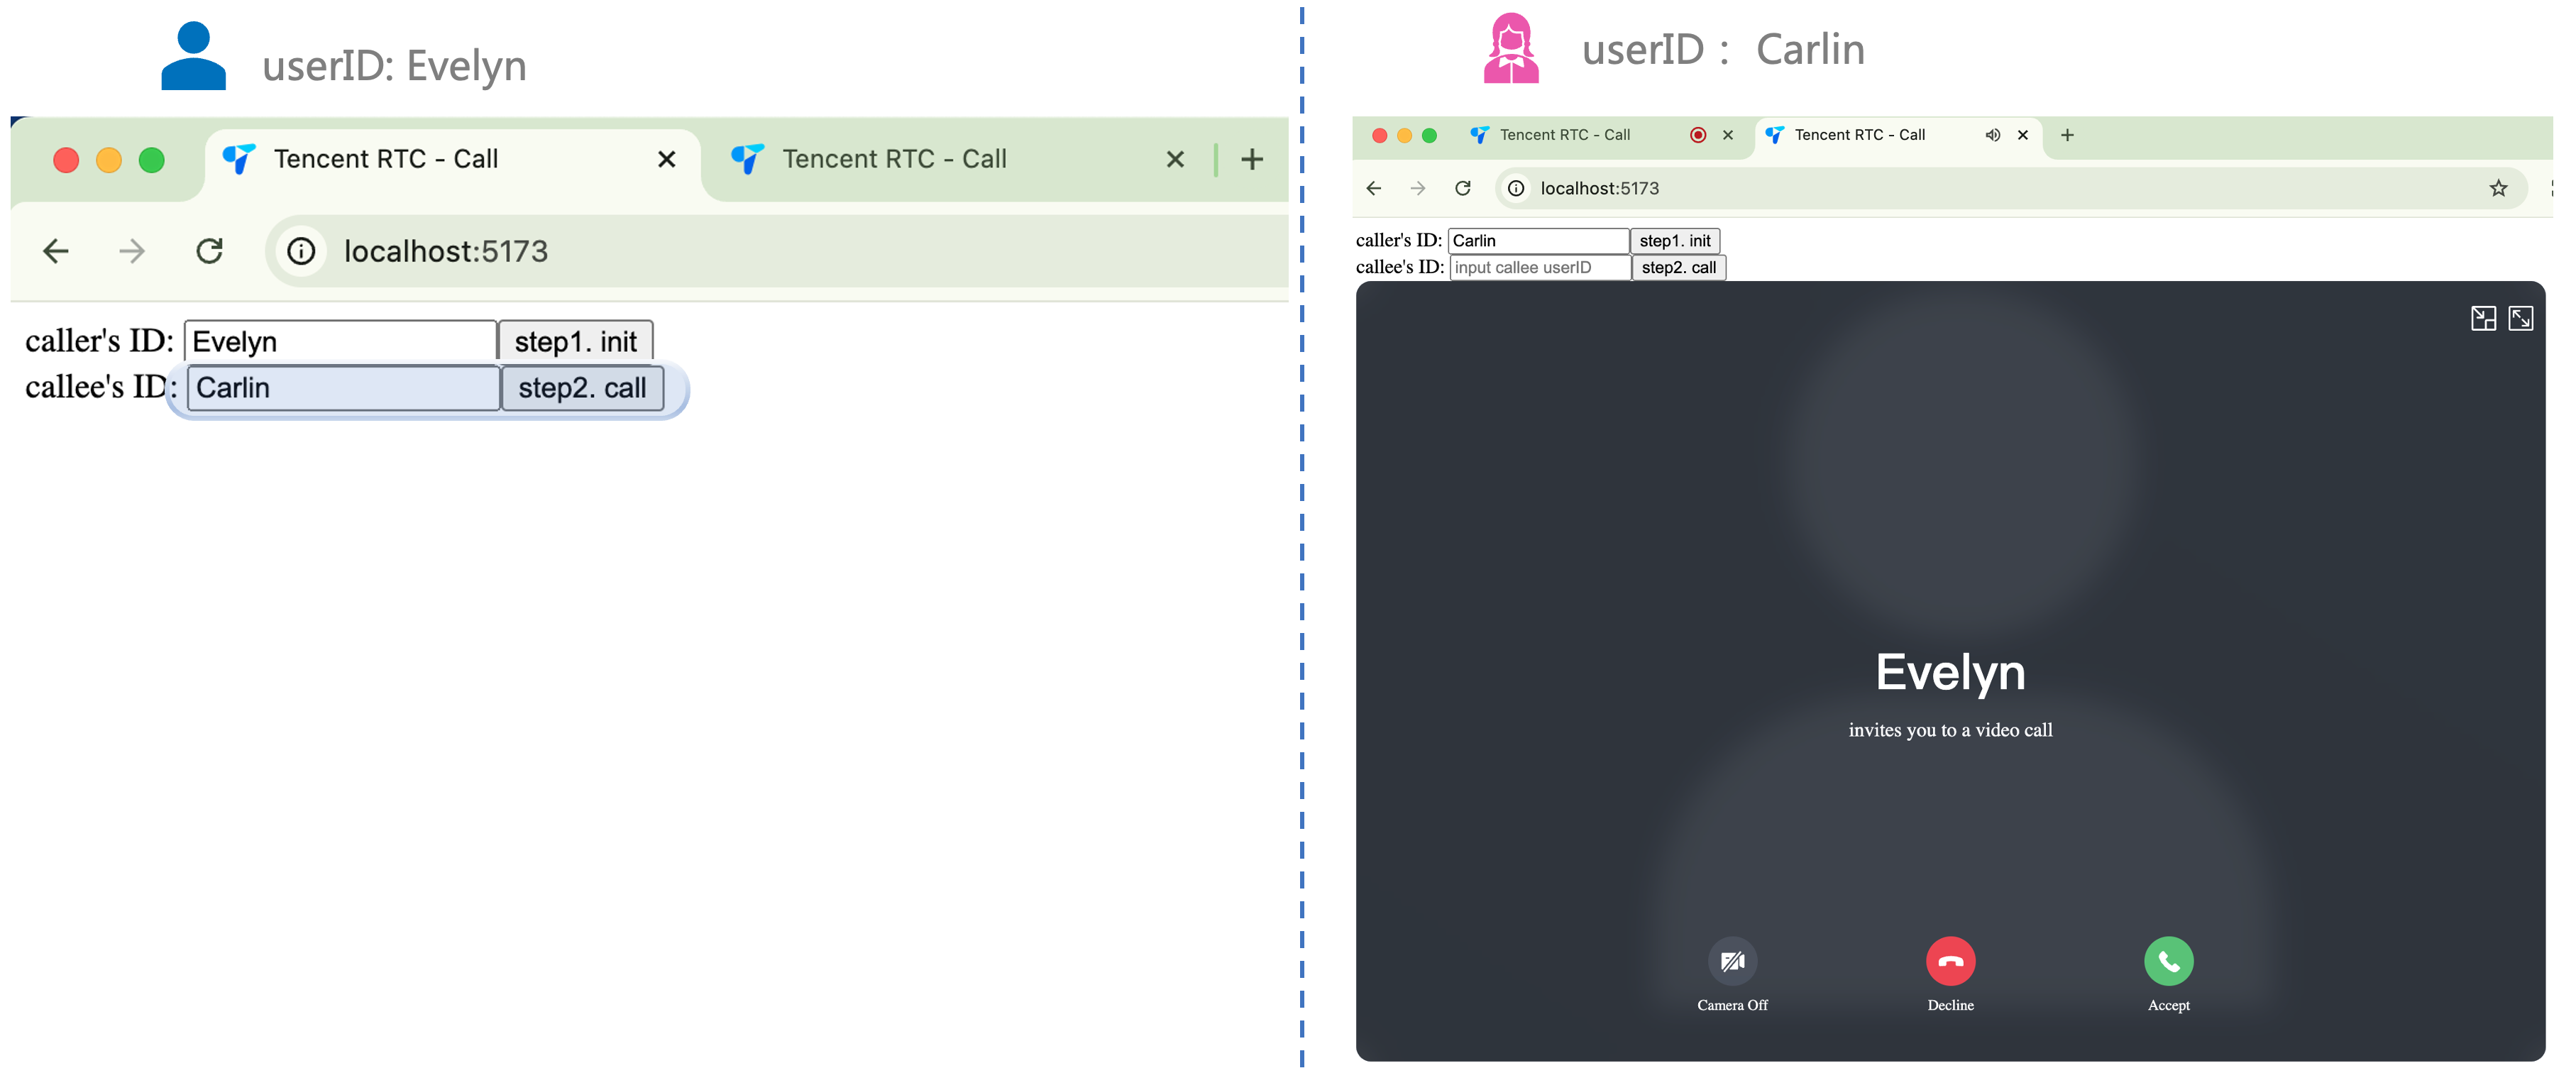
4. **After both userID init to successfully**, click on` step2. call`to make a call. If you have a call problem, refer to [FAQs](https://trtc.io/document/51024?platform=android&product=call#create_userID).
|
|
171
|
+
|
|
172
|
+
|
|
173
|
+
|
|
174
|
+
|
|
175
|
+
|
|
176
|
+
## Additional Features
|
|
177
|
+
- [Setting Nickname, Avatar](https://trtc.io/document/59834?platform=web&product=call)
|
|
178
|
+
|
|
179
|
+
- [Group Call](https://trtc.io/document/59838?platform=web&product=call)
|
|
180
|
+
|
|
181
|
+
- [Floating Window](https://trtc.io/document/59842?platform=web&product=call)
|
|
182
|
+
|
|
183
|
+
- [Custom Ringtone](https://trtc.io/document/59847?platform=web&product=call)
|
|
184
|
+
|
|
185
|
+
- [Call Status Monitoring, Component Callback Event](https://trtc.io/document/59852?platform=web&product=call)
|
|
186
|
+
|
|
187
|
+
- [Setting Resolution, Fill Pattern](https://trtc.io/document/59835?platform=web&product=call)
|
|
188
|
+
|
|
189
|
+
- [Customize Interface](https://trtc.io/document/50997?platform=web&product=call)
|
|
161
190
|
|
|
162
191
|
|
|
163
192
|
## FAQs
|