@storyblok/react 2.0.18 → 2.1.0
This diff represents the content of publicly available package versions that have been released to one of the supported registries. The information contained in this diff is provided for informational purposes only and reflects changes between package versions as they appear in their respective public registries.
- package/README.md +251 -53
- package/dist/client-16ee9ae1.mjs +21 -0
- package/dist/client-6eb29fd9.js +1 -0
- package/dist/index-65ac33dd.js +1 -0
- package/dist/index-f1318b50.mjs +46 -0
- package/dist/storyblok-js-612aedc3.mjs +845 -0
- package/dist/storyblok-js-a8758ae9.js +1 -0
- package/dist/storyblok-react.js +1 -3
- package/dist/storyblok-react.mjs +36 -823
- package/dist/storyblok-react2.js +1 -0
- package/dist/storyblok-react2.mjs +18 -0
- package/dist/storyblok-react3.js +1 -0
- package/dist/storyblok-react3.mjs +17 -0
- package/dist/storyblok-react4.js +1 -0
- package/dist/storyblok-react4.mjs +12 -0
- package/dist/types/bridge-loader.d.ts +8 -0
- package/dist/types/common/client.d.ts +2 -0
- package/dist/types/common/index.d.ts +9 -0
- package/dist/types/index.d.ts +3 -10
- package/dist/types/rsc/index.d.ts +1 -0
- package/dist/types/story.d.ts +8 -0
- package/dist/types/types.d.ts +3 -1
- package/package.json +28 -10
- /package/dist/types/{components → common}/storyblok-component.d.ts +0 -0
package/README.md
CHANGED
|
@@ -4,7 +4,7 @@
|
|
|
4
4
|
</a>
|
|
5
5
|
<h1 align="center">@storyblok/react</h1>
|
|
6
6
|
<p align="center">
|
|
7
|
-
The React plugin you need to interact with <a href="http://www.storyblok.com?utm_source=github.com&utm_medium=readme&utm_campaign=storyblok-react" target="_blank">Storyblok API</a> and enable the <a href="https://www.storyblok.com/docs/guide/essentials/visual-editor?utm_source=github.com&utm_medium=readme&utm_campaign=storyblok-react" target="_blank">Real-time Visual Editing Experience</a>.
|
|
7
|
+
The React plugin you need to interact with <a href="http://www.storyblok.com?utm_source=github.com&utm_medium=readme&utm_campaign=storyblok-react" target="_blank">Storyblok API</a> and enable the <a href="https://www.storyblok.com/docs/guide/essentials/visual-editor?utm_source=github.com&utm_medium=readme&utm_campaign=storyblok-react" target="_blank">Real-time Visual Editing Experience</a>. This package helps you integrate Storyblok with React along with all types of React based frameworks like Next.js, Remix etc. This SDK also includes the support for React Server Side Components.
|
|
8
8
|
</p>
|
|
9
9
|
<br />
|
|
10
10
|
</div>
|
|
@@ -32,7 +32,7 @@
|
|
|
32
32
|
|
|
33
33
|
## 🚀 Usage
|
|
34
34
|
|
|
35
|
-
> If you are first-time user of
|
|
35
|
+
> If you are first-time user of Storyblok, read the [Getting Started](https://www.storyblok.com/docs/guide/getting-started?utm_source=github.com&utm_medium=readme&utm_campaign=storyblok-react) guide to get a project ready in less than 5 minutes.
|
|
36
36
|
|
|
37
37
|
### Installation
|
|
38
38
|
|
|
@@ -60,6 +60,10 @@ Register the plugin on your application and add the [access token](https://www.s
|
|
|
60
60
|
```js
|
|
61
61
|
import { storyblokInit, apiPlugin } from "@storyblok/react";
|
|
62
62
|
|
|
63
|
+
/** Import your components */
|
|
64
|
+
import Page from "./components/Page";
|
|
65
|
+
import Teaser from "./components/Teaser";
|
|
66
|
+
|
|
63
67
|
storyblokInit({
|
|
64
68
|
accessToken: "YOUR_ACCESS_TOKEN",
|
|
65
69
|
use: [apiPlugin],
|
|
@@ -68,13 +72,13 @@ storyblokInit({
|
|
|
68
72
|
components: {
|
|
69
73
|
page: Page,
|
|
70
74
|
teaser: Teaser,
|
|
71
|
-
grid: Grid,
|
|
72
|
-
feature: Feature,
|
|
73
75
|
},
|
|
74
76
|
});
|
|
75
77
|
```
|
|
76
78
|
|
|
77
|
-
>
|
|
79
|
+
> Note: This is the general way for initalizing the SDK, the initialization might be a little different depending upon the framework. You can see how everything works according to the framework in their respective sections below.
|
|
80
|
+
|
|
81
|
+
Add all your components to the components object in the `storyblokInit` function.
|
|
78
82
|
|
|
79
83
|
That's it! All the features are enabled for you: the _Api Client_ for interacting with [Storyblok CDN API](https://www.storyblok.com/docs/api/content-delivery#topics/introduction?utm_source=github.com&utm_medium=readme&utm_campaign=storyblok-react), and _Storyblok Bridge_ for [real-time visual editing experience](https://www.storyblok.com/docs/guide/essentials/visual-editor?utm_source=github.com&utm_medium=readme&utm_campaign=storyblok-react).
|
|
80
84
|
|
|
@@ -99,49 +103,54 @@ storyblokInit({
|
|
|
99
103
|
apiOptions: {
|
|
100
104
|
region: "us",
|
|
101
105
|
},
|
|
102
|
-
components: {
|
|
106
|
+
components: {},
|
|
103
107
|
});
|
|
104
108
|
```
|
|
105
109
|
|
|
106
110
|
> Note: For spaces created in the United States or China, the `region` parameter **must** be specified.
|
|
107
111
|
|
|
108
|
-
### Getting Started
|
|
109
|
-
|
|
110
112
|
`@storyblok/react` does three actions when you initialize it:
|
|
111
113
|
|
|
112
114
|
- Provides a `getStoryblokApi` object in your app, which is an instance of [storyblok-js-client](https://github.com/storyblok/storyblok-js-client).
|
|
113
|
-
- Loads [Storyblok Bridge](https://www.storyblok.com/docs/Guides/storyblok-latest-js?utm_source=github.com&utm_medium=readme&utm_campaign=storyblok-react) for real-time visual updates.
|
|
115
|
+
- Loads the [Storyblok Bridge](https://www.storyblok.com/docs/Guides/storyblok-latest-js?utm_source=github.com&utm_medium=readme&utm_campaign=storyblok-react) for real-time visual updates.
|
|
114
116
|
- Provides a `storyblokEditable` function to link editable components to the Storyblok Visual Editor.
|
|
115
117
|
|
|
116
|
-
|
|
117
|
-
|
|
118
|
-
Inject `getStoryblokApi`:
|
|
118
|
+
For every component you've defined in your Storyblok space, call the `storyblokEditable` function with the blok content:
|
|
119
119
|
|
|
120
120
|
```js
|
|
121
|
-
import {
|
|
121
|
+
import { storyblokEditable } from "@storyblok/react";
|
|
122
122
|
|
|
123
|
-
|
|
124
|
-
|
|
125
|
-
|
|
126
|
-
|
|
127
|
-
|
|
128
|
-
|
|
129
|
-
|
|
130
|
-
|
|
131
|
-
|
|
132
|
-
|
|
133
|
-
},
|
|
134
|
-
});
|
|
123
|
+
const Feature = ({ blok }) => {
|
|
124
|
+
return (
|
|
125
|
+
<div {...storyblokEditable(blok)} key={blok._uid} data-test="feature">
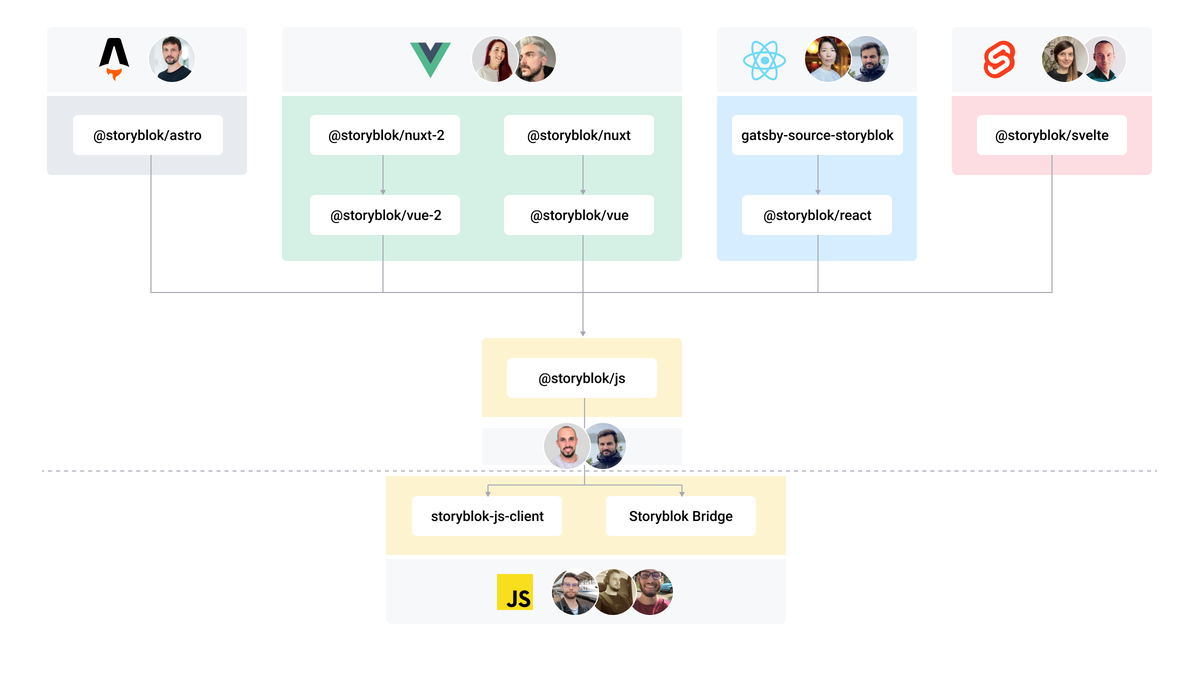
|
|
126
|
+
<div>
|
|
127
|
+
<div>{blok.name}</div>
|
|
128
|
+
<p>{blok.description}</p>
|
|
129
|
+
</div>
|
|
130
|
+
</div>
|
|
131
|
+
);
|
|
132
|
+
};
|
|
135
133
|
|
|
136
|
-
|
|
137
|
-
const { data } = await storyblokApi.get("cdn/stories", { version: "draft" });
|
|
134
|
+
export default Feature;
|
|
138
135
|
```
|
|
139
136
|
|
|
140
|
-
|
|
137
|
+
Where `blok` is the actual blok data coming from [Storyblok's Content Delivery API](https://www.storyblok.com/docs/api/content-delivery?utm_source=github.com&utm_medium=readme&utm_campaign=storyblok-react).
|
|
138
|
+
|
|
139
|
+
> Note: The `storyblokEditable` function works the same way for all the frameworks and components created.
|
|
140
|
+
|
|
141
|
+
### Getting Started
|
|
142
|
+
|
|
143
|
+
**This SDK provides you the support to work with React and all React Frameworks such as Next.js, Remix etc. Depending upon these different frameworks and versions, the way to use the SDK and the functionalities it provides differ.**
|
|
144
|
+
|
|
145
|
+
Below is the guide and examples on how to use it with different frameworks -
|
|
146
|
+
|
|
147
|
+
## React
|
|
141
148
|
|
|
142
|
-
|
|
149
|
+
The initalization remains the same when you work with React. You can intialze the SDK in the `index.js` file. Please refer to the 'Initialization' section above to read more.
|
|
143
150
|
|
|
144
|
-
|
|
151
|
+
### Fetching Content and Listening to Storyblok Visual Editor events
|
|
152
|
+
|
|
153
|
+
Use `useStoryblok` to fetch the content as well as enable live editing. You need to pass the `slug` as the first parameter, `apiOptions` as the second parameter, and `bridgeOptions` as the third parameter, which is optional if you want to set the options for the bridge by yourself. Check the available [apiOptions](https://github.com/storyblok/storyblok-js-client#class-storyblok) (passed to `storyblok-js-client`) and [bridgeOptions](https://www.storyblok.com/docs/Guides/storyblok-latest-js?utm_source=github.com&utm_medium=readme&utm_campaign=storyblok-nuxt) (passed to the Storyblok Bridge).
|
|
145
154
|
|
|
146
155
|
```js
|
|
147
156
|
import { useStoryblok, StoryblokComponent } from "@storyblok/react";
|
|
@@ -159,38 +168,225 @@ function App() {
|
|
|
159
168
|
export default App;
|
|
160
169
|
```
|
|
161
170
|
|
|
162
|
-
|
|
171
|
+
`StoryblokComponent` renders the route components dynamically, using the list of components loaded during the initialization inside the `storyblokInit` function.
|
|
172
|
+
|
|
173
|
+
This is how you can pass the Bridge options as a third parameter to `useStoryblok`:
|
|
174
|
+
|
|
175
|
+
```js
|
|
176
|
+
useStoryblok(
|
|
177
|
+
story.id,
|
|
178
|
+
{ version: "draft", resolveRelations: ["Article.author"] },
|
|
179
|
+
{
|
|
180
|
+
resolveRelations: ["Article.author"],
|
|
181
|
+
preventClicks: true,
|
|
182
|
+
}
|
|
183
|
+
);
|
|
184
|
+
```
|
|
185
|
+
|
|
186
|
+
**Check out our React Boilerplate [here](https://github.com/storyblok/storyblok-react-boilerplate), or read on how to add Storyblok to React in 5 mins [here](https://www.storyblok.com/tp/headless-cms-react)**
|
|
187
|
+
You can also take a look at the [React Playground](https://github.com/arorachakit/storyblok-react/tree/main/playground) in this repo.
|
|
188
|
+
|
|
189
|
+
## Next.js using App Router - Live Editing support
|
|
190
|
+
|
|
191
|
+
The components in the `app` directory are by default React Server Side Components, which limits the reactivity. You can enable Storyblok Visual Editor's live editing with React Server Components by rendering them inside a wrapper (`StoryblokPovider`) on the client. The SDK allows you to take full advantage of the Live Editing, but the use of Server Side Components is partial, which will be still better than the older Next.js approach performance-wise. The next section explains about how to use complete server side approach.
|
|
192
|
+
|
|
193
|
+
> The SDK has a special module for RSC. Always import `@storyblok/react/rsc` while using Server Components.
|
|
194
|
+
|
|
195
|
+
### 1. Initialize
|
|
196
|
+
|
|
197
|
+
In `app/layout.jsx`, call the `storyblokInit` function, but without loading the component list (we will do that on the client). Wrap your whole app using a `StoryblokProvider` component (this provider is created in the next step) :
|
|
163
198
|
|
|
164
199
|
```js
|
|
165
|
-
|
|
166
|
-
|
|
200
|
+
import { storyblokInit, apiPlugin } from "@storyblok/react/rsc";
|
|
201
|
+
import StoryblokProvider from "../components/StoryblokProvider";
|
|
202
|
+
|
|
203
|
+
storyblokInit({
|
|
204
|
+
accessToken: "YOUR_ACCESS_TOKEN",
|
|
205
|
+
use: [apiPlugin],
|
|
167
206
|
});
|
|
207
|
+
|
|
208
|
+
export default function RootLayout({ children }) {
|
|
209
|
+
return (
|
|
210
|
+
<StoryblokProvider>
|
|
211
|
+
<html lang="en">
|
|
212
|
+
<body>{children}</body>
|
|
213
|
+
</html>
|
|
214
|
+
</StoryblokProvider>
|
|
215
|
+
);
|
|
216
|
+
}
|
|
168
217
|
```
|
|
169
218
|
|
|
170
|
-
|
|
219
|
+
### 2. Create StoryblokProvider and Import your Storyblok Components
|
|
171
220
|
|
|
172
|
-
|
|
221
|
+
Create the `components/StoryblokProvider.jsx` file. Re-initalize the connection with Storyblok (this time, on the client) using `storyblokInit`, and import your Storyblok components:
|
|
173
222
|
|
|
174
223
|
```js
|
|
175
|
-
|
|
224
|
+
/** 1. Tag it as a client component */
|
|
225
|
+
"use client";
|
|
226
|
+
import { storyblokInit, apiPlugin } from "@storyblok/react/rsc";
|
|
227
|
+
|
|
228
|
+
/** 2. Import your components */
|
|
229
|
+
import Page from "../components/Page";
|
|
230
|
+
import Teaser from "../components/Teaser";
|
|
231
|
+
|
|
232
|
+
/** 3. Initialize it as usual */
|
|
233
|
+
storyblokInit({
|
|
234
|
+
accessToken: "YOUR_ACCESS_TOKEN",
|
|
235
|
+
use: [apiPlugin],
|
|
236
|
+
components: {
|
|
237
|
+
teaser: Teaser,
|
|
238
|
+
page: Page,
|
|
239
|
+
},
|
|
240
|
+
});
|
|
241
|
+
|
|
242
|
+
export default function StoryblokProvider({ children }) {
|
|
243
|
+
return children;
|
|
244
|
+
}
|
|
245
|
+
```
|
|
246
|
+
|
|
247
|
+
> Note: it's necessary to re-initialize here as well, as to enable the live editing experience inside the Visual Editor you need to initialize the lib universally (client + server).
|
|
248
|
+
|
|
249
|
+
### 3. Fetch Content and Render Components
|
|
250
|
+
|
|
251
|
+
The `getStoryblokApi` function, which is an instance of [storyblok-js-client](https://github.com/storyblok/storyblok-js-client) can be used to fetch the data from the Storyblok API. This should be imported from `@storyblok/react/rsc`.
|
|
252
|
+
You can render the content of your route with the `StoryblokStory` component, which will automatically handle the Visual Editor live events when editing the story. In `app/page.jsx`, use them as follows:
|
|
253
|
+
|
|
254
|
+
```js
|
|
255
|
+
import { getStoryblokApi } from "@storyblok/react/rsc";
|
|
256
|
+
import StoryblokStory from "@storyblok/react/story";
|
|
257
|
+
|
|
258
|
+
export default async function Home() {
|
|
259
|
+
const { data } = await fetchData();
|
|
176
260
|
|
|
177
|
-
const Feature = ({ blok }) => {
|
|
178
261
|
return (
|
|
179
|
-
<div
|
|
180
|
-
<
|
|
181
|
-
<div>{blok.name}</div>
|
|
182
|
-
<p>{blok.description}</p>
|
|
183
|
-
</div>
|
|
262
|
+
<div>
|
|
263
|
+
<StoryblokStory story={data.story} />
|
|
184
264
|
</div>
|
|
185
265
|
);
|
|
186
|
-
}
|
|
266
|
+
}
|
|
187
267
|
|
|
188
|
-
export
|
|
268
|
+
export async function fetchData() {
|
|
269
|
+
const storyblokApi = getStoryblokApi();
|
|
270
|
+
return storyblokApi.get(`cdn/stories/home`, { version: "draft" });
|
|
271
|
+
}
|
|
189
272
|
```
|
|
190
273
|
|
|
191
|
-
|
|
274
|
+
`StoryblokStory` keeps the state for thet story behind the scenes and uses `StoryblokComponent` to render the route components dynamically, using the list of components loaded during the initialization inside the `storyblokInit` function. You can use the `StoryblokComponent` inside the components to redner the nested components dynamically.
|
|
275
|
+
|
|
276
|
+
> Note: To use this approach (with `getStoryblokApi`), you need to include the `apiPlugin` module when calling `storyblokInit` function. If you don't use `apiPlugin`, you can use your preferred method or function to fetch your data.
|
|
277
|
+
|
|
278
|
+
To try this setup, take a look at the [Next 13 Live Editing Playground](https://github.com/arorachakit/storyblok-react/tree/main/playground-next13-live-editing) in this repo.
|
|
192
279
|
|
|
193
|
-
|
|
280
|
+
## Next.js using App Router - Full React Server Components
|
|
281
|
+
|
|
282
|
+
If you want to use the Next.js `app` directory approach, and React Server Components exclusively with everything on the server side, follow this approach.
|
|
283
|
+
|
|
284
|
+
> The SDK has a special module for RSC. Always import `@storyblok/react/rsc` while using Server Components.
|
|
285
|
+
|
|
286
|
+
**Limitation** - Real-time editing won't work if all the components are rendered on the server. Although, you can see the changes applied in the Visual Editor whenever you save or publish the changes applied to the story.
|
|
287
|
+
|
|
288
|
+
### 1. Initialize and Import your Storyblok Components
|
|
289
|
+
|
|
290
|
+
The initialzation remains the same here as well. Please refer to the above section about "Initialization" for more information about `storyblokInit` function.
|
|
291
|
+
In `app/layout.jsx`, call the `storyblokInit` function and use the new `StoryblokBridgeLoader` component to set up the Storyblok bridge. This Bridge Loader can be imported from `@storyblok/react/bridge-loader`:
|
|
292
|
+
|
|
293
|
+
```js
|
|
294
|
+
import { storyblokInit, apiPlugin } from "@storyblok/react/rsc";
|
|
295
|
+
import StoryblokBridgeLoader from "@storyblok/react/bridge-loader";
|
|
296
|
+
|
|
297
|
+
import Page from "../components/Page";
|
|
298
|
+
import Teaser from "../components/Teaser";
|
|
299
|
+
|
|
300
|
+
storyblokInit({
|
|
301
|
+
accessToken: "YOUR_ACCESS_TOKEN",
|
|
302
|
+
use: [apiPlugin],
|
|
303
|
+
components: {
|
|
304
|
+
teaser: Teaser,
|
|
305
|
+
page: Page,
|
|
306
|
+
},
|
|
307
|
+
});
|
|
308
|
+
|
|
309
|
+
export default RootLayout({ children }) =>{
|
|
310
|
+
return (
|
|
311
|
+
<html lang="en">
|
|
312
|
+
<body>{children}</body>
|
|
313
|
+
<StoryblokBridgeLoader options={bridgeOptions} />
|
|
314
|
+
</html>
|
|
315
|
+
);
|
|
316
|
+
}
|
|
317
|
+
```
|
|
318
|
+
|
|
319
|
+
As the name says, `StoryblokBridgeLoader` loads the bridge on the client. It helps you see the dotted lines and allows you to still click on the components inside the Visual Editor to open their schema. You can pass the bridge options using the `options` prop.
|
|
320
|
+
|
|
321
|
+
### 2. Fetch Content and Render Components
|
|
322
|
+
|
|
323
|
+
The `getStoryblokApi` function, is an instance of [storyblok-js-client](https://github.com/storyblok/storyblok-js-client) can be used to fetch the data from the Storyblok API. This is imported from `@storyblok/react/rsc`.
|
|
324
|
+
Go to the route you want to fetch data from and use it as follows:
|
|
325
|
+
|
|
326
|
+
```js
|
|
327
|
+
import { getStoryblokApi, StoryblokComponent } from "@storyblok/react/rsc";
|
|
328
|
+
|
|
329
|
+
export default async function Home() {
|
|
330
|
+
const { data } = await fetchData();
|
|
331
|
+
|
|
332
|
+
return (
|
|
333
|
+
<div>
|
|
334
|
+
<h1>Story: {data.story.id}</h1>
|
|
335
|
+
<StoryblokComponent blok={data.story.content} />
|
|
336
|
+
</div>
|
|
337
|
+
);
|
|
338
|
+
}
|
|
339
|
+
|
|
340
|
+
export async function fetchData() {
|
|
341
|
+
const storyblokApi = getStoryblokApi();
|
|
342
|
+
return storyblokApi.get(`cdn/stories/home`, { version: "draft" });
|
|
343
|
+
}
|
|
344
|
+
```
|
|
345
|
+
|
|
346
|
+
> Note: To use this approach (with `getStoryblokApi`), you need to include the `apiPlugin` module when calling `storyblokInit` function. If you don't use `apiPlugin`, you can use your preferred method or function to fetch your data.
|
|
347
|
+
|
|
348
|
+
`StoryblokComponent` renders the route components dynamically, using the list of components loaded during the initialization inside the `storyblokInit` function.
|
|
349
|
+
To try it, take a look at the [Next 13 RSC Playground](https://github.com/arorachakit/storyblok-react/tree/main/playground-next13-rsc) in this repo.
|
|
350
|
+
|
|
351
|
+
## Next.js using Pages Router
|
|
352
|
+
|
|
353
|
+
In this section, we'll see how to use the React SDK with the `pages` directory approach.
|
|
354
|
+
|
|
355
|
+
The initalization remains the same when you work with Next.js. You can intialze the SDK in the `_app.js` file. Please refer to the 'Initialization' section above to read more.
|
|
356
|
+
|
|
357
|
+
### 1. Fetching Content
|
|
358
|
+
|
|
359
|
+
The SDK provides a `getStoryblokApi` object in your app, which is an instance of [storyblok-js-client](https://github.com/storyblok/storyblok-js-client). This can be used to fetch the content from Storyblok. You can use it in functions like `getStaticProps`, `getStaticPaths`, `getServerSideProps` etc.
|
|
360
|
+
|
|
361
|
+
```js
|
|
362
|
+
import { getStoryblokApi } from "@storyblok/react";
|
|
363
|
+
|
|
364
|
+
// At the required place
|
|
365
|
+
const storyblokApi = getStoryblokApi();
|
|
366
|
+
const { data } = await storyblokApi.get("cdn/stories", { version: "draft" });
|
|
367
|
+
```
|
|
368
|
+
|
|
369
|
+
> Note: To use this approach, you need to include the `apiPlugin` module when calling `storyblokInit` function. If you don't use `apiPlugin`, you can use your preferred method or function to fetch your data.
|
|
370
|
+
|
|
371
|
+
### 2. Listening to Storyblok Visual Editor events
|
|
372
|
+
|
|
373
|
+
The SDK also provides you with the `useStoryblokState` hook. It works similarly to `useStoryblok` for live editing, but it doesn't fetch the content. Instead, it receives a story object as the first parameter. You can also pass the Bridge Options as the second parameter.
|
|
374
|
+
|
|
375
|
+
```js
|
|
376
|
+
import { useStoryblokState, StoryblokComponent } from "@storyblok/react";
|
|
377
|
+
|
|
378
|
+
export default function Home({ story: initialStory }) {
|
|
379
|
+
const story = useStoryblokState(initialStory);
|
|
380
|
+
|
|
381
|
+
if (!story.content) {
|
|
382
|
+
return <div>Loading...</div>;
|
|
383
|
+
}
|
|
384
|
+
|
|
385
|
+
return <StoryblokComponent blok={story.content} />;
|
|
386
|
+
}
|
|
387
|
+
```
|
|
388
|
+
|
|
389
|
+
In this case, the story is being passed as a prop that can be coming from where the story is being fetched. A complete example would look like this-
|
|
194
390
|
|
|
195
391
|
```js
|
|
196
392
|
import {
|
|
@@ -225,14 +421,15 @@ export async function getStaticProps({ preview = false }) {
|
|
|
225
421
|
}
|
|
226
422
|
```
|
|
227
423
|
|
|
228
|
-
|
|
229
|
-
|
|
424
|
+
`StoryblokComponent` renders the route components dynamically, using the list of components loaded during the initialization inside the `storyblokInit` function.
|
|
425
|
+
|
|
426
|
+
**Check out the [code for the first part of our Next.js + Storyblok Ultimate Tutorial](https://github.com/storyblok/next.js-ultimate-tutorial/tree/part-1). Or you can also read on how to add Storyblok to a Next.js project in 5 minutes [here](https://www.storyblok.com/tp/add-a-headless-cms-to-next-js-in-5-minutes)**
|
|
230
427
|
|
|
231
|
-
|
|
428
|
+
## Features and API
|
|
232
429
|
|
|
233
430
|
You can **choose the features to use** when you initialize the plugin. In that way, you can improve Web Performance by optimizing your page load and save some bytes.
|
|
234
431
|
|
|
235
|
-
|
|
432
|
+
### Storyblok API
|
|
236
433
|
|
|
237
434
|
You can use an `apiOptions` object. This is passed down to the [storyblok-js-client config object](https://github.com/storyblok/storyblok-js-client#class-storyblok):
|
|
238
435
|
|
|
@@ -259,7 +456,7 @@ If you prefer to use your own fetch method, just remove the `apiPlugin` and `sto
|
|
|
259
456
|
storyblokInit({});
|
|
260
457
|
```
|
|
261
458
|
|
|
262
|
-
|
|
459
|
+
### Storyblok Bridge
|
|
263
460
|
|
|
264
461
|
If you don't use `registerStoryblokBridge`, you still have access to the raw `window.StoryblokBridge`:
|
|
265
462
|
|
|
@@ -271,7 +468,7 @@ sbBridge.on(["input", "published", "change"], (event) => {
|
|
|
271
468
|
});
|
|
272
469
|
```
|
|
273
470
|
|
|
274
|
-
|
|
471
|
+
### Rendering Rich Text
|
|
275
472
|
|
|
276
473
|
You can easily render rich text by using the `renderRichText` function that comes with `@storyblok/react`:
|
|
277
474
|
|
|
@@ -326,11 +523,12 @@ renderRichText(blok.richTextField, {
|
|
|
326
523
|
});
|
|
327
524
|
```
|
|
328
525
|
|
|
526
|
+
We also recommend using the [Storyblok Rich Text Renderer for React by Claus](https://github.com/claus/storyblok-rich-text-react-renderer) for rendering your Storyblok rich text content to React elements and Next.js applications.
|
|
527
|
+
|
|
329
528
|
## The Storyblok JavaScript SDK Ecosystem
|
|
330
529
|
|
|
331
530
|
|
|
332
531
|
|
|
333
|
-
|
|
334
532
|
## 🔗 Related Links
|
|
335
533
|
|
|
336
534
|
- **[Storyblok Technology Hub](https://www.storyblok.com/technologies?utm_source=github.com&utm_medium=readme&utm_campaign=storyblok-react)**: Storyblok integrates with every framework so that you are free to choose the best fit for your project. We prepared the technology hub so that you can find selected beginner tutorials, videos, boilerplates, and even cheatsheets all in one place.
|
|
@@ -0,0 +1,21 @@
|
|
|
1
|
+
import { useState, useEffect } from "react";
|
|
2
|
+
import { h as he } from "./storyblok-js-612aedc3.mjs";
|
|
3
|
+
const useStoryblokState = (initialStory = null, bridgeOptions = {}) => {
|
|
4
|
+
let [story, setStory] = useState(initialStory);
|
|
5
|
+
const isBridgeEnable = typeof window !== "undefined" && typeof window.storyblokRegisterEvent !== "undefined";
|
|
6
|
+
if (!isBridgeEnable || !initialStory) {
|
|
7
|
+
return initialStory;
|
|
8
|
+
}
|
|
9
|
+
useEffect(() => {
|
|
10
|
+
setStory(initialStory);
|
|
11
|
+
he(
|
|
12
|
+
story.id,
|
|
13
|
+
(newStory) => setStory(newStory),
|
|
14
|
+
bridgeOptions
|
|
15
|
+
);
|
|
16
|
+
}, [initialStory]);
|
|
17
|
+
return story;
|
|
18
|
+
};
|
|
19
|
+
export {
|
|
20
|
+
useStoryblokState as u
|
|
21
|
+
};
|
|
@@ -0,0 +1 @@
|
|
|
1
|
+
"use strict";const e=require("react"),t=require("./storyblok-js-a8758ae9.js");exports.useStoryblokState=(r=null,o={})=>{let[s,i]=e.useState(r);return"undefined"!=typeof window&&void 0!==window.storyblokRegisterEvent&&r?(e.useEffect((()=>{i(r),t.he(s.id,(e=>i(e)),o)}),[r]),s):r};
|
|
@@ -0,0 +1 @@
|
|
|
1
|
+
"use strict";const o=require("./storyblok-js-a8758ae9.js"),e=require("react"),t=e.forwardRef((({blok:o,...t},r)=>{if(!o)return console.error("Please provide a 'blok' property to the StoryblokComponent"),e.createElement("div",null,"Please provide a blok property to the StoryblokComponent");const n=l(o.component);return n?e.createElement(n,{ref:r,blok:o,...t}):e.createElement("div",null)}));t.displayName="StoryblokComponent";let r=null,n={};const l=o=>n[o]?n[o]:(console.error(`Component ${o} doesn't exist.`),!1);exports.StoryblokComponent=t,exports.getComponent=l,exports.storyblokInit=(e={})=>{const{storyblokApi:t}=o.ue(e);r=t,n=e.components},exports.useStoryblokApi=()=>(r||console.error("You can't use getStoryblokApi if you're not loading apiPlugin."),r);
|
|
@@ -0,0 +1,46 @@
|
|
|
1
|
+
import { u as ue } from "./storyblok-js-612aedc3.mjs";
|
|
2
|
+
import React, { forwardRef } from "react";
|
|
3
|
+
const StoryblokComponent = forwardRef(
|
|
4
|
+
({ blok, ...restProps }, ref) => {
|
|
5
|
+
if (!blok) {
|
|
6
|
+
console.error(
|
|
7
|
+
"Please provide a 'blok' property to the StoryblokComponent"
|
|
8
|
+
);
|
|
9
|
+
return /* @__PURE__ */ React.createElement("div", null, "Please provide a blok property to the StoryblokComponent");
|
|
10
|
+
}
|
|
11
|
+
const Component = getComponent(blok.component);
|
|
12
|
+
if (Component) {
|
|
13
|
+
return /* @__PURE__ */ React.createElement(Component, { ref, blok, ...restProps });
|
|
14
|
+
}
|
|
15
|
+
return /* @__PURE__ */ React.createElement("div", null);
|
|
16
|
+
}
|
|
17
|
+
);
|
|
18
|
+
StoryblokComponent.displayName = "StoryblokComponent";
|
|
19
|
+
let storyblokApiInstance = null;
|
|
20
|
+
let componentsMap = {};
|
|
21
|
+
const useStoryblokApi = () => {
|
|
22
|
+
if (!storyblokApiInstance) {
|
|
23
|
+
console.error(
|
|
24
|
+
"You can't use getStoryblokApi if you're not loading apiPlugin."
|
|
25
|
+
);
|
|
26
|
+
}
|
|
27
|
+
return storyblokApiInstance;
|
|
28
|
+
};
|
|
29
|
+
const getComponent = (componentKey) => {
|
|
30
|
+
if (!componentsMap[componentKey]) {
|
|
31
|
+
console.error(`Component ${componentKey} doesn't exist.`);
|
|
32
|
+
return false;
|
|
33
|
+
}
|
|
34
|
+
return componentsMap[componentKey];
|
|
35
|
+
};
|
|
36
|
+
const storyblokInit = (pluginOptions = {}) => {
|
|
37
|
+
const { storyblokApi } = ue(pluginOptions);
|
|
38
|
+
storyblokApiInstance = storyblokApi;
|
|
39
|
+
componentsMap = pluginOptions.components;
|
|
40
|
+
};
|
|
41
|
+
export {
|
|
42
|
+
StoryblokComponent as S,
|
|
43
|
+
getComponent as g,
|
|
44
|
+
storyblokInit as s,
|
|
45
|
+
useStoryblokApi as u
|
|
46
|
+
};
|