@ray-js/t-agent 0.2.7 → 0.2.8-beta.2
This diff represents the content of publicly available package versions that have been released to one of the supported registries. The information contained in this diff is provided for informational purposes only and reflects changes between package versions as they appear in their respective public registries.
- package/README-zh_CN.md +286 -104
- package/README.md +249 -88
- package/dist/chat/ChatBubbleTile.d.ts +2 -2
- package/dist/chat/ChatMessage.js +7 -5
- package/dist/chat/ChatSession.d.ts +2 -2
- package/dist/chat/ChatSession.js +0 -5
- package/dist/chat/deepmerge.d.ts +27 -0
- package/dist/chat/deepmerge.js +141 -0
- package/dist/chat/index.d.ts +1 -0
- package/dist/chat/index.js +3 -1
- package/dist/chat/json.js +6 -1
- package/dist/chat/types.js +2 -0
- package/dist/chat/utils.d.ts +0 -1
- package/dist/chat/utils.js +0 -24
- package/dist/index.js +1 -0
- package/dist/plugins/ui.d.ts +2 -2
- package/package.json +5 -3
package/README-zh_CN.md
CHANGED
|
@@ -28,14 +28,7 @@ yarn add @ray-js/t-agent @ray-js/t-agent-plugin-aistream @ray-js/t-agent-ui-ray
|
|
|
28
28
|
}
|
|
29
29
|
```
|
|
30
30
|
|
|
31
|
-
|
|
32
|
-
|
|
33
|
-
部分功能对 App 的 kit 有依赖要求,需要配置 AIStreamKit 最低才能使用这些功能
|
|
34
|
-
|
|
35
|
-
| 功能 | AIStreamKit 最低版本 | 相关 API |
|
|
36
|
-
| ---------- | -------------------- | ------------------------------------- |
|
|
37
|
-
| 对话分组 | 1.3.2 | agent.plugins.aiStream.getChatId |
|
|
38
|
-
| 自定义参数 | 2.1.0 | agent.plugins.aiStream.onUserDataRead |
|
|
31
|
+
> 使用 MCP 功能时,`AIStreamKit` 需要 `2.2.1` 或以上版本。
|
|
39
32
|
|
|
40
33
|
## package.json 依赖要求
|
|
41
34
|
|
|
@@ -68,59 +61,70 @@ yarn run miniapp
|
|
|
68
61
|
import React from 'react';
|
|
69
62
|
import { View } from '@ray-js/components';
|
|
70
63
|
import { createChatAgent, withDebug, withUI } from '@ray-js/t-agent';
|
|
71
|
-
import {
|
|
64
|
+
import {
|
|
65
|
+
ChatContainer,
|
|
66
|
+
defaultRenderOptions,
|
|
67
|
+
MessageInput,
|
|
68
|
+
MessageList,
|
|
69
|
+
MessageActionBar,
|
|
70
|
+
} from '@ray-js/t-agent-ui-ray';
|
|
72
71
|
import { withAIStream, withBuildIn } from '@ray-js/t-agent-plugin-aistream';
|
|
73
72
|
|
|
74
73
|
const createAgent = () => {
|
|
75
|
-
|
|
76
|
-
|
|
77
|
-
|
|
78
|
-
|
|
79
|
-
|
|
80
|
-
|
|
81
|
-
|
|
82
|
-
|
|
83
|
-
|
|
84
|
-
|
|
85
|
-
|
|
86
|
-
|
|
74
|
+
const agent = createChatAgent(
|
|
75
|
+
withUI(),
|
|
76
|
+
withAIStream({
|
|
77
|
+
earlyStart: true,
|
|
78
|
+
agentId: 'your-agent-id',
|
|
79
|
+
tokenOptions: {
|
|
80
|
+
api: 'm.life.ai.agent.token.get',
|
|
81
|
+
version: '1.0',
|
|
82
|
+
extParams: {
|
|
83
|
+
dialogueMode: 1,
|
|
84
|
+
},
|
|
85
|
+
},
|
|
86
|
+
}),
|
|
87
|
+
withDebug(),
|
|
88
|
+
withBuildIn()
|
|
89
|
+
);
|
|
87
90
|
|
|
88
|
-
|
|
89
|
-
|
|
91
|
+
agent.plugins.aiStream.onUserDataRead((type, data, result) => {
|
|
92
|
+
if (type === 'start-event') {
|
|
93
|
+
result.userData = {
|
|
94
|
+
sessionAttributes: {
|
|
95
|
+
'custom.param': {
|
|
96
|
+
'custom.app.scene': {
|
|
97
|
+
value: 'chat-page',
|
|
98
|
+
},
|
|
99
|
+
},
|
|
100
|
+
},
|
|
101
|
+
};
|
|
102
|
+
}
|
|
103
|
+
});
|
|
90
104
|
|
|
91
|
-
|
|
92
|
-
onChatStart(async result => {
|
|
93
|
-
const hello = createMessage({
|
|
94
|
-
role: 'assistant',
|
|
95
|
-
});
|
|
105
|
+
const { onChatStart, createMessage } = agent;
|
|
96
106
|
|
|
97
|
-
|
|
98
|
-
|
|
99
|
-
|
|
100
|
-
await hello.persist();
|
|
107
|
+
onChatStart(async result => {
|
|
108
|
+
const hello = createMessage({
|
|
109
|
+
role: 'assistant',
|
|
101
110
|
});
|
|
102
111
|
|
|
103
|
-
|
|
104
|
-
|
|
105
|
-
|
|
106
|
-
|
|
107
|
-
});
|
|
112
|
+
hello.bubble.setText('Hello, world!');
|
|
113
|
+
result.messages.push(hello);
|
|
114
|
+
await hello.persist();
|
|
115
|
+
});
|
|
108
116
|
|
|
109
|
-
|
|
110
|
-
|
|
111
|
-
|
|
112
|
-
|
|
113
|
-
|
|
114
|
-
} catch (error) {
|
|
115
|
-
console.error('Agent creation failed:', error);
|
|
116
|
-
throw error;
|
|
117
|
-
}
|
|
117
|
+
return agent;
|
|
118
|
+
};
|
|
119
|
+
|
|
120
|
+
const renderOptions = {
|
|
121
|
+
...defaultRenderOptions,
|
|
118
122
|
};
|
|
119
123
|
|
|
120
124
|
export default function ChatPage() {
|
|
121
125
|
return (
|
|
122
126
|
<View style={{ height: '100vh' }}>
|
|
123
|
-
<ChatContainer createAgent={createAgent}>
|
|
127
|
+
<ChatContainer createAgent={createAgent} renderOptions={renderOptions}>
|
|
124
128
|
<MessageList />
|
|
125
129
|
<MessageInput />
|
|
126
130
|
<MessageActionBar />
|
|
@@ -799,6 +803,8 @@ const createAgent = () => {
|
|
|
799
803
|
- `options.sendBy` 发送者角色,默认为 'user'
|
|
800
804
|
- `options.responseBy` 响应者角色,默认为 'assistant'
|
|
801
805
|
- `options.userData` 可选的用户数据
|
|
806
|
+
- `agent.plugins.aiStream.removeMessage(message)` 删除一条历史消息
|
|
807
|
+
- `agent.plugins.aiStream.clearAllMessages()` 清空当前会话的所有消息和本地历史
|
|
802
808
|
- `agent.plugins.aiStream.getChatId()` 获取当前会话的 chatId,返回 Promise<string>
|
|
803
809
|
|
|
804
810
|
Hooks:
|
|
@@ -814,7 +820,7 @@ Hooks:
|
|
|
814
820
|
- `status` 消息状态
|
|
815
821
|
- `result.text` 文本内容,可以修改
|
|
816
822
|
- `onSkillCompose` 当收到技能数据时触发,用于处理技能的渲染
|
|
817
|
-
- `skill`
|
|
823
|
+
- `skill` 当前技能数据 (ReceivedTextSkillPacketBody)
|
|
818
824
|
- `respMsg` 响应消息
|
|
819
825
|
- `result.messages` 消息列表
|
|
820
826
|
- `onSkillsEnd` 当所有技能处理完成时触发
|
|
@@ -835,8 +841,99 @@ Hooks:
|
|
|
835
841
|
- `data.blocks` 当 type 为 'start-event' 时,包含本次发送的输入块
|
|
836
842
|
- `result.userData` 返回的用户数据对象,会被合并后发送给 AI 平台
|
|
837
843
|
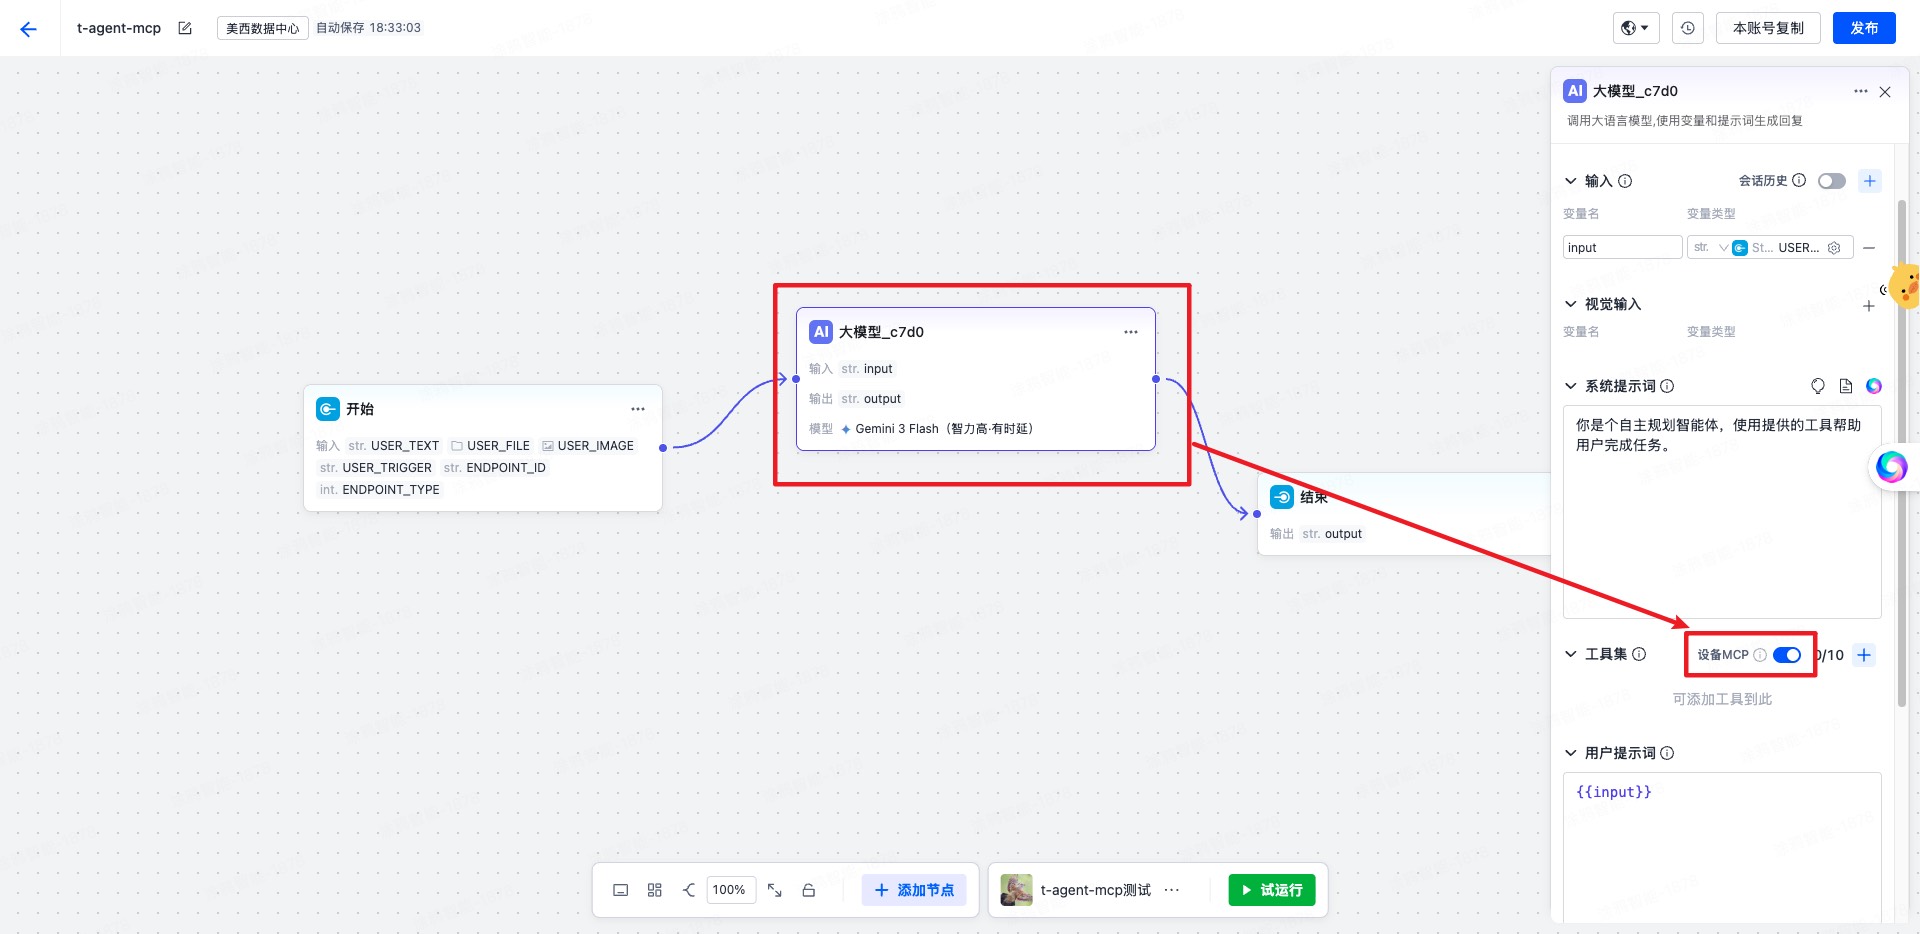
|
|
844
|
+
### withBuildIn 插件
|
|
845
|
+
|
|
846
|
+
提供了一些内置的功能,比如智能家居、知识库搜索等。
|
|
847
|
+
|
|
848
|
+
**支持的技能**:
|
|
849
|
+
|
|
850
|
+
- **智能家居**:设备控制、场景管理
|
|
851
|
+
- **知识库搜索**:关联文档展示
|
|
852
|
+
|
|
853
|
+
### withMCP 插件
|
|
854
|
+
|
|
855
|
+
提供 MCP 服务暴露能力,可以实现让 Agent 调用小程序里面提供的 tool,实现操作蓝牙设备,调用自定义 api,读取本地文件等功能,使用时先需要在智能体节点上开启“设备 MCP”,此外,MCP tool 的名字必须以 `device.` 开头。
|
|
856
|
+
|
|
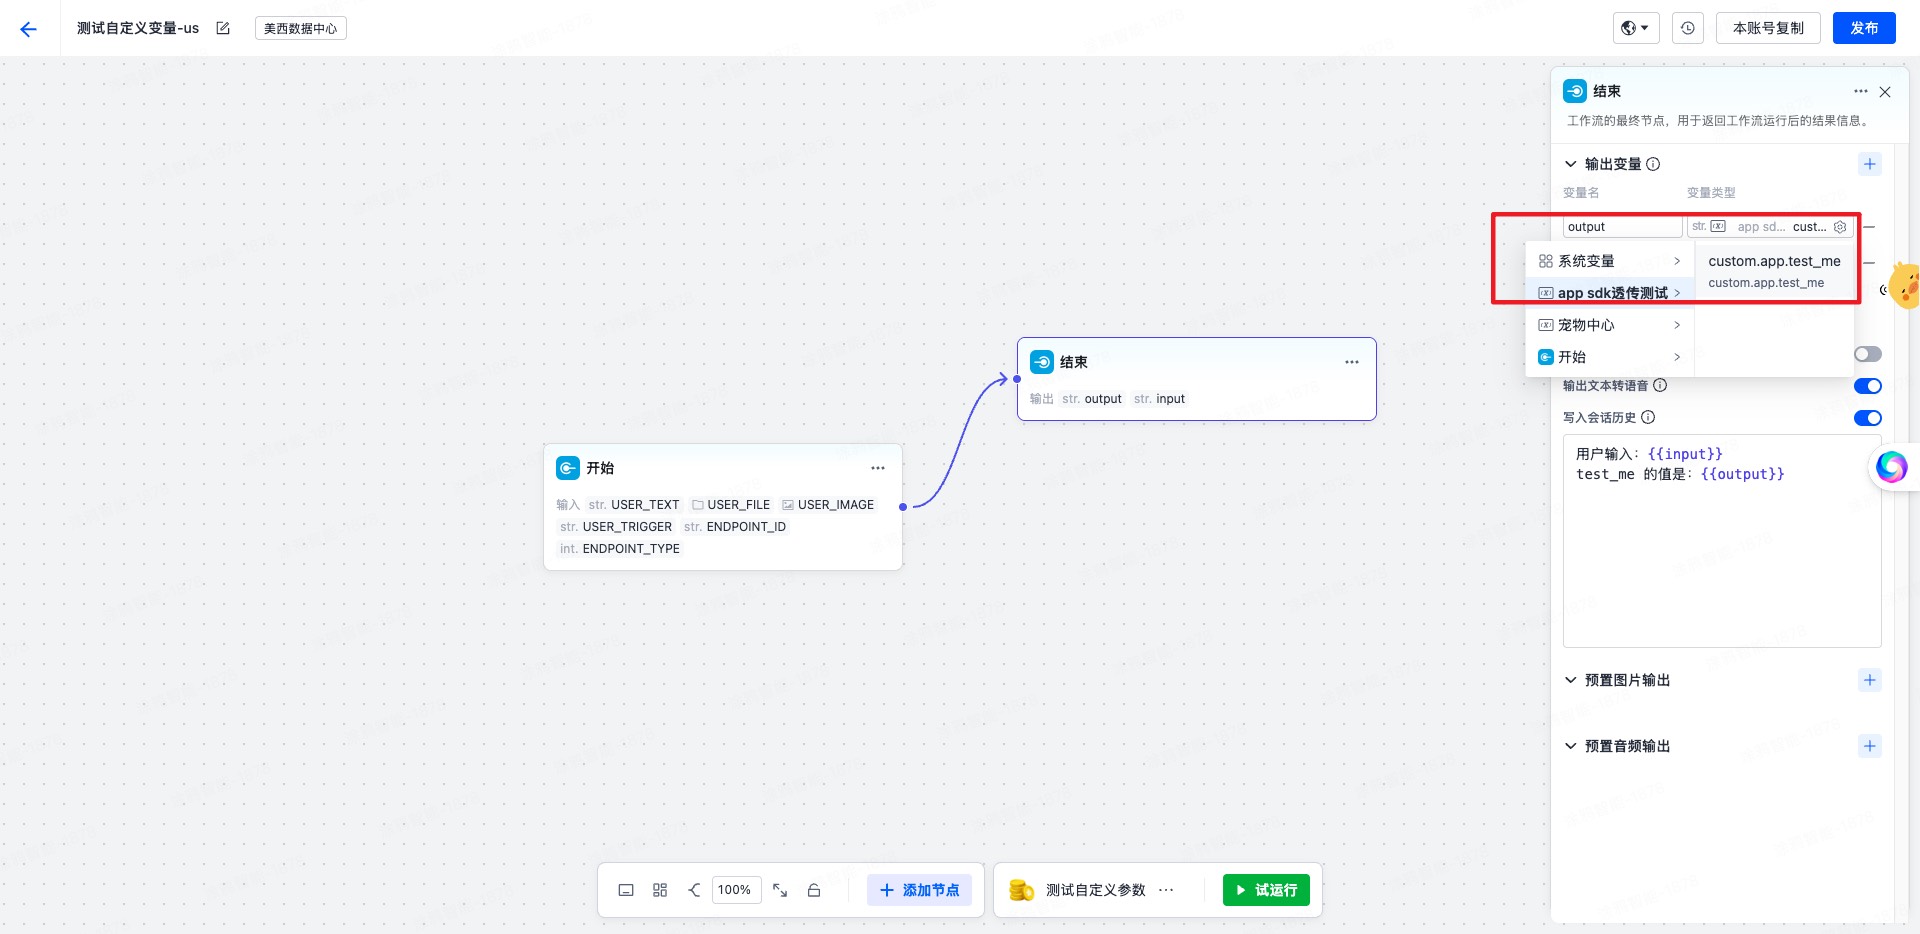
857
|
+
|
|
858
|
+
|
|
859
|
+
**使用前提**:
|
|
860
|
+
|
|
861
|
+
- 必须在 `withAIStream` 之后使用
|
|
862
|
+
- 使用 MCP 功能时,`AIStreamKit` 需要 `2.2.1` 或以上版本
|
|
863
|
+
- `createServer` 必须同步返回 `McpServer`
|
|
864
|
+
|
|
865
|
+
参数:
|
|
866
|
+
|
|
867
|
+
- `createServer(agent)` 创建 MCP 服务实例
|
|
868
|
+
- `createContext(event, agent)` 可选,为每次 MCP 请求补充上下文
|
|
869
|
+
|
|
838
870
|
**使用示例**:
|
|
839
871
|
|
|
872
|
+
```tsx
|
|
873
|
+
import { createChatAgent, withUI } from '@ray-js/t-agent';
|
|
874
|
+
import { McpServer, withAIStream, withMCP } from '@ray-js/t-agent-plugin-aistream';
|
|
875
|
+
|
|
876
|
+
const createAgent = () => {
|
|
877
|
+
const server = new McpServer({
|
|
878
|
+
name: 'demo-mcp',
|
|
879
|
+
version: '1.0.0',
|
|
880
|
+
});
|
|
881
|
+
|
|
882
|
+
server.registerTool(
|
|
883
|
+
'device.echo',
|
|
884
|
+
{
|
|
885
|
+
description: '回显输入参数',
|
|
886
|
+
inputSchema: {
|
|
887
|
+
type: 'object',
|
|
888
|
+
properties: {
|
|
889
|
+
text: { type: 'string' },
|
|
890
|
+
},
|
|
891
|
+
},
|
|
892
|
+
},
|
|
893
|
+
async (args, context) => {
|
|
894
|
+
return {
|
|
895
|
+
content: [
|
|
896
|
+
{
|
|
897
|
+
type: 'text',
|
|
898
|
+
text: JSON.stringify({
|
|
899
|
+
text: args.text,
|
|
900
|
+
sessionId: context.sessionId,
|
|
901
|
+
}),
|
|
902
|
+
},
|
|
903
|
+
],
|
|
904
|
+
};
|
|
905
|
+
}
|
|
906
|
+
);
|
|
907
|
+
|
|
908
|
+
return createChatAgent(
|
|
909
|
+
withUI(),
|
|
910
|
+
withAIStream({
|
|
911
|
+
agentId: 'your-agent-id',
|
|
912
|
+
}),
|
|
913
|
+
withMCP({
|
|
914
|
+
createServer: () => server,
|
|
915
|
+
createContext: event => ({
|
|
916
|
+
traceId: event.eventId,
|
|
917
|
+
}),
|
|
918
|
+
})
|
|
919
|
+
);
|
|
920
|
+
};
|
|
921
|
+
```
|
|
922
|
+
|
|
923
|
+
启用后,插件会:
|
|
924
|
+
|
|
925
|
+
- 在创建 session 时注入 `sessionAttributes.deviceMcp`
|
|
926
|
+
- 在收到 `MCP_CMD` 事件时调用对应 tool
|
|
927
|
+
- 将 tool 执行结果按 JSON-RPC 响应格式回传给 AIStream
|
|
928
|
+
|
|
929
|
+
### 自定义变量传入
|
|
930
|
+
|
|
931
|
+
某些情况下,你可能需要自定义变量到 agent 作为流程中的变量,你需要在工作流里配置自定义变量的引用处,然后再在小程序里传入自定义变量:
|
|
932
|
+
|
|
933
|
+
|
|
934
|
+
|
|
935
|
+
**小程序中传入自定义变量**:
|
|
936
|
+
|
|
840
937
|
```tsx
|
|
841
938
|
const agent = createChatAgent(
|
|
842
939
|
withUI(),
|
|
@@ -848,20 +945,28 @@ const agent = createChatAgent(
|
|
|
848
945
|
agent.plugins.aiStream.onUserDataRead((type, data, result) => {
|
|
849
946
|
// 在创建会话时传递用户信息
|
|
850
947
|
if (type === 'create-session') {
|
|
851
|
-
result.
|
|
852
|
-
|
|
853
|
-
|
|
854
|
-
|
|
948
|
+
result.userData = {
|
|
949
|
+
sessionAttributes: {
|
|
950
|
+
'custom.param': {
|
|
951
|
+
'custom.app.test_me': {
|
|
952
|
+
// 此处为平台上配置接收的参数名
|
|
953
|
+
value: `with value test me ${type} ${Date.now()}`,
|
|
954
|
+
},
|
|
955
|
+
},
|
|
855
956
|
},
|
|
856
957
|
};
|
|
857
958
|
return;
|
|
858
959
|
}
|
|
859
960
|
// 在每次发送消息时传递动态上下文
|
|
860
961
|
if (type === 'start-event') {
|
|
861
|
-
result.
|
|
862
|
-
|
|
863
|
-
|
|
864
|
-
|
|
962
|
+
result.userData = {
|
|
963
|
+
sessionAttributes: {
|
|
964
|
+
'custom.param': {
|
|
965
|
+
'custom.app.test_me': {
|
|
966
|
+
// 此处为平台上配置接收的参数名
|
|
967
|
+
value: `with value test me ${type} ${Date.now()}`,
|
|
968
|
+
},
|
|
969
|
+
},
|
|
865
970
|
},
|
|
866
971
|
};
|
|
867
972
|
return;
|
|
@@ -869,15 +974,6 @@ agent.plugins.aiStream.onUserDataRead((type, data, result) => {
|
|
|
869
974
|
});
|
|
870
975
|
```
|
|
871
976
|
|
|
872
|
-
### withBuildIn 插件
|
|
873
|
-
|
|
874
|
-
提供了一些内置的功能,比如智能家居、知识库搜索等。
|
|
875
|
-
|
|
876
|
-
**支持的技能**:
|
|
877
|
-
|
|
878
|
-
- **智能家居**:设备控制、场景管理
|
|
879
|
-
- **知识库搜索**:关联文档展示
|
|
880
|
-
|
|
881
977
|
## mock 机制
|
|
882
978
|
|
|
883
979
|
为了方便开发,我们提供了一个 mock 机制,可以在开发时不用连接小程序 AI 智能体平台,直接使用 mock 数据进行开发。
|
|
@@ -927,6 +1023,92 @@ mock.hooks.hook('asrDetection', context => {
|
|
|
927
1023
|
});
|
|
928
1024
|
```
|
|
929
1025
|
|
|
1026
|
+
### mock MCP
|
|
1027
|
+
|
|
1028
|
+
推荐做法是在 mock 的 `sendToAIStream` 钩子里,根据输入内容决定要调用哪个 MCP tool,再通过 `context.callMCPTool()` 直接走一遍完整的 MCP 调用链。
|
|
1029
|
+
|
|
1030
|
+
```tsx
|
|
1031
|
+
import { mock } from '@ray-js/t-agent-plugin-aistream';
|
|
1032
|
+
|
|
1033
|
+
const getToolCall = (text: string) => {
|
|
1034
|
+
if (text.includes('报错') || text.includes('失败') || text.includes('异常')) {
|
|
1035
|
+
return {
|
|
1036
|
+
name: 'device.home.energy.summary.fail',
|
|
1037
|
+
arguments: {
|
|
1038
|
+
reason: 'mock-error-case',
|
|
1039
|
+
},
|
|
1040
|
+
};
|
|
1041
|
+
}
|
|
1042
|
+
|
|
1043
|
+
if (text.includes('能耗') || text.includes('电量') || text.includes('数据')) {
|
|
1044
|
+
return {
|
|
1045
|
+
name: 'device.home.energy.summary.get',
|
|
1046
|
+
arguments: {
|
|
1047
|
+
period: 'today',
|
|
1048
|
+
},
|
|
1049
|
+
};
|
|
1050
|
+
}
|
|
1051
|
+
|
|
1052
|
+
return {
|
|
1053
|
+
name: 'device.app.open',
|
|
1054
|
+
arguments: {
|
|
1055
|
+
category: 'music',
|
|
1056
|
+
},
|
|
1057
|
+
};
|
|
1058
|
+
};
|
|
1059
|
+
|
|
1060
|
+
export const setupMockMCP = () => {
|
|
1061
|
+
mock.hooks.hook('sendToAIStream', async context => {
|
|
1062
|
+
const text = context.data
|
|
1063
|
+
.filter(item => item.type === 'text')
|
|
1064
|
+
.map(item => item.text)
|
|
1065
|
+
.join(' ');
|
|
1066
|
+
|
|
1067
|
+
if (!/mcp|应用|能耗|电量|数据|报错|失败|异常/i.test(text)) {
|
|
1068
|
+
return;
|
|
1069
|
+
}
|
|
1070
|
+
|
|
1071
|
+
const toolCall = getToolCall(text);
|
|
1072
|
+
|
|
1073
|
+
await context.writeText(`MCP mock 正在调用 ${toolCall.name}...`);
|
|
1074
|
+
|
|
1075
|
+
try {
|
|
1076
|
+
const result = await context.callMCPTool(toolCall.name, toolCall.arguments, {
|
|
1077
|
+
delayMs: 80,
|
|
1078
|
+
});
|
|
1079
|
+
await context.writeText(
|
|
1080
|
+
`工具 ${toolCall.name} 已返回:${
|
|
1081
|
+
typeof result === 'string' ? result : JSON.stringify(result == null ? {} : result)
|
|
1082
|
+
}`
|
|
1083
|
+
);
|
|
1084
|
+
} catch (error) {
|
|
1085
|
+
const message = error instanceof Error ? error.message : String(error);
|
|
1086
|
+
await context.writeText(`MCP mock 已收到工具报错:${message}`);
|
|
1087
|
+
}
|
|
1088
|
+
|
|
1089
|
+
await context.end();
|
|
1090
|
+
});
|
|
1091
|
+
};
|
|
1092
|
+
```
|
|
1093
|
+
|
|
1094
|
+
使用时在创建 agent 前注册一次即可:
|
|
1095
|
+
|
|
1096
|
+
```tsx
|
|
1097
|
+
const createAgent = () => {
|
|
1098
|
+
setupMockMCP();
|
|
1099
|
+
|
|
1100
|
+
return createChatAgent(
|
|
1101
|
+
withUI(),
|
|
1102
|
+
withAIStream({
|
|
1103
|
+
agentId: 'your-agent-id',
|
|
1104
|
+
}),
|
|
1105
|
+
withMCP({
|
|
1106
|
+
createServer: () => server,
|
|
1107
|
+
})
|
|
1108
|
+
);
|
|
1109
|
+
};
|
|
1110
|
+
```
|
|
1111
|
+
|
|
930
1112
|
## 附带的 utils 工具(现在不稳定,还在开发中)
|
|
931
1113
|
|
|
932
1114
|
### AbortController
|
|
@@ -1121,17 +1303,30 @@ yarn add @ray-js/t-agent-ui-ray
|
|
|
1121
1303
|
## 使用
|
|
1122
1304
|
|
|
1123
1305
|
```tsx
|
|
1124
|
-
import
|
|
1306
|
+
import React from 'react';
|
|
1307
|
+
import { View } from '@ray-js/components';
|
|
1308
|
+
import {
|
|
1309
|
+
ChatContainer,
|
|
1310
|
+
defaultRenderOptions,
|
|
1311
|
+
MessageActionBar,
|
|
1312
|
+
MessageInput,
|
|
1313
|
+
MessageList,
|
|
1314
|
+
} from '@ray-js/t-agent-ui-ray';
|
|
1125
1315
|
// createAgent 实现参见 t-agent 的使用示例
|
|
1126
1316
|
import { createAgent } from './createAgent';
|
|
1127
1317
|
|
|
1318
|
+
const renderOptions = {
|
|
1319
|
+
...defaultRenderOptions,
|
|
1320
|
+
};
|
|
1321
|
+
|
|
1128
1322
|
export default function ChatPage() {
|
|
1129
1323
|
// createAgent 必须返回一个 ChatAgent 应用过 withUI、withAIStream 插件的实例
|
|
1130
1324
|
return (
|
|
1131
1325
|
<View style={{ height: '100vh' }}>
|
|
1132
|
-
<ChatContainer createAgent={createAgent}>
|
|
1326
|
+
<ChatContainer createAgent={createAgent} renderOptions={renderOptions}>
|
|
1133
1327
|
<MessageList />
|
|
1134
1328
|
<MessageInput />
|
|
1329
|
+
<MessageActionBar />
|
|
1135
1330
|
</ChatContainer>
|
|
1136
1331
|
</View>
|
|
1137
1332
|
);
|
|
@@ -1190,7 +1385,16 @@ props:
|
|
|
1190
1385
|
|
|
1191
1386
|
- `className` 输入框的类名
|
|
1192
1387
|
- `placeholder` 输入框的占位符
|
|
1388
|
+
- `placeholderStyle` 输入框 placeholder 的样式
|
|
1193
1389
|
- `renderTop` 用于渲染输入框上方的内容
|
|
1390
|
+
- `style` 输入框容器样式
|
|
1391
|
+
- `attachment` 是否启用附件上传,或传入 `{ image, video, imageCount, videoCount }` 精细控制
|
|
1392
|
+
- `maxTextLength` 文本最大长度,默认 200
|
|
1393
|
+
- `maxAudioMs` 录音最大时长
|
|
1394
|
+
- `onStateChange` 输入框状态变化回调,状态值见 `MessageInputState`
|
|
1395
|
+
- `amplitudeCount` 语音波形振幅采样数量
|
|
1396
|
+
|
|
1397
|
+
`MessageInput` 当前默认导出的是 `MessageInputAIStream`,适用于已接入 `withAIStream` 的场景。
|
|
1194
1398
|
|
|
1195
1399
|
### MessageActionBar(0.2.x 新增)
|
|
1196
1400
|
|
|
@@ -1270,7 +1474,12 @@ const MyTile = ({ notifyHeightChanged }) => {
|
|
|
1270
1474
|
- bubble 气泡
|
|
1271
1475
|
- buttons 按钮组
|
|
1272
1476
|
- card 卡片
|
|
1477
|
+
- divider 分隔线
|
|
1478
|
+
- documents 关联文档
|
|
1479
|
+
- executeCard 执行结果卡片
|
|
1480
|
+
- file 文件
|
|
1273
1481
|
- image 图片
|
|
1482
|
+
- operateCard 操作结果卡片
|
|
1274
1483
|
- recommendations 推荐行动
|
|
1275
1484
|
- text 文本,包含 markdown 支持
|
|
1276
1485
|
- time 时间标识
|
|
@@ -1278,10 +1487,6 @@ const MyTile = ({ notifyHeightChanged }) => {
|
|
|
1278
1487
|
- video 视频
|
|
1279
1488
|
- workflow 工作选项
|
|
1280
1489
|
|
|
1281
|
-
### 内置 card
|
|
1282
|
-
|
|
1283
|
-
- WorkflowReplyCard 工作流回复卡片
|
|
1284
|
-
|
|
1285
1490
|
## React Hooks
|
|
1286
1491
|
|
|
1287
1492
|
### useChatAgent
|
|
@@ -1346,16 +1551,23 @@ const MyTilePart = () => {
|
|
|
1346
1551
|
|
|
1347
1552
|
### useSendAction
|
|
1348
1553
|
|
|
1349
|
-
发送一个 TTTAction
|
|
1554
|
+
发送一个 TTTAction。
|
|
1555
|
+
|
|
1556
|
+
如果当前组件位于 tile 或 card 内部,会优先走 `emitTileEvent`。
|
|
1557
|
+
如果当前组件只是 `ChatContainer` 下的普通子组件,则会退化为触发 UI 事件 `runTTTAction`。
|
|
1350
1558
|
|
|
1351
1559
|
```tsx
|
|
1352
1560
|
import { useSendAction } from '@ray-js/t-agent-ui-ray';
|
|
1353
1561
|
|
|
1354
|
-
const
|
|
1562
|
+
const ActionPanel = () => {
|
|
1355
1563
|
const sendAction = useSendAction();
|
|
1356
1564
|
|
|
1357
1565
|
const handleClick = () => {
|
|
1358
|
-
sendAction({
|
|
1566
|
+
sendAction({
|
|
1567
|
+
type: 'sendMessage',
|
|
1568
|
+
blocks: [{ type: 'text', text: 'hello' }],
|
|
1569
|
+
sendImmediately: true,
|
|
1570
|
+
});
|
|
1359
1571
|
};
|
|
1360
1572
|
|
|
1361
1573
|
return <button onClick={handleClick}>Send Message</button>;
|
|
@@ -1762,33 +1974,3 @@ const renderOptions = {
|
|
|
1762
1974
|
| t-agent.error.stream-exists | 错误提示 | 消息发送异常,请稍后再试 |
|
|
1763
1975
|
| t-agent.error.timeout | 错误提示 | 发送超时 |
|
|
1764
1976
|
| t-agent.error.asr-empty | 错误提示 | 语音识别结果为空 |
|
|
1765
|
-
|
|
1766
|
-
# 更新日志
|
|
1767
|
-
|
|
1768
|
-
## 0.2.x 版本
|
|
1769
|
-
|
|
1770
|
-
### @ray-js/t-agent
|
|
1771
|
-
|
|
1772
|
-
- **Hook 机制增强**:新增 `onMessageFeedback` 和 `onClearHistory` 等生命周期钩子
|
|
1773
|
-
- **消息状态管理**:优化消息状态管理,提供更精确的消息状态控制
|
|
1774
|
-
- **错误处理**:增强错误处理机制,支持更详细的错误信息和错误分类
|
|
1775
|
-
- **性能优化**:优化内存管理和垃圾回收机制
|
|
1776
|
-
|
|
1777
|
-
### @ray-js/t-agent-plugin-aistream
|
|
1778
|
-
|
|
1779
|
-
- **全新插件**:替代废弃的 assistant 插件,提供更强大的功能
|
|
1780
|
-
- **连接优化**:新增 `earlyStart` 参数,支持提前建立连接,减少首次响应时间
|
|
1781
|
-
- **Token 管理**:优化 Token 获取机制,支持自定义 `tokenOptions`
|
|
1782
|
-
- **语音识别**:新增 AsrAgent 语音识别功能,支持实时语音转文字
|
|
1783
|
-
- **Mock 机制**:改进的 mock 机制,支持更灵活的测试场景
|
|
1784
|
-
- **多模态支持**:默认支持文本、图片、语音等多种输入类型
|
|
1785
|
-
|
|
1786
|
-
### @ray-js/t-agent-ui-ray
|
|
1787
|
-
|
|
1788
|
-
- **消息操作栏**:新增 MessageActionBar 组件,支持多选操作和批量删除
|
|
1789
|
-
- **虚拟滚动**:集成 LazyScrollView,提供虚拟滚动和性能优化
|
|
1790
|
-
- **国际化系统**:完整的国际化系统,支持中文简繁体、英文、日文等 8 种语言
|
|
1791
|
-
- **翻译 Hook**:新增 useTranslate Hook,简化多语言使用
|
|
1792
|
-
- **自定义渲染**:扩展 renderOptions,支持更多自定义渲染选项
|
|
1793
|
-
- **交互优化**:优化长按菜单功能,支持复制、删除、多选、点赞等操作
|
|
1794
|
-
- **UI 完善**:新增多语言键值对,覆盖所有 UI 交互场景
|