@nocobase/plugin-ai 3.0.0-alpha.6 → 3.0.0-alpha.7
This diff represents the content of publicly available package versions that have been released to one of the supported registries. The information contained in this diff is provided for informational purposes only and reflects changes between package versions as they appear in their respective public registries.
- package/dist/ai/docs/nocobase/ai/ai-quick-start.md +1 -1
- package/dist/ai/docs/nocobase/ai/claude-code/index.md +1 -1
- package/dist/ai/docs/nocobase/ai/codex/index.md +1 -1
- package/dist/ai/docs/nocobase/ai/hermes-agent/index.md +1 -1
- package/dist/ai/docs/nocobase/ai/index.md +6 -25
- package/dist/ai/docs/nocobase/ai/install-nocobase-app.md +1 -1
- package/dist/ai/docs/nocobase/ai/openclaw/index.md +1 -1
- package/dist/ai/docs/nocobase/ai/opencode/index.md +1 -1
- package/dist/ai/docs/nocobase/ai/quick-start.mdx +9 -7
- package/dist/ai/docs/nocobase/ai/workbuddy/index.md +1 -1
- package/dist/ai/docs/nocobase/ai-builder/ai-portal/agent-workflow.md +153 -0
- package/dist/ai/docs/nocobase/ai-builder/ai-portal/components.md +134 -0
- package/dist/ai/docs/nocobase/ai-builder/ai-portal/deploy.md +164 -0
- package/dist/ai/docs/nocobase/ai-builder/ai-portal/index.md +144 -0
- package/dist/ai/docs/nocobase/ai-builder/ai-portal/project-structure.md +128 -0
- package/dist/ai/docs/nocobase/ai-builder/index.md +73 -32
- package/dist/ai/docs/nocobase/ai-builder/ui-builder.md +2 -0
- package/dist/ai/docs/nocobase/ai-dev/index.md +2 -1
- package/dist/ai/docs/nocobase/api/cli/index.md +1 -1
- package/dist/ai/docs/nocobase/api/cli/portal/dev.md +21 -9
- package/dist/ai/docs/nocobase/nocobase-cli/installation/cli.md +1 -1
- package/dist/client/244.da833c04c5b64be4.js +10 -0
- package/dist/client/index.js +1 -1
- package/dist/client-v2/244.7451d5c4713eced3.js +10 -0
- package/dist/client-v2/index.js +1 -1
- package/dist/client-v2/pages/EmployeesPage.d.ts +3 -0
- package/dist/externalVersion.js +15 -15
- package/dist/locale/en-US.json +3 -0
- package/dist/locale/zh-CN.json +3 -0
- package/dist/node_modules/@langchain/mistralai/package.json +1 -1
- package/dist/node_modules/@langchain/xai/package.json +1 -1
- package/dist/node_modules/fs-extra/package.json +1 -1
- package/dist/node_modules/jsonrepair/package.json +1 -1
- package/dist/node_modules/just-bash/package.json +1 -1
- package/dist/node_modules/nodejs-snowflake/package.json +1 -1
- package/dist/node_modules/openai/package.json +1 -1
- package/dist/node_modules/zod/package.json +1 -1
- package/dist/server/ai-employees/ai-conversations.d.ts +2 -1
- package/dist/server/ai-employees/ai-conversations.js +2 -0
- package/dist/server/collections/ai-conversations.js +5 -0
- package/dist/server/migrations/20260803185305-migrate-ai-conversations-portal-name.d.ts +14 -0
- package/dist/server/migrations/20260803185305-migrate-ai-conversations-portal-name.js +52 -0
- package/dist/server/resource/aiConversations.js +14 -2
- package/package.json +2 -2
- package/dist/client/244.145eb763339a109b.js +0 -10
- package/dist/client-v2/244.64cb9d3ee27dcdc6.js +0 -10
|
@@ -27,7 +27,7 @@ If the prerequisites are not met, tell the user they need to install the missing
|
|
|
27
27
|
If the user already has NocoBase CLI installed (run `nb --version` to check), proceed to the next step. If not, run the following command to install:
|
|
28
28
|
|
|
29
29
|
```bash
|
|
30
|
-
npm install -g @nocobase/cli
|
|
30
|
+
npm install -g @nocobase/cli@alpha
|
|
31
31
|
```
|
|
32
32
|
|
|
33
33
|
Run `nb --version` to confirm successful installation.
|
|
@@ -2,8 +2,8 @@
|
|
|
2
2
|
pageType: home
|
|
3
3
|
pageName: ai
|
|
4
4
|
title: 'NocoBase AI'
|
|
5
|
-
description: 'NocoBase AI Capabilities: AI Building
|
|
6
|
-
keywords: 'NocoBase AI,AI Building,AI Employees,AI Development,AI Agent,NocoBase CLI,Skills,MCP'
|
|
5
|
+
description: 'NocoBase AI Capabilities: AI Building, AI Employees, AI Agent Integration, AI Tools & Resources.'
|
|
6
|
+
keywords: 'NocoBase AI,AI Building,AI Portal,AI Employees,AI Development,AI Agent,NocoBase CLI,Skills,MCP'
|
|
7
7
|
features:
|
|
8
8
|
- title: Get Started
|
|
9
9
|
details: Install CLI, connect your app, start building — everything starts here.
|
|
@@ -21,7 +21,7 @@ features:
|
|
|
21
21
|
details: Use AI to assist NocoBase plugin development, covering the full process from scaffolding and component code to business logic.
|
|
22
22
|
link: /ai-dev
|
|
23
23
|
|
|
24
|
-
- title: AI Building
|
|
24
|
+
- title: AI Building
|
|
25
25
|
details: Build NocoBase applications and plugins with AI — from natural language descriptions to working systems or plugin code.
|
|
26
26
|
items:
|
|
27
27
|
- title: AI Building Quick Start
|
|
@@ -65,28 +65,6 @@ features:
|
|
|
65
65
|
details: Connect AI employees in workflow nodes to enable automated intelligent decision-making and content generation.
|
|
66
66
|
link: /ai-employees/workflow/nodes/employee/configuration
|
|
67
67
|
|
|
68
|
-
- title: Connect Your AI Agent
|
|
69
|
-
details: Your favorite AI Agent can now operate NocoBase too.
|
|
70
|
-
items:
|
|
71
|
-
- title: 'OpenClaw + NocoBase: The Most Popular AI Agent Working for You'
|
|
72
|
-
details: The world's most popular open-source AI Agent — let OpenClaw be your 24/7 NocoBase operator.
|
|
73
|
-
link: /ai/openclaw
|
|
74
|
-
- title: 'Hermes Agent: A NocoBase Assistant That Learns as You Use It'
|
|
75
|
-
details: Automatically distills successful experiences into reusable skills, understanding your business system better over time.
|
|
76
|
-
link: /ai/hermes-agent
|
|
77
|
-
- title: 'Go Hands-Free with WorkBuddy Driving NocoBase'
|
|
78
|
-
details: Made by Tencent, 20+ built-in skills, supporting WeCom, Lark, and multi-platform remote control of NocoBase.
|
|
79
|
-
link: /ai/workbuddy
|
|
80
|
-
- title: 'Claude Code + NocoBase: The Strongest AI Brain, Your NocoBase Chief Architect'
|
|
81
|
-
details: A powerful AI architect — understands project context and builds NocoBase as naturally as writing code.
|
|
82
|
-
link: /ai/claude-code
|
|
83
|
-
- title: 'Use Codex to Operate NocoBase for Both Building and Development'
|
|
84
|
-
details: Made by OpenAI, powered by GPT series, builds NocoBase in a secure sandbox where every step is controllable.
|
|
85
|
-
link: /ai/codex
|
|
86
|
-
- title: 'OpenCode + NocoBase: Open Source, Free, Vendor-Unlocked NocoBase Building'
|
|
87
|
-
details: Both driven by open-source communities, freely switch between models — the developer's choice for freedom.
|
|
88
|
-
link: /ai/opencode
|
|
89
|
-
|
|
90
68
|
- title: AI Tools & Resources
|
|
91
69
|
details: The infrastructure supporting NocoBase AI capabilities — CLI, Skills, and MCP.
|
|
92
70
|
items:
|
|
@@ -96,6 +74,9 @@ features:
|
|
|
96
74
|
- title: NocoBase Skills
|
|
97
75
|
details: Domain knowledge packages installable into AI Agents, enabling AI to understand NocoBase's capabilities and conventions.
|
|
98
76
|
link: /ai-builder#nocobase-skills
|
|
77
|
+
- title: nb portal Command Reference
|
|
78
|
+
details: All the commands for managing a Portal — create, develop, sync source, and deploy.
|
|
79
|
+
link: /api/cli/portal/
|
|
99
80
|
- title: NocoBase MCP
|
|
100
81
|
details: Model Context Protocol integration, enabling AI Agents to interact with NocoBase through a standardized protocol.
|
|
101
82
|
link: /ai/mcp/
|
|
@@ -25,6 +25,7 @@ Before getting started, make sure the following environment requirements are met
|
|
|
25
25
|
|
|
26
26
|
- Node.js >= 22
|
|
27
27
|
- Yarn 1.x
|
|
28
|
+
- pnpm (only needed when developing an [AI Portal](../ai-builder/ai-portal/index.md), where the Portal template uses it to install dependencies and start the dev server)
|
|
28
29
|
- We recommend using AI Agents powered by leading large models such as Claude or GPT. Results depend heavily on the model used — for the best experience, choose the latest flagship model available.
|
|
29
30
|
|
|
30
31
|
import { Tab, Tabs } from '@rspress/core/theme';
|
|
@@ -41,7 +42,7 @@ If you don't have a NocoBase application yet, you can use CLI to install and ini
|
|
|
41
42
|
#### Step 1: Install CLI
|
|
42
43
|
|
|
43
44
|
```bash
|
|
44
|
-
npm install -g @nocobase/cli
|
|
45
|
+
npm install -g @nocobase/cli@alpha
|
|
45
46
|
nb --version // Confirm successful installation
|
|
46
47
|
```
|
|
47
48
|
|
|
@@ -100,7 +101,7 @@ If you already have a running NocoBase instance, you can connect AI Agent to it
|
|
|
100
101
|
#### Step 1: Install CLI
|
|
101
102
|
|
|
102
103
|
```bash
|
|
103
|
-
npm install -g @nocobase/cli
|
|
104
|
+
npm install -g @nocobase/cli@alpha
|
|
104
105
|
nb --version // Confirm successful installation
|
|
105
106
|
```
|
|
106
107
|
|
|
@@ -145,6 +146,10 @@ After configuration is complete, restart your AI Agent session and you can start
|
|
|
145
146
|
|
|
146
147
|
## What's Next
|
|
147
148
|
|
|
149
|
+
### Start AI Building
|
|
150
|
+
|
|
151
|
+
Describe your requirements in natural language, and AI helps you complete data modeling, page building, and workflow orchestration — replace manual configuration with conversation, no coding required. See [AI Building Quick Start](../ai-builder/index.md#replace-manual-configuration-with-conversation).
|
|
152
|
+
|
|
148
153
|
### Production Installation and Deployment
|
|
149
154
|
|
|
150
155
|
If you're preparing to deploy NocoBase to production, this order usually works best:
|
|
@@ -156,13 +161,9 @@ If you're preparing to deploy NocoBase to production, this order usually works b
|
|
|
156
161
|
|
|
157
162
|
If you need to manage existing NocoBase instances (such as test or production environments), or switch between multiple environments, see [Environment Management](../ai-builder/env-bootstrap) — covering environment checks, adding environments, upgrades, and troubleshooting.
|
|
158
163
|
|
|
159
|
-
### Start AI Building
|
|
160
|
-
|
|
161
|
-
Describe your requirements in natural language, and AI helps you complete data modeling, page building, and workflow orchestration — replace manual configuration with conversation. See [AI Building Quick Start](../ai-builder/index.md#replace-manual-configuration-with-conversation).
|
|
162
|
-
|
|
163
164
|
### Continue with AI Plugin Development
|
|
164
165
|
|
|
165
|
-
If you need to develop custom plugins, AI can help too — from scaffolding generation to component code and business logic, covering the full plugin development process. See [AI Plugin Development](../ai-dev/index.md#from-
|
|
166
|
+
If you need to develop custom plugins, AI can help too — from scaffolding generation to component code and business logic, covering the full plugin development process. See [AI Plugin Development](../ai-dev/index.md#from-one-sentence-to-a-complete-plugin).
|
|
166
167
|
|
|
167
168
|
### Use AI Employees
|
|
168
169
|
|
|
@@ -174,6 +175,7 @@ If you already have a NocoBase application running, or have successfully complet
|
|
|
174
175
|
|
|
175
176
|
## Related Links
|
|
176
177
|
|
|
178
|
+
- [AI Portal](../ai-builder/ai-portal/index.md) — Have the AI Agent write frontend code with NocoBase as the foundation, and build a complete system
|
|
177
179
|
- [AI Building](../ai-builder/index.md) — Build NocoBase applications from scratch with AI
|
|
178
180
|
- [AI Plugin Development](../ai-dev/index.md) — Develop NocoBase plugins with AI assistance
|
|
179
181
|
- [AI Employees](../ai-employees/index.md) — Collaborate with AI in the business interface
|
|
@@ -0,0 +1,153 @@
|
|
|
1
|
+
---
|
|
2
|
+
title: "Building with an AI Agent"
|
|
3
|
+
description: "Drive an AI Agent to write AI Portal frontend pages in natural language, including how to write prompts, collaboration tips, and how to handle common problems."
|
|
4
|
+
keywords: "AI Portal,AI Agent,collaborative building,prompts,nocobase-portal-manage,Skills"
|
|
5
|
+
---
|
|
6
|
+
|
|
7
|
+
# Building with an AI Agent
|
|
8
|
+
|
|
9
|
+
:::tip Prerequisites
|
|
10
|
+
|
|
11
|
+
Before reading this page, make sure you have your first Portal running by following the [AI Portal Quick Start](./index.md).
|
|
12
|
+
|
|
13
|
+
:::
|
|
14
|
+
|
|
15
|
+
Day-to-day AI Portal development is a conversation with an AI Agent — you describe the page you want, it writes the code, you check the result in the browser.
|
|
16
|
+
|
|
17
|
+
## Work inside the Portal directory
|
|
18
|
+
|
|
19
|
+
Before you start, go into the Portal's source directory and open your AI Agent there. That way the Agent starts out in the right context, with access to `AGENTS.md` and the existing code.
|
|
20
|
+
|
|
21
|
+
First find out where the directory is:
|
|
22
|
+
|
|
23
|
+
```bash
|
|
24
|
+
nb portal info main
|
|
25
|
+
```
|
|
26
|
+
|
|
27
|
+
The dev path in the output is where the Portal source lives. `cd` there, then open your AI Agent:
|
|
28
|
+
|
|
29
|
+
```bash
|
|
30
|
+
cd <dev workspace directory>
|
|
31
|
+
```
|
|
32
|
+
|
|
33
|
+
After that, just describe what you need:
|
|
34
|
+
|
|
35
|
+
```
|
|
36
|
+
Add an order list page to the main portal of my nocobase app
|
|
37
|
+
```
|
|
38
|
+
|
|
39
|
+
## Have the AI read before it writes
|
|
40
|
+
|
|
41
|
+
There's an `AGENTS.md` at the root of the template describing this project's conventions: prefer reusing what's already in `src/extensions`, customize UI components through composition rather than editing the base components, and don't bring in Ant Design. AI Agents that read this file follow these conventions automatically.
|
|
42
|
+
|
|
43
|
+
You can also add your own project's conventions to `AGENTS.md` — naming habits, business terminology, directories to leave alone. Once they're in there they apply to every conversation, so you don't have to repeat yourself.
|
|
44
|
+
|
|
45
|
+
`src/extensions` contains a few built-in extensions. Among them, `nocobase-users-example` is a complete CRUD page with list, create, edit, and detail views. Pointing the AI at it beats describing a new page from scratch:
|
|
46
|
+
|
|
47
|
+
```
|
|
48
|
+
Build a product management page following the pattern in nocobase-users-example
|
|
49
|
+
```
|
|
50
|
+
|
|
51
|
+
## Prompt examples
|
|
52
|
+
|
|
53
|
+
### Scenario A: Create a new business page
|
|
54
|
+
|
|
55
|
+
Three things are enough — what's on the page, where the data comes from, and how it behaves:
|
|
56
|
+
|
|
57
|
+
```
|
|
58
|
+
Add a customer management page:
|
|
59
|
+
the table shows name, phone, email, and creation time, with search by name,
|
|
60
|
+
clicking a row opens a detail drawer where the record can be edited and saved
|
|
61
|
+
```
|
|
62
|
+
|
|
63
|
+
<!-- 需要一张 AI 生成的客户管理页面效果截图,展示表格、搜索框和详情抽屉 -->
|
|
64
|
+
|
|
65
|
+
### Scenario B: Modify an existing page
|
|
66
|
+
|
|
67
|
+
For a change request, be specific about what changes. No need to describe the whole page again:
|
|
68
|
+
|
|
69
|
+
```
|
|
70
|
+
Add a status filter to the customer list,
|
|
71
|
+
with the options "Following up", "Won", and "Lost", unfiltered by default
|
|
72
|
+
```
|
|
73
|
+
|
|
74
|
+
<!-- 需要一张添加状态筛选后的页面截图 -->
|
|
75
|
+
|
|
76
|
+
### Scenario C: Wire up a new collection
|
|
77
|
+
|
|
78
|
+
Once a collection exists, have the AI generate the matching pages. It reads the field definitions and picks form controls and list columns accordingly:
|
|
79
|
+
|
|
80
|
+
```
|
|
81
|
+
I just created a contracts collection, build me a matching set of CRUD pages
|
|
82
|
+
```
|
|
83
|
+
|
|
84
|
+
If the collection doesn't exist yet, use [Data Modeling](../data-modeling.md) to have the AI design the data structure first, then come back to the pages.
|
|
85
|
+
|
|
86
|
+
<!-- 需要一张根据数据表自动生成的增删改查页面截图 -->
|
|
87
|
+
|
|
88
|
+
### Scenario D: Reproduce a design
|
|
89
|
+
|
|
90
|
+
When you have a design file or an existing HTML prototype, hand it to the AI:
|
|
91
|
+
|
|
92
|
+
```
|
|
93
|
+
Build the home page from this prototype,
|
|
94
|
+
keep the colors and layout the same, and connect the data to the orders collection
|
|
95
|
+
```
|
|
96
|
+
|
|
97
|
+
<!-- 需要一个视频,展示给出原型图后 AI 复刻出页面的过程 -->
|
|
98
|
+
|
|
99
|
+
### Scenario E: Add an authentication method
|
|
100
|
+
|
|
101
|
+
Once an authentication method is enabled on the server, the login page needs matching frontend support:
|
|
102
|
+
|
|
103
|
+
```
|
|
104
|
+
DingTalk login is enabled in NocoBase, add a DingTalk login button to the login page
|
|
105
|
+
```
|
|
106
|
+
|
|
107
|
+
<!-- 需要一张登录页出现第三方登录按钮的截图 -->
|
|
108
|
+
|
|
109
|
+
## Collaboration tips
|
|
110
|
+
|
|
111
|
+
**Iterate in small steps.** Have the AI do one page or one change at a time, and check the result before moving on. If you describe five pages in one go, it's hard to tell which step went off the rails when something breaks.
|
|
112
|
+
|
|
113
|
+
**Leave the dev server running.** `nb portal dev main` hot-reloads, so you see the result right after each change the AI makes. That's the shortest feedback loop you can get.
|
|
114
|
+
|
|
115
|
+
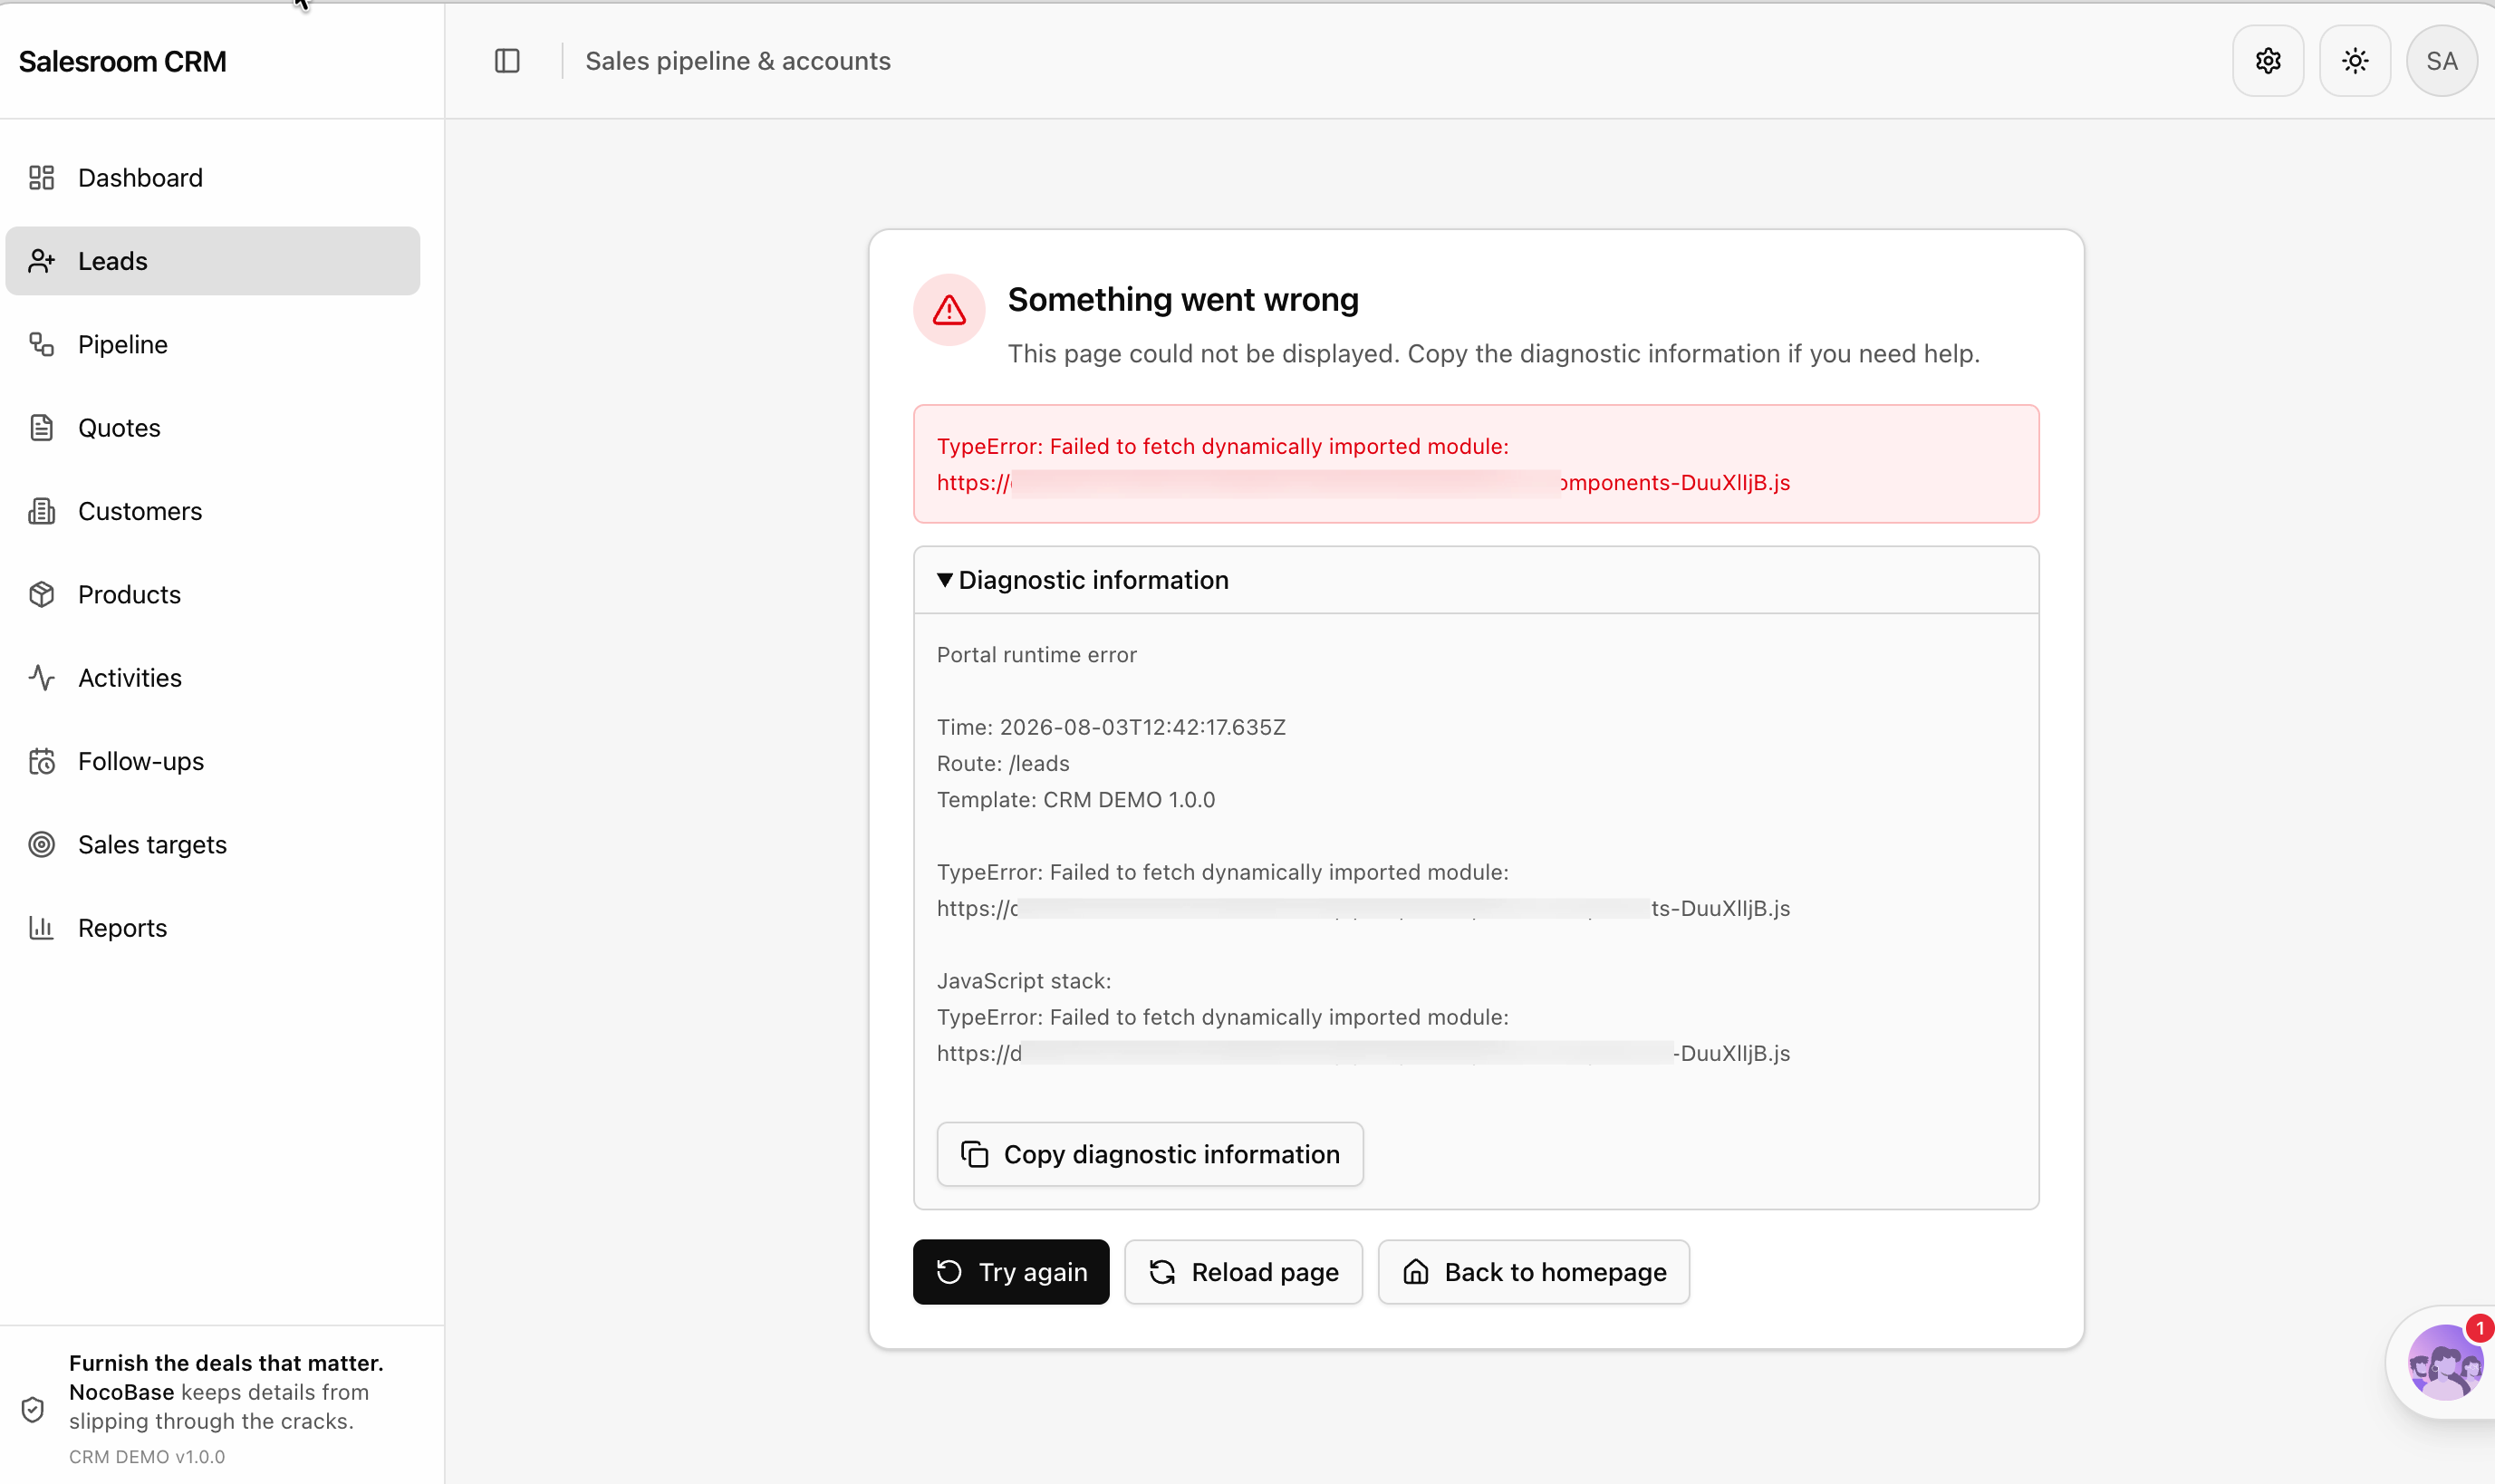
**Give it the exact error.** A blank page, a failed build, a 403 from an API — paste the full error message and a screenshot to the AI instead of making it guess. A few rounds usually sort it out. You don't need to work out which layer the problem is in first.
|
|
116
|
+
|
|
117
|
+
|
|
118
|
+
|
|
119
|
+
## Common questions
|
|
120
|
+
|
|
121
|
+
**How do I roll back when the AI gets it wrong?**
|
|
122
|
+
|
|
123
|
+
If the Portal source is under Git, `git checkout` is all you need. With the default `nocobase` source storage, you can pull a fresh copy from source storage over the local one:
|
|
124
|
+
|
|
125
|
+
```bash
|
|
126
|
+
nb portal pull main --force
|
|
127
|
+
```
|
|
128
|
+
|
|
129
|
+
`--force` deletes the dev workspace and pulls again, so make sure there's nothing you want to keep before running it. To avoid that trade-off, move the source to Git early on — see [Deployment and Source Management](./deploy.md).
|
|
130
|
+
|
|
131
|
+
**How do I troubleshoot a failed build?**
|
|
132
|
+
|
|
133
|
+
Run a build locally first to see the full error:
|
|
134
|
+
|
|
135
|
+
```bash
|
|
136
|
+
nb portal deploy main
|
|
137
|
+
```
|
|
138
|
+
|
|
139
|
+
TypeScript type errors and missing dependencies are the two most common causes. Paste the error to the AI and let it fix them.
|
|
140
|
+
|
|
141
|
+
**Do my manual edits conflict with the AI's?**
|
|
142
|
+
|
|
143
|
+
No. The Portal source is an ordinary frontend project — you can edit it yourself whenever you want, and let the AI pick up from there. As long as you're not both editing the same file at the same moment, there's no problem.
|
|
144
|
+
|
|
145
|
+
## Related Links
|
|
146
|
+
|
|
147
|
+
- [AI Portal Quick Start](./index.md) — Get your first AI-written frontend entry running
|
|
148
|
+
- [Deployment and Source Management](./deploy.md) — Putting Portal source under Git, and the deployment flow
|
|
149
|
+
- [Project Structure and Tech Stack](./project-structure.md) — The template's directory conventions, so you can tell whether the AI got it right
|
|
150
|
+
- [Standard Components and Extensions](./components.md) — The shadcn/ui component base and the extension mechanism
|
|
151
|
+
- [Data Modeling](../data-modeling.md) — Have the AI design the collections before building pages
|
|
152
|
+
- [`nb portal info`](../../api/cli/portal/info.md) — Check where a Portal's dev workspace is
|
|
153
|
+
- [`nb portal pull`](../../api/cli/portal/pull.md) — Pull the source again from source storage
|
|
@@ -0,0 +1,134 @@
|
|
|
1
|
+
---
|
|
2
|
+
title: "Standard Components and Extensions"
|
|
3
|
+
description: "The AI Portal's shadcn/ui component base and its extension mechanism — one directory per extension, discovered and mounted automatically."
|
|
4
|
+
keywords: "AI Portal,shadcn/ui,components,extensions,AppExtension,Registry,Tailwind CSS"
|
|
5
|
+
---
|
|
6
|
+
|
|
7
|
+
# Standard Components and Extensions
|
|
8
|
+
|
|
9
|
+
:::tip Prerequisites
|
|
10
|
+
|
|
11
|
+
Before reading this page, make sure you have your first Portal running by following the [AI Portal Quick Start](./index.md).
|
|
12
|
+
|
|
13
|
+
:::
|
|
14
|
+
|
|
15
|
+
A Portal's interface has two parts: `src/components/ui` provides the base components, and `src/extensions` holds the business modules. This page covers how to use both.
|
|
16
|
+
|
|
17
|
+
## Component base
|
|
18
|
+
|
|
19
|
+
`src/components/ui` has 60-odd [shadcn/ui](https://ui.shadcn.com/) components — buttons, forms, dialogs, drawers, tables, charts, all the common ones. The style is configured in `components.json`, and the icons come from lucide.
|
|
20
|
+
|
|
21
|
+
Unlike pulling in a component library, **the source of these components belongs to your project**. They sit in your repository, you can change them freely, and upstream updates never overwrite them.
|
|
22
|
+
|
|
23
|
+
Because of that, customize through composition rather than by editing them directly:
|
|
24
|
+
|
|
25
|
+
```tsx
|
|
26
|
+
// Recommended: wrap it, so the base component stays replaceable
|
|
27
|
+
import { Button } from "@/components/ui/button";
|
|
28
|
+
|
|
29
|
+
export function SubmitButton(props) {
|
|
30
|
+
return <Button variant="default" size="lg" {...props} />;
|
|
31
|
+
}
|
|
32
|
+
```
|
|
33
|
+
|
|
34
|
+
Editing `src/components/ui/button.tsx` directly works too, but it makes picking up upstream bug fixes harder later. When you do need to change a base component, compare against the upstream version first and merge selectively instead of overwriting your local changes wholesale.
|
|
35
|
+
|
|
36
|
+
:::warning Note
|
|
37
|
+
|
|
38
|
+
Don't bring Ant Design, or NocoBase's Ant Design-based client components, into a Portal. The Portal's styling is Tailwind CSS plus shadcn/ui, and mixing them causes style conflicts. This convention is already written into the template's `AGENTS.md`.
|
|
39
|
+
|
|
40
|
+
:::
|
|
41
|
+
|
|
42
|
+
## Extension mechanism
|
|
43
|
+
|
|
44
|
+
Business features are written as extensions under `src/extensions/`, one directory per feature module:
|
|
45
|
+
|
|
46
|
+
```text
|
|
47
|
+
src/extensions/
|
|
48
|
+
├── nocobase-acl/ Permission components
|
|
49
|
+
├── nocobase-ai/ AI conversation capabilities
|
|
50
|
+
├── nocobase-route-surfaces/ Page, drawer, and modal route surfaces
|
|
51
|
+
└── nocobase-users-example/ User management example
|
|
52
|
+
```
|
|
53
|
+
|
|
54
|
+
Each directory has an `extension.tsx` with a default export of an `AppExtension`. The template scans and loads them automatically — **drop it into the directory and it works, with no registration code to change**.
|
|
55
|
+
|
|
56
|
+
## AppExtension
|
|
57
|
+
|
|
58
|
+
An extension can provide these:
|
|
59
|
+
|
|
60
|
+
| Field | Description |
|
|
61
|
+
| --- | --- |
|
|
62
|
+
| `id` | Extension identifier, required |
|
|
63
|
+
| `priority` | Load order, lower numbers first, 100 by default |
|
|
64
|
+
| `resources` | Refine resource definitions, determining the navigation menu and route mapping |
|
|
65
|
+
| `routes` | Route elements, mounted under the authenticated route tree |
|
|
66
|
+
| `Provider` | A Provider wrapping the whole application |
|
|
67
|
+
| `AuthRuntimeProvider` | Authentication runtime Provider, active before login |
|
|
68
|
+
| `UserMenuItems` | Entries to add to the user menu |
|
|
69
|
+
| `authAdapters` | Authentication method adapters |
|
|
70
|
+
| `dev` | Resources and routes that only apply in development mode |
|
|
71
|
+
|
|
72
|
+
A minimal extension looks like this:
|
|
73
|
+
|
|
74
|
+
```tsx
|
|
75
|
+
import type { AppExtension } from "@/app/extension";
|
|
76
|
+
import { Route } from "react-router";
|
|
77
|
+
import { Package } from "lucide-react";
|
|
78
|
+
import { ProductList } from "./list";
|
|
79
|
+
|
|
80
|
+
const productsExtension: AppExtension = {
|
|
81
|
+
id: "products",
|
|
82
|
+
resources: [
|
|
83
|
+
{
|
|
84
|
+
name: "products",
|
|
85
|
+
list: "/products",
|
|
86
|
+
meta: {
|
|
87
|
+
label: "Products",
|
|
88
|
+
icon: <Package />,
|
|
89
|
+
acl: { type: "collection" }, // Takes part in NocoBase's collection permission checks
|
|
90
|
+
},
|
|
91
|
+
},
|
|
92
|
+
],
|
|
93
|
+
routes: <Route path="/products" element={<ProductList />} />,
|
|
94
|
+
};
|
|
95
|
+
|
|
96
|
+
export default productsExtension;
|
|
97
|
+
```
|
|
98
|
+
|
|
99
|
+
## Built-in extensions
|
|
100
|
+
|
|
101
|
+
The template ships with four extensions. They're ready to use, and they're also the best reference when writing new code:
|
|
102
|
+
|
|
103
|
+
**`nocobase-users-example`** — A complete CRUD module on NocoBase's standard `users` collection, with list, create, edit, and detail views. Point the AI at it when building a new page.
|
|
104
|
+
|
|
105
|
+
**`nocobase-acl`** — Permission components: `CanAccess`, `AclPage`, `AclRegion`, `AclField`, and `RoleSwitcher`.
|
|
106
|
+
|
|
107
|
+
**`nocobase-route-surfaces`** — Three route surfaces: full page, drawer, and modal. The same content can open as a standalone page or pop out as a drawer inside a list page, with route state staying in sync.
|
|
108
|
+
|
|
109
|
+
**`nocobase-ai`** — Brings NocoBase's AI conversation capabilities to the frontend, including the chat window, streaming, conversation history, and page context. Use it to build an AI assistant into your own Portal.
|
|
110
|
+
|
|
111
|
+
## Import rules
|
|
112
|
+
|
|
113
|
+
Two path conventions apply when writing an extension:
|
|
114
|
+
|
|
115
|
+
- Use the `@/` alias for anything from the host application, such as `@/components/ui/button`
|
|
116
|
+
- Keep relative imports inside the extension from reaching outside its own directory
|
|
117
|
+
|
|
118
|
+
That keeps every extension self-contained, so you can copy the whole directory into another Portal and keep using it.
|
|
119
|
+
|
|
120
|
+
## Installable official extensions
|
|
121
|
+
|
|
122
|
+
<!-- Registry 的对外地址和可安装项清单待定,确定后补充这一节:怎么安装、有哪些可选扩展、安装后源码落在哪里 -->
|
|
123
|
+
|
|
124
|
+
Besides the four built-in ones, NocoBase will provide a set of official extensions you can install as needed. Once installed, the source lands under `src/extensions/` and becomes your project's own code just like a built-in extension, ready to modify and commit with the application.
|
|
125
|
+
|
|
126
|
+
## Localization
|
|
127
|
+
|
|
128
|
+
Strings live in `src/locales/`, and the template ships with English and Chinese. An extension can have its own language pack too — create a `locales/` directory inside the extension and import it from `extension.tsx`.
|
|
129
|
+
|
|
130
|
+
## Related Links
|
|
131
|
+
|
|
132
|
+
- [AI Portal Quick Start](./index.md) — Get your first AI-written frontend entry running
|
|
133
|
+
- [Project Structure and Tech Stack](./project-structure.md) — The full directory conventions and common commands
|
|
134
|
+
- [Building with an AI Agent](./agent-workflow.md) — Have the AI follow a built-in extension when writing a new module
|
|
@@ -0,0 +1,164 @@
|
|
|
1
|
+
---
|
|
2
|
+
title: "Deployment and Source Management"
|
|
3
|
+
description: "The full develop, push, and deploy flow for an AI Portal, plus the two source storage modes and multi-environment deployment."
|
|
4
|
+
keywords: "AI Portal,deployment,source storage,Git,nb portal deploy,nb portal push,multi-environment"
|
|
5
|
+
---
|
|
6
|
+
|
|
7
|
+
# Deployment and Source Management
|
|
8
|
+
|
|
9
|
+
:::tip Prerequisites
|
|
10
|
+
|
|
11
|
+
Before reading this page, make sure you have your first Portal running by following the [AI Portal Quick Start](./index.md).
|
|
12
|
+
|
|
13
|
+
:::
|
|
14
|
+
|
|
15
|
+
Portal source lives in three places: the local dev workspace, source storage, and the deployed artifacts. `nb portal` keeps them in sync.
|
|
16
|
+
|
|
17
|
+
## The full lifecycle
|
|
18
|
+
|
|
19
|
+
The day-to-day loop looks like this:
|
|
20
|
+
|
|
21
|
+
```text
|
|
22
|
+
dev (local development) → push (push source) → deploy (build and deploy)
|
|
23
|
+
```
|
|
24
|
+
|
|
25
|
+
Where:
|
|
26
|
+
|
|
27
|
+
1. `nb portal dev <portal>` — Start the local dev server, change code and see the result
|
|
28
|
+
2. `nb portal push <portal>` — Push local source changes to source storage
|
|
29
|
+
3. `nb portal deploy <portal>` — Build and deploy, making changes live for users
|
|
30
|
+
|
|
31
|
+
If you're picking up a Portal a colleague already created, or you've switched machines, pull it locally first:
|
|
32
|
+
|
|
33
|
+
```bash
|
|
34
|
+
nb portal list # See which Portals exist
|
|
35
|
+
nb portal pull customer # Pull the source locally
|
|
36
|
+
nb portal dev customer # Start developing
|
|
37
|
+
```
|
|
38
|
+
|
|
39
|
+
`pull` downloads and unpacks the source into the dev workspace, `./<portal>` by default, or elsewhere with `--path`. Dependencies are installed automatically; add `--no-install` to skip that in CI or when you'd rather install them yourself.
|
|
40
|
+
|
|
41
|
+
After a successful pull, the dev workspace location is recorded in the CLI env config, so `dev`, `push`, and `deploy` all read the source from there without you specifying it every time.
|
|
42
|
+
|
|
43
|
+
## Adding a Portal
|
|
44
|
+
|
|
45
|
+
An application can have several Portals with separate pages and permissions but shared data. Say one entry for internal staff and one for external customers:
|
|
46
|
+
|
|
47
|
+
```bash
|
|
48
|
+
nb portal create customer
|
|
49
|
+
```
|
|
50
|
+
|
|
51
|
+
Creating generates `./customer` in the current directory as the dev workspace from the `@nocobase/portal-template-default` template, writes `.env` and `.env.local`, then installs dependencies. Use `--path` to put it elsewhere.
|
|
52
|
+
|
|
53
|
+
<!-- 需要一张 nb portal create 执行完成后的终端输出截图 -->
|
|
54
|
+
|
|
55
|
+
A Portal name can only contain lowercase letters, digits, underscores, and hyphens, and must start with a lowercase letter or digit.
|
|
56
|
+
|
|
57
|
+
## source storage
|
|
58
|
+
|
|
59
|
+
Portal source can be kept in two places:
|
|
60
|
+
|
|
61
|
+
| Mode | Description | When to use |
|
|
62
|
+
| --- | --- | --- |
|
|
63
|
+
| `nocobase` | The default, with source managed by NocoBase's source storage | Getting started quickly, solo development, no code review needed |
|
|
64
|
+
| `git` | Source saved to a Git repository you specify | Team collaboration, code review, CI integration |
|
|
65
|
+
|
|
66
|
+
The default `nocobase` is the fastest to start with, since you don't need a repository first. It has no version history though, so a bad change can only be rolled back by overwriting everything. **If this Portal will be iterated on long term, move it to Git early.**
|
|
67
|
+
|
|
68
|
+
### Switching to Git
|
|
69
|
+
|
|
70
|
+
`create` only generates the dev workspace; source storage configuration goes through `config`. You can switch any time after creating:
|
|
71
|
+
|
|
72
|
+
```bash
|
|
73
|
+
nb portal config customer \
|
|
74
|
+
--source-storage git \
|
|
75
|
+
--git-repo git@github.com:nocobase/customer-portal.git
|
|
76
|
+
|
|
77
|
+
nb portal push customer --message "Move customer portal source to Git"
|
|
78
|
+
```
|
|
79
|
+
|
|
80
|
+
`config` syncs the source storage setting to the remote Portal record, and subsequent `push` calls go through Git.
|
|
81
|
+
|
|
82
|
+
With one Portal per repository, the default repository root works fine for `--git-path`. You only need a subdirectory when you want several Portals in the same repository:
|
|
83
|
+
|
|
84
|
+
```bash
|
|
85
|
+
nb portal config customer --git-path portals/customer
|
|
86
|
+
```
|
|
87
|
+
|
|
88
|
+
### Pulling from another repository temporarily
|
|
89
|
+
|
|
90
|
+
To try out source from another repository without changing the Portal's configuration, `pull` accepts a one-off override:
|
|
91
|
+
|
|
92
|
+
```bash
|
|
93
|
+
nb portal pull customer --git-repo git@github.com:nocobase/another-portal.git
|
|
94
|
+
```
|
|
95
|
+
|
|
96
|
+
This doesn't modify the remote Portal record, and `--git-branch` and `--git-path` can only be used together with `--git-repo`. To switch to Git storage permanently, use `config` as above.
|
|
97
|
+
|
|
98
|
+
`config` can also change where the dev workspace lives — after moving the source to another directory, tell the CLI its new location with `--path`:
|
|
99
|
+
|
|
100
|
+
```bash
|
|
101
|
+
nb portal config customer --path ./workspaces/customer
|
|
102
|
+
```
|
|
103
|
+
|
|
104
|
+
## Differences between env types
|
|
105
|
+
|
|
106
|
+
`nb portal` synchronizes differently depending on the env type:
|
|
107
|
+
|
|
108
|
+
| env type | Description |
|
|
109
|
+
| --- | --- |
|
|
110
|
+
| `local` | The application is on this machine. `pull` fetches the source into the dev workspace, `deploy` builds from the dev workspace and syncs the artifacts |
|
|
111
|
+
| `docker` | The application runs in Docker, shared through a volume. Behavior is the same as above |
|
|
112
|
+
| `http` | Synchronized through the API. `pull` / `push` download or upload a source archive |
|
|
113
|
+
|
|
114
|
+
`ssh` envs don't support Portal management yet.
|
|
115
|
+
|
|
116
|
+
## Multi-environment deployment
|
|
117
|
+
|
|
118
|
+
The same Portal can be deployed to different environments, with `--env` naming the target:
|
|
119
|
+
|
|
120
|
+
```bash
|
|
121
|
+
nb portal deploy customer --env prod --yes
|
|
122
|
+
```
|
|
123
|
+
|
|
124
|
+
`--yes` skips the interactive confirmation. When the `--env` you pass explicitly differs from the current env, the CLI stops and asks by default. Remember to include `--yes` in scripts or CI, otherwise the command hangs at the confirmation.
|
|
125
|
+
|
|
126
|
+
For cross-environment collection schema and configuration releases, see [Release Management](../publish.md).
|
|
127
|
+
|
|
128
|
+
## Access path
|
|
129
|
+
|
|
130
|
+
Once deployed, a Portal's access path is:
|
|
131
|
+
|
|
132
|
+
```text
|
|
133
|
+
<appPublicPath>/x/<portal>/
|
|
134
|
+
```
|
|
135
|
+
|
|
136
|
+
For a Portal under a sub-application:
|
|
137
|
+
|
|
138
|
+
```text
|
|
139
|
+
<appPublicPath>/x/apps/<app>/<portal>/
|
|
140
|
+
```
|
|
141
|
+
|
|
142
|
+
The `/x/` prefix belongs to AI Portals; no-code Portals use `/v/`.
|
|
143
|
+
|
|
144
|
+
## Deleting a Portal
|
|
145
|
+
|
|
146
|
+
```bash
|
|
147
|
+
nb portal destroy customer
|
|
148
|
+
```
|
|
149
|
+
|
|
150
|
+
This deletes the Portal record and its deployed files, keeping the local dev workspace by default. Add `--delete-dev-path` when you want the dev workspace gone as well.
|
|
151
|
+
|
|
152
|
+
## Related Links
|
|
153
|
+
|
|
154
|
+
- [AI Portal Quick Start](./index.md) — Get your first AI-written frontend entry running
|
|
155
|
+
- [Building with an AI Agent](./agent-workflow.md) — Drive the AI to write pages in natural language
|
|
156
|
+
- [Project Structure and Tech Stack](./project-structure.md) — Build commands and environment variables
|
|
157
|
+
- [Release Management](../publish.md) — Release collection schemas and configuration across environments
|
|
158
|
+
- [`nb portal` Command Reference](../../api/cli/portal/index.md) — Complete parameter reference for all Portal commands
|
|
159
|
+
- [`nb portal create`](../../api/cli/portal/create.md) — All parameters for creating a Portal
|
|
160
|
+
- [`nb portal config`](../../api/cli/portal/config.md) — Adjust source storage and the dev workspace path
|
|
161
|
+
- [`nb portal push`](../../api/cli/portal/push.md) — Push source to source storage
|
|
162
|
+
- [`nb portal deploy`](../../api/cli/portal/deploy.md) — Build and deploy a Portal
|
|
163
|
+
- [`nb portal pull`](../../api/cli/portal/pull.md) — Pull source from source storage
|
|
164
|
+
- [`nb portal destroy`](../../api/cli/portal/destroy.md) — Delete the Portal record and its deployed files
|