@nocobase/plugin-ai 2.2.0-beta.17 → 2.2.0-beta.18
This diff represents the content of publicly available package versions that have been released to one of the supported registries. The information contained in this diff is provided for informational purposes only and reflects changes between package versions as they appear in their respective public registries.
- package/dist/ai/docs/nocobase/ai-dev/watermark-plugin.md +2 -0
- package/dist/ai/docs/nocobase/api/cli/api/resource/create.md +4 -3
- package/dist/ai/docs/nocobase/plugin-development/build.md +10 -4
- package/dist/ai/docs/nocobase/plugin-development/client/appendix/faq.md +1 -1
- package/dist/ai/docs/nocobase/plugin-development/client/examples/custom-action.md +2 -0
- package/dist/ai/docs/nocobase/plugin-development/client/examples/custom-block.md +2 -0
- package/dist/ai/docs/nocobase/plugin-development/client/examples/custom-field.md +2 -0
- package/dist/ai/docs/nocobase/plugin-development/client/examples/fullstack-plugin.md +2 -0
- package/dist/ai/docs/nocobase/plugin-development/client/examples/settings-page.md +2 -0
- package/dist/ai/docs/nocobase/plugin-development/common/i18n.md +3 -3
- package/dist/ai/docs/nocobase/plugin-development/server/cache.md +1 -1
- package/dist/ai/docs/nocobase/plugin-development/server/collections.md +0 -6
- package/dist/ai/docs/nocobase/plugin-development/server/command.md +2 -2
- package/dist/ai/docs/nocobase/plugin-development/server/context.md +2 -2
- package/dist/ai/docs/nocobase/plugin-development/server/i18n.md +4 -4
- package/dist/ai/docs/nocobase/plugin-development/write-your-first-plugin.md +91 -43
- package/dist/ai/docs/nocobase/users-permissions/sync/index.md +8 -1
- package/dist/ai/docs/nocobase/users-permissions/sync/sources/dingtalk.md +138 -0
- package/dist/ai/docs/nocobase/users-permissions/sync/sources/ldap.md +87 -0
- package/dist/client/{705.19b642db34de438a.js → 705.a4fe26945d175e8a.js} +1 -1
- package/dist/client/index.js +3 -3
- package/dist/client-v2/420.a5b929a5e7f330be.js +10 -0
- package/dist/client-v2/{705.8dc34d43f02f322c.js → 705.f2e1b26a3f000075.js} +1 -1
- package/dist/client-v2/ai-employees/chatbox/hooks/reasoning-stream.d.ts +10 -0
- package/dist/client-v2/ai-employees/chatbox/stores/chat-box.d.ts +0 -2
- package/dist/client-v2/index.js +3 -3
- package/dist/client-v2/llm-providers/forms.d.ts +2 -0
- package/dist/client-v2/llm-providers/index.d.ts +1 -0
- package/dist/client-v2/models/ai-employees/AIEmployeeShortcutModel.d.ts +1 -0
- package/dist/client-v2/repositories/AIConfigRepository.d.ts +2 -0
- package/dist/externalVersion.js +18 -16
- package/dist/locale/en-US.json +3 -4
- package/dist/locale/zh-CN.json +3 -4
- package/dist/node_modules/@langchain/mistralai/package.json +1 -1
- package/dist/node_modules/@langchain/xai/package.json +1 -1
- package/dist/node_modules/fs-extra/package.json +1 -1
- package/dist/node_modules/jsonrepair/package.json +1 -1
- package/dist/node_modules/just-bash/package.json +1 -1
- package/dist/node_modules/nodejs-snowflake/package.json +1 -1
- package/dist/node_modules/openai/package.json +1 -1
- package/dist/node_modules/zod/package.json +1 -1
- package/dist/server/ai-employees/ai-employee.js +40 -24
- package/dist/server/ai-employees/reasoning-stream-state.d.ts +23 -0
- package/dist/server/ai-employees/reasoning-stream-state.js +63 -0
- package/dist/server/llm-providers/common/reasoning.js +18 -10
- package/dist/{client-v2/ai-employees/chatbox/components/DebugPanel.d.ts → server/llm-providers/deepseek/index.d.ts} +2 -2
- package/dist/server/llm-providers/deepseek/index.js +32 -0
- package/dist/server/llm-providers/deepseek/provider.d.ts +57 -0
- package/dist/server/llm-providers/deepseek/provider.js +320 -0
- package/dist/server/llm-providers/deepseek/reasoning.d.ts +83 -0
- package/dist/server/llm-providers/deepseek/reasoning.js +285 -0
- package/dist/server/llm-providers/mistral.d.ts +1 -1
- package/dist/server/llm-providers/provider.d.ts +1 -0
- package/dist/server/llm-providers/provider.js +3 -0
- package/dist/server/llm-providers/shengsuanyun.d.ts +29 -0
- package/dist/server/llm-providers/shengsuanyun.js +114 -0
- package/dist/server/manager/ai-manager.d.ts +3 -0
- package/dist/server/manager/ai-manager.js +7 -2
- package/dist/server/plugin.js +2 -0
- package/dist/server/types/ai-message.type.d.ts +4 -0
- package/dist/swagger/index.d.ts +6 -0
- package/dist/swagger/schemas.d.ts +6 -0
- package/dist/swagger/schemas.js +6 -0
- package/package.json +2 -2
- package/dist/client-v2/420.b2aedb1ff71fca0e.js +0 -10
- package/dist/client-v2/debug-logger.d.ts +0 -52
- package/dist/server/llm-providers/deepseek.d.ts +0 -40
- package/dist/server/llm-providers/deepseek.js +0 -174
|
@@ -85,6 +85,8 @@ yarn pm create @my-project/plugin-watermark
|
|
|
85
85
|
|
|
86
86
|
AI generates a standard plugin directory structure under `packages/plugins/@my-project/plugin-watermark/`.
|
|
87
87
|
|
|
88
|
+
Once the scaffold is created, start development mode so your code changes hot-reload: for a project created by `nb init`, run `nb source dev` from the project root (`<app-path>`); for a NocoBase source repository you cloned yourself, run `yarn dev` from the source root.
|
|
89
|
+
|
|
88
90
|
### 3. Write Server-Side Code
|
|
89
91
|
|
|
90
92
|
AI will generate the following files:
|
|
@@ -1,12 +1,12 @@
|
|
|
1
1
|
---
|
|
2
2
|
title: "nb api resource create"
|
|
3
|
-
description: "nb api resource create command reference: create
|
|
3
|
+
description: "nb api resource create command reference: create one or more records in a selected NocoBase resource."
|
|
4
4
|
keywords: "nb api resource create,NocoBase CLI,create record,CRUD"
|
|
5
5
|
---
|
|
6
6
|
|
|
7
7
|
# nb api resource create
|
|
8
8
|
|
|
9
|
-
Create
|
|
9
|
+
Create records in a selected resource. Pass record data as a JSON object through `--values`, or as a JSON array of objects to create multiple records in a single request.
|
|
10
10
|
|
|
11
11
|
## Usage
|
|
12
12
|
|
|
@@ -21,7 +21,7 @@ nb api resource create --resource <resource> --values <json> [flags]
|
|
|
21
21
|
| `--resource` | string | Resource name, required |
|
|
22
22
|
| `--data-source` | string | Data source key, default `main` |
|
|
23
23
|
| `--source-id` | string | Source record ID for association resources |
|
|
24
|
-
| `--values` | string | Data for the new
|
|
24
|
+
| `--values` | string | Data for the new records: a JSON object, or a JSON array of objects to create multiple records; required |
|
|
25
25
|
| `--whitelist` | string[] | Fields allowed to write; repeatable or pass a JSON array |
|
|
26
26
|
| `--blacklist` | string[] | Fields forbidden to write; repeatable or pass a JSON array |
|
|
27
27
|
|
|
@@ -31,6 +31,7 @@ Also supports common connection parameters from [`nb api resource`](./index.md).
|
|
|
31
31
|
|
|
32
32
|
```bash
|
|
33
33
|
nb api resource create --resource users --values '{"nickname":"Ada"}'
|
|
34
|
+
nb api resource create --resource users --values '[{"nickname":"Ada"},{"nickname":"Grace"}]'
|
|
34
35
|
nb api resource create --resource posts.comments --source-id 1 --values '{"content":"Hello"}'
|
|
35
36
|
```
|
|
36
37
|
|
|
@@ -6,7 +6,7 @@ keywords: "plugin build,plugin package,yarn build,tar,build.config.ts,Rsbuild,ts
|
|
|
6
6
|
|
|
7
7
|
# Build and Package
|
|
8
8
|
|
|
9
|
-
After plugin development is complete, you need to go through two steps — build (compile source code) and package (generate `.
|
|
9
|
+
After plugin development is complete, you need to go through two steps — build (compile source code) and package (generate `.tgz`) — before distributing it to other NocoBase applications.
|
|
10
10
|
|
|
11
11
|
## Build Plugin
|
|
12
12
|
|
|
@@ -26,13 +26,13 @@ If the plugin is created in a source code repository, the first build will trigg
|
|
|
26
26
|
|
|
27
27
|
## Package Plugin
|
|
28
28
|
|
|
29
|
-
Packaging compresses the build artifacts into a `.
|
|
29
|
+
Packaging compresses the build artifacts into a `.tgz` file for easy upload to other environments:
|
|
30
30
|
|
|
31
31
|
```bash
|
|
32
32
|
yarn nocobase tar @my-project/plugin-hello
|
|
33
33
|
```
|
|
34
34
|
|
|
35
|
-
The package file is output to `storage/tar/@my-project/plugin-hello.
|
|
35
|
+
The package file is output to `storage/tar/` by default, named `<package-name>-<version>.tgz` — for example, `storage/tar/@my-project/plugin-hello-0.1.0.tgz`.
|
|
36
36
|
|
|
37
37
|
You can also combine build and package into one step using the `--tar` flag:
|
|
38
38
|
|
|
@@ -42,7 +42,13 @@ yarn build @my-project/plugin-hello --tar
|
|
|
42
42
|
|
|
43
43
|
## Upload to Other NocoBase Applications
|
|
44
44
|
|
|
45
|
-
Upload and extract the `.
|
|
45
|
+
Upload and extract the `.tgz` file to the target application's `./storage/plugins` directory. For detailed steps, see [Install and Upgrade Plugins](../get-started/install-upgrade-plugins.mdx).
|
|
46
|
+
|
|
47
|
+
If the target application was created with the NocoBase CLI (`nb init`), you can also import it directly with `nb plugin import` instead of extracting it manually:
|
|
48
|
+
|
|
49
|
+
```bash
|
|
50
|
+
nb plugin import /your/path/plugin-hello-0.1.0.tgz
|
|
51
|
+
```
|
|
46
52
|
|
|
47
53
|
### Enable a Plugin by Default
|
|
48
54
|
|
|
@@ -12,7 +12,7 @@ This page collects common pitfalls when developing client plugins. If you run in
|
|
|
12
12
|
|
|
13
13
|
### Plugin not visible in the Plugin Manager after creation
|
|
14
14
|
|
|
15
|
-
Make sure you ran `yarn pm create` instead of manually creating the directory. `yarn pm create`
|
|
15
|
+
Make sure you ran `yarn pm create` instead of manually creating the directory. Besides generating files, `yarn pm create` updates `tsconfig.paths.json` and runs `yarn postinstall`, which links the plugin into `node_modules` and regenerates the client plugin index so the application can discover it. A manually created directory skips that step — run `yarn nocobase upgrade` to rescan and register it in the `applicationPlugins` table.
|
|
16
16
|
|
|
17
17
|
### No changes on the page after enabling a plugin
|
|
18
18
|
|
|
@@ -49,6 +49,8 @@ yarn pm create @my-project/plugin-simple-action
|
|
|
49
49
|
|
|
50
50
|
For detailed instructions, see [Writing Your First Plugin](../../write-your-first-plugin).
|
|
51
51
|
|
|
52
|
+
Next, start development mode so your code changes hot-reload: for a project created by `nb init`, run `nb source dev` from the project root (`<app-path>`); for a NocoBase source repository you cloned yourself, run `yarn dev` from the source root.
|
|
53
|
+
|
|
52
54
|
## Step 2: Create Action Models
|
|
53
55
|
|
|
54
56
|
Each action needs to declare the scenario it appears in via the `static scene` property:
|
|
@@ -51,6 +51,8 @@ yarn pm create @my-project/plugin-simple-block
|
|
|
51
51
|
|
|
52
52
|
This will generate a basic file structure under `packages/plugins/@my-project/plugin-simple-block`. For detailed instructions, see [Writing Your First Plugin](../../write-your-first-plugin).
|
|
53
53
|
|
|
54
|
+
Next, start development mode so your code changes hot-reload: for a project created by `nb init`, run `nb source dev` from the project root (`<app-path>`); for a NocoBase source repository you cloned yourself, run `yarn dev` from the source root.
|
|
55
|
+
|
|
54
56
|
## Step 2: Create the Block Model
|
|
55
57
|
|
|
56
58
|
Create `src/client-v2/models/SimpleBlockModel.tsx`. This is the core of the entire plugin -- defining how the block renders and how it's configured.
|
|
@@ -52,6 +52,8 @@ yarn pm create @my-project/plugin-field-simple
|
|
|
52
52
|
|
|
53
53
|
For detailed instructions, see [Writing Your First Plugin](../../write-your-first-plugin).
|
|
54
54
|
|
|
55
|
+
Next, start development mode so your code changes hot-reload: for a project created by `nb init`, run `nb source dev` from the project root (`<app-path>`); for a NocoBase source repository you cloned yourself, run `yarn dev` from the source root.
|
|
56
|
+
|
|
55
57
|
## Step 2: Create the Field Model
|
|
56
58
|
|
|
57
59
|
Create `src/client-v2/models/DisplaySimpleFieldModel.tsx`. This is the core of the plugin -- defining how the field renders and which field interface it binds to.
|
|
@@ -55,6 +55,8 @@ yarn pm create @my-project/plugin-custom-table-block-resource
|
|
|
55
55
|
|
|
56
56
|
For detailed instructions, see [Writing Your First Plugin](../../write-your-first-plugin).
|
|
57
57
|
|
|
58
|
+
Next, start development mode so your code changes hot-reload: for a project created by `nb init`, run `nb source dev` from the project root (`<app-path>`); for a NocoBase source repository you cloned yourself, run `yarn dev` from the source root.
|
|
59
|
+
|
|
58
60
|
## Step 2: Define the Data Table (Server-Side)
|
|
59
61
|
|
|
60
62
|
Create `src/server/collections/todoItems.ts`. NocoBase will automatically load collection definitions from this directory:
|
|
@@ -52,6 +52,8 @@ yarn pm create @my-project/plugin-settings-page
|
|
|
52
52
|
|
|
53
53
|
This will generate a basic file structure under `packages/plugins/@my-project/plugin-settings-page`, including `src/client-v2/`, `src/server/`, `src/locale/`, and other directories. For detailed instructions, see [Writing Your First Plugin](../../write-your-first-plugin).
|
|
54
54
|
|
|
55
|
+
Next, start development mode so your code changes hot-reload: for a project created by `nb init`, run `nb source dev` from the project root (`<app-path>`); for a NocoBase source repository you cloned yourself, run `yarn dev` from the source root.
|
|
56
|
+
|
|
55
57
|
## Step 2: Register the Settings Page
|
|
56
58
|
|
|
57
59
|
Edit `src/client-v2/plugin.tsx`. In `load()`, use `this.pluginSettingsManager` to register the settings page. This is done in two steps -- first register the menu entry with `addMenuItem()`, then register the actual page with `addPageTabItem()`:
|
|
@@ -61,11 +61,11 @@ export class PluginSampleI18nServer extends Plugin {
|
|
|
61
61
|
},
|
|
62
62
|
],
|
|
63
63
|
});
|
|
64
|
-
await this.app.changeLanguage(answer1);
|
|
64
|
+
await this.app.i18n.changeLanguage(answer1);
|
|
65
65
|
const answer2 = await input({
|
|
66
|
-
message: app.i18n.t('Enter your name'),
|
|
66
|
+
message: this.app.i18n.t('Enter your name'),
|
|
67
67
|
});
|
|
68
|
-
console.log(app.i18n.t(`Your name is {{name}}`, { name: answer2 }));
|
|
68
|
+
console.log(this.app.i18n.t(`Your name is {{name}}`, { name: answer2 }));
|
|
69
69
|
});
|
|
70
70
|
}
|
|
71
71
|
}
|
|
@@ -212,7 +212,7 @@ export default class PluginCacheDemo extends Plugin {
|
|
|
212
212
|
});
|
|
213
213
|
|
|
214
214
|
// Create cache using newly registered store
|
|
215
|
-
const redisCache = await this.app.createCache({
|
|
215
|
+
const redisCache = await this.app.cacheManager.createCache({
|
|
216
216
|
name: 'redisCache',
|
|
217
217
|
store: 'redis',
|
|
218
218
|
prefix: 'app:',
|
|
@@ -197,12 +197,6 @@ When a plugin is first activated, the system will automatically synchronize Coll
|
|
|
197
197
|
yarn nocobase upgrade
|
|
198
198
|
```
|
|
199
199
|
|
|
200
|
-
If exceptions or dirty data occur during synchronization, you can rebuild the table structure by reinstalling the application:
|
|
201
|
-
|
|
202
|
-
```bash
|
|
203
|
-
yarn nocobase install -f
|
|
204
|
-
```
|
|
205
|
-
|
|
206
200
|
If you need to migrate existing data during plugin upgrades -- such as renaming fields, splitting tables, backfilling default values, etc. -- you should handle it through [Migration](./migration.md) scripts rather than manually modifying the database.
|
|
207
201
|
|
|
208
202
|
## Making a Collection Appear in the UI Data Table List
|
|
@@ -30,7 +30,7 @@ export default function (app: Application) {
|
|
|
30
30
|
app
|
|
31
31
|
.command('echo')
|
|
32
32
|
.option('-v, --version')
|
|
33
|
-
.action(async (
|
|
33
|
+
.action(async (options) => {
|
|
34
34
|
console.log('Hello World!');
|
|
35
35
|
if (options.version) {
|
|
36
36
|
console.log('Current version:', await app.version.get());
|
|
@@ -68,7 +68,7 @@ export default class PluginHelloServer extends Plugin {
|
|
|
68
68
|
app
|
|
69
69
|
.command('echo')
|
|
70
70
|
.option('-v, --version')
|
|
71
|
-
.action(async (
|
|
71
|
+
.action(async (options) => {
|
|
72
72
|
console.log('Hello World!');
|
|
73
73
|
if (options.version) {
|
|
74
74
|
console.log('Current version:', await app.version.get());
|
|
@@ -56,7 +56,7 @@ resourceManager.use(async (ctx) => {
|
|
|
56
56
|
|
|
57
57
|
```ts
|
|
58
58
|
resourceManager.use(async (ctx) => {
|
|
59
|
-
await ctx.cache.set('key', 'value',
|
|
59
|
+
await ctx.cache.set('key', 'value', 60 * 1000); // Cache for 60 seconds (TTL is in milliseconds)
|
|
60
60
|
const val = await ctx.cache.get('key');
|
|
61
61
|
ctx.body = val;
|
|
62
62
|
});
|
|
@@ -113,7 +113,7 @@ resourceManager.use(async (ctx) => {
|
|
|
113
113
|
|
|
114
114
|
```ts
|
|
115
115
|
resourceManager.use(async (ctx) => {
|
|
116
|
-
const canEdit =
|
|
116
|
+
const canEdit = ctx.can({ resource: 'posts', action: 'edit' });
|
|
117
117
|
if (!canEdit) {
|
|
118
118
|
ctx.throw(403, 'Forbidden');
|
|
119
119
|
}
|
|
@@ -68,13 +68,13 @@ export class PluginSampleI18nServer extends Plugin {
|
|
|
68
68
|
]
|
|
69
69
|
});
|
|
70
70
|
|
|
71
|
-
await this.app.changeLanguage(answer1);
|
|
71
|
+
await this.app.i18n.changeLanguage(answer1);
|
|
72
72
|
|
|
73
73
|
const answer2 = await input({
|
|
74
|
-
message: app.i18n.t('Enter your name')
|
|
74
|
+
message: this.app.i18n.t('Enter your name')
|
|
75
75
|
});
|
|
76
76
|
|
|
77
|
-
console.log(app.i18n.t('Your name is {{name}}', { name: answer2 }));
|
|
77
|
+
console.log(this.app.i18n.t('Your name is {{name}}', { name: answer2 }));
|
|
78
78
|
});
|
|
79
79
|
}
|
|
80
80
|
}
|
|
@@ -129,7 +129,7 @@ export class PluginSampleI18nServer extends Plugin {
|
|
|
129
129
|
load() {
|
|
130
130
|
this.app.use(async (ctx, next) => {
|
|
131
131
|
if (ctx.path === '/api/plugin-i18n') {
|
|
132
|
-
ctx.body = this.
|
|
132
|
+
ctx.body = this.t('Hello');
|
|
133
133
|
}
|
|
134
134
|
await next();
|
|
135
135
|
});
|
|
@@ -28,50 +28,83 @@ yarn pm create @my-project/plugin-hello
|
|
|
28
28
|
After the command runs successfully, it will generate basic files in the `packages/plugins/@my-project/plugin-hello` directory. The default structure is as follows:
|
|
29
29
|
|
|
30
30
|
```bash
|
|
31
|
-
|
|
32
|
-
|
|
33
|
-
|
|
34
|
-
|
|
35
|
-
|
|
36
|
-
|
|
37
|
-
|
|
38
|
-
|
|
39
|
-
|
|
40
|
-
|
|
41
|
-
|
|
42
|
-
|
|
43
|
-
|
|
44
|
-
|
|
45
|
-
|
|
46
|
-
|
|
47
|
-
|
|
48
|
-
|
|
49
|
-
|
|
50
|
-
|
|
51
|
-
|
|
52
|
-
|
|
53
|
-
|
|
54
|
-
|
|
55
|
-
|
|
56
|
-
|
|
57
|
-
|
|
58
|
-
|
|
59
|
-
|
|
60
|
-
|
|
31
|
+
packages/plugins/@my-project/plugin-hello/
|
|
32
|
+
├─ package.json
|
|
33
|
+
├─ README.md
|
|
34
|
+
├─ .npmignore
|
|
35
|
+
├─ client-v2.d.ts # v2 client entry type declaration
|
|
36
|
+
├─ client-v2.js # v2 client entry
|
|
37
|
+
├─ client.d.ts # v1 client entry type declaration
|
|
38
|
+
├─ client.js # v1 client entry
|
|
39
|
+
├─ server.d.ts # Server entry type declaration
|
|
40
|
+
├─ server.js # Server entry
|
|
41
|
+
└─ src
|
|
42
|
+
├─ index.ts # Default export server-side plugin
|
|
43
|
+
├─ client-v2 # v2 client-side code location
|
|
44
|
+
│ ├─ index.tsx # Default exported client-side plugin class
|
|
45
|
+
│ ├─ plugin.tsx # Plugin entry (extends @nocobase/client-v2 Plugin)
|
|
46
|
+
│ └─ client.d.ts
|
|
47
|
+
├─ client # v1 client-side code location
|
|
48
|
+
│ ├─ index.tsx
|
|
49
|
+
│ ├─ plugin.tsx
|
|
50
|
+
│ ├─ locale.ts
|
|
51
|
+
│ ├─ models
|
|
52
|
+
│ │ └─ index.ts
|
|
53
|
+
│ └─ client.d.ts
|
|
54
|
+
├─ server # Server-side code location
|
|
55
|
+
│ ├─ index.ts # Default exported server-side plugin class
|
|
56
|
+
│ ├─ plugin.ts # Plugin entry (extends @nocobase/server Plugin)
|
|
57
|
+
│ └─ collections # Server-side collections (empty directory initially)
|
|
58
|
+
└─ locale # Locale resources
|
|
59
|
+
├─ en-US.json
|
|
60
|
+
└─ zh-CN.json
|
|
61
61
|
```
|
|
62
62
|
|
|
63
|
-
|
|
63
|
+
The scaffold generates a minimal skeleton — `src/client-v2/` contains only entry files. The `models/` directory and `locale.ts` used in the following steps are ones you create yourself.
|
|
64
|
+
|
|
65
|
+
Next, start development mode so your code changes hot-reload:
|
|
66
|
+
|
|
67
|
+
- If the project was created with the NocoBase CLI (`nb init`), run this from the project root (`<app-path>`):
|
|
68
|
+
|
|
69
|
+
```bash
|
|
70
|
+
nb source dev
|
|
71
|
+
```
|
|
72
|
+
|
|
73
|
+
- If you cloned the NocoBase source repository yourself, run this from the source root:
|
|
74
|
+
|
|
75
|
+
```bash
|
|
76
|
+
yarn dev
|
|
77
|
+
```
|
|
78
|
+
|
|
79
|
+
Once it is running, access the plugin manager page in your browser (default URL: http://localhost:13000/admin/settings/plugin-manager) to confirm whether the plugin appears in the list.
|
|
64
80
|
|
|
65
81
|
## Step 2: Implement a Simple Client Block
|
|
66
82
|
|
|
67
83
|
Next, we'll add a custom block model to the plugin to display a welcome message.
|
|
68
84
|
|
|
69
|
-
1. **Create
|
|
85
|
+
1. **Create the translation helper file** `src/client-v2/locale.ts`. `tExpr` declares a namespaced translation expression, and `useT` provides the translation function inside components:
|
|
86
|
+
|
|
87
|
+
```ts
|
|
88
|
+
import { tExpr as _tExpr, useFlowEngine } from '@nocobase/flow-engine';
|
|
89
|
+
// @ts-ignore
|
|
90
|
+
import pkg from '../../package.json';
|
|
91
|
+
|
|
92
|
+
export function useT() {
|
|
93
|
+
const engine = useFlowEngine();
|
|
94
|
+
return (str: string) => engine.context.t(str, { ns: [pkg.name, 'client'] });
|
|
95
|
+
}
|
|
96
|
+
|
|
97
|
+
export function tExpr(key: string) {
|
|
98
|
+
return _tExpr(key, { ns: [pkg.name, 'client'] });
|
|
99
|
+
}
|
|
100
|
+
```
|
|
101
|
+
|
|
102
|
+
2. **Create a new block model file** `src/client-v2/models/HelloBlockModel.tsx`:
|
|
70
103
|
|
|
71
104
|
```tsx pure
|
|
72
|
-
import { BlockModel } from '@nocobase/client-v2';
|
|
73
105
|
import React from 'react';
|
|
74
|
-
import {
|
|
106
|
+
import { BlockModel } from '@nocobase/client-v2';
|
|
107
|
+
import { tExpr } from '../locale';
|
|
75
108
|
|
|
76
109
|
export class HelloBlockModel extends BlockModel {
|
|
77
110
|
renderComponent() {
|
|
@@ -89,18 +122,27 @@ HelloBlockModel.define({
|
|
|
89
122
|
});
|
|
90
123
|
```
|
|
91
124
|
|
|
92
|
-
|
|
125
|
+
3. **Register the block model**. Creating the model file is not enough on its own — the frontend runtime does not scan the `models/` directory automatically, so you have to register it explicitly in the plugin entry. Edit `src/client-v2/plugin.tsx` and declare how the model is loaded via `registerModelLoaders` inside `load()`:
|
|
93
126
|
|
|
94
|
-
```
|
|
95
|
-
import {
|
|
96
|
-
|
|
127
|
+
```tsx pure
|
|
128
|
+
import { Plugin } from '@nocobase/client-v2';
|
|
129
|
+
|
|
130
|
+
export class PluginHelloClientV2 extends Plugin {
|
|
131
|
+
async load() {
|
|
132
|
+
this.flowEngine.registerModelLoaders({
|
|
133
|
+
HelloBlockModel: {
|
|
134
|
+
loader: () => import('./models/HelloBlockModel'),
|
|
135
|
+
},
|
|
136
|
+
});
|
|
137
|
+
}
|
|
138
|
+
}
|
|
97
139
|
|
|
98
|
-
export default
|
|
99
|
-
HelloBlockModel,
|
|
100
|
-
} as Record<string, ModelConstructor>;
|
|
140
|
+
export default PluginHelloClientV2;
|
|
101
141
|
```
|
|
102
142
|
|
|
103
|
-
|
|
143
|
+
`registerModelLoaders` takes lazy-loading functions, so a model is only loaded once it is actually used. The key (`HelloBlockModel`) must match the model class name — the runtime uses it to pick the model class out of the module's named exports.
|
|
144
|
+
|
|
145
|
+
After saving the code, if you're running development mode, you should see hot-reload logs in the terminal output.
|
|
104
146
|
|
|
105
147
|
## Step 3: Activate and Test the Plugin
|
|
106
148
|
|
|
@@ -162,7 +204,7 @@ If the plugin is created in a source code repository, the first build will trigg
|
|
|
162
204
|
|
|
163
205
|
:::
|
|
164
206
|
|
|
165
|
-
After the build completes, the package file is located
|
|
207
|
+
After the build completes, the package file is located under `storage/tar/` by default, named `<package-name>-<version>.tgz` — for example, `storage/tar/@my-project/plugin-hello-0.1.0.tgz`.
|
|
166
208
|
|
|
167
209
|
:::tip
|
|
168
210
|
|
|
@@ -174,6 +216,12 @@ It's recommended to write test cases to verify core logic before publishing a pl
|
|
|
174
216
|
|
|
175
217
|
Upload and extract the package file to the target application's `./storage/plugins` directory. For detailed steps, see [Install and Upgrade Plugins](../get-started/install-upgrade-plugins.mdx).
|
|
176
218
|
|
|
219
|
+
If the target application was created with the NocoBase CLI (`nb init`), you can also import it directly with `nb plugin import` instead of extracting it manually:
|
|
220
|
+
|
|
221
|
+
```bash
|
|
222
|
+
nb plugin import /your/path/plugin-hello-0.1.0.tgz
|
|
223
|
+
```
|
|
224
|
+
|
|
177
225
|
## Related Links
|
|
178
226
|
|
|
179
227
|
- [Plugin Development Overview](./index.md) — Understand NocoBase microkernel architecture and plugin lifecycle
|
|
@@ -8,6 +8,13 @@ pkg: '@nocobase/plugin-user-data-sync'
|
|
|
8
8
|
|
|
9
9
|
This feature allows you to register and manage user data synchronization sources. By default, an HTTP API is provided, but additional data sources can be supported through plugins. It supports syncing data to the **Users** and **Departments** collections by default, with the possibility to extend synchronization to other target resources using plugins.
|
|
10
10
|
|
|
11
|
+
## Available data sources
|
|
12
|
+
|
|
13
|
+
- [DingTalk](./sources/dingtalk.md) — Synchronize DingTalk users and departments, with incremental updates through HTTP callbacks or Stream mode.
|
|
14
|
+
- [LDAP](./sources/ldap.md) — Synchronize LDAP users and optional organizational units by reusing an LDAP authenticator.
|
|
15
|
+
- [WeCom](./sources/wecom.md) — Synchronize users and departments from WeCom.
|
|
16
|
+
- [HTTP API](./sources/api.md) — Push user and department data through the synchronization API.
|
|
17
|
+
|
|
11
18
|
## Data Source Management and Synchronization
|
|
12
19
|
|
|
13
20
|
|
|
@@ -51,4 +58,4 @@ For failed synchronization tasks, you can click **Retry**.
|
|
|
51
58
|
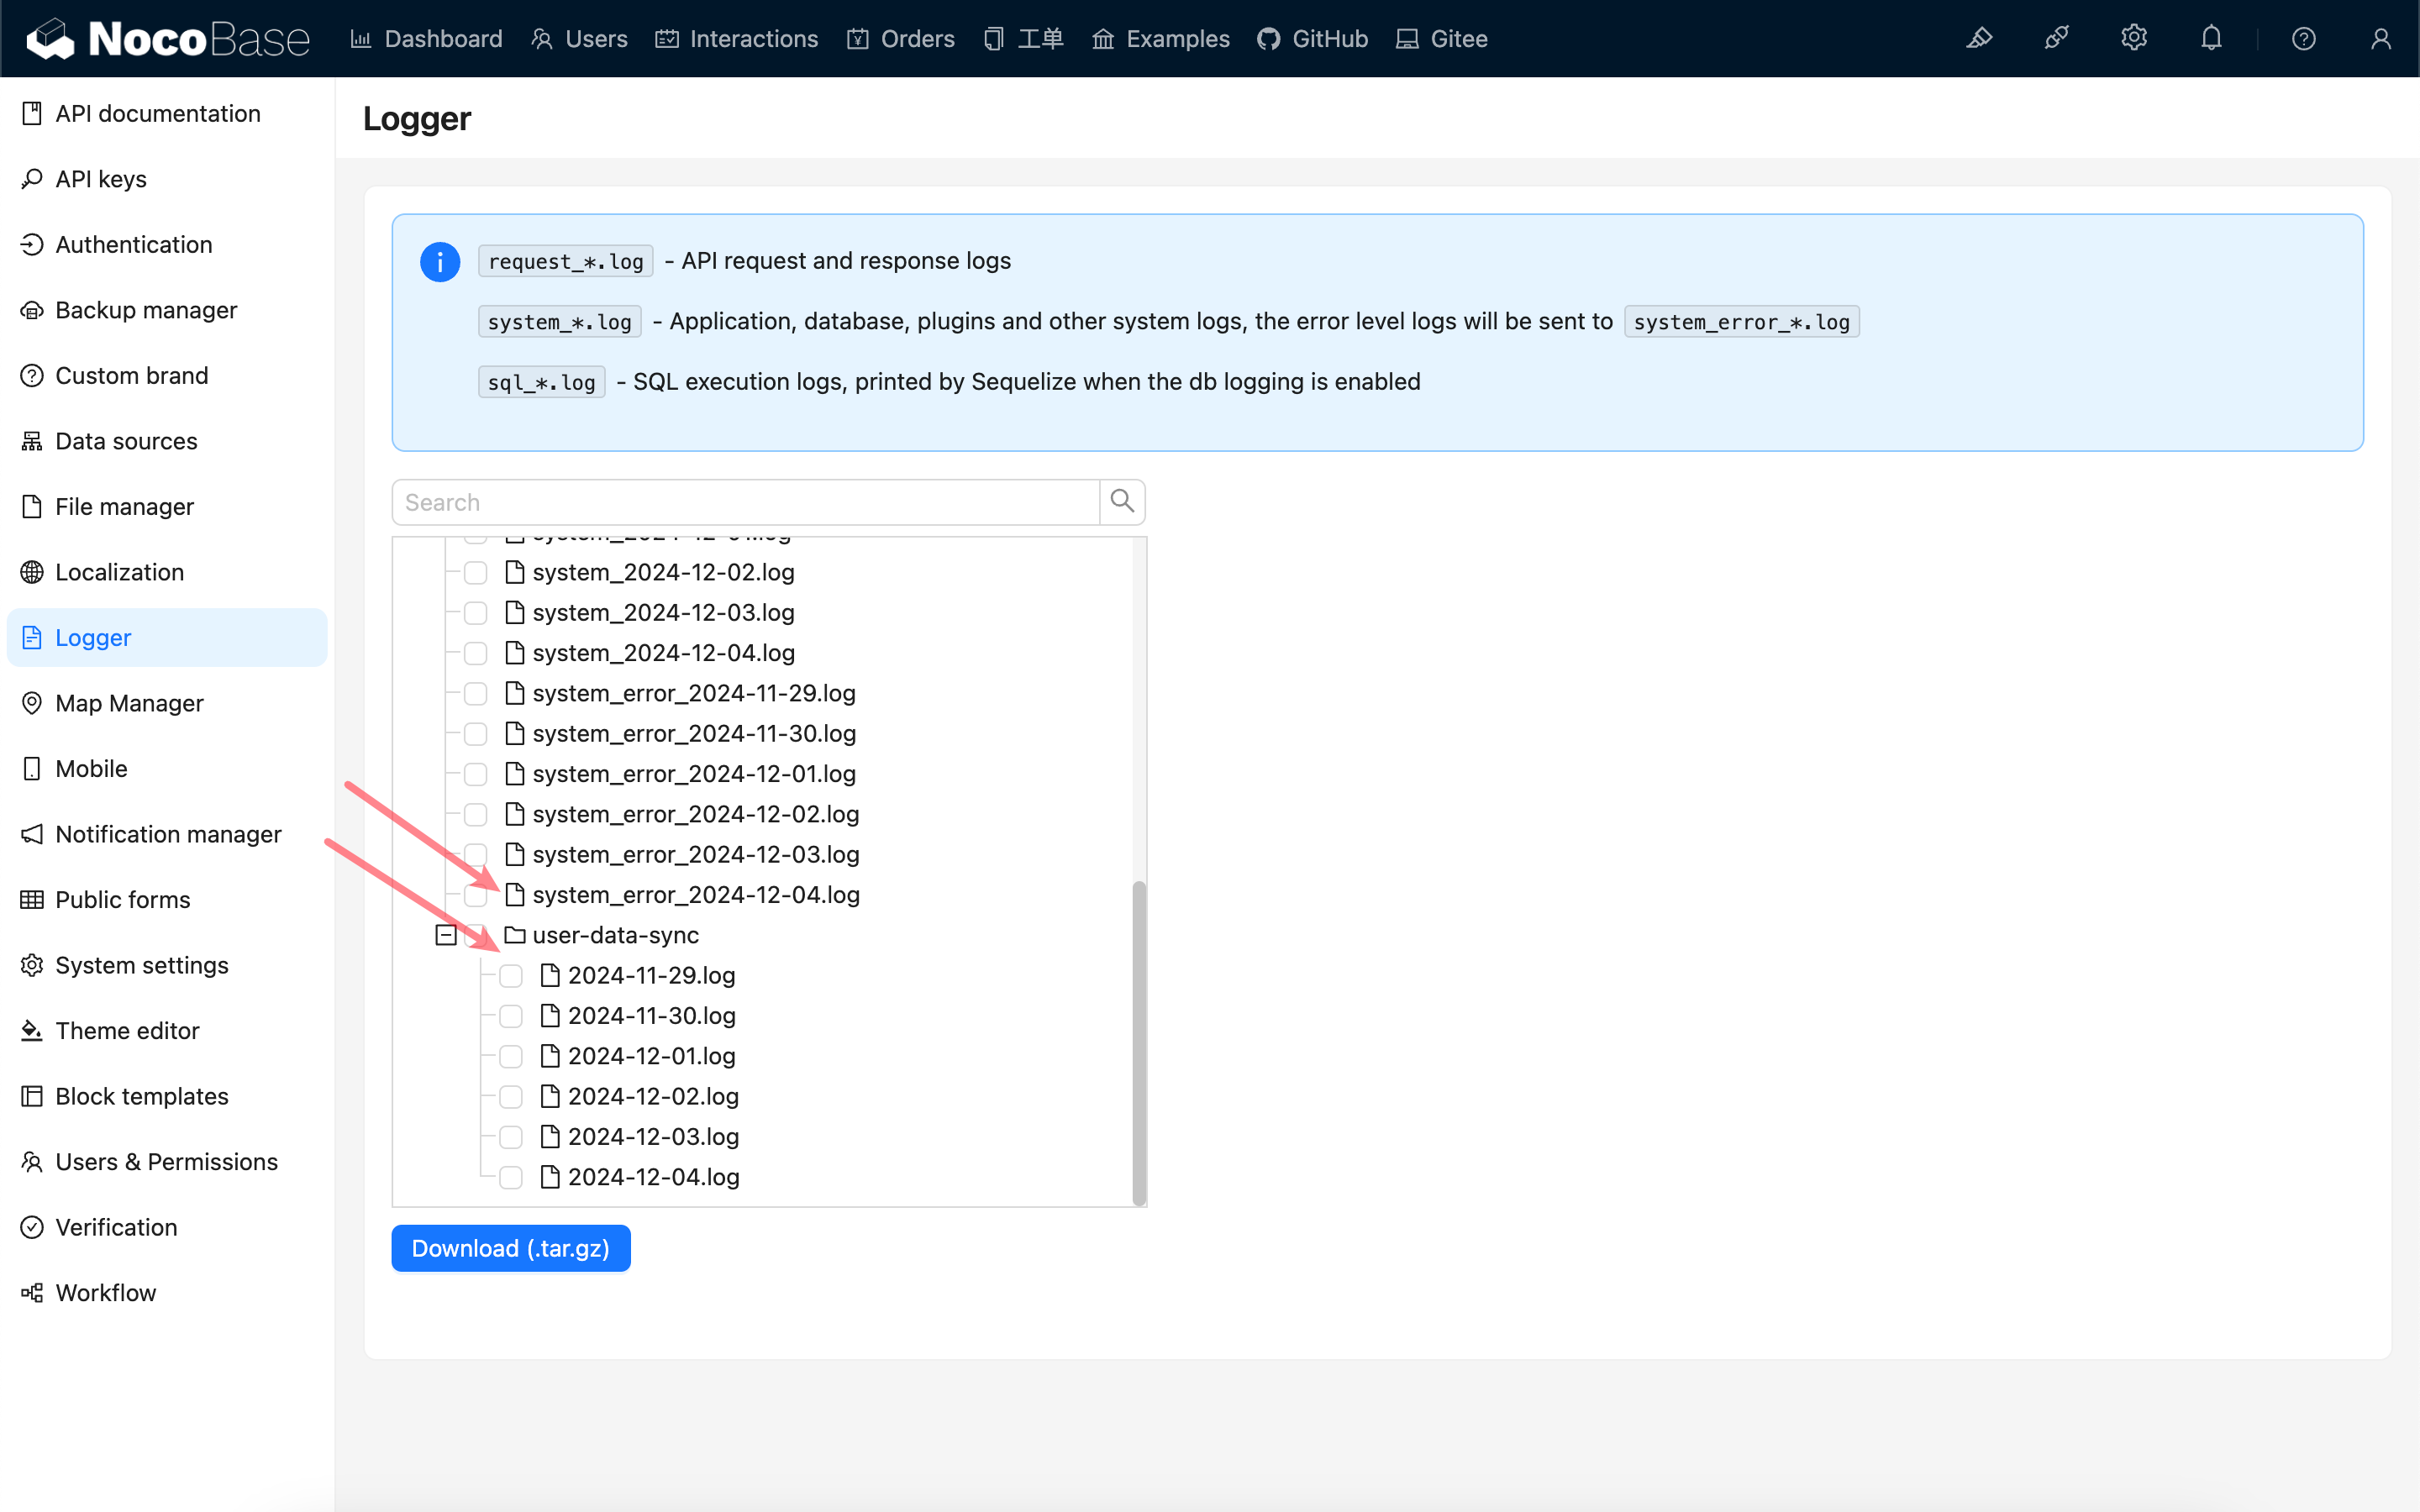
In case of synchronization failures, you can troubleshoot the issue through system logs. Additionally, raw synchronization records are stored in the `user-data-sync` directory under the application logs folder.
|
|
52
59
|
|
|
53
60
|
|
|
54
|
-
|
|
61
|
+

|
|
@@ -0,0 +1,138 @@
|
|
|
1
|
+
---
|
|
2
|
+
pkg: '@nocobase/plugin-auth-dingtalk'
|
|
3
|
+
title: "Synchronize User Data from DingTalk"
|
|
4
|
+
description: "Synchronize DingTalk users and departments to NocoBase and receive incremental changes through HTTP callbacks or Stream mode."
|
|
5
|
+
keywords: "DingTalk,user synchronization,department synchronization,Stream mode,event subscription,NocoBase"
|
|
6
|
+
---
|
|
7
|
+
|
|
8
|
+
# Synchronize User Data from DingTalk
|
|
9
|
+
|
|
10
|
+
<PluginInfo commercial="true" name="auth-dingtalk"></PluginInfo>
|
|
11
|
+
|
|
12
|
+
## Introduction
|
|
13
|
+
|
|
14
|
+
The **DingTalk** plugin synchronizes users and departments from a DingTalk organization to NocoBase. It supports full synchronization on demand and incremental updates through either an HTTP callback or a Stream connection.
|
|
15
|
+
|
|
16
|
+
## Before you begin
|
|
17
|
+
|
|
18
|
+
1. Install and enable the **DingTalk** and **User Data Synchronization** plugins.
|
|
19
|
+
2. Create an internal application in the DingTalk developer console.
|
|
20
|
+
3. Grant the contact permissions and configure the data permission scope described below.
|
|
21
|
+
4. Copy the application's Client ID and Client Secret. See [Authentication: DingTalk](/auth-verification/auth-dingtalk/) for the credential setup.
|
|
22
|
+
|
|
23
|
+
## Configure contact permissions and the data permission scope
|
|
24
|
+
|
|
25
|
+
Open **Permission Management** for the application in the DingTalk developer console and grant the following contact permissions.
|
|
26
|
+
|
|
27
|
+
| Permission | Identifier | Required | Purpose |
|
|
28
|
+
| --- | --- | --- | --- |
|
|
29
|
+
| Read department information | `qyapi_get_department_list` | Yes | Read the department list, names, and hierarchy. |
|
|
30
|
+
| Read department members | `qyapi_get_department_member` | Yes | Read the member list of each department. |
|
|
31
|
+
| Read member information | `qyapi_get_member` | Yes | Read member details and department memberships. |
|
|
32
|
+
| Employee mobile number information | `fieldMobile` | When using mobile numbers | Synchronize mobile numbers. This permission is required when **User unique identifier field** is `mobile`. |
|
|
33
|
+
| Email and other personal information | `fieldEmail` | No | Grant this permission when user email addresses need to be synchronized. |
|
|
34
|
+
|
|
35
|
+
After granting the permissions, configure the application's **Data Permission Scope** (also called **Contact Permission Scope** or **Visibility Range** in some console versions) to include the departments and employees that may be synchronized. Select all employees for a full organization synchronization. If only selected departments or employees are included, NocoBase synchronizes only those entries.
|
|
36
|
+
|
|
37
|
+
:::warning
|
|
38
|
+
API permissions determine which fields the application can read, while the data permission scope determines which departments and employees it can read. Both must be configured. Event subscriptions do not replace contact read permissions: after receiving an event, NocoBase still calls DingTalk APIs to retrieve the latest user or department information.
|
|
39
|
+
:::
|
|
40
|
+
|
|
41
|
+
If the same DingTalk application is also used for sign-in, grant the personal-information permissions described in [Authentication: DingTalk](/auth-verification/auth-dingtalk/). Those sign-in permissions are not required solely for user data synchronization.
|
|
42
|
+
|
|
43
|
+
## Add a DingTalk synchronization source
|
|
44
|
+
|
|
45
|
+
Go to **Users & Permissions > Synchronize**, click **Add new**, and select **DingTalk** as the type.
|
|
46
|
+
|
|
47
|
+
Configure the following fields:
|
|
48
|
+
|
|
49
|
+
| Field | Description |
|
|
50
|
+
| --- | --- |
|
|
51
|
+
| Source name | A unique name for this synchronization source. |
|
|
52
|
+
| Enabled | Starts event reception for this source and enables synchronization tasks. |
|
|
53
|
+
| Client ID | The Client ID of the DingTalk internal application. Environment variables and secrets are supported. |
|
|
54
|
+
| Client Secret | The Client Secret of the DingTalk internal application. Environment variables and secrets are supported. |
|
|
55
|
+
| User unique identifier field | Select `mobile` or `unionId`. Keep the selected field stable after the first synchronization. Users without a value for the selected field are skipped. |
|
|
56
|
+
| Event receiving mode | Select **HTTP callback** or **Stream mode** for incremental user and department changes. |
|
|
57
|
+
|
|
58
|
+
Save and enable the source, then click **Sync** to complete the initial full synchronization before relying on incremental events.
|
|
59
|
+
|
|
60
|
+
## Choose an event receiving mode
|
|
61
|
+
|
|
62
|
+
### Stream mode
|
|
63
|
+
|
|
64
|
+
Stream mode establishes an outbound persistent connection from the NocoBase server to DingTalk. It does not require a public callback URL, Token, or EncodingAESKey.
|
|
65
|
+
|
|
66
|
+
1. In the DingTalk developer console, open the application's event subscription settings and select **Stream mode**.
|
|
67
|
+
2. Subscribe to the user and department change events required by the application.
|
|
68
|
+
3. In NocoBase, select **Stream mode**, save the source, and enable it.
|
|
69
|
+
|
|
70
|
+
The Stream client starts when the source is enabled. Updating, disabling, or deleting the source refreshes or closes the corresponding connection.
|
|
71
|
+
|
|
72
|
+
:::info
|
|
73
|
+
The NocoBase server must be able to establish outbound connections to DingTalk. A reverse proxy or public inbound callback endpoint is not required for Stream mode.
|
|
74
|
+
:::
|
|
75
|
+
|
|
76
|
+
### HTTP callback
|
|
77
|
+
|
|
78
|
+
HTTP callback mode receives DingTalk events through a NocoBase callback URL.
|
|
79
|
+
|
|
80
|
+
1. Select **HTTP callback** in NocoBase.
|
|
81
|
+
2. Enter the Token and EncodingAESKey configured for the DingTalk event subscription.
|
|
82
|
+
3. Save the source and copy the generated **Event callback URL**.
|
|
83
|
+
4. Configure that URL in the DingTalk developer console and subscribe to the required user and department events.
|
|
84
|
+
|
|
85
|
+
The callback URL must be reachable by DingTalk. In a production environment, expose it through HTTPS and make sure the reverse proxy forwards the request path unchanged.
|
|
86
|
+
|
|
87
|
+
## Supported incremental events
|
|
88
|
+
|
|
89
|
+
Both event receiving modes handle the following DingTalk events:
|
|
90
|
+
|
|
91
|
+
| Event | Result in NocoBase |
|
|
92
|
+
| --- | --- |
|
|
93
|
+
| `user_add_org` | Create or update the user. |
|
|
94
|
+
| `user_modify_org` | Update the user. |
|
|
95
|
+
| `user_leave_org` | Delete the synchronized user. |
|
|
96
|
+
| `org_dept_create` | Create or update the department. |
|
|
97
|
+
| `org_dept_modify` | Update the department and synchronize its users. |
|
|
98
|
+
| `org_dept_remove` | Delete the synchronized department. |
|
|
99
|
+
|
|
100
|
+
## Synchronized fields
|
|
101
|
+
|
|
102
|
+
### Department fields
|
|
103
|
+
|
|
104
|
+
| DingTalk field | NocoBase field or purpose |
|
|
105
|
+
| --- | --- |
|
|
106
|
+
| `dept_id` | Source-unique department identifier. |
|
|
107
|
+
| `name` | Department name. |
|
|
108
|
+
| `parent_id` | Parent department used to build the department hierarchy. If the parent is outside the data permission scope, the department is synchronized as a root department. |
|
|
109
|
+
|
|
110
|
+
### User fields
|
|
111
|
+
|
|
112
|
+
| DingTalk field | NocoBase field or purpose |
|
|
113
|
+
| --- | --- |
|
|
114
|
+
| `mobile` or `unionid` | Generates the source-unique user identifier and username according to **User unique identifier field**. A user without the selected field is skipped. |
|
|
115
|
+
| `name` | User nickname. |
|
|
116
|
+
| `mobile` | Phone number. Requires the **Employee mobile number information** permission. |
|
|
117
|
+
| `email`, falling back to `org_email` | Email address. Requires the **Email and other personal information** permission. |
|
|
118
|
+
| `dept_id_list` | Department memberships. Only departments within the data permission scope are retained. |
|
|
119
|
+
| `dept_order_list` | Primary department. |
|
|
120
|
+
| `leader_in_dept` | Whether the user is an owner of the corresponding department. |
|
|
121
|
+
|
|
122
|
+
### Department owners
|
|
123
|
+
|
|
124
|
+
DingTalk uses `leader_in_dept` in the user details to indicate whether the user is an owner of each department they belong to. NocoBase synchronizes this flag separately for each department: the same user can own multiple departments, and an owned department does not have to be the user's primary department. Only departments within the data permission scope are included.
|
|
125
|
+
|
|
126
|
+
When an owner flag is removed in DingTalk, the corresponding owner flag in NocoBase is removed by the next synchronization. Owner status changed manually in NocoBase may be overwritten by DingTalk data during the next synchronization.
|
|
127
|
+
|
|
128
|
+
Full and incremental synchronization use the same field mapping. Other DingTalk user fields, such as avatar, job title, and employee number, are not currently synchronized.
|
|
129
|
+
|
|
130
|
+
## Troubleshooting
|
|
131
|
+
|
|
132
|
+
- If synchronization returns no data or an entire department is missing, verify the three required contact read permissions and confirm that the department is included in the data permission scope.
|
|
133
|
+
- If a user is present but their mobile number or email address is empty, verify the **Employee mobile number information** or **Email and other personal information** permission respectively.
|
|
134
|
+
- If DingTalk reports that a department or employee is outside the permission scope, expand the application's data permission scope instead of only resubscribing to events.
|
|
135
|
+
- If users are skipped, verify that they have a value for the configured unique identifier field.
|
|
136
|
+
- For Stream mode, check the application logs for `Dingtalk stream client starting`, `Dingtalk stream client started`, or connection errors.
|
|
137
|
+
- For HTTP callback mode, verify that the callback URL is publicly reachable and that Token and EncodingAESKey match the DingTalk configuration.
|
|
138
|
+
- Run a manual full synchronization after changing the application's permissions or visibility range.
|