@nocobase/plugin-ai 2.1.0-beta.44 → 2.1.0-beta.46
This diff represents the content of publicly available package versions that have been released to one of the supported registries. The information contained in this diff is provided for informational purposes only and reflects changes between package versions as they appear in their respective public registries.
- package/dist/ai/docs/nocobase/ai/install-upgrade-migration.mdx +127 -132
- package/dist/ai/docs/nocobase/ai-dev/capabilities.md +1 -1
- package/dist/ai/docs/nocobase/ai-dev/index.md +1 -1
- package/dist/ai/docs/nocobase/ai-dev/watermark-plugin.md +1 -1
- package/dist/ai/docs/nocobase/api/cli/app/autostart/disable.md +44 -0
- package/dist/ai/docs/nocobase/api/cli/app/autostart/enable.md +44 -0
- package/dist/ai/docs/nocobase/api/cli/app/autostart/index.md +63 -0
- package/dist/ai/docs/nocobase/api/cli/app/autostart/list.md +41 -0
- package/dist/ai/docs/nocobase/api/cli/app/autostart/run.md +50 -0
- package/dist/ai/docs/nocobase/api/cli/app/index.md +18 -15
- package/dist/ai/docs/nocobase/api/cli/app/restart.md +3 -11
- package/dist/ai/docs/nocobase/api/cli/app/start.md +3 -11
- package/dist/ai/docs/nocobase/api/cli/app/stop.md +22 -12
- package/dist/ai/docs/nocobase/api/cli/app/upgrade.md +6 -6
- package/dist/ai/docs/nocobase/api/cli/backup/create.md +49 -0
- package/dist/ai/docs/nocobase/api/cli/backup/index.md +46 -0
- package/dist/ai/docs/nocobase/api/cli/backup/restore.md +46 -0
- package/dist/ai/docs/nocobase/api/cli/config/delete.md +11 -9
- package/dist/ai/docs/nocobase/api/cli/config/get.md +11 -8
- package/dist/ai/docs/nocobase/api/cli/config/index.md +28 -24
- package/dist/ai/docs/nocobase/api/cli/config/set.md +14 -12
- package/dist/ai/docs/nocobase/api/cli/db/stop.md +10 -11
- package/dist/ai/docs/nocobase/api/cli/env/index.md +25 -23
- package/dist/ai/docs/nocobase/api/cli/env/info.md +12 -10
- package/dist/ai/docs/nocobase/api/cli/env/proxy/caddy.md +108 -0
- package/dist/ai/docs/nocobase/api/cli/env/proxy/index.md +54 -0
- package/dist/ai/docs/nocobase/api/cli/env/proxy/nginx.md +104 -0
- package/dist/ai/docs/nocobase/api/cli/env/remove.md +18 -14
- package/dist/ai/docs/nocobase/api/cli/env/update.md +115 -14
- package/dist/ai/docs/nocobase/api/cli/index.md +66 -52
- package/dist/ai/docs/nocobase/api/cli/init.md +244 -62
- package/dist/ai/docs/nocobase/api/cli/license/activate.md +13 -12
- package/dist/ai/docs/nocobase/api/cli/license/index.md +2 -2
- package/dist/ai/docs/nocobase/api/cli/plugin/import.md +74 -0
- package/dist/ai/docs/nocobase/api/cli/plugin/index.md +4 -2
- package/dist/ai/docs/nocobase/get-started/deployment/how-to-deploy-nocobase-faster.mdx +384 -0
- package/dist/ai/docs/nocobase/get-started/install-upgrade-plugins.mdx +16 -10
- package/dist/ai/docs/nocobase/get-started/upgrading/docker.md +1 -1
- package/dist/ai/docs/nocobase/index.md +3 -3
- package/dist/ai/docs/nocobase/multi-app/multi-app/app-block-and-switcher.md +68 -0
- package/dist/ai/docs/nocobase/multi-app/multi-app/app-sso.md +71 -0
- package/dist/ai/docs/nocobase/multi-app/multi-app/index.md +9 -1
- package/dist/ai/docs/nocobase/multi-app/multi-app/sub-app-api.md +112 -0
- package/dist/ai/docs/nocobase/plugin-development/client/appendix/faq.md +3 -3
- package/dist/ai/docs/nocobase/plugin-development/client/component/index.md +1 -1
- package/dist/ai/docs/nocobase/plugin-development/client/ctx/common-capabilities.md +2 -2
- package/dist/ai/docs/nocobase/plugin-development/client/ctx/index.md +1 -1
- package/dist/ai/docs/nocobase/plugin-development/client/router.md +11 -11
- package/dist/ai/docs/nocobase/quickstart/index.md +27 -0
- package/dist/ai/docs/nocobase/quickstart/installation/airgap.md +67 -0
- package/dist/ai/docs/nocobase/quickstart/installation/cli.md +205 -0
- package/dist/ai/docs/nocobase/quickstart/installation/docker-compose.md +123 -0
- package/dist/ai/docs/nocobase/quickstart/installation/env.md +101 -0
- package/dist/ai/docs/nocobase/quickstart/installation/migration.md +50 -0
- package/dist/ai/docs/nocobase/quickstart/operations/backup-restore.md +94 -0
- package/dist/ai/docs/nocobase/quickstart/operations/manage-app.md +166 -0
- package/dist/ai/docs/nocobase/quickstart/operations/multi-environment.md +171 -0
- package/dist/ai/docs/nocobase/quickstart/plugins/third-party.md +86 -0
- package/dist/ai/docs/nocobase/quickstart/production/index.md +163 -0
- package/dist/ai/docs/nocobase/quickstart/production/reverse-proxy/caddy.md +158 -0
- package/dist/ai/docs/nocobase/quickstart/production/reverse-proxy/index.md +100 -0
- package/dist/ai/docs/nocobase/quickstart/production/reverse-proxy/nginx.md +166 -0
- package/dist/ai/docs/nocobase/quickstart/release-management.md +1 -0
- package/dist/ai/docs/nocobase/solution/all-in-one/installation.md +181 -0
- package/dist/ai/docs/nocobase/solution/crm/changelog.md +0 -3
- package/dist/ai/docs/nocobase/solution/crm/installation.md +6 -76
- package/dist/ai/docs/nocobase/solution/crm/v1.md +6 -35
- package/dist/ai/docs/nocobase/solution/ticket-system/changelog.md +0 -2
- package/dist/ai/docs/nocobase/solution/ticket-system/installation.md +6 -69
- package/dist/ai/docs/nocobase/workflow/advanced/options.md +45 -1
- package/dist/client/{406.15c09d98faa2ccf1.js → 406.9a530334eae8cede.js} +1 -1
- package/dist/client/{428.e9f38da3b0d8b498.js → 428.431a00d29107058e.js} +1 -1
- package/dist/client/index.js +2 -2
- package/dist/client-v2/index.js +1 -1
- package/dist/externalVersion.js +16 -16
- package/dist/locale/de-DE.json +1 -0
- package/dist/locale/en-US.json +2 -1
- package/dist/locale/es-ES.json +1 -0
- package/dist/locale/fr-FR.json +1 -0
- package/dist/locale/hu-HU.json +1 -0
- package/dist/locale/id-ID.json +1 -0
- package/dist/locale/it-IT.json +1 -0
- package/dist/locale/ja-JP.json +1 -0
- package/dist/locale/ko-KR.json +1 -0
- package/dist/locale/nl-NL.json +1 -0
- package/dist/locale/pt-BR.json +1 -0
- package/dist/locale/ru-RU.json +1 -0
- package/dist/locale/tr-TR.json +1 -0
- package/dist/locale/uk-UA.json +1 -0
- package/dist/locale/vi-VN.json +1 -0
- package/dist/locale/zh-CN.json +2 -1
- package/dist/locale/zh-TW.json +1 -0
- package/dist/node_modules/@langchain/xai/package.json +1 -1
- package/dist/node_modules/fs-extra/package.json +1 -1
- package/dist/node_modules/jsonrepair/package.json +1 -1
- package/dist/node_modules/just-bash/package.json +1 -1
- package/dist/node_modules/nodejs-snowflake/package.json +1 -1
- package/dist/node_modules/openai/package.json +1 -1
- package/dist/node_modules/zod/package.json +1 -1
- package/dist/server/resource/ai.js +11 -9
- package/dist/server/workflow/nodes/employee/index.js +2 -4
- package/dist/server/workflow/nodes/employee/types.d.ts +2 -2
- package/package.json +2 -2
- package/dist/ai/docs/nocobase/api/cli/app/down.md +0 -41
|
@@ -0,0 +1,181 @@
|
|
|
1
|
+
---
|
|
2
|
+
title: "All-in-One Business Suite - Installation"
|
|
3
|
+
description: "Install the All-in-One Business Suite: one-click restore of the .nbdata backup file via Backup Manager. Requires NocoBase v2.1.0-alpha.40 or above and PostgreSQL 16; DB_UNDERSCORED must not be true."
|
|
4
|
+
keywords: "all-in-one business suite installation, All-in-One, backup restore, Backup Manager, nbdata, PostgreSQL, NocoBase"
|
|
5
|
+
---
|
|
6
|
+
|
|
7
|
+
# Installation
|
|
8
|
+
|
|
9
|
+
The All-in-One Business Suite covers six modules: **CRM, Sales Management, Help Desk, Project Management, IT Asset Management, and HR**. Use NocoBase's built-in **Backup Manager** plugin to restore the `.nbdata` backup file in one click and get the complete dataset.
|
|
10
|
+
|
|
11
|
+
:::tip Prerequisites
|
|
12
|
+
|
|
13
|
+
- A working NocoBase environment. For the main installation, see the [official installation docs](https://docs.nocobase.com/welcome/getting-started/installation)
|
|
14
|
+
- NocoBase **v2.1.0-alpha.40 or above** (the Backup Manager plugin is open source since this version, available in the Community Edition)
|
|
15
|
+
- The backup file downloaded: [nocobase_all_in_one_backup_260521.nbdata](https://static-docs.nocobase.com/nocobase_all_in_one_backup_260521.nbdata)
|
|
16
|
+
|
|
17
|
+
:::
|
|
18
|
+
|
|
19
|
+
:::warning Note
|
|
20
|
+
|
|
21
|
+
- The solution is built on **PostgreSQL 16** — your environment must use PostgreSQL 16
|
|
22
|
+
- **`DB_UNDERSCORED` must not be `true`** — check your `docker-compose.yml`; restore will fail if it is set to `true`
|
|
23
|
+
- **Restore overwrites ALL data in the target app** — if the target already has data, back up the current app first and run the restore carefully
|
|
24
|
+
|
|
25
|
+
:::
|
|
26
|
+
|
|
27
|
+
The current release is deployed via **backup restore**. Future releases will switch to incremental migration to make integration with existing NocoBase systems easier.
|
|
28
|
+
|
|
29
|
+
---
|
|
30
|
+
|
|
31
|
+
## Steps
|
|
32
|
+
|
|
33
|
+
### Step 1: Start the app with the `full` image
|
|
34
|
+
|
|
35
|
+
Use the `full` Docker image. It bundles the database client and other companion tools, so no extra configuration is needed:
|
|
36
|
+
|
|
37
|
+
```bash
|
|
38
|
+
docker pull nocobase/nocobase:alpha-full
|
|
39
|
+
```
|
|
40
|
+
|
|
41
|
+
Then start NocoBase from this image.
|
|
42
|
+
|
|
43
|
+
:::tip
|
|
44
|
+
|
|
45
|
+
Without the `full` image, you may need to install the `pg_dump` client inside the container manually — a tedious and brittle process.
|
|
46
|
+
|
|
47
|
+
:::
|
|
48
|
+
|
|
49
|
+
### Step 2: Enable the Backup Manager plugin
|
|
50
|
+
|
|
51
|
+
1. Sign in to NocoBase
|
|
52
|
+
2. Open **Plugin Manager**
|
|
53
|
+
3. Find and enable **Backup Manager**
|
|
54
|
+
|
|
55
|
+
### Step 3: Restore from the local backup file
|
|
56
|
+
|
|
57
|
+
1. After enabling the plugin, refresh the page
|
|
58
|
+
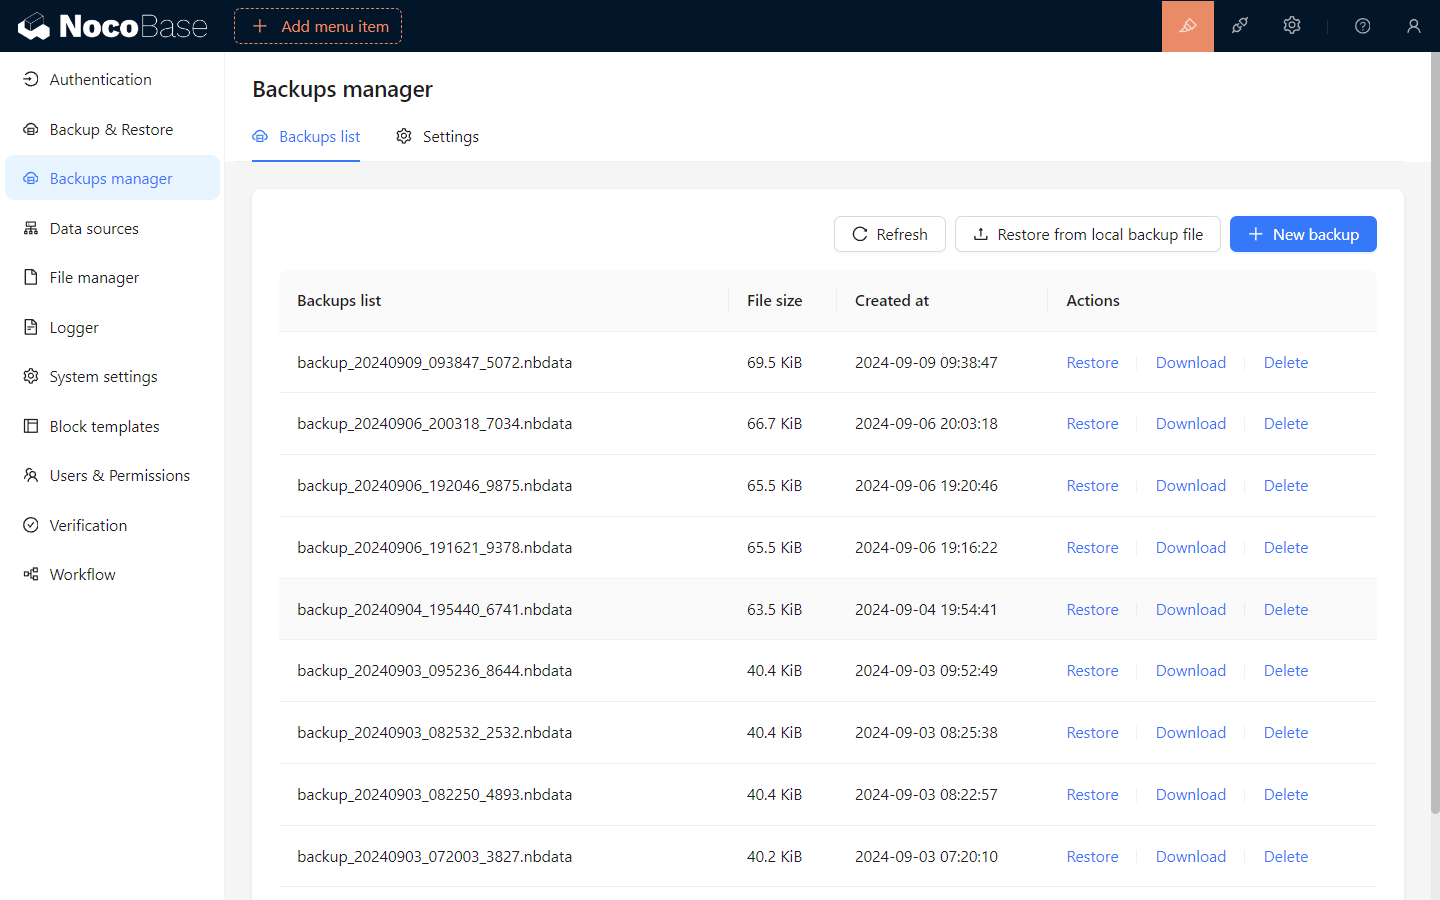
2. From the left menu, go to **System Management / Backup Manager**
|
|
59
|
+
|
|
60
|
+
|
|
61
|
+
|
|
62
|
+
3. Click **Restore from local backup** in the top right
|
|
63
|
+
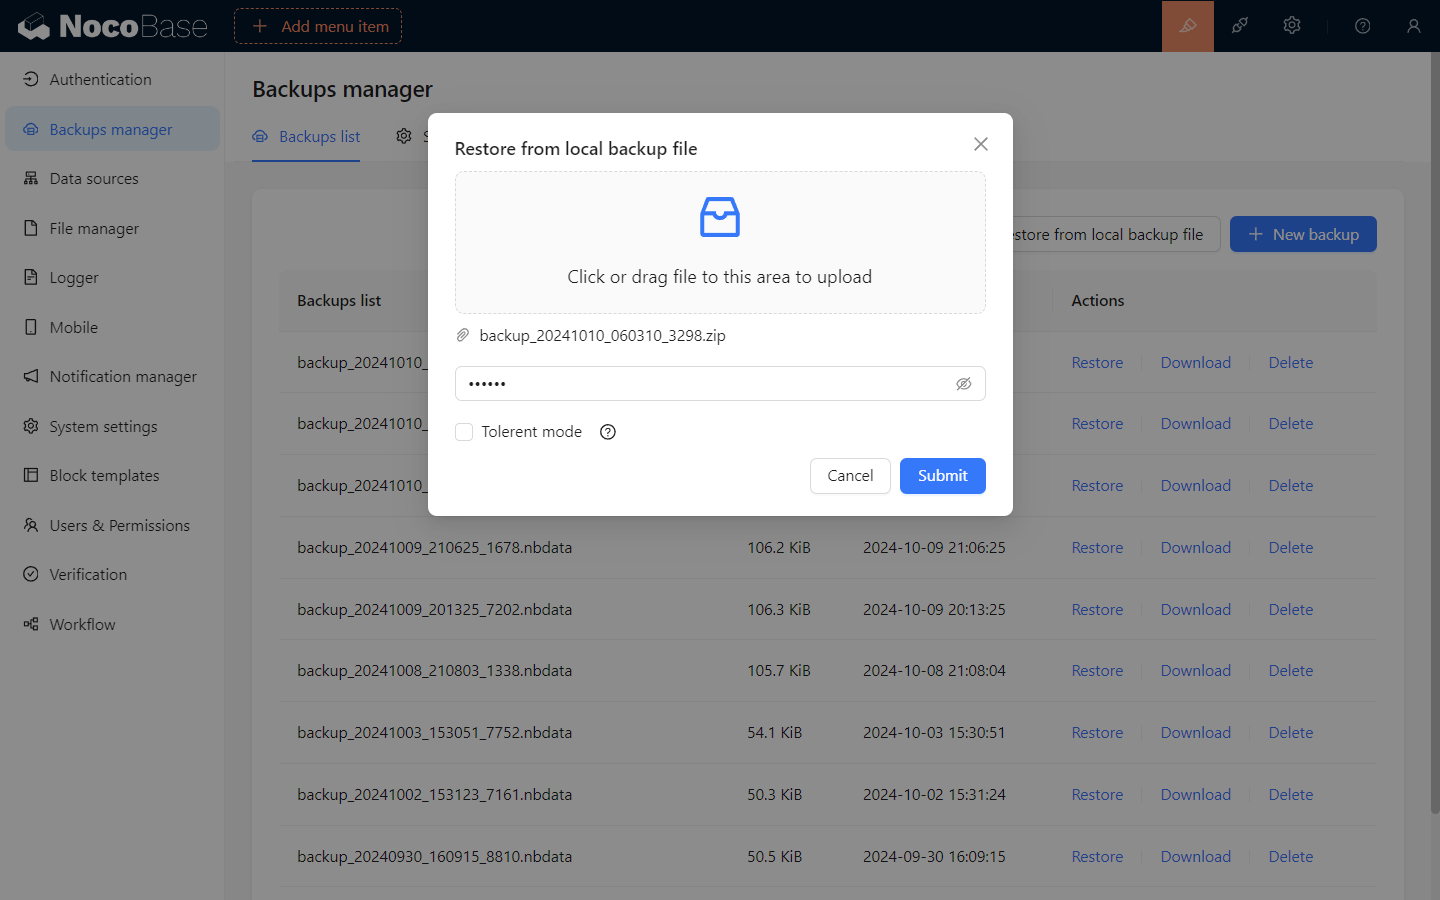
4. Drag the downloaded `nocobase_all_in_one_backup_260521.nbdata` file onto the upload area
|
|
64
|
+
|
|
65
|
+
|
|
66
|
+
|
|
67
|
+
5. Click **Submit** and wait for the restore to complete — typically tens of seconds to a few minutes
|
|
68
|
+
|
|
69
|
+
---
|
|
70
|
+
|
|
71
|
+
## Notes
|
|
72
|
+
|
|
73
|
+
- **Database compatibility** — PostgreSQL version, character set, and case sensitivity must match the backup source; the `schema` name in particular must be identical
|
|
74
|
+
- **Commercial plugin match** — every commercial plugin used in the backup must be installed and enabled locally first, or the restore will be interrupted. The All-in-One solution uses commercial plugins such as Email Manager, Audit Log, and AI Employees. On the Community Edition, the entry points for missing plugins simply do not appear and the other modules are unaffected
|
|
75
|
+
|
|
76
|
+
---
|
|
77
|
+
|
|
78
|
+
## Post-install configuration
|
|
79
|
+
|
|
80
|
+
The system is usable once the restore finishes, but two settings still point at our demo environment and need to be switched to your own.
|
|
81
|
+
|
|
82
|
+
### 1. File storage engine (OSS / local)
|
|
83
|
+
|
|
84
|
+
The demo backup ships with a storage engine pointing at our Alibaba Cloud OSS. The Access Key is not public, so any attachment field, print template, or AI employee avatar upload will fail.
|
|
85
|
+
|
|
86
|
+
Local storage is usually enough; switch to your own OSS only when you need CDN acceleration or large-file workloads.
|
|
87
|
+
|
|
88
|
+
**Switching steps:**
|
|
89
|
+
|
|
90
|
+
1. Open **Plugin Manager / File Manager** (or go to `/admin/settings/file-manager`)
|
|
91
|
+
|
|
92
|
+
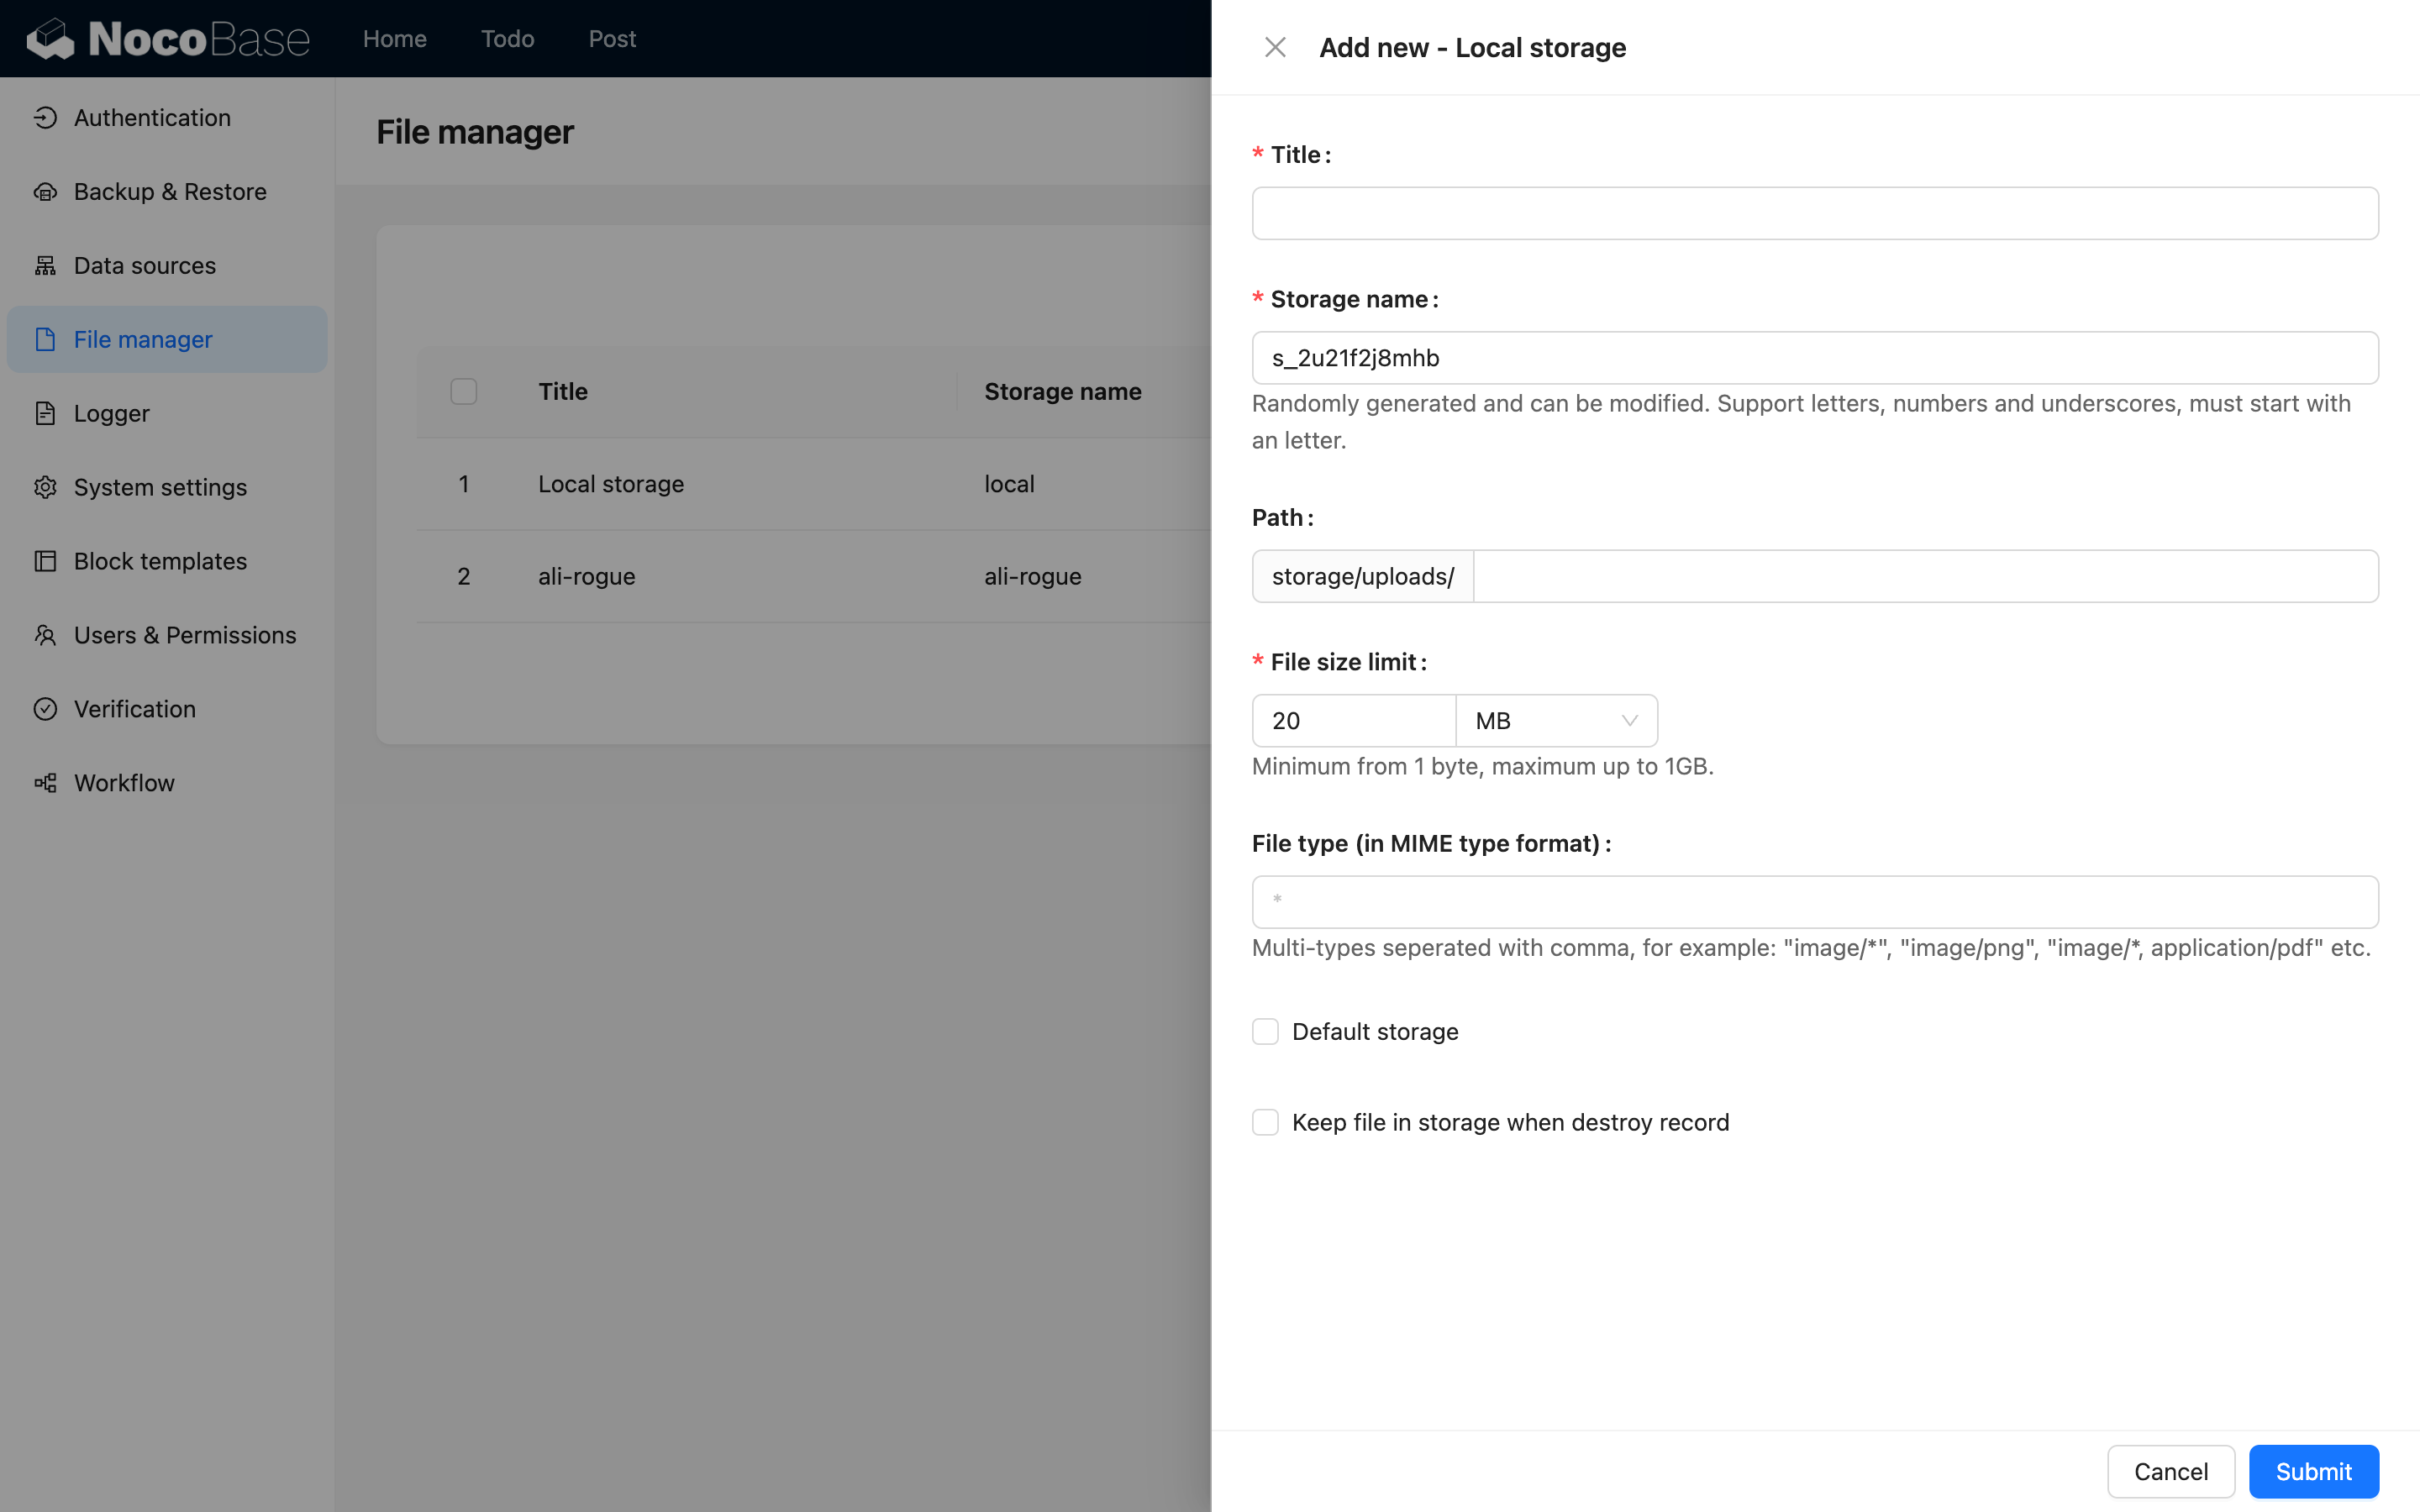
2. **Option A — use local storage** (simplest, suited for self-hosted deployments):
|
|
93
|
+
|
|
94
|
+
- Find the auto-created **Local Storage** entry
|
|
95
|
+
- Click **Edit**, check **Set as default storage engine** at the bottom of the config panel, then submit
|
|
96
|
+
|
|
97
|
+
|
|
98
|
+
|
|
99
|
+
:::warning Note
|
|
100
|
+
|
|
101
|
+
For Docker deployments, local storage lives inside the container; deleting the container loses the files. In production, mount a volume or use cloud storage.
|
|
102
|
+
|
|
103
|
+
:::
|
|
104
|
+
|
|
105
|
+
3. **Option B — use your own OSS / S3 / COS**:
|
|
106
|
+
|
|
107
|
+
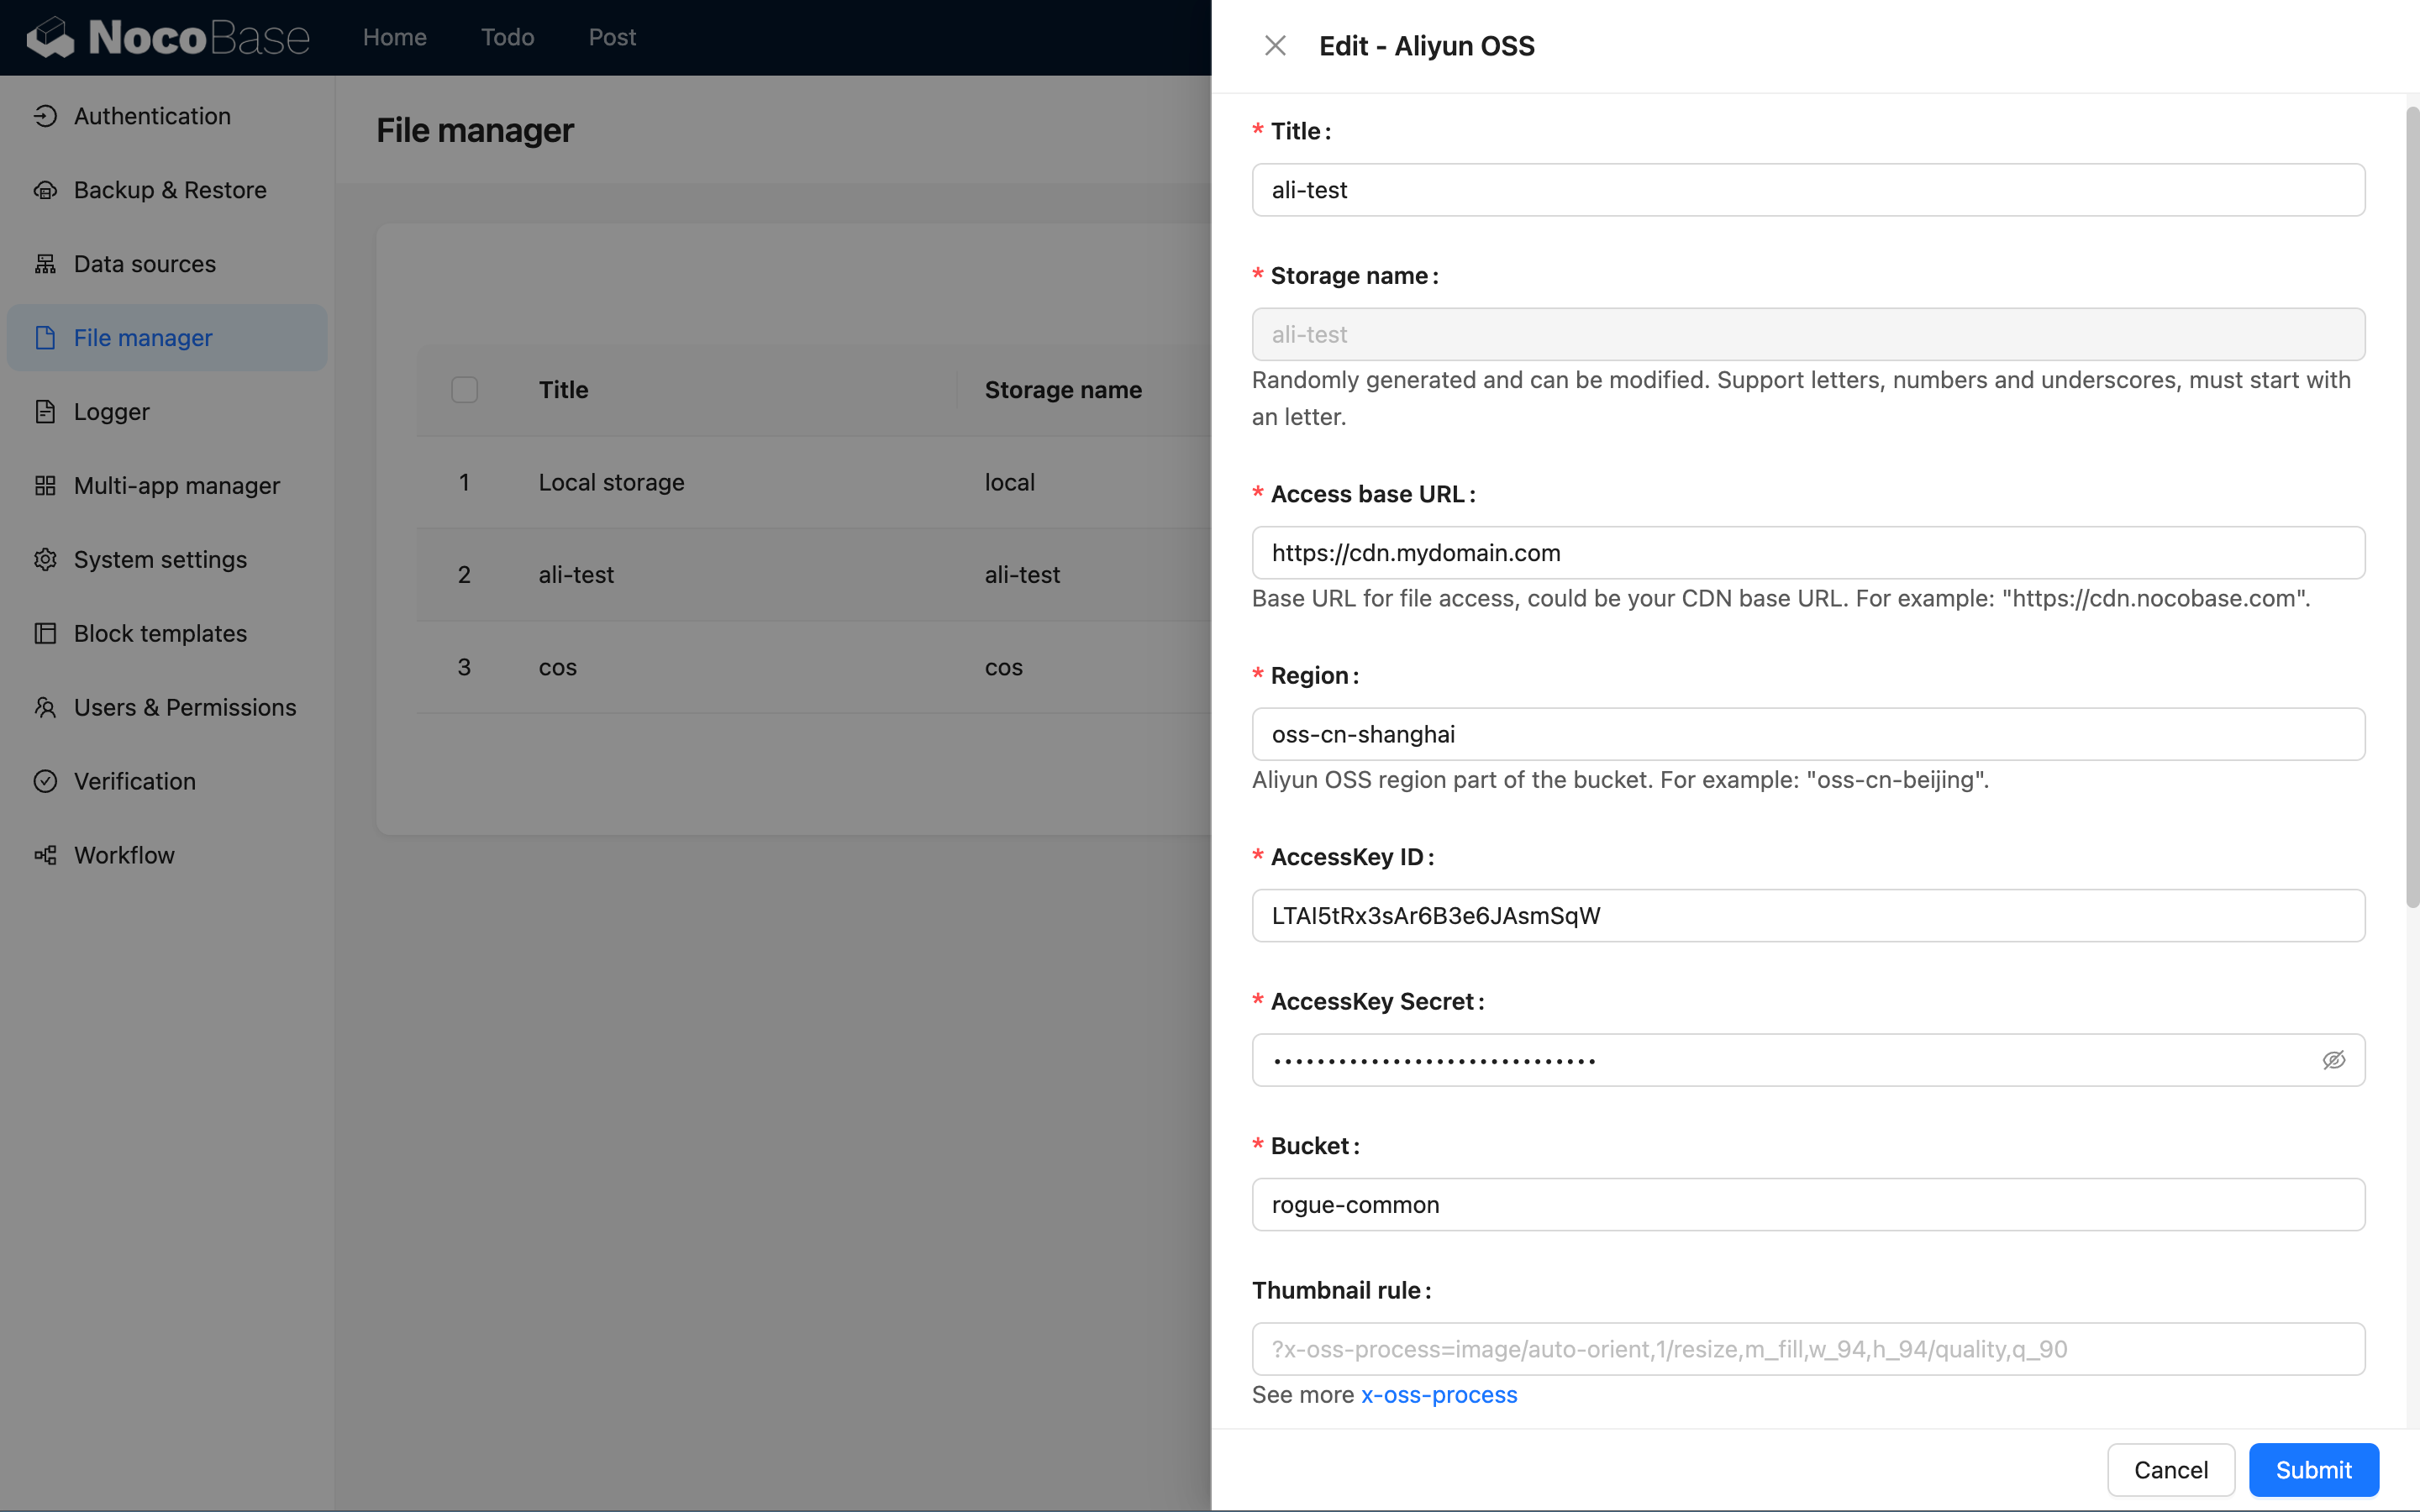
- Click **Add new**, choose the matching type (Alibaba Cloud OSS / Amazon S3 / Tencent Cloud COS / S3 Pro)
|
|
108
|
+
- Fill in Access Key, Bucket, Region, domain, and other parameters, check **Set as default storage engine**, then submit
|
|
109
|
+
|
|
110
|
+
|
|
111
|
+
|
|
112
|
+
4. Delete or disable the demo-preset OSS entry to avoid accidental use
|
|
113
|
+
|
|
114
|
+
See [Storage engine overview](../../file-manager/storage/index.md) for parameter details.
|
|
115
|
+
|
|
116
|
+
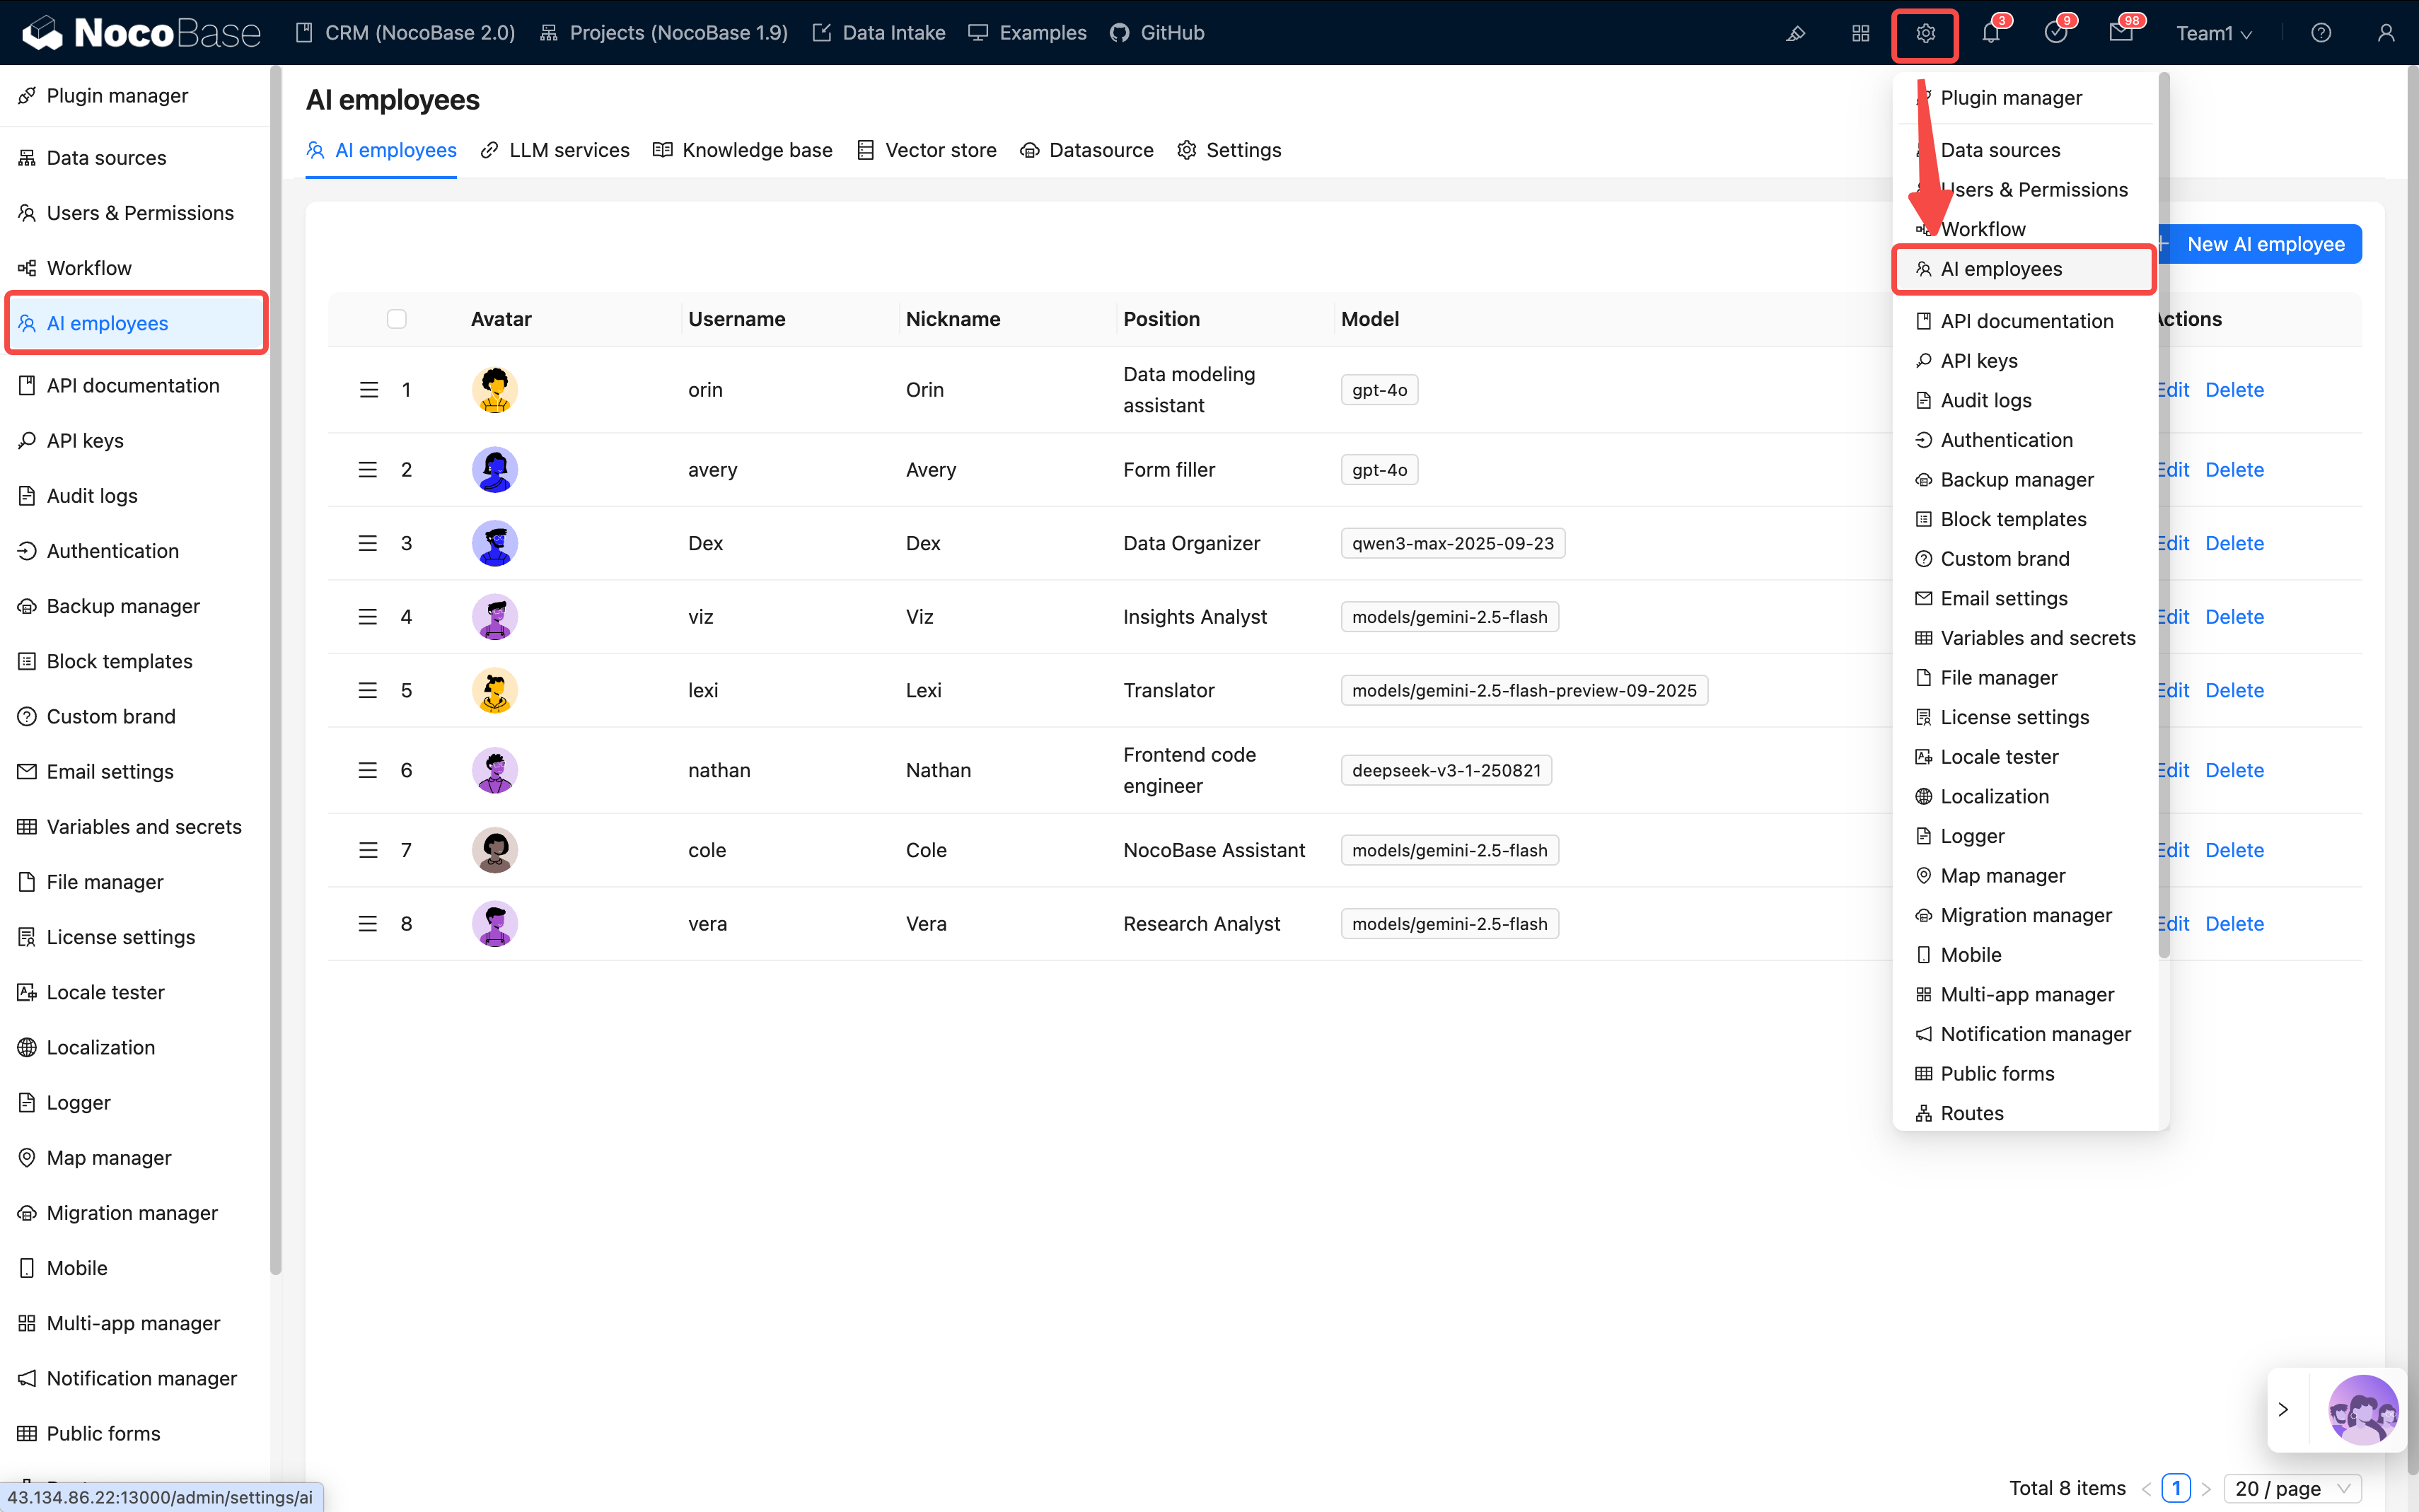
### 2. AI Employees LLM service keys
|
|
117
|
+
|
|
118
|
+
The demo backup preloads several LLM service entries (OpenAI, Claude, Gemini, DeepSeek, Qwen, Kimi, etc.) using our own API keys, which **will not work for you**. The AI Employees features are unusable until you swap them out.
|
|
119
|
+
|
|
120
|
+
**Configuration steps:**
|
|
121
|
+
|
|
122
|
+
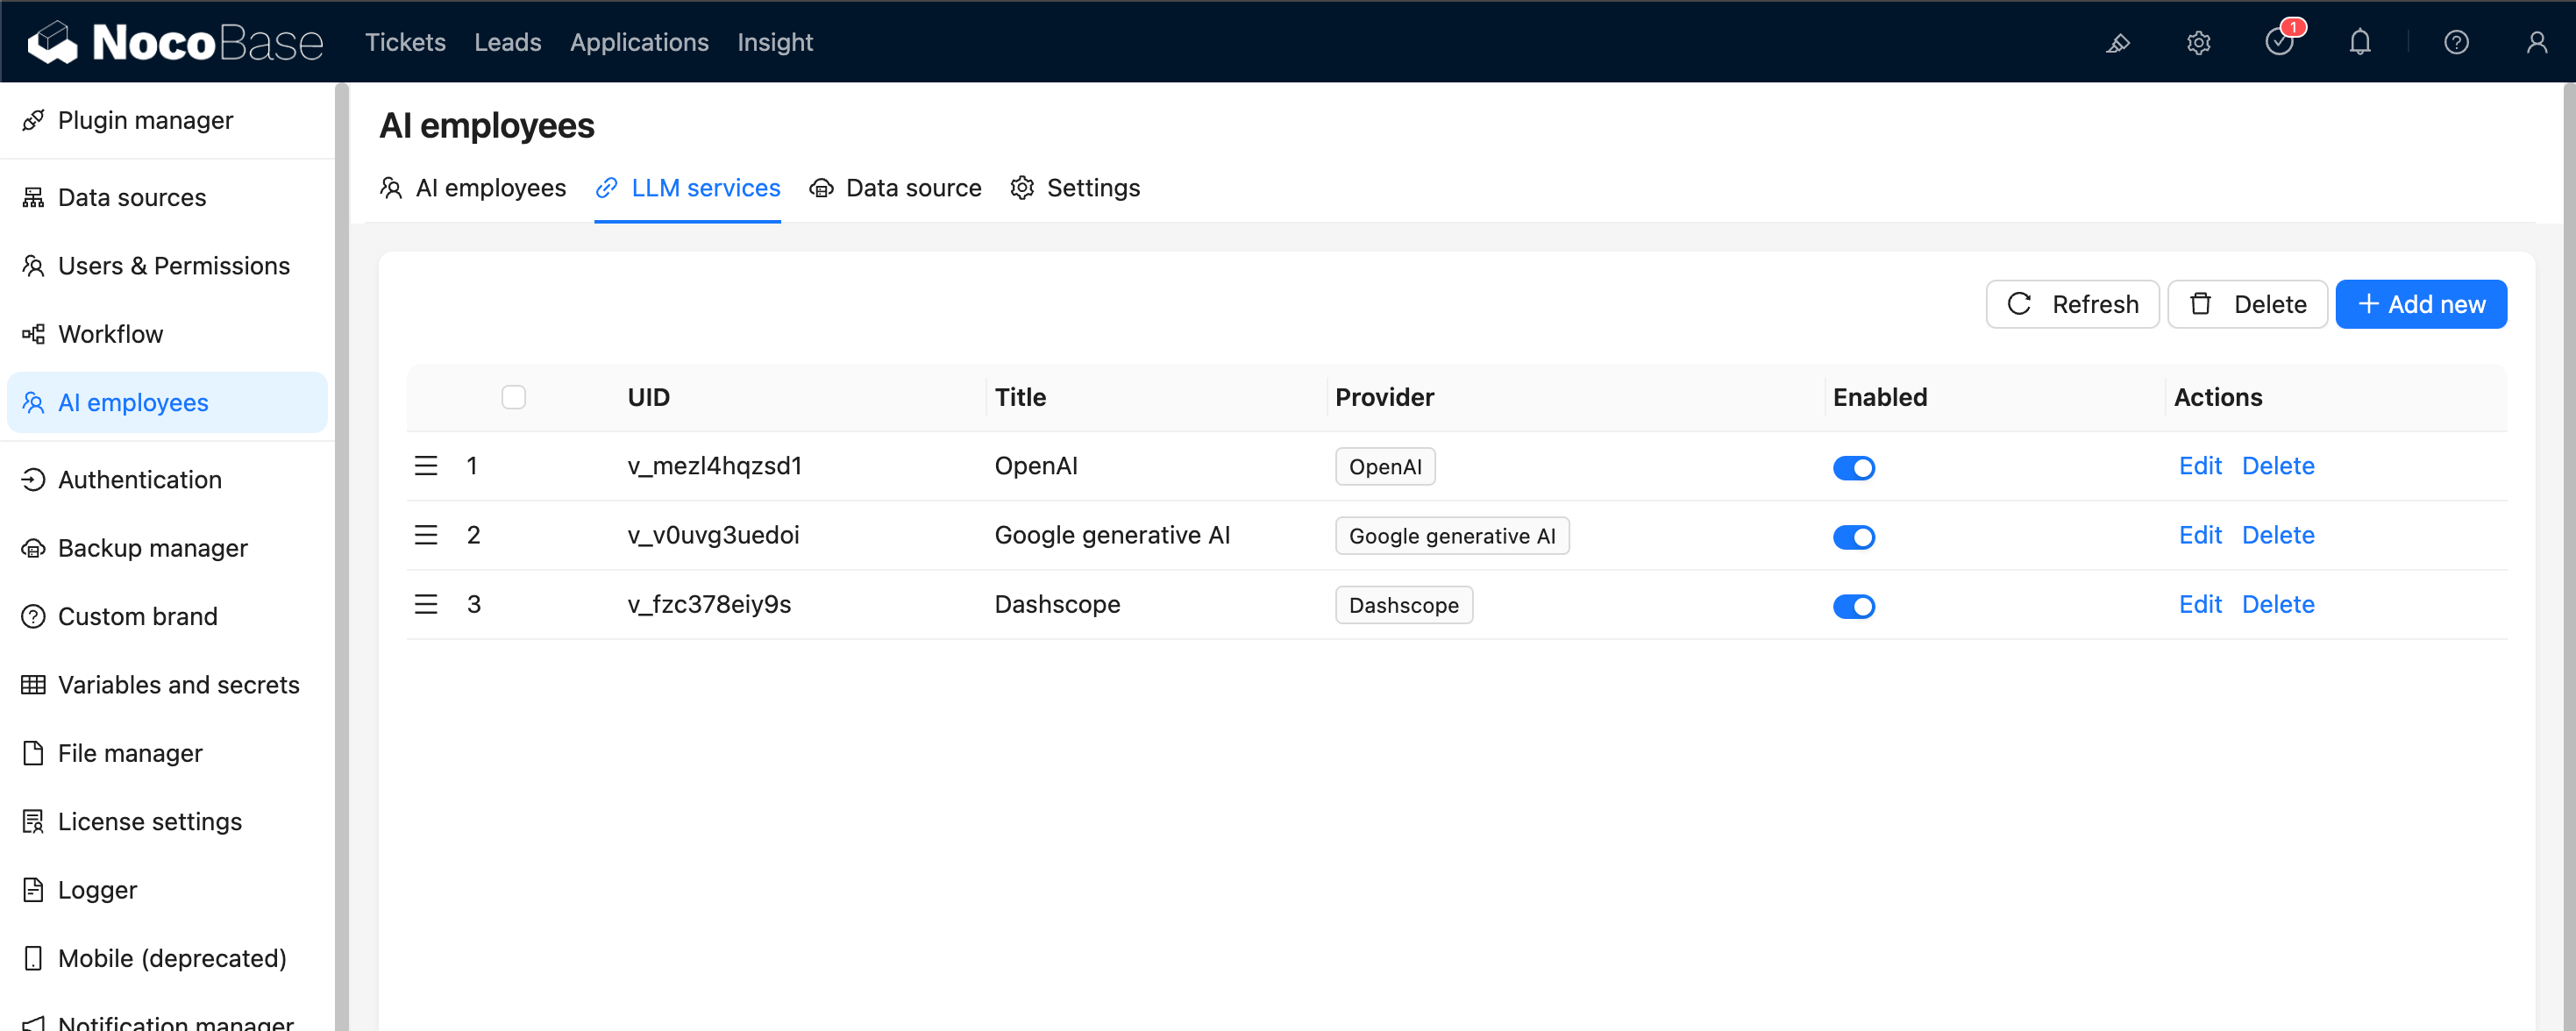
1. Open **System Settings / AI Employees / LLM service** (or go to `/admin/settings/ai/llm-services`)
|
|
123
|
+
|
|
124
|
+
|
|
125
|
+
|
|
126
|
+
2. The preloaded service list supports drag-to-reorder and an **Enabled** toggle
|
|
127
|
+
|
|
128
|
+
|
|
129
|
+
|
|
130
|
+
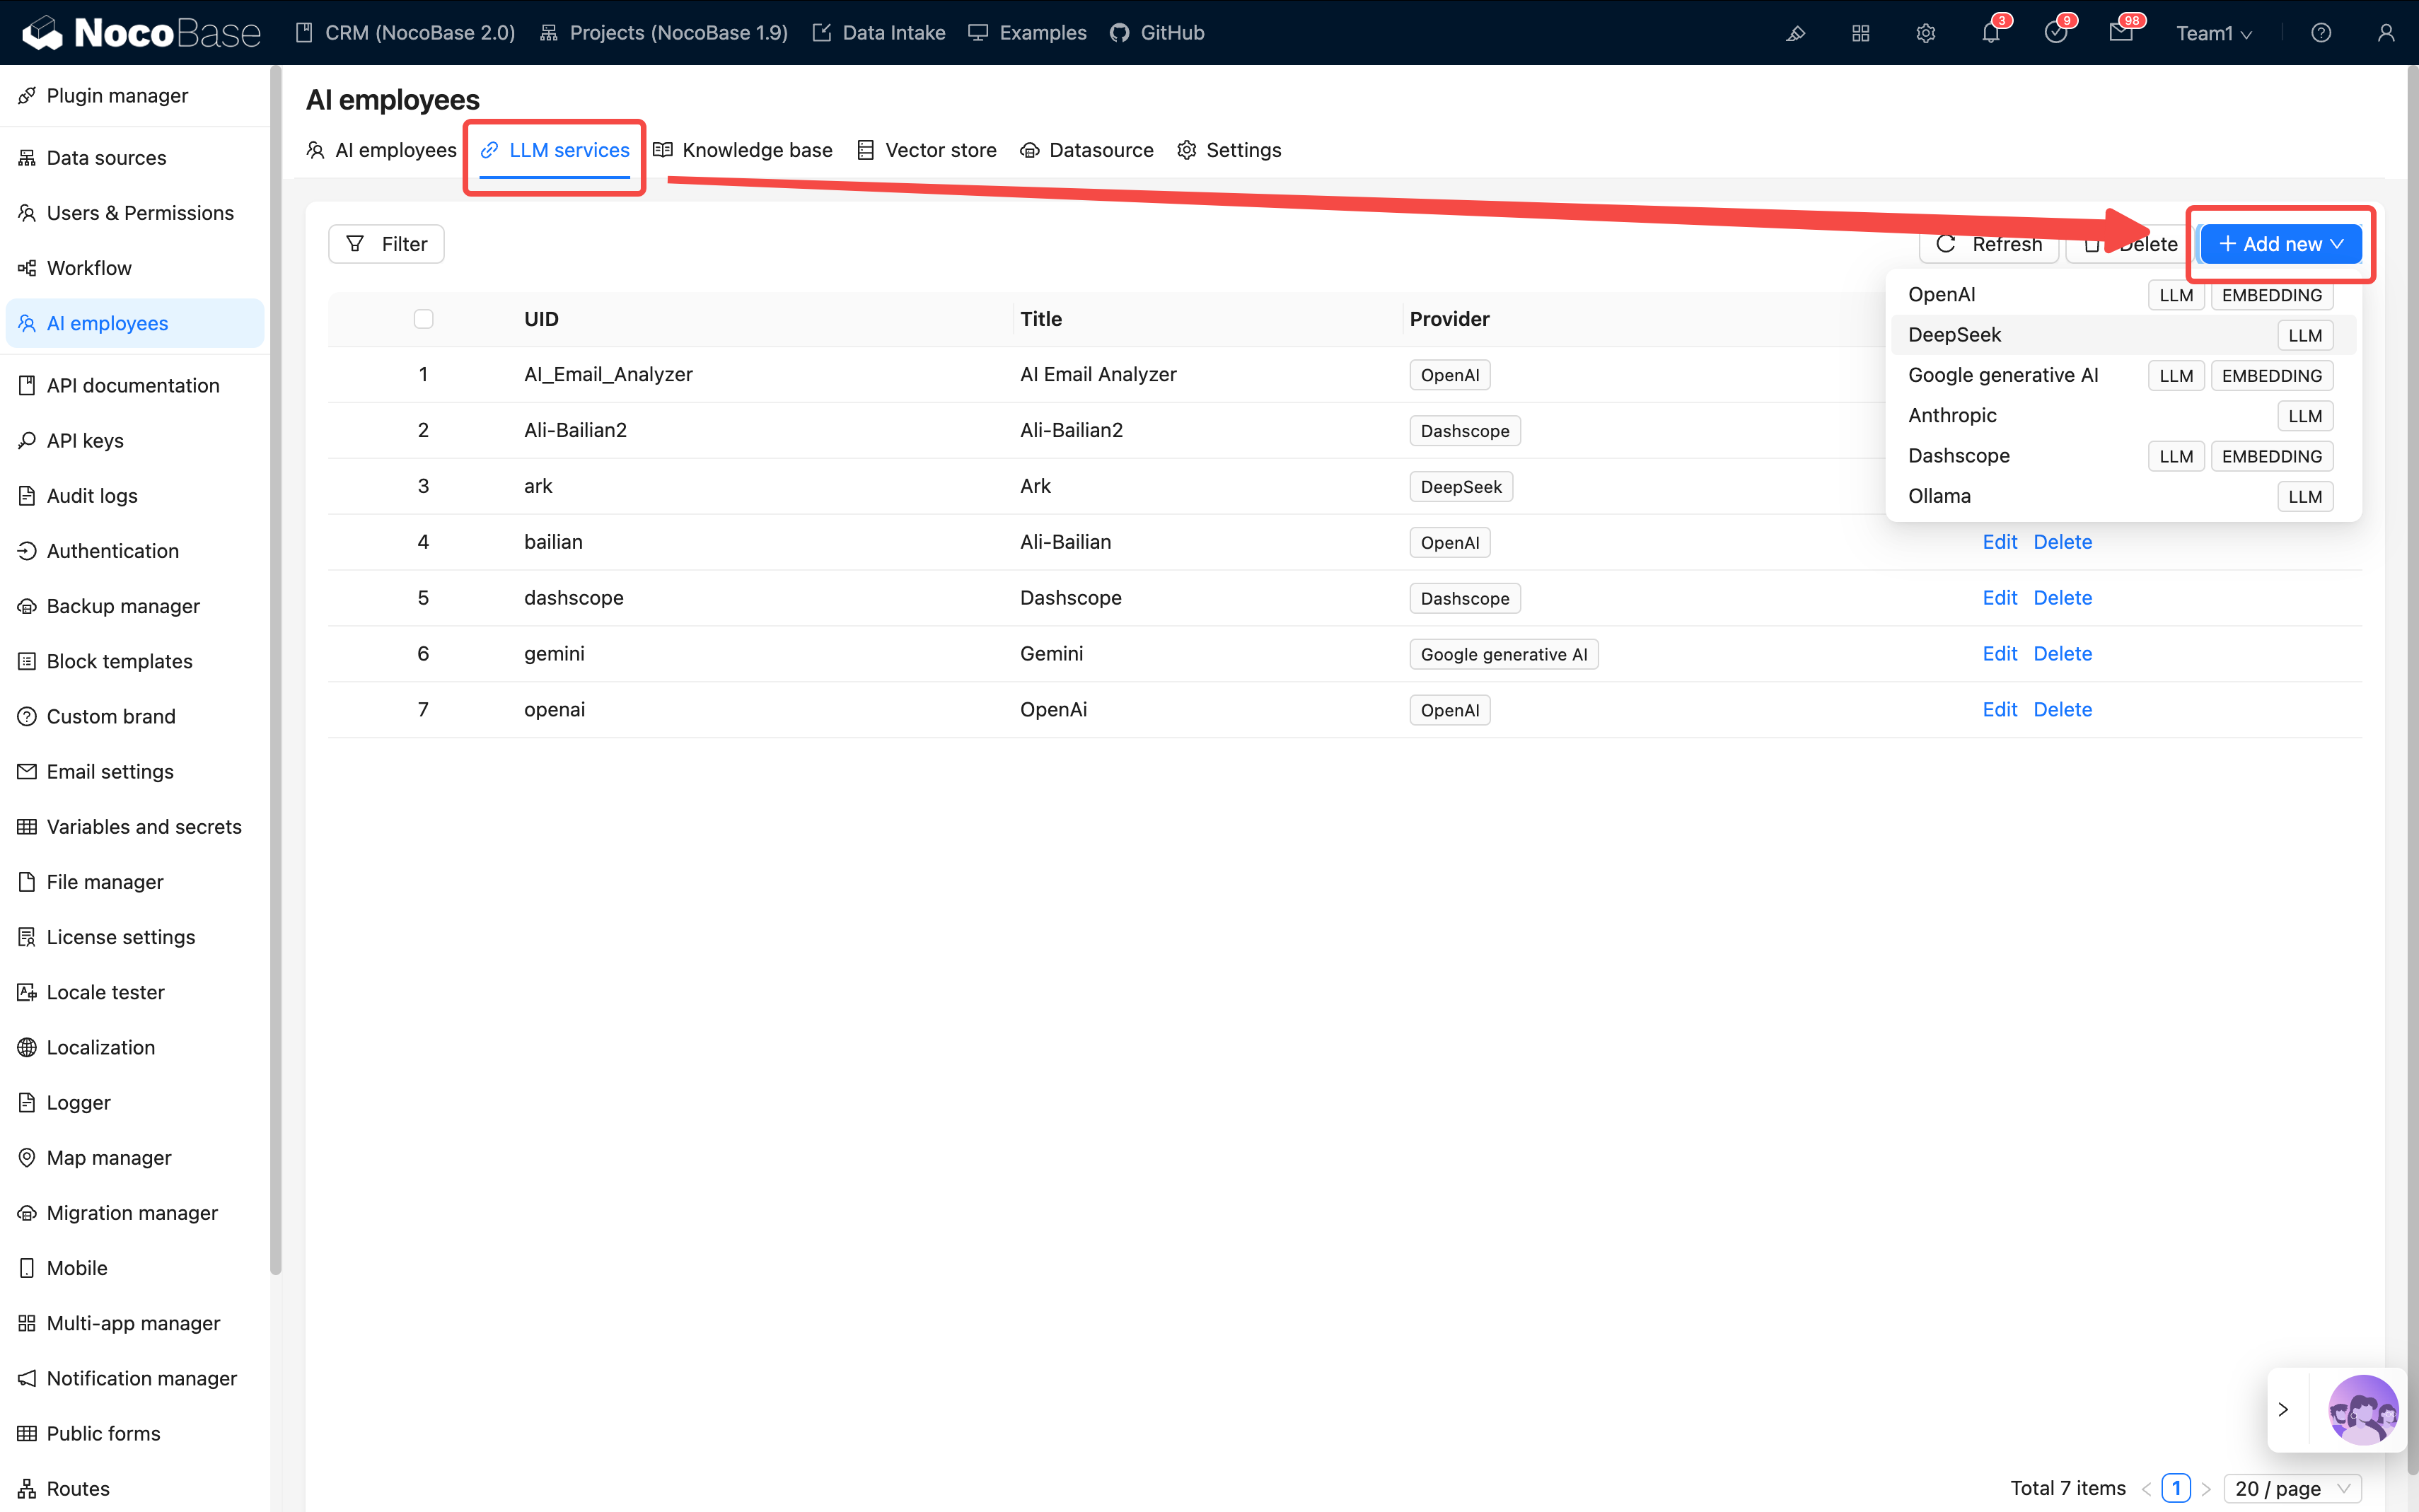
3. For each service you plan to use:
|
|
131
|
+
|
|
132
|
+
- Click **Edit**
|
|
133
|
+
- Replace **API Key** with your own (from the matching provider account: OpenAI, Anthropic, Google AI Studio, DeepSeek, Qwen, Kimi, etc.)
|
|
134
|
+
- Adjust **Base URL** if you use a proxy or a regional relay
|
|
135
|
+
- In **Enabled Models**, keep the models you need and remove the rest
|
|
136
|
+
|
|
137
|
+
|
|
138
|
+
|
|
139
|
+
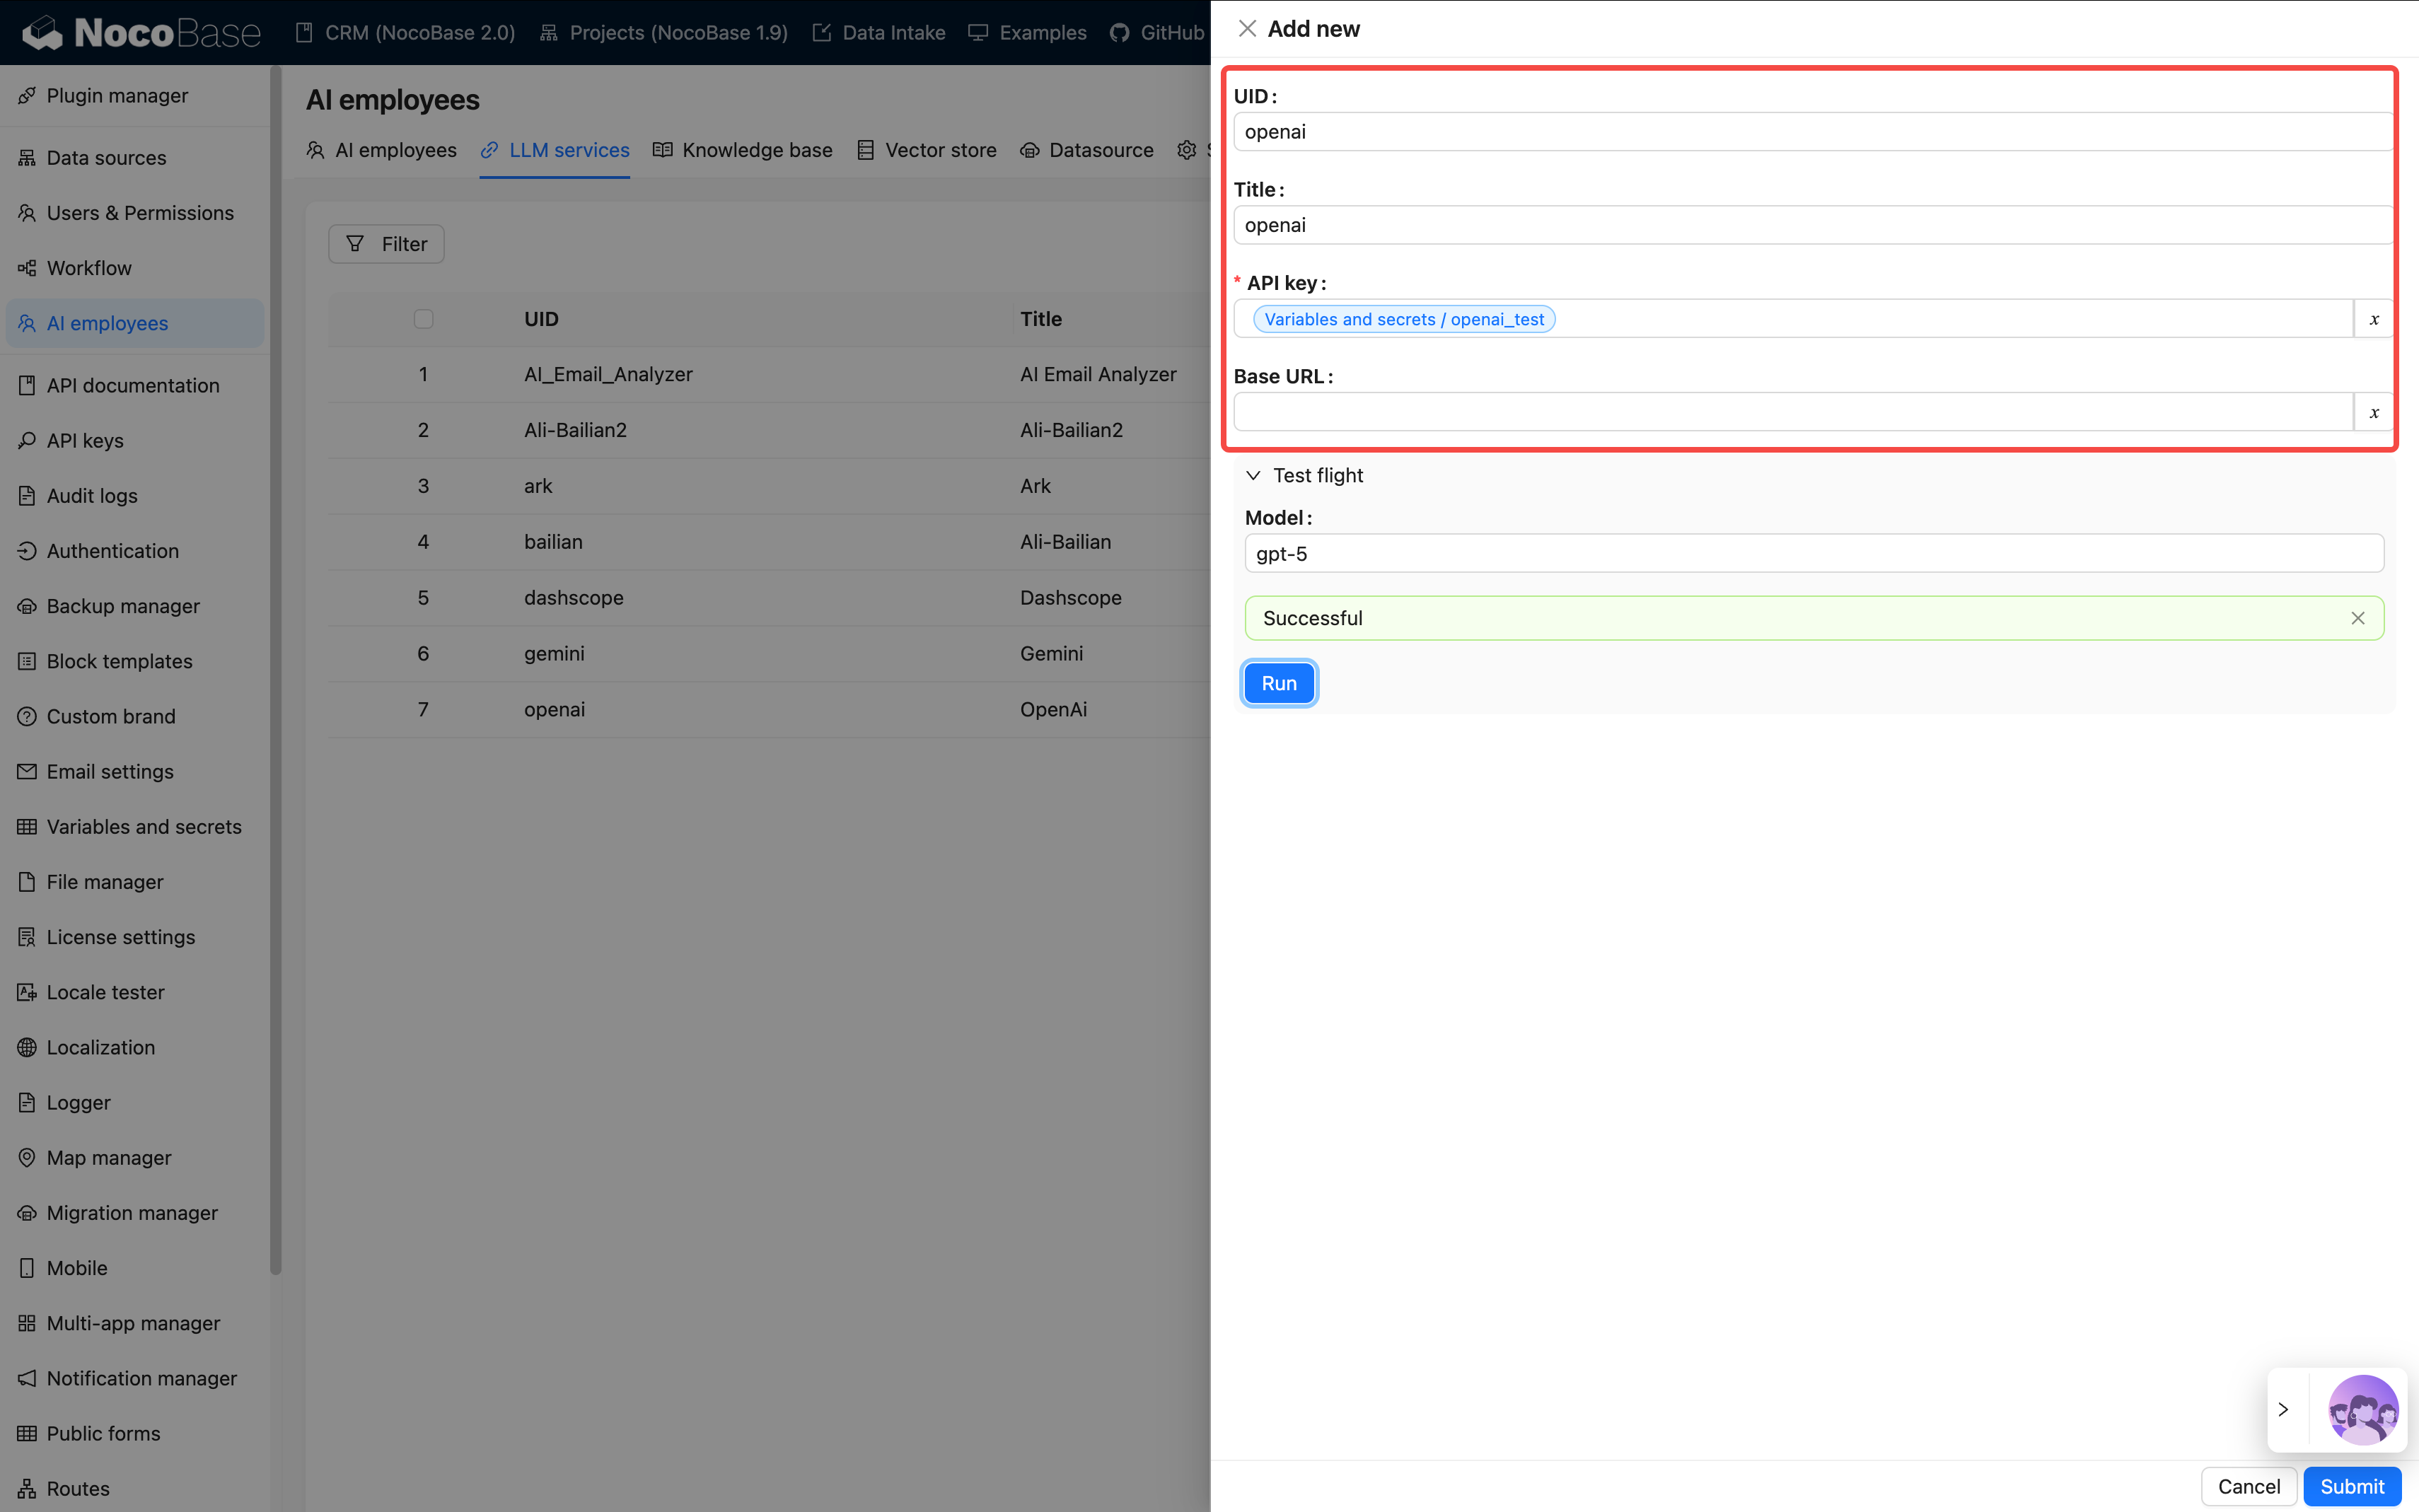
4. Click **Test flight** at the bottom to check connectivity, then **Submit** to save
|
|
140
|
+
|
|
141
|
+
|
|
142
|
+
|
|
143
|
+
5. For services you do not plan to use, just toggle **Disabled** — no need to delete
|
|
144
|
+
|
|
145
|
+
See [Configure LLM service](../../ai-employees/features/llm-service.md) for the full configuration.
|
|
146
|
+
|
|
147
|
+
:::tip
|
|
148
|
+
|
|
149
|
+
These two are the only must-change items after restoring the demo. Other settings (site logo, SMTP, Enterprise plugins, etc.) can be tuned as needed.
|
|
150
|
+
|
|
151
|
+
:::
|
|
152
|
+
|
|
153
|
+
---
|
|
154
|
+
|
|
155
|
+
## FAQ
|
|
156
|
+
|
|
157
|
+
### Will it work on the Community Edition? Any errors?
|
|
158
|
+
|
|
159
|
+
Yes, it works out of the box with no errors. Backup Manager has been open source since `v2.1.0-alpha.40`, so the Community Edition can install it. The demo does use some Enterprise plugins (Email Manager, Audit Log, AI Employees, etc.); on the Community Edition, the entry points for those features simply do not appear, but other modules are unaffected. For example, the Audit Log entry disappears, while CRM, Sales, Help Desk, Project, Asset, HR, and other core modules work normally.
|
|
160
|
+
|
|
161
|
+
### Which version should I use after restore?
|
|
162
|
+
|
|
163
|
+
Use the latest `alpha-full` image (`nocobase/nocobase:alpha-full`). The `full` image bundles the database client and other dependencies, avoiding restore failures caused by missing tools.
|
|
164
|
+
|
|
165
|
+
### The logo does not display after restore?
|
|
166
|
+
|
|
167
|
+
The logo in the official online demo has a domain restriction and cannot load on a local domain. Open **System Settings** and upload your own logo.
|
|
168
|
+
|
|
169
|
+
### File upload fails (OSS key error)?
|
|
170
|
+
|
|
171
|
+
The demo backup's preset storage engine points at our own OSS, and the key is not public. Open **Plugin Manager / File Manager**, set **Local Storage** as the default storage, save, and uploads will work again.
|
|
172
|
+
|
|
173
|
+
See the [File storage engine](#1-file-storage-engine-oss--local) section above for details.
|
|
174
|
+
|
|
175
|
+
### How do I switch languages?
|
|
176
|
+
|
|
177
|
+
The All-in-One solution ships with localization for 20+ languages (under the `nb_demo` namespace). After restore, the default language is Chinese; switch via **System Settings / enable the target language**.
|
|
178
|
+
|
|
179
|
+
### What about incremental upgrades?
|
|
180
|
+
|
|
181
|
+
Today the upgrade path is a full replacement, which means custom changes are overwritten. Always back up before upgrading. An incremental migration plan is in the works.
|
|
@@ -8,7 +8,6 @@ This page documents the update history for the CRM solution. New entries are add
|
|
|
8
8
|
|
|
9
9
|
**Backup files**:
|
|
10
10
|
- [nocobase_crm_v2_backup_260406.nbdata](https://static-docs.nocobase.com/nocobase_crm_v2_backup_260406.nbdata)
|
|
11
|
-
- [nocobase_crm_v2_sql_260406.zip](https://static-docs.nocobase.com/nocobase_crm_v2_sql_260406.zip)
|
|
12
11
|
|
|
13
12
|
**Changes**:
|
|
14
13
|
- Fixed table Summary aggregation display issue
|
|
@@ -24,7 +23,6 @@ This page documents the update history for the CRM solution. New entries are add
|
|
|
24
23
|
|
|
25
24
|
**Backup files**:
|
|
26
25
|
- [nocobase_crm_v2_backup_260327.nbdata](https://static-docs.nocobase.com/nocobase_crm_v2_backup_260327.nbdata)
|
|
27
|
-
- [nocobase_crm_v2_sql_260327.zip](https://static-docs.nocobase.com/nocobase_crm_v2_sql_260327.zip)
|
|
28
26
|
|
|
29
27
|
**Changes**:
|
|
30
28
|
|
|
@@ -52,7 +50,6 @@ This page documents the update history for the CRM solution. New entries are add
|
|
|
52
50
|
|
|
53
51
|
**Backup files**:
|
|
54
52
|
- nocobase_crm_v2_backup_260223.nbdata
|
|
55
|
-
- nocobase_crm_v2_sql_260223.zip
|
|
56
53
|
|
|
57
54
|
**Changes**:
|
|
58
55
|
- Initial release of CRM 2.0
|
|
@@ -2,15 +2,13 @@
|
|
|
2
2
|
|
|
3
3
|
> The current version is deployed via **backup and restore**. In future versions, we may switch to **incremental migration** to make it easier to integrate the solution into your existing systems.
|
|
4
4
|
|
|
5
|
-
|
|
5
|
+
> **The Backup Manager plugin is now open-source**: The "[Backup Manager](https://docs-cn.nocobase.com/handbook/backups)" plugin needed to restore the solution is now open-source and available to all editions (including the Community Edition). We recommend restoring directly via this plugin.
|
|
6
6
|
|
|
7
7
|
Before you begin, please ensure:
|
|
8
8
|
|
|
9
9
|
- You have a basic NocoBase running environment. For main system installation, please refer to the [official installation documentation](https://docs-cn.nocobase.com/welcome/getting-started/installation).
|
|
10
10
|
- NocoBase version **v2.1.0-beta.2 or above**.
|
|
11
|
-
- You have downloaded the
|
|
12
|
-
- **Backup file**: [nocobase_crm_v2_backup_260406.nbdata](https://static-docs.nocobase.com/nocobase_crm_v2_backup_260406.nbdata) - For Method 1
|
|
13
|
-
- **SQL file**: [nocobase_crm_v2_sql_260406.zip](https://static-docs.nocobase.com/nocobase_crm_v2_sql_260406.zip) - For Method 2
|
|
11
|
+
- You have downloaded the CRM system backup file: [nocobase_crm_v2_backup_260523.nbdata](https://static-docs.nocobase.com/nocobase_crm_v2_backup_260523.nbdata)
|
|
14
12
|
|
|
15
13
|
**Important Notes**:
|
|
16
14
|
- This solution is built on **PostgreSQL 16**. Please ensure your environment uses PostgreSQL 16.
|
|
@@ -18,9 +16,9 @@ Before you begin, please ensure:
|
|
|
18
16
|
|
|
19
17
|
---
|
|
20
18
|
|
|
21
|
-
##
|
|
19
|
+
## Restore Using Backup Manager
|
|
22
20
|
|
|
23
|
-
This method uses NocoBase's built-in "[Backup Manager](https://docs-cn.nocobase.com/handbook/backups)"
|
|
21
|
+
This method uses NocoBase's built-in "[Backup Manager](https://docs-cn.nocobase.com/handbook/backups)" plugin for one-click restoration. It is the simplest operation. This plugin is now open-source and available to all editions (including the Community Edition).
|
|
24
22
|
|
|
25
23
|
### Key Characteristics
|
|
26
24
|
|
|
@@ -28,9 +26,8 @@ This method uses NocoBase's built-in "[Backup Manager](https://docs-cn.nocobase.
|
|
|
28
26
|
1. **Convenient operation**: Completed within the UI, allowing for full restoration of all configurations including plugins.
|
|
29
27
|
2. **Complete restoration**: **Able to restore all system files**, including print template files and files uploaded via file fields in collections, ensuring full functional integrity.
|
|
30
28
|
* **Limitations**:
|
|
31
|
-
1. **
|
|
32
|
-
2. **
|
|
33
|
-
3. **Plugin dependency**: If the solution includes commercial plugins not present in your local environment, the restoration will fail.
|
|
29
|
+
1. **Strict environment requirements**: Requires your database environment (version, case sensitivity settings, etc.) to be highly compatible with the environment where the backup was created.
|
|
30
|
+
2. **Plugin dependency**: If the solution includes commercial plugins not present in your local environment, the restoration will fail.
|
|
34
31
|
|
|
35
32
|
### Steps
|
|
36
33
|
|
|
@@ -69,69 +66,6 @@ Then use this image to start your NocoBase service.
|
|
|
69
66
|
|
|
70
67
|
---
|
|
71
68
|
|
|
72
|
-
## Method 2: Direct SQL File Import (Universal, Better for Community Edition)
|
|
73
|
-
|
|
74
|
-
This method restores data by directly operating on the database, bypassing the "Backup Manager" plugin, and therefore has no Pro/Enterprise Edition restrictions.
|
|
75
|
-
|
|
76
|
-
### Key Characteristics
|
|
77
|
-
|
|
78
|
-
* **Advantages**:
|
|
79
|
-
1. **No edition restrictions**: Suitable for all NocoBase users, including Community Edition.
|
|
80
|
-
2. **High compatibility**: Does not rely on the `dump` tool within the application; as long as you can connect to the database, you can operate.
|
|
81
|
-
3. **High fault tolerance**: If the solution includes commercial plugins you do not have, the related features will not be enabled, but it will not affect the normal use of other features, and the application can start successfully.
|
|
82
|
-
* **Limitations**:
|
|
83
|
-
1. **Requires database operation skills**: Users need basic database operation skills, such as how to execute a `.sql` file.
|
|
84
|
-
2. **System file loss**: **This method will lose all system files**, including print template files and files uploaded via file fields in collections.
|
|
85
|
-
|
|
86
|
-
### Steps
|
|
87
|
-
|
|
88
|
-
**Step 1: Prepare a clean database**
|
|
89
|
-
|
|
90
|
-
Prepare a brand new, empty database for the data you are about to import.
|
|
91
|
-
|
|
92
|
-
**Step 2: Import the `.sql` file into the database**
|
|
93
|
-
|
|
94
|
-
Obtain the downloaded database file (usually in `.sql` format) and import its content into the database you prepared in the previous step. There are several ways to execute this, depending on your environment:
|
|
95
|
-
|
|
96
|
-
* **Option A: Via server command line (using Docker as an example)**
|
|
97
|
-
If you use Docker to install NocoBase and the database, you can upload the `.sql` file to the server and then use the `docker exec` command to perform the import. Assuming your PostgreSQL container is named `my-nocobase-db` and the filename is `nocobase_crm_v2_sql_260327.sql`:
|
|
98
|
-
|
|
99
|
-
```bash
|
|
100
|
-
# Copy the sql file into the container
|
|
101
|
-
docker cp nocobase_crm_v2_sql_260327.sql my-nocobase-db:/tmp/
|
|
102
|
-
# Enter the container and execute the import command
|
|
103
|
-
docker exec -it my-nocobase-db psql -U nocobase -d nocobase -f /tmp/nocobase_crm_v2_sql_260327.sql
|
|
104
|
-
```
|
|
105
|
-
* **Option B: Via a remote database client (Navicat, etc.)**
|
|
106
|
-
If your database port is exposed, you can use any graphical database client (such as Navicat, DBeaver, pgAdmin, etc.) to connect to the database, then:
|
|
107
|
-
1. Right-click the target database.
|
|
108
|
-
2. Select "Run SQL File" or "Execute SQL Script".
|
|
109
|
-
3. Select the downloaded `.sql` file and execute.
|
|
110
|
-
|
|
111
|
-
**Step 3: Connect to the database and start the application**
|
|
112
|
-
|
|
113
|
-
Configure your NocoBase startup parameters (such as environment variables `DB_HOST`, `DB_PORT`, `DB_DATABASE`, `DB_USER`, `DB_PASSWORD`, etc.) to point to the database where you just imported the data. Then, start the NocoBase service normally.
|
|
114
|
-
|
|
115
|
-
### Notes
|
|
116
|
-
|
|
117
|
-
* **Database permissions**: This method requires you to have an account and password that can directly operate on the database.
|
|
118
|
-
* **Plugin status**: After a successful import, although the data for commercial plugins included in the system exists, if you have not installed and enabled the corresponding plugins locally, the related features will not be displayed or usable, but this will not cause the application to crash.
|
|
119
|
-
|
|
120
|
-
---
|
|
121
|
-
|
|
122
|
-
## Summary and Comparison
|
|
123
|
-
|
|
124
|
-
| Feature | Method 1: Backup Manager | Method 2: Direct SQL Import |
|
|
125
|
-
| :-------------- | :--------------------------------------------------------------- | :----------------------------------------------------------------------------------------------------- |
|
|
126
|
-
| **Applicable Users** | **Pro/Enterprise Edition** users | **All users** (including Community Edition) |
|
|
127
|
-
| **Ease of Use** | ⭐⭐⭐⭐⭐ (Very simple, UI operation) | ⭐⭐⭐ (Requires basic database knowledge) |
|
|
128
|
-
| **Environment Requirements** | **Strict**, database and system versions must be highly compatible | **General**, requires database compatibility |
|
|
129
|
-
| **Plugin Dependency** | **Strong dependency**, plugins are validated during restoration; missing any plugin will cause **restoration failure**. | **Features strongly depend on plugins**. Data can be imported independently, and the system will have basic functionality. However, if corresponding plugins are missing, related features will be **completely unusable**. |
|
|
130
|
-
| **System Files** | **Fully preserved** (print templates, uploaded files, etc.) | **Will be lost** (print templates, uploaded files, etc.) |
|
|
131
|
-
| **Recommended Scenarios** | Enterprise users with controlled, consistent environments needing full functionality | Missing some plugins, seeking high compatibility and flexibility, non-Pro/Enterprise users, or those who can accept the loss of file features |
|
|
132
|
-
|
|
133
|
-
---
|
|
134
|
-
|
|
135
69
|
## FAQ
|
|
136
70
|
|
|
137
71
|
### Can Pro Edition users install this? Will it cause errors?
|
|
@@ -146,10 +80,6 @@ We recommend the latest `beta-full` image (e.g., `nocobase/nocobase:beta-full`).
|
|
|
146
80
|
|
|
147
81
|
The demo's logo is configured with a domain restriction and cannot load on local domains. Go to **System Settings** and re-upload your own logo.
|
|
148
82
|
|
|
149
|
-
### File upload error (OSS Key error)?
|
|
150
|
-
|
|
151
|
-
After SQL import, file uploads may fail with an OSS-related error. Solution: go to **Plugin Manager → File Manager**, set **Local Storage** as the default storage, and save. Uploads will work normally after this.
|
|
152
|
-
|
|
153
83
|
### What about incremental upgrades?
|
|
154
84
|
|
|
155
85
|
Currently, version upgrades are full replacements — your custom modifications will be overwritten. Always back up before upgrading. An incremental migration solution is being planned and will prioritize Pro/Enterprise editions. Community edition support is more difficult due to the lack of the migration management plugin.
|
|
@@ -21,13 +21,13 @@ The legacy CRM includes the following functional modules:
|
|
|
21
21
|
|
|
22
22
|
> The current version is deployed via backup and restoration.
|
|
23
23
|
|
|
24
|
+
> **The Backup Manager plugin is now open-source**: The "[Backup Manager](https://docs.nocobase.com/handbook/backups)" plugin needed to restore the solution is now open-source and available to all editions (including the Community Edition). We recommend restoring directly via this plugin.
|
|
25
|
+
|
|
24
26
|
Before you begin, please ensure:
|
|
25
27
|
|
|
26
28
|
- You have a basic NocoBase runtime environment. For main system installation, please refer to the detailed [Official Installation Documentation](https://docs.nocobase.com/welcome/getting-started/installation).
|
|
27
29
|
- NocoBase version **v2.1.0-beta.2 or higher**.
|
|
28
|
-
- You have downloaded the
|
|
29
|
-
- **Backup file**: [nocobase_crm_v1_backup_260224.nbdata](https://static-docs.nocobase.com/nocobase_crm_v1_backup_260224.nbdata) — Applicable to Method 1.
|
|
30
|
-
- **SQL file**: [nocobase_crm_v1_sql_260224.zip](https://static-docs.nocobase.com/nocobase_crm_v1_sql_260224.zip) — Applicable to Method 2.
|
|
30
|
+
- You have downloaded the CRM v1 backup file: [nocobase_crm_v1_backup_260224.nbdata](https://static-docs.nocobase.com/nocobase_crm_v1_backup_260224.nbdata)
|
|
31
31
|
|
|
32
32
|
**Important Notes**:
|
|
33
33
|
- This solution is based on the **PostgreSQL 16** database. Please ensure your environment uses PostgreSQL 16.
|
|
@@ -35,9 +35,9 @@ Before you begin, please ensure:
|
|
|
35
35
|
|
|
36
36
|
---
|
|
37
37
|
|
|
38
|
-
##
|
|
38
|
+
## Restore using Backup Manager
|
|
39
39
|
|
|
40
|
-
This method uses the built-in "**Backup Manager**"
|
|
40
|
+
This method uses the built-in "**Backup Manager**" plugin for one-click restoration, which is the simplest approach. This plugin is now open-source and available to all editions (including the Community Edition).
|
|
41
41
|
|
|
42
42
|
### Steps
|
|
43
43
|
|
|
@@ -57,34 +57,5 @@ This method uses the built-in "**Backup Manager**" (Pro/Enterprise) plugin for o
|
|
|
57
57
|
|
|
58
58
|
### Notes
|
|
59
59
|
|
|
60
|
-
* **
|
|
60
|
+
* **Database Compatibility**: Your PostgreSQL version, character set, and case sensitivity settings must match the backup source file.
|
|
61
61
|
* **Commercial Plugin Compatibility**: Please ensure you have obtained and enabled the commercial plugins required for this solution.
|
|
62
|
-
|
|
63
|
-
---
|
|
64
|
-
|
|
65
|
-
## Method 2: Import SQL file directly (General)
|
|
66
|
-
|
|
67
|
-
This method restores data by directly operating on the database and is applicable to all NocoBase users.
|
|
68
|
-
|
|
69
|
-
### Steps
|
|
70
|
-
|
|
71
|
-
**Step 1: Prepare a clean database**
|
|
72
|
-
|
|
73
|
-
Prepare a brand new, empty database for the data you are about to import.
|
|
74
|
-
|
|
75
|
-
**Step 2: Import the `.sql` file into the database**
|
|
76
|
-
|
|
77
|
-
* **Via Command Line (Docker Example)**:
|
|
78
|
-
|
|
79
|
-
```bash
|
|
80
|
-
# Copy the sql file into the container
|
|
81
|
-
docker cp nocobase_crm_v1_sql_260224.sql my-nocobase-db:/tmp/
|
|
82
|
-
# Enter the container and execute the import command
|
|
83
|
-
docker exec -it my-nocobase-db psql -U nocobase -d nocobase -f /tmp/nocobase_crm_v1_sql_260224.sql
|
|
84
|
-
```
|
|
85
|
-
|
|
86
|
-
* **Via Database Client**: Use tools like DBeaver, Navicat, or pgAdmin to connect to the database and execute the SQL file.
|
|
87
|
-
|
|
88
|
-
**Step 3: Connect to the database and start the application**
|
|
89
|
-
|
|
90
|
-
Configure NocoBase startup parameters to point to the database where the data was imported, then start the service.
|
|
@@ -8,7 +8,6 @@ This page documents the update history for the Ticketing System solution. New en
|
|
|
8
8
|
|
|
9
9
|
**Backup files**:
|
|
10
10
|
- [nocobase_tickets_v2_backup_260324.nbdata](https://static-docs.nocobase.com/nocobase_tickets_v2_backup_260324.nbdata)
|
|
11
|
-
- [nocobase_tickets_v2_sql_260324.zip](https://static-docs.nocobase.com/nocobase_tickets_v2_sql_260324.zip)
|
|
12
11
|
|
|
13
12
|
**Changes**:
|
|
14
13
|
- Fixed error "SLA Config not found" when marking a ticket as completed
|
|
@@ -21,7 +20,6 @@ This page documents the update history for the Ticketing System solution. New en
|
|
|
21
20
|
|
|
22
21
|
**Backup files**:
|
|
23
22
|
- nocobase_tts_v2_backup_260302.nbdata
|
|
24
|
-
- nocobase_tts_v2_sql_260302.zip
|
|
25
23
|
|
|
26
24
|
**Changes**:
|
|
27
25
|
- Initial release of Ticketing System v2
|
|
@@ -2,15 +2,13 @@
|
|
|
2
2
|
|
|
3
3
|
> The current version uses **backup and restoration** for deployment. In future versions, we may switch to **incremental migration** to facilitate the integration of the solution into your existing systems.
|
|
4
4
|
|
|
5
|
-
|
|
5
|
+
> **The Backup Manager plugin is now open-source**: The "[Backup Manager](https://docs.nocobase.com/handbook/backups)" plugin needed to restore the solution is now open-source and available to all editions (including the Community Edition). We recommend restoring directly via this plugin.
|
|
6
6
|
|
|
7
7
|
Before you begin, please ensure:
|
|
8
8
|
|
|
9
9
|
- You already have a basic NocoBase running environment. For main system installation, please refer to the detailed [official installation documentation](https://docs.nocobase.com/welcome/getting-started/installation).
|
|
10
10
|
- NocoBase version **2.0.0-beta.5 and above**.
|
|
11
|
-
- You have downloaded the
|
|
12
|
-
- **Backup file**: [nocobase_tickets_v2_backup_260324.nbdata](https://static-docs.nocobase.com/nocobase_tickets_v2_backup_260324.nbdata) - For Method 1
|
|
13
|
-
- **SQL file**: [nocobase_tickets_v2_sql_260324.zip](https://static-docs.nocobase.com/nocobase_tickets_v2_sql_260324.zip) - For Method 2
|
|
11
|
+
- You have downloaded the ticketing system backup file: [nocobase_tickets_v2_backup_260324.nbdata](https://static-docs.nocobase.com/nocobase_tickets_v2_backup_260324.nbdata)
|
|
14
12
|
|
|
15
13
|
**Important Notes**:
|
|
16
14
|
- This solution is built on **PostgreSQL 16**. Please ensure your environment uses PostgreSQL 16.
|
|
@@ -18,9 +16,9 @@ Before you begin, please ensure:
|
|
|
18
16
|
|
|
19
17
|
---
|
|
20
18
|
|
|
21
|
-
##
|
|
19
|
+
## Restore Using Backup Manager
|
|
22
20
|
|
|
23
|
-
This method uses the built-in "[Backup Manager](https://docs.nocobase.com/handbook/backups)"
|
|
21
|
+
This method uses the built-in "[Backup Manager](https://docs.nocobase.com/handbook/backups)" plugin for one-click restoration, which is the simplest operation. This plugin is now open-source and available to all editions (including the Community Edition).
|
|
24
22
|
|
|
25
23
|
### Core Features
|
|
26
24
|
|
|
@@ -28,9 +26,8 @@ This method uses the built-in "[Backup Manager](https://docs.nocobase.com/handbo
|
|
|
28
26
|
1. **Convenient Operation**: Can be completed via the UI, allowing for full restoration of all configurations, including plugins.
|
|
29
27
|
2. **Complete Restoration**: **Able to restore all system files**, including print templates, files uploaded to attachment fields, etc., ensuring full functionality.
|
|
30
28
|
* **Limitations**:
|
|
31
|
-
1. **
|
|
32
|
-
2. **
|
|
33
|
-
3. **Plugin Dependencies**: If the solution includes commercial plugins not present in your local environment, the restoration will fail.
|
|
29
|
+
1. **Strict Environment Requirements**: Requires your database environment (version, case sensitivity, etc.) to be highly compatible with the environment where the backup was created.
|
|
30
|
+
2. **Plugin Dependencies**: If the solution includes commercial plugins not present in your local environment, the restoration will fail.
|
|
34
31
|
|
|
35
32
|
### Steps
|
|
36
33
|
|
|
@@ -67,66 +64,6 @@ Then use this image to start your NocoBase service.
|
|
|
67
64
|
* **Database Compatibility**: This is the most critical point for this method. Your PostgreSQL database **version, character set, and case sensitivity settings** must match the backup source file. In particular, the `schema` name must be consistent.
|
|
68
65
|
* **Commercial Plugin Matching**: Please ensure you have and have enabled all commercial plugins required by the solution, otherwise the restoration will be interrupted.
|
|
69
66
|
|
|
70
|
-
---
|
|
71
|
-
|
|
72
|
-
## Method 2: Direct SQL File Import (Universal, More Suitable for Community Edition)
|
|
73
|
-
|
|
74
|
-
This method restores data by directly operating the database, bypassing the "Backup Manager" plugin, and therefore has no Pro/Enterprise plugin restrictions.
|
|
75
|
-
|
|
76
|
-
### Core Features
|
|
77
|
-
|
|
78
|
-
* **Advantages**:
|
|
79
|
-
1. **No Version Restrictions**: Applicable to all NocoBase users, including the Community Edition.
|
|
80
|
-
2. **High Compatibility**: Does not depend on the application's `dump` tool; it works as long as you can connect to the database.
|
|
81
|
-
3. **High Fault Tolerance**: If the solution contains commercial plugins you do not have, the related features will not be enabled, but this will not affect other functions, and the application can start successfully.
|
|
82
|
-
* **Limitations**:
|
|
83
|
-
1. **Requires Database Operation Skills**: Users need basic database operation skills, such as how to execute a `.sql` file.
|
|
84
|
-
2. **System Files Lost**: **This method will lose all system files**, including print templates, files uploaded to attachment fields, etc.
|
|
85
|
-
|
|
86
|
-
### Steps
|
|
87
|
-
|
|
88
|
-
**Step 1: Prepare a clean database**
|
|
89
|
-
|
|
90
|
-
Prepare a brand new, empty database for the data you are about to import.
|
|
91
|
-
|
|
92
|
-
**Step 2: Import the `.sql` file into the database**
|
|
93
|
-
|
|
94
|
-
Get the downloaded database file (usually in `.sql` format) and import its contents into the database prepared in the previous step. There are several ways to do this, depending on your environment:
|
|
95
|
-
|
|
96
|
-
* **Option A: Via server command line (Docker example)**
|
|
97
|
-
If you use Docker to install NocoBase and the database, you can upload the `.sql` file to the server and use the `docker exec` command to perform the import. Assuming your PostgreSQL container is named `my-nocobase-db` and the file is named `ticket_system.sql`:
|
|
98
|
-
|
|
99
|
-
```bash
|
|
100
|
-
# Copy the sql file into the container
|
|
101
|
-
docker cp ticket_system.sql my-nocobase-db:/tmp/
|
|
102
|
-
# Enter the container and execute the import command
|
|
103
|
-
docker exec -it my-nocobase-db psql -U your_username -d your_database_name -f /tmp/ticket_system.sql
|
|
104
|
-
```
|
|
105
|
-
* **Option B: Via remote database client**
|
|
106
|
-
If your database port is exposed, you can use any graphical database client (such as DBeaver, Navicat, pgAdmin, etc.) to connect to the database, open a new query window, paste the entire contents of the `.sql` file, and execute it.
|
|
107
|
-
|
|
108
|
-
**Step 3: Connect to the database and start the application**
|
|
109
|
-
|
|
110
|
-
Configure your NocoBase startup parameters (such as environment variables `DB_HOST`, `DB_PORT`, `DB_DATABASE`, `DB_USER`, `DB_PASSWORD`, etc.) to point to the database where you just imported the data. Then, start the NocoBase service normally.
|
|
111
|
-
|
|
112
|
-
### Notes
|
|
113
|
-
|
|
114
|
-
* **Database Permissions**: This method requires an account and password with permissions to directly operate the database.
|
|
115
|
-
* **Plugin Status**: After a successful import, although the commercial plugin data exists in the system, if you have not installed and enabled the corresponding plugins locally, the related features will not be displayed or usable, but this will not cause the application to crash.
|
|
116
|
-
|
|
117
|
-
---
|
|
118
|
-
|
|
119
|
-
## Summary and Comparison
|
|
120
|
-
|
|
121
|
-
| Feature | Method 1: Backup Manager | Method 2: Direct SQL Import |
|
|
122
|
-
| :-------------- | :--------------------------------------------------------------- | :----------------------------------------------------------------------------------------------------- |
|
|
123
|
-
| **Target Users** | **Pro/Enterprise** users | **All users** (including Community Edition) |
|
|
124
|
-
| **Ease of Use** | ⭐⭐⭐⭐⭐ (Very simple, UI operation) | ⭐⭐⭐ (Requires basic database knowledge) |
|
|
125
|
-
| **Environment Requirements** | **Strict**, database and system versions must be highly compatible | **General**, requires database compatibility |
|
|
126
|
-
| **Plugin Dependencies** | **Strong dependency**, plugins are verified during restoration; missing any plugin will cause **restoration failure**. | **Features depend on plugins**. Data can be imported independently, and the system will have basic functionality. However, if corresponding plugins are missing, related features will be **completely unusable**. |
|
|
127
|
-
| **System Files** | **Fully preserved** (print templates, uploaded files, etc.) | **Will be lost** (print templates, uploaded files, etc.) |
|
|
128
|
-
| **Recommended Scenarios** | Enterprise users with a controlled, consistent environment who need complete functionality | Missing some plugins, seeking high compatibility and flexibility, non-Pro/Enterprise users, can accept the loss of file-related functions |
|
|
129
|
-
|
|
130
67
|
We hope this tutorial helps you successfully deploy the ticketing system. If you encounter any issues during the process, please feel free to contact us!
|
|
131
68
|
---
|
|
132
69
|
|
|
@@ -1,5 +1,49 @@
|
|
|
1
1
|
# Advanced Configuration
|
|
2
2
|
|
|
3
|
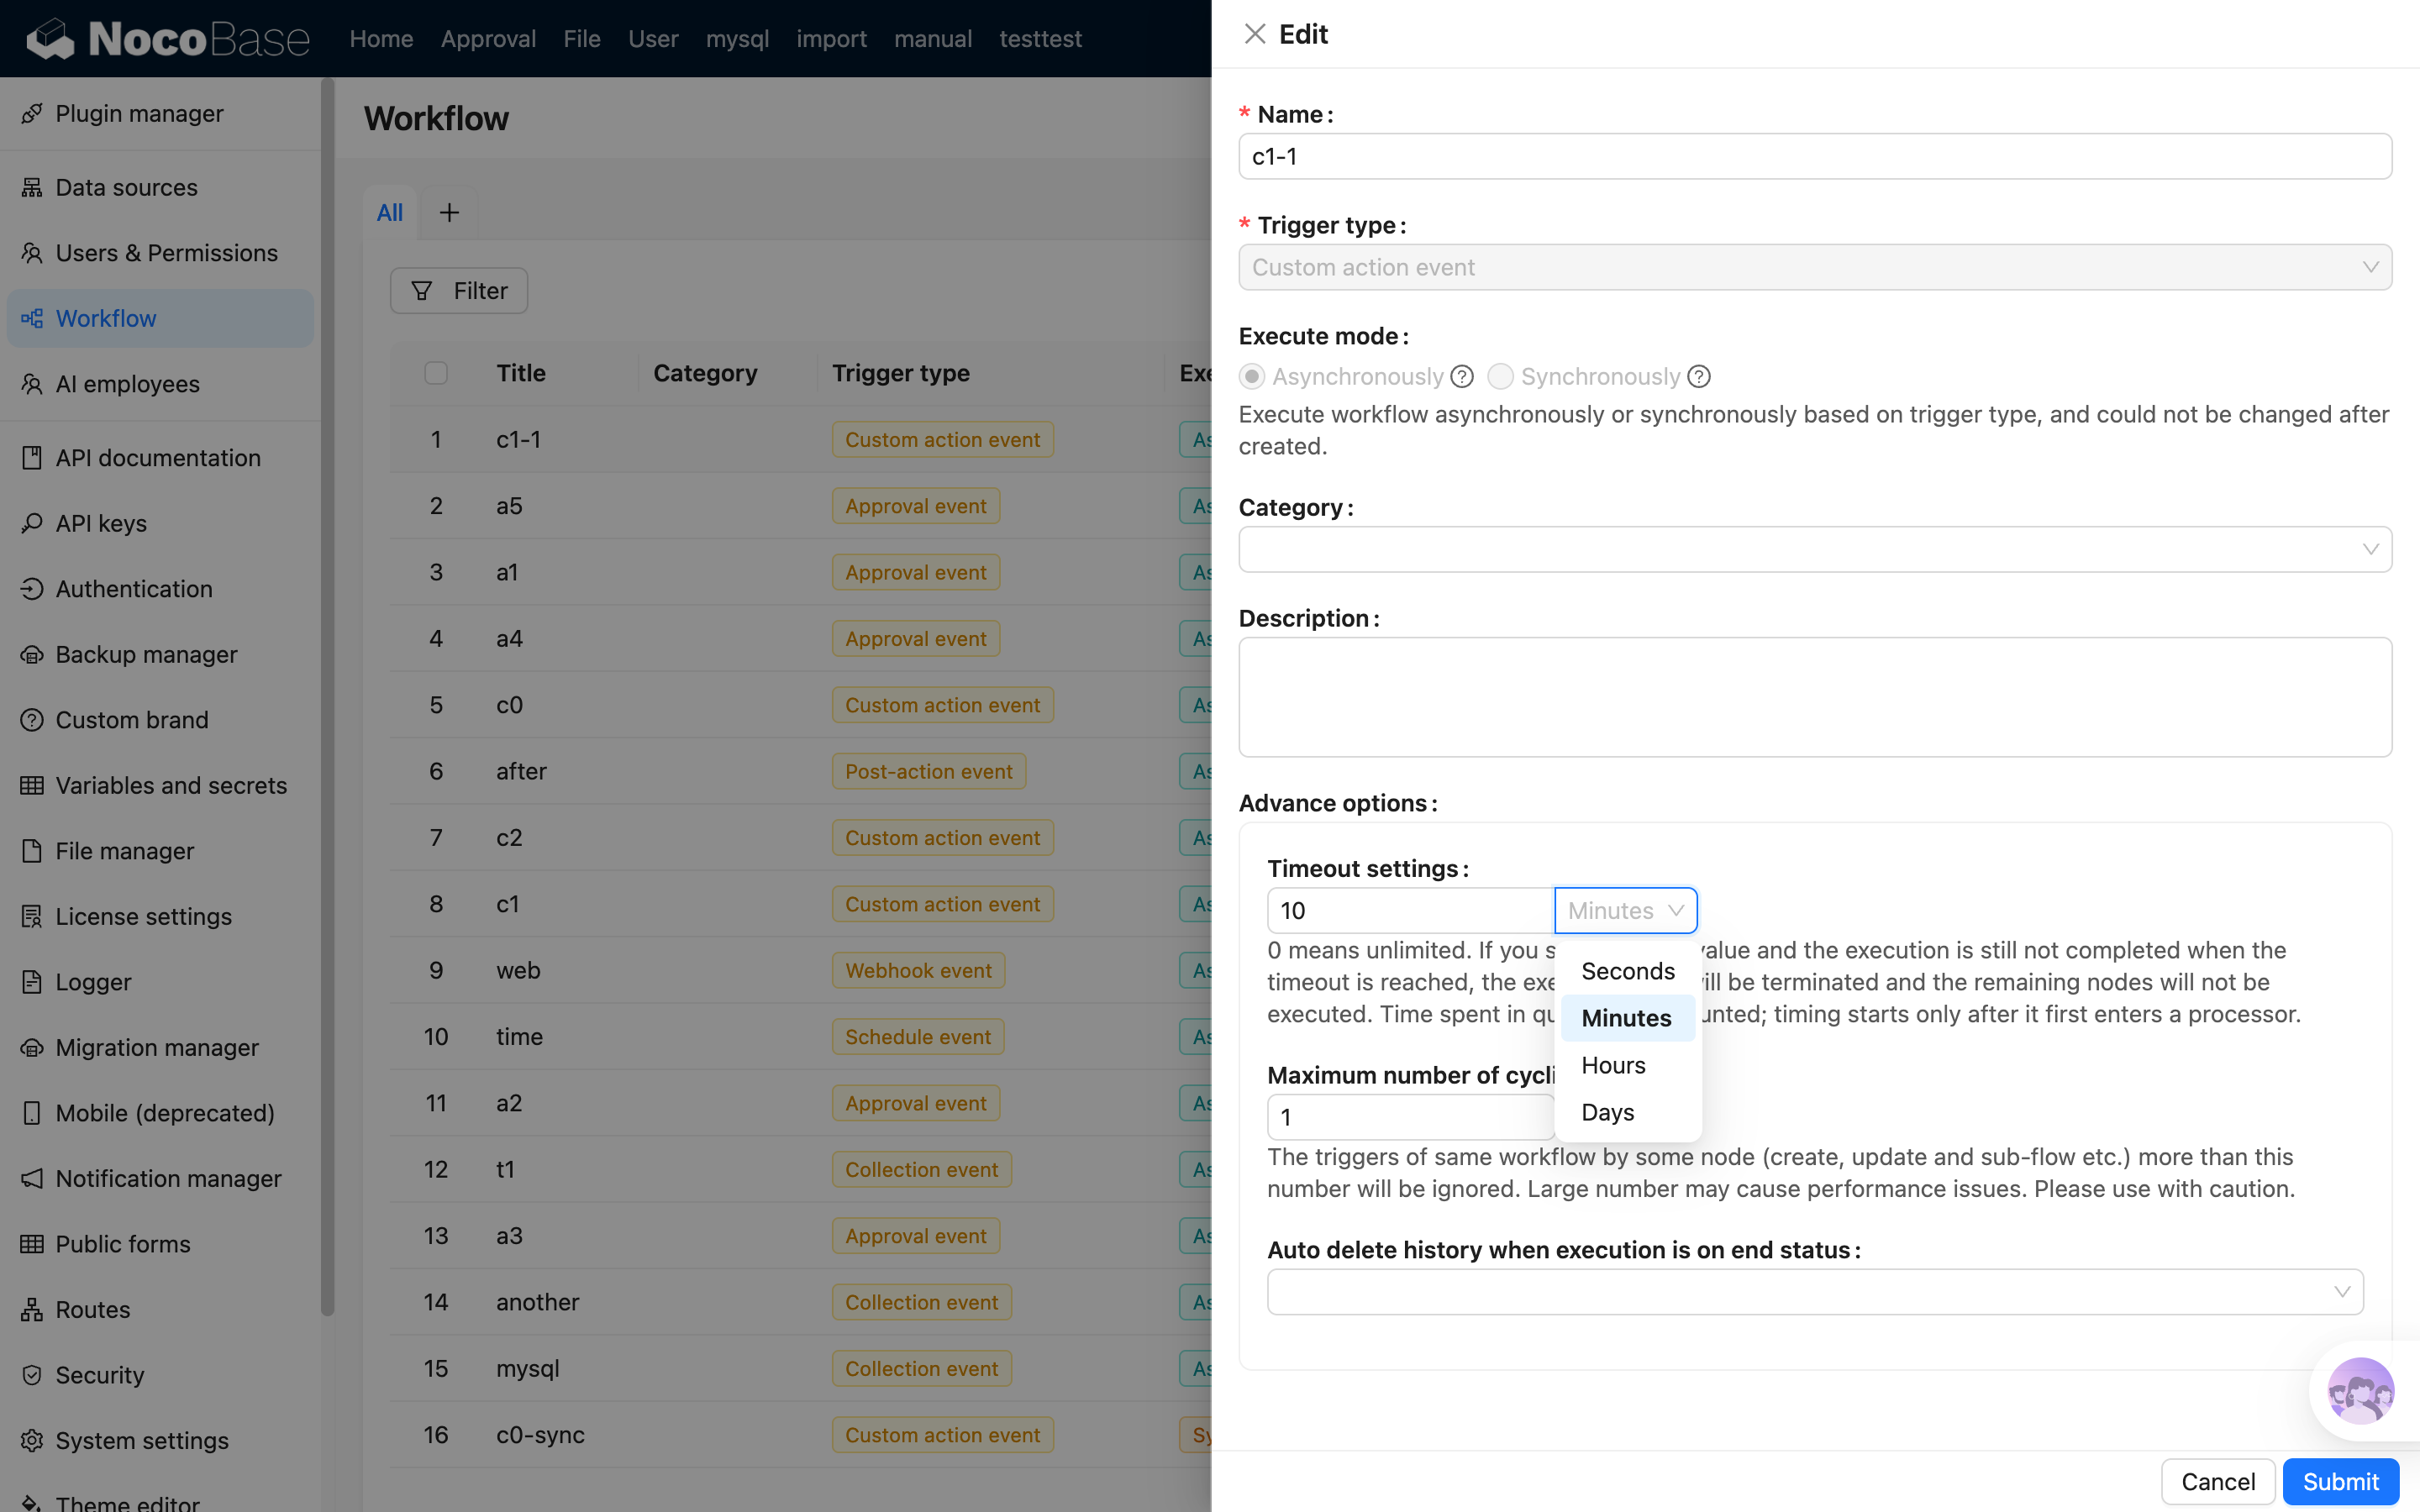
+
## Timeout Settings
|
|
4
|
+
|
|
5
|
+
Starting from version `2.1.0`, workflows support timeout settings to limit the maximum duration of a single execution from the time it starts processing until it ends. Timeout settings are useful for preventing workflows from occupying execution resources indefinitely because of long-running operations, manual processing, or waiting for external callbacks.
|
|
6
|
+
|
|
7
|
+
In the workflow creation or editing dialog, expand "Advanced options" to configure "Timeout settings":
|
|
8
|
+
|
|
9
|
+
|
|
10
|
+
|
|
11
|
+
The available options are:
|
|
12
|
+
|
|
13
|
+
- Enter `0` to set no timeout limit (default).
|
|
14
|
+
- Enter a value greater than `0` to enable the timeout limit. The interface supports seconds, minutes, hours, and days as units.
|
|
15
|
+
- The maximum timeout is 180 days.
|
|
16
|
+
|
|
17
|
+
### Timing Rules
|
|
18
|
+
|
|
19
|
+
The timeout starts counting when the workflow first enters a processor. After a workflow is triggered, time spent waiting in the queue for scheduling, or stored for delayed start, does not count toward the timeout.
|
|
20
|
+
|
|
21
|
+
After entering a processor, the timeout continues to count, including actual node execution time and time spent by nodes that have entered a waiting state, such as manual processing, approval, delay, or waiting for an external callback. The timeout does not pause when the workflow is waiting for user action.
|
|
22
|
+
|
|
23
|
+
The timeout deadline is determined when the execution starts. Changing a workflow's timeout settings only affects executions that start processing afterward; it does not recalculate executions that have already started.
|
|
24
|
+
|
|
25
|
+
### Timeout Handling
|
|
26
|
+
|
|
27
|
+
If the execution has not ended when the timeout is reached, the system terminates it:
|
|
28
|
+
|
|
29
|
+
- The execution history status changes to "Aborted", and the termination reason is shown as "Timed out".
|
|
30
|
+
- Node jobs that are currently running or waiting are marked as "Aborted".
|
|
31
|
+
- Subsequent nodes will not continue to execute.
|
|
32
|
+
- If this execution has running subflow executions, those subflows are also aborted together with the parent execution.
|
|
33
|
+
|
|
34
|
+
Examples:
|
|
35
|
+
|
|
36
|
+
- If a loop node runs an extremely long loop and the processing inside the loop is time-consuming, causing the whole loop node to exceed the configured timeout, the currently running loop node and its internal nodes are forcibly terminated, and subsequent nodes will not continue to execute.
|
|
37
|
+
- If a manual processing or approval node waits for a long time and exceeds the configured timeout, the currently waiting manual processing node is forcibly terminated, subsequent nodes will not continue to execute, and the related tasks are canceled.
|
|
38
|
+
|
|
39
|
+
:::info{title=Note}
|
|
40
|
+
Timeout settings are a global limit for the entire workflow execution, not a timeout for an individual node. If you only need to limit the waiting time of a specific node, such as an HTTP Request or JavaScript Script node, use that node's own timeout settings.
|
|
41
|
+
:::
|
|
42
|
+
|
|
43
|
+
:::info{title=Note}
|
|
44
|
+
If you need to implement business-level time-limited handling, such as "mark a work order as timed out if nobody processes it within 10 minutes", usually use the [Delay node](../nodes/delay.md) together with parallel branches to arrange the follow-up handling. The global timeout directly terminates the current execution, so it is suitable as a fallback protection mechanism, not for carrying subsequent business branches.
|
|
45
|
+
:::
|
|
46
|
+
|
|
3
47
|
## Execution Mode
|
|
4
48
|
|
|
5
49
|
Workflows are executed either asynchronously or synchronously, based on a trigger type selected during creation. Asynchronous mode means that after a specific event is triggered, the workflow enters a queue and is executed one by one by background scheduling. Synchronous mode, on the other hand, does not enter the scheduling queue after being triggered; it starts executing directly and provides immediate feedback upon completion.
|
|
@@ -30,4 +74,4 @@ It is recommended not to enable auto-deletion of execution history when debuggin
|
|
|
30
74
|
|
|
31
75
|
:::info{title=Note}
|
|
32
76
|
Deleting a workflow's history does not reduce its execution count.
|
|
33
|
-
:::
|
|
77
|
+
:::
|