@lobehub/chat 0.76.2 → 0.77.0
This diff represents the content of publicly available package versions that have been released to one of the supported registries. The information contained in this diff is provided for informational purposes only and reflects changes between package versions as they appear in their respective public registries.
- package/.bunfig.toml +3 -0
- package/.github/workflows/release.yml +6 -13
- package/.github/workflows/sync.yml +1 -1
- package/.github/workflows/test.yml +5 -12
- package/CHANGELOG.md +25 -0
- package/README.md +51 -28
- package/README.zh-CN.md +55 -28
- package/bun.lockb +0 -0
- package/docs/Deploy-with-Azure-OpenAI.md +49 -0
- package/docs/{deploy-with-azure-openai.zh-CN.md → Deploy-with-Azure-OpenAI.zh-CN.md} +8 -0
- package/docs/Home.md +38 -13
- package/docs/{Plugin-Development.en-US.md → Plugin-Development.md} +45 -13
- package/docs/Plugin-Development.zh-CN.md +67 -35
- package/docs/{Upstream-Sync.en-US.md → Upstream-Sync.md} +4 -3
- package/docs/Upstream-Sync.zh-CN.md +4 -3
- package/docs/_Sidebar.md +20 -13
- package/locales/en_US/common.json +17 -17
- package/locales/en_US/market.json +9 -5
- package/locales/en_US/setting.json +8 -7
- package/locales/en_US/welcome.json +3 -3
- package/locales/ru_RU/market.json +6 -2
- package/locales/ru_RU/setting.json +2 -1
- package/locales/zh_CN/common.json +1 -1
- package/locales/zh_CN/empty.json +1 -1
- package/locales/zh_CN/error.json +1 -1
- package/locales/zh_CN/market.json +6 -2
- package/locales/zh_CN/plugin.json +1 -1
- package/locales/zh_CN/setting.json +2 -1
- package/locales/zh_CN/welcome.json +1 -1
- package/package.json +1 -1
- package/renovate.json +13 -0
- package/src/features/AgentSetting/AgentConfig/index.tsx +2 -10
- package/src/locales/default/market.ts +4 -0
- package/src/locales/resources/en_US.ts +1 -1
- package/src/locales/resources/index.ts +6 -6
- package/src/locales/resources/ru_RU.ts +1 -1
- package/src/locales/resources/zh_CN.ts +1 -1
- package/src/pages/chat/features/Conversation/ChatList/index.tsx +4 -4
- package/src/pages/market/features/AgentCard/index.tsx +24 -5
- package/src/pages/market/features/AgentCard/style.ts +8 -1
- package/src/pages/market/features/SideBar/Mobile.tsx +1 -1
- package/src/pages/market/layout.mobile.tsx +3 -0
- package/src/pages/market/layout.tsx +4 -0
- package/src/pages/settings/index.page.tsx +1 -8
- package/vercel.json +2 -2
- package/.github/workflows/contributor-help.yml +0 -27
|
@@ -6,9 +6,9 @@
|
|
|
6
6
|
|
|
7
7
|
- [Custom Plugin Workflow](#custom-plugin-workflow)
|
|
8
8
|
|
|
9
|
-
- [1
|
|
10
|
-
- [2
|
|
11
|
-
- [3
|
|
9
|
+
- [**`1`** Create and Start a Plugin Project](#1-create-and-start-a-plugin-project)
|
|
10
|
+
- [**`2`** Add the Local Plugin in LobeChat Role Settings](#2-add-the-local-plugin-in-lobechat-role-settings)
|
|
11
|
+
- [**`3`** Test the Plugin Functionality in a Session](#3-test-the-plugin-functionality-in-a-session)
|
|
12
12
|
|
|
13
13
|
- [Local Plugin Development](#local-plugin-development)
|
|
14
14
|
|
|
@@ -19,6 +19,10 @@
|
|
|
19
19
|
|
|
20
20
|
- [Plugin Deployment and Publication](#plugin-deployment-and-publication)
|
|
21
21
|
|
|
22
|
+
- [Plugin Shield](#plugin-shield)
|
|
23
|
+
|
|
24
|
+
- [Link](#link)
|
|
25
|
+
|
|
22
26
|
## Plugin Composition
|
|
23
27
|
|
|
24
28
|
A LobeChat plugin consists of the following components:
|
|
@@ -30,11 +34,13 @@ A LobeChat plugin consists of the following components:
|
|
|
30
34
|
- **Server-side**: Implement the API capabilities described in the manifest.
|
|
31
35
|
- **Frontend UI** (optional): Implement the interface described in the manifest, which will be displayed in plugin messages to provide richer information display than plain text.
|
|
32
36
|
|
|
37
|
+
<br/>
|
|
38
|
+
|
|
33
39
|
## Custom Plugin Workflow
|
|
34
40
|
|
|
35
41
|
To integrate a plugin into LobeChat, you need to add and use a custom plugin in LobeChat. This section will guide you through the process.
|
|
36
42
|
|
|
37
|
-
### 1
|
|
43
|
+
### **`1`** Create and Start a Plugin Project
|
|
38
44
|
|
|
39
45
|
First, you need to create a plugin project locally. You can use the [lobe-chat-plugin-template][lobe-chat-plugin-template-url] template we have prepared:
|
|
40
46
|
|
|
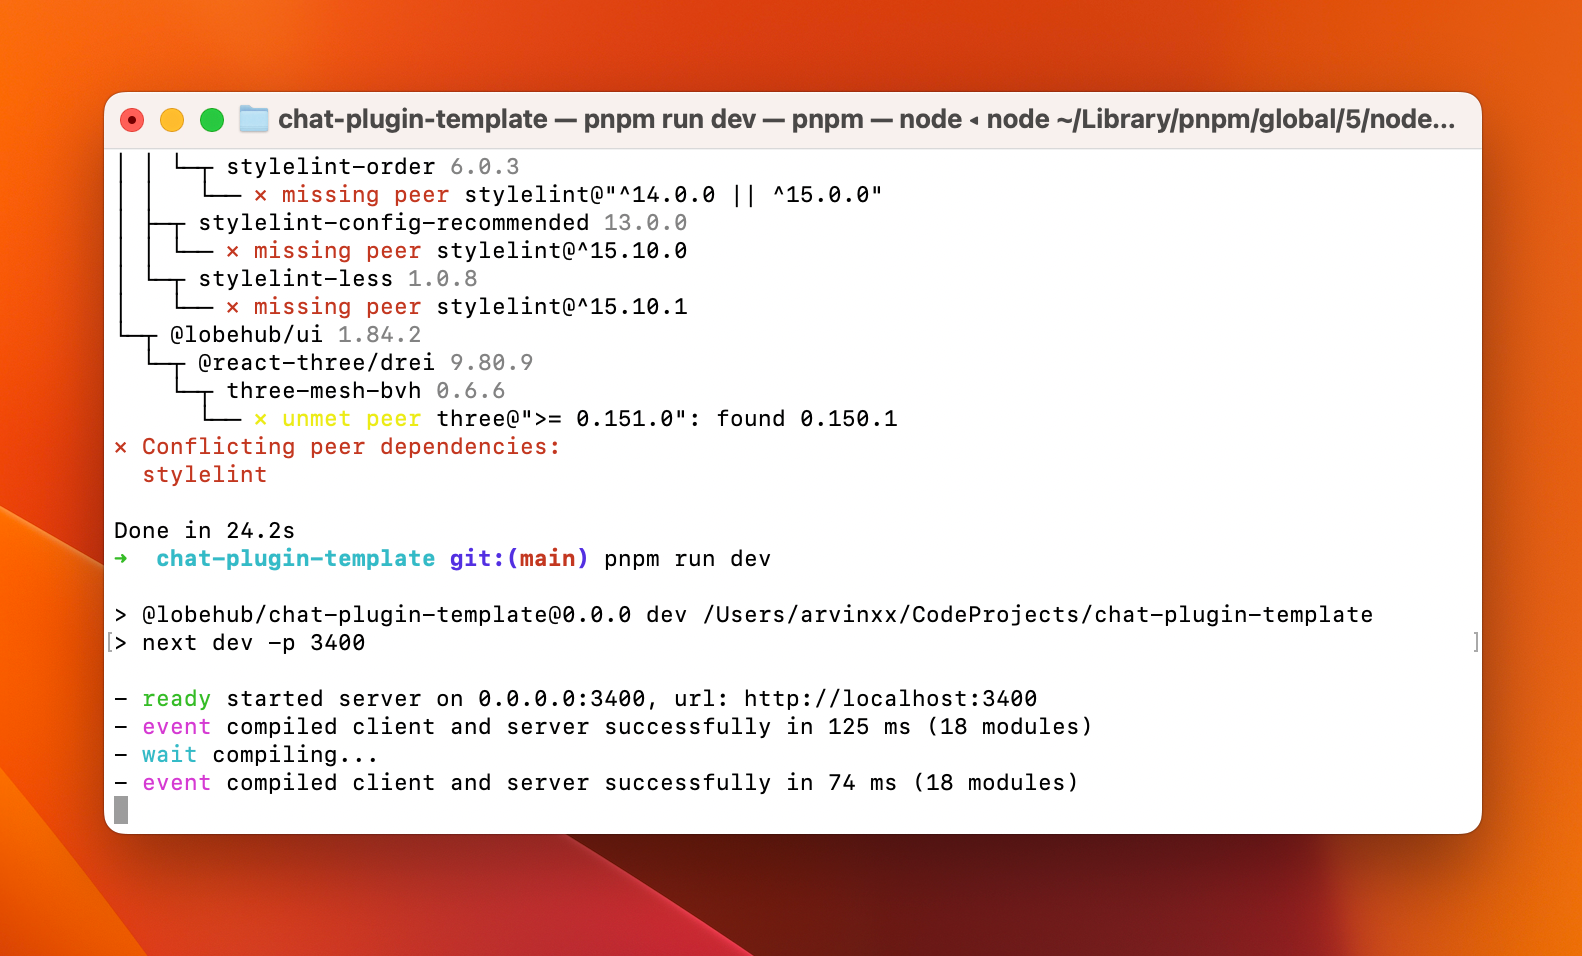
@@ -49,31 +55,31 @@ When you see `ready started server on 0.0.0.0:3400, url: http://localhost:3400`,
|
|
|
49
55
|
|
|
50
56
|
|
|
51
57
|
|
|
52
|
-
### 2
|
|
58
|
+
### **`2`** Add the Local Plugin in LobeChat Role Settings
|
|
53
59
|
|
|
54
60
|
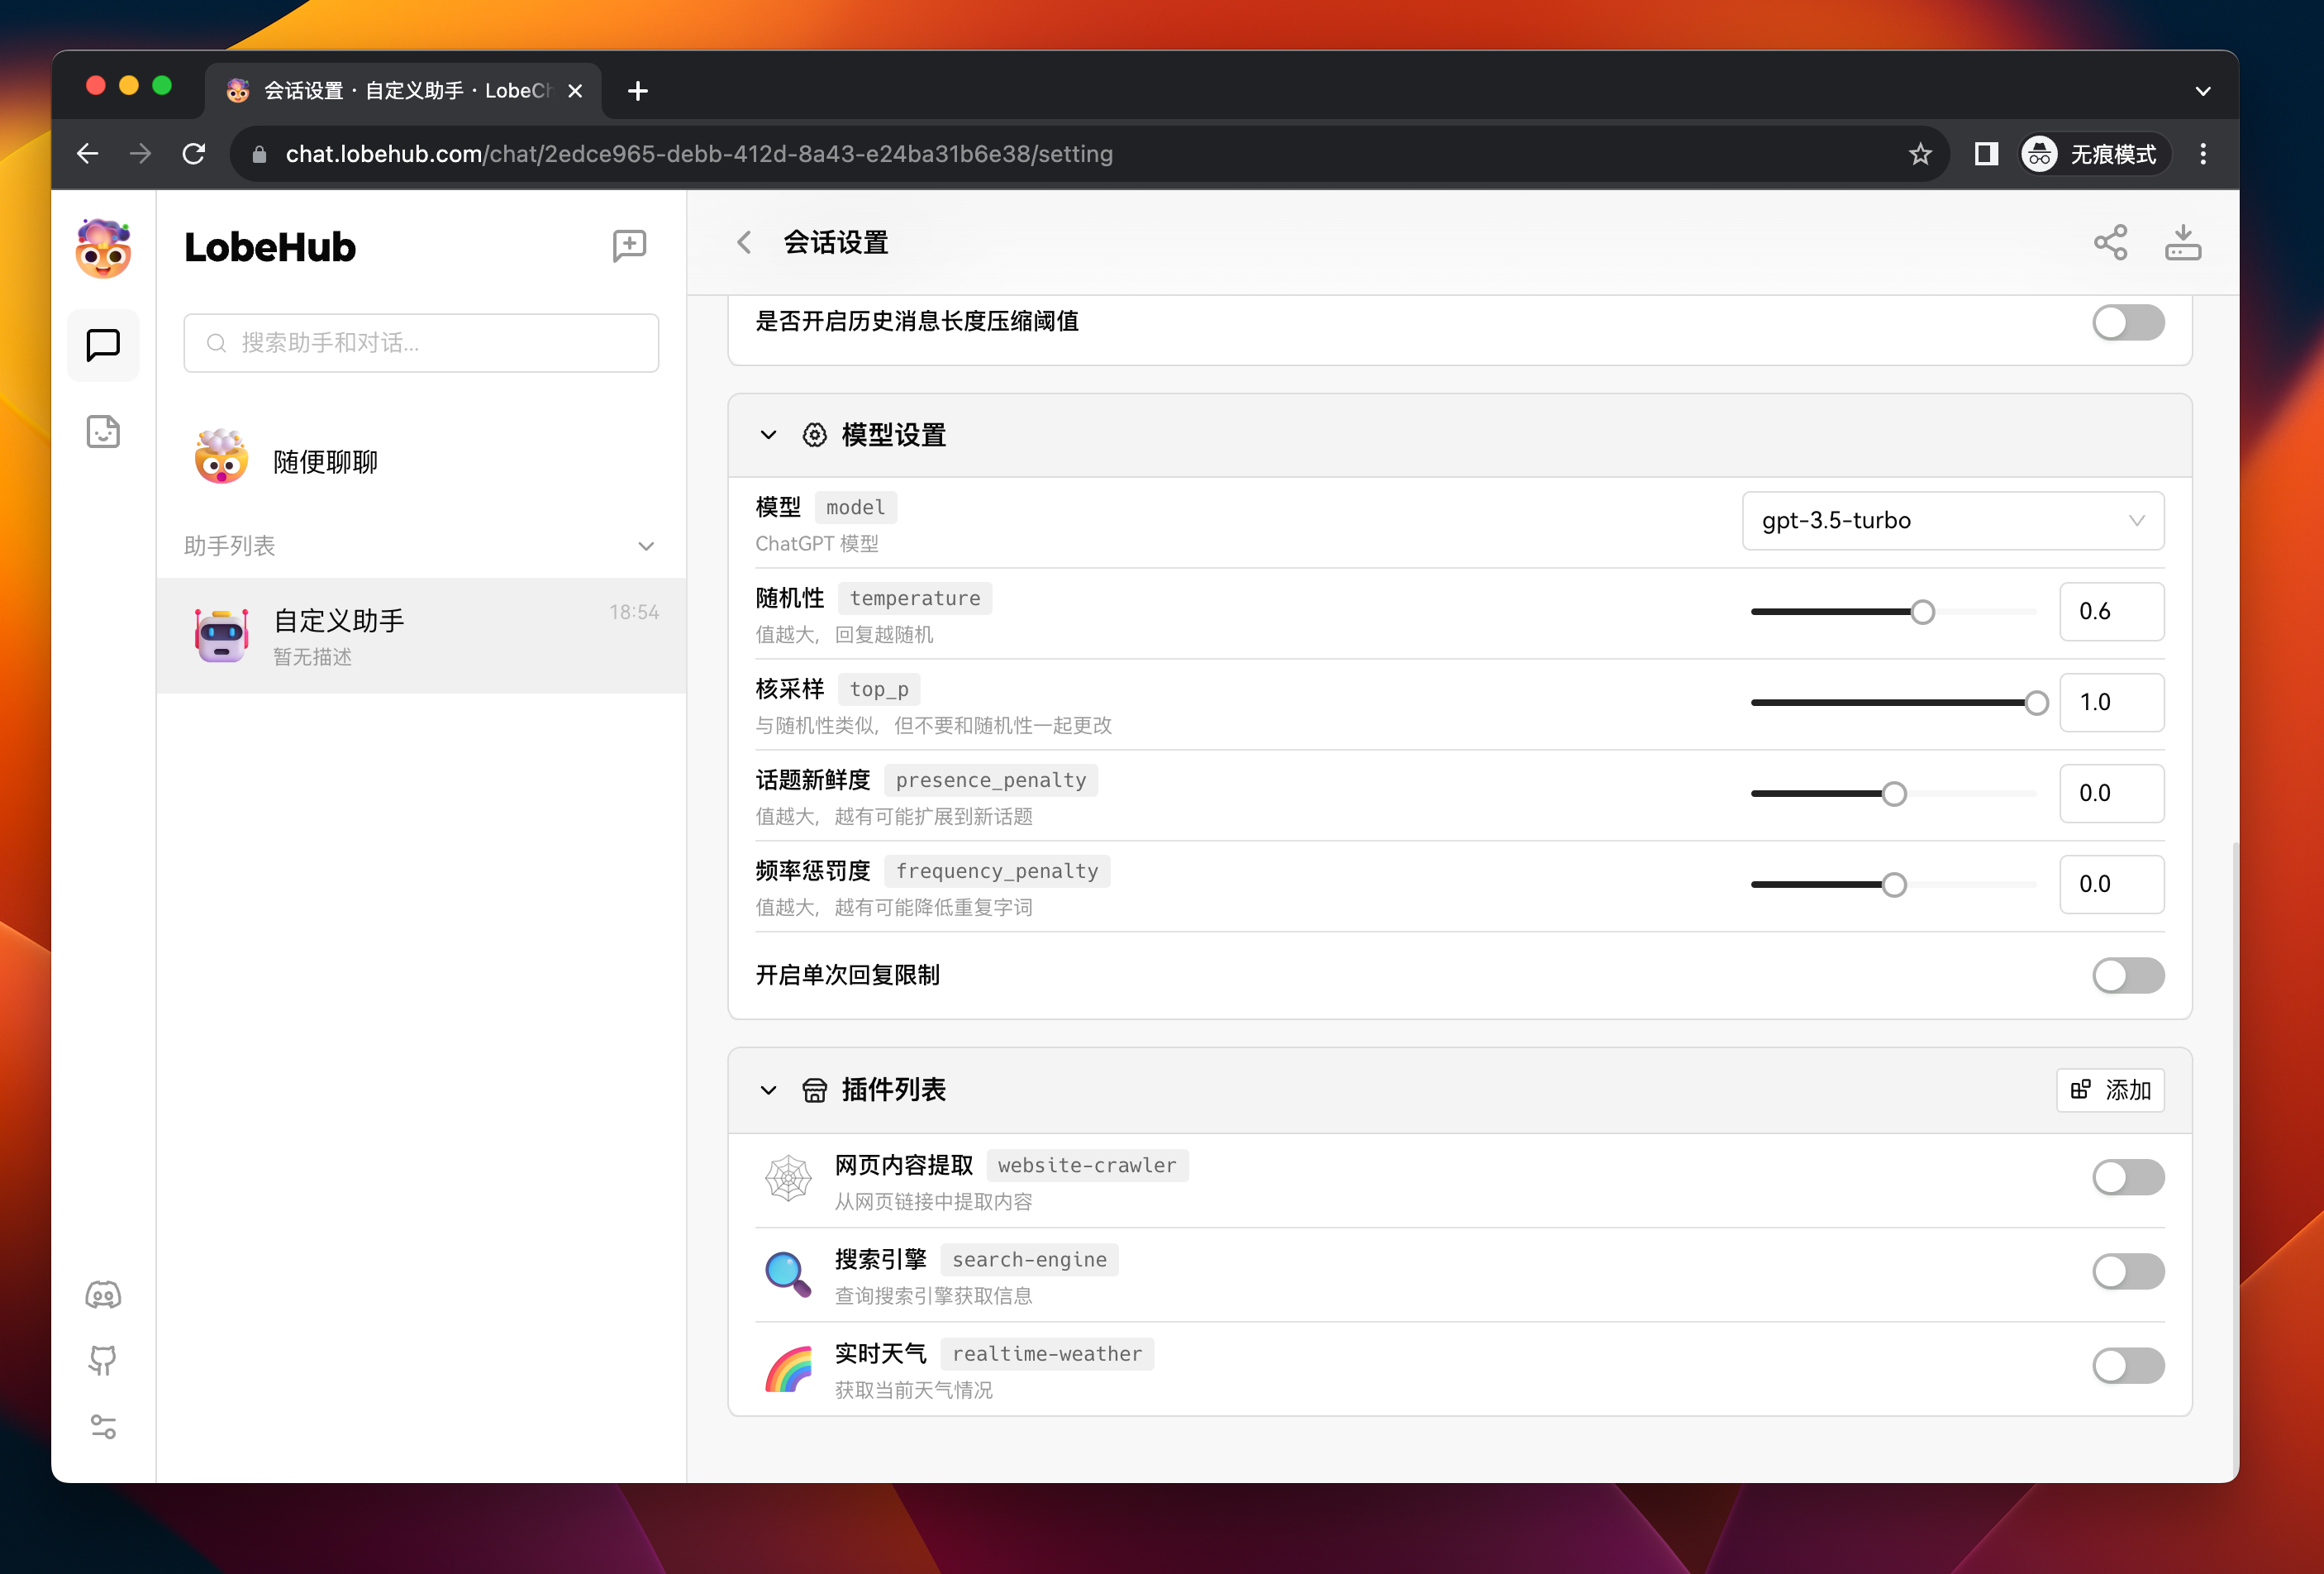
Next, go to LobeChat, create a new assistant, and go to its session settings page:
|
|
55
61
|
|
|
56
62
|
|
|
57
63
|
|
|
58
|
-
Click the
|
|
64
|
+
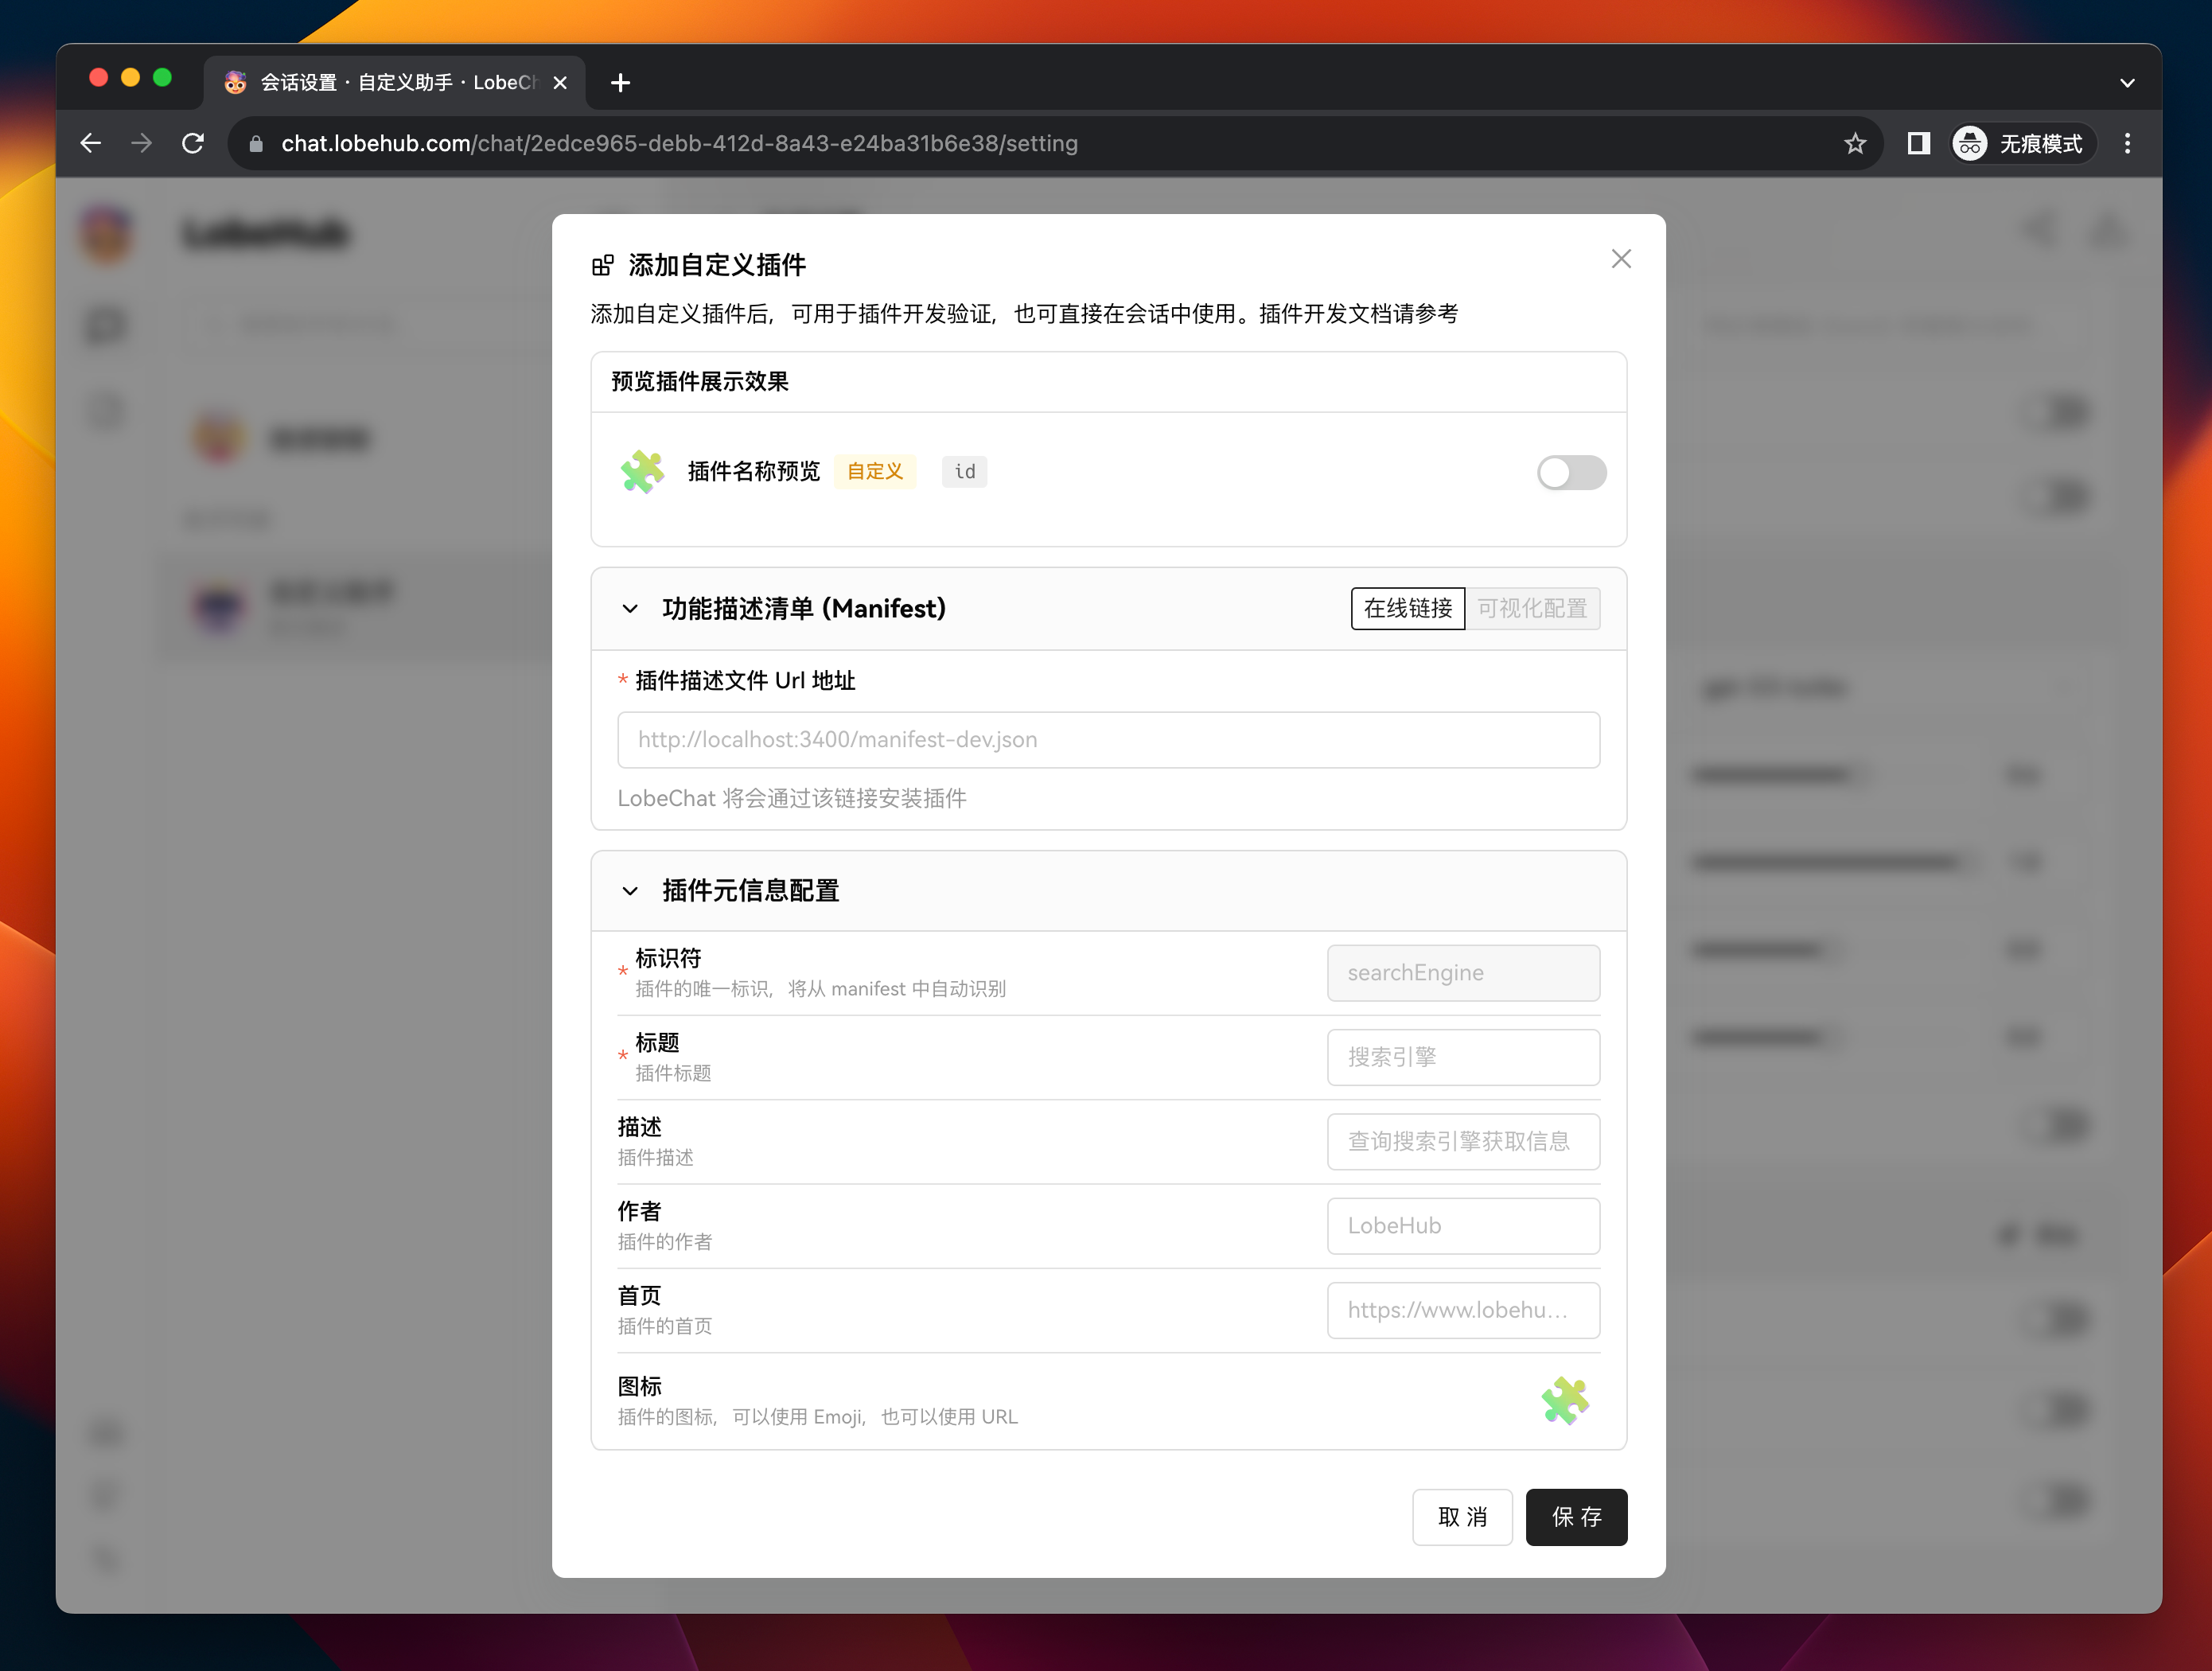
Click the <kbd>Add</kbd> button on the right side of "Plugin List" to open the custom plugin add dialog:
|
|
59
65
|
|
|
60
66
|
|
|
61
67
|
|
|
62
|
-
Enter `http://localhost:3400/manifest-dev.json` in the
|
|
68
|
+
Enter `http://localhost:3400/manifest-dev.json` in the `Plugin Manifest URL` field, which is the URL of the locally started plugin manifest.
|
|
63
69
|
|
|
64
|
-
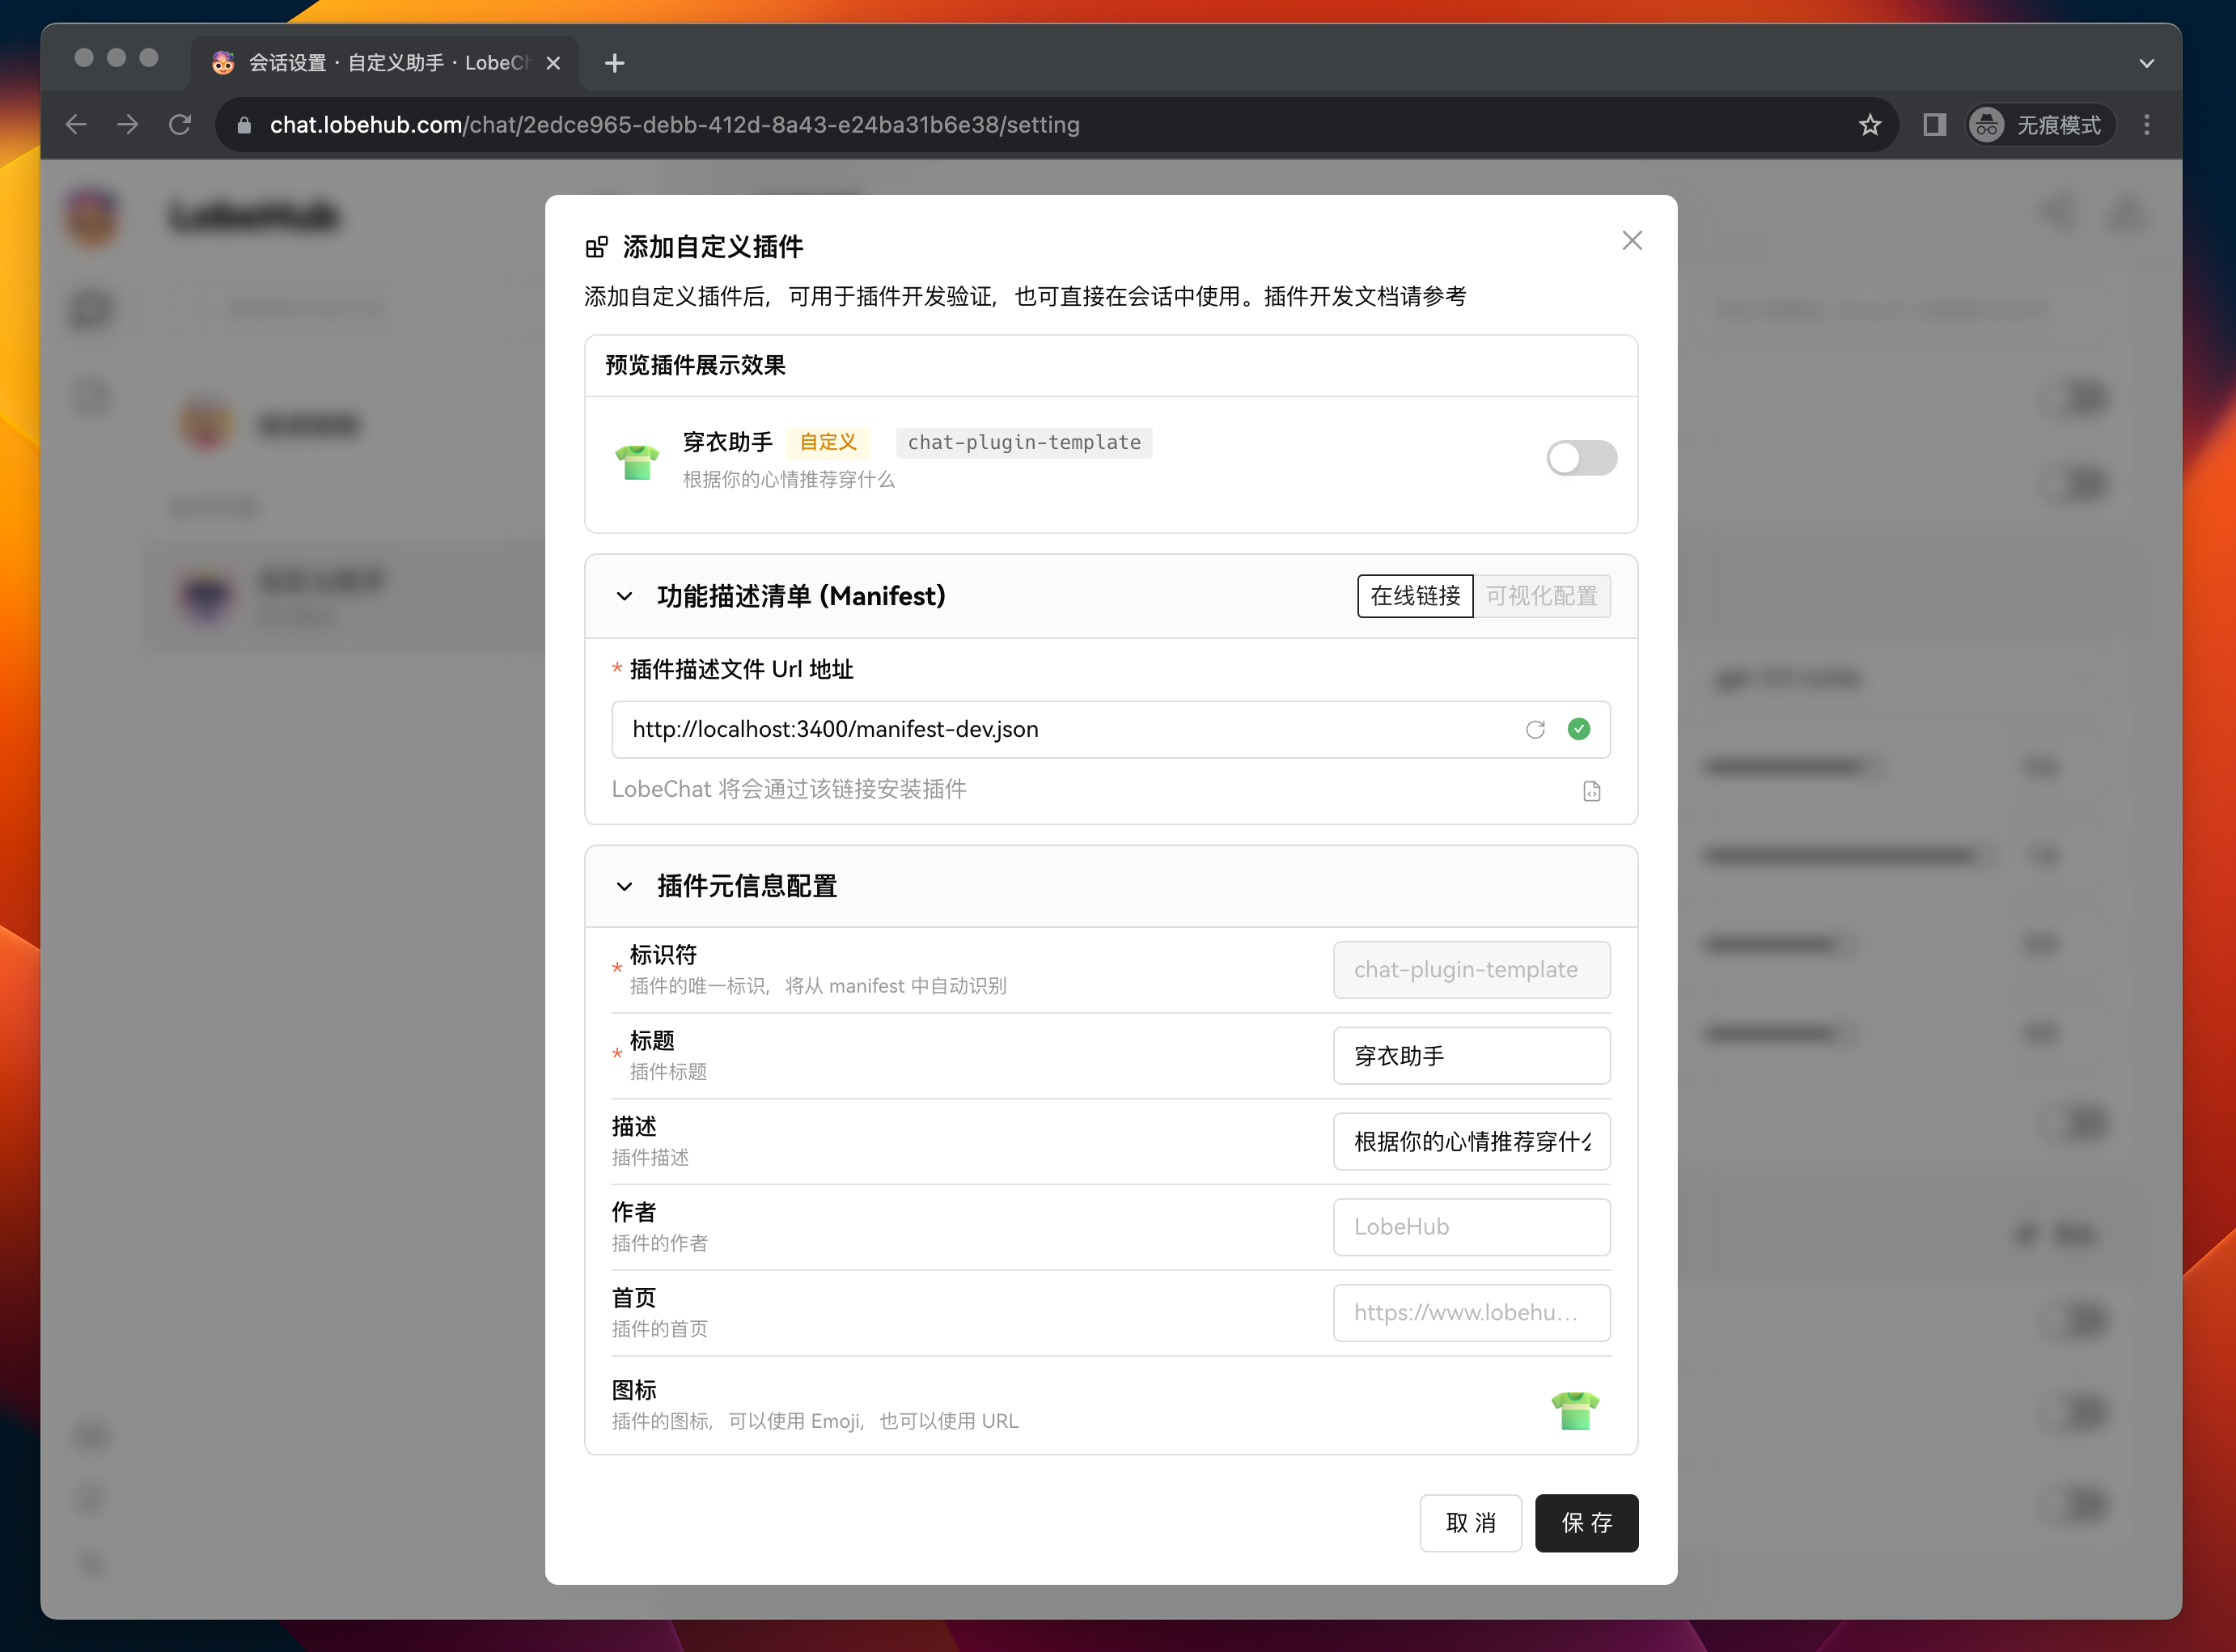
At this point, you should see that the identifier of the plugin has been automatically recognized as `chat-plugin-template`. Then fill in the remaining form fields (only the title is required) and click the
|
|
70
|
+
At this point, you should see that the identifier of the plugin has been automatically recognized as `chat-plugin-template`. Then fill in the remaining form fields (only the title is required) and click the <kbd>Save</kbd> button to complete the custom plugin addition.
|
|
65
71
|
|
|
66
72
|
|
|
67
73
|
|
|
68
|
-
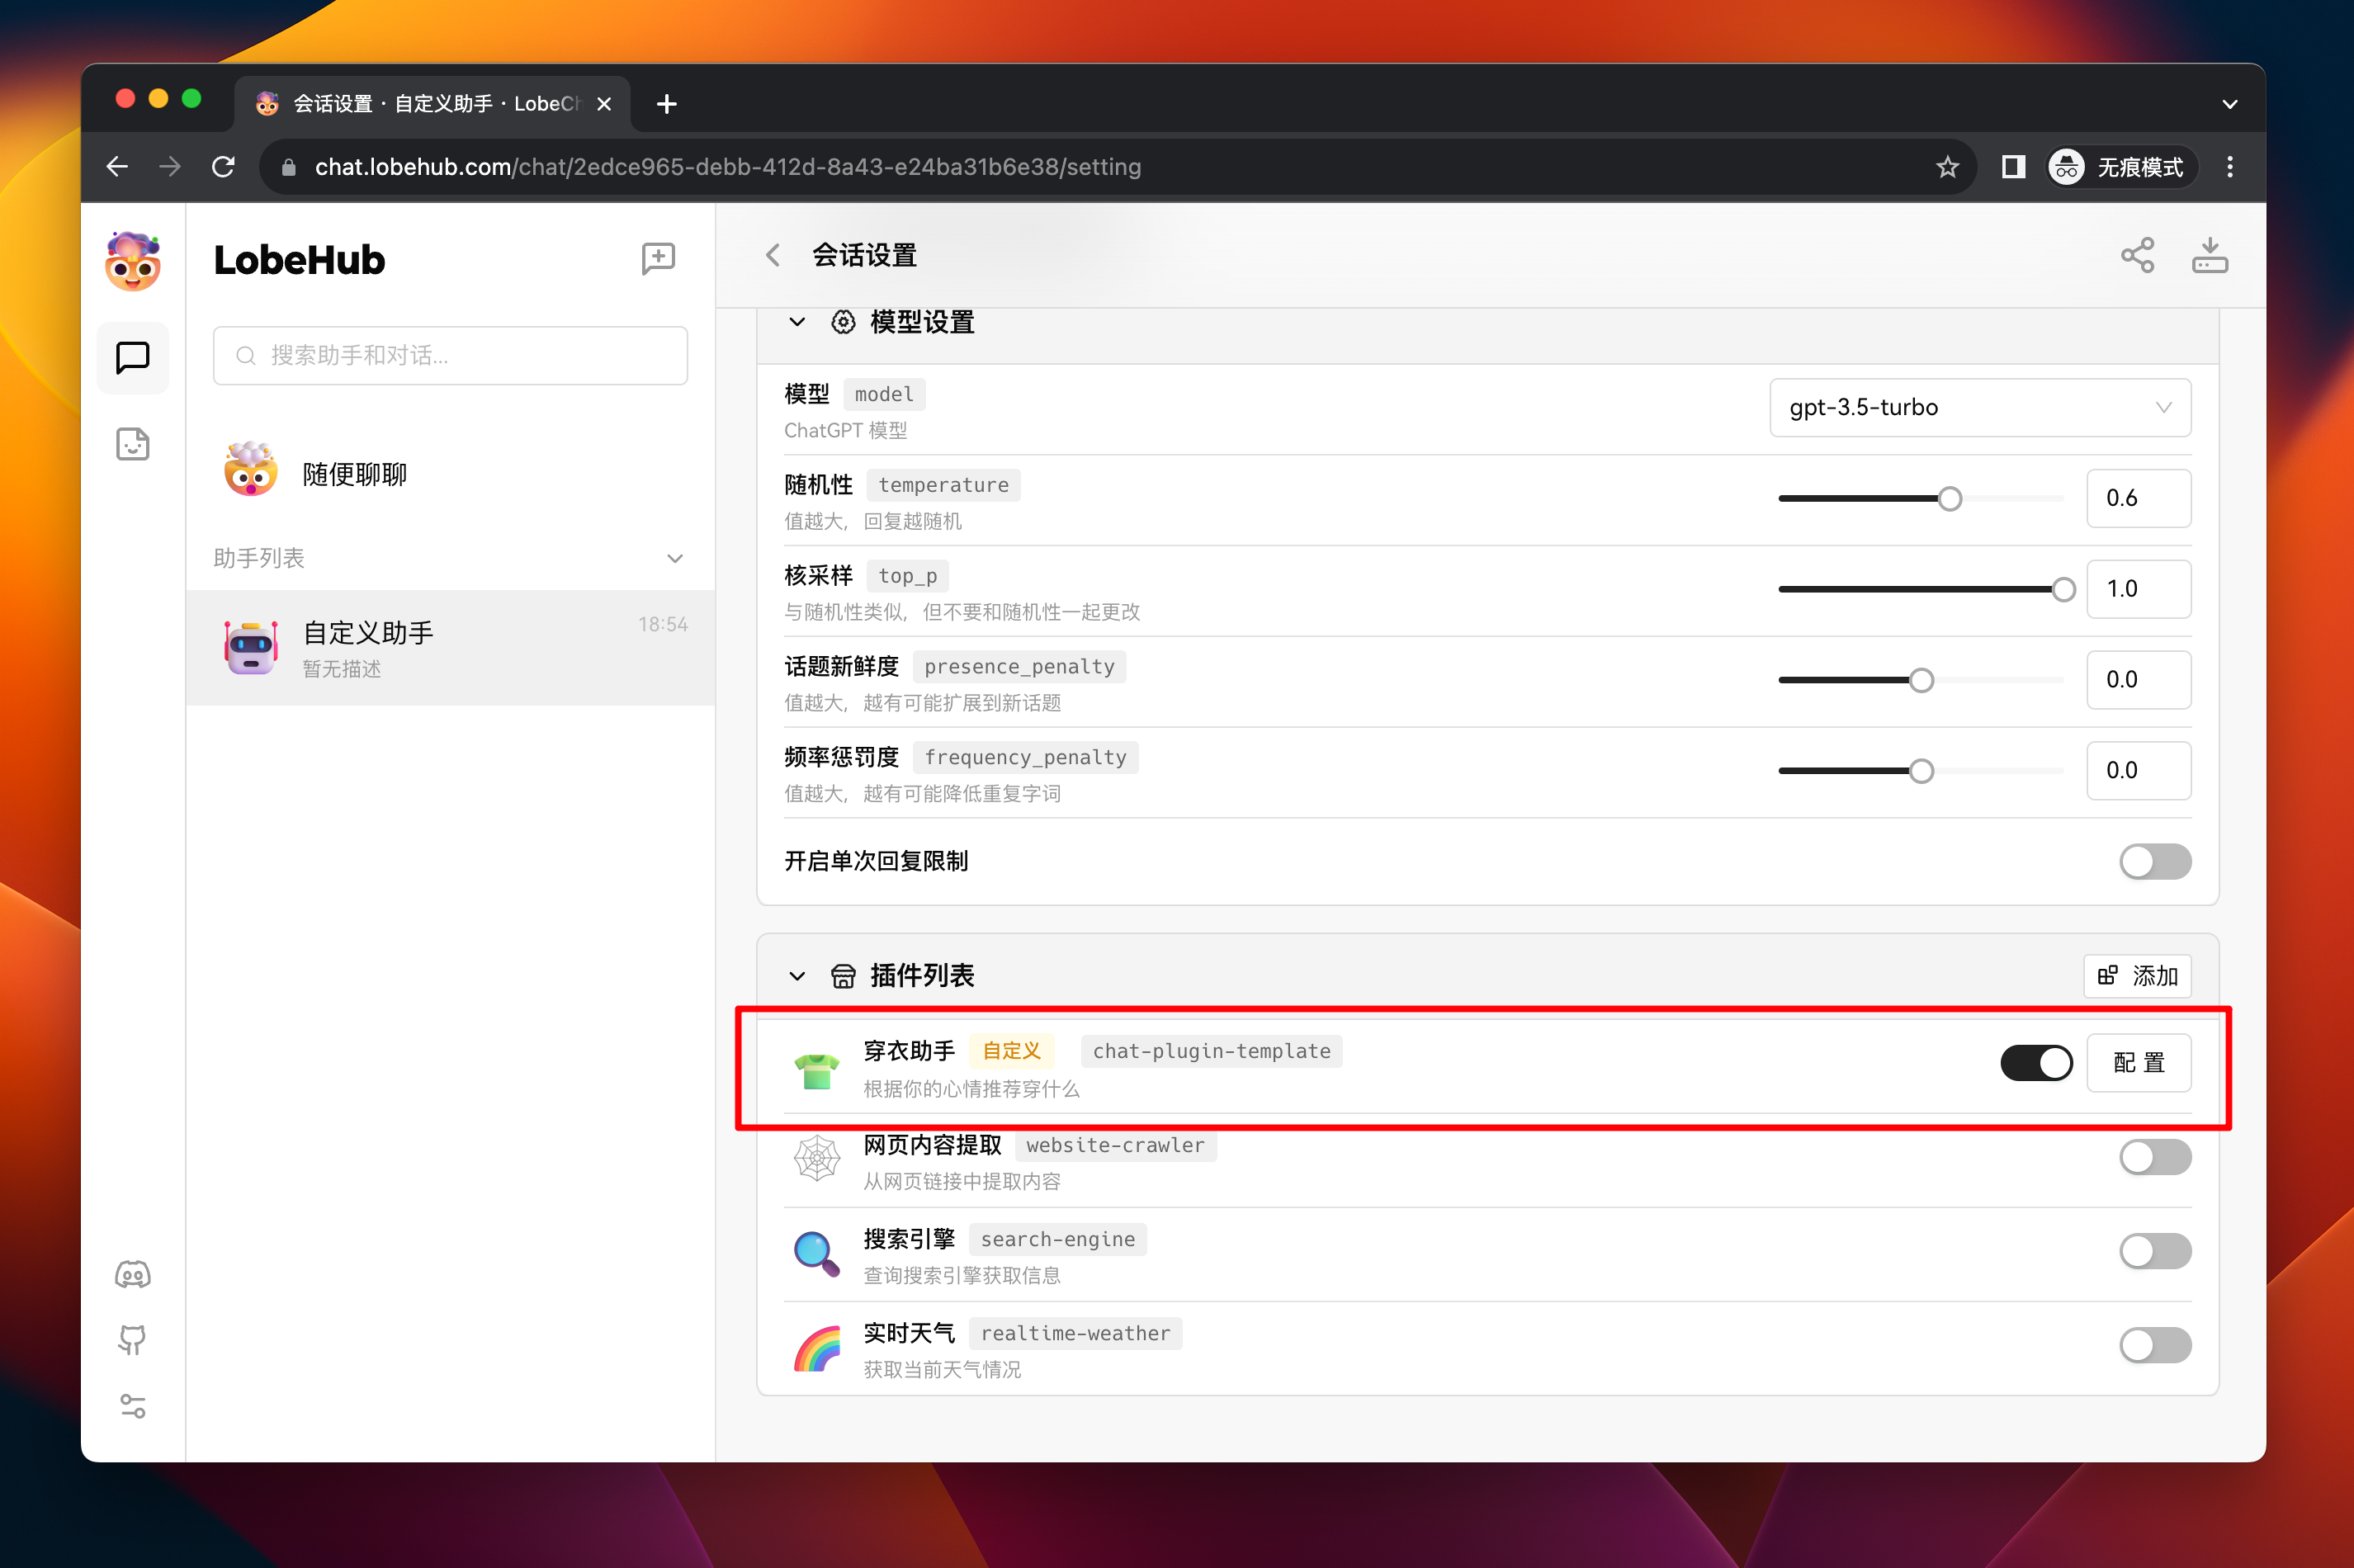
After adding the plugin, you can see the newly added plugin in the plugin list. If you need to modify the plugin's configuration, you can click the
|
|
74
|
+
After adding the plugin, you can see the newly added plugin in the plugin list. If you need to modify the plugin's configuration, you can click the <kbd>Settings</kbd> button to make changes.
|
|
69
75
|
|
|
70
76
|
|
|
71
77
|
|
|
72
|
-
### 3
|
|
78
|
+
### **`3`** Test the Plugin Functionality in a Session
|
|
73
79
|
|
|
74
80
|
Next, we need to test the functionality of the custom plugin.
|
|
75
81
|
|
|
76
|
-
Click the
|
|
82
|
+
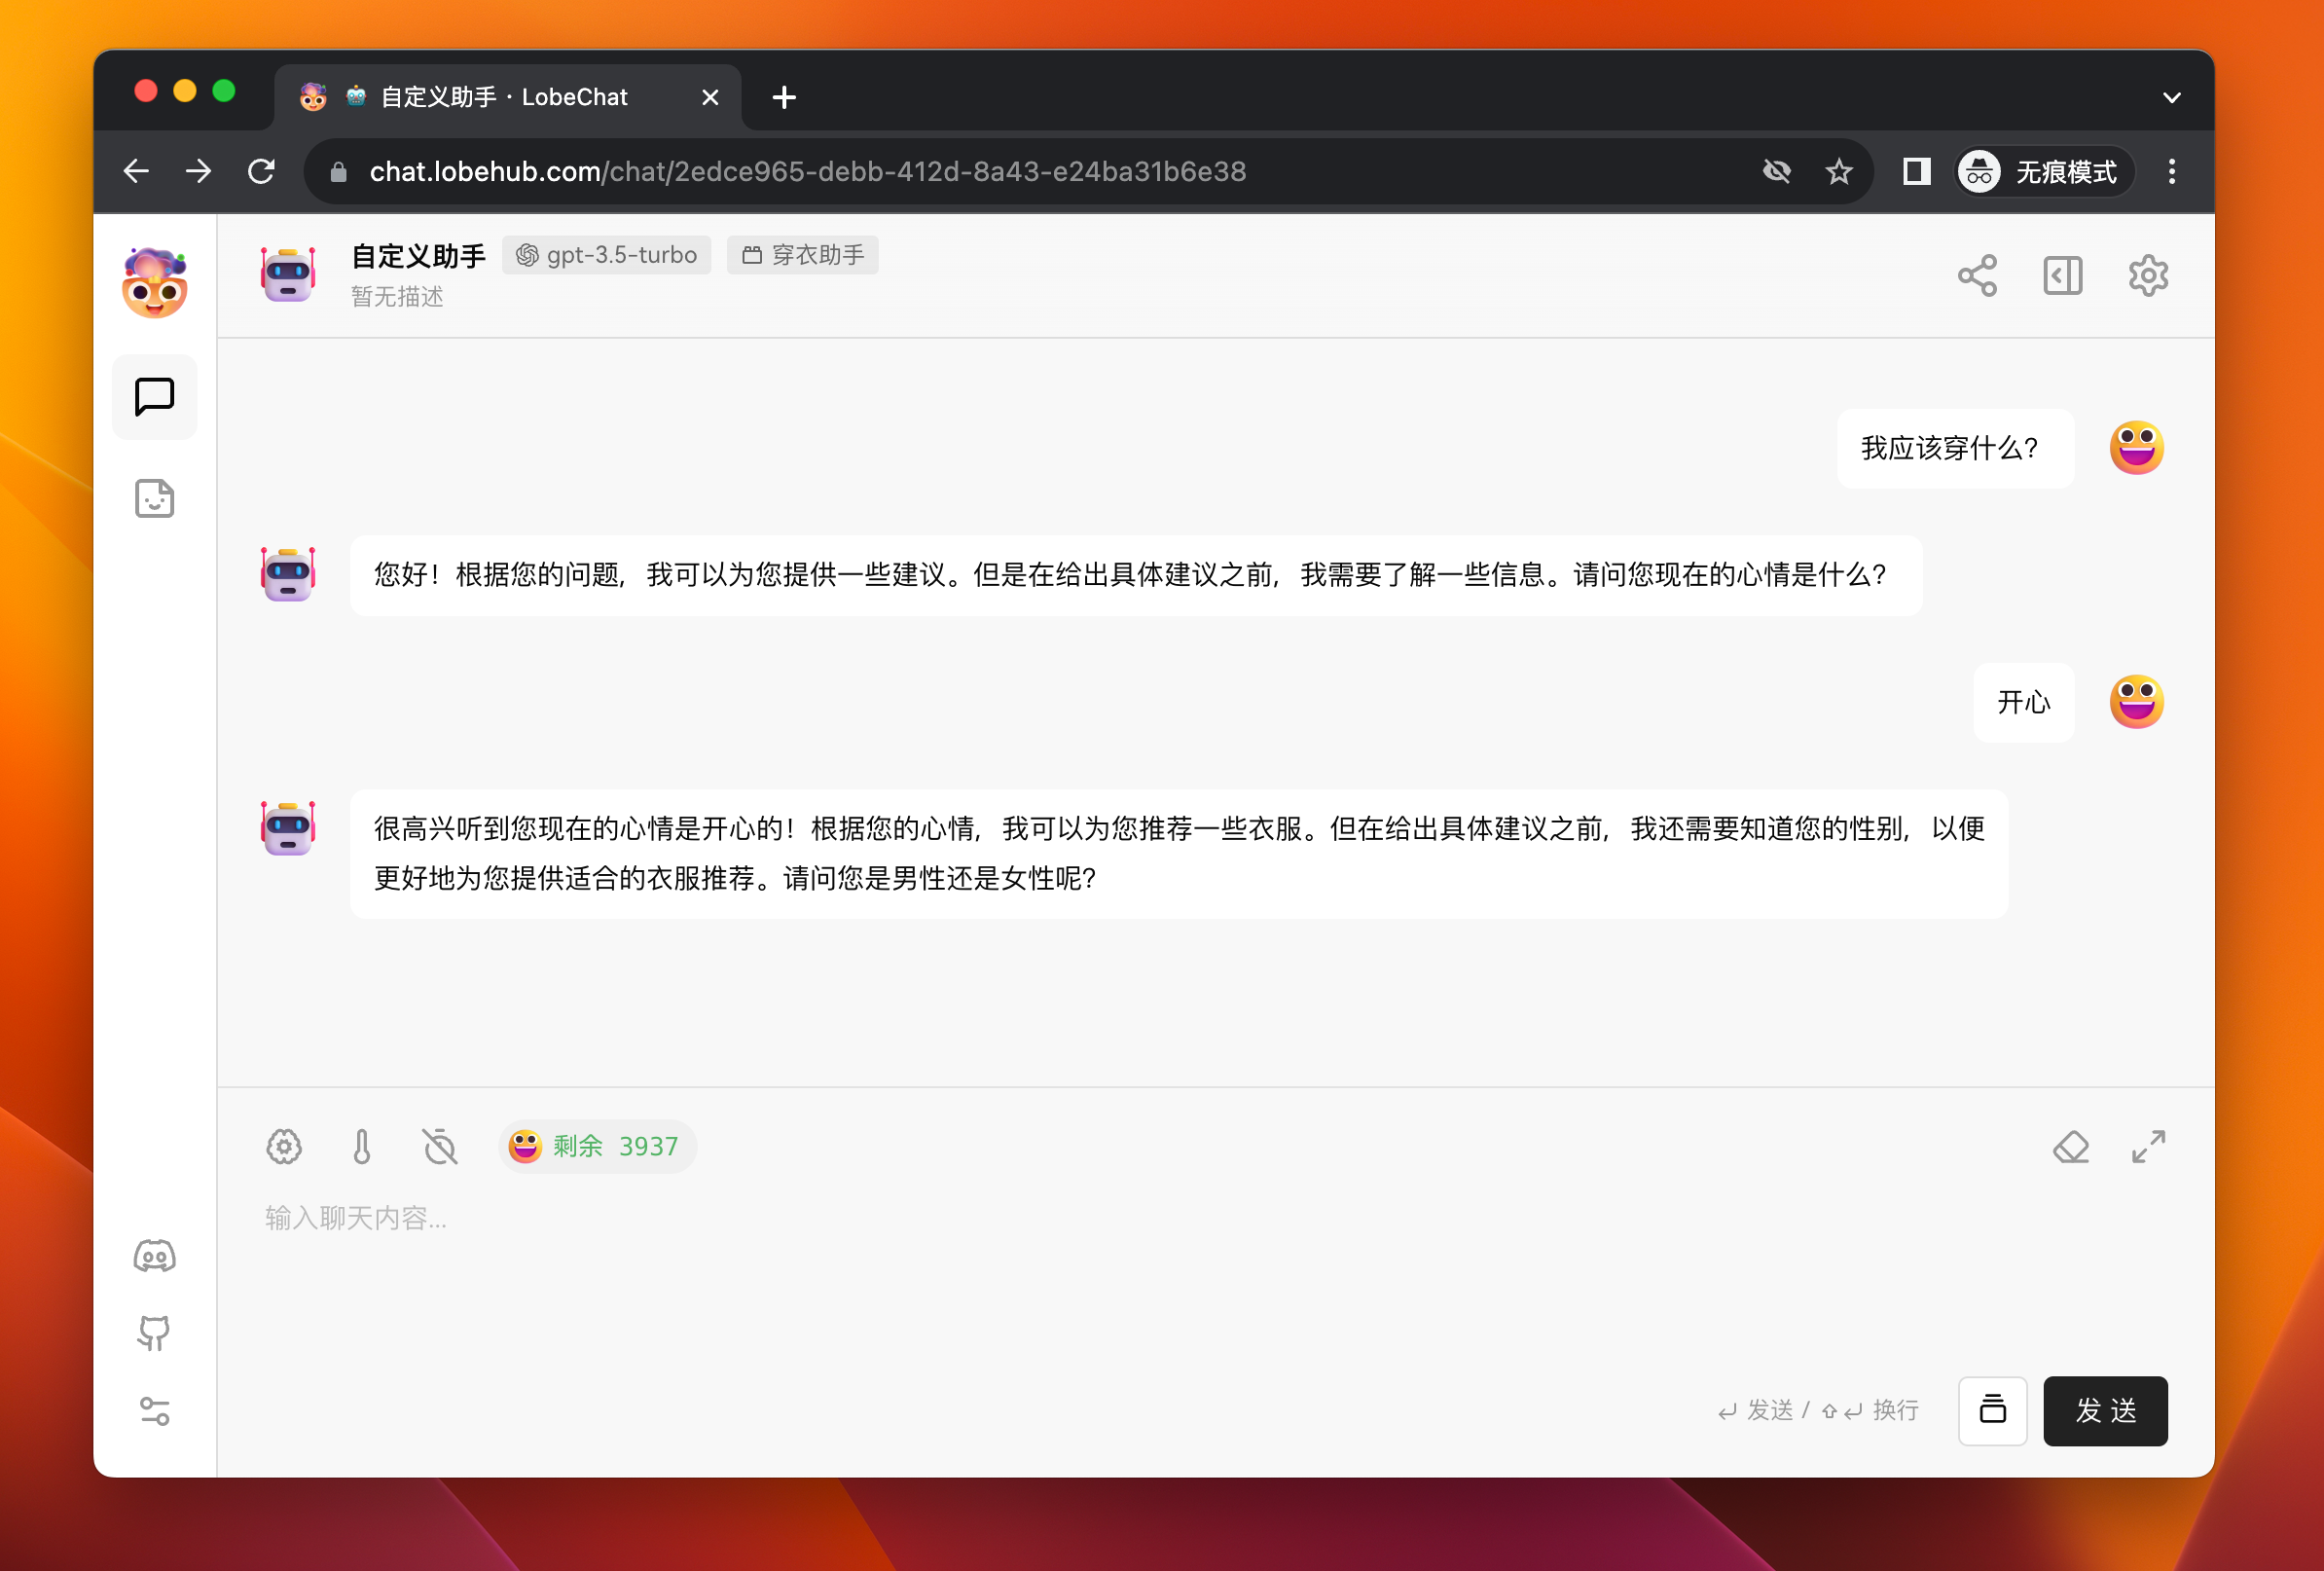
Click the <kbd>Back</kbd> button to go back to the session area, and then send a message to the assistant: "What should I wear?" The assistant will try to ask you about your gender and current mood.
|
|
77
83
|
|
|
78
84
|
|
|
79
85
|
|
|
@@ -83,6 +89,8 @@ After answering, the assistant will make a plugin call to retrieve recommended c
|
|
|
83
89
|
|
|
84
90
|
After completing these steps, you have learned the basic process of adding and using a custom plugin in LobeChat.
|
|
85
91
|
|
|
92
|
+
<br/>
|
|
93
|
+
|
|
86
94
|
## Local Plugin Development
|
|
87
95
|
|
|
88
96
|
In the previous workflow, we have learned how to add and use a plugin. Now let's focus on the development process of custom plugins.
|
|
@@ -190,7 +198,7 @@ In this example, `manClothes` and `womanClothes` are hardcoded mock data. In act
|
|
|
190
198
|
|
|
191
199
|
#### Gateway
|
|
192
200
|
|
|
193
|
-
Since the default plugin gateway in LobeChat is a cloud service (
|
|
201
|
+
Since the default plugin gateway in LobeChat is a cloud service (\</api/plugins>), which sends requests to the API addresses specified in the manifest to solve the cross-origin issue.
|
|
194
202
|
|
|
195
203
|
For custom plugins, the requests need to be sent to the local service. Therefore, by specifying the gateway in the manifest (<http://localhost:3400/api/gateway>), LobeChat will directly request this address. Then you only need to create a gateway implementation at this address.
|
|
196
204
|
|
|
@@ -248,15 +256,39 @@ const Render = memo(() => {
|
|
|
248
256
|
export default Render;
|
|
249
257
|
```
|
|
250
258
|
|
|
259
|
+
<br/>
|
|
260
|
+
|
|
251
261
|
## Plugin Deployment and Publication
|
|
252
262
|
|
|
253
263
|
After completing the plugin development, you can deploy the plugin using your preferred method. For example, you can use Vercel or package it as a Docker image for publication.
|
|
254
264
|
|
|
255
265
|
If you want more people to use your plugin, you are welcome to submit it for review in the plugin marketplace.
|
|
256
266
|
|
|
267
|
+
[![][submit-plugin-shield]][submit-plugin-url]
|
|
268
|
+
|
|
269
|
+
### Plugin Shield
|
|
270
|
+
|
|
271
|
+
[](https://github.com/lobehub/lobe-chat-plugins)
|
|
272
|
+
|
|
273
|
+
```markdown
|
|
274
|
+
[](https://github.com/lobehub/lobe-chat-plugins)
|
|
275
|
+
```
|
|
276
|
+
|
|
277
|
+
<br/>
|
|
278
|
+
|
|
279
|
+
## Link
|
|
280
|
+
|
|
281
|
+
- **📘 Pluging SDK Docs**: <https://chat-plugin-sdk.lobehub.com>
|
|
282
|
+
- **🚀 chat-plugin-template**: <https://github.com/lobehub/chat-plugin-template>
|
|
283
|
+
- **🧩 chat-plugin-sdk**: <https://github.com/lobehub/chat-plugin-sdk>
|
|
284
|
+
- **🚪 chat-plugin-sdk**: <https://github.com/lobehub/chat-plugin-gateway>
|
|
285
|
+
- **🏪 lobe-chat-plugins**: <https://github.com/lobehub/lobe-chat-plugins>
|
|
286
|
+
|
|
257
287
|
<!-- LINK GROUP -->
|
|
258
288
|
|
|
259
289
|
[fetch-plugin-message-url]: https://github.com/lobehub/chat-plugin-template
|
|
260
290
|
[lobe-chat-plugin-template-url]: https://github.com/lobehub/chat-plugin-template
|
|
261
|
-
[manifest-docs-url]: https://
|
|
291
|
+
[manifest-docs-url]: https://chat-plugin-sdk.lobehub.com/guides/plugin-manifest
|
|
262
292
|
[plugin-error-type-url]: https://github.com/lobehub/chat-plugin-template
|
|
293
|
+
[submit-plugin-shield]: https://img.shields.io/badge/🧩/🏪_submit_plugin-%E2%86%92-50E3C2?style=for-the-badge
|
|
294
|
+
[submit-plugin-url]: https://github.com/lobehub/lobe-chat-plugins
|
|
@@ -6,9 +6,9 @@
|
|
|
6
6
|
|
|
7
7
|
- [自定义插件流程](#自定义插件流程)
|
|
8
8
|
|
|
9
|
-
- [1
|
|
10
|
-
- [2
|
|
11
|
-
- [3
|
|
9
|
+
- [**`1`** 创建并启动插件项目](#1-创建并启动插件项目)
|
|
10
|
+
- [**`2`** 在 LobeChat 角色设置中添加本地插件](#2-在-lobechat-角色设置中添加本地插件)
|
|
11
|
+
- [**`3`** 会话测试插件功能](#3-会话测试插件功能)
|
|
12
12
|
|
|
13
13
|
- [本地插件开发](#本地插件开发)
|
|
14
14
|
|
|
@@ -19,23 +19,29 @@
|
|
|
19
19
|
|
|
20
20
|
- [插件部署与发布](#插件部署与发布)
|
|
21
21
|
|
|
22
|
+
- [插件 Shield](#插件-shield)
|
|
23
|
+
|
|
24
|
+
- [链接](#链接)
|
|
25
|
+
|
|
22
26
|
## 插件构成
|
|
23
27
|
|
|
24
28
|
一个 LobeChat 的插件由以下几个部分组成:
|
|
25
29
|
|
|
26
|
-
1. **插件索引**:用于展示插件的基本信息,包括插件名称、描述、作者、版本、插件描述清单的链接,官方的插件索引地址:[lobe-chat-plugins](https://github.com/lobehub/lobe-chat-plugins)。若想上架插件到官方插件市场,需要[提交 PR](https://github.com/lobehub/lobe-chat-plugins/pulls) 到该仓库;
|
|
30
|
+
1. **插件索引**:用于展示插件的基本信息,包括插件名称、描述、作者、版本、插件描述清单的链接,官方的插件索引地址:[lobe-chat-plugins](https://github.com/lobehub/lobe-chat-plugins)。若想上架插件到官方插件市场,需要 [提交 PR](https://github.com/lobehub/lobe-chat-plugins/pulls) 到该仓库;
|
|
27
31
|
2. **插件描述清单 (manifest)**:用于描述插件的功能实现,包含了插件的服务端描述、前端展示信息、版本号等。关于 manifest 的详细介绍,详见 [manifest][manifest-docs-url];
|
|
28
32
|
3. **插件服务**:用于实现插件描述清单中所描述的服务端和前端模块,分别如下:
|
|
29
33
|
- **服务端**:需要实现 manifest 中描述的 `api` 部分的接口能力;
|
|
30
|
-
- **前端 UI**(可选):需要实现 manifest 中描述的 `ui`
|
|
34
|
+
- **前端 UI**(可选):需要实现 manifest 中描述的 `ui` 部分的界面,该界面将会在插件消息中透出,进而实现比文本更加丰富的信息展示方式。
|
|
35
|
+
|
|
36
|
+
<br/>
|
|
31
37
|
|
|
32
38
|
## 自定义插件流程
|
|
33
39
|
|
|
34
|
-
|
|
40
|
+
本节将会介绍如何在 LobeChat 中添加和使用一个自定义插件。
|
|
35
41
|
|
|
36
|
-
### 1
|
|
42
|
+
### **`1`** 创建并启动插件项目
|
|
37
43
|
|
|
38
|
-
|
|
44
|
+
你需要先在本地创建一个插件项目,可以使用我们准备好的模板 [lobe-chat-plugin-template][lobe-chat-plugin-template-url]
|
|
39
45
|
|
|
40
46
|
```bash
|
|
41
47
|
$ git clone https://github.com/lobehub/chat-plugin-template.git
|
|
@@ -44,35 +50,35 @@ $ npm i
|
|
|
44
50
|
$ npm run dev
|
|
45
51
|
```
|
|
46
52
|
|
|
47
|
-
|
|
53
|
+
当出现`ready started server on 0.0.0.0:3400, url: http://localhost:3400` 时,说明插件服务已经在本地启动成功。
|
|
48
54
|
|
|
49
55
|

|
|
50
56
|
|
|
51
|
-
### 2
|
|
57
|
+
### **`2`** 在 LobeChat 角色设置中添加本地插件
|
|
52
58
|
|
|
53
59
|
接下来进入到 LobeChat 中,创建一个新的助手,并进入它的会话设置页:
|
|
54
60
|
|
|
55
61
|

|
|
56
62
|
|
|
57
|
-
|
|
63
|
+
点击插件列表右侧的 <kbd>添加<kbd/> 按钮,打开自定义插件添加弹窗:
|
|
58
64
|
|
|
59
65
|

|
|
60
66
|
|
|
61
|
-
在
|
|
67
|
+
在 **插件描述文件 Url** 地址 中填入 `http://localhost:3400/manifest-dev.json` ,这是我们本地启动的插件描述清单地址。
|
|
62
68
|
|
|
63
|
-
此时,你应该可以看到看到插件的标识符一栏已经被自动识别为 `chat-plugin-template
|
|
69
|
+
此时,你应该可以看到看到插件的标识符一栏已经被自动识别为 `chat-plugin-template`。接下来你需要填写剩下的表单字段(只有标题必填),然后点击 <kbd>保存</kbd> 按钮,即可完成自定义插件添加。
|
|
64
70
|
|
|
65
71
|

|
|
66
72
|
|
|
67
|
-
|
|
73
|
+
完成添加后,在插件列表中就能看到刚刚添加的插件,如果需要修改插件的配置,可以点击最右侧的 <kbd>设置</kbd> 按钮进行修改。
|
|
68
74
|
|
|
69
75
|

|
|
70
76
|
|
|
71
|
-
### 3
|
|
77
|
+
### **`3`** 会话测试插件功能
|
|
72
78
|
|
|
73
|
-
|
|
79
|
+
接来下我们需要测试这个插件的功能是否正常。
|
|
74
80
|
|
|
75
|
-
|
|
81
|
+
点击 <kbd>返回</kbd> 按钮回到会话区,然后向助手发送消息:「我应该穿什么? 」此时助手将会尝试向你询问,了解你的性别与当前的心情。
|
|
76
82
|
|
|
77
83
|

|
|
78
84
|
|
|
@@ -82,15 +88,17 @@ $ npm run dev
|
|
|
82
88
|
|
|
83
89
|
当完成这些操作后,你已经了解了添加自定义插件,并在 LobeChat 中使用的基础流程。
|
|
84
90
|
|
|
91
|
+
<br/>
|
|
92
|
+
|
|
85
93
|
## 本地插件开发
|
|
86
94
|
|
|
87
95
|
在上述流程中,我们已经了解插件的添加和使用的方式,接下来重点介绍自定义插件开发的过程。
|
|
88
96
|
|
|
89
97
|
### manifest
|
|
90
98
|
|
|
91
|
-
manifest
|
|
99
|
+
`manifest` 聚合了插件功能如何实现的信息。核心字段为 `api` 与 `ui`,分别描述了插件的服务端接口能力与前端渲染的界面地址。
|
|
92
100
|
|
|
93
|
-
以我们提供的模板中的 manifest 为例:
|
|
101
|
+
以我们提供的模板中的 `manifest` 为例:
|
|
94
102
|
|
|
95
103
|
```json
|
|
96
104
|
{
|
|
@@ -130,12 +138,12 @@ manifest 聚合了插件功能如何实现的信息。核心的字段为 `api`
|
|
|
130
138
|
在这份 manifest 中,主要包含了以下几个部分:
|
|
131
139
|
|
|
132
140
|
1. `identifier`:这是插件的唯一标识符,用来区分不同的插件,这个字段需要全局唯一。
|
|
133
|
-
2. `api
|
|
141
|
+
2. `api`:这是一个数组,包含了插件的所有 API 接口信息。每个接口都包含了url、name、description 和 parameters 字段,均为必填项。其中 `description` 和 `parameters` 两个字段,将会作为 [Function Call](https://sspai.com/post/81986) 的 `functions` 参数发送给 gpt, parameters 需要符合 [JSON Schema](https://json-schema.org/) 规范。 在这个例子中,api 接口名为 `recommendClothes` ,这个接口的功能是根据用户的心情和性别来推荐衣服。接口的参数包括用户的心情和性别,这两个参数都是必填项。
|
|
134
142
|
3. `ui`:这个字段包含了插件的用户界面信息,指明了 LobeChat 从哪个地址加载插件的前端界面。由于 LobeChat 插件界面加载是基于 iframe 实现的,因此可以按需指定插件界面的高度、宽度。
|
|
135
|
-
4. `gateway`:这个字段指定了 LobeChat 查询 api 接口的网关。LobeChat
|
|
143
|
+
4. `gateway`:这个字段指定了 LobeChat 查询 api 接口的网关。LobeChat 默认的插件网关是云端服务,而自定义插件的请求需要发给本地启动的服务,远端调用本地地址,一般调用不通。gateway 字段解决了该问题。通过在 manifest 中指定 gateway,LobeChat 将会向该地址发送插件请求,本地的网关地址将会调度请求到本地的插件服务。发布到线上的插件可以不用指定该字段。
|
|
136
144
|
5. `version`:这是插件的版本号,现阶段暂时没有作用;
|
|
137
145
|
|
|
138
|
-
|
|
146
|
+
在实际开发中,你可以根据自己的需求,修改插件的描述清单,声明想要实现的功能。 关于 manifest 各个字段的完整介绍,参见:[manifest][manifest-docs-url]。
|
|
139
147
|
|
|
140
148
|
### 项目结构
|
|
141
149
|
|
|
@@ -153,15 +161,15 @@ manifest 聚合了插件功能如何实现的信息。核心的字段为 `api`
|
|
|
153
161
|
│ │ └── index.tsx # 前端展示界面
|
|
154
162
|
```
|
|
155
163
|
|
|
156
|
-
|
|
164
|
+
本模板使用 Next.js 作为开发框架。你可以使用任何你熟悉的开发框架与开发语言,只要能够实现 manifest 中描述的功能即可。
|
|
157
165
|
|
|
158
|
-
|
|
166
|
+
同时也欢迎大家贡献更多框架与语言的插件模板。
|
|
159
167
|
|
|
160
168
|
### 服务端
|
|
161
169
|
|
|
162
|
-
|
|
170
|
+
服务端需要实现 manifest 中描述的 api 接口。在模板中,我们使用了 vercel 的 [Edge Runtime](https://nextjs.org/docs/pages/api-reference/edge),免去运维。
|
|
163
171
|
|
|
164
|
-
####
|
|
172
|
+
#### API 实现
|
|
165
173
|
|
|
166
174
|
针对 Edge Runtime ,我们在 `@lobehub/chat-plugin-sdk` 提供了 `createErrorResponse` 方法,用于快速返回错误响应。目前提供的错误类型详见:[PluginErrorType][plugin-error-type-url]。
|
|
167
175
|
|
|
@@ -185,13 +193,13 @@ export default async (req: Request) => {
|
|
|
185
193
|
};
|
|
186
194
|
```
|
|
187
195
|
|
|
188
|
-
其中 `maniClothes` 和 `womanClothes`
|
|
196
|
+
其中 `maniClothes` 和 `womanClothes` 是 mock 数据,在实际场景中,可以替换为数据库查询等。
|
|
189
197
|
|
|
190
|
-
####
|
|
198
|
+
#### Plugin Gateway
|
|
191
199
|
|
|
192
|
-
由于 LobeChat
|
|
200
|
+
由于 LobeChat 默认的插件网关是云端服务 `/api/plugins`,云端服务通过 manifest 上的 `api.url` 地址发送请求,以解决跨域问题。
|
|
193
201
|
|
|
194
|
-
|
|
202
|
+
针对自定义插件,插件请求需要发送给本地服务, 因此通过在 manifest 中指定网关 (<http://localhost:3400/api/gateway>),LobeChat 将会直接请求该地址,然后只需要在该地址下创建对应的网关即可。
|
|
195
203
|
|
|
196
204
|
```ts
|
|
197
205
|
import { createLobeChatPluginGateway } from '@lobehub/chat-plugins-gateway';
|
|
@@ -207,21 +215,21 @@ export default async createLobeChatPluginGateway();
|
|
|
207
215
|
|
|
208
216
|
### 插件 UI 界面
|
|
209
217
|
|
|
210
|
-
|
|
218
|
+
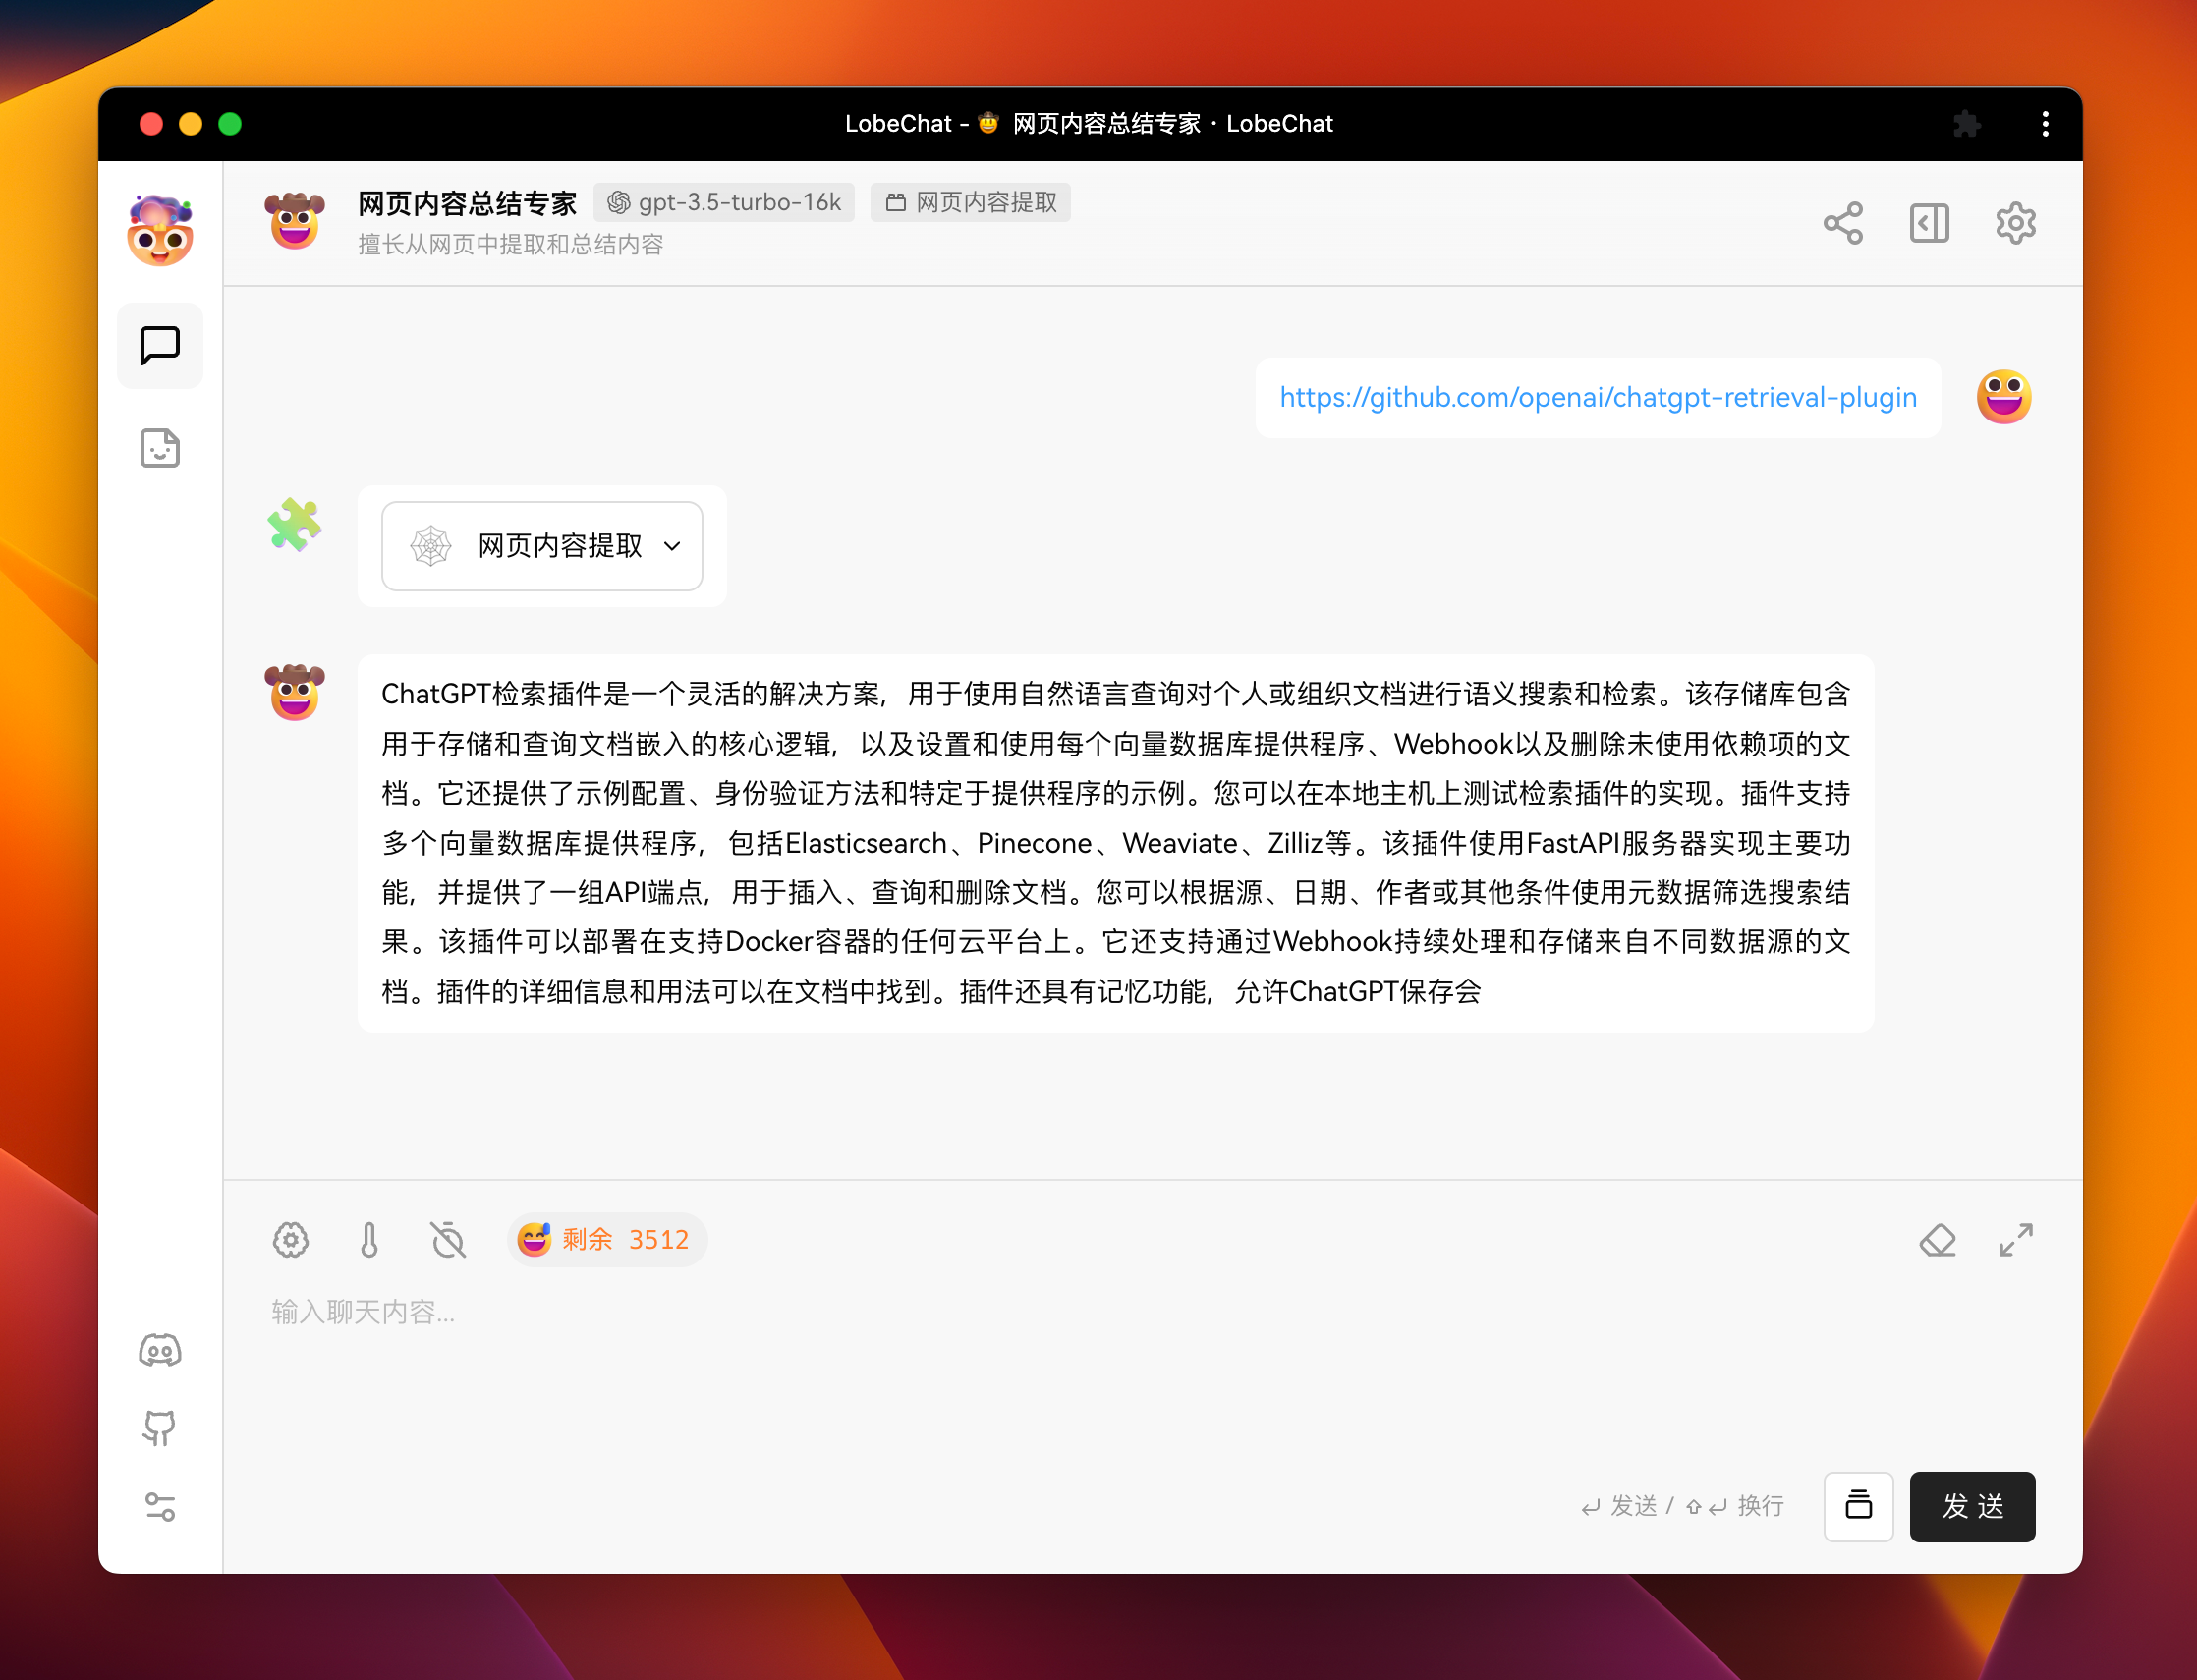
自定义插件的 UI 界面是一个可选项。例如 官方插件 [「🧩 / 🕸 网页内容提取」](https://github.com/lobehub/chat-plugin-web-crawler),没有实现相应的用户界面。
|
|
211
219
|
|
|
212
220
|
|
|
213
221
|
|
|
214
|
-
|
|
222
|
+
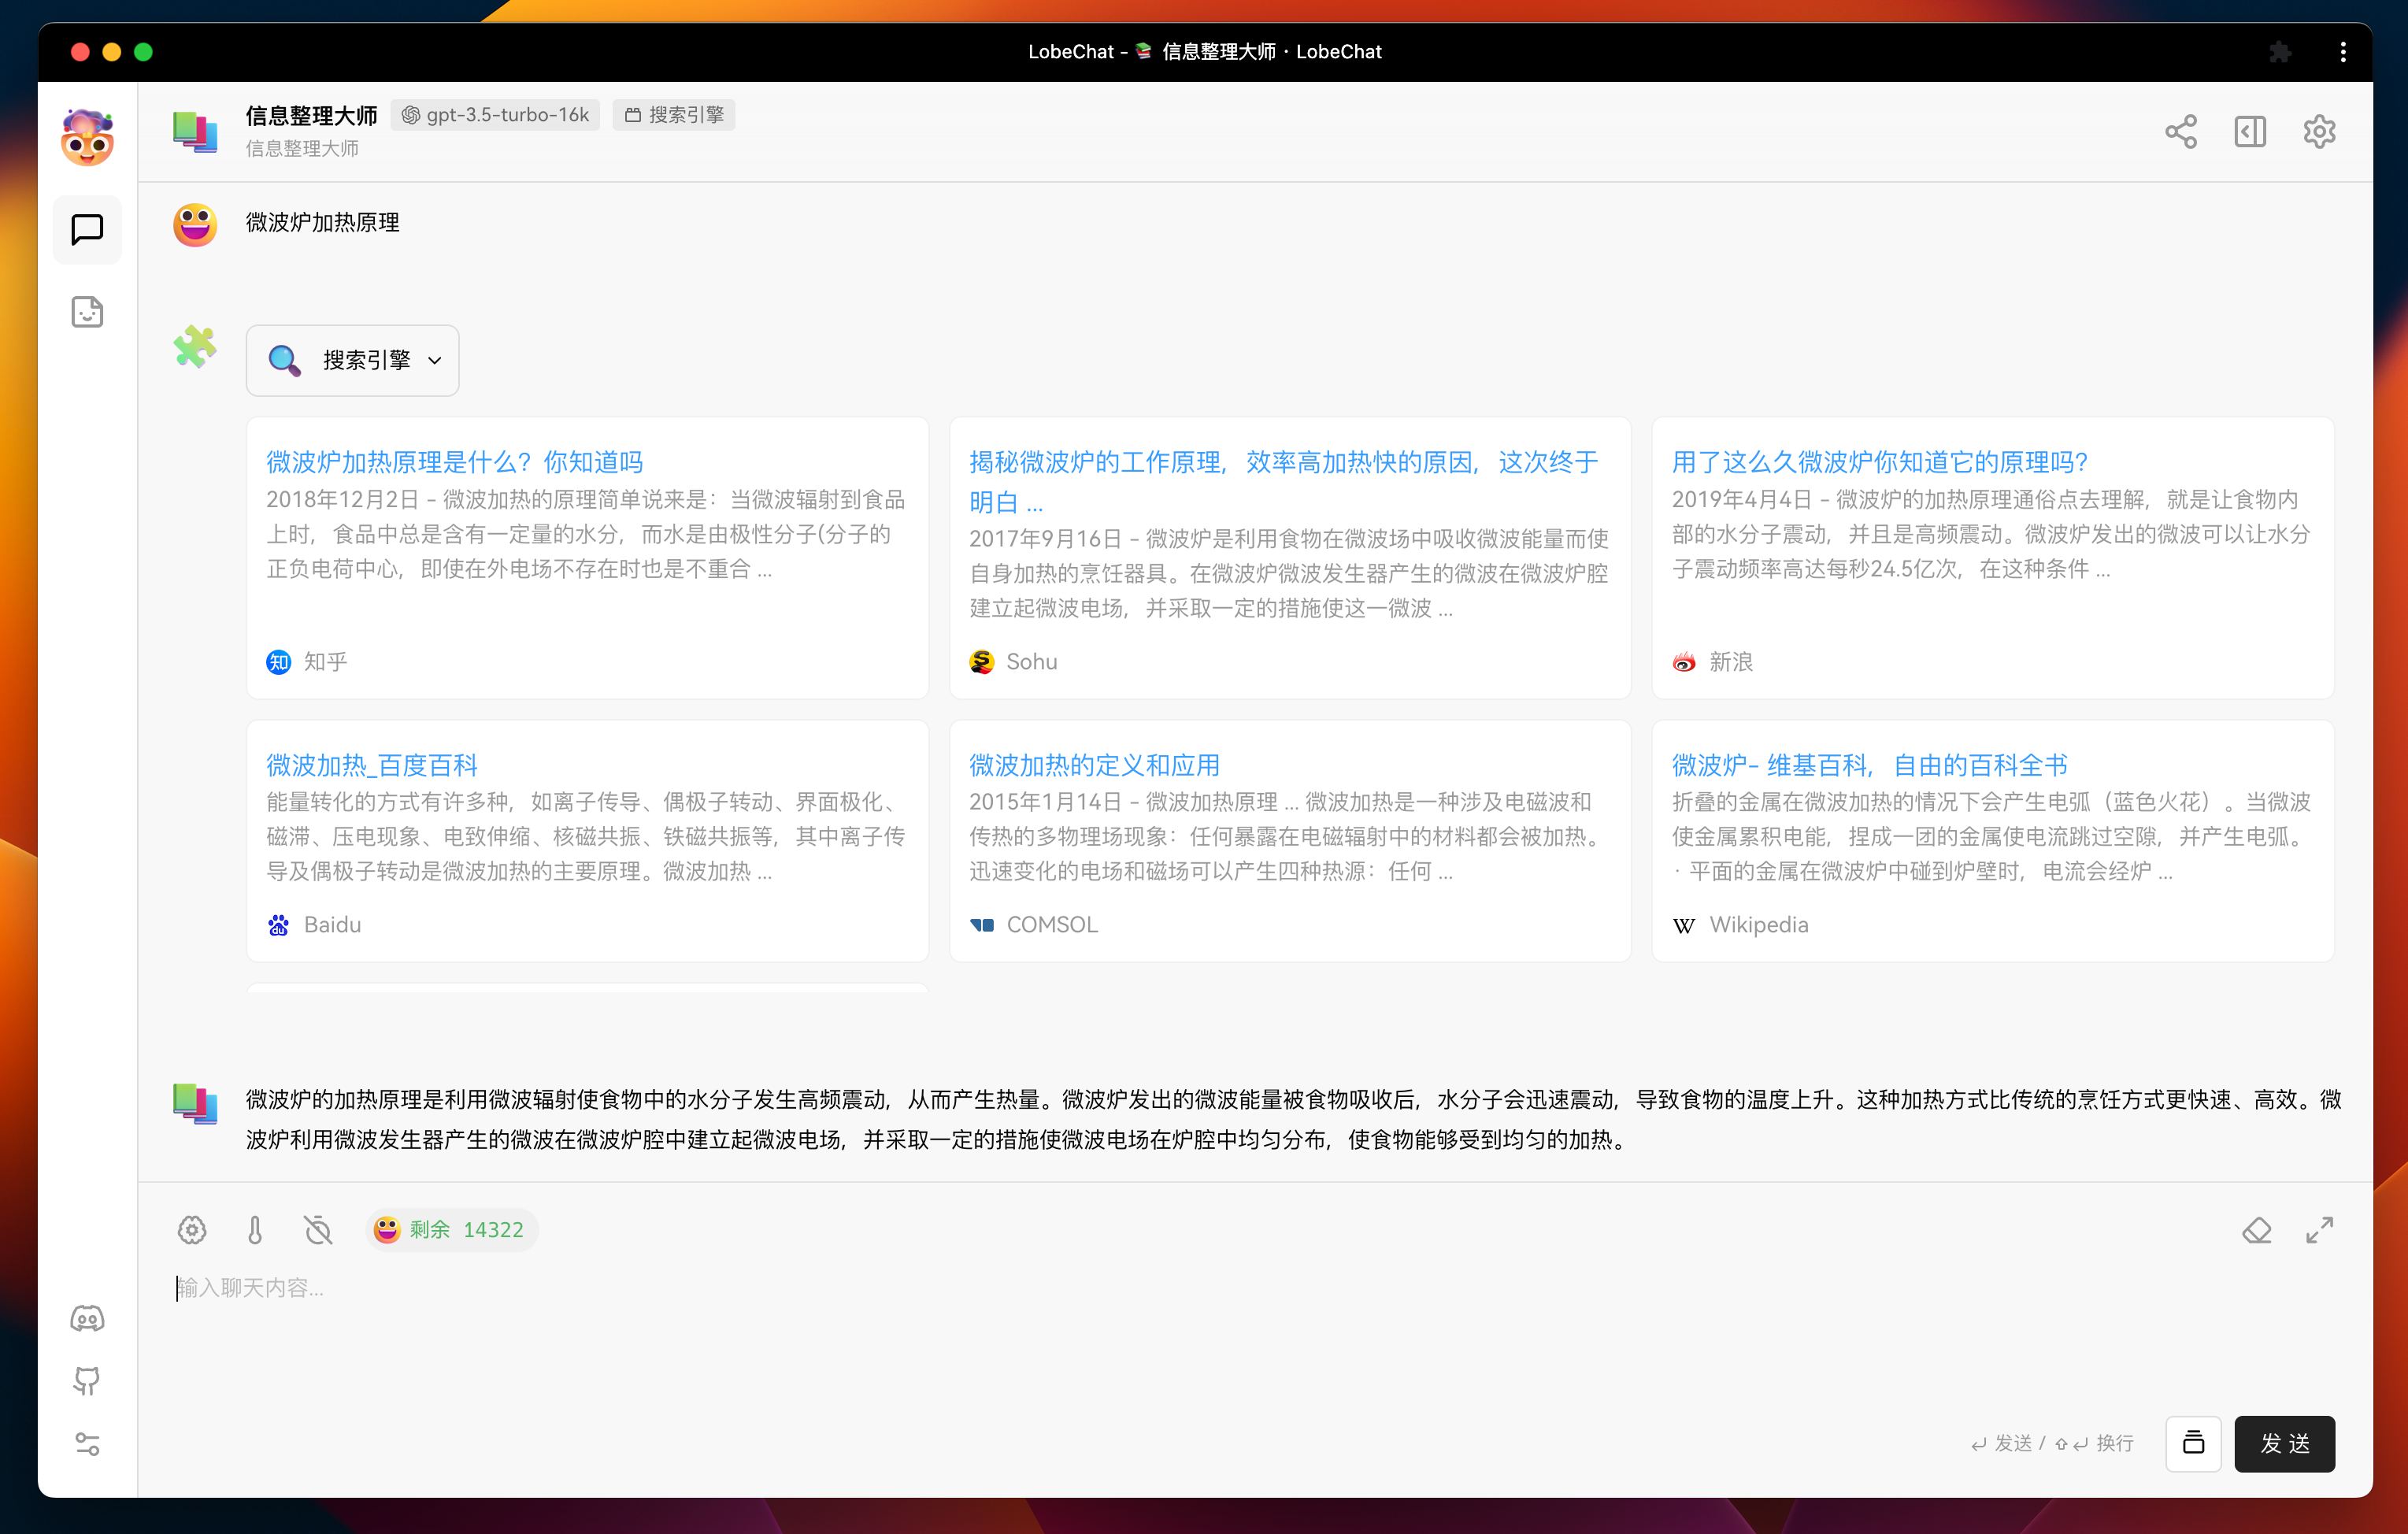
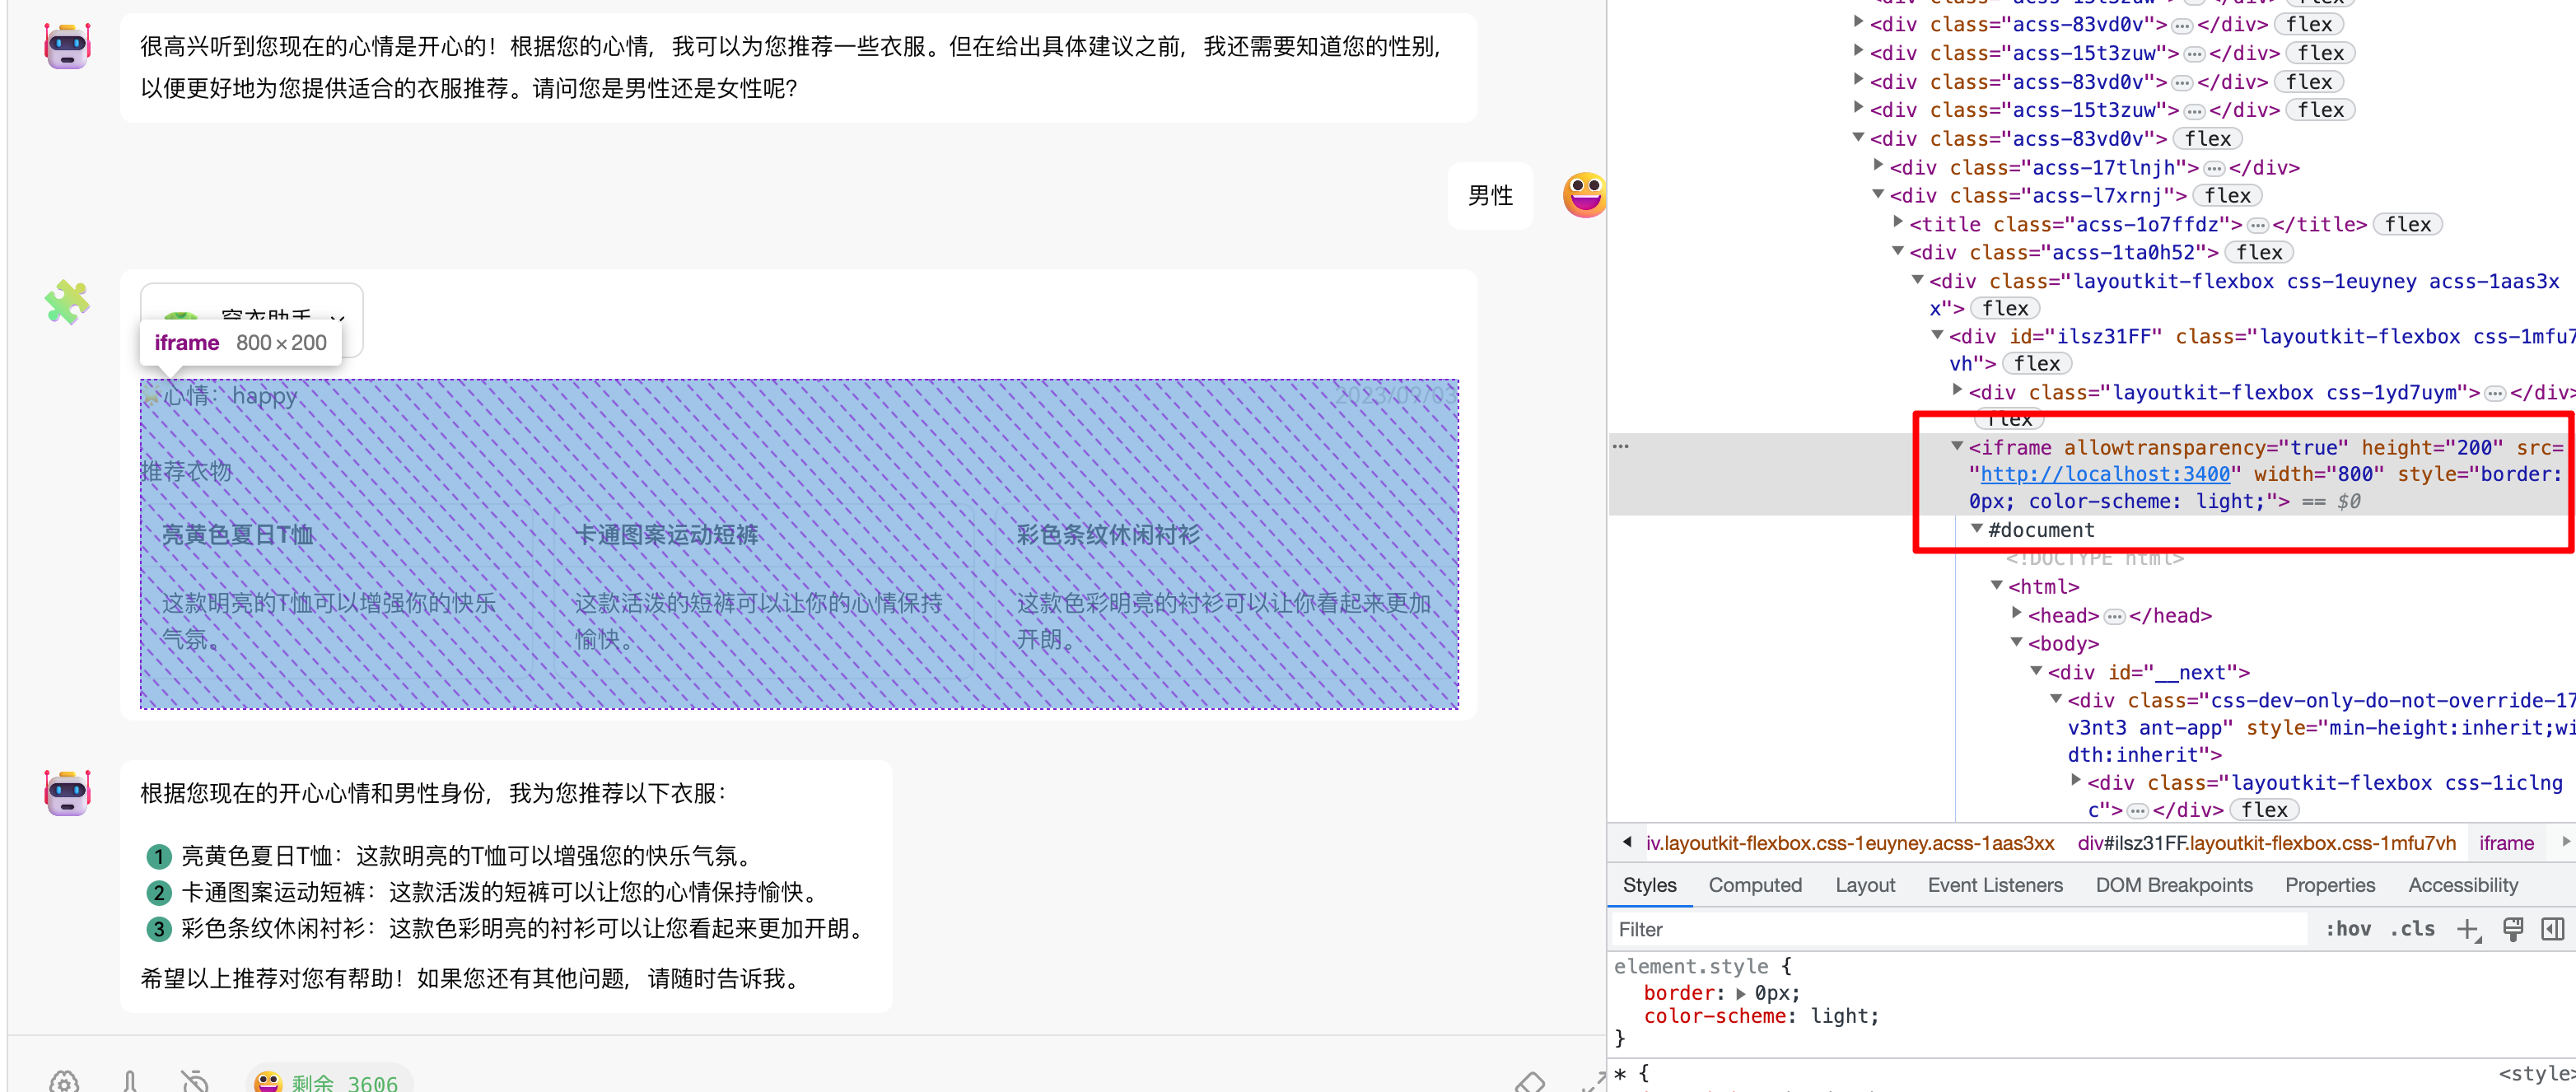
如果你希望在插件消息中展示更加丰富的信息,或者包含一些富交互操作,你可以为插件定制一个用户界面。例如下图则为[「搜索引擎」](https://github.com/lobehub/chat-plugin-search-engine)插件的用户界面。
|
|
215
223
|
|
|
216
224
|
|
|
217
225
|
|
|
218
226
|
#### 插件 UI 界面实现
|
|
219
227
|
|
|
220
|
-
LobeChat 通过 `iframe`
|
|
228
|
+
LobeChat 通过 `iframe` 实现插件 ui 的加载,使用 `postMessage` 实现主体与插件的通信。因此, 插件 UI 的实现方式与普通的网页开发一致,你可以使用任何你熟悉的前端框架与开发语言。
|
|
221
229
|
|
|
222
230
|
|
|
223
231
|
|
|
224
|
-
|
|
232
|
+
在我们提供的模板中使用了 React + Next.js + [antd](https://ant.design/) 作为前端界面框架,你可以在 [`src/pages/index.tsx`](https://github.com/lobehub/chat-plugin-template/blob/main/src/pages/index.tsx) 中找到用户界面的实现。
|
|
225
233
|
|
|
226
234
|
其中关于插件通信,我们在 [`@lobehub/chat-plugin-sdk`](https://github.com/lobehub/chat-plugin-sdk) 提供了相关方法,用于简化插件与 LobeChat 的通信。你可以通过 `fetchPluginMessage` 方法主动向 LobeChat 获取当前消息的数据。关于该方法的详细介绍,参见:[fetchPluginMessage][fetch-plugin-message-url]。
|
|
227
235
|
|
|
@@ -247,15 +255,39 @@ const Render = memo(() => {
|
|
|
247
255
|
export default Render;
|
|
248
256
|
```
|
|
249
257
|
|
|
258
|
+
<br/>
|
|
259
|
+
|
|
250
260
|
## 插件部署与发布
|
|
251
261
|
|
|
252
262
|
当你完成插件的开发后,你可以使用你习惯的方式进行插件的部署。例如使用 vercel ,或者打包成 docker 发布等等。
|
|
253
263
|
|
|
254
264
|
如果你希望插件被更多人使用,欢迎将你的插件 [提交上架](https://github.com/lobehub/lobe-chat-plugins) 到插件市场。
|
|
255
265
|
|
|
266
|
+
[![][submit-plugin-shield]][submit-plugin-url]
|
|
267
|
+
|
|
268
|
+
### 插件 Shield
|
|
269
|
+
|
|
270
|
+
[](https://github.com/lobehub/lobe-chat-plugins)
|
|
271
|
+
|
|
272
|
+
```markdown
|
|
273
|
+
[](https://github.com/lobehub/lobe-chat-plugins)
|
|
274
|
+
```
|
|
275
|
+
|
|
276
|
+
<br/>
|
|
277
|
+
|
|
278
|
+
## 链接
|
|
279
|
+
|
|
280
|
+
- **📘 Pluging SDK 文档**: <https://chat-plugin-sdk.lobehub.com>
|
|
281
|
+
- **🚀 chat-plugin-template**: <https://github.com/lobehub/chat-plugin-template>
|
|
282
|
+
- **🧩 chat-plugin-sdk**: <https://github.com/lobehub/chat-plugin-sdk>
|
|
283
|
+
- **🚪 chat-plugin-gateway**: <https://github.com/lobehub/chat-plugin-gateway>
|
|
284
|
+
- **🏪 lobe-chat-plugins**: <https://github.com/lobehub/lobe-chat-plugins>
|
|
285
|
+
|
|
256
286
|
<!-- LINK GROUP -->
|
|
257
287
|
|
|
258
288
|
[fetch-plugin-message-url]: https://github.com/lobehub/chat-plugin-template
|
|
259
289
|
[lobe-chat-plugin-template-url]: https://github.com/lobehub/chat-plugin-template
|
|
260
|
-
[manifest-docs-url]: https://
|
|
290
|
+
[manifest-docs-url]: https://chat-plugin-sdk.lobehub.com/guides/plugin-manifest
|
|
261
291
|
[plugin-error-type-url]: https://github.com/lobehub/chat-plugin-template
|
|
292
|
+
[submit-plugin-shield]: https://img.shields.io/badge/🧩/🏪_submit_plugin-%E2%86%92-50E3C2?style=for-the-badge
|
|
293
|
+
[submit-plugin-url]: https://github.com/lobehub/lobe-chat-plugins
|
|
@@ -8,9 +8,10 @@ If you have deployed your own project following the one-click deployment steps i
|
|
|
8
8
|
|
|
9
9
|
## Enabling Automatic Updates
|
|
10
10
|
|
|
11
|
-
>
|
|
11
|
+
> **Note**\
|
|
12
|
+
> If you encounter an error executing Upstream Sync, manually Sync Fork once
|
|
12
13
|
|
|
13
14
|
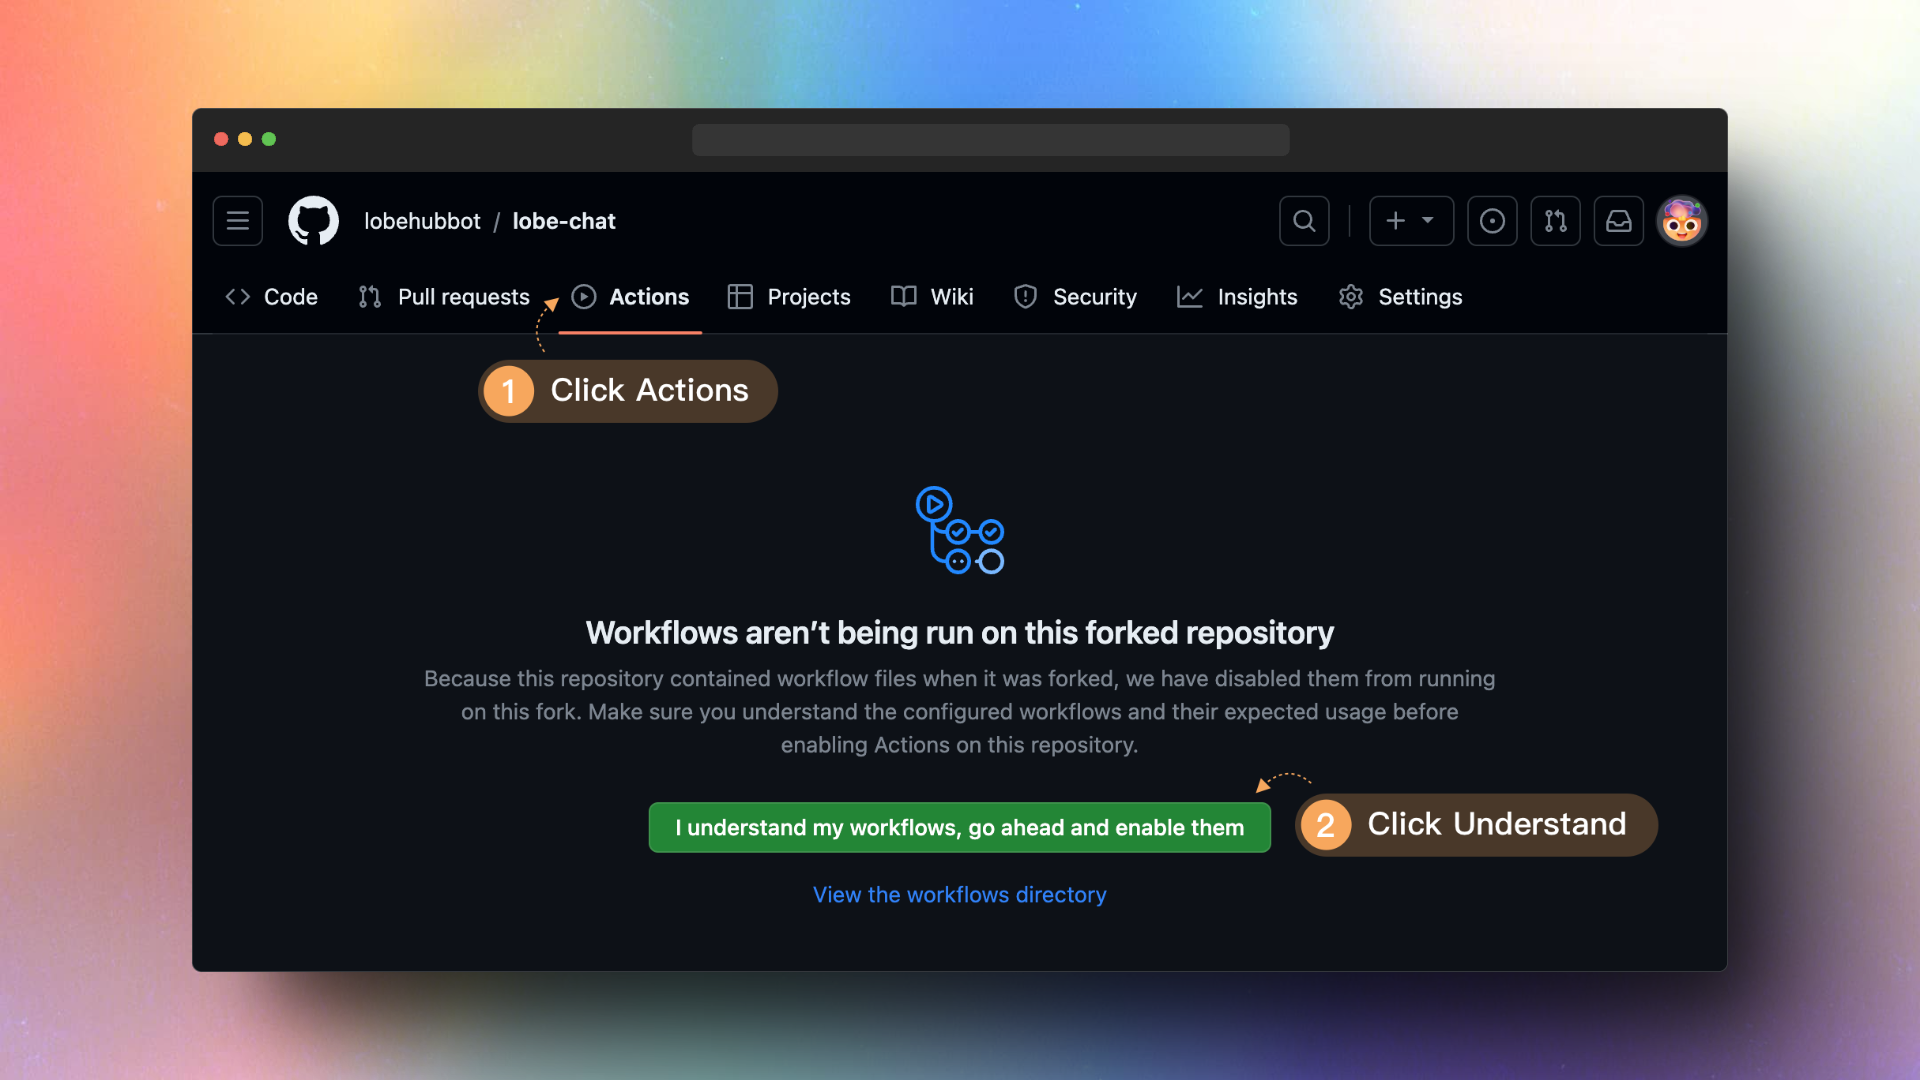
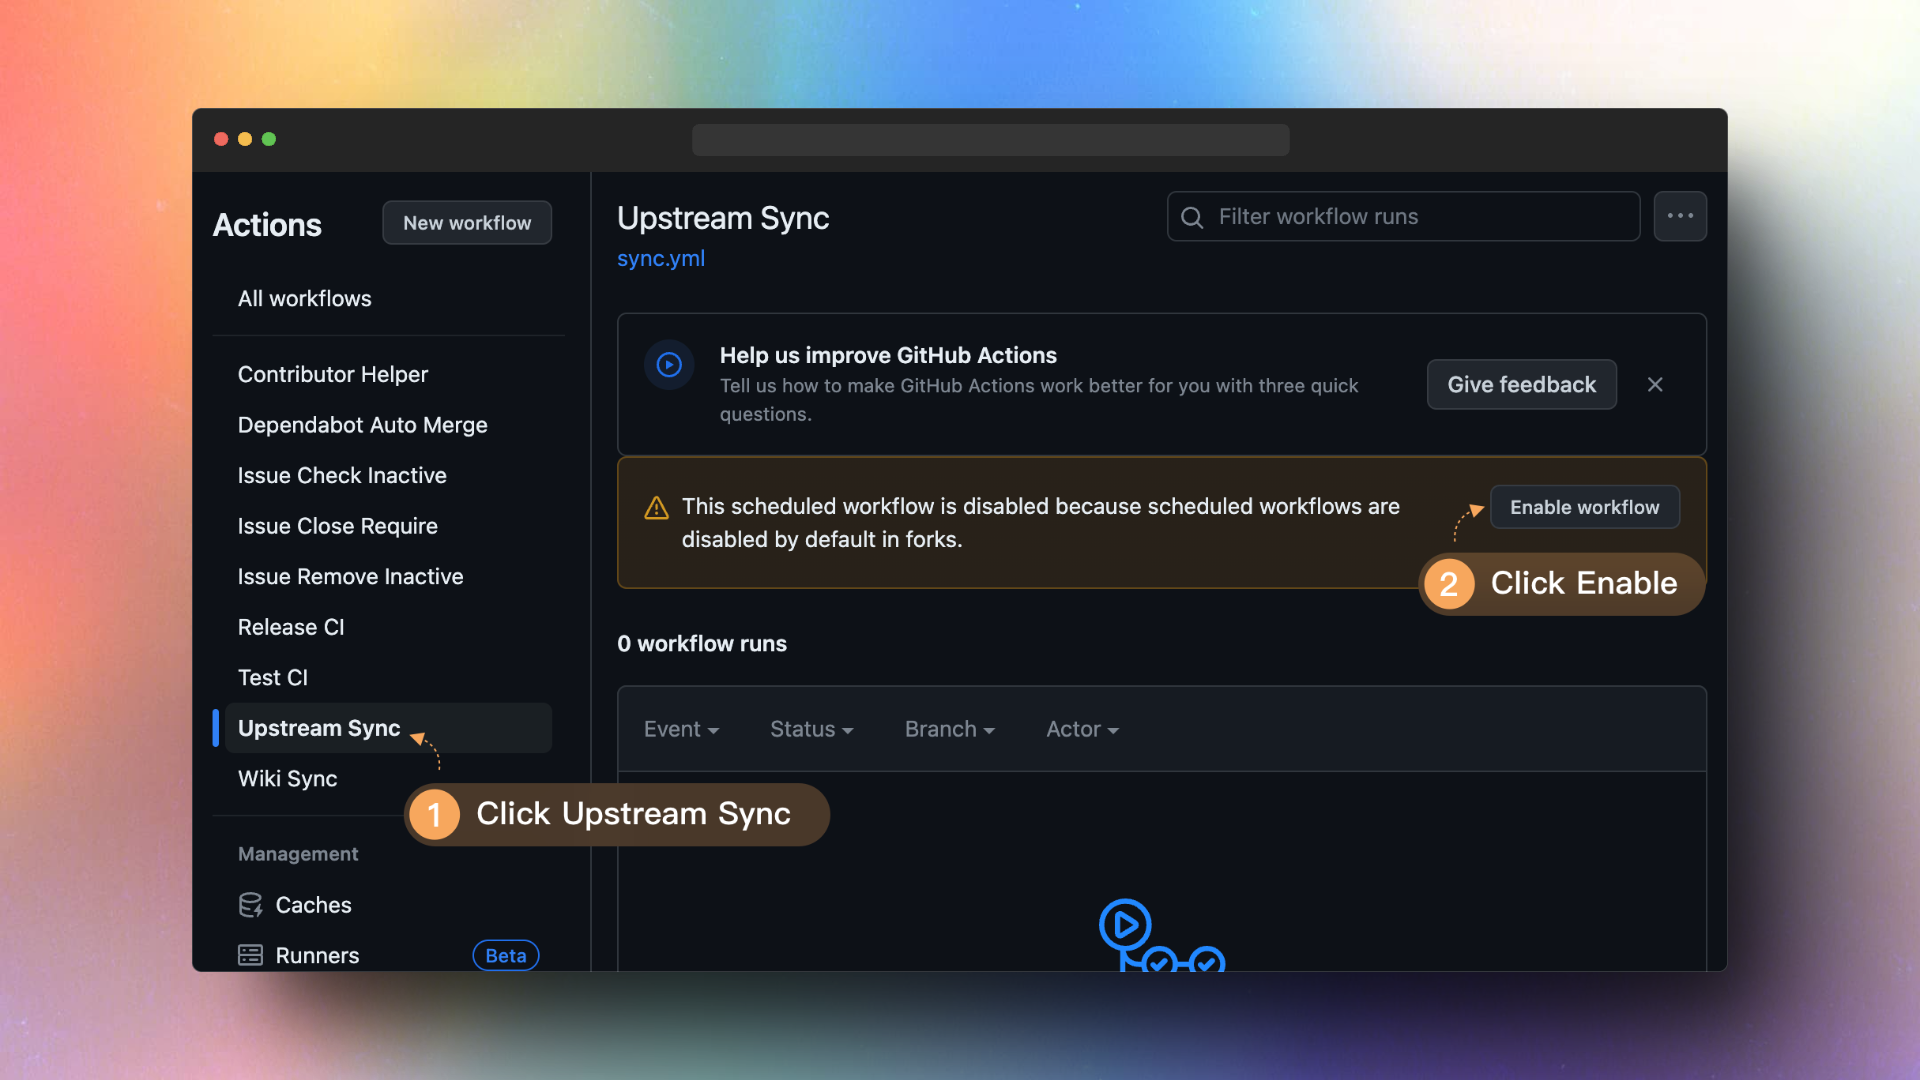
Once you have forked the project, due to Github restrictions, you will need to manually enable Workflows on the Actions page of your forked project and activate the Upstream Sync Action. Once enabled, you can set up hourly automatic updates.
|
|
14
15
|
|
|
15
|
-
|
|
17
|
+
|
|
@@ -8,9 +8,10 @@
|
|
|
8
8
|
|
|
9
9
|
## 启动自动更新
|
|
10
10
|
|
|
11
|
-
>
|
|
11
|
+
> **Note**\
|
|
12
|
+
> 如果你在执行 `Upstream Sync` 时遇到错误,请手动执再行一次
|
|
12
13
|
|
|
13
14
|
当你 Fork 了项目后,由于 Github 的限制,你需要手动在你 Fork 的项目的 Actions 页面启用 Workflows,并启动 Upstream Sync Action。启用后,你可以设置每小时进行一次自动更新。
|
|
14
15
|
|
|
15
|
-

|
|
17
|
+

|
package/docs/_Sidebar.md
CHANGED
|
@@ -1,22 +1,29 @@
|
|
|
1
1
|
## Lobe Chat Wiki
|
|
2
2
|
|
|
3
|
-
|
|
3
|
+
#### 🏠 Home
|
|
4
4
|
|
|
5
|
-
- [TOC](Home)
|
|
5
|
+
- [TOC](Home) | [目录](Home)
|
|
6
6
|
|
|
7
|
-
|
|
7
|
+
#### 🤯 LobeChat
|
|
8
8
|
|
|
9
|
-
- [Upstream Sync](Upstream-Sync.
|
|
10
|
-
|
|
11
|
-
- [简体中文](Upstream-Sync.zh-CN)
|
|
9
|
+
- [Upstream Sync](Upstream-Sync) | [中文](Upstream-Sync.zh-CN)
|
|
10
|
+
- [Deploying with Azure OpenAI](Deploy-with-Azure-OpenAI) | [中文](Deploy-with-Azure-OpenAI.zh-CN)
|
|
12
11
|
|
|
13
|
-
|
|
12
|
+
#### 🤖 Agents
|
|
14
13
|
|
|
15
|
-
- [Agent Index]
|
|
14
|
+
- [Agent Index][agent-index] | [中文][agent-index-cn]
|
|
16
15
|
|
|
17
|
-
|
|
16
|
+
#### 🧩 Plugins
|
|
18
17
|
|
|
19
|
-
- [Plugin Index]
|
|
20
|
-
- [Plugin Development](Plugin-Development.
|
|
21
|
-
|
|
22
|
-
|
|
18
|
+
- [Plugin Index][plugin-index] | [中文][plugin-index-cn]
|
|
19
|
+
- [Plugin Development](Plugin-Development) | [中文](Plugin-Development.zh-CN)
|
|
20
|
+
- [Plugin SDK Docs][plugin-sdk] | [中文][plugin-skd-cn]
|
|
21
|
+
|
|
22
|
+
<!-- LINK GROUP -->
|
|
23
|
+
|
|
24
|
+
[agent-index]: https://github.com/lobehub/lobe-chat-agents
|
|
25
|
+
[agent-index-cn]: https://github.com/lobehub/lobe-chat-agents/blob/main/README.zh-CN.md
|
|
26
|
+
[plugin-index]: https://github.com/lobehub/lobe-chat-plugins
|
|
27
|
+
[plugin-index-cn]: https://github.com/lobehub/lobe-chat-plugins/blob/main/README.zh-CN.md
|
|
28
|
+
[plugin-sdk]: https://chat-plugin-sdk.lobehub.com
|
|
29
|
+
[plugin-skd-cn]: https://chat-plugin-sdk.lobehub.com
|
|
@@ -1,49 +1,49 @@
|
|
|
1
1
|
{
|
|
2
2
|
"about": "About",
|
|
3
3
|
"advanceSettings": "Advanced Settings",
|
|
4
|
-
"agentDefaultMessage": "Hello, I'm **{{name}}**. You can start chatting with me right away or go to [
|
|
4
|
+
"agentDefaultMessage": "Hello, I'm **{{name}}**. You can start chatting with me right away or go to [Agent Settings](/chat/setting#session={{id}}) to complete my information.",
|
|
5
5
|
"agentDefaultMessageWithSystemRole": "Hello, I'm **{{name}}**, {{systemRole}}. Let's start chatting!",
|
|
6
6
|
"agentMaxToken": "Max Session Length",
|
|
7
7
|
"agentModel": "Model",
|
|
8
|
-
"agentProfile": "
|
|
8
|
+
"agentProfile": "Agent Information",
|
|
9
9
|
"appInitializing": "LobeChat is initializing, please wait...",
|
|
10
10
|
"archive": "Archive",
|
|
11
11
|
"autoGenerate": "Auto Generate",
|
|
12
|
-
"autoGenerateTooltip": "Auto generate
|
|
12
|
+
"autoGenerateTooltip": "Auto generate agent description based on prompts",
|
|
13
13
|
"backToBottom": "Go to Latest Messages",
|
|
14
14
|
"cancel": "Cancel",
|
|
15
15
|
"changelog": "Changelog",
|
|
16
16
|
"clearCurrentMessages": "Clear Current Session Messages",
|
|
17
17
|
"close": "Close",
|
|
18
18
|
"confirmClearCurrentMessages": "You are about to clear the current session messages. Once cleared, they cannot be recovered. Please confirm your operation.",
|
|
19
|
-
"confirmRemoveSessionItemAlert": "You are about to delete this
|
|
19
|
+
"confirmRemoveSessionItemAlert": "You are about to delete this agent. Once deleted, it cannot be recovered. Please confirm your operation.",
|
|
20
20
|
"copy": "Copy",
|
|
21
21
|
"copySuccess": "Copy Success",
|
|
22
|
-
"defaultAgent": "Custom
|
|
23
|
-
"defaultSession": "Custom
|
|
22
|
+
"defaultAgent": "Custom Agent",
|
|
23
|
+
"defaultSession": "Custom Agent",
|
|
24
24
|
"delete": "Delete",
|
|
25
25
|
"edit": "Edit",
|
|
26
26
|
"export": "Export Configuration",
|
|
27
27
|
"exportType": {
|
|
28
|
-
"agent": "Export
|
|
29
|
-
"agentWithMessage": "Export
|
|
30
|
-
"all": "Export Global Settings and All
|
|
31
|
-
"allAgent": "Export All
|
|
32
|
-
"allAgentWithMessage": "Export All
|
|
28
|
+
"agent": "Export Agent Settings",
|
|
29
|
+
"agentWithMessage": "Export Agent and Messages",
|
|
30
|
+
"all": "Export Global Settings and All Agent Data",
|
|
31
|
+
"allAgent": "Export All Agent Settings",
|
|
32
|
+
"allAgentWithMessage": "Export All Agents and Messages",
|
|
33
33
|
"globalSetting": "Export Global Settings"
|
|
34
34
|
},
|
|
35
35
|
"feedback": "Feedback",
|
|
36
36
|
"import": "Import Configuration",
|
|
37
37
|
"inbox": {
|
|
38
|
-
"defaultMessage": "Hello, I'm your intelligent
|
|
39
|
-
"desc": "Activate the brain cluster and spark your thinking. Your intelligent
|
|
38
|
+
"defaultMessage": "Hello, I'm your intelligent agent. You can ask me any questions and I will do my best to answer you. If you need a more professional or customized agent, you can click <kbd>+</kbd> to create a custom agent.",
|
|
39
|
+
"desc": "Activate the brain cluster and spark your thinking. Your intelligent agent is here to communicate with you about everything.",
|
|
40
40
|
"title": "Chat Freely"
|
|
41
41
|
},
|
|
42
42
|
"message": {
|
|
43
43
|
"function_loading": "Plugin request in progress..."
|
|
44
44
|
},
|
|
45
45
|
"moreSetting": "More Settings...",
|
|
46
|
-
"newAgent": "New
|
|
46
|
+
"newAgent": "New Agent",
|
|
47
47
|
"noDescription": "No Description",
|
|
48
48
|
"ok": "OK",
|
|
49
49
|
"pin": "Pin",
|
|
@@ -53,10 +53,10 @@
|
|
|
53
53
|
"reset": "Reset",
|
|
54
54
|
"retry": "Retry",
|
|
55
55
|
"roleAndArchive": "Roles and Archives",
|
|
56
|
-
"searchAgentPlaceholder": "Search
|
|
56
|
+
"searchAgentPlaceholder": "Search Agents and Conversations...",
|
|
57
57
|
"send": "Send",
|
|
58
58
|
"sendPlaceholder": "Enter chat content...",
|
|
59
|
-
"sessionList": "
|
|
59
|
+
"sessionList": "Agent List",
|
|
60
60
|
"setting": "Settings",
|
|
61
61
|
"share": "Share",
|
|
62
62
|
"stop": "Stop",
|
|
@@ -79,7 +79,7 @@
|
|
|
79
79
|
"searchPlaceholder": "Search Topics...",
|
|
80
80
|
"title": "Topic"
|
|
81
81
|
},
|
|
82
|
-
"updateAgent": "Update
|
|
82
|
+
"updateAgent": "Update Agent Information",
|
|
83
83
|
"updatePrompt": "Update Prompts",
|
|
84
84
|
"warp": "Line break"
|
|
85
85
|
}
|
|
@@ -1,12 +1,16 @@
|
|
|
1
1
|
{
|
|
2
|
-
"addAgent": "Add
|
|
2
|
+
"addAgent": "Add Agent",
|
|
3
3
|
"search": {
|
|
4
|
-
"placeholder": "Search
|
|
4
|
+
"placeholder": "Search agent name, description or keywords..."
|
|
5
5
|
},
|
|
6
6
|
"sidebar": {
|
|
7
7
|
"comment": "Comments",
|
|
8
8
|
"prompt": "Prompts",
|
|
9
|
-
"title": "
|
|
9
|
+
"title": "Agent Details"
|
|
10
10
|
},
|
|
11
|
-
"submitAgent": "Submit
|
|
12
|
-
|
|
11
|
+
"submitAgent": "Submit Agent",
|
|
12
|
+
"title": {
|
|
13
|
+
"recentSubmits": "Recent Submits",
|
|
14
|
+
"allAgents": "All Agents"
|
|
15
|
+
}
|
|
16
|
+
}
|
|
@@ -73,7 +73,8 @@
|
|
|
73
73
|
"useAzure": {
|
|
74
74
|
"desc": "Using OpenAI services from Azure",
|
|
75
75
|
"fetch": "Get list",
|
|
76
|
-
"title": "Azure OpenAI"
|
|
76
|
+
"title": "Azure OpenAI",
|
|
77
|
+
"serverConfig": "The administrator has enabled Azure OpenAI on the server side, switching is prohibited"
|
|
77
78
|
}
|
|
78
79
|
},
|
|
79
80
|
"waitingForMore": "<1>Access to other models is planned</1>, so stay tuned ✨"
|
|
@@ -86,11 +87,11 @@
|
|
|
86
87
|
"title": "Background Color"
|
|
87
88
|
},
|
|
88
89
|
"description": {
|
|
89
|
-
"placeholder": "Please enter
|
|
90
|
-
"title": "
|
|
90
|
+
"placeholder": "Please enter agent description",
|
|
91
|
+
"title": "Agent Description"
|
|
91
92
|
},
|
|
92
93
|
"name": {
|
|
93
|
-
"placeholder": "Please enter
|
|
94
|
+
"placeholder": "Please enter agent name",
|
|
94
95
|
"title": "Name"
|
|
95
96
|
},
|
|
96
97
|
"prompt": {
|
|
@@ -101,7 +102,7 @@
|
|
|
101
102
|
"placeholder": "Please enter tag",
|
|
102
103
|
"title": "Tag"
|
|
103
104
|
},
|
|
104
|
-
"title": "
|
|
105
|
+
"title": "Agent Information"
|
|
105
106
|
},
|
|
106
107
|
"settingChat": {
|
|
107
108
|
"chatStyleType": {
|
|
@@ -229,8 +230,8 @@
|
|
|
229
230
|
"title": "Theme Settings"
|
|
230
231
|
},
|
|
231
232
|
"tab": {
|
|
232
|
-
"agent": "Default
|
|
233
|
+
"agent": "Default Agent",
|
|
233
234
|
"common": "Common Settings",
|
|
234
235
|
"llm": "Custom LLM API"
|
|
235
236
|
}
|
|
236
|
-
}
|
|
237
|
+
}
|
|
@@ -4,11 +4,11 @@
|
|
|
4
4
|
"start": "Start Now"
|
|
5
5
|
},
|
|
6
6
|
"header": "Welcome",
|
|
7
|
-
"pickAgent": "Or choose from the following
|
|
7
|
+
"pickAgent": "Or choose from the following agent templates",
|
|
8
8
|
"skip": "Skip Creation",
|
|
9
9
|
"slogan": {
|
|
10
|
-
"desc1": "Unlock the power of your brain and ignite your creativity. Your intelligent
|
|
11
|
-
"desc2": "Create your first
|
|
10
|
+
"desc1": "Unlock the power of your brain and ignite your creativity. Your intelligent agent is always here.",
|
|
11
|
+
"desc2": "Create your first agent and let's get started~",
|
|
12
12
|
"title": "Give yourself a smarter brain"
|
|
13
13
|
}
|
|
14
14
|
}
|