@lobehub/chat 0.135.3 → 0.136.0
This diff represents the content of publicly available package versions that have been released to one of the supported registries. The information contained in this diff is provided for informational purposes only and reflects changes between package versions as they appear in their respective public registries.
- package/CHANGELOG.md +42 -0
- package/docs/self-hosting/advanced/authentication.mdx +14 -80
- package/docs/self-hosting/advanced/authentication.zh-CN.mdx +14 -74
- package/docs/self-hosting/advanced/sso-providers/auth0.mdx +92 -0
- package/docs/self-hosting/advanced/sso-providers/auth0.zh-CN.mdx +85 -0
- package/docs/self-hosting/advanced/sso-providers/microsoft-entra-id.mdx +74 -0
- package/docs/self-hosting/advanced/sso-providers/microsoft-entra-id.zh-CN.mdx +76 -0
- package/docs/self-hosting/environment-variables/basic.mdx +37 -1
- package/docs/self-hosting/environment-variables/basic.zh-CN.mdx +36 -1
- package/package.json +2 -2
- package/src/app/api/auth/next-auth.ts +39 -12
- package/src/app/chat/features/TopicListContent/Topic/index.tsx +3 -0
- package/src/app/settings/common/Common.tsx +1 -1
- package/src/config/server/app.ts +4 -0
- package/src/features/Conversation/Error/OAuthForm.tsx +1 -1
package/CHANGELOG.md
CHANGED
|
@@ -2,6 +2,48 @@
|
|
|
2
2
|
|
|
3
3
|
# Changelog
|
|
4
4
|
|
|
5
|
+
## [Version 0.136.0](https://github.com/lobehub/lobe-chat/compare/v0.135.4...v0.136.0)
|
|
6
|
+
|
|
7
|
+
<sup>Released on **2024-03-15**</sup>
|
|
8
|
+
|
|
9
|
+
#### ✨ Features
|
|
10
|
+
|
|
11
|
+
- **misc**: Support azure-ad as a new sso provider.
|
|
12
|
+
|
|
13
|
+
<br/>
|
|
14
|
+
|
|
15
|
+
<details>
|
|
16
|
+
<summary><kbd>Improvements and Fixes</kbd></summary>
|
|
17
|
+
|
|
18
|
+
#### What's improved
|
|
19
|
+
|
|
20
|
+
- **misc**: Support azure-ad as a new sso provider, closes [#1456](https://github.com/lobehub/lobe-chat/issues/1456) ([6649cd1](https://github.com/lobehub/lobe-chat/commit/6649cd1))
|
|
21
|
+
|
|
22
|
+
</details>
|
|
23
|
+
|
|
24
|
+
<div align="right">
|
|
25
|
+
|
|
26
|
+
[](#readme-top)
|
|
27
|
+
|
|
28
|
+
</div>
|
|
29
|
+
|
|
30
|
+
### [Version 0.135.4](https://github.com/lobehub/lobe-chat/compare/v0.135.3...v0.135.4)
|
|
31
|
+
|
|
32
|
+
<sup>Released on **2024-03-15**</sup>
|
|
33
|
+
|
|
34
|
+
<br/>
|
|
35
|
+
|
|
36
|
+
<details>
|
|
37
|
+
<summary><kbd>Improvements and Fixes</kbd></summary>
|
|
38
|
+
|
|
39
|
+
</details>
|
|
40
|
+
|
|
41
|
+
<div align="right">
|
|
42
|
+
|
|
43
|
+
[](#readme-top)
|
|
44
|
+
|
|
45
|
+
</div>
|
|
46
|
+
|
|
5
47
|
### [Version 0.135.3](https://github.com/lobehub/lobe-chat/compare/v0.135.2...v0.135.3)
|
|
6
48
|
|
|
7
49
|
<sup>Released on **2024-03-15**</sup>
|
|
@@ -1,94 +1,28 @@
|
|
|
1
|
-
import { Callout, Steps } from 'nextra/components';
|
|
2
|
-
|
|
3
1
|
# Identity Verification Service
|
|
4
2
|
|
|
5
|
-
LobeChat supports
|
|
6
|
-
|
|
7
|
-
## Configure Identity Verification Service
|
|
8
|
-
|
|
9
|
-
<Steps>
|
|
10
|
-
### Create Auth0 Application
|
|
11
|
-
|
|
12
|
-
Register and log in to [Auth0][auth0-client-page], click on the "Applications" in the left navigation bar to switch to the application management interface, and click "Create Application" in the upper right corner to create an application.
|
|
13
|
-
|
|
14
|
-

|
|
15
|
-
|
|
16
|
-
Fill in the application name you want to display to the organization users, choose any application type, and click "Create".
|
|
17
|
-
|
|
18
|
-

|
|
19
|
-
|
|
20
|
-
After successful creation, click on the corresponding application to enter the application details page, switch to the "Settings" tab, and you can see the corresponding configuration information.
|
|
21
|
-
|
|
22
|
-

|
|
23
|
-
|
|
24
|
-
In the application configuration page, you also need to configure Allowed Callback URLs, where you should fill in:
|
|
25
|
-
|
|
26
|
-
```bash
|
|
27
|
-
http(s)://your-domain/api/auth/callback/auth0
|
|
28
|
-
```
|
|
3
|
+
LobeChat supports the configuration of external identity verification services for internal use within enterprises/organizations to centrally manage user authorization.
|
|
29
4
|
|
|
30
|
-
|
|
5
|
+
Currently supported identity verification services include:
|
|
31
6
|
|
|
32
|
-
|
|
33
|
-
|
|
34
|
-
consistent with the deployed URL.
|
|
35
|
-
</Callout>
|
|
7
|
+
- [Auth0](/en/self-hosting/sso-providers/auth0)
|
|
8
|
+
- [Microsoft Entra ID](/en/self-hosting/sso-providers/microsoft-entra-id)
|
|
36
9
|
|
|
37
|
-
|
|
38
|
-
|
|
39
|
-
Click on the "Users Management" in the left navigation bar to enter the user management interface, where you can create users for your organization to log in to LobeChat.
|
|
40
|
-
|
|
41
|
-

|
|
42
|
-
|
|
43
|
-
### Configure Environment Variables
|
|
44
|
-
|
|
45
|
-
When deploying LobeChat, you need to configure the following environment variables:
|
|
46
|
-
|
|
47
|
-
| Environment Variable | Type | Description |
|
|
48
|
-
| --------------------- | -------- | --------------------------------------------------------------------------------------------------------------------------------------------------------------------------------------------------- |
|
|
49
|
-
| `ENABLE_OAUTH_SSO` | Required | Enable single sign-on (SSO) for LobeChat. Set to `1` to enable single sign-on. |
|
|
50
|
-
| `NEXTAUTH_SECRET` | Required | Key used to encrypt Auth.js session tokens. You can generate a key using the following command: `openssl rand -base64 32` |
|
|
51
|
-
| `AUTH0_CLIENT_ID` | Required | Client ID of the Auth0 application |
|
|
52
|
-
| `AUTH0_CLIENT_SECRET` | Required | Client Secret of the Auth0 application |
|
|
53
|
-
| `AUTH0_ISSUER` | Required | Domain of the Auth0 application, `https://example.auth0.com` |
|
|
54
|
-
| `ACCESS_CODE` | Required | Add a password to access this service. You can set a sufficiently long random password to "disable" access code authorization. |
|
|
55
|
-
| `NEXTAUTH_URL` | Optional | The URL is used to specify the callback address for the execution of OAuth authentication in Auth.js. It needs to be set only when the default address is incorrect. `https://example.com/api/auth` |
|
|
56
|
-
|
|
57
|
-
You can refer to the related variable details at [Environment Variables](/en/self-hosting/environment-variable#auth0).
|
|
58
|
-
</Steps>
|
|
59
|
-
|
|
60
|
-
<Callout>
|
|
61
|
-
After successful deployment, users will be able to authenticate and use LobeChat using the users
|
|
62
|
-
configured in Auth0.
|
|
63
|
-
</Callout>
|
|
10
|
+
Click on the links to view the corresponding platform's configuration documentation.
|
|
64
11
|
|
|
65
12
|
## Advanced Configuration
|
|
66
13
|
|
|
67
|
-
|
|
68
|
-
|
|
69
|
-
If your enterprise or organization already has a unified identity authentication infrastructure, you can connect to an existing single sign-on service in Applications -> SSO Integrations.
|
|
70
|
-
|
|
71
|
-
Auth0 supports single sign-on services such as Azure Active Directory, Slack, Google Workspace, Office 365, Zoom, and more. For a detailed list of supported services, please refer to [this link][auth0-sso-integrations].
|
|
72
|
-
|
|
73
|
-

|
|
14
|
+
To simultaneously enable multiple identity verification sources, please set the `SSO_PROVIDERS` environment variable, separating them with commas, for example, `auth0,azure-ad`.
|
|
74
15
|
|
|
75
|
-
|
|
16
|
+
The order corresponds to the display order of the SSO providers.
|
|
76
17
|
|
|
77
|
-
|
|
18
|
+
| SSO Provider | Value |
|
|
19
|
+
| --- | --- |
|
|
20
|
+
| Auth0 | auth0 |
|
|
21
|
+
| Microsoft Entra ID | azure-ad |
|
|
78
22
|
|
|
79
|
-
|
|
23
|
+
## Other SSO Providers
|
|
80
24
|
|
|
81
|
-
|
|
82
|
-
Configuring social login services by default allows anyone to authenticate, which may lead to
|
|
83
|
-
LobeChat being abused by external users.
|
|
84
|
-
</Callout>
|
|
25
|
+
Please refer to the [NextAuth.js][next-auth-js] documentation and feel free to submit a Pull Request.
|
|
85
26
|
|
|
86
|
-
<Callout>
|
|
87
|
-
If you need to restrict login users, be sure to configure a **blocking policy**: After enabling
|
|
88
|
-
the social login option, refer to [this article][auth0-login-actions-manual] to create an Action
|
|
89
|
-
to set up a blocking/allow list.
|
|
90
|
-
</Callout>
|
|
91
27
|
|
|
92
|
-
[
|
|
93
|
-
[auth0-login-actions-manual]: https://auth0.com/blog/permit-or-deny-login-requests-using-auth0-actions/
|
|
94
|
-
[auth0-sso-integrations]: https://marketplace.auth0.com/features/sso-integrations
|
|
28
|
+
[next-auth-js]: https://next-auth.js.org/providers
|
|
@@ -1,88 +1,28 @@
|
|
|
1
|
-
import { Callout, Steps } from 'nextra/components';
|
|
2
|
-
|
|
3
1
|
# 身份验证服务
|
|
4
2
|
|
|
5
|
-
LobeChat 支持配置外部身份验证服务,供企业 /
|
|
6
|
-
|
|
7
|
-
## 配置身份验证服务
|
|
8
|
-
|
|
9
|
-
<Steps>
|
|
10
|
-
### 创建 Auth0 应用
|
|
11
|
-
|
|
12
|
-
注册并登录 [Auth0][auth0-client-page],点击左侧导航栏的「Applications」,切换到应用管理界面,点击右上角「Create Application」以创建应用。
|
|
13
|
-
|
|
14
|
-

|
|
15
|
-
|
|
16
|
-
填写你想向组织用户显示的应用名称,可选择任意应用类型,点击「Create」。
|
|
17
|
-
|
|
18
|
-

|
|
19
|
-
|
|
20
|
-
创建成功后,点击相应的应用,进入应用详情页,切换到「Settings」标签页,就可以看到相应的配置信息
|
|
21
|
-
|
|
22
|
-

|
|
23
|
-
|
|
24
|
-
在应用配置页面中,还需要配置 Allowed Callback URLs,在此处填写:
|
|
25
|
-
|
|
26
|
-
```bash
|
|
27
|
-
http(s)://your-domain/api/auth/callback/auth0
|
|
28
|
-
```
|
|
3
|
+
LobeChat 支持配置外部身份验证服务,供企业 / 组织内部使用,统一管理用户授权。
|
|
29
4
|
|
|
30
|
-
|
|
5
|
+
目前支持的身份验证服务有:
|
|
31
6
|
|
|
32
|
-
|
|
33
|
-
|
|
34
|
-
</Callout>
|
|
7
|
+
- [Auth0](/zh/self-hosting/sso-providers/auth0)
|
|
8
|
+
- [Microsoft Entra ID](/zh/self-hosting/sso-providers/microsoft-entra-id)
|
|
35
9
|
|
|
36
|
-
|
|
37
|
-
|
|
38
|
-
点击左侧导航栏的「Users Management」,进入用户管理界面,可以为你的组织新建用户,用以登录 LobeChat
|
|
39
|
-
|
|
40
|
-

|
|
41
|
-
|
|
42
|
-
### 配置环境变量
|
|
43
|
-
|
|
44
|
-
在部署 LobeChat 时,你需要配置以下环境变量:
|
|
45
|
-
|
|
46
|
-
| 环境变量 | 类型 | 描述 |
|
|
47
|
-
| --------------------- | -- | ------------------------------------------------------------------------------------------- |
|
|
48
|
-
| `ENABLE_OAUTH_SSO` | 必选 | 为 LobeChat 启用单点登录 (SSO)。设置为 `1` 以启用单点登录。 |
|
|
49
|
-
| `NEXTAUTH_SECRET` | 必选 | 用于加密 Auth.js 会话令牌的密钥。您可以使用以下命令生成秘钥: `openssl rand -base64 32` |
|
|
50
|
-
| `AUTH0_CLIENT_ID` | 必选 | Auth0 应用程序的 Client ID |
|
|
51
|
-
| `AUTH0_CLIENT_SECRET` | 必选 | Auth0 应用程序的 Client Secret |
|
|
52
|
-
| `AUTH0_ISSUER` | 必选 | Auth0 应用程序的 Domain,`https://example.auth0.com` |
|
|
53
|
-
| `ACCESS_CODE` | 必选 | 添加访问此服务的密码,你可以设置一个足够长的随机密码以 “禁用” 访问码授权 |
|
|
54
|
-
| `NEXTAUTH_URL` | 可选 | 该 URL 用于指定 Auth.js 在执行 OAuth 验证时的回调地址,当默认生成的重定向地址发生不正确时才需要设置。`https://example.com/api/auth` |
|
|
55
|
-
|
|
56
|
-
前往 [环境变量](/zh/self-hosting/environment-variable#auth0) 可查阅相关变量详情。
|
|
57
|
-
</Steps>
|
|
58
|
-
|
|
59
|
-
<Callout>部署成功后,用户将可以使用 Auth0 中配置的用户通过身份认证并使用 LobeChat。</Callout>
|
|
10
|
+
点击链接可以查看对应平台的配置文档。
|
|
60
11
|
|
|
61
12
|
## 进阶配置
|
|
62
13
|
|
|
63
|
-
|
|
64
|
-
|
|
65
|
-
如果你的企业或组织已有现有的统一身份认证设施,可在 Applications -> SSO Integrations 中,连接现有的单点登录服务。
|
|
66
|
-
|
|
67
|
-
Auth0 支持 Azure Active Directory / Slack / Google Workspace / Office 365 / Zoom 等单点登录服务,详细支持列表可参考 [这里][auth0-sso-integrations]
|
|
68
|
-
|
|
69
|
-

|
|
14
|
+
同时启用多个身份验证源请设置 `SSO_PROVIDERS` 环境变量,以逗号 `,` 分割,例如 `auth0,azure-ad`。
|
|
70
15
|
|
|
71
|
-
|
|
16
|
+
顺序为 SSO 提供商的显示顺序。
|
|
72
17
|
|
|
73
|
-
|
|
18
|
+
| SSO 提供商 | 值 |
|
|
19
|
+
| --- | --- |
|
|
20
|
+
| Auth0 | auth0 |
|
|
21
|
+
| Microsoft Entra ID | azure-ad |
|
|
74
22
|
|
|
75
|
-
|
|
23
|
+
## 其他 SSO 提供商
|
|
76
24
|
|
|
77
|
-
|
|
78
|
-
配置社交登录服务默认会允许所有人通过认证,这可能会导致 LobeChat 被外部人员滥用。
|
|
79
|
-
</Callout>
|
|
25
|
+
请参考 [NextAuth.js][next-auth-js] 文档,欢迎提交 Pull Request。
|
|
80
26
|
|
|
81
|
-
<Callout>
|
|
82
|
-
如果你需要限制登录人员,务必配置 **阻止策略**: 请在打开社交登录选项后,参考
|
|
83
|
-
[这篇文章][auth0-login-actions-manual] 创建 Action 来设置阻止 / 允许列表。
|
|
84
|
-
</Callout>
|
|
85
27
|
|
|
86
|
-
[
|
|
87
|
-
[auth0-login-actions-manual]: https://auth0.com/blog/permit-or-deny-login-requests-using-auth0-actions/
|
|
88
|
-
[auth0-sso-integrations]: https://marketplace.auth0.com/features/sso-integrations
|
|
28
|
+
[next-auth-js]: https://next-auth.js.org/providers
|
|
@@ -0,0 +1,92 @@
|
|
|
1
|
+
import { Callout, Steps } from 'nextra/components';
|
|
2
|
+
|
|
3
|
+
# Configure Auth0 Identity Verification Service
|
|
4
|
+
|
|
5
|
+
<Steps>
|
|
6
|
+
### Create Auth0 Application
|
|
7
|
+
|
|
8
|
+
Register and log in to [Auth0][auth0-client-page], click on the "Applications" in the left navigation bar to switch to the application management interface, and click "Create Application" in the upper right corner to create an application.
|
|
9
|
+
|
|
10
|
+

|
|
11
|
+
|
|
12
|
+
Fill in the application name you want to display to the organization users, choose any application type, and click "Create".
|
|
13
|
+
|
|
14
|
+

|
|
15
|
+
|
|
16
|
+
After successful creation, click on the corresponding application to enter the application details page, switch to the "Settings" tab, and you can see the corresponding configuration information.
|
|
17
|
+
|
|
18
|
+

|
|
19
|
+
|
|
20
|
+
In the application configuration page, you also need to configure Allowed Callback URLs, where you should fill in:
|
|
21
|
+
|
|
22
|
+
```bash
|
|
23
|
+
http(s)://your-domain/api/auth/callback/auth0
|
|
24
|
+
```
|
|
25
|
+
|
|
26
|
+

|
|
27
|
+
|
|
28
|
+
<Callout type={'info'}>
|
|
29
|
+
You can fill in or modify Allowed Callback URLs after deployment, but make sure the filled URL is
|
|
30
|
+
consistent with the deployed URL.
|
|
31
|
+
</Callout>
|
|
32
|
+
|
|
33
|
+
### Add Users
|
|
34
|
+
|
|
35
|
+
Click on the "Users Management" in the left navigation bar to enter the user management interface, where you can create users for your organization to log in to LobeChat.
|
|
36
|
+
|
|
37
|
+

|
|
38
|
+
|
|
39
|
+
### Configure Environment Variables
|
|
40
|
+
|
|
41
|
+
When deploying LobeChat, you need to configure the following environment variables:
|
|
42
|
+
|
|
43
|
+
| Environment Variable | Type | Description |
|
|
44
|
+
| --------------------- | -------- | --------------------------------------------------------------------------------------------------------------------------------------------------------------------------------------------------- |
|
|
45
|
+
| `ENABLE_OAUTH_SSO` | Required | Enable single sign-on (SSO) for LobeChat. Set to `1` to enable single sign-on. |
|
|
46
|
+
| `NEXTAUTH_SECRET` | Required | Key used to encrypt Auth.js session tokens. You can generate a key using the following command: `openssl rand -base64 32` |
|
|
47
|
+
| `SSO_PROVIDERS` | Optional | Select the single sign-on provider for LoboChat. Use `auth0` for Auth0. |
|
|
48
|
+
| `AUTH0_CLIENT_ID` | Required | Client ID of the Auth0 application |
|
|
49
|
+
| `AUTH0_CLIENT_SECRET` | Required | Client Secret of the Auth0 application |
|
|
50
|
+
| `AUTH0_ISSUER` | Required | Domain of the Auth0 application, `https://example.auth0.com` |
|
|
51
|
+
| `ACCESS_CODE` | Required | Add a password to access this service. You can set a sufficiently long random password to "disable" access code authorization. |
|
|
52
|
+
| `NEXTAUTH_URL` | Optional | The URL is used to specify the callback address for the execution of OAuth authentication in Auth.js. It needs to be set only when the default address is incorrect. `https://example.com/api/auth` |
|
|
53
|
+
|
|
54
|
+
|
|
55
|
+
You can refer to the related variable details at [Environment Variables](/en/self-hosting/environment-variable#auth0).
|
|
56
|
+
</Steps>
|
|
57
|
+
|
|
58
|
+
<Callout>
|
|
59
|
+
After successful deployment, users will be able to authenticate and use LobeChat using the users
|
|
60
|
+
configured in Auth0.
|
|
61
|
+
</Callout>
|
|
62
|
+
|
|
63
|
+
## Advanced Configuration
|
|
64
|
+
|
|
65
|
+
### Connecting to an Existing Single Sign-On Service
|
|
66
|
+
|
|
67
|
+
If your enterprise or organization already has a unified identity authentication infrastructure, you can connect to an existing single sign-on service in Applications -> SSO Integrations.
|
|
68
|
+
|
|
69
|
+
Auth0 supports single sign-on services such as Azure Active Directory, Slack, Google Workspace, Office 365, Zoom, and more. For a detailed list of supported services, please refer to [this link][auth0-sso-integrations].
|
|
70
|
+
|
|
71
|
+

|
|
72
|
+
|
|
73
|
+
### Configuring Social Login
|
|
74
|
+
|
|
75
|
+
If your enterprise or organization needs to support external user logins, you can configure social login services in Authentication -> Social.
|
|
76
|
+
|
|
77
|
+

|
|
78
|
+
|
|
79
|
+
<Callout type={'warning'}>
|
|
80
|
+
Configuring social login services by default allows anyone to authenticate, which may lead to
|
|
81
|
+
LobeChat being abused by external users.
|
|
82
|
+
</Callout>
|
|
83
|
+
|
|
84
|
+
<Callout>
|
|
85
|
+
If you need to restrict login users, be sure to configure a **blocking policy**: After enabling
|
|
86
|
+
the social login option, refer to [this article][auth0-login-actions-manual] to create an Action
|
|
87
|
+
to set up a blocking/allow list.
|
|
88
|
+
</Callout>
|
|
89
|
+
|
|
90
|
+
[auth0-client-page]: https://manage.auth0.com/dashboard
|
|
91
|
+
[auth0-login-actions-manual]: https://auth0.com/blog/permit-or-deny-login-requests-using-auth0-actions/
|
|
92
|
+
[auth0-sso-integrations]: https://marketplace.auth0.com/features/sso-integrations
|
|
@@ -0,0 +1,85 @@
|
|
|
1
|
+
import { Callout, Steps } from 'nextra/components';
|
|
2
|
+
|
|
3
|
+
# 配置 Auth0 身份验证服务
|
|
4
|
+
|
|
5
|
+
<Steps>
|
|
6
|
+
### 创建 Auth0 应用
|
|
7
|
+
|
|
8
|
+
注册并登录 [Auth0][auth0-client-page],点击左侧导航栏的「Applications」,切换到应用管理界面,点击右上角「Create Application」以创建应用。
|
|
9
|
+
|
|
10
|
+

|
|
11
|
+
|
|
12
|
+
填写你想向组织用户显示的应用名称,可选择任意应用类型,点击「Create」。
|
|
13
|
+
|
|
14
|
+

|
|
15
|
+
|
|
16
|
+
创建成功后,点击相应的应用,进入应用详情页,切换到「Settings」标签页,就可以看到相应的配置信息
|
|
17
|
+
|
|
18
|
+

|
|
19
|
+
|
|
20
|
+
在应用配置页面中,还需要配置 Allowed Callback URLs,在此处填写:
|
|
21
|
+
|
|
22
|
+
```bash
|
|
23
|
+
http(s)://your-domain/api/auth/callback/auth0
|
|
24
|
+
```
|
|
25
|
+
|
|
26
|
+

|
|
27
|
+
|
|
28
|
+
<Callout type={'info'}>
|
|
29
|
+
可以在部署后再填写或修改 Allowed Callback URLs,但是务必保证填写的 URL 与部署的 URL 一致
|
|
30
|
+
</Callout>
|
|
31
|
+
|
|
32
|
+
### 新增用户
|
|
33
|
+
|
|
34
|
+
点击左侧导航栏的「Users Management」,进入用户管理界面,可以为你的组织新建用户,用以登录 LobeChat
|
|
35
|
+
|
|
36
|
+

|
|
37
|
+
|
|
38
|
+
### 配置环境变量
|
|
39
|
+
|
|
40
|
+
在部署 LobeChat 时,你需要配置以下环境变量:
|
|
41
|
+
|
|
42
|
+
| 环境变量 | 类型 | 描述 |
|
|
43
|
+
| ------------------------ | ------------ | ----------------------------------------------------------------------------------------- |
|
|
44
|
+
| `ENABLE_OAUTH_SSO` | 必选 | 为 LobeChat 启用单点登录 (SSO)。设置为 `1` 以启用单点登录。 |
|
|
45
|
+
| `NEXTAUTH_SECRET` | 必选 | 用于加密 Auth.js 会话令牌的密钥。您可以使用以下命令生成秘钥: `openssl rand -base64 32` |
|
|
46
|
+
| `SSO_PROVIDERS` | 必选 | 选择 LoboChat 的单点登录提供商。使用 Auth0 请填写 `auth0`。 |
|
|
47
|
+
| `AUTH0_CLIENT_ID` | 必选 | Auth0 应用程序的 Client ID |
|
|
48
|
+
| `AUTH0_CLIENT_SECRET` | 必选 | Auth0 应用程序的 Client Secret |
|
|
49
|
+
| `AUTH0_ISSUER` | 必选 | Auth0 应用程序的 Domain,`https://example.auth0.com` |
|
|
50
|
+
| `ACCESS_CODE` | 必选 | 添加访问此服务的密码,你可以设置一个足够长的随机密码以 “禁用” 访问码授权 |
|
|
51
|
+
| `NEXTAUTH_URL` | 可选 | 该URL用于指定 Auth.js 在执行 OAuth 验证时的回调地址,当默认生成的重定向地址发生不正确时才需要设置。`https://example.com/api/auth` |
|
|
52
|
+
|
|
53
|
+
前往 [环境变量](/zh/self-hosting/environment-variable#auth0) 可查阅相关变量详情。
|
|
54
|
+
</Steps>
|
|
55
|
+
|
|
56
|
+
<Callout>部署成功后,用户将可以使用 Auth0 中配置的用户通过身份认证并使用 LobeChat。</Callout>
|
|
57
|
+
|
|
58
|
+
## 进阶配置
|
|
59
|
+
|
|
60
|
+
### 连接现有的单点登录服务
|
|
61
|
+
|
|
62
|
+
如果你的企业或组织已有现有的统一身份认证设施,可在 Applications -> SSO Integrations 中,连接现有的单点登录服务。
|
|
63
|
+
|
|
64
|
+
Auth0 支持 Azure Active Directory / Slack / Google Workspace / Office 365 / Zoom 等单点登录服务,详细支持列表可参考 [这里][auth0-sso-integrations]
|
|
65
|
+
|
|
66
|
+

|
|
67
|
+
|
|
68
|
+
### 配置社交登录
|
|
69
|
+
|
|
70
|
+
如果你的企业或组织需要支持外部人员登录,可以在 Authentication -> Social 中,配置社交登录服务。
|
|
71
|
+
|
|
72
|
+

|
|
73
|
+
|
|
74
|
+
<Callout type={'warning'}>
|
|
75
|
+
配置社交登录服务默认会允许所有人通过认证,这可能会导致 LobeChat 被外部人员滥用。
|
|
76
|
+
</Callout>
|
|
77
|
+
|
|
78
|
+
<Callout>
|
|
79
|
+
如果你需要限制登录人员,务必配置 **阻止策略**: 请在打开社交登录选项后,参考
|
|
80
|
+
[这篇文章][auth0-login-actions-manual] 创建 Action 来设置阻止 / 允许列表。
|
|
81
|
+
</Callout>
|
|
82
|
+
|
|
83
|
+
[auth0-client-page]: https://manage.auth0.com/dashboard
|
|
84
|
+
[auth0-login-actions-manual]: https://auth0.com/blog/permit-or-deny-login-requests-using-auth0-actions/
|
|
85
|
+
[auth0-sso-integrations]: https://marketplace.auth0.com/features/sso-integrations
|
|
@@ -0,0 +1,74 @@
|
|
|
1
|
+
import { Callout, Steps } from 'nextra/components';
|
|
2
|
+
|
|
3
|
+
# Configuration of Microsoft Entra ID Authentication Service
|
|
4
|
+
|
|
5
|
+
<Steps>
|
|
6
|
+
### Create a Microsoft Entra ID Application
|
|
7
|
+
|
|
8
|
+
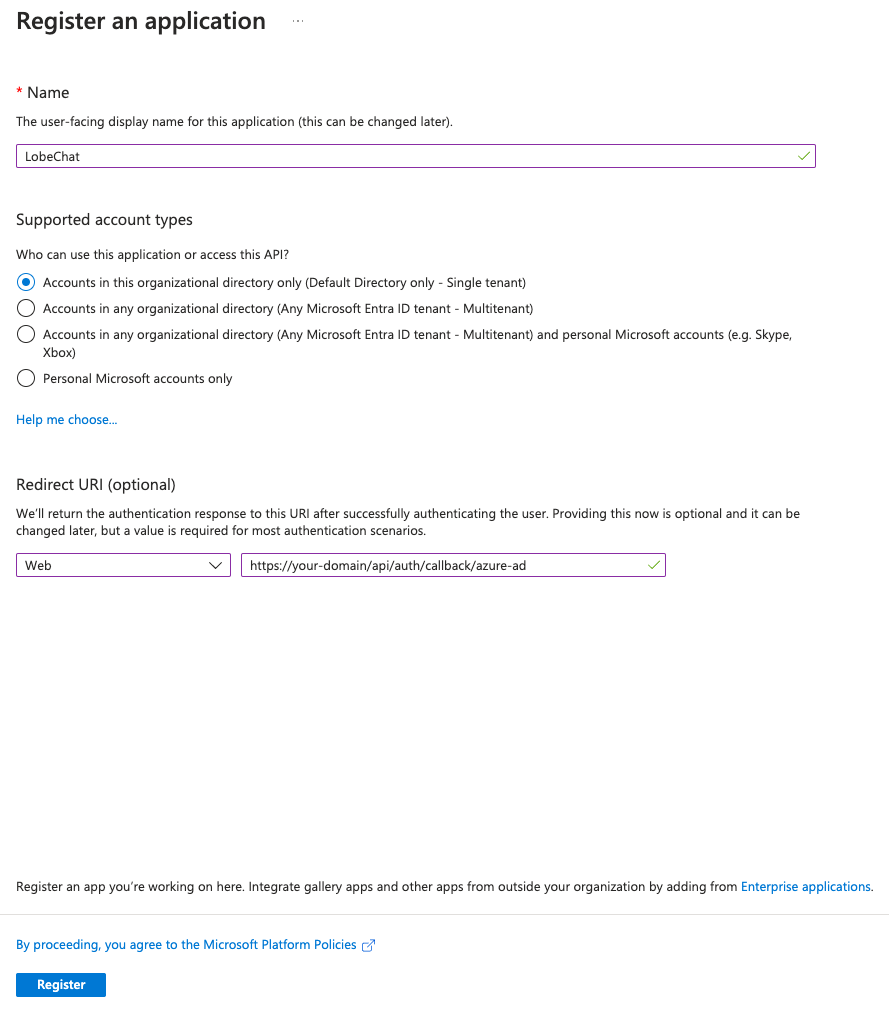
In your [Microsoft Azure Portal][microsoft-azure-portal], go to Microsoft Entra ID -> App registrations -> New registration to create a new application.
|
|
9
|
+
|
|
10
|
+
Fill in the desired application name to be displayed to organizational users, choose the account types you wish to support, and if only internal users are supported, select `Accounts in this organizational directory only (Default Directory only - Single tenant)`.
|
|
11
|
+
|
|
12
|
+
In the `Redirect URI (optional)` section, for the application type, select `Web`, and in the Callback URL, enter:
|
|
13
|
+
|
|
14
|
+
```bash
|
|
15
|
+
https://<your-domain>/api/auth/callback/azure-ad
|
|
16
|
+
```
|
|
17
|
+
|
|
18
|
+
<Callout type={'info'}>
|
|
19
|
+
- You can fill in or modify the Redirect URIs after registering, but make sure the URL you enter matches the deployed URL.
|
|
20
|
+
- Please replace "your-domain" with your own domain.
|
|
21
|
+
</Callout>
|
|
22
|
+
|
|
23
|
+
|
|
24
|
+
|
|
25
|
+
Click on "Register".
|
|
26
|
+
|
|
27
|
+
After successfully creating the application, click on the corresponding application to enter the application details page, and switch to the "Overview" tab to view the corresponding configuration information.
|
|
28
|
+
|
|
29
|
+

|
|
30
|
+
|
|
31
|
+
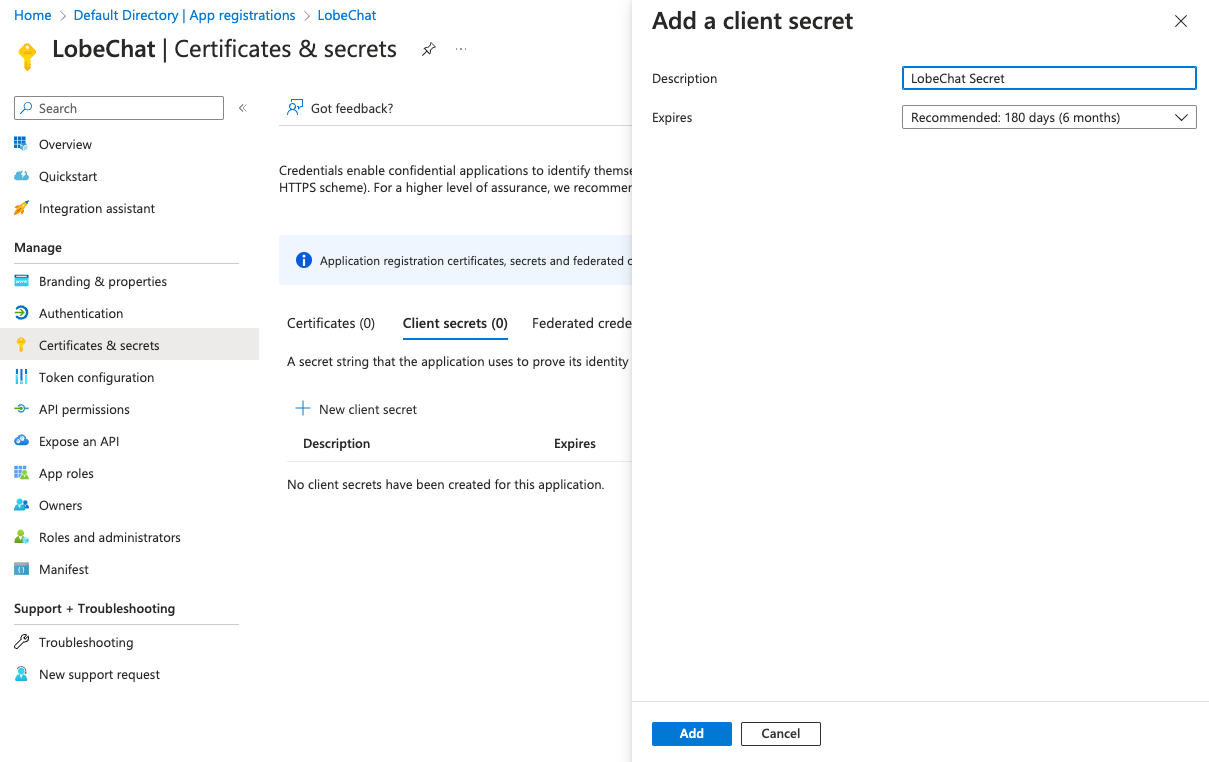
Go to "Certificates & secrets", select the "Client secrets" tab, click on "New client secret", fill in the description, select the expiration time, and click on "Add" to create a new client secret.
|
|
32
|
+
|
|
33
|
+
|
|
34
|
+
|
|
35
|
+
<Callout type={'info'}>
|
|
36
|
+
- Please make sure to save your client secret as this is your only chance to view it.
|
|
37
|
+
</Callout>
|
|
38
|
+
|
|
39
|
+
|
|
40
|
+
### Add Users
|
|
41
|
+
|
|
42
|
+
Go back to the "Microsoft Entra ID" interface, enter "Users", click on "New user", fill in the user information, and click on "Create" to create a user for using LobeChat.
|
|
43
|
+
|
|
44
|
+
### Configure Environment Variables
|
|
45
|
+
|
|
46
|
+
When deploying LobeChat, you need to configure the following environment variables:
|
|
47
|
+
|
|
48
|
+
| Environment Variable | Type | Description |
|
|
49
|
+
| ------------------------ | -------- | -------------------------------------------------------------------------------------------------------------------------------------------------------------------------------------------------------------------------- |
|
|
50
|
+
| `ENABLE_OAUTH_SSO` | Required | Enable single sign-on (SSO) for LobeChat. Set to `1` to enable single sign-on. |
|
|
51
|
+
| `NEXTAUTH_SECRET` | Required | Key used to encrypt Auth.js session tokens. You can generate the key using the following command: `openssl rand -base64 32` |
|
|
52
|
+
| `SSO_PROVIDERS` | Required | Select the single sign-on provider for LoboChat. Use `azure-ad` for Microsoft Entra ID. | |
|
|
53
|
+
| `AZURE_AD_CLIENT_ID` | Required | Client ID of the Microsoft Entra ID application. |
|
|
54
|
+
| `AZURE_AD_CLIENT_SECRET` | Required | Client Secret of the Microsoft Entra ID application. |
|
|
55
|
+
| `AZURE_AD_TENANT_ID` | Required | Tenant ID of the Microsoft Entra ID application. |
|
|
56
|
+
| `ACCESS_CODE` | Required | Add a password for accessing this service, you can set a sufficiently long random password to "disable" access code authorization. |
|
|
57
|
+
| `NEXTAUTH_URL` | Optional | This URL is used to specify the callback address for Auth.js when performing OAuth authentication. It is only necessary to set it when the default generated redirect address is incorrect. `https://example.com/api/auth` |
|
|
58
|
+
You can refer to [environment variables](/en/self-hosting/environment-variable#microsoft-entra-id) for details on related variables.
|
|
59
|
+
</Steps>
|
|
60
|
+
|
|
61
|
+
<Callout>After successful deployment, users will be able to authenticate and use LobeChat using the users configured in Microsoft Entra ID.</Callout>
|
|
62
|
+
|
|
63
|
+
## Advanced Configuration
|
|
64
|
+
|
|
65
|
+
Please explore further in the [Microsoft Entra ID Learning Center][microsoft-learn-entra].
|
|
66
|
+
|
|
67
|
+
## Related Resources
|
|
68
|
+
|
|
69
|
+
- [Quickstart: Register an app][microsoft-entra-register-app]
|
|
70
|
+
|
|
71
|
+
[microsoft-learn-entra]: https://learn.microsoft.com/en-us/entra/identity/
|
|
72
|
+
[microsoft-entra-register-app]: https://learn.microsoft.com/en-us/entra/identity-platform/quickstart-register-app
|
|
73
|
+
[microsoft-azure-portal]: https://portal.azure.com/
|
|
74
|
+
[microsoft-entra-id]: https://www.microsoft.com/en-us/security/business/identity-access/microsoft-entra-id
|
|
@@ -0,0 +1,76 @@
|
|
|
1
|
+
import { Callout, Steps } from 'nextra/components';
|
|
2
|
+
|
|
3
|
+
# 配置 Microsoft Entra ID 身份验证服务
|
|
4
|
+
|
|
5
|
+
<Steps>
|
|
6
|
+
### 创建 Microsoft Entra ID 应用
|
|
7
|
+
|
|
8
|
+
在你的 [Microsoft Azure Portal][microsoft-azure-portal] 进入 Microsoft Entra ID -> App registrations -> New registration 创建一个新的应用。
|
|
9
|
+
|
|
10
|
+
填写你想向组织用户显示的应用名称,选择你期望支持的账户类型,如果只支持内部用户请选择 `Accounts in this organizational directory only (Default Directory only - Single tenant)`。
|
|
11
|
+
|
|
12
|
+
在 `Redirect URI (optional)` 中,应用类型选择 `Web`,Callback URL, 处填写:
|
|
13
|
+
|
|
14
|
+
```bash
|
|
15
|
+
https://<your-domain>/api/auth/callback/azure-ad
|
|
16
|
+
```
|
|
17
|
+
|
|
18
|
+
<Callout type={'info'}>
|
|
19
|
+
- 可以在 Register 后再填写或修改 Redirect URIs,但是务必保证填写的 URL 与部署的 URL 一致。
|
|
20
|
+
- your-domain 请填写自己的域名
|
|
21
|
+
</Callout>
|
|
22
|
+
|
|
23
|
+

|
|
24
|
+
|
|
25
|
+
点击「Register」
|
|
26
|
+
|
|
27
|
+
创建成功后,点击相应的应用,进入应用详情页,切换到「Overview」标签页,就可以看到相应的配置信息。
|
|
28
|
+
|
|
29
|
+

|
|
30
|
+
|
|
31
|
+
进入「Certificates & secrets」,选择「Client secrets」标签,点击「New client secret」,填写描述,选择过期时间,点击「Add」,创建一个新的客户端密钥。
|
|
32
|
+
|
|
33
|
+

|
|
34
|
+
|
|
35
|
+
<Callout type={'info'}>
|
|
36
|
+
- 请务必保存好你的客户端密钥,因为这是你唯一的机会查看它。
|
|
37
|
+
</Callout>
|
|
38
|
+
|
|
39
|
+
|
|
40
|
+
### 新增用户
|
|
41
|
+
|
|
42
|
+
回到「Microsoft Entra ID」界面,进入「Users」,点击「New user」,填写用户信息,点击「Create」,创建用户以使用 LobeChat。
|
|
43
|
+
|
|
44
|
+
### 配置环境变量
|
|
45
|
+
|
|
46
|
+
在部署 LobeChat 时,你需要配置以下环境变量:
|
|
47
|
+
|
|
48
|
+
| 环境变量 | 类型 | 描述 |
|
|
49
|
+
| ------------------------ | ------------ | ----------------------------------------------------------------------------------------- |
|
|
50
|
+
| `ENABLE_OAUTH_SSO` | 必选 | 为 LobeChat 启用单点登录 (SSO)。设置为 `1` 以启用单点登录。 |
|
|
51
|
+
| `NEXTAUTH_SECRET` | 必选 | 用于加密 Auth.js 会话令牌的密钥。您可以使用以下命令生成秘钥: `openssl rand -base64 32` |
|
|
52
|
+
| `SSO_PROVIDERS` | 必选 | 选择 LoboChat 的单点登录提供商。使用 Microsoft Entra ID 请填写 `azure-ad`。 |
|
|
53
|
+
| `AZURE_AD_CLIENT_ID` | 必选 | Microsoft Entra ID 应用程序的 Client ID |
|
|
54
|
+
| `AZURE_AD_CLIENT_SECRET` | 必选 | Microsoft Entra ID 应用程序的 Client Secret |
|
|
55
|
+
| `AZURE_AD_TENANT_ID` | 必选 | Microsoft Entra ID 应用程序的 Tenant ID |
|
|
56
|
+
| `ACCESS_CODE` | 必选 | 添加访问此服务的密码,你可以设置一个足够长的随机密码以 “禁用” 访问码授权 |
|
|
57
|
+
| `NEXTAUTH_URL` | 可选 | 该URL用于指定 Auth.js 在执行 OAuth 验证时的回调地址,当默认生成的重定向地址发生不正确时才需要设置。`https://example.com/api/auth` |
|
|
58
|
+
|
|
59
|
+
前往 [环境变量](/zh/self-hosting/environment-variable#microsoft-entra-id) 可查阅相关变量详情。
|
|
60
|
+
</Steps>
|
|
61
|
+
|
|
62
|
+
<Callout>部署成功后,用户将可以使用 Microsoft Entra ID 中配置的用户通过身份认证并使用 LobeChat。</Callout>
|
|
63
|
+
|
|
64
|
+
## 进阶配置
|
|
65
|
+
|
|
66
|
+
请在 [Microsoft Entra ID 学习中心][microsoft-learn-entra],做进一步探索。
|
|
67
|
+
|
|
68
|
+
|
|
69
|
+
## 相关资料
|
|
70
|
+
|
|
71
|
+
- [快速注册应用指导][microsoft-entra-register-app]
|
|
72
|
+
|
|
73
|
+
[microsoft-learn-entra]: https://learn.microsoft.com/en-us/entra/identity/
|
|
74
|
+
[microsoft-entra-register-app]: https://learn.microsoft.com/en-us/entra/identity-platform/quickstart-register-app
|
|
75
|
+
[microsoft-azure-portal]: https://portal.azure.com/
|
|
76
|
+
[microsoft-entra-id]: https://www.microsoft.com/en-us/security/business/identity-access/microsoft-entra-id
|
|
@@ -64,6 +64,13 @@ Further reading:
|
|
|
64
64
|
- Default: `-`
|
|
65
65
|
- Example: `1`
|
|
66
66
|
|
|
67
|
+
#### `SSO_PROVIDERS`
|
|
68
|
+
|
|
69
|
+
- Type: Required
|
|
70
|
+
- Description: Select the single sign-on provider for LoboChat. For multiple SSO Providers separating them with commas, for example, `auth0,azure-ad`
|
|
71
|
+
- Default: `auth0`
|
|
72
|
+
- Example: `auth0,azure-ad`
|
|
73
|
+
|
|
67
74
|
#### `NEXTAUTH_SECRET`
|
|
68
75
|
|
|
69
76
|
- Type: Required
|
|
@@ -81,7 +88,7 @@ Further reading:
|
|
|
81
88
|
### Auth0
|
|
82
89
|
|
|
83
90
|
<Callout>
|
|
84
|
-
Currently, we only support the Auth0 identity verification service
|
|
91
|
+
Currently, we only support the Auth0, Microsoft Entra ID identity verification service providers. If you need to use
|
|
85
92
|
other identity verification service providers, you can submit a [feature
|
|
86
93
|
request](https://github.com/lobehub/lobe-chat/issues/new/choose) or Pull Request.
|
|
87
94
|
</Callout>
|
|
@@ -107,6 +114,35 @@ Further reading:
|
|
|
107
114
|
- Default: `-`
|
|
108
115
|
- Example: `https://example.auth0.com`
|
|
109
116
|
|
|
117
|
+
### Microsoft Entra ID
|
|
118
|
+
|
|
119
|
+
<Callout>
|
|
120
|
+
Currently, we only support the Auth0, Microsoft Entra ID identity verification service providers. If you need to use
|
|
121
|
+
other identity verification service providers, you can submit a [feature
|
|
122
|
+
request](https://github.com/lobehub/lobe-chat/issues/new/choose) or Pull Request.
|
|
123
|
+
</Callout>
|
|
124
|
+
|
|
125
|
+
#### `AZURE_AD_CLIENT_ID`
|
|
126
|
+
|
|
127
|
+
- Type: Required
|
|
128
|
+
- Description: Client ID of the Microsoft Entra ID application.
|
|
129
|
+
- Default: `-`
|
|
130
|
+
- Example: `be8f6da1-58c3-4f16-ff1b-78f5148e10df`
|
|
131
|
+
|
|
132
|
+
#### `AZURE_AD_CLIENT_SECRET`
|
|
133
|
+
|
|
134
|
+
- Type: Required
|
|
135
|
+
- Description: Client Secret of the Microsoft Entra ID application.
|
|
136
|
+
- Default: `-`
|
|
137
|
+
- Example: `~gI8Q.pTiN1vwB6Gl.E1yFT1ojcXABkdACfJXaNj`
|
|
138
|
+
|
|
139
|
+
#### `AZURE_AD_TENANT_ID`
|
|
140
|
+
|
|
141
|
+
- Type: Required
|
|
142
|
+
- Description: Tenant ID of the Microsoft Entra ID application.
|
|
143
|
+
- Default: `-`
|
|
144
|
+
- Example: `c8ae2f36-edf6-4cda-96b9-d3e198a47cba`
|
|
145
|
+
|
|
110
146
|
## Plugin Service
|
|
111
147
|
|
|
112
148
|
### `PLUGINS_INDEX_URL`
|
|
@@ -64,6 +64,13 @@ LobeChat 在部署时提供了一些额外的配置项,你可以使用环境
|
|
|
64
64
|
- 默认值: `-`
|
|
65
65
|
- 示例: `1`
|
|
66
66
|
|
|
67
|
+
#### `SSO_PROVIDERS`
|
|
68
|
+
|
|
69
|
+
- Type: 必需
|
|
70
|
+
- 描述: 选择LoboChat的单点登录提供商。如果有多个单点登录提供商,请用逗号分隔,例如 `auth0,azure-ad`
|
|
71
|
+
- 默认值: `auth0`
|
|
72
|
+
- 示例: `auth0,azure-ad`
|
|
73
|
+
|
|
67
74
|
#### `NEXTAUTH_SECRET`
|
|
68
75
|
|
|
69
76
|
- 类型:必选
|
|
@@ -81,7 +88,7 @@ LobeChat 在部署时提供了一些额外的配置项,你可以使用环境
|
|
|
81
88
|
### Auth0
|
|
82
89
|
|
|
83
90
|
<Callout>
|
|
84
|
-
|
|
91
|
+
目前,我们仅支持 Auth0 和 Microsoft Entra ID 身份验证服务提供商。如果您需要使用其他身份验证服务提供商,可以提交
|
|
85
92
|
[功能请求](https://github.com/lobehub/lobe-chat/issues/new/choose) 或 Pull Request。
|
|
86
93
|
</Callout>
|
|
87
94
|
|
|
@@ -106,6 +113,34 @@ LobeChat 在部署时提供了一些额外的配置项,你可以使用环境
|
|
|
106
113
|
- 默认值: `-`
|
|
107
114
|
- 示例: `https://example.auth0.com`
|
|
108
115
|
|
|
116
|
+
### Microsoft Entra ID
|
|
117
|
+
|
|
118
|
+
<Callout>
|
|
119
|
+
目前,我们仅支持 Auth0 和 Microsoft Entra ID 身份验证服务提供商。如果您需要使用其他身份验证服务提供商,可以提交
|
|
120
|
+
[功能请求](https://github.com/lobehub/lobe-chat/issues/new/choose) 或 Pull Request。
|
|
121
|
+
</Callout>
|
|
122
|
+
|
|
123
|
+
#### `AZURE_AD_CLIENT_ID`
|
|
124
|
+
|
|
125
|
+
- 类型:必需
|
|
126
|
+
- 描述:Microsoft Entra ID 应用程序的客户端 ID。
|
|
127
|
+
- 默认值:`-`
|
|
128
|
+
- 示例:`be8f6da1-58c3-4f16-ff1b-78f5148e10df`
|
|
129
|
+
|
|
130
|
+
#### `AZURE_AD_CLIENT_SECRET`
|
|
131
|
+
|
|
132
|
+
- 类型:必需
|
|
133
|
+
- 描述:Microsoft Entra ID 应用程序的客户端密钥。
|
|
134
|
+
- 默认值:`-`
|
|
135
|
+
- 示例:`~gI8Q.pTiN1vwB6Gl.E1yFT1ojcXABkdACfJXaNj`
|
|
136
|
+
|
|
137
|
+
#### `AZURE_AD_TENANT_ID`
|
|
138
|
+
|
|
139
|
+
- 类型:必需
|
|
140
|
+
- 描述:Microsoft Entra ID 应用程序的租户 ID。
|
|
141
|
+
- 默认值:`-`
|
|
142
|
+
- 示例:`c8ae2f36-edf6-4cda-96b9-d3e198a47cba`
|
|
143
|
+
|
|
109
144
|
## 插件服务
|
|
110
145
|
|
|
111
146
|
### `PLUGINS_INDEX_URL`
|
package/package.json
CHANGED
|
@@ -1,6 +1,6 @@
|
|
|
1
1
|
{
|
|
2
2
|
"name": "@lobehub/chat",
|
|
3
|
-
"version": "0.
|
|
3
|
+
"version": "0.136.0",
|
|
4
4
|
"description": "Lobe Chat - an open-source, high-performance chatbot framework that supports speech synthesis, multimodal, and extensible Function Call plugin system. Supports one-click free deployment of your private ChatGPT/LLM web application.",
|
|
5
5
|
"keywords": [
|
|
6
6
|
"framework",
|
|
@@ -169,7 +169,7 @@
|
|
|
169
169
|
"@types/lodash-es": "^4",
|
|
170
170
|
"@types/node": "^20",
|
|
171
171
|
"@types/numeral": "^2",
|
|
172
|
-
"@types/react": "18
|
|
172
|
+
"@types/react": "^18",
|
|
173
173
|
"@types/react-dom": "^18",
|
|
174
174
|
"@types/rtl-detect": "^1",
|
|
175
175
|
"@types/semver": "^7",
|
|
@@ -1,10 +1,20 @@
|
|
|
1
1
|
import NextAuth from 'next-auth';
|
|
2
2
|
import Auth0 from 'next-auth/providers/auth0';
|
|
3
|
+
import AzureAd from 'next-auth/providers/azure-ad';
|
|
3
4
|
|
|
4
5
|
import { getServerConfig } from '@/config/server';
|
|
5
6
|
|
|
6
|
-
const {
|
|
7
|
-
|
|
7
|
+
const {
|
|
8
|
+
ENABLE_OAUTH_SSO,
|
|
9
|
+
SSO_PROVIDERS,
|
|
10
|
+
AUTH0_CLIENT_ID,
|
|
11
|
+
AUTH0_CLIENT_SECRET,
|
|
12
|
+
AUTH0_ISSUER,
|
|
13
|
+
AZURE_AD_CLIENT_ID,
|
|
14
|
+
AZURE_AD_CLIENT_SECRET,
|
|
15
|
+
AZURE_AD_TENANT_ID,
|
|
16
|
+
NEXTAUTH_SECRET,
|
|
17
|
+
} = getServerConfig();
|
|
8
18
|
|
|
9
19
|
declare module '@auth/core/jwt' {
|
|
10
20
|
// Returned by the `jwt` callback and `auth`, when using JWT sessions
|
|
@@ -33,16 +43,33 @@ const nextAuth = NextAuth({
|
|
|
33
43
|
},
|
|
34
44
|
},
|
|
35
45
|
providers: ENABLE_OAUTH_SSO
|
|
36
|
-
? [
|
|
37
|
-
|
|
38
|
-
|
|
39
|
-
|
|
40
|
-
|
|
41
|
-
|
|
42
|
-
|
|
43
|
-
|
|
44
|
-
|
|
45
|
-
|
|
46
|
+
? SSO_PROVIDERS.split(/[,,]/).map((provider) => {
|
|
47
|
+
switch (provider) {
|
|
48
|
+
case 'auth0': {
|
|
49
|
+
return Auth0({
|
|
50
|
+
// Specify auth scope, at least include 'openid email'
|
|
51
|
+
// all scopes in Auth0 ref: https://auth0.com/docs/get-started/apis/scopes/openid-connect-scopes#standard-claims
|
|
52
|
+
authorization: { params: { scope: 'openid email profile' } },
|
|
53
|
+
clientId: AUTH0_CLIENT_ID,
|
|
54
|
+
clientSecret: AUTH0_CLIENT_SECRET,
|
|
55
|
+
issuer: AUTH0_ISSUER,
|
|
56
|
+
});
|
|
57
|
+
}
|
|
58
|
+
case 'azure-ad': {
|
|
59
|
+
return AzureAd({
|
|
60
|
+
// Specify auth scope, at least include 'openid email'
|
|
61
|
+
// all scopes in Azure AD ref: https://learn.microsoft.com/en-us/entra/identity-platform/scopes-oidc#openid-connect-scopes
|
|
62
|
+
authorization: { params: { scope: 'openid email profile' } },
|
|
63
|
+
clientId: AZURE_AD_CLIENT_ID,
|
|
64
|
+
clientSecret: AZURE_AD_CLIENT_SECRET,
|
|
65
|
+
tenantId: AZURE_AD_TENANT_ID,
|
|
66
|
+
});
|
|
67
|
+
}
|
|
68
|
+
default: {
|
|
69
|
+
throw new Error(`[NextAuth] provider ${provider} is not supported`);
|
|
70
|
+
}
|
|
71
|
+
}
|
|
72
|
+
})
|
|
46
73
|
: [],
|
|
47
74
|
secret: NEXTAUTH_SECRET,
|
|
48
75
|
trustHost: true,
|
|
@@ -64,6 +64,9 @@ export const Topic = memo(() => {
|
|
|
64
64
|
cover={imageUrl(`empty_topic_${isDarkMode ? 'dark' : 'light'}.webp`)}
|
|
65
65
|
desc={t('topic.guide.desc')}
|
|
66
66
|
height={120}
|
|
67
|
+
imageProps={{
|
|
68
|
+
priority: true,
|
|
69
|
+
}}
|
|
67
70
|
onVisibleChange={(visible) => {
|
|
68
71
|
updateGuideState({ topic: visible });
|
|
69
72
|
}}
|
package/src/config/server/app.ts
CHANGED
|
@@ -58,9 +58,13 @@ export const getAppConfig = () => {
|
|
|
58
58
|
PLUGIN_SETTINGS: process.env.PLUGIN_SETTINGS,
|
|
59
59
|
|
|
60
60
|
ENABLE_OAUTH_SSO: !!process.env.ENABLE_OAUTH_SSO,
|
|
61
|
+
SSO_PROVIDERS: process.env.SSO_PROVIDERS || 'auth0',
|
|
61
62
|
AUTH0_CLIENT_ID: process.env.AUTH0_CLIENT_ID || '',
|
|
62
63
|
AUTH0_CLIENT_SECRET: process.env.AUTH0_CLIENT_SECRET || '',
|
|
63
64
|
AUTH0_ISSUER: process.env.AUTH0_ISSUER || '',
|
|
65
|
+
AZURE_AD_CLIENT_ID: process.env.AZURE_AD_CLIENT_ID || '',
|
|
66
|
+
AZURE_AD_CLIENT_SECRET: process.env.AZURE_AD_CLIENT_SECRET || '',
|
|
67
|
+
AZURE_AD_TENANT_ID: process.env.AZURE_AD_TENANT_ID || '',
|
|
64
68
|
NEXTAUTH_SECRET: process.env.NEXTAUTH_SECRET || '',
|
|
65
69
|
|
|
66
70
|
ENABLE_LANGFUSE: process.env.ENABLE_LANGFUSE === '1',
|