@lobehub/chat 0.128.2 → 0.128.4
This diff represents the content of publicly available package versions that have been released to one of the supported registries. The information contained in this diff is provided for informational purposes only and reflects changes between package versions as they appear in their respective public registries.
- package/.github/workflows/issue-close-require.yml +3 -3
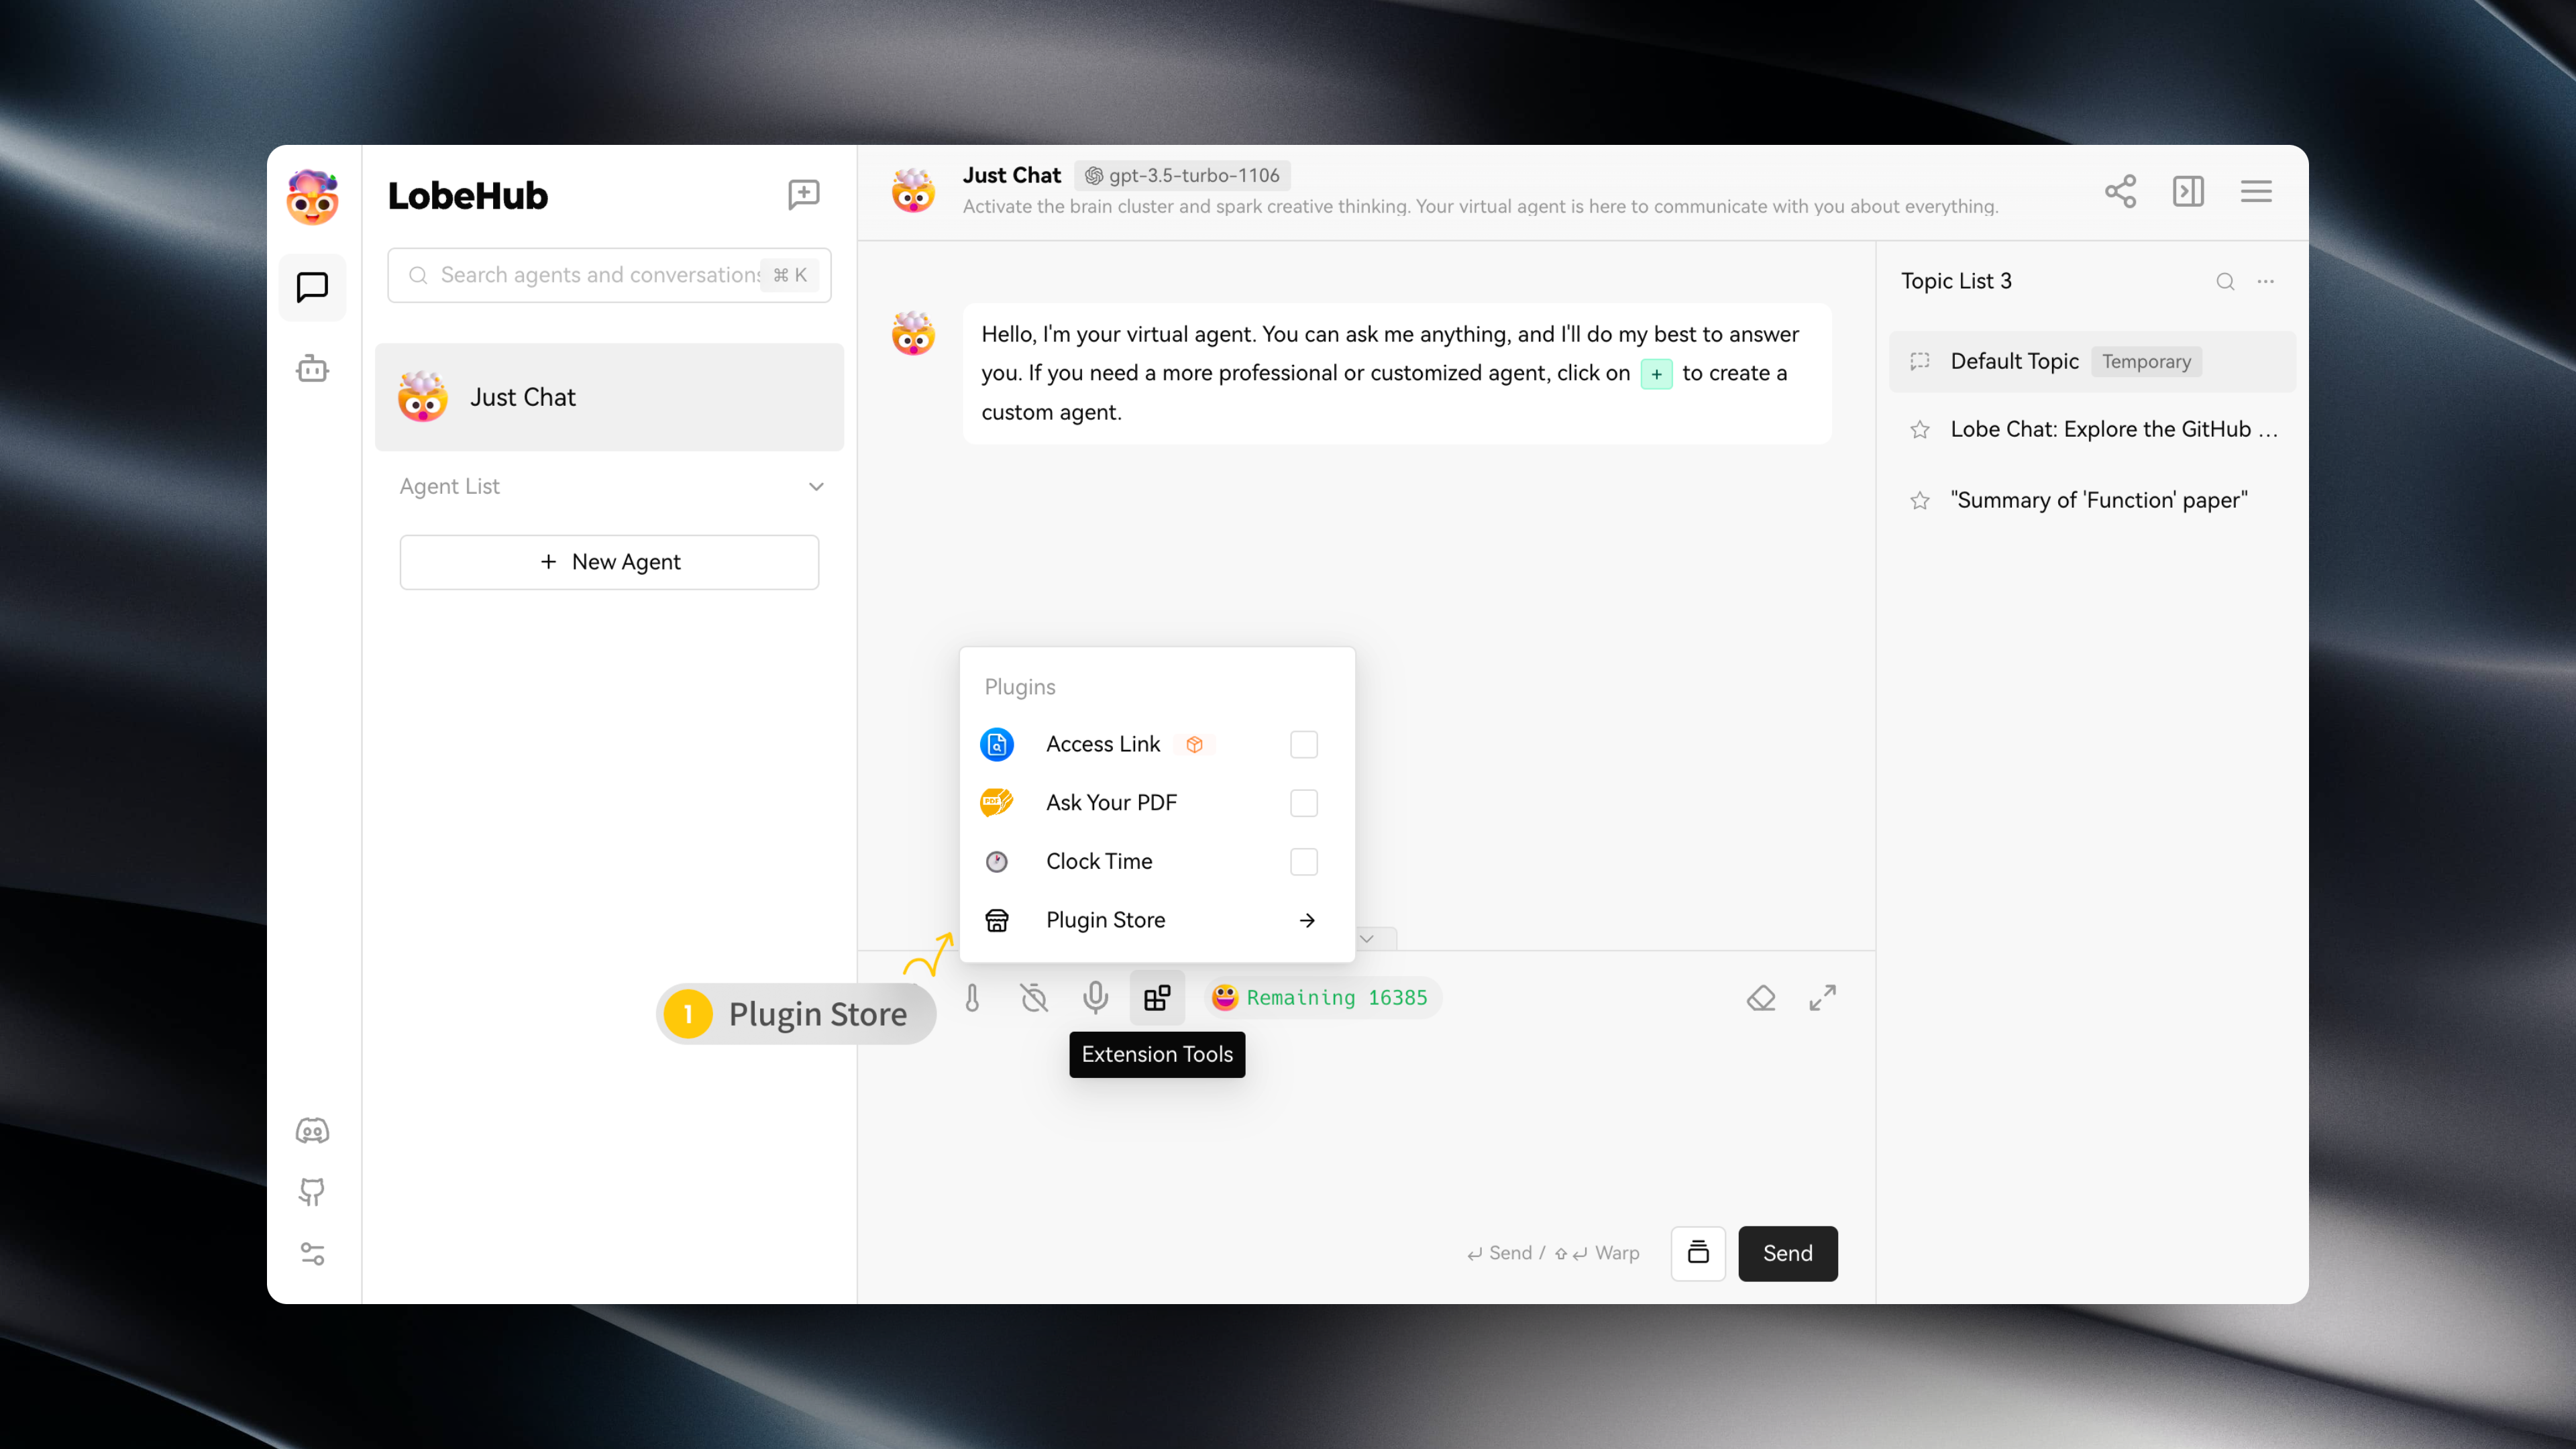
- package/.github/workflows/issues-translate.yml +3 -3
- package/.github/workflows/wiki-sync.yml +2 -2
- package/.husky/commit-msg +0 -3
- package/.husky/pre-commit +0 -3
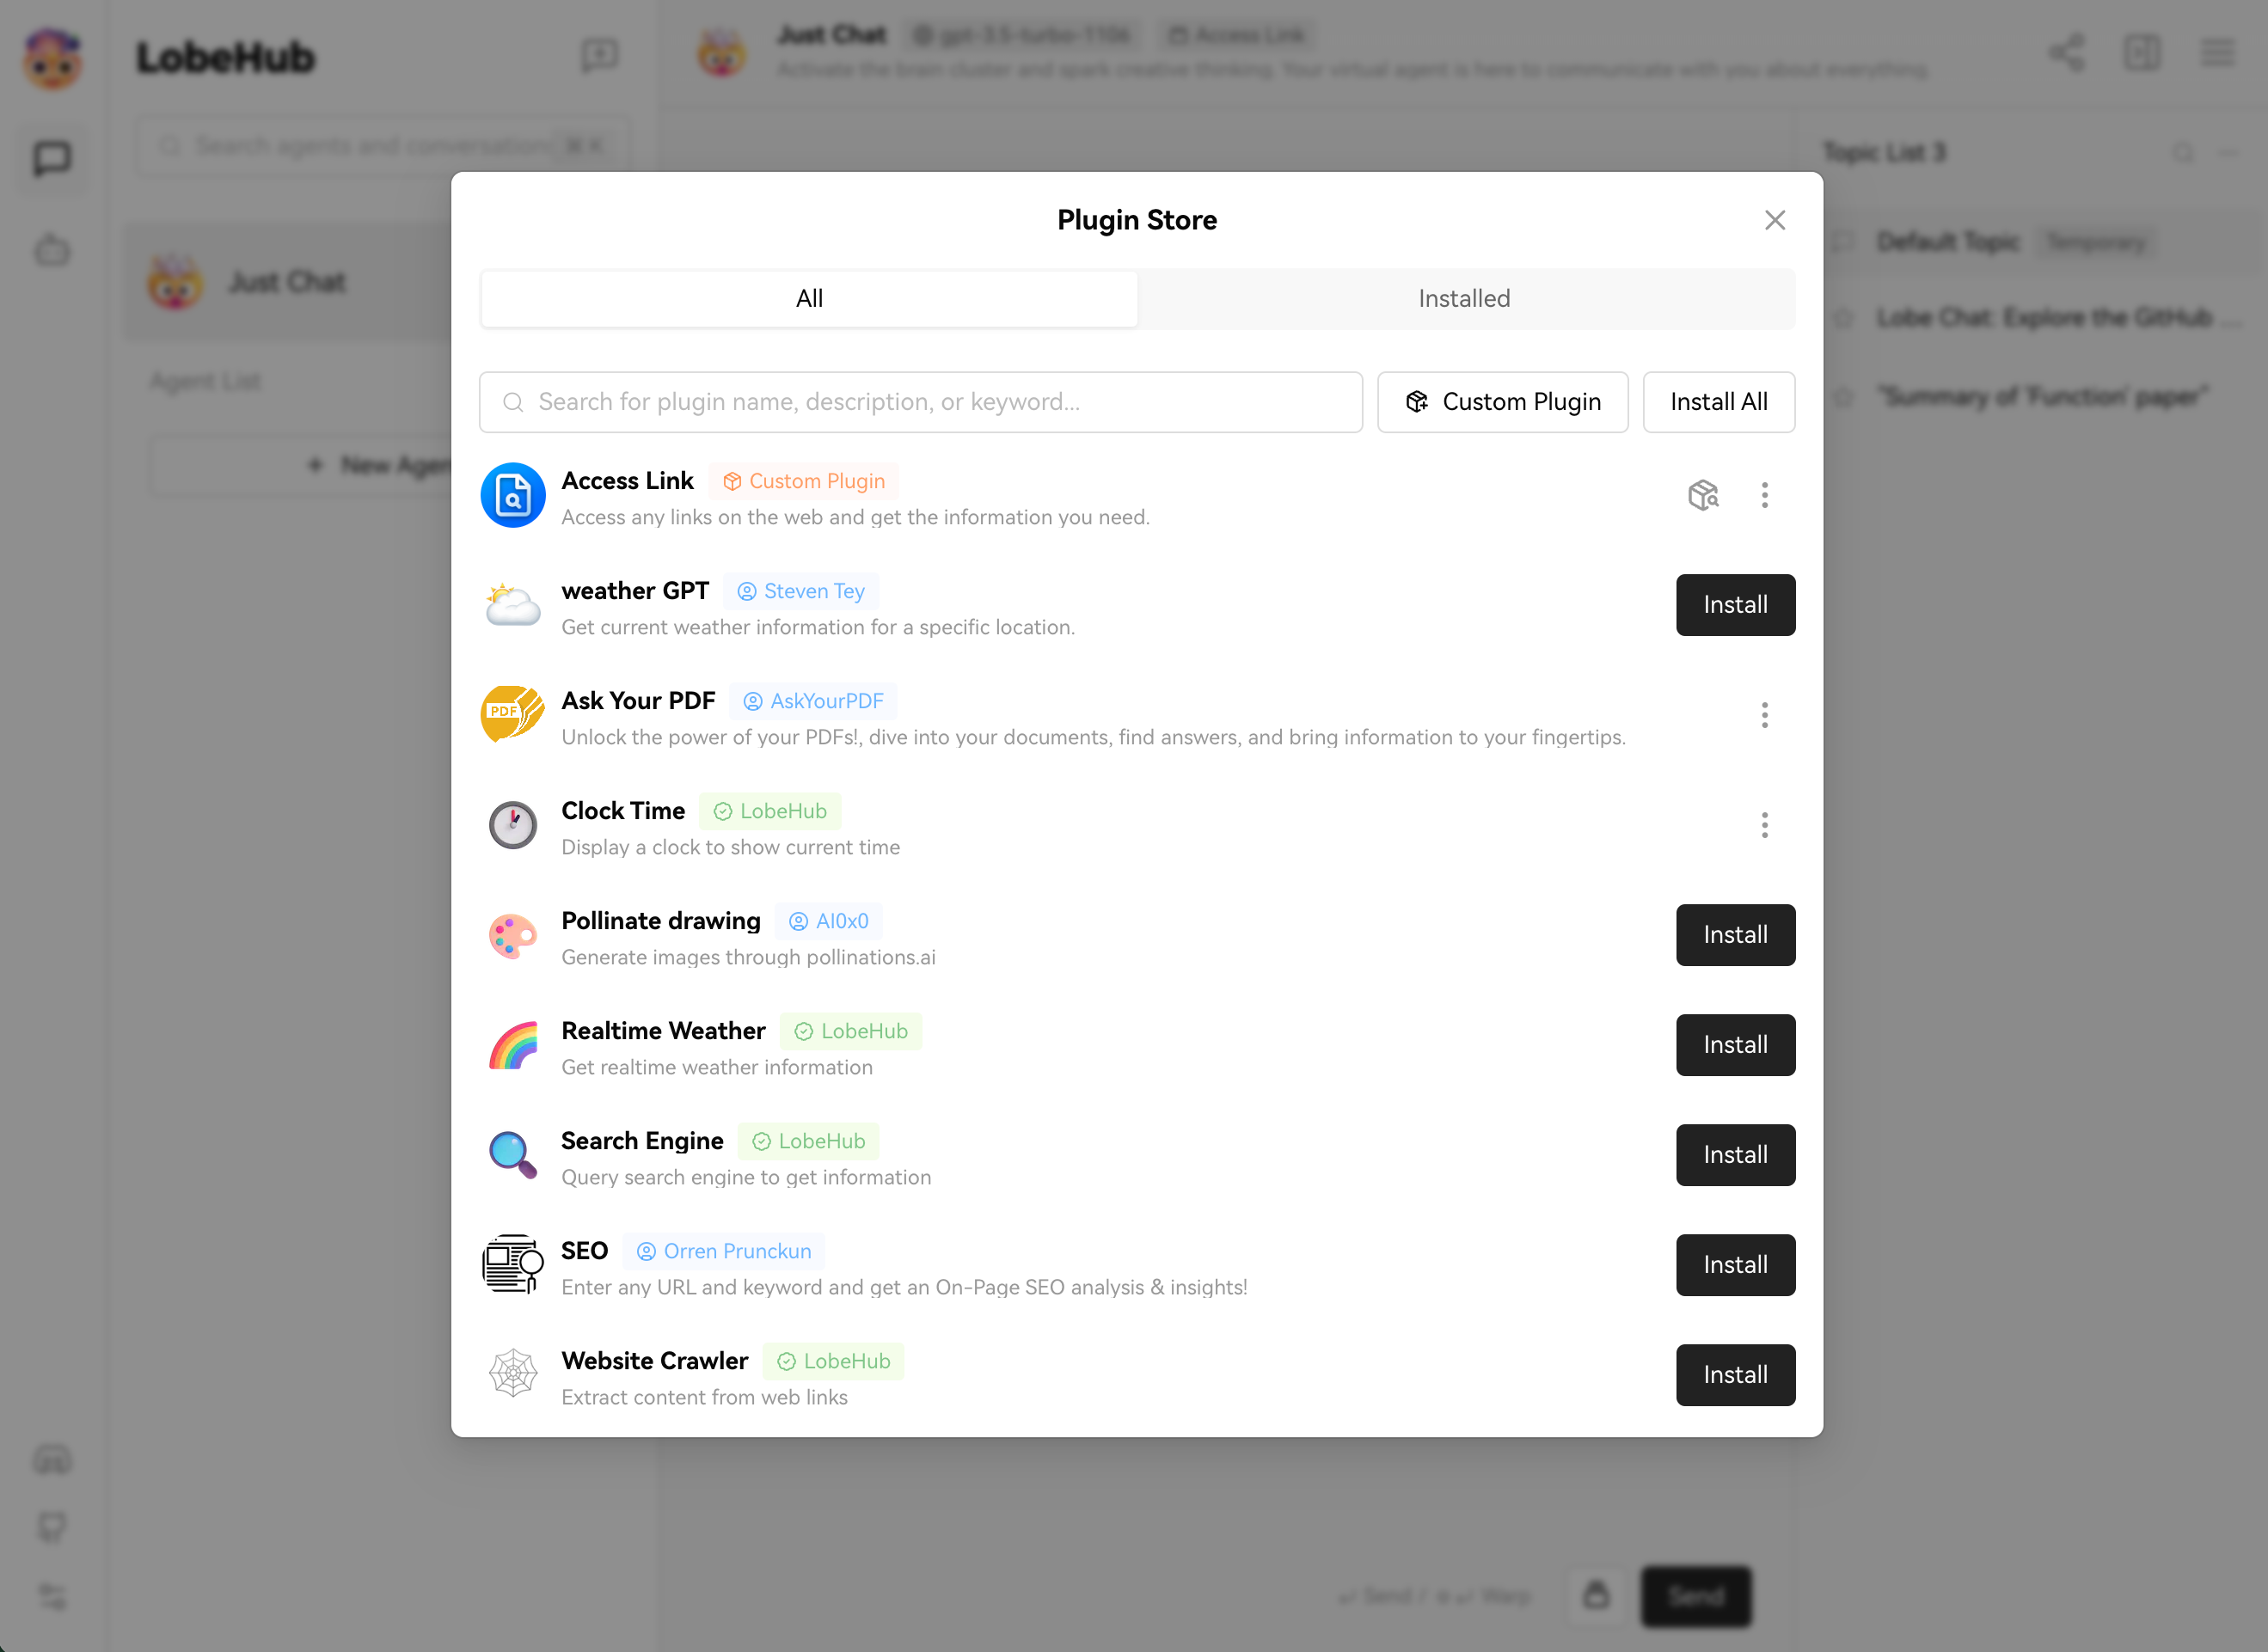
- package/.i18nrc.js +2 -2
- package/CHANGELOG.md +50 -0
- package/README.md +3 -3
- package/README.zh-CN.md +3 -3
- package/contributing/Basic/Feature-Development.md +713 -0
- package/{docs/Development → contributing/Basic}/Feature-Development.zh-CN.md +2 -2
- package/{docs/Development → contributing/Basic}/Intro.zh-CN.md +5 -5
- package/{docs → contributing}/Home.md +21 -30
- package/{docs/Development → contributing/Internationalization}/Internationalization-Implementation.zh-CN.md +1 -1
- package/{docs → contributing}/_Sidebar.md +19 -30
- package/docs/agents/concepts.mdx +18 -0
- package/docs/agents/concepts.zh-CN.mdx +17 -0
- package/docs/agents/custom-agent.mdx +34 -0
- package/docs/agents/custom-agent.zh-CN.mdx +31 -0
- package/docs/agents/model.mdx +68 -0
- package/docs/agents/model.zh-CN.mdx +64 -0
- package/docs/agents/prompt.mdx +96 -0
- package/docs/agents/prompt.zh-CN.mdx +97 -0
- package/docs/agents/topics.mdx +7 -0
- package/docs/agents/topics.zh-CN.mdx +6 -0
- package/docs/common-errors/no-v1-suffix.mdx +18 -0
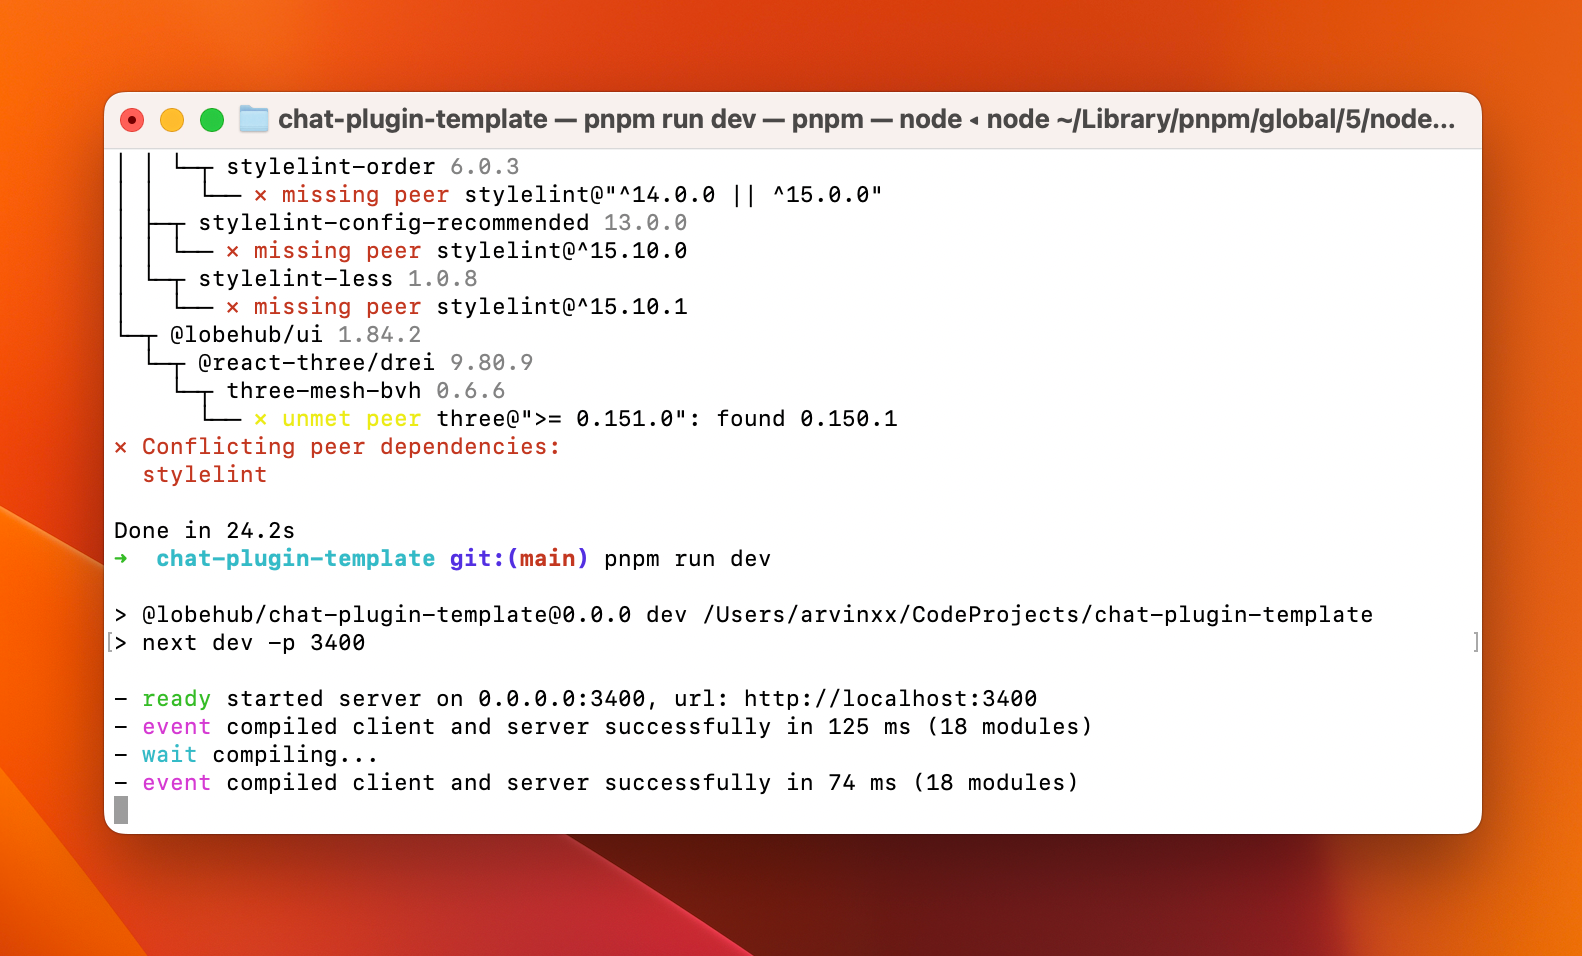
- package/docs/common-errors/no-v1-suffix.zh-CN.mdx +17 -0
- package/docs/common-errors/proxy-with-unable-to-verify-leaf-signature.mdx +70 -0
- package/docs/{Deployment/Common-Error.zh-CN.md → common-errors/proxy-with-unable-to-verify-leaf-signature.zh-CN.mdx} +8 -26
- package/docs/environment-variables/common.mdx +215 -0
- package/docs/environment-variables/common.zh-CN.mdx +214 -0
- package/docs/environment-variables/model-provider.mdx +135 -0
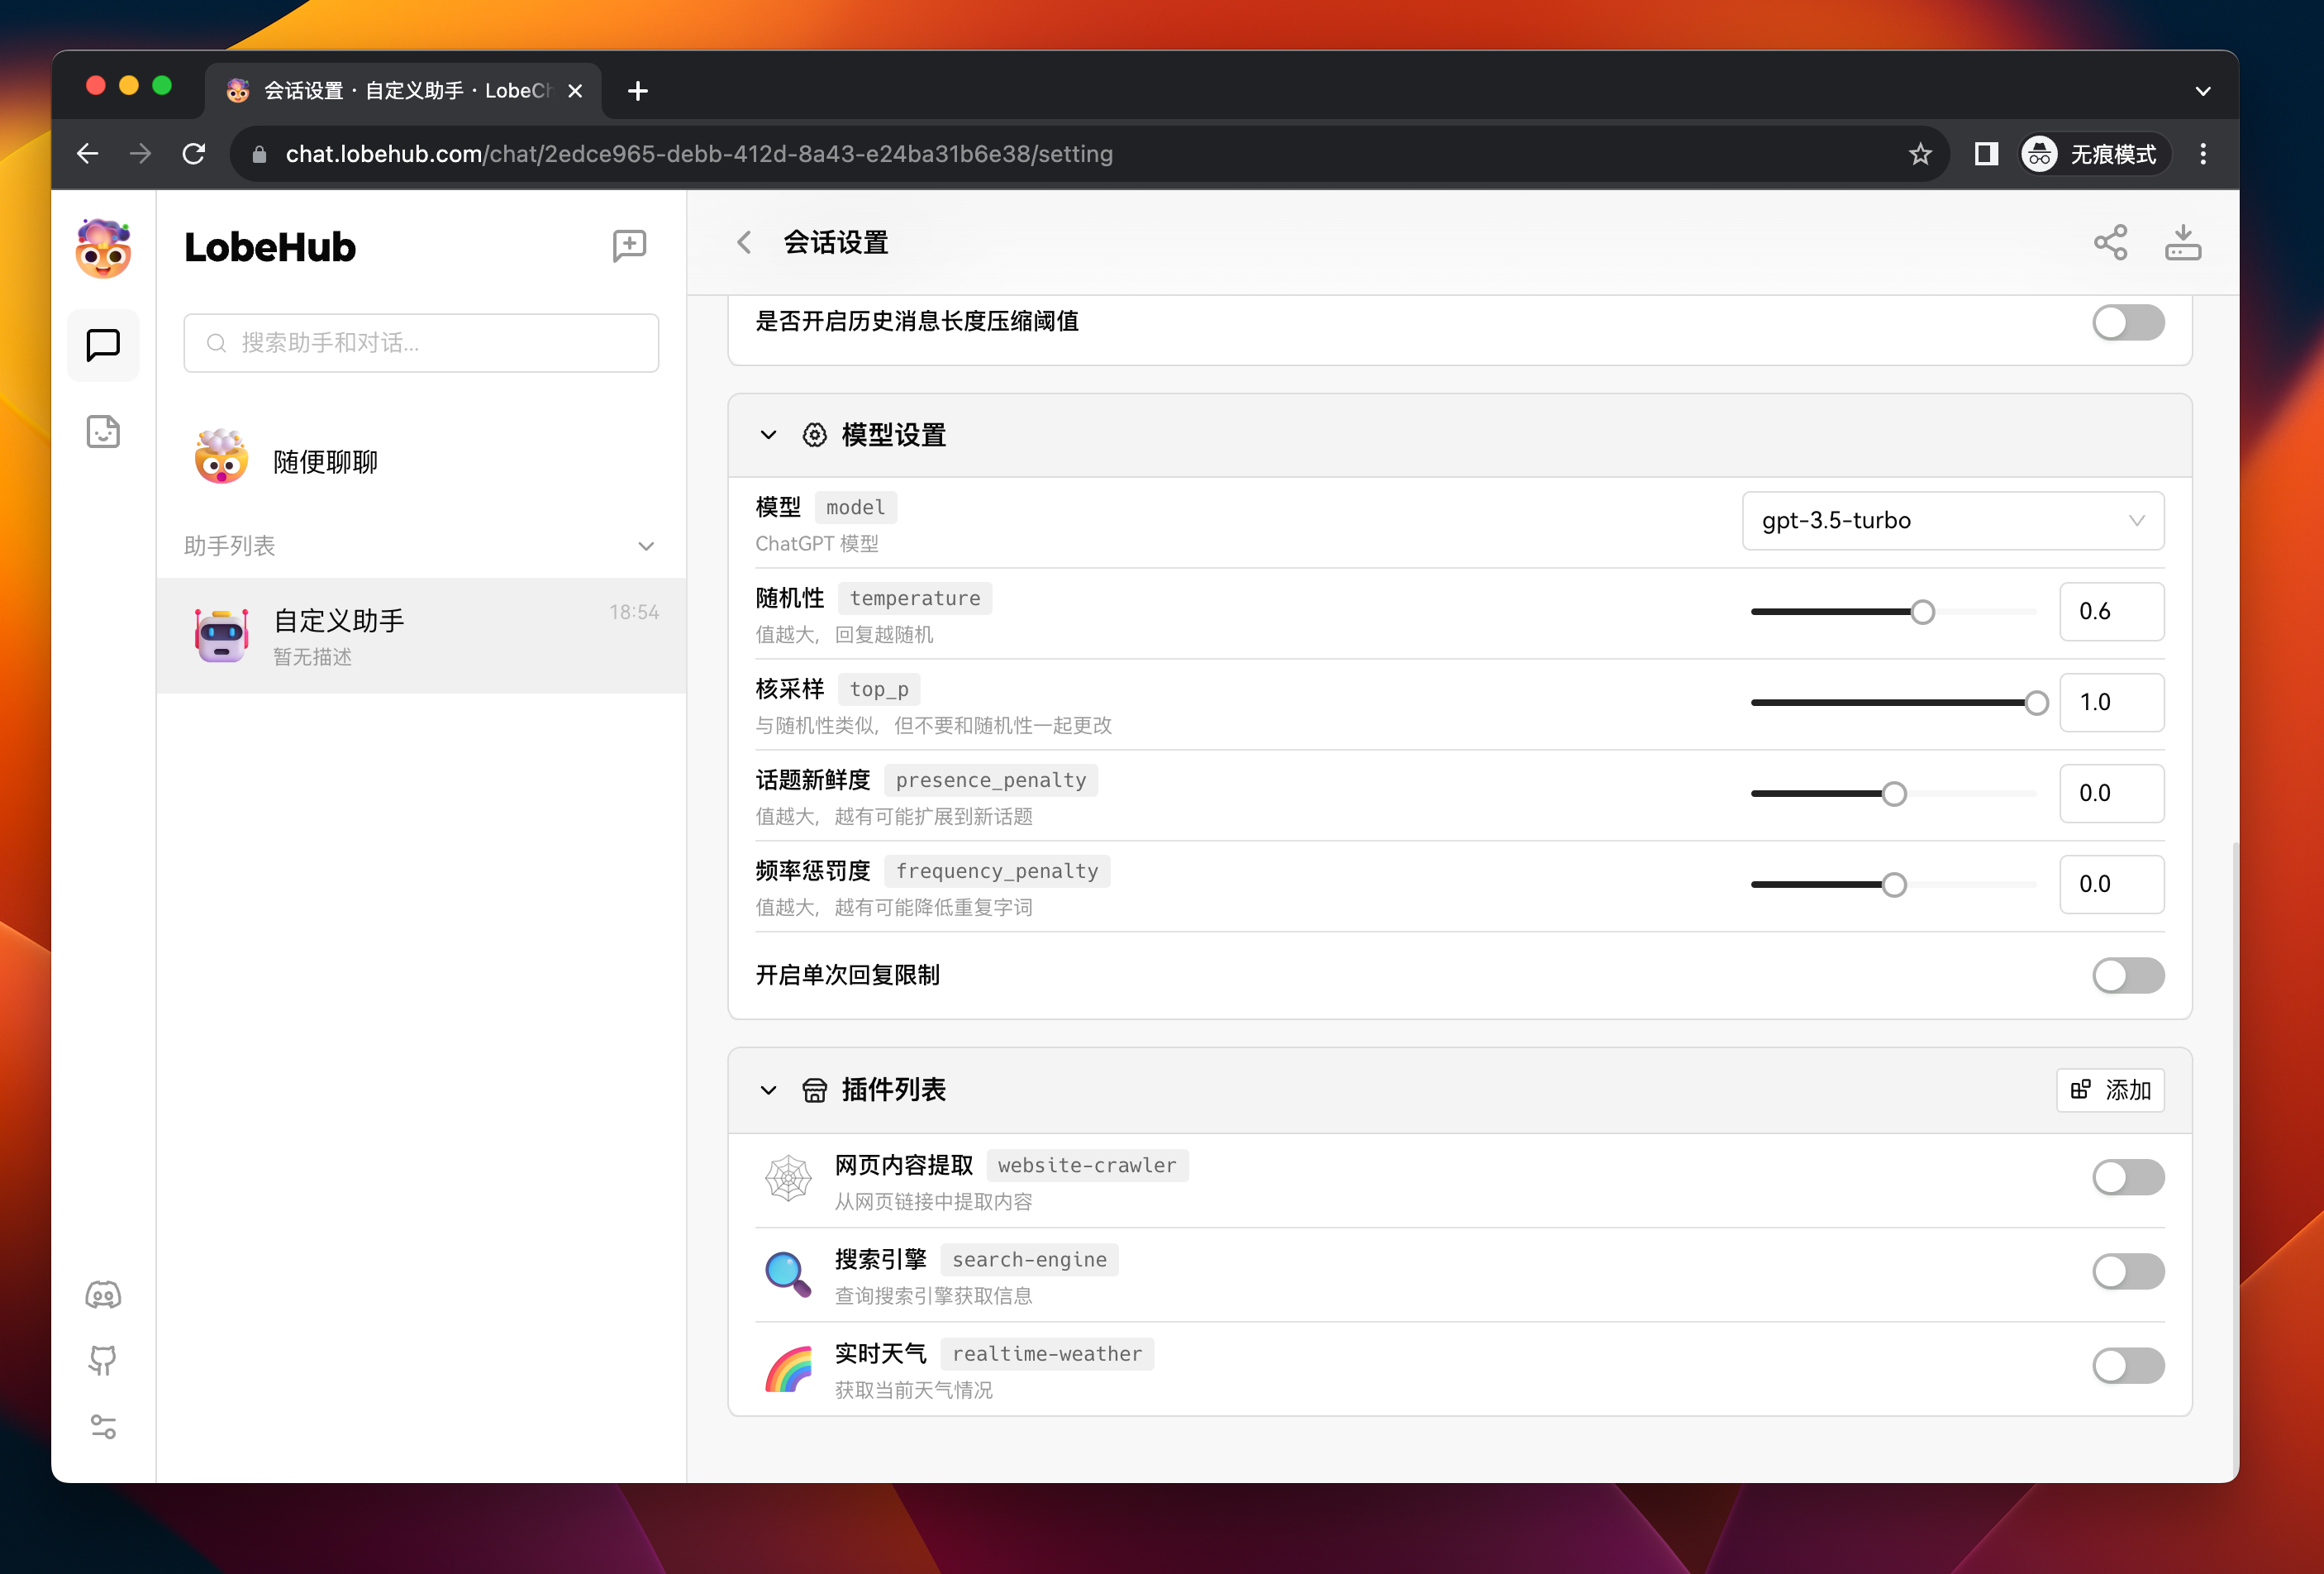
- package/docs/environment-variables/model-provider.zh-CN.mdx +133 -0
- package/docs/package.json +5 -0
- package/docs/plugins/basic-usage.mdx +40 -0
- package/docs/{Usage/Plugins.zh-CN.md → plugins/basic-usage.zh-CN.mdx} +7 -21
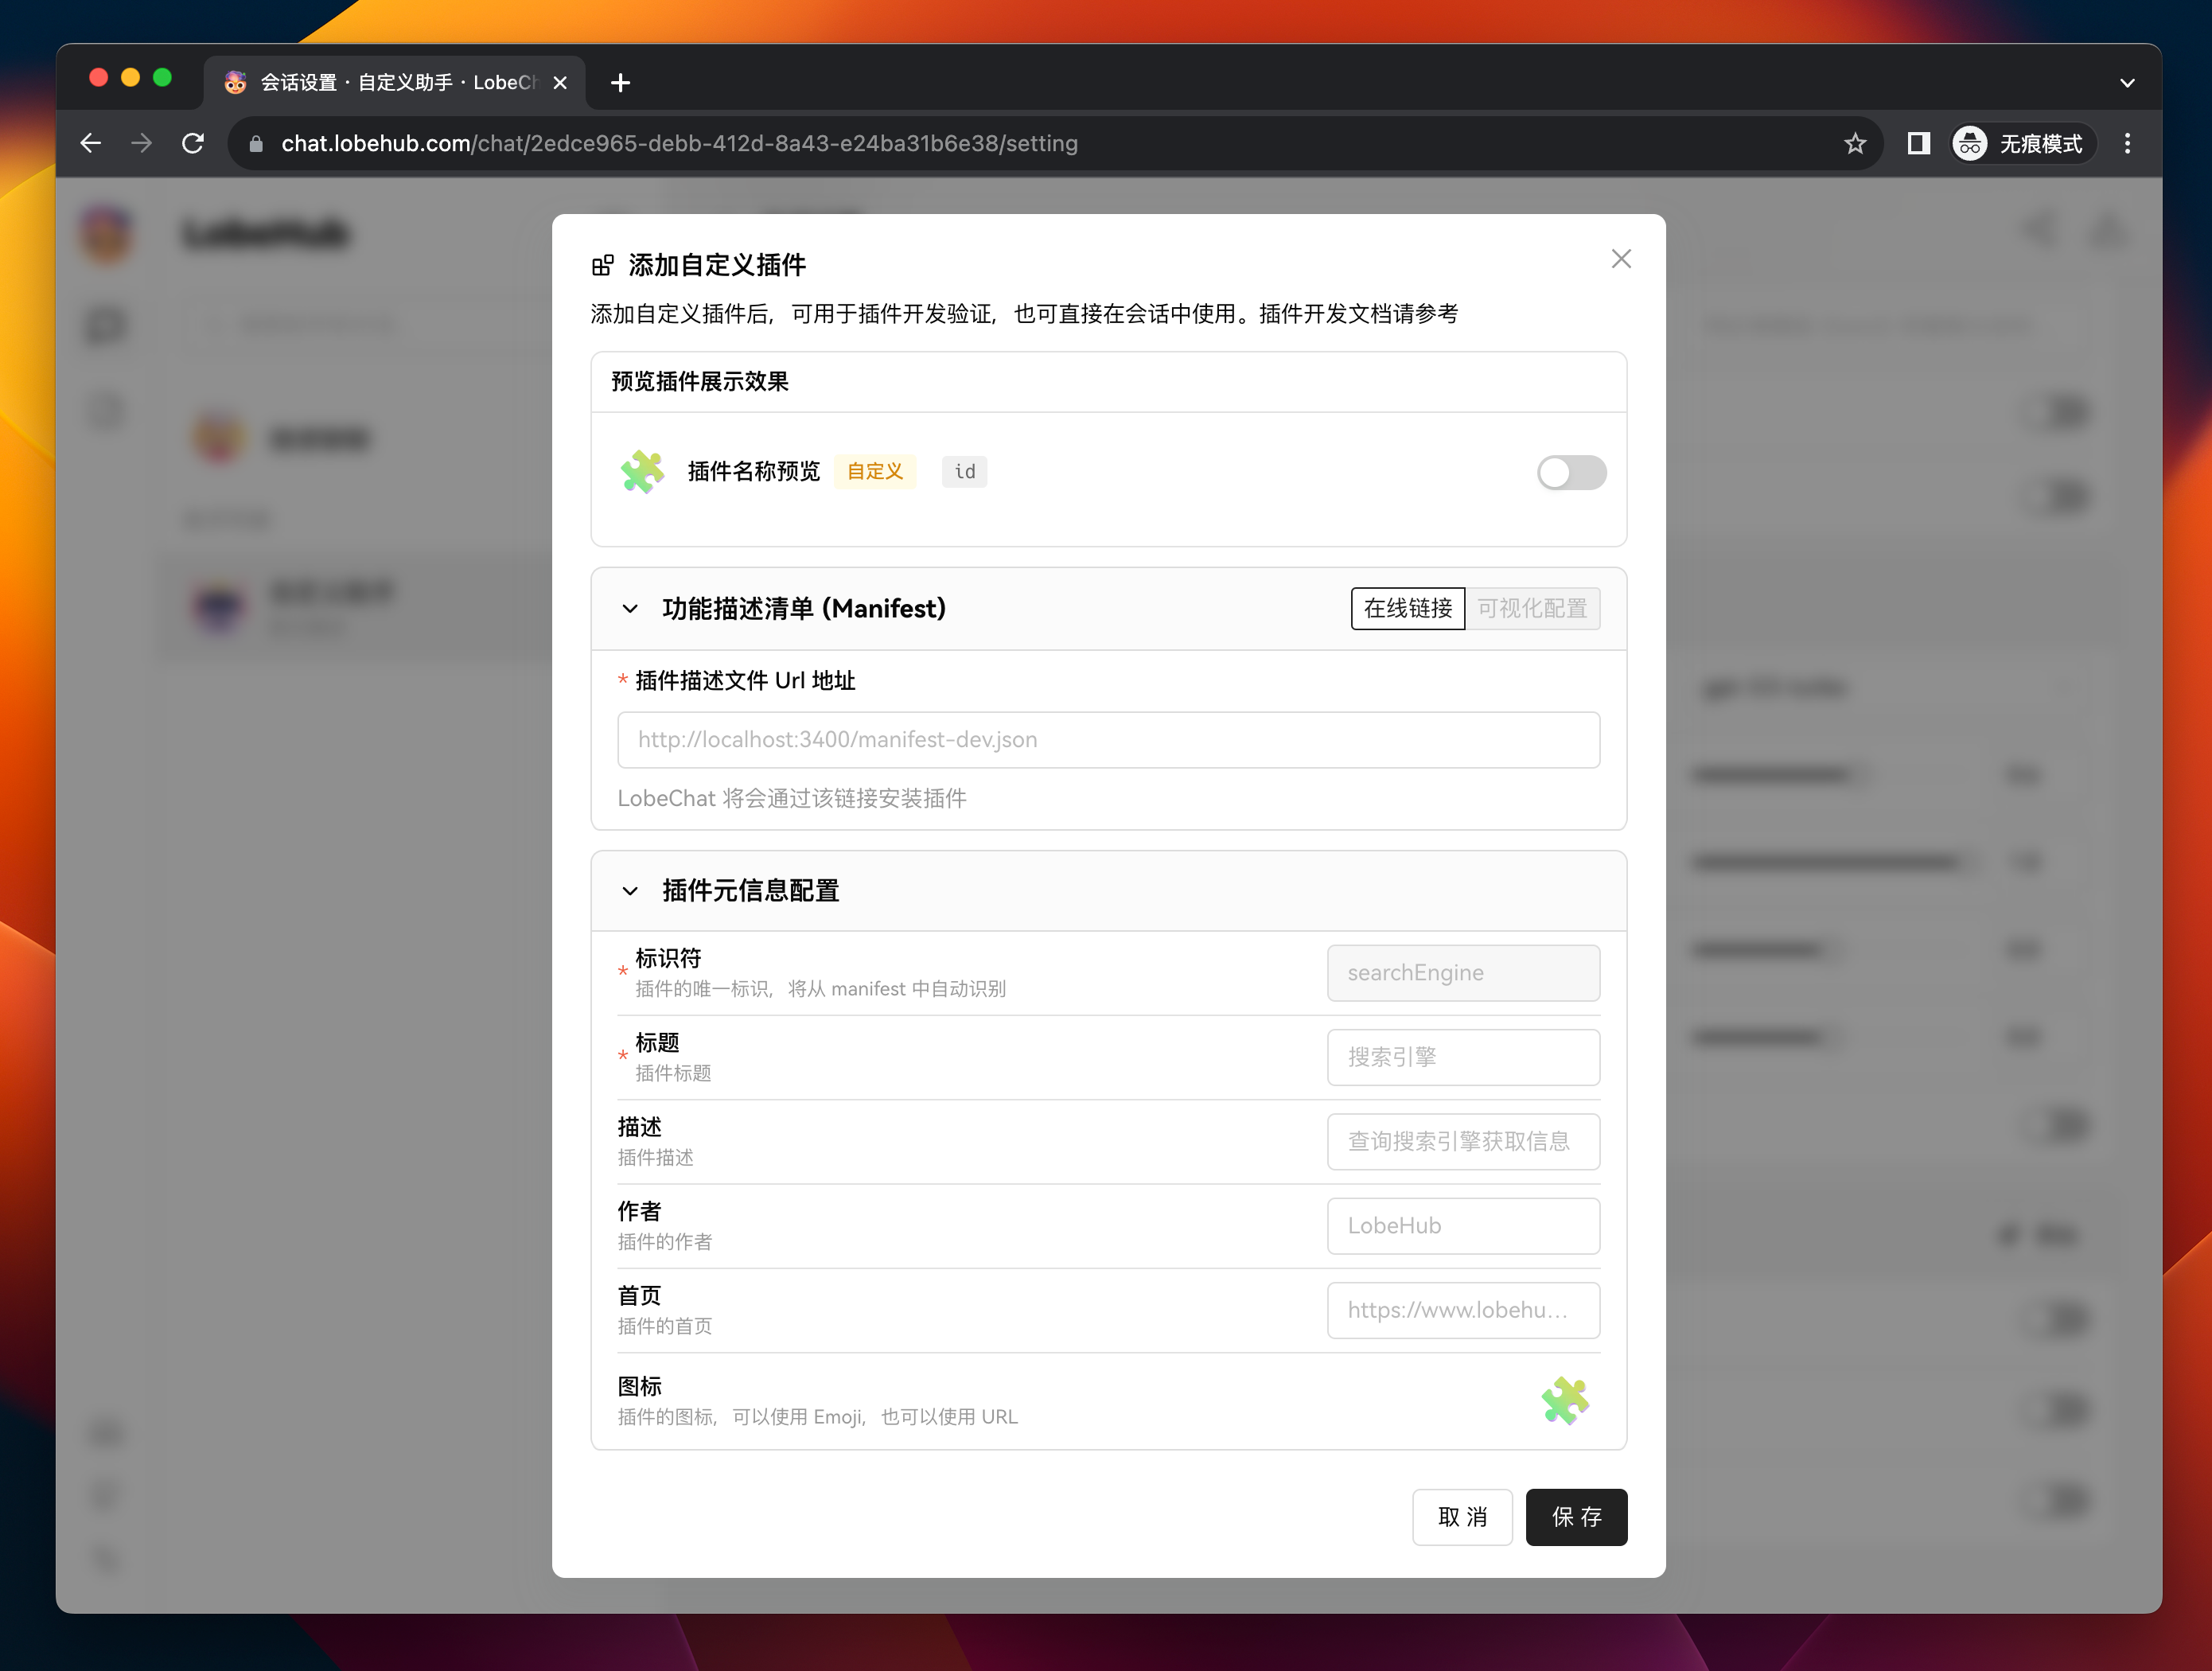
- package/docs/plugins/custom-plugin.mdx +27 -0
- package/docs/plugins/custom-plugin.zh-CN.mdx +26 -0
- package/docs/plugins/plugin-development.mdx +262 -0
- package/docs/{Plugins/Plugin-Development.zh-CN.md → plugins/plugin-development.zh-CN.mdx} +9 -33
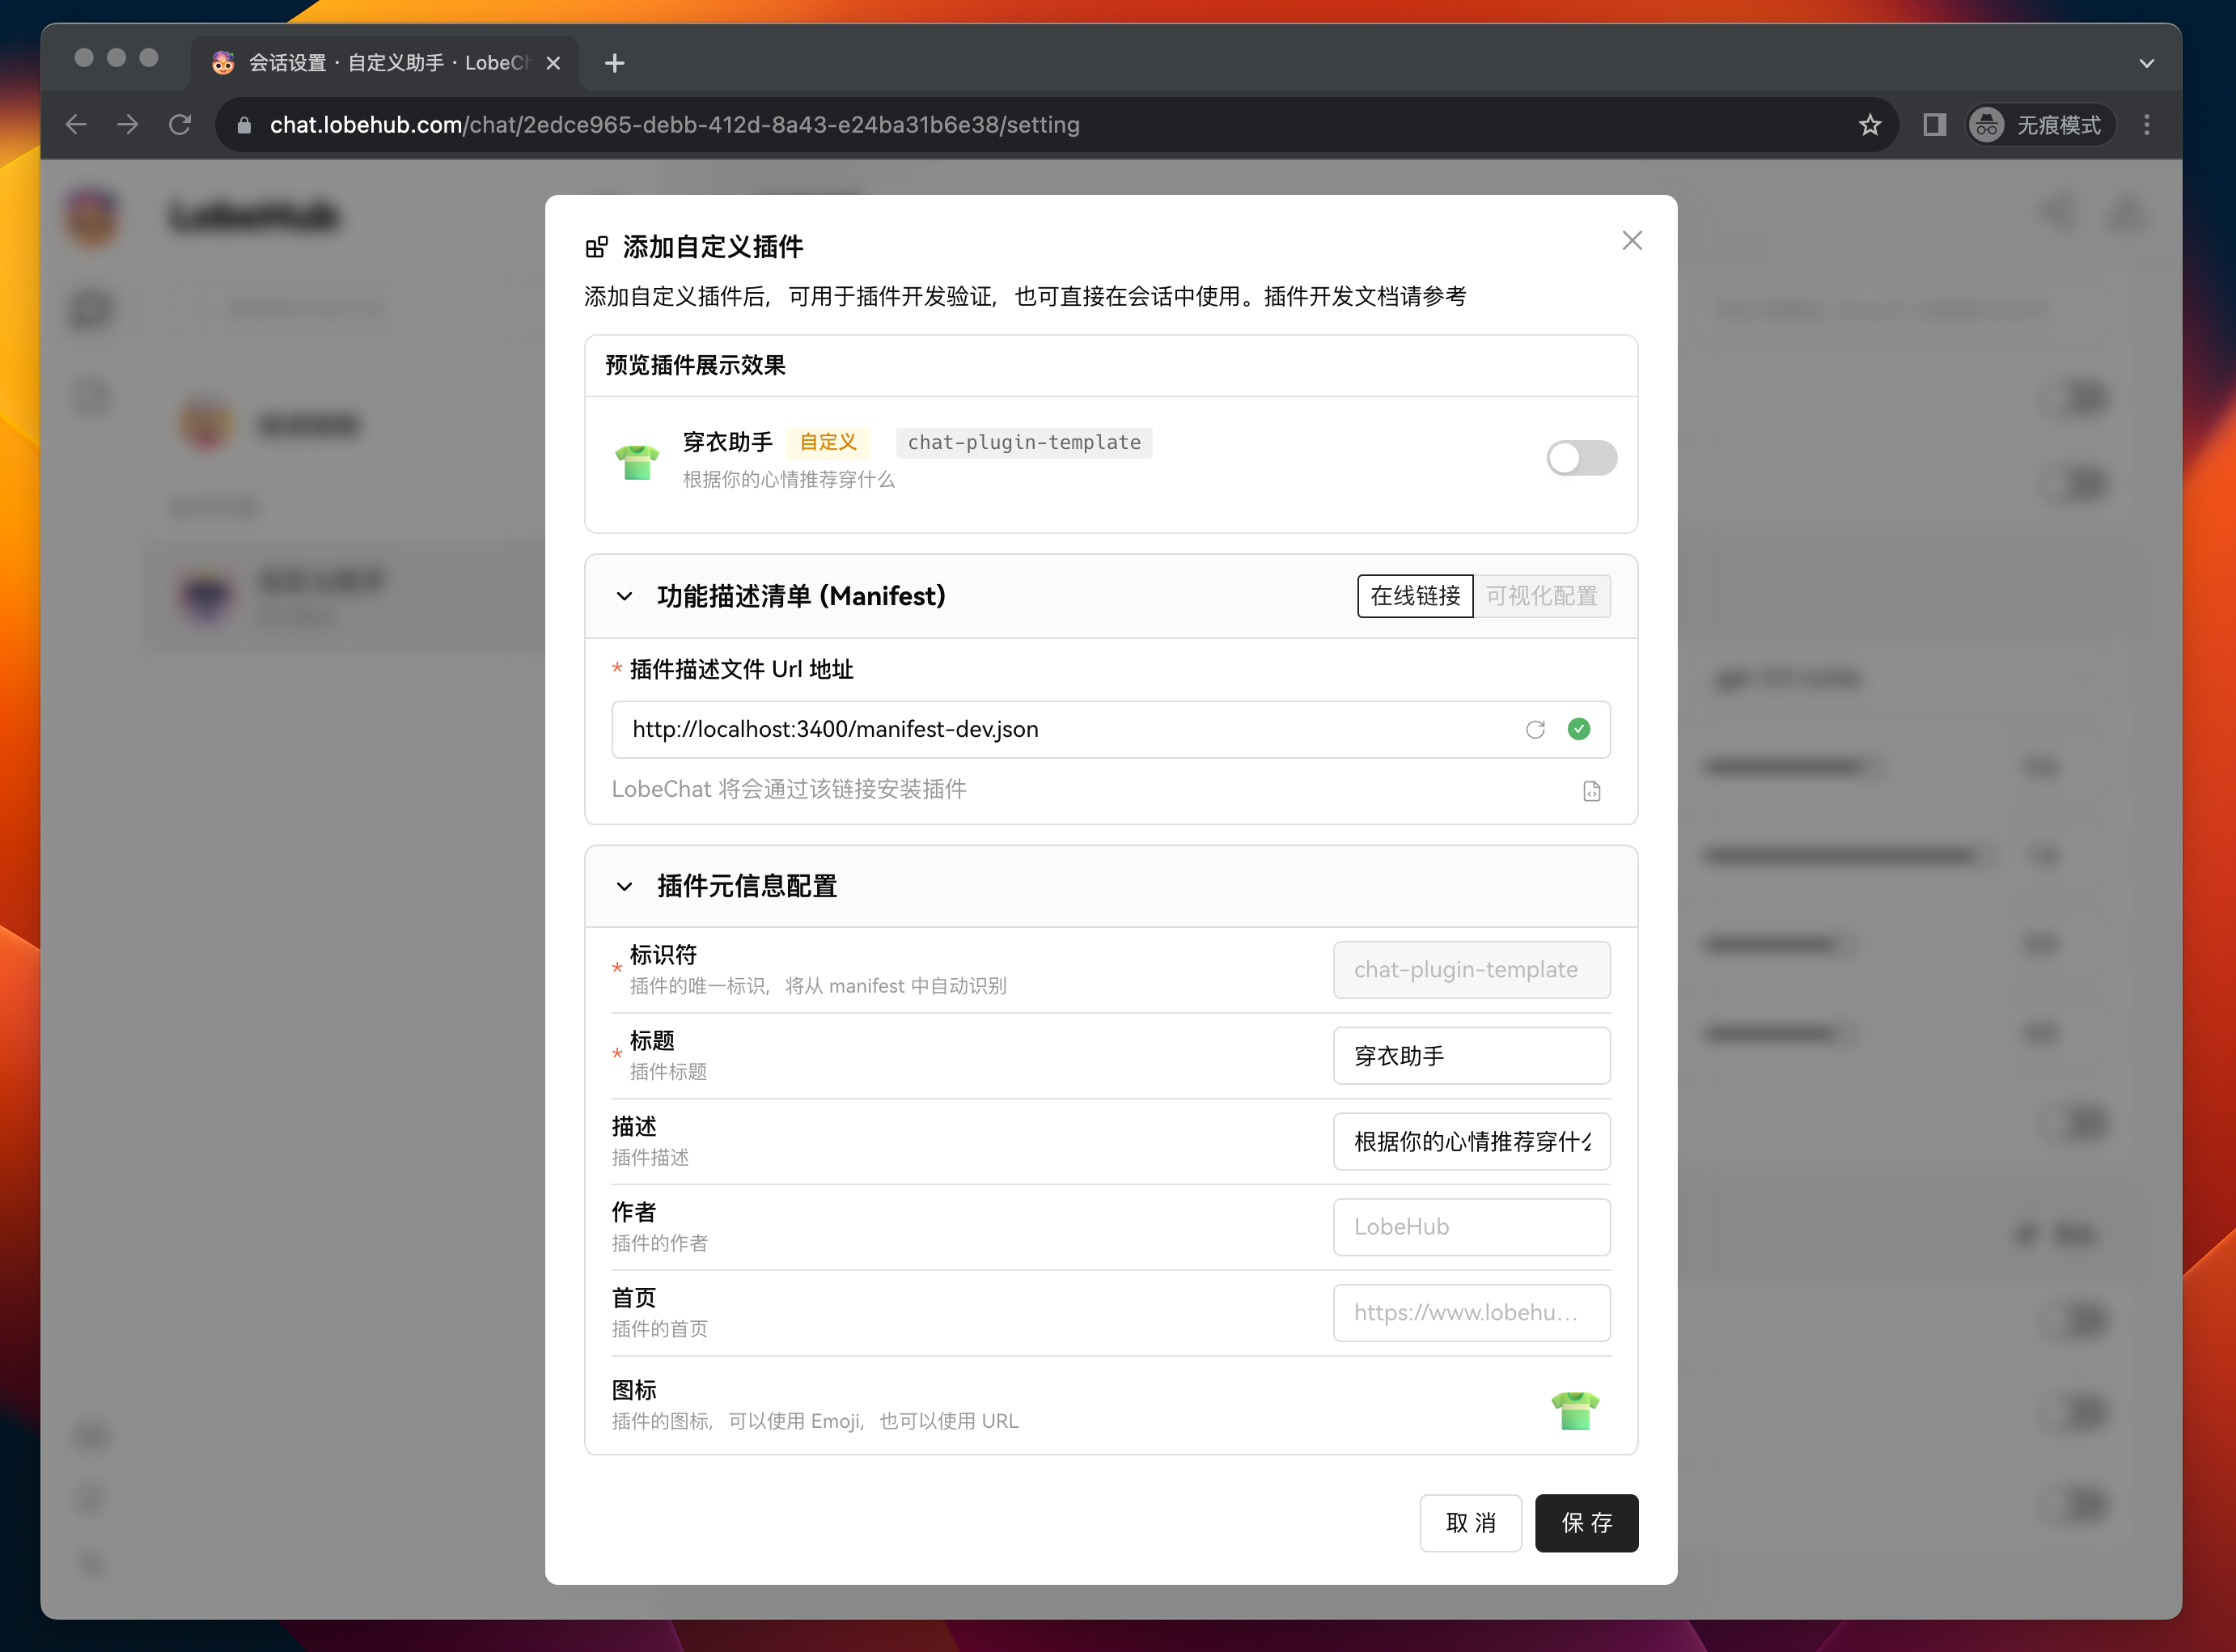
- package/docs/plugins/plugin-store.mdx +10 -0
- package/docs/plugins/plugin-store.zh-CN.mdx +9 -0
- package/docs/self-hosting/analytics.mdx +20 -0
- package/docs/{Deployment/Analytics.zh-CN.md → self-hosting/analytics.zh-CN.mdx} +5 -8
- package/docs/self-hosting/authentication.mdx +94 -0
- package/docs/self-hosting/authentication.zh-CN.mdx +90 -0
- package/docs/self-hosting/deploy-with-azure-openai.mdx +48 -0
- package/docs/{Deployment/Deploy-with-Azure-OpenAI.zh-CN.md → self-hosting/deploy-with-azure-openai.zh-CN.mdx} +16 -21
- package/docs/self-hosting/docker-compose.mdx +121 -0
- package/docs/self-hosting/docker-compose.zh-CN.mdx +121 -0
- package/docs/self-hosting/docker.mdx +152 -0
- package/docs/self-hosting/docker.zh-CN.mdx +149 -0
- package/docs/self-hosting/environment-variable.mdx +340 -0
- package/docs/{Deployment/Environment-Variable.zh-CN.md → self-hosting/environment-variable.zh-CN.mdx} +43 -57
- package/docs/self-hosting/upstream-sync.mdx +66 -0
- package/docs/{Deployment/Upstream-Sync.zh-CN.md → self-hosting/upstream-sync.zh-CN.mdx} +23 -21
- package/docs/self-hosting/vercel.mdx +39 -0
- package/docs/self-hosting/vercel.zh-CN.mdx +39 -0
- package/docs/usage/agent-market.mdx +35 -0
- package/docs/usage/agent-market.zh-CN.mdx +32 -0
- package/docs/usage/mobile.mdx +8 -0
- package/docs/usage/mobile.zh-CN.mdx +7 -0
- package/docs/usage/more.mdx +21 -0
- package/docs/usage/more.zh-CN.mdx +19 -0
- package/docs/usage/plugin-system.mdx +84 -0
- package/docs/usage/plugin-system.zh-CN.mdx +77 -0
- package/docs/usage/pwa.mdx +21 -0
- package/docs/usage/pwa.zh-CN.mdx +21 -0
- package/docs/usage/text-to-image.mdx +5 -0
- package/docs/usage/text-to-image.zh-CN.mdx +6 -0
- package/docs/usage/theme.mdx +17 -0
- package/docs/usage/theme.zh-CN.mdx +15 -0
- package/docs/usage/tts.mdx +26 -0
- package/docs/usage/tts.zh-CN.mdx +24 -0
- package/docs/usage/vision.mdx +8 -0
- package/docs/usage/vision.zh-CN.mdx +7 -0
- package/locales/ar/common.json +1 -0
- package/locales/de-DE/common.json +1 -0
- package/locales/en-US/common.json +1 -0
- package/locales/es-ES/common.json +1 -0
- package/locales/fr-FR/common.json +1 -0
- package/locales/it-IT/common.json +1 -0
- package/locales/ja-JP/common.json +1 -0
- package/locales/ko-KR/common.json +1 -0
- package/locales/nl-NL/common.json +1 -0
- package/locales/pl-PL/common.json +1 -0
- package/locales/pt-BR/common.json +1 -0
- package/locales/ru-RU/common.json +1 -0
- package/locales/tr-TR/common.json +1 -0
- package/locales/vi-VN/common.json +1 -0
- package/locales/zh-CN/common.json +1 -0
- package/locales/zh-TW/common.json +1 -0
- package/next.config.mjs +5 -0
- package/package.json +6 -5
- package/scripts/docsWorkflow/const.ts +1 -1
- package/scripts/docsWorkflow/toc.ts +6 -6
- package/src/app/welcome/(desktop)/features/Footer.tsx +5 -3
- package/src/config/client.ts +6 -0
- package/src/const/url.ts +10 -1
- package/src/features/PluginStore/OnlineList.tsx +2 -16
- package/src/features/SideBar/BottomActions.tsx +11 -10
- package/src/locales/default/common.ts +1 -0
- package/docs/Deployment/Analytics.md +0 -20
- package/docs/Deployment/Authentication.md +0 -80
- package/docs/Deployment/Authentication.zh-CN.md +0 -80
- package/docs/Deployment/Common-Error.md +0 -87
- package/docs/Deployment/Deploy-with-Azure-OpenAI.md +0 -54
- package/docs/Deployment/Docker-Deployment.md +0 -219
- package/docs/Deployment/Docker-Deployment.zh-CN.md +0 -217
- package/docs/Deployment/Environment-Variable.md +0 -362
- package/docs/Deployment/Upstream-Sync.md +0 -62
- package/docs/Plugins/Plugin-Development.md +0 -287
- package/docs/Usage/Plugins.md +0 -53
- package/docs/Usage/Usage-Agents.md +0 -201
- package/docs/Usage/Usage-Agents.zh-CN.md +0 -202
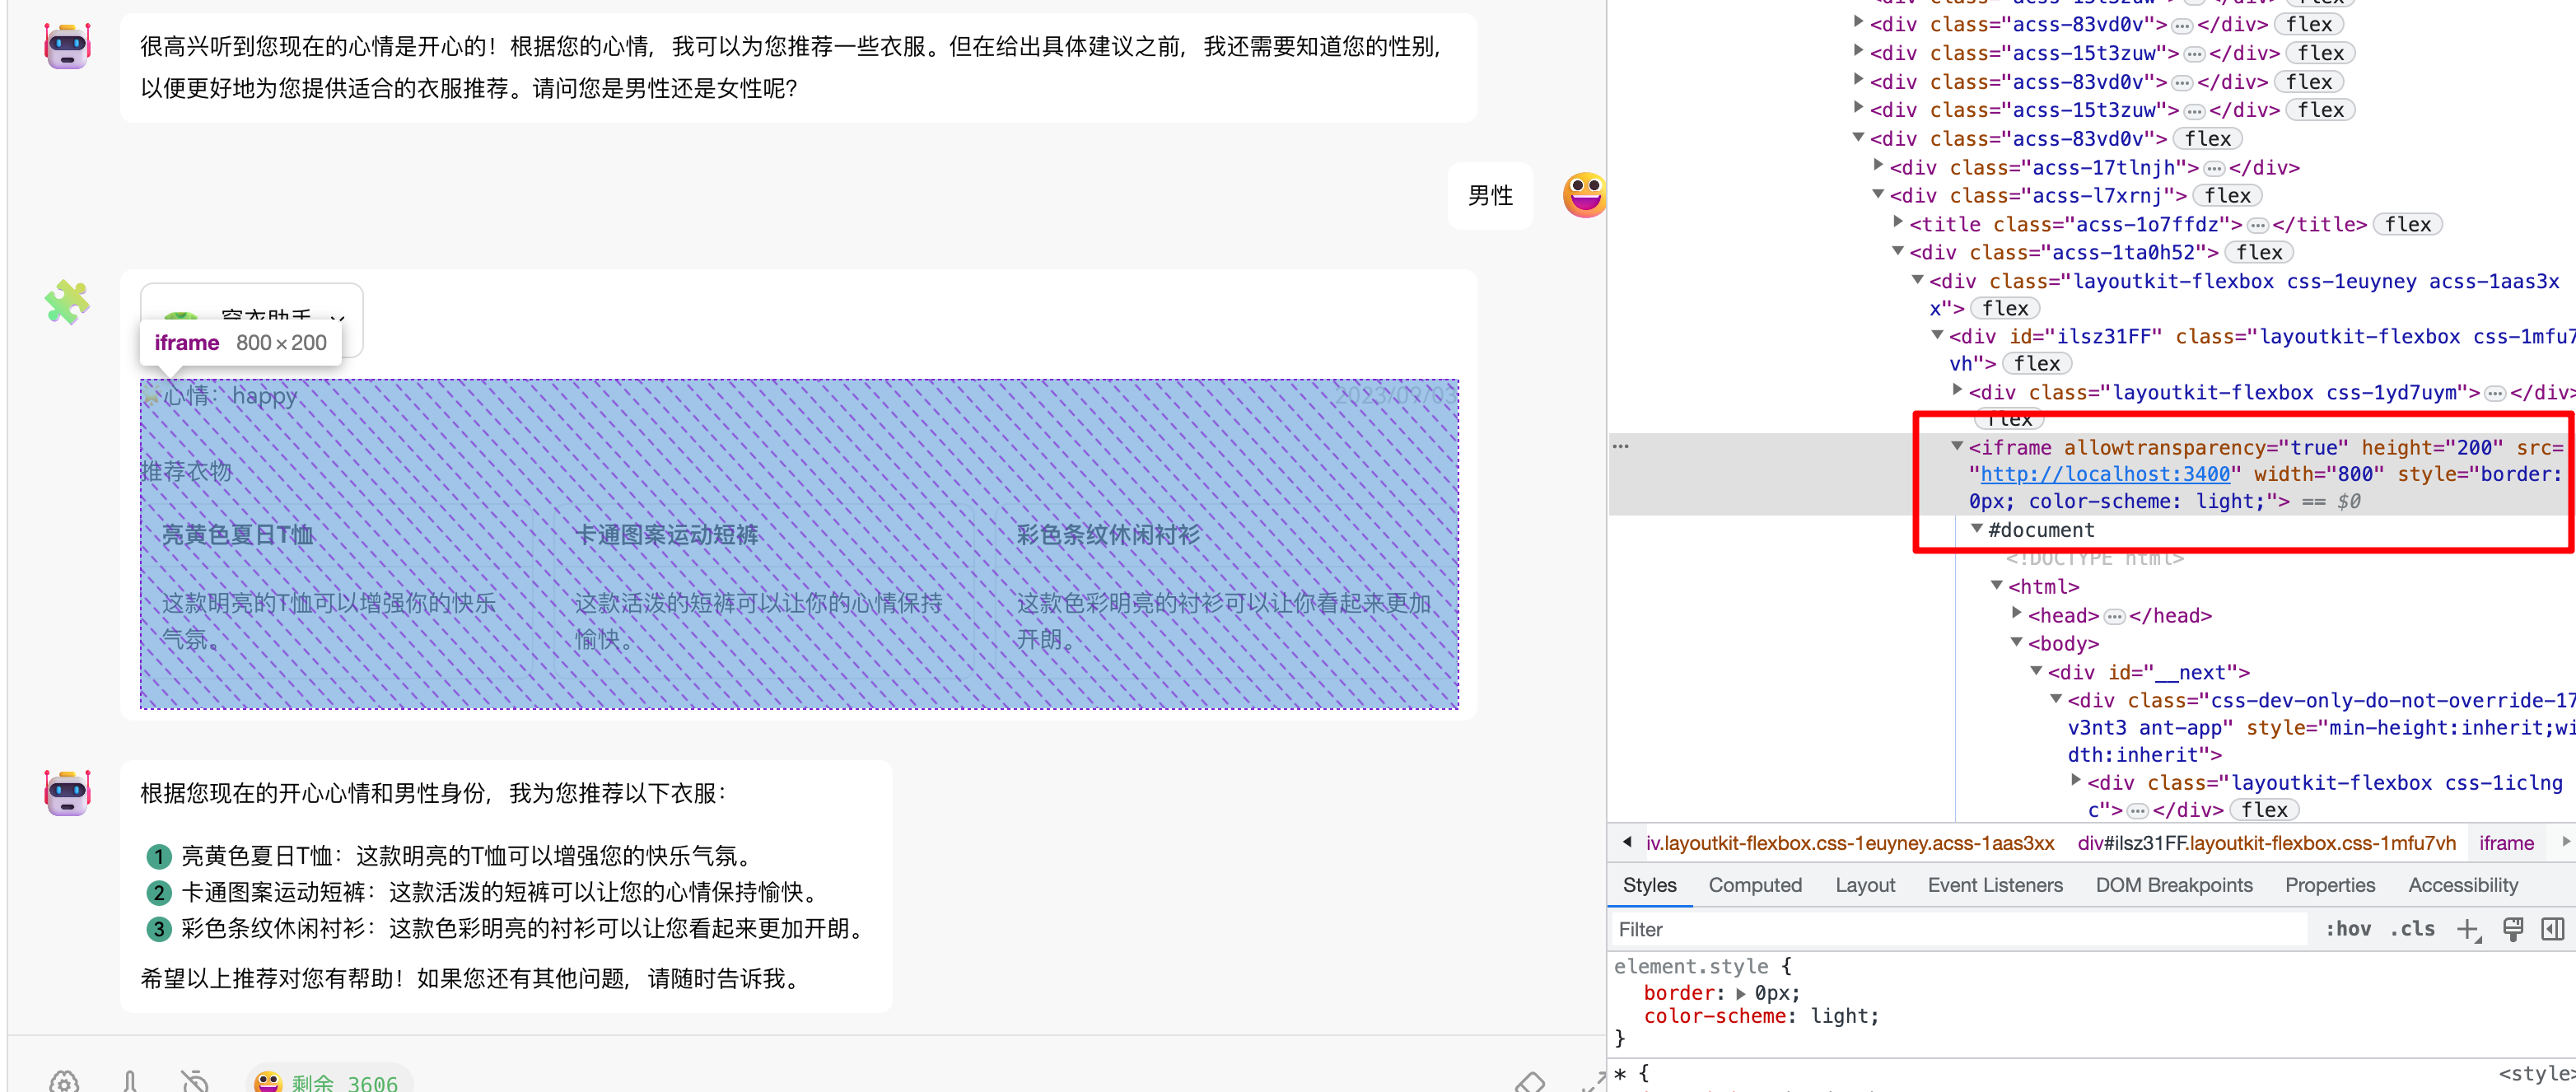
- package/docs/Usage/Usage-Topics.md +0 -31
- package/docs/Usage/Usage-Topics.zh-CN.md +0 -31
- /package/{docs/Development → contributing/Basic}/Add-New-Authentication-Providers.md +0 -0
- /package/{docs/Development → contributing/Basic}/Add-New-Authentication-Providers.zh-CN.md +0 -0
- /package/{docs/Development → contributing/Basic}/Architecture.md +0 -0
- /package/{docs/Development → contributing/Basic}/Architecture.zh-CN.md +0 -0
- /package/{docs/Development → contributing/Basic}/Chat-API.md +0 -0
- /package/{docs/Development → contributing/Basic}/Chat-API.zh-CN.md +0 -0
- /package/{docs/Development → contributing/Basic}/Contributing-Guidelines.md +0 -0
- /package/{docs/Development → contributing/Basic}/Contributing-Guidelines.zh-CN.md +0 -0
- /package/{docs/Development → contributing/Basic}/Feature-Development-Frontend.md +0 -0
- /package/{docs/Development → contributing/Basic}/Feature-Development-Frontend.zh-CN.md +0 -0
- /package/{docs/Development → contributing/Basic}/Folder-Structure.md +0 -0
- /package/{docs/Development → contributing/Basic}/Folder-Structure.zh-CN.md +0 -0
- /package/{docs/Development → contributing/Basic}/Intro.md +0 -0
- /package/{docs/Development → contributing/Basic}/Resources.md +0 -0
- /package/{docs/Development → contributing/Basic}/Resources.zh-CN.md +0 -0
- /package/{docs/Development → contributing/Basic}/Setup-Development.md +0 -0
- /package/{docs/Development → contributing/Basic}/Setup-Development.zh-CN.md +0 -0
- /package/{docs/Development → contributing/Basic}/Test.md +0 -0
- /package/{docs/Development → contributing/Basic}/Test.zh-CN.md +0 -0
- /package/{docs/Development → contributing/Internationalization}/Add-New-Locale.md +0 -0
- /package/{docs/Development → contributing/Internationalization}/Add-New-Locale.zh-CN.md +0 -0
- /package/{docs/Development → contributing/Internationalization}/Internationalization-Implementation.md +0 -0
- /package/{docs → contributing}/Others/Lighthouse.md +0 -0
- /package/{docs → contributing}/Others/Lighthouse.zh-CN.md +0 -0
- /package/{docs/Development → contributing/State-Management}/State-Management-Intro.md +0 -0
- /package/{docs/Development → contributing/State-Management}/State-Management-Intro.zh-CN.md +0 -0
- /package/{docs/Development → contributing/State-Management}/State-Management-Selectors.md +0 -0
- /package/{docs/Development → contributing/State-Management}/State-Management-Selectors.zh-CN.md +0 -0
- /package/{docs → contributing}/_Footer.md +0 -0
|
@@ -0,0 +1,262 @@
|
|
|
1
|
+
# Plugin Development Guide
|
|
2
|
+
|
|
3
|
+
## Plugin Composition
|
|
4
|
+
|
|
5
|
+
A LobeChat plugin consists of the following components:
|
|
6
|
+
|
|
7
|
+
1. **Plugin Index**: Used to display basic information about the plugin, including the plugin name, description, author, version, and a link to the plugin manifest. The official plugin index can be found at [lobe-chat-plugins](https://github.com/lobehub/lobe-chat-plugins). If you want to publish a plugin to the official plugin marketplace, you need to [submit a PR](https://github.com/lobehub/lobe-chat-plugins/pulls) to this repository.
|
|
8
|
+
2. **Plugin Manifest**: Used to describe the functionality of the plugin, including the server-side description, frontend display information, and version number. For a detailed introduction to the manifest, see [manifest][manifest-docs-url].
|
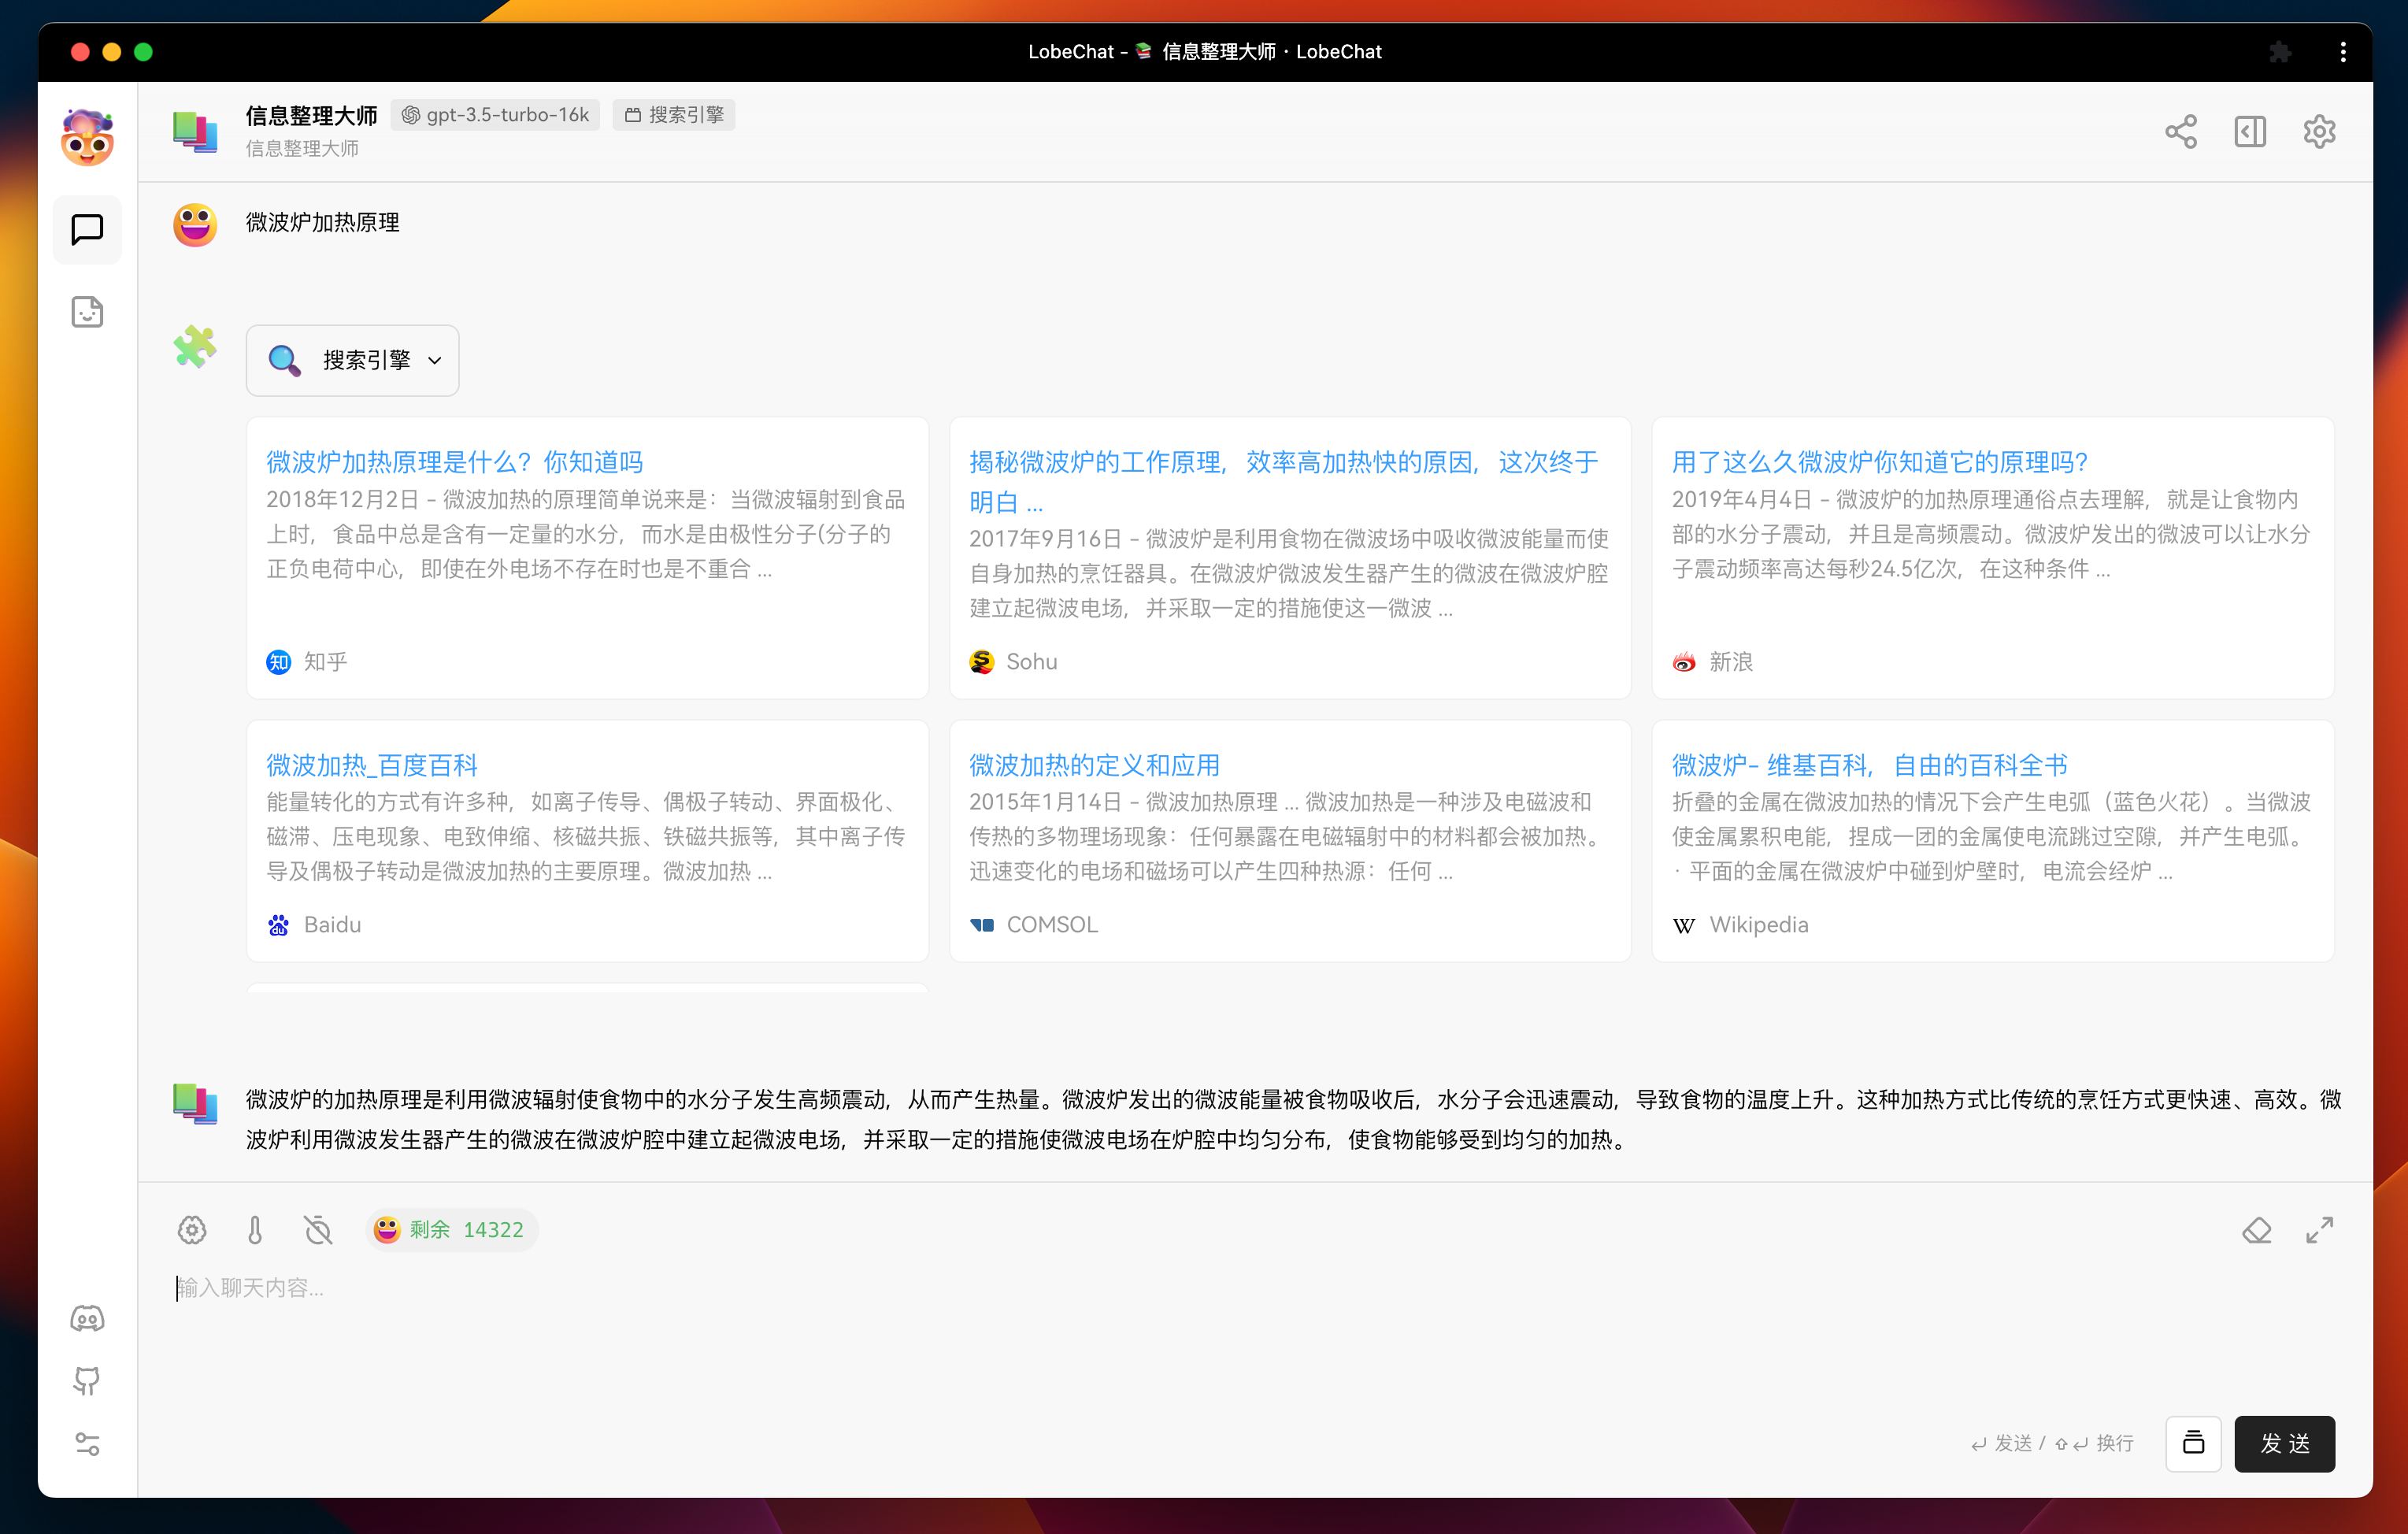
|
9
|
+
3. **Plugin Services**: Used to implement the server-side and frontend modules described in the plugin manifest, as follows:
|
|
10
|
+
- **Server-side**: Needs to implement the interface capabilities described in the `api` section of the manifest.
|
|
11
|
+
- **Frontend UI** (optional): Needs to implement the interface described in the `ui` section of the manifest. This interface will be displayed in plugin messages, allowing for a richer display of information than plain text.
|
|
12
|
+
|
|
13
|
+
## Custom Plugin Workflow
|
|
14
|
+
|
|
15
|
+
This section will introduce how to add and use a custom plugin in LobeChat.
|
|
16
|
+
|
|
17
|
+
### **`1`** Create and Launch Plugin Project
|
|
18
|
+
|
|
19
|
+
You need to first create a plugin project locally, you can use the template we have prepared [lobe-chat-plugin-template][lobe-chat-plugin-template-url]
|
|
20
|
+
|
|
21
|
+
```bash
|
|
22
|
+
$ git clone https://github.com/lobehub/chat-plugin-template.git
|
|
23
|
+
$ cd chat-plugin-template
|
|
24
|
+
$ npm i
|
|
25
|
+
$ npm run dev
|
|
26
|
+
```
|
|
27
|
+
|
|
28
|
+
When you see `ready started server on 0.0.0.0:3400, url: http://localhost:3400`, it means the plugin service has been successfully launched locally.
|
|
29
|
+
|
|
30
|
+
|
|
31
|
+
|
|
32
|
+
### **`2`** Add Local Plugin in LobeChat Role Settings
|
|
33
|
+
|
|
34
|
+
Next, go to LobeChat, create a new assistant, and go to its session settings page:
|
|
35
|
+
|
|
36
|
+
|
|
37
|
+
|
|
38
|
+
Click the <kbd>Add</kbd> button on the right of the plugin list to open the custom plugin adding popup:
|
|
39
|
+
|
|
40
|
+
|
|
41
|
+
|
|
42
|
+
Fill in the **Plugin Description File Url** with `http://localhost:3400/manifest-dev.json`, which is the manifest address of the plugin we started locally.
|
|
43
|
+
|
|
44
|
+
At this point, you should see that the identifier of the plugin has been automatically recognized as `chat-plugin-template`. Next, you need to fill in the remaining form fields (only the title is required), and then click the <kbd>Save</kbd> button to complete the custom plugin addition.
|
|
45
|
+
|
|
46
|
+
|
|
47
|
+
|
|
48
|
+
After adding, you can see the newly added plugin in the plugin list. If you need to modify the plugin configuration, you can click the <kbd>Settings</kbd> button on the far right to make changes.
|
|
49
|
+
|
|
50
|
+
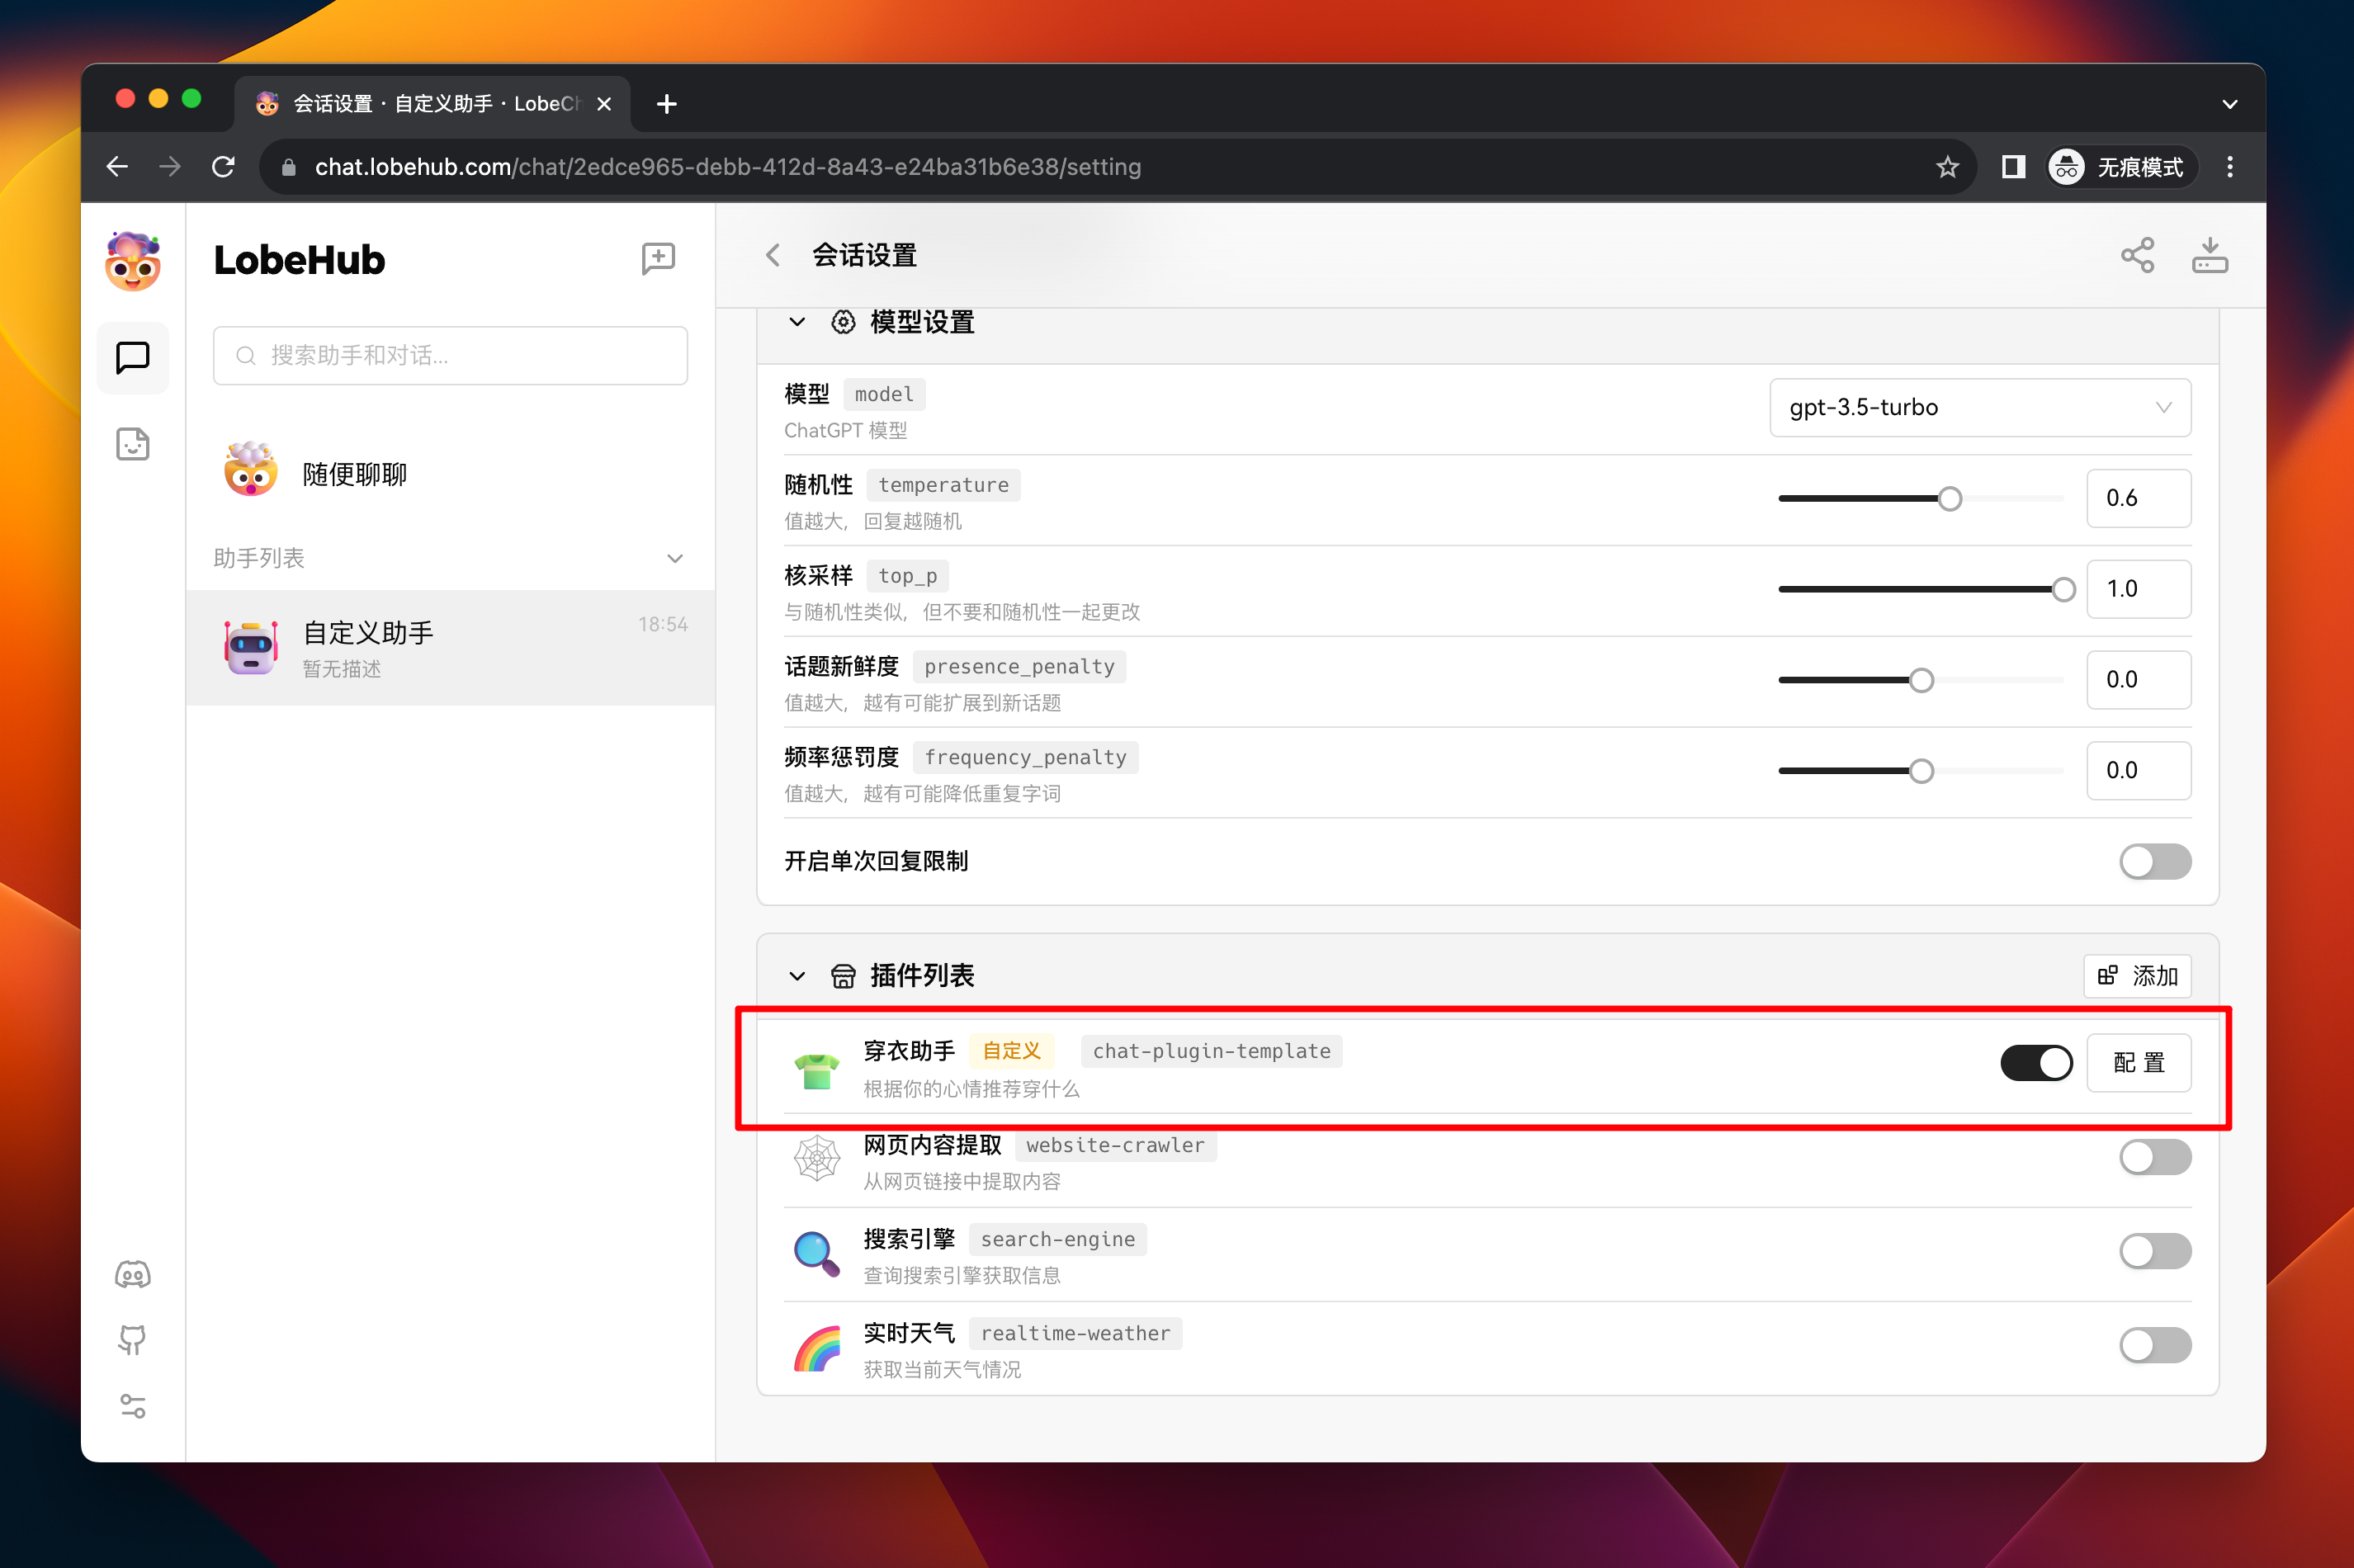
|
|
51
|
+
|
|
52
|
+
### **`3`** Test Plugin Function in Session
|
|
53
|
+
|
|
54
|
+
Next, we need to test whether the plugin's function is working properly.
|
|
55
|
+
|
|
56
|
+
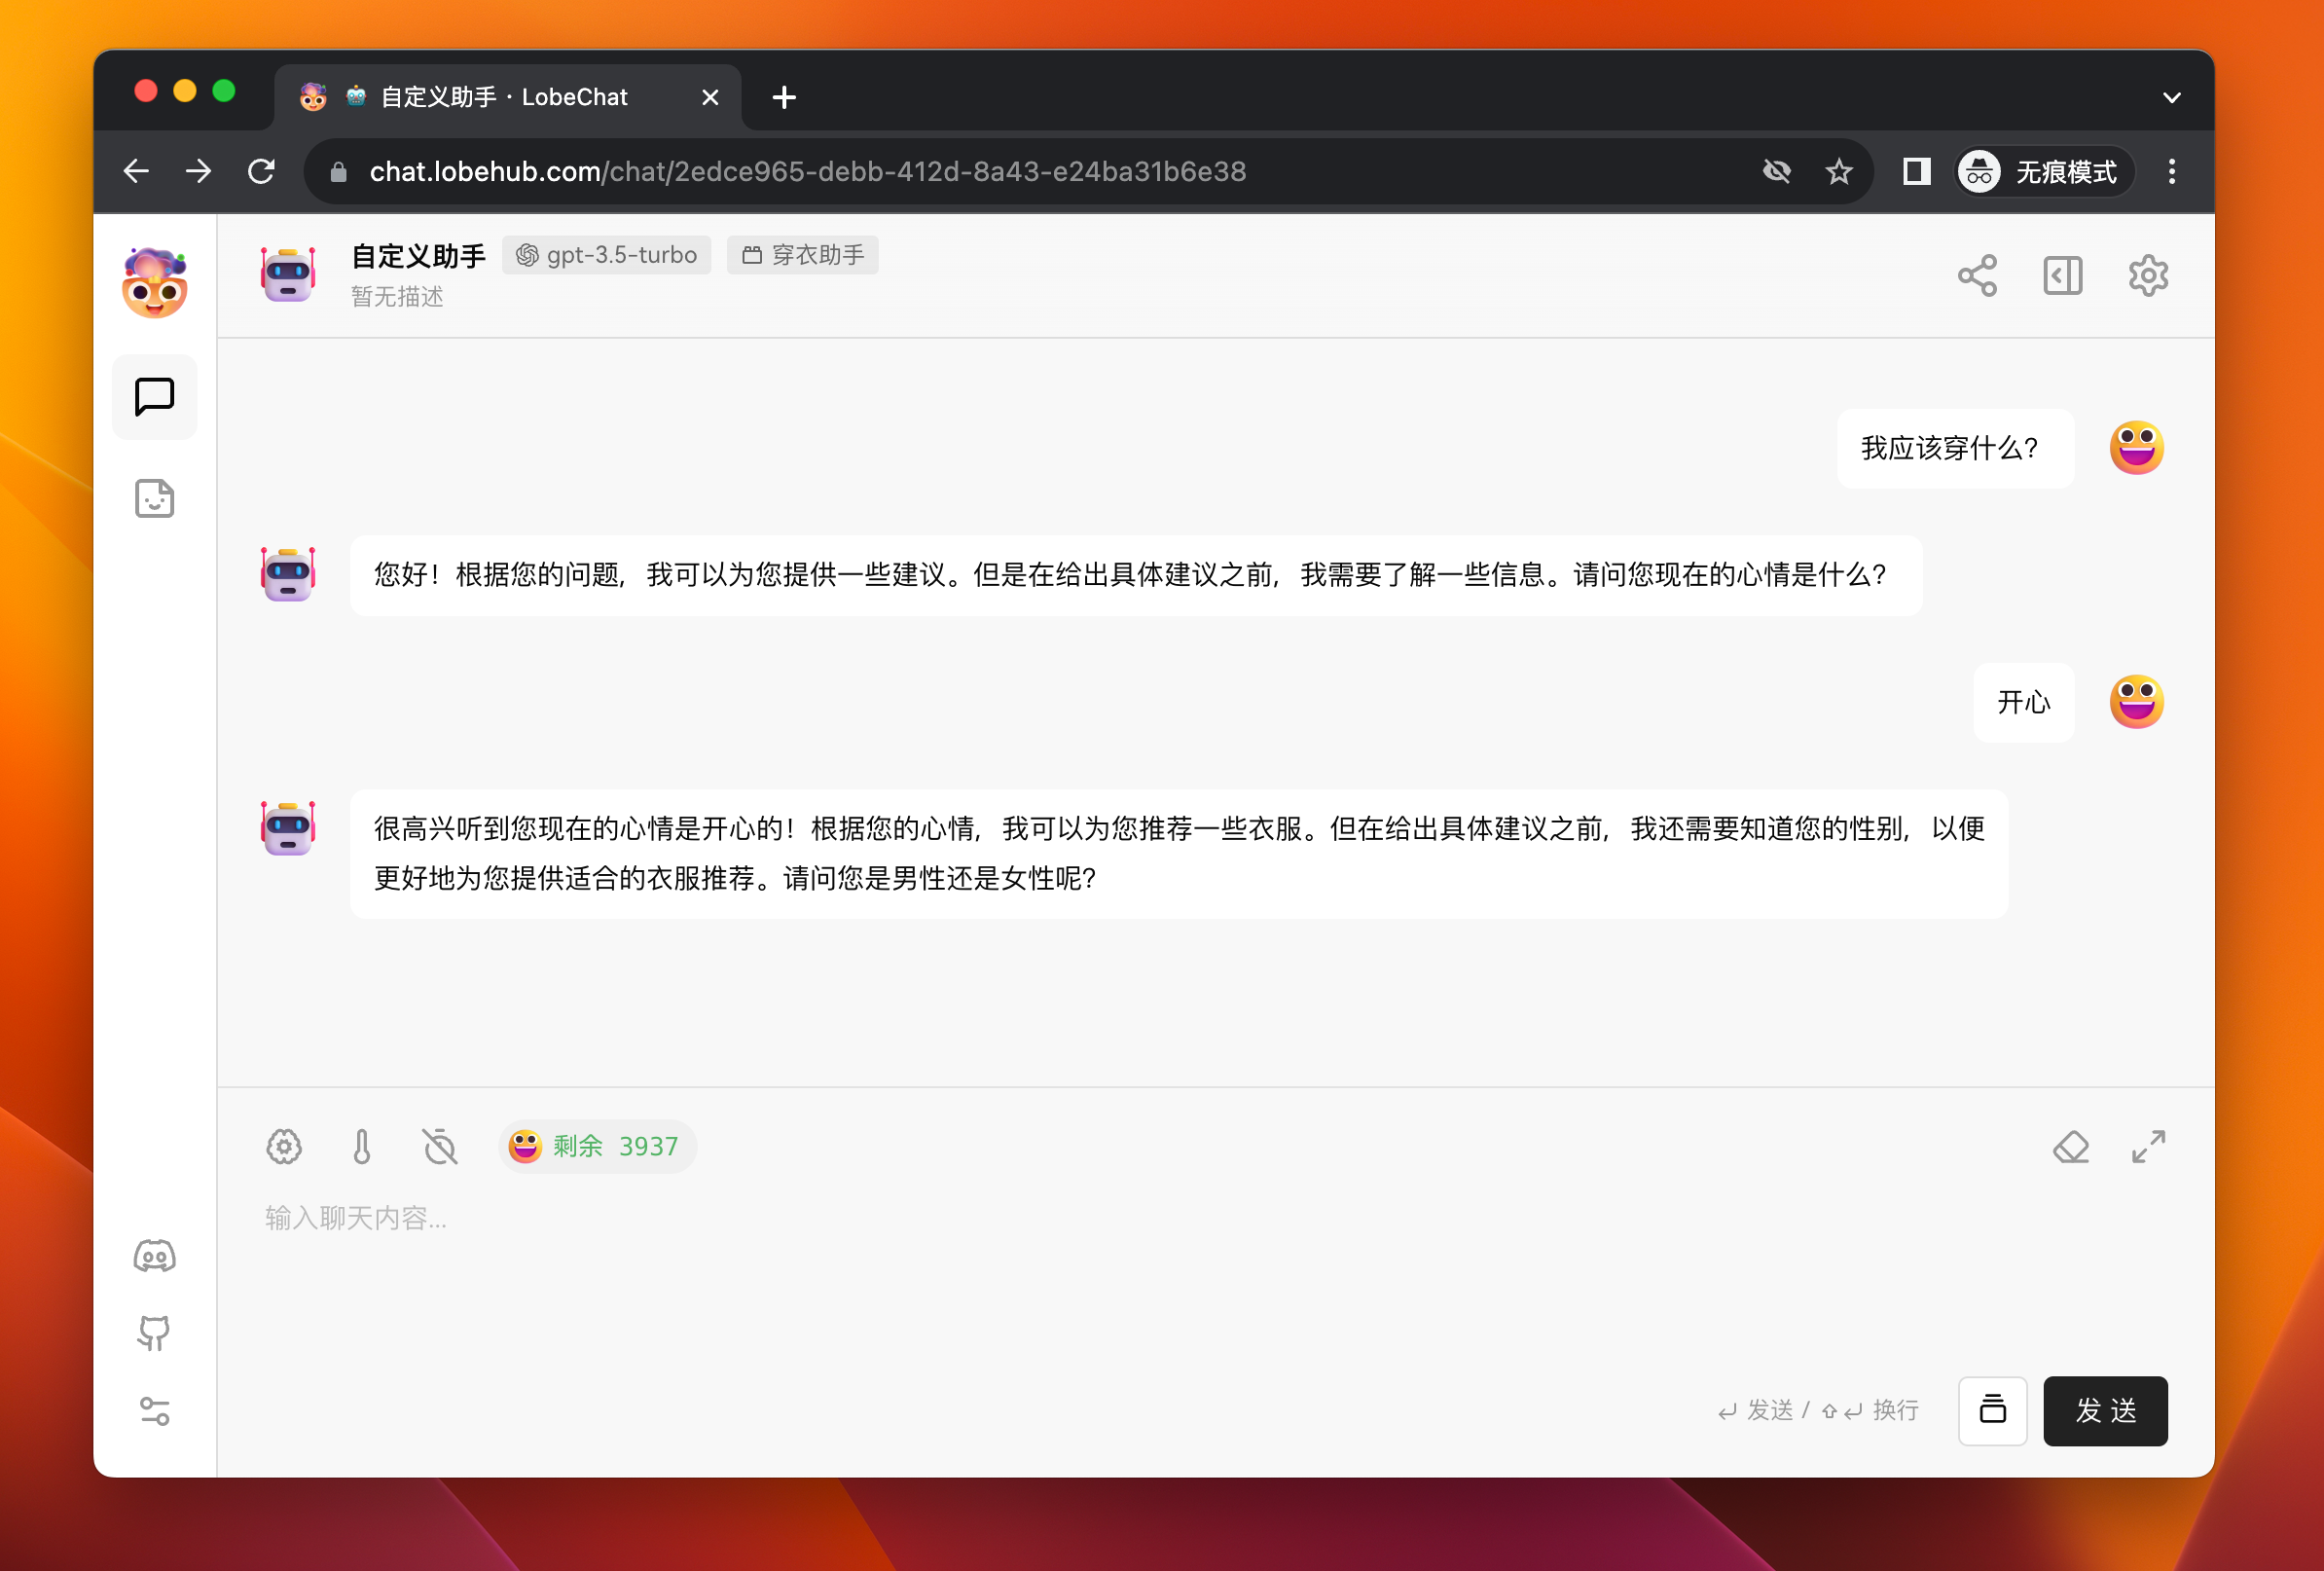
Click the <kbd>Back</kbd> button to return to the session area, and then send a message to the assistant: "What should I wear?" At this point, the assistant will try to ask you about your gender and current mood.
|
|
57
|
+
|
|
58
|
+
|
|
59
|
+
|
|
60
|
+
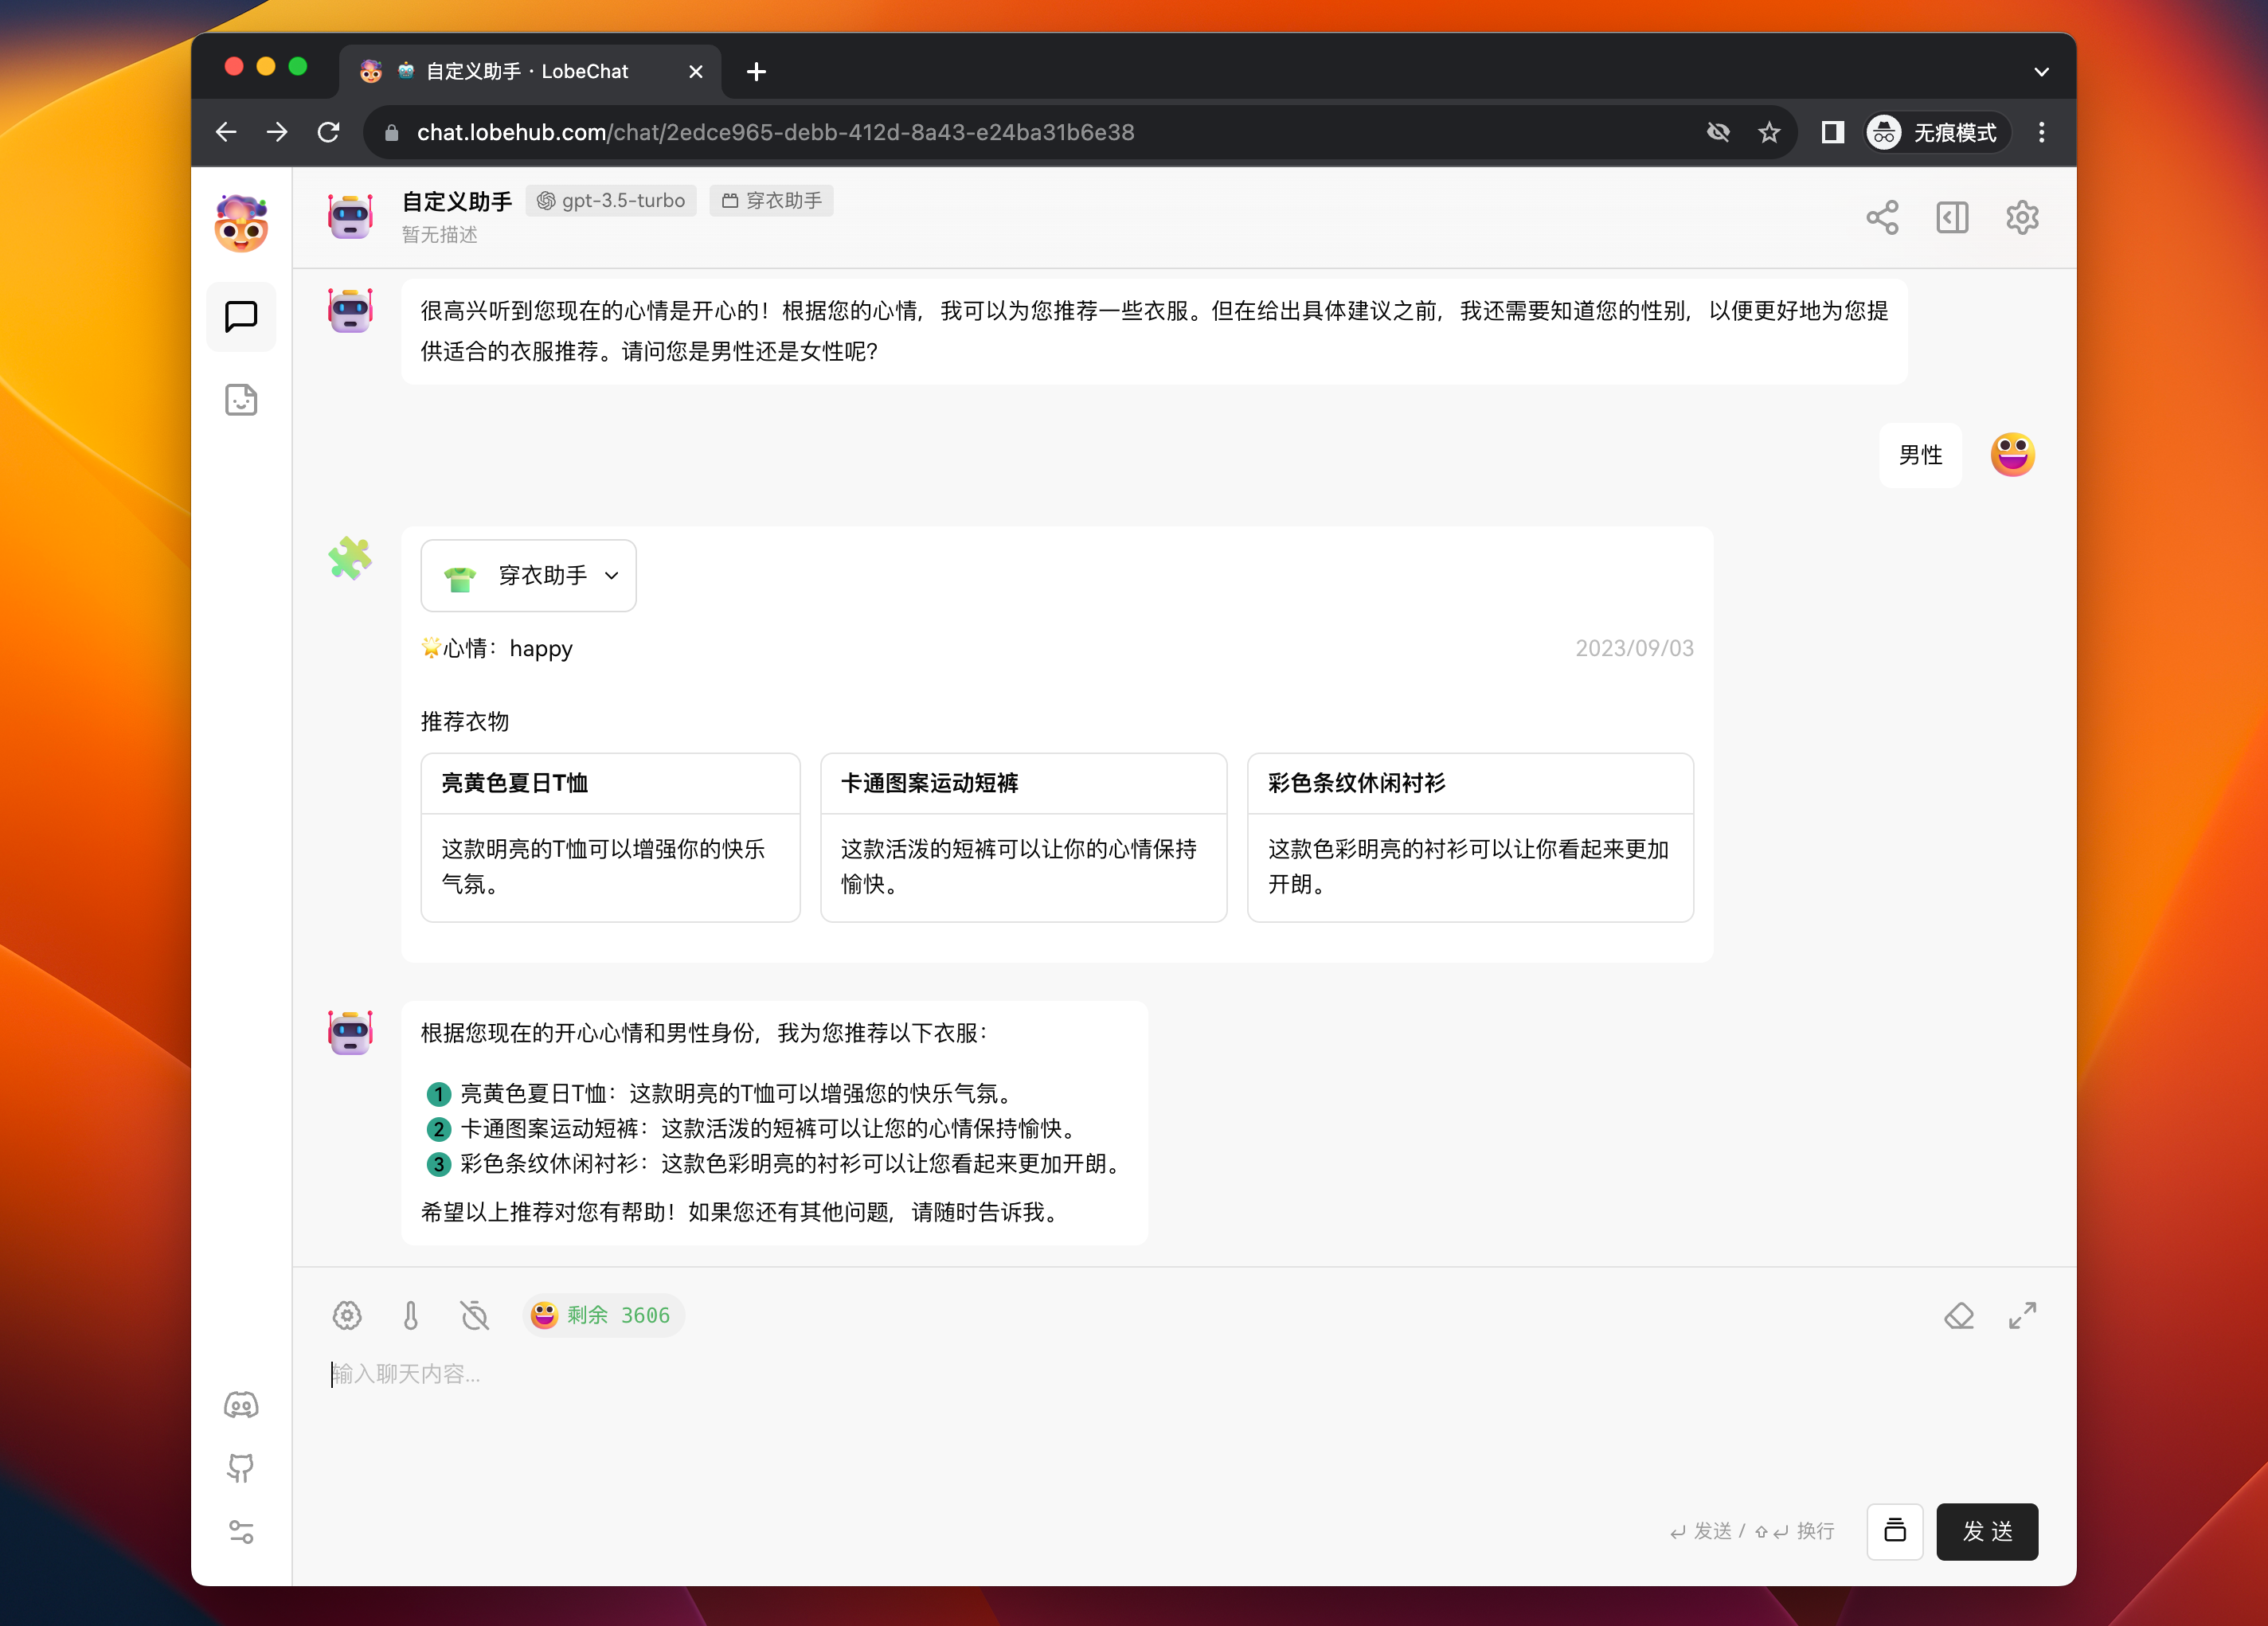
After answering, the assistant will initiate the plugin call, retrieve recommended clothing data from the server based on your gender and mood, and push it to you. Finally, it will provide a text summary based on this information.
|
|
61
|
+
|
|
62
|
+
|
|
63
|
+
|
|
64
|
+
After completing these operations, you have understood the basic process of adding custom plugins and using them in LobeChat.
|
|
65
|
+
|
|
66
|
+
<br />
|
|
67
|
+
|
|
68
|
+
## Local Plugin Development
|
|
69
|
+
|
|
70
|
+
In the above process, we have learned how to add and use plugins. Next, we will focus on the process of developing custom plugins.
|
|
71
|
+
|
|
72
|
+
### Manifest
|
|
73
|
+
|
|
74
|
+
The `manifest` aggregates information on how the plugin's functionality is implemented. The core fields are `api` and `ui`, which respectively describe the server-side interface capabilities and the front-end rendering interface address of the plugin.
|
|
75
|
+
|
|
76
|
+
Taking the `manifest` in the template we provided as an example:
|
|
77
|
+
|
|
78
|
+
```json
|
|
79
|
+
{
|
|
80
|
+
"api": [
|
|
81
|
+
{
|
|
82
|
+
"url": "http://localhost:3400/api/clothes",
|
|
83
|
+
"name": "recommendClothes",
|
|
84
|
+
"description": "Recommend clothes to the user based on their mood",
|
|
85
|
+
"parameters": {
|
|
86
|
+
"properties": {
|
|
87
|
+
"mood": {
|
|
88
|
+
"description": "The user's current mood, with optional values: happy, sad, anger, fear, surprise, disgust",
|
|
89
|
+
"enums": ["happy", "sad", "anger", "fear", "surprise", "disgust"],
|
|
90
|
+
"type": "string"
|
|
91
|
+
},
|
|
92
|
+
"gender": {
|
|
93
|
+
"type": "string",
|
|
94
|
+
"enum": ["man", "woman"],
|
|
95
|
+
"description": "The user's gender, which needs to be asked for from the user to obtain this information"
|
|
96
|
+
}
|
|
97
|
+
},
|
|
98
|
+
"required": ["mood", "gender"],
|
|
99
|
+
"type": "object"
|
|
100
|
+
}
|
|
101
|
+
}
|
|
102
|
+
],
|
|
103
|
+
"gateway": "http://localhost:3400/api/gateway",
|
|
104
|
+
"identifier": "chat-plugin-template",
|
|
105
|
+
"ui": {
|
|
106
|
+
"url": "http://localhost:3400",
|
|
107
|
+
"height": 200
|
|
108
|
+
},
|
|
109
|
+
"version": "1"
|
|
110
|
+
}
|
|
111
|
+
```
|
|
112
|
+
|
|
113
|
+
In this manifest, it mainly includes the following parts:
|
|
114
|
+
|
|
115
|
+
1. `identifier`: This is the unique identifier of the plugin, used to distinguish different plugins. This field needs to be globally unique.
|
|
116
|
+
2. `api`: This is an array containing all the API interface information of the plugin. Each interface includes the url, name, description, and parameters fields, all of which are required. The `description` and `parameters` fields will be sent to GPT as the `functions` parameter of the [Function Call](https://sspai.com/post/81986), and the parameters need to comply with the [JSON Schema](https://json-schema.org/) specification. In this example, the API interface is named `recommendClothes`, and its function is to recommend clothes based on the user's mood and gender. The interface parameters include the user's mood and gender, both of which are required.
|
|
117
|
+
3. `ui`: This field contains information about the plugin's user interface, indicating from which address LobeChat loads the plugin's front-end interface. Since LobeChat plugin interface loading is implemented based on iframes, the height and width of the plugin interface can be specified as needed.
|
|
118
|
+
4. `gateway`: This field specifies the gateway for LobeChat to query the plugin's API interface. LobeChat's default plugin gateway is a cloud-based service, and requests for custom plugins need to be sent to a locally launched service. Remote calls to a local address are generally not feasible. The `gateway` field solves this problem. By specifying the gateway in the manifest, LobeChat will send plugin requests to this address, and the local gateway address will dispatch requests to the local plugin service. Published online plugins do not need to specify this field.
|
|
119
|
+
5. `version`: This is the version number of the plugin, which currently has no effect.
|
|
120
|
+
|
|
121
|
+
In actual development, you can modify the plugin's description list according to your own needs to declare the functionality you want to implement. For a complete introduction to each field in the manifest, see: [manifest][manifest-docs-url].
|
|
122
|
+
|
|
123
|
+
### Project Structure
|
|
124
|
+
|
|
125
|
+
The [lobe-chat-plugin-template][lobe-chat-plugin-template-url] template project uses Next.js as the development framework, and its core directory structure is as follows:
|
|
126
|
+
|
|
127
|
+
```
|
|
128
|
+
➜ chat-plugin-template
|
|
129
|
+
├── public
|
|
130
|
+
│ └── manifest-dev.json # Manifest file
|
|
131
|
+
├── src
|
|
132
|
+
│ └── pages
|
|
133
|
+
│ │ ├── api # Next.js server-side folder
|
|
134
|
+
│ │ │ ├── clothes.ts # Implementation of the recommendClothes interface
|
|
135
|
+
│ │ │ └── gateway.ts # Local plugin proxy gateway
|
|
136
|
+
│ │ └── index.tsx # Front-end display interface
|
|
137
|
+
```
|
|
138
|
+
|
|
139
|
+
This template uses Next.js as the development framework. You can use any development framework and language you are familiar with, as long as it can implement the functionality described in the manifest.
|
|
140
|
+
|
|
141
|
+
Contributions of more plugin templates using different frameworks and languages are also welcome.
|
|
142
|
+
|
|
143
|
+
### Server-Side
|
|
144
|
+
|
|
145
|
+
The server-side needs to implement the API interfaces described in the manifest. In the template, we use Vercel's [Edge Runtime](https://nextjs.org/docs/pages/api-reference/edge) to eliminate the need for maintenance.
|
|
146
|
+
|
|
147
|
+
#### API Implementation
|
|
148
|
+
|
|
149
|
+
For the Edge Runtime, we provide the `createErrorResponse` method in `@lobehub/chat-plugin-sdk` to quickly return error responses. Currently, the provided error types are detailed in: [PluginErrorType][plugin-error-type-url].
|
|
150
|
+
|
|
151
|
+
The implementation of the clothes interface in the template is as follows:
|
|
152
|
+
|
|
153
|
+
```ts
|
|
154
|
+
export default async (req: Request) => {
|
|
155
|
+
if (req.method !== 'POST') return createErrorResponse(PluginErrorType.MethodNotAllowed);
|
|
156
|
+
|
|
157
|
+
const { gender, mood } = (await req.json()) as RequestData;
|
|
158
|
+
|
|
159
|
+
const clothes = gender === 'man' ? manClothes : womanClothes;
|
|
160
|
+
|
|
161
|
+
const result: ResponseData = {
|
|
162
|
+
clothes: clothes[mood] || [],
|
|
163
|
+
mood,
|
|
164
|
+
today: Date.now(),
|
|
165
|
+
};
|
|
166
|
+
|
|
167
|
+
return new Response(JSON.stringify(result));
|
|
168
|
+
};
|
|
169
|
+
```
|
|
170
|
+
|
|
171
|
+
Where `manClothes` and `womanClothes` are mock data and can be replaced with database queries in actual scenarios.
|
|
172
|
+
|
|
173
|
+
#### Plugin Gateway
|
|
174
|
+
|
|
175
|
+
Since the default plugin gateway for LobeChat is a cloud service `/api/plugins`, the cloud service sends requests to the address specified in the manifest's `api.url` to solve cross-origin issues.
|
|
176
|
+
|
|
177
|
+
For custom plugins, plugin requests need to be sent to the local service. Therefore, by specifying the gateway in the manifest (http://localhost:3400/api/gateway), LobeChat> will directly request this address, and then only the corresponding gateway needs to be created at that address.
|
|
178
|
+
|
|
179
|
+
```ts
|
|
180
|
+
import { createLobeChatPluginGateway } from '@lobehub/chat-plugins-gateway';
|
|
181
|
+
|
|
182
|
+
export const config = {
|
|
183
|
+
runtime: 'edge',
|
|
184
|
+
};
|
|
185
|
+
|
|
186
|
+
export default createLobeChatPluginGateway();
|
|
187
|
+
```
|
|
188
|
+
|
|
189
|
+
[`@lobehub/chat-plugins-gateway`](https://github.com/lobehub/chat-plugins-gateway) contains the implementation of the plugin gateway in LobeChat [here](https://github.com/lobehub/lobe-chat/blob/main/src/pages/api/plugins.api.ts). You can use this package directly to create a gateway, allowing LobeChat to access the local plugin service.
|
|
190
|
+
|
|
191
|
+
### Plugin UI Interface
|
|
192
|
+
|
|
193
|
+
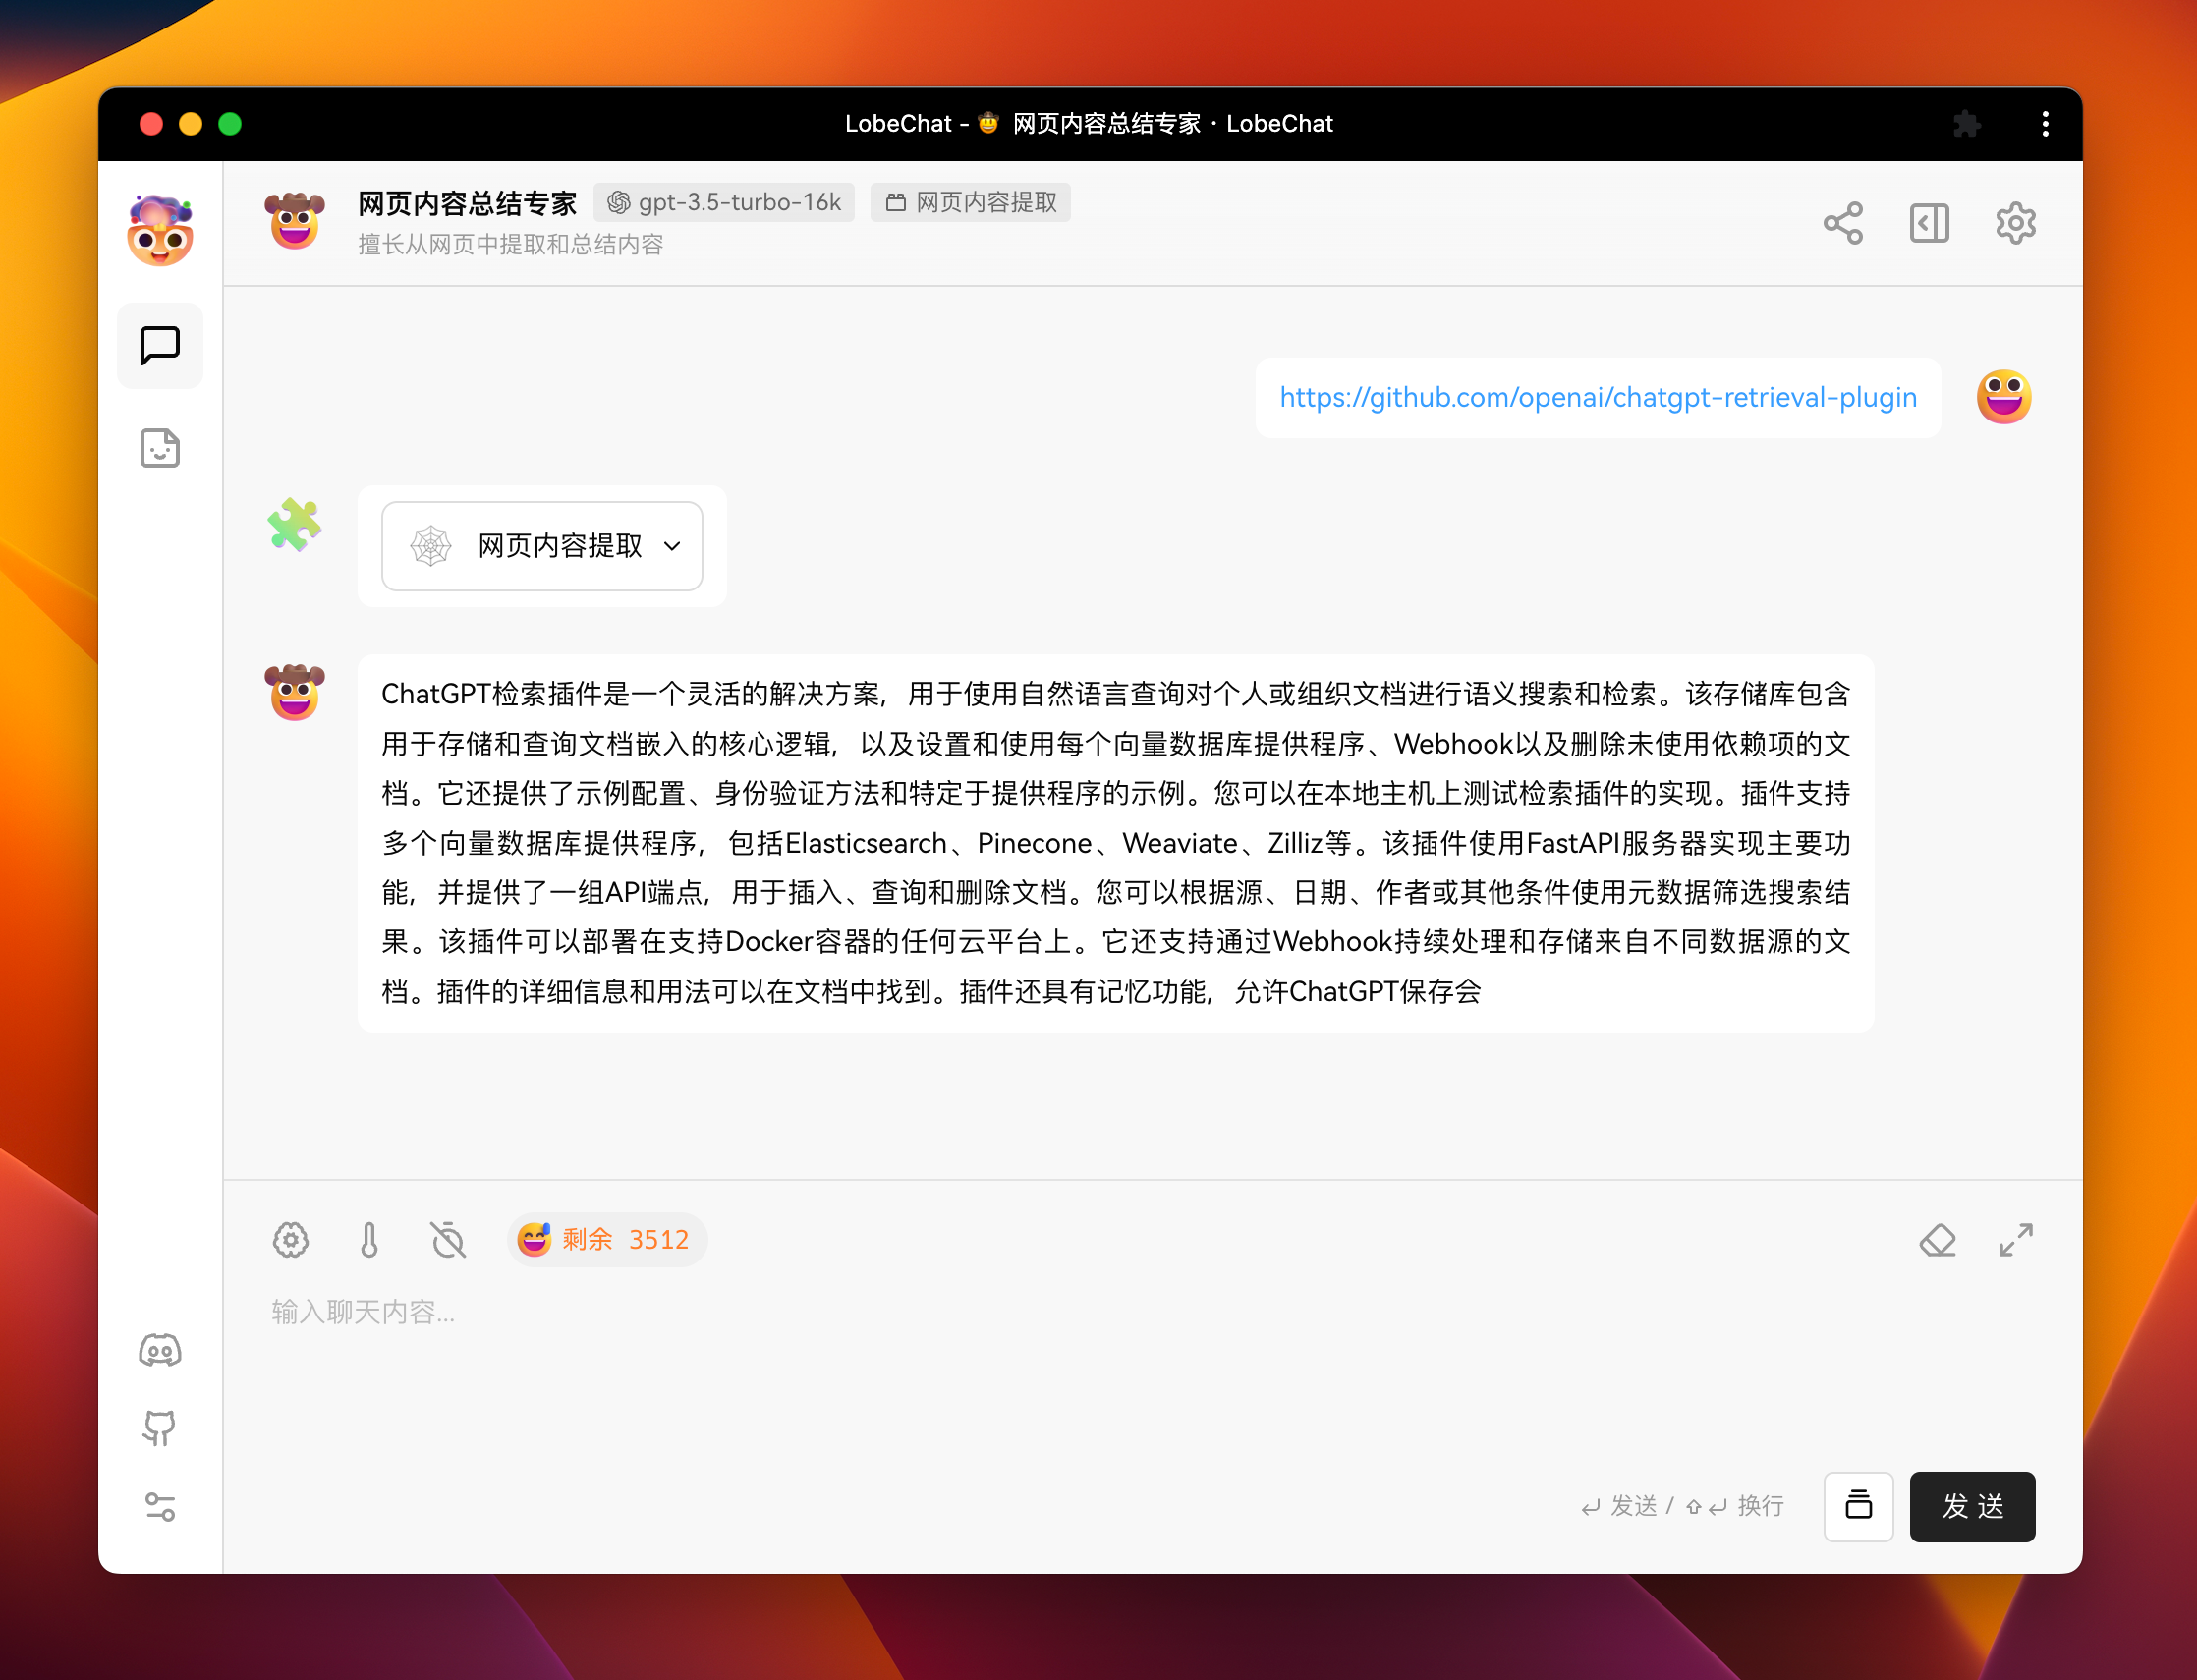
The custom UI interface for plugins is optional. For example, the official plugin [Web Content Extraction](https://github.com/lobehub/chat-plugin-web-crawler) does not have a corresponding user interface.
|
|
194
|
+
|
|
195
|
+
|
|
196
|
+
|
|
197
|
+
If you want to display richer information in plugin messages or include some interactive operations, you can customize a user interface for the plugin. For example, the following image shows the user interface for the [Search Engine](https://github.com/lobehub/chat-plugin-search-engine) plugin.
|
|
198
|
+
|
|
199
|
+
|
|
200
|
+
|
|
201
|
+
#### Implementation of Plugin UI Interface
|
|
202
|
+
|
|
203
|
+
LobeChat implements the loading of plugin UI through `iframe` and uses `postMessage` to communicate with the plugin. Therefore, the implementation of the plugin UI is consistent with regular web development. You can use any frontend framework and development language you are familiar with.
|
|
204
|
+
|
|
205
|
+
|
|
206
|
+
|
|
207
|
+
In the template we provide, we use React + Next.js + [antd](https://ant.design/) as the frontend interface framework. You can find the implementation of the user interface in [`src/pages/index.tsx`](https://github.com/lobehub/chat-plugin-template/blob/main/src/pages/index.tsx).
|
|
208
|
+
|
|
209
|
+
As for plugin communication, we provide relevant methods in [`@lobehub/chat-plugin-sdk`](https://github.com/lobehub/chat-plugin-sdk) to simplify communication between the plugin and LobeChat. You can actively retrieve the current message data from LobeChat using the `fetchPluginMessage` method. For detailed information about this method, see: [fetchPluginMessage][fetch-plugin-message-url].
|
|
210
|
+
|
|
211
|
+
```tsx
|
|
212
|
+
import { fetchPluginMessage } from '@lobehub/chat-plugin-sdk';
|
|
213
|
+
import { memo, useEffect, useState } from 'react';
|
|
214
|
+
|
|
215
|
+
import { ResponseData } from '@/type';
|
|
216
|
+
|
|
217
|
+
const Render = memo(() => {
|
|
218
|
+
const [data, setData] = useState<ResponseData>();
|
|
219
|
+
|
|
220
|
+
useEffect(() => {
|
|
221
|
+
// Retrieve the current plugin message from LobeChat
|
|
222
|
+
fetchPluginMessage().then((e: ResponseData) => {
|
|
223
|
+
setData(e);
|
|
224
|
+
});
|
|
225
|
+
}, []);
|
|
226
|
+
|
|
227
|
+
return <>...</>;
|
|
228
|
+
});
|
|
229
|
+
|
|
230
|
+
export default Render;
|
|
231
|
+
```
|
|
232
|
+
|
|
233
|
+
## Plugin Deployment and Release
|
|
234
|
+
|
|
235
|
+
Once you have finished developing the plugin, you can deploy it using your preferred method, such as using Vercel or packaging it as a Docker container for release, and so on.
|
|
236
|
+
|
|
237
|
+
If you want more people to use your plugin, feel free to [submit it for listing](https://github.com/lobehub/lobe-chat-plugins) on the plugin marketplace.
|
|
238
|
+
|
|
239
|
+
[![][submit-plugin-shield]][submit-plugin-url]
|
|
240
|
+
|
|
241
|
+
### Plugin Shield
|
|
242
|
+
|
|
243
|
+
[](https://github.com/lobehub/lobe-chat-plugins)
|
|
244
|
+
|
|
245
|
+
```md
|
|
246
|
+
[](https://github.com/lobehub/lobe-chat-plugins)
|
|
247
|
+
```
|
|
248
|
+
|
|
249
|
+
## Links
|
|
250
|
+
|
|
251
|
+
- **📘 Pluging SDK Documentation**: https://chat-plugin-sdk.lobehub.com
|
|
252
|
+
- **🚀 chat-plugin-template**: https://github.com/lobehub/chat-plugin-template
|
|
253
|
+
- **🧩 chat-plugin-sdk**: https://github.com/lobehub/chat-plugin-sdk
|
|
254
|
+
- **🚪 chat-plugin-gateway**: https://github.com/lobehub/chat-plugins-gateway
|
|
255
|
+
- **🏪 lobe-chat-plugins**: https://github.com/lobehub/lobe-chat-plugins
|
|
256
|
+
|
|
257
|
+
[fetch-plugin-message-url]: https://github.com/lobehub/chat-plugin-template
|
|
258
|
+
[lobe-chat-plugin-template-url]: https://github.com/lobehub/chat-plugin-template
|
|
259
|
+
[manifest-docs-url]: https://chat-plugin-sdk.lobehub.com/guides/plugin-manifest
|
|
260
|
+
[plugin-error-type-url]: https://github.com/lobehub/chat-plugin-template
|
|
261
|
+
[submit-plugin-shield]: https://img.shields.io/badge/🧩/🏪_submit_plugin-%E2%86%92-95f3d9?labelColor=black&style=for-the-badge
|
|
262
|
+
[submit-plugin-url]: https://github.com/lobehub/lobe-chat-plugins
|
|
@@ -1,21 +1,5 @@
|
|
|
1
1
|
# 插件开发指南
|
|
2
2
|
|
|
3
|
-
#### TOC
|
|
4
|
-
|
|
5
|
-
- [插件构成](#插件构成)
|
|
6
|
-
- [自定义插件流程](#自定义插件流程)
|
|
7
|
-
- [**`1`** 创建并启动插件项目](#1-创建并启动插件项目)
|
|
8
|
-
- [**`2`** 在 LobeChat 角色设置中添加本地插件](#2-在-lobechat-角色设置中添加本地插件)
|
|
9
|
-
- [**`3`** 会话测试插件功能](#3-会话测试插件功能)
|
|
10
|
-
- [本地插件开发](#本地插件开发)
|
|
11
|
-
- [manifest](#manifest)
|
|
12
|
-
- [项目结构](#项目结构)
|
|
13
|
-
- [服务端](#服务端)
|
|
14
|
-
- [插件 UI 界面](#插件-ui-界面)
|
|
15
|
-
- [插件部署与发布](#插件部署与发布)
|
|
16
|
-
- [插件 Shield](#插件-shield)
|
|
17
|
-
- [链接](#链接)
|
|
18
|
-
|
|
19
3
|
## 插件构成
|
|
20
4
|
|
|
21
5
|
一个 LobeChat 的插件由以下几个部分组成:
|
|
@@ -26,8 +10,6 @@
|
|
|
26
10
|
- **服务端**:需要实现 manifest 中描述的 `api` 部分的接口能力;
|
|
27
11
|
- **前端 UI**(可选):需要实现 manifest 中描述的 `ui` 部分的界面,该界面将会在插件消息中透出,进而实现比文本更加丰富的信息展示方式。
|
|
28
12
|
|
|
29
|
-
<br/>
|
|
30
|
-
|
|
31
13
|
## 自定义插件流程
|
|
32
14
|
|
|
33
15
|
本节将会介绍如何在 LobeChat 中添加和使用一个自定义插件。
|
|
@@ -53,7 +35,7 @@ $ npm run dev
|
|
|
53
35
|
|
|
54
36
|

|
|
55
37
|
|
|
56
|
-
点击插件列表右侧的 <kbd
|
|
38
|
+
点击插件列表右侧的 <kbd>添加</kbd> 按钮,打开自定义插件添加弹窗:
|
|
57
39
|
|
|
58
40
|

|
|
59
41
|
|
|
@@ -81,7 +63,7 @@ $ npm run dev
|
|
|
81
63
|
|
|
82
64
|
当完成这些操作后,你已经了解了添加自定义插件,并在 LobeChat 中使用的基础流程。
|
|
83
65
|
|
|
84
|
-
<br/>
|
|
66
|
+
<br />
|
|
85
67
|
|
|
86
68
|
## 本地插件开发
|
|
87
69
|
|
|
@@ -192,7 +174,7 @@ export default async (req: Request) => {
|
|
|
192
174
|
|
|
193
175
|
由于 LobeChat 默认的插件网关是云端服务 `/api/plugins`,云端服务通过 manifest 上的 `api.url` 地址发送请求,以解决跨域问题。
|
|
194
176
|
|
|
195
|
-
针对自定义插件,插件请求需要发送给本地服务, 因此通过在 manifest 中指定网关 (
|
|
177
|
+
针对自定义插件,插件请求需要发送给本地服务, 因此通过在 manifest 中指定网关 (http://localhost:3400/api/gateway),LobeChat 将会直接请求该地址,然后只需要在该地址下创建对应的网关即可。
|
|
196
178
|
|
|
197
179
|
```ts
|
|
198
180
|
import { createLobeChatPluginGateway } from '@lobehub/chat-plugins-gateway';
|
|
@@ -201,7 +183,7 @@ export const config = {
|
|
|
201
183
|
runtime: 'edge',
|
|
202
184
|
};
|
|
203
185
|
|
|
204
|
-
export default
|
|
186
|
+
export default createLobeChatPluginGateway();
|
|
205
187
|
```
|
|
206
188
|
|
|
207
189
|
[`@lobehub/chat-plugins-gateway`](https://github.com/lobehub/chat-plugins-gateway) 包含了 LobeChat 中插件网关的[实现](https://github.com/lobehub/lobe-chat/blob/main/src/pages/api/plugins.api.ts),你可以直接使用该包创建网关,进而让 LobeChat 访问到本地的插件服务。
|
|
@@ -248,8 +230,6 @@ const Render = memo(() => {
|
|
|
248
230
|
export default Render;
|
|
249
231
|
```
|
|
250
232
|
|
|
251
|
-
<br/>
|
|
252
|
-
|
|
253
233
|
## 插件部署与发布
|
|
254
234
|
|
|
255
235
|
当你完成插件的开发后,你可以使用你习惯的方式进行插件的部署。例如使用 vercel ,或者打包成 docker 发布等等。
|
|
@@ -266,17 +246,13 @@ export default Render;
|
|
|
266
246
|
[](https://github.com/lobehub/lobe-chat-plugins)
|
|
267
247
|
```
|
|
268
248
|
|
|
269
|
-
<br/>
|
|
270
|
-
|
|
271
249
|
## 链接
|
|
272
250
|
|
|
273
|
-
- **📘 Pluging SDK 文档**:
|
|
274
|
-
- **🚀 chat-plugin-template**:
|
|
275
|
-
- **🧩 chat-plugin-sdk**:
|
|
276
|
-
- **🚪 chat-plugin-gateway**:
|
|
277
|
-
- **🏪 lobe-chat-plugins**:
|
|
278
|
-
|
|
279
|
-
<!-- LINK GROUP -->
|
|
251
|
+
- **📘 Pluging SDK 文档**: https://chat-plugin-sdk.lobehub.com
|
|
252
|
+
- **🚀 chat-plugin-template**: https://github.com/lobehub/chat-plugin-template
|
|
253
|
+
- **🧩 chat-plugin-sdk**: https://github.com/lobehub/chat-plugin-sdk
|
|
254
|
+
- **🚪 chat-plugin-gateway**: https://github.com/lobehub/chat-plugins-gateway
|
|
255
|
+
- **🏪 lobe-chat-plugins**: https://github.com/lobehub/lobe-chat-plugins
|
|
280
256
|
|
|
281
257
|
[fetch-plugin-message-url]: https://github.com/lobehub/chat-plugin-template
|
|
282
258
|
[lobe-chat-plugin-template-url]: https://github.com/lobehub/chat-plugin-template
|
|
@@ -0,0 +1,10 @@
|
|
|
1
|
+
# Plugin Store
|
|
2
|
+
|
|
3
|
+
You can access the plugin store by going to "Extension Tools" -> "Plugin Store" in the session toolbar.
|
|
4
|
+
|
|
5
|
+
|
|
6
|
+
|
|
7
|
+
In the plugin store, you can directly install and use plugins in LobeChat.
|
|
8
|
+
|
|
9
|
+
|
|
10
|
+
|
|
@@ -0,0 +1,9 @@
|
|
|
1
|
+
# 插件商店
|
|
2
|
+
|
|
3
|
+
你可以在会话工具条中的 「扩展工具」 -> 「插件商店」,进入插件商店。
|
|
4
|
+
|
|
5
|
+

|
|
6
|
+
|
|
7
|
+
插件商店中会在 LobeChat 中可以直接安装并使用的插件。
|
|
8
|
+
|
|
9
|
+

|
|
@@ -0,0 +1,20 @@
|
|
|
1
|
+
import { Callout } from 'nextra/components';
|
|
2
|
+
|
|
3
|
+
# Data Analysis
|
|
4
|
+
|
|
5
|
+
To better help analyze the usage of LobeChat users, we have integrated several free/open-source data analytics services in LobeChat for collecting user usage data, which you can enable as needed.
|
|
6
|
+
|
|
7
|
+
<Callout type={'warning'}>
|
|
8
|
+
Currently, the integrated data analytics platforms only support deployment and usage on
|
|
9
|
+
Vercel/Zeit platforms and do not support Docker/Docker Compose deployment.
|
|
10
|
+
</Callout>
|
|
11
|
+
|
|
12
|
+
## Vercel Analytics
|
|
13
|
+
|
|
14
|
+
[Vercel Analytics](https://vercel.com/analytics) is a data analytics service launched by Vercel, which can help you collect website visit data, including traffic, sources, and devices used for access.
|
|
15
|
+
|
|
16
|
+
We have integrated Vercel Analytics into the code, and you can enable it by setting the environment variable `NEXT_PUBLIC_ANALYTICS_VERCEL=1`, and then open the Analytics tab in your Vercel deployment project to view your app's visit data.
|
|
17
|
+
|
|
18
|
+
Vercel Analytics provides 2500 free Web Analytics Events per month (which can be understood as page views), which is generally sufficient for personal deployment and self-use products.
|
|
19
|
+
|
|
20
|
+
If you need to learn more about using Vercel Analytics, please refer to the [Vercel Web Analytics Quick Start](https://vercel.com/docs/analytics/quickstart).
|
|
@@ -1,11 +1,10 @@
|
|
|
1
|
-
|
|
1
|
+
import {Callout} from "nextra/components";
|
|
2
2
|
|
|
3
|
-
|
|
3
|
+
# 数据分析
|
|
4
4
|
|
|
5
|
-
|
|
5
|
+
为更好地帮助分析 LobeChat 的用户使用情况,我们在 LobeChat 中集成了若干免费 / 开源的数据统计服务,用于收集用户的使用情况,你可以按需开启。
|
|
6
6
|
|
|
7
|
-
|
|
8
|
-
- [🚧 Posthog](#-posthog)
|
|
7
|
+
<Callout type={'warning'}>目前集成的数据分析平台,均只支持 Vercel / Zeabur 平台部署使用,不支持 Docker/Docker Compose 部署</Callout>
|
|
9
8
|
|
|
10
9
|
## Vercel Analytics
|
|
11
10
|
|
|
@@ -15,6 +14,4 @@
|
|
|
15
14
|
|
|
16
15
|
Vercel Analytics 提供了 2500 次 / 月的免费 Web Analytics Events (可以理解为 PV),对于个人部署自用的产品来说基本够用。
|
|
17
16
|
|
|
18
|
-
如果你需要了解 Vercel Analytics 的详细使用教程,请查阅[Vercel Web Analytics 快速开始](https://vercel.com/docs/analytics/quickstart)
|
|
19
|
-
|
|
20
|
-
## 🚧 Posthog
|
|
17
|
+
如果你需要了解 Vercel Analytics 的详细使用教程,请查阅 [Vercel Web Analytics 快速开始](https://vercel.com/docs/analytics/quickstart)
|
|
@@ -0,0 +1,94 @@
|
|
|
1
|
+
import { Callout, Steps } from 'nextra/components';
|
|
2
|
+
|
|
3
|
+
# Identity Verification Service
|
|
4
|
+
|
|
5
|
+
LobeChat supports configuring external identity verification services for internal use by enterprises/organizations to centrally manage user authorization. Currently, it supports [Auth0][auth0-client-page]. This article will introduce how to configure the identity verification service.
|
|
6
|
+
|
|
7
|
+
## Configure Identity Verification Service
|
|
8
|
+
|
|
9
|
+
<Steps>
|
|
10
|
+
|
|
11
|
+
### Create Auth0 Application
|
|
12
|
+
|
|
13
|
+
Register and log in to [Auth0][auth0-client-page], click on the "Applications" in the left navigation bar to switch to the application management interface, and click "Create Application" in the upper right corner to create an application.
|
|
14
|
+
|
|
15
|
+

|
|
16
|
+
|
|
17
|
+
Fill in the application name you want to display to the organization users, choose any application type, and click "Create".
|
|
18
|
+
|
|
19
|
+

|
|
20
|
+
|
|
21
|
+
After successful creation, click on the corresponding application to enter the application details page, switch to the "Settings" tab, and you can see the corresponding configuration information.
|
|
22
|
+
|
|
23
|
+

|
|
24
|
+
|
|
25
|
+
In the application configuration page, you also need to configure Allowed Callback URLs, where you should fill in:
|
|
26
|
+
|
|
27
|
+
```bash
|
|
28
|
+
http(s)://your-domain/api/auth/callback/auth0
|
|
29
|
+
```
|
|
30
|
+
|
|
31
|
+

|
|
32
|
+
|
|
33
|
+
<Callout type={'info'}>
|
|
34
|
+
You can fill in or modify Allowed Callback URLs after deployment, but make sure the filled URL is
|
|
35
|
+
consistent with the deployed URL.
|
|
36
|
+
</Callout>
|
|
37
|
+
|
|
38
|
+
### Add Users
|
|
39
|
+
|
|
40
|
+
Click on the "Users Management" in the left navigation bar to enter the user management interface, where you can create users for your organization to log in to LobeChat.
|
|
41
|
+
|
|
42
|
+

|
|
43
|
+
|
|
44
|
+
### Configure Environment Variables
|
|
45
|
+
|
|
46
|
+
When deploying LobeChat, you need to configure the following environment variables:
|
|
47
|
+
|
|
48
|
+
| Environment Variable | Type | Description |
|
|
49
|
+
| --- | --- | --- |
|
|
50
|
+
| `ENABLE_OAUTH_SSO` | Required | Enable single sign-on (SSO) for LobeChat. Set to `1` to enable single sign-on. |
|
|
51
|
+
| `NEXTAUTH_SECRET` | Required | Key used to encrypt Auth.js session tokens. You can generate a key using the following command: `openssl rand -base64 32` |
|
|
52
|
+
| `AUTH0_CLIENT_ID` | Required | Client ID of the Auth0 application |
|
|
53
|
+
| `AUTH0_CLIENT_SECRET` | Required | Client Secret of the Auth0 application |
|
|
54
|
+
| `AUTH0_ISSUER` | Required | Domain of the Auth0 application, `https://example.auth0.com` |
|
|
55
|
+
| `ACCESS_CODE` | Required | Add a password to access this service. You can set a sufficiently long random password to "disable" access code authorization. |
|
|
56
|
+
|
|
57
|
+
You can refer to the related variable details at [Environment Variables](/en/self-hosting/environment-variable#auth0).
|
|
58
|
+
|
|
59
|
+
</Steps>
|
|
60
|
+
|
|
61
|
+
<Callout>
|
|
62
|
+
After successful deployment, users will be able to authenticate and use LobeChat using the users
|
|
63
|
+
configured in Auth0.
|
|
64
|
+
</Callout>
|
|
65
|
+
|
|
66
|
+
## Advanced Configuration
|
|
67
|
+
|
|
68
|
+
### Connecting to an Existing Single Sign-On Service
|
|
69
|
+
|
|
70
|
+
If your enterprise or organization already has a unified identity authentication infrastructure, you can connect to an existing single sign-on service in Applications -> SSO Integrations.
|
|
71
|
+
|
|
72
|
+
Auth0 supports single sign-on services such as Azure Active Directory, Slack, Google Workspace, Office 365, Zoom, and more. For a detailed list of supported services, please refer to [this link][auth0-sso-integrations].
|
|
73
|
+
|
|
74
|
+

|
|
75
|
+
|
|
76
|
+
### Configuring Social Login
|
|
77
|
+
|
|
78
|
+
If your enterprise or organization needs to support external user logins, you can configure social login services in Authentication -> Social.
|
|
79
|
+
|
|
80
|
+

|
|
81
|
+
|
|
82
|
+
<Callout type={'warning'}>
|
|
83
|
+
Configuring social login services by default allows anyone to authenticate, which may lead to
|
|
84
|
+
LobeChat being abused by external users.
|
|
85
|
+
</Callout>
|
|
86
|
+
<Callout>
|
|
87
|
+
If you need to restrict login users, be sure to configure a **blocking policy**: After enabling
|
|
88
|
+
the social login option, refer to [this article][auth0-login-actions-manual] to create an Action
|
|
89
|
+
to set up a blocking/allow list.
|
|
90
|
+
</Callout>
|
|
91
|
+
|
|
92
|
+
[auth0-client-page]: https://manage.auth0.com/dashboard
|
|
93
|
+
[auth0-login-actions-manual]: https://auth0.com/blog/permit-or-deny-login-requests-using-auth0-actions/
|
|
94
|
+
[auth0-sso-integrations]: https://marketplace.auth0.com/features/sso-integrations
|
|
@@ -0,0 +1,90 @@
|
|
|
1
|
+
import { Callout, Steps } from 'nextra/components';
|
|
2
|
+
|
|
3
|
+
# 身份验证服务
|
|
4
|
+
|
|
5
|
+
LobeChat 支持配置外部身份验证服务,供企业 / 组织内部使用,统一管理用户授权,目前支持 [Auth0][auth0-client-page],本文将介绍如何配置身份验证服务。
|
|
6
|
+
|
|
7
|
+
## 配置身份验证服务
|
|
8
|
+
|
|
9
|
+
<Steps>
|
|
10
|
+
|
|
11
|
+
### 创建 Auth0 应用
|
|
12
|
+
|
|
13
|
+
注册并登录 [Auth0][auth0-client-page],点击左侧导航栏的「Applications」,切换到应用管理界面,点击右上角「Create Application」以创建应用。
|
|
14
|
+
|
|
15
|
+

|
|
16
|
+
|
|
17
|
+
填写你想向组织用户显示的应用名称,可选择任意应用类型,点击「Create」。
|
|
18
|
+
|
|
19
|
+

|
|
20
|
+
|
|
21
|
+
创建成功后,点击相应的应用,进入应用详情页,切换到「Settings」标签页,就可以看到相应的配置信息
|
|
22
|
+
|
|
23
|
+

|
|
24
|
+
|
|
25
|
+
在应用配置页面中,还需要配置 Allowed Callback URLs,在此处填写:
|
|
26
|
+
|
|
27
|
+
```bash
|
|
28
|
+
http(s)://your-domain/api/auth/callback/auth0
|
|
29
|
+
```
|
|
30
|
+
|
|
31
|
+

|
|
32
|
+
|
|
33
|
+
{' '}
|
|
34
|
+
|
|
35
|
+
<Callout type={'info'}>
|
|
36
|
+
可以在部署后再填写或修改 Allowed Callback URLs,但是务必保证填写的 URL 与部署的 URL 一致
|
|
37
|
+
</Callout>
|
|
38
|
+
|
|
39
|
+
### 新增用户
|
|
40
|
+
|
|
41
|
+
点击左侧导航栏的「Users Management」,进入用户管理界面,可以为你的组织新建用户,用以登录 LobeChat
|
|
42
|
+
|
|
43
|
+

|
|
44
|
+
|
|
45
|
+
### 配置环境变量
|
|
46
|
+
|
|
47
|
+
在部署 LobeChat 时,你需要配置以下环境变量:
|
|
48
|
+
|
|
49
|
+
| 环境变量 | 类型 | 描述 |
|
|
50
|
+
| --- | --- | --- |
|
|
51
|
+
| `ENABLE_OAUTH_SSO` | 必选 | 为 LobeChat 启用单点登录 (SSO)。设置为 `1` 以启用单点登录。 |
|
|
52
|
+
| `NEXTAUTH_SECRET` | 必选 | 用于加密 Auth.js 会话令牌的密钥。您可以使用以下命令生成秘钥: `openssl rand -base64 32` |
|
|
53
|
+
| `AUTH0_CLIENT_ID` | 必选 | Auth0 应用程序的 Client ID |
|
|
54
|
+
| `AUTH0_CLIENT_SECRET` | 必选 | Auth0 应用程序的 Client Secret |
|
|
55
|
+
| `AUTH0_ISSUER` | 必选 | Auth0 应用程序的 Domain,`https://example.auth0.com` |
|
|
56
|
+
| `ACCESS_CODE` | 必选 | 添加访问此服务的密码,你可以设置一个足够长的随机密码以 “禁用” 访问码授权 |
|
|
57
|
+
|
|
58
|
+
前往 [环境变量](/zh/self-hosting/environment-variable#auth0) 可查阅相关变量详情。
|
|
59
|
+
|
|
60
|
+
</Steps>
|
|
61
|
+
|
|
62
|
+
<Callout>部署成功后,用户将可以使用 Auth0 中配置的用户通过身份认证并使用 LobeChat。</Callout>
|
|
63
|
+
|
|
64
|
+
## 进阶配置
|
|
65
|
+
|
|
66
|
+
### 连接现有的单点登录服务
|
|
67
|
+
|
|
68
|
+
如果你的企业或组织已有现有的统一身份认证设施,可在 Applications -> SSO Integrations 中,连接现有的单点登录服务。
|
|
69
|
+
|
|
70
|
+
Auth0 支持 Azure Active Directory / Slack / Google Workspace / Office 365 / Zoom 等单点登录服务,详细支持列表可参考 [这里][auth0-sso-integrations]
|
|
71
|
+
|
|
72
|
+

|
|
73
|
+
|
|
74
|
+
### 配置社交登录
|
|
75
|
+
|
|
76
|
+
如果你的企业或组织需要支持外部人员登录,可以在 Authentication -> Social 中,配置社交登录服务。
|
|
77
|
+
|
|
78
|
+

|
|
79
|
+
|
|
80
|
+
<Callout type={'warning'}>
|
|
81
|
+
配置社交登录服务默认会允许所有人通过认证,这可能会导致 LobeChat 被外部人员滥用。
|
|
82
|
+
</Callout>
|
|
83
|
+
<Callout>
|
|
84
|
+
如果你需要限制登录人员,务必配置 **阻止策略**: 请在打开社交登录选项后,参考
|
|
85
|
+
[这篇文章][auth0-login-actions-manual] 创建 Action 来设置阻止 / 允许列表。
|
|
86
|
+
</Callout>
|
|
87
|
+
|
|
88
|
+
[auth0-client-page]: https://manage.auth0.com/dashboard
|
|
89
|
+
[auth0-login-actions-manual]: https://auth0.com/blog/permit-or-deny-login-requests-using-auth0-actions/
|
|
90
|
+
[auth0-sso-integrations]: https://marketplace.auth0.com/features/sso-integrations
|