@apify/actors-mcp-server 0.2.14 → 0.2.15-beta.1
This diff represents the content of publicly available package versions that have been released to one of the supported registries. The information contained in this diff is provided for informational purposes only and reflects changes between package versions as they appear in their respective public registries.
- package/README.md +140 -343
- package/dist/const.d.ts +1 -0
- package/dist/const.d.ts.map +1 -1
- package/dist/const.js +1 -0
- package/dist/const.js.map +1 -1
- package/dist/main.js +1 -1
- package/dist/main.js.map +1 -1
- package/dist/mcp/server.d.ts.map +1 -1
- package/dist/mcp/server.js +27 -9
- package/dist/mcp/server.js.map +1 -1
- package/dist/tools/actor.d.ts +3 -1
- package/dist/tools/actor.d.ts.map +1 -1
- package/dist/tools/actor.js +13 -6
- package/dist/tools/actor.js.map +1 -1
- package/dist/tsconfig.tsbuildinfo +1 -1
- package/dist/types.d.ts +3 -0
- package/dist/types.d.ts.map +1 -1
- package/dist/utils/progress.d.ts +13 -0
- package/dist/utils/progress.d.ts.map +1 -0
- package/dist/utils/progress.js +92 -0
- package/dist/utils/progress.js.map +1 -0
- package/package.json +1 -1
package/README.md
CHANGED
|
@@ -1,83 +1,126 @@
|
|
|
1
|
-
|
|
1
|
+
<h1 align="center">
|
|
2
|
+
<a href="https://mcp.apify.com">
|
|
3
|
+
<picture>
|
|
4
|
+
<source media="(prefers-color-scheme: dark)" srcset="docs/apify_mcp_server_banner_dark.png">
|
|
5
|
+
<img alt="Apify MCP Server" src="docs/apify_mcp_server_banner.png" width="500">
|
|
6
|
+
</picture>
|
|
7
|
+
</a>
|
|
8
|
+
<br>
|
|
9
|
+
<small><a href="https://mcp.apify.com">mcp.apify.com</a></small>
|
|
10
|
+
</h1>
|
|
11
|
+
|
|
12
|
+
<p align=center>
|
|
13
|
+
<a href="https://www.npmjs.com/package/@apify/actors-mcp-server" rel="nofollow"><img src="https://img.shields.io/npm/v/@apify/actors-mcp-server.svg" alt="NPM latest version" data-canonical-src="https://img.shields.io/npm/v/@apify/actors-mcp-server.svg" style="max-width: 100%;"></a>
|
|
14
|
+
<a href="https://www.npmjs.com/package/@apify/actors-mcp-server" rel="nofollow"><img src="https://img.shields.io/npm/dm/@apify/actors-mcp-server.svg" alt="Downloads" data-canonical-src="https://img.shields.io/npm/dm/@apify/actors-mcp-server.svg" style="max-width: 100%;"></a>
|
|
15
|
+
<a href="https://github.com/apify/actors-mcp-server/actions/workflows/check.yaml"><img src="https://github.com/apify/actors-mcp-server/actions/workflows/check.yaml/badge.svg?branch=master" alt="Build Status" style="max-width: 100%;"></a>
|
|
16
|
+
<a href="https://apify.com/apify/actors-mcp-server"><img src="https://apify.com/actor-badge?actor=apify/actors-mcp-server" alt="Actor runs" style="max-width: 100%;"></a>
|
|
17
|
+
</p>
|
|
18
|
+
|
|
19
|
+
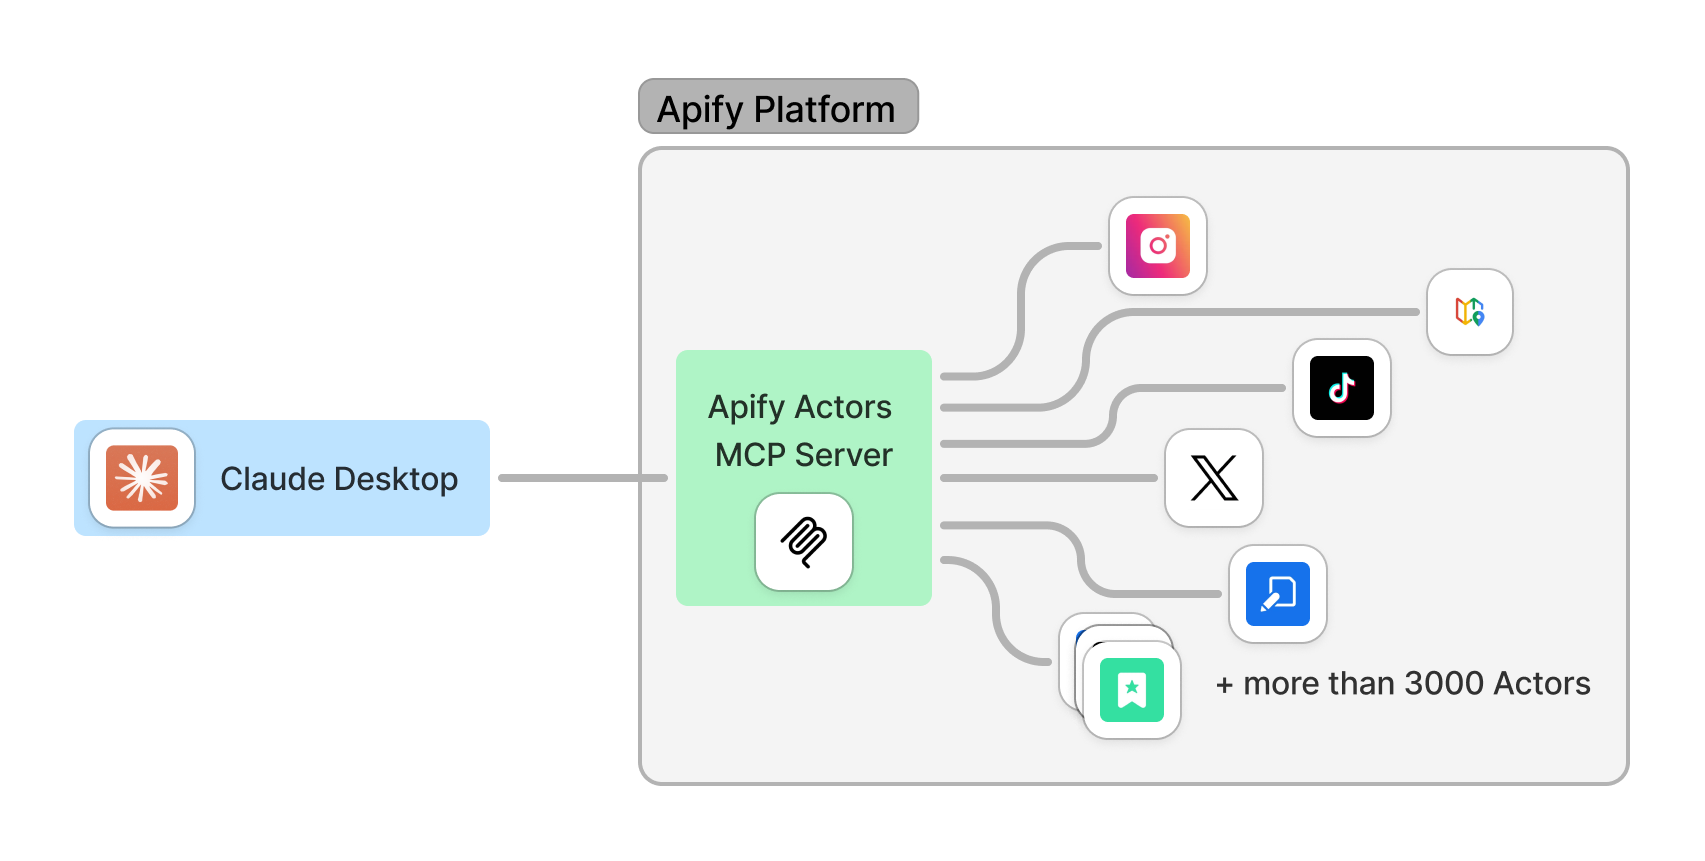
The Apify Model Context Protocol (MCP) Server at **mcp.apify.com** instantly connects AI applications and agents to thousands of ready‑built tools. It allows your AI assistant to use any [Apify Actor](https://apify.com/store) for web scraping, data extraction, and automation tasks in real time.
|
|
20
|
+
|
|
21
|
+
> **🚀 Try the hosted Apify MCP Server!**
|
|
22
|
+
>
|
|
23
|
+
> For the easiest setup and most powerful features, including the ability to find and use any Actor from Apify Store, connect your AI assistant to our hosted server:
|
|
24
|
+
>
|
|
25
|
+
> **[`https://mcp.apify.com`](https://mcp.apify.com)**
|
|
26
|
+
>
|
|
27
|
+
> It supports OAuth, so you can connect from clients like Claude.ai or Visual Studio Code with just the URL.
|
|
2
28
|
|
|
3
|
-
|
|
29
|
+
|
|
4
30
|
|
|
5
|
-
|
|
6
|
-
|
|
31
|
+
## Table of Contents
|
|
32
|
+
- [🌐 Introducing the Apify MCP server](#-introducing-the-apify-mcp-server)
|
|
33
|
+
- [🚀 Quickstart](#-quickstart)
|
|
34
|
+
- [🤖 MCP clients and examples](#-mcp-clients-and-examples)
|
|
35
|
+
- [🪄 Try Apify MCP instantly](#-try-apify-mcp-instantly)
|
|
36
|
+
- [🛠️ Tools, resources, and prompts](#-tools-resources-and-prompts)
|
|
37
|
+
- [🐛 Troubleshooting (local MCP server)](#-troubleshooting-local-mcp-server)
|
|
38
|
+
- [⚙️ Development](#-development)
|
|
39
|
+
- [🤝 Contributing](#-contributing)
|
|
40
|
+
- [📚 Learn more](#-learn-more)
|
|
7
41
|
|
|
8
|
-
|
|
9
|
-
- **🇦 [MCP Server Actor](https://apify.com/apify/actors-mcp-server)** – HTTP server accessible via Server-Sent Events (SSE), see [guide](#-mcp-server-actor)
|
|
10
|
-
- **⾕ MCP Server Stdio** – Local server available via standard input/output (stdio), see [guide](#-mcp-server-at-a-local-host)
|
|
42
|
+
# 🌐 Introducing the Apify MCP server
|
|
11
43
|
|
|
12
|
-
|
|
44
|
+
The Apify MCP Server allows an AI assistant to use any [Apify Actor](https://apify.com/store) as a tool to perform a specific task.
|
|
45
|
+
For example, it can:
|
|
46
|
+
- Use [Facebook Posts Scraper](https://apify.com/apify/facebook-posts-scraper) to extract data from Facebook posts from multiple pages/profiles.
|
|
47
|
+
- Use [Google Maps Email Extractor](https://apify.com/lukaskrivka/google-maps-with-contact-details) to extract contact details from Google Maps.
|
|
48
|
+
- Use [Google Search Results Scraper](https://apify.com/apify/google-search-scraper) to scrape Google Search Engine Results Pages (SERPs).
|
|
49
|
+
- Use [Instagram Scraper](https://apify.com/apify/instagram-scraper) to scrape Instagram posts, profiles, places, photos, and comments.
|
|
50
|
+
- Use [RAG Web Browser](https://apify.com/apify/web-scraper) to search the web, scrape the top N URLs, and return their content.
|
|
13
51
|
|
|
14
|
-
|
|
52
|
+
**Apify MCP Server Tutorial: Integrate 5,000+ Apify Actors and Agents with Claude**
|
|
15
53
|
|
|
16
|
-
|
|
17
|
-
|
|
18
|
-
|
|
19
|
-
|
|
20
|
-
|
|
21
|
-
|
|
22
|
-
|
|
23
|
-
|
|
24
|
-
|
|
25
|
-
|
|
26
|
-
|
|
27
|
-
-
|
|
28
|
-
-
|
|
29
|
-
|
|
30
|
-
|
|
54
|
+
https://www.youtube.com/watch?v=BKu8H91uCTg
|
|
55
|
+
|
|
56
|
+
# 🚀 Quickstart
|
|
57
|
+
|
|
58
|
+
You can use the Apify MCP Server in two ways:
|
|
59
|
+
|
|
60
|
+
**HTTPS Endpoint (mcp.apify.com)**: Connect from your MCP client via OAuth or by including the `Authorization: Bearer <APIFY_TOKEN>` header in your requests. This is the recommended method for most use cases. Because it supports OAuth, you can connect from clients like [Claude.ai](https://claude.ai) or [Visual Studio Code](https://code.visualstudio.com/) using just the URL: `https://mcp.apify.com`.
|
|
61
|
+
- `https://mcp.apify.com` (recommended) for streamable transport
|
|
62
|
+
- `https://mcp.apify.com/sse` for legacy SSE transport
|
|
63
|
+
|
|
64
|
+
**Standard Input/Output (stdio)**: Ideal for local integrations and command-line tools like the Claude for Desktop client.
|
|
65
|
+
- Set the MCP client server command to `npx @apify/actors-mcp-server` and the `APIFY_TOKEN` environment variable to your Apify API token.
|
|
66
|
+
- See `npx @apify/actors-mcp-server --help` for more options.
|
|
67
|
+
|
|
68
|
+
You can find detailed instructions for setting up the MCP server in the [Apify documentation](https://docs.apify.com/platform/integrations/mcp).
|
|
69
|
+
|
|
70
|
+
# 🤖 MCP clients and examples
|
|
71
|
+
|
|
72
|
+
To interact with the Apify MCP server, you can use various MCP clients, such as:
|
|
73
|
+
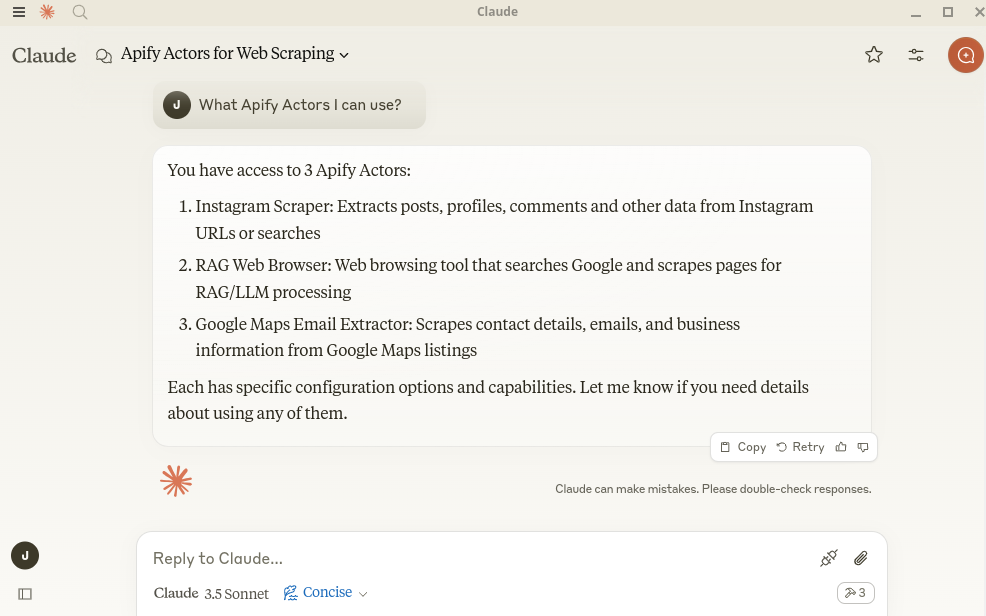
- [Claude Desktop](https://claude.ai/download)
|
|
74
|
+
- [Visual Studio Code](https://code.visualstudio.com/)
|
|
75
|
+
- [LibreChat](https://www.librechat.ai/)
|
|
76
|
+
- [Apify Tester MCP Client](https://apify.com/jiri.spilka/tester-mcp-client)
|
|
31
77
|
- Other clients at [https://modelcontextprotocol.io/clients](https://modelcontextprotocol.io/clients)
|
|
32
78
|
- More clients at [https://glama.ai/mcp/clients](https://glama.ai/mcp/clients)
|
|
33
79
|
|
|
34
|
-
|
|
35
|
-
- "Search the web and summarize recent trends
|
|
36
|
-
- "Find the top 10
|
|
37
|
-
- "Find and analyze the Instagram profile of The Rock"
|
|
38
|
-
- "Provide a step-by-step guide on using the Model Context Protocol
|
|
80
|
+
With MCP server integrated, you can ask your AI assistant things like:
|
|
81
|
+
- "Search the web and summarize recent trends in AI Agents."
|
|
82
|
+
- "Find the top 10 Italian restaurants in San Francisco."
|
|
83
|
+
- "Find and analyze the Instagram profile of The Rock."
|
|
84
|
+
- "Provide a step-by-step guide on using the Model Context Protocol, including source URLs."
|
|
39
85
|
- "What Apify Actors can I use?"
|
|
40
86
|
|
|
41
|
-
|
|
87
|
+
### Supported Clients Matrix
|
|
42
88
|
|
|
43
|
-
|
|
44
|
-
|
|
45
|
-
With the MCP Tester client you can load Actors dynamically but this is not yet supported by other MCP clients.
|
|
46
|
-
We also plan to add more features, see [Roadmap](#-roadmap-march-2025) for more details.
|
|
47
|
-
|
|
48
|
-
# 🔄 What is the Model Context Protocol?
|
|
89
|
+
The following table outlines the tested MCP clients and their level of support for key features.
|
|
49
90
|
|
|
50
|
-
|
|
51
|
-
|
|
91
|
+
| Client | Dynamic Tool Discovery | Notes |
|
|
92
|
+
| --- | --- | --- |
|
|
93
|
+
| **Claude.ai (web)** | ✅ Full | |
|
|
94
|
+
| **Claude Desktop** | 🟡 Partial | Tools may need to be reloaded manually in the client. |
|
|
95
|
+
| **VS Code (Genie)** | ✅ Full | |
|
|
96
|
+
| **LibreChat** | ❓ Untested | |
|
|
97
|
+
| **Apify Tester MCP Client** | ✅ Full | Designed for testing Apify MCP servers. |
|
|
52
98
|
|
|
53
|
-
|
|
99
|
+
*This matrix is a work in progress. If you have tested other clients, please consider contributing to this documentation.*
|
|
54
100
|
|
|
101
|
+
# 🪄 Try Apify MCP Instantly
|
|
55
102
|
|
|
56
|
-
|
|
103
|
+
Want to try Apify MCP without any setup?
|
|
57
104
|
|
|
58
|
-
|
|
105
|
+
Check out [Apify Tester MCP Client](https://apify.com/jiri.spilka/tester-mcp-client)
|
|
59
106
|
|
|
60
|
-
|
|
61
|
-
|
|
107
|
+
This interactive, chat-like interface provides an easy way to explore the capabilities of Apify MCP without any local setup.
|
|
108
|
+
Just sign in with your Apify account and start experimenting with web scraping, data extraction, and automation tools!
|
|
62
109
|
|
|
63
|
-
#
|
|
110
|
+
# 🛠️ Tools, resources, and prompts
|
|
64
111
|
|
|
65
|
-
|
|
112
|
+
The MCP server provides a set of tools for interacting with Apify Actors.
|
|
113
|
+
Since the Apify Store is large and growing rapidly, the MCP server provides a way to dynamically discover and use new Actors.
|
|
66
114
|
|
|
67
115
|
### Actors
|
|
68
116
|
|
|
69
117
|
Any [Apify Actor](https://apify.com/store) can be used as a tool.
|
|
70
|
-
By default, the server is pre-configured with
|
|
118
|
+
By default, the server is pre-configured with one Actor, `apify/rag-web-browser`, and several helper tools.
|
|
119
|
+
The MCP server loads an Actor's input schema and creates a corresponding MCP tool.
|
|
120
|
+
This allows the AI agent to know exactly what arguments to pass to the Actor and what to expect in return.
|
|
71
121
|
|
|
72
|
-
```text
|
|
73
|
-
'apify/rag-web-browser'
|
|
74
|
-
```
|
|
75
|
-
The MCP server loads the Actor input schema and creates MCP tools corresponding to the Actors.
|
|
76
|
-
See this example of input schema for the [RAG Web Browser](https://apify.com/apify/rag-web-browser/input-schema).
|
|
77
122
|
|
|
78
|
-
|
|
79
|
-
The arguments for an MCP tool represent the input parameters of the Actor.
|
|
80
|
-
For example, for the `apify/rag-web-browser` Actor, the arguments are:
|
|
123
|
+
For example, for the `apify/rag-web-browser` Actor, the input parameters are:
|
|
81
124
|
|
|
82
125
|
```json
|
|
83
126
|
{
|
|
@@ -85,308 +128,60 @@ For example, for the `apify/rag-web-browser` Actor, the arguments are:
|
|
|
85
128
|
"maxResults": 3
|
|
86
129
|
}
|
|
87
130
|
```
|
|
88
|
-
You don't need to specify
|
|
131
|
+
You don't need to manually specify which Actor to call or its input parameters; the LLM handles this automatically.
|
|
89
132
|
When a tool is called, the arguments are automatically passed to the Actor by the LLM.
|
|
90
133
|
You can refer to the specific Actor's documentation for a list of available arguments.
|
|
91
134
|
|
|
92
135
|
### Helper tools
|
|
93
|
-
One of the powerful features of MCP with Apify is dynamic actor tooling – the ability for an AI agent to find new tools (Actors) as needed and incorporate them. Here are some special MCP operations and how Apify MCP Server supports them:
|
|
94
|
-
|
|
95
|
-
- Actor discovery and management: Search for Actors (`search-actors`), view details (`get-actor-details`), and dynamically add them (`add-actor`).
|
|
96
|
-
- Apify documentation: Search Apify documentation (`search-apify-docs`) and fetch specific documents (`fetch-apify-docs`).
|
|
97
|
-
- Built-in help tool: A static helper (`apify-actor-help-tool`) that returns usage info for the Apify MCP Server.
|
|
98
|
-
|
|
99
|
-
## Prompt & Resources
|
|
100
|
-
|
|
101
|
-
The server does not provide any resources and prompts.
|
|
102
|
-
We plan to add [Apify's dataset](https://docs.apify.com/platform/storage/dataset) and [key-value store](https://docs.apify.com/platform/storage/key-value-store) as resources in the future.
|
|
103
|
-
|
|
104
|
-
# ⚙️ Usage
|
|
105
|
-
|
|
106
|
-
The Apify MCP Server can be used in two ways: **as an Apify Actor** running on the Apify platform
|
|
107
|
-
or as a **local server** running on your machine.
|
|
108
|
-
|
|
109
|
-
## 🇦 MCP Server Actor
|
|
110
|
-
|
|
111
|
-
### Standby web server
|
|
112
|
-
|
|
113
|
-
The Actor runs in [**Standby mode**](https://docs.apify.com/platform/actors/running/standby) with an HTTP web server that receives and processes requests.
|
|
114
|
-
|
|
115
|
-
To start the server with default Actors, send an HTTP GET request with your [Apify API token](https://console.apify.com/settings/integrations) to the following URL:
|
|
116
|
-
```
|
|
117
|
-
https://actors-mcp-server.apify.actor?token=<APIFY_TOKEN>
|
|
118
|
-
```
|
|
119
|
-
It is also possible to start the MCP server with a different set of Actors.
|
|
120
|
-
To do this, create a [task](https://docs.apify.com/platform/actors/running/tasks) and specify the list of Actors you want to use.
|
|
121
|
-
|
|
122
|
-
Then, run the task in Standby mode with the selected Actors:
|
|
123
|
-
```shell
|
|
124
|
-
https://USERNAME--actors-mcp-server-task.apify.actor?token=<APIFY_TOKEN>
|
|
125
|
-
```
|
|
126
|
-
|
|
127
|
-
You can find a list of all available Actors in the [Apify Store](https://apify.com/store).
|
|
128
|
-
|
|
129
|
-
#### 💬 Interact with the MCP Server over SSE
|
|
130
|
-
|
|
131
|
-
Once the server is running, you can interact with Server-Sent Events (SSE) to send messages to the server and receive responses.
|
|
132
|
-
The easiest way is to use [Tester MCP Client](https://apify.com/jiri.spilka/tester-mcp-client) on Apify.
|
|
133
|
-
|
|
134
|
-
[Claude Desktop](https://claude.ai/download) currently lacks SSE support, but you can use it with Stdio transport; see [MCP Server at a local host](#-mcp-server-at-a-local-host) for more details.
|
|
135
|
-
Note: The free version of Claude Desktop may experience intermittent connection issues with the server.
|
|
136
|
-
|
|
137
|
-
In the client settings, you need to provide server configuration:
|
|
138
|
-
```json
|
|
139
|
-
{
|
|
140
|
-
"mcpServers": {
|
|
141
|
-
"apify": {
|
|
142
|
-
"type": "sse",
|
|
143
|
-
"url": "https://actors-mcp-server.apify.actor/sse",
|
|
144
|
-
"env": {
|
|
145
|
-
"APIFY_TOKEN": "your-apify-token"
|
|
146
|
-
}
|
|
147
|
-
}
|
|
148
|
-
}
|
|
149
|
-
}
|
|
150
|
-
```
|
|
151
|
-
|
|
152
|
-
## ⾕ MCP Server at a local host
|
|
153
136
|
|
|
154
|
-
|
|
155
|
-
|
|
137
|
+
One of the most powerful features of using MCP with Apify is dynamic tool discovery.
|
|
138
|
+
It gives an AI agent the ability to find new tools (Actors) as needed and incorporate them.
|
|
139
|
+
Here are some special MCP operations and how the Apify MCP Server supports them:
|
|
156
140
|
|
|
157
|
-
|
|
141
|
+
- **Actor discovery and management**: Search for Actors, view their details, and dynamically add or remove them as available tools for the AI.
|
|
142
|
+
- **Apify documentation**: Search the Apify documentation and fetch specific documents to provide context to the AI.
|
|
143
|
+
- **Actor runs (*)**: Get lists of your Actor runs, inspect their details, and retrieve logs.
|
|
144
|
+
- **Apify storage (*)**: Access data from your datasets and key-value stores.
|
|
158
145
|
|
|
159
|
-
|
|
160
|
-
- The latest version of Claude Desktop must be installed (or another MCP client)
|
|
161
|
-
- [Node.js](https://nodejs.org/en) (v18 or higher)
|
|
162
|
-
- [Apify API Token](https://docs.apify.com/platform/integrations/api#api-token) (`APIFY_TOKEN`)
|
|
163
|
-
|
|
164
|
-
Make sure you have the `node` and `npx` installed properly:
|
|
165
|
-
```bash
|
|
166
|
-
node -v
|
|
167
|
-
npx -v
|
|
168
|
-
```
|
|
169
|
-
If not, follow this guide to install Node.js: [Downloading and installing Node.js and npm](https://docs.npmjs.com/downloading-and-installing-node-js-and-npm).
|
|
170
|
-
|
|
171
|
-
#### Claude Desktop
|
|
172
|
-
|
|
173
|
-
To configure Claude Desktop to work with the MCP server, follow these steps. For a detailed guide, refer to the [Claude Desktop Users Guide](https://modelcontextprotocol.io/quickstart/user) or watch the [video tutorial](https://youtu.be/gf5WXeqydUU?t=440).
|
|
174
|
-
|
|
175
|
-
1. Download Claude for desktop
|
|
176
|
-
- Available for Windows and macOS.
|
|
177
|
-
- For Linux users, you can build a Debian package using this [unofficial build script](https://github.com/aaddrick/claude-desktop-debian).
|
|
178
|
-
2. Open the Claude Desktop app and enable **Developer Mode** from the top-left menu bar.
|
|
179
|
-
3. Once enabled, open **Settings** (also from the top-left menu bar) and navigate to the **Developer Option**, where you'll find the **Edit Config** button.
|
|
180
|
-
4. Open the configuration file and edit the following file:
|
|
181
|
-
|
|
182
|
-
- On macOS: `~/Library/Application\ Support/Claude/claude_desktop_config.json`
|
|
183
|
-
- On Windows: `%APPDATA%/Claude/claude_desktop_config.json`
|
|
184
|
-
- On Linux: `~/.config/Claude/claude_desktop_config.json`
|
|
185
|
-
|
|
186
|
-
```json
|
|
187
|
-
{
|
|
188
|
-
"mcpServers": {
|
|
189
|
-
"actors-mcp-server": {
|
|
190
|
-
"command": "npx",
|
|
191
|
-
"args": ["-y", "@apify/actors-mcp-server"],
|
|
192
|
-
"env": {
|
|
193
|
-
"APIFY_TOKEN": "your-apify-token"
|
|
194
|
-
}
|
|
195
|
-
}
|
|
196
|
-
}
|
|
197
|
-
}
|
|
198
|
-
```
|
|
199
|
-
Alternatively, you can use the `actors` argument to select one or more Apify Actors:
|
|
200
|
-
```json
|
|
201
|
-
{
|
|
202
|
-
"mcpServers": {
|
|
203
|
-
"actors-mcp-server": {
|
|
204
|
-
"command": "npx",
|
|
205
|
-
"args": [
|
|
206
|
-
"-y", "@apify/actors-mcp-server",
|
|
207
|
-
"--actors", "lukaskrivka/google-maps-with-contact-details,apify/instagram-scraper"
|
|
208
|
-
],
|
|
209
|
-
"env": {
|
|
210
|
-
"APIFY_TOKEN": "your-apify-token"
|
|
211
|
-
}
|
|
212
|
-
}
|
|
213
|
-
}
|
|
214
|
-
}
|
|
215
|
-
```
|
|
216
|
-
5. Restart Claude Desktop
|
|
217
|
-
|
|
218
|
-
- Fully quit Claude Desktop (ensure it's not just minimized or closed).
|
|
219
|
-
- Restart Claude Desktop.
|
|
220
|
-
- Look for the 🔌 icon to confirm that the Actors MCP server is connected.
|
|
221
|
-
|
|
222
|
-
6. Open the Claude Desktop chat and ask "What Apify Actors can I use?"
|
|
223
|
-
|
|
224
|
-
|
|
225
|
-
|
|
226
|
-
7. Examples
|
|
227
|
-
|
|
228
|
-
You can ask Claude to perform tasks, such as:
|
|
229
|
-
```text
|
|
230
|
-
Find and analyze recent research papers about LLMs.
|
|
231
|
-
Find the top 10 best Italian restaurants in San Francisco.
|
|
232
|
-
Find and analyze the Instagram profile of The Rock.
|
|
233
|
-
```
|
|
234
|
-
|
|
235
|
-
To understand how to set up and run the MCP server on Claude, you can watch this short video tutorial ▷ on YouTube:
|
|
236
|
-
|
|
237
|
-
[Apify MCP Server Tutorial: Integrate 5,000+ Apify Actors and Agents Into Claude](https://www.youtube.com/watch?v=UOkJm9pTgMw)
|
|
238
|
-
|
|
239
|
-
#### VS Code
|
|
240
|
-
|
|
241
|
-
For one-click installation, click one of the install buttons below:
|
|
242
|
-
|
|
243
|
-
[](https://insiders.vscode.dev/redirect/mcp/install?name=actors-mcp-server&config=%7B%22command%22%3A%22npx%22%2C%22args%22%3A%5B%22-y%22%2C%22%40apify%2Factors-mcp-server%22%5D%2C%22env%22%3A%7B%22APIFY_TOKEN%22%3A%22%24%7Binput%3Aapify_token%7D%22%7D%7D&inputs=%5B%7B%22type%22%3A%22promptString%22%2C%22id%22%3A%22apify_token%22%2C%22description%22%3A%22Apify+API+Token%22%2C%22password%22%3Atrue%7D%5D) [](https://insiders.vscode.dev/redirect/mcp/install?name=actors-mcp-server&config=%7B%22command%22%3A%22npx%22%2C%22args%22%3A%5B%22-y%22%2C%22%40apify%2Factors-mcp-server%22%5D%2C%22env%22%3A%7B%22APIFY_TOKEN%22%3A%22%24%7Binput%3Aapify_token%7D%22%7D%7D&inputs=%5B%7B%22type%22%3A%22promptString%22%2C%22id%22%3A%22apify_token%22%2C%22description%22%3A%22Apify+API+Token%22%2C%22password%22%3Atrue%7D%5D&quality=insiders)
|
|
244
|
-
|
|
245
|
-
##### Manual installation
|
|
246
|
-
|
|
247
|
-
You can manually install the Apify MCP Server in VS Code. First, click one of the install buttons at the top of this section for a one-click installation.
|
|
248
|
-
|
|
249
|
-
Alternatively, add the following JSON block to your User Settings (JSON) file in VS Code. You can do this by pressing `Ctrl + Shift + P` and typing `Preferences: Open User Settings (JSON)`.
|
|
250
|
-
|
|
251
|
-
```json
|
|
252
|
-
{
|
|
253
|
-
"mcp": {
|
|
254
|
-
"inputs": [
|
|
255
|
-
{
|
|
256
|
-
"type": "promptString",
|
|
257
|
-
"id": "apify_token",
|
|
258
|
-
"description": "Apify API Token",
|
|
259
|
-
"password": true
|
|
260
|
-
}
|
|
261
|
-
],
|
|
262
|
-
"servers": {
|
|
263
|
-
"actors-mcp-server": {
|
|
264
|
-
"command": "npx",
|
|
265
|
-
"args": ["-y", "@apify/actors-mcp-server"],
|
|
266
|
-
"env": {
|
|
267
|
-
"APIFY_TOKEN": "${input:apify_token}"
|
|
268
|
-
}
|
|
269
|
-
}
|
|
270
|
-
}
|
|
271
|
-
}
|
|
272
|
-
}
|
|
273
|
-
```
|
|
274
|
-
|
|
275
|
-
Optionally, you can add it to a file called `.vscode/mcp.json` in your workspace - just omit the top-level `mcp {}` key. This will allow you to share the configuration with others.
|
|
146
|
+
**Note**: Helper tool categories marked with (*) are not enabled by default in the MCP server and must be explicitly enabled using the `tools` argument (either the `--tools` command line argument for the stdio server or the `?tools` URL query parameter for the remote MCP server). The `tools` argument is a comma-separated list of categories with the following possible values:
|
|
276
147
|
|
|
277
|
-
|
|
148
|
+
- `docs`: Search and fetch Apify documentation tools.
|
|
149
|
+
- `runs`: Get Actor run lists, run details, and logs from a specific Actor run.
|
|
150
|
+
- `storage`: Access datasets, key-value stores, and their records.
|
|
151
|
+
- `preview`: Experimental tools in preview mode.
|
|
278
152
|
|
|
279
|
-
|
|
280
|
-
{
|
|
281
|
-
"servers": {
|
|
282
|
-
"actors-mcp-server": {
|
|
283
|
-
"command": "npx",
|
|
284
|
-
"args": [
|
|
285
|
-
"-y", "@apify/actors-mcp-server",
|
|
286
|
-
"--actors", "lukaskrivka/google-maps-with-contact-details,apify/instagram-scraper"
|
|
287
|
-
],
|
|
288
|
-
"env": {
|
|
289
|
-
"APIFY_TOKEN": "${input:apify_token}"
|
|
290
|
-
}
|
|
291
|
-
}
|
|
292
|
-
}
|
|
293
|
-
}
|
|
294
|
-
```
|
|
295
|
-
|
|
296
|
-
#### VS Code
|
|
153
|
+
For example, to enable all tools, use `npx @apify/actors-mcp-server --tools docs,runs,storage,preview` or `https://mcp.apify.com/?tools=docs,runs,storage,preview`.
|
|
297
154
|
|
|
298
|
-
|
|
155
|
+
### Prompt & Resources
|
|
299
156
|
|
|
300
|
-
|
|
157
|
+
The server does not yet provide any resources or prompts.
|
|
301
158
|
|
|
302
|
-
|
|
303
|
-
|
|
304
|
-
You can manually install the Apify MCP Server in VS Code. First, click one of the install buttons at the top of this section for a one-click installation.
|
|
305
|
-
|
|
306
|
-
Alternatively, add the following JSON block to your User Settings (JSON) file in VS Code. You can do this by pressing `Ctrl + Shift + P` and typing `Preferences: Open User Settings (JSON)`.
|
|
307
|
-
|
|
308
|
-
```json
|
|
309
|
-
{
|
|
310
|
-
"mcp": {
|
|
311
|
-
"inputs": [
|
|
312
|
-
{
|
|
313
|
-
"type": "promptString",
|
|
314
|
-
"id": "apify_token",
|
|
315
|
-
"description": "Apify API Token",
|
|
316
|
-
"password": true
|
|
317
|
-
}
|
|
318
|
-
],
|
|
319
|
-
"servers": {
|
|
320
|
-
"actors-mcp-server": {
|
|
321
|
-
"command": "npx",
|
|
322
|
-
"args": ["-y", "@apify/actors-mcp-server"],
|
|
323
|
-
"env": {
|
|
324
|
-
"APIFY_TOKEN": "${input:apify_token}"
|
|
325
|
-
}
|
|
326
|
-
}
|
|
327
|
-
}
|
|
328
|
-
}
|
|
329
|
-
}
|
|
330
|
-
```
|
|
331
|
-
|
|
332
|
-
Optionally, you can add it to a file called `.vscode/mcp.json` in your workspace - just omit the top-level `mcp {}` key. This will allow you to share the configuration with others.
|
|
333
|
-
|
|
334
|
-
If you want to specify which Actors to load, you can add the `--actors` argument:
|
|
335
|
-
|
|
336
|
-
```json
|
|
337
|
-
{
|
|
338
|
-
"servers": {
|
|
339
|
-
"actors-mcp-server": {
|
|
340
|
-
"command": "npx",
|
|
341
|
-
"args": [
|
|
342
|
-
"-y", "@apify/actors-mcp-server",
|
|
343
|
-
"--actors", "lukaskrivka/google-maps-with-contact-details,apify/instagram-scraper"
|
|
344
|
-
],
|
|
345
|
-
"env": {
|
|
346
|
-
"APIFY_TOKEN": "${input:apify_token}"
|
|
347
|
-
}
|
|
348
|
-
}
|
|
349
|
-
}
|
|
350
|
-
}
|
|
351
|
-
```
|
|
352
|
-
|
|
353
|
-
#### Debugging NPM package @apify/actors-mcp-server with @modelcontextprotocol/inspector
|
|
159
|
+
### Debugging the NPM package
|
|
354
160
|
|
|
355
161
|
To debug the server, use the [MCP Inspector](https://github.com/modelcontextprotocol/inspector) tool:
|
|
356
162
|
|
|
357
163
|
```shell
|
|
358
|
-
export APIFY_TOKEN=your-apify-token
|
|
164
|
+
export APIFY_TOKEN="your-apify-token"
|
|
359
165
|
npx @modelcontextprotocol/inspector npx -y @apify/actors-mcp-server
|
|
360
166
|
```
|
|
361
167
|
|
|
362
|
-
#
|
|
168
|
+
# ⚙️ Development
|
|
363
169
|
|
|
364
170
|
## Prerequisites
|
|
365
171
|
|
|
366
172
|
- [Node.js](https://nodejs.org/en) (v18 or higher)
|
|
367
|
-
- Python 3.9 or higher
|
|
368
173
|
|
|
369
|
-
Create an environment file `.env
|
|
174
|
+
Create an environment file, `.env`, with the following content:
|
|
370
175
|
```text
|
|
371
|
-
APIFY_TOKEN=your-apify-token
|
|
176
|
+
APIFY_TOKEN="your-apify-token"
|
|
372
177
|
```
|
|
373
178
|
|
|
374
|
-
Build the actor-mcp-server package:
|
|
179
|
+
Build the `actor-mcp-server` package:
|
|
375
180
|
|
|
376
181
|
```bash
|
|
377
182
|
npm run build
|
|
378
183
|
```
|
|
379
184
|
|
|
380
|
-
## Local client (SSE)
|
|
381
|
-
|
|
382
|
-
To test the server with the SSE transport, you can use the script `examples/clientSse.ts`:
|
|
383
|
-
Currently, the Node.js client does not support establishing a connection to a remote server with custom headers.
|
|
384
|
-
You need to change the URL to your local server URL in the script.
|
|
385
|
-
|
|
386
|
-
```bash
|
|
387
|
-
node dist/examples/clientSse.js
|
|
388
|
-
```
|
|
389
|
-
|
|
390
185
|
## Debugging
|
|
391
186
|
|
|
392
187
|
Since MCP servers operate over standard input/output (stdio), debugging can be challenging.
|
|
@@ -395,37 +190,39 @@ For the best debugging experience, use the [MCP Inspector](https://github.com/mo
|
|
|
395
190
|
You can launch the MCP Inspector via [`npm`](https://docs.npmjs.com/downloading-and-installing-node-js-and-npm) with this command:
|
|
396
191
|
|
|
397
192
|
```bash
|
|
398
|
-
export APIFY_TOKEN=your-apify-token
|
|
193
|
+
export APIFY_TOKEN="your-apify-token"
|
|
399
194
|
npx @modelcontextprotocol/inspector node ./dist/stdio.js
|
|
400
195
|
```
|
|
401
196
|
|
|
402
|
-
Upon launching, the Inspector will display a URL that you can
|
|
197
|
+
Upon launching, the Inspector will display a URL that you can open in your browser to begin debugging.
|
|
403
198
|
|
|
404
|
-
|
|
199
|
+
# 🐛 Troubleshooting (local MCP server)
|
|
200
|
+
|
|
201
|
+
- Make sure you have `node` installed by running `node -v`.
|
|
202
|
+
- Make sure the `APIFY_TOKEN` environment variable is set.
|
|
203
|
+
- Always use the latest version of the MCP server by using `@apify/actors-mcp-server@latest`.
|
|
204
|
+
|
|
205
|
+
## 💡 Limitations
|
|
405
206
|
|
|
406
207
|
The Actor input schema is processed to be compatible with most MCP clients while adhering to [JSON Schema](https://json-schema.org/) standards. The processing includes:
|
|
407
208
|
- **Descriptions** are truncated to 500 characters (as defined in `MAX_DESCRIPTION_LENGTH`).
|
|
408
209
|
- **Enum fields** are truncated to a maximum combined length of 200 characters for all elements (as defined in `ACTOR_ENUM_MAX_LENGTH`).
|
|
409
|
-
- **Required fields** are explicitly marked with a
|
|
410
|
-
- **Nested properties** are built for special cases like proxy configuration and request list sources to ensure correct input structure.
|
|
210
|
+
- **Required fields** are explicitly marked with a `REQUIRED` prefix in their descriptions for compatibility with frameworks that may not handle the JSON schema properly.
|
|
211
|
+
- **Nested properties** are built for special cases like proxy configuration and request list sources to ensure the correct input structure.
|
|
411
212
|
- **Array item types** are inferred when not explicitly defined in the schema, using a priority order: explicit type in items > prefill type > default value type > editor type.
|
|
412
|
-
- **Enum values and examples** are added to property descriptions to ensure visibility even if the client doesn't fully support JSON schema.
|
|
413
|
-
|
|
414
|
-
Memory for each Actor is limited to 4GB.
|
|
415
|
-
Free users have an 8GB limit, 128MB needs to be allocated for running `Actors-MCP-Server`.
|
|
416
|
-
|
|
417
|
-
If you need other features or have any feedback, [submit an issue](https://console.apify.com/actors/1lSvMAaRcadrM1Vgv/issues) in Apify Console to let us know.
|
|
213
|
+
- **Enum values and examples** are added to property descriptions to ensure visibility, even if the client doesn't fully support the JSON schema.
|
|
214
|
+
- **Rental Actors** are only available for use with the hosted MCP server at https://mcp.apify.com. When running the server locally via stdio, you can only access Actors that are already added to your local toolset. To dynamically search for and use any Actor from the Apify Store—including rental Actors—connect to the hosted endpoint.
|
|
418
215
|
|
|
419
|
-
#
|
|
216
|
+
# 🤝 Contributing
|
|
420
217
|
|
|
421
|
-
|
|
422
|
-
- Add tools such as Actor logs and Actor runs for debugging.
|
|
218
|
+
We welcome contributions to improve the Apify MCP Server! Here's how you can help:
|
|
423
219
|
|
|
424
|
-
|
|
220
|
+
- **🐛 Report issues**: Find a bug or have a feature request? [Open an issue](https://github.com/apify/actors-mcp-server/issues).
|
|
221
|
+
- **🔧 Submit pull requests**: Fork the repo and submit pull requests with enhancements or fixes.
|
|
222
|
+
- **📚 Documentation**: Improvements to docs and examples are always welcome.
|
|
223
|
+
- **💡 Share use cases**: Contribute examples to help other users.
|
|
425
224
|
|
|
426
|
-
|
|
427
|
-
- Make sure you have the `APIFY_TOKEN` environment variable set
|
|
428
|
-
- Always use the latest version of the MCP server by setting `@apify/actors-mcp-server@latest`
|
|
225
|
+
For major changes, please open an issue first to discuss your proposal and ensure it aligns with the project's goals.
|
|
429
226
|
|
|
430
227
|
# 📚 Learn more
|
|
431
228
|
|
|
@@ -434,6 +231,6 @@ If you need other features or have any feedback, [submit an issue](https://conso
|
|
|
434
231
|
- [What is MCP and why does it matter?](https://blog.apify.com/what-is-model-context-protocol/)
|
|
435
232
|
- [How to use MCP with Apify Actors](https://blog.apify.com/how-to-use-mcp/)
|
|
436
233
|
- [Tester MCP Client](https://apify.com/jiri.spilka/tester-mcp-client)
|
|
437
|
-
- [
|
|
234
|
+
- [Webinar: Building and Monetizing MCP Servers on Apify](https://www.youtube.com/watch?v=w3AH3jIrXXo)
|
|
438
235
|
- [MCP Client development guide](https://github.com/cyanheads/model-context-protocol-resources/blob/main/guides/mcp-client-development-guide.md)
|
|
439
236
|
- [How to build and monetize an AI agent on Apify](https://blog.apify.com/how-to-build-an-ai-agent/)
|
package/dist/const.d.ts
CHANGED
package/dist/const.d.ts.map
CHANGED
|
@@ -1 +1 @@
|
|
|
1
|
-
{"version":3,"file":"const.d.ts","sourceRoot":"","sources":["../src/const.ts"],"names":[],"mappings":"AACA,eAAO,MAAM,uBAAuB,OAAQ,CAAC;AAC7C,eAAO,MAAM,qBAAqB,MAAM,CAAC;AACzC,eAAO,MAAM,4BAA4B,MAAM,CAAC;AAEhD,eAAO,MAAM,kCAAkC,IAAI,CAAC;AAGpD,eAAO,MAAM,uBAAuB,OAAQ,CAAC;AAG7C,eAAO,MAAM,WAAW,qBAAqB,CAAC;AAC9C,eAAO,MAAM,cAAc,UAAU,CAAC;AAGtC,eAAO,MAAM,iBAAiB,sBAAsB,CAAC;AAErD,oBAAY,WAAW;IACnB,SAAS,cAAc;IACvB,UAAU,eAAe;IACzB,SAAS,cAAc;IACvB,iBAAiB,sBAAsB;IACvC,YAAY,iBAAiB;IAC7B,gBAAgB,oBAAoB;IACpC,cAAc,kBAAkB;IAChC,cAAc,kBAAkB;IAChC,kBAAkB,uBAAuB;IACzC,WAAW,gBAAgB;IAC3B,gBAAgB,qBAAqB;IACrC,iBAAiB,sBAAsB;IACvC,wBAAwB,6BAA6B;IACrD,mBAAmB,wBAAwB;IAC3C,wBAAwB,6BAA6B;IACrD,0BAA0B,+BAA+B;IACzD,mBAAmB,0BAA0B;IAC7C,YAAY,kBAAkB;IAC9B,WAAW,sBAAsB;IACjC,UAAU,qBAAqB;CAClC;AAED,eAAO,MAAM,QAAQ;;CAIpB,CAAC;AAGF,eAAO,MAAM,+BAA+B,OAAQ,CAAC;AACrD,eAAO,MAAM,8BAA8B,QAC8F,CAAC;AAE1I,eAAO,MAAM,6BAA6B,gEAAgE,CAAC;AAG3G,eAAO,MAAM,oBAAoB,MAAM,CAAC;AACxC,eAAO,MAAM,oBAAoB,QAAU,CAAC;AAC5C,eAAO,MAAM,yBAAyB,MAAM,CAAC;AAC7C,eAAO,MAAM,yBAAyB,QAAU,CAAC;AAEjD,eAAO,MAAM,mBAAmB;IAC5B,oBAAoB;;;IAGpB,kCAAkC;;IAElC,iCAAiC;;CAE3B,CAAC;AAEX;;;GAGG;AACH,eAAO,MAAM,wBAAwB,KAAK,CAAC;AAE3C,eAAO,MAAM,uBAAuB,SAAS,CAAC;AAE9C,eAAO,MAAM,OAAO;;;;CAInB,CAAC"}
|
|
1
|
+
{"version":3,"file":"const.d.ts","sourceRoot":"","sources":["../src/const.ts"],"names":[],"mappings":"AACA,eAAO,MAAM,uBAAuB,OAAQ,CAAC;AAC7C,eAAO,MAAM,qBAAqB,MAAM,CAAC;AACzC,eAAO,MAAM,4BAA4B,MAAM,CAAC;AAEhD,eAAO,MAAM,kCAAkC,IAAI,CAAC;AAGpD,eAAO,MAAM,uBAAuB,OAAQ,CAAC;AAG7C,eAAO,MAAM,WAAW,qBAAqB,CAAC;AAC9C,eAAO,MAAM,cAAc,UAAU,CAAC;AAGtC,eAAO,MAAM,iBAAiB,sBAAsB,CAAC;AAErD,oBAAY,WAAW;IACnB,SAAS,cAAc;IACvB,UAAU,eAAe;IACzB,SAAS,cAAc;IACvB,iBAAiB,sBAAsB;IACvC,YAAY,iBAAiB;IAC7B,gBAAgB,oBAAoB;IACpC,cAAc,kBAAkB;IAChC,cAAc,kBAAkB;IAChC,kBAAkB,uBAAuB;IACzC,WAAW,gBAAgB;IAC3B,gBAAgB,qBAAqB;IACrC,iBAAiB,sBAAsB;IACvC,wBAAwB,6BAA6B;IACrD,mBAAmB,wBAAwB;IAC3C,wBAAwB,6BAA6B;IACrD,0BAA0B,+BAA+B;IACzD,mBAAmB,0BAA0B;IAC7C,YAAY,kBAAkB;IAC9B,WAAW,sBAAsB;IACjC,UAAU,qBAAqB;CAClC;AAED,eAAO,MAAM,QAAQ;;CAIpB,CAAC;AAGF,eAAO,MAAM,+BAA+B,OAAQ,CAAC;AACrD,eAAO,MAAM,8BAA8B,QAC8F,CAAC;AAE1I,eAAO,MAAM,6BAA6B,gEAAgE,CAAC;AAG3G,eAAO,MAAM,oBAAoB,MAAM,CAAC;AACxC,eAAO,MAAM,oBAAoB,QAAU,CAAC;AAC5C,eAAO,MAAM,yBAAyB,MAAM,CAAC;AAC7C,eAAO,MAAM,yBAAyB,QAAU,CAAC;AAEjD,eAAO,MAAM,mBAAmB;IAC5B,oBAAoB;;;IAGpB,kCAAkC;;IAElC,iCAAiC;;CAE3B,CAAC;AAEX;;;GAGG;AACH,eAAO,MAAM,wBAAwB,KAAK,CAAC;AAE3C,eAAO,MAAM,uBAAuB,SAAS,CAAC;AAE9C,eAAO,MAAM,OAAO;;;;CAInB,CAAC;AAEF,eAAO,MAAM,iCAAiC,OAAQ,CAAC"}
|
package/dist/const.js
CHANGED
package/dist/const.js.map
CHANGED
|
@@ -1 +1 @@
|
|
|
1
|
-
{"version":3,"file":"const.js","sourceRoot":"","sources":["../src/const.ts"],"names":[],"mappings":"AAAA,oBAAoB;AACpB,MAAM,CAAC,MAAM,uBAAuB,GAAG,IAAK,CAAC;AAC7C,MAAM,CAAC,MAAM,qBAAqB,GAAG,GAAG,CAAC;AACzC,MAAM,CAAC,MAAM,4BAA4B,GAAG,GAAG,CAAC;AAEhD,MAAM,CAAC,MAAM,kCAAkC,GAAG,CAAC,CAAC;AAEpD,kBAAkB;AAClB,MAAM,CAAC,MAAM,uBAAuB,GAAG,IAAK,CAAC,CAAC,kGAAkG;AAEhJ,aAAa;AACb,MAAM,CAAC,MAAM,WAAW,GAAG,kBAAkB,CAAC;AAC9C,MAAM,CAAC,MAAM,cAAc,GAAG,OAAO,CAAC;AAEtC,qBAAqB;AACrB,MAAM,CAAC,MAAM,iBAAiB,GAAG,mBAAmB,CAAC;AAErD,MAAM,CAAN,IAAY,WAqBX;AArBD,WAAY,WAAW;IACnB,sCAAuB,CAAA;IACvB,wCAAyB,CAAA;IACzB,sCAAuB,CAAA;IACvB,sDAAuC,CAAA;IACvC,4CAA6B,CAAA;IAC7B,mDAAoC,CAAA;IACpC,+CAAgC,CAAA;IAChC,+CAAgC,CAAA;IAChC,wDAAyC,CAAA;IACzC,0CAA2B,CAAA;IAC3B,oDAAqC,CAAA;IACrC,sDAAuC,CAAA;IACvC,oEAAqD,CAAA;IACrD,0DAA2C,CAAA;IAC3C,oEAAqD,CAAA;IACrD,wEAAyD,CAAA;IACzD,4DAA6C,CAAA;IAC7C,6CAA8B,CAAA;IAC9B,gDAAiC,CAAA;IACjC,8CAA+B,CAAA;AACnC,CAAC,EArBW,WAAW,KAAX,WAAW,QAqBtB;AAED,MAAM,CAAC,MAAM,QAAQ,GAAG;IACpB,MAAM,EAAE;QACJ,uBAAuB;KAC1B;CACJ,CAAC;AAEF,qBAAqB;AACrB,MAAM,CAAC,MAAM,+BAA+B,GAAG,IAAK,CAAC;AACrD,MAAM,CAAC,MAAM,8BAA8B,GAAG,4DAA4D;MACpG,2DAA2D,WAAW,CAAC,iBAAiB,2CAA2C,CAAC;AAE1I,MAAM,CAAC,MAAM,6BAA6B,GAAG,6DAA6D,CAAC;AAE3G,QAAQ;AACR,MAAM,CAAC,MAAM,oBAAoB,GAAG,GAAG,CAAC;AACxC,MAAM,CAAC,MAAM,oBAAoB,GAAG,EAAE,GAAG,EAAE,CAAC,CAAC,aAAa;AAC1D,MAAM,CAAC,MAAM,yBAAyB,GAAG,GAAG,CAAC;AAC7C,MAAM,CAAC,MAAM,yBAAyB,GAAG,EAAE,GAAG,EAAE,CAAC,CAAC,SAAS;AAE3D,MAAM,CAAC,MAAM,mBAAmB,GAAG;IAC/B,oBAAoB;IACpB,oBAAoB,EAAE,sBAAsB;IAC5C,IAAI,EAAE,MAAM;IACZ,kCAAkC;IAClC,sBAAsB,EAAE,wBAAwB;IAChD,iCAAiC;IACjC,aAAa,EAAE,eAAe;CACxB,CAAC;AAEX;;;GAGG;AACH,MAAM,CAAC,MAAM,wBAAwB,GAAG,EAAE,CAAC;AAE3C,MAAM,CAAC,MAAM,uBAAuB,GAAG,MAAM,CAAC;AAE9C,MAAM,CAAC,MAAM,OAAO,GAAG;IACnB,KAAK,EAAE,YAAY;IACnB,MAAM,EAAE,kCAAkC,EAAE,+BAA+B;IAC3E,SAAS,EAAE,qBAAqB;CACnC,CAAC"}
|
|
1
|
+
{"version":3,"file":"const.js","sourceRoot":"","sources":["../src/const.ts"],"names":[],"mappings":"AAAA,oBAAoB;AACpB,MAAM,CAAC,MAAM,uBAAuB,GAAG,IAAK,CAAC;AAC7C,MAAM,CAAC,MAAM,qBAAqB,GAAG,GAAG,CAAC;AACzC,MAAM,CAAC,MAAM,4BAA4B,GAAG,GAAG,CAAC;AAEhD,MAAM,CAAC,MAAM,kCAAkC,GAAG,CAAC,CAAC;AAEpD,kBAAkB;AAClB,MAAM,CAAC,MAAM,uBAAuB,GAAG,IAAK,CAAC,CAAC,kGAAkG;AAEhJ,aAAa;AACb,MAAM,CAAC,MAAM,WAAW,GAAG,kBAAkB,CAAC;AAC9C,MAAM,CAAC,MAAM,cAAc,GAAG,OAAO,CAAC;AAEtC,qBAAqB;AACrB,MAAM,CAAC,MAAM,iBAAiB,GAAG,mBAAmB,CAAC;AAErD,MAAM,CAAN,IAAY,WAqBX;AArBD,WAAY,WAAW;IACnB,sCAAuB,CAAA;IACvB,wCAAyB,CAAA;IACzB,sCAAuB,CAAA;IACvB,sDAAuC,CAAA;IACvC,4CAA6B,CAAA;IAC7B,mDAAoC,CAAA;IACpC,+CAAgC,CAAA;IAChC,+CAAgC,CAAA;IAChC,wDAAyC,CAAA;IACzC,0CAA2B,CAAA;IAC3B,oDAAqC,CAAA;IACrC,sDAAuC,CAAA;IACvC,oEAAqD,CAAA;IACrD,0DAA2C,CAAA;IAC3C,oEAAqD,CAAA;IACrD,wEAAyD,CAAA;IACzD,4DAA6C,CAAA;IAC7C,6CAA8B,CAAA;IAC9B,gDAAiC,CAAA;IACjC,8CAA+B,CAAA;AACnC,CAAC,EArBW,WAAW,KAAX,WAAW,QAqBtB;AAED,MAAM,CAAC,MAAM,QAAQ,GAAG;IACpB,MAAM,EAAE;QACJ,uBAAuB;KAC1B;CACJ,CAAC;AAEF,qBAAqB;AACrB,MAAM,CAAC,MAAM,+BAA+B,GAAG,IAAK,CAAC;AACrD,MAAM,CAAC,MAAM,8BAA8B,GAAG,4DAA4D;MACpG,2DAA2D,WAAW,CAAC,iBAAiB,2CAA2C,CAAC;AAE1I,MAAM,CAAC,MAAM,6BAA6B,GAAG,6DAA6D,CAAC;AAE3G,QAAQ;AACR,MAAM,CAAC,MAAM,oBAAoB,GAAG,GAAG,CAAC;AACxC,MAAM,CAAC,MAAM,oBAAoB,GAAG,EAAE,GAAG,EAAE,CAAC,CAAC,aAAa;AAC1D,MAAM,CAAC,MAAM,yBAAyB,GAAG,GAAG,CAAC;AAC7C,MAAM,CAAC,MAAM,yBAAyB,GAAG,EAAE,GAAG,EAAE,CAAC,CAAC,SAAS;AAE3D,MAAM,CAAC,MAAM,mBAAmB,GAAG;IAC/B,oBAAoB;IACpB,oBAAoB,EAAE,sBAAsB;IAC5C,IAAI,EAAE,MAAM;IACZ,kCAAkC;IAClC,sBAAsB,EAAE,wBAAwB;IAChD,iCAAiC;IACjC,aAAa,EAAE,eAAe;CACxB,CAAC;AAEX;;;GAGG;AACH,MAAM,CAAC,MAAM,wBAAwB,GAAG,EAAE,CAAC;AAE3C,MAAM,CAAC,MAAM,uBAAuB,GAAG,MAAM,CAAC;AAE9C,MAAM,CAAC,MAAM,OAAO,GAAG;IACnB,KAAK,EAAE,YAAY;IACnB,MAAM,EAAE,kCAAkC,EAAE,+BAA+B;IAC3E,SAAS,EAAE,qBAAqB;CACnC,CAAC;AAEF,MAAM,CAAC,MAAM,iCAAiC,GAAG,IAAK,CAAC,CAAC,YAAY"}
|
package/dist/main.js
CHANGED
|
@@ -36,7 +36,7 @@ if (STANDBY_MODE) {
|
|
|
36
36
|
});
|
|
37
37
|
log.info('Actor is running in the STANDBY mode.');
|
|
38
38
|
app.listen(PORT, () => {
|
|
39
|
-
log.info(`The Actor web server is listening for user requests at ${HOST}`);
|
|
39
|
+
log.info(`The Actor web server is listening for user requests at ${HOST}:${PORT}`);
|
|
40
40
|
});
|
|
41
41
|
}
|
|
42
42
|
else {
|