ladder_drive 0.5.2 → 0.6.0
This diff represents the content of publicly available package versions that have been released to one of the supported registries. The information contained in this diff is provided for informational purposes only and reflects changes between package versions as they appear in their respective public registries.
- checksums.yaml +5 -5
- data/.gitignore +0 -1
- data/Gemfile +6 -2
- data/Gemfile.lock +93 -17
- data/README.md +47 -14
- data/README_jp.md +51 -2
- data/Rakefile +31 -0
- data/doc/jp/raspberrypi.md +183 -0
- data/ladder_drive.gemspec +2 -1
- data/lib/ladder_drive/asm.rb +62 -7
- data/lib/ladder_drive/cli.rb +11 -0
- data/lib/ladder_drive/plc_device.rb +33 -4
- data/lib/ladder_drive/protocol/mitsubishi/fx_device.rb +14 -0
- data/lib/ladder_drive/protocol/mitsubishi/fx_protocol.rb +330 -0
- data/lib/ladder_drive/protocol/mitsubishi/mc_protocol.rb +6 -6
- data/lib/ladder_drive/protocol/mitsubishi/mitsubishi.rb +4 -0
- data/lib/ladder_drive/protocol/protocol.rb +1 -0
- data/lib/ladder_drive/version.rb +1 -1
- data/lib/plc/emulator/emu_device.rb +7 -0
- data/lib/plc/emulator/emu_plc.rb +6 -2
- data/lib/plc/emulator/emu_plc_server.rb +9 -8
- data/lib/plc/emulator/plc_plugins.rb +155 -0
- data/plugins/blank_plugin.rb +11 -0
- data/plugins/google_drive_plugin.rb +191 -0
- data/plugins/ifttt_plugin.rb +134 -0
- data/plugins/plc_mapper_plugin.rb +186 -0
- data/plugins/slack_plugin.rb +155 -0
- data/plugins/trello_plugin.rb +156 -0
- metadata +41 -5
checksums.yaml
CHANGED
|
@@ -1,7 +1,7 @@
|
|
|
1
1
|
---
|
|
2
|
-
|
|
3
|
-
metadata.gz:
|
|
4
|
-
data.tar.gz:
|
|
2
|
+
SHA256:
|
|
3
|
+
metadata.gz: 2bd6ed103f79bb7083b861a6464f83c668dcbb5c14808d3e702cc5a4206c9c6b
|
|
4
|
+
data.tar.gz: e7c1f12717307d569f203f8c054413cf97c69e66c832247846f675f0405b9d4f
|
|
5
5
|
SHA512:
|
|
6
|
-
metadata.gz:
|
|
7
|
-
data.tar.gz:
|
|
6
|
+
metadata.gz: f6b4b164bbeba262f1c57334955ea09e423662b6e63a1b502f953211df9640645731a3970316e376f4545f046a75db2c3c5a0d3705d16725dd033ce3156e3483
|
|
7
|
+
data.tar.gz: a0525951ac3a7d82a1b767806a0b59e2c5a7f95b55621e7ab7fd456689659d3f537f5c90f2baa3cc5cd618c536c66510ccb97cc2bc29b751a5b74a0e2b314518
|
data/.gitignore
CHANGED
data/Gemfile
CHANGED
data/Gemfile.lock
CHANGED
|
@@ -1,49 +1,125 @@
|
|
|
1
1
|
PATH
|
|
2
2
|
remote: .
|
|
3
3
|
specs:
|
|
4
|
-
ladder_drive (0.
|
|
4
|
+
ladder_drive (0.6.0)
|
|
5
5
|
activesupport (~> 4.2, >= 4.2.7)
|
|
6
|
-
|
|
6
|
+
ffi (~> 1.9.24, >= 1.9.24)
|
|
7
|
+
pi_piper (>= 2.0.0)
|
|
7
8
|
thor (~> 0)
|
|
8
9
|
|
|
9
10
|
GEM
|
|
10
11
|
remote: https://rubygems.org/
|
|
11
12
|
specs:
|
|
12
|
-
|
|
13
|
+
activemodel (4.2.11)
|
|
14
|
+
activesupport (= 4.2.11)
|
|
15
|
+
builder (~> 3.1)
|
|
16
|
+
activesupport (4.2.11)
|
|
13
17
|
i18n (~> 0.7)
|
|
14
|
-
json (~> 1.7, >= 1.7.7)
|
|
15
18
|
minitest (~> 5.1)
|
|
16
19
|
thread_safe (~> 0.3, >= 0.3.4)
|
|
17
20
|
tzinfo (~> 1.1)
|
|
21
|
+
addressable (2.5.2)
|
|
22
|
+
public_suffix (>= 2.0.2, < 4.0)
|
|
23
|
+
builder (3.2.3)
|
|
24
|
+
concurrent-ruby (1.1.3)
|
|
25
|
+
declarative (0.0.10)
|
|
26
|
+
declarative-option (0.1.0)
|
|
27
|
+
domain_name (0.5.20180417)
|
|
28
|
+
unf (>= 0.0.5, < 1.0.0)
|
|
18
29
|
eventmachine (1.0.9)
|
|
19
|
-
|
|
20
|
-
|
|
21
|
-
|
|
22
|
-
|
|
23
|
-
|
|
30
|
+
faraday (0.15.4)
|
|
31
|
+
multipart-post (>= 1.2, < 3)
|
|
32
|
+
ffi (1.9.25)
|
|
33
|
+
google-api-client (0.21.2)
|
|
34
|
+
addressable (~> 2.5, >= 2.5.1)
|
|
35
|
+
googleauth (>= 0.5, < 0.7.0)
|
|
36
|
+
httpclient (>= 2.8.1, < 3.0)
|
|
37
|
+
mime-types (~> 3.0)
|
|
38
|
+
representable (~> 3.0)
|
|
39
|
+
retriable (>= 2.0, < 4.0)
|
|
40
|
+
google_drive (3.0.0)
|
|
41
|
+
google-api-client (>= 0.11.0, < 0.22.0)
|
|
42
|
+
googleauth (>= 0.5.0, < 1.0.0)
|
|
43
|
+
nokogiri (>= 1.5.3, < 2.0.0)
|
|
44
|
+
googleauth (0.6.7)
|
|
45
|
+
faraday (~> 0.12)
|
|
46
|
+
jwt (>= 1.4, < 3.0)
|
|
47
|
+
memoist (~> 0.16)
|
|
48
|
+
multi_json (~> 1.11)
|
|
49
|
+
os (>= 0.9, < 2.0)
|
|
50
|
+
signet (~> 0.7)
|
|
51
|
+
http-cookie (1.0.3)
|
|
52
|
+
domain_name (~> 0.5)
|
|
53
|
+
httpclient (2.8.3)
|
|
54
|
+
i18n (0.9.5)
|
|
55
|
+
concurrent-ruby (~> 1.0)
|
|
56
|
+
json (2.1.0)
|
|
57
|
+
jwt (2.1.0)
|
|
58
|
+
memoist (0.16.0)
|
|
59
|
+
mime-types (3.2.2)
|
|
60
|
+
mime-types-data (~> 3.2015)
|
|
61
|
+
mime-types-data (3.2018.0812)
|
|
62
|
+
mini_portile2 (2.3.0)
|
|
63
|
+
minitest (5.11.3)
|
|
64
|
+
multi_json (1.13.1)
|
|
65
|
+
multipart-post (2.0.0)
|
|
66
|
+
netrc (0.11.0)
|
|
67
|
+
nokogiri (1.8.5)
|
|
68
|
+
mini_portile2 (~> 2.3.0)
|
|
69
|
+
oauth (0.5.4)
|
|
70
|
+
os (1.0.0)
|
|
24
71
|
pi_piper (2.0.0)
|
|
25
72
|
eventmachine (= 1.0.9)
|
|
26
73
|
ffi
|
|
27
|
-
power_assert (
|
|
74
|
+
power_assert (1.1.3)
|
|
75
|
+
public_suffix (3.0.3)
|
|
28
76
|
rake (10.5.0)
|
|
29
|
-
|
|
77
|
+
representable (3.0.4)
|
|
78
|
+
declarative (< 0.1.0)
|
|
79
|
+
declarative-option (< 0.2.0)
|
|
80
|
+
uber (< 0.2.0)
|
|
81
|
+
rest-client (2.0.2)
|
|
82
|
+
http-cookie (>= 1.0.2, < 2.0)
|
|
83
|
+
mime-types (>= 1.16, < 4.0)
|
|
84
|
+
netrc (~> 0.8)
|
|
85
|
+
retriable (3.1.2)
|
|
86
|
+
ruby-trello (2.1.0)
|
|
87
|
+
activemodel (>= 3.2.0)
|
|
88
|
+
addressable (~> 2.3)
|
|
89
|
+
json
|
|
90
|
+
oauth (>= 0.4.5)
|
|
91
|
+
rest-client (>= 1.8.0)
|
|
92
|
+
serialport (1.3.1)
|
|
93
|
+
signet (0.11.0)
|
|
94
|
+
addressable (~> 2.3)
|
|
95
|
+
faraday (~> 0.9)
|
|
96
|
+
jwt (>= 1.5, < 3.0)
|
|
97
|
+
multi_json (~> 1.10)
|
|
98
|
+
test-unit (3.2.8)
|
|
30
99
|
power_assert
|
|
31
|
-
thor (0.20.
|
|
32
|
-
thread_safe (0.3.
|
|
33
|
-
tzinfo (1.2.
|
|
100
|
+
thor (0.20.3)
|
|
101
|
+
thread_safe (0.3.6)
|
|
102
|
+
tzinfo (1.2.5)
|
|
34
103
|
thread_safe (~> 0.1)
|
|
104
|
+
uber (0.1.0)
|
|
105
|
+
unf (0.1.4)
|
|
106
|
+
unf_ext
|
|
107
|
+
unf_ext (0.0.7.5)
|
|
35
108
|
|
|
36
109
|
PLATFORMS
|
|
37
110
|
ruby
|
|
38
|
-
x64-mingw32
|
|
39
111
|
|
|
40
112
|
DEPENDENCIES
|
|
41
|
-
activesupport
|
|
113
|
+
activesupport
|
|
42
114
|
bundler (~> 1.11)
|
|
115
|
+
ffi
|
|
116
|
+
google_drive
|
|
43
117
|
ladder_drive!
|
|
44
118
|
pi_piper
|
|
45
119
|
rake (~> 10.0)
|
|
120
|
+
ruby-trello
|
|
121
|
+
serialport
|
|
46
122
|
test-unit
|
|
47
123
|
|
|
48
124
|
BUNDLED WITH
|
|
49
|
-
1.
|
|
125
|
+
1.16.6
|
data/README.md
CHANGED
|
@@ -4,12 +4,12 @@
|
|
|
4
4
|
|
|
5
5
|
The ladder_drive is a simple abstract ladder for PLC (Programmable Logic Controller).
|
|
6
6
|
|
|
7
|
-
We aim to design abstraction ladder which
|
|
7
|
+
We aim to design the abstraction ladder which can run on any PLC with same ladder source or binary and prepare full stack tools.
|
|
8
8
|
|
|
9
9
|
# Getting started
|
|
10
10
|
|
|
11
11
|
It's required the Ruby environment.
|
|
12
|
-
To prepare the Ruby environment, please find
|
|
12
|
+
To prepare the Ruby environment, please find websites.
|
|
13
13
|
|
|
14
14
|
Install LadderDrive at the command prompt.
|
|
15
15
|
|
|
@@ -19,7 +19,7 @@ $ gem install ladder_drive
|
|
|
19
19
|
|
|
20
20
|
[](https://gyazo.com/6f00d74612def41fb33d836275b74c24)
|
|
21
21
|
|
|
22
|
-
# Create
|
|
22
|
+
# Create a LadderDrive project
|
|
23
23
|
|
|
24
24
|
At the command prompt, create a new LadderDrive project.
|
|
25
25
|
|
|
@@ -30,7 +30,7 @@ $ cd my_project
|
|
|
30
30
|
|
|
31
31
|
[](https://gyazo.com/c538f66129aa425e2b1da4f478a10f52)
|
|
32
32
|
|
|
33
|
-
Created files
|
|
33
|
+
Created files have consisted like the tree below.
|
|
34
34
|
|
|
35
35
|
```
|
|
36
36
|
.
|
|
@@ -52,8 +52,8 @@ Created files are consisted like the tree below.
|
|
|
52
52
|
## PLC configuration
|
|
53
53
|
|
|
54
54
|
There is a plc project under the plc directory.
|
|
55
|
-
Launch
|
|
56
|
-
(Currently we support the Emulator and MITSUBISHI iQ-R R08CUP only.)
|
|
55
|
+
Launch one of the plc projects which you want to use.
|
|
56
|
+
(Currently, we support the Emulator and MITSUBISHI iQ-R R08CUP only.)
|
|
57
57
|
|
|
58
58
|
Configure ethernet connection by the tool which is provided by plc maker.
|
|
59
59
|
Then upload settings and plc program to the plc.
|
|
@@ -64,8 +64,8 @@ Then upload settings and plc program to the plc.
|
|
|
64
64
|
## LadderDrive configuration
|
|
65
65
|
|
|
66
66
|
There is a configuration file at config/plc.yml.
|
|
67
|
-
Currently we support MITSUBISHI iQ-R R08CUP and the Emulator.
|
|
68
|
-
You only change host to an
|
|
67
|
+
Currently, we support MITSUBISHI iQ-R R08CUP and the Emulator.
|
|
68
|
+
You only change host to an IP address of your plc.
|
|
69
69
|
|
|
70
70
|
```
|
|
71
71
|
# plc.yml
|
|
@@ -82,9 +82,9 @@ plc: # Beginning of PLC section.
|
|
|
82
82
|
|
|
83
83
|
## LadderDrive programming
|
|
84
84
|
|
|
85
|
-
|
|
85
|
+
The Ladderdrive program file is located under the asm directory.
|
|
86
86
|
By default, use asm/main.esc.
|
|
87
|
-
Edit it and programming.
|
|
87
|
+
Edit it and programming.
|
|
88
88
|
|
|
89
89
|
Refer [Wiki](https://github.com/ito-soft-design/ladder_drive/wiki/mnemonic) to check mnemonic.
|
|
90
90
|
|
|
@@ -126,7 +126,7 @@ default:
|
|
|
126
126
|
```rake``` is same as ```rake target=iq-r```.
|
|
127
127
|
|
|
128
128
|
|
|
129
|
-
The LadderDrive program runs immediately after
|
|
129
|
+
The LadderDrive program runs immediately after upload.
|
|
130
130
|
|
|
131
131
|
```sh
|
|
132
132
|
$ rake [target=iq-r]
|
|
@@ -141,7 +141,7 @@ done uploading
|
|
|
141
141
|
>
|
|
142
142
|
```
|
|
143
143
|
|
|
144
|
-
After
|
|
144
|
+
After uploading the program, it becomes in to console mode.
|
|
145
145
|
You can read and write a device by entering commands.
|
|
146
146
|
|
|
147
147
|
Use the r command if you want to read devices.
|
|
@@ -188,9 +188,10 @@ X or Y devices are assigned to GPIOs.
|
|
|
188
188
|
### Installation
|
|
189
189
|
|
|
190
190
|
```sh
|
|
191
|
+
$ sudo apt-get update
|
|
191
192
|
$ sudo apt-get install ruby-dev
|
|
192
193
|
$ sudo apt-get install libssl-dev
|
|
193
|
-
$ sudo gem install ladder_drive
|
|
194
|
+
$ sudo gem install ladder_drive --no-ri --no-rdoc
|
|
194
195
|
```
|
|
195
196
|
|
|
196
197
|
### Execution
|
|
@@ -198,7 +199,7 @@ $ sudo gem install ladder_drive
|
|
|
198
199
|
```sh
|
|
199
200
|
$ ladder_drive create project
|
|
200
201
|
$ cd project
|
|
201
|
-
$ rake target=raspberrypi
|
|
202
|
+
$ sudo rake target=raspberrypi
|
|
202
203
|
```
|
|
203
204
|
|
|
204
205
|
### I/O settings
|
|
@@ -268,6 +269,38 @@ plc["D0", 10] = [0, 1, 2, ..., 9]
|
|
|
268
269
|
plc["D0".."D9"] => [0, 1, 2, ..., 9]
|
|
269
270
|
```
|
|
270
271
|
|
|
272
|
+
## Plugin
|
|
273
|
+
|
|
274
|
+
If you want to an enhancement function Ladder drive running on Unix based machine, use a plugin.
|
|
275
|
+
|
|
276
|
+
Put xxx_plugin.rb into your project's plugins directory.
|
|
277
|
+
xxx is the name of the plugin. i.e.) If your plugin name is 'bar' then xxx is 'bar' . -> bar_plugin.rb
|
|
278
|
+
|
|
279
|
+
### Callbacks
|
|
280
|
+
|
|
281
|
+
Ladder drive calls ```plugin_xxx_init``` function for the initialization. If you need to initialize it, to do here.
|
|
282
|
+
|
|
283
|
+
It also calls ```plugin_xxx_exec``` for execution of your plugin.
|
|
284
|
+
|
|
285
|
+
### plugins
|
|
286
|
+
|
|
287
|
+
Ladder drive has several plugins by default.
|
|
288
|
+
If you want to use a plugin, execute below command.
|
|
289
|
+
|
|
290
|
+
```
|
|
291
|
+
$ ladder_drive plugin plugin_name
|
|
292
|
+
```
|
|
293
|
+
|
|
294
|
+
|Plugin name|description|
|
|
295
|
+
|:--|:--|
|
|
296
|
+
|ifttt|Launch IFTTT's Webhooks trigger service.|
|
|
297
|
+
|google_drive|Writing data to Google spreadsheet.|
|
|
298
|
+
|plc_mapper|Share other PLCs data with Ladder drive device.|
|
|
299
|
+
|slack|Cast the data to the Slack.|
|
|
300
|
+
|trello|Move the card of Trello to specified list.|
|
|
301
|
+
|
|
302
|
+
|
|
303
|
+
|
|
271
304
|
# Information related ladder_drive
|
|
272
305
|
|
|
273
306
|
- [My japanese diary [ladder_drive]](http://diary.itosoft.com/?category=ladder_drive)
|
data/README_jp.md
CHANGED
|
@@ -183,6 +183,13 @@ OUT M1
|
|
|
183
183
|
|
|
184
184
|
<!-- [](https://youtu.be/qGbicGLB7Gs) -->
|
|
185
185
|
|
|
186
|
+
|
|
187
|
+
```warning: constant ::Fixnum is deprecated``` の表示が出る場合は次の様にしてみてください。
|
|
188
|
+
|
|
189
|
+
```sh
|
|
190
|
+
$ RUBYOPT="-W0" rake
|
|
191
|
+
```
|
|
192
|
+
|
|
186
193
|
## Raspberry Pi
|
|
187
194
|
|
|
188
195
|
Raspberry Pi上で動作させることもできます。
|
|
@@ -193,9 +200,10 @@ XとYデバイスはGPIOに割り付けます。
|
|
|
193
200
|
OSとしてRaspbianを使用した場合は次の手順でインストールできます。
|
|
194
201
|
|
|
195
202
|
```sh
|
|
203
|
+
$ sudo apt-get update
|
|
196
204
|
$ sudo apt-get install ruby-dev
|
|
197
205
|
$ sudo apt-get install libssl-dev
|
|
198
|
-
$ sudo gem install ladder_drive
|
|
206
|
+
$ sudo gem install ladder_drive --no-ri --no-rdoc
|
|
199
207
|
```
|
|
200
208
|
|
|
201
209
|
この時の環境は下の通りです。
|
|
@@ -211,7 +219,7 @@ Linux raspberrypi 4.9.41+ #1023 Tue Aug 8 15:47:12 BST 2017 armv6l GNU/Linux
|
|
|
211
219
|
```sh
|
|
212
220
|
$ ladder_drive create project
|
|
213
221
|
$ cd project
|
|
214
|
-
$ rake target=raspberrypi
|
|
222
|
+
$ sudo rake target=raspberrypi
|
|
215
223
|
```
|
|
216
224
|
|
|
217
225
|
### I/O設定
|
|
@@ -281,6 +289,47 @@ plc["D0", 10] = [0, 1, 2, ..., 9]
|
|
|
281
289
|
plc["D0".."D9"] => [0, 1, 2, ..., 9]
|
|
282
290
|
```
|
|
283
291
|
|
|
292
|
+
## プラグイン
|
|
293
|
+
|
|
294
|
+
UnixベースのマシンでLadder Driveを実行した場合にプラグインで機能を拡張できます。
|
|
295
|
+
例えば各種センサーを読み込みLadder Driveのデバイスにセットしたり、Webサービスと連動させたりという事ができます。
|
|
296
|
+
|
|
297
|
+
プラグインを作成する場合はプロジェクにpluginsディレクトリを作成し、xxx_plugin.rbというファイル名のRubyスクリプトを作成します。xxxはプラグインの名称を示しbarプラグインならbar_plugin.rbになります。
|
|
298
|
+
|
|
299
|
+
### プラグインのコールバック
|
|
300
|
+
|
|
301
|
+
起動時にプラグインの初期化をするために```plugin_xxx_init```が呼び出されます。(xxxはプラグインの名称が入り、sample_plugin.rbならxxxにsampleが入ります)
|
|
302
|
+
初期が必要な場合はここで行なってください。
|
|
303
|
+
|
|
304
|
+
Ladder Driveが1サイクル実行後に```plugin_xxx_exec```を呼び出します。(xxxについては上記の通りです)
|
|
305
|
+
ここでLadder Driveデバイスへの読み書きなどを行います。
|
|
306
|
+
|
|
307
|
+
### あらかじめ用意されているプラグイン
|
|
308
|
+
|
|
309
|
+
Ladder Driveでは次のプラグインがあらかじめ用意されています。
|
|
310
|
+
Ladder DriveをIoT Gateway として機能させるプラグインになります。
|
|
311
|
+
|
|
312
|
+
|名称|内容|
|
|
313
|
+
|:--|:--|
|
|
314
|
+
|ifttt|IFTTTのWebhooksを起動します。|
|
|
315
|
+
|google_drive|Google spreadsheetにデータを書き込みます。|
|
|
316
|
+
|plc_mapper|複数のPLCのデータをLadder Driveのメモリーに展開します。|
|
|
317
|
+
|slack|Slackにデータの変化を記録します。|
|
|
318
|
+
|trello|trelloのカードを指定のリストに移動します。|
|
|
319
|
+
|
|
320
|
+
これらの用意されているプラグインをインストールするには
|
|
321
|
+
|
|
322
|
+
```
|
|
323
|
+
$ ladder_drive plugin plugin_name
|
|
324
|
+
```
|
|
325
|
+
|
|
326
|
+
plugin_nameには上記プラグインの名称を入れます。
|
|
327
|
+
指定されたプラグインがpluginsディレクトリーに作成されます。
|
|
328
|
+
|
|
329
|
+
|
|
330
|
+
それぞれのプラグインの使い方はWikiの方に記載する予定です。
|
|
331
|
+
|
|
332
|
+
|
|
284
333
|
## LadderDriveに関する情報
|
|
285
334
|
|
|
286
335
|
- [一往確認日記 [ladder_drive]](http://diary.itosoft.com/?category=ladder_drive)
|
data/Rakefile
CHANGED
|
@@ -1,5 +1,8 @@
|
|
|
1
1
|
require "bundler/gem_tasks"
|
|
2
2
|
require 'rake/testtask'
|
|
3
|
+
require 'fileutils'
|
|
4
|
+
|
|
5
|
+
include FileUtils
|
|
3
6
|
|
|
4
7
|
task :default => [:test]
|
|
5
8
|
|
|
@@ -7,3 +10,31 @@ Rake::TestTask.new do |t|
|
|
|
7
10
|
t.test_files = FileList['test/**/test*.rb']
|
|
8
11
|
t.verbose = true
|
|
9
12
|
end
|
|
13
|
+
|
|
14
|
+
namespace :doc do
|
|
15
|
+
|
|
16
|
+
desc "Make epub documentation."
|
|
17
|
+
task :epub do
|
|
18
|
+
dst_dir = "tmp/doc"
|
|
19
|
+
FileList['doc/**/*.md'].each do |src|
|
|
20
|
+
dst = dst_dir + src.gsub(/^doc/, "").gsub(/md$/, "epub")
|
|
21
|
+
mkdir_p File.dirname(dst), verbose: false
|
|
22
|
+
cmd = "pandoc -f markdown -t epub3 #{src} -o #{dst}"
|
|
23
|
+
puts `#{cmd}`
|
|
24
|
+
end
|
|
25
|
+
end
|
|
26
|
+
|
|
27
|
+
=begin FIXME:It does not work on my mac.
|
|
28
|
+
desc "Make pdf documentation."
|
|
29
|
+
task :pdf do
|
|
30
|
+
dst_dir = "tmp/doc"
|
|
31
|
+
FileList['doc/**/*.md'].each do |src|
|
|
32
|
+
dst = dst_dir + src.gsub(/^doc/, "").gsub(/md$/, "pdf")
|
|
33
|
+
mkdir_p File.dirname(dst), verbose: false
|
|
34
|
+
cmd = "pandoc #{src} -o #{dst}"
|
|
35
|
+
puts `#{cmd}`
|
|
36
|
+
end
|
|
37
|
+
end
|
|
38
|
+
=end
|
|
39
|
+
|
|
40
|
+
end
|
|
@@ -0,0 +1,183 @@
|
|
|
1
|
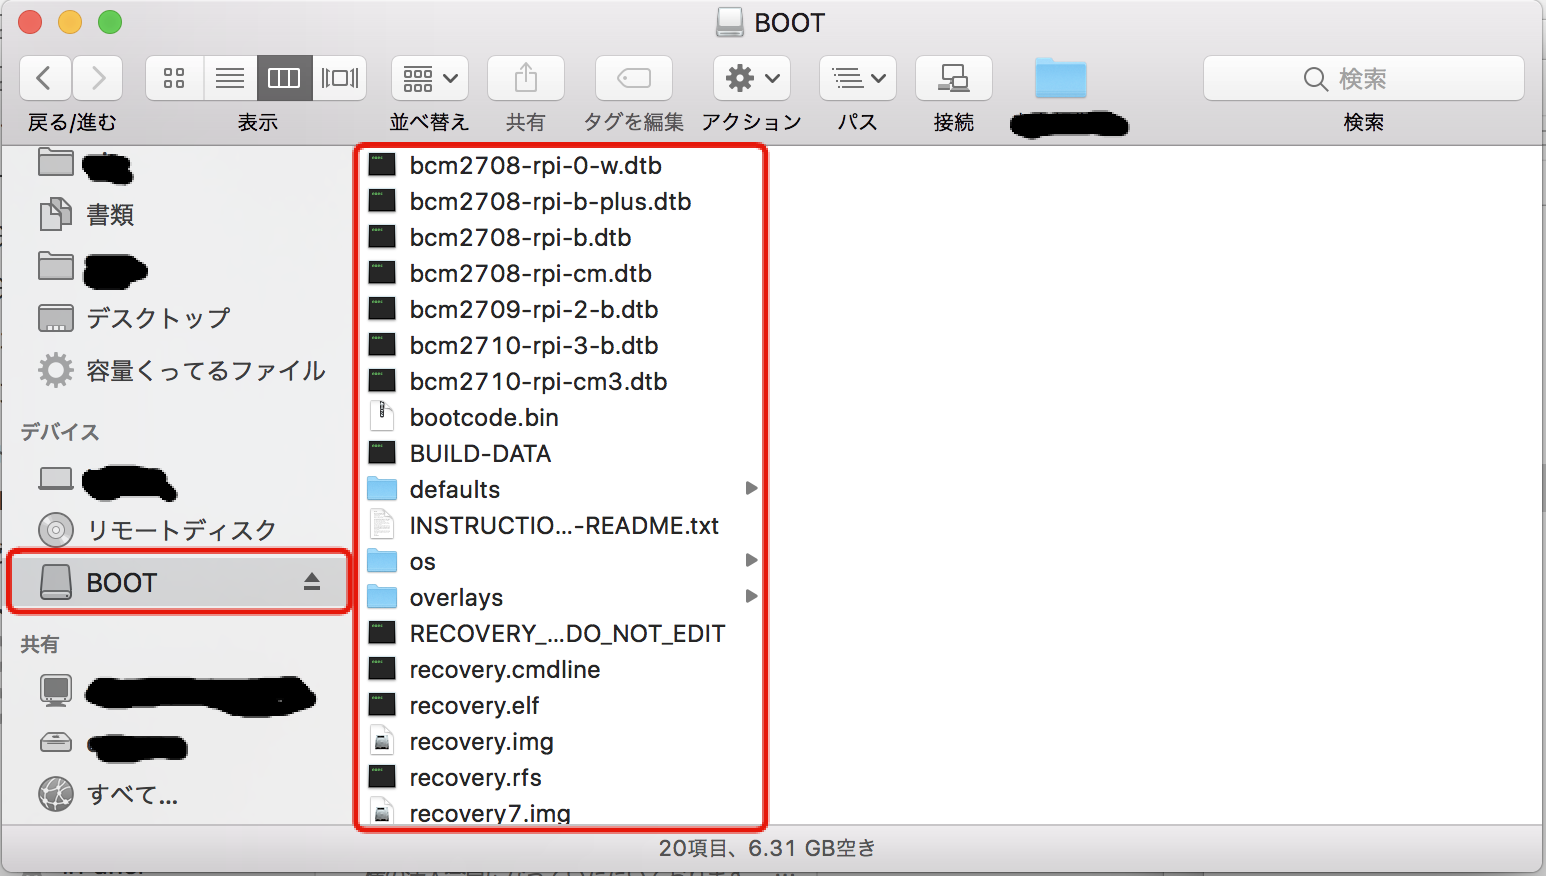
+
# Ladder Drive
|
|
2
|
+
|
|
3
|
+
Ladder Driveは仮想的なPLCです。
|
|
4
|
+
Raspberry Piで動作させるとGPIOをX、Yデバイスとして制御できます。
|
|
5
|
+
|
|
6
|
+
# Raspberry Pi編
|
|
7
|
+
|
|
8
|
+
Ladder DriveはRaspberry Pi上で実行させることができます。
|
|
9
|
+
ここではその手順を説明します。
|
|
10
|
+
詳しいインストールの仕方については、別途Raspberry Piの入門書などをご覧ください。
|
|
11
|
+
|
|
12
|
+
## Raspberry Piセットアップ
|
|
13
|
+
|
|
14
|
+
ここでは、Raspberry PiのOSとしてメジャーなRaspbianを使用します。
|
|
15
|
+
NOOBSというインストーラでインストールしていきます。
|
|
16
|
+
|
|
17
|
+
### SDカードの準備
|
|
18
|
+
|
|
19
|
+
[https://www.raspberrypi.org/downloads/](https://www.raspberrypi.org/downloads/) にアクセスし、NOOBSをクリックします。
|
|
20
|
+
|
|
21
|
+
|
|
22
|
+
|
|
23
|
+
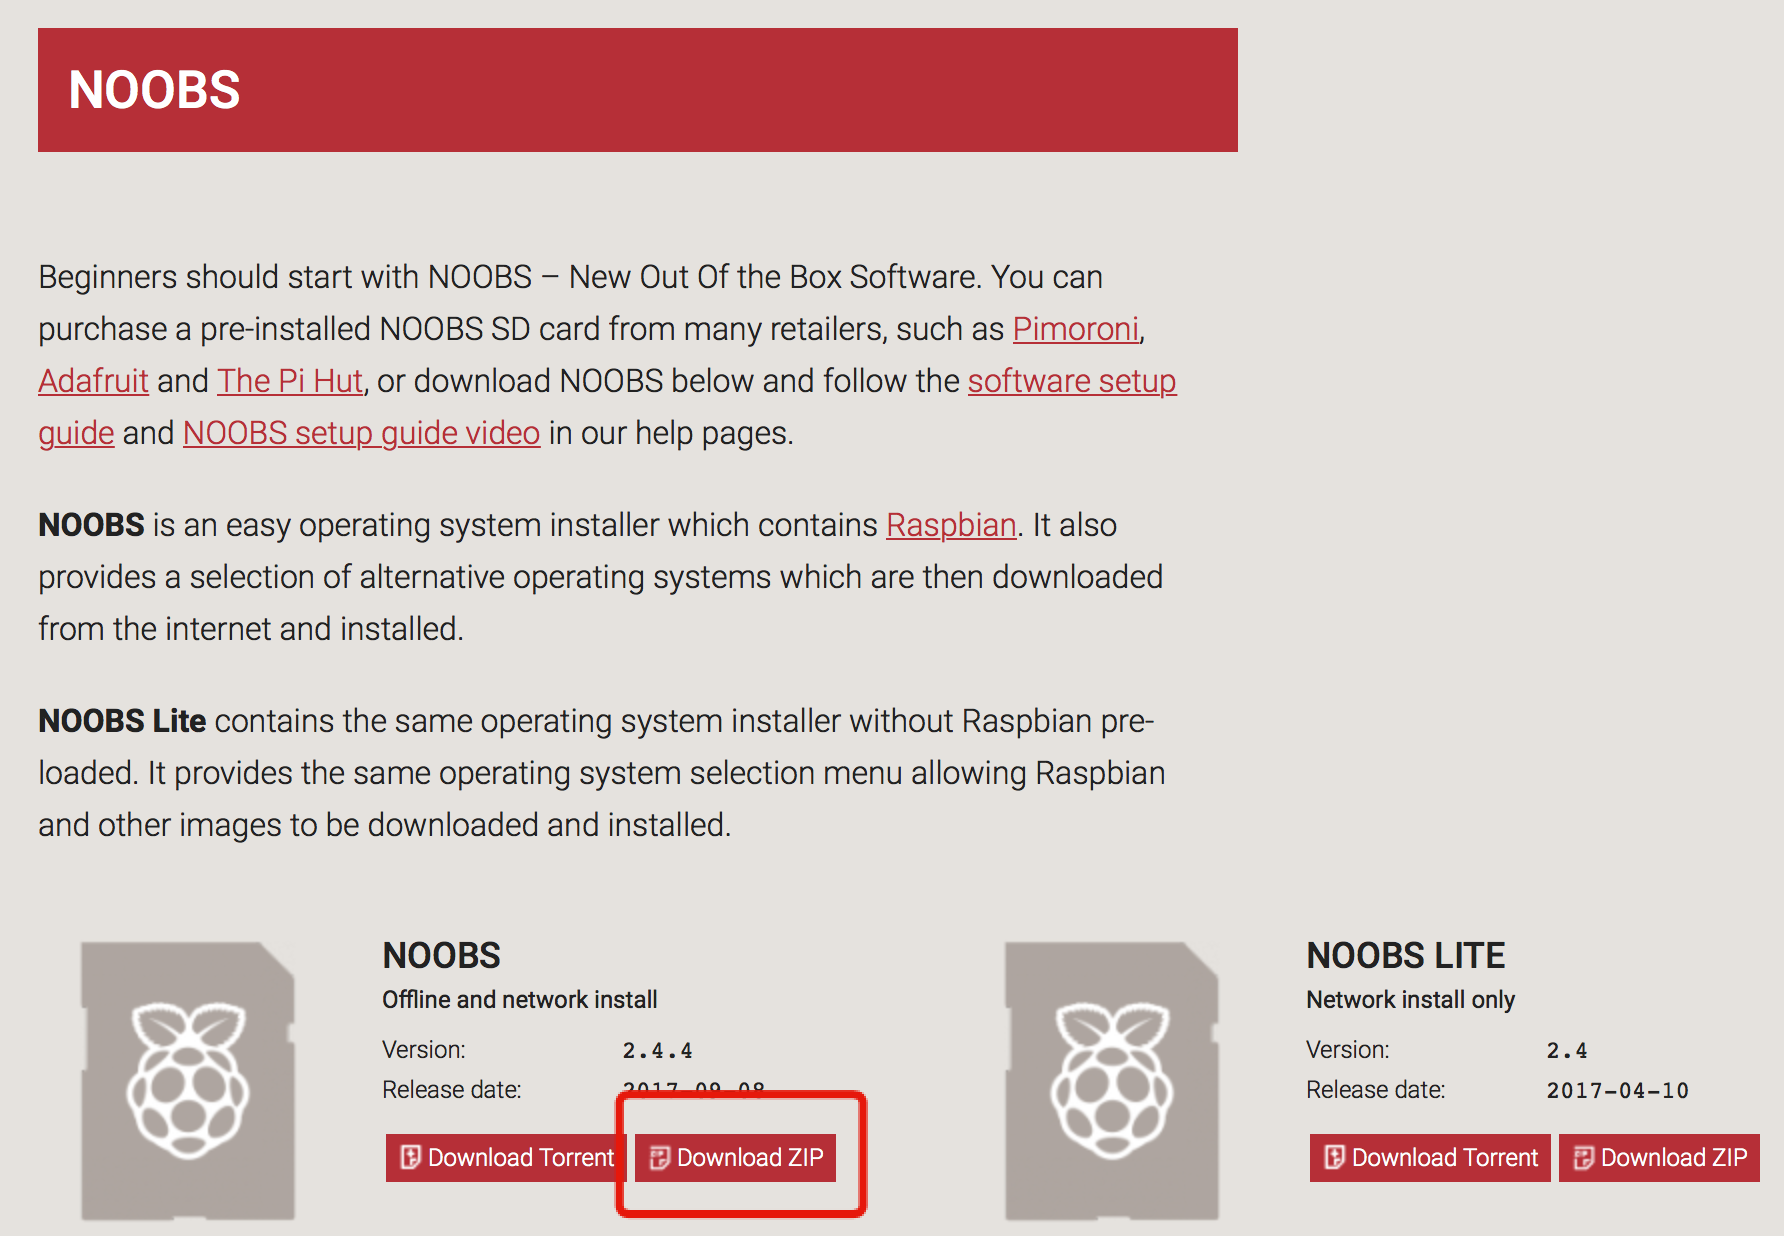
NOOBSのDonwload.zipをクリックしダウンロードします。
|
|
24
|
+
|
|
25
|
+
|
|
26
|
+
|
|
27
|
+
ダウンロードが完了したらzipファイルを展開します。
|
|
28
|
+
そのファイルを全てフオーマット済み(FAT形式)の micro SD カードにコピーします。
|
|
29
|
+
|
|
30
|
+
|
|
31
|
+
|
|
32
|
+
|
|
33
|
+
### Raspbianのインスール
|
|
34
|
+
|
|
35
|
+
micro SDカードをRaspberry Piに装着し起動します。
|
|
36
|
+
キーボード、マウスをUSBポートに挿入し、HDMIケーブルでモニターかテレビに接続します。
|
|
37
|
+
電源を繋いで起動します。
|
|
38
|
+
|
|
39
|
+
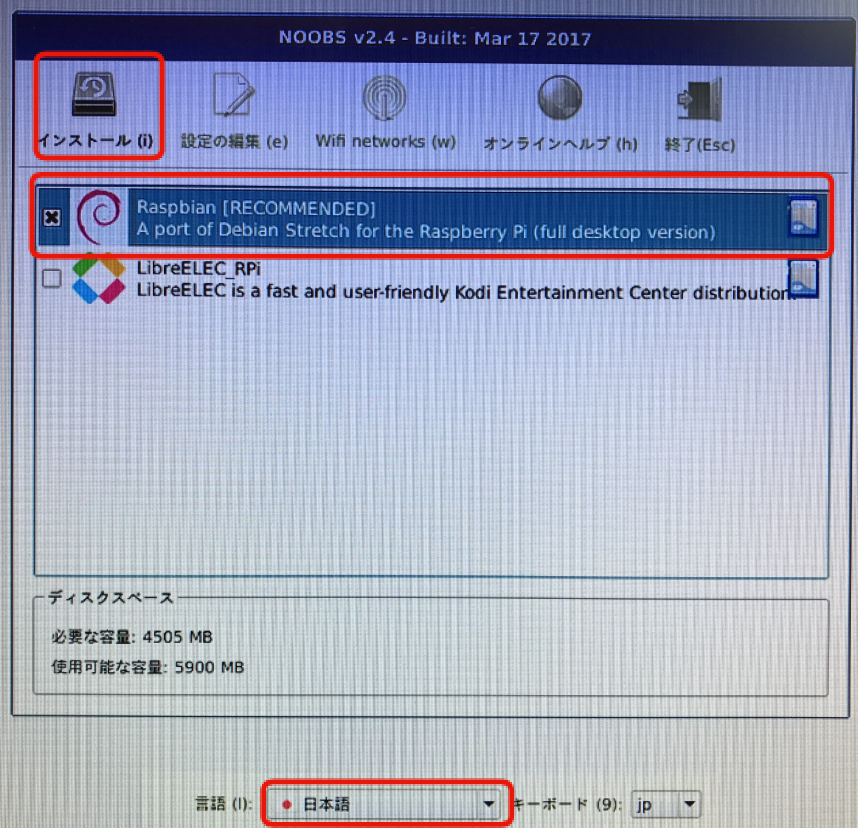
NOBSが起動します。
|
|
40
|
+
Raspbianを選択し、画面下の言語選択で日本語を選び、左上のインスールボタンを押します。
|
|
41
|
+
|
|
42
|
+
|
|
43
|
+
|
|
44
|
+
|
|
45
|
+
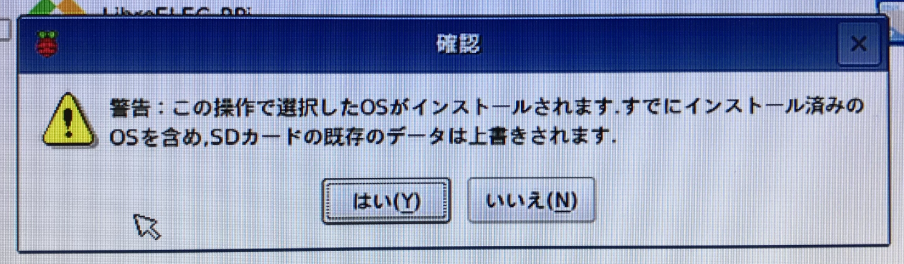
確認ダイアログが表示されるので、はいを押すとインストールが開始されます。
|
|
46
|
+
|
|
47
|
+
|
|
48
|
+
|
|
49
|
+
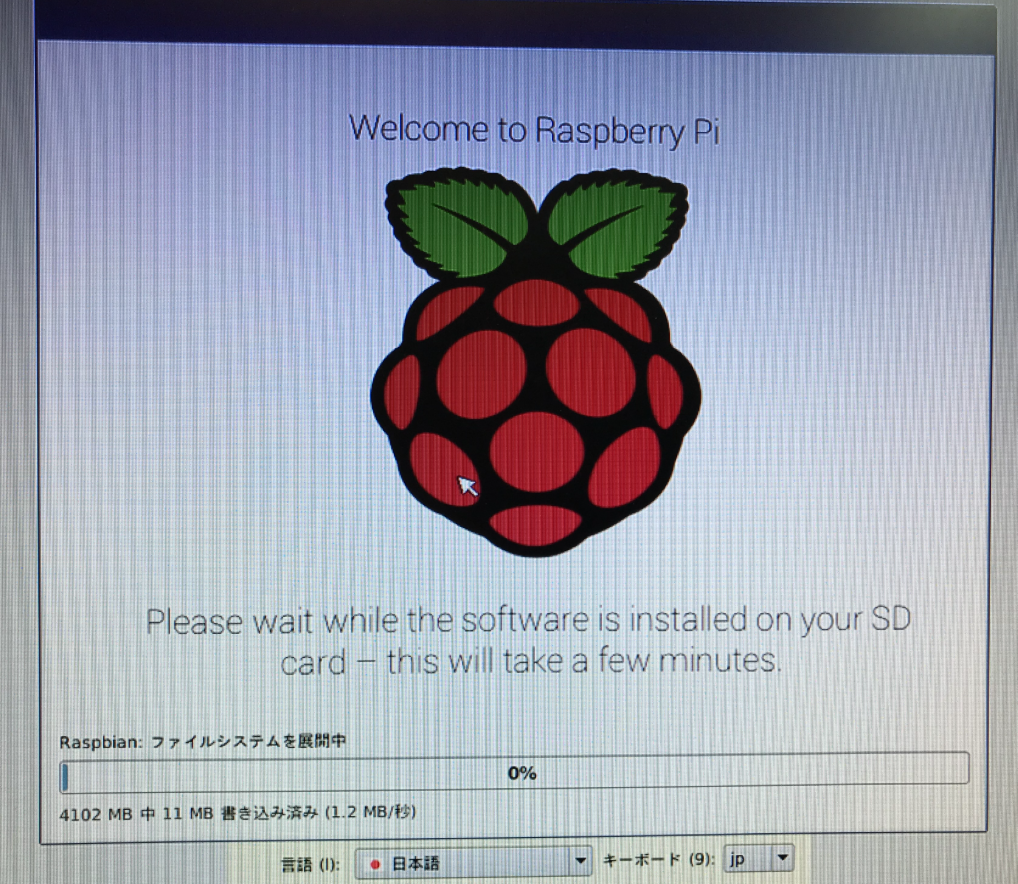
インストール中の画面。
|
|
50
|
+
|
|
51
|
+
|
|
52
|
+
|
|
53
|
+
### 初期設定
|
|
54
|
+
|
|
55
|
+
インストールが完了するとGUI画面が表示されます。
|
|
56
|
+
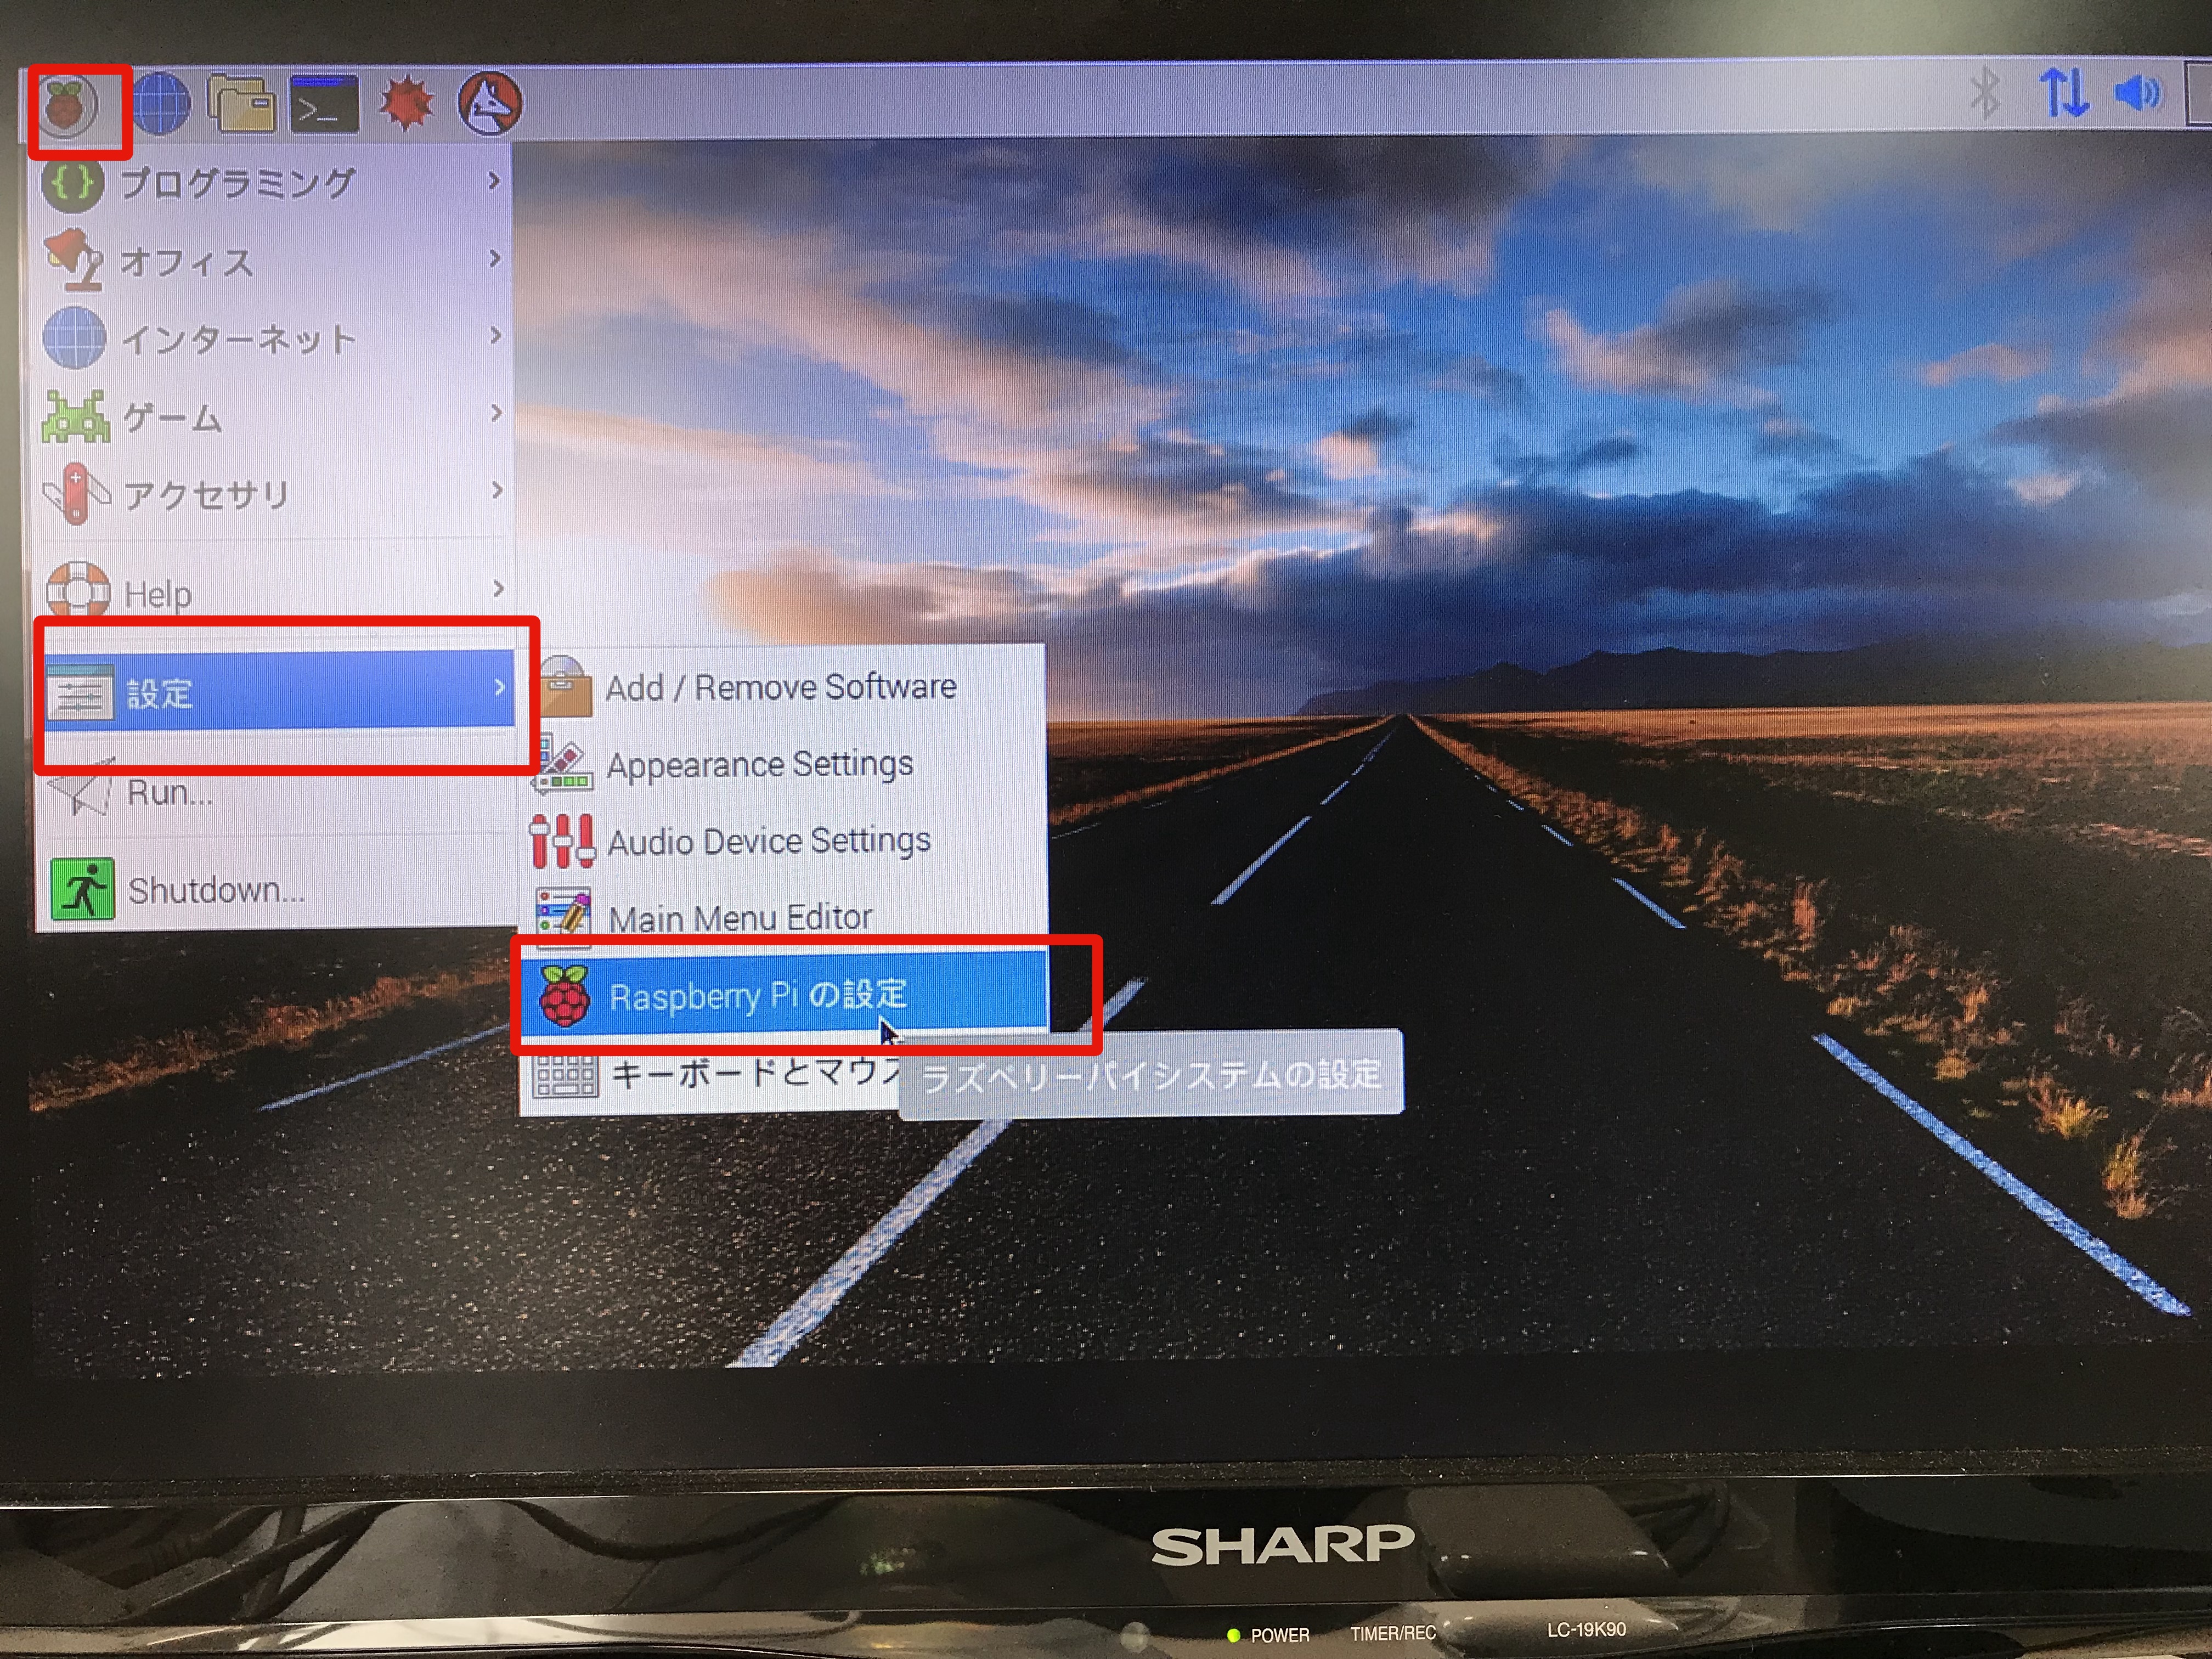
左上のメニューから設定 > Raspberry Piの設定を選びます。
|
|
57
|
+
|
|
58
|
+
|
|
59
|
+
|
|
60
|
+
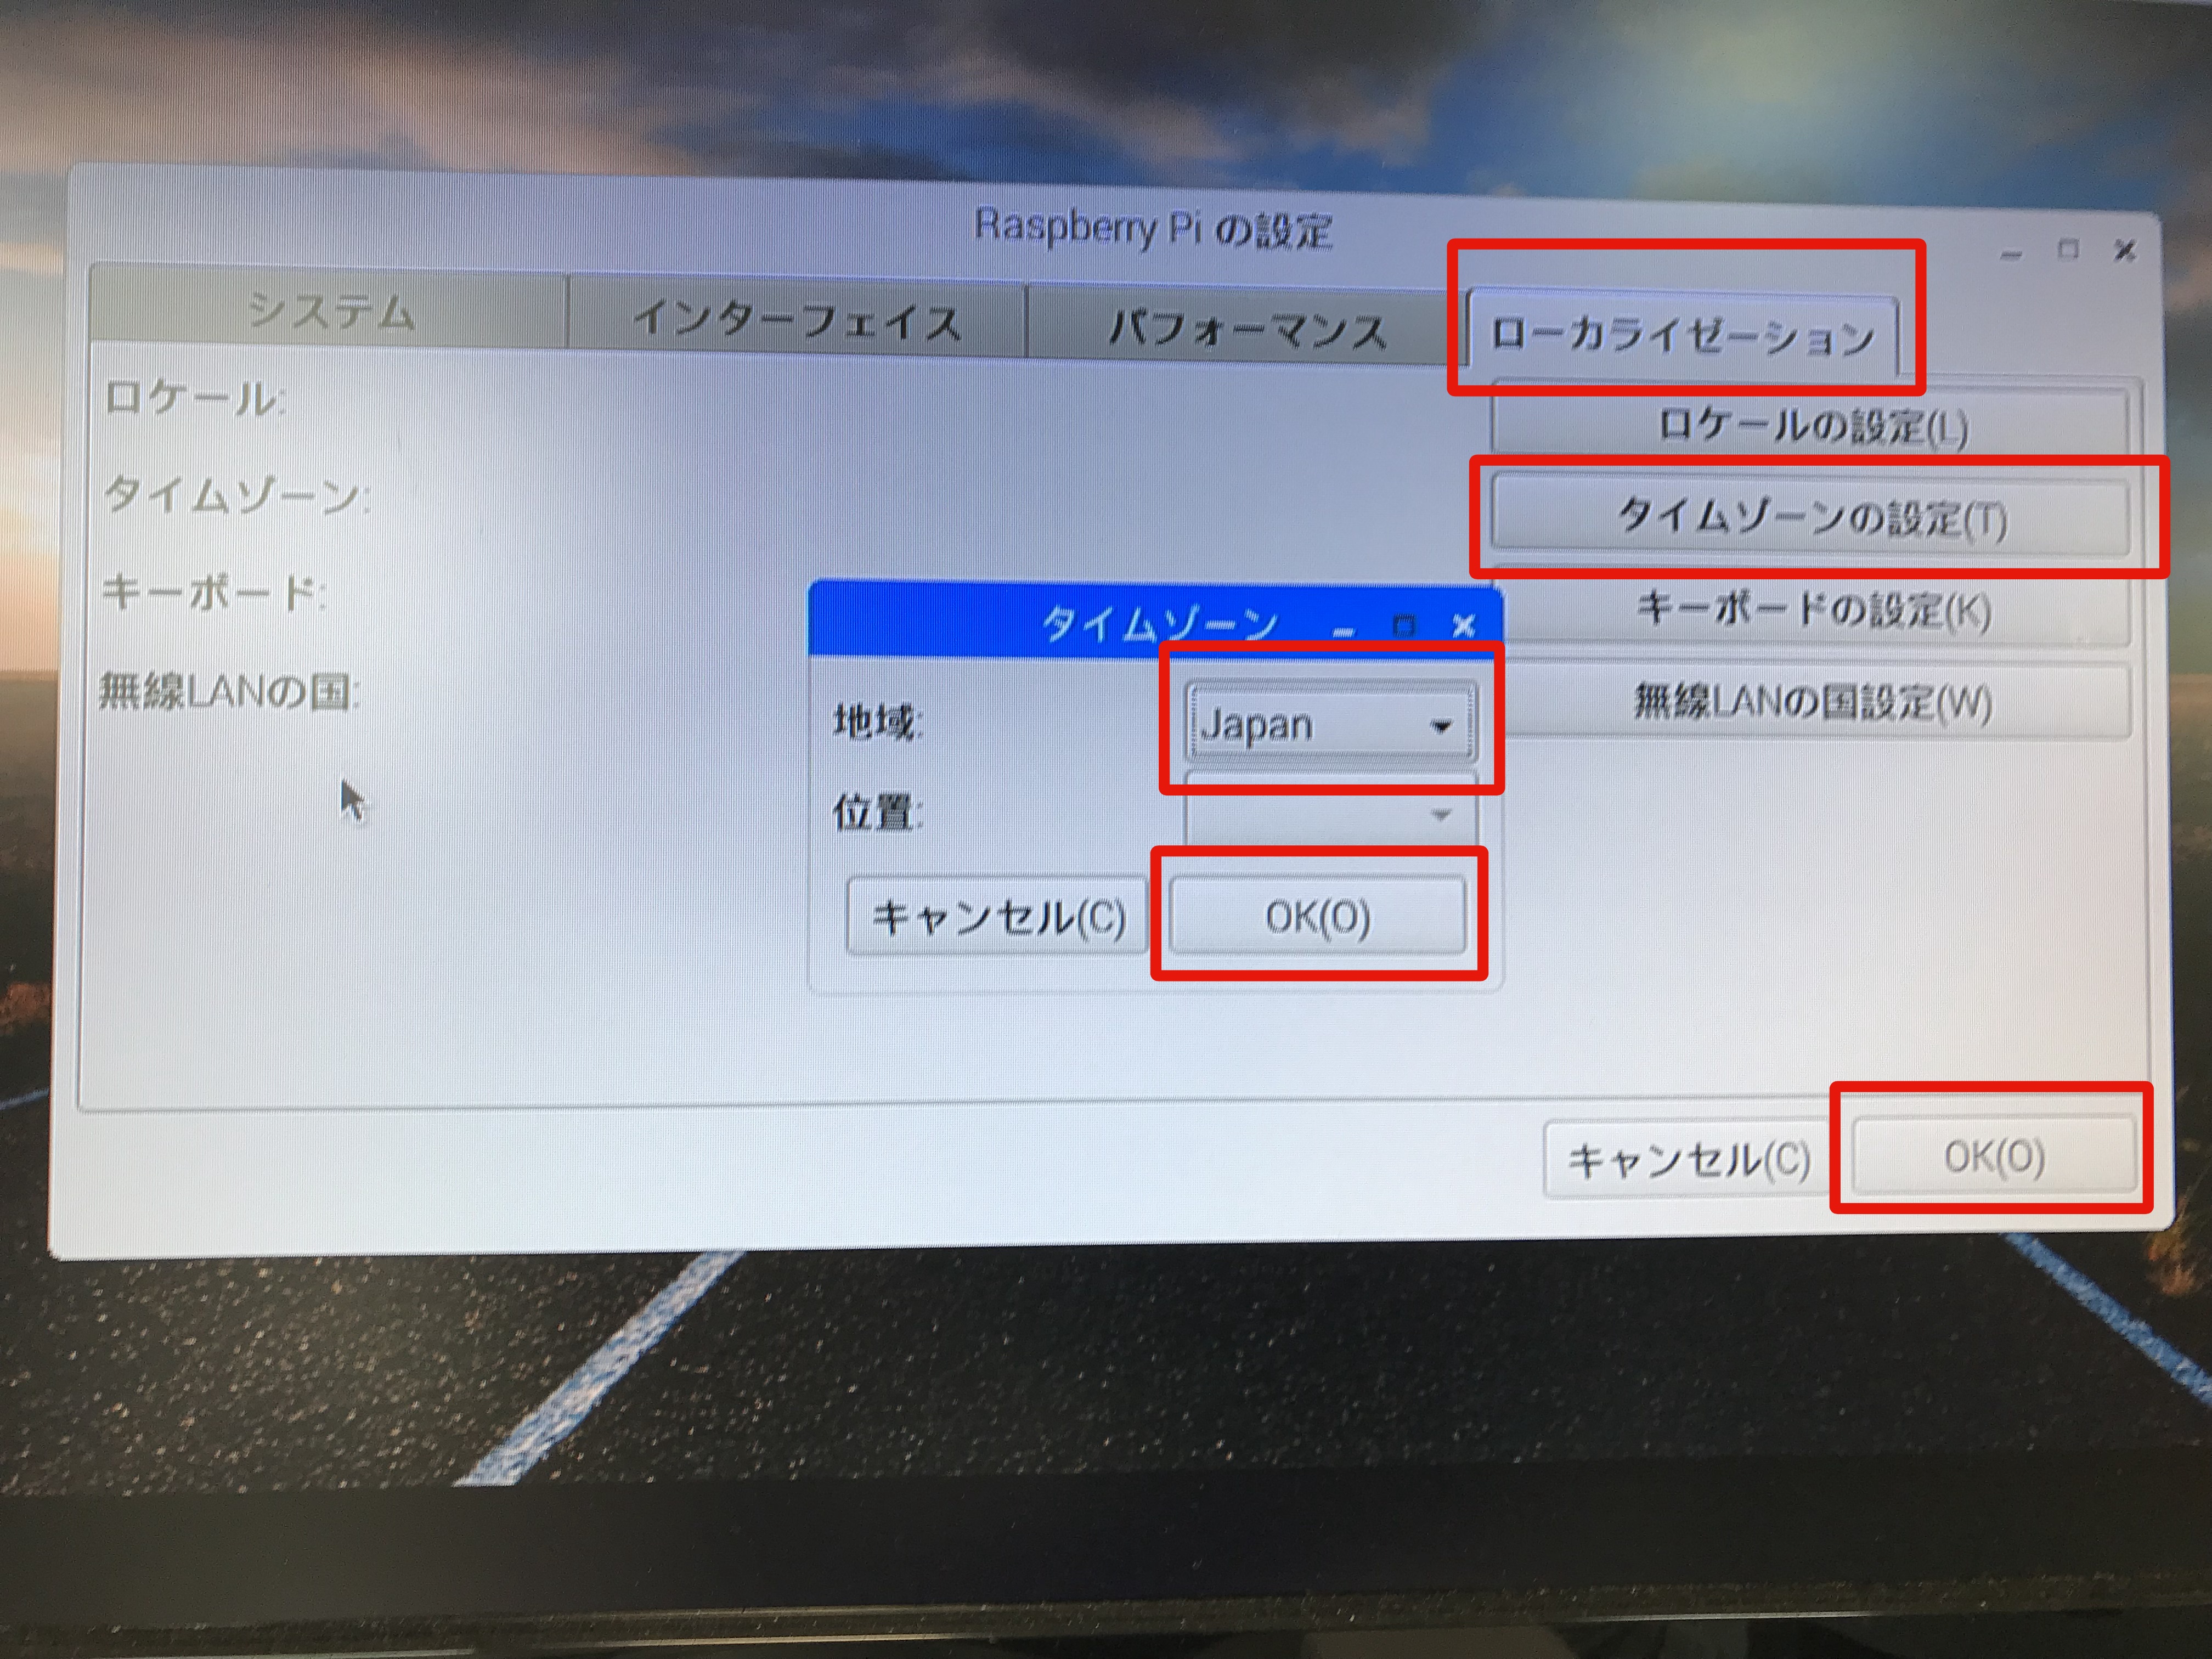
この画面で必要に応じて初期設定を済ませます。
|
|
61
|
+
インストール時に日本語を選択しているので、ローカリゼーションはタイムゾーンの設定くらいですみます。
|
|
62
|
+
|
|
63
|
+
|
|
64
|
+
|
|
65
|
+
|
|
66
|
+
## ladder_driveのインストール
|
|
67
|
+
|
|
68
|
+
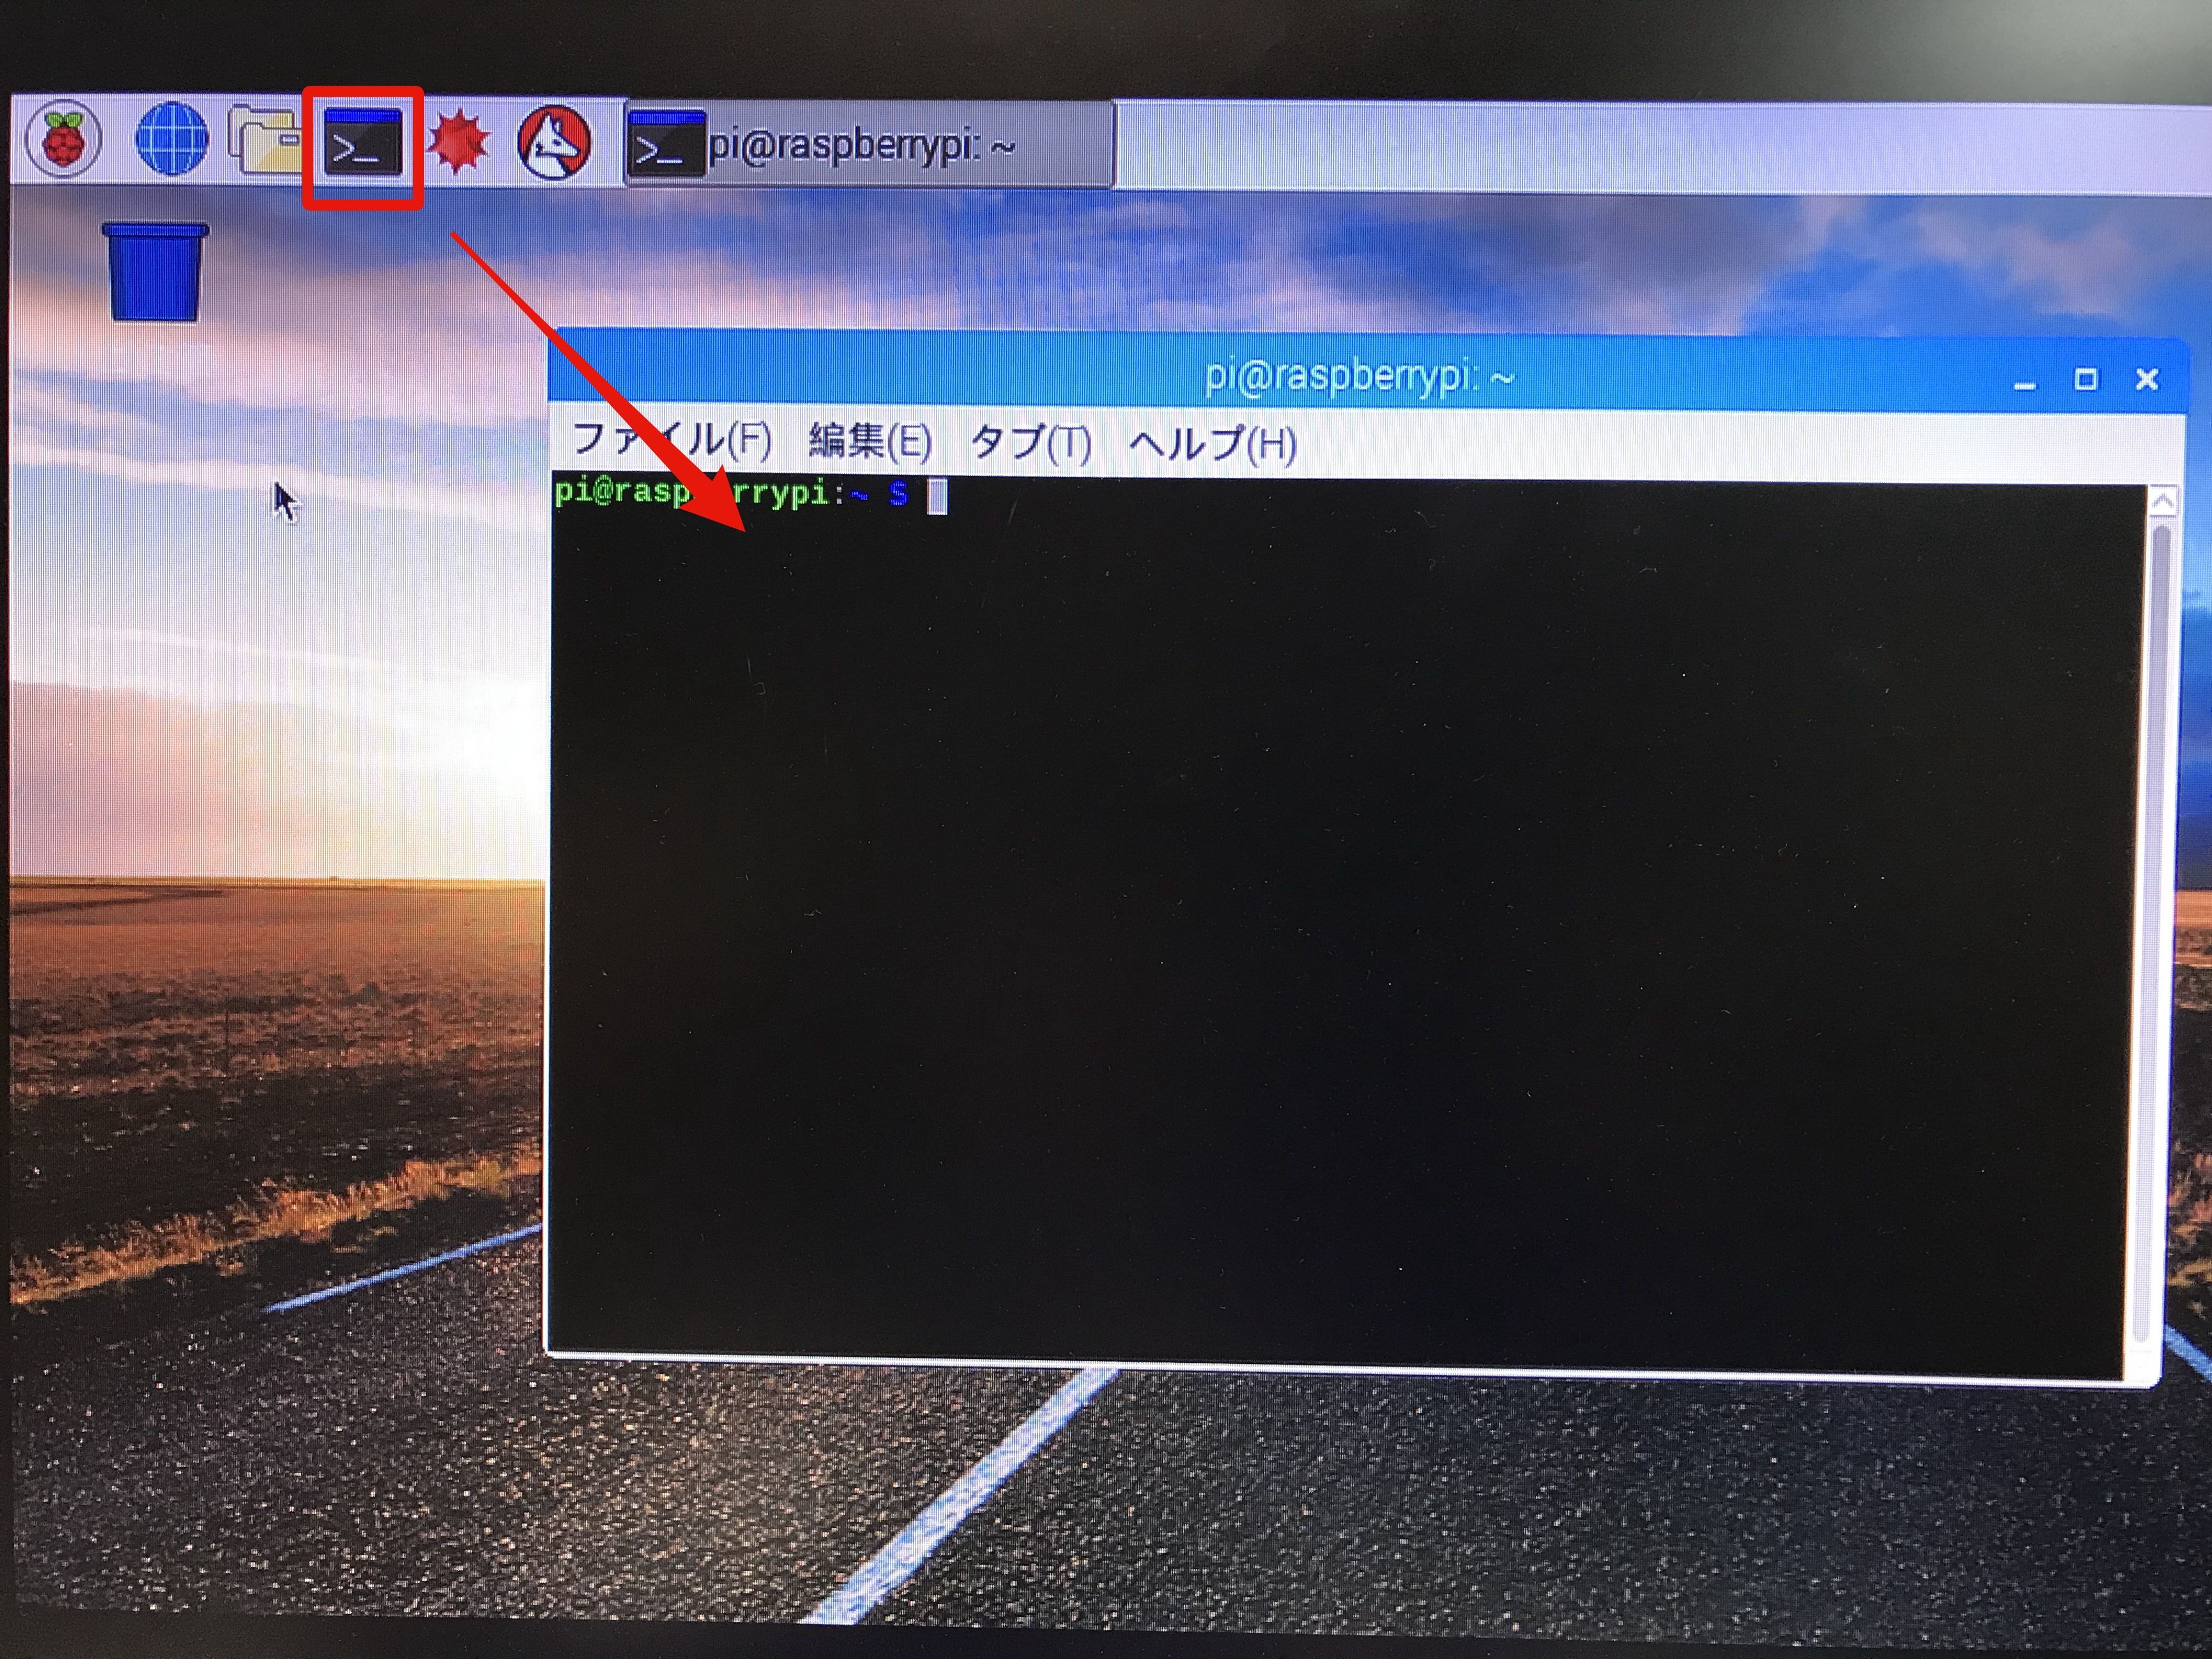
Ladder Driveのインストールはターミナルで行なっていきます。
|
|
69
|
+
図の様にターミナルを起動します。
|
|
70
|
+
|
|
71
|
+
|
|
72
|
+
|
|
73
|
+
|
|
74
|
+
ターミナルで、以下のコマンドを入力していくとladder_driveがインストールできます。
|
|
75
|
+
|
|
76
|
+
```
|
|
77
|
+
$ sudo apt-get update
|
|
78
|
+
$ sudo apt-get install ruby-dev
|
|
79
|
+
$ sudo apt-get install libssl-dev
|
|
80
|
+
$ sudo gem install ladder_drive --no-ri --no-rdoc
|
|
81
|
+
```
|
|
82
|
+
|
|
83
|
+
## プロジェクト作成
|
|
84
|
+
|
|
85
|
+
Ladder Driveのプロジェクトを作成します。
|
|
86
|
+
|
|
87
|
+
```ladder_drive create project``` コマンドでプロジェクトを作成、```cd project``` でプロジェクトディレクトリに移動します。
|
|
88
|
+
|
|
89
|
+
```
|
|
90
|
+
$ ladder_drive create project
|
|
91
|
+
$ cd project
|
|
92
|
+
```
|
|
93
|
+
|
|
94
|
+
Ladder Driveでは asm/main.asm ファイルに記述されたラダープログラムを実行します。
|
|
95
|
+
asm/main.asmを編集し次の様にします。
|
|
96
|
+
|
|
97
|
+
```
|
|
98
|
+
LD X0
|
|
99
|
+
OR M0
|
|
100
|
+
OUT Y0
|
|
101
|
+
END
|
|
102
|
+
```
|
|
103
|
+
|
|
104
|
+
この例ではX0とM0のORの結果をY0に出力します。
|
|
105
|
+
|
|
106
|
+
Raspberry PiではX0、Y0はGPIOに割り当てられています。
|
|
107
|
+
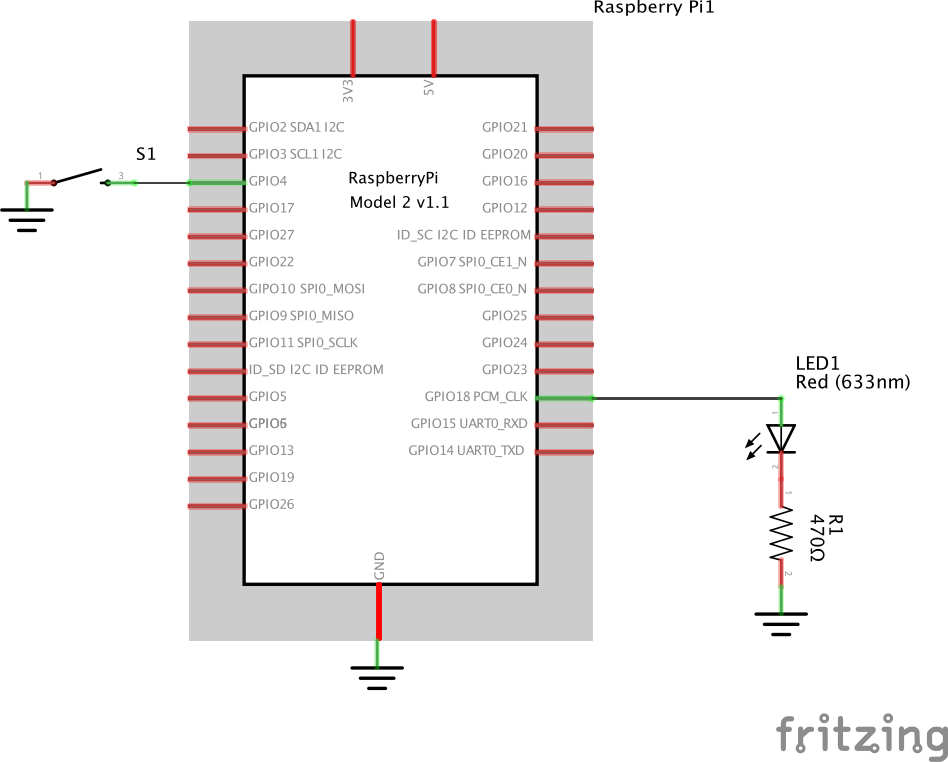
どのGPIOに割り当てるかは confg/plc.yml ファイルで定義でき、デフォルトではGPIO4がX0、GPIO18がY0に割り当てられています。
|
|
108
|
+
|
|
109
|
+
```
|
|
110
|
+
raspberrypi:
|
|
111
|
+
cpu: Raspberry Pi
|
|
112
|
+
io: # assign gpio to x and y
|
|
113
|
+
inputs:
|
|
114
|
+
x0:
|
|
115
|
+
pin: 4
|
|
116
|
+
pull: :up
|
|
117
|
+
x1:
|
|
118
|
+
pin: 17
|
|
119
|
+
pull: :up
|
|
120
|
+
x2:
|
|
121
|
+
pin: 27
|
|
122
|
+
pull: :up
|
|
123
|
+
outputs:
|
|
124
|
+
y0:
|
|
125
|
+
pin: 18
|
|
126
|
+
y1:
|
|
127
|
+
pin: 23
|
|
128
|
+
y2:
|
|
129
|
+
pin: 42
|
|
130
|
+
```
|
|
131
|
+
GPIO4にスイッチを配線し、GPIO18にLEDを配線します。
|
|
132
|
+
|
|
133
|
+
|
|
134
|
+
|
|
135
|
+
|
|
136
|
+
## プロジェクト実行
|
|
137
|
+
|
|
138
|
+
```sudo rake target=raspberrypi``` を実行するとプロジェクトが起動し、コンソール入力待ちになります。
|
|
139
|
+
|
|
140
|
+
```
|
|
141
|
+
$ sudo rake target=raspberrypi
|
|
142
|
+
launching respberrypi plc ...
|
|
143
|
+
done launching
|
|
144
|
+
uploading build/main.hex ...
|
|
145
|
+
done uploading
|
|
146
|
+
|
|
147
|
+
LadderDrive is an abstract PLC.
|
|
148
|
+
This is a console to communicate with PLC.
|
|
149
|
+
|
|
150
|
+
>
|
|
151
|
+
```
|
|
152
|
+
|
|
153
|
+
wコマンドにてデバイスの書き込みができます。
|
|
154
|
+
```w m0 1``` と入力するとM0がONになります。
|
|
155
|
+
main.asmでプログラミングした内容では、M0がONになるとY0もONになり、LEDが点灯します。
|
|
156
|
+
```w m0 0``` と入力すると消灯します。
|
|
157
|
+
|
|
158
|
+
```
|
|
159
|
+
> w m0 1
|
|
160
|
+
> w m0 0
|
|
161
|
+
```
|
|
162
|
+
|
|
163
|
+
main.asmでプログラミングした内容ではX0がONになってもY0がONになります。
|
|
164
|
+
X0はGPIO4のことですから、スイッチを押すとLEDが点灯します。
|
|
165
|
+
離すと消灯します。
|
|
166
|
+
|
|
167
|
+
|
|
168
|
+
## サービスとして Ladder Drive を起動
|
|
169
|
+
|
|
170
|
+
電源投入でLadder Driveが起動する様にサービスとして立ち上げることができます。 Ladder Driveプロジェクのディレクトリで以下のコマンドを実行することでサービスを立ち上げることができます。
|
|
171
|
+
|
|
172
|
+
```
|
|
173
|
+
$ sudo rake service:install
|
|
174
|
+
$ sudo rake service:enable
|
|
175
|
+
$ sudo rake service:start
|
|
176
|
+
```
|
|
177
|
+
|
|
178
|
+
## デモ
|
|
179
|
+
|
|
180
|
+
Ladder Driveの動画をYouTubeにアプロードしています。
|
|
181
|
+
スイッチを押すとLEDが点灯する様子が見れます。
|
|
182
|
+
|
|
183
|
+
https://youtu.be/UBhSaRNp_gM
|
data/ladder_drive.gemspec
CHANGED
|
@@ -16,7 +16,8 @@ Gem::Specification.new do |spec|
|
|
|
16
16
|
|
|
17
17
|
spec.add_runtime_dependency 'thor', '~> 0'
|
|
18
18
|
spec.add_runtime_dependency 'activesupport', '~> 4.2', '>= 4.2.7'
|
|
19
|
-
spec.add_runtime_dependency '
|
|
19
|
+
spec.add_runtime_dependency 'ffi', '~> 1.9.24', '>= 1.9.24'
|
|
20
|
+
spec.add_runtime_dependency 'pi_piper', '~> 2.0', '>= 2.0.0'
|
|
20
21
|
|
|
21
22
|
spec.files = `git ls-files -z`.split("\x0").reject { |f| f.match(%r{^(test|spec|features)/}) }
|
|
22
23
|
spec.bindir = "exe"
|