hot-glue 0.4.4 → 0.4.8.1
Sign up to get free protection for your applications and to get access to all the features.
- checksums.yaml +4 -4
- data/.circleci/config.yml +71 -0
- data/.gitignore +4 -1
- data/Gemfile +5 -1
- data/Gemfile.lock +17 -17
- data/{LICENCE → LICENSE} +10 -6
- data/README.md +293 -246
- data/README2.md +79 -0
- data/config/database.yml +8 -83
- data/db/schema.rb +1 -0
- data/lib/generators/hot_glue/install_generator.rb +0 -1
- data/lib/generators/hot_glue/layout/builder.rb +42 -31
- data/lib/generators/hot_glue/markup_templates/erb.rb +97 -86
- data/lib/generators/hot_glue/scaffold_generator.rb +249 -82
- data/lib/generators/hot_glue/templates/controller.rb.erb +51 -47
- data/lib/generators/hot_glue/templates/erb/_form.erb +3 -2
- data/lib/generators/hot_glue/templates/erb/_line.erb +1 -1
- data/lib/generators/hot_glue/templates/erb/_list.erb +26 -20
- data/lib/generators/hot_glue/templates/erb/_new_form.erb +3 -2
- data/lib/generators/hot_glue/templates/erb/_show.erb +11 -7
- data/lib/generators/hot_glue/templates/erb/create.turbo_stream.erb +4 -4
- data/lib/generators/hot_glue/templates/erb/destroy.turbo_stream.erb +2 -2
- data/lib/generators/hot_glue/templates/erb/edit.erb +2 -2
- data/lib/generators/hot_glue/templates/erb/index.erb +1 -1
- data/lib/generators/hot_glue/templates/erb/new.erb +1 -1
- data/lib/generators/hot_glue/templates/erb/update.turbo_stream.erb +2 -2
- data/lib/hotglue/version.rb +3 -1
- metadata +6 -26
- data/db/schema.rb +0 -60
- data/lib/generators/hot_glue/markup_templates/haml.rb +0 -243
- data/lib/generators/hot_glue/markup_templates/slim.rb +0 -9
data/README.md
CHANGED
|
@@ -1,10 +1,8 @@
|
|
|
1
1
|
|
|
2
|
-
[](https://circleci.com/gh/jasonfb/hot-glue)
|
|
4
3
|
|
|
5
4
|
Hot Glue is a Rails scaffold builder for the Turbo era. It is an evolution of the admin-interface style scaffolding systems of the 2010s ([activeadmin](https://github.com/activeadmin/activeadmin), [rails_admin](https://github.com/sferik/rails_admin), and [active_scaffold](https://github.com/activescaffold/active_scaffold)).
|
|
6
5
|
|
|
7
|
-
|
|
8
6
|
Using Turbo-Rails and Hotwire (default in Rails 7) you get a lightning-fast out-of-the-box CRUD building experience.
|
|
9
7
|
|
|
10
8
|
Every page displays only a list view: new and edit operations happen as 'edit-in-place', so the user never leaves the page.
|
|
@@ -19,18 +17,18 @@ By default, it generates code that gives users full control over objects they 'o
|
|
|
19
17
|
|
|
20
18
|
Hot Glue generates functionality that's quick and dirty. It lets you be crafty. As with a real hot glue gun, use with caution.
|
|
21
19
|
|
|
22
|
-
* Build plug-and-play scaffolding mixing generated ERB
|
|
23
|
-
* Everything edits-in-place (unless you use
|
|
24
|
-
* Automatically Reads Your Models (make them before building your scaffolding!)
|
|
20
|
+
* Build plug-and-play scaffolding mixing generated ERB with the power of Hotwire and Turbo-Rails
|
|
21
|
+
* Everything edits-in-place (unless you use `--big-edit`, then it won't)
|
|
22
|
+
* Automatically Reads Your Models (make them AND migrate your DB before building your scaffolding!)
|
|
25
23
|
* Excellent for CREATE-READ-UPDATE-DELETE (CRUD), lists with pagination (coming soon: searching & sorting)
|
|
26
24
|
* Great for prototyping, but you should learn Rails fundamentals first.
|
|
27
25
|
* 'Packaged' with Devise, Kaminari, Rspec, FontAwesome
|
|
28
|
-
* Create system specs
|
|
26
|
+
* Create system specs automatically along with the generated code.
|
|
29
27
|
* Nest your routes model-by-model for built-in poor man's authentication.
|
|
30
28
|
* Throw the scaffolding away when your app is ready to graduate to its next phase.
|
|
31
29
|
|
|
32
30
|
# Hot Glue Tutorial
|
|
33
|
-
## [GET THE COURSE TODAY (includes Hot Glue License)](https://
|
|
31
|
+
## [GET THE COURSE TODAY (includes Hot Glue License)](https://jfbcodes.com/courses/hot-glue-in-depth-tutorial/?utm_source=github.com&utm_campaign=github_hot_glue_readme_page) **only $60 USD!**
|
|
34
32
|
|
|
35
33
|
| | |
|
|
36
34
|
| ------------- | ------------- |
|
|
@@ -55,44 +53,36 @@ Instantly get a simple CRUD interface
|
|
|
55
53
|
|
|
56
54
|
# Getting Started
|
|
57
55
|
|
|
58
|
-
_If you are on Rails 6,
|
|
59
|
-
|
|
60
|
-
|
|
61
|
-
## 1. ADD RSPEC, FACTORY-BOT, AND FFAKER
|
|
56
|
+
_If you are on Rails 6, see [LEGACY SETUP FOR RAILS 6](https://github.com/jasonfb/hot-glue/README2.md) and complete those steps FIRST._
|
|
62
57
|
|
|
63
|
-
add these 3 gems to your gemfile **inside a group for both :development and :test*. Do not add these gems to only the :test group or else your will have problems with the generators.
|
|
64
|
-
```
|
|
65
|
-
gem 'rspec-rails'
|
|
66
|
-
gem 'factory_bot_rails'
|
|
67
|
-
gem 'ffaker'
|
|
68
|
-
```
|
|
69
58
|
|
|
70
|
-
|
|
59
|
+
## 1. Rails 7 New App
|
|
71
60
|
|
|
72
|
-
|
|
61
|
+
There are two ways to create new apps on Rails 7: With or without ImportMap. These instructions prefer the **without Importmap** method, but to help you choose [see this post](https://jasonfleetwoodboldt.com/courses/stepping-up-rails/rails-7-do-i-need-importmap-rails/)
|
|
73
62
|
|
|
74
|
-
|
|
63
|
+
`rails new --css=bootstrap --javascript=webpack --database=postgresql`
|
|
75
64
|
|
|
76
|
-
|
|
65
|
+
Confirm that both Stimulus and Turbo are working. For the quick step-by-step to help you confirm
|
|
66
|
+
that both Stimulus and Turbo are working for your new JSBundling-Rails/CSSBunlding-Rails setup [see this post](https://jasonfleetwoodboldt.com/courses/stepping-up-rails/rails-7-new-app-with-js-bundling-css-bundling/).
|
|
77
67
|
|
|
78
|
-
|
|
68
|
+
(Note that Bootstrap is optional for Hot Glue. Here, I am just showing you the default isntallation for simplicity.)
|
|
79
69
|
|
|
80
|
-
|
|
70
|
+
For the old method of installing Bootstrap [see this post](https://jasonfleetwoodboldt.com/courses/stepping-up-rails/rails-7-bootstrap/)
|
|
81
71
|
|
|
82
|
-
|
|
72
|
+
Remember, for Rails 6 you must go through the [LEGACY SETUP FOR RAILS 6](https://github.com/jasonfb/hot-glue/README2.md) before continuing.
|
|
83
73
|
|
|
84
|
-
|
|
74
|
+
## 2. ADD RSPEC, FACTORY-BOT, AND FFAKER
|
|
85
75
|
|
|
86
|
-
|
|
76
|
+
add these 3 gems to your gemfile **inside a group for both :development and :test*. Do not add these gems to only the :test group or else your will have problems with the generators.
|
|
87
77
|
```
|
|
88
|
-
gem '
|
|
78
|
+
gem 'rspec-rails'
|
|
79
|
+
gem 'factory_bot_rails'
|
|
80
|
+
gem 'ffaker'
|
|
89
81
|
```
|
|
90
82
|
|
|
91
|
-
|
|
83
|
+
- run `rails generate rspec:install`
|
|
84
|
+
|
|
92
85
|
|
|
93
|
-
```
|
|
94
|
-
@import "bootstrap";
|
|
95
|
-
```
|
|
96
86
|
|
|
97
87
|
## 3. HOTGLUE INSTALLER
|
|
98
88
|
Add `gem 'hot-glue'` to your Gemfile & `bundle install`
|
|
@@ -101,7 +91,7 @@ Purchase a license at https://heliosdev.shop/hot-glue-license
|
|
|
101
91
|
|
|
102
92
|
During in installation, you MUST supply a `--layout` flag.
|
|
103
93
|
|
|
104
|
-
### `--layout` flag
|
|
94
|
+
### `--layout` flag (NOTE: haml and slim are no longer supported at this time)
|
|
105
95
|
Here you will set up and install Hot Glue for the first time. It will install a config file that will save two preferences: layout (hotglue or bootstrap) and markup (erb or haml or slim).
|
|
106
96
|
|
|
107
97
|
Once you run the installer, the installer will save what you set it to in `config/hot_glue.yml`. Newly generated scaffolds will use these two settings, but you can modify them just by modifying the config file (you don't need to re-run the installer)
|
|
@@ -135,7 +125,7 @@ The themes are just SCSS files installed into app/assets/stylesheets. You can tw
|
|
|
135
125
|
|
|
136
126
|
### `--markup` flag
|
|
137
127
|
|
|
138
|
-
default is `erb
|
|
128
|
+
default is `erb`. IMPORTANT: As of right now, I am only supporting & building against ERB. HAML and SLIM are not currently supported.
|
|
139
129
|
|
|
140
130
|
|
|
141
131
|
## 3. RUN HOT-GLUE INSTALL:
|
|
@@ -145,9 +135,64 @@ default is `erb`
|
|
|
145
135
|
### Example installing HAML using Hot Glue layout and the 'like_mountain_view' (Gmail-inspired) theme:
|
|
146
136
|
`rails generate hot_glue:install --markup=erb --layout=hotglue --theme=like_mountain_view`
|
|
147
137
|
|
|
138
|
+
The Hot Glue installer did several things for you in this step. Examine the git diffs or see 'Hot Glue Installer Notes' below.
|
|
139
|
+
|
|
140
|
+
|
|
141
|
+
## 4. install font-awesome (optional)
|
|
142
|
+
|
|
143
|
+
I recommend
|
|
144
|
+
https://github.com/tomkra/font_awesome5_rails
|
|
145
|
+
or
|
|
146
|
+
https://github.com/FortAwesome/font-awesome-sass
|
|
147
|
+
|
|
148
|
+
|
|
149
|
+
## 5. Devise
|
|
150
|
+
|
|
151
|
+
(or only use --gd mode, see below)
|
|
152
|
+
|
|
153
|
+
Add to your Gemfile
|
|
154
|
+
|
|
155
|
+
As of 2022-01-26 Devise for Rails 7 is still not released so you must use **main branch**, like so:
|
|
156
|
+
|
|
157
|
+
`gem 'devise', branch: 'main', git: 'https://github.com/heartcombo/devise.git'`
|
|
158
|
+
|
|
159
|
+
(If you are on Rails 6, you must do ALL of the steps in the Legacy Setup steps. Be sure not to skip **Legacy Step #5** (below))
|
|
160
|
+
|
|
161
|
+
For Rails 7, be sure you are on the main branch of devise above and your logins should work. (The previously necessary step of disabling turbo shown in Legacy Step #5 is no longer needed. )
|
|
162
|
+
|
|
163
|
+
You MUST run the installer FIRST or else you will put your app into a non-workable state:
|
|
164
|
+
```
|
|
165
|
+
rails generate devise:install
|
|
166
|
+
```
|
|
167
|
+
|
|
168
|
+
IMPORTANT: Follow the instructions the Devise installer gives you, *Except Step 3*, you can skip this step:
|
|
169
|
+
```
|
|
170
|
+
3. Ensure you have flash messages in app/views/layouts/application.html.erb.
|
|
171
|
+
For example:
|
|
172
|
+
|
|
173
|
+
<p class="notice"><%= notice %></p>
|
|
174
|
+
<p class="alert"><%= alert %></p>
|
|
175
|
+
|
|
176
|
+
```
|
|
177
|
+
|
|
178
|
+
Be sure to create primary auth model with:
|
|
179
|
+
|
|
180
|
+
`rails generate devise User name:string`
|
|
181
|
+
|
|
182
|
+
Remember, you don't need to tell Devise that your User has an email, an encrypted password, a reset token, and a 'remember me' flag to let the user stay logged in.
|
|
183
|
+
|
|
184
|
+
Those features come by default with Devise, and you'll find the fields for them in the newly generated migration file.
|
|
185
|
+
|
|
186
|
+
In this example above, you are creating all of those fields along with a simple 'name' (string) field for your User table.
|
|
187
|
+
|
|
188
|
+
|
|
189
|
+
|
|
190
|
+
|
|
191
|
+
### Hot Glue Installer Notes
|
|
148
192
|
|
|
149
|
-
|
|
150
|
-
|
|
193
|
+
These things were **done for you** in Step #3 (above). You don't need to think about them but if you are familiar with Capybara and/or adding Hot Glue to an existing app, you may want to:
|
|
194
|
+
|
|
195
|
+
#### Hot Glue modified `application.html.erb`
|
|
151
196
|
Note: if you have some kind of non-standard application layout, like one at a different file
|
|
152
197
|
or if you have modified your opening <body> tag, this may not have been automatically applied by the installer.
|
|
153
198
|
|
|
@@ -156,8 +201,7 @@ or if you have modified your opening <body> tag, this may not have been automati
|
|
|
156
201
|
<%= render partial: 'layouts/flash_notices' %>
|
|
157
202
|
```
|
|
158
203
|
|
|
159
|
-
|
|
160
|
-
(THIS WAS AUTOMATICALLY DONE BY THE HOT GLUE INSTALLATION)
|
|
204
|
+
#### Hot Glue modified `rails_helper.rb`
|
|
161
205
|
Note: if you have some kind of non-standard rails_helper.rb, like one that does not use the standard ` do |config|` syntax after your `RSpec.configure`
|
|
162
206
|
this may not have been automatically applied by the installer.
|
|
163
207
|
|
|
@@ -170,8 +214,7 @@ this may not have been automatically applied by the installer.
|
|
|
170
214
|
```
|
|
171
215
|
|
|
172
216
|
|
|
173
|
-
|
|
174
|
-
(THIS WAS AUTOMATICALLY DONE BY THE HOT GLUE INSTALLATION)
|
|
217
|
+
#### Hot Glue switched Capybara from RACK-TEST to HEADLESS CHROME
|
|
175
218
|
|
|
176
219
|
- By default Capybara is installed with :rack_test as its driver.
|
|
177
220
|
- This does not support Javascript, and the code from Hot Glue IS NOT fallback compatible-- it will not work on non-Javascript browsers.
|
|
@@ -192,7 +235,7 @@ By default, the installer should have added this option to your `rails_helper.rb
|
|
|
192
235
|
Capybara.default_driver = :selenium_chrome_headless
|
|
193
236
|
```
|
|
194
237
|
|
|
195
|
-
Alternatively, can define your own driver like so:
|
|
238
|
+
Alternatively, you can define your own driver like so:
|
|
196
239
|
|
|
197
240
|
```
|
|
198
241
|
Capybara.register_driver :my_headless_chrome_desktop do |app|
|
|
@@ -211,8 +254,7 @@ Alternatively, can define your own driver like so:
|
|
|
211
254
|
|
|
212
255
|
```
|
|
213
256
|
|
|
214
|
-
|
|
215
|
-
(THIS WAS ALSO AUTOMATICALLY DONE BY THE HOT GLUE INSTALLATION)
|
|
257
|
+
#### Hot Glue Added a Quick (Old-School) Capybara Login For Devise
|
|
216
258
|
|
|
217
259
|
- for a quick Capybara login, create a support helper in `spec/support/` and log-in as your user
|
|
218
260
|
- in the default code, the devise login would be for an object called account and lives at the route `/accounts/sign_in`
|
|
@@ -228,148 +270,12 @@ Alternatively, can define your own driver like so:
|
|
|
228
270
|
end
|
|
229
271
|
```
|
|
230
272
|
|
|
231
|
-
|
|
232
|
-
## 4. install font-awesome (optional)
|
|
233
|
-
|
|
234
|
-
I recommend
|
|
235
|
-
https://github.com/tomkra/font_awesome5_rails
|
|
236
|
-
or
|
|
237
|
-
https://github.com/FortAwesome/font-awesome-sass
|
|
238
|
-
|
|
239
|
-
|
|
240
|
-
## 5. Devise
|
|
241
|
-
|
|
242
|
-
(or only use --gd mode, see below)
|
|
243
|
-
|
|
244
|
-
Add to your Gemfile
|
|
245
|
-
|
|
246
|
-
As of 2021-12-28 Devise for Rails 7 is still not released so you must use main branch, like so:
|
|
247
|
-
`gem 'devise', branch: 'main', git: 'https://github.com/heartcombo/devise.git'`
|
|
248
|
-
|
|
249
|
-
If on Rails 6 **or** Rails 7, you must do the steps in **Legacy Step #5** (below).
|
|
250
|
-
|
|
251
|
-
(If you are on Rails 6, you must do ALL of the steps in the Legacy Setup steps.)
|
|
252
|
-
|
|
253
|
-
To be clear: You CAN use Devise with Rails 7, but you must still do the Legacy Step #5 described below for your login to work.
|
|
254
|
-
|
|
255
|
-
```
|
|
256
|
-
rails generate devise:install
|
|
257
|
-
```
|
|
258
|
-
|
|
259
|
-
IMPORTANT: Follow the instructions the Devise installer gives you, *Except Step 3*, you can skip this step:
|
|
260
|
-
```
|
|
261
|
-
3. Ensure you have flash messages in app/views/layouts/application.html.erb.
|
|
262
|
-
For example:
|
|
263
|
-
|
|
264
|
-
<p class="notice"><%= notice %></p>
|
|
265
|
-
<p class="alert"><%= alert %></p>
|
|
266
|
-
|
|
267
|
-
```
|
|
268
|
-
|
|
269
|
-
|
|
270
|
-
As described in Legacy Step #5, **you cannot** skip Devise installer Step 4, even though the installer tells you it is optional:
|
|
271
|
-
```
|
|
272
|
-
4. You can copy Devise views (for customization) to your app by running:
|
|
273
|
-
|
|
274
|
-
rails g devise:views
|
|
275
|
-
|
|
276
|
-
```
|
|
277
|
-
Once you copy the files, you must modify the Devise views to disable Turbo as described in Legacy Step #5.
|
|
278
|
-
|
|
279
|
-
|
|
280
|
-
## LEGACY SETUP FOR RAILS 6
|
|
281
|
-
|
|
282
|
-
(Note Legacy Step #5 is necessary for BOTH Rails 6 and Rails 7.)
|
|
283
|
-
|
|
284
|
-
|
|
285
|
-
## Legacy Step #1. ADD HOTWIRE
|
|
286
|
-
(RAILS 6 ONLY— SKIP THIS STEP FOR RAILS 7)
|
|
287
|
-
```
|
|
288
|
-
yarn add @hotwired/turbo-rails
|
|
289
|
-
```
|
|
290
|
-
or `npm install @hotwired/turbo-rails`
|
|
291
|
-
|
|
292
|
-
|
|
293
|
-
## Legacy Step #2. SWITCH FROM TurblLinks to Turbo-Rails
|
|
294
|
-
(RAILS 6 ONLY — SKIP FOR RAILS 7)
|
|
295
|
-
(THIS WAS AUTOMATICALLY DONE BY THE HOT GLUE INSTALLATION -- CONFIRM CHANGES ONLY)
|
|
296
|
-
- Add `gem 'turbo-rails'` to your Gemfile & `bundle install`
|
|
297
|
-
- Then install it with `rails turbo:install`
|
|
298
|
-
- The Turbo install has switched your action cable settings from 'async' to Redis, so be sure to start a redis server
|
|
299
|
-
- in `app/javascript/packs/application.js` remove this line
|
|
300
|
-
```
|
|
301
|
-
import Turbolinks from "turbolinks"
|
|
302
|
-
```
|
|
303
|
-
and replace it with
|
|
304
|
-
```
|
|
305
|
-
import { Turbo } from "@hotwired/turbo-rails"
|
|
306
|
-
```
|
|
307
|
-
|
|
308
|
-
|
|
309
|
-
Also replace
|
|
310
|
-
```
|
|
311
|
-
Turbolinks.start()
|
|
312
|
-
```
|
|
313
|
-
with:
|
|
314
|
-
```
|
|
315
|
-
Turbo.start()
|
|
316
|
-
```
|
|
317
|
-
|
|
318
|
-
|
|
319
|
-
## Legacy Step #3. INSTALL WEBPACKER
|
|
320
|
-
(_SKIP FOR RAILS 7_ unless you want to use Webpacker with Rails 7)
|
|
321
|
-
|
|
322
|
-
** For webpacker, you must be using Node version ^12.13.0 || ^14.15.0 || >=16 **
|
|
323
|
-
|
|
324
|
-
I recommend Node Version Manager (NVM) to switch between nodes. You will not be able to get through the following command with a Node version that does not match above.
|
|
325
|
-
|
|
326
|
-
Check your node version with `node -v`
|
|
327
|
-
|
|
328
|
-
```
|
|
329
|
-
`yarn add @rails/webpacker`
|
|
330
|
-
```
|
|
331
|
-
|
|
332
|
-
|
|
333
|
-
rails webpacker:install
|
|
334
|
-
|
|
335
|
-
## Legacy Step #4: ENUM Support
|
|
336
|
-
For Enum support, I recommend activerecord-pg_enum
|
|
337
|
-
Instructions for Rails 6 are here:
|
|
338
|
-
https://jasonfleetwoodboldt.com/courses/stepping-up-rails/enumerated-types-in-rails-and-postgres/
|
|
339
|
-
|
|
340
|
-
_This functionality is now built-in to Rails 7._
|
|
341
|
-
|
|
342
|
-
|
|
343
|
-
## Legacy Step #5-- Fix Devise if adding Turbo To Your Project
|
|
344
|
-
## IMPORTANT: Devise currently has serious compatibility issues with Turbo Rails. In particular, your log-in screens do not work out of the box. Follow the next step to fix them.
|
|
345
|
-
|
|
346
|
-
Manually port the Devise views into your app with
|
|
347
|
-
|
|
348
|
-
`rails generate devise:views`
|
|
349
|
-
|
|
350
|
-
Edit `devise/registrations/new`, `devise/sessions/new`, `devise/passwords/new` and `devise/confirmations/new` modifying all four templates like so:
|
|
351
|
-
|
|
352
|
-
form_for(resource, as: resource_name, url: session_path(resource_name) ) do |f|
|
|
353
|
-
|
|
354
|
-
|
|
355
|
-
|
|
356
|
-
add the data-turbo false option in the html key:
|
|
357
|
-
|
|
358
|
-
|
|
359
|
-
form_for(resource, as: resource_name, **html: {'data-turbo' => "false"},** url: session_path(resource_name) ) do |f|
|
|
360
|
-
|
|
361
|
-
|
|
362
|
-
|
|
363
|
-
This tells Devise to fall back to non-Turbo interaction for the log-in and registration. For the rest of the app, we will use Turbo Rails interactions.
|
|
364
|
-
|
|
365
|
-
|
|
366
273
|
---
|
|
367
274
|
---
|
|
368
275
|
|
|
369
276
|
|
|
370
277
|
# HOT GLUE DOCS
|
|
371
278
|
|
|
372
|
-
|
|
373
279
|
## First Argument
|
|
374
280
|
(no double slash)
|
|
375
281
|
|
|
@@ -404,33 +310,54 @@ end
|
|
|
404
310
|
```
|
|
405
311
|
|
|
406
312
|
|
|
407
|
-
### `--
|
|
313
|
+
### `--nested=`
|
|
408
314
|
|
|
409
|
-
|
|
315
|
+
This object is nested within another tree of objects, and there is a nested route in your `routes.rb` file. When specifying the parent(s), be sure to use **singular case**.
|
|
410
316
|
|
|
317
|
+
#### Example #1: One-level Nesting
|
|
318
|
+
Invoice `has_many :lines` and a Line `belongs_to :invoice`
|
|
411
319
|
|
|
412
|
-
|
|
320
|
+
```
|
|
321
|
+
resources :invoices do
|
|
322
|
+
resource :lines do
|
|
323
|
+
end
|
|
324
|
+
```
|
|
413
325
|
|
|
414
|
-
|
|
326
|
+
`rails generate hot_glue:scaffold Invoice`
|
|
415
327
|
|
|
328
|
+
`rails generate hot_glue:scaffold Line --nested=invoice`
|
|
416
329
|
|
|
417
|
-
For multi-level nesting use slashes to separate your levels of nesting. Remember, you should match what you have in your routes.rb file.
|
|
418
330
|
|
|
331
|
+
Remember, nested should match how the hierarchy of nesting is in your `routes.rb` file. (Which Hot Glue does not create or edit for you.)
|
|
332
|
+
|
|
333
|
+
#### Example #2: Two-level Nesting
|
|
334
|
+
|
|
335
|
+
Invoice `has_many :lines` and a Line `belongs_to :invoice`
|
|
336
|
+
Line `has_many :charges` and Charge `belongs_to :line`
|
|
337
|
+
|
|
338
|
+
**config/routes.rb**
|
|
419
339
|
```
|
|
420
340
|
resources :invoices do
|
|
421
341
|
resources :lines do
|
|
422
342
|
resources :charge
|
|
423
343
|
end
|
|
424
344
|
end
|
|
425
|
-
|
|
426
345
|
```
|
|
427
|
-
In this example, it is presumed that the current user has_many :invoices, and that invoices have many :lines, and that lines have many :charges
|
|
428
346
|
|
|
429
347
|
|
|
430
|
-
|
|
431
|
-
|
|
348
|
+
_For multi-level nesting use slashes to separate your levels of nesting._
|
|
349
|
+
|
|
350
|
+
`rails generate hot_glue:scaffold Invoice`
|
|
351
|
+
|
|
352
|
+
`rails generate hot_glue:scaffold Line --nested=invoice`
|
|
353
|
+
|
|
354
|
+
`rails generate hot_glue:scaffold Charge --nested=invoice/line`
|
|
355
|
+
|
|
432
356
|
|
|
433
|
-
|
|
357
|
+
|
|
358
|
+
For non-Gd controllers, your auth root will be used as the starting point when loading the objects from the URL if this object is nested.
|
|
359
|
+
|
|
360
|
+
(For Gd controllers the root object will be loaded directly from the ActiveRecord object.)
|
|
434
361
|
|
|
435
362
|
In the example above, @invoice will be loaded from
|
|
436
363
|
|
|
@@ -444,13 +371,9 @@ Then, finally the @charge will be loaded
|
|
|
444
371
|
|
|
445
372
|
`@charge = @line.charges.find(params[:id])`
|
|
446
373
|
|
|
447
|
-
|
|
448
|
-
|
|
449
|
-
It works, but it isn't granular. As well, it isn't appropriate for a large app with any level of intricacy to access control (that is, having roles).
|
|
450
|
-
|
|
451
|
-
Your customers can delete their own objects by default (may be a good idea or a bad idea for you). If you don't want that, you should strip out the delete actions off the controllers.
|
|
452
|
-
|
|
374
|
+
This is "starfish access control" or "poor man's access control." It works when the current user has several things they can manage, and by extension can manage children of those things.
|
|
453
375
|
|
|
376
|
+
|
|
454
377
|
### `--auth=`
|
|
455
378
|
|
|
456
379
|
By default, it will be assumed you have a `current_user` for your user authentication. This will be treated as the "authentication root" for the "poor man's auth" explained above.
|
|
@@ -473,6 +396,26 @@ It is also presumed that when viewing their own dashboard of things, the user wi
|
|
|
473
396
|
|
|
474
397
|
If you supply nesting (see below), your nest chain will automatically begin with your auth root object (see nesting)
|
|
475
398
|
|
|
399
|
+
#### Optionalized Nested Parents
|
|
400
|
+
|
|
401
|
+
Add `~` in front of any nested parameter (any parent in the `--nest` list) you want to make optional. This creates a two-headed controller: It can operate with or without that optionalized parameter.
|
|
402
|
+
|
|
403
|
+
This is an advanced feature is to use two duplicitous routes to the same controller. You can only use this feature with Gd controller. To use, specify your controller *twice* in your routes.rb. Then, in your `--nest` setting, add `~` to any nested parent you want to **make optional**. "Make optional" means the controller will behave as-if it exists in two places: once, at the normal nest level. Then the same controller will 'exist' again one-level up in your routes. **If the route has sub-routes, you'll need to re-specify the entire subtree also**.
|
|
404
|
+
```
|
|
405
|
+
namespace :admin
|
|
406
|
+
resources :users do
|
|
407
|
+
resources :invoices
|
|
408
|
+
end
|
|
409
|
+
resources :invoices
|
|
410
|
+
end
|
|
411
|
+
```
|
|
412
|
+
Hot Glue will build the scaffolding once for users and once again for invoice. Even though we have two routes pointed to invoices,
|
|
413
|
+
```
|
|
414
|
+
rails generate hot_glue:scaffold User --namespace=admin --gd --downnest=invoices
|
|
415
|
+
rails generate hot_glue:scaffold Invoice --namespace=admin --gd --nest=~users
|
|
416
|
+
```
|
|
417
|
+
Notice for the Invoice build, the parent user is *optionalized* (not 'optional'-- optionalized: to be made so it can be made optional). The Invoices controller, which is a Gd controller, will load the User if a user is specified in the route (`/admin/users/:user_id/invoices/`). It will ALSO work at `/admin/invoices` and will switch back into loading directly from the base class when routed this way.
|
|
418
|
+
|
|
476
419
|
|
|
477
420
|
|
|
478
421
|
|
|
@@ -549,22 +492,79 @@ If you specify an include list, it will be treated as a whitelist: no fields wil
|
|
|
549
492
|
|
|
550
493
|
`rails generate hot_glue:scaffold Account --include=first_name,last_name,company_name,created_at,kyc_verified_at`
|
|
551
494
|
|
|
552
|
-
|
|
495
|
+
You may not specify both include and exclude.
|
|
496
|
+
|
|
497
|
+
Include setting is affected by both specified grouping and smarty layouts, explained below.
|
|
498
|
+
|
|
499
|
+
|
|
500
|
+
#### Specified Grouping Mode
|
|
501
|
+
|
|
502
|
+
To specify grouped columns, separate COLUMNS by a COLON, then separate fields with commas. Specified groupings work like smart layouts (see below), except you drive which groupings make up the columns.
|
|
503
|
+
|
|
504
|
+
(Smarty layouts, below, achieves the same effect but automatically groups your fields into a smart number of columns. )
|
|
505
|
+
|
|
553
506
|
If you want to group up fields together into columns, use a COLON (`:`) character to specify columns.
|
|
554
|
-
Your input may have a COLON at the end of it, but otherwise your columns will made flush left.
|
|
555
507
|
|
|
556
|
-
|
|
508
|
+
Your input **may** have a COLON at the end of it, but otherwise your columns will made **flush left**.
|
|
509
|
+
|
|
510
|
+
Without specified grouping (and not using smart layout), no group will happen, so these two fields would display in two columns:
|
|
557
511
|
`--include=api_id,api_key`
|
|
558
512
|
|
|
559
|
-
With a trailing colon
|
|
513
|
+
With a trailing colon you would be specifying the grouping. You're telling Hot Glue to make the two fields into column #1. (There is no other column.)
|
|
560
514
|
`--include=api_id,api_key:`
|
|
561
515
|
|
|
516
|
+
|
|
562
517
|
If, for example, you wanted to put the `name` field into column #1 and then the api_id and api_key into column #2, you would use:
|
|
563
518
|
`--include=name:api_id,api_key`
|
|
564
519
|
|
|
565
|
-
Specifying any colon in your include syntax switches the builder into 12-column mode, whereas without you might create more than 12 columns if there are too many feilds for the available columns on the layout.
|
|
566
520
|
|
|
567
|
-
|
|
521
|
+
|
|
522
|
+
Specifying any colon in your include syntax switches the builder into specified grouping mode. The effect will be that the fields will be stacked together into nicely fit columns. (This will look confusing if your user expect an Excel-like interface.)
|
|
523
|
+
|
|
524
|
+
With Bootstrap in specified grouping or smart layout mode, it automatically attempts to fit everything into 12-columns.
|
|
525
|
+
|
|
526
|
+
Using Bootstrap with neither specified grouping nor smart layouts may make 12 columns, which will produce strange result. (Bootstrap is not designed to work with, for example, a 13-column layout.)
|
|
527
|
+
|
|
528
|
+
You should typically either specify your grouping or use smart layouts when building with Bootstrap, but if your use case does not fit the stacking feature you can specify neither and then you may have deal with the over-stuffed layouts as explained above.
|
|
529
|
+
|
|
530
|
+
|
|
531
|
+
|
|
532
|
+
### `--smart-layout` mode (automatic grouping) (default: false)
|
|
533
|
+
|
|
534
|
+
Smart layouts are like specified grouping but Hot Glue does the work of figuring out how many fields you want in each column.
|
|
535
|
+
|
|
536
|
+
It will concatinate your fields into groups that will fit into the Bootstraps 12-column grid.
|
|
537
|
+
|
|
538
|
+
The effect will be that the fields will be stacked together into nicely fit columns.
|
|
539
|
+
|
|
540
|
+
**Some people expect each field to be a column and think this looks strange.**
|
|
541
|
+
|
|
542
|
+
**If your customer is used to Excel, this feature will confuse them.**
|
|
543
|
+
|
|
544
|
+
Also, this feature will **probably not** be supported by the SORTING (not yet implemented; TBD). I'm not really sure it makes sense to build a non-columnar layout with sorting, so I think I **probably won't support smart layouts** if you want sorting. (You will be forced to choose between the two which I think makes sense.)
|
|
545
|
+
|
|
546
|
+
The layout builder works from right-to-left and starts with 12, the number of Bootstrap's columns.
|
|
547
|
+
|
|
548
|
+
It reserves 2 columns for the default buttons. Then +1 additional column for **each magic button** you have specified.
|
|
549
|
+
|
|
550
|
+
Then it takes 4 columns for **each downnested portal**.
|
|
551
|
+
|
|
552
|
+
If you're keeping track, that means we may have used 6 to 8 out of our Bootstrap columns already if we have buttons & portals. (With no portals and no magic buttons you have a nice even 10 columns to work with.)
|
|
553
|
+
|
|
554
|
+
If we have 2 downnested portals and only the default buttons, that uses 10 out of 12 Bootstrap columns, leaving only 2 bootstrap columns for the fields.
|
|
555
|
+
|
|
556
|
+
THe layout builder takes the number of columns left and then distributes the feilds 'evenly' among them. However, note that order specified translates to up-to-down within the column, and then left-to-right across the columns, like so:
|
|
557
|
+
|
|
558
|
+
A D G
|
|
559
|
+
|
|
560
|
+
B E H
|
|
561
|
+
|
|
562
|
+
C F I
|
|
563
|
+
|
|
564
|
+
This is what would happen if 9 fields, specified in the order A,B,C,D,E,F,G,H,I, were distributed across 3 columns.
|
|
565
|
+
|
|
566
|
+
(If you had a number of fields that wasn't easily divisible by the number of columns, it would leave the final column a few fields short of the others.)
|
|
567
|
+
|
|
568
568
|
|
|
569
569
|
|
|
570
570
|
### `--show-only=`
|
|
@@ -576,30 +576,30 @@ IMPORTANT: By default, all fields that begin with an underscore (`_`) are automa
|
|
|
576
576
|
|
|
577
577
|
I would recommend this for fields you want globally non-editable by users in your app. For example, a counter cache or other field set only by a backend mechanism.
|
|
578
578
|
|
|
579
|
-
### `--
|
|
580
|
-
(for Rails <=6, default is false. For Rails 7, default is true.)
|
|
579
|
+
### `--ujs_syntax=true` (Default is set automatically based on whether you have turbo-rails installed)
|
|
581
580
|
|
|
582
|
-
|
|
581
|
+
If you are pre-Turbo (UJS), your delete buttons will come out like this:
|
|
582
|
+
`data: {'confirm': 'Are you sure you want to delete....?'}`
|
|
583
583
|
|
|
584
|
-
If you
|
|
584
|
+
If you are Turbo (Rails 7 or Rails 6 with proactive Turbo-Rails install), your delete button will be:
|
|
585
|
+
`data: {'turbo-confirm': 'Are you sure you want to delete....?'}`
|
|
585
586
|
|
|
586
|
-
|
|
587
|
-
{confirm: 'Are you sure?'}
|
|
588
|
-
```
|
|
587
|
+
If you specify the flag, you preference will be used. If you leave the flag off, Hot Glue will detect the presence of Turbo-Rails in your app.
|
|
589
588
|
|
|
590
|
-
If you
|
|
591
|
-
|
|
592
|
-
## TODO: fix this
|
|
593
|
-
```
|
|
589
|
+
**WARNING**: If you created a new Rails app since October 2021 and you have the yanked turbo-rails Gems on your local machine,
|
|
590
|
+
you will have some bugs with the delete buttons and also not be on the latest version of turbo-rails.
|
|
594
591
|
|
|
592
|
+
Make sure to uninstall the yanked 7.1.0 and 7.1.1 from your machine with `gem uninstall turbo-rails`
|
|
593
|
+
and also fix any Rails apps created since October 2021 by fixing the Gemfile. Details here:
|
|
594
|
+
https://stackoverflow.com/questions/70671324/new-rails-7-turbo-app-doesnt-show-the-data-turbo-confirm-alert-messages-dont-f
|
|
595
595
|
|
|
596
596
|
|
|
597
|
-
### `--magic-buttons`
|
|
597
|
+
### `--magic-buttons`
|
|
598
598
|
If you pass a list of magic buttons (separated by commas), they will appear in the button area on your list.
|
|
599
599
|
|
|
600
|
-
It will be assumed there will be
|
|
600
|
+
It will be assumed there will be corresponding bang methods on your models.
|
|
601
601
|
|
|
602
|
-
The
|
|
602
|
+
The bang (`!`) methods can respond in one of four ways:
|
|
603
603
|
|
|
604
604
|
• With true, in which case a generic success message will be shown in the flash notice (“Approved” or “Rejected” in this case)
|
|
605
605
|
|
|
@@ -619,9 +619,10 @@ For more information see Example 5 in the Tutorial
|
|
|
619
619
|
### `--downnest`
|
|
620
620
|
|
|
621
621
|
Automatically create subviews down your object tree. This should be the name of a has_many relationship based from the current object.
|
|
622
|
-
You will need to build scaffolding with the same name for the related object as well.
|
|
623
|
-
On the list view, the object you are currently building will be built with a sub-view list of the objects related from the given line.
|
|
622
|
+
You will need to build scaffolding with the same name for the related object as well. On the list view, the object you are currently building will be built with a sub-view list of the objects related from the given line.
|
|
624
623
|
|
|
624
|
+
The downnested child table (not to be confused with this object's `--nested` setting, where you are specifying this object's _parents_) is called a **child portal**. When you create a record in the child portal, the related record is automatically set to be owned by its parent (as specified by `--nested`). For an example, see the [v0.4.7 release notes](https://github.com/jasonfb/hot-glue/releases/tag/v0.4.7).
|
|
625
|
+
|
|
625
626
|
|
|
626
627
|
|
|
627
628
|
|
|
@@ -661,6 +662,11 @@ Omits pagination. (All list views have pagination by default.)
|
|
|
661
662
|
|
|
662
663
|
Omits list action. Only makes sense to use this if you are create a view where you only want the create button you want to navigate to the update screen alternative ways.
|
|
663
664
|
|
|
665
|
+
|
|
666
|
+
### `--no-list-labels`
|
|
667
|
+
|
|
668
|
+
Omits list labels. (note that in the form the labels are rendered again anyway)
|
|
669
|
+
|
|
664
670
|
### `--no-create`
|
|
665
671
|
|
|
666
672
|
Omits create action.
|
|
@@ -681,7 +687,6 @@ Sometimes you might want to redisplay the entire list after you make an update (
|
|
|
681
687
|
|
|
682
688
|
To do this, use flag `--display_list_after_update`. The update will behave like delete and re-fetch all the records in the result and tell Turbo to swap out the entire list.
|
|
683
689
|
|
|
684
|
-
### `--smart-layout` (default: false)
|
|
685
690
|
|
|
686
691
|
|
|
687
692
|
|
|
@@ -694,25 +699,59 @@ Obviously, the created controller will always have this base controller as its s
|
|
|
694
699
|
|
|
695
700
|
## Field Types Supported
|
|
696
701
|
|
|
697
|
-
- Integers that don't end with `_id
|
|
702
|
+
- Integers that don't end with `_id`: displayed as input fields with type="number"
|
|
698
703
|
- Integers that do end with `_id` will be treated automatically as associations. You should have a Rails association defined. (Hot Glue will warn you if it can't find one.)
|
|
699
|
-
- String
|
|
700
|
-
- Text
|
|
701
|
-
- Float
|
|
702
|
-
- Datetime
|
|
703
|
-
- Date
|
|
704
|
-
- Time
|
|
705
|
-
- Boolean
|
|
706
|
-
- Enum -
|
|
704
|
+
- String: displayed as small input box
|
|
705
|
+
- Text: displayed as large textarea
|
|
706
|
+
- Float: displayed as input box
|
|
707
|
+
- Datetime: displayed as HTML5 datetime picker
|
|
708
|
+
- Date: displayed as HTML5 date picker
|
|
709
|
+
- Time: displayed as HTML5 time picker
|
|
710
|
+
- Boolean: displayed radio buttons yes/ no
|
|
711
|
+
- Enum - displayed as a drop-down list (defined the enum values on your model). For Rails 6 see https://jasonfleetwoodboldt.com/courses/stepping-up-rails/enumerated-types-in-rails-and-postgres/
|
|
712
|
+
|
|
707
713
|
|
|
708
|
-
|
|
714
|
+
# VERSION HISTORY
|
|
709
715
|
|
|
710
716
|
|
|
711
717
|
|
|
712
|
-
# VERSION HISTORY
|
|
713
718
|
|
|
719
|
+
#### 2022-02-07 - v0.4.8 Optionalized Nested Parents
|
|
720
|
+
- optionalized nested parents. to use add `~` in front of any nested parameter you want to make optional
|
|
721
|
+
|
|
722
|
+
- This is an advanced feature is to use two duplicitous routes to the same controller. You can only use this feature with Gd controller. To use, specify your controller *twice* in your routes.rb. Then, in your `--nest` setting, add `~` to any nested parent you want to **make optional**. "Make optional" means the controller will behave as-if it exists in two places: once, at the normal nest level. Then the same controller will 'exist' again one-level up in your routes. **If the route has sub-routes, you'll need to re-specify the entire subtree also**.
|
|
723
|
+
```
|
|
724
|
+
namespace :admin
|
|
725
|
+
resources :users do
|
|
726
|
+
resources :invoices
|
|
727
|
+
end
|
|
728
|
+
resoures :invoices
|
|
729
|
+
end
|
|
730
|
+
```
|
|
731
|
+
We will build the scaffolding once for users and once again for invoice. Even though we have two routes pointed to invoices,
|
|
732
|
+
```
|
|
733
|
+
rails generate hot_glue:scaffold User --namespace=admin --gd --downnest=invoices
|
|
734
|
+
rails generate hot_glue:scaffold Invoice --namespace=admin --gd --nest=~users
|
|
735
|
+
```
|
|
736
|
+
- Notice for the Invoice build, the parent user is *optionalized* (not 'optional'-- optionalized: to be made so it can be made optional). The Invoices controller, which is a Gd controller, will load the User if a user is specified in the route (`/admin/users/:user_id/invoices/`). It will ALSO work at `/admin/invoices` and will switch back into loading directly from the base class when routed this way.
|
|
737
|
+
- fixes to specified grouping mode-- the columns you specify now grab up the remaining bootstrap columns to fill space
|
|
738
|
+
|
|
739
|
+
#### 2022-01-26 - v0.4.7 `--nest` has been renamed to `--nested`; please use `--nested` moving forward
|
|
740
|
+
- `--alt-controller-name` feature from the last release has been removed, I have something better coming soon
|
|
741
|
+
- significant improvements to how child portals are handled, including setting the owner (parent) object when creating new records from a child portal
|
|
742
|
+
- improvements to how 'self-auth' is handled, i.e., when a controller is built using an authentication identifier (e.g. `current_user`) that is the same as the controller's object
|
|
743
|
+
- note that when building a self-auth controller, the list view still behaves as-if it is a list but controller only has access to the auth object (e.g. `current_user`). You would really only need this for the edge case of a user updating their own record, or, as in the example, to use as the starting point for building the child portals.
|
|
744
|
+
- another edge case in here that has been fixed involved creating a 'no field' form-- in the example, invoices are created using the "new" button and "save" button, even though the form has no editable fields for the user to input. In these edge cases, an invisible form field is inserted to make the form submission work correctly. This only happens for an action that has no inputable fields.
|
|
745
|
+
- cleaner code for the `_form` output and also the `controller` output
|
|
746
|
+
|
|
747
|
+
#### 2022-01-23 - v0.4.6 - `--no-list-labels` (flag; defaults false)
|
|
748
|
+
(additional features in this release have been subsequently removed)
|
|
714
749
|
|
|
715
|
-
#### 2022-
|
|
750
|
+
#### 2022-01-11 - v0.4.5 - buttons on smart layouts take up 1 bootstrap column each; fixes confirmation alert for delete buttons
|
|
751
|
+
|
|
752
|
+
#### 2022-01-01 - v0.4.3 and 0.4.4 - adding fully email-based license, no activation codes required.
|
|
753
|
+
|
|
754
|
+
#### 2022-12-30 - v0.4.2 -- Smart layouts introduced
|
|
716
755
|
|
|
717
756
|
#### 2021-12-15 - v0.4.1
|
|
718
757
|
|
|
@@ -720,11 +759,10 @@ Obviously, the created controller will always have this base controller as its s
|
|
|
720
759
|
|
|
721
760
|
#### 2021-12-12 - v0.3.9 - Magic Buttons
|
|
722
761
|
|
|
723
|
-
|
|
724
762
|
#### 2021-12-11 - v0.3.5 - Downnesting
|
|
725
763
|
|
|
726
764
|
|
|
727
|
-
#### 2021-11-27 - v0.2.9E
|
|
765
|
+
#### 2021-11-27 - v0.2.9E (experimental)
|
|
728
766
|
- Downnesting
|
|
729
767
|
- Adds spec coverage support for enums
|
|
730
768
|
- Several more fixes; this is preparation for forthcoming release.
|
|
@@ -732,7 +770,6 @@ Obviously, the created controller will always have this base controller as its s
|
|
|
732
770
|
|
|
733
771
|
#### 2021-10-11 - v0.2.6 - many additional automatic fixes for default Rails installation 6 or 7 for the generate hot_glue:install command
|
|
734
772
|
|
|
735
|
-
|
|
736
773
|
#### 2021-10-10 - v0.2.5 - this version is all about developer happyness:
|
|
737
774
|
- significant fixes for the behavioral (system) specs. they now create new & update interactions
|
|
738
775
|
for (almost) all field types
|
|
@@ -746,9 +783,9 @@ Obviously, the created controller will always have this base controller as its s
|
|
|
746
783
|
|
|
747
784
|
#### 2021-09-30 - v0.2.3 - fixes ERB output for show-only fields; fixes flash_notices for erb or haml; adds @stimulus_syntax flag for delete confirmations with stimulus
|
|
748
785
|
|
|
749
|
-
#### 2021-09-27
|
|
786
|
+
#### 2021-09-27 - v0.2.2 - Fixes some issues with related fields; unlocks Rails 7 in Gemspec file
|
|
750
787
|
|
|
751
|
-
#### 2021-09-20
|
|
788
|
+
#### 2021-09-20 - v0.2.1 - Fixes nesting behavior when using gd option
|
|
752
789
|
|
|
753
790
|
#### 2021-09-06 - v0.2.0 - ERB or HAML; use the option --markup=erb or --markup=haml (default is now erb)
|
|
754
791
|
|
|
@@ -776,9 +813,6 @@ Obviously, the created controller will always have this base controller as its s
|
|
|
776
813
|
|
|
777
814
|
|
|
778
815
|
|
|
779
|
-
|
|
780
|
-
|
|
781
|
-
|
|
782
816
|
# HOW THIS GEM IS TESTED
|
|
783
817
|
|
|
784
818
|
SETUP:
|
|
@@ -796,16 +830,29 @@ The DUMMY testing DOES NOT test the actual functionality of the output code (it
|
|
|
796
830
|
|
|
797
831
|
|
|
798
832
|
# DATABASE
|
|
833
|
+
being able to run `rake spec` at the root of this repo is achieved using
|
|
834
|
+
```
|
|
835
|
+
ln -s spec/dummy/db/schema.rb db/schema.rb
|
|
836
|
+
```
|
|
837
|
+
|
|
838
|
+
|
|
799
839
|
|
|
800
|
-
|
|
801
|
-
|
|
802
|
-
|
|
803
|
-
|
|
804
|
-
|
|
840
|
+
Run rspec as
|
|
841
|
+
```
|
|
842
|
+
rake spec
|
|
843
|
+
```
|
|
844
|
+
Or with test coverage report:
|
|
805
845
|
|
|
806
|
-
|
|
846
|
+
```
|
|
847
|
+
COVERGE=on rake spec
|
|
848
|
+
|
|
849
|
+
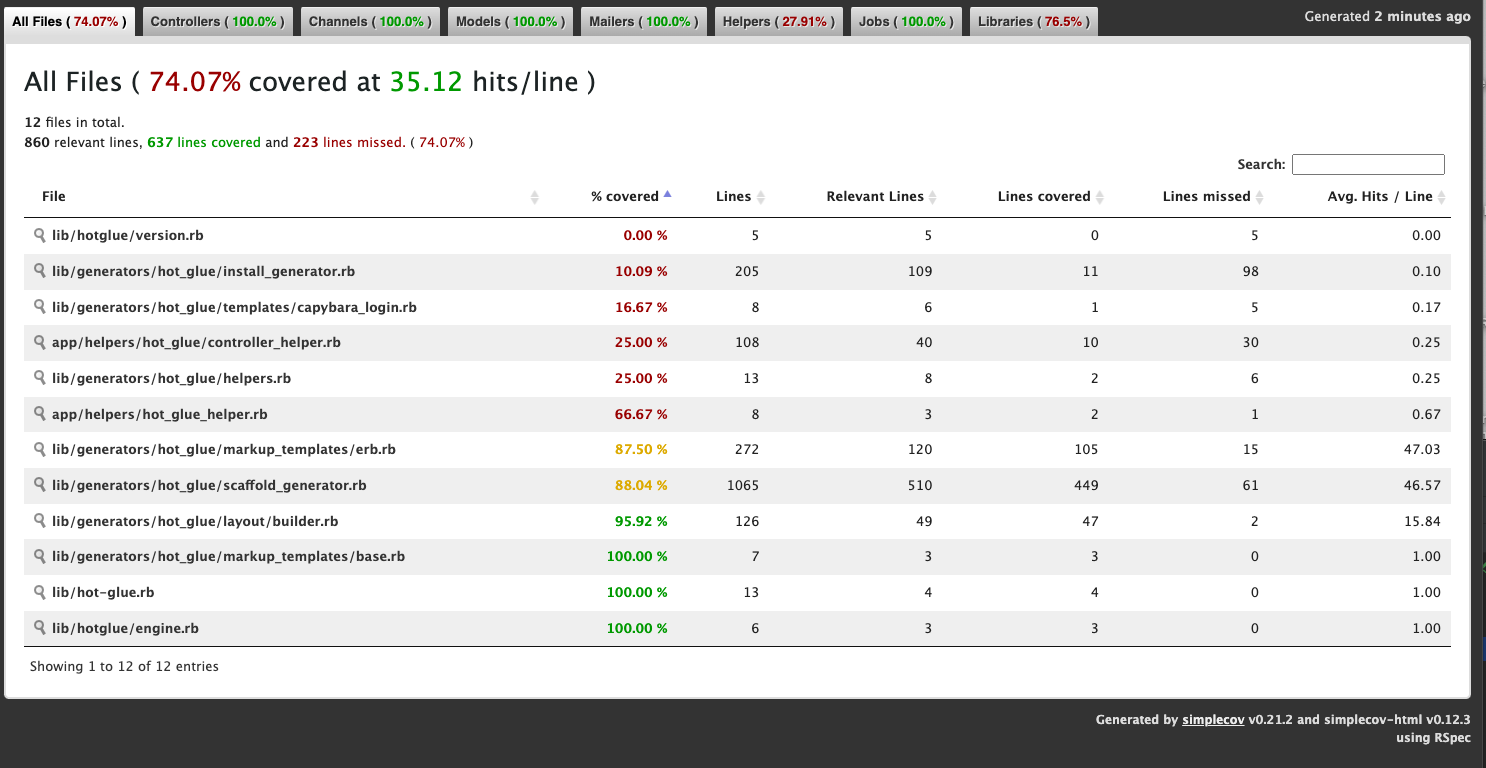
```
|
|
807
850
|
|
|
808
|
-
|
|
809
|
-
|
|
851
|
+
--
|
|
852
|
+
--
|
|
853
|
+
|
|
854
|
+
Test coverage as of 2022-02-06
|
|
855
|
+
|
|
856
|
+
|
|
810
857
|
|
|
811
858
|
|