tomopari 0.1.0__tar.gz
This diff represents the content of publicly available package versions that have been released to one of the supported registries. The information contained in this diff is provided for informational purposes only and reflects changes between package versions as they appear in their respective public registries.
- tomopari-0.1.0/LICENSE +22 -0
- tomopari-0.1.0/MANIFEST.in +9 -0
- tomopari-0.1.0/PKG-INFO +257 -0
- tomopari-0.1.0/README.md +230 -0
- tomopari-0.1.0/pyproject.toml +10 -0
- tomopari-0.1.0/setup.cfg +4 -0
- tomopari-0.1.0/setup.py +49 -0
- tomopari-0.1.0/src/tomopari/__init__.py +11 -0
- tomopari-0.1.0/src/tomopari/_reconstruction_widget.py +782 -0
- tomopari-0.1.0/src/tomopari/_tests/__init__.py +0 -0
- tomopari-0.1.0/src/tomopari/napari.yaml +10 -0
- tomopari-0.1.0/src/tomopari/processors/OPTProcessor.py +946 -0
- tomopari-0.1.0/src/tomopari/processors/__init__.py +2 -0
- tomopari-0.1.0/src/tomopari/processors/alternating.py +725 -0
- tomopari-0.1.0/src/tomopari/processors/functions_utils.py +222 -0
- tomopari-0.1.0/src/tomopari/processors/unet.py +167 -0
- tomopari-0.1.0/src/tomopari/processors/weights_tomodl100.ckpt +0 -0
- tomopari-0.1.0/src/tomopari/widget_settings.py +245 -0
- tomopari-0.1.0/src/tomopari.egg-info/PKG-INFO +257 -0
- tomopari-0.1.0/src/tomopari.egg-info/SOURCES.txt +22 -0
- tomopari-0.1.0/src/tomopari.egg-info/dependency_links.txt +1 -0
- tomopari-0.1.0/src/tomopari.egg-info/entry_points.txt +2 -0
- tomopari-0.1.0/src/tomopari.egg-info/requires.txt +5 -0
- tomopari-0.1.0/src/tomopari.egg-info/top_level.txt +1 -0
tomopari-0.1.0/LICENSE
ADDED
|
@@ -0,0 +1,22 @@
|
|
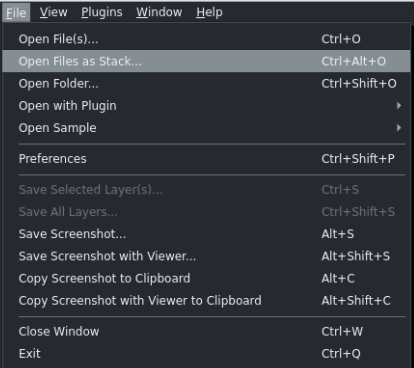
|
1
|
+
|
|
2
|
+
The MIT License (MIT)
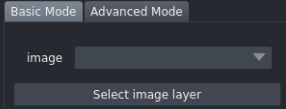
|
|
3
|
+
|
|
4
|
+
Copyright (c) 2023 Marcos Antonio Obando
|
|
5
|
+
|
|
6
|
+
Permission is hereby granted, free of charge, to any person obtaining a copy
|
|
7
|
+
of this software and associated documentation files (the "Software"), to deal
|
|
8
|
+
in the Software without restriction, including without limitation the rights
|
|
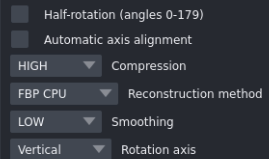
9
|
+
to use, copy, modify, merge, publish, distribute, sublicense, and/or sell
|
|
10
|
+
copies of the Software, and to permit persons to whom the Software is
|
|
11
|
+
furnished to do so, subject to the following conditions:
|
|
12
|
+
|
|
13
|
+
The above copyright notice and this permission notice shall be included in
|
|
14
|
+
all copies or substantial portions of the Software.
|
|
15
|
+
|
|
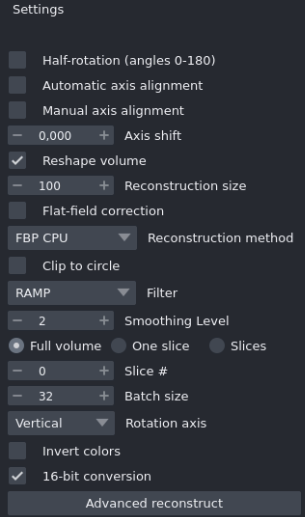
16
|
+
THE SOFTWARE IS PROVIDED "AS IS", WITHOUT WARRANTY OF ANY KIND, EXPRESS OR
|
|
17
|
+
IMPLIED, INCLUDING BUT NOT LIMITED TO THE WARRANTIES OF MERCHANTABILITY,
|
|
18
|
+
FITNESS FOR A PARTICULAR PURPOSE AND NONINFRINGEMENT. IN NO EVENT SHALL THE
|
|
19
|
+
AUTHORS OR COPYRIGHT HOLDERS BE LIABLE FOR ANY CLAIM, DAMAGES OR OTHER
|
|
20
|
+
LIABILITY, WHETHER IN AN ACTION OF CONTRACT, TORT OR OTHERWISE, ARISING FROM,
|
|
21
|
+
OUT OF OR IN CONNECTION WITH THE SOFTWARE OR THE USE OR OTHER DEALINGS IN
|
|
22
|
+
THE SOFTWARE.
|
tomopari-0.1.0/PKG-INFO
ADDED
|
@@ -0,0 +1,257 @@
|
|
|
1
|
+
Metadata-Version: 2.1
|
|
2
|
+
Name: tomopari
|
|
3
|
+
Version: 0.1.0
|
|
4
|
+
Summary: A plugin for optical projection tomography reconstruction with model-based neural networks.
|
|
5
|
+
Author: Marcos Antonio Obando, Minh Nhat Trinh, David Palecek, Germán Mato, Teresa Correia
|
|
6
|
+
Author-email: marcos.obando@ib.edu.ar
|
|
7
|
+
License: MIT
|
|
8
|
+
Classifier: Development Status :: 2 - Pre-Alpha
|
|
9
|
+
Classifier: Framework :: napari
|
|
10
|
+
Classifier: Intended Audience :: Developers
|
|
11
|
+
Classifier: License :: OSI Approved :: MIT License
|
|
12
|
+
Classifier: Operating System :: OS Independent
|
|
13
|
+
Classifier: Programming Language :: Python
|
|
14
|
+
Classifier: Programming Language :: Python :: 3
|
|
15
|
+
Classifier: Programming Language :: Python :: 3.9
|
|
16
|
+
Classifier: Programming Language :: Python :: 3.10
|
|
17
|
+
Classifier: Programming Language :: Python :: 3.11
|
|
18
|
+
Classifier: Topic :: Scientific/Engineering :: Image Processing
|
|
19
|
+
Requires-Python: >=3.9
|
|
20
|
+
Description-Content-Type: text/markdown
|
|
21
|
+
License-File: LICENSE
|
|
22
|
+
Requires-Dist: magicgui
|
|
23
|
+
Requires-Dist: qtpy
|
|
24
|
+
Requires-Dist: scikit-image
|
|
25
|
+
Requires-Dist: scipy
|
|
26
|
+
Requires-Dist: qbi-radon
|
|
27
|
+
|
|
28
|
+
# tomopari
|
|
29
|
+
|
|
30
|
+
[](https://github.com/obandomarcos/ToMoDL/blob/nhattm/tomopari/LICENSE)
|
|
31
|
+
[](https://pypi.org/project/tomopari)
|
|
32
|
+
[](https://python.org)
|
|
33
|
+
<!-- [](https://github.com/marcoso96/tomopari/actions) -->
|
|
34
|
+
[](https://codecov.io/gh/marcoso96/tomopari)
|
|
35
|
+
[](https://napari-hub.org/plugins/tomopari)
|
|
36
|
+
|
|
37
|
+
A plugin for optical projection tomography reconstruction with model-based neural networks.
|
|
38
|
+
|
|
39
|
+
----------------------------------
|
|
40
|
+
|
|
41
|
+
This [napari] plugin was generated with [Cookiecutter] using [@napari]'s [cookiecutter-napari-plugin] template.
|
|
42
|
+
|
|
43
|
+
<!--
|
|
44
|
+
Don't miss the full getting started guide to set up your new package:
|
|
45
|
+
https://github.com/napari/cookiecutter-napari-plugin#getting-started
|
|
46
|
+
|
|
47
|
+
and review the napari docs for plugin developers:
|
|
48
|
+
https://napari.org/stable/plugins/index.html
|
|
49
|
+
-->
|
|
50
|
+
## 🔬 Introduction
|
|
51
|
+
|
|
52
|
+
**tomopari** is a [napari](https://napari.org/) plugin that enables users to easily reconstruct tomography images directly from raw projection data. Simply load an ordered stack of projection files into the napari viewer, and the plugin takes care of reconstructing the corresponding tomographic volume.
|
|
53
|
+
|
|
54
|
+
## 🚀 Usage
|
|
55
|
+
|
|
56
|
+
1. **Load ordered stack**
|
|
57
|
+
|
|
58
|
+
|
|
59
|
+
Go to **File → Open Files as Stack...** and load the angular projections for parallel beam optical tomography reconstruction.
|
|
60
|
+
|
|
61
|
+
After loading, the stack of θ-angular projection images should have shape of $N_{angles} × det_h × det_w$, where:
|
|
62
|
+
|
|
63
|
+
- $N_{angles}$ is the number of projection views (one image per rotation angle θ),
|
|
64
|
+
- $det_h$ is the detector height (vertical pixel dimension),
|
|
65
|
+
- $det_w$ is the detector width (horizontal pixel dimension).
|
|
66
|
+
2. **Select image layer**
|
|
67
|
+
|
|
68
|
+
|
|
69
|
+
In the dropdown menu, click **Select image layer** and choose the loaded volume.
|
|
70
|
+
|
|
71
|
+
<!-- make this line be bigger and bold -->
|
|
72
|
+
<h3>From here you can choose between two reconstruction modes: Basic and Advanced.</h3>
|
|
73
|
+
|
|
74
|
+
### 🔹 Basic Mode
|
|
75
|
+
|
|
76
|
+
|
|
77
|
+
3. **Half-rotation**
|
|
78
|
+
- Click **Half rotation** if your projection data was acquired from 0° to 180°.
|
|
79
|
+
- Leave it unchecked if data was acquired from 0° to 360°.
|
|
80
|
+
|
|
81
|
+
4. **Automatic axis alignment**
|
|
82
|
+
If the rotation axis is not correctly aligned during acquisition, enable **Automatic axis alignment**. This aligns the sinogram to the detector center using the [Wall-method].
|
|
83
|
+
|
|
84
|
+
5. **Compression**
|
|
85
|
+
Compression affects the detector dimension differently depending on the acquisition mode:
|
|
86
|
+
|
|
87
|
+
- Vertical-axis mode → the $det_w$ will be resized
|
|
88
|
+
- Horizontal-axis mode → the $det_h$ will be resized
|
|
89
|
+
|
|
90
|
+
Available compression levels:
|
|
91
|
+
- **HIGH** → resize to 100
|
|
92
|
+
- **MEDIUM** → resize to 256
|
|
93
|
+
- **LOW** → resize to 512
|
|
94
|
+
- **NO** → no compression
|
|
95
|
+
|
|
96
|
+
|
|
97
|
+
|
|
98
|
+
6. **Reconstruction method**
|
|
99
|
+
- **FBP CPU / FBP GPU** → from the [QBI_radon] library
|
|
100
|
+
- **TOMODL CPU / TOMODL GPU / UNET CPU / UNET GPU** → proposed in our [ToMoDL-paper]
|
|
101
|
+
|
|
102
|
+
7. **Smoothing level**
|
|
103
|
+
Select smoothing strength (only applies to **TOMODL** methods). Can be more fine tuned in the **Advanced mode**.
|
|
104
|
+
- **LOW** → 2
|
|
105
|
+
- **MEDIUM** → 4
|
|
106
|
+
- **HIGH** → 6
|
|
107
|
+
|
|
108
|
+
8. **Rotation axis**
|
|
109
|
+
Select how your data is organized with respect to the rotation axis:
|
|
110
|
+
- **Vertical** → $det_w$ corresponds to the axis **perpendicular** to rotation.
|
|
111
|
+
- **Horizontal** → $det_h$ corresponds to the axis **perpendicular** to rotation.
|
|
112
|
+
---
|
|
113
|
+
|
|
114
|
+
### 🔹 Advanced Mode
|
|
115
|
+
|
|
116
|
+
|
|
117
|
+
9. **Manual axis alignment**
|
|
118
|
+
Shift the object along $det_w$ in vertical mode, and along $det_h$ in horizontal mode.
|
|
119
|
+
- Negative values → shift left (toward lower pixel indices)
|
|
120
|
+
- Positive values → shift right (toward higher pixel indices)
|
|
121
|
+
|
|
122
|
+
10. **Reshape volume**
|
|
123
|
+
Select a reconstruction size (alternative to compression levels from Basic mode).
|
|
124
|
+
|
|
125
|
+
11. **Flat-field correction**
|
|
126
|
+
Apply flat-field correction to projection data before reconstruction.
|
|
127
|
+
|
|
128
|
+
12. **Clip to circle**
|
|
129
|
+
Constrain the reconstructed object inside a circular region.
|
|
130
|
+
|
|
131
|
+
13. **Filter (FBP only)**
|
|
132
|
+
Choose the filter to apply when using FBP methods.
|
|
133
|
+
|
|
134
|
+
14. **Full volume mode**
|
|
135
|
+
- Enabled → reconstruct the whole volume.
|
|
136
|
+
|
|
137
|
+
16. **One Slice mode**
|
|
138
|
+
- Enabled → reconstruct only a single slice at the **Slice #** index.
|
|
139
|
+
|
|
140
|
+
17. **Slices mode**
|
|
141
|
+
- Enabled → reconstruct from index 0 up to the chosen slice index in the **Slice #** field.
|
|
142
|
+
|
|
143
|
+
18. **Batch size**
|
|
144
|
+
Number of slices processed simultaneously:
|
|
145
|
+
- Higher values → faster reconstruction but greater GPU memory usage.
|
|
146
|
+
- On CPU → limited to processing **1 slice at a time**.
|
|
147
|
+
|
|
148
|
+
19. **Invert colors**
|
|
149
|
+
Invert grayscale values in the reconstructed volume.
|
|
150
|
+
|
|
151
|
+
20. **16-bit conversion**
|
|
152
|
+
The reconstructed volume is always generated in **32-bit float** precision. Enable this option to convert the final volume to **16-bit**, which significantly improves 3D rendering performance in napari.
|
|
153
|
+
Leave it unchecked if you prefer to keep the full 32-bit float output.
|
|
154
|
+
---
|
|
155
|
+
|
|
156
|
+
21. **Reconstruct!**
|
|
157
|
+
|
|
158
|
+

|
|
159
|
+
|
|
160
|
+
A new layer will appear on top of the projections stack with the reconstructed volume.
|
|
161
|
+
|
|
162
|
+
|
|
163
|
+
## 💻 Installation Guide *(No Code — Highly Recommended)*
|
|
164
|
+
|
|
165
|
+
### 🧩 **Step 1: Install Napari (Bundled App)**
|
|
166
|
+
|
|
167
|
+
> 💡 *Skip this step if you already installed Napari via `pip`.*
|
|
168
|
+
|
|
169
|
+
You can directly download the official Napari **bundled installer** for your operating system:
|
|
170
|
+
|
|
171
|
+
* 🪟 **Windows (.exe):**
|
|
172
|
+
👉 [napari-0.6.5-Windows-x86_64.exe](https://github.com/napari/napari/releases/download/v0.6.5/napari-0.6.5-Windows-x86_64.exe)
|
|
173
|
+
|
|
174
|
+
* 🐧 **Ubuntu (.sh):**
|
|
175
|
+
👉 [napari-0.6.5-Linux-x86_64.sh](https://github.com/napari/napari/releases/download/v0.6.5/napari-0.6.5-Linux-x86_64.sh)
|
|
176
|
+
|
|
177
|
+
📘 **Official Guide:**
|
|
178
|
+
Follow the Napari documentation for detailed installation steps:
|
|
179
|
+
🔗 [Napari Installation Guide (Bundled App)](https://napari.org/0.6.5/tutorials/fundamentals/installation_bundle_conda.html)
|
|
180
|
+
|
|
181
|
+
---
|
|
182
|
+
|
|
183
|
+
### ⚙️ **Step 2: Install PyTorch Inside Napari’s Bundled Environment**
|
|
184
|
+
|
|
185
|
+
> 💡 *Skip this step if PyTorch is already installed in your Napari environment.*
|
|
186
|
+
|
|
187
|
+
This step ensures **PyTorch** is properly installed within Napari’s internal Conda environment for full compatibility.
|
|
188
|
+
|
|
189
|
+
#### 🪟 **Windows Users**
|
|
190
|
+
|
|
191
|
+
1. Download the installer:
|
|
192
|
+
🔗 [install_torch2napari_windows.bat](https://github.com/obandomarcos/ToMoDL/releases/download/v.0.2.25/install_torch2napari_windows.bat)
|
|
193
|
+
2. Double-click the `.bat` file to run it.
|
|
194
|
+
*(It will automatically detect Napari’s environment and install PyTorch.)*
|
|
195
|
+
|
|
196
|
+
#### 🐧 **Linux Users**
|
|
197
|
+
|
|
198
|
+
1. Download the installer:
|
|
199
|
+
🔗 [install_torch2napari_linux.sh](https://github.com/obandomarcos/ToMoDL/releases/download/v.0.2.25/install_torch2napari_linux.sh)
|
|
200
|
+
2. Run it in your terminal:
|
|
201
|
+
|
|
202
|
+
```bash
|
|
203
|
+
bash install_torch2napari_linux.sh
|
|
204
|
+
```
|
|
205
|
+
|
|
206
|
+
---
|
|
207
|
+
|
|
208
|
+
### 3️⃣ Install our plugin — **tomopari**
|
|
209
|
+
|
|
210
|
+
Our plugin is available on the [napari-hub](https://napari-hub.org/plugins/tomopari.html).
|
|
211
|
+
---
|
|
212
|
+
🔹 Option 1: Install directly from napari
|
|
213
|
+
1. Open **napari**.
|
|
214
|
+
2. Go to **Plugins → Install/Uninstall Plugins**.
|
|
215
|
+
3. Search for **tomopari** and click **Install**.
|
|
216
|
+
---
|
|
217
|
+
🔹 Option 2: Install via pip (from Napari Console)
|
|
218
|
+
Open napari’s **Python Console** and type:
|
|
219
|
+
|
|
220
|
+
```bash
|
|
221
|
+
pip install tomopari
|
|
222
|
+
```
|
|
223
|
+
|
|
224
|
+
> After installation, **restart napari** to apply the changes. 😊
|
|
225
|
+
|
|
226
|
+
## 🤝 Contributing
|
|
227
|
+
|
|
228
|
+
Contributions are very welcome. Tests can be run with [tox], please ensure
|
|
229
|
+
the coverage at least stays the same before you submit a pull request.
|
|
230
|
+
|
|
231
|
+
## 📜 License
|
|
232
|
+
|
|
233
|
+
Distributed under the terms of the [MIT] license,
|
|
234
|
+
"tomopari" is free and open source software
|
|
235
|
+
|
|
236
|
+
## 🐛Issues
|
|
237
|
+
|
|
238
|
+
If you encounter any problems, please [file an issue] along with a detailed description.
|
|
239
|
+
|
|
240
|
+
[napari]: https://github.com/napari/napari
|
|
241
|
+
[Cookiecutter]: https://github.com/audreyr/cookiecutter
|
|
242
|
+
[@napari]: https://github.com/napari
|
|
243
|
+
[MIT]: http://opensource.org/licenses/MIT
|
|
244
|
+
[BSD-3]: http://opensource.org/licenses/BSD-3-Clause
|
|
245
|
+
[GNU GPL v3.0]: http://www.gnu.org/licenses/gpl-3.0.txt
|
|
246
|
+
[GNU LGPL v3.0]: http://www.gnu.org/licenses/lgpl-3.0.txt
|
|
247
|
+
[Apache Software License 2.0]: http://www.apache.org/licenses/LICENSE-2.0
|
|
248
|
+
[Mozilla Public License 2.0]: https://www.mozilla.org/media/MPL/2.0/index.txt
|
|
249
|
+
[cookiecutter-napari-plugin]: https://github.com/napari/cookiecutter-napari-plugin
|
|
250
|
+
|
|
251
|
+
[QBI_radon]: https://github.com/QBioImaging/QBI_radon
|
|
252
|
+
[Wall-method]: https://doi.org/10.1088/0031-9155/50/19/015
|
|
253
|
+
[ToMoDL-paper]: https://doi.org/10.1038/s41598-023-47650-3
|
|
254
|
+
[napari]: https://github.com/napari/napari
|
|
255
|
+
[tox]: https://tox.readthedocs.io/en/latest/
|
|
256
|
+
[pip]: https://pypi.org/project/pip/
|
|
257
|
+
[PyPI]: https://pypi.org/
|
tomopari-0.1.0/README.md
ADDED
|
@@ -0,0 +1,230 @@
|
|
|
1
|
+
# tomopari
|
|
2
|
+
|
|
3
|
+
[](https://github.com/obandomarcos/ToMoDL/blob/nhattm/tomopari/LICENSE)
|
|
4
|
+
[](https://pypi.org/project/tomopari)
|
|
5
|
+
[](https://python.org)
|
|
6
|
+
<!-- [](https://github.com/marcoso96/tomopari/actions) -->
|
|
7
|
+
[](https://codecov.io/gh/marcoso96/tomopari)
|
|
8
|
+
[](https://napari-hub.org/plugins/tomopari)
|
|
9
|
+
|
|
10
|
+
A plugin for optical projection tomography reconstruction with model-based neural networks.
|
|
11
|
+
|
|
12
|
+
----------------------------------
|
|
13
|
+
|
|
14
|
+
This [napari] plugin was generated with [Cookiecutter] using [@napari]'s [cookiecutter-napari-plugin] template.
|
|
15
|
+
|
|
16
|
+
<!--
|
|
17
|
+
Don't miss the full getting started guide to set up your new package:
|
|
18
|
+
https://github.com/napari/cookiecutter-napari-plugin#getting-started
|
|
19
|
+
|
|
20
|
+
and review the napari docs for plugin developers:
|
|
21
|
+
https://napari.org/stable/plugins/index.html
|
|
22
|
+
-->
|
|
23
|
+
## 🔬 Introduction
|
|
24
|
+
|
|
25
|
+
**tomopari** is a [napari](https://napari.org/) plugin that enables users to easily reconstruct tomography images directly from raw projection data. Simply load an ordered stack of projection files into the napari viewer, and the plugin takes care of reconstructing the corresponding tomographic volume.
|
|
26
|
+
|
|
27
|
+
## 🚀 Usage
|
|
28
|
+
|
|
29
|
+
1. **Load ordered stack**
|
|
30
|
+

|
|
31
|
+
|
|
32
|
+
Go to **File → Open Files as Stack...** and load the angular projections for parallel beam optical tomography reconstruction.
|
|
33
|
+
|
|
34
|
+
After loading, the stack of θ-angular projection images should have shape of $N_{angles} × det_h × det_w$, where:
|
|
35
|
+
|
|
36
|
+
- $N_{angles}$ is the number of projection views (one image per rotation angle θ),
|
|
37
|
+
- $det_h$ is the detector height (vertical pixel dimension),
|
|
38
|
+
- $det_w$ is the detector width (horizontal pixel dimension).
|
|
39
|
+
2. **Select image layer**
|
|
40
|
+

|
|
41
|
+
|
|
42
|
+
In the dropdown menu, click **Select image layer** and choose the loaded volume.
|
|
43
|
+
|
|
44
|
+
<!-- make this line be bigger and bold -->
|
|
45
|
+
<h3>From here you can choose between two reconstruction modes: Basic and Advanced.</h3>
|
|
46
|
+
|
|
47
|
+
### 🔹 Basic Mode
|
|
48
|
+

|
|
49
|
+
|
|
50
|
+
3. **Half-rotation**
|
|
51
|
+
- Click **Half rotation** if your projection data was acquired from 0° to 180°.
|
|
52
|
+
- Leave it unchecked if data was acquired from 0° to 360°.
|
|
53
|
+
|
|
54
|
+
4. **Automatic axis alignment**
|
|
55
|
+
If the rotation axis is not correctly aligned during acquisition, enable **Automatic axis alignment**. This aligns the sinogram to the detector center using the [Wall-method].
|
|
56
|
+
|
|
57
|
+
5. **Compression**
|
|
58
|
+
Compression affects the detector dimension differently depending on the acquisition mode:
|
|
59
|
+
|
|
60
|
+
- Vertical-axis mode → the $det_w$ will be resized
|
|
61
|
+
- Horizontal-axis mode → the $det_h$ will be resized
|
|
62
|
+
|
|
63
|
+
Available compression levels:
|
|
64
|
+
- **HIGH** → resize to 100
|
|
65
|
+
- **MEDIUM** → resize to 256
|
|
66
|
+
- **LOW** → resize to 512
|
|
67
|
+
- **NO** → no compression
|
|
68
|
+
|
|
69
|
+
|
|
70
|
+
|
|
71
|
+
6. **Reconstruction method**
|
|
72
|
+
- **FBP CPU / FBP GPU** → from the [QBI_radon] library
|
|
73
|
+
- **TOMODL CPU / TOMODL GPU / UNET CPU / UNET GPU** → proposed in our [ToMoDL-paper]
|
|
74
|
+
|
|
75
|
+
7. **Smoothing level**
|
|
76
|
+
Select smoothing strength (only applies to **TOMODL** methods). Can be more fine tuned in the **Advanced mode**.
|
|
77
|
+
- **LOW** → 2
|
|
78
|
+
- **MEDIUM** → 4
|
|
79
|
+
- **HIGH** → 6
|
|
80
|
+
|
|
81
|
+
8. **Rotation axis**
|
|
82
|
+
Select how your data is organized with respect to the rotation axis:
|
|
83
|
+
- **Vertical** → $det_w$ corresponds to the axis **perpendicular** to rotation.
|
|
84
|
+
- **Horizontal** → $det_h$ corresponds to the axis **perpendicular** to rotation.
|
|
85
|
+
---
|
|
86
|
+
|
|
87
|
+
### 🔹 Advanced Mode
|
|
88
|
+

|
|
89
|
+
|
|
90
|
+
9. **Manual axis alignment**
|
|
91
|
+
Shift the object along $det_w$ in vertical mode, and along $det_h$ in horizontal mode.
|
|
92
|
+
- Negative values → shift left (toward lower pixel indices)
|
|
93
|
+
- Positive values → shift right (toward higher pixel indices)
|
|
94
|
+
|
|
95
|
+
10. **Reshape volume**
|
|
96
|
+
Select a reconstruction size (alternative to compression levels from Basic mode).
|
|
97
|
+
|
|
98
|
+
11. **Flat-field correction**
|
|
99
|
+
Apply flat-field correction to projection data before reconstruction.
|
|
100
|
+
|
|
101
|
+
12. **Clip to circle**
|
|
102
|
+
Constrain the reconstructed object inside a circular region.
|
|
103
|
+
|
|
104
|
+
13. **Filter (FBP only)**
|
|
105
|
+
Choose the filter to apply when using FBP methods.
|
|
106
|
+
|
|
107
|
+
14. **Full volume mode**
|
|
108
|
+
- Enabled → reconstruct the whole volume.
|
|
109
|
+
|
|
110
|
+
16. **One Slice mode**
|
|
111
|
+
- Enabled → reconstruct only a single slice at the **Slice #** index.
|
|
112
|
+
|
|
113
|
+
17. **Slices mode**
|
|
114
|
+
- Enabled → reconstruct from index 0 up to the chosen slice index in the **Slice #** field.
|
|
115
|
+
|
|
116
|
+
18. **Batch size**
|
|
117
|
+
Number of slices processed simultaneously:
|
|
118
|
+
- Higher values → faster reconstruction but greater GPU memory usage.
|
|
119
|
+
- On CPU → limited to processing **1 slice at a time**.
|
|
120
|
+
|
|
121
|
+
19. **Invert colors**
|
|
122
|
+
Invert grayscale values in the reconstructed volume.
|
|
123
|
+
|
|
124
|
+
20. **16-bit conversion**
|
|
125
|
+
The reconstructed volume is always generated in **32-bit float** precision. Enable this option to convert the final volume to **16-bit**, which significantly improves 3D rendering performance in napari.
|
|
126
|
+
Leave it unchecked if you prefer to keep the full 32-bit float output.
|
|
127
|
+
---
|
|
128
|
+
|
|
129
|
+
21. **Reconstruct!**
|
|
130
|
+
|
|
131
|
+

|
|
132
|
+
|
|
133
|
+
A new layer will appear on top of the projections stack with the reconstructed volume.
|
|
134
|
+
|
|
135
|
+
|
|
136
|
+
## 💻 Installation Guide *(No Code — Highly Recommended)*
|
|
137
|
+
|
|
138
|
+
### 🧩 **Step 1: Install Napari (Bundled App)**
|
|
139
|
+
|
|
140
|
+
> 💡 *Skip this step if you already installed Napari via `pip`.*
|
|
141
|
+
|
|
142
|
+
You can directly download the official Napari **bundled installer** for your operating system:
|
|
143
|
+
|
|
144
|
+
* 🪟 **Windows (.exe):**
|
|
145
|
+
👉 [napari-0.6.5-Windows-x86_64.exe](https://github.com/napari/napari/releases/download/v0.6.5/napari-0.6.5-Windows-x86_64.exe)
|
|
146
|
+
|
|
147
|
+
* 🐧 **Ubuntu (.sh):**
|
|
148
|
+
👉 [napari-0.6.5-Linux-x86_64.sh](https://github.com/napari/napari/releases/download/v0.6.5/napari-0.6.5-Linux-x86_64.sh)
|
|
149
|
+
|
|
150
|
+
📘 **Official Guide:**
|
|
151
|
+
Follow the Napari documentation for detailed installation steps:
|
|
152
|
+
🔗 [Napari Installation Guide (Bundled App)](https://napari.org/0.6.5/tutorials/fundamentals/installation_bundle_conda.html)
|
|
153
|
+
|
|
154
|
+
---
|
|
155
|
+
|
|
156
|
+
### ⚙️ **Step 2: Install PyTorch Inside Napari’s Bundled Environment**
|
|
157
|
+
|
|
158
|
+
> 💡 *Skip this step if PyTorch is already installed in your Napari environment.*
|
|
159
|
+
|
|
160
|
+
This step ensures **PyTorch** is properly installed within Napari’s internal Conda environment for full compatibility.
|
|
161
|
+
|
|
162
|
+
#### 🪟 **Windows Users**
|
|
163
|
+
|
|
164
|
+
1. Download the installer:
|
|
165
|
+
🔗 [install_torch2napari_windows.bat](https://github.com/obandomarcos/ToMoDL/releases/download/v.0.2.25/install_torch2napari_windows.bat)
|
|
166
|
+
2. Double-click the `.bat` file to run it.
|
|
167
|
+
*(It will automatically detect Napari’s environment and install PyTorch.)*
|
|
168
|
+
|
|
169
|
+
#### 🐧 **Linux Users**
|
|
170
|
+
|
|
171
|
+
1. Download the installer:
|
|
172
|
+
🔗 [install_torch2napari_linux.sh](https://github.com/obandomarcos/ToMoDL/releases/download/v.0.2.25/install_torch2napari_linux.sh)
|
|
173
|
+
2. Run it in your terminal:
|
|
174
|
+
|
|
175
|
+
```bash
|
|
176
|
+
bash install_torch2napari_linux.sh
|
|
177
|
+
```
|
|
178
|
+
|
|
179
|
+
---
|
|
180
|
+
|
|
181
|
+
### 3️⃣ Install our plugin — **tomopari**
|
|
182
|
+
|
|
183
|
+
Our plugin is available on the [napari-hub](https://napari-hub.org/plugins/tomopari.html).
|
|
184
|
+
---
|
|
185
|
+
🔹 Option 1: Install directly from napari
|
|
186
|
+
1. Open **napari**.
|
|
187
|
+
2. Go to **Plugins → Install/Uninstall Plugins**.
|
|
188
|
+
3. Search for **tomopari** and click **Install**.
|
|
189
|
+
---
|
|
190
|
+
🔹 Option 2: Install via pip (from Napari Console)
|
|
191
|
+
Open napari’s **Python Console** and type:
|
|
192
|
+
|
|
193
|
+
```bash
|
|
194
|
+
pip install tomopari
|
|
195
|
+
```
|
|
196
|
+
|
|
197
|
+
> After installation, **restart napari** to apply the changes. 😊
|
|
198
|
+
|
|
199
|
+
## 🤝 Contributing
|
|
200
|
+
|
|
201
|
+
Contributions are very welcome. Tests can be run with [tox], please ensure
|
|
202
|
+
the coverage at least stays the same before you submit a pull request.
|
|
203
|
+
|
|
204
|
+
## 📜 License
|
|
205
|
+
|
|
206
|
+
Distributed under the terms of the [MIT] license,
|
|
207
|
+
"tomopari" is free and open source software
|
|
208
|
+
|
|
209
|
+
## 🐛Issues
|
|
210
|
+
|
|
211
|
+
If you encounter any problems, please [file an issue] along with a detailed description.
|
|
212
|
+
|
|
213
|
+
[napari]: https://github.com/napari/napari
|
|
214
|
+
[Cookiecutter]: https://github.com/audreyr/cookiecutter
|
|
215
|
+
[@napari]: https://github.com/napari
|
|
216
|
+
[MIT]: http://opensource.org/licenses/MIT
|
|
217
|
+
[BSD-3]: http://opensource.org/licenses/BSD-3-Clause
|
|
218
|
+
[GNU GPL v3.0]: http://www.gnu.org/licenses/gpl-3.0.txt
|
|
219
|
+
[GNU LGPL v3.0]: http://www.gnu.org/licenses/lgpl-3.0.txt
|
|
220
|
+
[Apache Software License 2.0]: http://www.apache.org/licenses/LICENSE-2.0
|
|
221
|
+
[Mozilla Public License 2.0]: https://www.mozilla.org/media/MPL/2.0/index.txt
|
|
222
|
+
[cookiecutter-napari-plugin]: https://github.com/napari/cookiecutter-napari-plugin
|
|
223
|
+
|
|
224
|
+
[QBI_radon]: https://github.com/QBioImaging/QBI_radon
|
|
225
|
+
[Wall-method]: https://doi.org/10.1088/0031-9155/50/19/015
|
|
226
|
+
[ToMoDL-paper]: https://doi.org/10.1038/s41598-023-47650-3
|
|
227
|
+
[napari]: https://github.com/napari/napari
|
|
228
|
+
[tox]: https://tox.readthedocs.io/en/latest/
|
|
229
|
+
[pip]: https://pypi.org/project/pip/
|
|
230
|
+
[PyPI]: https://pypi.org/
|
tomopari-0.1.0/setup.cfg
ADDED
tomopari-0.1.0/setup.py
ADDED
|
@@ -0,0 +1,49 @@
|
|
|
1
|
+
from setuptools import setup, find_packages
|
|
2
|
+
|
|
3
|
+
with open("README.md", "r", encoding="utf-8") as fh:
|
|
4
|
+
long_description = fh.read()
|
|
5
|
+
|
|
6
|
+
setup(
|
|
7
|
+
name="tomopari",
|
|
8
|
+
version="0.1.0",
|
|
9
|
+
description="A plugin for optical projection tomography reconstruction with model-based neural networks.",
|
|
10
|
+
long_description=long_description,
|
|
11
|
+
long_description_content_type="text/markdown",
|
|
12
|
+
author="Marcos Antonio Obando, Minh Nhat Trinh, David Palecek, Germán Mato, Teresa Correia",
|
|
13
|
+
author_email="marcos.obando@ib.edu.ar",
|
|
14
|
+
license="MIT",
|
|
15
|
+
license_files=["LICENSE"],
|
|
16
|
+
classifiers=[
|
|
17
|
+
"Development Status :: 2 - Pre-Alpha",
|
|
18
|
+
"Framework :: napari",
|
|
19
|
+
"Intended Audience :: Developers",
|
|
20
|
+
"License :: OSI Approved :: MIT License",
|
|
21
|
+
"Operating System :: OS Independent",
|
|
22
|
+
"Programming Language :: Python",
|
|
23
|
+
"Programming Language :: Python :: 3",
|
|
24
|
+
"Programming Language :: Python :: 3.9",
|
|
25
|
+
"Programming Language :: Python :: 3.10",
|
|
26
|
+
"Programming Language :: Python :: 3.11",
|
|
27
|
+
"Topic :: Scientific/Engineering :: Image Processing",
|
|
28
|
+
],
|
|
29
|
+
python_requires=">=3.9",
|
|
30
|
+
install_requires=[
|
|
31
|
+
"magicgui",
|
|
32
|
+
"qtpy",
|
|
33
|
+
# "napari",
|
|
34
|
+
# "pyqt5",
|
|
35
|
+
"scikit-image",
|
|
36
|
+
"scipy",
|
|
37
|
+
"qbi-radon",
|
|
38
|
+
# "pyopengl==3.1.6"
|
|
39
|
+
],
|
|
40
|
+
package_dir={"": "src"},
|
|
41
|
+
packages=find_packages(where="src"),
|
|
42
|
+
include_package_data=True,
|
|
43
|
+
entry_points={
|
|
44
|
+
"napari.manifest": [
|
|
45
|
+
"tomopari = tomopari:napari.yaml",
|
|
46
|
+
]
|
|
47
|
+
},
|
|
48
|
+
package_data={"": ["*.yaml"], "tomopari.processors": ["*.ckpt"]},
|
|
49
|
+
)
|
|
@@ -0,0 +1,11 @@
|
|
|
1
|
+
try:
|
|
2
|
+
from ._version import version as __version__
|
|
3
|
+
except ImportError:
|
|
4
|
+
__version__ = "unknown"
|
|
5
|
+
__author__ = "Marcos Obando and Minh Nhat Trinh"
|
|
6
|
+
__credits__ = "Teresa Correia and Germán Mato"
|
|
7
|
+
__email__ = "marcos.obando@ib.edu.ar"
|
|
8
|
+
|
|
9
|
+
|
|
10
|
+
from ._reconstruction_widget import ReconstructionWidget
|
|
11
|
+
from .processors import OPTProcessor
|