kistitch 0.5.0__tar.gz
This diff represents the content of publicly available package versions that have been released to one of the supported registries. The information contained in this diff is provided for informational purposes only and reflects changes between package versions as they appear in their respective public registries.
- kistitch-0.5.0/.gitignore +10 -0
- kistitch-0.5.0/LICENSE +21 -0
- kistitch-0.5.0/PKG-INFO +200 -0
- kistitch-0.5.0/README.md +176 -0
- kistitch-0.5.0/kistitch/__init__.py +0 -0
- kistitch-0.5.0/kistitch/clearvias.py +23 -0
- kistitch-0.5.0/kistitch/cli.py +430 -0
- kistitch-0.5.0/kistitch/commit.py +335 -0
- kistitch-0.5.0/kistitch/drc.py +536 -0
- kistitch-0.5.0/kistitch/obstacles.py +322 -0
- kistitch-0.5.0/kistitch/overlay.py +327 -0
- kistitch-0.5.0/kistitch/padvia.py +357 -0
- kistitch-0.5.0/kistitch/placement.py +232 -0
- kistitch-0.5.0/kistitch/plan.py +120 -0
- kistitch-0.5.0/kistitch/pourstitch.py +592 -0
- kistitch-0.5.0/kistitch/pourstitch_command.py +161 -0
- kistitch-0.5.0/kistitch/raster.py +201 -0
- kistitch-0.5.0/kistitch/render.py +429 -0
- kistitch-0.5.0/kistitch/returnpath.py +320 -0
- kistitch-0.5.0/kistitch/returnvia.py +197 -0
- kistitch-0.5.0/kistitch/returnvia_command.py +450 -0
- kistitch-0.5.0/kistitch/returnvia_planner.py +306 -0
- kistitch-0.5.0/kistitch/snapshot.py +555 -0
- kistitch-0.5.0/pyproject.toml +52 -0
- kistitch-0.5.0/tests/conftest.py +33 -0
- kistitch-0.5.0/tests/test_clearvias.py +273 -0
- kistitch-0.5.0/tests/test_cli.py +342 -0
- kistitch-0.5.0/tests/test_drc.py +748 -0
- kistitch-0.5.0/tests/test_obstacles.py +393 -0
- kistitch-0.5.0/tests/test_overlay.py +849 -0
- kistitch-0.5.0/tests/test_padvia.py +943 -0
- kistitch-0.5.0/tests/test_placement.py +1010 -0
- kistitch-0.5.0/tests/test_planner_rules.py +161 -0
- kistitch-0.5.0/tests/test_pourstitch.py +634 -0
- kistitch-0.5.0/tests/test_pourstitch_command.py +528 -0
- kistitch-0.5.0/tests/test_raster.py +89 -0
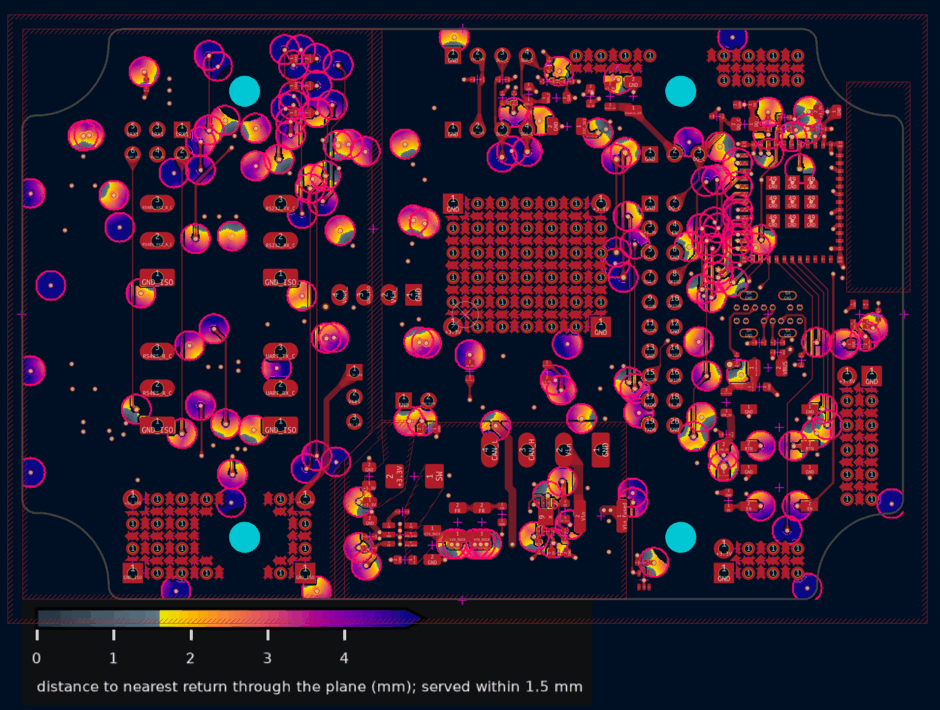
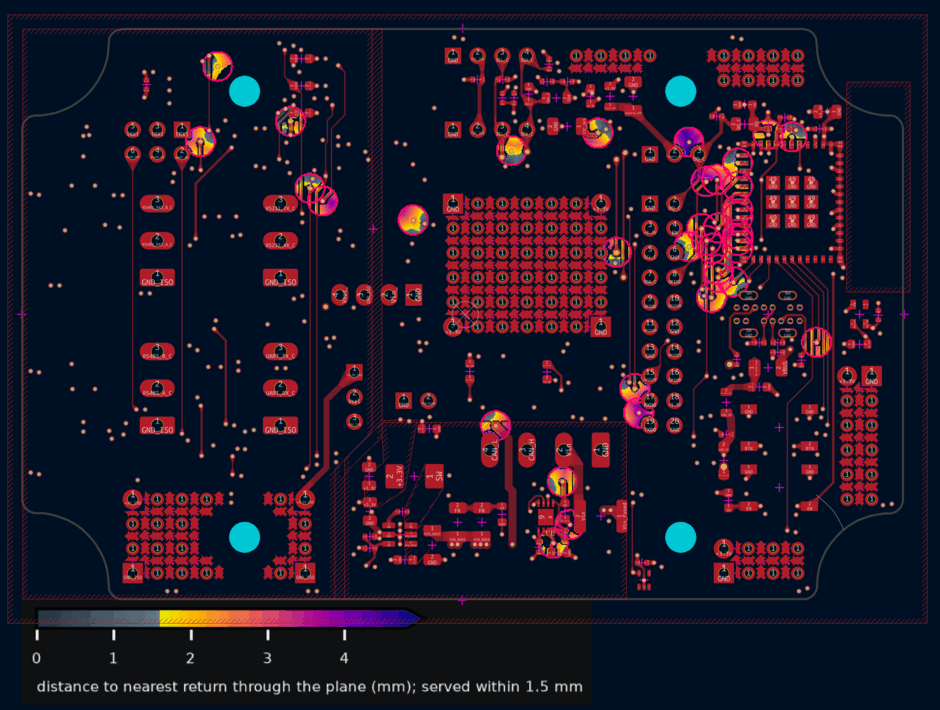
- kistitch-0.5.0/tests/test_returnpath.py +322 -0
- kistitch-0.5.0/tests/test_returnvia.py +799 -0
- kistitch-0.5.0/tests/test_returnvia_command.py +1290 -0
- kistitch-0.5.0/tests/test_returnvia_planner.py +435 -0
- kistitch-0.5.0/tests/test_snapshot.py +499 -0
- kistitch-0.5.0/uv.lock +1514 -0
kistitch-0.5.0/LICENSE
ADDED
|
@@ -0,0 +1,21 @@
|
|
|
1
|
+
MIT License
|
|
2
|
+
|
|
3
|
+
Copyright (c) 2025 Hat Labs Oy
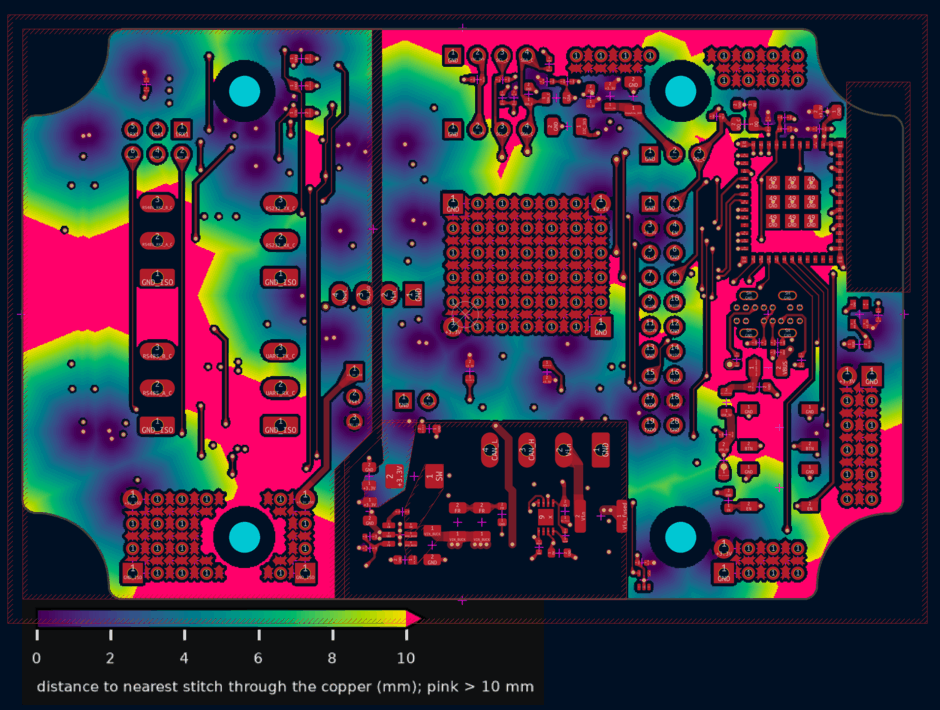
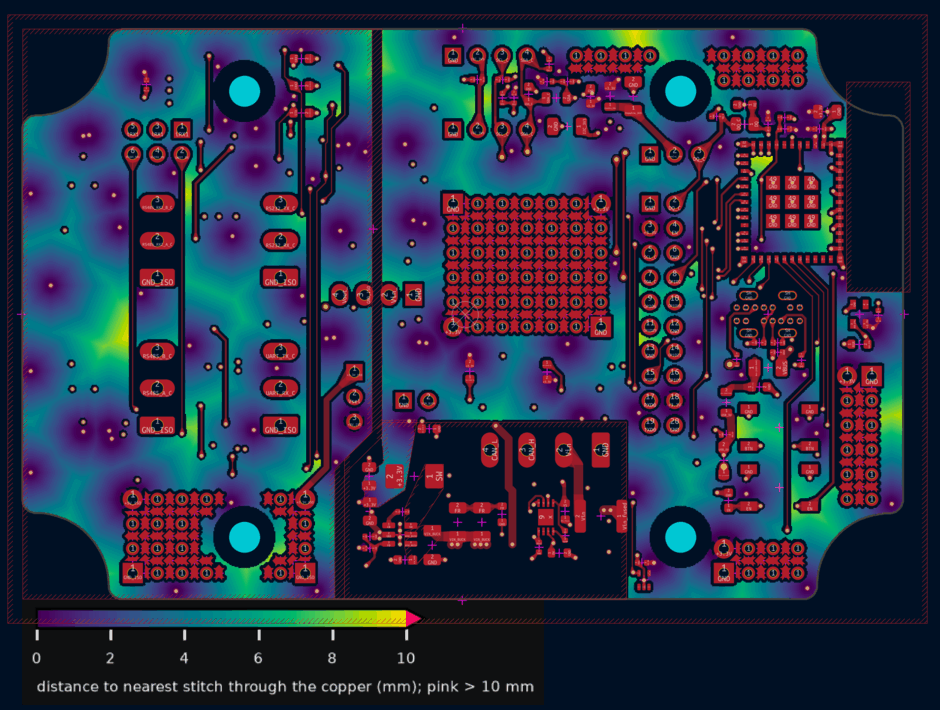
|
|
4
|
+
|
|
5
|
+
Permission is hereby granted, free of charge, to any person obtaining a copy
|
|
6
|
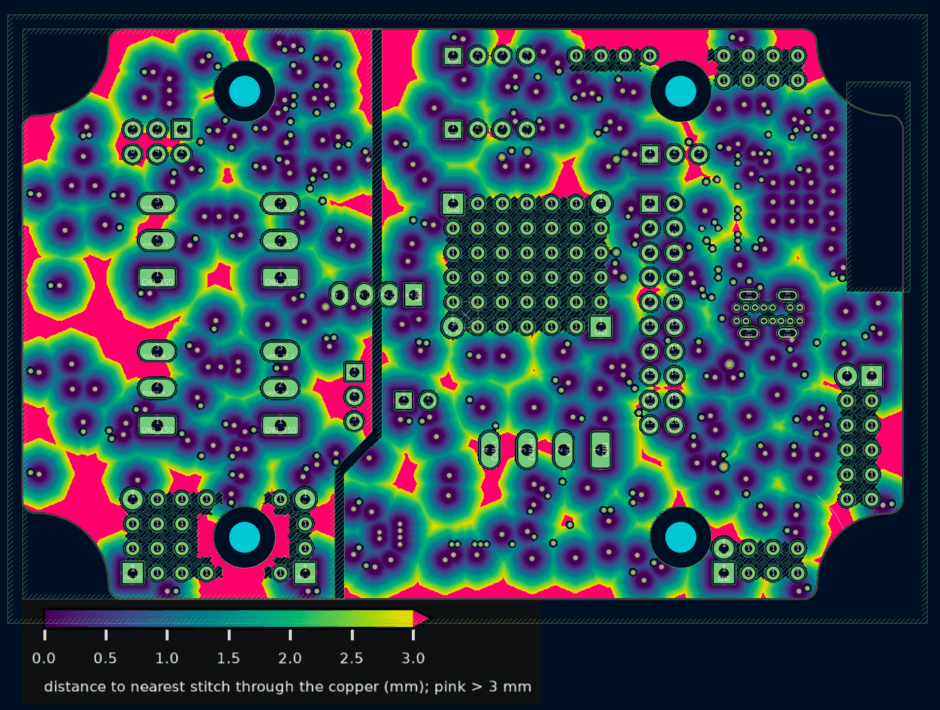
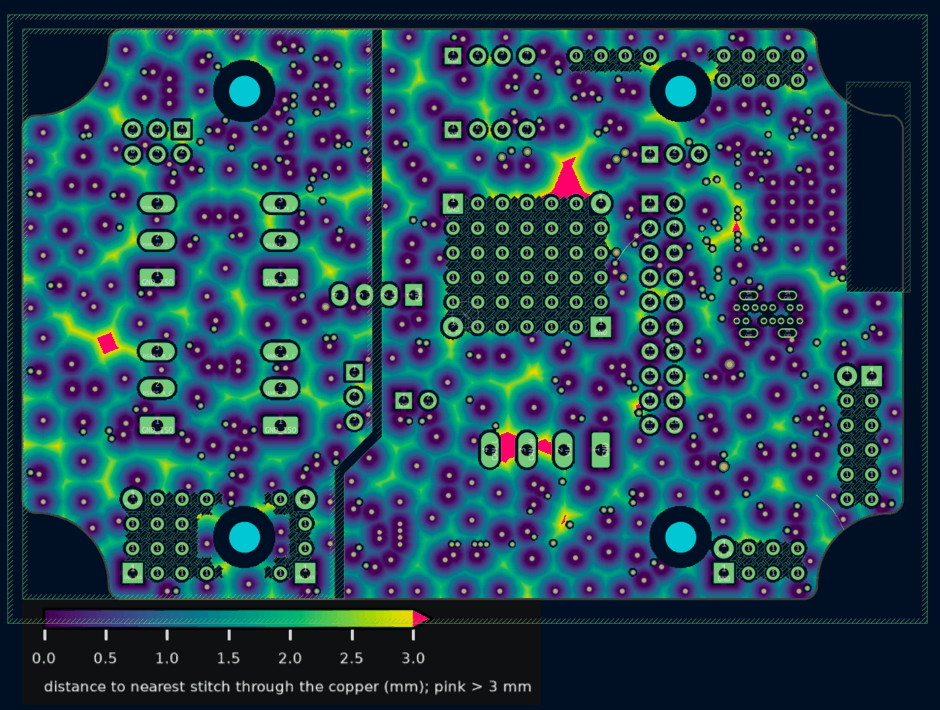
+
of this software and associated documentation files (the "Software"), to deal
|
|
7
|
+
in the Software without restriction, including without limitation the rights
|
|
8
|
+
to use, copy, modify, merge, publish, distribute, sublicense, and/or sell
|
|
9
|
+
copies of the Software, and to permit persons to whom the Software is
|
|
10
|
+
furnished to do so, subject to the following conditions:
|
|
11
|
+
|
|
12
|
+
The above copyright notice and this permission notice shall be included in all
|
|
13
|
+
copies or substantial portions of the Software.
|
|
14
|
+
|
|
15
|
+
THE SOFTWARE IS PROVIDED "AS IS", WITHOUT WARRANTY OF ANY KIND, EXPRESS OR
|
|
16
|
+
IMPLIED, INCLUDING BUT NOT LIMITED TO THE WARRANTIES OF MERCHANTABILITY,
|
|
17
|
+
FITNESS FOR A PARTICULAR PURPOSE AND NONINFRINGEMENT. IN NO EVENT SHALL THE
|
|
18
|
+
AUTHORS OR COPYRIGHT HOLDERS BE LIABLE FOR ANY CLAIM, DAMAGES OR OTHER
|
|
19
|
+
LIABILITY, WHETHER IN AN ACTION OF CONTRACT, TORT OR OTHERWISE, ARISING FROM,
|
|
20
|
+
OUT OF OR IN CONNECTION WITH THE SOFTWARE OR THE USE OR OTHER DEALINGS IN THE
|
|
21
|
+
SOFTWARE.
|
kistitch-0.5.0/PKG-INFO
ADDED
|
@@ -0,0 +1,200 @@
|
|
|
1
|
+
Metadata-Version: 2.5
|
|
2
|
+
Name: kistitch
|
|
3
|
+
Version: 0.5.0
|
|
4
|
+
Summary: DRC-checked placement of return, pad and pour stitching vias for KiCad, with return and coverage heatmaps
|
|
5
|
+
Project-URL: Homepage, https://github.com/hatlabs/kistitch
|
|
6
|
+
Author-email: Matti Airas <matti.airas@hatlabs.fi>
|
|
7
|
+
License-Expression: MIT
|
|
8
|
+
License-File: LICENSE
|
|
9
|
+
Keywords: EDA,KiCad,PCB,stitching,vias
|
|
10
|
+
Classifier: Development Status :: 4 - Beta
|
|
11
|
+
Classifier: License :: OSI Approved :: MIT License
|
|
12
|
+
Classifier: Programming Language :: Python :: 3
|
|
13
|
+
Classifier: Topic :: Scientific/Engineering :: Electronic Design Automation (EDA)
|
|
14
|
+
Classifier: Topic :: Utilities
|
|
15
|
+
Requires-Python: >=3.11
|
|
16
|
+
Requires-Dist: kicad-python>=0.8.0
|
|
17
|
+
Requires-Dist: loguru>=0.7.2
|
|
18
|
+
Requires-Dist: matplotlib>=3.10.0
|
|
19
|
+
Requires-Dist: numpy>=2.0
|
|
20
|
+
Requires-Dist: scikit-image>=0.25
|
|
21
|
+
Requires-Dist: scipy>=1.14
|
|
22
|
+
Requires-Dist: shapely>=2.0.7
|
|
23
|
+
Description-Content-Type: text/markdown
|
|
24
|
+
|
|
25
|
+
# Kistitch: Via Stitching for KiCad Layouts
|
|
26
|
+
|
|
27
|
+
Formerly [breakneck](https://pypi.org/project/breakneck/). To switch an installed tool, run `uv tool uninstall breakneck && uv tool install kistitch`. The neckdown command `cut` is gone; breakneck 0.4.x still has it.
|
|
28
|
+
|
|
29
|
+
## Introduction
|
|
30
|
+
|
|
31
|
+
Kistitch works on the board open in KiCad's PCB editor, through the KiCad IPC API. It has two jobs:
|
|
32
|
+
|
|
33
|
+
- **Via placement.** `returnvia`, `padvia` and `pourstitch` place ground return vias, pad stitching vias and pour stitching vias. Every run is checked with KiCad's own DRC before anything is committed, and lands as one undoable step.
|
|
34
|
+
- **Heatmaps.** `returnvia` and `pourstitch` show return distance and pour coverage as heatmaps, rendered to a file or placed on the board, for checking a layout and placing vias by hand.
|
|
35
|
+
|
|
36
|
+
### Return vias
|
|
37
|
+
|
|
38
|
+
A signal changing layers through a via also changes its reference plane, and its return current needs a ground via nearby to follow it. `returnvia` places a ground via within `--distance` (default 1.5 mm) of every via on a non-ground net that has none.
|
|
39
|
+
|
|
40
|
+
| Before: `kistitch returnvia --check --overlay` | After: `kistitch returnvia --overlay` |
|
|
41
|
+
|---|---|
|
|
42
|
+
|  |  |
|
|
43
|
+
|
|
44
|
+
The return distance heatmap on F.Cu of a four-layer board, before and after placing return vias, following a `pourstitch --power` run. Each pink ring marks an unserved via end: one with no ground return within 1.5 mm through its reference plane. The rings left after the run mark the vias the planner couldn't serve; fix those by hand.
|
|
45
|
+
|
|
46
|
+
**Reference planes.** A via end is a copper layer the via connects on: a same-net track, pad or fill touches it there. A via that connects on fewer than two layers carries no layer change and is exempt. Each end's reference plane is the nearest other copper layer in stack order with a ground zone outline at the via, the upper one of two equally near layers. Ends on the same plane are measured once.
|
|
47
|
+
|
|
48
|
+
**Metric.** The return distance on a plane is the distance from the via's centre to the nearest return's centre through that plane's ground fill: a straight hop across the via's own antipad, then through the fill. Returns are the ground net's vias and through-hole pads with fill within reach of them. A return of GND does not serve a via whose plane is GND_ISO. A via end is served when its distance is at most `--distance` plus a 0.1 mm margin for the 0.1 mm raster. Paths on the raster run in eight directions, which overstates a straight run by up to about 8 % between them, so the effective straight-line limit depends on direction: about 1.46–1.65 mm at the default distance.
|
|
49
|
+
|
|
50
|
+
The planner places vias by the same measure. For each via and ground net with unserved ends, it tries spots on rings around the via, nearest first, out to `--distance` plus the margin, and takes the first spot with full clearance that serves every one of those ends. A spot across a slot in a plane is rejected if the path around the slot is too long. A planned run therefore passes its own `--check`, except for the vias it reports as unfixable (including those left to a nearby forced via, which the log names), the vias it forced, and vias whose return DRC dropped at the round limit. The planner measures each ground net's plane as it was filled before the run. Every new via of one ground net cuts an antipad into the planes of the other ground nets, which can lengthen paths through them, so on a board with more than one ground net run `returnvia --check` after the run and the refill.
|
|
51
|
+
|
|
52
|
+
Boards with isolated sections are supported: each end is measured against the ground net whose zone on its reference plane contains the via, so a via in a GND_ISO section gets a GND_ISO return, and a via whose ends reference GND and GND_ISO gets one of each. A via end outside every ground zone is reported, not served. So is an end whose plane has no ground fill within `--distance` of the via.
|
|
53
|
+
|
|
54
|
+
The ground nets are the nets with zones on two or more inner layers. A board with no such net, such as a two-layer board or a stackup with one inner ground plane, uses the net named GND. Without a GND net, `returnvia` stops before changing anything and asks for `--ground-nets`. A net named in `--ground-nets` that has no zones, vias or pads on the board, usually a typo, gets a warning. Vias on ground nets never need a return.
|
|
55
|
+
|
|
56
|
+
**Stackup assumption.** The plane next to a signal layer is taken to be a ground pour. In a SIG-GND-PWR-SIG stackup, B.Cu's real reference is the power plane on In2. With no ground zone on In2, B.Cu ends are measured on In1 instead. A board-wide low-priority GND zone under the power plane on In2 makes In2 the reference, but leaves B.Cu ends with no ground fill there, so every B.Cu end fails.
|
|
57
|
+
|
|
58
|
+
### Pad stitching vias
|
|
59
|
+
|
|
60
|
+
`padvia` gives every SMD pad with its own net's fill within reach on another copper layer a via and a short stub track into the net's plane or pour, unless the pad already reaches a same-net via or through-hole pad within 1 mm, copper edge to copper edge, through its tracks, pads or pour. Only fill the via fits in counts: a sliver narrower than the via, such as a strip of pour left under a same-net track, doesn't select the pad. The via goes on the side of the pad facing away from the footprint centre where there is room. The stub runs at multiples of 45°: one segment when the via lies straight or diagonally off the pad, otherwise a diagonal and a straight leg. `--nets GND +3.3V` limits it to those pads of the listed nets. Keep `--nets` when a net meant to join its plane at a single point, such as a star ground, has a zone under its pads; leave that net out of the list.
|
|
61
|
+
|
|
62
|
+
### Pour stitching vias
|
|
63
|
+
|
|
64
|
+
With Manhattan routing, outer-layer pours break up into narrow fingers. A regular grid of stitching vias misses many of them, and an unstitched finger connected at one end can act as an antenna.
|
|
65
|
+
|
|
66
|
+
`pourstitch` makes every point of a net's pours lie within a distance D of a stitching via, measuring distance through the copper rather than in a straight line. A finger whose tip is 2 mm from a via across a gap, but 8 mm away along the copper, counts as 8 mm. Each run stitches one class of nets at one distance:
|
|
67
|
+
|
|
68
|
+
- `pourstitch` stitches the ground nets at 3 mm. They are found the same way as for `returnvia` (see above), and `--ground-nets` overrides the detection the same way. Without a ground net, the run stops before changing anything and asks for `--ground-nets`.
|
|
69
|
+
- `pourstitch --power` stitches every other net at 10 mm, power pours and pours of signal nets alike. On a board without a ground net, it logs that and stitches every net.
|
|
70
|
+
|
|
71
|
+
`--distance D` replaces the class's distance for every net in the run. Only nets with pours on two or more copper layers are stitched; a net whose zones are all on one layer has nothing to stitch and is skipped. `--nets GND GND_ISO` limits the run to the listed nets of its class. A listed net of the other class is skipped with a warning, so `pourstitch --nets GND +3.3V` stitches only GND, and +3.3V needs a `--power` run. When every listed net is of the other class, as in `pourstitch --nets +3.3V`, the run stops with an error naming the flag to use; it commits nothing and leaves the markers in place. The log names the class, its distance and the nets it stitches.
|
|
72
|
+
|
|
73
|
+
Power pours are stitched sparsely. They need vias to join their layers, to carry their DC current and to reach their extremities, and a 10 mm distance gives that. More power vias cost more than they give: each one cuts an antipad into the ground planes it passes through, and each one is a via on a non-ground net that needs its own ground return. Where a power pour carries high current, check that it has enough vias for it and add more by hand.
|
|
74
|
+
|
|
75
|
+
| Before: `kistitch pourstitch --power --check --overlay` | After: `kistitch pourstitch --power --overlay` |
|
|
76
|
+
|---|---|
|
|
77
|
+
|  |  |
|
|
78
|
+
|
|
79
|
+
Power pour coverage on F.Cu. Pink copper is more than 10 mm from a stitching via, measured through the copper.
|
|
80
|
+
|
|
81
|
+
Ground pours are stitched densely, so that the ground layers act as one reference and no ground finger is left to act as an antenna. At 3 mm the lattice pitch is about 4.2 mm, which is λ/20 at about 1.7 GHz in FR-4. That is not dense enough for RF: around an RF section, such as the surroundings of a 2.4 GHz module and its antenna feed, add ground vias by hand.
|
|
82
|
+
|
|
83
|
+
| Before: `kistitch pourstitch --check --overlay` | After: `kistitch pourstitch --overlay` |
|
|
84
|
+
|---|---|
|
|
85
|
+
|  |  |
|
|
86
|
+
|
|
87
|
+
Ground plane coverage on In1.Cu, following the `pourstitch --power` and `returnvia` runs above. Pink copper is more than 3 mm from a stitching via. The pink left after the run, here next to the through-hole pads, is copper where no via fits within 3 mm through the copper; the run logs its total area but doesn't mark it.
|
|
88
|
+
|
|
89
|
+
`pourstitch` rasterises the pours at 0.1 mm, places vias on a square lattice of pitch D·√2, then fills the remaining gaps one at a time, starting with the point farthest from any via. Narrow spots get a smaller fallback via. `--render` and `--overlay` show the result as heatmaps (see below).
|
|
90
|
+
|
|
91
|
+
## Installation
|
|
92
|
+
|
|
93
|
+
As a prerequisite, [install uv](https://docs.astral.sh/uv/getting-started/installation/).
|
|
94
|
+
|
|
95
|
+
To run kistitch without actually installing it:
|
|
96
|
+
|
|
97
|
+
```
|
|
98
|
+
uvx kistitch <command> [options...]
|
|
99
|
+
```
|
|
100
|
+
|
|
101
|
+
To install kistitch as a tool:
|
|
102
|
+
|
|
103
|
+
```
|
|
104
|
+
uv tool install kistitch
|
|
105
|
+
```
|
|
106
|
+
|
|
107
|
+
Kistitch needs KiCad 10 and kicad-python 0.8 or later.
|
|
108
|
+
|
|
109
|
+
## KiCad Configuration
|
|
110
|
+
|
|
111
|
+
The new KiCad IPC API lets you connect to an existing KiCad instance using Inter-Process Communication (IPC). The API is not enabled by default. To enable it, open the KiCad preferences and navigate to "Plugins" and check the "Enable KiCad API" checkbox.
|
|
112
|
+
|
|
113
|
+
Only one KiCad instance can serve the API at a time. Close other KiCad windows if kistitch can't find the open board.
|
|
114
|
+
|
|
115
|
+
## Usage
|
|
116
|
+
|
|
117
|
+
**NOTE:** If you are running kistitch with `uvx`, prepend all kistitch commands below with `uvx`.
|
|
118
|
+
|
|
119
|
+
Run `kistitch -h`, or `kistitch <command> -h`, to see the available options.
|
|
120
|
+
|
|
121
|
+
### Placing vias
|
|
122
|
+
|
|
123
|
+
```bash
|
|
124
|
+
kistitch padvia
|
|
125
|
+
kistitch pourstitch --power
|
|
126
|
+
kistitch returnvia
|
|
127
|
+
kistitch pourstitch --overlay
|
|
128
|
+
```
|
|
129
|
+
|
|
130
|
+
Each placement run:
|
|
131
|
+
|
|
132
|
+
1. Refills the zones, so the planner sees current fills.
|
|
133
|
+
2. Plans the vias from a snapshot of the board.
|
|
134
|
+
3. Checks the plan with `kicad-cli pcb drc` on a temporary copy of the board, against a DRC run on an unmodified copy. Vias implicated in new violations are dropped, and the planner tries again without those spots, for up to five rounds.
|
|
135
|
+
4. Commits the remaining vias, their stubs and any markers as one undo step, replacing the markers of earlier runs, then refills the zones. If the board was edited in KiCad while the run was going, nothing is committed and the run has to be repeated.
|
|
136
|
+
|
|
137
|
+
Spots that need attention get markers on User.Eco2:
|
|
138
|
+
|
|
139
|
+
- a circle, at least 0.7 mm across, where no via fits (`returnvia` and `padvia`), and after `returnvia --check --overlay` at each via with an unserved end; on a `padvia` pad it encloses the pad with a margin, so copper drawn in front can't hide it;
|
|
140
|
+
- a + at a forced via (`returnvia --force`);
|
|
141
|
+
- a square at a new DRC violation that couldn't be pinned on a single via.
|
|
142
|
+
|
|
143
|
+
Other nets' pours are not obstacles, so a single via can cut a narrow neck of another net's pour. DRC reports that as unconnected items or isolated copper and names the pour's pads or zones, not the via. Kistitch counts these violations per net, in DRC of the board as it is and with the planned vias added. When a net's count goes up, the run commits nothing and exits with an error naming the net and listing the violations. An existing violation that DRC reports at different items after the refill leaves the count unchanged, so it gets a marker but doesn't stop the run. `--allow-splits` (on `returnvia`, `padvia` and `pourstitch`) commits anyway, with a square marker at each violation for fixing by hand. A dry run lists them without failing.
|
|
144
|
+
|
|
145
|
+
`pourstitch` doesn't mark uncovered spots; its heatmap shows them as areas. Each placing `returnvia`, `padvia` or `pourstitch` run that doesn't stop with an error replaces the previous markers, whichever command made them: it removes every shape on User.Eco2, hand-drawn ones included, in the same undo step, also when it places nothing. So after `padvia` then `pourstitch`, only `pourstitch`'s markers remain. A `--check --overlay` run replaces them too, in the undo step that places the overlay images: `returnvia` draws a circle at each via with an unserved end, matching the heatmap's rings, and `pourstitch` only removes the old markers. A `--check --overlay` run with nothing to show, such as a `returnvia` check with every via end served, still removes the old markers. A `--check` run without `--overlay`, or one that can't place overlays, as in a dry run with the overlay layers disabled, leaves the markers alone, as does a dry run of a placing command. `kistitch clear` removes the markers without a run.
|
|
146
|
+
|
|
147
|
+
`returnvia --force` adds a second pass: every via still without a return gets one at the spot with the most clearance, never overlapping other-net copper. These vias may violate clearance. They survive the DRC check despite that, and get a marker so you can fix them by hand. A forced via is a placeholder that may lie outside the ground fill, so it serves nothing: the run's log and heatmaps still count its via as unserved. Other vias of the same ground net within `--distance` of it in a straight line get no forced via of their own; they are reported unfixable with "relies on forced via at (x, y)" and get a circle. After moving it, refill the zones and run `returnvia --check` to confirm. Via ends outside every ground zone, or with no ground fill near the via, are never forced.
|
|
148
|
+
|
|
149
|
+
After `padvia`, stitch the pours in three steps, with checks by hand between them:
|
|
150
|
+
|
|
151
|
+
1. `pourstitch --power`. Look at the result with `--check --render` or `--overlay`, and add vias by hand at the extremities of power pours that are still uncovered.
|
|
152
|
+
2. `returnvia`. It gives every via on a non-ground net a return, the power stitching vias from step 1 included. Fix the vias it reports by hand, refill the zones and confirm with `returnvia --check`.
|
|
153
|
+
3. `pourstitch`. It counts the return vias already on the board as ground stitches, so it adds ground vias only where they leave gaps.
|
|
154
|
+
|
|
155
|
+
Finish with `pourstitch --power --check`, with `--render` or `--overlay`, and `returnvia --check`. The power check is repeated because steps 2 and 3 place GND vias inside the outer-layer power pours, which can lengthen paths through power fingers.
|
|
156
|
+
|
|
157
|
+
Power stitching goes first because its vias need returns, and ground stitching goes last because the return vias count towards it. Every via placed punches a hole in other nets' pours and can create new narrow spots, so after later hand edits, repeat the `--check` runs.
|
|
158
|
+
|
|
159
|
+
Notes:
|
|
160
|
+
|
|
161
|
+
- **Via sizes** come from each net's netclass. `--via DIAMETER/DRILL` overrides them, and `pourstitch --fallback-via` (default 0.5/0.3) sets the smaller size for narrow spots.
|
|
162
|
+
- **Which layers a via must join** is read from the net's zones. At each spot, a via must sit inside the net's fill on every copper layer where one of the net's zone outlines covers the spot, and there must be at least two such layers. A net with zones on only one layer can't be stitched and is skipped.
|
|
163
|
+
- **Other nets' pours** are not obstacles. They refill around the new vias, as in any KiCad layout.
|
|
164
|
+
- **Project rules are read from disk.** DRC uses the saved `.kicad_pro` and `.kicad_dru`, so save rule and netclass changes before running. The board itself is read from the editor, unsaved changes included.
|
|
165
|
+
- **kicad-cli** is taken from `--kicad-cli`, then from the running KiCad, then from `PATH`, then from the standard install locations.
|
|
166
|
+
- **Set the zones' "Remove islands" to Never** before running `pourstitch` or `returnvia`. KiCad then keeps unconnected islands in the fill, so kistitch can place vias in them, and a spot over the main pour on one layer with only an island on the other passes the two-layer rule instead of dropping out, and stops showing grey in the `pourstitch` heatmap. Islands kept this way appear as isolated copper in DRC until they are stitched. Stitching only lowers that count, so the split check doesn't block the run.
|
|
167
|
+
- **Runs add vias.** Every check counts the vias already on the board, so repeating a run adds nothing new. To remove a run's vias, undo it, or run `kistitch clear --vias` (below) to remove every stitching via not tied to a track or pad. KiCad 10 doesn't allow creating groups through the API, so a run's vias can't be grouped for selecting later.
|
|
168
|
+
|
|
169
|
+
### Clearing stitching vias
|
|
170
|
+
|
|
171
|
+
`kistitch clear --vias` removes stitching vias along with the markers and overlays, so `pourstitch` and `returnvia` can place a fresh set after layout changes. A via goes when it touches a fill of its own net on at least one layer and no track or pad of its net touches it. Vias in pads, fanout vias at the end of a track and locked vias stay. `--nets NET [NET ...]` limits the removal to those nets; by default every net with a zone is cleared. The removal is one undo step, followed by a zone refill. With `--dry-run` it logs how many vias per net would go and removes nothing.
|
|
172
|
+
|
|
173
|
+
**This removes every via touching a pour of its own net that no track or pad ties down, including vias placed by hand.** That includes fanout vias tied to a pad only through a pour, and vias that are the only link between two pours of the same net. To keep such a via, connect it with a short track or lock it. To restore a board after clearing, run `clear --vias`, then `padvia` (it re-adds a via with a stub track for each SMD pad, and the stubs keep those vias through later clears), then the three stitching steps above: `pourstitch --power`, `returnvia` and `pourstitch`.
|
|
174
|
+
|
|
175
|
+
### Dry runs
|
|
176
|
+
|
|
177
|
+
`kistitch --dry-run <command>` plans, runs DRC, logs what it would place and writes `--render` output, but commits no vias or markers. The zone refill before planning still runs, and `--overlay` still places its images, together with the markers of a `--check` run. The heatmaps include the planned vias: for `returnvia` they count as returns, except forced ones, so a dry run shows which via ends the run would leave unserved.
|
|
178
|
+
|
|
179
|
+
### Heatmaps
|
|
180
|
+
|
|
181
|
+
`pourstitch --render PATH` writes a figure with one panel per net and layer for the nets of the run's class, coloured by distance to the nearest stitching via, measured through the copper. Points beyond the run's distance, the class's default or `--distance`, are pink. Copper that no via could ever bring within that distance is grey: it is farther than that, through the net's copper on its layer, from every spot where a via could join the net's fill on two or more layers. Typical grey copper is a local zone on one layer whose other side is another net's pour, or the far end of such a zone joined to the main pour by a long neck. Other-net clearances are ignored for this, so a spot blocked only by other copper shows pink, not grey. Grey areas are left out of the uncovered area that `pourstitch` logs and are reported separately.
|
|
182
|
+
|
|
183
|
+
`returnvia --render PATH` writes one panel per copper layer on which an unserved via end lies. By default each panel shows only the copper inside the rings around the unserved via ends, which picks out the problem vias. With nothing unserved, the figure is the board outline titled as such, and no overlay is placed. `--full-map` shows the copper of every layer on which a via changing layers connects: every net's tracks, pads and pours, ground pours included, since a via placed anywhere in it would need its own return, and the ground vias. Other vias show only on layers where they have a measured end. Each pixel is coloured by the distance through its reference plane to the nearest ground return. The reference plane is the nearest other copper layer in stack order with a ground zone outline at that pixel, the same rule a via end uses. A via end shows its own measured return distance over the via and over its net's copper in its antipad, the void around it in the reference plane, merged antipads included. Where antipads merge, the copper shows the worst of their distances. Another net's copper over the antipad stays purple: it has no return there. A signal through-hole pad shows the distance a via at its centre would have, over the pad and its clearance hole; pads are not reported unserved. Copper within the served threshold, `--distance` plus the 0.1 mm margin, is dark grey-blue, lightening towards the threshold. Beyond it the colour steps to yellow and runs through matplotlib's `plasma_r` to dark blue at 3 × the threshold, and stays there farther out. Purple copper has no path to a return: it lies over a slot or void in its reference plane. Copper with no ground outline on any other layer has no reference plane and is left blank, such as a two-layer board's ground side. A pink ring of radius `--distance` marks each unserved via end on its own layer. Identical layers share a panel.
|
|
184
|
+
|
|
185
|
+
`returnvia` logs the number of exempt vias, which connect on fewer than two layers, and how many vias and via-plane returns are unserved. Set `LOGURU_LEVEL=DEBUG` to list each unserved via end with its distance or the reason it can't be served.
|
|
186
|
+
|
|
187
|
+
`pourstitch --overlay` and `returnvia --overlay` place one transparent image per copper layer on the board as a reference image, scaled and positioned to line up with the copper. The images go on User.1–User.4, one per copper layer in stack order, or on the layers given with `--overlay-layers`. Those layers must be enabled in Board Setup → Board Editor Layers. Each image carries its colourbar and label in a strip below the board outline. The board stores the images itself; the PNGs are written to a temporary directory and removed once placed. When they can't be placed, as in a dry run with the layers disabled, they stay there and the log lists their paths and placements. Toggle a layer's visibility to show or hide its heatmap, and remove them with `kistitch clear`. Both `clear` and a new `--overlay` replace only kistitch's own overlays, recognised by a `kistitch` text chunk in the PNG, or the `breakneck` chunk of overlays placed before the rename, also after the board outline has changed. Other reference images on those layers stay.
|
|
188
|
+
|
|
189
|
+
`pourstitch --check` and `returnvia --check` measure the existing vias only: no planning, no DRC and no vias. Combine them with `--render` or `--overlay` to see the current coverage. Every `--overlay` run commits its images and so adds an undo step; with `--check`, that step also replaces the markers. For repeated checks while placing vias by hand, use `--check --render` and keep the PNG open in an image viewer that reloads it; use `--overlay` for a one-off look on the board:
|
|
190
|
+
|
|
191
|
+
```bash
|
|
192
|
+
kistitch returnvia --check --render returnvia.png
|
|
193
|
+
kistitch pourstitch --power --check --render power.png
|
|
194
|
+
kistitch pourstitch --check --overlay
|
|
195
|
+
```
|
|
196
|
+
|
|
197
|
+
## Limitations
|
|
198
|
+
|
|
199
|
+
- Placed vias can't be grouped, because KiCad 10 refuses to create groups through the API.
|
|
200
|
+
- The planners use fixed clearances (0.3 mm to other-net copper; a pad's clearance override plus 0.1 mm where it has one) and don't evaluate custom design rules. The DRC check is what enforces those.
|
kistitch-0.5.0/README.md
ADDED
|
@@ -0,0 +1,176 @@
|
|
|
1
|
+
# Kistitch: Via Stitching for KiCad Layouts
|
|
2
|
+
|
|
3
|
+
Formerly [breakneck](https://pypi.org/project/breakneck/). To switch an installed tool, run `uv tool uninstall breakneck && uv tool install kistitch`. The neckdown command `cut` is gone; breakneck 0.4.x still has it.
|
|
4
|
+
|
|
5
|
+
## Introduction
|
|
6
|
+
|
|
7
|
+
Kistitch works on the board open in KiCad's PCB editor, through the KiCad IPC API. It has two jobs:
|
|
8
|
+
|
|
9
|
+
- **Via placement.** `returnvia`, `padvia` and `pourstitch` place ground return vias, pad stitching vias and pour stitching vias. Every run is checked with KiCad's own DRC before anything is committed, and lands as one undoable step.
|
|
10
|
+
- **Heatmaps.** `returnvia` and `pourstitch` show return distance and pour coverage as heatmaps, rendered to a file or placed on the board, for checking a layout and placing vias by hand.
|
|
11
|
+
|
|
12
|
+
### Return vias
|
|
13
|
+
|
|
14
|
+
A signal changing layers through a via also changes its reference plane, and its return current needs a ground via nearby to follow it. `returnvia` places a ground via within `--distance` (default 1.5 mm) of every via on a non-ground net that has none.
|
|
15
|
+
|
|
16
|
+
| Before: `kistitch returnvia --check --overlay` | After: `kistitch returnvia --overlay` |
|
|
17
|
+
|---|---|
|
|
18
|
+
|  |  |
|
|
19
|
+
|
|
20
|
+
The return distance heatmap on F.Cu of a four-layer board, before and after placing return vias, following a `pourstitch --power` run. Each pink ring marks an unserved via end: one with no ground return within 1.5 mm through its reference plane. The rings left after the run mark the vias the planner couldn't serve; fix those by hand.
|
|
21
|
+
|
|
22
|
+
**Reference planes.** A via end is a copper layer the via connects on: a same-net track, pad or fill touches it there. A via that connects on fewer than two layers carries no layer change and is exempt. Each end's reference plane is the nearest other copper layer in stack order with a ground zone outline at the via, the upper one of two equally near layers. Ends on the same plane are measured once.
|
|
23
|
+
|
|
24
|
+
**Metric.** The return distance on a plane is the distance from the via's centre to the nearest return's centre through that plane's ground fill: a straight hop across the via's own antipad, then through the fill. Returns are the ground net's vias and through-hole pads with fill within reach of them. A return of GND does not serve a via whose plane is GND_ISO. A via end is served when its distance is at most `--distance` plus a 0.1 mm margin for the 0.1 mm raster. Paths on the raster run in eight directions, which overstates a straight run by up to about 8 % between them, so the effective straight-line limit depends on direction: about 1.46–1.65 mm at the default distance.
|
|
25
|
+
|
|
26
|
+
The planner places vias by the same measure. For each via and ground net with unserved ends, it tries spots on rings around the via, nearest first, out to `--distance` plus the margin, and takes the first spot with full clearance that serves every one of those ends. A spot across a slot in a plane is rejected if the path around the slot is too long. A planned run therefore passes its own `--check`, except for the vias it reports as unfixable (including those left to a nearby forced via, which the log names), the vias it forced, and vias whose return DRC dropped at the round limit. The planner measures each ground net's plane as it was filled before the run. Every new via of one ground net cuts an antipad into the planes of the other ground nets, which can lengthen paths through them, so on a board with more than one ground net run `returnvia --check` after the run and the refill.
|
|
27
|
+
|
|
28
|
+
Boards with isolated sections are supported: each end is measured against the ground net whose zone on its reference plane contains the via, so a via in a GND_ISO section gets a GND_ISO return, and a via whose ends reference GND and GND_ISO gets one of each. A via end outside every ground zone is reported, not served. So is an end whose plane has no ground fill within `--distance` of the via.
|
|
29
|
+
|
|
30
|
+
The ground nets are the nets with zones on two or more inner layers. A board with no such net, such as a two-layer board or a stackup with one inner ground plane, uses the net named GND. Without a GND net, `returnvia` stops before changing anything and asks for `--ground-nets`. A net named in `--ground-nets` that has no zones, vias or pads on the board, usually a typo, gets a warning. Vias on ground nets never need a return.
|
|
31
|
+
|
|
32
|
+
**Stackup assumption.** The plane next to a signal layer is taken to be a ground pour. In a SIG-GND-PWR-SIG stackup, B.Cu's real reference is the power plane on In2. With no ground zone on In2, B.Cu ends are measured on In1 instead. A board-wide low-priority GND zone under the power plane on In2 makes In2 the reference, but leaves B.Cu ends with no ground fill there, so every B.Cu end fails.
|
|
33
|
+
|
|
34
|
+
### Pad stitching vias
|
|
35
|
+
|
|
36
|
+
`padvia` gives every SMD pad with its own net's fill within reach on another copper layer a via and a short stub track into the net's plane or pour, unless the pad already reaches a same-net via or through-hole pad within 1 mm, copper edge to copper edge, through its tracks, pads or pour. Only fill the via fits in counts: a sliver narrower than the via, such as a strip of pour left under a same-net track, doesn't select the pad. The via goes on the side of the pad facing away from the footprint centre where there is room. The stub runs at multiples of 45°: one segment when the via lies straight or diagonally off the pad, otherwise a diagonal and a straight leg. `--nets GND +3.3V` limits it to those pads of the listed nets. Keep `--nets` when a net meant to join its plane at a single point, such as a star ground, has a zone under its pads; leave that net out of the list.
|
|
37
|
+
|
|
38
|
+
### Pour stitching vias
|
|
39
|
+
|
|
40
|
+
With Manhattan routing, outer-layer pours break up into narrow fingers. A regular grid of stitching vias misses many of them, and an unstitched finger connected at one end can act as an antenna.
|
|
41
|
+
|
|
42
|
+
`pourstitch` makes every point of a net's pours lie within a distance D of a stitching via, measuring distance through the copper rather than in a straight line. A finger whose tip is 2 mm from a via across a gap, but 8 mm away along the copper, counts as 8 mm. Each run stitches one class of nets at one distance:
|
|
43
|
+
|
|
44
|
+
- `pourstitch` stitches the ground nets at 3 mm. They are found the same way as for `returnvia` (see above), and `--ground-nets` overrides the detection the same way. Without a ground net, the run stops before changing anything and asks for `--ground-nets`.
|
|
45
|
+
- `pourstitch --power` stitches every other net at 10 mm, power pours and pours of signal nets alike. On a board without a ground net, it logs that and stitches every net.
|
|
46
|
+
|
|
47
|
+
`--distance D` replaces the class's distance for every net in the run. Only nets with pours on two or more copper layers are stitched; a net whose zones are all on one layer has nothing to stitch and is skipped. `--nets GND GND_ISO` limits the run to the listed nets of its class. A listed net of the other class is skipped with a warning, so `pourstitch --nets GND +3.3V` stitches only GND, and +3.3V needs a `--power` run. When every listed net is of the other class, as in `pourstitch --nets +3.3V`, the run stops with an error naming the flag to use; it commits nothing and leaves the markers in place. The log names the class, its distance and the nets it stitches.
|
|
48
|
+
|
|
49
|
+
Power pours are stitched sparsely. They need vias to join their layers, to carry their DC current and to reach their extremities, and a 10 mm distance gives that. More power vias cost more than they give: each one cuts an antipad into the ground planes it passes through, and each one is a via on a non-ground net that needs its own ground return. Where a power pour carries high current, check that it has enough vias for it and add more by hand.
|
|
50
|
+
|
|
51
|
+
| Before: `kistitch pourstitch --power --check --overlay` | After: `kistitch pourstitch --power --overlay` |
|
|
52
|
+
|---|---|
|
|
53
|
+
|  |  |
|
|
54
|
+
|
|
55
|
+
Power pour coverage on F.Cu. Pink copper is more than 10 mm from a stitching via, measured through the copper.
|
|
56
|
+
|
|
57
|
+
Ground pours are stitched densely, so that the ground layers act as one reference and no ground finger is left to act as an antenna. At 3 mm the lattice pitch is about 4.2 mm, which is λ/20 at about 1.7 GHz in FR-4. That is not dense enough for RF: around an RF section, such as the surroundings of a 2.4 GHz module and its antenna feed, add ground vias by hand.
|
|
58
|
+
|
|
59
|
+
| Before: `kistitch pourstitch --check --overlay` | After: `kistitch pourstitch --overlay` |
|
|
60
|
+
|---|---|
|
|
61
|
+
|  |  |
|
|
62
|
+
|
|
63
|
+
Ground plane coverage on In1.Cu, following the `pourstitch --power` and `returnvia` runs above. Pink copper is more than 3 mm from a stitching via. The pink left after the run, here next to the through-hole pads, is copper where no via fits within 3 mm through the copper; the run logs its total area but doesn't mark it.
|
|
64
|
+
|
|
65
|
+
`pourstitch` rasterises the pours at 0.1 mm, places vias on a square lattice of pitch D·√2, then fills the remaining gaps one at a time, starting with the point farthest from any via. Narrow spots get a smaller fallback via. `--render` and `--overlay` show the result as heatmaps (see below).
|
|
66
|
+
|
|
67
|
+
## Installation
|
|
68
|
+
|
|
69
|
+
As a prerequisite, [install uv](https://docs.astral.sh/uv/getting-started/installation/).
|
|
70
|
+
|
|
71
|
+
To run kistitch without actually installing it:
|
|
72
|
+
|
|
73
|
+
```
|
|
74
|
+
uvx kistitch <command> [options...]
|
|
75
|
+
```
|
|
76
|
+
|
|
77
|
+
To install kistitch as a tool:
|
|
78
|
+
|
|
79
|
+
```
|
|
80
|
+
uv tool install kistitch
|
|
81
|
+
```
|
|
82
|
+
|
|
83
|
+
Kistitch needs KiCad 10 and kicad-python 0.8 or later.
|
|
84
|
+
|
|
85
|
+
## KiCad Configuration
|
|
86
|
+
|
|
87
|
+
The new KiCad IPC API lets you connect to an existing KiCad instance using Inter-Process Communication (IPC). The API is not enabled by default. To enable it, open the KiCad preferences and navigate to "Plugins" and check the "Enable KiCad API" checkbox.
|
|
88
|
+
|
|
89
|
+
Only one KiCad instance can serve the API at a time. Close other KiCad windows if kistitch can't find the open board.
|
|
90
|
+
|
|
91
|
+
## Usage
|
|
92
|
+
|
|
93
|
+
**NOTE:** If you are running kistitch with `uvx`, prepend all kistitch commands below with `uvx`.
|
|
94
|
+
|
|
95
|
+
Run `kistitch -h`, or `kistitch <command> -h`, to see the available options.
|
|
96
|
+
|
|
97
|
+
### Placing vias
|
|
98
|
+
|
|
99
|
+
```bash
|
|
100
|
+
kistitch padvia
|
|
101
|
+
kistitch pourstitch --power
|
|
102
|
+
kistitch returnvia
|
|
103
|
+
kistitch pourstitch --overlay
|
|
104
|
+
```
|
|
105
|
+
|
|
106
|
+
Each placement run:
|
|
107
|
+
|
|
108
|
+
1. Refills the zones, so the planner sees current fills.
|
|
109
|
+
2. Plans the vias from a snapshot of the board.
|
|
110
|
+
3. Checks the plan with `kicad-cli pcb drc` on a temporary copy of the board, against a DRC run on an unmodified copy. Vias implicated in new violations are dropped, and the planner tries again without those spots, for up to five rounds.
|
|
111
|
+
4. Commits the remaining vias, their stubs and any markers as one undo step, replacing the markers of earlier runs, then refills the zones. If the board was edited in KiCad while the run was going, nothing is committed and the run has to be repeated.
|
|
112
|
+
|
|
113
|
+
Spots that need attention get markers on User.Eco2:
|
|
114
|
+
|
|
115
|
+
- a circle, at least 0.7 mm across, where no via fits (`returnvia` and `padvia`), and after `returnvia --check --overlay` at each via with an unserved end; on a `padvia` pad it encloses the pad with a margin, so copper drawn in front can't hide it;
|
|
116
|
+
- a + at a forced via (`returnvia --force`);
|
|
117
|
+
- a square at a new DRC violation that couldn't be pinned on a single via.
|
|
118
|
+
|
|
119
|
+
Other nets' pours are not obstacles, so a single via can cut a narrow neck of another net's pour. DRC reports that as unconnected items or isolated copper and names the pour's pads or zones, not the via. Kistitch counts these violations per net, in DRC of the board as it is and with the planned vias added. When a net's count goes up, the run commits nothing and exits with an error naming the net and listing the violations. An existing violation that DRC reports at different items after the refill leaves the count unchanged, so it gets a marker but doesn't stop the run. `--allow-splits` (on `returnvia`, `padvia` and `pourstitch`) commits anyway, with a square marker at each violation for fixing by hand. A dry run lists them without failing.
|
|
120
|
+
|
|
121
|
+
`pourstitch` doesn't mark uncovered spots; its heatmap shows them as areas. Each placing `returnvia`, `padvia` or `pourstitch` run that doesn't stop with an error replaces the previous markers, whichever command made them: it removes every shape on User.Eco2, hand-drawn ones included, in the same undo step, also when it places nothing. So after `padvia` then `pourstitch`, only `pourstitch`'s markers remain. A `--check --overlay` run replaces them too, in the undo step that places the overlay images: `returnvia` draws a circle at each via with an unserved end, matching the heatmap's rings, and `pourstitch` only removes the old markers. A `--check --overlay` run with nothing to show, such as a `returnvia` check with every via end served, still removes the old markers. A `--check` run without `--overlay`, or one that can't place overlays, as in a dry run with the overlay layers disabled, leaves the markers alone, as does a dry run of a placing command. `kistitch clear` removes the markers without a run.
|
|
122
|
+
|
|
123
|
+
`returnvia --force` adds a second pass: every via still without a return gets one at the spot with the most clearance, never overlapping other-net copper. These vias may violate clearance. They survive the DRC check despite that, and get a marker so you can fix them by hand. A forced via is a placeholder that may lie outside the ground fill, so it serves nothing: the run's log and heatmaps still count its via as unserved. Other vias of the same ground net within `--distance` of it in a straight line get no forced via of their own; they are reported unfixable with "relies on forced via at (x, y)" and get a circle. After moving it, refill the zones and run `returnvia --check` to confirm. Via ends outside every ground zone, or with no ground fill near the via, are never forced.
|
|
124
|
+
|
|
125
|
+
After `padvia`, stitch the pours in three steps, with checks by hand between them:
|
|
126
|
+
|
|
127
|
+
1. `pourstitch --power`. Look at the result with `--check --render` or `--overlay`, and add vias by hand at the extremities of power pours that are still uncovered.
|
|
128
|
+
2. `returnvia`. It gives every via on a non-ground net a return, the power stitching vias from step 1 included. Fix the vias it reports by hand, refill the zones and confirm with `returnvia --check`.
|
|
129
|
+
3. `pourstitch`. It counts the return vias already on the board as ground stitches, so it adds ground vias only where they leave gaps.
|
|
130
|
+
|
|
131
|
+
Finish with `pourstitch --power --check`, with `--render` or `--overlay`, and `returnvia --check`. The power check is repeated because steps 2 and 3 place GND vias inside the outer-layer power pours, which can lengthen paths through power fingers.
|
|
132
|
+
|
|
133
|
+
Power stitching goes first because its vias need returns, and ground stitching goes last because the return vias count towards it. Every via placed punches a hole in other nets' pours and can create new narrow spots, so after later hand edits, repeat the `--check` runs.
|
|
134
|
+
|
|
135
|
+
Notes:
|
|
136
|
+
|
|
137
|
+
- **Via sizes** come from each net's netclass. `--via DIAMETER/DRILL` overrides them, and `pourstitch --fallback-via` (default 0.5/0.3) sets the smaller size for narrow spots.
|
|
138
|
+
- **Which layers a via must join** is read from the net's zones. At each spot, a via must sit inside the net's fill on every copper layer where one of the net's zone outlines covers the spot, and there must be at least two such layers. A net with zones on only one layer can't be stitched and is skipped.
|
|
139
|
+
- **Other nets' pours** are not obstacles. They refill around the new vias, as in any KiCad layout.
|
|
140
|
+
- **Project rules are read from disk.** DRC uses the saved `.kicad_pro` and `.kicad_dru`, so save rule and netclass changes before running. The board itself is read from the editor, unsaved changes included.
|
|
141
|
+
- **kicad-cli** is taken from `--kicad-cli`, then from the running KiCad, then from `PATH`, then from the standard install locations.
|
|
142
|
+
- **Set the zones' "Remove islands" to Never** before running `pourstitch` or `returnvia`. KiCad then keeps unconnected islands in the fill, so kistitch can place vias in them, and a spot over the main pour on one layer with only an island on the other passes the two-layer rule instead of dropping out, and stops showing grey in the `pourstitch` heatmap. Islands kept this way appear as isolated copper in DRC until they are stitched. Stitching only lowers that count, so the split check doesn't block the run.
|
|
143
|
+
- **Runs add vias.** Every check counts the vias already on the board, so repeating a run adds nothing new. To remove a run's vias, undo it, or run `kistitch clear --vias` (below) to remove every stitching via not tied to a track or pad. KiCad 10 doesn't allow creating groups through the API, so a run's vias can't be grouped for selecting later.
|
|
144
|
+
|
|
145
|
+
### Clearing stitching vias
|
|
146
|
+
|
|
147
|
+
`kistitch clear --vias` removes stitching vias along with the markers and overlays, so `pourstitch` and `returnvia` can place a fresh set after layout changes. A via goes when it touches a fill of its own net on at least one layer and no track or pad of its net touches it. Vias in pads, fanout vias at the end of a track and locked vias stay. `--nets NET [NET ...]` limits the removal to those nets; by default every net with a zone is cleared. The removal is one undo step, followed by a zone refill. With `--dry-run` it logs how many vias per net would go and removes nothing.
|
|
148
|
+
|
|
149
|
+
**This removes every via touching a pour of its own net that no track or pad ties down, including vias placed by hand.** That includes fanout vias tied to a pad only through a pour, and vias that are the only link between two pours of the same net. To keep such a via, connect it with a short track or lock it. To restore a board after clearing, run `clear --vias`, then `padvia` (it re-adds a via with a stub track for each SMD pad, and the stubs keep those vias through later clears), then the three stitching steps above: `pourstitch --power`, `returnvia` and `pourstitch`.
|
|
150
|
+
|
|
151
|
+
### Dry runs
|
|
152
|
+
|
|
153
|
+
`kistitch --dry-run <command>` plans, runs DRC, logs what it would place and writes `--render` output, but commits no vias or markers. The zone refill before planning still runs, and `--overlay` still places its images, together with the markers of a `--check` run. The heatmaps include the planned vias: for `returnvia` they count as returns, except forced ones, so a dry run shows which via ends the run would leave unserved.
|
|
154
|
+
|
|
155
|
+
### Heatmaps
|
|
156
|
+
|
|
157
|
+
`pourstitch --render PATH` writes a figure with one panel per net and layer for the nets of the run's class, coloured by distance to the nearest stitching via, measured through the copper. Points beyond the run's distance, the class's default or `--distance`, are pink. Copper that no via could ever bring within that distance is grey: it is farther than that, through the net's copper on its layer, from every spot where a via could join the net's fill on two or more layers. Typical grey copper is a local zone on one layer whose other side is another net's pour, or the far end of such a zone joined to the main pour by a long neck. Other-net clearances are ignored for this, so a spot blocked only by other copper shows pink, not grey. Grey areas are left out of the uncovered area that `pourstitch` logs and are reported separately.
|
|
158
|
+
|
|
159
|
+
`returnvia --render PATH` writes one panel per copper layer on which an unserved via end lies. By default each panel shows only the copper inside the rings around the unserved via ends, which picks out the problem vias. With nothing unserved, the figure is the board outline titled as such, and no overlay is placed. `--full-map` shows the copper of every layer on which a via changing layers connects: every net's tracks, pads and pours, ground pours included, since a via placed anywhere in it would need its own return, and the ground vias. Other vias show only on layers where they have a measured end. Each pixel is coloured by the distance through its reference plane to the nearest ground return. The reference plane is the nearest other copper layer in stack order with a ground zone outline at that pixel, the same rule a via end uses. A via end shows its own measured return distance over the via and over its net's copper in its antipad, the void around it in the reference plane, merged antipads included. Where antipads merge, the copper shows the worst of their distances. Another net's copper over the antipad stays purple: it has no return there. A signal through-hole pad shows the distance a via at its centre would have, over the pad and its clearance hole; pads are not reported unserved. Copper within the served threshold, `--distance` plus the 0.1 mm margin, is dark grey-blue, lightening towards the threshold. Beyond it the colour steps to yellow and runs through matplotlib's `plasma_r` to dark blue at 3 × the threshold, and stays there farther out. Purple copper has no path to a return: it lies over a slot or void in its reference plane. Copper with no ground outline on any other layer has no reference plane and is left blank, such as a two-layer board's ground side. A pink ring of radius `--distance` marks each unserved via end on its own layer. Identical layers share a panel.
|
|
160
|
+
|
|
161
|
+
`returnvia` logs the number of exempt vias, which connect on fewer than two layers, and how many vias and via-plane returns are unserved. Set `LOGURU_LEVEL=DEBUG` to list each unserved via end with its distance or the reason it can't be served.
|
|
162
|
+
|
|
163
|
+
`pourstitch --overlay` and `returnvia --overlay` place one transparent image per copper layer on the board as a reference image, scaled and positioned to line up with the copper. The images go on User.1–User.4, one per copper layer in stack order, or on the layers given with `--overlay-layers`. Those layers must be enabled in Board Setup → Board Editor Layers. Each image carries its colourbar and label in a strip below the board outline. The board stores the images itself; the PNGs are written to a temporary directory and removed once placed. When they can't be placed, as in a dry run with the layers disabled, they stay there and the log lists their paths and placements. Toggle a layer's visibility to show or hide its heatmap, and remove them with `kistitch clear`. Both `clear` and a new `--overlay` replace only kistitch's own overlays, recognised by a `kistitch` text chunk in the PNG, or the `breakneck` chunk of overlays placed before the rename, also after the board outline has changed. Other reference images on those layers stay.
|
|
164
|
+
|
|
165
|
+
`pourstitch --check` and `returnvia --check` measure the existing vias only: no planning, no DRC and no vias. Combine them with `--render` or `--overlay` to see the current coverage. Every `--overlay` run commits its images and so adds an undo step; with `--check`, that step also replaces the markers. For repeated checks while placing vias by hand, use `--check --render` and keep the PNG open in an image viewer that reloads it; use `--overlay` for a one-off look on the board:
|
|
166
|
+
|
|
167
|
+
```bash
|
|
168
|
+
kistitch returnvia --check --render returnvia.png
|
|
169
|
+
kistitch pourstitch --power --check --render power.png
|
|
170
|
+
kistitch pourstitch --check --overlay
|
|
171
|
+
```
|
|
172
|
+
|
|
173
|
+
## Limitations
|
|
174
|
+
|
|
175
|
+
- Placed vias can't be grouped, because KiCad 10 refuses to create groups through the API.
|
|
176
|
+
- The planners use fixed clearances (0.3 mm to other-net copper; a pad's clearance override plus 0.1 mm where it has one) and don't evaluate custom design rules. The DRC check is what enforces those.
|
|
File without changes
|
|
@@ -0,0 +1,23 @@
|
|
|
1
|
+
"""Find stitching vias that `clear --vias` removes."""
|
|
2
|
+
|
|
3
|
+
from collections.abc import Iterable
|
|
4
|
+
|
|
5
|
+
from kistitch.returnvia import filled_layers, tied_layers
|
|
6
|
+
from kistitch.snapshot import Snapshot, Via
|
|
7
|
+
|
|
8
|
+
|
|
9
|
+
def stitching_vias(snapshot: Snapshot, nets: Iterable[str] | None = None) -> list[Via]:
|
|
10
|
+
"""Unlocked vias in a fill of their own net that no track or pad ties down.
|
|
11
|
+
|
|
12
|
+
`nets` limits the search to those nets.
|
|
13
|
+
A track or a lock is how a hand-placed via tells itself apart.
|
|
14
|
+
"""
|
|
15
|
+
wanted = None if nets is None else set(nets)
|
|
16
|
+
return [
|
|
17
|
+
v
|
|
18
|
+
for v in snapshot.vias
|
|
19
|
+
if (wanted is None or v.net in wanted)
|
|
20
|
+
and not v.locked
|
|
21
|
+
and filled_layers(snapshot, v)
|
|
22
|
+
and not tied_layers(snapshot, v)
|
|
23
|
+
]
|