anifetch-cli 1.0.4__tar.gz → 1.0.6__tar.gz
This diff represents the content of publicly available package versions that have been released to one of the supported registries. The information contained in this diff is provided for informational purposes only and reflects changes between package versions as they appear in their respective public registries.
- {anifetch_cli-1.0.4/src/anifetch_cli.egg-info → anifetch_cli-1.0.6}/PKG-INFO +40 -44
- {anifetch_cli-1.0.4 → anifetch_cli-1.0.6}/README.md +36 -40
- anifetch_cli-1.0.6/pyproject.toml +60 -0
- anifetch_cli-1.0.6/src/anifetch/ansi2txt.py +56 -0
- anifetch_cli-1.0.6/src/anifetch/ansi_process.py +226 -0
- anifetch_cli-1.0.6/src/anifetch/ansi_process2.py +199 -0
- {anifetch_cli-1.0.4 → anifetch_cli-1.0.6}/src/anifetch/cli.py +1 -1
- {anifetch_cli-1.0.4 → anifetch_cli-1.0.6}/src/anifetch/core.py +13 -5
- {anifetch_cli-1.0.4 → anifetch_cli-1.0.6}/src/anifetch/renderer.py +11 -2
- {anifetch_cli-1.0.4 → anifetch_cli-1.0.6}/src/anifetch/utils.py +29 -5
- {anifetch_cli-1.0.4 → anifetch_cli-1.0.6/src/anifetch_cli.egg-info}/PKG-INFO +40 -44
- {anifetch_cli-1.0.4 → anifetch_cli-1.0.6}/src/anifetch_cli.egg-info/SOURCES.txt +3 -0
- anifetch_cli-1.0.6/src/anifetch_cli.egg-info/requires.txt +4 -0
- anifetch_cli-1.0.4/pyproject.toml +0 -56
- anifetch_cli-1.0.4/src/anifetch_cli.egg-info/requires.txt +0 -4
- {anifetch_cli-1.0.4 → anifetch_cli-1.0.6}/LICENSE +0 -0
- {anifetch_cli-1.0.4 → anifetch_cli-1.0.6}/setup.cfg +0 -0
- {anifetch_cli-1.0.4 → anifetch_cli-1.0.6}/src/anifetch/__init__.py +0 -0
- {anifetch_cli-1.0.4 → anifetch_cli-1.0.6}/src/anifetch/__main__.py +0 -0
- {anifetch_cli-1.0.4 → anifetch_cli-1.0.6}/src/anifetch/assets/example.mp4 +0 -0
- {anifetch_cli-1.0.4 → anifetch_cli-1.0.6}/src/anifetch/keyreader.py +0 -0
- {anifetch_cli-1.0.4 → anifetch_cli-1.0.6}/src/anifetch_cli.egg-info/dependency_links.txt +0 -0
- {anifetch_cli-1.0.4 → anifetch_cli-1.0.6}/src/anifetch_cli.egg-info/entry_points.txt +0 -0
- {anifetch_cli-1.0.4 → anifetch_cli-1.0.6}/src/anifetch_cli.egg-info/top_level.txt +0 -0
|
@@ -1,6 +1,6 @@
|
|
|
1
1
|
Metadata-Version: 2.4
|
|
2
2
|
Name: anifetch-cli
|
|
3
|
-
Version: 1.0.
|
|
3
|
+
Version: 1.0.6
|
|
4
4
|
Summary: Animated terminal fetch with video and audio support.
|
|
5
5
|
Author-email: Notenlish <notenlish@gmail.com>
|
|
6
6
|
Maintainer: Immelancholy
|
|
@@ -19,10 +19,10 @@ Classifier: Operating System :: MacOS
|
|
|
19
19
|
Requires-Python: >=3.11
|
|
20
20
|
Description-Content-Type: text/markdown
|
|
21
21
|
License-File: LICENSE
|
|
22
|
-
Requires-Dist: platformdirs
|
|
23
|
-
Requires-Dist: wcwidth
|
|
24
|
-
Requires-Dist: rich
|
|
25
|
-
Requires-Dist: pynput
|
|
22
|
+
Requires-Dist: platformdirs>=4.5.1
|
|
23
|
+
Requires-Dist: wcwidth>=0.2.14
|
|
24
|
+
Requires-Dist: rich>=14.3.1
|
|
25
|
+
Requires-Dist: pynput>=1.8.1
|
|
26
26
|
Dynamic: license-file
|
|
27
27
|
|
|
28
28
|

|
|
@@ -33,9 +33,9 @@ This is a small tool built with fastfetch/neofetch, ffmpeg and chafa. It allows
|
|
|
33
33
|
|
|
34
34
|
## Installation
|
|
35
35
|
|
|
36
|
-
**Quick Links Installation Guide For:**
|
|
36
|
+
**Quick Links Installation Guide For:**
|
|
37
37
|
|
|
38
|
-
[Linux](#installation-for-linux-system) • [Windows](#installation-for-windows-winget-or-scoop) • [macOS](#installation-for-macos-homebrew)• [Manual](#manual-installation) • [Development](#developer-installation)
|
|
38
|
+
[Linux](#installation-for-linux-system) • [Windows](#installation-for-windows-winget-or-scoop) • [macOS](#installation-for-macos-homebrew) • [Manual](#manual-installation) • [Development](#developer-installation)
|
|
39
39
|
|
|
40
40
|
### Installation for Linux System
|
|
41
41
|
Recommended Python version: 3.11 and later.
|
|
@@ -72,12 +72,10 @@ After installation, run this to test if anifetch was installed correctly:
|
|
|
72
72
|
anifetch example.mp4
|
|
73
73
|
```
|
|
74
74
|
|
|
75
|
-
|
|
76
75
|
Please read our [User guide](#user-guide) for more info on how to use anifetch.
|
|
77
76
|
|
|
78
77
|
---
|
|
79
78
|
|
|
80
|
-
|
|
81
79
|
### Installation for Windows (Winget or Scoop)
|
|
82
80
|
|
|
83
81
|
Check whether you have winget installed by running `winget` in the windows terminal. If you dont have it, install it [here](https://github.com/microsoft/winget-cli/?tab=readme-ov-file#installing-the-client). If you want, you can use [Scoop](https://scoop.sh/) instead. Just replace the `winget` part with `scoop`.
|
|
@@ -99,7 +97,6 @@ After installing the necessary dependencies using winget/scoop, install anifetch
|
|
|
99
97
|
|
|
100
98
|
Please read our [Post installation](#post-installation) and [User guide](#user-guide) for more info on how to use anifetch.
|
|
101
99
|
|
|
102
|
-
|
|
103
100
|
### Installation for macOS (HomeBrew)
|
|
104
101
|
|
|
105
102
|
Install homebrew if you haven't installed it already by following the guide [here](https://brew.sh/).
|
|
@@ -155,7 +152,6 @@ You can then run the `anifetch` command directly in your terminal.
|
|
|
155
152
|
|
|
156
153
|
Since pipx installs packages in an isolated environment, you won't have to worry about dependency conflicts or polluting your global python environment. `anifetch` will behave just like a native cli tool. You can upgrade your installation with `pipx upgrade anifetch`
|
|
157
154
|
|
|
158
|
-
|
|
159
155
|
---
|
|
160
156
|
|
|
161
157
|
### Installation for NixOS
|
|
@@ -164,12 +160,12 @@ Add the anifetch repo as a flake input:
|
|
|
164
160
|
|
|
165
161
|
```nix
|
|
166
162
|
{
|
|
167
|
-
|
|
168
|
-
|
|
169
|
-
|
|
170
|
-
|
|
171
|
-
};
|
|
163
|
+
inputs = {
|
|
164
|
+
anifetch = {
|
|
165
|
+
url = "github:Notenlish/anifetch";
|
|
166
|
+
inputs.nixpkgs.follows = "nixpkgs";
|
|
172
167
|
};
|
|
168
|
+
};
|
|
173
169
|
}
|
|
174
170
|
```
|
|
175
171
|
|
|
@@ -182,9 +178,9 @@ Remember to add:
|
|
|
182
178
|
to your nixos configuration, like I've done here on my system:
|
|
183
179
|
|
|
184
180
|
```nix
|
|
185
|
-
|
|
186
|
-
|
|
187
|
-
|
|
181
|
+
nixosConfigurations = {
|
|
182
|
+
Enlil = nixpkgs.lib.nixosSystem {
|
|
183
|
+
specialArgs = { inherit inputs outputs; };
|
|
188
184
|
```
|
|
189
185
|
|
|
190
186
|
#### ❄️ As a package:
|
|
@@ -192,12 +188,13 @@ to your nixos configuration, like I've done here on my system:
|
|
|
192
188
|
Add anifetch to your packages list like so:
|
|
193
189
|
|
|
194
190
|
```nix
|
|
195
|
-
{inputs, pkgs, ...}:
|
|
196
|
-
|
|
197
|
-
|
|
198
|
-
|
|
199
|
-
|
|
200
|
-
|
|
191
|
+
{ inputs, pkgs, ... }:
|
|
192
|
+
{
|
|
193
|
+
environment.systemPackages = with pkgs; [
|
|
194
|
+
inputs.anifetch.packages.${pkgs.stdenv.hostPlatform.system}.default
|
|
195
|
+
fastfetch # Choose either fastfetch or neofetch to run anifetch with
|
|
196
|
+
neofetch
|
|
197
|
+
];
|
|
201
198
|
}
|
|
202
199
|
```
|
|
203
200
|
|
|
@@ -206,18 +203,19 @@ Add anifetch to your packages list like so:
|
|
|
206
203
|
Add the overlay to nixpkgs overlays, then add the package to your package list as you would a package from the normal nixpkgs repo.
|
|
207
204
|
|
|
208
205
|
```nix
|
|
209
|
-
{inputs, pkgs, ...}:
|
|
210
|
-
|
|
211
|
-
|
|
212
|
-
|
|
213
|
-
|
|
214
|
-
};
|
|
215
|
-
|
|
216
|
-
environment.systemPackages = with pkgs; [
|
|
217
|
-
anifetch
|
|
218
|
-
fastfetch # Choose either fastfetch or neofetch to run anifetch with
|
|
219
|
-
neofetch
|
|
206
|
+
{ inputs, pkgs, ... }:
|
|
207
|
+
{
|
|
208
|
+
nixpkgs = {
|
|
209
|
+
overlays = [
|
|
210
|
+
inputs.anifetch.overlays.default
|
|
220
211
|
];
|
|
212
|
+
};
|
|
213
|
+
|
|
214
|
+
environment.systemPackages = with pkgs; [
|
|
215
|
+
anifetch
|
|
216
|
+
fastfetch # Choose either fastfetch or neofetch to run anifetch with
|
|
217
|
+
neofetch
|
|
218
|
+
];
|
|
221
219
|
}
|
|
222
220
|
```
|
|
223
221
|
|
|
@@ -238,7 +236,6 @@ pip install -e .
|
|
|
238
236
|
```
|
|
239
237
|
> on windows do this to activate the venv instead: `venv\Scripts\activate`. Also on windows you should use `py` instead of `python3`.
|
|
240
238
|
|
|
241
|
-
|
|
242
239
|
This installs `anifetch` in editable mode within a local virtual environment for development.
|
|
243
240
|
|
|
244
241
|
You can then run the program in two ways:
|
|
@@ -252,14 +249,13 @@ On Nix you can run:
|
|
|
252
249
|
|
|
253
250
|
```bash
|
|
254
251
|
nix develop
|
|
255
|
-
pip install -e .
|
|
256
252
|
```
|
|
257
253
|
|
|
258
|
-
|
|
254
|
+
To install the package into a devshell. However, it is recommended to use [nix-direnv](https://github.com/nix-community/nix-direnv) to enter the development environment automatically, much like a python venv.
|
|
259
255
|
|
|
260
256
|
## User Guide
|
|
261
257
|
|
|
262
|
-
You don't need to configure anything for `fastfetch` or `neofetch`. If they already work on your machine, `anifetch` will detect and use them automatically. Please note that at least one of these must be installed, otherwise anifetch won't work. **By default, `anifetch` will use fastfetch**.
|
|
258
|
+
You don't need to configure anything for `fastfetch` or `neofetch`. If they already work on your machine, `anifetch` will detect and use them automatically. Please note that at least one of these must be installed, otherwise anifetch won't work. **By default, `anifetch` will use fastfetch**.
|
|
263
259
|
|
|
264
260
|
> We dont recommend using neofetch as it is archived. **To use neofetch**, you must append `-nf` to the anifetch command. For some distros you may need to append `--force` to the command too since neofetch is deprecated.
|
|
265
261
|
|
|
@@ -286,7 +282,7 @@ _Note : by default, the video `example.mp4` can directly be used as an example._
|
|
|
286
282
|
- `--cleanup`: Clears the screen on program exit.
|
|
287
283
|
- `-nf` / `--neofetch`: uses `neofetch` instead of `fastfetch`
|
|
288
284
|
- `-fr` / `--force-render`: Forcefully re-renders the animation while not caring about the cache. Useful if the cache is broken or the contents of the video file has changed.
|
|
289
|
-
- `-i` / `--interval`: Use this to make anifetch update the fetch information over time, sets fetch refresh interval in seconds. Default is -1(never).
|
|
285
|
+
- `-i` / `--interval`: Use this to make anifetch update the fetch information over time, sets fetch refresh interval in seconds. Default is -1(never).
|
|
290
286
|
- `-b` / `--benchmark`: For testing, prints how long it took to process in seconds.
|
|
291
287
|
- `--force`: Add this argument if you want to use neofetch even if it is deprecated on your system.
|
|
292
288
|
- `--chroma`: Add this argument to chromakey a hexadecimal color from the video using ffmpeg. Syntax: '--chroma \<hex-color>:\<similiarity>:\<blend>'
|
|
@@ -329,14 +325,12 @@ Add this to the end of `.bashrc`:
|
|
|
329
325
|
anifetch [video_file] [other_args_if_needed]
|
|
330
326
|
```
|
|
331
327
|
|
|
332
|
-
|
|
333
328
|
## Customizing Fastfetch/Neofetch output
|
|
334
329
|
|
|
335
330
|
For customizing fastfetch/neofetch output, you can check out these pages:
|
|
336
331
|
- [Fastfetch Customization](https://github.com/fastfetch-cli/fastfetch/wiki/Configuration)
|
|
337
332
|
- [Neofetch Customization](https://github.com/dylanaraps/neofetch/wiki/Customizing-Info)
|
|
338
333
|
|
|
339
|
-
|
|
340
334
|
## 📊 Benchmarks
|
|
341
335
|
|
|
342
336
|
Here's the benchmark from running each cli 10 times. Tested on Windows 11 with Intel I5-12500H processor.
|
|
@@ -355,7 +349,7 @@ Make sure to install the dependencies listed on [Prerequisites](#Prerequisites).
|
|
|
355
349
|
|
|
356
350
|
If weird characters are appearing in your terminal then your terminals font probably can't render some characters. Consider installling [nerdfonts](https://www.nerdfonts.com/).
|
|
357
351
|
|
|
358
|
-
If your OS is prompting you about `"Anifetch" is requesting special priviliges` or something similiar after pressing a key to stop the running Anifetch instance, add this argument: `--no-input-restore`. The technical reason for this is that Anifetch records the keys you press and enters them back to the terminal on your behalf. That way you can immediately run whatever command you want, without having to re-enter a key or two. Certain OS's have built-in protections against this as a security notice, which is why you might encounter a security prompt.
|
|
352
|
+
If your OS is prompting you about `"Anifetch" is requesting special priviliges` or something similiar after pressing a key to stop the running Anifetch instance, add this argument: `--no-input-restore`. The technical reason for this is that Anifetch records the keys you press and enters them back to the terminal on your behalf. That way you can immediately run whatever command you want, without having to re-enter a key or two. Certain OS's have built-in protections against this as a security notice, which is why you might encounter a security prompt.
|
|
359
353
|
|
|
360
354
|
## Notes
|
|
361
355
|
|
|
@@ -365,6 +359,8 @@ Also, ffmpeg can generate the the same image for 2 consecutive frames, which may
|
|
|
365
359
|
|
|
366
360
|
Currently only the `symbols` format of chafa is supported, formats like kitty, iterm etc. are not supported. If you try to tell chafa to use iterm, kitty etc. it will just override your format with `symbols` mode.
|
|
367
361
|
|
|
362
|
+
Most fastfetch configs/presets should work out of the box. If you run into an issue with a particular preset, just open an issue and paste your config.
|
|
363
|
+
|
|
368
364
|
## What's Next
|
|
369
365
|
|
|
370
366
|
- [ ] Support different formats like iterm, kitty, sixel etc.
|
|
@@ -6,9 +6,9 @@ This is a small tool built with fastfetch/neofetch, ffmpeg and chafa. It allows
|
|
|
6
6
|
|
|
7
7
|
## Installation
|
|
8
8
|
|
|
9
|
-
**Quick Links Installation Guide For:**
|
|
9
|
+
**Quick Links Installation Guide For:**
|
|
10
10
|
|
|
11
|
-
[Linux](#installation-for-linux-system) • [Windows](#installation-for-windows-winget-or-scoop) • [macOS](#installation-for-macos-homebrew)• [Manual](#manual-installation) • [Development](#developer-installation)
|
|
11
|
+
[Linux](#installation-for-linux-system) • [Windows](#installation-for-windows-winget-or-scoop) • [macOS](#installation-for-macos-homebrew) • [Manual](#manual-installation) • [Development](#developer-installation)
|
|
12
12
|
|
|
13
13
|
### Installation for Linux System
|
|
14
14
|
Recommended Python version: 3.11 and later.
|
|
@@ -45,12 +45,10 @@ After installation, run this to test if anifetch was installed correctly:
|
|
|
45
45
|
anifetch example.mp4
|
|
46
46
|
```
|
|
47
47
|
|
|
48
|
-
|
|
49
48
|
Please read our [User guide](#user-guide) for more info on how to use anifetch.
|
|
50
49
|
|
|
51
50
|
---
|
|
52
51
|
|
|
53
|
-
|
|
54
52
|
### Installation for Windows (Winget or Scoop)
|
|
55
53
|
|
|
56
54
|
Check whether you have winget installed by running `winget` in the windows terminal. If you dont have it, install it [here](https://github.com/microsoft/winget-cli/?tab=readme-ov-file#installing-the-client). If you want, you can use [Scoop](https://scoop.sh/) instead. Just replace the `winget` part with `scoop`.
|
|
@@ -72,7 +70,6 @@ After installing the necessary dependencies using winget/scoop, install anifetch
|
|
|
72
70
|
|
|
73
71
|
Please read our [Post installation](#post-installation) and [User guide](#user-guide) for more info on how to use anifetch.
|
|
74
72
|
|
|
75
|
-
|
|
76
73
|
### Installation for macOS (HomeBrew)
|
|
77
74
|
|
|
78
75
|
Install homebrew if you haven't installed it already by following the guide [here](https://brew.sh/).
|
|
@@ -128,7 +125,6 @@ You can then run the `anifetch` command directly in your terminal.
|
|
|
128
125
|
|
|
129
126
|
Since pipx installs packages in an isolated environment, you won't have to worry about dependency conflicts or polluting your global python environment. `anifetch` will behave just like a native cli tool. You can upgrade your installation with `pipx upgrade anifetch`
|
|
130
127
|
|
|
131
|
-
|
|
132
128
|
---
|
|
133
129
|
|
|
134
130
|
### Installation for NixOS
|
|
@@ -137,12 +133,12 @@ Add the anifetch repo as a flake input:
|
|
|
137
133
|
|
|
138
134
|
```nix
|
|
139
135
|
{
|
|
140
|
-
|
|
141
|
-
|
|
142
|
-
|
|
143
|
-
|
|
144
|
-
};
|
|
136
|
+
inputs = {
|
|
137
|
+
anifetch = {
|
|
138
|
+
url = "github:Notenlish/anifetch";
|
|
139
|
+
inputs.nixpkgs.follows = "nixpkgs";
|
|
145
140
|
};
|
|
141
|
+
};
|
|
146
142
|
}
|
|
147
143
|
```
|
|
148
144
|
|
|
@@ -155,9 +151,9 @@ Remember to add:
|
|
|
155
151
|
to your nixos configuration, like I've done here on my system:
|
|
156
152
|
|
|
157
153
|
```nix
|
|
158
|
-
|
|
159
|
-
|
|
160
|
-
|
|
154
|
+
nixosConfigurations = {
|
|
155
|
+
Enlil = nixpkgs.lib.nixosSystem {
|
|
156
|
+
specialArgs = { inherit inputs outputs; };
|
|
161
157
|
```
|
|
162
158
|
|
|
163
159
|
#### ❄️ As a package:
|
|
@@ -165,12 +161,13 @@ to your nixos configuration, like I've done here on my system:
|
|
|
165
161
|
Add anifetch to your packages list like so:
|
|
166
162
|
|
|
167
163
|
```nix
|
|
168
|
-
{inputs, pkgs, ...}:
|
|
169
|
-
|
|
170
|
-
|
|
171
|
-
|
|
172
|
-
|
|
173
|
-
|
|
164
|
+
{ inputs, pkgs, ... }:
|
|
165
|
+
{
|
|
166
|
+
environment.systemPackages = with pkgs; [
|
|
167
|
+
inputs.anifetch.packages.${pkgs.stdenv.hostPlatform.system}.default
|
|
168
|
+
fastfetch # Choose either fastfetch or neofetch to run anifetch with
|
|
169
|
+
neofetch
|
|
170
|
+
];
|
|
174
171
|
}
|
|
175
172
|
```
|
|
176
173
|
|
|
@@ -179,18 +176,19 @@ Add anifetch to your packages list like so:
|
|
|
179
176
|
Add the overlay to nixpkgs overlays, then add the package to your package list as you would a package from the normal nixpkgs repo.
|
|
180
177
|
|
|
181
178
|
```nix
|
|
182
|
-
{inputs, pkgs, ...}:
|
|
183
|
-
|
|
184
|
-
|
|
185
|
-
|
|
186
|
-
|
|
187
|
-
};
|
|
188
|
-
|
|
189
|
-
environment.systemPackages = with pkgs; [
|
|
190
|
-
anifetch
|
|
191
|
-
fastfetch # Choose either fastfetch or neofetch to run anifetch with
|
|
192
|
-
neofetch
|
|
179
|
+
{ inputs, pkgs, ... }:
|
|
180
|
+
{
|
|
181
|
+
nixpkgs = {
|
|
182
|
+
overlays = [
|
|
183
|
+
inputs.anifetch.overlays.default
|
|
193
184
|
];
|
|
185
|
+
};
|
|
186
|
+
|
|
187
|
+
environment.systemPackages = with pkgs; [
|
|
188
|
+
anifetch
|
|
189
|
+
fastfetch # Choose either fastfetch or neofetch to run anifetch with
|
|
190
|
+
neofetch
|
|
191
|
+
];
|
|
194
192
|
}
|
|
195
193
|
```
|
|
196
194
|
|
|
@@ -211,7 +209,6 @@ pip install -e .
|
|
|
211
209
|
```
|
|
212
210
|
> on windows do this to activate the venv instead: `venv\Scripts\activate`. Also on windows you should use `py` instead of `python3`.
|
|
213
211
|
|
|
214
|
-
|
|
215
212
|
This installs `anifetch` in editable mode within a local virtual environment for development.
|
|
216
213
|
|
|
217
214
|
You can then run the program in two ways:
|
|
@@ -225,14 +222,13 @@ On Nix you can run:
|
|
|
225
222
|
|
|
226
223
|
```bash
|
|
227
224
|
nix develop
|
|
228
|
-
pip install -e .
|
|
229
225
|
```
|
|
230
226
|
|
|
231
|
-
|
|
227
|
+
To install the package into a devshell. However, it is recommended to use [nix-direnv](https://github.com/nix-community/nix-direnv) to enter the development environment automatically, much like a python venv.
|
|
232
228
|
|
|
233
229
|
## User Guide
|
|
234
230
|
|
|
235
|
-
You don't need to configure anything for `fastfetch` or `neofetch`. If they already work on your machine, `anifetch` will detect and use them automatically. Please note that at least one of these must be installed, otherwise anifetch won't work. **By default, `anifetch` will use fastfetch**.
|
|
231
|
+
You don't need to configure anything for `fastfetch` or `neofetch`. If they already work on your machine, `anifetch` will detect and use them automatically. Please note that at least one of these must be installed, otherwise anifetch won't work. **By default, `anifetch` will use fastfetch**.
|
|
236
232
|
|
|
237
233
|
> We dont recommend using neofetch as it is archived. **To use neofetch**, you must append `-nf` to the anifetch command. For some distros you may need to append `--force` to the command too since neofetch is deprecated.
|
|
238
234
|
|
|
@@ -259,7 +255,7 @@ _Note : by default, the video `example.mp4` can directly be used as an example._
|
|
|
259
255
|
- `--cleanup`: Clears the screen on program exit.
|
|
260
256
|
- `-nf` / `--neofetch`: uses `neofetch` instead of `fastfetch`
|
|
261
257
|
- `-fr` / `--force-render`: Forcefully re-renders the animation while not caring about the cache. Useful if the cache is broken or the contents of the video file has changed.
|
|
262
|
-
- `-i` / `--interval`: Use this to make anifetch update the fetch information over time, sets fetch refresh interval in seconds. Default is -1(never).
|
|
258
|
+
- `-i` / `--interval`: Use this to make anifetch update the fetch information over time, sets fetch refresh interval in seconds. Default is -1(never).
|
|
263
259
|
- `-b` / `--benchmark`: For testing, prints how long it took to process in seconds.
|
|
264
260
|
- `--force`: Add this argument if you want to use neofetch even if it is deprecated on your system.
|
|
265
261
|
- `--chroma`: Add this argument to chromakey a hexadecimal color from the video using ffmpeg. Syntax: '--chroma \<hex-color>:\<similiarity>:\<blend>'
|
|
@@ -302,14 +298,12 @@ Add this to the end of `.bashrc`:
|
|
|
302
298
|
anifetch [video_file] [other_args_if_needed]
|
|
303
299
|
```
|
|
304
300
|
|
|
305
|
-
|
|
306
301
|
## Customizing Fastfetch/Neofetch output
|
|
307
302
|
|
|
308
303
|
For customizing fastfetch/neofetch output, you can check out these pages:
|
|
309
304
|
- [Fastfetch Customization](https://github.com/fastfetch-cli/fastfetch/wiki/Configuration)
|
|
310
305
|
- [Neofetch Customization](https://github.com/dylanaraps/neofetch/wiki/Customizing-Info)
|
|
311
306
|
|
|
312
|
-
|
|
313
307
|
## 📊 Benchmarks
|
|
314
308
|
|
|
315
309
|
Here's the benchmark from running each cli 10 times. Tested on Windows 11 with Intel I5-12500H processor.
|
|
@@ -328,7 +322,7 @@ Make sure to install the dependencies listed on [Prerequisites](#Prerequisites).
|
|
|
328
322
|
|
|
329
323
|
If weird characters are appearing in your terminal then your terminals font probably can't render some characters. Consider installling [nerdfonts](https://www.nerdfonts.com/).
|
|
330
324
|
|
|
331
|
-
If your OS is prompting you about `"Anifetch" is requesting special priviliges` or something similiar after pressing a key to stop the running Anifetch instance, add this argument: `--no-input-restore`. The technical reason for this is that Anifetch records the keys you press and enters them back to the terminal on your behalf. That way you can immediately run whatever command you want, without having to re-enter a key or two. Certain OS's have built-in protections against this as a security notice, which is why you might encounter a security prompt.
|
|
325
|
+
If your OS is prompting you about `"Anifetch" is requesting special priviliges` or something similiar after pressing a key to stop the running Anifetch instance, add this argument: `--no-input-restore`. The technical reason for this is that Anifetch records the keys you press and enters them back to the terminal on your behalf. That way you can immediately run whatever command you want, without having to re-enter a key or two. Certain OS's have built-in protections against this as a security notice, which is why you might encounter a security prompt.
|
|
332
326
|
|
|
333
327
|
## Notes
|
|
334
328
|
|
|
@@ -338,6 +332,8 @@ Also, ffmpeg can generate the the same image for 2 consecutive frames, which may
|
|
|
338
332
|
|
|
339
333
|
Currently only the `symbols` format of chafa is supported, formats like kitty, iterm etc. are not supported. If you try to tell chafa to use iterm, kitty etc. it will just override your format with `symbols` mode.
|
|
340
334
|
|
|
335
|
+
Most fastfetch configs/presets should work out of the box. If you run into an issue with a particular preset, just open an issue and paste your config.
|
|
336
|
+
|
|
341
337
|
## What's Next
|
|
342
338
|
|
|
343
339
|
- [ ] Support different formats like iterm, kitty, sixel etc.
|
|
@@ -362,4 +358,4 @@ I dont remember where I got the example.mp4 video from, if you know the source o
|
|
|
362
358
|
|
|
363
359
|
## Star History
|
|
364
360
|
|
|
365
|
-
[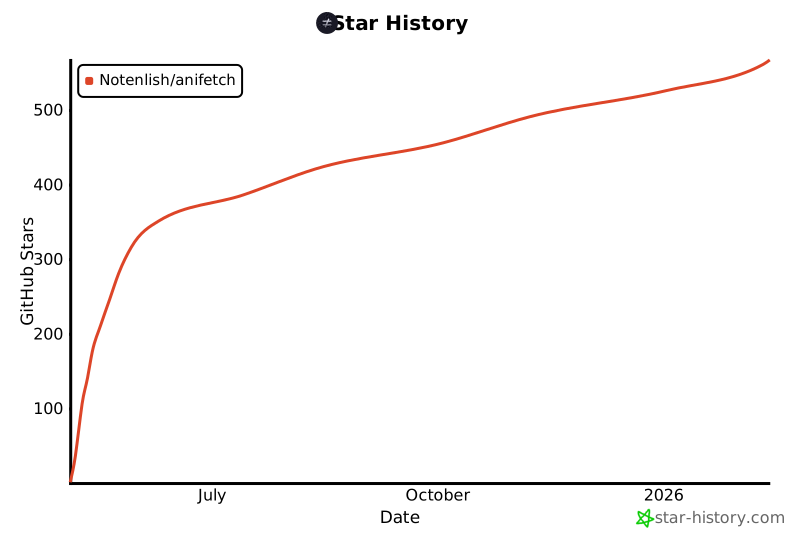](https://www.star-history.com/#Notenlish/anifetch&Date)
|
|
361
|
+
[](https://www.star-history.com/#Notenlish/anifetch&Date)
|
|
@@ -0,0 +1,60 @@
|
|
|
1
|
+
[build-system]
|
|
2
|
+
requires = ["setuptools>=61.0"]
|
|
3
|
+
build-backend = "setuptools.build_meta"
|
|
4
|
+
|
|
5
|
+
[project]
|
|
6
|
+
name = "anifetch-cli"
|
|
7
|
+
classifiers = [
|
|
8
|
+
"Development Status :: 5 - Production/Stable",
|
|
9
|
+
"Environment :: Console",
|
|
10
|
+
"Topic :: Terminals",
|
|
11
|
+
"Operating System :: Microsoft :: Windows",
|
|
12
|
+
"Operating System :: POSIX",
|
|
13
|
+
"Operating System :: Unix",
|
|
14
|
+
"Operating System :: MacOS",
|
|
15
|
+
]
|
|
16
|
+
keywords = [
|
|
17
|
+
"fetch",
|
|
18
|
+
"terminal",
|
|
19
|
+
"cli",
|
|
20
|
+
"animated",
|
|
21
|
+
"neofetch",
|
|
22
|
+
"fastfetch",
|
|
23
|
+
"anifetch",
|
|
24
|
+
]
|
|
25
|
+
version = "1.0.6"
|
|
26
|
+
description = "Animated terminal fetch with video and audio support."
|
|
27
|
+
# If I put everyone here it messes with the "author" meta section.
|
|
28
|
+
authors = [{ name = "Notenlish", email = "notenlish@gmail.com" }]
|
|
29
|
+
maintainers = [
|
|
30
|
+
# If I make it start with immelancholy for some reason it uses gallophostix's gmail for immelancholy.
|
|
31
|
+
{ name = "Gallophostrix", email = "gallophostrix@gmail.com" },
|
|
32
|
+
{ name = "Immelancholy" },
|
|
33
|
+
{ name = "Notenlish", email = "notenlish@gmail.com" },
|
|
34
|
+
]
|
|
35
|
+
|
|
36
|
+
readme = "README.md"
|
|
37
|
+
license = { text = "MIT" }
|
|
38
|
+
requires-python = ">=3.11"
|
|
39
|
+
dependencies = [
|
|
40
|
+
"platformdirs>=4.5.1",
|
|
41
|
+
"wcwidth>=0.2.14",
|
|
42
|
+
"rich>=14.3.1",
|
|
43
|
+
"pynput>=1.8.1",
|
|
44
|
+
# "regex==2026.5.9"
|
|
45
|
+
]
|
|
46
|
+
|
|
47
|
+
[project.urls]
|
|
48
|
+
Homepage = "https://github.com/Notenlish/anifetch"
|
|
49
|
+
Issues = "https://github.com/Notenlish/anifetch/issues"
|
|
50
|
+
|
|
51
|
+
[project.scripts]
|
|
52
|
+
anifetch = "anifetch.__init__:main"
|
|
53
|
+
anifetch-cli = "anifetch.__init__:main"
|
|
54
|
+
|
|
55
|
+
[tool.setuptools]
|
|
56
|
+
packages = ["anifetch"]
|
|
57
|
+
package-dir = { "" = "src" }
|
|
58
|
+
|
|
59
|
+
[tool.setuptools.package-data]
|
|
60
|
+
anifetch = ["assets/**/*"]
|
|
@@ -0,0 +1,56 @@
|
|
|
1
|
+
#!/usr/bin/env python
|
|
2
|
+
|
|
3
|
+
# SPDX-License-Identifier: MIT AND AGPL-3.0-only
|
|
4
|
+
|
|
5
|
+
# Original code from https://github.com/mmlb/ansi2txt
|
|
6
|
+
|
|
7
|
+
|
|
8
|
+
def ansi2txt(text: str) -> str:
|
|
9
|
+
EOF = ""
|
|
10
|
+
pos = 0
|
|
11
|
+
output = []
|
|
12
|
+
|
|
13
|
+
def getchar():
|
|
14
|
+
nonlocal pos
|
|
15
|
+
if pos >= len(text):
|
|
16
|
+
return EOF
|
|
17
|
+
ch = text[pos]
|
|
18
|
+
pos += 1
|
|
19
|
+
return ch
|
|
20
|
+
|
|
21
|
+
ch = None
|
|
22
|
+
|
|
23
|
+
while ch != EOF:
|
|
24
|
+
ch = getchar()
|
|
25
|
+
|
|
26
|
+
while ch == "\r":
|
|
27
|
+
ch = getchar()
|
|
28
|
+
if ch != "\n":
|
|
29
|
+
output.append("\r")
|
|
30
|
+
|
|
31
|
+
if ch == "\x1b":
|
|
32
|
+
ch = getchar()
|
|
33
|
+
|
|
34
|
+
if ch == "[":
|
|
35
|
+
ch = getchar()
|
|
36
|
+
while ch == ";" or ("0" <= ch <= "9") or ch == "?":
|
|
37
|
+
ch = getchar()
|
|
38
|
+
|
|
39
|
+
elif ch == "]":
|
|
40
|
+
ch = getchar()
|
|
41
|
+
if ch != EOF and "0" <= ch <= "9":
|
|
42
|
+
while True:
|
|
43
|
+
ch = getchar()
|
|
44
|
+
if ch == EOF or ord(ch) == 7:
|
|
45
|
+
break
|
|
46
|
+
elif ch == "\x1b":
|
|
47
|
+
ch = getchar()
|
|
48
|
+
break
|
|
49
|
+
|
|
50
|
+
elif ch == "%":
|
|
51
|
+
ch = getchar()
|
|
52
|
+
|
|
53
|
+
elif ch != EOF:
|
|
54
|
+
output.append(ch)
|
|
55
|
+
|
|
56
|
+
return "".join(output)
|