@modern-js/main-doc 0.0.0-next-20221229063546 → 0.0.0-next-20221229142742
This diff represents the content of publicly available package versions that have been released to one of the supported registries. The information contained in this diff is provided for informational purposes only and reflects changes between package versions as they appear in their respective public registries.
- package/.turbo/turbo-build.log +1 -1
- package/CHANGELOG.md +3 -3
- package/en/docusaurus-plugin-content-docs/current/configure/app/deploy/microFrontend.md +54 -0
- package/en/docusaurus-plugin-content-docs/current/configure/app/output/ssg.md +226 -0
- package/en/docusaurus-plugin-content-docs/current/guides/advanced-features/ssg.md +2 -2
- package/en/docusaurus-plugin-content-docs/current/guides/basic-features/data-fetch.md +1 -1
- package/en/docusaurus-plugin-content-docs/current/guides/topic-detail/framework-plugin/extend.md +162 -0
- package/en/docusaurus-plugin-content-docs/current/guides/topic-detail/framework-plugin/hook-list.md +803 -0
- package/en/docusaurus-plugin-content-docs/current/guides/topic-detail/framework-plugin/hook.md +169 -0
- package/en/docusaurus-plugin-content-docs/current/guides/topic-detail/framework-plugin/implement.md +247 -0
- package/en/docusaurus-plugin-content-docs/current/guides/topic-detail/framework-plugin/introduction.md +49 -0
- package/en/docusaurus-plugin-content-docs/current/guides/topic-detail/framework-plugin/plugin-api.md +116 -0
- package/en/docusaurus-plugin-content-docs/current/guides/topic-detail/framework-plugin/relationship.md +118 -0
- package/en/docusaurus-plugin-content-docs/current/guides/topic-detail/generator/config/common.md +1 -1
- package/en/docusaurus-plugin-content-docs/current/guides/topic-detail/generator/config/module.md +3 -1
- package/en/docusaurus-plugin-content-docs/current/guides/topic-detail/generator/config/mwa.md +1 -9
- package/en/docusaurus-plugin-content-docs/current/guides/topic-detail/generator/project.md +2 -2
- package/en/docusaurus-plugin-content-docs/current/tutorials/foundations/introduction.md +1 -1
- package/package.json +3 -3
- package/zh/configure/app/output/ssg.md +1 -5
- package/zh/guides/basic-features/data-fetch.md +1 -1
- package/zh/guides/basic-features/env-vars.md +1 -1
- package/zh/guides/topic-detail/generator/config/module.md +3 -1
- package/zh/guides/topic-detail/generator/config/mwa.md +1 -9
- package/zh/tutorials/foundations/introduction.md +1 -1
- package/en/docusaurus-plugin-content-docs/current/tutorials/foundations/basic.md +0 -8
- package/zh/tutorials/foundations/basic.md +0 -8
package/en/docusaurus-plugin-content-docs/current/guides/topic-detail/framework-plugin/hook.md
ADDED
|
@@ -0,0 +1,169 @@
|
|
|
1
|
+
---
|
|
2
|
+
title: Hook 模型
|
|
3
|
+
sidebar_position: 2
|
|
4
|
+
---
|
|
5
|
+
|
|
6
|
+
首先介绍一下 Modern.js 的基础的插件系统中的一些内容,包括 Hook 模型的工作方式、各个 Hook 模型的运行模式、Manager 的工作模式。
|
|
7
|
+
|
|
8
|
+
每种 Hook 模型都是独立的,可以独立管理运行函数。
|
|
9
|
+
|
|
10
|
+
## 基础工作方式
|
|
11
|
+
|
|
12
|
+
先以 Pipeline 为例,简单介绍一下 Hook 模型的工作方式。先看一个简单的例子:
|
|
13
|
+
|
|
14
|
+
```ts
|
|
15
|
+
import { createPipeline } from '@modern-js/plugin'
|
|
16
|
+
|
|
17
|
+
// 1. 创建
|
|
18
|
+
const pipeline = createPipeline<number, number>()
|
|
19
|
+
|
|
20
|
+
// 2. 添加函数
|
|
21
|
+
pipeline.use((count, next) => {
|
|
22
|
+
return next(count + 1)
|
|
23
|
+
})
|
|
24
|
+
pipeline.use((count, next) => {
|
|
25
|
+
return count * 2
|
|
26
|
+
})
|
|
27
|
+
|
|
28
|
+
// 3. 执行
|
|
29
|
+
pipeline.run(1) // 4
|
|
30
|
+
pipeline.run(5) // 12
|
|
31
|
+
```
|
|
32
|
+
|
|
33
|
+
在这个例子中,创建了一个 `Pipeline<number, number>` 类型的 Pipeline(L3),这意味着运行它的时候,你需要传入一个 `number`,然后你会得到一个 `number`,而这个模型管理的函数的类型是:
|
|
34
|
+
|
|
35
|
+
```ts
|
|
36
|
+
(count: number, next: (nextCount: number) => number) => number
|
|
37
|
+
```
|
|
38
|
+
|
|
39
|
+
这里全是 `number`,是因为我们创建的是 `Pipeline<number, number>` ,如果创建的是 `Pipeline<number, string>` 则运行它入参是 `number`,返回值是 `string`,对应管理的函数的类型会是:
|
|
40
|
+
|
|
41
|
+
```ts
|
|
42
|
+
(count: number, next: (nextCount: number) => string) => string
|
|
43
|
+
```
|
|
44
|
+
|
|
45
|
+
|
|
46
|
+
创建好 Pipeline 之后,可以通过 `use` 添加函数(L5、L8),需要注意的是,添加的顺序就是他们默认的运行顺序,在这些函数中,你可以对 `count` 进行处理、返回一个值,如果你调用了 `next` 函数,则会运行后面的函数,即如果你添加了三个函数: `A`、`B`、`C`,如果你在 `A` 中调用 `next` 那么就会运行 `B`,同样的,如果你在 `B` 中调用 `next` 那么就会运行 `C`,而在上面的例子中,添加的第一个函数(L5)就运行了 `next`,所以这里就会运行第二个函数(L8),并且运行的返回值就是 第二个函数的返回值,如果在第一个函数中没有调用 `next`,直接返回,例如:
|
|
47
|
+
|
|
48
|
+
```ts
|
|
49
|
+
import { createPipeline } from '@modern-js/plugin'
|
|
50
|
+
|
|
51
|
+
// 1. 创建
|
|
52
|
+
const pipeline = createPipeline<number, number>()
|
|
53
|
+
|
|
54
|
+
// 2. 添加函数
|
|
55
|
+
pipeline.use((count, next) => {
|
|
56
|
+
return count + 1
|
|
57
|
+
})
|
|
58
|
+
pipeline.use((count, next) => {
|
|
59
|
+
return count * 2
|
|
60
|
+
})
|
|
61
|
+
|
|
62
|
+
// 3. 执行
|
|
63
|
+
pipeline.run(1) // 2
|
|
64
|
+
pipeline.run(5) // 6
|
|
65
|
+
```
|
|
66
|
+
|
|
67
|
+
则在运行 Pipeline 的时候就不会运行第二个函数,那么 Pipeline 的运行结果则就是第一个函数的返回值。
|
|
68
|
+
|
|
69
|
+
最后,运行 Pipeline 的方式也显而易见就是调用 `pipeline.run` 。
|
|
70
|
+
|
|
71
|
+
## 不同 Hook 模型的区别
|
|
72
|
+
|
|
73
|
+
上面这部分就是 Pipeline 整体的一个工作模式的描述,其他的 Hook 模型的工作模式基本也是这样,主要的区别点,是函数类型、执行顺序,参数。
|
|
74
|
+
|
|
75
|
+
### Pipeline
|
|
76
|
+
|
|
77
|
+
上面的例子就是以 Pipeline 为例描述的,这里就不赘述了,在 Pipeline 这个大类中,提供了两个小类:Sync 和 Async,顾名思义,它们的区别就是管理的函数的类型是 Sync 的还是 Async 的。
|
|
78
|
+
|
|
79
|
+
:::info 注
|
|
80
|
+
当 Pipeline 中没有函数或者所有函数都调用了 `next` 函数,则就需要在运行的时候提供:
|
|
81
|
+
|
|
82
|
+
```ts
|
|
83
|
+
pipeline({}, {
|
|
84
|
+
onLast: () => {
|
|
85
|
+
// do something
|
|
86
|
+
}
|
|
87
|
+
})
|
|
88
|
+
```
|
|
89
|
+
:::
|
|
90
|
+
|
|
91
|
+
### Waterfall
|
|
92
|
+
|
|
93
|
+
这种模型顾名思义,他的特点就是参数的顺序递交,即前面一个函数的返回值,将会成为下一个函数的入参,我们也用一个例子来看一下:
|
|
94
|
+
|
|
95
|
+
```ts
|
|
96
|
+
import { createWaterfall } from '@modern-js/plugin'
|
|
97
|
+
|
|
98
|
+
// 1. 创建
|
|
99
|
+
const waterfall = createWaterfall<number>()
|
|
100
|
+
|
|
101
|
+
// 2. 添加函数
|
|
102
|
+
waterfall.use((count) => {
|
|
103
|
+
return count + 1
|
|
104
|
+
})
|
|
105
|
+
waterfall.use((count) => {
|
|
106
|
+
return count * 2
|
|
107
|
+
})
|
|
108
|
+
|
|
109
|
+
// 3. 执行
|
|
110
|
+
waterfall.run(1) // 4
|
|
111
|
+
waterfall.run(5) // 12
|
|
112
|
+
```
|
|
113
|
+
|
|
114
|
+
这个例子中,创建了一个类型为 `Waterfall<number> `,即这个模型执行的入参和返回值是一样的,这个例子中都是 `number`,而它管理的函数的类型是:
|
|
115
|
+
|
|
116
|
+
```ts
|
|
117
|
+
(count: number) => number
|
|
118
|
+
```
|
|
119
|
+
|
|
120
|
+
可能简单看这个例子感觉和上面的 Pipeline 功能一样,那需要注意的是,首先这里 Waterfall 管理的函数没有next 函数作为第二个参数,所以它无法在函数内部通过调用 next 来先运行之后添加的函数,从而修改运行的顺序,其次这里的运行的入参的类型和返回值的类型必须是一样的(而 Pipeline 可以不一样)。
|
|
121
|
+
|
|
122
|
+
同样的,在 Waterfall 这个大类中,也提供了 Sync 和 Async 的小类,分别对应 Sync 和 Async 的函数。
|
|
123
|
+
|
|
124
|
+
### Workflow
|
|
125
|
+
|
|
126
|
+
这种 Hook 模型与上面两种 Hook 模型的区别是,没有那么强的前后参数返回值递交的概念,在这个模型中,每个函数都是基于同样的入参,相对独立运行的,通过一个例子简单看一下:
|
|
127
|
+
|
|
128
|
+
```ts
|
|
129
|
+
import { createWorkflow } from '@modern-js/plugin'
|
|
130
|
+
|
|
131
|
+
// 1. 创建
|
|
132
|
+
const workflow = createWorkflow <number, number>()
|
|
133
|
+
|
|
134
|
+
// 2. 添加函数
|
|
135
|
+
workflow.use((count) => {
|
|
136
|
+
return count + 1
|
|
137
|
+
})
|
|
138
|
+
workflow.use((count) => {
|
|
139
|
+
return count * 2
|
|
140
|
+
})
|
|
141
|
+
|
|
142
|
+
// 3. 执行
|
|
143
|
+
workflow.run(1) // [2, 2]
|
|
144
|
+
workflow.run(5) // [6, 10]
|
|
145
|
+
```
|
|
146
|
+
|
|
147
|
+
在这个例子中,添加了两个函数,所以运行的结果就是这两个函数运行的结果形成的一个数组。
|
|
148
|
+
|
|
149
|
+
虽然这种模型中没有那么强的前后参数返回值递交的概念,但依旧有执行顺序的区别,在 Workflow 这个大类中,提供了三个小类:Sync、Async、Parallel。他们之间的区别就是函数的执行顺序,当然默认的都是按照添加顺序执行,而在 Sync、Async 则是强制按照添加顺序执行,而 Parallel 则是 Async 模式的一个变体,即它使用的是 `Promise.all` 来执行所有函数,而 Async 则会 `await` 前面的函数运行结束。
|
|
150
|
+
|
|
151
|
+
## Hook 模型对比
|
|
152
|
+
|
|
153
|
+
<div style={{ width: "100%", overflowX: "scroll" }}>
|
|
154
|
+
<div style={{ width: "150%" }}>
|
|
155
|
+
|
|
156
|
+
||函数类型|执行顺序|函数参数来源|执行返回值来源|倾向处理的任务类型|函数 TS 类型|
|
|
157
|
+
|-----|-----|-----|-----|----|----|----|
|
|
158
|
+
|Pipeline|Sync|默认执行第一个添加的函数,可以通过 next 调用之后添加的函数|第一个函数的参数来源是运行的参数,之后的函数的参数来源是,前一个函数向 next 函数传递的参数|第一个函数的返回值|<ul><li>需要修改初始参数</li><li>需要修改函数执行顺序</li></ul>|`(input: I, next: Next<I, O>) => O`|
|
|
159
|
+
|AsyncPipeline|Sync/Async|默认执行第一个添加的函数,可以通过 next 调用之后添加的函数|第一个函数的参数来源是运行的参数,之后的函数的参数来源是,前一个函数向 next 函数传递的参数|第一个函数的返回值|<ul><li>需要修改初始参数</li><li>需要修改函数执行顺序</li></ul>|`(input: I, next: AsyncNext<I, O>) => O | Promise<O>`|
|
|
160
|
+
|WaterFall|Sync|一直顺序执行|第一个函数的参数来源是运行的参数,之后的函数的参数来源是,前一个函数的返回值|最后一个函数的返回值|<ul><li>需要修改初始参数</li><li>不需要修改函数执行顺序</li></ul>|`(I: I) => I`|
|
|
161
|
+
|AsyncWaterFall|Sync/Async|一直顺序执行|第一个函数的参数来源是运行的参数,之后的函数的参数来源是,前一个函数的返回值|最后一个函数的返回值|<ul><li>需要修改初始参数</li><li>不需要修改函数执行顺序</li></ul>|`(I: I) => I | Promise<I>`|
|
|
162
|
+
|Workflow|Sync|一直顺序执行|所有函数的入参都是运行的参数|所有函数返回值形成的数组|<ul><li>不需要修改初始参数</li><li>不需要修改函数执行顺序</li></ul>|`(I: I) => O`|
|
|
163
|
+
|AsyncWorkflow|Sync/Async|一直顺序执行|所有函数的入参都是运行的参数|所有函数返回值形成的数组|<ul><li>不需要修改初始参数</li><li>不需要修改函数执行顺序</li></ul>|`(I: I) => O | Promise<O>`|
|
|
164
|
+
|ParallelWorkFlow|Sync/Async|异步执行|所有函数的入参都是运行的参数|所有函数返回值形成的数组|<ul><li>不需要修改初始参数</li><li>不关心执行顺序</li></ul>|`(I: I) => O | Promise<O>`|
|
|
165
|
+
|
|
166
|
+
</div>
|
|
167
|
+
</div>
|
|
168
|
+
|
|
169
|
+
Workflow、Waterfall 其实都是 Pipeline 的变体,Pipeline 可以通过特定的写法来实现 Workflow、Waterfall,但都较为麻烦,有许多隐形的约定。为了方便使用,提供了这两种变体来满足这种特殊场景。
|
package/en/docusaurus-plugin-content-docs/current/guides/topic-detail/framework-plugin/implement.md
ADDED
|
@@ -0,0 +1,247 @@
|
|
|
1
|
+
---
|
|
2
|
+
title: 如何编写插件
|
|
3
|
+
sidebar_position: 3
|
|
4
|
+
---
|
|
5
|
+
|
|
6
|
+
上一小节介绍了 Modern.js 插件的 Hook 模型,这一小节介绍如何编写插件。
|
|
7
|
+
|
|
8
|
+
## 实现插件
|
|
9
|
+
|
|
10
|
+
Modern.js 插件是一个对象,对象包含以下属性:
|
|
11
|
+
|
|
12
|
+
- `name`: 插件的名称,唯一标识符。
|
|
13
|
+
- `setup`: 插件初始化函数,只会执行一次。setup 函数可以返回一个 Hooks 对象,Modern.js 会在特定的时机执行这些 Hooks。
|
|
14
|
+
|
|
15
|
+
```ts
|
|
16
|
+
const MyPlugin = {
|
|
17
|
+
name: 'my-plugin',
|
|
18
|
+
|
|
19
|
+
setup() {
|
|
20
|
+
// 执行一些初始化逻辑
|
|
21
|
+
const foo = '1';
|
|
22
|
+
|
|
23
|
+
// 返回一个 Hooks 对象
|
|
24
|
+
return {
|
|
25
|
+
afterBuild: () => {
|
|
26
|
+
// 在构建完成后执行逻辑
|
|
27
|
+
},
|
|
28
|
+
};
|
|
29
|
+
},
|
|
30
|
+
};
|
|
31
|
+
```
|
|
32
|
+
|
|
33
|
+
另外,在插件中,允许配置与其他插件的执行顺序。详情可以参考[插件关系](/docs/guides/topic-detail/framework-plugin/relationship)。
|
|
34
|
+
|
|
35
|
+
### 插件类型
|
|
36
|
+
|
|
37
|
+
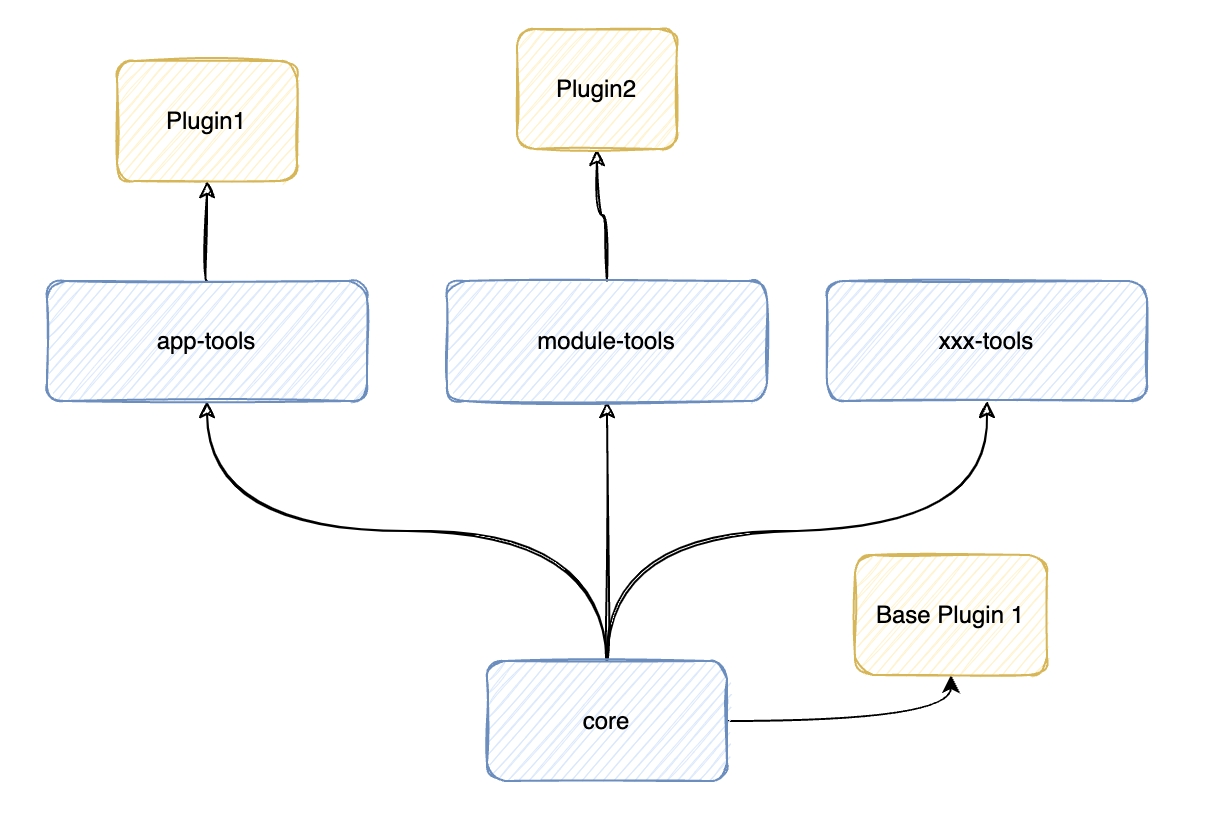
Modern-js 支持多种工程开发,如应用工程(app-tools), 模块工程(module-tools)等。
|
|
38
|
+
|
|
39
|
+
为了兼顾不同工程开发的差异和通性,Modern-js 将插件如下图进行组织:
|
|
40
|
+
|
|
41
|
+
|
|
42
|
+
|
|
43
|
+
从图可以看出,Modern-js 将插件大致分为两类:
|
|
44
|
+
|
|
45
|
+
1. 通用插件: 插件只会包含一些基础的 Hooks
|
|
46
|
+
|
|
47
|
+
2. 工程插件: 不同的工程开发会在通用插件的基础上扩展出自己的 Hooks, Config 等类型。
|
|
48
|
+
|
|
49
|
+
使用 TypeScript 时,可以引入内置的 `CliPlugin` 等类型,为插件提供正确的类型推导。
|
|
50
|
+
|
|
51
|
+
```ts
|
|
52
|
+
import type { CliPlugin } from '@modern-js/core';
|
|
53
|
+
|
|
54
|
+
const MyPlugin: CliPlugin = {
|
|
55
|
+
name: 'my-plugin',
|
|
56
|
+
|
|
57
|
+
setup() {
|
|
58
|
+
const foo = '1';
|
|
59
|
+
|
|
60
|
+
return {
|
|
61
|
+
afterBuild: () => {
|
|
62
|
+
// 在构建完成后执行逻辑
|
|
63
|
+
},
|
|
64
|
+
};
|
|
65
|
+
},
|
|
66
|
+
};
|
|
67
|
+
```
|
|
68
|
+
|
|
69
|
+
上述代码为通用插件,只包含一些基础的 Hooks。 Modern.js 支持通过泛型对插件的定义进行扩展:
|
|
70
|
+
|
|
71
|
+
```ts
|
|
72
|
+
import type { CliPlugin, AppTools } from '@modern-js/app-tools';
|
|
73
|
+
|
|
74
|
+
const MyPlugin: CliPlugin<AppTools> = {
|
|
75
|
+
name: 'my-plugin',
|
|
76
|
+
|
|
77
|
+
setup() {
|
|
78
|
+
const foo = '1';
|
|
79
|
+
|
|
80
|
+
return {
|
|
81
|
+
afterBuild: () => {
|
|
82
|
+
// 在构建完成后执行逻辑
|
|
83
|
+
},
|
|
84
|
+
};
|
|
85
|
+
},
|
|
86
|
+
};
|
|
87
|
+
```
|
|
88
|
+
|
|
89
|
+
如果仔细观察 `AppTools` 这个类型,可以发现 `AppTools` 由 3 种类型构成.
|
|
90
|
+
|
|
91
|
+
```ts
|
|
92
|
+
type AppTools = {
|
|
93
|
+
hooks: AppToolsHooks;
|
|
94
|
+
userConfig: AppToolsUserConfig;
|
|
95
|
+
normalizedConfig: AppToolsNormalizedConfig;
|
|
96
|
+
};
|
|
97
|
+
```
|
|
98
|
+
|
|
99
|
+
当编写插件时,插件通过泛型扩展在不同的基础上扩展自己的 Hooks 等类型:
|
|
100
|
+
|
|
101
|
+
```ts
|
|
102
|
+
// 通用插件上扩展
|
|
103
|
+
import type { CliPlugin } from '@modern-js/core';
|
|
104
|
+
import type { MyPluginHook } from 'xxx';
|
|
105
|
+
|
|
106
|
+
const MyPlugin: CliPlugin<{ hooks: MyPluginHook }> = {};
|
|
107
|
+
```
|
|
108
|
+
|
|
109
|
+
```ts
|
|
110
|
+
// 在 @modern-js/app-tools 基础上扩展
|
|
111
|
+
import type { CliPlugin, AppTools } from '@modern-js/app-tools';
|
|
112
|
+
import type { MyPluginHook } from 'xxx';
|
|
113
|
+
|
|
114
|
+
const MyPlugin: CliPlugin<AppTools & { hooks: MyPluginHook }> = {};
|
|
115
|
+
```
|
|
116
|
+
|
|
117
|
+
详细说明,请参考 [扩展 Hook](/docs/guides/topic-detail/framework-plugin/extend)。
|
|
118
|
+
|
|
119
|
+
### 插件配置项
|
|
120
|
+
|
|
121
|
+
**建议将插件写成函数的形式**,使插件能通过函数入参来接收配置项:
|
|
122
|
+
|
|
123
|
+
```ts
|
|
124
|
+
import type { CliPlugin } from '@modern-js/core';
|
|
125
|
+
|
|
126
|
+
type MyPluginOptions = {
|
|
127
|
+
foo: string;
|
|
128
|
+
};
|
|
129
|
+
|
|
130
|
+
const MyPlugin = (options: MyPluginOptions): CliPlugin => ({
|
|
131
|
+
name: 'my-plugin',
|
|
132
|
+
|
|
133
|
+
setup() {
|
|
134
|
+
console.log(options.foo);
|
|
135
|
+
},
|
|
136
|
+
});
|
|
137
|
+
```
|
|
138
|
+
|
|
139
|
+
### 插件 API
|
|
140
|
+
|
|
141
|
+
插件的 `setup` 函数会接收一个 api 入参,你可以调用 api 上提供的一些方法来获取到配置、应用上下文等信息。
|
|
142
|
+
|
|
143
|
+
```ts
|
|
144
|
+
import type { CliPlugin } from '@modern-js/core';
|
|
145
|
+
|
|
146
|
+
export default (): CliPlugin => ({
|
|
147
|
+
name: 'my-plugin',
|
|
148
|
+
|
|
149
|
+
setup(api) {
|
|
150
|
+
// 获取应用原始配置
|
|
151
|
+
const config = api.useConfigContext();
|
|
152
|
+
// 获取应用运行上下文
|
|
153
|
+
const appContext = api.useAppContext();
|
|
154
|
+
// 获取解析之后的最终配置
|
|
155
|
+
const resolvedConfig = api.useResolvedConfigContext();
|
|
156
|
+
},
|
|
157
|
+
});
|
|
158
|
+
```
|
|
159
|
+
|
|
160
|
+
插件 API 的详细说明,请参考 [Plugin API](/docs/guides/topic-detail/framework-plugin/plugin-api)。
|
|
161
|
+
|
|
162
|
+
### 异步 setup
|
|
163
|
+
|
|
164
|
+
CLI 插件的 setup 可以是一个异步函数,在初始化过程中执行异步逻辑。
|
|
165
|
+
|
|
166
|
+
```ts
|
|
167
|
+
import type { CliPlugin } from '@modern-js/core';
|
|
168
|
+
|
|
169
|
+
export default (): CliPlugin => ({
|
|
170
|
+
name: 'my-plugin',
|
|
171
|
+
|
|
172
|
+
async setup(api) {
|
|
173
|
+
await doSomething();
|
|
174
|
+
},
|
|
175
|
+
});
|
|
176
|
+
```
|
|
177
|
+
|
|
178
|
+
## 添加插件
|
|
179
|
+
|
|
180
|
+
自定义插件的使用方式可以查看:[plugins (框架插件)](/docs/configure/app/plugins)。下面会介绍 Modern.js 中推荐的插件实现方法。
|
|
181
|
+
|
|
182
|
+
### 开发本地插件
|
|
183
|
+
|
|
184
|
+
本地插件推荐写在 `config/plugin` 目录下,并通过 `export default` 导出:
|
|
185
|
+
|
|
186
|
+
```ts title=config/plugin/MyPlugin.ts
|
|
187
|
+
import type { CliPlugin } from '@modern-js/core';
|
|
188
|
+
|
|
189
|
+
export default (): CliPlugin => ({
|
|
190
|
+
name: 'my-plugin',
|
|
191
|
+
|
|
192
|
+
setup() {
|
|
193
|
+
// 插件初始化
|
|
194
|
+
},
|
|
195
|
+
});
|
|
196
|
+
```
|
|
197
|
+
|
|
198
|
+
然后在 `modern.config.ts` 中注册对应的插件:
|
|
199
|
+
|
|
200
|
+
```ts title="modern.config.ts"
|
|
201
|
+
import { defineConfig } from '@modern-js/app-tools';
|
|
202
|
+
import MyPlugin from './config/plugin/MyPlugin';
|
|
203
|
+
|
|
204
|
+
export default defineConfig({
|
|
205
|
+
plugins: [MyPlugin()],
|
|
206
|
+
});
|
|
207
|
+
```
|
|
208
|
+
|
|
209
|
+
### 在 npm 上发布插件
|
|
210
|
+
|
|
211
|
+
如果需要将 Modern.js 插件发布到 npm,推荐使用 Modern.js 中的模块工程方案来管理和构建。
|
|
212
|
+
|
|
213
|
+
首先创建一个空的模块工程方案项目,调整 npm 包名称:
|
|
214
|
+
|
|
215
|
+
```json
|
|
216
|
+
{
|
|
217
|
+
"name": "my-plugin"
|
|
218
|
+
...
|
|
219
|
+
}
|
|
220
|
+
```
|
|
221
|
+
|
|
222
|
+
然后新建对应的插件文件:
|
|
223
|
+
|
|
224
|
+
```ts title=src/index.ts
|
|
225
|
+
import type { CliPlugin } from '@modern-js/core';
|
|
226
|
+
|
|
227
|
+
export default (): CliPlugin => ({
|
|
228
|
+
name: 'my-plugin',
|
|
229
|
+
|
|
230
|
+
setup() {
|
|
231
|
+
// 插件初始化
|
|
232
|
+
},
|
|
233
|
+
});
|
|
234
|
+
```
|
|
235
|
+
|
|
236
|
+
发布之后,安装到需要使用的项目 `pnpm add my-plugin`,这里以一个应用项目为例,然后在 `modern.config.ts` 中添加:
|
|
237
|
+
|
|
238
|
+
```ts title="modern.config.ts"
|
|
239
|
+
import { defineConfig } from '@modern-js/app-tools';
|
|
240
|
+
import MyPlugin from 'my-plugin';
|
|
241
|
+
|
|
242
|
+
export default defineConfig({
|
|
243
|
+
plugins: [MyPlugin()],
|
|
244
|
+
});
|
|
245
|
+
```
|
|
246
|
+
|
|
247
|
+
如果你发现目前 Modern.js 存在无法满足的场景,欢迎通过**编写自定义插件的方式**来一起建设 Modern.js 生态。
|
|
@@ -0,0 +1,49 @@
|
|
|
1
|
+
---
|
|
2
|
+
title: 介绍
|
|
3
|
+
sidebar_position: 1
|
|
4
|
+
---
|
|
5
|
+
|
|
6
|
+
## Modern.js 插件系统
|
|
7
|
+
|
|
8
|
+
Modern.js 用于扩展项目运行、请求、渲染等不同阶段功能的系统,主要分为三个部分:Hook 模型、管理器,上下文共享机制。
|
|
9
|
+
|
|
10
|
+
Hook 模型用于确定当前 Hook 的执行方式,不同 Hook 模型的函数拥有不同的执行逻辑。管理器用于控制 Hook 的执行与调度。上下文共享机制用于在不同 Hook 间传递信息。
|
|
11
|
+
|
|
12
|
+
目前 Modern.js 提供几种不同的 Hook 模型:
|
|
13
|
+
|
|
14
|
+
- Pipeline
|
|
15
|
+
- Sync
|
|
16
|
+
- Async
|
|
17
|
+
- Waterfall
|
|
18
|
+
- Sync
|
|
19
|
+
- Async
|
|
20
|
+
- Workflow
|
|
21
|
+
- Sync
|
|
22
|
+
- Async
|
|
23
|
+
- Parallel(Async)
|
|
24
|
+
|
|
25
|
+
:::note
|
|
26
|
+
后续章节详细介绍各个模型的执行方式。
|
|
27
|
+
:::
|
|
28
|
+
|
|
29
|
+
基于 Hook 模型和管理器,Modern.js 暴露了三套插件:CLI、Runtime、Server。
|
|
30
|
+
|
|
31
|
+
其中 CLI 插件是 Modern.js 中主要的运行流程控制模型,Modern.js 中绝大部分功能都是主要通过这一套模型运行的。Runtime 插件主要负责处理 React 组件渲染逻辑。Server 插件主要用于对服务端的生命周期以及用户请求的控制。
|
|
32
|
+
|
|
33
|
+
## 插件可以做什么
|
|
34
|
+
|
|
35
|
+
Modern.js 的所有功能都是通过这套插件实现的,这意味着 Modern.js 中的所有能力是都对开发者开放的。开发者可以通过编写插件来扩展更多功能,适配复杂场景,包括但不限于:
|
|
36
|
+
|
|
37
|
+
- 注册命令
|
|
38
|
+
- 修改 Modern.js 配置、配置校验 Schema
|
|
39
|
+
- 修改编译时的 Webpack/Babel/Less/Sass/Tailwind CSS/... 配置
|
|
40
|
+
- 修改运行时需要渲染的 React 组件、Element
|
|
41
|
+
- 修改页面路由
|
|
42
|
+
- 修改服务器路由
|
|
43
|
+
- 自定义控制台输出
|
|
44
|
+
- 自定义动态 HTML 模版
|
|
45
|
+
- 自定义 Node.js 服务器框架
|
|
46
|
+
- 自定义 React 组件客户端/服务器端渲染
|
|
47
|
+
- ...
|
|
48
|
+
|
|
49
|
+
当 Modern.js 暂时没有覆盖到你所需要的功能或场景时,可以开发一个自定义插件,来实现适配特殊场景的相关功能。
|
package/en/docusaurus-plugin-content-docs/current/guides/topic-detail/framework-plugin/plugin-api.md
ADDED
|
@@ -0,0 +1,116 @@
|
|
|
1
|
+
---
|
|
2
|
+
title: 插件 API
|
|
3
|
+
sidebar_position: 6
|
|
4
|
+
---
|
|
5
|
+
|
|
6
|
+
插件的 `setup` 函数会接收一个 `api` 入参,你可以调用 api 上提供的一些方法来获取到配置、应用上下文等信息。
|
|
7
|
+
|
|
8
|
+
```ts
|
|
9
|
+
import type { CliPlugin } from '@modern-js/core';
|
|
10
|
+
|
|
11
|
+
export default (): CliPlugin => ({
|
|
12
|
+
name: 'my-plugin',
|
|
13
|
+
|
|
14
|
+
setup(api) {
|
|
15
|
+
// 获取应用原始配置
|
|
16
|
+
const config = api.useConfigContext();
|
|
17
|
+
// 获取应用运行上下文
|
|
18
|
+
const appContext = api.useAppContext();
|
|
19
|
+
// 获取解析之后的最终配置
|
|
20
|
+
const resolvedConfig = api.useResolvedConfigContext();
|
|
21
|
+
},
|
|
22
|
+
});
|
|
23
|
+
```
|
|
24
|
+
|
|
25
|
+
## API
|
|
26
|
+
|
|
27
|
+
### useConfigContext
|
|
28
|
+
|
|
29
|
+
用于获取应用原始配置。
|
|
30
|
+
|
|
31
|
+
```ts
|
|
32
|
+
const useConfigContext: () => UserConfig
|
|
33
|
+
|
|
34
|
+
interface UserConfig {
|
|
35
|
+
source?: SourceConfig;
|
|
36
|
+
output?: OutputConfig;
|
|
37
|
+
server?: ServerConfig;
|
|
38
|
+
dev?: DevConfig;
|
|
39
|
+
deploy?: DeployConfig;
|
|
40
|
+
tools?: ToolsConfig;
|
|
41
|
+
plugins?: PluginConfig;
|
|
42
|
+
runtime?: RuntimeConfig;
|
|
43
|
+
runtimeByEntries?: RuntimeByEntriesConfig;
|
|
44
|
+
}
|
|
45
|
+
```
|
|
46
|
+
|
|
47
|
+
具体配置字段的意义请参考【[配置](/docs/configure/app/source/alias)】。
|
|
48
|
+
|
|
49
|
+
### useAppContext
|
|
50
|
+
|
|
51
|
+
用于获取应用运行上下文。
|
|
52
|
+
|
|
53
|
+
```ts
|
|
54
|
+
const useAppContext: () => IAppContext
|
|
55
|
+
|
|
56
|
+
interface IAppContext {
|
|
57
|
+
appDirectory: string;
|
|
58
|
+
configFile: string | false;
|
|
59
|
+
ip?: string;
|
|
60
|
+
port?: number;
|
|
61
|
+
distDirectory: string;
|
|
62
|
+
packageName: string;
|
|
63
|
+
srcDirectory: string;
|
|
64
|
+
sharedDirectory: string;
|
|
65
|
+
nodeModulesDirectory: string;
|
|
66
|
+
internalDirectory: string;
|
|
67
|
+
plugins: {
|
|
68
|
+
cli?: any;
|
|
69
|
+
server?: any;
|
|
70
|
+
}[];
|
|
71
|
+
entrypoints: Entrypoint[];
|
|
72
|
+
serverRoutes: ServerRoute[];
|
|
73
|
+
htmlTemplates: HtmlTemplates;
|
|
74
|
+
}
|
|
75
|
+
```
|
|
76
|
+
|
|
77
|
+
### useResolvedConfigContext
|
|
78
|
+
|
|
79
|
+
用于获取解析之后的最终配置。
|
|
80
|
+
|
|
81
|
+
```ts
|
|
82
|
+
const useResolvedConfigContext: () => NormalizedConfig
|
|
83
|
+
|
|
84
|
+
interface NormalizedConfig {
|
|
85
|
+
source: NormalizedSourceConfig;
|
|
86
|
+
output: OutputConfig;
|
|
87
|
+
server: ServerConfig;
|
|
88
|
+
dev: DevConfig;
|
|
89
|
+
deploy: DeployConfig;
|
|
90
|
+
tools: NormalizedToolsConfig;
|
|
91
|
+
plugins: PluginConfig;
|
|
92
|
+
runtime: RuntimeConfig;
|
|
93
|
+
runtimeByEntries?: RuntimeByEntriesConfig;
|
|
94
|
+
_raw: UserConfig
|
|
95
|
+
}
|
|
96
|
+
```
|
|
97
|
+
|
|
98
|
+
具体配置字段的意义请参考【[配置](/docs/configure/app/source/alias)】。
|
|
99
|
+
|
|
100
|
+
### useHookRunners
|
|
101
|
+
|
|
102
|
+
用于获取 Hooks 的执行器,并触发特定的 Hook 执行。
|
|
103
|
+
|
|
104
|
+
```ts
|
|
105
|
+
import type { CliPlugin } from '@modern-js/core';
|
|
106
|
+
|
|
107
|
+
export default (): CliPlugin => ({
|
|
108
|
+
name: 'my-plugin',
|
|
109
|
+
|
|
110
|
+
async setup(api) {
|
|
111
|
+
const hookRunners = api.useHookRunners();
|
|
112
|
+
// 触发 afterBuild Hook
|
|
113
|
+
await hookRunners.afterBuild();
|
|
114
|
+
},
|
|
115
|
+
});
|
|
116
|
+
```
|
|
@@ -0,0 +1,118 @@
|
|
|
1
|
+
---
|
|
2
|
+
title: 插件之间的关系
|
|
3
|
+
sidebar_position: 4
|
|
4
|
+
---
|
|
5
|
+
|
|
6
|
+
Modern.js 的插件配置对象提供了一系列的字段,用于控制插件顺序、互斥等能力,可用的字段如下:
|
|
7
|
+
|
|
8
|
+
- `name`: `string`,设置当前插件的名称。
|
|
9
|
+
- `pre`: `string[]`,这些插件最终会调整到当前插件前面。
|
|
10
|
+
- `post`: `string[]`,这些插件最终会调整到当前插件后面。
|
|
11
|
+
- `rivals`: `string[]`,互斥插件,遇到这些插件时会报错。
|
|
12
|
+
- `required`: `string[]`,必需插件,插件列表中没有对应的插件时会报错。
|
|
13
|
+
- `usePlugin`: `CliPlugin[]`,注册其他插件。
|
|
14
|
+
|
|
15
|
+
通过以上参数可以实现插件的前置、后置、互斥、必需等逻辑。
|
|
16
|
+
|
|
17
|
+
## 插件排序
|
|
18
|
+
|
|
19
|
+
Modern.js 的插件通过 `pre`、`post` 参数来实现了插件排序的功能。
|
|
20
|
+
|
|
21
|
+
### 前置插件
|
|
22
|
+
|
|
23
|
+
默认情况下,插件会按照添加顺序依次执行,通过 `pre` 字段可以声明前置执行的插件。
|
|
24
|
+
|
|
25
|
+
比如有下面两个插件:
|
|
26
|
+
|
|
27
|
+
```ts title=foo.ts
|
|
28
|
+
const foo = {
|
|
29
|
+
name: 'plugin-foo',
|
|
30
|
+
};
|
|
31
|
+
```
|
|
32
|
+
|
|
33
|
+
```ts title=bar.ts
|
|
34
|
+
const bar = {
|
|
35
|
+
name: 'plugin-bar',
|
|
36
|
+
pre: ['plugin-foo'],
|
|
37
|
+
};
|
|
38
|
+
```
|
|
39
|
+
|
|
40
|
+
`bar` 插件在 `pre` 字段中配置了 `foo` 插件,因此 `foo` 插件一定会在 `bar` 插件之前执行。
|
|
41
|
+
|
|
42
|
+
### 后置插件
|
|
43
|
+
|
|
44
|
+
同样的,通过 `post` 字段可以声明后置执行的插件。
|
|
45
|
+
|
|
46
|
+
```ts title=foo.ts
|
|
47
|
+
const foo = {
|
|
48
|
+
name: 'plugin-foo',
|
|
49
|
+
};
|
|
50
|
+
```
|
|
51
|
+
|
|
52
|
+
```ts title=bar.ts
|
|
53
|
+
const bar = {
|
|
54
|
+
name: 'plugin-bar',
|
|
55
|
+
post: ['plugin-foo'],
|
|
56
|
+
};
|
|
57
|
+
```
|
|
58
|
+
|
|
59
|
+
`bar` 插件在 `post` 字段中配置了 `foo` 插件,因此 `foo` 插件一定会在 `bar` 插件之后执行。
|
|
60
|
+
|
|
61
|
+
## 互斥插件
|
|
62
|
+
|
|
63
|
+
通过 `rivals` 字段可以声明插件间的互斥关系。
|
|
64
|
+
|
|
65
|
+
有下面两个插件:
|
|
66
|
+
|
|
67
|
+
```ts title=foo.ts
|
|
68
|
+
const foo = {
|
|
69
|
+
name: 'plugin-foo',
|
|
70
|
+
};
|
|
71
|
+
```
|
|
72
|
+
|
|
73
|
+
```ts title=bar.ts
|
|
74
|
+
const bar = {
|
|
75
|
+
name: 'plugin-bar',
|
|
76
|
+
rivals: ['plugin-foo'],
|
|
77
|
+
};
|
|
78
|
+
```
|
|
79
|
+
|
|
80
|
+
`bar` 插件在 `rivals` 字段中配置了 `foo` 插件,因此同时添加了 `foo` 插件和 `bar` 插件就会报错。
|
|
81
|
+
|
|
82
|
+
## 必需插件
|
|
83
|
+
|
|
84
|
+
通过 `required` 字段可以声明插件间的依赖关系。
|
|
85
|
+
|
|
86
|
+
有下面两个插件:
|
|
87
|
+
|
|
88
|
+
```ts title=foo.ts
|
|
89
|
+
const foo = {
|
|
90
|
+
name: 'plugin-foo',
|
|
91
|
+
};
|
|
92
|
+
```
|
|
93
|
+
|
|
94
|
+
```ts title=bar.ts
|
|
95
|
+
const bar = {
|
|
96
|
+
name: 'plugin-bar',
|
|
97
|
+
required: ['plugin-foo'],
|
|
98
|
+
};
|
|
99
|
+
```
|
|
100
|
+
|
|
101
|
+
`bar` 插件在 `required` 字段中配置了 `foo` 插件,因此使用 `bar` 插件时,如果未配置 `foo` 插件就会报错。
|
|
102
|
+
|
|
103
|
+
## 注册插件
|
|
104
|
+
|
|
105
|
+
当插件之间存在依赖关系时,我们也可以在一个插件中通过 `usePlugin` 主动注册另一个插件:
|
|
106
|
+
|
|
107
|
+
```ts title=foo.ts
|
|
108
|
+
const foo = () => ({
|
|
109
|
+
name: 'plugin-foo',
|
|
110
|
+
});
|
|
111
|
+
|
|
112
|
+
const bar = () => ({
|
|
113
|
+
name: 'plugin-bar',
|
|
114
|
+
usePlugin: [foo()],
|
|
115
|
+
});
|
|
116
|
+
```
|
|
117
|
+
|
|
118
|
+
当使用者配置了 `bar` 插件时,`foo` 插件也会自动注册生效,使用者就不需要去额外注册 `foo` 插件了。
|