xcfit 1.3.0 → 2.0.0
This diff represents the content of publicly available package versions that have been released to one of the supported registries. The information contained in this diff is provided for informational purposes only and reflects changes between package versions as they appear in their respective public registries.
- checksums.yaml +4 -4
- data/Docs/Xcode7.md +273 -0
- data/Docs/xcdoe7swift2.md +311 -0
- data/README.md +115 -147
- data/XCFit.podspec +2 -2
- data/lib/XCFit/version.rb +1 -1
- metadata +15 -13
checksums.yaml
CHANGED
|
@@ -1,7 +1,7 @@
|
|
|
1
1
|
---
|
|
2
2
|
SHA1:
|
|
3
|
-
metadata.gz:
|
|
4
|
-
data.tar.gz:
|
|
3
|
+
metadata.gz: 61a7738c585f3b4deedad95296d858f0fdbd3319
|
|
4
|
+
data.tar.gz: c7219816bd7b469c43aab06a220eac7d2438d13d
|
|
5
5
|
SHA512:
|
|
6
|
-
metadata.gz:
|
|
7
|
-
data.tar.gz:
|
|
6
|
+
metadata.gz: e631145f52c763c42ca6dce6c714ebbc2fcdbde932c5cb22f8155444a81e80a7743bd720e099fb1d6edc985db461686272562f65fca43762e5f8125f2dfb2c18
|
|
7
|
+
data.tar.gz: b12c56cf873cdf3a0af194d73f2dc89ff53ac0cebb4b7d0052bcaabea4b04a1854a617048f4f72db12462f64f27f4373f023b0f17e2bc80e0e2a55bb5db88698
|
data/Docs/Xcode7.md
ADDED
|
@@ -0,0 +1,273 @@
|
|
|
1
|
+
|
|
2
|
+
|
|
3
|
+
#XCFit : Xcode 7 V
|
|
4
|
+
## XCFit - 'Swift' Your iOS/macOS apps towards BDD
|
|
5
|
+
|
|
6
|
+
####XCFit a.k.a ([XCUI](https://developer.apple.com/videos/play/wwdc2015/406/0), [Cucumberish](https://github.com/Ahmed-Ali/Cucumberish) and [Fitnesse](https://github.com/paulstringer/OCSlimProject) Integrations Tests) is a full stack Xcode BDD framework for [Swift](https://swift.org) iOS and macOS apps. XCFit allows us to write API, UI and Acceptance Tests with Swift in human readable language using tools like [Cucumber](https://cucumber.io/) and [Fitnesse](http://fitnesse.org/) in Xcode. We can still use Apple's brand new UI Testing framework (XCUI) under the hood of Cucumberish. XCFit is fully automated solution for Cucumberish and Fitnesse. You can use 80(Fitnesse):20(Cucumberish) formula to automate Acceptance and UI Testing for better coverage and faster feedback. XCFit is available on [RubyGem](https://rubygems.org/gems/xcfit) and [CocoaPods](http://cocoadocs.org/docsets/XCFit).
|
|
7
|
+
|
|
8
|
+
|
|
9
|
+
### Quick Demo with Example App
|
|
10
|
+
|
|
11
|
+
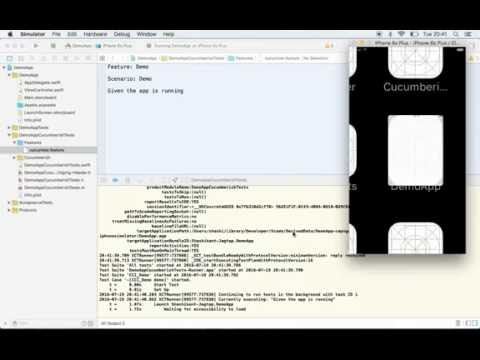
You can clone the existing repo which has a demo app. To get started..Watch this animated GIF for the steps below.
|
|
12
|
+
|
|
13
|
+

|
|
14
|
+
|
|
15
|
+
```
|
|
16
|
+
$ git clone https://github.com/Shashikant86/XCFit
|
|
17
|
+
$ cd XCFit/XCFitDemo
|
|
18
|
+
$ open XCFitDemo.xcworkspace
|
|
19
|
+
```
|
|
20
|
+
Run Unit, UI and Cucumberish test with Xcode. "cmd + U". Edit Scheme if nessesary to avoid running Unit Tests for this demo. Or Run nit from command line. Update Simulator device/OS version as installed in your Xcode if nessessary
|
|
21
|
+
|
|
22
|
+
```
|
|
23
|
+
$ xcodebuild -workspace XCFitDemo.xcworkspace -scheme XCFitDemo -sdk iphonesimulator -destination 'platform=iOS Simulator,name=iPhone 6,OS=9.3' test | xcpretty -r html -r junit --test --color
|
|
24
|
+
```
|
|
25
|
+
Watch out HTML and JUnit reports generated in the 'Build/reports/' directory with XCPretty. Install XCpretty if you havent got already.
|
|
26
|
+
|
|
27
|
+
Running Fitnesse Tests: Clean, Build and Execute
|
|
28
|
+
|
|
29
|
+
```
|
|
30
|
+
$ xcodebuild -workspace XCFitDemo.xcworkspace -scheme XCFitAcceptanceTests -sdk iphonesimulator -destination 'platform=iOS Simulator,name=iPhone 6,OS=9.3' clean build | xcpretty
|
|
31
|
+
|
|
32
|
+
$java -jar fitnesse-standalone.jar -v -o -c "FrontPage?suite&format=junit"
|
|
33
|
+
|
|
34
|
+
```
|
|
35
|
+
|
|
36
|
+
###### Using Fastlane
|
|
37
|
+
|
|
38
|
+
Assuming you have Bundler rubygem installed if not install it by "gem install bundler"
|
|
39
|
+
|
|
40
|
+
```
|
|
41
|
+
$ bundle install
|
|
42
|
+
$ bundle exec fastlane cucumberish
|
|
43
|
+
$ bundle exec fastlane fitnesse
|
|
44
|
+
```
|
|
45
|
+
|
|
46
|
+
|
|
47
|
+
Curently XCFitDemo App is configured on TravisCI which runs both Cucumberish and Fitnesse Tests. The sample .travis.yml is in the Github repo and sample logs from TravisCI [here](https://travis-ci.org/Shashikant86/XCFit/builds/145963673).
|
|
48
|
+
|
|
49
|
+
|
|
50
|
+
Big Thanks to
|
|
51
|
+
- [Cucumberish](https://github.com/Ahmed-Ali/Cucumberish) : Provide native [Gherkin](https://github.com/cucumber/cucumber/wiki/Gherkin) parser for iOS Apps to enable BDD in Xcode using Given When Then. Yay!
|
|
52
|
+
- [OCSlimProject](https://github.com/paulstringer/OCSlimProject) : Provide Xcode Templates to enable BDD with Decision Tables using Fitnesse
|
|
53
|
+
|
|
54
|
+
XCFit automated configuration of these two guys.
|
|
55
|
+
|
|
56
|
+
### Version
|
|
57
|
+
CocoaPods -- [XCFit-CocoaPods](http://cocoadocs.org/docsets/XCFit) : 0.1.0
|
|
58
|
+
|
|
59
|
+
RubyGems -- [xcfit-RubyGem](https://rubygems.org/gems/xcfit) : 0.8.0
|
|
60
|
+
|
|
61
|
+
### Tech & Software Requirements
|
|
62
|
+
|
|
63
|
+
XCFit uses a number of open source projects to work properly. You need to have following
|
|
64
|
+
|
|
65
|
+
Hardware : You must have Mac Operating System with OSX/MacOS version > 10.9
|
|
66
|
+
|
|
67
|
+
Software:
|
|
68
|
+
* [Ruby](https://www.ruby-lang.org/en/) - Use [RVM](https://rvm.io/) for GEM management. Ideally Ruby > 2.X
|
|
69
|
+
* [Xcode](https://developer.apple.com/xcode/) - Ideally Xcode 7.X
|
|
70
|
+
* [RubyGems](https://rubygems.org/) - RubyGem with [Cocoapods](https://cocoapods.org/) installed
|
|
71
|
+
* [Curl on Mac](https://developer.apple.com/legacy/library/documentation/Darwin/Reference/ManPages/man1/curl.1.html) - Might be pre-installed but worth double checking.
|
|
72
|
+
* Ruby Packages : Xcpretty, Fastlane(Optional), Rake, Bundler.. Install with 'gem install <package_name>'
|
|
73
|
+
|
|
74
|
+
|
|
75
|
+
### Installation
|
|
76
|
+
|
|
77
|
+
XCFit requires [RubyGems](https://rubygems.org/) to run.
|
|
78
|
+
|
|
79
|
+
You need Gulp installed globally:
|
|
80
|
+
|
|
81
|
+
|
|
82
|
+
$ gem install xcfit
|
|
83
|
+
|
|
84
|
+
Now you are good to get started with XCFit for now. Later we also need to install XCFit Pod.
|
|
85
|
+
|
|
86
|
+
# Usage
|
|
87
|
+
Now that you can execute 'xcfit' command from your terminal/iTerm etc etc. Example Output Looks like this :
|
|
88
|
+
|
|
89
|
+
```
|
|
90
|
+
$ xcfit
|
|
91
|
+
Tasks:
|
|
92
|
+
xcfit get_cucumberish VERSION # Downloads Cucumberish version and Create Features directory. You must execute this from Cucumberish Xcode Target directory
|
|
93
|
+
xcfit get_fitnesse # Download Fitnesse JAR file from Internet. You must execute this from Xcode Fitnesse Acceptance Test Xcode Target directory
|
|
94
|
+
xcfit help [TASK] # Describe available tasks or one specific task
|
|
95
|
+
xcfit set_xcode_templates # Generate All Xcode Templates for the Gherkin Feature Files & targets for Cucumberish and Fitnesse
|
|
96
|
+
xcfit version # Get the current version number
|
|
97
|
+
|
|
98
|
+
```
|
|
99
|
+
|
|
100
|
+
## Setup Xcode Templates
|
|
101
|
+
|
|
102
|
+
In existing app or brand new app, we have to enable the Xcode templates for files and targets to speed up the things. Run following command from your termonal
|
|
103
|
+
|
|
104
|
+
|
|
105
|
+
```sh
|
|
106
|
+
$ xcfit set_xcode_templates
|
|
107
|
+
|
|
108
|
+
```
|
|
109
|
+
|
|
110
|
+
- This will add couple of templates to your Xcode for iOS and macOS apps. In your app if you go to 'File--->New--->Target'
|
|
111
|
+
|
|
112
|
+
You will see new option for iOS and OSX i.e 'XCFit'. Once Clicked on it. You will see Cucumberish API, Cucumberish UI and Fitnesse Acceptance Tests targets. As shown
|
|
113
|
+
|
|
114
|
+

|
|
115
|
+
|
|
116
|
+
|
|
117
|
+
|
|
118
|
+
- Once Clicked on the target e.g 'Cucumberish UI Test Bundle' Xcode will create UI testing target with all the required files with Bridging hrader for Cucumberish UI Testing.
|
|
119
|
+
Once Clicked on the target e.g 'Fitnesse Acceptance Test Bundle' Xcode will create UI tAcceptance test with all the required files with Bridging headers for the Fitnesse Acceptance Test. We will see that in details soon.
|
|
120
|
+
|
|
121
|
+

|
|
122
|
+
You can watch YouTube video of XCFit setup [here](https://www.youtube.com/watch?v=Q3cKinwYwhE)
|
|
123
|
+
|
|
124
|
+
- This script also set new file type in Xcode to create new Gherking feature file
|
|
125
|
+
|
|
126
|
+
## Setting up Cucumberish UI Target
|
|
127
|
+
|
|
128
|
+
3 Steps to setup Cucumberish. You don't need to use Cocoapods to setup this target.
|
|
129
|
+
|
|
130
|
+
|
|
131
|
+
- Add new target iOS/macOS project and Select "File -> New -> Target -> XCFit -> Cucumberish UI Test Bundle". Give it a name you like e.g CucumberishUITests
|
|
132
|
+
|
|
133
|
+
Now that Xcode has created brand new target with all required Swift and Objective-C files to run Cucumberish. All Xcode setting has been done by the Xcode Template. Don't worry about configuting anything.
|
|
134
|
+
|
|
135
|
+
|
|
136
|
+
- Now that you have to CD into the Cucumberish target directory .eg CucumberishUITests
|
|
137
|
+
|
|
138
|
+
```sh
|
|
139
|
+
$ cd $CUCUMBERISH_TARGET_DIR
|
|
140
|
+
$ xcfit get_cucumberish 0.0.7
|
|
141
|
+
```
|
|
142
|
+
This will download Cucumberish directory from version 0.0.7 and also creats 'Features' directory. You can then reference those directory in Xcode. For "Cucumberish" directory select 'Copy if needed and Create Group' and for the "Features" directory select don't create group or Copy if needed. Just " create folder reference"
|
|
143
|
+
Now Add sample Feature File to 'Features' directory either by File->New->Gherkin Or Just add it using your favourite text editor e.g demo.feature with content
|
|
144
|
+
|
|
145
|
+
```
|
|
146
|
+
Feature: Demo App Feature
|
|
147
|
+
|
|
148
|
+
Scenario: Demo Scenario
|
|
149
|
+
|
|
150
|
+
Given the app is running
|
|
151
|
+
|
|
152
|
+
```
|
|
153
|
+
|
|
154
|
+
- Finally from the Cucumberish target 'General' setting select 'Testing -> Target To Test' and configure scheme to add Cucumeerish UI target to Test
|
|
155
|
+
|
|
156
|
+
You are done !!
|
|
157
|
+
|
|
158
|
+
You can watch YouTube video of Cucumberish Setup [here](https://www.youtube.com/watch?v=Wd9myhNkpx4)
|
|
159
|
+
|
|
160
|
+
You can add more feature/Scenarios and implement steps definitions inside your Swift File. [Ahmed-Ali](https://github.com/Ahmed-Ali) creator of Cucumberish already implemented useful pre-defined steps have a look at this [Swift file](https://github.com/Ahmed-Ali/Cucumberish/blob/master/CucumberishExample/CucumberishExampleUITests/CCIStepDefinitions.swift). You are free to try Page Object Pattern and all other crazy stuff to abstract and refactor your Swift code.
|
|
161
|
+
|
|
162
|
+
|
|
163
|
+
|
|
164
|
+

|
|
165
|
+
|
|
166
|
+
## Setting up Fitnesse Acceptance Target
|
|
167
|
+
|
|
168
|
+
You can also setup Fitnesse Acceptance Tests but you need to use Cocoapod for this target.
|
|
169
|
+
|
|
170
|
+
Basically Steps are pretty much same mentioned in the [OCSlimProject](http://paulstringer.github.io/OCSlimProject/) but most of them are automated for simplicity. Here is simple way to set Fitnesse Acceptance tests for iOS/MacOS Apps
|
|
171
|
+
|
|
172
|
+
|
|
173
|
+
|
|
174
|
+
- Create new target, "File --> New --> Target --> XCFit --> Fitnesse Acceptance Test". Give it a suitable name e.g 'AcceptanceTests'
|
|
175
|
+
|
|
176
|
+
- Create/Update Podfile with
|
|
177
|
+
|
|
178
|
+
|
|
179
|
+
```ruby
|
|
180
|
+
|
|
181
|
+
use_frameworks!
|
|
182
|
+
|
|
183
|
+
target 'AcceptanceTests' do
|
|
184
|
+
pod 'XCFit'
|
|
185
|
+
end
|
|
186
|
+
```
|
|
187
|
+
|
|
188
|
+
Run 'Pod install' and build newly created Acceptance target from Xcode. You should see 'LaunchFitnesse' Script geerated and Your app should be talking to fitnesse now.
|
|
189
|
+
|
|
190
|
+
- Now CD into FITNESSE_TARGET directory and Get Fitnesse JAR file by running
|
|
191
|
+
|
|
192
|
+
```sh
|
|
193
|
+
$ cd $FITNESSE_TARGET
|
|
194
|
+
$ xcfit get_fitnesse
|
|
195
|
+
```
|
|
196
|
+
|
|
197
|
+
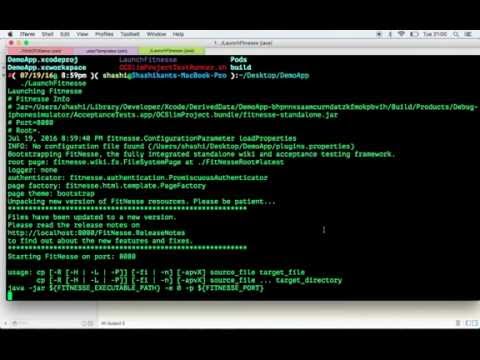
You should have fitnesse-standalone file downloaded in the target directory. You can now execute 'LaunchFitnesse'
|
|
198
|
+
|
|
199
|
+
```sh
|
|
200
|
+
$ ./LaunchFitnesse
|
|
201
|
+
```
|
|
202
|
+
|
|
203
|
+
Now you should have Fitnesse up and runnig. Follow Paul's article for the details on how to write acceptance tests [here](http://stringerstheory.net/acceptance-testing-with-ios/)
|
|
204
|
+
|
|
205
|
+
You can watch YouTube video of XCFit Fitnesse [here](https://www.youtube.com/watch?v=Wd9myhNkpx4)
|
|
206
|
+
|
|
207
|
+

|
|
208
|
+
|
|
209
|
+
## Continous Integration & Test Reporting
|
|
210
|
+
|
|
211
|
+
Continous Integration is very important and you simply can't avoid that. XCFit will be easily configured on any CI server including Apple's own [Xcode Server](https://developer.apple.com/library/ios/documentation/IDEs/Conceptual/xcode_guide-continuous_integration/) or very polular one [Jenkins](https://jenkins.io/) as we can generate reports in both HTML and JUnit format.
|
|
212
|
+
As of now, you might be running tests within Xcode, but there are some awsome tools which allows us to run our tests from command line. The 'xcodebuild' is being used to build and test Xcode Schemes. [Fastlane](https://github.com/fastlane/fastlane) seems much easier option to automate everything but it's upto you. These are long commands but you k ow better how to Script it Or Fastlane it, right ? :)
|
|
213
|
+
|
|
214
|
+
Curently XCFitDemo App is configured on TravisCI which runs both Cucumberish and Fitnesse Tests. The sample .travis.yml is in the Github repo and sample logs from TravisCI [here](https://travis-ci.org/Shashikant86/XCFit/builds/145963673). Watch out Live Execution :
|
|
215
|
+
|
|
216
|
+

|
|
217
|
+
|
|
218
|
+
### Cucumberish
|
|
219
|
+
|
|
220
|
+
You can execute Cucumberish tests with like this for XCFitDemo App.
|
|
221
|
+
|
|
222
|
+
[XCPretty](https://github.com/supermarin/xcpretty) can be used to generate JUnit Or HTML report as below
|
|
223
|
+
|
|
224
|
+
|
|
225
|
+
```sh
|
|
226
|
+
xcodebuild -workspace XCFitDemo.xcworkspace -scheme XCFitDemo -sdk iphonesimulator -destination 'platform=iOS Simulator,name=iPhone 6' test | xcpretty -r html -r junit --test --color
|
|
227
|
+
```
|
|
228
|
+
|
|
229
|
+
You can now analyse the reports generated in the 'build/reports' directory. You will find both HTML and JUnit reports. You can configure these reports with Xcode-Server, Jenkins, TeamCity easily in the post build setting.
|
|
230
|
+
|
|
231
|
+
```
|
|
232
|
+
$ open build/reports/tests.html
|
|
233
|
+
```
|
|
234
|
+
|
|
235
|
+
|
|
236
|
+

|
|
237
|
+
|
|
238
|
+
### Fitnesse
|
|
239
|
+
|
|
240
|
+
You can first build the Acceptance target
|
|
241
|
+
|
|
242
|
+
```sh
|
|
243
|
+
$ xcodebuild -workspace XCFitDemo.xcworkspace -scheme XCFitAcceptanceTests -sdk iphonesimulator -destination 'platform=iOS Simulator,name=iPhone 6' clean build | xcpretty
|
|
244
|
+
```
|
|
245
|
+
|
|
246
|
+
Now run the Fitnesse tests using
|
|
247
|
+
|
|
248
|
+
```sh
|
|
249
|
+
|
|
250
|
+
$ java -jar fitnesse-standalone.jar -v -o -c "FrontPage?suite"
|
|
251
|
+
```
|
|
252
|
+
You can also set reports directory and generate Junit style reports inside the "XCFitDemo/FitNesseRoot/files/testResults/" directory. You can configure these reports with Xcode-Server, Jenkins, TeamCity easily in the post build setting.
|
|
253
|
+
|
|
254
|
+
|
|
255
|
+
|
|
256
|
+
|
|
257
|
+
|
|
258
|
+
|
|
259
|
+
# Video Demo
|
|
260
|
+
|
|
261
|
+
### XCFit Xcode Setup
|
|
262
|
+
|
|
263
|
+
[](http://www.youtube.com/watch?v=Q3cKinwYwhE)
|
|
264
|
+
|
|
265
|
+
|
|
266
|
+
### XCFit Cucumberish Demo
|
|
267
|
+
|
|
268
|
+
[](http://www.youtube.com/watch?v=Wd9myhNkpx4)
|
|
269
|
+
|
|
270
|
+
|
|
271
|
+
### XCFit Fitnesse Demo
|
|
272
|
+
|
|
273
|
+
[](http://www.youtube.com/watch?v=xFRSIugJ-FA)
|
|
@@ -0,0 +1,311 @@
|
|
|
1
|
+
#XCFit
|
|
2
|
+
## XCFit - 'Swift' Your iOS/macOS apps towards BDD
|
|
3
|
+
|
|
4
|
+
####XCFit a.k.a ([XCUI](https://developer.apple.com/videos/play/wwdc2015/406/0), [Cucumberish](https://github.com/Ahmed-Ali/Cucumberish) and [Fitnesse](https://github.com/paulstringer/OCSlimProject) Integrations Tests) is a full stack Xcode BDD framework for [Swift](https://swift.org) iOS and macOS apps. XCFit allows us to write API, UI and Acceptance Tests with Swift in human readable language using tools like [Cucumber](https://cucumber.io/) and [Fitnesse](http://fitnesse.org/) in Xcode. We can still use Apple's brand new UI Testing framework (XCUI) under the hood of Cucumberish. XCFit is fully automated solution for Cucumberish and Fitnesse. You can use 80(Fitnesse):20(Cucumberish) formula to automate Acceptance and UI Testing for better coverage and faster feedback. XCFit is available on [RubyGem](https://rubygems.org/gems/xcfit) and [CocoaPods](http://cocoadocs.org/docsets/XCFit).
|
|
5
|
+
|
|
6
|
+
|
|
7
|
+
### XCFit Features
|
|
8
|
+
There are few reason you should go for XCFit
|
|
9
|
+
***
|
|
10
|
+
- You can now write Given When Then and Decision Table in Xcode !! YAY.. Thanks to Cucumberish and OCSlimProject ! And XCFit automated them !!
|
|
11
|
+
- You can now write/Execute all your Acdeptance Tests and UI Tests using Apple's brand new programming language "Swift" in Xcode. Goodbye Appium, Calabash, Frank, KIF and Goodbye Ruby,Java, Python. It's pure Swift !!
|
|
12
|
+
|
|
13
|
+
- XCFit provides Xcode Templates to create new Cucumberish and Fitnesse targets which reduce hectic Xcode configuration steps. It's all automated in XCFit
|
|
14
|
+
- One command to set all fully automated Xcode template for Cucumberish and Fitnesse targets
|
|
15
|
+
- New Template to create Gherkin Feature file in Xcode
|
|
16
|
+
- Automated [Cucumberish](https://github.com/Ahmed-Ali/Cucumberish) Setup in one command
|
|
17
|
+
- Enhanced [OCSlimProject](https://github.com/paulstringer/OCSlimProject) templates and automated Fitnesse download process.
|
|
18
|
+
- XCFit target templates are independent of native Xcode Test targets.
|
|
19
|
+
- We can stiil use Apple's brand new XCUI Testing framework. Its native Xcode implementation, No Appium, Calabash etc etc
|
|
20
|
+
- Setup Cucumberish and Fitnesse in Xcode within few minutes !!
|
|
21
|
+
|
|
22
|
+
***
|
|
23
|
+
|
|
24
|
+
|
|
25
|
+
### Quick Demo with Example App
|
|
26
|
+
|
|
27
|
+
You can clone the existing repo which has a demo app. To get started..Watch this animated GIF for the steps below.
|
|
28
|
+
|
|
29
|
+

|
|
30
|
+
|
|
31
|
+
```
|
|
32
|
+
$ git clone https://github.com/Shashikant86/XCFit
|
|
33
|
+
$ cd XCFit/XCFitDemo
|
|
34
|
+
$ open XCFitDemo.xcworkspace
|
|
35
|
+
```
|
|
36
|
+
Run Unit, UI and Cucumberish test with Xcode. "cmd + U". Edit Scheme if nessesary to avoid running Unit Tests for this demo. Or Run nit from command line. Update Simulator device/OS version as installed in your Xcode if nessessary
|
|
37
|
+
|
|
38
|
+
```
|
|
39
|
+
$ xcodebuild -workspace XCFitDemo.xcworkspace -scheme XCFitDemo -sdk iphonesimulator -destination 'platform=iOS Simulator,name=iPhone 6,OS=9.3' test | xcpretty -r html -r junit --test --color
|
|
40
|
+
```
|
|
41
|
+
Watch out HTML and JUnit reports generated in the 'Build/reports/' directory with XCPretty. Install XCpretty if you havent got already.
|
|
42
|
+
|
|
43
|
+
Running Fitnesse Tests: Clean, Build and Execute
|
|
44
|
+
|
|
45
|
+
```
|
|
46
|
+
$ xcodebuild -workspace XCFitDemo.xcworkspace -scheme XCFitAcceptanceTests -sdk iphonesimulator -destination 'platform=iOS Simulator,name=iPhone 6,OS=9.3' clean build | xcpretty
|
|
47
|
+
|
|
48
|
+
$java -jar fitnesse-standalone.jar -v -o -c "FrontPage?suite&format=junit"
|
|
49
|
+
|
|
50
|
+
```
|
|
51
|
+
|
|
52
|
+
###### Using Fastlane
|
|
53
|
+
|
|
54
|
+
Assuming you have Bundler rubygem installed if not install it by "gem install bundler"
|
|
55
|
+
|
|
56
|
+
```
|
|
57
|
+
$ bundle install
|
|
58
|
+
$ bundle exec fastlane cucumberish
|
|
59
|
+
$ bundle exec fastlane fitnesse
|
|
60
|
+
```
|
|
61
|
+
|
|
62
|
+
|
|
63
|
+
Curently XCFitDemo App is configured on TravisCI which runs both Cucumberish and Fitnesse Tests. The sample .travis.yml is in the Github repo and sample logs from TravisCI [here](https://travis-ci.org/Shashikant86/XCFit/builds/145963673).
|
|
64
|
+
|
|
65
|
+
|
|
66
|
+
Big Thanks to
|
|
67
|
+
- [Cucumberish](https://github.com/Ahmed-Ali/Cucumberish) : Provide native [Gherkin](https://github.com/cucumber/cucumber/wiki/Gherkin) parser for iOS Apps to enable BDD in Xcode using Given When Then. Yay!
|
|
68
|
+
- [OCSlimProject](https://github.com/paulstringer/OCSlimProject) : Provide Xcode Templates to enable BDD with Decision Tables using Fitnesse
|
|
69
|
+
|
|
70
|
+
XCFit automated configuration of these two guys.
|
|
71
|
+
|
|
72
|
+
### Version
|
|
73
|
+
CocoaPods -- [XCFit-CocoaPods](http://cocoadocs.org/docsets/XCFit) : 0.1.0
|
|
74
|
+
|
|
75
|
+
RubyGems -- [xcfit-RubyGem](https://rubygems.org/gems/xcfit) : 0.8.0
|
|
76
|
+
|
|
77
|
+
### Tech & Software Requirements
|
|
78
|
+
|
|
79
|
+
XCFit uses a number of open source projects to work properly. You need to have following
|
|
80
|
+
|
|
81
|
+
Hardware : You must have Mac Operating System with OSX/MacOS version > 10.9
|
|
82
|
+
|
|
83
|
+
Software:
|
|
84
|
+
* [Ruby](https://www.ruby-lang.org/en/) - Use [RVM](https://rvm.io/) for GEM management. Ideally Ruby > 2.X
|
|
85
|
+
* [Xcode](https://developer.apple.com/xcode/) - Ideally Xcode 7.X
|
|
86
|
+
* [RubyGems](https://rubygems.org/) - RubyGem with [Cocoapods](https://cocoapods.org/) installed
|
|
87
|
+
* [Curl on Mac](https://developer.apple.com/legacy/library/documentation/Darwin/Reference/ManPages/man1/curl.1.html) - Might be pre-installed but worth double checking.
|
|
88
|
+
* Ruby Packages : Xcpretty, Fastlane(Optional), Rake, Bundler.. Install with 'gem install <package_name>'
|
|
89
|
+
|
|
90
|
+
|
|
91
|
+
### Installation
|
|
92
|
+
|
|
93
|
+
XCFit requires [RubyGems](https://rubygems.org/) to run.
|
|
94
|
+
|
|
95
|
+
You need Gulp installed globally:
|
|
96
|
+
|
|
97
|
+
|
|
98
|
+
$ gem install xcfit
|
|
99
|
+
|
|
100
|
+
Now you are good to get started with XCFit for now. Later we also need to install XCFit Pod.
|
|
101
|
+
|
|
102
|
+
# Usage
|
|
103
|
+
Now that you can execute 'xcfit' command from your terminal/iTerm etc etc. Example Output Looks like this :
|
|
104
|
+
|
|
105
|
+
```
|
|
106
|
+
$ xcfit
|
|
107
|
+
Tasks:
|
|
108
|
+
xcfit get_cucumberish VERSION # Downloads Cucumberish version and Create Features directory. You must execute this from Cucumberish Xcode Target directory
|
|
109
|
+
xcfit get_fitnesse # Download Fitnesse JAR file from Internet. You must execute this from Xcode Fitnesse Acceptance Test Xcode Target directory
|
|
110
|
+
xcfit help [TASK] # Describe available tasks or one specific task
|
|
111
|
+
xcfit set_xcode_templates # Generate All Xcode Templates for the Gherkin Feature Files & targets for Cucumberish and Fitnesse
|
|
112
|
+
xcfit version # Get the current version number
|
|
113
|
+
|
|
114
|
+
```
|
|
115
|
+
|
|
116
|
+
## Setup Xcode Templates
|
|
117
|
+
|
|
118
|
+
In existing app or brand new app, we have to enable the Xcode templates for files and targets to speed up the things. Run following command from your termonal
|
|
119
|
+
|
|
120
|
+
|
|
121
|
+
```sh
|
|
122
|
+
$ xcfit set_xcode_templates
|
|
123
|
+
|
|
124
|
+
```
|
|
125
|
+
|
|
126
|
+
- This will add couple of templates to your Xcode for iOS and macOS apps. In your app if you go to 'File--->New--->Target'
|
|
127
|
+
|
|
128
|
+
You will see new option for iOS and OSX i.e 'XCFit'. Once Clicked on it. You will see Cucumberish API, Cucumberish UI and Fitnesse Acceptance Tests targets. As shown
|
|
129
|
+
|
|
130
|
+

|
|
131
|
+
|
|
132
|
+
|
|
133
|
+
|
|
134
|
+
- Once Clicked on the target e.g 'Cucumberish UI Test Bundle' Xcode will create UI testing target with all the required files with Bridging hrader for Cucumberish UI Testing.
|
|
135
|
+
Once Clicked on the target e.g 'Fitnesse Acceptance Test Bundle' Xcode will create UI tAcceptance test with all the required files with Bridging headers for the Fitnesse Acceptance Test. We will see that in details soon.
|
|
136
|
+
|
|
137
|
+

|
|
138
|
+
You can watch YouTube video of XCFit setup [here](https://www.youtube.com/watch?v=Q3cKinwYwhE)
|
|
139
|
+
|
|
140
|
+
- This script also set new file type in Xcode to create new Gherking feature file
|
|
141
|
+
|
|
142
|
+
## Setting up Cucumberish UI Target
|
|
143
|
+
|
|
144
|
+
3 Steps to setup Cucumberish. You don't need to use Cocoapods to setup this target.
|
|
145
|
+
|
|
146
|
+
|
|
147
|
+
- Add new target iOS/macOS project and Select "File -> New -> Target -> XCFit -> Cucumberish UI Test Bundle". Give it a name you like e.g CucumberishUITests
|
|
148
|
+
|
|
149
|
+
Now that Xcode has created brand new target with all required Swift and Objective-C files to run Cucumberish. All Xcode setting has been done by the Xcode Template. Don't worry about configuting anything.
|
|
150
|
+
|
|
151
|
+
|
|
152
|
+
- Now that you have to CD into the Cucumberish target directory .eg CucumberishUITests
|
|
153
|
+
|
|
154
|
+
```sh
|
|
155
|
+
$ cd $CUCUMBERISH_TARGET_DIR
|
|
156
|
+
$ xcfit get_cucumberish 0.0.7
|
|
157
|
+
```
|
|
158
|
+
This will download Cucumberish directory from version 0.0.7 and also creats 'Features' directory. You can then reference those directory in Xcode. For "Cucumberish" directory select 'Copy if needed and Create Group' and for the "Features" directory select don't create group or Copy if needed. Just " create folder reference"
|
|
159
|
+
Now Add sample Feature File to 'Features' directory either by File->New->Gherkin Or Just add it using your favourite text editor e.g demo.feature with content
|
|
160
|
+
|
|
161
|
+
```
|
|
162
|
+
Feature: Demo App Feature
|
|
163
|
+
|
|
164
|
+
Scenario: Demo Scenario
|
|
165
|
+
|
|
166
|
+
Given the app is running
|
|
167
|
+
|
|
168
|
+
```
|
|
169
|
+
|
|
170
|
+
- Finally from the Cucumberish target 'General' setting select 'Testing -> Target To Test' and configure scheme to add Cucumeerish UI target to Test
|
|
171
|
+
|
|
172
|
+
You are done !!
|
|
173
|
+
|
|
174
|
+
You can watch YouTube video of Cucumberish Setup [here](https://www.youtube.com/watch?v=Wd9myhNkpx4)
|
|
175
|
+
|
|
176
|
+
You can add more feature/Scenarios and implement steps definitions inside your Swift File. [Ahmed-Ali](https://github.com/Ahmed-Ali) creator of Cucumberish already implemented useful pre-defined steps have a look at this [Swift file](https://github.com/Ahmed-Ali/Cucumberish/blob/master/CucumberishExample/CucumberishExampleUITests/CCIStepDefinitions.swift). You are free to try Page Object Pattern and all other crazy stuff to abstract and refactor your Swift code.
|
|
177
|
+
|
|
178
|
+
|
|
179
|
+
|
|
180
|
+

|
|
181
|
+
|
|
182
|
+
## Setting up Fitnesse Acceptance Target
|
|
183
|
+
|
|
184
|
+
You can also setup Fitnesse Acceptance Tests but you need to use Cocoapod for this target.
|
|
185
|
+
|
|
186
|
+
Basically Steps are pretty much same mentioned in the [OCSlimProject](http://paulstringer.github.io/OCSlimProject/) but most of them are automated for simplicity. Here is simple way to set Fitnesse Acceptance tests for iOS/MacOS Apps
|
|
187
|
+
|
|
188
|
+
|
|
189
|
+
|
|
190
|
+
- Create new target, "File --> New --> Target --> XCFit --> Fitnesse Acceptance Test". Give it a suitable name e.g 'AcceptanceTests'
|
|
191
|
+
|
|
192
|
+
- Create/Update Podfile with
|
|
193
|
+
|
|
194
|
+
|
|
195
|
+
```ruby
|
|
196
|
+
|
|
197
|
+
use_frameworks!
|
|
198
|
+
|
|
199
|
+
target 'AcceptanceTests' do
|
|
200
|
+
pod 'XCFit'
|
|
201
|
+
end
|
|
202
|
+
```
|
|
203
|
+
|
|
204
|
+
Run 'Pod install' and build newly created Acceptance target from Xcode. You should see 'LaunchFitnesse' Script geerated and Your app should be talking to fitnesse now.
|
|
205
|
+
|
|
206
|
+
- Now CD into FITNESSE_TARGET directory and Get Fitnesse JAR file by running
|
|
207
|
+
|
|
208
|
+
```sh
|
|
209
|
+
$ cd $FITNESSE_TARGET
|
|
210
|
+
$ xcfit get_fitnesse
|
|
211
|
+
```
|
|
212
|
+
|
|
213
|
+
You should have fitnesse-standalone file downloaded in the target directory. You can now execute 'LaunchFitnesse'
|
|
214
|
+
|
|
215
|
+
```sh
|
|
216
|
+
$ ./LaunchFitnesse
|
|
217
|
+
```
|
|
218
|
+
|
|
219
|
+
Now you should have Fitnesse up and runnig. Follow Paul's article for the details on how to write acceptance tests [here](http://stringerstheory.net/acceptance-testing-with-ios/)
|
|
220
|
+
|
|
221
|
+
You can watch YouTube video of XCFit Fitnesse [here](https://www.youtube.com/watch?v=Wd9myhNkpx4)
|
|
222
|
+
|
|
223
|
+

|
|
224
|
+
|
|
225
|
+
## Continous Integration & Test Reporting
|
|
226
|
+
|
|
227
|
+
Continous Integration is very important and you simply can't avoid that. XCFit will be easily configured on any CI server including Apple's own [Xcode Server](https://developer.apple.com/library/ios/documentation/IDEs/Conceptual/xcode_guide-continuous_integration/) or very polular one [Jenkins](https://jenkins.io/) as we can generate reports in both HTML and JUnit format.
|
|
228
|
+
As of now, you might be running tests within Xcode, but there are some awsome tools which allows us to run our tests from command line. The 'xcodebuild' is being used to build and test Xcode Schemes. [Fastlane](https://github.com/fastlane/fastlane) seems much easier option to automate everything but it's upto you. These are long commands but you k ow better how to Script it Or Fastlane it, right ? :)
|
|
229
|
+
|
|
230
|
+
Curently XCFitDemo App is configured on TravisCI which runs both Cucumberish and Fitnesse Tests. The sample .travis.yml is in the Github repo and sample logs from TravisCI [here](https://travis-ci.org/Shashikant86/XCFit/builds/145963673). Watch out Live Execution :
|
|
231
|
+
|
|
232
|
+

|
|
233
|
+
|
|
234
|
+
### Cucumberish
|
|
235
|
+
|
|
236
|
+
You can execute Cucumberish tests with like this for XCFitDemo App.
|
|
237
|
+
|
|
238
|
+
[XCPretty](https://github.com/supermarin/xcpretty) can be used to generate JUnit Or HTML report as below
|
|
239
|
+
|
|
240
|
+
|
|
241
|
+
```sh
|
|
242
|
+
xcodebuild -workspace XCFitDemo.xcworkspace -scheme XCFitDemo -sdk iphonesimulator -destination 'platform=iOS Simulator,name=iPhone 6' test | xcpretty -r html -r junit --test --color
|
|
243
|
+
```
|
|
244
|
+
|
|
245
|
+
You can now analyse the reports generated in the 'build/reports' directory. You will find both HTML and JUnit reports. You can configure these reports with Xcode-Server, Jenkins, TeamCity easily in the post build setting.
|
|
246
|
+
|
|
247
|
+
```
|
|
248
|
+
$ open build/reports/tests.html
|
|
249
|
+
```
|
|
250
|
+
|
|
251
|
+
|
|
252
|
+

|
|
253
|
+
|
|
254
|
+
### Fitnesse
|
|
255
|
+
|
|
256
|
+
You can first build the Acceptance target
|
|
257
|
+
|
|
258
|
+
```sh
|
|
259
|
+
$ xcodebuild -workspace XCFitDemo.xcworkspace -scheme XCFitAcceptanceTests -sdk iphonesimulator -destination 'platform=iOS Simulator,name=iPhone 6' clean build | xcpretty
|
|
260
|
+
```
|
|
261
|
+
|
|
262
|
+
Now run the Fitnesse tests using
|
|
263
|
+
|
|
264
|
+
```sh
|
|
265
|
+
|
|
266
|
+
$ java -jar fitnesse-standalone.jar -v -o -c "FrontPage?suite"
|
|
267
|
+
```
|
|
268
|
+
You can also set reports directory and generate Junit style reports inside the "XCFitDemo/FitNesseRoot/files/testResults/" directory. You can configure these reports with Xcode-Server, Jenkins, TeamCity easily in the post build setting.
|
|
269
|
+
|
|
270
|
+
|
|
271
|
+
|
|
272
|
+
## What XCFit can solve in iOS/macOS team?
|
|
273
|
+
XCFit can bring lot of improvement the way you work. The most common problems in iOS development is explained by Paul Stringer in this [article](http://stringerstheory.net/acceptance-testing-with-ios/). XCFit can solve few of them
|
|
274
|
+
|
|
275
|
+
- Better Developer/QA collabration, Early QA Involvement.
|
|
276
|
+
|
|
277
|
+
Usually,in the iOS development world, Developer build an app using Swift and Objective-C and army of manual and automated QA uses tools like Apppium, Calabash using languages like Ruby, Java, Python WTF !!. QA and Developers world is totally different. With XCFit you will be speaking same language that is "Swift". QA can write test script as we build. No need to wait until build is handed over. Just work with developer ! Little bit of learning curve for QA but you will save developers time as they don't to learn Java, Pyth or Ruby to help QA team
|
|
278
|
+
|
|
279
|
+
- Quick Acceptance & UI testing setup
|
|
280
|
+
|
|
281
|
+
You will be surprised by how easily/quickly you can setup Fitnesse(Acceptance Test) and Cucumberish(UI Testing) environmant in Xcode and running your first test.
|
|
282
|
+
|
|
283
|
+
- Getting Business people involved
|
|
284
|
+
|
|
285
|
+
As we can now able to write scenarios with Given/When/Then and decision tables. We can get business people involved to contribute to acceptance criteria. In short we got all benefits of BDD in iOS/macOS project.
|
|
286
|
+
|
|
287
|
+
- Developers don't need to learn Ruby or similar ! Just stick to Swift
|
|
288
|
+
|
|
289
|
+
You must be happy as you won't need to learn other language just in case QA ask something to solve. With XCFit it's everything Swift.
|
|
290
|
+
|
|
291
|
+
- Fix failed attempt to automate testing by QA team
|
|
292
|
+
|
|
293
|
+
As of now your QA team might have tried all wrappers on [UIAutomation](https://developer.apple.com/library/tvos/documentation/DeveloperTools/Conceptual/InstrumentsUserGuide/UIAutomation.html) e.g Appium, Calabash, Frank, KIF etc etc and keeping themselve busy writing some Ruby, Python, Java code to automate testing and all that attempts results in Slow, Brittle, Untrusted, Non-valuable UI tests causing harm to mobile development rather than good. With XCFit, everyone will be speaking same language and you can cover businness logic with lighting fast Fitnesse Tests and major journeys with UI tests. Keep it 80:20 means 80% Fitness and 20% Cucumberish or XCUI.
|
|
294
|
+
|
|
295
|
+
|
|
296
|
+
|
|
297
|
+
# Video Demo
|
|
298
|
+
|
|
299
|
+
### XCFit Xcode Setup
|
|
300
|
+
|
|
301
|
+
[](http://www.youtube.com/watch?v=Q3cKinwYwhE)
|
|
302
|
+
|
|
303
|
+
|
|
304
|
+
### XCFit Cucumberish Demo
|
|
305
|
+
|
|
306
|
+
[](http://www.youtube.com/watch?v=Wd9myhNkpx4)
|
|
307
|
+
|
|
308
|
+
|
|
309
|
+
### XCFit Fitnesse Demo
|
|
310
|
+
|
|
311
|
+
[](http://www.youtube.com/watch?v=xFRSIugJ-FA)
|
data/README.md
CHANGED
|
@@ -3,18 +3,14 @@
|
|
|
3
3
|
[](http://cocoapods.org/pods/XCFit)
|
|
4
4
|
[](http://cocoapods.org/pods/XCFit)
|
|
5
5
|
|
|
6
|
-
#XCFit
|
|
7
|
-
## XCFit - 'Swift' Your iOS/macOS apps towards BDD
|
|
8
|
-
|
|
9
|
-
####XCFit a.k.a ([XCUI](https://developer.apple.com/videos/play/wwdc2015/406/0), [Cucumberish](https://github.com/Ahmed-Ali/Cucumberish) and [Fitnesse](https://github.com/paulstringer/OCSlimProject) Integrations Tests) is a full stack Xcode BDD framework for [Swift](https://swift.org) iOS and macOS apps. XCFit allows us to write API, UI and Acceptance Tests with Swift in human readable language using tools like [Cucumber](https://cucumber.io/) and [Fitnesse](http://fitnesse.org/) in Xcode. We can still use Apple's brand new UI Testing framework (XCUI) under the hood of Cucumberish. XCFit is fully automated solution for Cucumberish and Fitnesse. You can use 80(Fitnesse):20(Cucumberish) formula to automate Acceptance and UI Testing for better coverage and faster feedback. XCFit is available on [RubyGem](https://rubygems.org/gems/xcfit) and [CocoaPods](http://cocoadocs.org/docsets/XCFit).
|
|
6
|
+
# XCFit : Xcode 8 + Swift 3
|
|
10
7
|
|
|
8
|
+
#### XCFit a.k.a ([XCUI](https://developer.apple.com/videos/play/wwdc2015/406/0), [Cucumberish](https://github.com/Ahmed-Ali/Cucumberish) and [Fitnesse](https://github.com/paulstringer/OCSlimProject) Integrations Tests) is a full stack Xcode BDD framework for [Swift](https://swift.org) iOS and macOS apps. XCFit allows us to write API, UI and Acceptance Tests with Swift in human readable language using tools like [Cucumber](https://cucumber.io/) and [Fitnesse](http://fitnesse.org/) in Xcode. We can still use Apple's brand new UI Testing framework (XCUI) under the hood of Cucumberish. XCFit is fully automated solution for Cucumberish and Fitnesse. You can use 80(Fitnesse):20(Cucumberish) formula to automate Acceptance and UI Testing for better coverage and faster feedback. XCFit is available on [RubyGem](https://rubygems.org/gems/xcfit) and [CocoaPods](http://cocoadocs.org/docsets/XCFit).
|
|
11
9
|
|
|
12
10
|
### XCFit Features
|
|
13
|
-
There are few reason you should go for XCFit
|
|
14
11
|
***
|
|
15
12
|
- You can now write Given When Then and Decision Table in Xcode !! YAY.. Thanks to Cucumberish and OCSlimProject ! And XCFit automated them !!
|
|
16
13
|
- You can now write/Execute all your Acdeptance Tests and UI Tests using Apple's brand new programming language "Swift" in Xcode. Goodbye Appium, Calabash, Frank, KIF and Goodbye Ruby,Java, Python. It's pure Swift !!
|
|
17
|
-
|
|
18
14
|
- XCFit provides Xcode Templates to create new Cucumberish and Fitnesse targets which reduce hectic Xcode configuration steps. It's all automated in XCFit
|
|
19
15
|
- One command to set all fully automated Xcode template for Cucumberish and Fitnesse targets
|
|
20
16
|
- New Template to create Gherkin Feature file in Xcode
|
|
@@ -26,46 +22,31 @@ There are few reason you should go for XCFit
|
|
|
26
22
|
|
|
27
23
|
***
|
|
28
24
|
|
|
25
|
+
### Xcode 7 Users
|
|
29
26
|
|
|
30
|
-
|
|
27
|
+
If you are still XCode 7 users then please follow [this](https://github.com/Shashikant86/XCFit/blob/master/Docs/xcdoe7swift2.md) link for documentation
|
|
31
28
|
|
|
32
|
-
You can clone the existing repo which has a demo app. To get started..Watch this animated GIF for the steps below.
|
|
33
29
|
|
|
34
|
-
|
|
30
|
+
### Quick Demo with Example App
|
|
35
31
|
|
|
36
|
-
|
|
32
|
+
You can clone the existing repo which has a demo app we can run Unit, Fitnesse and Cucumbertish Tests as XCTest
|
|
33
|
+
```
|
|
37
34
|
$ git clone https://github.com/Shashikant86/XCFit
|
|
38
|
-
$ cd XCFit/
|
|
39
|
-
$ open
|
|
40
|
-
```
|
|
41
|
-
Run Unit, UI and Cucumberish test with Xcode. "cmd + U". Edit Scheme if nessesary to avoid running Unit Tests for this demo. Or Run nit from command line. Update Simulator device/OS version as installed in your Xcode if nessessary
|
|
42
|
-
|
|
43
|
-
```
|
|
44
|
-
$ xcodebuild -workspace XCFitDemo.xcworkspace -scheme XCFitDemo -sdk iphonesimulator -destination 'platform=iOS Simulator,name=iPhone 6,OS=9.3' test | xcpretty -r html -r junit --test --color
|
|
45
|
-
```
|
|
46
|
-
Watch out HTML and JUnit reports generated in the 'Build/reports/' directory with XCPretty. Install XCpretty if you havent got already.
|
|
47
|
-
|
|
48
|
-
Running Fitnesse Tests: Clean, Build and Execute
|
|
49
|
-
|
|
35
|
+
$ cd XCFit/XCFitnesse
|
|
36
|
+
$ open XCFitnesse.xcworkspace
|
|
50
37
|
```
|
|
51
|
-
|
|
52
|
-
|
|
53
|
-
|
|
54
|
-
|
|
38
|
+
Run Unit, Fitnesse and Cucumberish test with Xcode. "cmd + U". We can execute it using Fastlane
|
|
39
|
+
|
|
40
|
+
|
|
55
41
|
```
|
|
56
|
-
|
|
57
|
-
|
|
58
|
-
|
|
59
|
-
Assuming you have Bundler rubygem installed if not install it by "gem install bundler"
|
|
60
|
-
|
|
42
|
+
$ bundle install
|
|
43
|
+
$ bundle exec fastlane xctest_fitnesse
|
|
61
44
|
```
|
|
62
|
-
|
|
63
|
-
|
|
64
|
-
|
|
65
|
-
```
|
|
66
|
-
|
|
45
|
+
|
|
46
|
+
|
|
47
|
+
Watch this animated GIF for the steps below.
|
|
67
48
|
|
|
68
|
-
|
|
49
|
+

|
|
69
50
|
|
|
70
51
|
|
|
71
52
|
Big Thanks to
|
|
@@ -87,9 +68,10 @@ Hardware : You must have Mac Operating System with OSX/MacOS version > 10.9
|
|
|
87
68
|
|
|
88
69
|
Software:
|
|
89
70
|
* [Ruby](https://www.ruby-lang.org/en/) - Use [RVM](https://rvm.io/) for GEM management. Ideally Ruby > 2.X
|
|
90
|
-
* [
|
|
71
|
+
* [Xcode8](https://developer.apple.com/xcode/) - Ideally Xcode 8
|
|
91
72
|
* [RubyGems](https://rubygems.org/) - RubyGem with [Cocoapods](https://cocoapods.org/) installed
|
|
92
73
|
* [Curl on Mac](https://developer.apple.com/legacy/library/documentation/Darwin/Reference/ManPages/man1/curl.1.html) - Might be pre-installed but worth double checking.
|
|
74
|
+
* NodeJS and iOS-Sim
|
|
93
75
|
* Ruby Packages : Xcpretty, Fastlane(Optional), Rake, Bundler.. Install with 'gem install <package_name>'
|
|
94
76
|
|
|
95
77
|
|
|
@@ -120,7 +102,7 @@ Tasks:
|
|
|
120
102
|
|
|
121
103
|
## Setup Xcode Templates
|
|
122
104
|
|
|
123
|
-
In existing app or brand new app, we have to enable the Xcode templates for files and targets to speed up the things. Run following command from your
|
|
105
|
+
In existing app or brand new app, we have to enable the Xcode templates for files and targets to speed up the things. Run following command from your terminal
|
|
124
106
|
|
|
125
107
|
|
|
126
108
|
```sh
|
|
@@ -130,190 +112,176 @@ $ xcfit set_xcode_templates
|
|
|
130
112
|
|
|
131
113
|
- This will add couple of templates to your Xcode for iOS and macOS apps. In your app if you go to 'File--->New--->Target'
|
|
132
114
|
|
|
133
|
-
You will see new option for iOS and OSX i.e 'XCFit'. Once Clicked on it. You will see Cucumberish
|
|
134
|
-
|
|
135
|
-

|
|
136
|
-
|
|
115
|
+
You will see new option for iOS and OSX i.e 'XCFit'. Once Clicked on it. You will see Cucumberish UI and Fitnesse Acceptance Tests targets. As shown
|
|
137
116
|
|
|
117
|
+

|
|
138
118
|
|
|
139
119
|
- Once Clicked on the target e.g 'Cucumberish UI Test Bundle' Xcode will create UI testing target with all the required files with Bridging hrader for Cucumberish UI Testing.
|
|
140
120
|
Once Clicked on the target e.g 'Fitnesse Acceptance Test Bundle' Xcode will create UI tAcceptance test with all the required files with Bridging headers for the Fitnesse Acceptance Test. We will see that in details soon.
|
|
141
121
|
|
|
142
|
-

|
|
143
|
-
You can watch YouTube video of XCFit setup [here](https://www.youtube.com/watch?v=Q3cKinwYwhE)
|
|
144
|
-
|
|
145
122
|
- This script also set new file type in Xcode to create new Gherking feature file
|
|
146
123
|
|
|
147
124
|
## Setting up Cucumberish UI Target
|
|
148
125
|
|
|
149
|
-
|
|
126
|
+
Few Steps to setup BDD Styles in Xcode8
|
|
150
127
|
|
|
128
|
+
##### Add New Target for Cucumberish
|
|
151
129
|
|
|
152
130
|
- Add new target iOS/macOS project and Select "File -> New -> Target -> XCFit -> Cucumberish UI Test Bundle". Give it a name you like e.g CucumberishUITests
|
|
153
131
|
|
|
154
|
-
Now that Xcode has created brand new target with all required Swift and Objective-C files to run Cucumberish. All Xcode setting has been done by the Xcode Template.
|
|
132
|
+
Now that Xcode has created brand new target with all required Swift and Objective-C files to run Cucumberish. All Xcode setting has been done by the Xcode Template.
|
|
155
133
|
|
|
134
|
+
##### Download Cucumberish in the target
|
|
156
135
|
|
|
136
|
+
This can be done in two ways. By directly downloading contents of "Cucumberish" directory into the target directory or using Cocoapods.
|
|
137
|
+
###### Using Direct Download with XCFit
|
|
157
138
|
- Now that you have to CD into the Cucumberish target directory .eg CucumberishUITests
|
|
158
139
|
|
|
159
140
|
```sh
|
|
160
|
-
$ cd $
|
|
161
|
-
$ xcfit get_cucumberish 0.0
|
|
141
|
+
$ cd $_YOUR_CUCUMBERISH_TARGET_DIR
|
|
142
|
+
$ xcfit get_cucumberish 1.0.0
|
|
162
143
|
```
|
|
163
|
-
This will download Cucumberish directory from version 0.0
|
|
164
|
-
Now Add sample Feature File to 'Features' directory either by File->New->Gherkin Or Just add it using your favourite text editor e.g demo.feature with content
|
|
144
|
+
This will download Cucumberish directory from version 1.0.0 and also create 'Features' directory. You can then reference those directory in Xcode. For "Cucumberish" directory select 'Copy if needed and Create Group' and for the "Features" directory select don't create group or Copy if needed. Just " create folder reference"
|
|
165
145
|
|
|
166
|
-
|
|
167
|
-
Feature: Demo App Feature
|
|
146
|
+
###### Using Cocoapods
|
|
168
147
|
|
|
169
|
-
|
|
170
|
-
|
|
171
|
-
Given the app is running
|
|
148
|
+
- In your Podfile, add following Pod entry and update/install pod
|
|
172
149
|
|
|
150
|
+
```ruby
|
|
151
|
+
target '$_YOUR_CUCUMBERISH_TARGET' do
|
|
152
|
+
pod 'Cucumberish', :git => 'https://github.com/Ahmed-Ali/Cucumberish'
|
|
153
|
+
end
|
|
173
154
|
```
|
|
174
155
|
|
|
175
|
-
- Finally from the Cucumberish target 'General' setting select 'Testing -> Target To Test' and configure scheme to add Cucumeerish UI target to Test
|
|
176
156
|
|
|
177
|
-
You are done !!
|
|
178
|
-
|
|
179
|
-
You can watch YouTube video of Cucumberish Setup [here](https://www.youtube.com/watch?v=Wd9myhNkpx4)
|
|
180
157
|
|
|
181
|
-
|
|
158
|
+
```sh
|
|
159
|
+
$ pod update
|
|
160
|
+
```
|
|
182
161
|
|
|
183
162
|
|
|
163
|
+
##### Create Cucumber Features - Gherkin
|
|
164
|
+
Now Add sample Feature File to 'Features' directory either by File->New->Gherkin Or Just add it using your favourite text editor e.g demo.feature with content
|
|
184
165
|
|
|
185
|
-
|
|
166
|
+
```
|
|
167
|
+
Feature: Demo App Feature
|
|
186
168
|
|
|
187
|
-
|
|
169
|
+
Scenario: Demo Scenario
|
|
188
170
|
|
|
189
|
-
|
|
171
|
+
Given the app is running
|
|
190
172
|
|
|
191
|
-
|
|
173
|
+
```
|
|
192
174
|
|
|
175
|
+
##### Add Target To Test
|
|
193
176
|
|
|
177
|
+
- Finally from the Cucumberish target 'General' setting select 'Testing -> Target To Test' and configure scheme to add Cucumeerish UI target to Test
|
|
194
178
|
|
|
195
|
-
|
|
179
|
+
You are done !!
|
|
196
180
|
|
|
197
|
-
-
|
|
181
|
+
You can add more feature/Scenarios and implement steps definitions inside your Swift File. [Ahmed-Ali](https://github.com/Ahmed-Ali) creator of Cucumberish already implemented useful pre-defined steps have a look at this [Swift file](https://github.com/Ahmed-Ali/Cucumberish/blob/master/CucumberishExample/CucumberishExampleUITests/CCIStepDefinitions.swift). You are free to try Page Object Pattern and all other crazy stuff to abstract and refactor your Swift code.
|
|
198
182
|
|
|
199
183
|
|
|
200
|
-
|
|
184
|
+
## Setting up Fitnesse Acceptance Target with XCTest
|
|
201
185
|
|
|
202
|
-
|
|
186
|
+
You can also setup Fitnesse Acceptance Tests but you need to use Cocoapods for this target.
|
|
203
187
|
|
|
204
|
-
|
|
205
|
-
pod 'XCFit'
|
|
206
|
-
end
|
|
207
|
-
```
|
|
188
|
+
You can find detailed blog post on [Dzone](https://dzone.com/articles/integrate-fitnesse-with-xctest-using-xcode8)
|
|
208
189
|
|
|
209
|
-
|
|
190
|
+
#### Add Acceptance and Acceptance Unit Test Target to Project
|
|
210
191
|
|
|
211
|
-
|
|
192
|
+
We have all the predefined targets for FitNesse. Just add “Acceptance Tests” target from the template and “AcceptanceUnitTests” target from the bundle. You will need “FitNesse Suite page name” to create this target but just put “OCSlimProjectExamplePage” there for now . Add your ‘AcceptanceTests’ target as a ‘Target Dependancy’ of this new target in Build Phases. This ensures that it the latest code has been built prior to the tests being run.
|
|
212
193
|
|
|
213
|
-
|
|
214
|
-
$ cd $FITNESSE_TARGET
|
|
215
|
-
$ xcfit get_fitnesse
|
|
216
|
-
```
|
|
194
|
+

|
|
217
195
|
|
|
218
|
-
|
|
196
|
+
#### Add Pod Dependencies
|
|
197
|
+
We need to create a “Podfile” at the root of the project with the following content.
|
|
219
198
|
|
|
220
|
-
```
|
|
221
|
-
|
|
199
|
+
```ruby
|
|
200
|
+
target 'AcceptanceTests' do
|
|
201
|
+
pod 'OCSlimProject'
|
|
202
|
+
end
|
|
203
|
+
target 'AcceptanceUnitTests' do
|
|
204
|
+
pod 'OCSlimProjectTestBundleSupport'
|
|
205
|
+
end
|
|
222
206
|
```
|
|
223
207
|
|
|
224
|
-
Now
|
|
208
|
+
Now, we can run ‘pod install’ at this stage and close the current Xcode session and open project workspace.
|
|
225
209
|
|
|
226
|
-
|
|
210
|
+

|
|
227
211
|
|
|
228
|
-
|
|
212
|
+
#### Build Acceptance Tests Target
|
|
213
|
+
At this stage, we should be able to build the “Acceptance Tests” target. If you are using Xcode8, you might see some warning related to the Swift3 Syntax. Just Click on ‘Edit-> Convert-> To Current Swift Syntax
|
|
229
214
|
|
|
230
|
-
|
|
215
|
+
Now you should be able to build an “Acceptance Tests” target. Once, build is successful, you should see “LaunchFitnesse” script is generated in the root of the project. We can launch and execute the fitness test as shown below.
|
|
231
216
|
|
|
232
|
-
|
|
233
|
-
As of now, you might be running tests within Xcode, but there are some awsome tools which allows us to run our tests from command line. The 'xcodebuild' is being used to build and test Xcode Schemes. [Fastlane](https://github.com/fastlane/fastlane) seems much easier option to automate everything but it's upto you. These are long commands but you k ow better how to Script it Or Fastlane it, right ? :)
|
|
217
|
+

|
|
234
218
|
|
|
235
|
-
|
|
219
|
+
#### Test AcceptanceUnitTests Target
|
|
236
220
|
|
|
237
|
-
|
|
221
|
+
Now if you select “AcceptanceUnitTarget” and press CMD+U.
|
|
238
222
|
|
|
239
|
-
|
|
223
|
+

|
|
240
224
|
|
|
241
|
-
You can execute Cucumberish tests with like this for XCFitDemo App.
|
|
242
225
|
|
|
243
|
-
|
|
226
|
+
Now we can see that FitNesse tests are running as shown above. We can add this to main scheme to make sure we are running it after the unit tests to follow proper development workflow. We can build and run it as our normal unit tests.
|
|
244
227
|
|
|
245
228
|
|
|
246
|
-
|
|
247
|
-
xcodebuild -workspace XCFitDemo.xcworkspace -scheme XCFitDemo -sdk iphonesimulator -destination 'platform=iOS Simulator,name=iPhone 6' test | xcpretty -r html -r junit --test --color
|
|
248
|
-
```
|
|
229
|
+
### Taking Control with Bundler, Fastlane, and Trainer
|
|
249
230
|
|
|
250
|
-
|
|
231
|
+
Now that , we have seen how to run FitNesse acceptance tests from Xcode but it’s a good idea to run it with Fastlane. We can also take control of version of Cocoapods and Fastlane by using Bundler. Let’s create a Gemfile at the root of the project with the following gem
|
|
251
232
|
|
|
233
|
+
```ruby
|
|
234
|
+
source "https://rubygems.org"
|
|
235
|
+
gem 'cocoapods'
|
|
236
|
+
gem 'fastlane' plugins_path = File.join(File.dirname(__FILE__), '.', 'Pluginfile') eval(File.read(plugins_path), binding) if File.exist?(plugins_path
|
|
252
237
|
```
|
|
253
|
-
$ open build/reports/tests.html
|
|
254
|
-
```
|
|
255
|
-
|
|
256
238
|
|
|
257
|
-
|
|
239
|
+
Let’s also create directory “fastlane” and make “Fastfile” with following content
|
|
258
240
|
|
|
259
|
-
|
|
260
|
-
|
|
261
|
-
You can first build the Acceptance target
|
|
241
|
+
```ruby
|
|
262
242
|
|
|
263
|
-
|
|
264
|
-
|
|
243
|
+
fastlane_version "1.104.0"
|
|
244
|
+
default_platform :ios
|
|
245
|
+
platform :ios do
|
|
246
|
+
before_all do
|
|
247
|
+
system "rm -rf ../test_reports/"
|
|
248
|
+
system "bundle install"
|
|
249
|
+
system "pod install"
|
|
250
|
+
system "bundle exec fastlane add_plugin trainer"
|
|
251
|
+
end
|
|
252
|
+
desc "Runs all the Unit tests and Fitnesse Aceptance Tests"
|
|
253
|
+
lane :xctest_fitnesse do
|
|
254
|
+
scan(scheme: "FitnesseXCTestDemo",
|
|
255
|
+
destination: 'platform=iOS Simulator,name=iPhone 7 Plus,OS=10.0',
|
|
256
|
+
output_directory: "test_reports/",
|
|
257
|
+
output_types: "html",
|
|
258
|
+
fail_build: false )
|
|
259
|
+
trainer(output_directory: "test_reports/trainer_report/")
|
|
260
|
+
end
|
|
261
|
+
end
|
|
265
262
|
```
|
|
266
263
|
|
|
267
|
-
Now
|
|
264
|
+
Now we will create a “fastlane/PluginFile” to add “trainer” plugin.
|
|
268
265
|
|
|
269
|
-
```
|
|
266
|
+
```ruby
|
|
267
|
+
gem 'fastlane-plugin-trainer'
|
|
270
268
|
|
|
271
|
-
$ java -jar fitnesse-standalone.jar -v -o -c "FrontPage?suite"
|
|
272
269
|
```
|
|
273
|
-
You can also set reports directory and generate Junit style reports inside the "XCFitDemo/FitNesseRoot/files/testResults/" directory. You can configure these reports with Xcode-Server, Jenkins, TeamCity easily in the post build setting.
|
|
274
|
-
|
|
275
|
-
|
|
276
|
-
|
|
277
|
-
## What XCFit can solve in iOS/macOS team?
|
|
278
|
-
XCFit can bring lot of improvement the way you work. The most common problems in iOS development is explained by Paul Stringer in this [article](http://stringerstheory.net/acceptance-testing-with-ios/). XCFit can solve few of them
|
|
279
|
-
|
|
280
|
-
- Better Developer/QA collabration, Early QA Involvement.
|
|
281
|
-
|
|
282
|
-
Usually,in the iOS development world, Developer build an app using Swift and Objective-C and army of manual and automated QA uses tools like Apppium, Calabash using languages like Ruby, Java, Python WTF !!. QA and Developers world is totally different. With XCFit you will be speaking same language that is "Swift". QA can write test script as we build. No need to wait until build is handed over. Just work with developer ! Little bit of learning curve for QA but you will save developers time as they don't to learn Java, Pyth or Ruby to help QA team
|
|
283
|
-
|
|
284
|
-
- Quick Acceptance & UI testing setup
|
|
285
|
-
|
|
286
|
-
You will be surprised by how easily/quickly you can setup Fitnesse(Acceptance Test) and Cucumberish(UI Testing) environmant in Xcode and running your first test.
|
|
287
270
|
|
|
288
|
-
|
|
271
|
+
After running “bundle install” we should be able to run those test from command line like this :
|
|
289
272
|
|
|
290
|
-
|
|
273
|
+

|
|
291
274
|
|
|
292
|
-
- Developers don't need to learn Ruby or similar ! Just stick to Swift
|
|
293
|
-
|
|
294
|
-
You must be happy as you won't need to learn other language just in case QA ask something to solve. With XCFit it's everything Swift.
|
|
295
|
-
|
|
296
|
-
- Fix failed attempt to automate testing by QA team
|
|
297
|
-
|
|
298
|
-
As of now your QA team might have tried all wrappers on [UIAutomation](https://developer.apple.com/library/tvos/documentation/DeveloperTools/Conceptual/InstrumentsUserGuide/UIAutomation.html) e.g Appium, Calabash, Frank, KIF etc etc and keeping themselve busy writing some Ruby, Python, Java code to automate testing and all that attempts results in Slow, Brittle, Untrusted, Non-valuable UI tests causing harm to mobile development rather than good. With XCFit, everyone will be speaking same language and you can cover businness logic with lighting fast Fitnesse Tests and major journeys with UI tests. Keep it 80:20 means 80% Fitness and 20% Cucumberish or XCUI.
|
|
299
275
|
|
|
276
|
+
You can watch YouTube video of XCFTest-Fitnesse [here](https://www.youtube.com/watch?v=xqvy1vN87e8)
|
|
300
277
|
|
|
301
278
|
|
|
302
279
|
# Video Demo
|
|
303
280
|
|
|
304
|
-
###
|
|
305
|
-
|
|
306
|
-
[](http://www.youtube.com/watch?v=Q3cKinwYwhE)
|
|
307
|
-
|
|
308
|
-
|
|
309
|
-
### XCFit Cucumberish Demo
|
|
310
|
-
|
|
311
|
-
[](http://www.youtube.com/watch?v=Wd9myhNkpx4)
|
|
312
|
-
|
|
281
|
+
### XCTest Fitnesse Demo
|
|
313
282
|
|
|
314
|
-
|
|
283
|
+
[](http://www.youtube.com/watch?v=xxqvy1vN87e8)
|
|
315
284
|
|
|
316
|
-
[](http://www.youtube.com/watch?v=xFRSIugJ-FA)
|
|
317
285
|
|
|
318
286
|
## Author
|
|
319
287
|
|
|
@@ -321,9 +289,9 @@ Shashikant86, shashikant.jagtap@icloud.com
|
|
|
321
289
|
|
|
322
290
|
# TODO
|
|
323
291
|
|
|
324
|
-
* Swift Implementation of Gherkin Parser
|
|
325
|
-
* Cocoapods free installation. Carthage or Swift Package Manager once ready
|
|
326
|
-
* Setting up XCFit on Apple's own CI Xcode Server
|
|
292
|
+
* Swift Implementation of Gherkin Parser
|
|
293
|
+
* Cocoapods free installation. Carthage or Swift Package Manager once ready
|
|
294
|
+
* Setting up XCFit on Apple's own CI Xcode Server
|
|
327
295
|
|
|
328
296
|
## LICENSE
|
|
329
297
|
|
data/XCFit.podspec
CHANGED
|
@@ -1,10 +1,10 @@
|
|
|
1
1
|
Pod::Spec.new do |s|
|
|
2
2
|
s.name = 'XCFit'
|
|
3
|
-
s.version = '0.
|
|
3
|
+
s.version = '2.0.0'
|
|
4
4
|
s.summary = 'Full Stack BDD for iOS and macOS Apps with Swift, Xcode using XCUITest, Cucumberish, FitNesse and friends.'
|
|
5
5
|
|
|
6
6
|
s.description = <<-DESC
|
|
7
|
-
XCFit is a full stack BDD framework for iOS and macOS apps with Swift using Cucumberish and Fitnesse. Native Xcode implementation, No Appium, No Calabash, No Ruby or any other non iOS language.
|
|
7
|
+
XCFit is a full stack BDD framework for iOS and macOS apps with Swift using Cucumberish and Fitnesse. Native Xcode implementation, No Appium, No Calabash, No Ruby or any other non iOS language.
|
|
8
8
|
DESC
|
|
9
9
|
|
|
10
10
|
s.homepage = 'https://github.com/Shashikant86/XCFit'
|
data/lib/XCFit/version.rb
CHANGED
metadata
CHANGED
|
@@ -1,55 +1,55 @@
|
|
|
1
1
|
--- !ruby/object:Gem::Specification
|
|
2
2
|
name: xcfit
|
|
3
3
|
version: !ruby/object:Gem::Version
|
|
4
|
-
version:
|
|
4
|
+
version: 2.0.0
|
|
5
5
|
platform: ruby
|
|
6
6
|
authors:
|
|
7
7
|
- Shashikant86
|
|
8
8
|
autorequire:
|
|
9
9
|
bindir: bin
|
|
10
10
|
cert_chain: []
|
|
11
|
-
date: 2016-09-
|
|
11
|
+
date: 2016-09-27 00:00:00.000000000 Z
|
|
12
12
|
dependencies:
|
|
13
13
|
- !ruby/object:Gem::Dependency
|
|
14
14
|
name: thor
|
|
15
15
|
requirement: !ruby/object:Gem::Requirement
|
|
16
16
|
requirements:
|
|
17
|
-
- -
|
|
17
|
+
- - ~>
|
|
18
18
|
- !ruby/object:Gem::Version
|
|
19
19
|
version: 0.17.0
|
|
20
20
|
type: :runtime
|
|
21
21
|
prerelease: false
|
|
22
22
|
version_requirements: !ruby/object:Gem::Requirement
|
|
23
23
|
requirements:
|
|
24
|
-
- -
|
|
24
|
+
- - ~>
|
|
25
25
|
- !ruby/object:Gem::Version
|
|
26
26
|
version: 0.17.0
|
|
27
27
|
- !ruby/object:Gem::Dependency
|
|
28
28
|
name: bundler
|
|
29
29
|
requirement: !ruby/object:Gem::Requirement
|
|
30
30
|
requirements:
|
|
31
|
-
- -
|
|
31
|
+
- - ~>
|
|
32
32
|
- !ruby/object:Gem::Version
|
|
33
33
|
version: '1.12'
|
|
34
34
|
type: :development
|
|
35
35
|
prerelease: false
|
|
36
36
|
version_requirements: !ruby/object:Gem::Requirement
|
|
37
37
|
requirements:
|
|
38
|
-
- -
|
|
38
|
+
- - ~>
|
|
39
39
|
- !ruby/object:Gem::Version
|
|
40
40
|
version: '1.12'
|
|
41
41
|
- !ruby/object:Gem::Dependency
|
|
42
42
|
name: rake
|
|
43
43
|
requirement: !ruby/object:Gem::Requirement
|
|
44
44
|
requirements:
|
|
45
|
-
- -
|
|
45
|
+
- - ~>
|
|
46
46
|
- !ruby/object:Gem::Version
|
|
47
47
|
version: '10.0'
|
|
48
48
|
type: :development
|
|
49
49
|
prerelease: false
|
|
50
50
|
version_requirements: !ruby/object:Gem::Requirement
|
|
51
51
|
requirements:
|
|
52
|
-
- -
|
|
52
|
+
- - ~>
|
|
53
53
|
- !ruby/object:Gem::Version
|
|
54
54
|
version: '10.0'
|
|
55
55
|
description: XCFit is a full stack BDD framework in Xcode for iOS and macOS apps with
|
|
@@ -62,9 +62,11 @@ executables:
|
|
|
62
62
|
extensions: []
|
|
63
63
|
extra_rdoc_files: []
|
|
64
64
|
files:
|
|
65
|
-
-
|
|
66
|
-
-
|
|
65
|
+
- .gitignore
|
|
66
|
+
- .travis.yml
|
|
67
67
|
- Dangerfile
|
|
68
|
+
- Docs/Xcode7.md
|
|
69
|
+
- Docs/xcdoe7swift2.md
|
|
68
70
|
- Gemfile
|
|
69
71
|
- Gemfile.lock
|
|
70
72
|
- LICENSE
|
|
@@ -157,17 +159,17 @@ require_paths:
|
|
|
157
159
|
- lib
|
|
158
160
|
required_ruby_version: !ruby/object:Gem::Requirement
|
|
159
161
|
requirements:
|
|
160
|
-
- -
|
|
162
|
+
- - '>='
|
|
161
163
|
- !ruby/object:Gem::Version
|
|
162
164
|
version: '0'
|
|
163
165
|
required_rubygems_version: !ruby/object:Gem::Requirement
|
|
164
166
|
requirements:
|
|
165
|
-
- -
|
|
167
|
+
- - '>='
|
|
166
168
|
- !ruby/object:Gem::Version
|
|
167
169
|
version: '0'
|
|
168
170
|
requirements: []
|
|
169
171
|
rubyforge_project:
|
|
170
|
-
rubygems_version: 2.
|
|
172
|
+
rubygems_version: 2.0.14.1
|
|
171
173
|
signing_key:
|
|
172
174
|
specification_version: 4
|
|
173
175
|
summary: Full Stack BDD in Xcode Templates for iOS and macOS Apps with Swift, Xcode
|